Fadyblok240 (talk | contribs) No edit summary |
|||
| (40 intermediate revisions by 29 users not shown) | |||
| Line 1: | Line 1: | ||
| + | {{Cleanup|Very informal tone and does not follow the style guide at all - uses a lot of first person, and it's written like one person owns the article, which really should not be the case for an encyclopedia.}} |
||
| + | '''Morse code''' is a method of transmitting information in a series of dots and dashes. A dot is a short [[redstone]] pulse, a dash is a long pulse. Dashes are approximately three times as long as dots. In Minecraft, there aren't any specific uses for creating a communication device, but it can be an interesting experiment. |
||
| + | == Introduction == |
||
| − | Not finished!!! |
||
| ⚫ | For Morse code to be able to be sent and received in Minecraft, [[redstone circuits]] will be required. There are two main gates for first decoding the signal - an [[AND gate]] and [[Redstone circuits#RS NOR latch|RS-NOR latch]]. It's recommended that you read up on those and get familiar with them before proceeding. There are three main sections of this - the Sender, which will create the signal required, a Decoder, which turns the signal into a series of lights indicating the dots and the dashes, and finally a Translator, which can be connected to turn that information into a single light representing the letter sent. |
||
| − | ==Morse Code== |
||
| ⚫ | |||
| − | Morse code is a method of transmitting information, when words are not possible, in a series of on-off, lights, or clicks. It can them be understood by someone back into the letter. Each character is represented by a unique |
||
| − | sequence of dots and dashes. |
||
| − | In Minecraft there is no specific use for creating a communication device as of yet, but for now it's just an interesting experiment that is a lot of fun. |
||
| − | The first Morse code signal to be sent and decoded in minecraft was done by Beardedcow on the 19.4.11. A video for that transmission is [http://www.youtube.com/watch?v=9dRk1Pi27bQ here]. |
||
| − | For Morse code to be able to be sent and received in minecraft we use redstone. There are two main gates for first decoding the signal, a 'and' gate and 'rs-nor latch'. To be able to advance into this tutorial I would greatly |
||
| ⚫ | |||
| + | This is the simplest of the three sections - all that needs to be achieved from this is something that can later be decoded into either a dot or a dash. To do this, you will need to make the signal for a dash longer than that of the signal for a dot. This can be achieved by using what has become known as '''[[Redstone circuit#Pulse Circuit|'Monostable Circuits']]'''; which are easy to produce due to [[redstone repeater]]s. As repeaters can also be set on a delay, you can use this to increase the time take for the message to be sent through the wire. [[File:PulseLengthener.png|300px|thumb|left|Monostable Circuit/Pulse Lengthener (long)]]. This will be used for the dash and the reset option, which will be created later. The dot doesn't require any delay or extension as it can be detected by the fact that it hasn't been increased. |
||
| ⚫ | |||
| − | |||
| − | These are the simplest of the three sections, all we want to achieve from this is something that can later be decoded into either a dot or a dash. To do this we going to make the signal for a dash longer than that of the |
||
| − | signal for a dot. We achieve this by using what has become known as 'monostable circuits' this have become easy to produce ever since the beta 1.3 update which introduced the redstone repeaters, these have a function |
||
| − | to |
||
| − | be able to power any sort of block, such as dirt or stone. As repeaters can also be set on a delay we can increase the time take for the message to be sent through the wire. [[File:PulseLengthener.png|300px|thumb|left|Monostable Circuit/Pulse Lengthener (long)]]. We will use this |
||
| − | for the dash and the reset option, which I will get to later, the dot doesn't require any delay or extension as we can detect a dot by the fact that it hasn't been increased. |
||
===The Decoder=== |
===The Decoder=== |
||
| − | Now after the 'Sender' this is going to be much more complicated. What |
+ | Now, after the 'Sender', this is going to be much more complicated. What you want to be able to do here is a system to be able to understand the dots and the dashes and convert that into a light display. To explain this, it's best if just explain from the image. |
| ⚫ | |||
| ⚫ | |||
| − | Here we can see one section of the decoding system. The initial decoder doesn't require the first and gate and instead comes straight from the input 'I'. When the first input comes through it will be sent into a length |
||
| − | detecting and gate 'B' or the repeater and gate, if the signal is long enough it will be able to pass through this and gate and then power the rs-nor 'C', which will then allow the Q for dash to be on. If the length of the signal is |
||
| − | |||
| − | not long enough to pass through 'B' it will then not activate the Rs-nor, instead it will just go where the signal also goes which is round to the next 'C^', rs-nor which once switched will send a signal round to 'B' therefore |
||
| − | not allowing any more signals to pass through. When this happens the power from the 3rd input of the 3 input 'and' gate 'B' will go to the Q(dot). If the power for the dash is on then it will over ride the dot turning it off, if it's |
||
| − | |||
| − | on otherwise if the dash had been activated and then the signal goes through the dot would also be on so we need to make the dot turn off when dash is on, we can do this as shown, feeding the power back into the Q |
||
| − | dot. |
||
| + | Here you can see one section of the decoding system. The initial decoder doesn't require the first AND gate and instead comes straight from the input 'I'. When the first input comes through it will be sent into a length detecting and gate 'B' or the repeater and gate, if the signal is long enough it will be able to pass through this and gate and then power the rs-nor 'C', which will then allow the Q for dash to be on. If the length of the signal is not long enough to pass through 'B' it will then not activate the Rs-nor, instead it will just go where the signal also goes which is round to the next 'C^', rs-nor which once switched will send a signal round to 'B' therefore not allowing any more signals to pass through. When this happens the power from the 3rd input of the 3 input 'and' gate 'B' will go to the Q(dot). If the power for the dash is on then it will over ride the dot turning it off, if it's on otherwise if the dash had been activated and then the signal goes through the dot would also be on, so you will need to make the dot turn off when dash is on, you can do this as shown, feeding the power back into the Q dot. |
||
| ⚫ | |||
| − | by any other impulse. The rs-nor 'C^' which activates the 3rd input also goes into another and gate which when the next impulse comes through will allow the signal to pass and go the same process again as before. |
||
| ⚫ | You will notice that at 'B' there is four repeaters delaying the message to the 3rd input this is because you need to allow time, if it’s there, for the dash to pass through and then block the gate so it can no longer be affected by any other impulse. The rs-nor 'C^' which activates the 3rd input also goes into another and gate which when the next impulse comes through will allow the signal to pass and go the same process again as before. |
||
That about does it for the decoder. |
That about does it for the decoder. |
||
| − | To |
+ | To build the reseter, you need to just place redstone torches under all the rs-nors and then have a repeater 'and' gate the requires more than a dash would and set up a button for that, it is would recommended to use a delay after the gate as well to make sure that no other things will change when you send the reset through the system. Also remember that you want the lights to be OFF, default and then turn on when you want to reset. |
| − | the gate as well to make sure that no other things will change when you send the reset through the system. Also remember that you want the lights to be OFF, default and then turn on when you want to reset. |
||
===The Translator=== |
===The Translator=== |
||
| + | [[File:Poweringrepeaters1.jpg|300px|thumb|right]] |
||
| ⚫ | |||
| + | To get all the different signals to the translator you will need to choose a position, it is suggested to position it somewhere to the side of your decoder, but you need to remember which light means which. To keep the lines from interfering with each other, it is best to put the lines of wire on alternate levels (create bridges). Remember to check your wires to make sure that the signal does not exceed 16 blocks. Now the first stage is to get all the signals together. To do this you use repeaters, which has the unique ability to prevent signal interference. |
||
| ⚫ | |||
| + | [[File:Poweringrepeaters2.jpg|300px|thumb|right]] |
||
| − | to pass power into a block, this is what we exploit in are translator. |
||
| − | |||
| − | To get all the different signals to the translator you going to need to choose a position, I would suggest somewhere to the side of your decoder either left or right but you need to remember which light means which. To |
||
| − | keep the lines from interfering with each other, it is best to put the lines of wire on alternate levels (create bridges). Remembering to check your wires to make sure that the signal can reach all the way along, remembering |
||
| − | the repeaters. Now the first stage is to get all the signals together. To do this we use the magical repeater that as well as having the ability to power blocks also can be run alongside each other without interference from |
||
| − | one another. It hard to explain what to really do but here is a basic screenshots to show what can be done to create the desired affect.[[File:Poweringrepeaters1.jpg|300px|thumb|right|Monostable Circuit/Pulse Lengthener (long)]][[File:Poweringrepeaters2.jpg|300px|thumb|right|Monostable Circuit/Pulse Lengthener (long)]]. |
||
| − | |||
| − | Ok, so you've got the information going into your repeaters now we need to get it to be translated, the tricky part. Now if you have done decoding be for you might have noticed that the signal is the wrong way round as |
||
| − | we inverted it when we got it to the repeaters, so you might be thinking didn't we need to invert them then before we got to the repeaters, well the answer is no unlike most signals Morse code has lots of lapping over like |
||
| − | A and E, E is dot and A is dot dash, as you can see the E is contained within the A for this reason we need to be able to define the requirements more, to do this we will in the end have basically have two and gates for each |
||
| − | letter but I will explain more of that later. |
||
| + | If you have done decoding before, you might have noticed that the signal is the wrong way round as you inverted it when you got it to the repeaters, so you might be thinking didn't you will need to invert them then before you got to the repeaters, well the answer is no unlike most signals Morse code has lots of lapping over like A and E, E is dot and A is dot dash, as you can see the E is contained within the A for this reason, you will need to be able to define the requirements more, to do this you will in the end have basically have two and gates for each letter, but it will explained more of later. |
||
| − | To start with you going to want to create a your line of repeaters all the way along, remember if you haven’t sent a signal through your system, or you've reset it which I will mention at the end, then all your repeaters right |
||
| − | now should be on, if there not then you need to go back and check, first of all check that you've reset them and then check your wiring to the translator. If you have got them all on then I should be good, so far. After your |
||
| − | line of repeaters you're going to want to create a line of any block, I like to use sandstone or mossy cobble for mine but it's personal, it won't affect the wiring. Now continue this on so that you have 26 lines of blocks, the |
||
| − | number of letters in the English alphabet. Ok so now you can kind of see your translator taking shape now to make the process easier for yourself later, I usually place redstone torches all the way along the blocks on |
||
| − | every row, you'll understand later. That took some time didn't it; well I warn you there’s going to be a couple of tasks like that in this tutorial. Once you've got all your redstone torches set-up you want to place a row of |
||
| − | blocks above everyone pulse two extra blocks on the end that you want the final signal, I know move fun. By now your rows should look something like this. [[File:Screeny3.jpg|300px|thumb|left|Monostable Circuit/Pulse Lengthener (long)]]. I have the redstone repeaters on the opposite for |
||
| − | no reason but to show you that the light will be off when power from the repeater gets them. |
||
| + | To start, you will want to create a line of repeaters all the way along, remember if you haven’t sent a signal through your system, or you've reset it which it will be mentioned at the end, then all your repeaters right now should be on, if there not then you need to go back and check, first of all check that you've reset them and then check your wiring to the translator. If you have got them all on, then it should be good, so far. After your line of repeaters you're going to want to create a line of any block, it is suggested to use sandstone or mossy cobble for mine but it's personal, it won't affect the wiring. Now continue this on so that you have 26 lines of blocks, the number of letters in the English alphabet. So, now you can kind of see your translator taking shape now to make the process easier for yourself later, it is suggested to place redstone torches all the way along the blocks on every row, you'll understand later. That took some time didn't it; be warned that there’s going to be a couple of tasks like that in this tutorial. Once you've got all your redstone torches set-up you want to place a row of blocks above everyone pulse two extra blocks on the end that you want the final signal. By now, your rows should look something like this. |
||
| ⚫ | |||
| + | [[File:Screeny3.jpg|300px|thumb|left]]. |
||
| − | you can see also I have moved this signal down and then inverted it then but it to a light which will show the letter. |
||
| ⚫ | Now that you've got the repeaters and the lights set up, you want to place wire all along the top of your blocks to the end and then place a torch coming down the side facing where the input came from. As you can see, it has been moved this signal down, inverted it, and then put it to a light which will show the letter.[[File:Screeny4.jpg|300px|thumb|left|Above View of rows]] |
||
| + | This is the first and gate down. As well as being able to power the block and the wires next to that block, it also powers the wire under nether, you can use this feature to be able to create the next and gate; sort of, but before then, you are going to go through and program the first and gate, now as you have already placed all the torches it is now quite easy to program in, basically you want to pull up your Morse code showing you the different signals and then remove the torch that is it meant to be, remember that it will go in pairs, dash dot, dash dot, dash dot and so on, so to program in A which is dot dash you need to remove the 2nd and the 3rd torch. It is very important to make sure you get the right end display. Although, it can always be done at the end, or with the next step, which is to create the second and gate, this will in the end mean that the signal will only be on when all the criteria is full filled, to stop any of the incorrect lights showing. Now, to do this you are going to want to remember where the gaps are in the torches, for example, by giving the gaps all numbers and writing down which ones are empty. It is suggested to do this row by row. Create a trench directly underneath the torches two deep, and now for everything |
||
| ⚫ | gap that you had place a block and a redstone wire on to it and feed the redstone wire overall of them to the opposite end of the torches away from where your display is. This is what 'A' would look like underneath, now you want to get this message up to the top layer of your row, where the redstone wire is. You do this using vertical wiring and then feeding a wire to connect them both up, like this. |
||
| ⚫ | |||
| + | [[File:Underand.png|300px|thumb|right|Under the 'and' gate]] |
||
| + | [[File:Endofthetrans.png|300px|thumb|right]] |
||
| + | {{tutorials}} |
||
| − | This is the first and gate down. As well as being able to power the block and the wires next to that block, it also powers the wire under nether, we can use this feature to be able to create the next and gate; sort of, BUT |
||
| − | before then we are going to go through and program the first and gate, now as we have already placed all the torches it is now quite easy to program in, basically you want to pull up your Morse code showing you the |
||
| − | different signals and then remove the torch that is it meant to be, remember that it will go in pairs, dash dot, dash dot, dash dot and so on, so to program in A which is dot dash you need to remove the 2nd and the 3rd |
||
| − | torch. I hope you understand that because it's very important to make sure you get the right end display. Ok so you've completed that, right? If not it's ok can always be done at the end, or with the next step. Which is to |
||
| − | create the second and gate, this will in the end mean that the signal will only be on when all the criteria is full filled, to stop any of the incorrect lights showing. Now to do this you are going to want to remember where the |
||
| − | gaps are in the torches, I did this by giving the gaps all numbers and writing down which ones are empty. I suggest doing this row by row. Create a trench directly underneath the torches two deep, and now for everything |
||
| ⚫ | |||
| − | underneath[[File:Underand.png|300px|thumb|right|Monostable Circuit/Pulse Lengthener (long)]], now you want to get this message up to the top layer of your row, where the redstone wire is. you do this using vertical wiring and then feeding a wire to connect them both up, like this. [[File:Endofthetrans.png|300px|thumb|right|Monostable Circuit/Pulse Lengthener (long)]] |
||
| ⚫ | |||
| + | [[de::technik:Komplexe Signalübertragung]] |
||
| − | Thanks A lot for taking time to read and I hope it help. |
||
| + | [[zh:教程/摩尔斯码]] |
||
Revision as of 21:46, 9 May 2021
Morse code is a method of transmitting information in a series of dots and dashes. A dot is a short redstone pulse, a dash is a long pulse. Dashes are approximately three times as long as dots. In Minecraft, there aren't any specific uses for creating a communication device, but it can be an interesting experiment.
Introduction
For Morse code to be able to be sent and received in Minecraft, redstone circuits will be required. There are two main gates for first decoding the signal - an AND gate and RS-NOR latch. It's recommended that you read up on those and get familiar with them before proceeding. There are three main sections of this - the Sender, which will create the signal required, a Decoder, which turns the signal into a series of lights indicating the dots and the dashes, and finally a Translator, which can be connected to turn that information into a single light representing the letter sent.
The Sender
This is the simplest of the three sections - all that needs to be achieved from this is something that can later be decoded into either a dot or a dash. To do this, you will need to make the signal for a dash longer than that of the signal for a dot. This can be achieved by using what has become known as 'Monostable Circuits'; which are easy to produce due to redstone repeaters. As repeaters can also be set on a delay, you can use this to increase the time take for the message to be sent through the wire.
Monostable Circuit/Pulse Lengthener (long)
. This will be used for the dash and the reset option, which will be created later. The dot doesn't require any delay or extension as it can be detected by the fact that it hasn't been increased.
The Decoder
Now, after the 'Sender', this is going to be much more complicated. What you want to be able to do here is a system to be able to understand the dots and the dashes and convert that into a light display. To explain this, it's best if just explain from the image.
Monostable Circuit/Pulse Lengthener (long)
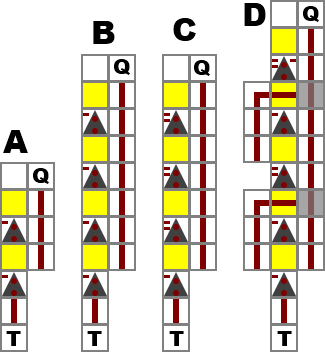
Here you can see one section of the decoding system. The initial decoder doesn't require the first AND gate and instead comes straight from the input 'I'. When the first input comes through it will be sent into a length detecting and gate 'B' or the repeater and gate, if the signal is long enough it will be able to pass through this and gate and then power the rs-nor 'C', which will then allow the Q for dash to be on. If the length of the signal is not long enough to pass through 'B' it will then not activate the Rs-nor, instead it will just go where the signal also goes which is round to the next 'C^', rs-nor which once switched will send a signal round to 'B' therefore not allowing any more signals to pass through. When this happens the power from the 3rd input of the 3 input 'and' gate 'B' will go to the Q(dot). If the power for the dash is on then it will over ride the dot turning it off, if it's on otherwise if the dash had been activated and then the signal goes through the dot would also be on, so you will need to make the dot turn off when dash is on, you can do this as shown, feeding the power back into the Q dot.
You will notice that at 'B' there is four repeaters delaying the message to the 3rd input this is because you need to allow time, if it’s there, for the dash to pass through and then block the gate so it can no longer be affected by any other impulse. The rs-nor 'C^' which activates the 3rd input also goes into another and gate which when the next impulse comes through will allow the signal to pass and go the same process again as before.
That about does it for the decoder.
To build the reseter, you need to just place redstone torches under all the rs-nors and then have a repeater 'and' gate the requires more than a dash would and set up a button for that, it is would recommended to use a delay after the gate as well to make sure that no other things will change when you send the reset through the system. Also remember that you want the lights to be OFF, default and then turn on when you want to reset.
The Translator
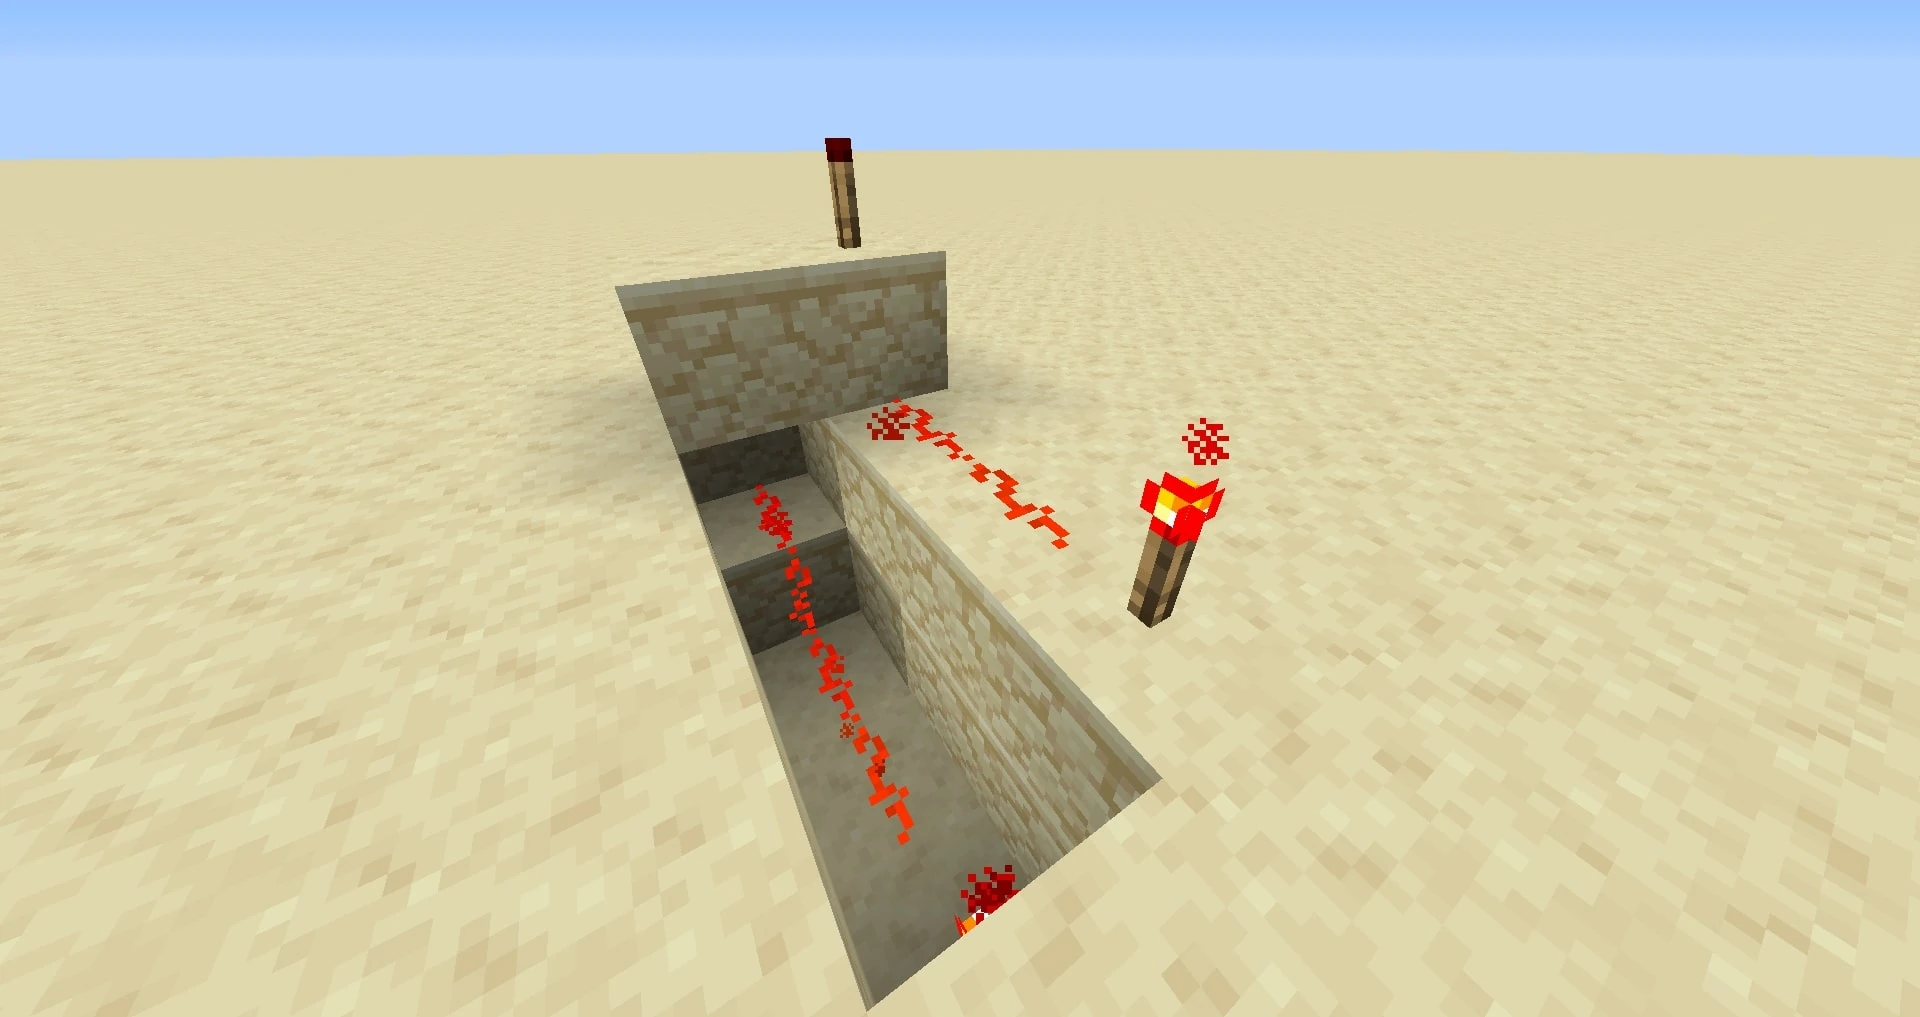
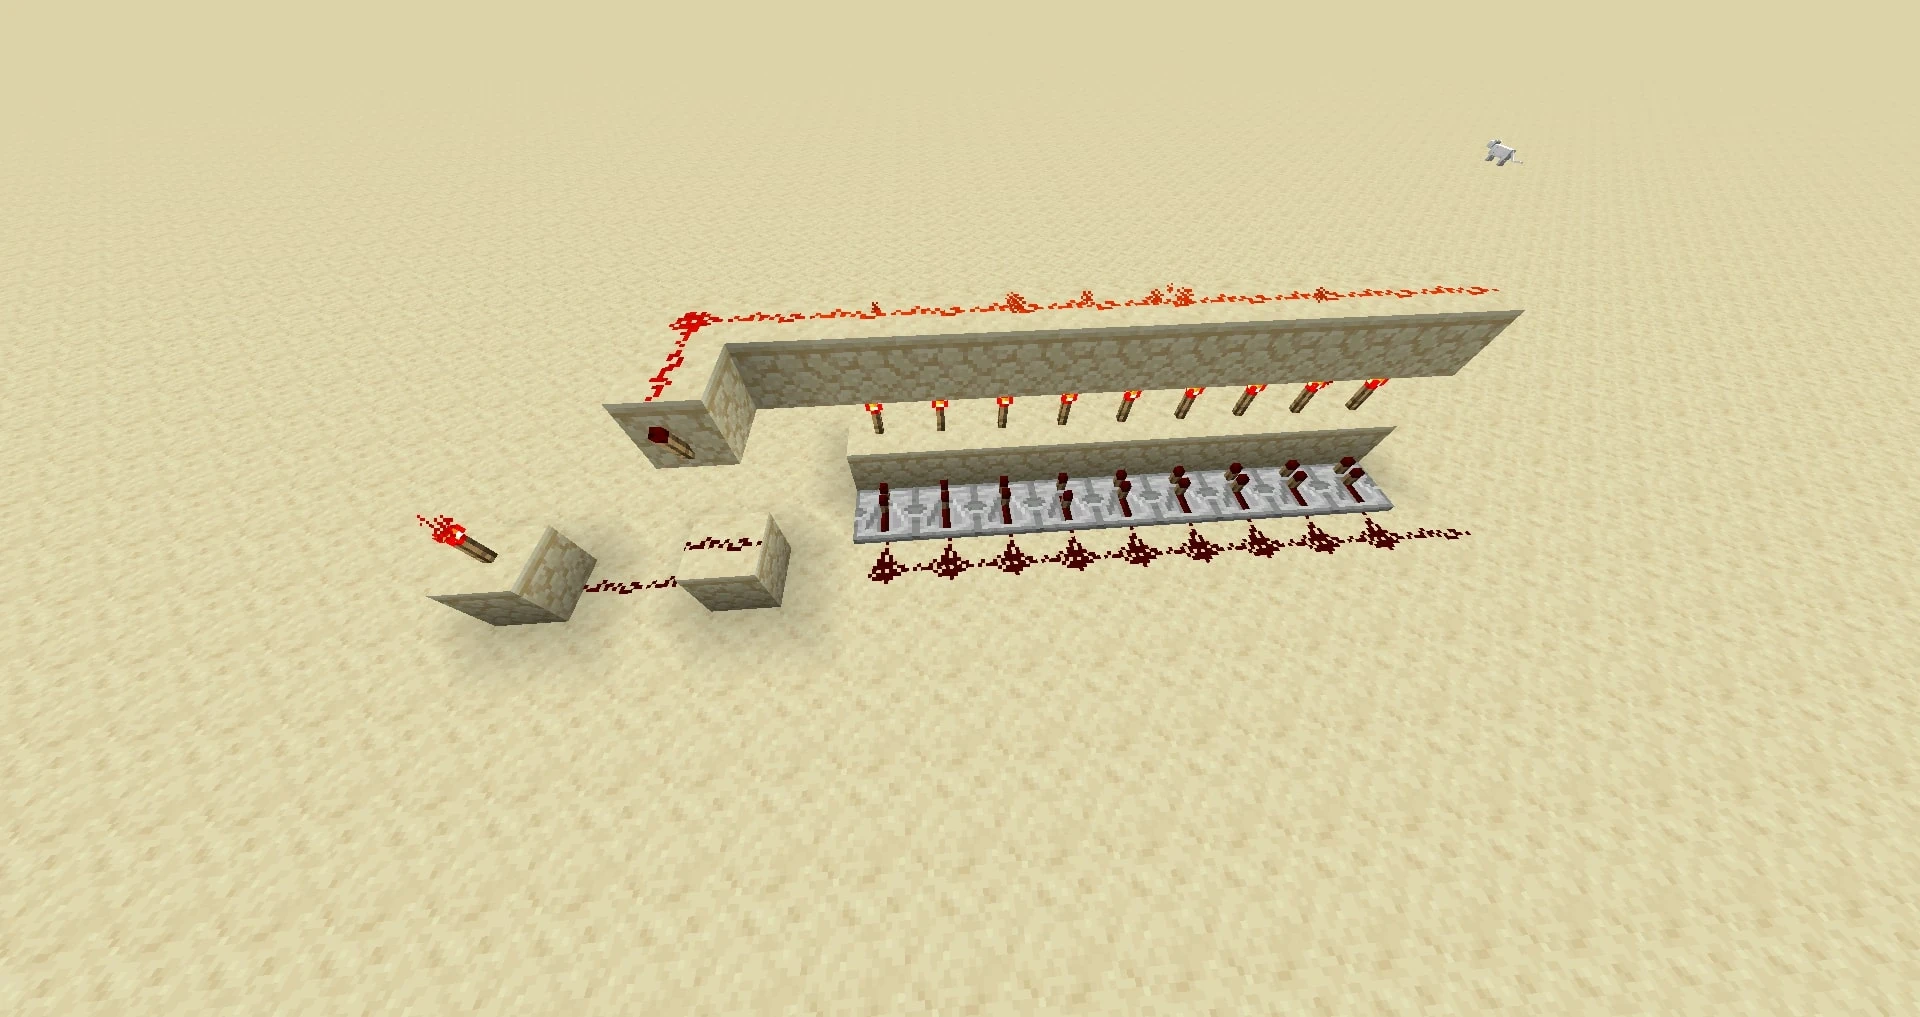
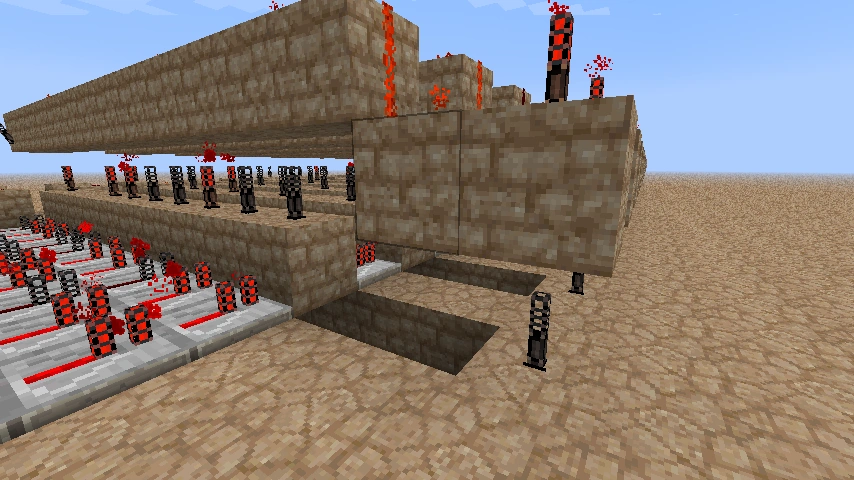
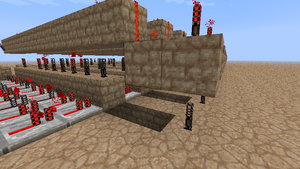
This works almost the same as any normal decoder system that uses redstone repeaters. As mentioned before, the repeaters have the ability to pass power into a block, this is what you will exploit in your translator.
To get all the different signals to the translator you will need to choose a position, it is suggested to position it somewhere to the side of your decoder, but you need to remember which light means which. To keep the lines from interfering with each other, it is best to put the lines of wire on alternate levels (create bridges). Remember to check your wires to make sure that the signal does not exceed 16 blocks. Now the first stage is to get all the signals together. To do this you use repeaters, which has the unique ability to prevent signal interference.

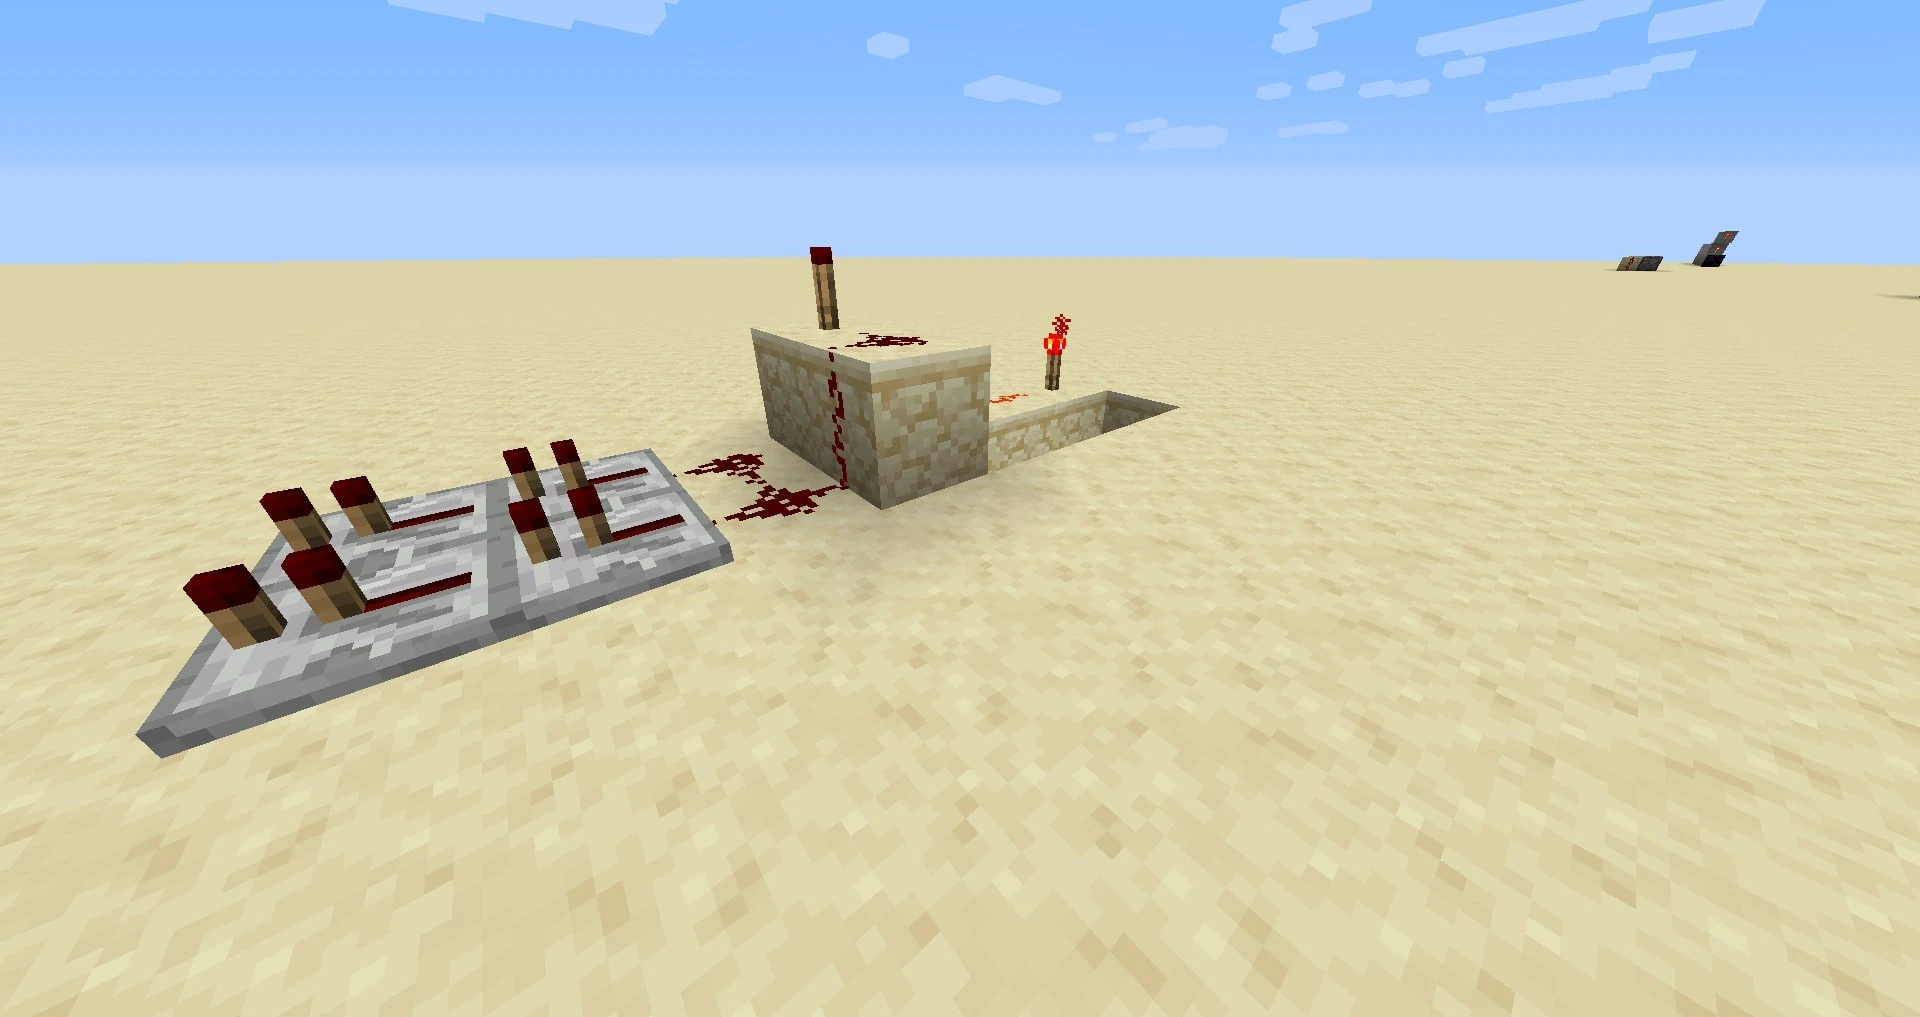
If you have done decoding before, you might have noticed that the signal is the wrong way round as you inverted it when you got it to the repeaters, so you might be thinking didn't you will need to invert them then before you got to the repeaters, well the answer is no unlike most signals Morse code has lots of lapping over like A and E, E is dot and A is dot dash, as you can see the E is contained within the A for this reason, you will need to be able to define the requirements more, to do this you will in the end have basically have two and gates for each letter, but it will explained more of later.
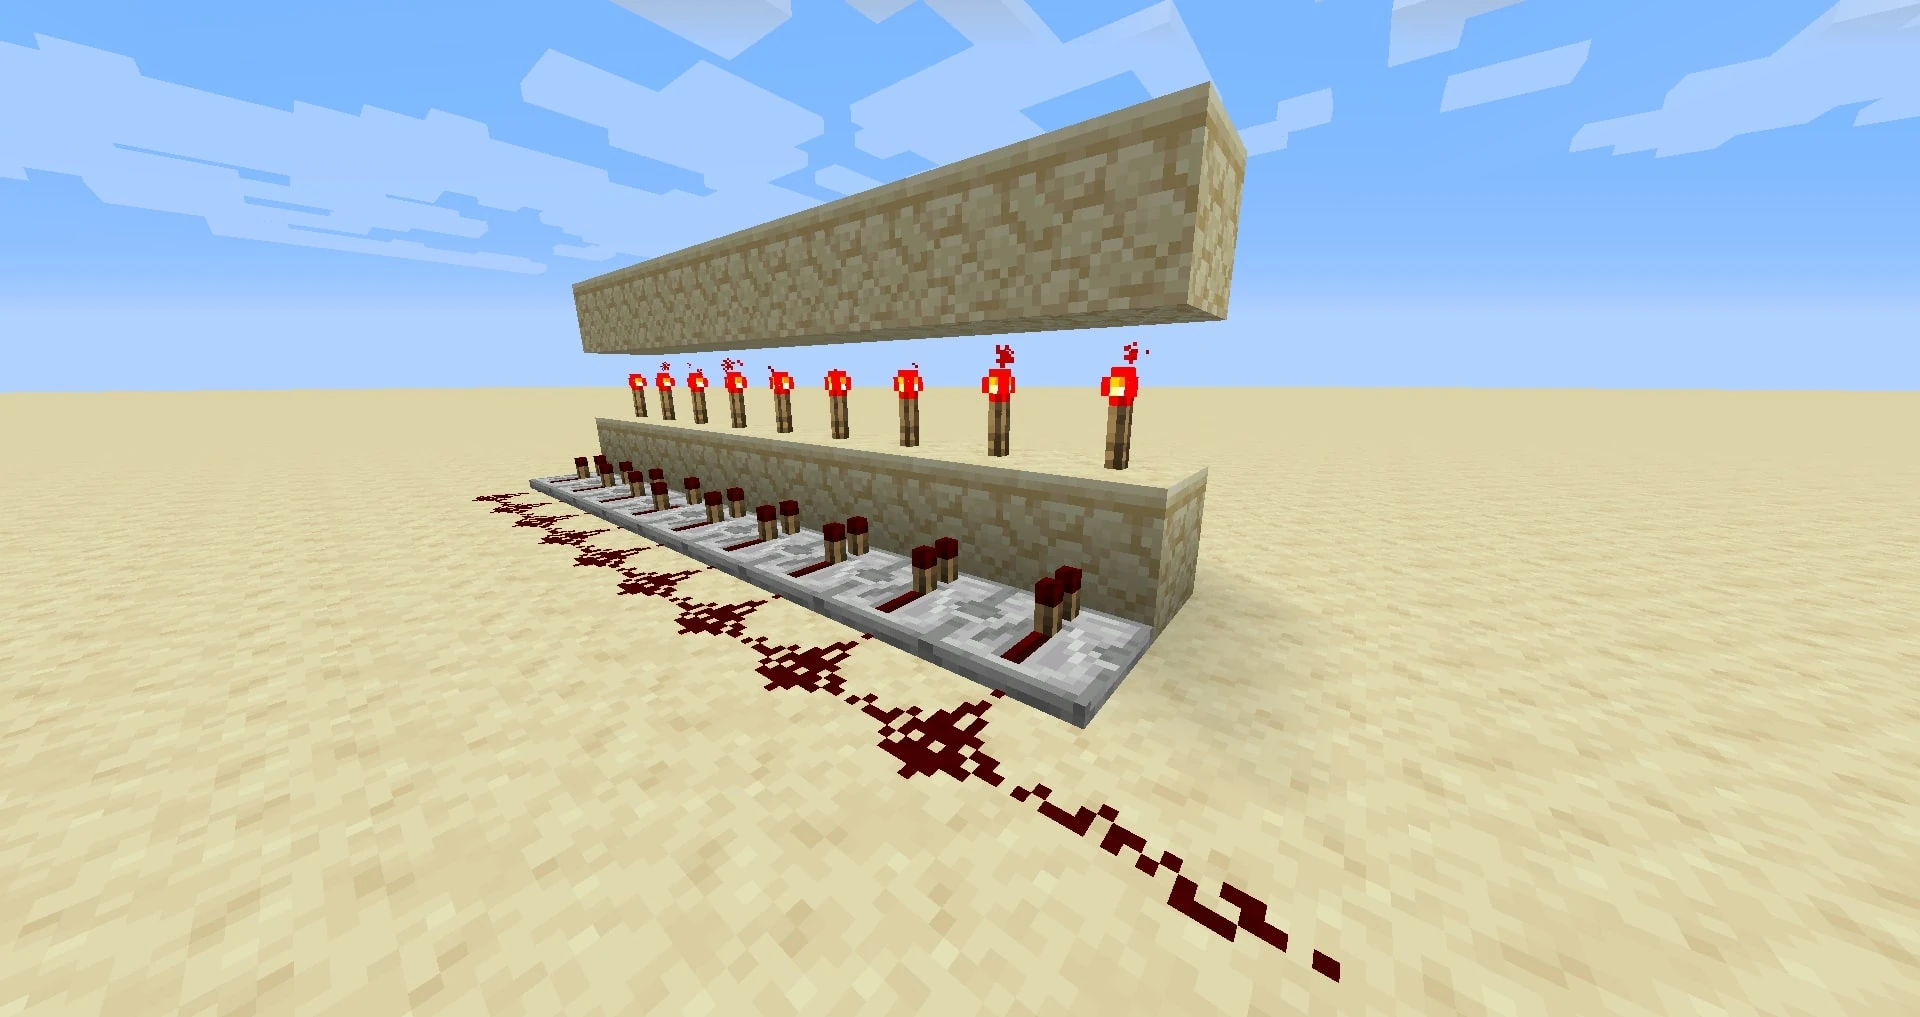
To start, you will want to create a line of repeaters all the way along, remember if you haven’t sent a signal through your system, or you've reset it which it will be mentioned at the end, then all your repeaters right now should be on, if there not then you need to go back and check, first of all check that you've reset them and then check your wiring to the translator. If you have got them all on, then it should be good, so far. After your line of repeaters you're going to want to create a line of any block, it is suggested to use sandstone or mossy cobble for mine but it's personal, it won't affect the wiring. Now continue this on so that you have 26 lines of blocks, the number of letters in the English alphabet. So, now you can kind of see your translator taking shape now to make the process easier for yourself later, it is suggested to place redstone torches all the way along the blocks on every row, you'll understand later. That took some time didn't it; be warned that there’s going to be a couple of tasks like that in this tutorial. Once you've got all your redstone torches set-up you want to place a row of blocks above everyone pulse two extra blocks on the end that you want the final signal. By now, your rows should look something like this.

. Now that you've got the repeaters and the lights set up, you want to place wire all along the top of your blocks to the end and then place a torch coming down the side facing where the input came from. As you can see, it has been moved this signal down, inverted it, and then put it to a light which will show the letter.
Above View of rows
This is the first and gate down. As well as being able to power the block and the wires next to that block, it also powers the wire under nether, you can use this feature to be able to create the next and gate; sort of, but before then, you are going to go through and program the first and gate, now as you have already placed all the torches it is now quite easy to program in, basically you want to pull up your Morse code showing you the different signals and then remove the torch that is it meant to be, remember that it will go in pairs, dash dot, dash dot, dash dot and so on, so to program in A which is dot dash you need to remove the 2nd and the 3rd torch. It is very important to make sure you get the right end display. Although, it can always be done at the end, or with the next step, which is to create the second and gate, this will in the end mean that the signal will only be on when all the criteria is full filled, to stop any of the incorrect lights showing. Now, to do this you are going to want to remember where the gaps are in the torches, for example, by giving the gaps all numbers and writing down which ones are empty. It is suggested to do this row by row. Create a trench directly underneath the torches two deep, and now for everything gap that you had place a block and a redstone wire on to it and feed the redstone wire overall of them to the opposite end of the torches away from where your display is. This is what 'A' would look like underneath, now you want to get this message up to the top layer of your row, where the redstone wire is. You do this using vertical wiring and then feeding a wire to connect them both up, like this. Once this is all connected up to each one, you're complete you should now go test your system for any mistakes.
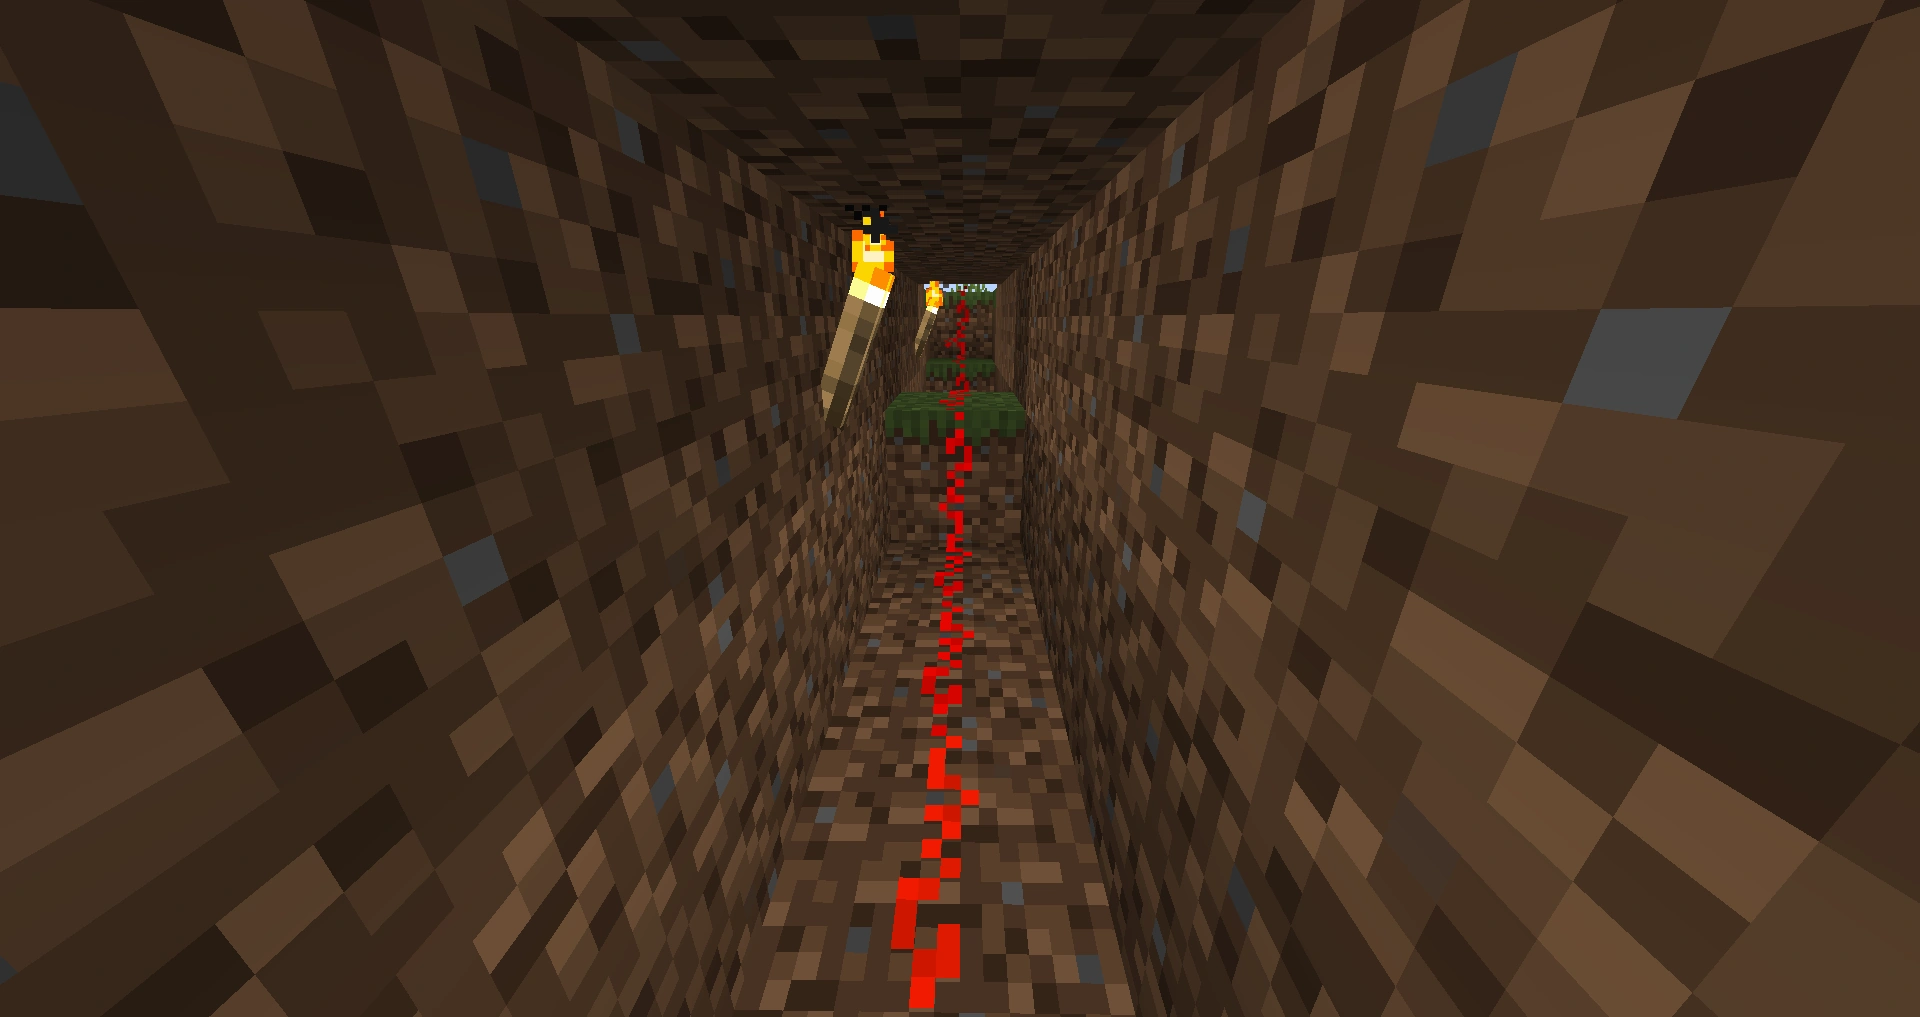
Under the 'and' gate