(Stuff) Tag: Visual edit |
No edit summary Tag: Visual edit |
||
| (150 intermediate revisions by more than 100 users not shown) | |||
| Line 1: | Line 1: | ||
| − | {{about|creating resource packs for {{el|je}}|Bedrock Edition add-ons|Tutorials/Creating resource pack add-ons|}} |
||
{{exclusive|java}} |
{{exclusive|java}} |
||
{{cleanup}} |
{{cleanup}} |
||
| − | + | {{TOC|right}} |
|
== Preface == |
== Preface == |
||
Resource packs allow users to include files that can modify or add custom textures, models, animations, music, sounds, user interfaces, and languages that change the way some things in ''Minecraft'' behave or look. |
Resource packs allow users to include files that can modify or add custom textures, models, animations, music, sounds, user interfaces, and languages that change the way some things in ''Minecraft'' behave or look. |
||
=== What NOT to do === |
=== What NOT to do === |
||
| − | There are some things that you should NOT do when creating a resource pack / texture packs, which includes but is not limited to: |
+ | There are some things that you should ''NOT'' do when creating a resource pack / texture packs, which includes but is not limited to: |
*Anything that violates the ''Minecraft'' [https://account.mojang.com/documents/minecraft_eula EULA]. |
*Anything that violates the ''Minecraft'' [https://account.mojang.com/documents/minecraft_eula EULA]. |
||
| Line 16: | Line 15: | ||
It is also suggested that you never extract game files to your desktop, as it can result in technical issues. |
It is also suggested that you never extract game files to your desktop, as it can result in technical issues. |
||
| − | ==Getting |
+ | ==Getting started== |
| − | === Making a |
+ | === Making a resource pack=== |
| − | ''Minecraft'' has a unique mechanic that allows for text and media files to be added to the game files that allow for everything from custom block textures and models to custom credits and sound events. This tutorial is meant to help with setting up the file systems in order to implement them. Since the files are essentially code, there are technical rules for how to format files and certain things may change from version to version. As such, what is written in this tutorial may not apply to every situation, but in the case where the difference is significant and specific, it |
+ | ''Minecraft'' has a unique mechanic that allows for text and media files to be added to the game files that allow for everything from custom block textures and models to custom credits and sound events. This tutorial is meant to help with setting up the file systems in order to implement them. Since the files are essentially code, there are technical rules for how to format files and certain things may change from version to version. As such, what is written in this tutorial may not apply to every situation, but in the case where the difference is significant and specific, it provides a framework on the changes needed for different versions. |
| − | ''This tutorial is geared toward the latest release of'' Minecraft'', which is currently 1. |
+ | ''This tutorial is geared toward the latest release of'' Minecraft'', which is currently 1.20'' |
| + | |||
| + | <br/> |
||
| + | { |
||
| + | "pack": { |
||
| + | "pack_format": 15, |
||
| + | "description": "My Resource Pack" |
||
| + | }, |
||
| + | "language": { |
||
| + | "LANG_COUNTRY": { |
||
| + | "name": "My Custom Language", |
||
| + | "region": "Country/Region name", |
||
| + | "bidirectional": false |
||
| + | } |
||
| + | } |
||
| + | } |
||
===Tools=== |
===Tools=== |
||
Creating custom files for ''Minecraft'', whether in the forms of resource/data packs or mods, is somewhat technical and can be difficult. There are many rules that must be followed in order for add-ons to work correctly, most notably how the files are formatted. There are many tools that can help mitigate these issues, some of which are listed here. |
Creating custom files for ''Minecraft'', whether in the forms of resource/data packs or mods, is somewhat technical and can be difficult. There are many rules that must be followed in order for add-ons to work correctly, most notably how the files are formatted. There are many tools that can help mitigate these issues, some of which are listed here. |
||
| − | ====File |
+ | ====File archiver==== |
| − | To access the base assets of ''Minecraft'' to edit textures, models, or sounds, a file archiver is needed. [https://www.7-zip.org 7-Zip] or [https://www.rarlab.com/download.htm WinRAR] are suggested. MacOS has a built-in file archiver called "Archive Utility" that can be used, but if an alternative is wanted, [https://apps.apple.com/us/app/the-unarchiver/id425424353?mt=12 The Unarchiver] |
+ | To access the base assets of ''Minecraft'' to edit textures, models, or sounds, a file archiver is needed. [https://www.7-zip.org 7-Zip] or [https://www.rarlab.com/download.htm WinRAR] are suggested. MacOS has a built-in file archiver called "Archive Utility" that can be used, but if an alternative is wanted, [https://apps.apple.com/us/app/the-unarchiver/id425424353?mt=12 The Unarchiver] also works. |
| − | ==== |
+ | ====Editor ==== |
| − | Making a resource pack involves creating [[JSON]] text files, which can be tricky to use and format correctly. Many |
+ | Making a resource pack involves creating [[JSON]] text files, which can be tricky to use and format correctly. Many File Editors assist with formatting these files and making sure proper syntax is used, as well as help organizing files in a project. Here are some suggestions: |
| − | *[https:// |
+ | * [https://notepad-plus-plus.org/ Notepad++] - A very lightweight Text Editor. very easy to use |
| − | *[https://code.visualstudio.com Visual Studio Code] – More complex |
+ | * [https://code.visualstudio.com Visual Studio Code] – More complex Text Editor better suited for those who have experience with working in Text Editors. |
| + | * [https://jsonformatter.org/json-parser jsonformatter.org] - an online JSON formatting |
||
| − | ====Audio |
+ | ====Audio editor==== |
In order to add sound files, you must put it in the proper format (.ogg). While this can be done using one of numerous sites online, an audio editor program is suggested to allow customizing or trimming of audio files. [https://www.audacityteam.org Audacity] is one of the most popular audio editors. |
In order to add sound files, you must put it in the proper format (.ogg). While this can be done using one of numerous sites online, an audio editor program is suggested to allow customizing or trimming of audio files. [https://www.audacityteam.org Audacity] is one of the most popular audio editors. |
||
| − | ====Image |
+ | ====Image editor/3D modeling tool==== |
| − | To add textures or custom models, it is suggested to use a modeling program that allows for a visual-based editing system. Like with audio conversion websites, there are many online tools, though a common recommended program is [https://blockbench.net Blockbench]. Most image editors |
+ | To add textures or custom models, it is suggested to use a modeling program that allows for a visual-based editing system. Like with audio conversion websites, there are many online tools, though a common recommended program is [https://blockbench.net Blockbench]. Most image editors suffice to modify textures, but it is recommended to use an editor that supports [[transparency]] such as [https://www.getpaint.net/index.html paint.net] or https://pixlr.com/ so that you may add transparent pixels to textures. |
==Creating a resource pack== |
==Creating a resource pack== |
||
| Line 45: | Line 60: | ||
''In versions 1.11 and higher, all file names within a resource pack should use lowercase letters only.'' |
''In versions 1.11 and higher, all file names within a resource pack should use lowercase letters only.'' |
||
| − | ===Creating the |
+ | ===Creating the folder=== |
| − | The first thing we need to do is create the folder that |
+ | The first thing we need to do is create the folder that contains all the resource pack files. Create a folder on your desktop or another easily accessible location and name it <code>Tutorial_Resource_Pack</code>. This eventually becomes the name displayed in the resource pack menu. |
===Creating a .MCMETA file === |
===Creating a .MCMETA file === |
||
Within your resource pack folder, we need to create a {{cd|pack.mcmeta}} file. This lets ''Minecraft'' know that the folder is a resource pack and contains useful information such as: |
Within your resource pack folder, we need to create a {{cd|pack.mcmeta}} file. This lets ''Minecraft'' know that the folder is a resource pack and contains useful information such as: |
||
| − | * |
+ | *The recommended version for the resource pack. |
*The description displayed under the pack title in the selection menu. |
*The description displayed under the pack title in the selection menu. |
||
*Preliminary information on any custom languages added in the resource pack. |
*Preliminary information on any custom languages added in the resource pack. |
||
| Line 62: | Line 77: | ||
{ |
{ |
||
"pack": { |
"pack": { |
||
| − | "pack_format": |
+ | "pack_format": 18, |
| − | "description": "Tutorial |
+ | "description": "Tutorial Resource Pack" |
} |
} |
||
} |
} |
||
| Line 77: | Line 92: | ||
*{{cd|5}} for versions [[Java Edition 1.15|1.15]] – [[Java Edition 1.16.1|1.16.1]] |
*{{cd|5}} for versions [[Java Edition 1.15|1.15]] – [[Java Edition 1.16.1|1.16.1]] |
||
*{{cd|6}} for versions [[Java Edition 1.16.2|1.16.2]] – [[Java Edition 1.16.5|1.16.5]] |
*{{cd|6}} for versions [[Java Edition 1.16.2|1.16.2]] – [[Java Edition 1.16.5|1.16.5]] |
||
| − | *{{cd|7}} for versions [[Java Edition 1.17|1.17 |
+ | *{{cd|7}} for versions [[Java Edition 1.17|1.17.x]] |
| + | *{{cd|8}} for versions [[1.18|1.18.x]] |
||
| − | |||
| + | *{{cd|9}} for versions [[1.19]] – [[Java Edition 1.19.2|1.19.2]] |
||
| + | *{{Cd|11}} for version [[Java Edition 22w42a|22w42a]] – [[Java Edition 22w44a|22w44a]] |
||
| + | *{{Cd|12}} for version [[Java Edition 1.19.3|1.19.3]] |
||
| + | *{{Cd|13}} for version [[Java Edition 1.19.4|1.19.4]] |
||
| + | *{{Cd|14}} for version [[Java Edition 23w14a|23w14a]] – [[Java Edition 23w16a|23w16a]] |
||
| + | *{{Cd|15}} for version [[Java Edition 1.20|1.20.0]] - [[Java Edition 1.20.1|1.20.1]] |
||
| + | *{{Cd|16}} for version [[Java Edition 23w31a|23w31a]] |
||
| + | *{{Cd|17}} for version [[Java Edition 23w32a|23w32a]] - [[23w35a]] |
||
| + | *{{Cd|18}} for version [[Java Edition 1.20.2|1.20.2]] |
||
| + | *{{Cd|19}} for version [[23w42a]] |
||
| + | *{{Cd|20}} for version [[23w43a]] – [[23w44a]] |
||
| + | *{{Cd|21}} for version [[23w45a]] – [[23w46a]] |
||
| + | *{{Cd|22}} for version [[Java Edition 1.20.3|1.20.3]] – [[Java Edition 1.20.4|1.20.4]] |
||
''Note: As more updates are released, values may be changed or added.'' |
''Note: As more updates are released, values may be changed or added.'' |
||
=====<code>"description"</code>===== |
=====<code>"description"</code>===== |
||
| − | The text following <code>"description"</code> is displayed under the pack title in the selection menu, and must be put inside quotes <code>""</code>. If you wish to use special characters, you can enter the Unicode code for the character in the format <code>\u####</code>, where <code>####</code> is the Unicode hex code for the character. Say you want to use the letter |
+ | The text following <code>"description"</code> is displayed under the pack title in the selection menu, and must be put inside quotes <code>""</code>. If you wish to use special characters, you can enter the Unicode code for the character in the format <code>\u####</code>, where <code>####</code> is the Unicode hex code for the character. Say you want to use the letter ß, which has code <code>U+00DF</code>. Inside the description you would type {{cd|\u00DF}}. Make sure that you are using the correct slash, or it may not work. A list of Unicode codes can be found [[wikipedia:List of Unicode characters|here]]. ''Note: Only the characters 0000–FFFF ({{w|Basic Multilingual Plane}}) are supported.''{{Citation needed}} |
| − | =====Correct |
+ | =====Correct syntax ===== |
Be very careful not to forget quotation marks <code>""</code>, colons <code>:</code>, braces <code>{}</code>, or square brackets <code>[]</code>. Missing one of these can lead to your resource pack not being detected by Minecraft. Make sure that your <code>pack.mcmeta</code> file matches the one shown above. |
Be very careful not to forget quotation marks <code>""</code>, colons <code>:</code>, braces <code>{}</code>, or square brackets <code>[]</code>. Missing one of these can lead to your resource pack not being detected by Minecraft. Make sure that your <code>pack.mcmeta</code> file matches the one shown above. |
||
| − | ===Testing your |
+ | ===Testing your pack=== |
[[File:TestingJavaPack.png|alt=|thumb|432x432px|If your resource pack is formatted correctly, it should appear in the selection menu like this.]] |
[[File:TestingJavaPack.png|alt=|thumb|432x432px|If your resource pack is formatted correctly, it should appear in the selection menu like this.]] |
||
At this point, you can test if the pack is formatted correctly by putting it in the game! To do this you must place your resource pack folder in the ''Minecraft'' pack folder. You can access it by selecting "[[Options]]", then "Resource Packs", then "Open Pack Folder", or you can navigate to it from your file browser: |
At this point, you can test if the pack is formatted correctly by putting it in the game! To do this you must place your resource pack folder in the ''Minecraft'' pack folder. You can access it by selecting "[[Options]]", then "Resource Packs", then "Open Pack Folder", or you can navigate to it from your file browser: |
||
| − | *For Windows, right click on the start button → run → type in %appdata% → .minecraft → resourcepacks |
+ | * For Windows, right click on the start button → run → type in %appdata% → .minecraft → resourcepacks |
| − | *For MacOS, go to Library → Application Support → minecraft → resourcepacks |
+ | * For MacOS, go to Library → Application Support → minecraft → resourcepacks |
*For Linux, go to ~/.minecraft/resourcepacks (/home/<username>/.minecraft/resourcepacks) |
*For Linux, go to ~/.minecraft/resourcepacks (/home/<username>/.minecraft/resourcepacks) |
||
Once you have the folder open, you can drag your custom pack folder and drop it in. |
Once you have the folder open, you can drag your custom pack folder and drop it in. |
||
If you have formatted the files correctly, you should see your resource pack appear in the menu. |
If you have formatted the files correctly, you should see your resource pack appear in the menu. |
||
| − | ==== |
+ | ====Troubleshooting==== |
If you don't see your pack in the list, make sure your {{cd|pack.mcmeta}} file is correct and saved in the folder. Look for any missing braces {{code|<nowiki>{}</nowiki>}}, commas {{code|,}}, colons {{code|:}}, quotation marks {{code|""}}, or square brackets {{code|<nowiki>[]</nowiki>}}. Remember that for each open brace, quotation, or square bracket, you must have a closing brace, quotation, or square bracket. |
If you don't see your pack in the list, make sure your {{cd|pack.mcmeta}} file is correct and saved in the folder. Look for any missing braces {{code|<nowiki>{}</nowiki>}}, commas {{code|,}}, colons {{code|:}}, quotation marks {{code|""}}, or square brackets {{code|<nowiki>[]</nowiki>}}. Remember that for each open brace, quotation, or square bracket, you must have a closing brace, quotation, or square bracket. |
||
===Pack icon=== |
===Pack icon=== |
||
| − | If an icon is not specified, a [[cobblestone]] icon |
+ | If an icon is not specified, a [[cobblestone]] icon appears next to the pack. If you want to use your own pack icon, you can place it inside your resource pack folder with the name <code>pack.png</code>. The file must be a PNG, and works with any square resolution, but a 128×128 pixel image renders the best. |
| − | ==Adding content== |
+ | ==Adding content == |
| − | ===Structuring the assets folder=== |
+ | ===Structuring the assets folder === |
| − | Now that you have your resource pack set up, you can start adding content to it. |
+ | Now that you have your resource pack set up, you can start adding content to it. You add most files into a subfolder called <code>assets</code>. Simply create a new folder inside your resource pack folder named <code>assets</code>. This, <code>pack.mcmeta</code>, and <code>pack.png</code> should be the only files located directly in your parent resource pack folder. Any other resource files must be located somewhere in <code>assets</code> or they won't be read by ''Minecraft''. |
| − | ====Adding a namespace folder |
+ | ====Adding a namespace folder==== |
| − | Next, inside your assets folder are your namespace folders. These help separate the files in your resource pack so that there is no confusion between which files are located where. If you plan on modifying or replacing vanilla resources, those files would go into the <code>minecraft</code> namespace folder. Custom additions should go in your own namespace folder, which for this tutorial |
+ | Next, inside your assets folder are your namespace folders. These help separate the files in your resource pack so that there is no confusion between which files are located where. If you plan on modifying or replacing vanilla resources, those files would go into the <code>minecraft</code> namespace folder. Custom additions should go in your own namespace folder, which for this tutorial is named <code>custom</code>. In the future, you should use a significant or unique namespace so that there isn't a possibility of other resource packs confusing which files belong where when multiple packs are loaded. |
| − | === |
+ | ===Accessing the vanilla resources === |
| − | If you plan on editing multiple resources, or to help ease of access, you may want to save a copy of the vanilla resources in an accessible location in case some things rely on other files within the directory. To do this, you need to navigate to the vanilla resources file by opening the <code>versions</code> folder inside the <code>.minecraft</code> directory. You should see a list of numbered folders, which correspond to versions that you've loaded or used in the past. Open the folder corresponding to the version you want for your resource pack (in this tutorial it would be 1. |
+ | If you plan on editing multiple resources, or to help ease of access, you may want to save a copy of the vanilla resources in an accessible location in case some things rely on other files within the directory. To do this, you need to navigate to the vanilla resources file by opening the <code>versions</code> folder inside the <code>.minecraft</code> directory. You should see a list of numbered folders, which correspond to versions that you've loaded or used in the past. Open the folder corresponding to the version you want for your resource pack (in this tutorial it would be 1.19) and extract the JAR file located inside, which can be done by right clicking the file and selecting a file archiver from the "Open With" option. You may want to save this in an accessible location for future reference, as certain tasks such as modifying block models require textures in addition to the model files. If you do not have a program that can open .jar files simply change the extension from .jar to .zip. |
| − | ===Modifying an |
+ | === Modifying an entity's texture=== |
This section goes through the process of modifying a texture, using the creeper texture as an example. |
This section goes through the process of modifying a texture, using the creeper texture as an example. |
||
| − | ==== |
+ | ====Finding the vanilla texture==== |
| − | First, you |
+ | First, you need the vanilla resource to get the texture you want to edit. This is located in the extracted version folder that was created in the previous section. In the extracted folder, navigate to <code>assets</code>→<code>minecraft</code>→<code>textures</code>→<code>entity</code>→<code>creeper</code> where you can find <code>creeper.png</code>. Save a duplicate of this file somewhere accessible or keep the folder window open during the next few steps. |
[[File:CreeperTexture1.png|360px|link=|alt=|thumb|The creeper texture loaded in paint.net]] |
[[File:CreeperTexture1.png|360px|link=|alt=|thumb|The creeper texture loaded in paint.net]] |
||
| − | Next you'll need to replicate the folder structure of the vanilla pack within your resource pack, which lets ''Minecraft'' know to use the texture. Since we are modifying a default texture, this |
+ | Next you'll need to replicate the folder structure of the vanilla pack within your resource pack, which lets ''Minecraft'' know to use the texture. Since we are modifying a default texture, this is in the <code>minecraft</code> subfolder of our <code>assets</code> folder. Within the <code>minecraft</code> folder of ''your resource pack'', do the following: |
#Inside {{cd|minecraft}}, create a folder called {{cd|textures}}. |
#Inside {{cd|minecraft}}, create a folder called {{cd|textures}}. |
||
#Inside {{cd|textures}}, create a folder called {{cd|entity}}. |
#Inside {{cd|textures}}, create a folder called {{cd|entity}}. |
||
#Inside {{cd|entity}}, create a folder called {{cd|creeper}}. |
#Inside {{cd|entity}}, create a folder called {{cd|creeper}}. |
||
| − | #Copy the creeper texture from the vanilla resource pack into your newly created <code>creeper</code> folder. |
+ | # Copy the creeper texture from the vanilla resource pack into your newly created <code>creeper</code> folder. |
Now that you have the normal creeper texture placed in your resource pack, open it up in the image editor of your choice. It should look something like the image shown. |
Now that you have the normal creeper texture placed in your resource pack, open it up in the image editor of your choice. It should look something like the image shown. |
||
| − | Since texture files are very small, you may need to zoom in. |
+ | Since texture files are very small, you may need to zoom in. |
;A quick note on textures |
;A quick note on textures |
||
| − | If you've never seen a texture before, the above image might surprise you. |
+ | If you've never seen a texture before, the above image might surprise you. A lot of textures look this way and are "wrapped" around a model, like wrapping paper around a present. |
| − | [[File:LargerTextureLayoutMap.png|alt=|thumb|246x246px|Color-coded Texture. Sections of the same color |
+ | [[File:LargerTextureLayoutMap.png|alt=|thumb|246x246px|Color-coded Texture. Sections of the same color always face the same direction.]] |
Now it's time to be creative! Edit the texture however you want. For simplicity, this example adds a headband. Note where the changes are and compare it to the color-coded texture above. |
Now it's time to be creative! Edit the texture however you want. For simplicity, this example adds a headband. Note where the changes are and compare it to the color-coded texture above. |
||
[[File:Creeperheadband.png|202x202px|link=|alt=|left|thumb|Creeper texture with a red headband.]] |
[[File:Creeperheadband.png|202x202px|link=|alt=|left|thumb|Creeper texture with a red headband.]] |
||
| − | Once you are happy with your texture, save the file as <code>creeper.png</code>. It is important that it is saved with the same name as the default asset or otherwise it |
+ | Once you are happy with your texture, save the file as <code>creeper.png</code>. It is important that it is saved with the same name as the default asset or otherwise it cannot detect and load your texture. |
Now you can load up ''Minecraft'' and spawn a creeper with your custom texture! If it doesn't show up, make sure that you've selected your resource pack. If it still doesn't work, make sure you've named the file properly and placed it in the correct folder. |
Now you can load up ''Minecraft'' and spawn a creeper with your custom texture! If it doesn't show up, make sure that you've selected your resource pack. If it still doesn't work, make sure you've named the file properly and placed it in the correct folder. |
||
[[File:ResourcePackNewCreeper.png|thumb|260x260px|Here's the creeper with the new texture as it appears in-game.]] |
[[File:ResourcePackNewCreeper.png|thumb|260x260px|Here's the creeper with the new texture as it appears in-game.]] |
||
| − | =====Pack |
+ | =====Pack hierarchy===== |
| − | If you are playing with multiple resource packs loaded, there may be some textures that are in your pack that aren't being shown. This is because of the way resource packs are loaded in ''Minecraft''. All selected resource pack files are loaded from the bottom up as they are shown in the selection menu, so if there is a resource pack that is loaded above yours, it may replace files that you've changed. This can cause various issues with using multiple themed resource packs that have differing textures. |
+ | If you are playing with multiple resource packs loaded, there may be some textures that are in your pack that aren't being shown. This is because of the way resource packs are loaded in ''Minecraft''. All selected resource pack files are loaded from the bottom up as they are shown in the selection menu, so if there is a resource pack that is loaded above yours, it may replace files that you've changed. This can cause various issues with using multiple themed resource packs that have differing textures, so make sure you have your resource pack at the top. |
| − | ===Modeling |
+ | ===Modeling blocks and items=== |
{{Main|Model}} |
{{Main|Model}} |
||
| − | Sometimes you may want to change one of the ''Minecraft'' models. To do so you |
+ | Sometimes you may want to change one of the ''Minecraft'' models. To do so you need a file archiver to get the default model and texture along with a 3D modeling tool to edit the model. Blockbench works well in this case since it can export directly to the <code>.json</code> format needed for models. |
| − | ====Replacing a |
+ | ====Replacing a block==== |
| − | Because the default [[ladder]] in ''Minecraft'' isn't 3D, you can replace it with your own model. First, get all the ladder's files into this resource pack: |
+ | Because the default [[ladder]] in ''Minecraft'' isn't 3D, you can replace it with your own model. First, get all the ladder's files into this resource pack: |
#Open the ''Minecraft'' JAR file using a ZIP viewer of your choice. |
#Open the ''Minecraft'' JAR file using a ZIP viewer of your choice. |
||
| Line 159: | Line 187: | ||
*Navigate into the {{cd|assets/minecraft/blockstates}} folder, then extract {{cd|ladder.json}} to {{cd|Tutorial_Resource_Pack/assets/minecraft/blockstates}} |
*Navigate into the {{cd|assets/minecraft/blockstates}} folder, then extract {{cd|ladder.json}} to {{cd|Tutorial_Resource_Pack/assets/minecraft/blockstates}} |
||
*Navigate into the {{cd|assets/minecraft/models/block}} folder, then extract {{cd|ladder.json}} to {{cd|Tutorial_Resource_Pack/assets/minecraft/models/block}} |
*Navigate into the {{cd|assets/minecraft/models/block}} folder, then extract {{cd|ladder.json}} to {{cd|Tutorial_Resource_Pack/assets/minecraft/models/block}} |
||
| − | *Navigate into the {{cd|assets/minecraft/ |
+ | *Navigate into the {{cd|assets/minecraft/models/item}} folder, then extract {{cd|ladder.json}} to {{cd|Tutorial_Resource_Pack/assets/minecraft/models/item}} |
*Lastly, navigate into the {{cd|assets/minecraft/textures/block}} folder, then extract {{cd|ladder.png}} to {{cd|Tutorial_Resource_Pack/assets/minecraft/textures/block}}. |
*Lastly, navigate into the {{cd|assets/minecraft/textures/block}} folder, then extract {{cd|ladder.png}} to {{cd|Tutorial_Resource_Pack/assets/minecraft/textures/block}}. |
||
Now you can either edit the {{cd|ladder.png}} using your preferred image editor, or you can edit it in your preferred modeling editor. |
Now you can either edit the {{cd|ladder.png}} using your preferred image editor, or you can edit it in your preferred modeling editor. |
||
| − | Note: If you are doing a basic "Just Simple Nonanimated Textures" pack, the .json files are unnecessary. |
+ | Note: If you are doing a basic "Just Simple Nonanimated Textures" resource pack, the .json files are unnecessary. Otherwise, if you are doing special features to change what the texture looks like when certain parameters are true or false, then the .json files would be necessary. For example, if you created a resource pack that makes grass blocks smooth, the .json files would prevent you from having dirt lines everywhere in your world that already uses code. |
| − | ==== |
+ | ====Modeling the ladder - Blockbench==== |
| − | In modeling the ladder, we |
+ | In modeling the ladder, we use ''[https://blockbench.net/ Blockbench]''. Once you have opened the program, press {{cd|Ctrl+O}} to open the model selection menu. After the open dialog has appeared, go to the location where you saved <code>ladder.json</code> and select . |
| − | You then should be facing a ladder that is on the south side of the box. |
+ | You then should be facing a ladder that is on the south side of the box. |
*On the menu bar, go to ''"Edit -> Add Cube"'' to create a new block. |
*On the menu bar, go to ''"Edit -> Add Cube"'' to create a new block. |
||
*Resize the model to a full-sized cube. Then, under ''Textures'' on the left panel right click {{cd|ladder.png}}, then click ''Apply to Untextured Faces.'' |
*Resize the model to a full-sized cube. Then, under ''Textures'' on the left panel right click {{cd|ladder.png}}, then click ''Apply to Untextured Faces.'' |
||
| − | *In the top left, there |
+ | *In the top left, there is an image of the ladder, with a 1×1 highlighted region. Move this to change the texture to what you want it to be. Repeat until all sides of the block are as wanted. |
| − | *Go to ''"File -> Save Model"'' and save in {{cd|resourcepacks/Tutorial_Resource_Pack/assets/minecraft/models/block/ladder.json}} (Replace ''"block"'' with ''"blocks"'' for 1.12 and below). |
+ | *Go to ''"File -> Save Model"'' and save in {{cd|resourcepacks/Tutorial_Resource_Pack/assets/minecraft/models/block/ladder.json}} (Replace ''"block"'' with ''"blocks"'' for 1.12 and below). |
Now we have created a new model for the ladder block in Blockbench. |
Now we have created a new model for the ladder block in Blockbench. |
||
| − | ====Texturing the |
+ | ====Texturing the ladder - paint.net==== |
Go to getpaint.net and get paint.net or go to ninite.com, select paintNET and run it after it downloads to install paint.net for free. |
Go to getpaint.net and get paint.net or go to ninite.com, select paintNET and run it after it downloads to install paint.net for free. |
||
| Line 184: | Line 212: | ||
*Do Ctrl+O and go to .minecraft/textures/block/ladder.png and double click. |
*Do Ctrl+O and go to .minecraft/textures/block/ladder.png and double click. |
||
*Edit the Ladder however you want. |
*Edit the Ladder however you want. |
||
| − | *When you're done, press the X button in the top right of the window. It |
+ | *When you're done, press the X button in the top right of the window. It opens a dialog if you changed anything and ask if you want to save your work. Press Save then okay twice. You don't need to change anything in the menus. |
====Finishing off==== |
====Finishing off==== |
||
| Line 191: | Line 219: | ||
===Changing existing sounds or music=== |
===Changing existing sounds or music=== |
||
{{info needed section|Changing subtitles of sounds, adding subtitles to existing sounds without them}} |
{{info needed section|Changing subtitles of sounds, adding subtitles to existing sounds without them}} |
||
| − | Just like modifying the default textures or models, you can substitute custom sounds in place of the default ones. |
+ | Just like modifying the default textures or models, you can substitute custom sounds in place of the default ones. This example shows how to change the boss music in the [[ender dragon]] fight. |
=====Finding a sound's path===== |
=====Finding a sound's path===== |
||
Similar to the custom texture and models, you'll first need to know the ''path'' of the sound you want to change. |
Similar to the custom texture and models, you'll first need to know the ''path'' of the sound you want to change. |
||
| − | #Inside your [[.minecraft]] folder, navigate to {{cd|assets/indexes}}, which |
+ | #Inside your [[.minecraft]] folder, navigate to {{cd|assets/indexes}}, which contains a list of numbered <code>.json</code> files. |
#Find the {{cd|.json}} file corresponding to your ''Minecraft'' version (e.g. {{cd|1.16.json}}), and open it with a text editor or IDE. |
#Find the {{cd|.json}} file corresponding to your ''Minecraft'' version (e.g. {{cd|1.16.json}}), and open it with a text editor or IDE. |
||
| − | #In this file you can find all the sounds found in ''Minecraft''. Press {{key|CTRL+F}} to search for your sound. |
+ | #In this file you can find all the sounds found in ''Minecraft''. Press {{key|CTRL+F}} to search for your sound. |
| − | #* |
+ | #*For a list of filenames for music, you can check [[Music#List]] |
| − | #Your sound path |
+ | #Your sound path should look something like this: {{cd|minecraft/sounds/music/game/end/boss.ogg}} |
| − | ===== |
+ | =====Modifying the sound===== |
#'''Inside your resource pack folder''', navigate to {{cd|assets/minecraft}}. |
#'''Inside your resource pack folder''', navigate to {{cd|assets/minecraft}}. |
||
| − | #Create a new folder named {{cd|sounds}}. |
+ | # Create a new folder named {{cd|sounds}}. |
#Now inside your {{cd|sounds}} folder, you need to create new folders depending on your sound's path. For example, if your path is {{cd|minecraft/sounds/music/game/end/boss.ogg}}, you need to create the folders {{cd|sounds/music/game/end}}. |
#Now inside your {{cd|sounds}} folder, you need to create new folders depending on your sound's path. For example, if your path is {{cd|minecraft/sounds/music/game/end/boss.ogg}}, you need to create the folders {{cd|sounds/music/game/end}}. |
||
| − | #In the last folder (in this example, it's {{cd|end}}) you can put in your new sound file. Make sure you named the file to the file that you're replacing, or in this example, {{cd|boss.ogg}}. |
+ | # In the last folder (in this example, it's {{cd|end}}) you can put in your new sound file. Make sure you named the file to the file that you're replacing, or in this example, {{cd|boss.ogg}}. |
| − | #*Note that this file '''must''' be a {{cd|.ogg}} file. To convert your sound file to a {{cd|.ogg}} file, you can use the free website [https://audio.online-convert.com/convert-to-ogg Online-Convert.com] |
+ | #* Note that this file '''must''' be a {{cd|.ogg}} file. To convert your sound file to a {{cd|.ogg}} file, you can use the free website [https://audio.online-convert.com/convert-to-ogg Online-Convert.com] |
| − | =====Testing your sound===== |
+ | =====Testing your sound ===== |
If everything went according to plan, you have now replaced a sound in ''Minecraft''. To test it: |
If everything went according to plan, you have now replaced a sound in ''Minecraft''. To test it: |
||
| Line 222: | Line 250: | ||
In addition to modifying default sounds, you can add your own! In this example, a new player hurt sound can be added without replacing any of the current player hurt sounds. |
In addition to modifying default sounds, you can add your own! In this example, a new player hurt sound can be added without replacing any of the current player hurt sounds. |
||
| − | ===== Finding the sound path |
+ | ===== Finding the sound path===== |
| − | In order to add a sound, you'll need to know where it should actually go by determining its ''path''. Unlike replacing sounds, you |
+ | In order to add a sound, you'll need to know where it should actually go by determining its ''path''. Unlike replacing sounds, you should go straight to your resource pack folder and search in there. |
| − | #Find and open your version's <code>.json</code> index file (e.g <code>1. |
+ | #Find and open your version's <code>.json</code> index file (e.g <code>1.19.json</code>) from <code>.minecraft/assets/indexes</code>. |
| − | # |
+ | #Press {{key|CTRL+F}} to search for your sound path. |
| − | #*In this case, the location for the player hurt sounds |
+ | #*In this case, the location for the player hurt sounds looks like this: {{cd|minecraft/sounds/damage/}}. |
| − | ===== |
+ | =====Adding the folders and sound in your resource pack===== |
| − | # |
+ | #Going to your resource pack folder, navigate to <code>Tutorial_Resource_Pack/assets/minecraft</code>. |
#Inside the <code>minecraft</code> folder, create a folder named {{cd|sounds}}. |
#Inside the <code>minecraft</code> folder, create a folder named {{cd|sounds}}. |
||
#*If you already have a <code>sounds</code> folder from replacing a default sound, open that folder. |
#*If you already have a <code>sounds</code> folder from replacing a default sound, open that folder. |
||
#Within the <code>sounds</code> folder, create a folder that matches the directory of the sound you want to add. In this case, we are going to create a file called <code>damage</code>. |
#Within the <code>sounds</code> folder, create a folder that matches the directory of the sound you want to add. In this case, we are going to create a file called <code>damage</code>. |
||
| − | #Add your sound here. |
+ | #Add your sound here. |
#*The sound ''must'' be a {{cd|.ogg}} file. Like in the previous section, you may use the free website [https://audio.online-convert.com/convert-to-ogg Online-Convert.com] or use Audacity as mentioned at the top of the page. |
#*The sound ''must'' be a {{cd|.ogg}} file. Like in the previous section, you may use the free website [https://audio.online-convert.com/convert-to-ogg Online-Convert.com] or use Audacity as mentioned at the top of the page. |
||
#*Also note the already existing files seen in your {{cd|.json}} file from above. In this case, five other hurt sounds exist within the {{cd|minecraft/sounds/damage/}} folder, two for falling at different heights ({{cd|fallbig.ogg}} and {{cd|fallsmall.ogg}}) and the other three are when the player actually gets hurt ({{cd|hit1.ogg}}, {{cd|hit2.ogg}}, and {{cd|hit3.ogg}}) Since we want to ''add'' a fourth sound to the existing three hurt sounds, we cannot reuse those file names. For simplicity, name your sound {{cd|hit4.ogg}}. |
#*Also note the already existing files seen in your {{cd|.json}} file from above. In this case, five other hurt sounds exist within the {{cd|minecraft/sounds/damage/}} folder, two for falling at different heights ({{cd|fallbig.ogg}} and {{cd|fallsmall.ogg}}) and the other three are when the player actually gets hurt ({{cd|hit1.ogg}}, {{cd|hit2.ogg}}, and {{cd|hit3.ogg}}) Since we want to ''add'' a fourth sound to the existing three hurt sounds, we cannot reuse those file names. For simplicity, name your sound {{cd|hit4.ogg}}. |
||
| Line 244: | Line 272: | ||
#Go back to {{cd|assets/minecraft}} in your resource pack folder. |
#Go back to {{cd|assets/minecraft}} in your resource pack folder. |
||
#Create a text file named {{cd|sounds.json}}. Do make sure that the file extension is indeed '''.json''' and nothing else. |
#Create a text file named {{cd|sounds.json}}. Do make sure that the file extension is indeed '''.json''' and nothing else. |
||
| − | # |
+ | #At your choice, paste the following template into {{cd|sounds.json}}: |
<syntaxhighlight lang="json"> |
<syntaxhighlight lang="json"> |
||
{ |
{ |
||
| Line 265: | Line 293: | ||
} |
} |
||
} |
} |
||
| − | </syntaxhighlight> |
+ | </syntaxhighlight> |
*The above code only applies to this example, which adds a new damage sound. If you are changing a different sound event, replace {{cd|entity.player.hurt}} with the sound event listed in the vanilla {{cd|sounds.json}} file. |
*The above code only applies to this example, which adds a new damage sound. If you are changing a different sound event, replace {{cd|entity.player.hurt}} with the sound event listed in the vanilla {{cd|sounds.json}} file. |
||
| − | *You can find out the id used by ''Minecraft'' for each sound folder. By using {{cd|/playsound}} in-game, you can determine this id. In this case, using {{cd|/playsound minecraft:entity.player.hurt master @s}} |
+ | *You can find out the id used by ''Minecraft'' for each sound folder. By using {{cd|/playsound}} in-game, you can determine this id. In this case, using {{cd|/playsound minecraft:entity.player.hurt master @s}} confirms that the player's hurt sound is indeed classified as {{cd|entity.player.hurt}}. |
*Make sure the name fields are in lowercase characters only. The names of your files should be in lowercase as well. Otherwise, the resource pack may fail to use your new sounds. |
*Make sure the name fields are in lowercase characters only. The names of your files should be in lowercase as well. Otherwise, the resource pack may fail to use your new sounds. |
||
| − | *The {{cd|subtitle}} field dictates the text |
+ | *The {{cd|subtitle}} field dictates the text to display when the sound is played. It can either be a string of text, or can use a field defined in a {{cd|lang}} file.{{needs testing|Can raw JSON text be used?}} |
| + | *In addition to these fields displayed, you may add more additional fields to the {{cd|sounds.json}} file to specify more parameters such as {{cd|volume}} and {{cd|pitch}}. A detailed list of additional {{cd|sounds.json}} fields can be found [[Sounds.json|here]]. |
||
| − | |||
| − | Correct {{cd|.json}} formatting is required! Any missing bracket, comma, etc. |
+ | *Correct {{cd|.json}} formatting is required! Any missing bracket, comma, etc. causes the resource pack to fail. |
=====Testing your sound===== |
=====Testing your sound===== |
||
| − | If there is an error anywhere in your {{cd|sounds.json}} file, none of the sounds described in it |
+ | If there is an error anywhere in your {{cd|sounds.json}} file, none of the sounds described in it appear in-game. If this happens, you should check the spelling and file paths. |
If everything went according to plan, you have now added a sound to ''Minecraft''. To test it: |
If everything went according to plan, you have now added a sound to ''Minecraft''. To test it: |
||
| − | #Make sure you have enabled your resource pack. |
+ | #Make sure you have enabled your resource pack. |
#*If you already had ''Minecraft'' open with your resource pack enabled, you can press {{key|F3+T}} to reload all resource packs. |
#*If you already had ''Minecraft'' open with your resource pack enabled, you can press {{key|F3+T}} to reload all resource packs. |
||
| − | #Use the {{cmd|playsound}} command once again to play your sound. In our example, type: {{cd|/playsound minecraft:entity.player.hurt master @s}}. For this example, it |
+ | #Use the {{cmd|playsound}} command once again to play your sound. In our example, type: {{cd|/playsound minecraft:entity.player.hurt master @s}}. For this example, it likely requires multiple tries, as hurt sounds are chosen randomly. |
| − | ===Adding |
+ | ===Adding languages=== |
{{Main|Resource pack#Language}} |
{{Main|Resource pack#Language}} |
||
| − | You can add new languages to ''Minecraft'' using a resource pack. Assume your language code is 'LANG'<ref>[[wikipedia:ISO 639|ISO 639]]</ref> and country/region code is 'COUNTRY',<ref>[[wikipedia:ISO 3166-1#Current codes|ISO 3166-1]]</ref> {{cd|pack.mcmeta}} |
+ | You can add new languages to ''Minecraft'' using a resource pack. Assume your language code is 'LANG'<ref>[[wikipedia:ISO 639|ISO 639]]</ref> and country/region code is 'COUNTRY',<ref>[[wikipedia:ISO 3166-1#Current codes|ISO 3166-1]]</ref> {{cd|pack.mcmeta}} looks like: |
| − | ;pack.mcmeta |
+ | ; pack.mcmeta |
<syntaxhighlight lang="json"> |
<syntaxhighlight lang="json"> |
||
{ |
{ |
||
"pack": { |
"pack": { |
||
| − | "pack_format": |
+ | "pack_format": 15, |
"description": "Tutorial Resource Pack" |
"description": "Tutorial Resource Pack" |
||
}, |
}, |
||
| Line 306: | Line 334: | ||
If you want your language to be right-to-left, set {{cd|"bidirectional"}} to {{cd|true}}. |
If you want your language to be right-to-left, set {{cd|"bidirectional"}} to {{cd|true}}. |
||
| − | Then, put {{cd|LANG_COUNTRY.json}} in {{cd|assets/minecraft/lang}} inside your resource pack. When you launch the game, choose your resource pack, open the [[Language]] selection screen, and your new language |
+ | Then, put {{cd|LANG_COUNTRY.json}} in {{cd|assets/minecraft/lang}} inside your resource pack. When you launch the game, choose your resource pack, open the [[Language]] selection screen, and your new language should be there. |
;Notes |
;Notes |
||
| Line 312: | Line 340: | ||
The {{cd|pack.mcmeta}} goes in the '''root folder of your resource pack, not in the {{cd|assets/minecraft/lang}} folder'''. Also note that '''the above {{cd|pack.mcmeta}} is the same file as the {{cd|pack.mcmeta}} file that you have created a while ago'''. As of [[Java Edition 1.7-pre|1.7-pre]], you can choose multiple resource packs at once. If you want to use your new language and resource pack for before 1.7, you need to combine them manually because multiple resource packs could not be selected before the version. |
The {{cd|pack.mcmeta}} goes in the '''root folder of your resource pack, not in the {{cd|assets/minecraft/lang}} folder'''. Also note that '''the above {{cd|pack.mcmeta}} is the same file as the {{cd|pack.mcmeta}} file that you have created a while ago'''. As of [[Java Edition 1.7-pre|1.7-pre]], you can choose multiple resource packs at once. If you want to use your new language and resource pack for before 1.7, you need to combine them manually because multiple resource packs could not be selected before the version. |
||
| − | ===Animation |
+ | ===Animation properties=== |
{{Main|Resource pack#Animation}} |
{{Main|Resource pack#Animation}} |
||
An example of an animation file is this: |
An example of an animation file is this: |
||
| Line 337: | Line 365: | ||
;Note |
;Note |
||
| − | All you really need to make a texture animated is the following code. By default, it |
+ | All you really need to make a texture animated is the following code. By default, it makes each frame last only one tick: |
;stone.png.mcmeta |
;stone.png.mcmeta |
||
| Line 348: | Line 376: | ||
Save the file as the same name as the texture you want to be animated with an {{cd|.mcmeta}} in the same folder as your texture. |
Save the file as the same name as the texture you want to be animated with an {{cd|.mcmeta}} in the same folder as your texture. |
||
| − | ===Texture |
+ | ===Texture properties=== |
{{Main|Resource Pack#Textures}} |
{{Main|Resource Pack#Textures}} |
||
| − | An example of a texture property is this: |
+ | An example of a texture property is this: |
;shadow.png.mcmeta |
;shadow.png.mcmeta |
||
| Line 364: | Line 392: | ||
===Fonts=== |
===Fonts=== |
||
{{Main|Resource pack#Fonts}} |
{{Main|Resource pack#Fonts}} |
||
| − | Character sizes in fonts are determined by the last line of pixels that contains pixels that contain a non-zero alpha. This allows additional padding to be added around characters by adding a color with an alpha level of 1, which ''Minecraft'' |
+ | Character sizes in fonts are determined by the last line of pixels that contains pixels that contain a non-zero alpha. This allows additional padding to be added around characters by adding a color with an alpha level of 1, which ''Minecraft'' considers as part of the character. |
| − | ==Testing your |
+ | ==Testing your resource pack== |
*Launch the game |
*Launch the game |
||
| Line 372: | Line 400: | ||
*Click on ''[[Resource Pack]]s'' |
*Click on ''[[Resource Pack]]s'' |
||
*Find "''Tutorial_Resource_Pack''" in the list on the left and click the arrow next to it |
*Find "''Tutorial_Resource_Pack''" in the list on the left and click the arrow next to it |
||
| − | *Click ''Done'' |
+ | * Click ''Done'' |
| − | If you decide you want to make some changes to your resource pack, edit your resource pack, go to resource packs in options, remove your pack from the active list and exit, go back, and reapply it. Alternatively, saving the texture to the resource pack and pressing {{key|F3+T}} |
+ | If you decide you want to make some changes to your resource pack, edit your resource pack, go to resource packs in options, remove your pack from the active list and exit, go back, and reapply it. Alternatively, saving the texture to the resource pack and pressing {{key|F3+T}} reloads the pack without the need to reload the default textures first. |
| − | == |
+ | ==Packaging resource packs with worlds== |
| − | For use in singleplayer worlds, you can package your resource pack as a ZIP file named {{cd|resources.zip}} inside the world directory. This |
+ | For use in singleplayer worlds, you can package your resource pack as a ZIP file named {{cd|resources.zip}} inside the world directory. This is then automatically used when playing the singleplayer world. |
| − | ==Server |
+ | ==Server resource packs== |
| − | If you are the owner of a server, you may set it as the resource pack of your server. |
+ | If you are the owner of a server, you may set it as the resource pack of your server. |
#Make sure your pack format is a .zip-folder. |
#Make sure your pack format is a .zip-folder. |
||
#Upload the pack on a file hosting website, e.g. [https://mc-packs.net/ MCPacks]. |
#Upload the pack on a file hosting website, e.g. [https://mc-packs.net/ MCPacks]. |
||
#Copy the download link of your pack. IMPORTANT: If you are using your own server or some other host then you have to make sure that you are using a direct download link. You also need to make sure to use a SSL certificate that is compatible with the shipped Java version 8 u51. ([https://bugs.mojang.com/browse/MC-143768 MC-143768]) |
#Copy the download link of your pack. IMPORTANT: If you are using your own server or some other host then you have to make sure that you are using a direct download link. You also need to make sure to use a SSL certificate that is compatible with the shipped Java version 8 u51. ([https://bugs.mojang.com/browse/MC-143768 MC-143768]) |
||
| − | #Open the server.properties with a text editor. |
+ | # Open the server.properties with a text editor. |
| − | #Search for the line |
+ | #Search for the line {{cd|resource-pack{{=}}}}. |
#Paste the download link after the equal sign. |
#Paste the download link after the equal sign. |
||
| − | #Optional: Set the |
+ | #Optional: Set the {{cd|require-resource-pack}} property to {{cd|true}} to force people to use the resource pack. |
| − | # |
+ | #Save your changes to the server-properties and restart your server. |
| − | # |
+ | #Enjoy! |
| − | Servers can have an icon that |
+ | Servers can have an icon that appears in the Multiplayer list. |
#Create a PNG image with a size of 64 by 64 pixels, transparency is supported. |
#Create a PNG image with a size of 64 by 64 pixels, transparency is supported. |
||
| Line 398: | Line 426: | ||
#Move it to the server's directory. |
#Move it to the server's directory. |
||
#Restart the server. |
#Restart the server. |
||
| − | #Server icons |
+ | #Server icons should display next to the server name. |
==References== |
==References== |
||
Latest revision as of 16:26, 2 April 2024
Preface
Resource packs allow users to include files that can modify or add custom textures, models, animations, music, sounds, user interfaces, and languages that change the way some things in Minecraft behave or look.
What NOT to do
There are some things that you should NOT do when creating a resource pack / texture packs, which includes but is not limited to:
- Anything that violates the Minecraft EULA.
- Release files that allow users to play a release of Minecraft without having purchased it from Mojang.
- Release the decompiled source code of Minecraft in any way.
In any case, you should always follow the Terms and Conditions on the Mojang Studios website.
It is also suggested that you never extract game files to your desktop, as it can result in technical issues.
Getting started
Making a resource pack
Minecraft has a unique mechanic that allows for text and media files to be added to the game files that allow for everything from custom block textures and models to custom credits and sound events. This tutorial is meant to help with setting up the file systems in order to implement them. Since the files are essentially code, there are technical rules for how to format files and certain things may change from version to version. As such, what is written in this tutorial may not apply to every situation, but in the case where the difference is significant and specific, it provides a framework on the changes needed for different versions.
This tutorial is geared toward the latest release of Minecraft, which is currently 1.20
{
  "pack": {
    "pack_format": 15,
    "description": "My Resource Pack"
  },
  "language": {
    "LANG_COUNTRY": {
      "name": "My Custom Language",
      "region": "Country/Region name",
      "bidirectional": false
    }
  }
}
Tools
Creating custom files for Minecraft, whether in the forms of resource/data packs or mods, is somewhat technical and can be difficult. There are many rules that must be followed in order for add-ons to work correctly, most notably how the files are formatted. There are many tools that can help mitigate these issues, some of which are listed here.
File archiver
To access the base assets of Minecraft to edit textures, models, or sounds, a file archiver is needed. 7-Zip or WinRAR are suggested. MacOS has a built-in file archiver called "Archive Utility" that can be used, but if an alternative is wanted, The Unarchiver also works.
Editor
Making a resource pack involves creating JSON text files, which can be tricky to use and format correctly. Many File Editors assist with formatting these files and making sure proper syntax is used, as well as help organizing files in a project. Here are some suggestions:
- Notepad++ - A very lightweight Text Editor. very easy to use
- Visual Studio Code – More complex Text Editor better suited for those who have experience with working in Text Editors.
- jsonformatter.org - an online JSON formatting
Audio editor
In order to add sound files, you must put it in the proper format (.ogg). While this can be done using one of numerous sites online, an audio editor program is suggested to allow customizing or trimming of audio files. Audacity is one of the most popular audio editors.
Image editor/3D modeling tool
To add textures or custom models, it is suggested to use a modeling program that allows for a visual-based editing system. Like with audio conversion websites, there are many online tools, though a common recommended program is Blockbench. Most image editors suffice to modify textures, but it is recommended to use an editor that supports transparency such as paint.net or https://pixlr.com/ so that you may add transparent pixels to textures.
Creating a resource pack
All the resources and instructions in a pack reside in the pack folder, which lives in the "resourcepacks" directory. You may wish to use an IDE to help keep track of the files within your resource pack if there are multiple.
In versions 1.11 and higher, all file names within a resource pack should use lowercase letters only.
Creating the folder
The first thing we need to do is create the folder that contains all the resource pack files. Create a folder on your desktop or another easily accessible location and name it Tutorial_Resource_Pack. This eventually becomes the name displayed in the resource pack menu.
Creating a .MCMETA file
Within your resource pack folder, we need to create a pack.mcmeta file. This lets Minecraft know that the folder is a resource pack and contains useful information such as:
- The recommended version for the resource pack.
- The description displayed under the pack title in the selection menu.
- Preliminary information on any custom languages added in the resource pack.
To create this file, we need to create a text file within the folder and name it pack.mcmeta. Make sure the file extension is .mcmeta and not .txt or the pack may not be detected. When renaming you may get a warning that changing a file name extension could make the file unusable or may switch the program required to open it. You can still open this file in a text editor by right-clicking the file and selecting the "Open With" option. Note: You may need to select a program using your file browser.
Formatting pack.mcmeta
Open pack.mcmeta in a text editor or IDE of your choice and type or copy+paste the following:
{
  "pack": {
    "pack_format": 18,
    "description": "Tutorial Resource Pack"
  }
}
"pack_format"
The value of "pack_format" tells Minecraft what release the resource pack is designed for, and is different for certain versions. The following list what versions each value is associated with:
1for versions 1.6.1 – 1.8.92for versions 1.9 – 1.10.23for versions 1.11 – 1.12.24for versions 1.13 – 1.14.45for versions 1.15 – 1.16.16for versions 1.16.2 – 1.16.57for versions 1.17.x8for versions 1.18.x9for versions 1.19 – 1.19.211for version 22w42a – 22w44a12for version 1.19.313for version 1.19.414for version 23w14a – 23w16a15for version 1.20.0 - 1.20.116for version 23w31a17for version 23w32a - 23w35a18for version 1.20.219for version 23w42a20for version 23w43a – 23w44a21for version 23w45a – 23w46a22for version 1.20.3 – 1.20.4
Note: As more updates are released, values may be changed or added.
"description"
The text following "description" is displayed under the pack title in the selection menu, and must be put inside quotes "". If you wish to use special characters, you can enter the Unicode code for the character in the format \u####, where #### is the Unicode hex code for the character. Say you want to use the letter ß, which has code U+00DF. Inside the description you would type \u00DF. Make sure that you are using the correct slash, or it may not work. A list of Unicode codes can be found here. Note: Only the characters 0000–FFFF (Basic Multilingual Plane) are supported.[citation needed]
Correct syntax
Be very careful not to forget quotation marks "", colons :, braces {}, or square brackets []. Missing one of these can lead to your resource pack not being detected by Minecraft. Make sure that your pack.mcmeta file matches the one shown above.
Testing your pack
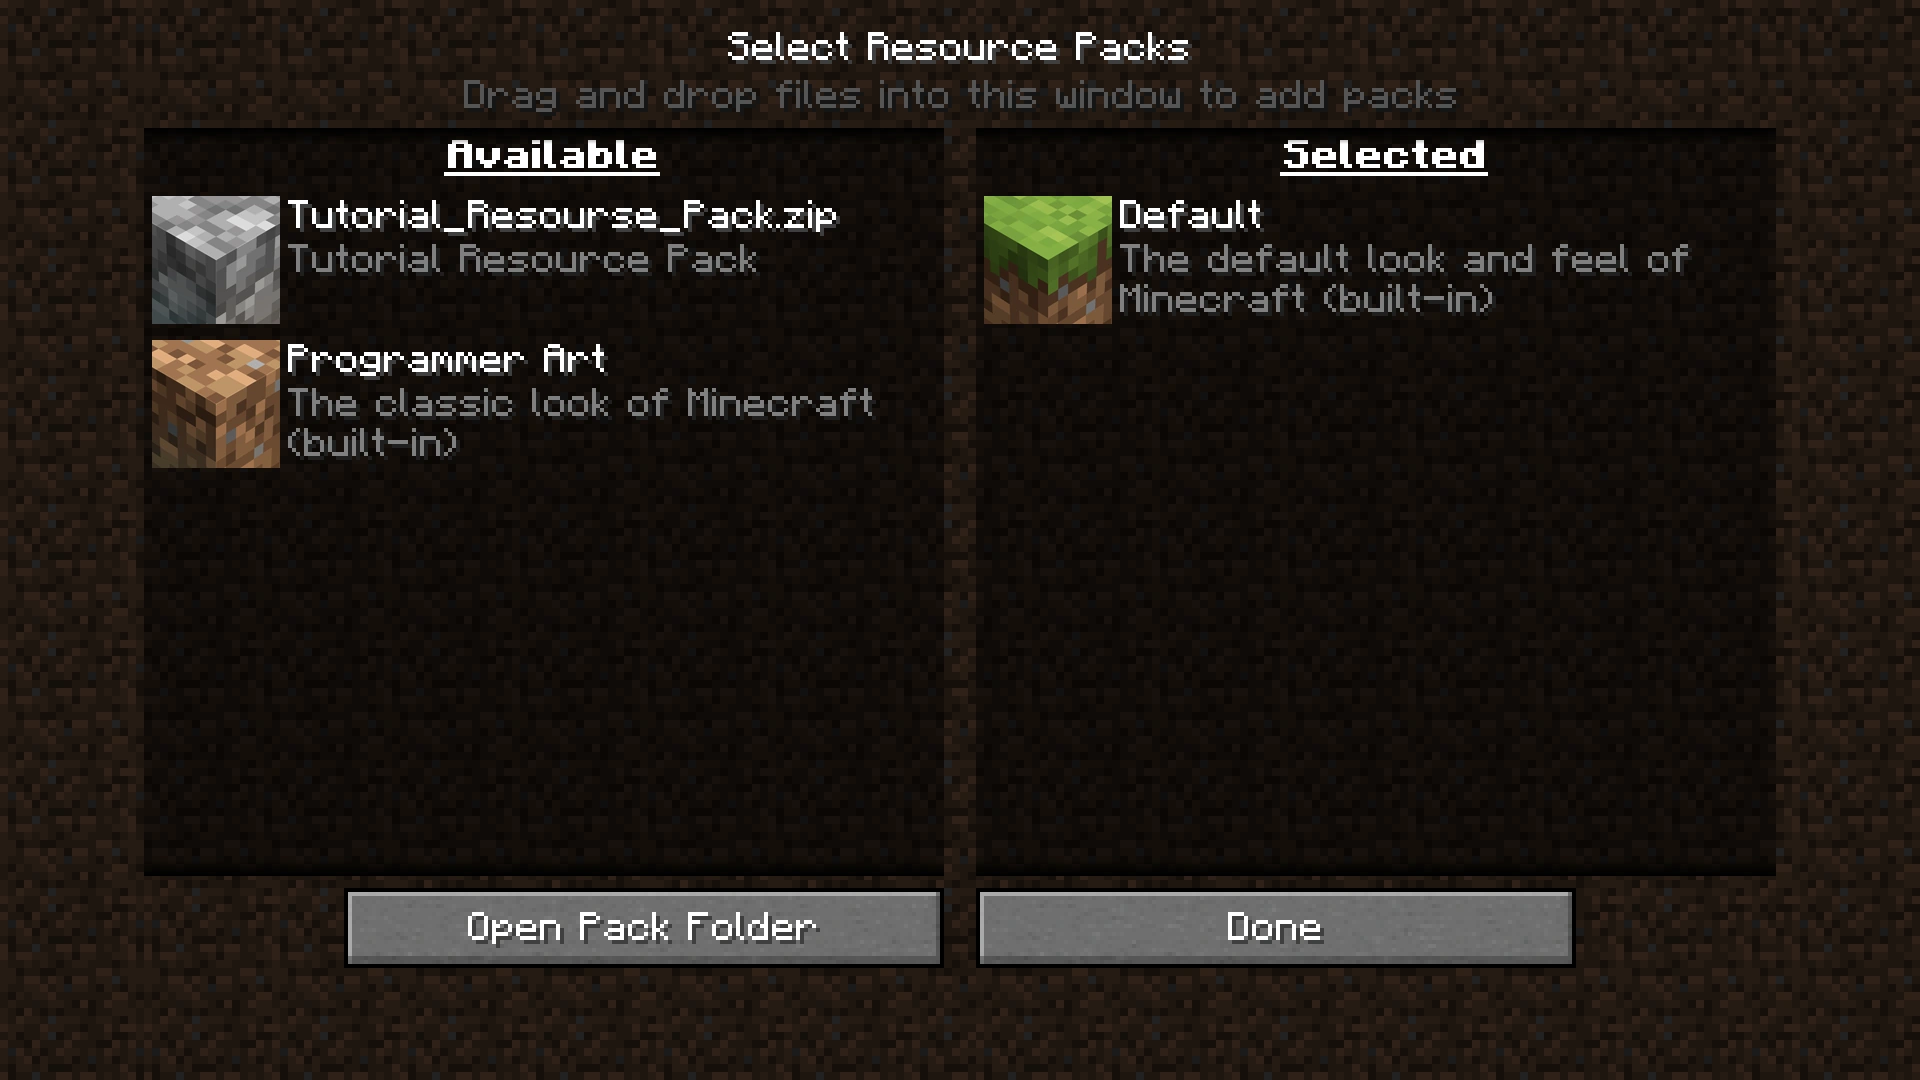
If your resource pack is formatted correctly, it should appear in the selection menu like this.
At this point, you can test if the pack is formatted correctly by putting it in the game! To do this you must place your resource pack folder in the Minecraft pack folder. You can access it by selecting "Options", then "Resource Packs", then "Open Pack Folder", or you can navigate to it from your file browser:
- For Windows, right click on the start button → run → type in %appdata% → .minecraft → resourcepacks
- For MacOS, go to Library → Application Support → minecraft → resourcepacks
- For Linux, go to ~/.minecraft/resourcepacks (/home/<username>/.minecraft/resourcepacks)
Once you have the folder open, you can drag your custom pack folder and drop it in.
If you have formatted the files correctly, you should see your resource pack appear in the menu.
Troubleshooting
If you don't see your pack in the list, make sure your pack.mcmeta file is correct and saved in the folder. Look for any missing braces {}, commas ,, colons :, quotation marks "", or square brackets []. Remember that for each open brace, quotation, or square bracket, you must have a closing brace, quotation, or square bracket.
Pack icon
If an icon is not specified, a cobblestone icon appears next to the pack. If you want to use your own pack icon, you can place it inside your resource pack folder with the name pack.png. The file must be a PNG, and works with any square resolution, but a 128×128 pixel image renders the best.
Adding content
Structuring the assets folder
Now that you have your resource pack set up, you can start adding content to it. You add most files into a subfolder called assets. Simply create a new folder inside your resource pack folder named assets. This, pack.mcmeta, and pack.png should be the only files located directly in your parent resource pack folder. Any other resource files must be located somewhere in assets or they won't be read by Minecraft.
Adding a namespace folder
Next, inside your assets folder are your namespace folders. These help separate the files in your resource pack so that there is no confusion between which files are located where. If you plan on modifying or replacing vanilla resources, those files would go into the minecraft namespace folder. Custom additions should go in your own namespace folder, which for this tutorial is named custom. In the future, you should use a significant or unique namespace so that there isn't a possibility of other resource packs confusing which files belong where when multiple packs are loaded.
Accessing the vanilla resources
If you plan on editing multiple resources, or to help ease of access, you may want to save a copy of the vanilla resources in an accessible location in case some things rely on other files within the directory. To do this, you need to navigate to the vanilla resources file by opening the versions folder inside the .minecraft directory. You should see a list of numbered folders, which correspond to versions that you've loaded or used in the past. Open the folder corresponding to the version you want for your resource pack (in this tutorial it would be 1.19) and extract the JAR file located inside, which can be done by right clicking the file and selecting a file archiver from the "Open With" option. You may want to save this in an accessible location for future reference, as certain tasks such as modifying block models require textures in addition to the model files. If you do not have a program that can open .jar files simply change the extension from .jar to .zip.
Modifying an entity's texture
This section goes through the process of modifying a texture, using the creeper texture as an example.
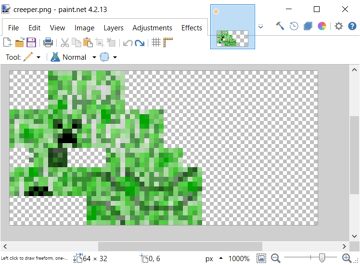
Finding the vanilla texture
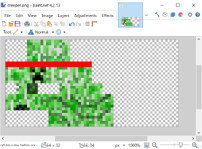
First, you need the vanilla resource to get the texture you want to edit. This is located in the extracted version folder that was created in the previous section. In the extracted folder, navigate to assets→minecraft→textures→entity→creeper where you can find creeper.png. Save a duplicate of this file somewhere accessible or keep the folder window open during the next few steps.
The creeper texture loaded in paint.net
Next you'll need to replicate the folder structure of the vanilla pack within your resource pack, which lets Minecraft know to use the texture. Since we are modifying a default texture, this is in the minecraft subfolder of our assets folder. Within the minecraft folder of your resource pack, do the following:
- Inside
minecraft, create a folder calledtextures. - Inside
textures, create a folder calledentity. - Inside
entity, create a folder calledcreeper. - Copy the creeper texture from the vanilla resource pack into your newly created
creeperfolder.
Now that you have the normal creeper texture placed in your resource pack, open it up in the image editor of your choice. It should look something like the image shown.
Since texture files are very small, you may need to zoom in.
- A quick note on textures
If you've never seen a texture before, the above image might surprise you. A lot of textures look this way and are "wrapped" around a model, like wrapping paper around a present.
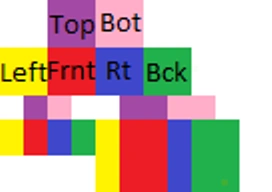
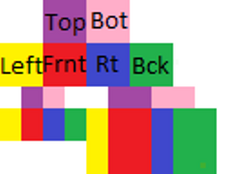
Color-coded Texture. Sections of the same color always face the same direction.
Now it's time to be creative! Edit the texture however you want. For simplicity, this example adds a headband. Note where the changes are and compare it to the color-coded texture above.
Creeper texture with a red headband.
Once you are happy with your texture, save the file as creeper.png. It is important that it is saved with the same name as the default asset or otherwise it cannot detect and load your texture.
Now you can load up Minecraft and spawn a creeper with your custom texture! If it doesn't show up, make sure that you've selected your resource pack. If it still doesn't work, make sure you've named the file properly and placed it in the correct folder.
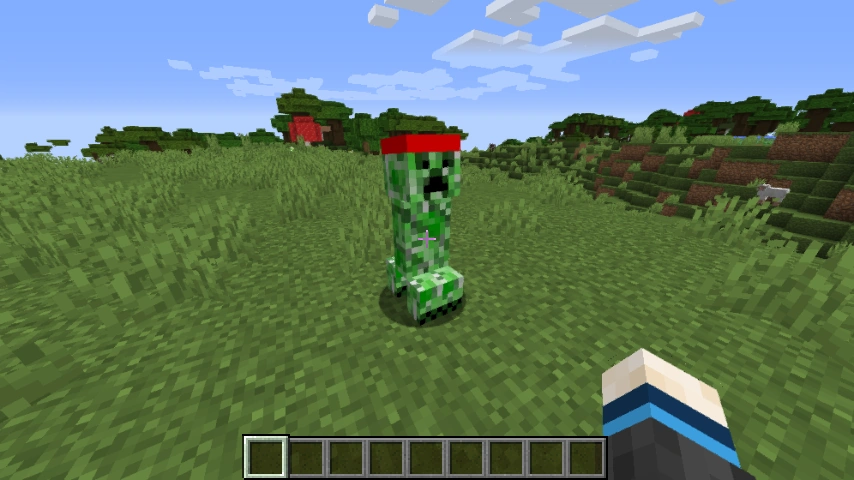
Here's the creeper with the new texture as it appears in-game.
Pack hierarchy
If you are playing with multiple resource packs loaded, there may be some textures that are in your pack that aren't being shown. This is because of the way resource packs are loaded in Minecraft. All selected resource pack files are loaded from the bottom up as they are shown in the selection menu, so if there is a resource pack that is loaded above yours, it may replace files that you've changed. This can cause various issues with using multiple themed resource packs that have differing textures, so make sure you have your resource pack at the top.
Modeling blocks and items
Sometimes you may want to change one of the Minecraft models. To do so you need a file archiver to get the default model and texture along with a 3D modeling tool to edit the model. Blockbench works well in this case since it can export directly to the .json format needed for models.
Replacing a block
Because the default ladder in Minecraft isn't 3D, you can replace it with your own model. First, get all the ladder's files into this resource pack:
- Open the Minecraft JAR file using a ZIP viewer of your choice.
- Navigate into the
assets/minecraft/blockstatesfolder, then extractladder.jsontoTutorial_Resource_Pack/assets/minecraft/blockstates - Navigate into the
assets/minecraft/models/blockfolder, then extractladder.jsontoTutorial_Resource_Pack/assets/minecraft/models/block - Navigate into the
assets/minecraft/models/itemfolder, then extractladder.jsontoTutorial_Resource_Pack/assets/minecraft/models/item - Lastly, navigate into the
assets/minecraft/textures/blockfolder, then extractladder.pngtoTutorial_Resource_Pack/assets/minecraft/textures/block.
Now you can either edit the ladder.png using your preferred image editor, or you can edit it in your preferred modeling editor.
Note: If you are doing a basic "Just Simple Nonanimated Textures" resource pack, the .json files are unnecessary. Otherwise, if you are doing special features to change what the texture looks like when certain parameters are true or false, then the .json files would be necessary. For example, if you created a resource pack that makes grass blocks smooth, the .json files would prevent you from having dirt lines everywhere in your world that already uses code.
Modeling the ladder - Blockbench
In modeling the ladder, we use Blockbench. Once you have opened the program, press Ctrl+O to open the model selection menu. After the open dialog has appeared, go to the location where you saved ladder.json and select .
You then should be facing a ladder that is on the south side of the box.
- On the menu bar, go to "Edit -> Add Cube" to create a new block.
- Resize the model to a full-sized cube. Then, under Textures on the left panel right click
ladder.png, then click Apply to Untextured Faces. - In the top left, there is an image of the ladder, with a 1×1 highlighted region. Move this to change the texture to what you want it to be. Repeat until all sides of the block are as wanted.
- Go to "File -> Save Model" and save in
resourcepacks/Tutorial_Resource_Pack/assets/minecraft/models/block/ladder.json(Replace "block" with "blocks" for 1.12 and below).
Now we have created a new model for the ladder block in Blockbench.
Texturing the ladder - paint.net
Go to getpaint.net and get paint.net or go to ninite.com, select paintNET and run it after it downloads to install paint.net for free.
- Open paint.net.
- Do Ctrl+O and go to .minecraft/textures/block/ladder.png and double click.
- Edit the Ladder however you want.
- When you're done, press the X button in the top right of the window. It opens a dialog if you changed anything and ask if you want to save your work. Press Save then okay twice. You don't need to change anything in the menus.
Finishing off
When you have completed the 3D model of the ladder and saved it, launch Minecraft, and test it out. Place a ladder on a wall, and you should see its replaced model.
Changing existing sounds or music
Just like modifying the default textures or models, you can substitute custom sounds in place of the default ones. This example shows how to change the boss music in the ender dragon fight.
Finding a sound's path
Similar to the custom texture and models, you'll first need to know the path of the sound you want to change.
- Inside your .minecraft folder, navigate to
assets/indexes, which contains a list of numbered.jsonfiles. - Find the
.jsonfile corresponding to your Minecraft version (e.g.1.16.json), and open it with a text editor or IDE. - In this file you can find all the sounds found in Minecraft. Press CTRL + F to search for your sound.
- For a list of filenames for music, you can check Music#List
- Your sound path should look something like this:
minecraft/sounds/music/game/end/boss.ogg
Modifying the sound
- Inside your resource pack folder, navigate to
assets/minecraft. - Create a new folder named
sounds. - Now inside your
soundsfolder, you need to create new folders depending on your sound's path. For example, if your path isminecraft/sounds/music/game/end/boss.ogg, you need to create the folderssounds/music/game/end. - In the last folder (in this example, it's
end) you can put in your new sound file. Make sure you named the file to the file that you're replacing, or in this example,boss.ogg.- Note that this file must be a
.oggfile. To convert your sound file to a.oggfile, you can use the free website Online-Convert.com
- Note that this file must be a
Testing your sound
If everything went according to plan, you have now replaced a sound in Minecraft. To test it:
- Make sure you have enabled your resource pack.
- If you already had Minecraft open with your resource pack enabled, you can press F3 + T to reload all resource packs.
- Use the
/playsoundcommand to play your sound. In our example, type:/playsound minecraft:music.dragon master @s
Adding new sounds or music
In addition to modifying default sounds, you can add your own! In this example, a new player hurt sound can be added without replacing any of the current player hurt sounds.
Finding the sound path
In order to add a sound, you'll need to know where it should actually go by determining its path. Unlike replacing sounds, you should go straight to your resource pack folder and search in there.
- Find and open your version's
.jsonindex file (e.g1.19.json) from.minecraft/assets/indexes. - Press CTRL + F to search for your sound path.
- In this case, the location for the player hurt sounds looks like this:
minecraft/sounds/damage/.
- In this case, the location for the player hurt sounds looks like this:
Adding the folders and sound in your resource pack
- Going to your resource pack folder, navigate to
Tutorial_Resource_Pack/assets/minecraft. - Inside the
minecraftfolder, create a folder namedsounds.- If you already have a
soundsfolder from replacing a default sound, open that folder.
- If you already have a
- Within the
soundsfolder, create a folder that matches the directory of the sound you want to add. In this case, we are going to create a file calleddamage. - Add your sound here.
- The sound must be a
.oggfile. Like in the previous section, you may use the free website Online-Convert.com or use Audacity as mentioned at the top of the page. - Also note the already existing files seen in your
.jsonfile from above. In this case, five other hurt sounds exist within theminecraft/sounds/damage/folder, two for falling at different heights (fallbig.oggandfallsmall.ogg) and the other three are when the player actually gets hurt (hit1.ogg,hit2.ogg, andhit3.ogg) Since we want to add a fourth sound to the existing three hurt sounds, we cannot reuse those file names. For simplicity, name your soundhit4.ogg.
- The sound must be a
Changing the sound event
Because we are adding a sound, we must change the associated sound event in sounds.json.
- Go back to
assets/minecraftin your resource pack folder. - Create a text file named
sounds.json. Do make sure that the file extension is indeed .json and nothing else. - At your choice, paste the following template into
sounds.json:
{
  "entity.player.hurt": {
    "sounds": [
      {
        "name": "damage/hit1"
      },
      {
        "name": "damage/hit2"
      },
      {
        "name": "damage/hit3"
      },
      {
        "name": "damage/hit4"
      }
    ],
    "subtitle": "Hurt"
  }
}
- The above code only applies to this example, which adds a new damage sound. If you are changing a different sound event, replace
entity.player.hurtwith the sound event listed in the vanillasounds.jsonfile. - You can find out the id used by Minecraft for each sound folder. By using
/playsoundin-game, you can determine this id. In this case, using/playsound minecraft:entity.player.hurt master @sconfirms that the player's hurt sound is indeed classified asentity.player.hurt. - Make sure the name fields are in lowercase characters only. The names of your files should be in lowercase as well. Otherwise, the resource pack may fail to use your new sounds.
- The
subtitlefield dictates the text to display when the sound is played. It can either be a string of text, or can use a field defined in alangfile.[needs testing] - In addition to these fields displayed, you may add more additional fields to the
sounds.jsonfile to specify more parameters such asvolumeandpitch. A detailed list of additionalsounds.jsonfields can be found here. - Correct
.jsonformatting is required! Any missing bracket, comma, etc. causes the resource pack to fail.
Testing your sound
If there is an error anywhere in your sounds.json file, none of the sounds described in it appear in-game. If this happens, you should check the spelling and file paths.
If everything went according to plan, you have now added a sound to Minecraft. To test it:
- Make sure you have enabled your resource pack.
- If you already had Minecraft open with your resource pack enabled, you can press F3 + T to reload all resource packs.
- Use the
/playsoundcommand once again to play your sound. In our example, type:/playsound minecraft:entity.player.hurt master @s. For this example, it likely requires multiple tries, as hurt sounds are chosen randomly.
Adding languages
You can add new languages to Minecraft using a resource pack. Assume your language code is 'LANG'[1] and country/region code is 'COUNTRY',[2] pack.mcmeta looks like:
- pack.mcmeta
{
  "pack": {
    "pack_format": 15,
    "description": "Tutorial Resource Pack"
  },
  "language": {
    "LANG_COUNTRY": {
      "name": "Tutorial Language",
      "region": "COUNTRY/REGION NAME",
      "bidirectional": false
    }
  }
}
If you want your language to be right-to-left, set "bidirectional" to true.
Then, put LANG_COUNTRY.json in assets/minecraft/lang inside your resource pack. When you launch the game, choose your resource pack, open the Language selection screen, and your new language should be there.
- Notes
The pack.mcmeta goes in the root folder of your resource pack, not in the assets/minecraft/lang folder. Also note that the above pack.mcmeta is the same file as the pack.mcmeta file that you have created a while ago. As of 1.7-pre, you can choose multiple resource packs at once. If you want to use your new language and resource pack for before 1.7, you need to combine them manually because multiple resource packs could not be selected before the version.
Animation properties
An example of an animation file is this:
- stone.png.mcmeta
{
  "animation": {
    "interpolate": true,
    "width": 1,
    "height": 7,
    "frametime": 1,
    "frames": [
      {
        "index": 0,
        "time": 0
      },
      1, 2, 3, 4, 5, 6, 4, 2
    ]
  }
}
- Note
All you really need to make a texture animated is the following code. By default, it makes each frame last only one tick:
- stone.png.mcmeta
{
  "animation": {}
}
Save the file as the same name as the texture you want to be animated with an .mcmeta in the same folder as your texture.
Texture properties
An example of a texture property is this:
- shadow.png.mcmeta
{
  "texture": {
    "blur": false,
    "clamp": true
  }
}
Fonts
Character sizes in fonts are determined by the last line of pixels that contains pixels that contain a non-zero alpha. This allows additional padding to be added around characters by adding a color with an alpha level of 1, which Minecraft considers as part of the character.
Testing your resource pack
- Launch the game
- Click on Options
- Click on Resource Packs
- Find "Tutorial_Resource_Pack" in the list on the left and click the arrow next to it
- Click Done
If you decide you want to make some changes to your resource pack, edit your resource pack, go to resource packs in options, remove your pack from the active list and exit, go back, and reapply it. Alternatively, saving the texture to the resource pack and pressing F3 + T reloads the pack without the need to reload the default textures first.
Packaging resource packs with worlds
For use in singleplayer worlds, you can package your resource pack as a ZIP file named resources.zip inside the world directory. This is then automatically used when playing the singleplayer world.
Server resource packs
If you are the owner of a server, you may set it as the resource pack of your server.
- Make sure your pack format is a .zip-folder.
- Upload the pack on a file hosting website, e.g. MCPacks.
- Copy the download link of your pack. IMPORTANT: If you are using your own server or some other host then you have to make sure that you are using a direct download link. You also need to make sure to use a SSL certificate that is compatible with the shipped Java version 8 u51. (MC-143768)
- Open the server.properties with a text editor.
- Search for the line
resource-pack=. - Paste the download link after the equal sign.
- Optional: Set the
require-resource-packproperty totrueto force people to use the resource pack. - Save your changes to the server-properties and restart your server.
- Enjoy!
Servers can have an icon that appears in the Multiplayer list.
- Create a PNG image with a size of 64 by 64 pixels, transparency is supported.
- Save (or rename) it to
server-icon.png. - Move it to the server's directory.
- Restart the server.
- Server icons should display next to the server name.