m (tightening whitespace) |
HypePCGamer (talk | contribs) (→Biomes) Tag: Visual edit |
||
| Line 288: | Line 288: | ||
* You are standing on sand, with no trees or water nearby. You are in a [[desert]]. Again, go to high ground and look around for trees and green grass. If you see some, go there before continuing with this guide. If there's no green in sight, this is another situation where you can reasonably toss the world and try again. Deserts are much easier when encountered from outside, but they are missing important things like dirt, wood, and accessible stone, all of which which you really do need to start off the game. |
* You are standing on sand, with no trees or water nearby. You are in a [[desert]]. Again, go to high ground and look around for trees and green grass. If you see some, go there before continuing with this guide. If there's no green in sight, this is another situation where you can reasonably toss the world and try again. Deserts are much easier when encountered from outside, but they are missing important things like dirt, wood, and accessible stone, all of which which you really do need to start off the game. |
||
* You are in a [[dark forest]], with thick trees, a thick leaf canopy, and [[giant mushroom]]s scattered around. This is a particularly unsafe place for a starting character and a beginning player, because the canopy can create areas dark enough for hostile mobs to spawn in daytime. However, if you move quickly, you can probably make it to more open ground in a reasonable amount of time, and start setting up in a more reasonable biome. Don't leave the dark forest behind completely, though — once you have basic armor and weapons, it's a very resource-rich area. Grab some of that plentiful wood once you reach the edge! The giant mushrooms also offer a plentiful source of food, so don't forget to grab some of those! There is a rare chance that a [[Woodland Mansion]] will spawn in this biome. They are dangerous, but provide you a lot of good resources, so make a note where it is! |
* You are in a [[dark forest]], with thick trees, a thick leaf canopy, and [[giant mushroom]]s scattered around. This is a particularly unsafe place for a starting character and a beginning player, because the canopy can create areas dark enough for hostile mobs to spawn in daytime. However, if you move quickly, you can probably make it to more open ground in a reasonable amount of time, and start setting up in a more reasonable biome. Don't leave the dark forest behind completely, though — once you have basic armor and weapons, it's a very resource-rich area. Grab some of that plentiful wood once you reach the edge! The giant mushrooms also offer a plentiful source of food, so don't forget to grab some of those! There is a rare chance that a [[Woodland Mansion]] will spawn in this biome. They are dangerous, but provide you a lot of good resources, so make a note where it is! |
||
| − | * The land around you is greyish-purple, with dusty particles, giant mushrooms, and red "cows": Rejoice, for you have received a miracle: a spawn in a [[mushroom fields]] biome, where hostile creatures cannot appear (except for underground dungeons). You do need to go elsewhere to find wood, crop seeds, and some other resources, but otherwise, you've gotten into a golden situation here. Once you have even a bit of wood, you can get unlimited food from the [[ |
+ | * The land around you is greyish-purple, with dusty particles, giant mushrooms, and red "cows": Rejoice, for you have received a miracle: a spawn in a [[mushroom fields]] biome, where hostile creatures cannot appear (except for underground dungeons). You do need to go elsewhere to find wood, crop seeds, and some other resources, but otherwise, you've gotten into a golden situation here. Once you have even a bit of wood, you can get unlimited food from the red cows ([[Mooshroom]]<nowiki/>s), and you have a large area in which you barely need to worry about your safety even at night, a great place to set up your long-term base. |
==== Villages ==== |
==== Villages ==== |
||
Revision as of 15:13, 17 June 2021
This starter guide provides advice for players who do not know how to begin their Minecraft journey. It mainly teaches you what to do on your first day, so you can safely survive the first night.
Before reading this page, it's expected for players to have already bought and downloaded the game. You must create a new world before starting the tutorial.
Your character can die in this game, but if you aren't in Hardcore Mode, that doesn't end the game. Indeed, it's mostly an inconvenience. If you take enough damage to die, your things drop where you died, and your character respawns elsewhere. Initially this will be near where you started (the "world spawn"), but using a bed lets you pick the spot.
Controls and interface
Minecraft is a sandbox game, in which your avatar wanders around in a world, collecting resources and using items. To get an advantage, you need to master the control system. If you are having trouble with it, you may want to start with a Peaceful Mode world to practice. Your world is made of blocks, mostly cubical. These blocks represent objects in the game, but their size also makes a standard measure of distance. This and many other pages talk in terms of, e.g., "five blocks away" (officially, each block is a one-meter cube). Your character can stand within a single block's space, and it stands a little less than two blocks tall. Time passes within this world; a game day passes in 20 real-world minutes. Nighttime is much more dangerous than daytime; the game starts at dawn, and you have 10 minutes of game time before nightfall. The primary purpose of this guide is to let you "find your feet" and get basic equipment and shelter before night.
This article mostly assumes you are playing on Java Edition or desktop versions of Bedrock Edition, where you will be using keyboard and mouse to interact with the game. The Controls page gives you a complete overview of all the controls.
This and other articles will generally refer to controls by their default keys. Most of the controls can be changed in the game's options menu, by clicking on the one you want to change, and then pressing the key you want to use for that control. If you are already using that key for something else, then it will turn red.
In Java Edition, when you start the game for the first time, a short in-game tutorial appears to explain the basics of how to move and look around.
When moving around the world and dealing with blocks and creatures in the world, there are four basic operations, each discussed below:
- Movement in four directions, as well as looking upward and downward, jumping, and sneaking. Variations include sprinting and swimming.
- As you move around, you occasionally see or produce items floating "loose" in the world. Interacting with those is simple: when you move close enough to them, they fly toward you and you automatically take them into your inventory (unless your inventory is full, see below). At the start of a game, just pick up every loose item you encounter. You may eventually find uses for them, and it takes a little while to fill up your inventory. You can also drop ("throw") items back into the world.
- "Mining" or breaking blocks, which is the usual way to collect resources from the landscape. Usually a broken block drops one or more loose items. Attacking mobile creatures ("mobs") uses the same controls as breaking blocks, and they also drop loose items when killed. In general, attacking requires brief taps of the relevant control, while breaking blocks requires holding down the same control. Some blocks, such as tall grass, break instantly.
- "Using" items or blocks. This is more complex, since it can apply to blocks in the world or to tools in your hand. The same controls are used for some interactions with creatures (such as shearing sheep or trading with villagers), but this is a matter for later days in the game.
- Your character can also work with items in a GUI, especially managing your own inventory, crafting new items, and working with storage items such as chests. This uses the mouse and sometimes the keyboard differently, while you are focused on your inventory and/or a crafting task rather than the world around you.
| Action | Control |
|---|---|
| Move Forward | W |
| Sprint/Swim (if in water) | Double tap W or hold W and Control |
| Move Backward | S |
| Move Left | A |
| Move Right | D |
| Jump | Spacebar |
| Sneak/Crouch | Left Shift |
| Move Camera | Mouse (Move your mouse up, you will look up) |
| Attack or Hit | Left Click |
| Break (Mine) Block | Hold down left mouse button |
| Use/Interact/Place Block | Right Click |
| Open/Close inventory | E |
| Throw/Drop Item | Q |
| Pause/Menu | Esc |
Controllers, touchscreens, etc.
Again, most of this article will assume you are using keyboard and mouse, but here is a brief summary for other control methods such as game controllers or touchscreens:
Mining, attacking, and "using" items all require targeting a spot on the screen. Many versions of the game have a cursor in the center of the screen used for targeting, but touchscreens allow the player to tap on the screen to act as the targeting spot. Only blocks near you can be targeted, and you can tell a block is targeted by it having a box around it (or, in the case of touchscreens, being brighter). This selected area or block affects the way you use these actions. For example, using is based on what you are looking at and what is in your hand. Less obviously, the player's actions of attacking and mining also use this cursor or selector method. The buttons for both attacking and mining are always the same, but attacking is only a tap of the control while mining requires holding down the control. These actions may use up blocks and change tools that you are holding and also change depending on your held item. Any time this tutorial uses verbs describing in-game actions, you may want to test out that action using the controls page as a reference.
Movement
Moving the mouse (or trackball, for simplicity we refer to the mouse) forward and back causes your character to look upward and downward. Moving the mouse left and right causes your character to not just look, but turn in that direction, changing which direction is "forward". The keys AWSD moves your character left, forward, backward and right, respectively; note that none of these make your character turn around or even look in the direction you're moving. Be careful about moving to the sides or backward without knowing what's there, as you can fall off cliffs or otherwise run into danger! Looking around also lets you pick out individual blocks or creatures to interact with, see below. If you walk off the edge of a block to where there is no solid block, you fall. If you fall more than three blocks (and not into water) you take damage depending on the distance fallen. If you fall into water over your head, you can eventually drown unless you swim back to the surface, and if you fall into lava, you quickly burn to death!
Double-tapping and holding the "forward" key (again, W by default), or pressing Ctrl, while moving forward, causes you to sprint, running faster (but this consumes food more quickly). If you fall into water, the same keys let you swim around.
The Spacebar lets you jump; you can jump one-and-a-quarter blocks high, and can also jump across a two block gap in the ground (four blocks if sprinting). By default, walking into a one-block-higher edge automatically makes you jump up to the new level, but there are still many situations where you need to jump upward. If you turn off Auto-Jump you need to explicitly jump up to higher terrain. If you fall into water (or lava!), this same key is how you move upward toward the surface, and jump out onto the shore.
The ⇧ Left Shift key makes you "sneak". While sneaking, your viewpoint gets a little lower, and you move more slowly. The benefit of sneaking is that you cannot fall off the edge of a block; in fact, you can sneak slightly over the edge of a block, to look at and interact with the side of the block you're standing on.
It is also possible for your character to crawl, but this is more complex; see the article "Crawling" for full details.
Breaking blocks and using items
To interact with blocks, you need to move relatively close (within four or five blocks distance), and "focus" on the block by moving your cursor (the crosshairs) over the block you want to interact with.
Pressing the left button ![]() hits whatever you are focused on. This is also how you attack animals or monsters later. Holding down the button on a block continues hitting it, eventually breaking it. This is generally how you collect materials from the world. Some blocks require particular tools to collect them, but the first two sorts of blocks you collect are likely wood and dirt (grass blocks count as dirt), and both of those can be gathered with your bare hands. However, even these can be collected more efficiently with proper tools (such as an axe for wood and a shovel for dirt), and soon you can make some for yourself. Generally when you start a world, the first thing you'll want to do is to find some trees and break a few blocks of wood out of their trunks ("punching wood"). Once broken, the blocks drop as loose items, which you can move toward to collect. Holding something that isn't a tool (say, the block of wood or dirt you just picked up) still counts as "bare hands". Other things seen around you, such as tall grass or flowers, still count as blocks despite not being square, but they don't necessarily "drop themselves" when hit. For example, tall grass usually drops nothing, but sometimes drops seeds, which you can later plant to grow wheat for making bread to eat.
hits whatever you are focused on. This is also how you attack animals or monsters later. Holding down the button on a block continues hitting it, eventually breaking it. This is generally how you collect materials from the world. Some blocks require particular tools to collect them, but the first two sorts of blocks you collect are likely wood and dirt (grass blocks count as dirt), and both of those can be gathered with your bare hands. However, even these can be collected more efficiently with proper tools (such as an axe for wood and a shovel for dirt), and soon you can make some for yourself. Generally when you start a world, the first thing you'll want to do is to find some trees and break a few blocks of wood out of their trunks ("punching wood"). Once broken, the blocks drop as loose items, which you can move toward to collect. Holding something that isn't a tool (say, the block of wood or dirt you just picked up) still counts as "bare hands". Other things seen around you, such as tall grass or flowers, still count as blocks despite not being square, but they don't necessarily "drop themselves" when hit. For example, tall grass usually drops nothing, but sometimes drops seeds, which you can later plant to grow wheat for making bread to eat.
The right button ![]() is more complex: This is the "Use" command, with effects that depend not only on what you're pointing at, but on what you're holding. There are special blocks (such as the "crafting table" discussed below) which open a GUI when used, but if you are not pointing at one of these, you just use whatever you currently hold. There are various tools that are used for their respective purposes, but at first you're probably holding a block of wood or dirt, and the "use" of a block is to place it down into the world. Simple blocks like these can be placed on any surface of a block that's already in the world, but more complicated blocks such as flowers can be put only in particular places (e.g. the top of a grass or dirt block). If you are pointing at a block that does have its own use, but you want to place a block on it (instead of, say, opening the GUI for a crafting table), you can "sneak" while placing the block.
is more complex: This is the "Use" command, with effects that depend not only on what you're pointing at, but on what you're holding. There are special blocks (such as the "crafting table" discussed below) which open a GUI when used, but if you are not pointing at one of these, you just use whatever you currently hold. There are various tools that are used for their respective purposes, but at first you're probably holding a block of wood or dirt, and the "use" of a block is to place it down into the world. Simple blocks like these can be placed on any surface of a block that's already in the world, but more complicated blocks such as flowers can be put only in particular places (e.g. the top of a grass or dirt block). If you are pointing at a block that does have its own use, but you want to place a block on it (instead of, say, opening the GUI for a crafting table), you can "sneak" while placing the block.
When you eventually encounter a villager, you can also right-click on the villager to buy and sell items.
Combat
Surviving in Minecraft often requires a knowledge of the game's combat mechanics. There are two combat systems that exist in Minecraft – the system in the Java Edition and the system in all other versions. In Java Edition, without a tool in the player's hand, any attack deals 1 health point (![]() ) of damage. In Bedrock Edition, a bare-handed attack deals 2 health points (
) of damage. In Bedrock Edition, a bare-handed attack deals 2 health points (![]() ) of damage. Tools in general do a great deal more damage, and do more damage the higher their tier. In general, swords do make the best weapons, followed closely by axes. Pickaxes do less damage, and shovels do the least. Hitting a creature with a sword uses up 1 point of its durability, while using any other tool uses up 2 points of the tool's durability. When a creature is hit, it turns red for a half second, marking its "invulnerability period". A second attack in this time does no damage.
) of damage. Tools in general do a great deal more damage, and do more damage the higher their tier. In general, swords do make the best weapons, followed closely by axes. Pickaxes do less damage, and shovels do the least. Hitting a creature with a sword uses up 1 point of its durability, while using any other tool uses up 2 points of the tool's durability. When a creature is hit, it turns red for a half second, marking its "invulnerability period". A second attack in this time does no damage.
The combat mechanics for non-Java platforms are simple: While three blocks away or closer to an animal, monster, or other players, the player can attack that entity by clicking the attack button while their cursor is over the entity. Clicking speed does not affect the combat, instead, a player's skill in combat is based more on their hit accuracy. The basic tools from above each deal multiple hearts of damage when the player attacks an entity while holding that tool.
In the Java Edition, a slightly different combat system is used. To attack any animal, monster, or other players, the player still must have the cursor hovering over the entity and be within three blocks of the entity when they press the attack button. However, after attacking, the weapon enters a brief "cooldown" period, indicated by the position of the weapon in the player's hand, and also by an icon in the hotbar. This happens even if you missed, or if the target was still invulnerable for a previous attack! Different basic tools have different cooldowns between hits. If the player attacks while still in a cooldown period, the attack deals much less damage, making it more important to aim your attacks. In Java Edition, axes do far more damage per hit than swords, but their cooldown period is much longer, giving them lower overall damage than swords over time. They also still wear out twice as fast as a sword.
In addition to attacking, the player can also block attacks with the shield. (Crafting a shield requires first obtaining an iron ingot, so you probably won't have one for your first day.) A shield completely negates any damage when it is raised with the ![]() right mouse button. In Java Edition, a shield can be temporarily disabled if attacked with an axe.
right mouse button. In Java Edition, a shield can be temporarily disabled if attacked with an axe.
Items and inventory

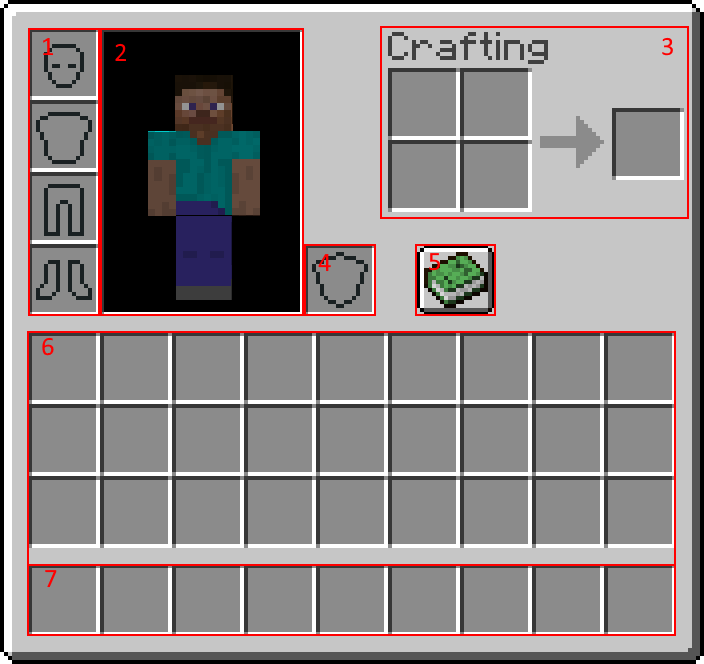
1. Player's armor. 2. Character. 3. Personal crafting area. 4. Offhand slot. 5. Recipe book. 6. Inventory. 7. Hotbar (part of inventory)
Picking a loose item up is as simple as walking over or near the item. To drop the item in your hand (see below), use the "throw" key, which defaults to Q. This will toss the item two or three blocks in the direction you are looking. In multiplayer, you can use this to give an item to another player -- just throw the item toward them and they will naturally pick it up. You can also drop items or stacks of items using the Inventory GUI, discussed below.
Pro tip: On standard keyboards, the Q key is right next to the movement keys. This makes it very easy to accidentally throw away the item you're currently using, which may be a valuable tool. Many players prefer to change the "throw/drop" function to another key, such as O or K. All of these controls and more can be viewed by pressing Esc -> Options -> Controls.
From the start of the game, you can see nine special inventory slots, called your "hotbar", but you also have more slots which are normally hidden. As you pick up items, the first few appear in your hotbar slots, but once those are full, they go into the 27 slots of your main inventory. At any given time, one of your hotbar slots is "selected", and the item in that slot is considered to be "in hand". (You can see your item in hand in front of you.) You can press keys 1 through 9 (or use a mouse-wheel if you have one) to choose which hotbar slot is active, thus you can quickly switch among up to 9 handy tools or other items.
Multiple items of the same type usually "stack", showing a number indicating how many of them there are. Most items stack up to 64; other items stack only to 16 (of these, you will likely see chicken eggs first). Weapons, tools and armor are more individual, and do not stack at all. When you use, place, or throw items from a stack, you generally use one item at a time, counting down the stack.
To get at the rest of your slots (and the beginnings of crafting), press E to open your personal inventory. (This will also announce your first advancement or achievement; you can safely ignore all such announcements.) This is your first GUI ("Graphical User Interface") and shares many features with the other GUIs that you'll encounter later:
- Your cursor no longer controls your view. Instead, you use it to pick up and drag items among various slots. Left-click picks up or drops an entire stack; right-click picks up half of a stack or drop one item at a time. There are more complex options, see the "Inventory" article linked above for details.
- Note that opening a GUI does not pause the game, but while you are attending to the inventory you can only see a little of the world around you. Be careful about fooling with your inventory while monsters are around! On the Java Edition, opening any GUI also allows you to switch away from Minecraft and to another desktop window, without pausing the game.
Looking to the right, you can see an image of your inventory screen. There is a little image of your character, showing their current appearance. Left of that image are four slots for any armor you are wearing -- these can each contain only an appropriate armor piece, for helmet, chest, legs, or feet. (This guide does not discuss armor.) Just to the right is a slot marked with a shield, which is your "offhand slot". This one can actually contain almost any item, but most common is indeed a shield (which you also probably won't get on your first day). If you are wearing a shield, you can use it with the same "use" key as for other items -- in general, you can "use" any item in your offhand, as long as neither the item in your main hand nor the block you are looking at has a "use" feature.
Below these are the 27 slots of your main inventory. You can drag items around from these slots to your hotbar and back, armor pieces can be moved to and from their armor slots, and items can be dragged to the personal crafting grid, about which more below. Dragging items completely out of the GUI's rectangle and releasing them there drops the items into the world, much like the Q key (or whatever you rebound that to), but it is easier to drop a whole stack this way.
The hotbar and main inventory add up to 36 slots for general storage, which is the limit for how much a player can carry around and transport on their person. There is no sense of "weight" or encumbrance for items; a player moves at normal speed regardless of how full their inventory is, or what particular items they are carrying. (It is a running joke that a player can bounce around while carrying what "should be" hundreds of tons of stone and/or metal.) If your inventory becomes completely full, you cannot pick up new items, although you may still be able to pick up more of any stackable items that you already have.
Crafting
Also on your inventory screen is a 2×2 arrangement of squares. This is your inventory crafting grid. Here you can take some of the items you've collected and turn them into new items. Below the crafting grid is the Recipe Book icon, which provides assistance with remembering and using crafting recipes (see its page for full details). You do not actually need to use the Recipe Book, but for a beginning player, it can be very helpful in finding out what your options are, and even for advanced players, it adds a bit of convenience. In general, you learn new recipes automatically when you pick up (or craft) a key item for the recipes in question. Actually crafting an item certainly gets you its recipe, if you somehow didn't learn it by picking up the ingredients.
When starting a game, your first craft typically involves two steps: First, take a single log of wood and put it in the crafting grid. The output slot then shows a stack of four matching wooden planks, which you can then take. Then take those planks and put one in each of the crafting grid's four slots. The output slot then shows a crafting table, which you should take, put on your hotbar, and place down in the world to begin more advanced crafting. Having placed the table, you can right-click on it ("use", as above) to open a UI similar to your inventory, but with a 3×3 crafting grid. This lets you do many more recipes; you can also use it for any recipe you could craft in your inventory, but the larger crafting grid allows many more possibilities. Notice that the crafting table also has a Recipe Book icon, as do several other crafting blocks you encounter later in the game. Any of these recipe books show only the recipes that apply to its block. So your inventory's recipe book shows only 2×2 recipes, but the crafting table's recipe book shows all of its crafting recipes. Similarly, the furnace's recipe book shows smelting recipes, and so on.
Having set up a crafting table, your next step should be to make some sticks; you can actually do that in the 2×2 crafting grid in your inventory, the recipe is two planks arranged one over the other. (Remember: as long as a recipe can fit in a 2×2 space, you can craft it in your own inventory.) Having a stick unlocks the recipes for your first tools, discussed below. (Note: A stick is not a club! Using it to hit something is no better than using your bare hands.) When you are done with your crafting table for the moment, you can break it like any other wooden block: Your bare hands can do, but it is much quicker to break it with an axe, which you might have just crafted.
Tools and swords
The basic tools the player can acquire come in multiple tiers based on your materials, and they include the pickaxe, the axe, and the shovel, for mining, respectively, stone-type, wood-type, and dirt & sand-type blocks. The fourth tool is the hoe, which is a little different — it is mostly used later, as part of farming, but can also be used to more quickly break some lightweight blocks such as leaves. swords are similar to tools, and come in the same tiers, but these are used for attacking animals or monsters rather than breaking blocks. The six tiers are Wood, Stone, Gold, Iron,Diamond, and Netherite, but for the first day you are limited to wood, stone, and possibly iron. Higher tier tools break blocks faster and last longer, and swords do more damage. For pickaxes in particular, many blocks require a minimum tier for you to collect them: Wooden pickaxes can collect stone and coal ore, but iron ore requires at least a stone pickaxe, and more advanced ores (again, unlikely on your first day) require at least an iron pickaxe. Gold is a special case; it probably won't be relevant for your first day, but don't make gold tools, swords, or armor -- they are weak and fragile. If you happen to find golden items in chests, you can use them as long as they last.
Once you have sticks, the Recipe Book for the crafting table includes recipes for the wooden tools. The wooden pickaxe lets you harvest cobblestone, and once you have that, you get the recipes for stone tools. Later, iron or gold ingots, and diamonds, likewise appear in the recipes for those tiers. That said, all the recipes for each tool follow similar patterns, making a little picture of the tool in the crafting grid, and different tiers vary only in the material used. For wooden tools, any combination of planks can be used. If you can't immediately find stone, you might want to make other tools out of wood; once you upgrade to stone or iron, you can always use the wooden tools for furnace fuel.
Be thrifty with your first few iron ingots. The "Second Day" tutorial has more information, but briefly, the most important things to make first are a shield, an iron pickaxe, and a bucket. After that you can move on to an iron sword, other tools, and eventually iron armor.
Here are the recipes for the first three tiers of pickaxe, followed by the stone and iron versions of the other tools and swords:
| Ingredients | Crafting recipe | Description |
|---|---|---|
| Sticks + Planks or Cobblestone or Iron Ingots |
Mines stone blocks faster. |
Mine stone/iron and craft:
| Name | Ingredients | Crafting recipe | Description |
|---|---|---|---|
| Axe | Sticks + Cobblestone or Iron Ingots |
Mines wooden blocks faster. Can be used as melee weapon that deals more damage than sword, but is slower and loses 2 durability when hitting a mob instead of 1. | |
| Hoe | Sticks + Cobblestone or Iron Ingots |
Use to change dirt to farmland, and can break leaves and hay bales faster. | |
| Shovel | Sticks + Cobblestone or Iron Ingots |
Mines soil type blocks faster, including sand and gravel. "Use" (right button) to change grass into a path. | |
| Sword | Sticks + Cobblestone or Iron Ingots |
Fast weapon with decent damage. |
Overview
First day
For the first day, you have just a few basic objectives:
- Look around to see what your environment is, and if necessary go someplace else. (See "Biomes" below for more details on this.)
- Acquire resources and tools: Get wood, make wood tools (at least a pickaxe), use that to get cobblestone, make stone tools.
- Get coal (or make charcoal) to make torches, and find or make a shelter for the night.
- Optional goals include:
As the first day begins, you need to collect logs. First, you should look around for trees, and go toward any you find, and break their trunks by "punching wood" as discussed above. You need to collect at least 5-8 logs for your first round of tools and items you need immediately. You'll certainly want more a little later, but a few tools now make collecting more wood go much more quickly. As discussed above, the first thing to make is a crafting table, followed by a few sticks. The first tool you should craft is a wooden pickaxe (3 planks in the top 3 slots, and 2 sticks down from the middle plank). Crafting other wooden tools is not recommended, as you can quickly get cobblestone and make stone tools.
If any stone blocks are exposed close by, you can mine them with your new pickaxe to collect about 20 blocks of cobblestone. This is the amount you need to create every basic tool needed for this tutorial: a stone sword, pickaxe,axe, shovel and a furnace. If you are efficiency minded, just mine 3 blocks of stone with your wooden pickaxe, immediately make a stone pickaxe and mine the rest of the stone with it, as it is about twice as fast. While you're doing this, keep an eye out for coal ore, and mine any you find. Depending on the position of the stone blocks, mining them might well make you a mini-cave to spend the night in, otherwise keep an eye out for possible places to lair up.
Once you have a stone axe, you should try to get more logs as time allows; extra logs are useful in many ways, such as building, crafting, securing your base and much more. If you have difficulty finding coal, you definitely want an extra dozen or more logs to make charcoal! With coal or charcoal, you can make torches (coal/charcoal above a stick on the crafting grid) for the night.
Optional goals: While you're doing this, break any tall grass you pass and collect any seeds that drop (but don't waste time on this), and once you've got a sword or an axe, kill whatever food animals you pass, especially sheep (up to 3 of them), collecting whatever they drop. (Not all animals are food animals: Only pigs, sheep, cows, chickens and rabbits drop meat. Horses, llamas, foxes, wolves, cats and bees are all best left alone for now.) Don't spend too much time chasing down animals though, a few pieces of meat are plenty, and you only need 3 pieces of wool for now. If you happen to spot some iron ore, wait until you've got your stone pickaxe, and then mine that too.
If you are next to a river or an ocean, you might want to get some fish for food. Cod and salmon are some of the best food sources in the game, and new fish will reappear soon after you killed some (or even all) of them, so you don't need to worry about preserving them for future breeding (they can't be bred anyway). Before entering water, you should first make sure it is not too deep, and the bottom of the river/ocean is well illuminated, because not only are you more likely to drown in deeper water, but it is more likely to spawn drowneds, a variant of zombie that will attack you off guard. While in water, you can still use WASD to move around, but your movements will be much slower than on land. press space to move upward in water (also for getting back onto the shore), and ⇧ Shift to descend. pressing ctrl and W together will allow you to swim faster, and you can change directions flexibly by moving the camera. Remember to always watch the oxygen bar above your health bar, as when all bubbles are gone, you will start taking drowning damage. Cod and salmon can be easily killed with a swipe of a sword. After this tiny fishing trip, remember to cook your fish in a furnace, so you get cooked cod and cooked salmon.
By the time you've done this, sunset is likely imminent or in the past. If you're really ahead of the game, you might take a moment to hoe some grass or dirt next to a river or pond, and plant seeds to get a head start on wheat. Place a torch near these so they can grow overnight. But at that point, it's time to finish for the day: Head for cover, and either prepare a cave as your first night's lair, or make a mini-house. If you were able to make a bed, you don't strictly need a shelter, it's better to have it someplace safe where you can leave it be, but you can also just find an open space to place it. Either way, use the bed as soon as you can.
Night time
For most players, the first night is time to set up your crafting table and furnace, cook your meat and perhaps some logs for charcoal, and maybe craft a few things for the next day. If you managed to pick up some iron ore, smelt that too, and consult the "second day" tutorial for what to make with it. If you've settled into a cave, you might want to mine overnight to look for coal or iron ore, but don't go too deep because you want to get an early start for the next day. If you managed to get wool for a bed, you also have the option of just skipping the night; if you managed to make yourself too hungry or hurt, or didn't get much in the way of other resources, that might be a good idea.
At night time, the primary danger is hostile mobs (monsters) that spawn only in the dark. These include zombies, skeletons, spiders, creepers, and more. All of these are good reasons to stay put in a well-lit shelter. But if you are really seeking adventure, you could always arm yourself with a sword or an axe and fight some monsters. While you might be able to get some materials for further crafting, it is dangerous, and if you die, all of your items and experience levels drop where you died, and you respawn at your bed (or at your world spawn if you don't have one). So a good idea before adventuring out is to sleep on the bed and leave it, or right click on the bed during the day. When you see "Respawn point set" in the chat message, you can be sure that in case you die, you will be respawning in your base next to the bed, instead of in the wild where you first spawned next to a bunch of monsters. However, most of the monsters you can fight at this point either burn (zombies and skeletons) or become less dangerous (spiders) when morning comes, and it is easier to fight them later when you have better equipment. If you must fight monsters this early, be especially wary of skeletons; in the open their arrows can easily get your ![]() health quite low or even kill you at a distance, and if they're in the water or on higher ground, it's unlikely you'll be able to reach them before being killed at this stage. If you happen to see any of the more powerful monsters, keep well away from them: At this point, an enderman, a witch, or even a creeper can kill you easily.
health quite low or even kill you at a distance, and if they're in the water or on higher ground, it's unlikely you'll be able to reach them before being killed at this stage. If you happen to see any of the more powerful monsters, keep well away from them: At this point, an enderman, a witch, or even a creeper can kill you easily.
If you are repeatedly being killed (too ambitious, a monster got into your shelter, or you didn't manage to make a shelter), you can always dig a three-block deep hole, cover it up and hide there. However, consider that because this is the first day, you won't actually lose much when you die (except for what has already been gathered that day), so if you do end up being killed you can just tough it out until dawn and start again. Keep on practicing killing mobs until you get the hang of it. If you're completely desperate, you can consider switching to "peaceful difficulty", which causes all the monsters to disappear until you switch back.
Shelter
As noted above, you should really want to find or make some kind of shelter before your first night, to avoid being killed. The "Shelters" article linked above gives a lot of suggestions for emergency shelters and more advanced ideas, but it only takes a little thinking ahead to manage a decent shelter for the first night. As you move around collecting logs and so on, look at the landscape for potential homes. Easiest (if you can find it) is a small cave with a single entrance that you can wall or fence off. If it's not quite ideal, consider if you can fix it quickly – say, fencing off a back door to deeper caves. If you don't have a cave, you may be able to make one, by digging into a mountainside or even roofing over a small valley. If instead, you have wide, flat space, then go ahead and build a small house. In all cases:
- Don't be too ambitious the first night, because you want to be safe before dark, and you also want to light up the space you claim (see "Light" below). You can always expand and decorate your home later, or even rearrange the landscape around it.
- When picking your location, it's good to have a view of the landscape so you can see if any monsters are waiting for you in the morning. You might need to leave your shelter at a sprint to escape a pesky creeper. Similarly, don't set up next to a pond where skeletons might take refuge in the morning.
- Learn about the awesome powers of wood! Fences can be used not only in the obvious way but as windows or transparent walls, with fence gates to get in and out. Doors provide a full-height exit for solid walls: logs, planks, stone, even dirt, but not fences! A few properly-placed ladders can make it a lot easier to get up to your roof or up a hill. A chest is also useful – stash anything you're not going to use soon, so you don't have to worry about it if you happen to get killed. You save some of your precious 36 inventory slots by making planks and sticks only as you need them. Even if you don't have a chance to do anything fancy before nightfall, you can spend part of the night exploring the Recipe Book for your crafting table and furnace.
- If you can manage to make a bed early on, place that in your shelter and use it the first night you have it. Getting killed is much less painful after that because sleeping in a bed sets the spawn point next to it, so you reappear inside your home rather than somewhere out in the wild. After the first night, you may well want to spend the nights crafting and mining. Phantoms are not an immediate concern, but you really do want that bed by at least your third night, or simply don't venture out at night until you have a bed.
Light
Monsters can't spawn within 24 blocks of you, but huddling in the dark is no fun – and when you do leave your home, you don't want to come back to find a monster has spawned or moved in. So, you need to light up your space, and at this point, the light you have is torches. A single torch gives enough light to prevent monster spawns completely within a 7 block range (barring obstructions), and reduce them for about the same distance past that. That range is in "taxicab distance", with each square east, west, north south, up and down counting independently. Accordingly, the safe zone only runs 3 spaces or so diagonally, and steps up or down can shorten it further. Even outside the safe zone, having some light sharply reduces the chance of monsters spawning (depending on how much light), but it's better to use enough torches to keep your whole home well-lit. If you have extra torches after that, try to light some space outside your home (or at least the entrance) too, to push back the area where monsters are likely to spawn.
Food and hunger
Once you have tools and shelter, your next priority is food. ![]() Hunger takes a while to hit, so it shouldn't be a problem on your first day, but you should try to pick up some food for when it does, just so you don't get into an emergency situation. If you get too hungry, you start suffering: Below 90% you can't heal damage, below 30% you can't sprint, and the hunger bar goes empty, you begin to starve. You can't starve to death unless you're in Hard difficulty, but you are still quite vulnerable. You do not lose hunger at all in Peaceful mode.
Hunger takes a while to hit, so it shouldn't be a problem on your first day, but you should try to pick up some food for when it does, just so you don't get into an emergency situation. If you get too hungry, you start suffering: Below 90% you can't heal damage, below 30% you can't sprint, and the hunger bar goes empty, you begin to starve. You can't starve to death unless you're in Hard difficulty, but you are still quite vulnerable. You do not lose hunger at all in Peaceful mode.
The primary drain on hunger is from healing damage, and for quite some time, eating is your only way to heal damage! Fighting (even before healing damage), sprinting, and jumping are also energy-intensive. (Be careful about going uphill with auto-jump!) You have a little grace period (see "saturation") when starting the game and after eating, but when that's exhausted, your food bar start rippling, after which healing damage or getting too athletic starts to drain your hunger bar. See the Second Day guide for slightly more detail, or the Hunger page for the whole story.
Note that if you are staying at full health, and not fighting, sprinting and/or jumping, swimming long distances or mining many blocks, then you use almost no food. Walking at normal speed does not use up food (neither does sneaking). Thus, if your character has a secure place to stay, you can just stay put to conserve food while waiting out the night, a storm, or crop/animal growth.
Making a crude wheat farm early on (by breaking tall grass for seeds, and planting next to existing water) is listed as an optional objective, but if you can pull it off your first day, it gives you a definite head start on the game. Having wheat gives you more options: Harvested wheat can be used to make bread, or to capture and breed sheep and cows, and extra seeds can similarly be used to capture and breed chickens.
That said, killing a few animals and cooking their meat can certainly tide you over for long enough to make more permanent arrangements. The occasional apple or sweet berries can help a bit, but mind those damage-dealing bushes!
There are also a few items you technically can eat, but shouldn't. Raw chicken (the only one of these you'll likely see the first day) has a 30% chance of giving food poisoning that can leave you even hungrier, and if you eat rotten flesh, that has an 80% of giving you food poisoning. Eating a spider eye outright poisons you, and eating a pufferfish poisons you badly.
If you can manage to kill a couple (or more) spiders, you may have enough string (2 to be exact) to craft a fishing rod, which is a perpetual source of food if you have water nearby. Cooked cod and cooked salmon are both good food items, replenishing both the hunger and saturation levels. However, if you are next to a river or an ocean, fishing with a fishing rod is not the best choice, since you can just jump into the water and kill some of the fish.
Play-by-play
Getting Started
A player begins the game standing in a landscape somewhere. This is the general area in which a player reappears (respawns) upon death. (If you've slept in a bed (and the bed's still there) you will instead respawn next to that.) This is the start of a new Minecraft world. This tutorial is intended to teach you the skills needed to survive in this world and eventually be able to do just about anything you desire. You can do the different sections below in any order you desire, but many sections require you to first complete other tasks first. The tasks listed on this page (except those noted as optional) should all be completed before moving on to the second day tutorial, even if it takes you multiple days to complete all of the tutorials. No matter what, your goal for the first day should be creating a bed or shelter so you can survive the night. The other tasks are also very important and can all be completed along with the main objectives while leaving you with extra time.
See the first section of this guide for information about controls and getting around in the world. You need to master those skills in order to complete the following tasks. Again, the game starts at noon, and you have 10 minutes of game time before nightfall. Your overarching goal here is to acquire basic equipment and a simple shelter in that time. You do have some time to practice your basic skills and learn about your inventory, but don't take too much time at that. If night falls and you still don't have any shelter or basic equipment, it is fair (for your first game) to switch the game to Peaceful mode for the night.
While following the steps below, break any tall grass you see and collect any seeds that drop. They become useful later. In fact, collect any loose items you come across; almost everything can be potentially useful. Also keep an eye out for orange pumpkin blocks and (if you happen to be in a jungle) green melon blocks. If you find any, break some of them and take the results with you for later farming. Also watch out for sweet berry bushes. "Using" them can provide berries for a bit of food, but actually stepping into them hurts!
Biomes
The Minecraft world is divided into different areas called "biomes". Different biomes contain different blocks and plants and change how the land is shaped. There is an advancement that includes finding all the biomes; this is better explained on the advancements page. Biomes affect you, especially at the beginning of the game, but you need not worry about specific biomes until you have learned how to play the game. If you are curious, you may want to read more about biomes on the biomes page. That said, there are a few cases you should worry about:
- You start on a small island in the ocean: Go to the highest point on the island and look around for other land. If you see a reasonably-sized continent with trees and animals, swim there. If you see no large land and no animals in sight, you have an "ocean spawn". For a player's first game, it is entirely reasonable to exit this world and try again with a different seed.
- You are standing on sand, with no trees or water nearby. You are in a desert. Again, go to high ground and look around for trees and green grass. If you see some, go there before continuing with this guide. If there's no green in sight, this is another situation where you can reasonably toss the world and try again. Deserts are much easier when encountered from outside, but they are missing important things like dirt, wood, and accessible stone, all of which which you really do need to start off the game.
- You are in a dark forest, with thick trees, a thick leaf canopy, and giant mushrooms scattered around. This is a particularly unsafe place for a starting character and a beginning player, because the canopy can create areas dark enough for hostile mobs to spawn in daytime. However, if you move quickly, you can probably make it to more open ground in a reasonable amount of time, and start setting up in a more reasonable biome. Don't leave the dark forest behind completely, though — once you have basic armor and weapons, it's a very resource-rich area. Grab some of that plentiful wood once you reach the edge! The giant mushrooms also offer a plentiful source of food, so don't forget to grab some of those! There is a rare chance that a Woodland Mansion will spawn in this biome. They are dangerous, but provide you a lot of good resources, so make a note where it is!
- The land around you is greyish-purple, with dusty particles, giant mushrooms, and red "cows": Rejoice, for you have received a miracle: a spawn in a mushroom fields biome, where hostile creatures cannot appear (except for underground dungeons). You do need to go elsewhere to find wood, crop seeds, and some other resources, but otherwise, you've gotten into a golden situation here. Once you have even a bit of wood, you can get unlimited food from the red cows (Mooshrooms), and you have a large area in which you barely need to worry about your safety even at night, a great place to set up your long-term base.
Villages
If you see houses and other buildings nearby, this is not exactly a biome, but it means that you are near a village, which is a good thing. In fact, a village lets you skip past much of the first and second-day activities (due to ready-made shelter and beds) but it requires a bit of care. It's worth exploring the village and looting any chests you find; if you happen to find any emeralds, you might even be able to buy some useful items from the villagers. Besides providing equipment, food and other resources, a village also lets you collect the seeds for all four of the basic crops up front, from their farms, and you can also take one of their beds with you when you leave. You can even grab a few blocks of wood or stone from their houses, but try not to damage the village too much -- your best bet may be to disassemble one of the smaller houses and move its bed to one of the intact houses. (Don't bother doing this in a desert village, the sandstone is pretty but fragile, and you can't make tools out of it.)
If you see an iron golem trundling around, be careful -- If you attack it or the villagers, it will come after you!
Right-click (use) on the villagers to open the trading interface. Do not left-click (attack) on them as they will be very upset! They will at least raise their prices... and if an iron golem notices, you're in trouble.
As you originally encounter them, villagers can sell useful early-game items like iron tools, armor and weapons, but remember that eventually you will be able to mine for your own iron and such. Don't bother buying stone tools unless you're in a desert, and maybe not even then. You can also harvest wheat and vegetables from village farms, but be sure to replant them afterwards, they won't look like much newly planted, but they'll grow back over time.. You can even sell the crops you harvested back to the farmers. You can also harvest any hay bales from the vicinity and craft them back into wheat, and sell the wheat to any farmer you find (or make bread out of it for yourself).
Any time you are near a village, you must sleep in one of their beds overnight, as soon as night falls. Trying to stay up overnight can expose the village to attacks by monsters, which can easily wipe out the villagers. It's okay if a villager has already claimed the bed — trying to use the bed the first time simply kicks the villager out, and then you can use the bed again for yourself. If you have a village, you should probably travel some distance from it (say, fifty or a hundred or so blocks from the edge) to make your own lair, to avoid having monsters appear overnight due to your presence. If monsters (such as illagers) do appear during the day, your best bet at this point is to ring one of the bells in the village, and hope that the village's iron golem can deal with the invasion. If your village gets wiped out, it will be a while before you have the resources needed to repopulate it!
Certainly remember where the village was, because as you accumulate more resources, the trading will become much more exploitable. For the first day, the most obvious tricks are:
- Take any food or other resources from the chests. Some items like obsidian or horse armor may not be immediately useful, so you can leave those for later.
- Collect any hay bales and harvest any crops that are ripe,. Try to replant what you harvest, but make sure you keep seeds for each of the four crops (wheat, carrots, potatoes, beetroot). If there are pumpkins or melons around, collect samples of those.
- The hay bales can be turned into wheat, which, along with any harvested crops can be sold back to the farmers. If you have a fair bit of extra wood, and can find a Fletcher, you can turn the wood into sticks (see below) and sell those, getting 1 emerald for 2 logs' worth of wood. With those emeralds and any you find in the chests, you may be able to buy a couple more useful items, most likely leather armor or iron tools.
- If you really need wood or stone, try harvesting a few logs or cobblestone from above head height in the houses, so as to minimize the damage.
- Sleep in a bed overnight, and take it with you when you go.
Log
Wood is the most basic resource in Minecraft, and you need to collect some up front. The usual and most plentiful wood source are logs from trees, which are available in most biomes. Logs are one of many items that can be collected without the use of a tool. All you have to do is mine any log of the tree with your hand or any item. Each block drops as an item that you can pick up and put in your inventory by approaching it. You should start by collecting 6-8 logs for your first tools. There are many different types of trees in Minecraft, each having its own individual name and look. Each kind of log can easily be crafted into a matching type of planks. All logs and planks work for any recipe requiring logs or planks respectively, but a few recipes require that all the wood you use be the same type (for example, when making a boat, you can't mix oak and spruce planks). If you mine all the wood from a tree, the leaf blocks atop it start decaying (you can also break them yourself), dropping sticks, saplings, and perhaps apples. For your first day, don't wait around for leaves to decay, but as usual, pick up any items they do drop and save them for later. Once you get to making axes, harvesting wood will be much faster!
A rarer source of wood is sunken ships which are made of logs and planks and are found in ocean biomes, but dealing with these is probably best saved for later. Abandoned mineshafts (found on the surface in a few biomes) also contain planks, but these are definitely better saved for later. Your Recipe Book provides an assortment of useful recipes for wood, including each type of wood as you encounter it.
In order to obtain better materials at faster speeds, the player needs tools. Tools are items that allow the player to complete tasks other than placing blocks at faster speeds than normal. Most tools can be made out of different materials each better than the last. Using a tool to mine the blocks for it is intended mines the blocks more quickly than normal. Tools lose durability upon each use, even if the use was to hit an entity. In fact, using tools as weapons generally wears them out more quickly. Enough damage to a tool eventually causes the tool to break. Different tools have different properties and abilities. If you are using a tool on a block and it seems to be taking an unexpectedly long time, you may be using the wrong tool for that block. Stop to look at the block and reconsider your approach.
Having acquired wood and made a crafting table, the first tool to craft is a wooden pickaxe. This starts by crafting a couple of logs into planks, and then at two of those planks into sticks. The planks required for a wooden tool can be any combination of planks, as shown below.
You probably won't need to craft any other tools out of wood, because you can soon start upgrading to stone, but if you're starting in a forest, making a crafting table and wooden axe from your first three logs can help you get more wood quickly.
The basic tools are:
- The Pickaxe is used to break and gather stone, metal, and related materials such as ores.
- The Axe is used to collect wooden materials more quickly.
- TheShovel is used to gather dirt-type blocks: dirt, sand, gravel, clay, and their variations. "Grass blocks" are a variation of dirt.
- The Hoe can be used to quickly break some lightweight blocks such as Leaves, but its main use is to turn dirt or grass blocks into farmland.
- Special mention for the Sword. Instead of breaking blocks, a sword is used to attack animals or monsters.
See the overview above for tool crafting recipes, but the reader may have noticed that in order to craft a basic tool, they more or less draw it with its components in the crafting grid. Other items are crafted in a similar fashion.
Entering the Stone Age

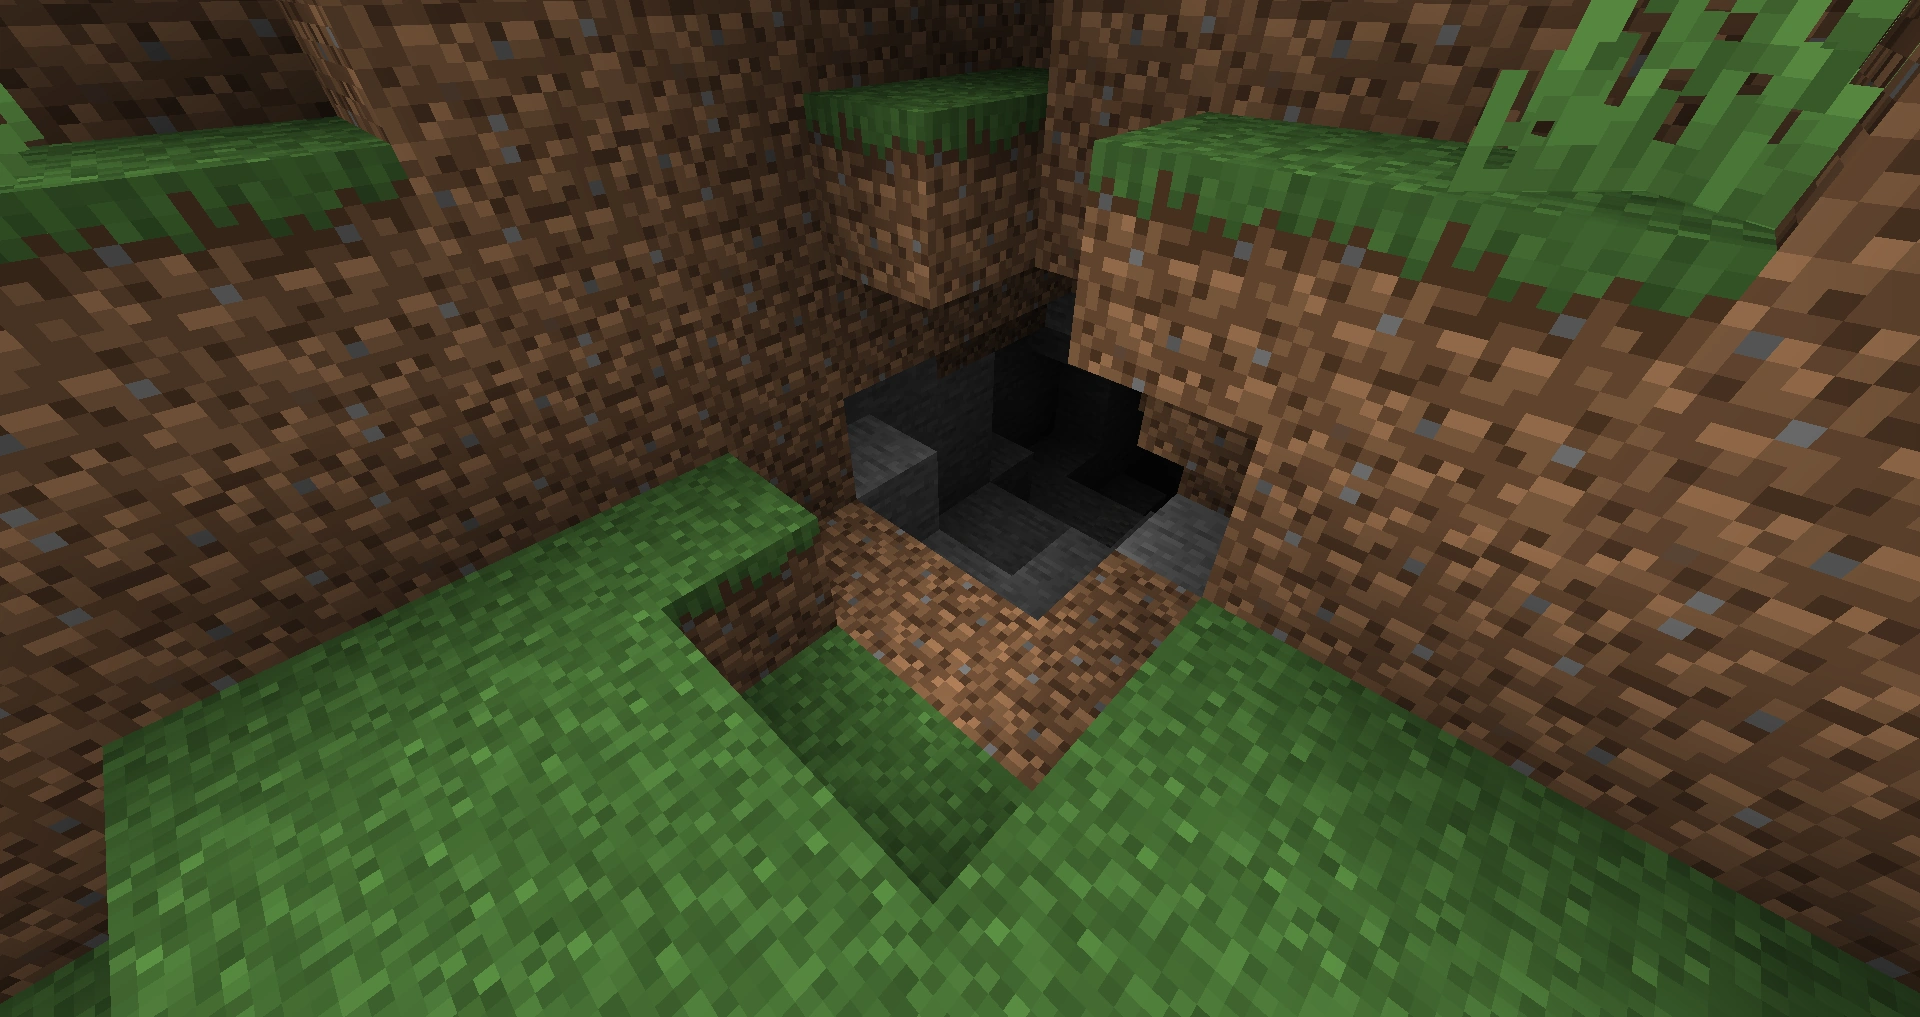
Cave entrances usually expose stone, but be cautious about going into the depths!
Once the player has crafted a pickaxe, they can successfully acquire cobblestone to make better tools. Cobblestone is collected by finding stone then mining it with any pickaxe. Stone mined with any pickaxe drops as a cobblestone item. Besides the "original" gray stone, there are three other kinds of rock you can find, which are good for building, but you cannot use them to craft tools. White diorite and red granite are fairly obvious, but andesite is also gray, and can easily be mistaken for proper stone; when you start mining, check the block that you get in your inventory to make sure it's actually cobblestone instead of an andesite block.
If no stone appears above ground near the player, stone can also be found by digging into the ground. The stone layer usually appears within 5 blocks under dirt and grass block or within 8 blocks under sand and sandstone. Remember to never mine out the block you are standing on, unless you know that what's below that block isn't a long fall, lava, or other dangers! Another warning here: Unlike most blocks, sand and gravel can fall, and if they fall on you they can suffocate you. If that happens, don't panic, just dig yourself out as quickly as you can.
Most players should gather at least 19 pieces of cobblestone in total, which is enough to make a furnace and all the basic stone tools including the sword and hoe. Taking extra cobblestone is good in case you use up some of your tools and need to replace them. At your crafting table, you should have all the recipes you need for a full set of stone tools.
At this point, you have a set of basic tools and both of the basic crafting blocks. And while you're not really prepared for a fight, you at least have a basic weapon to defend yourself or hunt animals for food.
Your options for "what to do next" have opened up: The top priority is to arrange for a shelter for the night, a bed to sleep in, or both... but you should also have at least some time left to gather more resources (especially light and food) as you explore and/or build. These extra resources can give you a solid head start for the next day and the remainder of the game. Read the following sections, and attend to them according to what you find in the world around you.
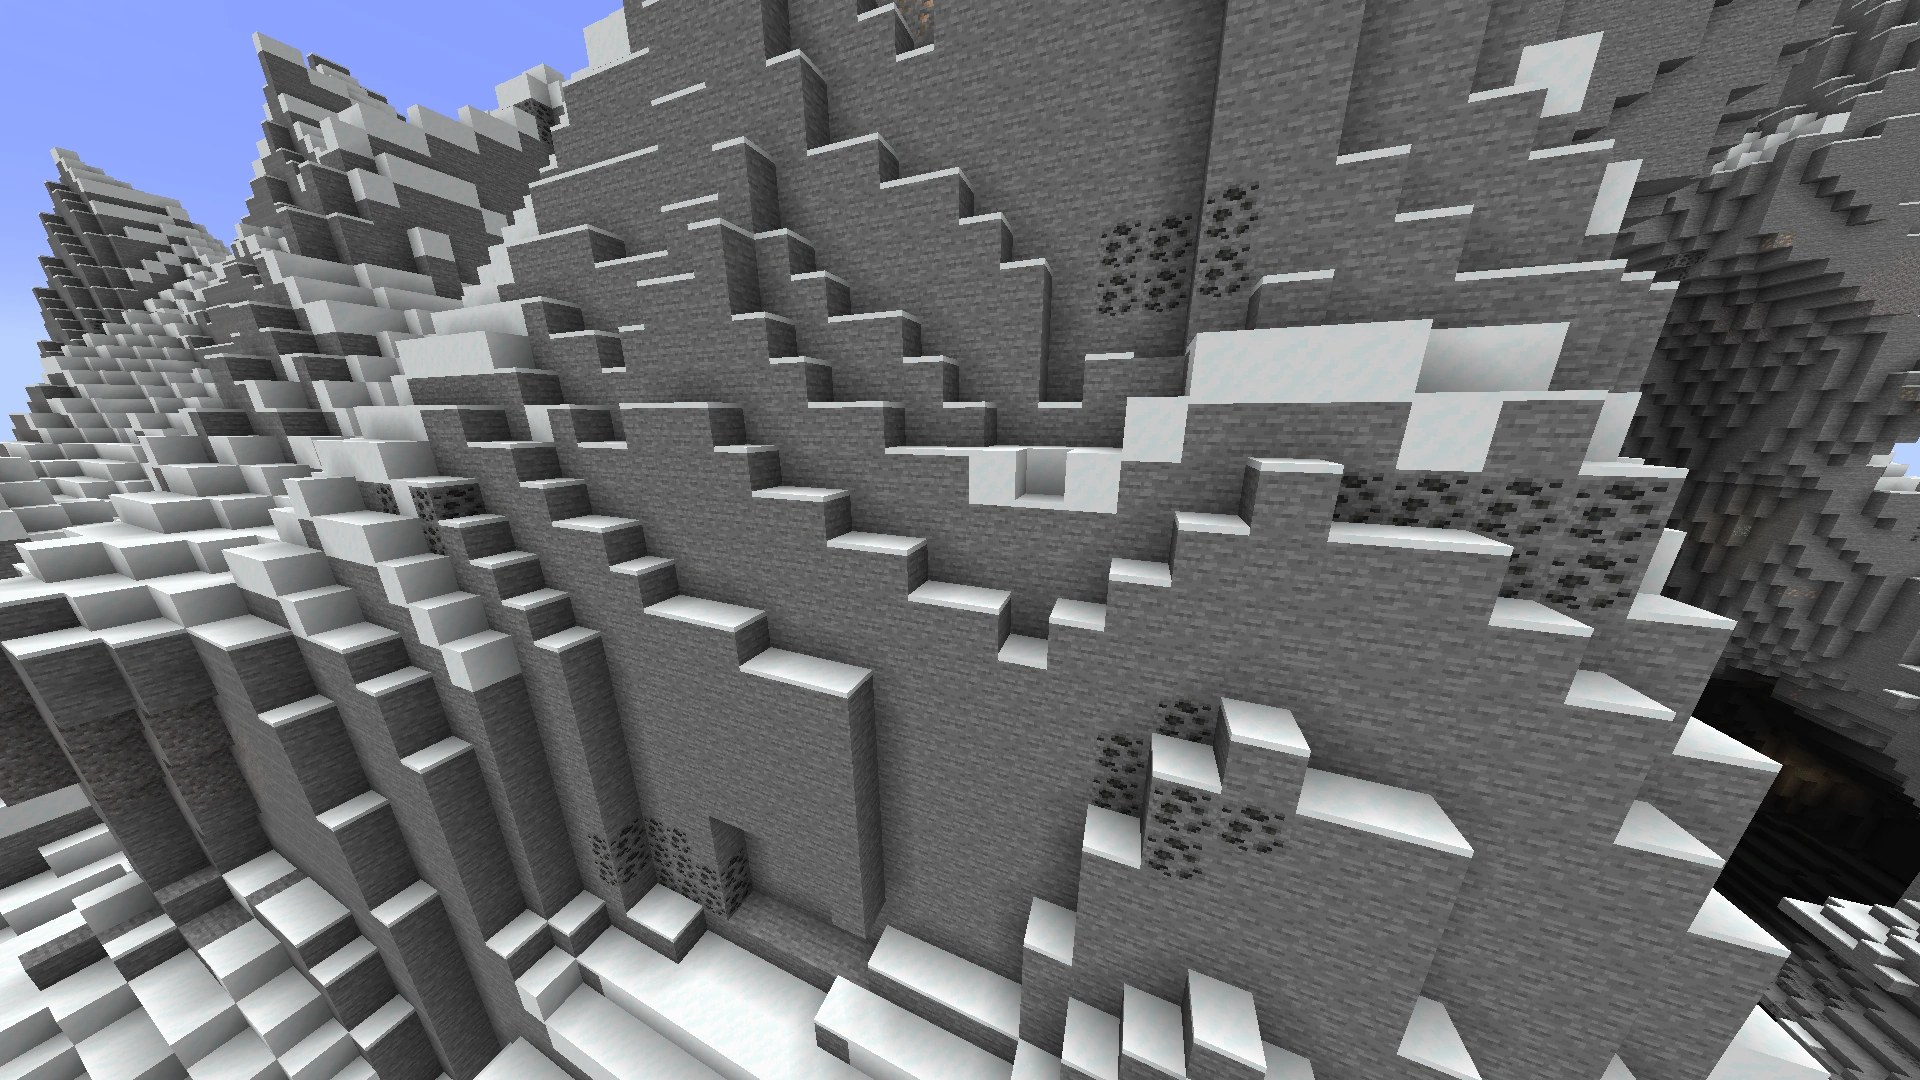
Coal ore exposed on the surface.
A good start is to take your stone axe, and cut down some more trees for logs, trying to accumulate at least 10 or even 20 logs. Although some trees may look different than others, all logs work the same. However, different kinds of logs don't stack together, and likewise for their planks. While you cut down trees, try to gather the saplings, sticks, and perhaps apples that drop from the leaves.
While doing this, explore the immediate area (making sure you don't get lost), to try and find some coal ore. Coal is a key resource for making torches and smelting materials, but if you can't get it, you can fill in withcharcoal, which is smelted from logs. If you get some, craft a few torches up front, but don't use up all your coal -- save some for later smelting. If you happen across a similar ore with tan specks in place of the black ones, you have found iron ore. Iron is extremely useful for most of your Minecraft career, and if it's within easy reach, go ahead and gather it (a stone pickaxe is required). However, if it's in a difficult-to-reach place, just note its location and save it for later.
Along the way, keep an eye out for useful plants. Keep breaking grass for seeds as you pass it, and grab a few of other plant types that you encounter, except perhaps for flowers. Flowers are not very useful yet (though dandelions might be helpful for catching rabbits), but more useful finds (depending on where you are) include pumpkin blocks, sugar cane, melons, cactus, and sweet berry bushes. If you find any of these, break some of them and take the results with you for later farming. Be careful with cactus and berry bushes, as they harm you if you touch them! "Using" a berry bush can drop the berries without breaking the bush, but the bushes are common (not to mention hazardous), and if you do want more bushes, you can just plant the berries.
Basic necessities
Light
Players are greatly affected by light in Minecraft. Any underground space is dark, and half of the time the game is at night. It is possible to see a little better by altering the same settings to raise the brightness level of the display, but this only goes so far, because it's not just about visibility -- monsters spawn in the darkness. Specifically, any space further than 24 blocks from a player that isn't lit up well enough (about 7 blocks in taxicab distance from full sunlight or a light source) is a potential spawning ground for monsters. Accordingly, a player "claims" territory by lighting it up so that monsters cannot spawn. From the first day, a player can createtorches, a basic light source that remains useful throughout the game. Torches (and any other light source) need to be placed in the world to give off light. They can be placed on the side or top of any solid block, and some that aren't entirely solid (for example, you can put a torch on top of a fence). Unlike in real life, a torch remains lit forever, allowing the player to use torches as a cheap and permanent light source. One stick plus one coal or charcoal, crafts into 4 torches. At the very beginning of the game, you should make torches 4 at a time as you need them, once you have a reasonable supply of coal and/or charcoal you can keep a stack of torches handy.
The most important places to light up are a player's home or base, caves explored, the outside around the player's home, and anywhere the player is often at or near that is dark.
Torches are also useful to prevent getting lost in caves as well as to prevent monsters from spawning in them. On the way into a cave, for example, a player can place torches on the left side wall (especially near where tunnels branch, and then the player knows that to find the way out, the torches should be on the right.
Getting food
Even though you probably aren't hungry yet, collecting some food up front, and arranging for more, is a good thing. Just now, there are three things you can do about that:
- You can find apples and sweet berries which are immediately edible, but these are not very good food, and also don't warrant much further discussion. Grab them as you find them, eat them if you need to.
- You can start a crude farm, which does not provide food immediately, but it pays off well later, as a head start toward a permanent food supply.
- You can kill animals and cook their meat, to get some high-quality food for your first few days of the game.
- You can kill spiders to get string, from which you can craft a fishing rod to catch fish, which you can cook for good food.
As with your health bar, you start with a full hunger bar, with 10 icons ("shanks") representing 20 hunger points. After you have been moving around (and perhaps fighting) for a while, the hunger bar begins rippling and start decreasing. If the hunger bar drops below 90% (![]() × 9), you cannot regenerate health, and if it gets to 30% (
× 9), you cannot regenerate health, and if it gets to 30% (![]()
![]()
![]() ), you can't sprint. If the hunger bar goes down to empty, you begin losing
), you can't sprint. If the hunger bar goes down to empty, you begin losing ![]() health. Unless you are in Hard mode (and a beginning player shouldn't be), you can't actually starve to death, but your health declines 1 health point (
health. Unless you are in Hard mode (and a beginning player shouldn't be), you can't actually starve to death, but your health declines 1 health point (![]() ) in Normal mode, or half the health bar (
) in Normal mode, or half the health bar (![]()
![]()
![]()
![]()
![]() in Easy mode), which leaves you quite vulnerable. If you are playing in Peaceful mode, you do not have to deal with hunger at all.
in Easy mode), which leaves you quite vulnerable. If you are playing in Peaceful mode, you do not have to deal with hunger at all.
The primary drain on hunger is from healing damage, and for quite some time this will be your only way to heal damage! Fighting (even before healing damage), sprinting, and jumping are all food-intensive as well. (That includes going uphill with auto-jump.) You have a little grace period (see "saturation") when starting the game and after eating, but when that's exhausted, your food bar starts to ripple, after which healing damage or getting too athletic starts to drain your hunger bar. See the Second Day guide for slightly more detail, or the Hunger page for the whole story.
If you are staying at full health, and not fighting, sprinting, jumping, swimming long distances, or mining many blocks, then you use almost no food. Walking at normal speed does not use up food. Neither does rowing a boat. Thus, if your character has a secure place to stay, you can just stay put to conserve food while waiting out the night, a storm, or crop/animal growth.
First farming
Previously, you learned to break tall grass and collect the seeds. Now you have a chance to use those. Look for any water (pond, river, ocean) with dirt or grass nearby at the water level. Use your hoe on the dirt or grass, within 4 blocks of the water itself (diagonals count). Wait a moment to make sure the new farmland darkens instead of reverting back to dirt, then plant your seeds, one per block (save one or two seeds for possible chicken-wrangling, below). Later you can make a more organized farm, but for now, you have just gotten a head start on a permanent food supply. When you come back here tomorrow or the next day, the seeds may have grown into wheat, which you can use to make bread or to lure and breed cows (see "animals", below). You also get extra seeds from harvesting the wheat, which you can use to plant more wheat, or to lure and breed chickens. Pro tip: If you have any torches, place one to light the field overnight.
If you have found a village, it should have farms that may include any of the four food crops: Wheat, carrots, potatoes, and beetroot. See their respective pages to see how to recognize the mature plants, and how to prepare each of these for eating. Having done so, you can harvest any mature plants you find and replant the crop afterward, with a seed (wheat or beetroot) or one of the several carrots or potatoes you just harvested. Be sure to save some seeds, and extra carrots and potatoes, for your own later farms.
Animals
Those creatures in Minecraft that are not immediately hostile to the player, are known as passive and neutral mobs ("mobs" for "mobile", this is a common term on this wiki). Many passive mobs can be killed for meat. Raw meat is not as nourishing as cooked meat. See "Smelting" below for details on how to cook food.
Passive mobs never attempt to harm the player. The majority of passive mobs are traditional domesticated farm animals which usually ignore the player. If harmed, they flee for a short time. Some animals (such as rabbits or foxes) run straight away from players who get too near. If a passive mob is killed, it may drop resources such as raw meat. Most passive mobs at least drop a fewexperience orbs if killed by the player, but baby animals never drop anything. These passive mobs include the several meat animals... and now you've got a new stone sword! Look for sheep, cows, chickens, and pigs, use your sword to kill a few and collect the meat and other drops. In particular look for sheep, and try to kill at least 3 of them for their wool. That said, don't slaughter everything you see. Try to leave at least two of each kind alive for later breeding. If you have sufficient wood and are doing well on time, you might even set up a small corral of wooden fences and fence gates, and use seeds to lure some chickens in there for later. Unless you found a village, you don't yet have the wheat you'd need to lure cows and sheep, nor the root vegetables that pigs prefer, but you might perhaps be able to use dandelions to lure rabbits into a secure pen.
Neutral mobs act similarly to passive mobs except that they harm the player if provoked. Wolves, polar bears, iron golems, llamas, dolphins, pandas and bees attack the player if the player harms them. These creatures also attack other creatures that hurt them. A polar bear is hostile to the player if a bear cub is nearby, and bees attack if you molest their hive. Bees and wolves both attack as a group: if one of them attacks, all the others in the vicinity join in! For all of these, plus the passive horses, donkeys, and cats, just leave them be for now. They don't drop meat, and you don't have the means to tame or breed them yet.
For more information on breeding, see the page Breeding. Taming mobs is more complex, but you might look at the pages for Wolves, Cats, Horses, and Llamas.
You may also see fish in nearby rivers, and you can go into the water to kill them with your sword. Cod and salmon are edible, but you should cook them like other meat. Be careful about playing in the water. Aside from the risk of drowning in deep water, there may be monsters in there likedrowned, and pufferfish can hurt you badly if you approach them. Then too, moving in water is slow, and you don't want to spend too much time there.
Smelting
To progress in the game and even to stay alive, the player needs to know how to use a furnace. A furnace is used to cook food, turn iron and gold ores into metal, and create other specific items such as charcoal, all of which are collectively called "smelting". To use a furnace, the player must first have one. This is the crafting recipe:
Just like the crafting table, the player uses the furnace by first placing it down in the world then clicking on it with the use button. The furnace itself counts as a stone-type block, so to pick it back up you need to break it with a pickaxe.
The furnace GUI has only three slots and includes two icons to indicate time. The top left slot ("input") is where items to smelt are placed. The items are moved from this slot one by one as they are cooked and the products are placed in the right slot ("output"). To cook items, the furnace requires fuel, which is placed in the fuel slot at the bottom left. (The example below shows how to smelt 3 logs into charcoal.) The "fire" icon burns down to show how much of the current fuel item is left, while the arrow shows how far along the smelting of the current item is. Items cannot be partly-smelted: If smelting is interrupted (you pulled the item out of the input, the fuel ran out, or you broke the furnace), the input item remains unchanged.
Smelting takes some time, but you don't need to stay in the GUI, as the process continues while you go do something else. A furnace automatically uses fuel (one item at a time) from the fuel slot as needed, until either all of the items in the input are smelted or all of the fuel runs out. If the input items run out before the fuel, the furnace stays lit until the current fuel item is used up. You can put in more items to use up the rest of the burn time. While the furnace is lit, the furnace block becomes a temporary light source, displaying fire particles and making popping sounds.
It takes 10 seconds for each item to be smelted. Different fuel items burn for different amounts of time; most items made from wood can be used as fuel, but coal or charcoal are more efficient, and other fuels may become available later in the game. Some common fuels: Any wooden tool (or sword) can smelt one item; a wooden plank can smelt 1.5 items (that is, 2 planks smelt 3 items, as shown above), and a piece of coal or charcoal smelts 8 items. Don't use logs directly as fuel; the log burns no longer than each of the four planks you could make from it.
In Java Edition, an efficient fuel is charcoal produced by smelting logs using planks as fuel. In Bedrock Edition, charcoal produced by smelting logs using wood slabs is more efficient, because on Bedrock versions, slabs smelt twice as many items as the planks they were made from.
For the first day (or the night afterward), you should start by cooking any raw meat you have, and smelt some logs into charcoal. If you have a bit of extra coal or charcoal, you may want to make a campfire, which burns indefinitely and can cook food without using fuel. Be careful around a campfire, it will also burn you if you walk on it! Unlike most things you make, if you break a campfire it will not drop itself, but you will at least get a piece of charcoal back.
If you got any iron ore, smelt that too, and craft items according to how many ingots you have: In order, start with a shield, then an iron pickaxe, iron sword, and a bucket. (More details can be found in the "second day" guide.)
For fuel, start with any wood tools the player has replaced with stone tools, and planks (2 at a time) to smelt a little meat and/or your first charcoal, then move on to coal and/or charcoal for larger jobs. Note that charcoal is a more efficient fuel source than planks, as it keeps the furnace lit longer than the wood that went into it would have.
Smelting items in a furnace also produces experience, which is automatically awarded to the player upon removing any smelted item out of the furnace.
Safety (sleep and shelter)
Making your bed and lying in it
To make it through the first night, the player can do either (or both) of two options: build a shelter, or get hold of a bed. If you have to choose, the bed is likely easier and safer... if you can find those precious three blocks of wool. (If you were lucky enough to run into a village, you can sleep in one of their beds, and probably swipe it afterward.)
A bed is a special block with an unusual shape: It takes up two blocks of floor space, but is only about half a block tall. When crafting a bed, the three wool must be the same color, which becomes the color of the bed. However, the planks need not match. Wool is obtained from sheep; for now you need to kill them for it, but later in the game you can shear sheep to get the wool without harming them. Sometimes you may find wool lying on the ground, especially in a forest; this wool comes from sheep that were killed by wolves (or in multiplayer, by other players). If there are no sheep to be found at all, you can eventually collect string from killed spiders, and craft wool from the string.
With a bed, the night is easy to survive. All you need to do to do is place the bed somewhere suitable (see below, but almost any open ground works) and use it (sleep in it) whenever night falls. If you try using it as sundown approaches but are told "you can only sleep at night or during a thunderstorm...", just wait a few seconds and try again, it works once sundown has properly begun. You also cannot use a bed when hostile monsters are within 10 blocks, or you get the message "you can't sleep now, there are monsters nearby". On successfully using a bed, you change to lying position on the bed without the ability to move – not even looking around. It takes a few seconds after getting into bed before the game skips the night, giving you a chance to change your mind.
A bed allows you to do three important things:
- It lets you skip past the night (or a thunderstorm, which can also be a fairly dangerous situation for a new player). No time passes in the world: crops do not grow, furnaces do not smelt, etc., but the game time advances to dawn, upon which monsters stop spawning on the surface and any skeletons or zombies caught in the sudden sunlight burst into flame.
- If you are in a multiplayer game, all other players must also use a bed before night is skipped, though various game mods can alter that rule.
- Using a bed sets your spawn point, that is the location you respawn in if you die. Without a set spawn point, after dying you reappear somewhere, without your possessions, within 20 blocks of the world spawn point (usually outdoors), and if it was night time, it's still night when you respawn. This is not a pleasant situation! In current versions (1.15 or newer) of Java Edition, using the bed during daytime sets your spawn point even if you can't sleep yet.
- If you have not slept (or died) within the last three days or so, Phantoms can spawn at night and even during thunderstorms. If you go outside, these swoop down from the sky to attack. Sleeping in a bed prevents this not-so-minor inconvenience. Phantoms burn like other undead monsters after the sun rises.
A few warnings about using beds for a spawn point:
- To actually respawn at the new spawn point, the bed needs to stay put! If you pick up the bed to take with you, then if you die the bed is counted as "missing", and it's back to somewhere near the world spawn.
- You also need to have some open space next to the bed, on the same level or the level below -- someplace where you could stand when you respawn. This has to be a solid, opaque block to stand on -- glass, slabs, fences, or other non-solid blocks do not count. If there is no such space when you die, the bed is considered "obstructed", and again, it's back to the world spawn. However, your spawn point still defaults to the bed, if you clear the area out later.
- In multi-player, if another player has since used the same bed, your spawn point is also lost.
These limitations are why the best option is to have a secure shelter of your own, with a bed permanently installed inside it. That way, after death you come back safe at home. If it's still night or storming, you can go back to bed and sleep through to daylight, before you go back in search of your fallen possessions.
Shelter
The best way to avoid the darkness and accompanying mobs of night time is to craft and use a bed, but this isn't an option available to all players by the end of their first day. Building a shelter is an important skill for players to learn, and especially so if you cannot get a bed. The point of a quick shelter is to keep all monsters far enough from you that they cannot harm you. Monsters do not even move toward a player who is in a correctly built shelter. A shelter is a good place to continue to mine, craft, and smelt items while waiting for daybreak. If a village happens to be nearby, that is an ideal place to seek shelter, but in modern versions of the game, a village also has beds, so you can just avoid any trouble by sleeping through the night.
To protect a player, a shelter should be made out of blocks that cannot be walked or seen through by monsters. Holes in the walls or ceiling can be a safety hazard as baby zombies can fit through a one-block gap, skeletons can shoot through open gaps created by slabs or stairs, and spiders can climb over most walls. Creepers can blow up a house made of dirt or wood (stone is more durable), but only if they can see you. All that said, holes above head height (2 blocks or more above the ground outside) are out of reach for most monsters, and while spiders can climb, they cannot fit through a one-block wide gap. Fences (see below) can be used for windows; while monsters can see (or shoot) over a fence on the ground, if the fences are joined on all sides to blocks, the monsters can't see, move or shoot through them (and you cannot shoot through them either).
The walls and ceiling of a shelter can be made entirely out of material the player has gathered, but it is usually faster to dig your shelter out of a hill, or to close off the openings of a nearby cave. When doing this, you need to avoid the few blocks affected by gravity, which for now are just sand and gravel. A player may already have a hole dug out from gathering cobblestone earlier in the day, which can be quickly fitted out as as a shelter. Sometimes, there may be a naturally generated structure nearby that would serve as a shelter. If you're stuck on an open plain, you may yet need to build a small hut out of dirt, planks, and/or stone.
In an emergency, you might not have time to make an adequate shelter, if night falls and monsters show up before you can arrange for something. There are still a few options left:
- If a hill is nearby, you can dig a short tunnel into the hill and block off the entrance. This gives you enough time to place a crafting table and make a few fences, which you can use to replace the blocks at the entrance (one at a time so nothing gets in), so that you can see when dawn comes. Lacking fences, you can leave a one-block hole above head height at the entrance.
- While digging straight down is usually unsafe, an emergency may warrant digging straight down three blocks from the surface and quickly blocking off the top. If you have already made some fences or trapdoors, these are ideal for the top, as, again, they let you see when dawn comes.
- You can ride a boat out into an ocean to avoid the monsters on land, but there may also be monsters under the water (see Drowned). At the least, avoid any areas lit from underneath the water, and in a boat you can easily move away from any monsters that appear. Also, hunger does not deplete in a boat.
- If desperate enough you can change the difficulty to "peaceful mode" temporarily to remove all monsters, and change it back in the morning.
Having created a shelter, you need to light it up to avoid being in almost complete darkness. Even a single torch is sufficient for a small hidey-hole, and if you are using a furnace, it also provides a bit of light while you smelt. That said, it's better to have light before building a shelter, so you can set up light sources when you can still see.
To get in and out of a shelter, the player needs some type of entrance/exit. If necessary, the shelter's exit can simply be some dirt or other easily broken blocks. A much better way to set up a shelter's entrance is by crafting and placing a door. A door is relatively cheap and can be placed on any solid, opaque block. The door requires a vertical space of two blocks, similar to how a bed takes up a horizontal space of 2 blocks. Placing the door from the outside causes it to be flush with the outside wall. Doors can be quickly opened and closed and while closed some of them allow the player to see outside, without monsters being able to see or attack the player inside. In Easy and Normal difficulty, zombies bang on doors, but cannot actually break them down. If you are playing on Hard difficulty (again, a beginning player shouldn't be!), a zombie can break down a wooden door, but even then, you can easily block off the door from the inside with one or two blocks.
A good alternative to a door is a fence gate. Even in Hard difficulty, monsters do not know how to open a fence gate and do not break them like doors.
Useful crafts
There are a few things the player can craft which are particularly useful when making a shelter. In all cases, see their respective pages for more details. For all but the chest, the planks you use must all be of the same type (the ladder uses no planks).
- Doors make a 2-high entrance that can be quickly opened or closed. Depending what wood they're made of, you may be able to see through them a little, but regardless they let light through, which can tell you when dawn comes even if they have no transparent parts.
- Trapdoors are the vertical version of doors, providing a one-block entrance in a floor or ceiling. (Ladders are helpful here, see below.) They likewise let light pass through, but you may or may not be able to actually see through them.
- Fences are a versatile barrier; placed in a line on the ground, they block most monsters (and animals). While they look like they're only one block high, they are in fact 1½ blocks high, which is too high to jump over. (But watch out for blocks within the couple of blocks behind them, which can let monsters climb up on those to jump onto the fence.) One drawback is that spiders can climb such fences, like other blocks. If placed in a wall (that is, surrounded by blocks on all sides including the top), fences can provide a cheap window, since you can see through them (but monsters can't). Make sure the fence is visibly joined to all blocks on each side; they do not join to doors, trapdoors or glass. You can also make similar walls out of cobblestone or other kinds of stone, but these don't provide visibility.
- Fence gates are a cross between doors and fences. They are 1½ blocks high like fences, but can be opened and closed.
- Ladders are a flat block which you can place against a wall to let you climb them. If you leave the bottom block (against the ground) un-laddered, you need to jump to get onto the ladder, but monsters won't think to do that, so they can't climb after you. As usual, spiders can still climb the wall.
- A Chest isn't really necessary at this stage, but it's a convenient way to stash items you don't want to carry around. If you get killed, anything in the chest remains there, waiting for you rather than scattered around your death site. It needs to be placed as a block, then "use" the block to open its GUI and get at the contents. If you break a chest (use your hand or an axe), everything that was inside spills out as loose items, along with the chest item itself. Two chests next to each other can combine into a "large chest", see the Chest page for full details.
| Name | Ingredients | Crafting recipe |
|---|---|---|
| Wooden Door | Matching Planks | |
| Wooden Fence | Matching Planks + Stick |
|
| Wooden Fence gate | Stick + Matching Planks |
|
| Wooden Trapdoor | Matching Planks | |
| Ladders | Stick | |
| Chest | Any Planks |
Read more: Guide to shelters
Dawn
Wait for full light (or the sounds of burning undead), wield your sword, and carefully leave your shelter. Even in sunny weather, watch out for any remaining monsters — this may well be your first fight. If you see spiders, don't panic, they likely have become neutral in the sun, and you can try to kill them for their strings. If you see a creeper, your best option at this point is to run at least 16 blocks away from it and wait for it to go away (or explode, if it got too close before you got away). If you see any skeletons or zombies hiding under trees or in water, stay away from them — skeletons can still shoot at you if you are too close (16 blocks or so), and either skeletons or zombies may come out from shade to attack you even as they burn. If a burning zombie attacks you and the difficulty is normal or hard, they have a chance to set you on fire! If this happens, flee and jump into any nearby (monster-free) water. Once you're out and clear of monsters, look around for and collect bones, arrows, or rotten flesh which may have been dropped by dead skeletons and zombies.
If it is not sunny, you may have worse problems: You may need to kill zombies or even skeletons (or just retreat back in your shelter until the sun comes out). Zombies can be easy to kill by themselves, but in a pack, they can overrun you — and if attacked, they can call any other zombies in the area to join the fight. At night or during a storm, they can actually summon new zombies!
A skeleton is pretty accurate with its bow. It can be difficult to dodge the arrows. Also, you become an easier target the closer you get. If you get too close, it can kill you in only a couple of shots, because you have no armor. It's best to have a bow (or at least a shield) of your own before facing skeletons. If you don't have a bow or shield and they see you, try to run up to them and get in a few hits with your sword before you get shot too many times (at a distance, you can dodge the arrows).
Assuming you made it out of the shelter, congratulations! You've survived your first night in Minecraft! Within the next day or two, you should have acquired some iron armor and better weapons, which remove much of the terror from nighttime. You can also make a more secure shelter (including a safe place for your bed), and start fencing off and lighting territory for farming.
After the first day
A tutorial for the next day is available here: Tutorials/The Second Day. In general, your options increase over time, and you have more choice about what tasks to focus on next.
Following are some general tips:
Home safety
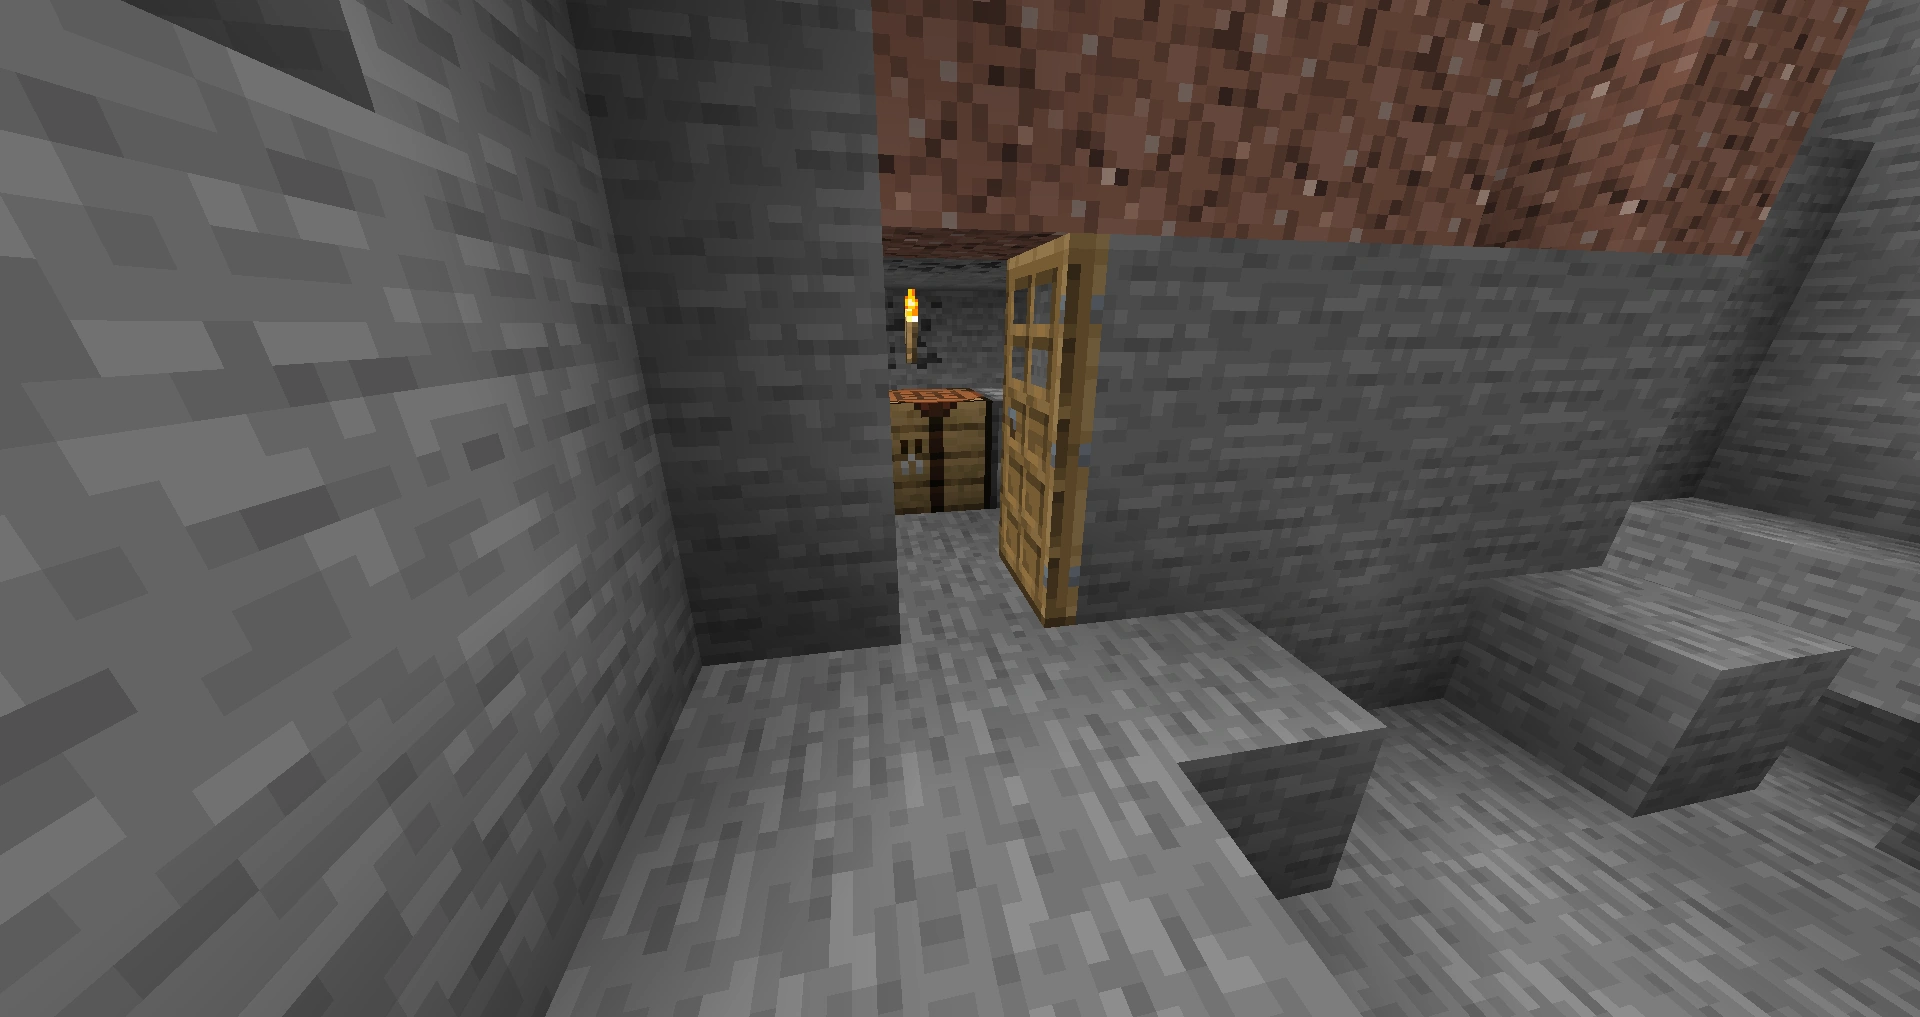
A 3×3×2 chamber in stone, filled with 1 bed, 1 furnace, 1 crafting table, and 1 torch. Sealed with door and defended by a dry moat.
By the end of the first day, your shelter is likely to be primitive and small. In the days afterward, you can build a better home, in any of various forms. Some natural extensions include a back door, windows, a surrounding fence, and even traps for monsters. Others are beautiful houses. If you build one and you don't like it, just build a different one. Remember that any time you pick up your bed, your spawn point reverts to the default (that is, random within 20 blocks of the world spawn point), until you not only place but sleep in (or at least "use") a bed again. For this reason, if your home is not very near the world spawn point, you should eventually use a compass to locate the exact point, and build a shelter there, or keep enough wool and planks to build new beds in new locations to keep your respawn point nearby as you explore the world.
Mining
Eventually, you must venture below ground to gather iron and other resources. While there are much more advanced mining techniques, the most basic way to find ores is by entering a cave and exploring. Remember, if you are mining, "never dig straight down" is a great rule to follow as you might fall in lava or in a group of monsters. You can, however, dig down in a 2×1 pattern, standing in the middle of the 2 blocks. This allows you to have a "safe block" in case there is lava beneath you. Or you can dig your shaft a few blocks at a time and put in ladders as you go, or just dig a staircase down instead of a straight shaft.
Finding a cave
You have no problems if you have just spent your night in a cave. If you haven't, the easiest way to do so is to roam the Overworld a little and look out for exposed cave entrances. Mountains biomes have caves inside mountains, but these are generally not what you want, because only coal ore appears above sea level. For iron and better ores, you want to find a cave opening into the ground (these are quite common) and head downward. Sometimes such caves end immediately, but often they continue into big cave systems. If they seem to end right away, sometimes there is a continuation about 2-8 blocks farther back and below the cave's end; mining in these directions (8 blocks back and down, exploring somewhat to the sides) can reveal this if it is the case. Digging away gravel or dirt can also expose cave extensions, but you may go through a few shovels that way. If you can't find any all day, just sleep away the night, replenishing your resources like wood and food as you use them. If you hear suspicious, hostile noises, just try to listen and follow them.
Cave exploration
Cave exploration is pretty straight forward: you light up your way with torches, mine up ores as you see them (check ores and minerals), and kill enemies as you encounter them (see Tutorials/Combat for details). Some important techniques might not be obvious to a new player, such as using waterfalls to descend into shafts, and/or swim back up from them. There are also many options for marking your trail and not getting lost. Also, note that sneaking (on PCs, the ⇧ Left Shift key by default) prevents you from falling over the edge of a block, and as such it is useful if you are caving near a long drop, especially a drop into lava. There are also open ravines, which can be explored by daylight, a bit more safely than underground caves. If you have spent a long time in a cave, be wary of coming back to the surface at night — at night there can be more monsters on the surface than there were in the caves, and if you spent long enough down there, there might even be phantoms! If there are, then try to avoid them or bring a spare bed with you while mining so you can sleep and get rid of them.
Tutorial videos
History
| Java Edition Classic | |||||
|---|---|---|---|---|---|
| May 16, 2009 | Notch discussed Survival among the various game modes he envisioned for the game. | ||||
| June 14, 2009 | Notch discussed his vision of how Survival mode would work. | ||||
| August 10, 2009 | Survival mode testing starts. At this time, there was no health bar, and resource management was being tested. | ||||
| August 18, 2009 | Hearts are shown, mobs take damage when hit. | ||||
0.24 SURVIVAL TEST{{Extension DPL}}<ul><li>[[Chorus Fruit|Chorus Fruit]]<br/>{{about|the fruit that drops from [[chorus tree]]s|the building material|Popped Chorus Fruit|other uses|Chorus}}
{{Item
| title = Chorus Fruit
| image = Chorus Fruit.png
| renewable = Yes
| heals = {{hunger|4}}
| stackable = Yes (64)
}}
'''Chorus fruit''' is a [[food]] [[item]] native to [[the End]] that can be eaten, or [[smelting|smelted]] into [[Popped Chorus Fruit|popped chorus fruit]]. It can be eaten even when the hunger bar is full, and eating it may teleport the [[player]] up to 8 blocks in any direction.
== Obtaining ==
{{see also|Tutorials/Chorus fruit farming}}
Chorus fruit can be obtained by breaking [[Chorus Plant (block)|chorus plant blocks]]. Each block of chorus plant has a 50% chance to drop a chorus fruit. This is not affected by [[Fortune]].<ref>{{bug|MC-198924||Chorus Fruit doesn't have a higher chance with Fortune|Invalid}}</ref>
== Usage ==
To eat chorus fruit, press and hold {{control|use}} while it is selected in the hotbar. Eating one restores {{hunger|4}} [[hunger]] and 2.4 hunger [[Hunger#Mechanics|saturation]].
Unlike most foods, chorus fruits can be eaten even when the player has a full hunger bar.
The player may also be [[teleportation|teleported]]: up to 16 attempts are made to choose a random destination within ±8 on all three axes in the same manner as [[Enderman#Teleportation|enderman teleportation]], with the exception that the player may teleport into an area only 2 blocks high, or one block tall if the player is crawling. The player does not land in the average centroid of the block, but rather to any position within an 8-block range. The player will be teleported directly down to the ground regardless of the height it was used at if the player is too far from a valid destination.
The chorus fruit, unlike an [[Ender Pearl|ender pearl]], can teleport the player through [[solid block]]s. The algorithm tries to avoid [[fluid]]s; the player cannot teleport into a space occupied by [[water]] or [[lava]]. However, the player can be teleported onto dangerous blocks such as fire, cacti and magma blocks.<ref>{{bug|MC-102836||Enderman and chorus fruit can teleport to some dangerous places}}</ref>
If a teleport succeeds, a sound similar to an enderman teleporting plays originating from the teleportation origin location. Chorus fruit has a cooldown of 1 second before being able to be used again. The cooldown is represented by a white overlay on the chorus fruit in the hotbar. The cooldown is applied to all chorus fruits items, including those in the player's inventory and containers.<ref>{{bug|MC-88236|||WAI}}</ref>
Eating chorus fruit may teleport the player into areas protected by [[bedrock]], [[barrier|barrier blocks]], or other blocks that are otherwise unbreakable in [[Survival]] mode. However, it cannot teleport the player onto [[the Nether]] roof.<ref>{{bug|MC-84198|||Fixed}}</ref>
Chorus fruit is completely non-functional above the nether roof.
[[Fox]]es can also eat chorus fruit and the teleportation effect works the same as with players.
=== Smelting ingredient ===
{{smelting
|Chorus Fruit
|Popped Chorus Fruit
|0.1}}
== Sounds ==
===Generic===
{{Sound table/Entity/Food}}
===Unique===
{{edition|java}}:
{{Sound table
|rowspan=2
|sound=Teleport1.ogg
|sound2=Teleport2.ogg
|subtitle=Player teleports
|source=player
|description=When a player teleports by eating a chorus fruit
|id=item.chorus_fruit.teleport
|translationkey=subtitles.item.chorus_fruit.teleport
|volume=1.0
|pitch=1.0
|distance=16}}
{{Sound table
|subtitle=Fox teleports
|source=Players & Friendly Creatures<wbr><ref group=sound>{{Bug|MC-257516||"Fox teleports" sound plays for both Players and Friendly Creatures sound categories}}</ref>|overridesource=1
|description=When a fox teleports by eating a chorus fruit
|id=entity.fox.teleport
|translationkey=subtitles.entity.fox.teleport
|volume=1.0
|pitch=1.0
|distance=16
|foot=1}}
{{edition|bedrock}}:
{{Sound table
|type=bedrock
|sound=Teleport1.ogg
|sound2=Teleport2.ogg
|source=hostile
|description=When something teleports by eating a chorus fruit
|id=mob.shulker.teleport
|volume=1.0
|pitch=1.0
|foot=1}}
==Data values ==
===ID===
{{edition|java}}:
{{ID table
|edition=java
|showforms=y
|generatetranslationkeys=y
|displayname=Chorus Fruit
|spritetype=item
|nameid=chorus_fruit
|form=item
|foot=1}}
{{edition|bedrock}}:
{{ID table
|edition=bedrock
|shownumericids=y
|showforms=y
|notshowbeitemforms=y
|generatetranslationkeys=y
|displayname=Chorus Fruit
|spritetype=item
|nameid=chorus_fruit
|id=558
|form=item
|foot=1}}
==Advancements==
{{load advancements|Husbandry;A Balanced Diet}}
==History==
{{History|java}}
{{History||1.9|snap=15w31a|[[File:Chorus Fruit JE1 BE1.png|32px]] Added chorus fruit.}}
{{History|||snap=15w34c|A cooldown for using chorus fruit has now been added.}}
{{History|||snap=15w37a|The chorus fruit's teleportation range has now been reduced from ±32 to ±8.}}
{{History|||snap=15w50a|Added a [[sound]] for chorus fruit: <code>item.chorus_fruit.teleport</code>.}}
{{History||1.10|snap=16w21a|Chorus fruit can now teleport riders off their mounts.}}
{{History||1.13|snap=17w47a|Prior to [[1.13/Flattening|''The Flattening'']], this [[item]]'s numeral ID was 432.}}
{{History||1.14|snap=18w43a|[[File:Chorus Fruit JE2 BE2.png|32px]] The texture of chorus fruit has now been changed.}}
{{History||1.20.2|snap=23w33a|Eating chorus fruit now resets fall distance.<ref>{{bug|MC-112133||Eating chorus fruit does not reset fall distance|Fixed}}</ref>}}
{{History|pocket}}
{{History||1.0.0|snap=alpha 0.17.0.1|[[File:Chorus Fruit JE1 BE1.png|32px]] Added chorus fruit.}}
{{History|||snap=alpha 1.0.0.1|The cooldown of chorus fruit now has an animation.}}
{{History|bedrock}}
{{History||1.7.0|snap=beta 1.7.0.2|The category that chorus fruit are apart of in the [[Creative inventory]] has been changed from "Nature" to "Items".}}
{{History||1.10.0|snap=beta 1.10.0.3|[[File:Chorus Fruit JE2 BE2.png|32px]] The texture of chorus fruit has now been changed.}}
{{History||1.13.0|snap=beta 1.13.0.15|Chorus fruit has been moved back to the "Nature" section in the Creative inventory.}}
{{History|console}}
{{History||xbox=TU46|xbone=CU36|switch=1.0.1|ps=1.38|wiiu=Patch 15|[[File:Chorus Fruit JE1 BE1.png|32px]] Added chorus fruit.}}
{{History||xbox=none|xbone=none|ps=1.90|wiiu=none|switch=none|[[File:Chorus Fruit JE2 BE2.png|32px]] The texture of chorus fruit has now been changed.}}
{{History|new 3ds}}
{{History||1.7.10|[[File:Chorus Fruit JE1 BE1.png|32px]] Added chorus fruit.}}
{{History|foot}}
==Issues==
{{issue list}}
==References==
{{reflist}}
==External Links==
*[https://www.minecraft.net/en-us/article/taking-inventory--chorus-fruit Taking Inventory: Chorus Fruit] – Minecraft.net on November 5, 2020
{{Items}}
[[Category:Plants]]
[[Category:Food]]
[[Category:Renewable resources]]
[[de:Chorusfrucht]]
[[es:Fruta chorus]]
[[fr:Chorus]]
[[ja:コーラスフルーツ]]
[[ko:후렴과]]
[[nl:Chorusfruit]]
[[pl:Owoc refrenusu]]
[[pt:Fruta do coro]]
[[ru:Плод коруса]]
[[uk:Фрукт хорусу]]
[[zh:紫颂果]]</li><li>[[A Very Fine Item|A Very Fine Item]]<br/>{{Joke feature}}
{{Item
| image = A Very Fine Item.png
| renewable = No
| stackable = Yes (64)
}}
'''A very fine item''' was a joke item from [[Java Edition 20w14∞]], found only in the {{code|isolation}} dimension.
== Appearance ==
The texture of a very fine item resembles the side face of a grass block with the words "Home Sweet Home" written on it. Unlike most items, its texture is 64x64 pixels, rather than the usual 16x16.
== Obtaining ==
=== Dimension ===
A very fine item can only be obtained from an item frame in the {{Code|isolation}} dimension. There is a maximum of 1 fine item that can be found legitimately in any world.
=== Cheats/Creative mode ===
This item can't be found in the creative inventory, but it can be middle-click duplicated in creative mode or given with the {{Code|code=give <target> minecraft:fine_item <amount>}} command.
== Usage ==
This item cannot be placed or used in any way other than a trophy. It can still be inserted and/or rotated inside of an item frame.
== Data values ==
=== ID ===
{{ID table
|showforms=y
|generatetranslationkeys=java
|displayname=A Very Fine Item
|spritetype=item
|nameid=fine_item
|form=item
|foot=1}}
== History ==
{{History|java}}
{{History||20w14∞|[[File:A Very Fine Item.png|32px]] Added a very fine item.}}
{{History|foot}}
== Gallery ==
<gallery>
File:isolation biome.png|The Easter Egg dimension that the item spawns in.
</gallery>
== References ==
{{reflist}}
{{Items}}
{{Jokes}}
[[Category:Non-renewable resources]]
[[Category:Joke items]]
[[es:A Very Fine Item]]
[[pt:Um item muito bom]]</li></ul> | Added survival mode in Survival Test. During this time, death was permanent, meaning players could not respawn and the level needed to be restarted unless a save file had been created. | ||||
| Until mid-Alpha, survival single-player was the only available mode besides Classic creative mode. | |||||
| Java Edition Indev | |||||
0.31{{Extension DPL}}<ul><li>[[:Category:Plants|Category:Plants]]<br/>All pages covering blocks of such things as tall grass and flowers.
[[Category:Blocks]]
[[Category:Items]]
[[cs:Kategorie:Rostliny]]
[[es:Categoría:Plantas]]
[[fr:Catégorie:Plante]]
[[hu:Kategória:Növények]]
[[it:Categoria:Piante]]
[[ja:カテゴリ:植物]]
[[ko:분류:식물]]
[[nl:Categorie:Planten]]
[[pl:Kategoria:Rośliny]]
[[pt:Categoria:Plantas]]
[[ru:Категория:Растения]]
[[th:หมวดหมู่:พืช]]
[[zh:Category:植物]]</li><li>[[Raw Salmon|Raw Salmon]]<br/>{{about|the item|the mob|Salmon}}
{{Item
| title = Raw Salmon
| image = Raw Salmon.png
| renewable = Yes
| heals = {{hunger|2}}
| stackable = Yes (64)
}}
'''Raw salmon''' is a food item that can be eaten by the [[player]] or cooked to make [[cooked salmon]].
== Obtaining ==
=== Mob loot ===
====Salmon====
[[Salmon]] always drops 1 raw salmon when killed, unaffected by Looting.<ref>{{bug|MC-212795||Salmon & Fish mobs are not affected by Looting}}</ref> If it is killed while on [[fire]], it drops 1 [[Cooked Salmon|cooked salmon]] instead.
====Guardians and elder guardians ====
[[Guardian|Guardians]] and [[Elder Guardian|elder guardians]] have a 2.5% chance to drop a random fish, with 25% of them being raw salmon, which drops as cooked if the guardian was on fire. The chance of getting the fish drop is increased by 1% per level with [[Looting]] (for a maximum of 5.5% with Looting III), but the type of fish is not affected.
====Polar bears====
[[Polar bear]]s have a 25% chance of dropping 0–2 raw salmon when killed. The maximum amount can be increased by 1 per level of Looting, for a maximum of 0-5 with Looting III. If killed while on fire, they drop cooked salmon instead.
=== Fishing ===
{{main|Fishing}}Raw salmon can be obtained from [[fishing]]. The wait time of one being caught is decreased with the [[Lure]] enchantment and the chance of one being caught is slightly decreased with the [[Luck of the Sea]] enchantment (named as such because it increases treasure, not fish).
Catching salmon awards 1-6 experience.
=== Chest loot ===
{{LootChestItem|raw-salmon}}
=== Villager gifts ===
{{in|java}}, Fisherman villagers throw raw salmon at [[player]]s under the [[Hero of the Village]] effect.
== Usage ==
=== Smelting ingredient ===
{{smelting
|Raw Salmon
|Cooked Salmon
|0.35
}}
=== Food ===
Raw salmon restores {{hunger|2}} [[hunger]] and 0.2 [[Hunger#Mechanics|saturation]].
=== Cats ===
Raw salmon can be used to tame [[cat]]s with {{frac|1|3}} chance of success, get cats off of [[chest]]s, and [[bed]]s, [[breed]] cats, and make baby cats grow up faster by 10% of the remaining time. Additionally, raw salmon can be used to heal cats by {{hp|2|mob=1}}.
Raw salmon can be used to gain [[ocelot]] trust, breed ocelots, and make baby ocelots grow up by 10%.
=== Dolphins ===
A [[dolphin]] can be fed raw salmon to increase its trust of the player and cause it to interact with the player more often. However, unlike most other animal mobs, this does not cause them to breed.
Additionally, dolphins swim to the nearest chest in a [[shipwreck]] or [[underwater ruin]] after they are fed raw salmon. If the chest in the nearest structure is broken, they swim to another structure with a chest.
=== Trading ===
Apprentice-level Fisherman [[villager]]s have 50%{{only|bedrock}} or {{frac|2|3}}{{only|java}} chance to buy 6 raw salmon and one [[emerald]] for 6 cooked salmon.
Journeyman-level Fisherman villagers offer to buy 13 raw salmon for an emerald.
=== Wolves ===
{{IN|bedrock}}, raw salmon can be fed only to [[wolves]] not at full health, healing them by {{hp|2|mob=1}}. Unlike other wolf food, raw salmon cannot be used to breed wolves or to accelerate the growth of baby wolves.
==Sounds==
{{Sound table/Entity/Food}}
== Data values ==
=== ID ===
{{edition|java}}:
{{ID table
|edition=java
|showitemtags=y
|showforms=y
|generatetranslationkeys=y
|displayname=Raw Salmon
|spritetype=item
|nameid=salmon
|itemtags=fishes
|form=item
|foot=1}}
{{edition|bedrock}}:
{{ID table
|edition=bedrock
|shownumericids=y
|showforms=y
|notshowbeitemforms=y
|generatetranslationkeys=y
|displayname=Raw Salmon
|spritetype=item
|nameid=salmon
|id=265
|form=item
|foot=1}}
== Achievements ==
{{load achievements|Lion Hunter}}
== Advancements ==
{{load advancements|Husbandry;A Balanced Diet;Fishy Business;A Complete Catalogue}}
== Video ==
<span style="display:inline-block">{{yt|s_GcAFeoREk}}</span>
== History ==
{{History|java}}
{{History||1.7.2|snap=13w36a|[[File:Raw Salmon JE1 BE1.png|32px]] Added raw salmon.}}
{{History||1.8|snap=14w25a|Raw salmon is now obtainable rare drops from [[guardian]]s and [[elder guardians]].}}
{{History||1.9|snap=15w44a|Raw salmon can now be found in [[bonus chest]]s.}}
{{History||1.10|snap=16w20a|Raw salmon is now dropped from [[polar bear]]s.}}
{{History||1.13|snap=17w47a|The different data values for the <code>fish</code> and <code>cooked_fish</code> IDs have been split up into their own IDs.
|Prior to [[1.13/Flattening|''The Flattening'']], these [[item]]s' numeral IDs were 349 and 250.}}
{{History|||snap=18w08b|Salmon has been added as a [[mob]], which drops raw salmon when killed (cooked while on [[fire]]).
|[[File:Raw Salmon JE2 BE2.png|32px]] The texture for raw salmon has been changed.}}
{{History||1.14|snap=18w48a|Raw salmon can now be found in chests in [[village]] fisher cottages.}}
{{History|||snap=19w11a|Fisherman [[villager]]s now [[trading|buy]] raw salmon.}}
{{History|||snap=19w13a|Fisherman villagers now give raw salmon to players under the [[Hero of the Village]] effect.}}
{{History|pocket alpha}}
{{History||v0.11.0|snap=build 1|[[File:Raw Salmon JE1 BE1.png|32px]] Added raw salmon.}}
{{History||v0.12.1|snap=build 1|Salmon now restores [[hunger]] instead of [[health]].
|Raw salmon can now be used to tame [[ocelot]]s.}}
{{History||v0.16.0|snap=build 1|Salmon is now [[drops|dropped]] by [[guardian]]s and [[elder guardian]]s.}}
{{History|pocket}}
{{History||1.0.0|snap=alpha 0.17.0.1|Added [[polar bear]]s, which drop raw salmon.}}
{{History|bedrock}}
{{History||1.2.0|snap=beta 1.2.0.2|Raw salmon is now found inside [[bonus chest]]s.}}
{{History||1.4.0|snap=beta 1.2.14.2|Salmon has been added as a [[mob]], which drops raw salmon when killed (cooked while on [[fire]]).
|[[File:Raw Salmon JE2 BE2.png|32px]] The texture for raw salmon has been changed.}}
{{History|||snap=beta 1.2.20.1|Added [[dolphin]]s, which can be [[breeding|bred]] with raw salmon.}}
{{History||1.5.0|snap=beta 1.5.0.0|Raw salmon can no longer be used to breed dolphins.
|Giving raw salmon to dolphins now leads the [[player]] to nearest [[underwater ruins]] or [[shipwreck]].}}
{{History||1.8.0|snap=beta 1.8.0.8|Raw salmon can no longer be used to tame [[ocelot]]s.
|Raw salmon can now be used to [[breeding|breed]] ocelots.
|Added stray [[cat]]s, which can be tamed by being fed raw salmon.}}
{{History||1.11.0|snap=beta 1.11.0.4|Raw salmon can now be [[trading|sold]] to fisherman [[villager]]s.}}
{{History||1.16.100|snap=beta 1.16.100.52|If [[salmon]] is [[death|killed]] while on [[fire]], then they now drop [[cooked salmon]] instead of a raw salmon.}}
{{History|console}}
{{History||xbox=TU31|xbone=CU19|ps=1.22|wiiu=Patch 3|[[File:Raw Salmon JE1 BE1.png|32px]] Added raw salmon.}}
{{History||xbox=TU69|ps=1.76|wiiu=Patch 38|[[File:Raw Salmon JE2 BE2.png|32px]] The texture for raw salmon have been changed.}}
{{History|new 3ds}}
{{History||0.1.0|[[File:Raw Salmon JE1 BE1.png|32px]] Added raw salmon.}}
{{History|foot}}
== Issues ==
{{issue list}}
== See also ==
* [[Fishing]]
== References ==
{{reflist}}
{{items}}
[[de:Roher Lachs]]
[[es:Salmón crudo]]
[[ja:生鮭]]
[[ko:생연어]]
[[pt:Salmão cru]]
[[ru:Сырой лосось]]
[[tr:Çiğ Somon]]
[[zh:生鲑鱼]]
[[Category:Renewable resources]]
[[Category:Food]]</li></ul> | 20100129 | Crafting is introduced. | |||
| Java Edition Infdev | |||||
| Minecraft Infdev | 20100227-1 | Death is no longer permanent; the player is now able to respawn. | |||
| Java Edition Alpha | |||||
v1.0.15{{Extension DPL}}<ul><li>[[Torchflower Seeds|Torchflower Seeds]]<br/>{{wip}}
{{Block
| image = <gallery>
Torchflower Age 0.png| Age 0
Torchflower Age 1.png| Age 1
Torchflower Age 2.png| Age 2
</gallery>
| image2 = Torchflower Seeds JE1.png
| transparent = Yes
| light = No
| tool = N/A
| renewable = Yes
| stackable = Yes (64)
| rarity = Common
|flammable=No
|lavasusceptible=No
}}
'''Torchflower seeds''' are seeds that have a chance to be dropped by [[Sniffer|sniffers]] when they finish digging.
== Obtaining ==
[[Sniffer]]s will occasionally bury their nose in the ground and start digging. Once the sniffer has finished digging, one torchflower seed will have a chance to be dropped on the floor as an item.
Sniffers can only dig for torchflower seeds in the following blocks:
*{{BlockLink|Dirt}}
*{{BlockLink|Grass Block}}
*{{BlockLink|Podzol}}
*{{BlockLink|Coarse Dirt}}
*{{BlockLink|Rooted Dirt}}
*{{BlockLink|Moss Block}}
*{{BlockLink|Mud}}
*{{BlockLink|Muddy Mangrove Roots}}
They cannot dig for torchflower seeds on [[mycelium]], which is intended.<ref>{{bug|MC-260259||Sniffers cannot dig nor find seeds on mycelium|WAI}}</ref>
== Usage ==
=== Crop ===
{{main|Tutorials/Crop farming|title1=Crop farming}}
Torchflower seeds can be {{control|placed}} on [[farmland]], where they grow through three stages. Breaking the torchflower crop before it matures drops the seed, while breaking the final stage produces one [[torchflower]] and does not yield the seed.
Crops break if pushed by a [[piston]] or if their supporting farmland breaks or turns to dirt (i.e. by being trampled), dropping their usual drops.
Farmer [[villager]]s can plant torchflower seeds, but cannot harvest them after they have fully grown.<ref>{{bug|MC-263382|||WAI}}</ref>
=== Feeding ===
Torchflower seeds can be used to breed [[sniffer]]s and [[chicken]]s and reduce the remaining growth duration of snifflets and chicks by 10%. Also, if some torchflower seeds were fed to an injured sniffer, it will heal it by {{hp|2}} health points.
=== Taming ===
Torchflower seeds can be used to tame [[parrot]]s.
=== Composting ===
Placing torchflower seeds into a [[composter]] has a 30% chance of raising the compost level by 1.
== Sounds ==
{{Sound table/Block/Crop}}
== Data values ==
=== ID ===
{{edition|java}}:
{{ID table
|edition=java
|showblocktags=y
|showitemtags=y
|showforms=y
|generatetranslationkeys=y
|displayname=Torchflower Crop
|spritetype=block
|nameid=torchflower_crop
|form=block
|blocktags=bee_growables, crops}}
{{ID table
|displayname=Torchflower Seeds
|spritetype=item
|nameid=torchflower_seeds
|form=item
|itemtags=villager_plantable_seeds
|foot=1}}
{{edition|bedrock}}:
{{ID table
|edition=bedrock
|shownumericids=y
|showforms=y
|generatetranslationkeys=y
|displayname=Torchflower Crop
|spritetype=block
|nameid=torchflower_crop
|id=-567
|form=block
|translationkey=-}}
{{ID table
|displayname=Torchflower Seeds
|spritetype=item
|nameid=torchflower_seeds
|id=296
|form=item
|foot=1}}
=== Block states ===
{{see also|Block states}}
{{/BS}}
== Achievements ==
{{Load achievements|Planting The Past}}
== Advancements ==
{{load advancements|A Seedy Place;Planting The Past;Little Sniffs}}
== History ==
{{History|java}}
{{History||1.20<br>(Experimental)|link=1.19.4|snap=23w07a|[[File:Torchflower Seeds JE1.png|32px]] Added torchflower seeds behind the [[Java Edition 1.20|Update 1.20 experimental datapack]].}}
{{History|||snap=1.19.4 Pre-release 1|Torchflower seeds can now be used to breed [[chicken]]s and tame [[parrot]]s.<ref>{{bug|MC-260035|||Fixed}}</ref>|Torchflower seeds are now next to other seeds in the [[Creative inventory]].|Placing torchflower seeds in farmland now gives the player the "A Seedy Place" [[advancement]].}}
{{History||1.20|snap=23w12a|[[Sniffer]]s can now be obtained in Survival, making torchflower seeds [[renewable]].|Torchflower seeds are now available without using the "Update 1.20" experimental datapack.}}
{{History|||snap=23w14a|Torchflower seeds can now be picked up by farmer [[villager]]s.|[[Sniffer]]s can now be tempted with torchflower seeds.}}
{{History|||snap=23w16a|[[Villager]]s can now plant torchflower seeds.}}
{{History|||snap=23w17a|The player now get the [[advancement]] "Little sniffs" when they feed a [[snifflet]] using torchflower seeds, "Planting the past" when they plant torchflower seeds on [[farmland]].}}
{{History|bedrock}}
{{History||Sniffer<br>(Experimental)|link=Bedrock Edition 1.19.70|snap=beta 1.19.70.23|[[File:Torchflower Seeds JE1.png|32px]] Added torchflower seeds behind the "[[Bedrock Edition 1.20.0|Sniffer]]" [[experimental]] toggle.}}
{{History||1.20.0|snap=beta 1.20.0.20|Torchflower seeds are now available without using the "Sniffer" experimental toggle.}}
{{History|foot}}
== Issues ==
{{issue list}}
== Trivia ==
* The final growth stage of the torchflower crop uses the same ID as the actual torchflower. This causes some side effects, such as the plant becoming offset and randomly jumping to the side.<ref>{{bug|MC-260472|resolution=wai}}</ref>
== Gallery ==
<gallery>
Torchflower Seeds stages.png|All the growth stages of torchflower seeds.
</gallery>
== Notes ==
{{notelist}}
== References ==
{{reflist}}
{{Blocks|upcoming}}
{{Items}}
[[Category:Plants]]
[[Category:Non-solid blocks]]
[[de:Fackelliliensamen]]
[[es:Semillas de plantorcha]]
[[ja:トーチフラワーの種]]
[[pt:Sementes de plantocha]]
[[zh:火把莲种子]]</li><li>[[Golden Apple|Golden Apple]]<br/>{{Distinguish|Enchanted Golden Apple}}
{{Item
| image = Golden Apple.png
| rarity = Rare
| heals = {{hunger|4}}
|effects=: {{EffectLink|Absorption}} (2:00)
: {{EffectLink|Regeneration}} II (0:05)
|renewable = Yes
|stackable = Yes (64)
}}
A '''golden apple''' is a [[food]] item that bestows beneficial effects when consumed, and is also used to cure a [[Zombie Villager|zombie villager]] under the [[Weakness]] effect into a normal [[villager]].
== Obtaining ==
=== Crafting ===
{{Crafting
|A1= Gold Ingot
|B1= Gold Ingot
|C1= Gold Ingot
|A2= Gold Ingot
|B2= Apple
|C2= Gold Ingot
|A3= Gold Ingot
|B3= Gold Ingot
|C3= Gold Ingot
|Output= Golden Apple
|type= Foodstuff
}}
=== Chest loot ===
On the base of <code>ancient_city/city_center/city_center_2</code>, a single golden apple is contained in the [[chest]]. Eating it at that location unlocks the [[piston]] doors to the [[redstone]] labs beneath.
{{LootChestItem|golden-apple}}
== Usage ==
{{see also|Tutorials/Hunger management|title1=Hunger management}}
To eat a golden apple, press and hold {{control|use}} while it is selected in the hotbar. It restores {{hunger|4}} points of hunger and 9.6 hunger [[Hunger#Mechanics|saturation]].
Unlike most foods, golden apples can be eaten when the hunger bar is full.
The golden apple provides:
*[[Absorption]] I for 2 minutes (providing {{hp|4|absorption=1}} points of absorption health)
*[[Regeneration]] II ({{hp|1}} every 25 ticks, {{hp|2|notag=1}} × 0.4 per second) for 5 seconds (long enough to heal {{hp|4}} points of damage)
=== Curing zombie villagers ===
{{main|Zombie Villager#Curing}}
A golden apple and a [[potion of weakness]] can be used to convert a [[zombie villager]] into a regular [[villager]].
=== Horses ===
Golden apples can be used for improving the chances of taming a [[horse]] by 10%, for [[breeding]] and leading horses, and for speeding up the growth of baby horses by 4 minutes.
===Piglins===
{{EntityLink|Piglin|Piglins}} are attracted to golden apples. They run toward any golden apples on the ground, and inspect it for 6 to 8 seconds before putting it in their inventory. However, piglins do not eat golden apples (or any [[food]]).
== Sounds ==
{{Sound table/Entity/Food}}
== Data values ==
=== ID ===
{{edition|java}}:
{{ID table
|edition=java
|showforms=y
|generatetranslationkeys=y
|displayname=Golden Apple
|spritetype=item
|nameid=golden_apple
|form=item
|foot=1}}
{{edition|bedrock}}:
{{ID table
|edition=bedrock
|shownumericids=y
|showforms=y
|notshowbeitemforms=y
|generatetranslationkeys=y
|displayname=Golden Apple
|spritetype=item
|nameid=golden_apple
|id=258
|form=item
|foot=1}}
== Achievements ==
{{load achievements|Zombie Doctor;Oooh, shiny!}}
== Advancements ==
{{load advancements|Zombie Doctor;Oh Shiny;A Furious Cocktail;How Did We Get Here;Husbandry;A Balanced Diet}}
== History ==
{{History|java infdev}}
{{History||February 23, 2010|link=http://www.minecraftforum.net/topic/2750582-the-secret-history-of-minecraft/|A [[player]] named JTE put a [[crafting]] recipe for golden apples as a joke at the bottom of a crafting guide she made. The recipe used [[gold ingot]]s instead of [[block of gold|gold blocks]].}}
{{History||20100227-1|[[File:Golden Apple JE1 BE1.png|32px]] Added golden apples.
|Golden apples heal a full {{hp|20}} [[health]] points, making them the best [[food]] in the entire game.
|Golden apples are [[crafting|crafted]] with an [[apple]] and eight [[gold block|blocks of gold]].
|However, since apples were not yet obtainable in normal gameplay, golden apples were not obtainable either.}}
{{History||20100625-2|Golden apples can now be rarely found in [[dungeon]]s, making them obtainable in normal gameplay.}}
{{History|java beta}}
{{History||1.8|snap=Pre-release|Due to the addition of [[hunger]], golden apples have been changed so that they restore {{hunger|10}}, instead of {{hp|20}} [[health]] points, but also give [[Regeneration]] for 30 seconds.
|[[Apple]]s can now be found in [[stronghold]] storeroom [[chest]]s, making golden apples craftable in normal gameplay for the first time.}}
{{History|java}}
{{History||1.0.0|snap=Beta 1.9 Prerelease 2|Golden apples have been given 'glint' (animated purple glow) when viewed from the [[player]]'s [[inventory]], and its tooltip has now changed from the standard white to a magenta color.}}
{{History|||snap=Beta 1.9 Prerelease 3|Golden apples can now be found in the new [[stronghold]] altar [[chest]]s.}}
{{History||1.1|snap=11w48a|Golden apples are now easier to [[crafting|craft]]. Standard [[apple]]s now rarely [[drops|drop]] from oak [[leaves]], meaning that [[player]]s no longer need to venture into [[stronghold]]s/[[dungeon]]s to find one.
|As [[gold]] is also renewable via [[Zombified Piglin|zombie pigmen]], golden apples have become a [[renewable resource]].}}
{{History|||snap=release|Golden apples have been changed, so that they now restore {{hunger|4}} and give only 4 seconds of [[Regeneration]].
|The [[crafting]] recipe of golden apples has been modified, requiring 8 [[gold nugget]]s instead of 8 [[blocks of gold]] to craft. Although its natural spawn is rare, it is easier to obtain through crafting.}}
{{History||1.3.1|snap=12w21a|With the addition of [[enchanted golden apple]]s, which got a purple tooltip, the standard golden apple's tooltip changed to blue. However, the standard golden apple's effects remain unchanged.}}
{{History||1.4.2|snap=12w32a|Golden apples can now be fed to [[zombie villager]]s with the [[Weakness]] debuff causing them to revert to [[villager]]s after a delay of about 3 minutes.}}
{{History||1.6.1|snap=13w23a|Golden apples now use 8 [[gold ingot]]s instead of 8 [[gold nugget]]s.
|The [[Regeneration]] effect of golden apples has been slowed down.}}
{{History|||snap=13w23b|Golden apples now give the player [[Health Boost]] for 1:30 and [[Regeneration]] II for 0:10. This temporarily gives the [[player]] 4 extra base [[health]] points, and it heals a total of {{hp|4}} health points.}}
{{History|||snap=13w24b|The Health Boost effect has been replaced with [[Absorption]], lasting 1:30.}}
{{History|||snap=13w25a|Absorption from golden apples now lasts 2:00.}}
{{History|||snap=?|Golden apples can now be used to tame, breed and heal horses and donkeys.}}
{{History||1.9|snap=15w37a|The [[Regeneration]] effect from golden apples has been reduced to Regeneration I (from II in [[Java Edition 1.8]]).}}
{{History|||snap=15w43a|A single golden apple can now sometimes be found in [[igloo]] [[chest]]s.}}
{{History|||snap=15w43b|A single golden apple is now always found in igloo chests.}}
{{History|||snap=15w44a|The [[Regeneration]] effect from golden apples has been returned to Regeneration II, as it had been in [[Java Edition 1.8|1.8]].
|The average yield of golden apples from [[dungeon]] chests has been increased.
|Golden apples have been added to [[desert temple]] and [[mineshaft]] chests.}}
{{History||1.11|snap=16w39a|Golden apples are now found in the new [[woodland mansion]] chests.}}
{{History||1.13|snap=17w47a|The names and IDs have been split into golden apple and enchanted golden apple.
|Prior to [[1.13/Flattening|''The Flattening'']], this [[item]]'s numeral ID was 322.}}
{{History|||snap=18w09a|Golden apples can now generate in the [[chest]]s of [[underwater ruins]].}}
{{History||1.14|snap=18w43a|[[File:Golden Apple JE2 BE2.png|32px]] The texture for golden apples has been changed.}}
{{History||1.16|snap=20w16a|Golden apples can now be found inside [[ruined portal]] chests.}}
{{History|||snap=20w18a|Golden apples are now less common in ruined portal [[chest]]s.}}
{{History||1.16.2|snap=20w30a|Golden apples are now found in [[bastion remnant]] chests.}}
{{History||1.18|snap=experimental snapshot 6|Horses, donkeys and mules now follow players holding golden apples.}}
{{History||1.19|snap=22w14a|A single golden apple may now be found in the chest at {{cd|city_center_2}} in [[Ancient City|ancient cities]].}}
{{History|pocket alpha}}
{{History||v0.12.1|snap=build 1|[[File:Golden Apple JE1 BE1.png|32px]] Added golden apples.}}
{{History|||snap=build 3|A [[crafting]] recipe has been added for golden apples.}}
{{History|bedrock}}
{{History||1.4.0|snap=beta 1.2.20.1|Golden apples can now generate in the [[chest]]s of [[underwater ruins]].}}
{{History||1.10.0|snap=beta 1.10.0.3|[[File:Golden Apple JE2 BE2.png|32px]] The texture for golden apples has been changed.}}
{{History||1.16.0|snap=beta 1.16.0.57|Golden apples can now be found inside [[ruined portal]] chests.}}
{{History|console}}
{{History||xbox=TU1|xbone=CU1|ps=1.0|wiiu=Patch 1|switch=1.0.1|[[File:Golden Apple JE1 BE1.png|32px]] Added golden apples.}}
{{History||xbox=TU5|Due to the addition of [[hunger]], golden apples have been changed, so that they restore {{hunger|10}} instead of {{hp|20}} health points, but also give [[Regeneration]] for 30 seconds.}}
{{History||xbox=TU19|xbone=CU7|ps=1.12|Golden apples now give extra "[[Absorption]]" health for a short period.}}
{{History||xbox=none|xbone=none|ps=1.90|wiiu=none|switch=none|[[File:Golden Apple JE2 BE2.png|32px]] The texture for golden apples has been changed.}}
{{History|New 3DS}}
{{History||0.1.0|[[File:Golden Apple JE1 BE1.png|32px]] Added golden apples.}}
{{History|foot}}
== Issues ==
{{issue list}}
== Trivia ==
Prior to [[Java Edition Beta 1.8]], the golden apple outwardly restored the player's full {{hp|20}} health points; Internally however, it is set to restore over double that, at {{hp|42}} health points. This is most likely a reference to [https://en.wikipedia.org/wiki/The_Hitchhiker's_Guide_to_the_Galaxy The Hitchhiker's Guide to the Galaxy], making it restore (the meaning of) life, 42 (health points). This is far before either the [[Absorption]] or [[Health Boost]] effects, causing this reference go unnoticed.
== Gallery ==
<gallery>
File:GoldenAppleComparison.png|A comparison of the two golden apple variations.
File:Golden apple in dungen 2013.png|A golden apple found in a dungeon.
File:Notch Apple In Mansion Chest.png|An extremely rare occasion where a regular golden apple and an enchanted apple being found in the same woodland mansion chest {{in|ee}}.
File:GoldenAppleDungeonChest.png|Golden apple in a [[dungeon]] chest, prior to 1.3.1. It resembles the enchanted golden apple.
File:Golden Apple Mineshaft Loot.png|A golden apple was found in a minecart chest in an abandoned mineshaft.
</gallery>
{{Items}}
[[Category:Renewable resources]]
[[Category:Food]]
[[cs:Zlaté jablko]]
[[de:Goldener Apfel]]
[[es:Manzana dorada]]
[[fr:Pomme dorée]]
[[hu:Aranyalma]]
[[it:Mela d'oro]]
[[ja:金のリンゴ]]
[[ko:황금 사과]]
[[nl:Gouden appel]]
[[pl:Złote jabłko]]
[[pt:Maçã dourada]]
[[ru:Золотое яблоко]]
[[th:แอปเปิ้ลทอง]]
[[tr:Altın Elma]]
[[uk:Золоте яблуко]]
[[zh:金苹果]]</li></ul> | Added multiplayer. Originally, Notch had only allowed a limited number of people from the Minecraft IRC channel to participate in the first tests of multiplayer. These invitees could invite other people to test out this mode; however, the password was leaked and the server was quickly filled up. Notch released the first version of the multiplayer server software on the 4th of August, 2010. The client was updated so that players could enter the IP of a server to join it. | ||||
| Pocket Edition Alpha | |||||
v0.2.0{{Extension DPL}}<ul><li>[[Crossbow|Crossbow]]<br/>{{For}}
{{Item
| title = Crossbow
| image = <gallery>
Crossbow.png | Crossbow
Crossbow Pull 0.png | Pull (state 0)
Crossbow Pull 1.png | Pull (state 1)
Crossbow Pull 2.png | Pull (state 2)
Arrow Loaded Crossbow.png | Arrow loaded
Firework Loaded Crossbow.png | Firework loaded
</gallery>
| rarity = Common
| renewable = Yes
| durability = 465{{only|JE|short=yes}}<br>464{{only|BE|short=1}}
| stackable = No
}}
A '''crossbow''' is a ranged [[weapon]] similar to a [[bow]] that uses [[arrow]]s or [[firework rocket|fireworks]] as ammunition.
== Obtaining ==
=== Crafting ===
{{Crafting
|A1=Stick|B1=Iron Ingot |C1=Stick
|A2=String|B2= Tripwire Hook|C2=String
|B3= Stick
|Output= Crossbow
|type= Combat
}}
=== Repairing ===
{{Grinding
|showdescription=1
|ingredients=2× Damaged [[Crossbow]] or<br>2× Damaged [[Arrow Loaded Crossbow]] or<br>2× Damaged [[Firework Loaded Crossbow]]
|Damaged Crossbow; Damaged Arrow Loaded Crossbow; Damaged Firework Loaded Crossbow
|Damaged Crossbow; Damaged Arrow Loaded Crossbow; Damaged Firework Loaded Crossbow
|Crossbow; Arrow Loaded Crossbow; Firework Loaded Crossbow
|description=The [[item durability|durability]] of the two crossbows is added together, plus an extra 5% durability.
}}
{{Crafting
|Damaged Crossbow;Damaged Arrow Loaded Crossbow;Damaged Firework Loaded Crossbow
|Damaged Crossbow;Damaged Arrow Loaded Crossbow;Damaged Firework Loaded Crossbow
|Output=Crossbow
|type=Combat
|ignoreusage=1
|showdescription=1
|description=The durability of the two crossbows is added together, plus an extra 5% durability. Any loaded ammunition is lost.
}}
=== Mob loot ===
==== Pillagers ====
When killed, a [[pillager]] has a small chance (8.5%) of dropping a loaded or unloaded crossbow with random [[durability]]; the [[drop]] rate increases by 1% per [[level]] of [[Looting]]: 9.5% with Looting I, 10.5% with Looting II and 11.5% with Looting III. The [[drop]]ped crossbow can rarely (10% chance) be [[enchanted]] at level 5–19 regardless of being [[enchanted]] when it [[spawn]]ed.
Crossbows dropped by pillagers may have multiple enchantments, including duplicate enchantments on the same weapon.
==== Piglins ====
[[Piglin]]s have a chance of wielding a crossbow upon spawning, and they also have a small chance (8.5%) of dropping a loaded or unloaded crossbow of random durability when killed; this rate increases by 1% per level of [[Looting]]: 9.5% with Looting I, 10.5% with Looting II and 11.5% with Looting III. It can rarely (10% chance) be enchanted at level 5–19 regardless of being enchanted when spawned.
=== Chest loot ===
{{LootChestItem|crossbow,damaged-level-enchanted-crossbow,damaged-random-enchanted-crossbow,damaged-random-enchanted-crossbow-2}}
=== Trading ===
Journeyman-level Fletcher [[villager]]s offer to [[trading|sell]] an unenchanted crossbow for 3 [[emerald]]s.
Master-level Fletcher villagers have a {{frac|1|16}} (6.25%) chance of selling an [[enchanting|enchanted]] crossbow for 8 emeralds.{{only|bedrock}}
Master-level Fletcher villagers have {{frac|2|3}} chance of selling an enchanted crossbow for 7-22 emeralds.{{only|java}}
== Usage ==
<gallery>
Steve aiming with Crossbow.png|
Alex aiming with Crossbow.png|
Pillager Aiming with Crossbow BE.png|
Piglin with Crossbow targeting JE.png|
</gallery>
Despite using [[iron ingot]]s in their crafting recipe, crossbows cannot be smelted into [[iron nugget]]s.<ref>{{bug|MC-111738}}</ref>
=== Weapon ===
[[File:Crossbowcooldown.gif|thumb|right|Charging and shooting the crossbow {{in|bedrock}}.]]
Crossbows are similar to [[bow]]s, but take longer to load and are slightly more powerful, shooting farther with slightly higher accuracy. Alternatively, they can be loaded with a firework rocket, which flies in a straight line.
Load them by {{control|using}} them, which makes the player move at sneak speed. Unlike bows, the [[arrow]] or [[firework rocket]] can be fired only if the player releases the use button after the crossbow is loaded{{Only|je}} or if the crossbow finishes its loading animation {{Only|be}}. At this point, it ''must be used a second time'' to fire its bolt.
Once it has reached full charge, the [[player]]'s speed returns to normal. After that, shooting a charged crossbow does not delay any of the [[player]]'s current action like [[sprinting]] or [[swimming]].
The crossbow can even be placed in another [[inventory]] slot or into an [[item frame]] without the [[arrow]] or [[firework rocket]] being unloaded or fired. A charged crossbow also remains charged after enchanting it with an enchantment table or with an anvil.
In order to use the crossbow, at least one arrow or firework rocket must be present in the inventory. The player can choose the type of arrow to fire based on its location in their [[inventory]]:
* [[File:Java Crossbow 1stP Loading.mp4|thumb|177x177px|Java Edition first-person loading animation for crossbows.]]Arrows in the off-hand, or the selected [[hotbar]] slot if the crossbow is in the off-hand, are prioritized first.
* If there are no arrows in the off-hand or selected hotbar slot, the arrow closest to slot 0 is selected.
Crossbows take 1.25 seconds (25 ticks) to load.
The player can load either an arrow, spectral arrow, tipped arrow (of any effect) or a firework (of any color/type).
[[File:Bedrock Crossbow 1stP Loading.mp4|thumb|177x177px|Bedrock Edition first-person loading animation for crossbows.]]
[[Endermen]] teleport away from projectile paths, so they cannot be hit with crossbow [[arrow]]s. However, they can still get harmed by [[firework rocket]] explosions, if they can't detect the firework rocket.
;Attack strength
''Java Edition'':
{| class="wikitable" style="text-align:center" data-description="Crossbow Damage Statistic"
|-
! Damage || Arrow || Max firework
|-
| {{ItemSprite|Crossbow|text= '''Minimum'''}}
| {{hp|7}}
| {{hp|11}}
|-
| {{ItemSprite|Crossbow|text= '''Average'''}}
| {{hp|9}}
| {{hp|14.5}}
|-
| {{ItemSprite|Crossbow|text= '''Maximum'''}}
| {{hp|11}}
| {{hp|18}}
|}
''Bedrock Edition''
* Always {{hp|9}}
=== Fireworks ===
[[Firework rocket]]s can be fired by loading the crossbow only while holding the rockets in the off-hand. They fly at 32 m/s. Firework rockets with higher flight duration have a longer time before they explode and therefore travel farther. Firing a firework rocket uses 3 [[durability]] points per shot.
{| class="wikitable" style="text-align:center"
! colspan="4" |Firework rocket range
|-
|Minimum
|Average
|Maximum
|Gunpowder
|-
|32m (20 ticks)
|40.8m (25.5 ticks)
|49.6m (31 ticks)
|1 ([[File:Gunpowder JE2 BE2.png|12x12px]])
|-
|48m (30 ticks)
|56.8m (35.5 ticks)
|65.6m (41 ticks)
| 2 ([[File:Gunpowder JE2 BE2.png|12x12px]][[File:Gunpowder JE2 BE2.png|12x12px]])
|-
|64m (40 ticks)
|72.8m (45.5 ticks)
|81.6m (51 ticks)
|3 ([[File:Gunpowder JE2 BE2.png|12x12px]][[File:Gunpowder JE2 BE2.png|12x12px]][[File:Gunpowder JE2 BE2.png|12x12px]])
|}
Firework rockets also work with the [[Multishot]] enchantment, enabling the [[player]] to shoot 3 firework rockets at a time. The increased durability usage stacks, resulting in 9 durability being consumed with each shot.
A shot firework rocket explodes instantly when it hits a [[mob]] or [[block]].{{only|java}} If the firework rocket has no explosion effect, it deals no [[damage]]. The explosion of a firework rocket deals {{hp|5}} to {{hp|6}} points of damage, with one [[firework star]]. The explosion has a radius of roughly 4 blocks, which is unaffected by the firework star's [[Firework Star#Effects|effect]]. Each additional firework star on the rocket deals an additional {{hp|1}} to {{hp|2}} points of damage, for a maximum of {{hp|11}} to {{hp|18}} with 7 firework stars. The flight duration of the firework increases the maximum range the firework can travel before exploding, but does not affect the damage output. Likewise, the damage remains the same regardless of any dyes used. The [[Piercing]] enchantment causes the firework rocket to pierce a number of entities based on its respective level before exploding.{{only|java}} Unlike an arrow shot from a bow, the firework does not slow down under water.
=== Repair ===
Crossbows can be repaired in an [[anvil]] or [[grindstone]] by combining two crossbows. Any loaded ammunition is retained from the crossbow in the first slot but sacrificed from the crossbow in the second slot.
===Enchantments===
{| class="wikitable"
|+
!Name
!Description
!Max Level
|-
|[[Quick Charge]]
|Decreases the reloading time of the crossbow by {{code|level * 0.25}} seconds. Crossbows with [[Quick Charge]] III fire slightly faster than [[bow]]s. If [[commands]] are used to enchant a crossbow with Quick Charge V, the crossbow charges instantaneously. A crossbow enchanted with Quick Charge VI is effectively impossible to charge, which renders it useless. This can be done only {{in|je}}.
|III
|-
|[[Multishot]]
| Makes the crossbow fire a spread of 3 projectiles at once instead of a single projectile, which is useful for targeting mobs spread out in a small area. This works for both [[arrow]]s and [[firework rocket]]s. Firing with this enchantment still uses only one projectile, and because of that, it is possible to recover only one of the three arrows shot from a Multishot crossbow. Multishot crossbows use 3 [[item durability|durability]] points per shot, unless using fireworks for ammunition, in which case 9 durability is consumed. Mutually exclusive with Piercing.
|I
|-
|[[Piercing]]
|Makes [[arrow]]s shot from the crossbow pierce [[entity|entities]] they hit and continue their flight, which allows each arrow to hit up to {{code|level + 1}} entities. This is useful for targeting [[mob]]s closely packed together, and for conserving arrows, as they can be picked up after piercing entities. Arrows fired in this manner also ignore [[Shield|shields]]. Mutually exclusive with Multishot.
|IV
|-
|[[Unbreaking]]
|Causes a <code>(Level /(Level+1)) * 100%</code> chance a shot fired does not reduce the [[item durability|durability]] of the crossbow.
|III
|-
|[[Mending]]
|Allows a certain proportion of [[experience]] orbs collected to contribute toward repairing the crossbow, rather than raising the [[player]]'s experience.
|I
|-
|[[Curse of Vanishing]]
| Causes the crossbow to disappear instead of dropping on the ground when the player dies. The {{cmd|gamerule keepInventory}} overrides this.
|I
|}
[[Multishot]] and [[Piercing]] are mutually exclusive. Normal methods of [[enchanting]] allow only one of them to be applied to a crossbow.
Crossbows can receive 3 unique [[enchanting|enchantment]]s, and have a base enchantability of 1. Enchantments specific to crossbows include [[Quick Charge]], Multishot and Piercing.
===Fuel===
Crossbows can be used as [[fuel]] in [[furnace]]s, [[smelting]] 1.5 [[item]]s per crossbow.
== Sounds ==
{{el|je}}:
{{Sound table
|sound=Crossbow loading start.ogg
|subtitle=Crossbow charges up
|source=player
|description=When a crossbow starts to load
|id=item.crossbow.loading_start
|translationkey=subtitles.item.crossbow.charge
|volume=0.15
|pitch=1.0
|distance=16}}
{{Sound table
|sound=Crossbow quick charge one1.ogg
|sound2=Crossbow quick charge one2.ogg
|sound3=Crossbow quick charge one3.ogg
|subtitle=Crossbow charges up
|source=player
|description=When a Quick Charge I crossbow starts to load <ref group=sound><code>quick1_3</code> occurs at half the frequency as the other sounds</ref>
|id=item.crossbow.quick_charge_1
|translationkey=subtitles.item.crossbow.charge
|volume=''varies'' <ref group=sound>0.325 for all except <code>quick1_1</code> (pitch=0.9), which is 0.25</ref>
|pitch=''varies'' <ref group=sound><code>quick1_1</code> can be 1.0 or 0.9; <code>quick1_2</code> can be 1.0 or 0.95; <code>quick1_3</code> can be 1.0</ref>
|distance=16}}
{{Sound table
|sound=Crossbow quick charge two1.ogg
|sound2=Crossbow quick charge two2.ogg
|sound3=Crossbow quick charge two3.ogg
|subtitle=Crossbow charges up
|source=player
|description=When a Quick Charge II crossbow starts to load <ref group=sound name=quickchargefrequency><code>_1</code> occurs at {{frac|2|3}} the frequency as the other sounds</ref>
|id=item.crossbow.quick_charge_2
|translationkey=subtitles.item.crossbow.charge
|pitch=''varies'' <ref group=sound name=quickchargevolume />
|volume=''varies'' <ref group=sound name=quickchargepitch />
|distance=16}}
{{Sound table
|sound=Crossbow quick charge three1.ogg
|sound2=Crossbow quick charge three2.ogg
|sound3=Crossbow quick charge three3.ogg
|subtitle=Crossbow charges up
|source=player
|description=When a Quick Charge III crossbow starts to load <ref group=sound name=quickchargefrequency />
|id=item.crossbow.quick_charge_3
|translationkey=subtitles.item.crossbow.charge
|volume=''varies'' <ref group=sound name=quickchargevolume>0.325 for all except <code>_1</code> (pitch=0.95), which is 0.25</ref>
|pitch=''varies'' <ref group=sound name=quickchargepitch><code>_1</code> can be 1.0 or 0.95; <code>_2</code> can be 1.0, 0.95, or 1.05; <code>_3</code> can be 1.0, 0.9, or 1.05</ref>
|distance=16}}
{{Sound table
|sound=Crossbow loading middle1.ogg
|sound2=Crossbow loading middle2.ogg
|sound3=Crossbow loading middle3.ogg
|sound4=Crossbow loading middle4.ogg
|subtitle=MC-203146
|source=player
|description=While a crossbow is loading <ref group=sound><code>loading_middle4</code> occurs at {{frac|1|4}} the frequency as the other sounds</ref>
|id=item.crossbow.loading_middle
|translationkey=-
|volume=0.325
|pitch=''varies'' <ref group=sound><code>loading_middle1</code> can be 1.0, 0.95, or 1.2; <code>loading_middle2</code> and <code>loading_middle3</code> can be 1.0, 0.9, or 1.05; <code>loading_middle4</code> can be 1.0</ref>
|distance=16}}
{{Sound table
|sound=Crossbow loading end.ogg
|subtitle=Crossbow loads
|source=dependent
|description=When a crossbow stops loading
|id=item.crossbow.loading_end
|translationkey=subtitles.item.crossbow.load
|volume=1.0
|pitch={{frac|13|15}}-1.2
|distance=16}}
{{Sound table
|sound=Crossbow shoot1.ogg
|sound2=Crossbow shoot2.ogg
|sound3=Crossbow shoot3.ogg
|subtitle=Crossbow fires
|source=dependent
|description=When a crossbow fires
|id=item.crossbow.shoot
|translationkey=subtitles.item.crossbow.shoot
|volume=0.8/0.9/0.9
|pitch=1.0/1.0/0.9 <ref group=sound>Multiplied by the loading percentage of the crossbow</ref>
|distance=16}}
{{Sound table
|sound=Arrow hit1.ogg
|sound2=Arrow hit2.ogg
|sound3=Arrow hit3.ogg
|sound4=Arrow hit4.ogg
|subtitle=Arrow hits
|source=neutral
|description=When an arrow hits a block or entity
|id=item.crossbow.hit
|translationkey=subtitles.item.crossbow.hit
|volume=1.0
|pitch={{frac|12|11}}-{{frac|4|3}}
|distance=16}}
{{Sound table
|sound=Succesfull Hit.ogg
|subtitle=Player hit
|source=player
|description=When an arrow shot by a player hits another player
|id=entity.arrow.hit_player
|translationkey=subtitles.entity.arrow.hit_player
|volume=0.18
|pitch=0.45
|distance=16}}
{{Sound table
|sound=Firework launch.ogg
|subtitle=Firework launches
|source=ambient
|description=When a crossbow fires a firework rocket
|id=entity.firework_rocket.launch
|translationkey=subtitles.entity.firework_rocket.launch
|volume=3.0
|pitch=1.0
|distance=16}}
{{Sound table
|sound=Random break.ogg
|subtitle=Item breaks
|source=dependent
|description=When a crossbow's durability is exhausted
|id=entity.item.break
|translationkey=subtitles.entity.item.break
|volume=0.8
|pitch=0.8-1.2
|distance=16
|foot=1}}
{{el|be}}:
{{Sound table
|type=bedrock
|sound=Crossbow loading start.ogg
|source=player
|description=When a crossbow starts to load
|id=crossbow.loading.start
|volume=1.0
|pitch=1.0}}
{{Sound table
|sound=Crossbow loading middle1.ogg
|sound2=Crossbow loading middle2.ogg
|sound3=Crossbow loading middle3.ogg
|sound4=Crossbow loading middle4.ogg
|source=player
|description=While a crossbow is loading and when a crossbow stops loading
|id=crossbow.loading.middle
|volume=1.0
|pitch=1.0}}
{{Sound table
|sound=Crossbow loading end.ogg
|source=player
|description=''Unused sound event''
|id=crossbow.loading.end
|volume=1.0
|pitch=1.0}}
{{Sound table
|sound=Crossbow quick charge one1.ogg
|sound2=Crossbow quick charge two1.ogg
|sound3=Crossbow quick charge three1.ogg
|source=player
|description=When a crossbow with Quick Charge starts to load
|id=crossbow.quick_charge.start
|volume=1.0
|pitch=1.0}}
{{Sound table
|sound=Crossbow quick charge one2.ogg
|sound2=Crossbow quick charge two2.ogg
|sound3=Crossbow quick charge three2.ogg
|source=player
|description=While a crossbow with Quick Charge is loading
|id=crossbow.quick_charge.middle
|volume=1.0
|pitch=1.0}}
{{Sound table
|sound=Crossbow quick charge one3.ogg
|sound2=Crossbow quick charge two3.ogg
|sound3=Crossbow quick charge three3.ogg
|source=player
|description=When a crossbow with Quick Charge stops loading
|id=crossbow.quick_charge.end
|volume=1.0
|pitch=1.0}}
{{Sound table
|sound=Crossbow shoot1.ogg
|sound2=Crossbow shoot2.ogg
|sound3=Crossbow shoot3.ogg
|source=player
|description=When a crossbow fires
|id=crossbow.shoot
|volume=1.0
|pitch=1.0}}
{{Sound table
|sound=Arrow hit1.ogg
|sound2=Arrow hit2.ogg
|sound3=Arrow hit3.ogg
|sound4=Arrow hit4.ogg
|source=player
|description=When an arrow hits a block or entity
|id=random.bowhit
|volume=1.0
|pitch=1.09-1.3}}
{{Sound table
|sound=Firework launch.ogg
|source=ambient
|description=When a crossbow fires a firework rocket
|id=firework.launch
|volume=1.0
|pitch=1.0}}
{{Sound table
|sound=Random break.ogg
|source=player
|description=When a crossbow's durability is exhausted
|id=random.break
|volume=1.0
|pitch=0.9
|foot=1}}
==Data values==
=== ID===
{{edition|java}}:
{{ID table
|edition=java
|showforms=y
|generatetranslationkeys=y
|displayname=Crossbow
|spritetype=item
|nameid=crossbow
|form=item
|foot=1}}
{{edition|bedrock}}:
{{ID table
|edition=bedrock
|shownumericids=y
|showforms=y
|notshowbeitemforms=y
|generatetranslationkeys=y
|displayname=Crossbow
|spritetype=item
|nameid=crossbow
|id=575
|form=item
|foot=1}}
===Item data===
{{el|java}}:
{{main|Player.dat format}}
<div class="treeview" style="margin-top: 0;">
*{{nbt|compound|tag}}: The '''tag''' tag.
{{:Player.dat_format/Crossbow}}
</div>
{{el|bedrock}}:
: See [[Bedrock Edition level format/Item format]].
==Achievements==
{{load achievements|Sniper Duel;Archer;Bullseye}}
==Advancements==
{{load advancements|Take Aim;Bullseye;Sniper Duel;Ol' Betsy;Who's the Pillager Now;Two Birds;Arbalistic}}
==History==
{{History||September 29, 2018|link={{tweet|Minecraft|1046094916902965249}}|Crossbows are announced at [[MINECON Earth 2018]].}}
{{History|java}}
{{History||1.14|snap=18w43a|[[File:Crossbow.png|32px]] [[File:Crossbow Pull 0.png|32px]] [[File:Crossbow Pull 1.png|32px]] [[File:Crossbow Pull 2.png|32px]] [[File:Arrow Loaded Crossbow.png|32px]] [[File:Crossbow.png|32px]] [[File:Crossbow Pull 0.png|32px]] [[File:Crossbow Pull 1.png|32px]] [[File:Crossbow Pull 2.png|32px]] [[File:Firework Loaded Crossbow.png|32px]] [[File:Crossbow.png|32px]] Added crossbows.
|Crossbows can be enchanted with either the [[Quick Charge]] (Highest Level III), [[Piercing]] (Highest Level IV) or [[Multishot]] (Highest Level I).}}
{{History|||snap=18w47a|Crossbows can now be found inside loot [[chest]]s at the top of [[pillager outpost]]s.}}
{{History|||snap=19w11a|Fletcher [[villager]]s now [[trading|sell]] crossbows and enchanted crossbows.}}
{{History||1.16|snap=20w07a|[[File:Piglin with Crossbow.png|32px]] [[File:Piglin left handed with Crossbow.png|35px]] [[File:Piglin using one hand to hold a loaded crossbow JE1.png|35px]] Added [[piglin]]s, which can spawn with and [[drops|drop]] crossbows.}}
{{History|||snap=20w16a|Crossbows now generate randomly enchanted in [[bastion remnants]] chests.}}
{{History||1.18|snap=21w37a|Crossbow durability is increased to 465 to match {{edition|BE}}.}}
{{History||1.19.4|snap=23w07a|The crossbow recipes are no longer unlocked by [[stick]]s.}}
{{History|upcoming java}}
{{History||Villager Trade Rebalance<br>(Experimental)|link=Java Edition 1.20.2|snap=23w31a|Enchantments exclusive to crossbows are no longer obtainable from villager [[trading]].}}
{{History|bedrock}}
{{History||1.8.0|snap=beta 1.8.0.10|[[File:Crossbow.png|32px]] [[File: Crossbow Pull 0.png|32px]] [[File: Crossbow Pull 1.png|32px]] [[File: Crossbow Pull 2.png|32px]] [[File:Arrow Loaded Crossbow.png|32px]] [[File:Crossbow.png|32px]] [[File:Crossbow Pull 0.png|32px]] [[File:Crossbow Pull 1.png|32px]] [[File:Crossbow Pull 2.png|32px]] [[File:Firework Loaded Crossbow.png|32px]] [[File:Crossbow.png|32px]] Added crossbows.
|Crossbows are currently apart of [[Experimental Gameplay]].}}
{{History||1.9.0|snap=beta 1.9.0.0|Added [[pillager]]s, which use and [[drops|drop]] crossbows.}}
{{History|||snap=beta 1.9.0.3|Crossbows now appear bigger in a pillager's hand.}}
{{History||1.10.0|snap=beta 1.10.0.3|Crossbows are now fully implemented and separate from [[Experimental Gameplay]].
|Crossbows can now be found in [[pillager outpost]] [[chest]]s.}}
{{History||1.11.0|snap=beta 1.11.0.4|Unenchanted and [[enchanting|enchanted]] crossbows can now be [[trading|bought]] from fletcher [[villager]]s.}}
{{History||1.12.0|snap=beta 1.12.0.3|Journeyman-level fletcher villagers now have 100% chance to [[trading|sell]] unenchanted crossbow, rather than 50% chance.}}
{{History||1.16.0|snap=beta 1.16.0.51|[[File:Piglin with Crossbow BE.png|32px]] Added [[piglin]]s, which can spawn with and [[drops|drop]] crossbows.}}
{{History|||snap=beta 1.16.0.57|Crossbows now generate randomly enchanted in [[bastion remnants]] chests.}}
{{History|PS4}}
{{History||1.90|[[File:Crossbow.png|32px]] [[File: Crossbow Pull 0.png|32px]] [[File: Crossbow Pull 1.png|32px]] [[File: Crossbow Pull 2.png|32px]] [[File:Arrow Loaded Crossbow.png|32px]] [[File:Crossbow.png|32px]] [[File:Crossbow Pull 0.png|32px]] [[File:Crossbow Pull 1.png|32px]] [[File:Crossbow Pull 2.png|32px]] [[File:Firework Loaded Crossbow.png|32px]] [[File:Crossbow.png|32px]] Added crossbows.}}
{{History|foot}}
==Issues==
{{issue list}}
==Trivia==
*Alongside [[pillager]]s, crossbows were inspired by ''[[Minecraft Dungeons]]'', even though they were added in the base game first.<ref>{{cite|url=https://discord.com/channels/579770991056519194/818903542139453480/819631528593588244| title = March 2021 developper Q&A|website=discord.com|date=March 11, 2021}}</ref>
*Crossbows [[enchanting|enchanted]] with [[Quick Charge]] VI and above get stuck on the first frame on the recharging animation because the resulting charge time is negative, and the game never reaches the time markers that tell it to advance the animation or the reloading procedure itself. It is technically possible to charge such crossbows, but this would require overflowing the value that determines how long the crossbow has been charged. This takes such an amount of time that this is practically impossible: for example, charging a crossbow with Quick Charge VI would take 69.4 years to complete.
*Although Piercing allows arrows to bypass [[shield]]s, they can't get through the wither armor.
*The crossbow's first-person loading animation in [[Bedrock Edition]] is different from [[Java Edition]].
*Even if a crossbow is already wound with a projectile, when it drops on the ground, it always looks uncharged.<ref>{{bug|MC-137552}}</ref>
*In real life, crossbows don't shoot the same arrows as bows, rather they shoot shorter, thicker, and oftentimes fletchless arrows (usually called "bolts") made to withstand the crossbow's increased power, which can shatter conventional arrows.
==Gallery==
<gallery>
File:CrossbowMinecon.png|A crossbow shown at [[MINECON Earth 2018]].
File:PillagerMinecon.png|A [[pillager]] armed with a crossbow, shown at MINECON Earth 2018.
File:EquippingCrossbow.png|How the crossbow is equipped.
File:Enchanted_Crossbow.gif|An enchanted crossbow.
File:Steve_Charging_Crossbow.gif|Steve charging crossbow {{in|java}}.
File:Alex_Charging_Crossbow.gif|Alex charging crossbow {{in|java}}.
File:Pillager_Charging_Crossbow.gif|Pillager charging crossbow.
File:Piglin_Charging_Crossbow.gif|Piglin charging crossbow.
File:Crossbow_(MCD).png|The ''Minecraft Dungeons'' variant of the crossbow
</gallery>
== References ==
{{reflist}}
== External Links ==
*[https://www.minecraft.net/en-us/article/taking-inventory--crossbow Taking Inventory: Crossbow] – Minecraft.net on October 20, 2022
{{Items}}
[[Category:Combat]]
[[Category:Renewable resources]]
[[de:Armbrust]]
[[es:Ballesta]]
[[fr:Arbalète]]
[[it:Balestra]]
[[ja:クロスボウ]]
[[ko:쇠뇌]]
[[pl:Kusza]]
[[pt:Besta]]
[[ru:Арбалет]]
[[th:หน้าไม้]]
[[zh:弩]]</li><li>[[Pufferfish (item)|Pufferfish (item)]]<br/>{{DISPLAYTITLE:Pufferfish}}
{{about|the food item|the mob|Pufferfish}}
{{Item
| title = Pufferfish
| image = File:Pufferfish_(item)_JE5_BE2.png
| renewable = Yes
| heals = {{hunger|1}}
| stackable = Yes (64)
|effects=: {{EffectLink|link=Hunger (effect)|Hunger}} III (0:15)
: {{EffectLink|Poison}} II (1:00)
: {{EffectLink|Nausea}} I (0:15){{only|JE}}
: {{EffectLink|Nausea}} II (0:15){{only|BE}}
}}
A '''pufferfish''' is a poisonous [[food]] item that is used to brew [[Potion of Water Breathing|Water Breathing potions]].
== Obtaining ==
=== Fishing ===
Pufferfish can be obtained through [[fishing]]. The pufferfish catch rate can be increased by [[Lure]], which reduces wait time generally.
<!--1-6 exp-->
{{IN|bedrock}}, pufferfish can be caught only when fishing outside [[jungle]] biomes and its variants (i.e. everywhere ''except'' in jungles).
=== Mob loot ===
==== Guardians and elder guardians ====
[[Guardian]]s and [[elder guardian]]s have a 2.5% chance of dropping a random fish upon death. This has a 13% chance of being pufferfish (0.325% chance of dropping a pufferfish). The chance of getting a fish can be increased by 1% per level of [[Looting]], but the type of fish is not affected.
==== Pufferfish ====
[[Pufferfish]] always drop 1 pufferfish in its item form when killed. This drop is not affected by the Looting enchantment.<ref>{{bug|MC-212795||Salmon & Fish mobs are not affected by Looting}}</ref>
== Usage ==
=== Food ===
Pufferfish restores {{hunger|1}} hunger and 0.2 [[Hunger#Mechanics|saturation]], but inflicts [[Hunger_(effect)|Hunger]] III for 15 seconds, [[Poison]] II for 1 minute, and [[Nausea]] I<sup>[''[[Java Edition|JE]] only'']</sup> or II<sup>[''[[Bedrock Edition|BE]] only'']</sup> for 15 seconds. Unlike [[rotten flesh]], it is not helpful to eat pufferfish while starving because they inflict more hunger than they earn.
===Brewing ingredient===
{{brewing
|Pufferfish
|Potion of Water Breathing
|head=1
}}
{{brewing
|Pufferfish
|Mundane Potion
|ingredients=Pufferfish + [[Water Bottle]]
|foot=1
}}
=== Trading ===
Master-level fisherman [[villager]]s buy 1~4{{only|bedrock|short=1}} or four{{only|java|short=1}} pufferfish for an [[emerald]].
=== Wolves ===
{{IN|Bedrock}}, pufferfish can be used to feed a [[wolf]], healing it by {{hp|1|mob=1}}, but only when the wolf is not at full health. Unlike other wolf food, pufferfish cannot be used to speed up the growth of baby wolves, and cannot be used to breed them.
== Sounds ==
{{Sound table/Entity/Food}}
== Data values ==
=== ID ===
{{edition|java}}:
{{ID table
|edition=java
|showitemtags=y
|showforms=y
|generatetranslationkeys=y
|displayname=Pufferfish
|spritetype=item
|nameid=pufferfish
|itemtags=fishes
|form=item
|foot=1}}
{{edition|bedrock}}:
{{ID table
|edition=bedrock
|shownumericids=y
|showforms=y
|notshowbeitemforms=y
|generatetranslationkeys=y
|displayname=Pufferfish
|spritetype=item
|nameid=pufferfish
|id=267
|form=item
|foot=1}}
== Advancements ==
{{load advancements|A Furious Cocktail;How did we get here;Husbandry;A Balanced Diet;Fishy Business}}
== History ==
{{History|java}}
{{History||1.7.2|snap=13w36a|[[File:Pufferfish (item) JE1.png|32px]] Added pufferfish.
|Added potions of [[Water Breathing]], which can be [[brewing|brewed]] by adding a pufferfish to an [[Awkward Potion]].}}
{{History|||snap=13w43a|[[File:Pufferfish (item) JE2 BE1.png|32px]] The texture of pufferfish has been changed.}}
{{History||1.8|snap=14w25a|Pufferfish is now obtainable as a rare drop from [[guardian]]s and [[elder guardian]]s.}}
{{History||1.13|snap=17w47a|The different data values for the <code>fish</code> ID have now been split up into their own IDs.
|Prior to [[1.13/Flattening|''The Flattening'']], this [[item]]'s numeral ID was 349.}}
{{History|||snap=18w08b|[[Pufferfish]] (and other [[fish]] types) has been added as a [[mob]], which [[drops|drop]] its item form when killed.
|[[File:Pufferfish (item) JE3 BE2.png|32px]] The texture of pufferfish has been changed.}}
{{History||1.14|snap=18w43a|[[File:Pufferfish (item) JE4 BE1.png|32px]] The texture of pufferfish has accidentally been reverted.}}
{{History|||snap=18w43b|[[File:Pufferfish (item) JE5 BE2.png|32px]] The correct texture of pufferfish has been restored.}}
{{History|||snap=19w11a|Fisherman [[villager]]s now [[trading|buy]] pufferfish.}}
{{History||1.16.2|snap=Pre-release 2|The level of [[Nausea]] given by pufferfish has been reduced from II to I.<ref>{{bug|MC-196473}}</ref>}}
{{History||1.17|snap=20w46a|The level of [[Poison]] given by pufferfish has been reduced from IV to II.<ref>{{bug|MC-197276}}</ref>}}
{{History|pocket alpha}}
{{History||v0.11.0|snap=build 1|[[File:Pufferfish (item) JE2 BE1.png|32px]] Added pufferfish.}}
{{History||v0.12.1|snap=build 1|Pufferfish now restore [[hunger]] instead of [[health]].
|Pufferfish can now be used to make [[potion]] of Water Breathing.}}
{{History||v0.16.0|snap=build 1|Pufferfish is now dropped by [[guardian]]s and [[elder guardian]]s.}}
{{History|bedrock}}
{{History||1.4.0|snap=beta 1.2.14.2|[[Pufferfish]] has been added as a [[mob]], which [[drops|drop]] its [[item]] form when killed.
|[[File:Pufferfish (item) JE5 BE2.png|32px]] The texture of pufferfish has been changed.}}
{{History||1.8.0|snap=beta 1.8.0.8|Pufferfish can now be used to feed [[ocelot]]s to gain their trust.}}
{{History||1.11.0|snap=beta 1.11.0.4|Pufferfish can now be [[trading|sold]] to fisherman [[villager]]s.}}
{{History||1.19.10|snap=beta 1.19.10.23|The strength of the [[poison]] effect has been decreased from IV to II.}}
{{History|console}}
{{History||xbox=TU31|xbone=CU19|ps=1.22|wiiu=Patch 3|switch=1.0.1|[[File:Pufferfish (item) JE2 BE1.png|32px]] Added pufferfish.}}
{{History||xbox=TU69|xbone=none|ps=1.76|wiiu=Patch 38|switch=none|[[Pufferfish]] (and other [[fish]] types) has been added as a [[mob]], which [[drops|drop]] its [[item]] form when killed.}}
{{History||xbox=none|xbone=none|ps=1.90|wiiu=none|switch=none|[[File:Pufferfish (item) JE5 BE2.png|32px]] The texture of pufferfish has been changed.}}
{{History|foot}}
== Issues ==
{{issue list}}
== Trivia ==
* The consumption of pufferfish inflicting the player with Nausea and Poison is based on reality. Real pufferfish contain the dangerous [[Wikipedia:Tetrodotoxin|tetrodotoxin]] within their organs, especially in the liver. Tetrodotoxin leads to quick death through respiratory paralysis. Muscle tissue and blood contain trace amounts. In East Asia, pufferfish are considered a delicacy known as [[Wikipedia:Fugu|fugu]], as small parts of the fish are actually edible. Any chef preparing fugu must have special licensing/certification to prepare this dish.
== Gallery ==
<gallery>
File:Eat Pufferfish.png|The result of eating pufferfish.
</gallery>
== See also ==
* [[Fishing]]
== References ==
{{Reflist}}
== External Links ==
*[https://www.minecraft.net/en-us/article/taking-inventory--pufferfish Taking Inventory: Pufferfish] – Minecraft.net on October 14, 2020
{{items}}
[[cs:Čtverzubec]]
[[de:Kugelfisch (Nahrung)]]
[[es:Pez globo (objeto)]]
[[fr:Poisson (nourriture)]]
[[it:Pesce palla (oggetto)]]
[[ja:フグ (アイテム)]]
[[ko:복어 (아이템)]]
[[nl:Kogelvis]]
[[pl:Rozdymka]]
[[pt:Baiacu (item)]]
[[ru:Иглобрюх (предмет)]]
[[th:ปลาปักเป้า (ไอเทม)]]
[[tr:Kirpi balığı]]
[[zh:河豚(物品)]]
[[Category:Food]]
[[Category:Brewing recipe]]
[[Category:Renewable resources]]</li></ul> | Added Survival mode. | ||||
v0.3.0{{Extension DPL}}<ul><li>[[Redstone Dust|Redstone Dust]]<br/>{{Redirect|Redstone|the ore|Redstone Ore|the powered mineral block|Block of Redstone|other uses|Redstone (disambiguation)}}
{{Block
| group = Inactive (connected)
| 1-1= Inactive Redstone Wire (NESW).png
| 1-2 = Inactive Redstone Wire (NESW) BE.png
| group2 = Inactive (unconnected)
| 2-1 = Inactive Redstone Wire (unconnected).png
| 2-2 = Inactive Redstone Wire (unconnected).png
| group3 = Active (connected)
| 3-1 = Active Redstone Wire (NESW).png
| 3-2 = Active Redstone Wire (NESW) BE.png
| group4 = Active (unconnected)
| 4-1 = Active Redstone Wire (unconnected).png
| 4-2 = Active Redstone Wire (unconnected).png
| image = Redstone Dust JE2 BE2.png
| extratext = [[#Gallery|View all renders]]
| transparent = Yes
| light = No
| tool = all
| renewable = Yes
| stackable = Yes (64)
| flammable = No
| lavasusceptible = No
}}
'''Redstone dust''' is a mineral that can transmit [[Redstone circuit#Power|redstone power]] as a wire when placed as a [[block]]. It is also used in [[crafting]] and [[brewing]].
== Obtaining ==
=== Mining ===
{{see also|Redstone Ore#Natural generation}}
[[Redstone ore]] mined using an iron [[pickaxe]] or higher drops 4 or 5 redstone dust (or more with [[Fortune]], averaging at 6 redstone dust with Fortune III). If mined with [[Silk Touch]], the block drops itself instead of redstone dust.
=== Natural generation ===
15 lengths of redstone dust are naturally generated as part of the trap in each [[jungle pyramid]]. 5 lengths of redstone dust can be found in one type of jail cell room in a [[woodland mansion]]. In [[Ancient City|ancient cities]], multiple pieces of redstone dust can be found integrated into circuitry.
=== Breaking ===
Redstone dust can be broken instantly using any tool, or without a tool, and drops itself as an item.
Redstone dust is removed and drops as an item if:
* its attachment block is moved, removed, or destroyed
* [[water]] or [[lava]] flows into its space
* a [[piston]] tries to push it or moves a block into its space
=== Mob loot ===
[[Witch]]es have a chance of dropping 0–2 redstone dust upon death. This is increased by 1 per level of [[Looting]], for a maximum of 0–5 redstone dust.
=== Chest loot ===
{{LootChestItem|redstone}}
=== Crafting ===
Redstone dust can be crafted from [[blocks of redstone]].
{{Crafting
|Block of Redstone
|Output=Redstone Dust,9
|type=Redstone
}}
=== Smelting ===
{{Smelting
|showname=1
|Redstone Ore; Deepslate Redstone Ore
|Redstone Dust
|0.7
}}
=== Trading ===
{{IN|java}}, novice-level cleric [[villager]]s sell two redstone dust for one [[emerald]].
{{IN|bedrock}}, novice-level cleric villagers sell four redstone dust for one emerald.
=== Villager gifts ===
{{see also|Tutorials/Raid farming}}
{{IN|Java}}, when the player has the [[Hero of the Village]] status effect, clerics might throw that player a redstone dust as a gift.
== Usage ==
Redstone dust is used for [[#Brewing ingredient|brewing]], [[#Crafting ingredient|crafting]], and in redstone circuits by placing it on the ground to create [[#Redstone component|redstone wire]]. It can also be used to power redstone components.
=== Brewing ingredient ===
{{Brewing
|head=1
|Redstone Dust
|Mundane Potion
|base=Water Bottle
}}
{{Brewing
|foot=1
|name=Increased Duration
|Redstone Dust
|showbase=1
|base=Potion of Fire Resistance; Potion of Invisibility; Potion of Night Vision; Potion of Poison; Potion of Regeneration; Potion of Slowness; Potion of Strength; Potion of Swiftness; Potion of Water Breathing; Potion of Weakness; Potion of Leaping; Potion of Slow Falling
}}
=== Crafting ingredient ===
{{crafting usage|Redstone Dust}}
=== {{anchor|Redstone dust}} Redstone component ===
When placed in the world, redstone dust becomes a block of "redstone wire"{{Info needed|other blco? BE?}}, which can transmit [[Redstone circuit#Power|redstone power]].
=== Smithing ingredient ===
{{Smithing
|head=1
|ingredients=Any Armor Trim +<br/>Any Armor Piece + <br/>Redstone Dust
|Any Armor Trim Smithing Template
|Netherite Chestplate
|Redstone
|Redstone Trim Netherite Chestplate
|showdescription=1
|description = All armor types can be used in this recipe,<br/>a netherite chestplate is shown as an example.<br/>
|tail=1
}}
;Trim color palette
The following color palette is shown on the designs on trimmed armor:
*{{TrimPalette|redstone dust}}
=== Placement ===
[[File:Redstone wire as circuit component.png|Examples of redstone wire configuration. ''Top Left:'' Redstone wire connects diagonally vertically through non-opaque blocks. ''Top Right:'' Redstone wire does ''not'' connect diagonally vertically through opaque blocks. ''Center:'' Redstone wire gets darker as its power level drops, to a maximum of 15 blocks from a power source.|thumb]]
[[File:Redstone on Glowstone, Stairs, Slabs.png|Examples of redstone wire placements.|thumb]]
Redstone dust can be placed on [[opaque]] blocks as well as [[glowstone]], upside-down [[slab]]s, [[glass]], upside-down [[stairs]], and [[hopper]]s. It can also be placed on some transparent blocks; see [[Opacity/Placement]] for more information. It cannot be placed suspended in midair, even with commands, which is not unintentional.<ref>{{bug|MC-182709}}</ref>
Redstone wire configures itself to point toward adjacent redstone [[Redstone components#Power components|power components]] and [[Redstone components#Transmission components|transmission component]] connection points. Redstone wire also configures itself to point toward adjacent redstone wire one block higher or lower – unless there is a solid opaque block above the lower redstone wire.
If there is only one such adjacent redstone component, redstone wire configures itself into a {{BlockSprite|redstone-dust}} line pointing both at the neighbor and away from it. If there are two or more such adjacent components, redstone wire connects them in the form of {{BlockSprite|redstone-dust}}, {{BlockSprite|redstone-dust-upleft}}, {{BlockSprite|redstone-dust-t-up}}, or {{BlockSprite|redstone-dust-cross}} as needed.
When there are no adjacent components, a single redstone wire configures itself into a {{BlockSprite|redstone-dust-cross}} plus sign, which can provide power in all four directions. By right-clicking it can be changed into a {{BlockSprite|redstone-dust-dot}} dot, which does not provide power to any of the four directions.
{{IN|bedrock}}, redstone wire automatically configures itself to point toward adjacent blocks or [[Redstone components#Mechanism components|mechanism components]]. {{IN|java}}, it does not. If such a configuration is desired, the other neighbors of the redstone wire must be arranged to create it, i.e the redstone dust must be placed in a way that it would be pointed at the block’s location even if it were not there.
When redstone wire is reconfigured after placement, it does not update other redstone components around it of the change unless that reconfiguration also includes a change in power level or another component provides an update. This can create situations where a mechanism component remains activated when it shouldn't, or vice versa, until it receives an update from something else – a "feature" of redstone wire that can be used to make a [[BUD|block update detector]].
{{-}}
=== Behavior ===
{{Schematic|caption=
{{IN|be}}, the signal can go down from glass blocks.
|||rd-$ew!|RL-!||||rd-$ew!|RL-!|-
|rt-$!|rd-$ew!|SB|||rt-$!|rd-$ew!|glass||-
|ts-$|SB|rd-$ew|RL||ts-$|SB|rd-$ew!|RL-!
}}{{Schematic|caption =
However, the signal can never go down from slabs.
|||rd-$ew!|RL-!||||rd-$ew!|RL-!|-
|rt-$!|rd-$ew!|SB|||rt-$!|rd-$ew!|glass||-
|ts-$|ts-$|rd-$ew|RL||ts-$|ts-$|rd-$ew|RL
}}
Redstone wire can transmit power, which can be used to operate [[Redstone components#Mechanism components|mechanism components]] ([[door]]s, [[piston]]s, [[redstone lamp]]s, etc.).
Redstone wire can be "powered" by a number of methods:
* from an adjacent [[Redstone components#Power components|power component]] or a strongly-powered block
* from the output of a redstone repeater or redstone comparator
* from adjacent redstone wire. The powering dust can be a level higher or lower, but with restrictions:
** Redstone dust can be powered by redstone dust that is one level lower, or on an [[opaque]] block one level higher. A transparent block cannot{{only|java}} pass power downward.
** The block "between" the two dust blocks must be air or transparent. A solid block there "cuts" the connection between the higher and lower dust.
The "power level" of redstone dust can vary from 0 to 15. Most power components power-up adjacent redstone dust to power level 15, but a few ([[daylight sensor]]s, [[trapped chest]]s, and [[weighted pressure plate]]s) may create a lower power level. Redstone repeaters output power level 15 (when turned on), but [[redstone comparator]]s may output a lower power level.
{{Schematic | caption =
Redstone wire can transmit power up to 15 blocks.
|rt-$!|rd-$ew!+15|rd-$ew!+14|rd-$ew!+13|rd-$ew!+12|rd-$ew!+11|rd-$ew!+10|rd-$ew!+9
|rd-$ew!+8|rd-$ew!+7|rd-$ew!+6|rd-$ew!+5|rd-$ew!+4|rd-$ew!+3|rd-$ew!+2|rd-$ew!+1|rd-$ew+0
}}
Power level drops by 1 for every block of redstone wire it crosses. Thus, redstone wire can transmit power for no more than 15 blocks. To go further, the power level must be re-strengthened – typically with a redstone repeater.
Powered redstone wire on top of, or pointing at, an opaque block provides ''weak'' power to the block. A weakly-powered block cannot power other adjacent redstone wire, but can still power redstone repeaters and comparators, and activate adjacent mechanism components. Transparent blocks cannot be powered.
When redstone wire is unpowered, it appears dark red. When powered, it becomes bright red at power level 15, fading to darker shades with decreasing power. Powered redstone wire also produces "dust" [[particles]] of the same color.
While redstone wire always provides power to the directions it points into, it can still point into directions in which it cannot give power. If redstone wire comes in the form of a cross, the player can right-click to toggle it between a cross and dot. A redstone dot does not power anything adjacent to it, but powers the block under it.
== Sounds ==
{{Sound table/Block/Normal}}
== Data values ==
=== ID ===
{{edition|java}}:
{{ID table
|edition=java
|firstcolumnname=Redstone Dust
|showforms=y
|generatetranslationkeys=y
|displayname=Block
|spritename=redstone-dust
|spritetype=block
|nameid=redstone_wire
|form=block}}
{{ID table
|displayname=Item
|spritename=redstone-dust
|spritetype=item
|nameid=redstone
|form=item
|foot=1}}
{{edition|bedrock}}:
{{ID table
|edition=bedrock
|firstcolumnname=Redstone Dust
|shownumericids=y
|showforms=y
|generatetranslationkeys=y
|displayname=Block
|spritename=redstone-dust
|spritetype=block
|nameid=redstone_wire
|id=55
|form=block}}
{{ID table
|displayname=Item
|spritename=redstone-dust
|spritetype=item
|nameid=redstone
|id=373
|form=item
|foot=1}}
=== Block states ===
{{see also|Block states}}
{{/BS}}
{{LoadPage|Redstone Dust/Asset history|List of block state combinations|h4}}
== Achievements ==
{{load achievements|Dispense With This}}
== Video ==
{{Video note|These videos do not show all uses for redstone in crafting and all methods of obtaining. This video is also outdated, as of 1.13 Java Edition, redstone is now called Redstone Dust.}}
<div style="text-align:center">
<span style="display:inline-block">{{yt|zldqknGFWb4}}</span>
<span style="display:inline-block">{{yt|_IApwvCLJW8}}</span>
</div>
== History ==
{{History||May 21, 2009|link=https://web.archive.org/web/0/http://notch.tumblr.com/post/110762705/my-list-on-tile-types-so-far|[[Notch]] shows interest in adding wire-type [[block]]s.}}
{{History|java alpha}}
{{History||v1.0.1|[[File:Redstone Dust JE1 BE1.png|32px]] Added redstone dust as an [[item]].
|[[File:Inactive Redstone Wire (NS) JE1.png|32px]] [[File:Inactive Redstone Wire (EW) JE1.png|32px]] [[File:Inactive Redstone Wire (NE) JE1.png|32px]] [[File:Inactive Redstone Wire (ES) JE1.png|32px]] [[File:Inactive Redstone Wire (SW) JE1.png|32px]] [[File:Inactive Redstone Wire (NW) JE1.png|32px]] [[File:Inactive Redstone Wire (NEW) JE1.png|32px]] [[File:Inactive Redstone Wire (NES) JE1.png|32px]] [[File:Inactive Redstone Wire (ESW) JE1.png|32px]] [[File:Inactive Redstone Wire (NSW) JE1.png|32px]] [[File:Inactive Redstone Wire (NESW) JE1.png|32px]]<br>[[File:Active Redstone Wire (NS) JE1.png|32px]] [[File:Active Redstone Wire (EW) JE1.png|32px]] [[File:Active Redstone Wire (NE) JE1.png|32px]] [[File:Active Redstone Wire (ES) JE1.png|32px]] [[File:Active Redstone Wire (SW) JE1.png|32px]] [[File:Active Redstone Wire (NW) JE1.png|32px]] [[File:Active Redstone Wire (NEW) JE1.png|32px]] [[File:Active Redstone Wire (NES) JE1.png|32px]] [[File:Active Redstone Wire (ESW) JE1.png|32px]] [[File:Active Redstone Wire (NSW) JE1.png|32px]] [[File:Active Redstone Wire (NESW) JE1.png|32px]] Added redstone dust as a placed [[block]].
|Redstone dust as a placed block has two power appearances; either completely on, or completely off.
|Redstone dust is used to craft [[redstone torch]]es.
|At this time, redstone has not been given an official name.}}
{{History||v1.0.2_01|Redstone dust now doesn't connect through solid [[block]]s diagonally down.{{needs testing|may have been changed in v1.0.2|type=untestable}}
|Walking on redstone dust no longer [[breaking|breaks]] it.{{needs testing|may have been changed in v1.0.2|type=untestable}}
|Active redstone dust now gives off [[particles]].{{needs testing|may have been changed in v1.0.2|type=untestable}}}}
{{History||v1.1.0|Redstone is now used to craft [[compass]]es.}}
{{History||v1.2.0|snap=<nowiki>?|slink=:Category:Information needed requiring unarchived version|Redstone is now used to craft [[clock]]s.}}
{{History|java beta}}
{{History||1.0|With the addition of inventory tooltips, the [[item]] form of redstone dust has been named "Redstone", and the usually unobtainable block form has been named "Redstone Dust".}}
{{History||1.2|Redstone is now used to craft [[dispenser]]s and [[note block]]s.}}
{{History||1.3|[[File:Inactive Redstone Wire (NS) JE2.png|32px]] [[File:Inactive Redstone Wire (EW) JE2.png|32px]] [[File:Inactive Redstone Wire (NE) JE2.png|32px]] [[File:Inactive Redstone Wire (ES) JE2.png|32px]] [[File:Inactive Redstone Wire (SW) JE2.png|32px]] [[File:Inactive Redstone Wire (NW) JE2.png|32px]] [[File:Inactive Redstone Wire (NEW) JE2.png|32px]] [[File:Inactive Redstone Wire (NES) JE2.png|32px]] [[File:Inactive Redstone Wire (ESW) JE2.png|32px]] [[File:Inactive Redstone Wire (NSW) JE2.png|32px]] [[File:Inactive Redstone Wire (NESW) JE2.png|32px]]<br>[[File:Active Redstone Wire (NS) JE2.png|32px]] [[File:Active Redstone Wire (EW) JE2.png|32px]] [[File:Active Redstone Wire (NE) JE2.png|32px]] [[File:Active Redstone Wire (ES) JE2.png|32px]] [[File:Active Redstone Wire (SW) JE2.png|32px]] [[File:Active Redstone Wire (NW) JE2.png|32px]] [[File:Active Redstone Wire (NEW) JE2.png|32px]] [[File:Active Redstone Wire (NES) JE2.png|32px]] [[File:Active Redstone Wire (ESW) JE2.png|32px]] [[File:Active Redstone Wire (NSW) JE2.png|32px]] [[File:Active Redstone Wire (NESW) JE2.png|32px]] Redstone wire gets darker the farther away it is from a source of power, using a dedicated [[tint]] system. Previously, it was fully on until it reached its limit.
|Its particles now appear gray due to not being tinted.
|Redstone is now used to craft [[redstone repeater]]s.}}
{{History||1.5|[[File:Inactive Redstone Wire (NS) JE3.png|32px]] [[File:Inactive Redstone Wire (EW) JE3.png|32px]] [[File:Inactive Redstone Wire (NE) JE3.png|32px]] [[File:Inactive Redstone Wire (ES) JE3.png|32px]] [[File:Inactive Redstone Wire (SW) JE3.png|32px]] [[File:Inactive Redstone Wire (NW) JE3.png|32px]] [[File:Inactive Redstone Wire (NEW) JE3.png|32px]] [[File:Inactive Redstone Wire (NES) JE3.png|32px]] [[File:Inactive Redstone Wire (ESW) JE3.png|32px]] [[File:Inactive Redstone Wire (NSW) JE3.png|32px]] [[File:Inactive Redstone Wire (NESW) JE3.png|32px]]<br>[[File:Active Redstone Wire (NS) JE3.png|32px]] [[File:Active Redstone Wire (EW) JE3.png|32px]] [[File:Active Redstone Wire (NE) JE3.png|32px]] [[File:Active Redstone Wire (ES) JE3.png|32px]] [[File:Active Redstone Wire (SW) JE3.png|32px]] [[File:Active Redstone Wire (NW) JE3.png|32px]] [[File:Active Redstone Wire (NEW) JE3.png|32px]] [[File:Active Redstone Wire (NES) JE3.png|32px]] [[File:Active Redstone Wire (ESW) JE3.png|32px]] [[File:Active Redstone Wire (NSW) JE3.png|32px]] [[File:Active Redstone Wire (NESW) JE3.png|32px]] Fully off redstone wire is no longer black.
|Redstone dust can now be placed on [[snow]].
|Redstone is now used to craft [[powered rail]]s and [[detector rail]]s.}}
{{History||1.6.6|Redstone dust now checks if the block below has a solid top face or [[glowstone]], allowing it to be placed on it.}}
{{History||1.7|Redstone dust now connects to a [[redstone repeater|repeater]] without the dust being explicitly pointed at it.
|Redstone can now be used to craft [[piston]]s.}}
{{History||1.8|snap=Pre-release|Redstone can now be found in the new [[stronghold]] storeroom [[chest]]s, and in the new [[mineshaft]] chests.}}
{{History|java}}
{{History||1.0.0|snap=Beta 1.9 Prerelease 3|Redstone can now be [[brewing|brewed]] in a [[water bottle]] to create a [[mundane potion]].
|Redstone can now be found in the new [[stronghold]] altar [[chest]]s.
|Redstone now extends the [[potion]]s of [[Fire Resistance]], [[Slowness]], [[Swiftness]], [[Poison]], [[Weakness]] and [[Strength]].}}
{{History|||snap=Beta 1.9 Prerelease 4|Redstone now extends the new potion of [[Regeneration]].}}
{{History|||snap=RC1|[[File:Inactive Redstone Wire (unconnected) JE1.png|32px]] <br>[[File:Active Redstone Wire (unconnected) JE1.png|32px]] Redstone dust placement on one [[block]] has been changed from a "+" to a "•" shape.}}
{{History||?|Redstone wire block particles are now correctly colored.}}
{{History||1.1|snap=11w49a|Fixed redstone update bug.{{more info}}}}
{{History||1.2.1|snap=12w06a|Redstone can now be placed on [[glowstone]].}}
{{History|||snap=12w07a|Redstone is now used to craft [[redstone lamp]]s.}}
{{History||1.3.1|snap=12w21a|Redstone can now be [[trading|bought]] from priest [[villager]]s, at 2–4 redstone for 1 [[emerald]], making them [[renewable]].}}
{{History|||snap=12w22a|Redstone dust now generates in [[jungle temple]]s.}}
{{History|||snap=12w25a|Redstone dust can now be placed on top of upside-down [[slabs]] and [[stairs]].}}
{{History||1.4.2|snap=12w34a|Redstone now extends the new [[potion]]s of [[Night Vision]] and [[Invisibility]].}}
{{History|||snap=12w38a|[[Witch]]es have been added, which sometimes [[drops|drop]] redstone when killed.}}
{{History||1.5|snap=13w01a|Redstone can now be used to craft [[blocks of redstone]] and [[dropper]]s.}}
{{History||1.7.2|snap=13w36a|Redstone now extends the new [[potion]] of [[Water Breathing]].}}
{{History||1.8|snap=14w02a|[[Trading]] has been changed: cleric [[villager]]s now [[trading|sell]] 1–4 redstone for 1 [[emerald]].}}
{{History|||snap=14w25a|Redstone dust no longer changes to [[obsidian]] next to water when [[lava]] flows into it.}}
{{History|||snap=14w27a|Redstone now extends the new [[potion]] of [[Leaping]].}}
{{History||1.9|snap=15w31a|[[File:Inactive Redstone Wire (unconnected) JE2.png|32px]] [[File:Inactive Redstone Wire (NS) JE4.png|32px]] [[File:Inactive Redstone Wire (EW) JE4.png|32px]] [[File:Inactive Redstone Wire (NE) JE4.png|32px]] [[File:Inactive Redstone Wire (ES) JE4.png|32px]] [[File:Inactive Redstone Wire (SW) JE4.png|32px]] [[File:Inactive Redstone Wire (NW) JE4.png|32px]] [[File:Inactive Redstone Wire (NEW) JE4.png|32px]] [[File:Inactive Redstone Wire (NES) JE4.png|32px]] [[File:Inactive Redstone Wire (ESW) JE4.png|32px]] [[File:Inactive Redstone Wire (NSW) JE4.png|32px]] [[File:Inactive Redstone Wire (NESW) JE4.png|32px]]<br>[[File:Active Redstone Wire (unconnected) JE2.png|32px]] [[File:Active Redstone Wire (NS) JE4.png|32px]] [[File:Active Redstone Wire (EW) JE4.png|32px]] [[File:Active Redstone Wire (NE) JE4.png|32px]] [[File:Active Redstone Wire (ES) JE4.png|32px]] [[File:Active Redstone Wire (SW) JE4.png|32px]] [[File:Active Redstone Wire (NW) JE4.png|32px]] [[File:Active Redstone Wire (NEW) JE4.png|32px]] [[File:Active Redstone Wire (NES) JE4.png|32px]] [[File:Active Redstone Wire (ESW) JE4.png|32px]] [[File:Active Redstone Wire (NSW) JE4.png|32px]] [[File:Active Redstone Wire (NESW) JE4.png|32px]] Some slight changes have been made to redstone wire's appearance - the dot now extends outward with two more pixels, and the south-facing section of bends, T shapes and crosses now has one fewer pixel. It also appears straighter and more continuous in straight wire form.
|Redstone can no longer be added to extended [[potion]]s or tier-II potions.}}
{{History|||snap=15w44a|The average yield of redstone from [[dungeon]] [[chest]]s has been cut by more than half.
|The average yield of redstone in [[mineshaft]] chests has been increased.}}
{{History|||snap=15w46a|The hitbox of redstone now covers only part of the surface of the [[block]] below, based on the orientation of the redstone.}}
{{History||1.11|snap=16w39a|Redstone dust can now be found in chests in [[woodland mansion]]s.
|Redstone can now used to craft [[observer]]s.}}
{{History||1.13|snap=17w47a|The [[item]] form of "Redstone" has been renamed to "Redstone Wire".
|Prior to [[1.13/Flattening|''The Flattening'']], this [[block]]'s numeral ID was 55, and the [[item]]'s 331.}}
{{History|||snap=17w48a|"Redstone" has been renamed to "Redstone Dust".}}
{{History|||snap=18w07a|Redstone now extends the new [[potion of the Turtle Master]].}}
{{History||1.14|snap=18w43a|[[File:Redstone Dust JE2 BE2.png|32px]] The texture of redstone dust has been changed.}}
{{History|||snap=18w50a|Redstone dust can now be found in chests in [[village]] temples.}}
{{History|||snap=19w12b|Redstone dust can now be placed on [[glass]], [[ice]] and [[sea lantern]]s.}}
{{History|||snap=19w13a|Cleric villagers now give redstone dust to players under the [[Hero of the Village]] effect.}}
{{History||1.16|snap=20w06a|Redstone dust now has a bottom texture.}}
{{History|||snap=20w09a|Redstone can now be used to craft [[target]]s.}}
{{History|||snap=20w18a|Redstone dust placement on one [[block]] has been changed from a "•" back to a "+" shape.
|Redstone dust's hitbox is now no longer strictly a cuboid, and more closely matches the shape of the wiring.<ref>{{bug|MC-137336}}</ref>
|Upward going redstone dust now has a hitbox on the side of the [[block]] too, rather than only on the floor.<ref>{{bug|MC-153508}}</ref>
|Unconnected redstone dust now has all direction block states set to "side".
|The direction block states of redstone dust are now properly set to "side" at the end of a redstone wire on both ends, rather than only the one with other redstone besides it.
|[[File:Inactive Redstone Wire (N).png|32px]] [[File:Inactive Redstone Wire (E).png|32px]] [[File:Inactive Redstone Wire (S).png|32px]] [[File:Inactive Redstone Wire (W).png|32px]]<br>[[File:Active Redstone Wire (N).png|32px]] [[File:Active Redstone Wire (E).png|32px]] [[File:Active Redstone Wire (S).png|32px]] [[File:Active Redstone Wire (W).png|32px]] While not accessible in normal gameplay, redstone dust that points into one side, but not the opposite, now visually reaches halfway across the [[block]].}}
{{History|||snap=20w19a|Redstone dust now visually connects when going up [[soul sand]], 8-layer [[snow]] stacks and the back side of upside-down [[stairs]].
|[[Particles]] are now generated across the length of the redstone wire rather than the center of the [[block]].}}
{{History|||snap=20w21a|Redstone dust placement on one [[block]] is now toggleable between a "+" and a "•" shape, by {{control|interacting}} with it.}}
{{History||1.17|snap=21w08a|Redstone dust can now drop and be smelted from [[deepslate redstone ore]].}}
{{History||1.19|snap=22w13a|Redstone wire now generates in [[Ancient City|ancient cities]].}}
{{History||1.20<br>(Experimental)|link=1.19.4|snap=23w04a|Redstone dust can now be used as an armor trim material.}}
{{History|pocket alpha}}
{{History||v0.8.0|snap=build 1|[[File:Redstone Dust JE1 BE1.png|32px]] Added redstone as an [[item]].
|Redstone is now [[drops|dropped]] when [[breaking|mined]] from [[redstone ore]].
|Redstone can be used to craft [[compass]]es and [[clock]]s.}}
{{History|||snap=build 2|Redstone can now be used to craft [[powered rail]]s.}}
{{History||v0.11.0|snap=build 1|Redstone is now used to craft [[redstone block]]s.}}
{{History||v0.12.1|snap=build 1|Redstone has been added to the [[Creative]] [[inventory]], but it still cannot be placed. }}
{{History||v0.13.0|snap=build 1|Redstone can now be placed.
|Redstone is now used to craft [[redstone lamp]]s, [[note block]]s, [[detector rail]]s and [[redstone torch]]es.}}
{{History||v0.14.0|snap=build 1|Redstone is now used to craft [[dispenser]]s and [[dropper]]s.}}
{{History||v0.15.0|snap=build 1|Redstone is now used to craft [[piston]]s and [[observer]]s.}}
{{History|pocket}}
{{History||1.0.4|snap=alpha 1.0.4.0|Cleric [[villager]]s now [[trading|sell]] 1–4 redstone for an [[emerald]].}}
{{History||1.1.0|snap=alpha 1.1.0.0|Redstone can now be found in [[woodland mansion]]s.}}
{{History|bedrock}}
{{History||?|[[File:Inactive Redstone Wire (NE) BE.png|32px]] [[File:Inactive Redstone Wire (ES) BE.png|32px]] [[File:Inactive Redstone Wire (SW) BE.png|32px]] [[File:Inactive Redstone Wire (NW) BE.png|32px]] [[File:Inactive Redstone Wire (NEW) BE.png|32px]] [[File:Inactive Redstone Wire (NES) BE.png|32px]] [[File:Inactive Redstone Wire (ESW) BE.png|32px]] [[File:Inactive Redstone Wire (NSW) BE.png|32px]] [[File:Inactive Redstone Wire (NESW) BE.png|32px]]<br>[[File:Active Redstone Wire (NE) BE.png|32px]] [[File:Active Redstone Wire (ES) BE.png|32px]] [[File:Active Redstone Wire (SW) BE.png|32px]] [[File:Active Redstone Wire (NW) BE.png|32px]] [[File:Active Redstone Wire (NEW) BE.png|32px]] [[File:Active Redstone Wire (NES) BE.png|32px]] [[File:Active Redstone Wire (ESW) BE.png|32px]] [[File:Active Redstone Wire (NSW) BE.png|32px]] [[File:Active Redstone Wire (NESW) BE.png|32px]]<br>Placed redstone now assumes its current appearance with a more solid center. Its linear state appearences are unknown.}}
{{History||1.10.0|snap=beta 1.10.0.3|[[File:Redstone Dust JE2 BE2.png|32px]] The texture of redstone has been changed.}}
{{History||1.11.0|snap=beta 1.11.0.1|Redstone can now be found in [[desert]] [[village]] temple [[chest]]s.}}
{{History|||snap=beta 1.11.0.4|Cleric [[villager]]s now [[trading|sell]] 4 redstone as part of their first tier [[trading|trade]].}}
{{History||1.16.210|snap=beta 1.16.210.57|"Redstone" has been renamed to "Redstone Dust".}}
{{History||1.17.0|snap=beta 1.16.230.52|Redstone dust can now drop and be smelted from [[deepslate redstone ore]].}}
{{History||1.19.0|snap=beta 1.19.0.26|Redstone wire now generates in [[Ancient City|ancient cities]].}}
{{History||1.19.80|snap=beta 1.19.80.21|Redstone dust can now be used as an armor trim material.}}
{{History|console}}
{{History||xbox=TU1|xbone=CU1|ps=1.0|wiiu=Patch 1|switch=1.0.1|[[File:Redstone Dust JE1 BE1.png|32px]] Added redstone.}}
{{History||xbox=TU3|Redstone now connects to a [[redstone repeater|repeater]] without the dust being explicitly pointed at it.}}
{{History||xbox=none|xbone=none|ps=1.90|wiiu=none|switch=none|[[File:Redstone Dust JE2 BE2.png|32px]] The texture of redstone has been changed.}}
{{History||ps=1.95|Redstone can now be placed on [[glass]].}}
{{History|new 3ds}}
{{History||0.1.0|[[File:Redstone Dust JE1 BE1.png|32px]] Added redstone dust.}}
{{History|foot}}
=== Redstone wire "item" ===
{{:Technical blocks/Redstone Wire}}
== Gallery ==
=== Renders ===
; Java Edition
<gallery>
Inactive Redstone Wire (NESW).png |
Inactive Redstone Wire (unconnected).png |
Inactive Redstone Wire (NS).png |
Inactive Redstone Wire (EW).png |
Inactive Redstone Wire (NE).png |
Inactive Redstone Wire (ES).png |
Inactive Redstone Wire (SW).png |
Inactive Redstone Wire (NW).png |
Inactive Redstone Wire (NEW).png |
Inactive Redstone Wire (NES).png |
Inactive Redstone Wire (ESW).png |
Inactive Redstone Wire (NSW).png
</gallery>
<gallery>
Active Redstone Wire (NESW).png |
Active Redstone Wire (unconnected).png |
Active Redstone Wire (NS).png |
Active Redstone Wire (EW).png |
Active Redstone Wire (NE).png |
Active Redstone Wire (ES).png |
Active Redstone Wire (SW).png |
Active Redstone Wire (NW).png |
Active Redstone Wire (NEW).png |
Active Redstone Wire (NES).png |
Active Redstone Wire (ESW).png |
Active Redstone Wire (NSW).png
</gallery>
; Bedrock Edition
<gallery>
Inactive Redstone Wire (NESW) BE.png |
Inactive Redstone Wire (NESW) BE.png |
Inactive Redstone Wire (NS).png |
Inactive Redstone Wire (EW).png |
Inactive Redstone Wire (NE) BE.png |
Inactive Redstone Wire (ES) BE.png |
Inactive Redstone Wire (SW) BE.png |
Inactive Redstone Wire (NW) BE.png |
Inactive Redstone Wire (NEW) BE.png |
Inactive Redstone Wire (NES) BE.png |
Inactive Redstone Wire (ESW) BE.png |
Inactive Redstone Wire (NSW) BE.png
</gallery>
<gallery>
Active Redstone Wire (NESW) BE.png |
Active Redstone Wire (NESW) BE.png |
Active Redstone Wire (NS).png |
Active Redstone Wire (EW).png |
Active Redstone Wire (NE) BE.png |
Active Redstone Wire (ES) BE.png |
Active Redstone Wire (SW) BE.png |
Active Redstone Wire (NW) BE.png |
Active Redstone Wire (NEW) BE.png |
Active Redstone Wire (NES) BE.png |
Active Redstone Wire (ESW) BE.png |
Active Redstone Wire (NSW) BE.png
</gallery>
=== Screenshots ===
<gallery>
Slab Stair Redstone.png|First image of redstone dust on top of slabs and stairs.
File:Olivia Tinkering.jpeg|[[Olivia]] using a scarce amount of redstone dust.
File:23w32a.jpg|[[Sunny]] using a very long strip of redstone dust.
</gallery>
=== In other media ===
<gallery>
Powered By Redstone JINX.jpg|Official T-shirt artwork "Powered By Redstone" made by [https://www.jinx.com JINX].
File:Redstone Behind Chiseled Bookshelf Pixel Art.png|Pixel art of redstone dust.
</gallery>
== Issues ==
{{issue list|redstone|redstone dust|redstone wire}}
== Trivia ==
* Five updates for [[wikipedia:Windows 10 version history|Windows 10]] released from 2016 to 2018 were codenamed "Redstone", referencing ''Minecraft''.<ref>{{link|url=https://www.theverge.com/2015/4/7/8364355/microsoft-redstone-windows-updates|title=Microsoft plans ‘Redstone’ updates for Windows 10 in 2016|author=Tom Warren|website=The Verge|date=April 7, 2015}}</ref>
* The block has 1,296 possible block state combinations, the highest of all blocks as of 1.15.2, beating [[fire]]'s 512 and [[note block]]'s 800.
* According to {{el|ee}}, redstone dust contains radioactive [[element]]s.
== References ==
{{Reflist}}
{{Redstone}}
{{Blocks|Utility}}
{{Items}}
[[Category:Redstone mechanics]]
[[Category:Mechanisms]]
[[Category:Mechanics]]
[[Category:Generated structure blocks]]
[[Category:Non-solid blocks]]
[[Category:Brewing recipe]]
[[cs:Rudit]]
[[de:Redstone]]
[[el:Σκόνη Κοκκινόπετρας]]
[[es:Polvo de redstone]]
[[fr:Poudre de redstone]]
[[hu:Redstone]]
[[it:Polvere di redstone]]
[[ja:レッドストーンダスト]]
[[ko:레드스톤 가루]]
[[nl:Redstonestof]]
[[pl:Redstone]]
[[pt:Pó de redstone]]
[[ru:Красная пыль]]
[[th:ผงเรดสโตน]]
[[tr:Kızıltaş]]
[[uk:Редстоун]]
[[zh:红石粉]]</li><li>[[Pickaxe|Pickaxe]]<br/>{{Dungeons hatnote|type=weapon}}
{{Redirect|Diamond Pickaxe|the ''Minecraft Dungeons'' weapon|MCD:Diamond Pickaxe}}
{{Redirect|Pick|the block|Sea Pickle|the control|Controls#Pick Block|the joke block|Pickaxe Block}}
{{Item
| image = <gallery>
Wooden Pickaxe.png | Wooden
Stone Pickaxe.png | Stone
Iron Pickaxe.png | Iron
Golden Pickaxe.png | Golden
Diamond Pickaxe.png | Diamond
Netherite Pickaxe.png | Netherite
</gallery>
|rarity = Common
|renewable =
* '''Netherite''': No
* '''Others''': Yes
|durability =
Java Edition:
* Wood: 59
* Stone: 131
* Iron: 250
* Golden: 32
* Diamond: 1,561
* Netherite: 2,031
Bedrock Edition:
* Wood: 60
* Stone: 132
* Iron: 251
* Golden: 33
* Diamond: 1,562
* Netherite: 2,032
| stackable = No
}}
A '''pickaxe''' is a [[tools|tool]] required to mine [[ore]]s, [[rock|rocks]], rock-based blocks and metal-based [[block]]s quickly and obtain them as items. A pickaxe mines faster and can obtain more block types as items depending on the material it is made from.
== Obtaining ==
=== Crafting ===
Pickaxes are crafted using 2 [[stick]]s and 3 identical units of tool material.
{{crafting |showdescription=1 |showname=0 |head=1
|name=[[Pickaxe]]
|A1={Any Planks}; Iron Ingot; Gold Ingot; Diamond
|B1={Any Planks}; Iron Ingot; Gold Ingot; Diamond
|C1={Any Planks}; Iron Ingot; Gold Ingot; Diamond
|B2=Stick
|B3=Stick
|Output=Wooden Pickaxe; Iron Pickaxe; Golden Pickaxe; Diamond Pickaxe
|type=Tool
}}
{{Crafting
|name=[[Stone Pickaxe]]
|A1=Any stone-tier block |B1=Any stone-tier block |C1=Any stone-tier block
|B2=Stick
|B3=Stick
|Output=Stone Pickaxe
|description=Can use cobblestone and its other variants interchangeably.
|type=Tool
}}
{{crafting |foot=1 |ignoreusage=1
|name=[[Pickaxe]]
|ingredients=Matching Damaged [[Pickaxe]]s
|Damaged Wooden Pickaxe; Damaged Stone Pickaxe; Damaged Iron Pickaxe; Damaged Golden Pickaxe; Damaged Diamond Pickaxe; Damaged Netherite Pickaxe
|Damaged Wooden Pickaxe; Damaged Stone Pickaxe; Damaged Iron Pickaxe; Damaged Golden Pickaxe; Damaged Diamond Pickaxe; Damaged Netherite Pickaxe
|Output=Wooden Pickaxe; Stone Pickaxe; Iron Pickaxe; Golden Pickaxe; Diamond Pickaxe; Netherite Pickaxe
|description=The durability of the two pickaxes is added together, plus an extra 5% of the tool type's total durability.
|type=Tool
}}
=== Upgrading ===
{{Smithing
|head=1
|Netherite Upgrade
|Diamond Pickaxe
|Netherite Ingot
|Netherite Pickaxe
|tail=1
}}
=== Repairing ===
==== Grinding ====
{{grinding
|showdescription=1
|ingredients=Matching Damaged [[Pickaxe]]s
|Damaged Wooden Pickaxe; Damaged Stone Pickaxe; Damaged Iron Pickaxe; Damaged Golden Pickaxe; Damaged Diamond Pickaxe; Damaged Netherite Pickaxe
|Damaged Wooden Pickaxe; Damaged Stone Pickaxe; Damaged Iron Pickaxe; Damaged Golden Pickaxe; Damaged Diamond Pickaxe; Damaged Netherite Pickaxe
|Wooden Pickaxe; Stone Pickaxe; Iron Pickaxe; Golden Pickaxe; Diamond Pickaxe; Netherite Pickaxe
|description=The durability of the two pickaxes is added together, plus an extra 5% durability.
}}
==== Unit repair ====
{{main|Anvil mechanics#Unit repair}}
Pickaxes can be repaired in an [[anvil]] by adding units of the [[tiers|tier's]] repair material, with each repair material restoring 25% of the pickaxe's maximum durability, rounded down.
=== Natural generation ===
{{LootChestItem|wooden-pickaxe,stone-pickaxe,iron-pickaxe,level-enchanted-iron-pickaxe,random-enchanted-golden-pickaxe,level-enchanted-diamond-pickaxe,random-enchanted-diamond-pickaxe,damaged-random-enchanted-diamond-pickaxe}}
=== Trading ===
{{IN|bedrock}}, novice-level toolsmith [[Villager|villagers]] have a 25% chance to sell stone pickaxes for one [[emerald]], Journeyman-level toolsmith villagers have a 25% chance to sell enchanted iron pickaxes for 3 emeralds, and master-level toolsmith villagers always sell enchanted diamond pickaxes for 13 emeralds.
{{IN|java}}, novice-level toolsmith villagers have a 40% chance to sell a stone pickaxe for one emerald, journeyman-level toolsmith villagers have a 40% chance to sell an enchanted iron pickaxe for 7–22 emeralds, and a master-level toolsmith always sells an enchanted diamond pickaxe for 18–35 emeralds.
The enchantments are the same as the ones obtained from an [[enchantment table]] at levels 5–19.
=== Villager gifts ===
{{IN|JE}}, toolsmith [[villager]]s throw stone pickaxes at players under the [[Hero of the Village]] effect.
=== Mob loot ===
{{IN|BE}}, [[pillager]]s and [[vindicator]]s have a chance of dropping a damaged iron pickaxe when killed during a [[raid]]. The pickaxe has a 50% chance of being enchanted with random enchantment(s).
== Usage ==
=== Mining ===
A pickaxe is used to break stone and metal-based materials faster. Breaking a block with a pickaxe consumes one use (one durability point). No durability is consumed for blocks that break instantly. Pickaxes have different amounts of uses based on the type:
* Wooden: 60
* Stone: 132
* Iron: 251
* Golden: 33
* Diamond: 1562
* Netherite: 2032
Different qualities of pickaxe are required to successfully harvest certain ores and blocks. For example, while [[stone]] can be mined with any pickaxe, [[gold ore]] must be mined with an [[iron]], [[diamond]], or [[netherite]] pickaxe, or else the player harvests no ore. Different pickaxes also mine many materials at different speeds:
==== Speed ====
The following table shows the time it takes to break each type of block.
* A <span style="background-color:#FFC7CE;color:#9C0006;">red</span> background indicates that the block cannot be harvested with that type of pickaxe.
* A <span style="background-color:#FFFFDD;color:#8A7600;">yellow</span> background indicates that the block cannot be harvested with that type of pickaxe, but still drops something.
* A <span style="background-color:#C6EFCE;color:#006100;">green</span> background indicates that the block can be harvested with that type of pickaxe.
<!-- Table is sorted by hardness (mining time with diamond shows well), then by name -->
{|class="wikitable collapsible collapsed" data-description="Mining time by block" style="background-color: transparent;"
! Times to break blocks by pickaxe
|-
|
{{breaking row|sort=1|simple=1|Obsidian|Diamond}}
{{breaking row|Crying Obsidian|Diamond}}
{{breaking row|Respawn Anchor|Diamond}}
{{breaking row|Block of Netherite|Diamond}}
{{breaking row|Ancient Debris|Diamond}}
{{breaking row|Ender Chest|Wood}}
{{breaking row|Anvil|Wood}}
{{breaking row|Bell|Wood}}
{{breaking row|Block of Coal|Wood}}
{{breaking row|Block of Diamond|Iron}}
{{breaking row|Block of Emerald|Iron}}
{{breaking row|Block of Iron|Stone}}
{{breaking row|Block of Raw Copper|Stone}}
{{breaking row|Block of Raw Gold|Iron}}
{{breaking row|Block of Raw Iron|Stone}}
{{breaking row|Block of Redstone|Wood}}
{{breaking row|Chain|Wood}}
{{breaking row|Enchantment Table|Wood}}
{{breaking row|Iron Bars|Wood}}
{{breaking row|Iron Door|Wood|item=1|link=Door}}
{{breaking row|Iron Trapdoor|Wood|link=Trapdoor}}
{{breaking row|Monster Spawner|Wood}}
{{breaking row|Deepslate Coal Ore|Wood}}
{{breaking row|Deepslate Copper Ore|Wood}}
{{breaking row|Deepslate Diamond Ore|Wood}}
{{breaking row|Deepslate Emerald Ore|Wood}}
{{breaking row|Deepslate Gold Ore|Wood}}
{{breaking row|Deepslate Iron Ore|Wood}}
{{breaking row|Deepslate Lapis Lazuli Ore|Wood}}
{{breaking row|Deepslate Redstone Ore|Wood}}
{{breaking row|Blast furnace|Wood}}
{{breaking row|Cobbled Deepslate|Wood}}
{{breaking row|Chiseled Deepslate|Wood}}
{{breaking row|Deepslate Bricks|Wood}}
{{breaking row|Deepslate Tiles|Wood}}
{{breaking row|Polished Deepslate|Wood}}
{{breaking row|Dispenser|Wood}}
{{breaking row|Dropper|Wood}}
{{breaking row|Furnace|Wood}}
{{breaking row|Lantern|wood}}
{{breaking row|Lodestone|Wood}}
{{breaking row|Smoker|Wood}}
{{breaking row|Stonecutter|Wood}}
{{breaking row|Conduit}}
{{breaking row|Block of Gold|Iron}}
{{breaking row|Block of Lapis Lazuli|Stone}}
{{breaking row|Coal Ore|Wood}}
{{breaking row|Copper Ore|Wood}}
{{breaking row|Copper Blocks|Wood}}
{{breaking row|Cut Copper|Wood}}
{{breaking row|Cut Copper Slab|Wood}}
{{breaking row|Cut Copper Stairs|Wood}}
{{breaking row|Deepslate|Wood}}
{{breaking row|Dragon Egg
|note=<ref group="note">The dragon egg can be mined directly only when there aren't any air blocks available for it to teleport to. However, the dragon egg can be collected by other means.</ref>}}
{{breaking row|Diamond Ore|Iron}}
{{breaking row|Emerald Ore|Iron}}
{{breaking row|End Stone|Wood}}
{{breaking row|Gold Ore|Iron}}
{{breaking row|Hopper|Wood}}
{{breaking row|Iron Ore|Stone}}
{{breaking row|Lightning Rod|Wood}}
{{breaking row|Lapis Lazuli Ore|Stone}}
{{breaking row|Nether Quartz Ore|Wood}}
{{breaking row|Nether Gold Ore|Wood}}
{{breaking row|Observer|Wood}}
{{breaking row|Redstone Ore|Iron}}
{{breaking row|Blue Ice|drop=0}}
{{breaking row|Compound Creator|Wood|drop=1|note=<ref group="note" name="Chemtable">Chemistry tables are slow to break by hand, similar to blocks that require a pickaxe to mine. However, they still drop as items.</ref>}}
{{breaking row|Heat Block|Wood}}
{{breaking row|Grindstone|Wood}}
{{breaking row|Bone Block|Wood}}
{{breaking row|Brick Stairs|Wood|link=Stairs}}
{{breaking row|Bricks|Wood}}
{{breaking row|Cauldron|Wood}}
{{breaking row|Cobblestone|Wood}}
{{breaking row|link=Stairs|Cobblestone Stairs|Wood}}
{{breaking row|Cobblestone Wall|Wood}}
{{breaking row|Mossy Cobblestone|Wood}}
{{breaking row|Nether Bricks|Wood}}
{{breaking row|Nether Brick Fence|Wood}}
{{breaking row|link=Stairs|Nether Brick Stairs|Wood}}
{{breaking row|Red Nether Bricks|Wood}}
{{breaking row|Polished Blackstone|Wood}}
{{breaking row|link=Slab|Stone Slabs|sprite=all-slabs|Wood}}
{{breaking row|Smooth Stone|Wood}}
{{breaking row|Shulker Box}}
{{breaking row|Concrete|Wood}}
{{breaking row|Andesite|Wood}}
{{breaking row|Dark Prismarine|Wood}}
{{breaking row|Diorite|Wood}}
{{breaking row|Dripstone Block|Wood}}
{{breaking row|Granite|Wood}}
{{breaking row|Mud Bricks|Wood}}
{{breaking row|Pointed Dripstone}}
{{breaking row|Prismarine|Wood}}
{{breaking row|Prismarine Bricks|Wood}}
{{breaking row|Purpur block|Wood}}
{{breaking row|Purpur pillar|Wood}}
{{breaking row|Stone|Wood}}
{{breaking row|Stone Bricks|Wood}}
{{breaking row|Tuff|Wood}}
{{breaking row|link=Stairs|Stone Brick Stairs|Wood}}
{{breaking row|Amethyst Bud|drop=0}}
{{breaking row|Amethyst Cluster|drop=0}}
{{breaking row|Blackstone|Wood}}
{{breaking row|Block of Amethyst|Wood}}
{{breaking row|Budding Amethyst|drop=0}}
{{breaking row|Chiseled Polished Blackstone|Wood}}
{{breaking row|Polished Blackstone Bricks|Wood}}
{{breaking row|Gilded Blackstone|Wood}}
{{breaking row|Glazed Terracotta|Wood}}
{{breaking row|Terracotta|Wood}}
{{breaking row|Basalt|Wood}}
{{breaking row|Smooth Basalt|Wood}}
{{breaking row|Polished Basalt|Wood}}
{{breaking row|Packed Mud}}
{{breaking row|Block of Quartz|Wood}}
{{breaking row|Quartz Stairs|Wood|link=Stairs}}
{{breaking row|Red Sandstone|Wood}}
{{breaking row|Red Sandstone Stairs|Wood|link=stairs}}
{{breaking row|Sandstone|Wood}}
{{breaking row|Sandstone Stairs|Wood|link=stairs}}
{{breaking row|Calcite|Wood}}
{{breaking row|Rail}}
{{breaking row|Brewing Stand|Wood}}
{{breaking row|Stone Button|any}}
{{breaking row|Ice|drop=0}}
{{breaking row|Magma Block|Wood}}
{{breaking row|Packed Ice|drop=0}}
{{breaking row|Frosted Ice|drop=0}}
{{breaking row|Stone Pressure Plate|Wood}}
{{breaking row|Netherrack|Wood}}
{{breaking row|sprite=crimson-nylium|Nylium|Wood|foot=1}}
|}
=== Weapon ===
Hitting a mob with a pickaxe is a stronger attack than using fists. Pickaxes lose 2 durability when used as a weapon.
==== Java Edition ====
Pickaxes have an attack speed modifier of −2.8, meaning they take about 0.83 seconds to [[Damage#Attack cooldown|recover]]. All pickaxes have an attack speed of 1.2 hits per second. They deal different damage based on the type:
{|class="wikitable" style="text-align:center" data-description="Attack damage"
! Pickaxe type
! Attack damage
! Damage per<br> second (DPS)
|-
|{{ItemLink|Wooden Pickaxe}} ||rowspan=2 |{{hp|2}} ||rowspan=2 |2.4
|-
|{{ItemLink|Golden Pickaxe}}
|-
|{{ItemLink|Stone Pickaxe}} ||{{hp|3}} ||3.6
|-
|{{ItemLink|Iron Pickaxe}} ||{{hp|4}} ||4.8
|-
|{{ItemLink|Diamond Pickaxe}} ||{{hp|5}} ||6
|-
|{{ItemLink|Netherite Pickaxe}} ||{{hp|6}} ||7.2
|}
==== Bedrock Edition ====
{{IN|bedrock}}, pickaxes always attack instantly and do the following damage:
{|class="wikitable" style="text-align:center" data-description="Attack damage"
! Pickaxe type
! Attack damage
|-
|{{ItemLink|Wooden Pickaxe}}<br />{{ItemLink|Golden Pickaxe}} ||{{hp|3}}
|-
|{{ItemLink|Stone Pickaxe}} ||{{hp|4}}
|-
|{{ItemLink|Iron Pickaxe}} ||{{hp|5}}
|-
|{{ItemLink|Diamond Pickaxe}} ||{{hp|6}}
|-
|{{ItemLink|Netherite Pickaxe}} ||{{hp|7}}
|}
=== Enchantments ===
A pickaxe can receive the following [[enchantment]]s:
{|class="wikitable col-2-center col-3-right"
|+
!Name
!Max Level
![[Enchanting|Method]]
|-
|[[Efficiency]]
|V
|{{Inventory slot|Enchanting Table}}{{Inventory slot|Anvil}}
|-
|[[Fortune]]<ref group=note name=note1>Fortune and Silk Touch are mutually exclusive.</ref>
|III
|{{Inventory slot|Enchanting Table}}{{Inventory slot|Anvil}}
|-
|[[Silk Touch]]<ref group=note name=note1/>
|I
|{{Inventory slot|Enchanting Table}}{{Inventory slot|Anvil}}
|-
|[[Unbreaking]]
|III
|{{Inventory slot|Enchanting Table}}{{Inventory slot|Anvil}}
|-
|[[Mending]]
|I
|{{Inventory slot|Anvil}}
|-
|[[Curse of Vanishing]]
|I
|{{Inventory slot|Anvil}}
|}
{{Notelist}}
=== Fuel ===
Wooden pickaxes can be used as a fuel in [[furnace]]s, smelting 1 item per wooden pickaxe.
=== Smelting ingredient ===
{{Smelting|showname=1|Iron Pickaxe;Golden Pickaxe|Iron Nugget;Gold Nugget|0,1}}
===Piglins===
{{EntityLink|Piglin|Piglins}} are attracted to golden pickaxes and run toward any golden pickaxes on the ground, and inspect it for 6 to 8 seconds before putting it in their inventory.
== Sounds ==
{{edition|java}}:
{{Sound table
|sound=Random break.ogg
|subtitle=Item breaks
|source=player
|description=When a pickaxe's durability is exhausted
|id=entity.item.break
|translationkey=subtitles.entity.item.break
|volume=0.8
|pitch=0.8-1.2
|distance=16
|foot=1}}
{{edition|bedrock}}:
{{Sound table
|type=bedrock
|sound=Random break.ogg
|source=player
|description=When a shovel's durability is exhausted
|id=random.break
|volume=1.0
|pitch=0.9
|foot=1}}
== Data values ==
=== ID ===
{{edition|java}}:
{{ID table
|edition=java
|showforms=y
|generatetranslationkeys=y
|displayname=Wooden Pickaxe
|spritetype=item
|nameid=wooden_pickaxe
|form=item}}
{{ID table
|displayname=Stone Pickaxe
|spritetype=item
|nameid=stone_pickaxe
|form=item}}
{{ID table
|displayname=Iron Pickaxe
|spritetype=item
|nameid=iron_pickaxe
|form=item}}
{{ID table
|displayname=Diamond Pickaxe
|spritetype=item
|nameid=diamond_pickaxe
|form=item}}
{{ID table
|displayname=Golden Pickaxe
|spritetype=item
|nameid=golden_pickaxe
|form=item}}
{{ID table
|displayname=Netherite Pickaxe
|spritetype=item
|nameid=netherite_pickaxe
|form=item
|foot=1}}
{{edition|bedrock}}:
{{ID table
|edition=bedrock
|shownumericids=y
|showforms=y
|notshowbeitemforms=y
|generatetranslationkeys=y
|displayname=Wooden Pickaxe
|spritetype=item
|nameid=wooden_pickaxe
|id=310
|form=item}}
{{ID table
|displayname=Stone Pickaxe
|spritetype=item
|nameid=stone_pickaxe
|id=314
|form=item}}
{{ID table
|displayname=Iron Pickaxe
|spritetype=item
|nameid=iron_pickaxe
|id=297
|form=item}}
{{ID table
|displayname=Diamond Pickaxe
|spritetype=item
|nameid=diamond_pickaxe
|id=318
|form=item}}
{{ID table
|displayname=Golden Pickaxe
|spritetype=item
|nameid=golden_pickaxe
|id=324
|form=item}}
{{ID table
|displayname=Netherite Pickaxe
|spritetype=item
|nameid=netherite_pickaxe
|id=606
|form=item
|foot=1}}
== Achievements ==
{{Load achievements|Time to mine!;Getting an Upgrade;MOAR Tools ;Oooh, shiny!}}
== Advancements ==
{{load advancements|Getting an Upgrade;Isn't It Iron Pick;Stone Age;Oh Shiny}}
== Video ==
{{yt|G_HTViy2JTo}}
== History ==
{{History|java indev}}
{{History||0.31|snap=20100110|[[File:Iron Pickaxe JE1.png|32px]] Added iron pickaxes.
|A pickaxe is used to gather [[stone]] materials 400% faster than by hand.
|When starting in a new world, the [[player]] is given one of each [[tool]].}}
{{History|||snap=20100124|A complete tool set is no longer given to the player on starting a new world. Instead, there are multiple [[chest]]s in the later called "[[Indev House]]" containing a stack of most accessible [[blocks]]/[[items]] including [[tools]].}}
{{History|||snap=20100128|[[File:Wooden Pickaxe JE1 BE1.png|32px]] [[File:Stone Pickaxe JE1 BE1.png|32px]] [[File:Diamond Pickaxe JE1 BE1.png|32px]] Tools now have tiers. Wooden, stone, and diamond pickaxes have been added.|[[File:Iron Pickaxe JE2 BE1.png|32px]] The texture of iron pickaxes has been changed.
|A pickaxe held by the [[player]] is now rendered to appear more 3D.|They cannot be crafted yet, but have been added to the item chest in the Indev house.}}
{{History|||snap=20100129|Wood, stone, iron, and diamond pickaxes can now be [[craft]]ed.}}
{{History|||snap=20100130|[[File:Golden Pickaxe JE1.png|32px]] Pickaxes can now be made out of [[gold]].}}
{{History|||snap=20100201-1|Tools, including pickaxes, now take [[damage]] when being used. |Better tools, including pickaxes, now last longer.}}
{{History|||snap=20100201-2|Better pickaxes are now required to mine harder materials.}}
{{History||20100206|[[File:Golden Pickaxe JE2 BE1.png|32px]] The texture of golden pickaxes has been changed.}}
{{History|java beta}}
{{History||1.2|Before, the pickaxe had much less [[item durability|durability]] (usually half as much).
|Gold pickaxes now [[breaking|mine]] certain materials much faster.}}
{{History||1.8|snap=Pre-release|Iron pickaxes are now found in the new [[stronghold]] storeroom [[chest]]s, and in the new [[mineshaft]] chests.}}
{{History|java}}
{{History||1.0.0|snap=Beta 1.9 Prerelease 3|Iron pickaxes can now be found in the new [[stronghold]] altar [[chest]]s.}}
{{History|||snap=RC1|Pickaxes and other [[tool]]s now make a [[sound]] when they break.}}
{{History||1.1|snap=12w01a|Iron pickaxes are now found in the new [[village]] blacksmith chests.}}
{{History||1.2.4|snap=release|[[Spruce planks]], [[birch planks]], and [[jungle planks]] can now be used to craft wooden pickaxes.}}
{{History||1.3.1|snap=12w16a|Wooden and stone pickaxes are now found in the new [[bonus chest]]s.}}
{{History|||snap=12w18a|Wooden pickaxes can now be used as fuel in a [[furnace]].}}
{{History|||snap=12w21a|Blacksmith [[villager]]s now [[trading|sell]] 1 diamond pickaxe for 10–11 [[emerald]]s, and 1 iron pickaxe for 7–8 emeralds.}}
{{History||1.6.1|snap=13w21a|Instead of replacing the barehanded [[damage]] ({{hp|1}}), pickaxes now add their damage onto the barehanded damage, which results in all pickaxes doing {{hp|1}} more damage than before.}}
{{History||1.7.2|snap=1.7.1|[[Acacia planks]] and [[dark oak planks]] can now be used to craft wooden pickaxes.}}
{{History||1.8|snap=14w02a|Tool smith villagers now [[trading|sell]] 1 [[enchanting|enchanted]] diamond pickaxe for 12–15 emeralds, and 1 enchanted iron pickaxe for 9–11 emeralds.
|Unenchanted pickaxes are no longer sold by [[villager]]s.}}
{{History||1.9|snap=15w31a|Enchanted iron and diamond pickaxes can now be found in the [[end ship]] [[chest]]s in [[end city|end cities]].}}
{{History|||snap=15w34a|Pickaxes now use the "attack strength" combat mechanic meter. The time it takes for the meter to fill up for a pickaxe is 0.8 seconds.}}
{{History|||snap=15w34c|Pickaxes now do less [[damage]], but recover quicker.}}
{{History|||snap=15w35a|Pickaxes now recover more slowly.}}
{{History|||snap=15w44a|The average yield of wood and stone pickaxes in [[bonus chest]]s has been decreased.
|The average yield of iron pickaxes in [[mineshaft]] [[chest]]s has been increased.}}
{{History||1.11.1|snap=16w50a|Golden and iron pickaxes can now be [[smelting|smelted]] down into one of their respective [[nugget]]s.}}
{{History||1.13|snap=17w47a|Prior to [[1.13/Flattening|''The Flattening'']], these [[item]]s' numeral IDs were 270, 274, 257, 278 and 285.}}
{{History||1.14|snap=18w43a|[[File:Wooden Pickaxe JE2 BE2.png|32px]] [[File:Stone Pickaxe JE2 BE2.png|32px]] [[File:Iron Pickaxe JE3 BE2.png|32px]] [[File:Golden Pickaxe JE3 BE2.png|32px]] [[File:Diamond Pickaxe JE2 BE2.png|32px]] The textures of all pickaxes have been changed.}}
{{History|||snap=18w50a|Iron pickaxes can now be found in chests in [[village]] toolsmith houses.}}
{{History|||snap=19w11a|Toolsmith [[villager]]s now [[trading|sell]] stone pickaxes.}}
{{History|||snap=19w13a|Toolsmith villagers now give stone pickaxes to players under the [[Hero of the Village]] effect.}}
{{History||1.16|snap=20w06a|[[File:Netherite Pickaxe JE1.png|32px]] Added netherite pickaxes.
|Netherite pickaxes are obtained by combining one diamond pickaxe and one netherite ingot in a crafting table.
|[[Crimson planks]] and [[warped planks]] can now be used to craft wooden pickaxes.}}
{{History|||snap=20w09a|[[File:Wooden Pickaxe JE3 BE3.png|32px]] [[File:Golden Pickaxe JE4 BE3.png|32px]] [[File:Diamond Pickaxe JE3 BE3.png|32px]] [[File:Netherite Pickaxe JE2 BE1.png|32px]] The textures of wooden, golden, diamond, and netherite pickaxes have been changed.}}
{{History|||snap=20w10a|[[File:Netherite Pickaxe JE3.png|32px]] Changed a pixel of the texture of netherite pickaxes.
|Netherite pickaxes can no longer be crafted.
|Netherite pickaxes are now obtained by combining one diamond pickaxe and one netherite ingot in a smithing table.}}
{{History|||snap=20w15a|Stone pickaxes can now be crafted using [[blackstone]].}}
{{History|||snap=20w16a|Golden pickaxes now generate randomly enchanted in [[ruined portal]] chests.}}
{{History||1.16.2|snap=20w30a|Randomly enchanted diamond pickaxes can now be found in [[bastion remnant]] chests.}}
{{History||1.17|snap=21w08a|Stone pickaxe can now be crafted using [[cobbled deepslate]].}}
{{History||1.19|snap=22w11a|[[Mangrove planks]] can now be used to craft wooden pickaxes.}}
{{History||1.20<br>(Experimental)|link=1.19.4|snap=23w04a|Upgrading diamond pickaxes to netherite pickaxes now requires the netherite upgrade [[smithing template]].}}
{{History|upcoming java}}
{{History||Villager Trade Rebalance<br>(Experimental)|link=Java Edition 1.20.2|snap=23w31a|[[Wandering trader]]s now have a chance to sell an enchanted iron pickaxe.}}
{{History||Combat Tests|snap=1.14.3 - Combat Test|The attack speed for all pickaxes has been increased to 2.5.
|The [[damage]] for all pickaxes has been increased by {{hp|1}}.}}
{{History|pocket alpha}}
{{History||v0.2.0|[[File:Stone Pickaxe JE1 BE1.png|32px]] Added stone pickaxes.}}
{{History||v0.3.0|[[File:Wooden Pickaxe JE1 BE1.png|32px]] Added wooden pickaxes.
|Survival players no longer start out with an infinite durability stone pickaxe in the inventory.}}
{{History||v0.3.2|[[File:Iron Pickaxe JE2 BE1.png|32px]] [[File:Golden Pickaxe JE2 BE1.png|32px]] [[File:Diamond Pickaxe JE1 BE1.png|32px]] Added iron, gold, and diamond pickaxes.}}
{{History||v0.4.0|Removed stone pickaxes from the creative inventory.}}
{{History||v0.11.0|snap=build 11|All pickaxes are now available in the [[creative]] inventory.}}
{{History|||snap=build 12|All pickaxes have been removed from creative.}}
{{History|||snap=build 13|Pickaxes have been re-added to creative mode.}}
{{History||v0.14.0|snap=build 1|Iron pickaxes can now be found inside [[minecart with chest]]s in [[mineshaft]]s.}}
{{History|pocket}}
{{History||1.0.0|snap=alpha 0.17.0.1|[[Enchanting|Enchanted]] iron pickaxes and enchanted diamond pickaxes can now be found in [[end city|end cities]].}}
{{History||1.0.4|snap=alpha 1.0.4.0|Toolsmith [[villager]]s now [[trading|sell]] enchanted diamond pickaxes for 12-15 emeralds as their last tier trades and enchanted iron pickaxes for 9-11 [[emerald]]s as their second tier trades.}}
{{History||1.1.0|snap=alpha 1.1.0.0|Iron and golden pickaxes are now [[smelting|smeltable]].}}
{{History|bedrock}}
{{History||1.2.0|snap=beta 1.2.0.2|Wooden and stone pickaxes can now be found inside [[bonus chest]]s.}}
{{History||1.10.0|snap=beta 1.10.0.3|Iron pickaxes can now be found in [[plains]] [[village]] weaponsmith houses.
|[[File:Wooden Pickaxe JE2 BE2.png|32px]] [[File:Stone Pickaxe JE2 BE2.png|32px]] [[File:Iron Pickaxe JE3 BE2.png|32px]] [[File:Golden Pickaxe JE3 BE2.png|32px]] [[File:Diamond Pickaxe JE2 BE2.png|32px]] The textures of all pickaxes have been changed.}}
{{History||1.11.0|snap=beta 1.11.0.1|Iron pickaxes can now be found in [[village]] toolsmiths [[chest]]s and in [[savanna]], [[taiga]], [[snowy taiga]] and [[desert]] village weaponsmith chests.}}
{{History|||snap=beta 1.11.0.4|[[Trading]] has been changed, toolsmith [[villager]]s now have a 25% chance to [[trading|sell]] an [[enchanting|enchanted]] iron pickaxe for 3 [[emerald]]s as part of their third tier trades, and an enchanted diamond pickaxe now costs 13 emeralds.
|Stone pickaxes can now be bought from toolsmith villagers.}}
{{History||1.16.0|snap=beta 1.16.0.51|[[File:Netherite Pickaxe JE2 BE1.png|32px]] Added netherite pickaxes.|Netherite pickaxes are obtained by combining one diamond pickaxe and one netherite ingot in a crafting table.
|[[File:Wooden Pickaxe JE3 BE3.png|32px]] [[File:Golden Pickaxe JE4 BE3.png|32px]] [[File:Diamond Pickaxe JE3 BE3.png|32px]] The textures of wooden, golden, and diamond pickaxes have been changed.}}
{{History|||snap=beta 1.16.0.57|Netherite pickaxes can no longer be crafted.
|Netherite pickaxes are now obtained by combining one diamond pickaxe and one netherite ingot in a smithing table.
|Stone pickaxes can now be crafted using [[blackstone]].
|Golden pickaxes now generate randomly enchanted in [[ruined portal]] chests.
|Netherite pickaxe now generate randomly enchanted in [[bastion remnant]] chest.}}
{{History||1.17.10|snap=beta 1.17.10.20|[[File:Netherite Pickaxe JE3.png|32px]] Changed a pixel of the texture of netherite pickaxes to match ''Java Edition''.}}
{{History|console}}
{{History||xbox=TU1|xbone=CU1|ps=1.0|wiiu=Patch 1|[[File:Wooden Pickaxe JE1 BE1.png|32px]] [[File:Stone Pickaxe JE1 BE1.png|32px]] [[File:Iron Pickaxe JE2 BE1.png|32px]] [[File:Golden Pickaxe JE2 BE1.png|32px]] [[File:Diamond Pickaxe JE1 BE1.png|32px]] Added pickaxes (all five types).}}
{{History||xbox=TU53|xbone=CU43|ps=1.49|wiiu=Patch 23|switch=1.0.3|Iron and golden pickaxes are now [[smelting|smeltable]].}}
{{History|Ps4}}
{{History||1.90|[[File:Wooden Pickaxe JE2 BE2.png|32px]] [[File:Stone Pickaxe JE2 BE2.png|32px]] [[File:Iron Pickaxe JE3 BE2.png|32px]] [[File:Golden Pickaxe JE3 BE2.png|32px]] [[File:Diamond Pickaxe JE2 BE2.png|32px]] The textures of all pickaxes have been changed.}}
{{History|New Nintendo 3DS Edition}}
{{History||0.1.0|[[File:Wooden Pickaxe JE1 BE1.png|32px]] [[File:Stone Pickaxe JE1 BE1.png|32px]] [[File:Iron Pickaxe JE2 BE1.png|32px]] [[File:Golden Pickaxe JE2 BE1.png|32px]] [[File:Diamond Pickaxe JE1 BE1.png|32px]] Added pickaxes.}}
{{History|foot}}
== Issues ==
{{issue list}}
== Trivia ==
*The golden pickaxe is the only pickaxe that is unable to harvest the material it is made from.
*The pickaxe is the only block-breaking tool without a {{control|use}} (right-click) function.
=== Publicity ===
*Plastic diamond pickaxes are official ''[[Minecraft]]'' merchandise.<ref>https://shop.minecraft.net/products/minecraft-pickaxe?_pos=3&_psq=pickaxe&_ss=e&_v=1.0</ref>
*In the game [[wikipedia:Naughty Bear: Panic in Paradise|''Naughty Bear: Panic in Paradise'']], the player can buy a diamond pickaxe which, according to the game, is made by "Kick it up a Notch Pickaxes", referring to [[Notch]].
*In mobile game ''[https://play.google.com/store/apps/details?id=br.com.tapps.vloggergoviral Vlogger Go Viral]'' clicker game, after buying the figurine shelf, there is a model of a diamond pickaxe stuck to a [[grass block]].
*In the game [[wikipedia:The Elder Scrolls V: Skyrim|''The Elder Scrolls V: Skyrim'']], the player can find a pickaxe called the "Notched Pickaxe", evidently an [[easter egg]].
*In the game [[wikipedia:Offensive Combat|''Offensive Combat'']], a stone pickaxe can be used as a melee weapon with the name of "The Notch Carver".
*In the game [[wikipedia:The Binding of Isaac (video game)|''The Binding of Isaac'']], an obtainable item named "Notched Axe", also with a drawn 8-bit look, can be used to destroy rocks. The Notched Axe also makes a return in the game's remake, [[wikipedia:The Binding of Isaac: Rebirth|''The Binding of Isaac: Rebirth'']].
*In the game [[wikipedia:Borderlands 2|''Borderlands 2'']], the player can find a secret area hidden away by blocks resembling Minecraft [[dirt]], also once inside the player can fight Creeper and the Mother Creeper to get rare Minecraft-related skins.
*In the game [[wikipedia:Octodad: Dadliest Catch|''Octodad: Dadliest Catch'']], the supermarket level has a "Mintcraft" display, an obvious parody of Minecraft, even including toy pickaxes and a creeper head.
*In the game [[wikipedia:Transformice|''Transformice'']], a diamond pickaxe can be found in the shop.
== Gallery ==
<gallery>
File:Pickaxe in Mineshaft Chest.png|A naturally generated pickaxe.
Live in Your World JINX.jpg|Official T-shirt artwork "Live in Your World" featuring an iron pickaxe made by [https://www.jinx.com JINX].
Pickaxe JINX.jpg|Official T-shirt artwork of a pickaxe made by JINX.
Stone Pickaxe SDGP.png|Stone pickaxe in the [[Super Duper Graphics Pack]].
Iron Pickaxe SDGP.png|Iron pickaxe in the [[Super Duper Graphics Pack]].
</gallery>
=== Enchanted pickaxes ===
<gallery>
Enchanted Wooden Pickaxe.gif
Enchanted Stone Pickaxe.gif
Enchanted Iron Pickaxe.gif
Enchanted Golden Pickaxe.gif
Enchanted Diamond Pickaxe.gif
Enchanted Netherite Pickaxe.gif
</gallery>
== References ==
{{reflist}}
== External Links ==
*[https://www.minecraft.net/en-us/article/taking-inventory-pickaxe Taking Inventory: Pickaxe] – Minecraft.net on May 10, 2018
{{items}}
[[Category:Combat]]
[[cs:Krumpáč]]
[[de:Spitzhacke]]
[[es:Pico]]
[[fr:Pioche]]
[[hu:Csákány]]
[[it:Piccone]]
[[ja:ツルハシ]]
[[ko:곡괭이]]
[[nl:Houweel]]
[[pl:Kilof]]
[[pt:Picareta]]
[[ru:Кирка]]
[[th:อีเต้อ]]
[[uk:Кайло]]
[[zh:镐]]</li></ul></nowiki> | Crafting was introduced. | ||||
| Legacy Console Edition | |||||
| TU1 | CU1 | 1.0 | Patch 1 | Added Survival mode. | |