BDJP007301 (talk | contribs) m (Revert edits by 3.12.149.246 (talk)) Tag: Rollback |
m (Revert edits by 103.71.17.1 (talk)) Tag: Rollback |
||
| (9 intermediate revisions by 8 users not shown) | |||
| Line 139: | Line 139: | ||
[[de:Texturenpaket]] |
[[de:Texturenpaket]] |
||
| − | [[es: |
+ | [[es:Paquete de textura]] |
[[fr:Pack de textures]] |
[[fr:Pack de textures]] |
||
[[hu:Textúracsomagok]] |
[[hu:Textúracsomagok]] |
||
| Line 146: | Line 146: | ||
[[nl:Thema]] |
[[nl:Thema]] |
||
[[pl:Paczki zasobów]] |
[[pl:Paczki zasobów]] |
||
| + | [[pt:Pacote de textura]] |
||
[[ru:Пакет текстур]] |
[[ru:Пакет текстур]] |
||
[[th:Texture pack]] |
[[th:Texture pack]] |
||
Revision as of 15:27, 3 January 2022
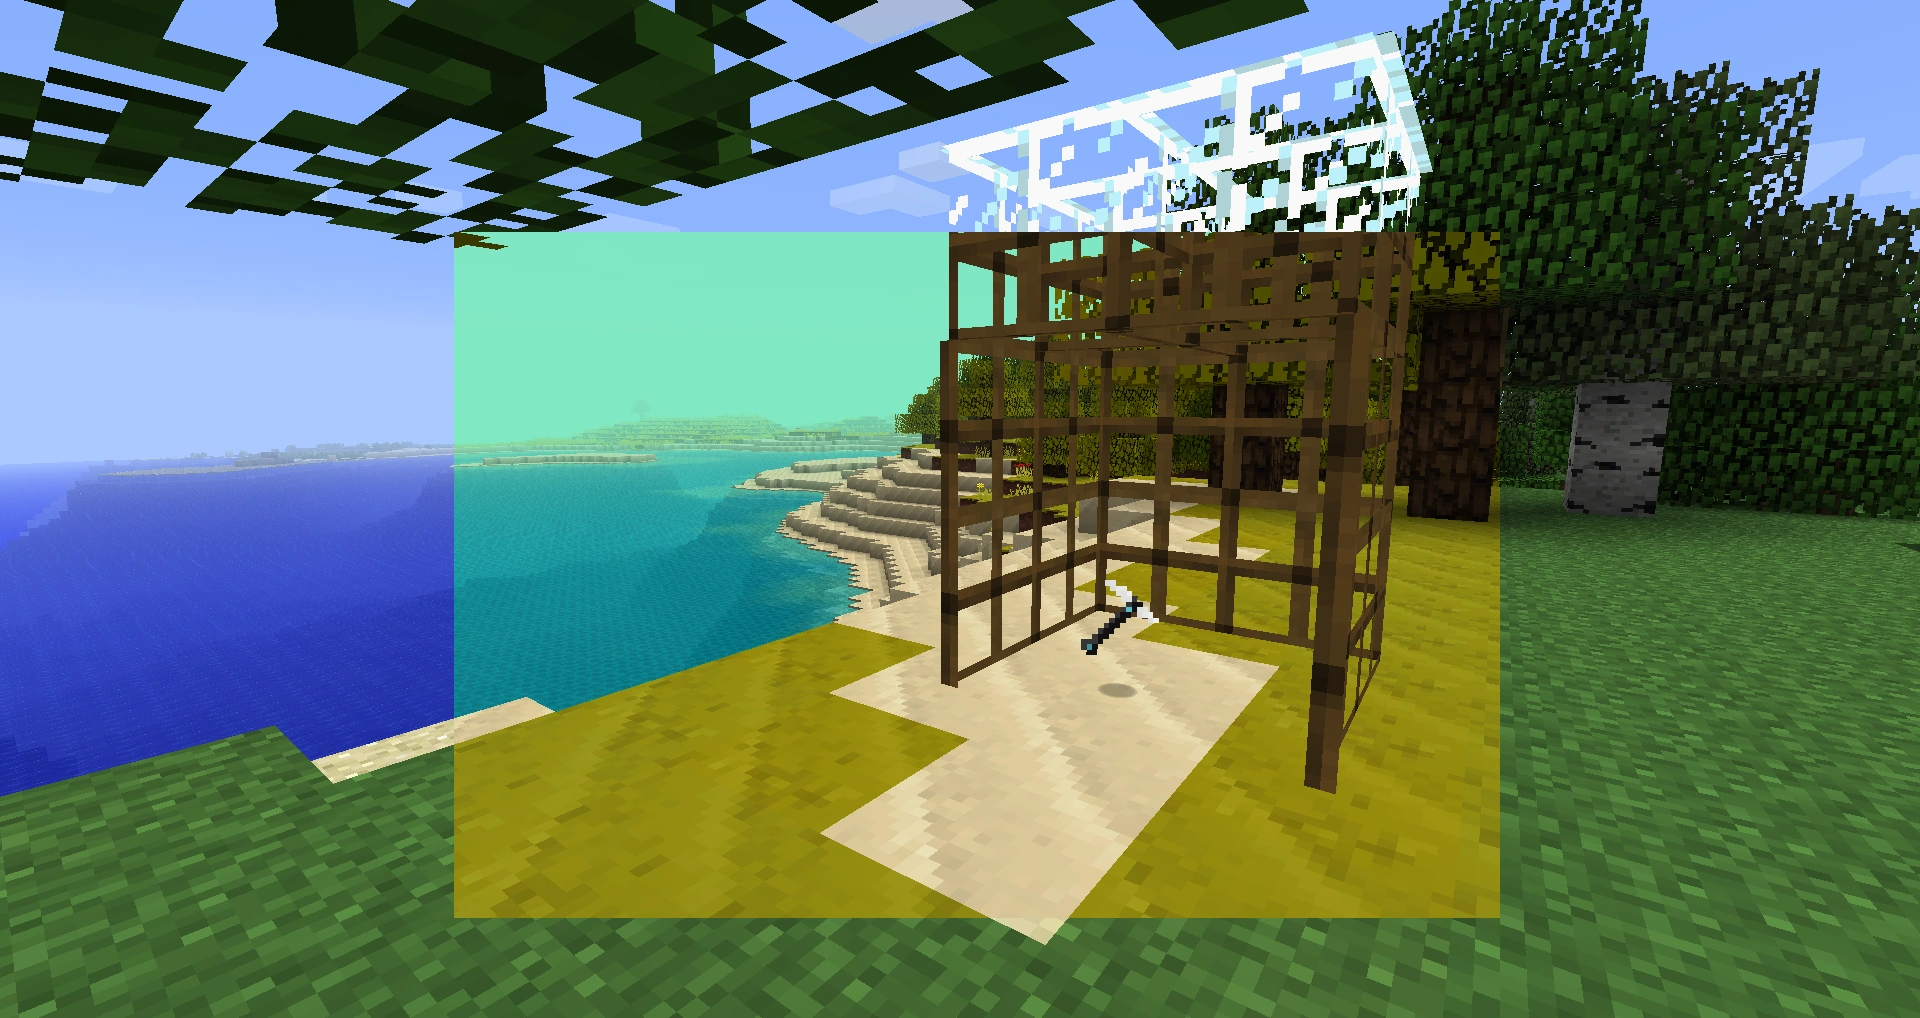
Default textures with a custom texture pack in the center. The texture pack being used is Jolicraft.
A texture pack was a collection of files that were used to change the in-game textures of blocks, items, mobs and the GUI. They were .zip files that had various PNG images in them and a text document named pack.txt. The native resolution of Minecraft's textures were 16×16 (measured pixels in block height and width). 32×32, 64×64, 128×128, 256×256, 512×512, and 1024×1024 textures were referred to as "HD".
In Java Edition 1.6.1, texture packs were replaced with resource packs, which provide more control over textures and other game features, such as music and text.
Behavior
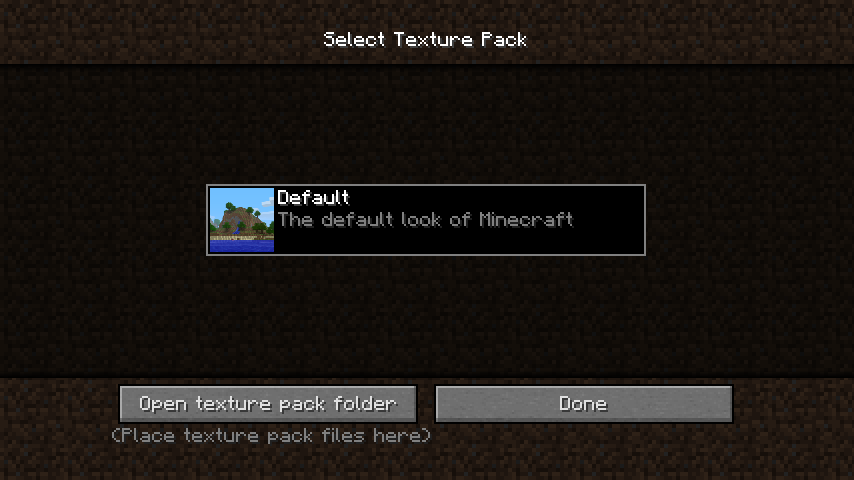
The default texture pack settings.
Texture packs can be placed in the folder texturepacks within the .minecraft folder. Each texture pack is either a .zip file within the texturepacks folder. Once in the folder, a texture pack can be added from the options.
Texture packs load their assets based on the order of the packs on the list. The bottom-most pack loads first, then each pack placed above it replaces assets of the same name with its assets.
Folder structure
|
Contents
pack.mcmeta
A texture pack is identified by Minecraft based on the presence of the folder of the root directory, which contain a text file called pack.mcmeta, which would contain a description of the texture pack which would appear in game.
The root directory also contains an optional image called pack.png, which shows as the thumbnail for the pack on the texture pack selection menu.
Installing a texture pack
- Download a texture pack. Most texture packs are in ZIP file format, but as long as it has the necessary files (
pack.mcmeta), Minecraft recognizes a folder as a texture pack. In-depth instructions on obtaining the files to make custom texture packs are located at Tutorials/Custom texture packs. However this is not necessary, as of snapshot 12w23a, for as long aspack.txtexists, it is recognized as a texture pack. - Run Minecraft. If Minecraft is already running, make sure to leave the world.
- Click Texture Packs in Options.
- Click Open Texture Pack Folder; this opens the folder where Minecraft stores all texture packs. If nothing happens, the folder must be found manually. Depending on the operating system it is located at:
- Windows XP and above:
%appdata%\.minecraft\texturepacks. - GNU/Linux:
~/.minecraft/texturepacks(this folder may be hidden in the Home folder). - macOS:
~/Library/Application Support/minecraft/texturepacks(this folder may be hidden).
- Windows XP and above:
- Minecraft does not have to be closed when placing the texture pack in the opened folder.
- In a few seconds the texture pack appears in Minecraft. Select it and click "Done". The texture pack is now applied. If Minecraft did not update, simply exit and reopen the texture packs screen.
Installation tips
- Texture packs may redesign only some textures. So if the main menu looks the same after a pack is selected, it doesn't mean the pack is not working.
- Many texture packs may be installed and overlap each other. The texture pack list can be scrolled by dragging the scrollbars up or down.
- Minecraft may lock the currently used texture pack (for example, if the pack contains custom textures for user interface), so the file can't be overwritten. If the pack needs to be updated, it may be necessary to temporarily switch to the default pack and then overwrite the file.
- To get an unzipped directory to show as a texture pack in Minecraft, that directory needs a
pack.txtfile in it. This, however, did not work prior to 12w23a. - Keep in mind that, if a texture pack is downloaded in ZIP form, it may contain another folder inside of it that has the texture pack's title, this is the actual texture pack. In this case, this folder must moved to the texture packs folder.
- If an older version of Minecraft (1.2.5 for example) is being used and a texture pack for a newer version is installed, the texture pack still runs properly, and ignores the unused items or blocks.
- If an older texture pack is used in a more recent version of Minecraft, then the newer blocks and items show a "missing texture" because the texture pack isn't made for newer versions.
- An editor is a great way to make a texture pack.
Current versions of Minecraft support higher resolutions of texture packs. Traditionally, textures in-game work on a 16×16 block. Bigger texture packs can go all the way up to 512×512 (32×, 64×, 128×, 256×) but require better hardware to play smoothly.
Converting texture packs to resource packs
Converting texture packs can be done with Mojang's converter tool (called "texture ender"). Converting texture packs from before 1.5 is a two-step process, requiring a converter to convert it to 1.5 first (called the "unstitcher") then the converter from 1.5 to 1.6. Links to both Mojang files are below:
History
| Java Edition Alpha | |||||
|---|---|---|---|---|---|
v1.2.2{{Extension DPL}}<ul><li>[[Photo|Photo]]<br/>{{exclusive|education}}
{{Item
| image = Photo EE2.png
| renewable = No (unless [[portfolio]] is available)
| stackable =
}}
A '''photo''' is an [[item]] containing a picture taken with a [[camera]].<ref>{{cite|url=https://web.archive.org/web/20210925044841mp_/https://educommunity.minecraft.net/hc/en-us/articles/4407489082644-Feature-Walkthrough-Minecraft-Education-Edition-GOAT-Beta-version-1-17-30-| title = Feature Walkthrough Minecraft: Education Edition GOAT Beta (version 1.17.30)|website=Minecraft: Education Edition Support|date=September 24, 2021}}</ref><ref>{{cite|url=https://education.minecraft.net/en-us/blog/new-update-and-anniversary-for-mee| title = The GOAT Update Celebrates a Minecraft Milestone!|website=Minecraft: Education Edition|date=November 2, 2021}}</ref><ref>{{ytl|2Wd0J-EIfws|GOAT Release Playthrough|Minecraft: Education Edition|December 2, 2021}}</ref>
== Obtaining ==
A photo in a [[portfolio]] can be saved as a photo item by selecting the "Save to Inventory" button underneath it.
== Usage ==
Photos display an image when held in the hand or when placed in an [[item frame]], similarly to [[map]]s. Photos can have captions added to them by renaming them in an [[anvil]] or by adding a caption while they are in a portfolio. Photos can be added to [[book and quill]]s and portfolios by selecting the "Add Photo" button in the book and quill or portfolio.
== Data values ==
=== ID ===
{{ID table
|edition=bedrock
|shownumericids=y
|showforms=y
|notshowbeitemforms=y
|generatetranslationkeys=y
|displayname=Photo
|spritetype=item
|nameid=photo_item
|id=?
|form=item
|foot=1}}
== History ==
{{History|education}}
{{History||1.17.30|snap=1.17.30.2|[[File:Photo EE1.png|32px]] Added photos.}}
{{History||1.17.30|snap=release|[[File:Photo EE2.png|32px]] Changed photo texture.}}
{{History|foot}}
== Gallery ==
<gallery>
Photo Item 1.png|A photo being placed in an item frame.
Photo Item 2.png|A photo being saved from a portfolio.
Photo Item 3.png|A photo being added to a book and quill.
</gallery>
== References ==
{{Reflist}}
{{Items}}
{{Education Edition}}
[[Category:Education Edition items]]
[[Category:Non-renewable resources]]
[[ja:写真]]
[[pl:Zdjęcie]]
[[zh:相片]]</li><li>[[Bundle|Bundle]]<br/>{{Experimental feature|bundle}}
{{planned|BE}}
{{Item
| image = Bundle.png
| image2 = Bundle Filled.png
| rarity = Common
| renewable = No
| stackable = No
}}
A '''bundle''' is an [[item]] that can store up to a stack's worth of mixed [[item]] types within itself in a single [[inventory]] slot. Items that stack to 16 occupy more space within the bundle, and items that do not stack occupy the entire bundle without allowing space for any other items.
== Obtaining ==
=== Crafting ===
{{Crafting
|showdescription=1
|A1=String |B1=Rabbit Hide |C1=String
|A2=Rabbit Hide |C2=Rabbit Hide
|A3=Rabbit Hide |B3=Rabbit Hide |C3=Rabbit Hide
|Output=Bundle
|type=Tool
|description={{OnlyExperimental|bundle}}
}}
== Usage ==
<!--The tooltip does not reflect the current bundle "tooltip"-->
{{FakeImage|style=max-width:250px;
|1={{Slot|Stick,64}}{{Slot|Ender Pearl,16}}{{Slot|Iron Sword}}<br>{{Slot|Stick,1}}{{Slot|Ender Pearl,4}}{{Slot|Iron Sword,64}}<br>{{Slot|Filled Bundle[Stick x32/Ender Pearl x8]| title = Bundle|link=none}}
|2=Item stack sizes (top row) and the number of bundle slots they take up (middle row). Sticks stack to 64, so they take up one bundle slot; ender pearls stack to 16, so they take up four; and swords do not stack, so they take up the whole bundle. So, for instance, a bundle may have 32 sticks and 8 ender pearls inside (bottom), which take up a total of {{Tooltip|(32×1)|32 Sticks}}+{{Tooltip|(8×4)|8 Ender Pearls}}=64 bundle slots.
}}
Bundles are used to store different [[item|item type]]s in the same [[inventory]] slot. This does not, however, increase the total capacity of the slot: each bundle has 64 "bundle slots" and each item placed in the bundle takes up these slots similar to how they take up space in a normal inventory slot: items that stack to 64 take up 1 bundle slot, items that stack to 16 (for example, [[egg]]s) take up 4, and items that do not stack (such as tools/weapons/armor) take up the whole bundle, all 64 slots.
Although bundles themselves cannot be stacked, a bundle can be placed inside another (nested): the inner bundle itself uses 4 slots plus the number of slots already occupied by the items in that bundle.<ref>{{bug|MC-203567||Bundles can be placed inside of bundles|WAI}}</ref>
To place items inside a bundle, either (1) pick up the bundle in the inventory and right-click on the item(s) to be placed inside or (2) pick up the item(s) and right-click on the bundle. When placing bundles inside another bundle, the interface uses the first method: picking up Bundle A and right clicking on Bundle B attempts to store Bundle B inside A.
Bundles can be {{ctrl|used}} inside the inventory to take out the last item put in. In this way, items are accessible LIFO (last in, first out). When {{ctrl|used}} outside the inventory, it dumps all the items out into the world.
Hovering over the bundle shows its contained items in its inventory slots. The number of bundle slots used is displayed as ''<fullness>''/64 in the tooltip. If the bundle is full, then the empty slots are greyed out with an <span class="invslot">{{SlotSprite|Bundle full}}</span>.
[[Shulker box]]es cannot be placed inside of bundles.
[[File:MinecraftBundle.jpg|thumb|Hovering the mouse over a bundle filled with mob loot, nearly full, with 61 items.]]
== Sounds ==
{{Sound table
|sound=Bundle drop contents1.ogg
|sound2=Bundle drop contents2.ogg
|sound3=Bundle drop contents3.ogg
|subtitle=Bundle empties
|source=player
|description=When a bundle's items are thrown onto the ground
|id=item.bundle.drop_contents
|translationkey=subtitles.item.bundle.drop_contents
|volume=0.8
|pitch=''varies'' <ref group=sound>Can be 0.8-1.2 or 0.76-1.14 for each sound</ref>
|distance=16}}
{{Sound table
|sound=Bundle insert1.ogg
|sound2=Bundle insert2.ogg
|sound3=Bundle insert3.ogg
|subtitle=Item packed
|source=player
|description=When items are placed into a bundle
|id=item.bundle.insert
|translationkey=subtitles.item.bundle.insert
|volume=0.8
|pitch=''varies'' <ref group=sound>Can be 0.8-1.2, 0.76-1.14, or 0.84-1.26 for each sound</ref>
|distance=16}}
{{Sound table
|sound=Bundle remove one1.ogg
|sound2=Bundle remove one2.ogg
|sound3=Bundle remove one3.ogg
|subtitle=Item unpacked
|source=player
|description=When items are removed from a bundle
|id=item.bundle.remove_one
|translationkey=subtitles.item.bundle.remove_one
|volume=0.8
|pitch=''varies' <ref group=sound>Can be 0.8-1.2, 0.84-1.26, or 0.88-1.32 for each sound</ref>
|distance=16
|foot=1}}
== Data values ==
=== ID ===
{{JE}}:
{{ID table
|edition=java
|showforms=y
|generatetranslationkeys=y
|displayname=Bundle
|spritetype=item
|nameid=bundle
|form=item
|foot=1}}
=== Item data ===
<div class="treeview" style="margin-top: 0;">
* {{nbt|compound|tag}}: The '''tag''' tag.
{{:Player.dat_format/Bundle}}
</div>
== History ==
{{History||October 3, 2020|link={{ytl|DBvZ2Iqmm3M|t=1846s}}|[[File:Bundle JE1.png|32px]][[File:Bundle Filled JE1.png|32px]] Bundles are revealed at [[Minecraft Live 2020]]. Hovering over them shows all items inside scattered around a large area, and incomplete bundles have the empty texture.}}
{{History||October 16, 2021|link=https://clips.twitch.tv/AffluentEncouragingOryxPeteZaroll-cd8pIapkfD4PRHxO|Ulraf, a game developer on ''Minecraft'', states that bundles will not be included in [[Caves & Cliffs]].}}
{{History||November 17, 2021|link=https://www.minecraft.net/en-us/article/caves---cliffs-update-part-ii-coming|Bundles are announced to be added after [[The Wild Update]].}}
{{History|java}}
{{History||1.17|snap=20w45a|[[File:Bundle JE1.png|32px]][[File:Bundle Filled JE1.png|32px]] Added bundles. Hovering over them shows some of the items contained and their quantities, much like the tooltip of a [[shulker box]]. Incomplete bundles have the full texture.}}
{{History|||snap=20w46a|[[File:Bundle JE2.png|32px]][[File:Bundle Filled JE2.png|32px]] The textures of bundles have been changed.
|Hovering over bundles now shows its contained items in special slots, similar to slots in the [[inventory]]. If the bundle is not full, it also has an empty slot with a plus on it.}}
{{History|||snap=20w48a|Bundles now show fullness as a number when [[advanced tooltips]] are enabled.
|{{ctrl|Using}} a bundle in the inventory now empties one item from the bundle instead of emptying all the contents out to the [[inventory]].
|{{ctrl|Using}} a bundle now throws out its entire content into the world.}}
{{History|||snap=20w49a|Bundle fullness is now always shown.
|Full bundles now show the blue bar instead of hiding it, to distinguish from empty bundles.}}
{{History|||snap=20w51a|Bundles now drop its contents when destroyed as an [[Item (entity)|item entity]].
|Bundle fullness has been changed from <code>Fullness: ''<fullness>'' / 64</code> to <code>''<fullness>''/64</code>
|The slots in the tooltip when hovering over bundles have changed to have a border, and rows of slot have a thicker edge between them.
|When the bundle is not full, it instead shows empty slots instead of one slot with a plus. When it is full, those empty slots become greyed out with an X.}}
{{History|||snap=21w05a|The player now receives a tutorial when first having a bundle in the inventory.}}
{{History|||snap=21w19a|Bundles are now accessible only through commands.}}
{{History||1.18|snap=Experimental Snapshot 1|Bundles are now available in the creative inventory and can be crafted once again.}}
{{History|||snap=21w37a|Bundles are once again accessible only through commands.}}
{{History||1.19.3|snap=22w42a|Bundles have been made available once again, and have been moved behind their own datapack.}}
{{h|bedrock}}
{{h||1.19.50|snap=beta 1.19.50.21|Added bundle GUI textures in the Vanilla Packs.}}
{{History|foot}}
== Issues ==
{{Issue list}}
== Gallery ==
<gallery>
JE 1.17 Development Bundle.png|The original bundle UI
Bundle in Inventory.jpg|A bundle inventory in the inventory
</gallery>
== References ==
{{Reflist}}
{{Items}}
[[Category:Storage]]
[[Category:Tools]]
[[Category:Renewable resources]]
[[de:Bündel]]
[[es:Saco]]
[[fr:Sac]]
[[ja:バンドル]]
[[pl:Sakwa]]
[[pt:Trouxa]]
[[ru:Мешок]]
[[zh:收纳袋]]</li></ul> | Official support for 16×16 texture packs was added in this update. Prior to this update, users would need to manually change the texture packs by overwriting the terrain.png image in their minecraft.jar files, or use a patcher. | ||||
| Java Edition Beta | |||||
1.8{{Extension DPL}}<ul><li>[[Name Tag|Name Tag]]<br/>{{about|the item that gives names to mobs|the nameplate above a player's head|Player#Username}}
{{Item
| image = Name Tag.png
| renewable = Yes
| stackable = Yes (64)
}}
A '''name tag''' is an [[item]] used to name [[mob]]s in the world and prevent them from despawning naturally.
== Obtaining ==
=== Chest loot ===
{{LootChestItem|name-tag}}
=== Fishing ===
Name tags can be caught from [[fishing]] as part of the treasure category with a {{frac|1|6}} chance after the 5% chance of being a treasure catch. The chance of catching treasure increases with the [[Luck of the Sea]] enchantment.
=== Trading ===
Master-level librarian [[villagers]] offer to sell a name tag for 20 [[emerald]]s as one of their available trades.
== Usage ==
To use a name tag, it must first be renamed with an [[anvil]], costing 1 [[experience]] level.
If it is not renamed, it has no effect when used on a mob. After the name tag is renamed, the player can {{control|use}} it on a mob to give it the name given to the name tag from the anvil. Mobs and name tags can be renamed any number of times. Name tags with the same name are stackable.
Once a mob is named, it keeps its name, and the name tag is consumed.
When a mob is named, it is excluded from the mob cap count.
Effects on various mobs:
* A named [[silverfish]] that goes into a block appears to lose its name because it is replaced by a newly generated unnamed silverfish when the block is broken.
* A baby (animal or villager) keeps its name when becoming an adult.
** A named [[villager]] keeps its name when transformed into a [[Zombie Villager|zombie villager]].
** A named zombie villager keeps its name when cured.
* [[Wandering Trader|Wandering trader]]s still despawn even if they are named, or in a [[minecart]] or [[boat]].
* A named [[wither]]'s boss bar displays its name instead of "Wither".
* Naming an [[ender dragon]] with commands also displays the name in the boss bar.
=== Limitations ===
Any mob can be named except for the [[ender dragon]] and [[player]]s.
A name tag can rename an [[armor stand]], though it does not show the nameplate above its head until <code>CustomNameVisible:1b</code> is set as an extra step.
{{control|Using|use}} a name tag on a villager renames the villager instead of opening the trading interface. A saddled pig is renamed instead of being ridden. Using a name tag on any other mob that can be interacted with performs the {{control|use}} action instead of being named. These mobs can be renamed if the player uses the name tag while crouching or standing in a [[nether portal]] because the portal suppresses the {{control|use}} action.
Once a name tag is used on a mob, it is impossible to remove the name of that mob without the use of commands or external modifications.
=== Behavior ===
Renamed mobs have their name displayed over their head in the same fashion as a mob named through a renamed [[spawn egg]]. Their names can be seen only if they are aimed at from four or fewer blocks away.
Mobs that are named using the name tag never despawn in the world, similar to tamed mobs.<ref>{{tweet|dinnerbone|327485109940916226}}</ref> The exceptions are [[wandering trader]]s or if the mob is hostile and the difficulty is switched to "[[Peaceful]]", causing any hostile mobs or any named hostile mobs to despawn immediately.
If a renamed mob kills a player, the custom name is used in the death message in place of the mob type name. For instance, if a vindicator named "Johnny" kills a player, the death message is "Player was slain by Johnny".
A renamed [[wither]] also has a renamed health bar, and the boss bar doesn't regenerate{{verify}}.
=== Easter eggs ===
* Any mob that receives the name "[[Easter eggs#Upside-down mobs|Dinnerbone]]" or "[[Easter eggs#Upside-down mobs|Grumm]]" is rendered upside down. This even includes the player in early versions of Bedrock Edition if the username is set to either of these and you are not signed into Xbox Live.
* Naming a [[sheep]] "[[Easter eggs#Jeb sheep|jeb_]]" causes its wool to fade between the dye colors, producing a rainbow effect. The [[wool]] that drops when the sheep is [[shear]]ed or killed is the original color of the sheep before the sheep was named.
* Naming a [[rabbit]] "[[Rabbit#Toast|Toast]]" causes it to have a special memorial skin of user xyzen420's girlfriend's [http://www.reddit.com/r/minecraftsuggestions/comments/27hjog/to_themogminer_my_bunny_is_missing_please_help_me/ missing rabbit].
* Naming a [[vindicator]] "Johnny" causes it to be aggressive and attack all [[mob]]s including the wither (except [[ghast]]s and other [[illager]]s). The hostility even extends to [[Ravager|ravagers]] in [[Java Edition|''Java Edition'']], as the "Johnny" vindicator can also attack the ravager while it's riding it.
== Data values ==
=== ID ===
{{edition|java}}:
{{ID table
|edition=java
|showforms=y
|generatetranslationkeys=y
|displayname=Name Tag
|spritetype=item
|nameid=name_tag
|form=item
|foot=1}}
{{edition|bedrock}}:
{{ID table
|edition=bedrock
|shownumericids=y
|showforms=y
|notshowbeitemforms=y
|generatetranslationkeys=y
|displayname=Name Tag
|spritetype=item
|nameid=name_tag
|id=548
|form=item
|foot=1}}
== History ==
{{History|java}}
{{History||1.6.1|snap=13w16b|[[File:Name Tag JE1 BE1.png|32px]] Added name tags. They can now be found in [[dungeon]] [[chest]]s.}}
{{History|||snap=13w25a|A [[mob]] named "Dinnerbone" or "Grumm" now renders upside down.}}
{{History||1.7.2|snap=13w36a|Name tags can now rarely be acquired by [[fishing]], making them [[renewable resource|renewable]].}}
{{History||1.7.4|snap=13w48b|A sheep named "jeb_" now fades between the [[dye]] colors.}}
{{History||1.8|snap=14w02a|Name tags can now be [[trading|bought]] from librarian [[villager]]s, at 20–22 [[emerald]]s for 1 name tag.}}
{{History|||snap=14w27a|[[Rabbit]]s have been added and naming one "Toast" gives it a special memorial skin.}}
{{History||1.9|snap=15w44a|Added name tags to [[mineshaft]] [[chest]]s.
|The average yield of name tags in [[dungeon]] chests has been decreased.}}
{{History||1.11|snap=16w39a|Name tags can now be found in the new [[woodland mansion]] chests.
|Added [[vindicator]]s, which attack almost all mobs if named "Johnny".}}
{{History||1.13|snap=17w47a|Prior to [[1.13/Flattening|''The Flattening'']], this [[item]]'s numeral ID was 421.}}
{{History||1.14|snap=18w43a|[[File:Name Tag JE2 BE2.png|32px]] The texture of name tags has been changed.}}
{{History||1.19|snap=Deep Dark Experimental Snapshot 1|Name tags now generate in [[ancient city]] chests.}}
{{History|pocket alpha}}
{{History||v0.15.0|snap=build 1|[[File:Name Tag JE1 BE1.png|32px]] Added name tags, and a new "Name" Interact button.
|A [[mob]] named "Dinnerbone" or "Grumm" renders upside down.
|A [[sheep]] named "jeb_" fades between the [[dye]] colors.
|Naming a [[rabbit]] "Toast" gives it a special memorial skin.}}
{{History|pocket}}
{{History||1.0.4|snap=alpha 1.0.4.0|Name tags can now be [[trading|bought]] from librarian [[villager]]s for 20-22 [[emerald]]s as their last tier trade.}}
{{History||1.1.0|snap=alpha 1.1.0.0|Naming a [[vindicator]] "Johnny" now makes it hostile to any [[mob]], except other [[illager]]s.
|Name tags can now be found in [[woodland mansion]]s.}}
{{History|bedrock}}
{{History||1.4.0|snap=beta 1.2.14.2|Name tags can now be found in buried treasure [[chest]]s.}}
{{History||1.10.0|snap=beta 1.10.0.3|[[File:Name Tag JE2 BE2.png|32px]] The texture of name tags has been changed.}}
{{History||1.11.0|snap=beta 1.11.0.4|Name tags [[trading|sold]] by librarian [[villager]]s now cost 20 [[emerald]]s.}}
{{History|console}}
{{History||xbox=TU19|xbone=CU7|ps=1.12|wiiu=Patch 1|[[File:Name Tag JE1 BE1.png|32px]] Added name tags.}}
{{History|PS4}}
{{History||1.90|[[File:Name Tag JE2 BE2.png|32px]] The texture of name tags has been changed.}}
{{History|3ds}}
{{History||0.1.0|[[File:Name Tag JE1 BE1.png|32px]] Added name tags.}}
{{History|foot}}
== Issues ==
{{issue list}}
== Trivia ==
* Name tags were added at the request of [https://www.youtube.com/user/paulsoaresjr/ Paulsoaresjr].<ref>{{tweet|paulsoaresjr|326865482839883777}}</ref><ref>{{tweet|Dinnerbone|326812168630722561}}</ref>
* A stack of up to 64 name tags can be renamed at once. The cost is 1 [[experience]] level per stack, regardless of how many name tags were stacked.
* To name a [[mob]] “Name Tag” the player must give the name tag a random name, then rename it back to “Name Tag”.
* A [[villager]] with a name tag turned into a [[zombie villager]] by a [[zombie]] with a name tag does not despawn, but a villager with a name tag turned into a zombie by a zombie without a name tag does despawn.
* It is impossible to have a rainbow [[sheep]] upside-down, because it is impossible for it to be named “Jeb_” and “Dinnerbone” at the same time.
== Gallery ==
<gallery>
NameTag2.png|To use a name tag, the [[player]] must first rename it using an [[anvil]].
NameTag1.png|A [[wolf]] that has been renamed using a name tag.
RenamedCreeper.png|A [[creeper]] renamed using the name tag.
RenamedWither.png|A [[Wither Boss|wither]] renamed using a name tag. The custom name takes place of "Wither" over the [[health bar]] as well.
YoYo.png|How to use "Grumm" and "Dinnerbone" name tag [[easter egg]] and [[lead]] to make another animal Yo-yo.
Grumm Horse.png|A [[horse]] using the "Grumm" or "Dinnerbone" easter egg to be rendered upside-down.
MineshaftNameTag.png|Name Tag found in a mineshaft chest.
Pocket Edition Name Tag.jpg|First image of a name tag in bedrock edition.
</gallery>
== See also ==
* [[Spawn Egg]]
== References ==
{{reflist}}
== External Links ==
*[https://www.minecraft.net/en-us/article/taking-inventory--name-tag Taking Inventory: Name Tag] – Minecraft.net on March 15, 2019
{{items}}
[[de:Namensschild]]
[[es:Etiqueta]]
[[fr:Étiquette]]
[[it:Targhetta]]
[[ja:名札]]
[[ko:이름표]]
[[nl:Naamkaartje]]
[[pl:Znacznik]]
[[pt:Etiqueta]]
[[ru:Бирка]]
[[zh:命名牌]]
[[Category:Renewable resources]]</li><li>[[Baked Potato|Baked Potato]]<br/>{{Item
| title = Baked Potato
| renewable = Yes
| heals = {{hunger|5}}
| stackable = Yes (64)}}
A '''baked potato''' is a [[food]] [[item]] that can be eaten by the [[player]].
== Obtaining ==
Baked potatoes can be obtained by cooking [[potato]]es in a [[furnace]], [[smoker]], or [[campfire]].
{{Smelting
|Potato
|Baked Potato
|0,35
}}
{{IN|JE}}, baked potatoes can also be obtained by killing a zombie or one of its variants while it is on fire. The drop chance is still affected by [[Looting]].
=== Chest loot ===
{{LootChestItem|baked-potato}}
== Usage ==
To eat a baked potato, press and hold {{control|use}} while it is selected in the [[hotbar]]. Eating one restores {{hunger|5}} hunger and 6.0 hunger [[Hunger#Mechanics|saturation]].
=== Crafting ingredient ===
{{crafting usage}}
=== Composting ===
Placing a baked potato into a [[composter]] has an 85% chance of raising the compost level by 1. This is more efficient than composting with raw potatoes.
== Sounds ==
{{Sound table/Entity/Food}}
== Data values ==
=== ID ===
{{edition|java}}:
{{ID table
|edition=java
|showforms=y
|generatetranslationkeys=y
|displayname=Baked Potato
|spritetype=item
|nameid=baked_potato
|form=item
|foot=1}}
{{edition|bedrock}}:
{{ID table
|edition=bedrock
|shownumericids=y
|showforms=y
|notshowbeitemforms=y
|generatetranslationkeys=y
|displayname=Baked Potato
|spritetype=item
|nameid=baked_potato
|id=281
|form=item
|foot=1}}
== Advancements ==
{{load advancements|Husbandry;A Balanced Diet}}
== History ==
{{History|java}}
{{History||1.4.2|snap=12w34a|[[File:Baked Potato JE1.png|32px]] Added baked potatoes.}}
{{History|||snap=12w37a|[[File:Baked Potato JE2 BE1.png|32px]] The texture of baked potatoes has been slightly changed.}}
{{History||1.8|snap=14w02a|Baked potatoes now restore {{Hunger|5}} hunger points instead of 6.}}
{{History|||snap=14w27a|Baked potatoes are now used to craft [[rabbit stew]].}}
{{History||1.13|snap=17w47a|Prior to [[1.13/Flattening|''The Flattening'']], this [[item]]'s numeral ID was 393.}}
{{History||1.14|snap=18w43a|[[File:Baked Potato JE3.png|32px]] The texture of baked potatoes has been changed.}}
{{History|||snap=18w50a|[[File:Baked Potato JE4 BE2.png|32px]] The texture of baked potatoes has been changed, once again.}}
{{History|||snap=19w03a|Placing a baked potato into the new [[composter]] has an 80% chance of raising the compost level by 1.}}
{{History|||snap=19w05a|Baked potatoes now have an 85% chance of increasing the compost level in a composter by 1.}}
{{History||1.17|snap=21w13a|Baked potatoes can now be dropped by flaming [[zombie]]s.<ref>{{bug|MC-199065}}</ref>}}
{{History||1.19|snap=22w13a|Baked potatoes can now be found in [[ancient city]] ice box [[chest]]s.}}
{{History|upcoming java}}
{{History||Villager Trade Rebalance<br>(Experimental)|link=Java Edition 1.20.2|snap=23w31a|[[Wandering trader]]s now have a chance to [[trading|buy]] baked potatoes from the player.}}
{{History|pocket alpha}}
{{History||v0.8.0|snap=build 1|[[File:Baked Potato JE2 BE1.png|32px]] Added baked potatoes.}}
{{History||v0.12.1|snap=build 1|Baked potatoes now restore [[hunger]] instead of [[health]].}}
{{History||v0.13.0|snap=build 1|Baked potatoes are now used to craft [[rabbit stew]].}}
{{History|bedrock}}
{{History||1.10.0|snap=beta 1.10.0.3|[[File:Baked Potato JE4 BE2.png|32px]] The texture of baked potatoes has been changed.}}
{{History||1.11.0|snap=beta 1.11.0.1|Baked potatoes can now be used to fill up [[composter]]s.}}
{{History|console}}
{{History||xbox=TU14|xbone=CU1|ps=1.04|wiiu=Patch 1|switch=1.0.1|[[File:Baked Potato JE2 BE1.png|32px]] Added baked potatoes.}}
{{History||ps=1.00|[[File:Baked Potato JE2 BE1.png|32px]] Added baked potatoes to the [[PlayStation 4 Edition|PS4]] and [[PlayStation Vita Edition|PSVita]].}}
{{History||xbox=none|xbone=none|ps=1.90|wiiu=none|switch=none|[[File:Baked Potato JE4 BE2.png|32px]] The texture of baked potatoes has been changed.}}
{{History|new3DS}}
{{History||0.1.0|[[File:Baked Potato JE2 BE1.png|32px]] Added baked potatoes.}}
{{History|foot}}
== Issues ==
{{issue list}}
== See also ==
* {{ItemLink|Poisonous Potato}}
{{Items}}
[[Category:Food]]
[[Category:Renewable resources]]
[[cs:Pečená brambora]]
[[de:Ofenkartoffel]]
[[es:Patata cocida]]
[[fr:Pomme de terre cuite]]
[[hu:Sült burgonya]]
[[it:Patata al forno]]
[[ja:ベイクドポテト]]
[[ko:구운 감자]]
[[nl:Gebakken aardappel]]
[[pl:Pieczony ziemniak]]
[[pt:Batata assada]]
[[ru:Печёный картофель]]
[[th:มันฝรั่งอบ]]
[[zh:烤马铃薯]]</li></ul> | ? | The HD crash bug is fixed, but they still don't work correctly with the unpatched client. | |||
| Java Edition | |||||
1.0.0{{Extension DPL}}<ul><li>[[Minecart with Furnace|Minecart with Furnace]]<br/>{{ItemEntity
|image=Minecart with Furnace.png
|renewable=Yes
|stackable=No
|size=Height: 0.7 Blocks<br>Width: 0.98 Blocks
|networkid=10
|drops= 1 {{ItemLink|Minecart with Furnace}}
|health={{Hp|6}}
}}
A '''minecart with furnace''' is a [[furnace]] inside a [[minecart]]. It can be powered with [[coal]] or [[charcoal]] to propel it across a [[rail]] line for a limited time, which can be used to move other minecarts.
==Obtaining==
Minecarts with furnace can be retrieved by attacking them, and by doing so it drops as an [[item]].
===Crafting===
{{Crafting
|Output= Minecart with Furnace
|type= Transportation
|Furnace|Minecart}}
==Usage==
Minecarts with furnaces are placed in the same way as other minecarts. It does not have a graphical user interface, unlike a [[furnace]].
Minecarts with furnaces can be powered, done by feeding fuel ([[coal]] or [[charcoal]]) into the furnace minecart with the {{Control|use}} button. The fuel is consumed immediately and it starts to move in the same direction the player clicked toward. Pressing {{Control|use}} always turns it to that direction, even when not holding coal.
Any piece of fuel, added at any time, increases the total range by an additional 3600 ticks (equal to 180 seconds or 3 minutes). The upper limit is 32767 ticks, approximately 27 minutes.
When powered, minecarts with furnaces cover 240m per minute (about 4 m/s, slightly slower than walking speed) or 720m per piece of coal. They do not accelerate beyond this speed when going downhill or on active [[powered rail]]s, and as long as they remain powered, they do not slow down when going uphill, on inactive powered rails, or when pushing or pulling other minecarts.
If a powered furnace minecart is derailed and then pushed back onto a rail, it starts moving again in the direction it came from, so they are not easily turned around in this state unless a player is nearby to redirect it with {{Control|use}}.
Minecarts with furnaces can climb up steep inclines while pushing other minecarts as long as they have fuel. If a minecart with furnace reaches a slope while pulling another minecart, the pulled minecart is switched to the forward position so that it can be pushed along the slope instead of pulled.
When a minecart with furnace bumps into another minecart or multiple minecarts, the other minecarts are pushed forward with great speed. The furnace minecart continues on with its own speed. Because of this speed difference, some of the minecarts may end up inside unloaded chunks on straight tracks.
===Train mechanics===
{{Schematic
|caption=weakly-shunted 1-cart train, one cart was used only to push the train together and is left behind
|AB|mc-$ew|mc-$ew|mc/Fu-$ew|-
|AB|ra-$wu|ra-$ew|ra-$ew|ra-$ew|ellipsis-ew
}}
{{Schematic
|caption=Creating a strongly-shunted 1-cart train. The sloped rail must be replaced with a horizontal rail before powering.
|AB|mc-$ew||mc/Fu-$ew|-
|AB|ra-$ew|ra-$ew|ra-$eu|ra-$ew|ra-$ew|ellipsis-ew
}}
[[File:FurnaceMinecartTrain.png|thumb|right|A Minecart train powered by furnace [[Minecart|minecarts.]]|alt=]]
A furnace minecart can be made to pull up to four other minecarts. All minecarts in this train move at the constant speed of the furnace minecart. Trains are formed when a minecart is pushed into the back of a powered furnace minecart or a short-enough train. These shunts are fragile at best and easily come undone, but some methods are stronger than others. For example, pushing a minecart into a furnace minecart and then powering the furnace gives a weaker shunt than pushing the furnace minecart into the other minecart against a wall, and then powering the furnace in the other direction.
A high-speed minecart running into the back of a furnace minecart going in the same direction automatically creates a weak shunt with it, pulling it along.
Pulling a minecart with TNT causes it to explode.
{| class="wikitable"
|+Pulled minecart/Shunt behavior
!Condition
!Result
|-
|Furnace loses power/speed||Shunt comes undone
|-
|Entity bumping besides those part of the train||Jettisoned forward
|-
|Upward sloped track||Jettisoned forward
|-
|Downward sloped track||Jettisoned forward (strong shunt) or shunt comes undone (weak shunt)
|-
|90° turn in track||Jettisoned backward
|-
|Turn toward north/south or east/west that is not the direction the train was shunted in||Train derails
|}
When a train comes to a turn, the shunt comes undone with the pulled minecart jettisoned backward. The correct way to make such a turn is having the shunt undone before a turn, and then make the two rejoin on a straight rail later by having the pulled cart catch up with the minecart with furnace.<ref name=mango/>
Since the train runs slower on a fully powered track than a normal minecart (~5 m/s compared to 8m/s), a train pulled by an unpowered furnace minecart is ideal for AFK farms involving breaking or placing blocks like [[nether wart]].<ref name=mango>{{YouTubeLink|1=pRLiAQfhTG8|2=Why The Furnace Minecart Isn't As Useless As You Think|3=ilmango}}</ref>
==Properties==
The coal is not stored as an item in the entity, but in the object data in the fuel property as a time in ticks. ''Fuel'' is a short value, i.e. a maximum of 32767 ticks, which is about 27 minutes. However, {{cmd|/summon furnace_minecart ~ ~ ~ {Fuel:32000} }} alone doesn't make it go since it doesn't have a direction. It can be right-clicked on a track to give it a direction, or it can be summoned with the properties ''PushX'' and ''PushZ'' set, which are responsible for the direction. The <code>Motion</code> property of every entity allows for movement of the minecart, but it does not direct the minecart to move on its own.
==Sounds==
{{Edition|Java}}:<br>
Minecarts with furnaces use the Friendly Creatures sound category for entity-dependent sound events.<ref group=sound name=rollsource>{{bug|MC-42132}}</ref>
{{Sound table
|sound=Minecart rolling.ogg
|subtitle=Minecart rolls
|source=Friendly Creatures <ref group=sound name=rollsource/>
|overridesource=1
|description=While a minecart with furnace is moving
|id=entity.minecart.riding
|translationkey=subtitles.entity.minecart.riding
|volume=0.0-0.35 <ref group=sound>Relates linearly with horizontal velocity (max 0.5)</ref>
|pitch=0.0-1.0 <ref group=sound>Will increase by 0.0025 per tick if the minecart's horizontal velocity is more than 0.01</ref>
|distance=16
|foot=1}}
{{Edition|Bedrock}}:
{{Sound table
|type=bedrock
|sound=Minecart rolling.ogg
|source=neutral
|description=While a minecart with furnace is moving
|id=minecart.base
|foot=1}}
==Data values==
===ID===
{{ID table
|edition=java
|firstcolumnname=Item
|showforms=y
|generatetranslationkeys=y
|displayname=Minecart with Furnace
|spritetype=item
|nameid=furnace_minecart
|form=item
|foot=1}}
{{ID table
|edition=java
|firstcolumnname=Entity
|generatetranslationkeys=y
|displayname=Minecart with Furnace
|spritetype=entity
|nameid=furnace_minecart
|foot=1}}
===Entity data===
Minecarts with furnace have entity data associated with them that contain various properties of the entity.
{{el|java}}:
{{main|Entity format}}
{{/ED}}
{{el|bedrock}}:
: See [[Bedrock Edition level format/Entity format]].
==History==
{{History|java alpha}}
{{History||v1.0.14|[[File:Minecart with Furnace JE1.png|32px]] [[File:Minecart with Furnace (item) JE1.png|32px]] Minecarts with furnace were added.
|Since no in-game name was indicated, they were referred to by names such as "powered minecart" or "furnace minecart".
|No matter how much fuel was added to the minecart, it would never move for more than 3 minutes after the last fuel.}}
{{History|java beta}}
{{History||1.0|When tooltips were added to items in inventory, this was named "Minecart with Furnace".}}
{{History||1.2|[[File:Minecart with Furnace JE2.png|32px]] The texture of the minecart with furnace has been changed.}}
{{History|java}}
{{History||1.0.0|snap=?|Each piece of [[coal]] now powers a [[minecart]] with furnace for {{convert|3|minutes|ticks}}, so that adding another piece of coal at any time increases the total range by another 3 minutes. A full stack of 64 coal now powers it for {{convert|192|minutes|ticks}}.
|Minecarts with furnace on a level track cover 204 meters per minute.}}
{{History||1.8|snap=14w11a|Minecarts with furnace now give a much greater boost to other minecarts.
|When powered, minecarts with furnace now move on non-powered rails without decelerating.}}
{{History|||snap=14w17a|Minecarts with furnace's behavior has been reverted, so that no change was released in [[Java Edition 1.8]].}}
{{History||1.11|snap=16w32a|The entity ID of the minecart with furnace has been changed from <code>MinecartFurnace</code> to <code>furnace_minecart</code>.}}
{{History||1.13|snap=17w47a|Prior to [[1.13/Flattening|''The Flattening'']], this [[item]]'s numeral ID was 343.}}
{{History||1.14|snap=18w43a|[[File:Minecart with Furnace JE3.png|32px]] [[File:Minecart with Furnace (item) JE2.png|32px]] The texture of the minecart with furnace has been changed.}}
{{History||1.15|snap=19w38a|[[File:Minecart with Furnace 19w38a.png|32px]] The furnace now appears dark, like suffocating mobs.}}
{{History|||snap=19w39a|The furnace texture is now colored correctly.}}
{{History||1.15.2|snap=Pre-Release 1|Furnace minecarts can now navigate around any corner.}}
{{History||1.19|snap=22w13a|The crafting recipe for a minecart with furnace is now shapeless.
|Breaking a minecart with furnace will now drop the item instead of the minecart and furnace separately.<ref>{{bug|MC-249493|||Fixed}}</ref>}}
{{History|console}}
{{History||xbox=TU1|xbone=CU1|ps=1.0|wiiu=Patch 1|switch=1.0.1|[[File:Minecart with Furnace JE2.png|32px]] [[File:Minecart with Furnace (item) JE1.png|32px]] Added minecart with furnace.}}
{{History|Ps4}}
{{History||1.90|[[File:Minecart with Furnace JE3.png|32px]] [[File:Minecart with Furnace (item) JE2.png|32px]] The texture of the minecart with furnace has been changed.}}
{{History|foot}}
==Issues==
{{issue list}}
==Trivia==
*The minecart with furnace is excluded from {{els|be|3ds}} on purpose. In a tweet, [[Jeb]] considered removing it from {{el|je}}.<ref>{{tweet|jeb|699241247391772672|I think we will phase out the furnace minecraft ''(sic)''|15 Feb 2016}}</ref>
**When converting a [[Legacy Console Edition]] world to a [[Bedrock Edition]] world, any present minecarts with furnaces are converted into a normal minecart.
**Despite the above-described poor standing of the minecart, it was most recently briefly featured in an animation in the [[Minecraft Live 2022]], where one was depicted as moving a train of about 20 minecarts at a higher than normal speed.
==Gallery==
<gallery>
Running Powered Minecart.png|A powered minecart in action.
</gallery>
==References==
{{reflist}}
{{Items}}
{{Entities}}
[[Category:Mechanics]]
[[cs:Parní vozík]]
[[de:Antriebslore]]
[[es:Vagoneta con horno]]
[[fr:Wagonnet motorisé]]
[[hu:Gőzmeghajtású csille]]
[[ja:かまど付きのトロッコ]]
[[ko:화로가 실린 광산 수레]]
[[nl:Mijnkar met oven]]
[[pl:Wagonik z piecem]]
[[ru:Вагонетка с печью]]
[[uk:Вагонетка з піччю]]
[[zh:动力矿车]]</li><li>[[Water Bucket|Water Bucket]]<br/>{{Item
| title = Water Bucket
| renewable = Yes
| image = Water Bucket.png
| stackable = No
}}
A '''water bucket''' is a [[bucket]] filled with [[water]].
== Obtaining ==
=== Interacting ===
To fill an empty [[bucket]] with water, {{control|use}} it on a [[water]] source block. The water is consumed in the process. Flowing water does not fill a bucket.
{{control|Using}} an empty bucket on a [[cauldron]] filled with water (water level 3) empties the cauldron and fills the bucket.
Water buckets can also be filled by placing an empty one in the fuel slot of a [[furnace]], and a wet [[sponge]] into the oven slot. The bucket is filled when the [[smelting]] process completes, which also leaves the sponge dry and ready to be reused.
=== Chest Loot ===
{{LootChestItem|water-bucket}}
== Usage ==
{{Control|Using}} a water bucket on a solid block places a water source block against that block, emptying the bucket; using a water bucket on a [[waterlogging|waterloggable]] block waterlogs the block. In [[the Nether]], however, the water evaporates, making a fire extinguishing sound and displays smoke particles while nothing gets placed.
=== Dispensers ===
A [[dispenser]] can be loaded with a water bucket, and when activated it places a water block directly before it, emptying the bucket. A dispenser loaded with an empty bucket and a water source right in front of it draws the source into the bucket when activated.
=== Cauldrons ===
A single water bucket can fill a [[cauldron]], and using an empty bucket on a water-filled cauldron fills the bucket. Empty buckets cannot be filled from partly-filled cauldrons.
=== Filling bucket with mobs ===
Water buckets can be used on a [[fish]], [[axolotl]] or [[tadpole]] to create a [[bucket of aquatic mob]].
=== Transportation ===
{{main|Tutorials/Elevators#Water elevators}}
Water buckets can be used as a means of quickly descending great heights in the [[Overworld]] and [[the End]], either by creating a waterfall or using the water bucket while falling to create a safe water landing.
Water buckets can also be used to climb vertical surfaces anywhere but [[the Nether]] by repeatedly creating higher waterfalls from the bottom and swimming up them.
== Sounds ==
{{el|je}}:
{{Sound table
|sound=Fill water bucket1.ogg
|sound2=Fill water bucket2.ogg
|sound3=Fill water bucket3.ogg
|subtitle=Bucket fills
|source=player
|description=When a bucket is filled with water
|id=item.bucket.fill
|translationkey=subtitles.item.bucket.fill
|volume=1.0
|pitch=1.0
|distance=16}}
{{Sound table
|sound=Empty water bucket1.ogg
|sound2=Empty water bucket2.ogg
|sound3=Empty water bucket3.ogg
|subtitle=Bucket empties
|source=block
|description=When the bucket is placed
|id=item.bucket.empty
|translationkey=subtitles.item.bucket.empty
|volume=1.0 <ref group=sound>Except for the second copy of {{cd|empty1}}, which is 0.9</ref>
|pitch=1.0
|distance=16
|foot=1}}
{{el|je}}:
{{Sound table
|type=bedrock
|sound=Fill water bucket1.ogg
|sound2=Fill water bucket2.ogg
|sound3=Fill water bucket3.ogg
|source=block
|description=When a bucket is filled with water
|id=bucket.fill_water
|volume=1.0
|pitch=1.0}}
{{Sound table
|sound=Empty water bucket1.ogg
|sound2=Empty water bucket2.ogg
|sound3=Empty water bucket3.ogg
|source=block
|description=When a water bucket is emptied
|id=bucket.empty_water
|volume=1.0
|pitch=1.0}}
{{Sound table
|rowspan=2
|sound=Water Splash Old.ogg
|source=block
|description=When a water bucket is placed in a cauldron<wbr><ref group=sound name=bucketsplash>{{Bug|MCPE-135919}}</ref>
|id=cauldron.fillwater
|volume=0.1
|pitch=1.0}}
{{Sound table
|source=block
|description=When a water bucket is removed from a cauldron<wbr><ref group=sound name=bucketsplash/>
|id=cauldron.takewater
|volume=0.1
|pitch=1.0
|foot=1}}
==Data values==
=== ID ===
{{edition|java}}:
{{ID table
|edition=java
|showforms=y
|generatetranslationkeys=y
|displayname=Water Bucket
|spritetype=item
|nameid=water_bucket
|form=item
|foot=1}}
{{edition|bedrock}}:
{{ID table
|edition=bedrock
|showaliasids=y
|shownumericids=y
|showforms=y
|notshowbeitemforms=y
|generatetranslationkeys=y
|displayname=Water Bucket
|spritetype=item
|nameid=water_bucket
|aliasid=bucket / 8
|id=362
|form=item
|translationkey=item.bucketWater.name
|foot=1}}
== Advancements ==
{{load advancements|Tactical fishing;The Cutest Predator;Bukkit bukkit}}
==History==
{{History|java infdev}}
{{History||20100615|[[File:Water Bucket JE1 BE1.png|32px]] Added water buckets.}}
{{History|java alpha}}
{{History||v1.2.6|{{control|use|text=Using}} a water bucket on [[block]]s with GUIs ([[chest]]s, [[furnace]]s, etc.) no longer places the water.}}
{{History|java}}
{{History||1.0.0|snap=Beta 1.9 Prerelease 2|Water buckets can now be used to fill [[cauldron]]s.}}
{{History||1.3.1|snap=12w15a|[[Dispenser]]s have now been given the ability to dispense water buckets. They can also collect if activated again.}}
{{History||1.8|snap=14w25a|A water bucket is now shown as the icon when [[water]] is used as a layer in [[Superflat]].}}
{{History|||snap=14w25b|[[Smelting]] a wet [[sponge]] while an empty bucket is in the fuel slot fills the bucket with water.}}
{{History||1.9|snap=15w44a|A full [[cauldron]] can now be emptied with a bucket, yielding a water bucket.}}
{{History|||snap=15w50a|Added sounds for collecting and pouring water using a bucket.}}
{{History||1.13|snap=17w47a|Prior to the ''[[Flattening]]'' this item's numerical ID was 326.}}
{{History|||snap=18w08b|Water buckets can now be used to pick up [[fish]] mobs.}}
{{History||1.14|snap=18w43a|[[File:Water Bucket JE2 BE2.png|32px]] The texture of water buckets has now been changed.
|Water buckets can now suck up liquids directly adjacent to the side they are facing. How this works is unknown, given the water bucket clearly already contains a liquid.}}
{{History|||snap=18w48a|Water buckets can now be found in [[chest]]s in [[village]] fishing cottages.}}
{{History|||snap=19w02a|Water buckets can now be used to put out [[campfire]]s.}}
{{History||1.17|snap=20w51a|Water buckets can now be used to collect [[axolotl]]s.}}
{{History||1.19|snap=22w11a|Water buckets can now be used to collect [[tadpole]]s.}}
{{History||1.19.3|snap=22w45a|Water buckets can now be emptied into [[waterlogging|waterlogged]] blocks, instead of placing water against them.<ref>{{bug|MC-127110|||Fixed}}</ref>}}
{{History|upcoming java}}
{{History||Villager Trade Rebalance<br>(Experimental)|link=Java Edition 1.20.2|snap=23w31a|[[Wandering trader]]s now have a chance to [[trading|buy]] a water bucket from the player.}}
{{History|pocket alpha}}
{{History||v0.7.0|[[File:Water Bucket JE1 BE1.png|32px]] Added water buckets.
|Water buckets were simply called "Bucket".}}
{{History||v0.7.4|Water buckets no longer stack to 64.}}
{{History||v0.14.0|snap=build 1|Dispensers can now shoot out water from water buckets.}}
{{History|bedrock}}
{{History||1.4.0|snap=beta 1.2.14.2|Water buckets can now be used to pick up [[fish mob]]s.
|Moved all bucket items, including water buckets, from the Equipment tab to the Items tab in the [[Creative inventory]].{{verify|type=update}}{{info needed}}<!---please check snapshots, only 1 major release version was checked each--->}}
{{History||1.10.0|snap=beta 1.10.0.3|[[File:Water Bucket JE2 BE2.png|32px]] The texture of water buckets has now been changed.}}
{{History||1.16.100|snap=beta 1.16.100.56|The ID of water buckets has been changed from <code>bucket/8</code> to <code>water_bucket</code>.}}
{{History||1.17.0|snap=beta 1.16.230.52|Water buckets can now be used to collect [[axolotl]]s.}}
{{History||1.18.10|snap=beta 1.18.10.24|Water buckets can now be used to collect [[tadpole]]s behind the "Wild Update" experimental toggle.}}
{{History|console}}
{{History||xbox=TU1|xbone=CU1|ps=1.0|wiiu=Patch 1|switch=1.0.1|[[File:Water Bucket JE1 BE1.png|32px]] Added water buckets.}}
{{History||xbox=TU9|[[Dispenser]]s have now been given the ability to shoot out the [[liquids]] inside water buckets. They can also suck up the liquids if activated again, but a bug prevents the empty [[bucket]] from being filled. Whether this was ever fixed is unknown.}}
{{History||xbox=none|xbone=none|ps=1.90|wiiu=none|switch=none|[[File:Water Bucket JE2 BE2.png|32px]] The texture of water buckets has now been changed.}}
{{History|New Nintendo 3DS Edition}}
{{History||0.1.0|[[File:Water Bucket JE1 BE1.png|32px]] Added water buckets.}}
{{History|foot}}
==Issues==
{{issue list}}
==Gallery==
<gallery>
Water Bucket SDGP.png|Water bucket in the [[Super Duper Graphics Pack]].
</gallery>
==References==
{{Reflist}}
{{Items}}
[[Category:Renewable resources]]
[[Category:Tools]]
[[de:Wassereimer]]
[[ja:水入りバケツ]]
[[pt:Balde de água]]
[[th:ถังน้ำ]]
[[uk:Відро води]]
[[zh:水桶]]</li></ul> | Beta 1.9 Prerelease 4 | Player can now reload the texture pack by pressing F3 + T. | |||
1.3.1{{Extension DPL}}<ul><li>[[Book and Quill|Book and Quill]]<br/>{{For|the item produced after a Book and Quill is signed|Written Book}}
{{Item
| image = Book and Quill.png
| renewable = Yes
| stackable = No
}}
A '''book and quill''' is an [[item]] used to write [[written book]]s.
== Obtaining ==
=== Crafting ===
{{Crafting
|Book
|Ink Sac
|Feather
|Output= Book and Quill
|type= Miscellaneous
}}
=== Natural generation ===
{{LootChestItem|book-and-quill}}
== Usage ==
=== Crafting ingredient ===
{{crafting usage}}
=== Writing ===
By pressing {{control|use item}} or long pressing screen anywhere{{only|bedrock}} while holding a book and quill in their hand, the [[player]] can open a text editor GUI.
Using this GUI, the player can write a single book up to 100{{only|java}} or 50{{only|bedrock}} pages long, with up to 798 characters per page. The player can write up to 79,800{{only|java}} or 12,800{{only|bedrock}} characters inside the entire book. No page may be longer than 14 lines and each line can have a width of 114 pixels (see pixel width of each character [[Language#Font|here]]).
The player has the ability to copy and paste into books. However, the paste does not work if the text being pasted is longer than a single page. Most Unicode characters are available in books, and they may be pasted in without issue.
In singleplayer, the world pauses while a book is being edited.{{only|java}}
=== Lecterns ===
One can place a book and quill or a [[written book]] on an empty [[lectern]].
The lectern then emits a redstone signal depending on the displayed page in the book. On the last page, the lectern emits a signal strength of 15. This is why lecterns are listed in the "redstone" tab in the [[creative inventory]].
=== Formatting codes ===
{{main|Formatting codes}}
{{exclusive|bedrock|section=1}}
Text in a book can be styled using codes starting with the {{key|§}} character (section sign).
* {{key|§}} + {{key|k}} creates randomly changing characters.
* {{key|§}} + {{key|l}} creates bold text.
* {{key|§}} + {{key|m}} creates strikethrough text.
* {{key|§}} + {{key|n}} creates underlined text.
* {{key|§}} + {{key|o}} creates italic text.
* {{key|§}} + {{key|0}} – {{key|f}} (hexadecimal) creates colored text.
* {{key|§}} + {{key|r}} resets any of the previous styles so text after it appears normally.
If the [[player]] uses multiple codes, and continue typing past the end of a line, the next line exhibits only the last formatting code used.
=== Signing ===
Books can be signed by pressing the "Sign" button while in the interface. {{IN|java}}, when signed, a book bears the name of the player who wrote it and a title chosen upon signing. {{IN|bedrock}}, the book doesn't display the name of the player as the author; instead, the author can be any text the player wants. After it has been signed, it cannot be edited again – it has turned into a [[written book]].
Special characters can be used in the title, if typed from a keyboard that supports them. Alt codes do not work, and the {{key|§}} character cannot be typed even using a keyboard that implements it, meaning titles cannot be colored or formatted in-game. However, on Linux using the compose key to produce special characters does work.
The title of the book can be up to 16 characters long, and the player cannot paste into a title. A "workaround" for the 16-character limitation is to manually rename the book at an [[Anvil#Renaming|anvil]], which always costs 1 [[Experience|experience level]]. This can be done with either a written book or a book and quill – both versions will always display the changed name. If a custom name is removed from a written book, it will revert back to the title it was given during the signing process.
=== Chiseled bookshelf ===
{{control|Use|text=Using}} the [[chiseled bookshelf]] while having a book and quill in the main hand will put the book inside the chiseled bookshelf.
=== Trading ===
{{IN|bedrock}}, expert-level librarian [[villager]]s buy 2 books and quills for one [[emerald]]. Book and quill is offered in two item slots due to being non-stackable.
{{IN|java}}, expert-level librarian villagers have a 50% chance to buy 2 books and quills for one emerald. The amount of books and quills needed is supposed to be 2, but due to the item being non-stackable, only one is needed for the trade.<ref>{{bug|MC-248042||Librarian's book and quill trade is always discounted to 1 since books are unstackable}}</ref>
== Sounds ==
{{edition|java}}:
{{Sound table
|rowspan=2
|sound=Page turn1.ogg
|sound2=Page turn2.ogg
|sound3=Page turn3.ogg
|subtitle=Page rustles
|source=master
|description=When the page of a book is turned
|id=item.book.page_turn
|translationkey=subtitles.item.book.page_turn
|volume=2.0
|pitch=1.0
|distance=16}}
{{Sound table
|subtitle=Page rustles
|source=block
|description=When the page of a book is turned on a lectern
|id=item.book.page_turn
|translationkey=subtitles.item.book.page_turn
|volume=2.0
|pitch=0.9-1.0
|distance=16}}
{{Sound table
|sound=Book thump1.ogg
|sound2=Book thump2.ogg
|subtitle=Book thumps
|source=block
|description=When a book is placed on a lectern
|id=item.book.put
|translationkey=subtitles.item.book.put
|volume=1.0
|pitch=1.0
|distance=16}}
{{Sound table
|sound=Chiseled bookshelf insert1.ogg
|sound2=Chiseled bookshelf insert2.ogg
|sound3=Chiseled bookshelf insert3.ogg
|sound4=Chiseled bookshelf insert4.ogg
|subtitle=Book placed
|source=block
|description=When a book and quill is placed in a chiseled bookshelf
|id=block.chiseled_bookshelf.insert
|translationkey=subtitles.chiseled_bookshelf.insert
|volume=0.8
|pitch=''varies'' <ref group=sound>Can be 1.0, 0.85, or 1.1 for each sound</ref>
|distance=16}}
{{Sound table
|sound=Chiseled bookshelf pickup1.ogg
|sound2=Chiseled bookshelf pickup2.ogg
|sound3=Chiseled bookshelf pickup3.ogg
|subtitle=Book taken
|source=block
|description=When a book and quill is removed from a chiseled bookshelf
|id=block.chiseled_bookshelf.pickup
|translationkey=subtitles.chiseled_bookshelf.take
|volume=0.8
|pitch=''varies'' <ref group=sound>Can be 1.0, 0.8, or 1.1 for each sound</ref>
|distance=16
|foot=1}}
{{edition|bedrock}}:
{{Sound table
|type=bedrock
|sound=Page turn1.ogg
|sound2=Page turn2.ogg
|sound3=Page turn3.ogg
|source=sound
|description=When the page of a book is turned
|id=item.book.page_turn
|volume=2.0
|pitch=1.0}}
{{Sound table
|sound=Book thump1.ogg
|sound2=Book thump2.ogg
|source=block
|description=When a book is placed on a lectern
|id=item.book.put
|volume=4.8
|pitch=1.0}}
{{Sound table
|type=bedrock
|sound=Chiseled bookshelf insert1.ogg
|sound2=Chiseled bookshelf insert2.ogg
|sound3=Chiseled bookshelf insert3.ogg
|sound4=Chiseled bookshelf insert4.ogg
|source=block
|description=When a book and quill is placed in a chiseled bookshelf
|id=insert.chiseled_bookshelf
|volume=0.8
|pitch=''varies'' <ref group=sound name=insertvaries>Can be 1.0, 0.85, or 1.1 for each sound</ref>}}
{{Sound table
|sound=Chiseled bookshelf pickup1.ogg
|sound2=Chiseled bookshelf pickup2.ogg
|sound3=Chiseled bookshelf pickup3.ogg
|source=block
|description=When a book and quill is removed from a chiseled bookshelf
|id=pickup.chiseled_bookshelf
|volume=0.8
|pitch=''varies'' <ref group=sound name=pickupvaries>Can be 1.0, 0.8, or 1.1 for each sound</ref>
|foot=1}}
== Data values ==
=== ID ===
{{edition|java}}:
{{ID table
|edition=java
|showitemtags=y
|showforms=y
|generatetranslationkeys=y
|displayname=Book and Quill
|spritetype=item
|nameid=writable_book
|itemtags=bookshelf_books, lectern_books
|form=item
|foot=1}}
{{edition|bedrock}}:
{{ID table
|edition=bedrock
|showitemtags=y
|shownumericids=y
|showforms=y
|notshowbeitemforms=y
|generatetranslationkeys=y
|displayname=Book and Quill
|spritetype=item
|nameid=writable_book
|id=510
|itemtags=minecraft:bookshelf_books, minecraft:lectern_books
|form=item
|foot=1}}
=== Item data ===
{{el|java}}:
{{main|Player.dat format}}
<div class="treeview" style="margin-top: 0;">
* {{nbt|compound|tag}}: The '''tag''' tag.
{{:Player.dat_format/Writable Books}}
</div>
{{el|bedrock}}:
: See [[Bedrock Edition level format/Item format]].
== Video ==
<div style="text-align:center">{{yt|DD_Z82wmGZA}}</div>
== History ==
{{History|java}}
{{History||1.3.1|snap=12w17a|[[File:Book and Quill JE1 BE1.png|32px]] Added books and quills.}}
{{History||1.7.2|snap=13w36a|Books and quills can now be crafted with a [[written book]] to clone the written book.}}
{{History||1.8|snap=14w05a|Copying written books now mark them as "Copy of Original" or "Copy of Copy".
|The copying status of a book is now denoted in a separate line in the tooltip, beneath the author's name.
|Copies of copies cannot be copied.}}
{{History|||snap=14w25a|Books and quills now use JSON text components instead of plain text with the new <code>pages</code> tag
|Book and quills are now capable of using the <code>clickEvent</code> and <code>hoverEvent</code> tags.}}
{{History||1.13|snap=17w47a|Prior to [[1.13/Flattening|''The Flattening'']], this [[item]]'s numeral ID was 386.}}
{{History||1.14|snap=18w43a|[[File:Book and Quill JE2 BE2.png|32px]] The texture of books and quills has now been changed.
|Added support for editing anywhere in the book and quill.<ref name="MC-1578">{{bug|MC-1578}}</ref>
|Books and quills now have copy/paste support.<ref name="MC-1578"></ref>
|The page limit of books and quills has now been increased from 50 to 100 pages.}}
{{History|||snap=19w11a|Librarian [[villager]]s now [[trading|buy]] books and quills instead of written books.}}
{{History||1.20<br>(Experimental)|link=1.19.3|snap=22w42a|Books and quills can now interact with [[chiseled bookshelves]].}}
{{History|bedrock}}
{{History||1.2.0|snap=beta 1.2.0.2|[[File:Book and Quill JE1 BE1.png|32px]] Added books and quills.}}
{{History||1.4.0|snap=beta 1.2.14.2|Books and quills can now be found inside [[buried treasure]] [[chest]]s.}}
{{History||1.6.0|snap=beta 1.6.0.1|Pages within books and quills can now be turned using the controller bumper buttons.}}
{{History||1.10.0|snap=beta 1.10.0.3|[[File:Book and Quill JE2 BE2.png|32px]] The texture of books and quills has now been changed.}}
{{History||1.11.0|snap=beta 1.11.0.4|Books and quills can now be [[trading|sold]] to librarian [[villager]]s.}}
{{History|console}}
{{History||xbox=TU25|xbone=CU14|ps=1.17|wiiu=Patch 1|switch=1.0.1|[[File:Book and Quill JE1 BE1.png|32px]] Added books and quills.}}
{{History|PS4}}
{{History||1.90|[[File:Book and Quill JE2 BE2.png|32px]] The texture of books and quills has now been changed.}}
{{History|foot}}
== Issues ==
{{issue list}}
== Trivia ==
* The in-game restrictions on books are not hard limits. Third party editors or commands can make books have more than 100 pages{{only|java}} (2,147,483,639 pages), more than 256 characters per page (32,767 characters per page), can change author names, and can have colored titles, among other things. These books still function properly in vanilla ''Minecraft'', meaning the [[player]] may encounter such books on adventure maps or multiplayer servers.<ref>http://www.minecraftforum.net/topic/1189266-hacking-books</ref>
* If the player renames a book and quill in an anvil before signing it, it retains the name from the anvil instead of taking the name from signing.{{only|java}}
== Gallery ==
<gallery>
Jeb book.png|The first image of a book seen.<ref>https://web.archive.org/web/20120427014334/https://www.mojang.com/2012/04/minecraft-snapshot-12w17a/</ref>
Book and Quill Writing.png|The GUI of writing a book.
Book and Quill Signing.png|The GUI of signing a book.
Written Book tooltip.png|A signed book.
BookandQuillOperators12w17a.png|Display of styles used in a book. "e" and "f" are difficult to see.
Book and Quill in Pocket Edition.jpg|A book and quill {{in|be}}.
Java book and quill example with text.png|An example of text in a book and quill in [[Java Edition]].
Better Together Book.jpg|A book and quill in ''Bedrock Edition''.
</gallery>
== References ==
{{Reflist}}
== External links ==
* [http://www.minecraftforum.net/topic/1498339-132ssp-bookshop-your-books-anywhere/ Bookshop - Book Sharing And Editing Tool]
* [http://fsymbols.com/generators/wide/ Full-Width Text Generator]
* [http://fsymbols.com/generators/smallcaps/ Small Caps Text Generator]
* [http://www.minecraftforum.net/topic/1202590-revise-edit-signed-books-w-more-options-all-os-12w17a/ Revise - External Book Editor]
== See also ==
* [[Book]]
* [[Bookshelf]]
* [[Written Book]]
{{Items}}
[[Category:Renewable resources]]
[[cs:Rozepsaná kniha s brkem]]
[[de:Buch und Feder]]
[[el:Βιβλίο και Πένα]]
[[es:Libro y pluma]]
[[fr:Livre vierge]]
[[hu:Könyv és toll]]
[[it:Libro e penna]]
[[ja:本と羽根ペン]]
[[ko:책과 깃펜]]
[[nl:Boek en veer]]
[[pl:Książka z piórem]]
[[pt:Livro e pena]]
[[ru:Книга с пером]]
[[th:หนังสือกับปากกาขนนก]]
[[uk:Книга з пером]]
[[zh:书与笔]]</li><li>[[Golden Apple|Golden Apple]]<br/>{{Distinguish|Enchanted Golden Apple}}
{{Item
| image = Golden Apple.png
| rarity = Rare
| heals = {{hunger|4}}
|effects=: {{EffectLink|Absorption}} (2:00)
: {{EffectLink|Regeneration}} II (0:05)
|renewable = Yes
|stackable = Yes (64)
}}
A '''golden apple''' is a [[food]] item that bestows beneficial effects when consumed, and is also used to cure a [[Zombie Villager|zombie villager]] under the [[Weakness]] effect into a normal [[villager]].
== Obtaining ==
=== Crafting ===
{{Crafting
|A1= Gold Ingot
|B1= Gold Ingot
|C1= Gold Ingot
|A2= Gold Ingot
|B2= Apple
|C2= Gold Ingot
|A3= Gold Ingot
|B3= Gold Ingot
|C3= Gold Ingot
|Output= Golden Apple
|type= Foodstuff
}}
=== Chest loot ===
On the base of <code>ancient_city/city_center/city_center_2</code>, a single golden apple is contained in the [[chest]]. Eating it at that location unlocks the [[piston]] doors to the [[redstone]] labs beneath.
{{LootChestItem|golden-apple}}
== Usage ==
{{see also|Tutorials/Hunger management|title1=Hunger management}}
To eat a golden apple, press and hold {{control|use}} while it is selected in the hotbar. It restores {{hunger|4}} points of hunger and 9.6 hunger [[Hunger#Mechanics|saturation]].
Unlike most foods, golden apples can be eaten when the hunger bar is full.
The golden apple provides:
*[[Absorption]] I for 2 minutes (providing {{hp|4|absorption=1}} points of absorption health)
*[[Regeneration]] II ({{hp|1}} every 25 ticks, {{hp|2|notag=1}} × 0.4 per second) for 5 seconds (long enough to heal {{hp|4}} points of damage)
=== Curing zombie villagers ===
{{main|Zombie Villager#Curing}}
A golden apple and a [[potion of weakness]] can be used to convert a [[zombie villager]] into a regular [[villager]].
=== Horses ===
Golden apples can be used for improving the chances of taming a [[horse]] by 10%, for [[breeding]] and leading horses, and for speeding up the growth of baby horses by 4 minutes.
===Piglins===
{{EntityLink|Piglin|Piglins}} are attracted to golden apples. They run toward any golden apples on the ground, and inspect it for 6 to 8 seconds before putting it in their inventory. However, piglins do not eat golden apples (or any [[food]]).
== Sounds ==
{{Sound table/Entity/Food}}
== Data values ==
=== ID ===
{{edition|java}}:
{{ID table
|edition=java
|showforms=y
|generatetranslationkeys=y
|displayname=Golden Apple
|spritetype=item
|nameid=golden_apple
|form=item
|foot=1}}
{{edition|bedrock}}:
{{ID table
|edition=bedrock
|shownumericids=y
|showforms=y
|notshowbeitemforms=y
|generatetranslationkeys=y
|displayname=Golden Apple
|spritetype=item
|nameid=golden_apple
|id=258
|form=item
|foot=1}}
== Achievements ==
{{load achievements|Zombie Doctor;Oooh, shiny!}}
== Advancements ==
{{load advancements|Zombie Doctor;Oh Shiny;A Furious Cocktail;How Did We Get Here;Husbandry;A Balanced Diet}}
== History ==
{{History|java infdev}}
{{History||February 23, 2010|link=http://www.minecraftforum.net/topic/2750582-the-secret-history-of-minecraft/|A [[player]] named JTE put a [[crafting]] recipe for golden apples as a joke at the bottom of a crafting guide she made. The recipe used [[gold ingot]]s instead of [[block of gold|gold blocks]].}}
{{History||20100227-1|[[File:Golden Apple JE1 BE1.png|32px]] Added golden apples.
|Golden apples heal a full {{hp|20}} [[health]] points, making them the best [[food]] in the entire game.
|Golden apples are [[crafting|crafted]] with an [[apple]] and eight [[gold block|blocks of gold]].
|However, since apples were not yet obtainable in normal gameplay, golden apples were not obtainable either.}}
{{History||20100625-2|Golden apples can now be rarely found in [[dungeon]]s, making them obtainable in normal gameplay.}}
{{History|java beta}}
{{History||1.8|snap=Pre-release|Due to the addition of [[hunger]], golden apples have been changed so that they restore {{hunger|10}}, instead of {{hp|20}} [[health]] points, but also give [[Regeneration]] for 30 seconds.
|[[Apple]]s can now be found in [[stronghold]] storeroom [[chest]]s, making golden apples craftable in normal gameplay for the first time.}}
{{History|java}}
{{History||1.0.0|snap=Beta 1.9 Prerelease 2|Golden apples have been given 'glint' (animated purple glow) when viewed from the [[player]]'s [[inventory]], and its tooltip has now changed from the standard white to a magenta color.}}
{{History|||snap=Beta 1.9 Prerelease 3|Golden apples can now be found in the new [[stronghold]] altar [[chest]]s.}}
{{History||1.1|snap=11w48a|Golden apples are now easier to [[crafting|craft]]. Standard [[apple]]s now rarely [[drops|drop]] from oak [[leaves]], meaning that [[player]]s no longer need to venture into [[stronghold]]s/[[dungeon]]s to find one.
|As [[gold]] is also renewable via [[Zombified Piglin|zombie pigmen]], golden apples have become a [[renewable resource]].}}
{{History|||snap=release|Golden apples have been changed, so that they now restore {{hunger|4}} and give only 4 seconds of [[Regeneration]].
|The [[crafting]] recipe of golden apples has been modified, requiring 8 [[gold nugget]]s instead of 8 [[blocks of gold]] to craft. Although its natural spawn is rare, it is easier to obtain through crafting.}}
{{History||1.3.1|snap=12w21a|With the addition of [[enchanted golden apple]]s, which got a purple tooltip, the standard golden apple's tooltip changed to blue. However, the standard golden apple's effects remain unchanged.}}
{{History||1.4.2|snap=12w32a|Golden apples can now be fed to [[zombie villager]]s with the [[Weakness]] debuff causing them to revert to [[villager]]s after a delay of about 3 minutes.}}
{{History||1.6.1|snap=13w23a|Golden apples now use 8 [[gold ingot]]s instead of 8 [[gold nugget]]s.
|The [[Regeneration]] effect of golden apples has been slowed down.}}
{{History|||snap=13w23b|Golden apples now give the player [[Health Boost]] for 1:30 and [[Regeneration]] II for 0:10. This temporarily gives the [[player]] 4 extra base [[health]] points, and it heals a total of {{hp|4}} health points.}}
{{History|||snap=13w24b|The Health Boost effect has been replaced with [[Absorption]], lasting 1:30.}}
{{History|||snap=13w25a|Absorption from golden apples now lasts 2:00.}}
{{History|||snap=?|Golden apples can now be used to tame, breed and heal horses and donkeys.}}
{{History||1.9|snap=15w37a|The [[Regeneration]] effect from golden apples has been reduced to Regeneration I (from II in [[Java Edition 1.8]]).}}
{{History|||snap=15w43a|A single golden apple can now sometimes be found in [[igloo]] [[chest]]s.}}
{{History|||snap=15w43b|A single golden apple is now always found in igloo chests.}}
{{History|||snap=15w44a|The [[Regeneration]] effect from golden apples has been returned to Regeneration II, as it had been in [[Java Edition 1.8|1.8]].
|The average yield of golden apples from [[dungeon]] chests has been increased.
|Golden apples have been added to [[desert temple]] and [[mineshaft]] chests.}}
{{History||1.11|snap=16w39a|Golden apples are now found in the new [[woodland mansion]] chests.}}
{{History||1.13|snap=17w47a|The names and IDs have been split into golden apple and enchanted golden apple.
|Prior to [[1.13/Flattening|''The Flattening'']], this [[item]]'s numeral ID was 322.}}
{{History|||snap=18w09a|Golden apples can now generate in the [[chest]]s of [[underwater ruins]].}}
{{History||1.14|snap=18w43a|[[File:Golden Apple JE2 BE2.png|32px]] The texture for golden apples has been changed.}}
{{History||1.16|snap=20w16a|Golden apples can now be found inside [[ruined portal]] chests.}}
{{History|||snap=20w18a|Golden apples are now less common in ruined portal [[chest]]s.}}
{{History||1.16.2|snap=20w30a|Golden apples are now found in [[bastion remnant]] chests.}}
{{History||1.18|snap=experimental snapshot 6|Horses, donkeys and mules now follow players holding golden apples.}}
{{History||1.19|snap=22w14a|A single golden apple may now be found in the chest at {{cd|city_center_2}} in [[Ancient City|ancient cities]].}}
{{History|pocket alpha}}
{{History||v0.12.1|snap=build 1|[[File:Golden Apple JE1 BE1.png|32px]] Added golden apples.}}
{{History|||snap=build 3|A [[crafting]] recipe has been added for golden apples.}}
{{History|bedrock}}
{{History||1.4.0|snap=beta 1.2.20.1|Golden apples can now generate in the [[chest]]s of [[underwater ruins]].}}
{{History||1.10.0|snap=beta 1.10.0.3|[[File:Golden Apple JE2 BE2.png|32px]] The texture for golden apples has been changed.}}
{{History||1.16.0|snap=beta 1.16.0.57|Golden apples can now be found inside [[ruined portal]] chests.}}
{{History|console}}
{{History||xbox=TU1|xbone=CU1|ps=1.0|wiiu=Patch 1|switch=1.0.1|[[File:Golden Apple JE1 BE1.png|32px]] Added golden apples.}}
{{History||xbox=TU5|Due to the addition of [[hunger]], golden apples have been changed, so that they restore {{hunger|10}} instead of {{hp|20}} health points, but also give [[Regeneration]] for 30 seconds.}}
{{History||xbox=TU19|xbone=CU7|ps=1.12|Golden apples now give extra "[[Absorption]]" health for a short period.}}
{{History||xbox=none|xbone=none|ps=1.90|wiiu=none|switch=none|[[File:Golden Apple JE2 BE2.png|32px]] The texture for golden apples has been changed.}}
{{History|New 3DS}}
{{History||0.1.0|[[File:Golden Apple JE1 BE1.png|32px]] Added golden apples.}}
{{History|foot}}
== Issues ==
{{issue list}}
== Trivia ==
Prior to [[Java Edition Beta 1.8]], the golden apple outwardly restored the player's full {{hp|20}} health points; Internally however, it is set to restore over double that, at {{hp|42}} health points. This is most likely a reference to [https://en.wikipedia.org/wiki/The_Hitchhiker's_Guide_to_the_Galaxy The Hitchhiker's Guide to the Galaxy], making it restore (the meaning of) life, 42 (health points). This is far before either the [[Absorption]] or [[Health Boost]] effects, causing this reference go unnoticed.
== Gallery ==
<gallery>
File:GoldenAppleComparison.png|A comparison of the two golden apple variations.
File:Golden apple in dungen 2013.png|A golden apple found in a dungeon.
File:Notch Apple In Mansion Chest.png|An extremely rare occasion where a regular golden apple and an enchanted apple being found in the same woodland mansion chest {{in|ee}}.
File:GoldenAppleDungeonChest.png|Golden apple in a [[dungeon]] chest, prior to 1.3.1. It resembles the enchanted golden apple.
File:Golden Apple Mineshaft Loot.png|A golden apple was found in a minecart chest in an abandoned mineshaft.
</gallery>
{{Items}}
[[Category:Renewable resources]]
[[Category:Food]]
[[cs:Zlaté jablko]]
[[de:Goldener Apfel]]
[[es:Manzana dorada]]
[[fr:Pomme dorée]]
[[hu:Aranyalma]]
[[it:Mela d'oro]]
[[ja:金のリンゴ]]
[[ko:황금 사과]]
[[nl:Gouden appel]]
[[pl:Złote jabłko]]
[[pt:Maçã dourada]]
[[ru:Золотое яблоко]]
[[th:แอปเปิ้ลทอง]]
[[tr:Altın Elma]]
[[uk:Золоте яблуко]]
[[zh:金苹果]]</li></ul> | 12w23a | Texture packs in folders (not zipped) are recognized and the texture pack image is displayed (for folders, not zipped). | |||
| 12w24a | The texture pack folder button now works on Macs. | ||||
1.5{{Extension DPL}}<ul><li>[[Melon Seeds|Melon Seeds]]<br/>{{Block
|image = <gallery>
Melon Stem Age 0.png | Age 0
Melon Stem Age 1.png | Age 1
Melon Stem Age 2.png | Age 2
Melon Stem Age 3.png | Age 3
Melon Stem Age 4.png | Age 4
Melon Stem Age 5.png | Age 5
Melon Stem Age 6.png | Age 6
Melon Stem Age 7.png | Age 7
</gallery>
| image2 = <gallery>
Attached Melon Stem (N).png | North
Attached Melon Stem (E).png | East
Attached Melon Stem (S).png | South
Attached Melon Stem (W).png | West
</gallery>
| transparent = Yes
| light = No
| tool = none
| renewable = Yes
| stackable = Yes (64)
| flammable = No
| lavasusceptible = No
}}'''Melon seeds''' are items obtained from [[Melon Slice|melon slices]] that can be used to grow melon stems.
'''Melon stems''' are plants grown on [[farmland]] that, over time, grow [[melon]]s on dirt, mud and moss blocks adjacent to them.
== Obtaining ==
=== Breaking ===
When broken, a melon stem drops 0–3 melon seeds. The chance for melon seeds to drop increases with the stem's age.
{| class="wikitable"
! rowspan="3" |[[Resource location]]
! rowspan="3" | Source
! colspan="4" | Default
|-
| colspan="1" rowspan="2" style="text-align:center" | Nothing || colspan="3" style="text-align:center" |{{ItemLink|Melon Seeds|Melon seeds}}
|-
| style="text-align:center" | 1 || style="text-align:center" | 2 || style="text-align:center" | 3
|-
| rowspan="8" |<code>blocks/melon_stem</code>
|{{BlockLink|Melon Stem|Melon stem}} <code>age = 0</code>
| style="text-align:center" |81.3%|| style="text-align:center" |17.42%|| style="text-align:center" |1.24%|| style="text-align:center" |0.03%
|-
|{{BlockLink|Melon Stem|Melon stem}} <code>age = 1</code>
| style="text-align:center" |65.1%|| style="text-align:center" |30.04%|| style="text-align:center" |4.62%|| style="text-align:center" |0.24%
|-
|{{BlockLink|Melon Stem|Melon stem}} <code>age = 2</code>
| style="text-align:center" |51.2%|| style="text-align:center" |38.4%|| style="text-align:center" |9.6%|| style="text-align:center" |0.8%
|-
|{{BlockLink|Melon Stem|Melon stem}} <code>age = 3</code>
| style="text-align:center" |39.44%|| style="text-align:center" |43.02%|| style="text-align:center" |15.64%|| style="text-align:center" |1.9%
|-
|{{BlockLink|Melon Stem|Melon stem}} <code>age = 4</code>
| style="text-align:center" |29.13%|| style="text-align:center" |44.44%|| style="text-align:center" |22.22%|| style="text-align:center" |3.7%
|-
|{{BlockLink|Melon Stem|Melon stem}} <code>age = 5</code>
| style="text-align:center" |21.6%|| style="text-align:center" |43.2%|| style="text-align:center" |28.8%|| style="text-align:center" |6.4%
|-
|{{BlockLink|Melon Stem|Melon stem}} <code>age = 6</code>
| style="text-align:center" |15.17%|| style="text-align:center" |39.82%|| style="text-align:center" |34.84%|| style="text-align:center" |10.16%
|-
|{{BlockLink|Melon Stem|Melon stem}} <code>age = 7</code>
| style="text-align:center" |10.16%|| style="text-align:center" |34.84%|| style="text-align:center" |39.82%|| style="text-align:center" |15.17%
|-
| rowspan="1" |<code>blocks/attached_melon_stem</code>
|{{BlockLink|Attached Melon Stem|Attached Melon stem}}
| style="text-align:center" |10.16%|| style="text-align:center" |34.84%|| style="text-align:center" |39.82%|| style="text-align:center" |15.17%
|}
=== Natural generation ===
Melon stems generate naturally in stem farm inside [[woodland mansion]]s.
Melon stems generate in 20% of the farm plots in [[savanna]] [[village]]s, and 10% of the farm plots in [[desert]] villages.
=== Chest loot ===
{{LootChestItem|melon-seeds}}
=== Crafting ===
{{Crafting
|Melon Slice
|Output= Melon Seeds
|type= Material
}}
=== Trading ===
[[Wandering trader]]s sell melon seeds for 1 [[emerald]].
== Usage ==
=== Farming ===
{{see also|Tutorials/Pumpkin and melon farming}}
Melon seeds can be planted only on [[farmland]], as stems. Over time, a stem grows through several stages<sup>[''[[Talk:Pumpkin Seeds|needs testing]]'']</sup> and, at its final growth stage, will produce [[melon]]s on any adjacent [[dirt]], [[Coarse Dirt|coarse dirt]], [[Rooted Dirt|rooted dirt]], [[Grass Block|grass block]], [[farmland]], [[podzol]], [[mycelium]], [[Moss Block|moss block]], [[mud]] or [[Muddy Mangrove Roots|muddy mangrove roots]]. If a melon is already occupying a spot adjacent to a stem it does not grow more melons until the melons is removed. A single stem can grow an unlimited number of melons. Melon stems need a minimum light level of 10 in the block above the stem to grow and give melons. Melon seeds are affected by [[bone meal]] only with respect to stem growth; bone meal does not help produce the actual melons.
=== Breeding ===
Like other seeds, melon seeds can be used to [[breed]] [[chicken]]s, lead chickens around, and make baby chickens grow up faster by 10% of the remaining time.
=== Taming ===
Like other seeds, melon seeds can be used to tame [[parrot]]s.
=== Composting ===
Placing melon seeds into a [[composter]] has a 30% chance of raising the compost level by 1.
== Melon Stem ==
A '''melon stem''' is the block that is planted on [[farmland]] when melon seeds are used on it. It starts underground, and rises up as the plant grows. The stem is colored green when young, and then yellow once fully grown.
The stem curves once a melon has grown from it. A fully-grown single stem connects to any [[melon]] in an adjacent square, thus there are 5 possible appearances to a stem. If there are multiple melons it can connect to, it favors the east, then west, north, and south. When the melon is removed, the stem returns to its straight shape.
== Sounds ==
{{Sound table/Block/Hard crop}}
== Data values ==
=== ID ===
{{edition|java}}:
{{ID table
|edition=java
|showblocktags=y
|showforms=y
|generatetranslationkeys=y
|displayname=Melon Stem
|spritetype=block
|nameid=melon_stem
|blocktags=bee_growables, crops
|form=block}}
{{ID table
|displayname=Attached Melon Stem
|spritetype=block
|nameid=attached_melon_stem
|form=block}}
{{ID table
|displayname=Melon Seeds
|spritetype=item
|nameid=melon_seeds
|form=item
|foot=1}}
{{edition|bedrock}}:
{{ID table
|edition=bedrock
|shownumericids=y
|showforms=y
|generatetranslationkeys=y
|displayname=Melon Stem
|spritetype=block
|nameid=melon_stem
|id=105
|form=block
|translationkey=-}}
{{ID table
|displayname=Melon Seeds
|spritetype=item
|nameid=melon_seeds
|id=293
|form=item
|foot=1}}
=== Block states ===
{{see also|Block states}}
{{/BS}}
== Advancements ==
{{load advancements|A Seedy Place}}
== History ==
{{info needed section|check if stems floated above farmland upon initial implementation}}
{{History|java beta}}
{{History||1.8|snap=Pre-release|[[File:Melon Seeds JE1 BE1.png|32px]] Added melon seeds.
|[[File:Melon Stem Age 0 JE1.png|32px]] [[File:Stem Age 1 JE1.png|32px]] [[File:Melon Stem Age 2 JE1.png|32px]] [[File:Melon Stem Age 3 JE1.png|32px]] [[File:Melon Stem Age 4 JE1.png|32px]] [[File:Melon Stem Age 5 JE1.png|32px]] [[File:Melon Stem Age 6 JE1.png|32px]] [[File:Melon Stem Age 7 JE1.png|32px]] Added the melon stem, with seven stages of growth.
|Melon seeds can found in the new [[mineshaft]] [[chest]]s.
|[[File:Attached Melon Stem (N) JE1.png|32px]] [[File:Attached Melon Stem (E) JE1.png|32px]] [[File:Attached Melon Stem (S) JE1.png|32px]] [[File:Attached Melon Stem (W) JE1.png|32px]] Melon stems have four slightly visually distinct appearances for each facing direction - the bent part of the stem rotates, but the other two planes do not.
|[[File:Melon Stem Age 8 JE1.png|32px]] [[File:Melon Stem Age 9 JE1.png|32px]] [[File:Melon Stem Age 10 JE1.png|32px]] [[File:Melon Stem Age 11 JE1.png|32px]] [[File:Melon Stem Age 12 JE1.png|32px]] [[File:Melon Stem Age 13 JE1.png|32px]] [[File:Melon Stem Age 14 JE1.png|32px]] [[File:Melon Stem Age 15 JE1.png|32px]] Melon stem data values 8–15 now show a glitched formation, with a floating stem with an attached stem cross eventually emerging below.
|[[File:Attached Stem Age 8 JE1.png|32px]] [[File:Attached Stem Age 9 JE1.png|32px]] [[File:Attached Stem Age 10 JE1.png|32px]] [[File:Attached Stem Age 11 JE1.png|32px]] [[File:Attached Stem Age 12 JE1.png|32px]] [[File:Attached Stem Age 13 JE1.png|32px]] [[File:Attached Stem Age 14 JE1.png|32px]] [[File:Attached Stem Age 15 JE1.png|32px]] Melon stem blocks with data values higher than 7 can now attach to adjacent fruits, which results in buggy stem textures with [[vines]] in the mix due to vines being below attached stems in [[terrain.png]].}}
{{History|||snap=Pre-release 2 ;)|Melon stems can now be grown faster using [[bone meal]].}}
{{History|java}}
{{History||1.3.1|snap=1.3|The texture of melon stems has been moved one pixel to the left in [[terrain.png]].
|[[File:Melon Stem Age 0 JE2.png|32px]] [[File:Melon Stem Age 1 JE2.png|32px]] [[File:Melon Stem Age 2 JE2.png|32px]] [[File:Melon Stem Age 3 JE2.png|32px]] [[File:Melon Stem Age 4 JE2.png|32px]] [[File:Melon Stem Age 5 JE2.png|32px]] [[File:Melon Stem Age 6 JE2.png|32px]] [[File:Melon Stem Age 7 JE2.png|32px]] Stems now appear slightly different.
|[[File:Melon Stem Age 8 JE2.png|32px]] [[File:Melon Stem Age 9 JE2.png|32px]] [[File:Melon Stem Age 10 JE2.png|32px]] [[File:Melon Stem Age 11 JE2.png|32px]] [[File:Melon Stem Age 12 JE2.png|32px]] [[File:Melon Stem Age 13 JE2.png|32px]] [[File:Melon Stem Age 14 JE2.png|32px]] [[File:Melon Stem Age 15 JE2.png|32px]] Overgrown stems now appear slightly different.
|[[File:Attached Melon Stem (N) JE2.png|32px]] [[File:Attached Melon Stem (E) JE2.png|32px]] [[File:Attached Melon Stem (S) JE2.png|32px]] [[File:Attached Melon Stem (W) JE2.png|32px]] Attached melon stems now appear slightly different.
|[[File:Attached Stem Age 8 JE2.png|32px]] [[File:Attached Stem Age 9 JE2.png|32px]] [[File:Attached Stem Age 10 JE2.png|32px]] [[File:Attached Stem Age 11 JE2.png|32px]] [[File:Attached Stem Age 12 JE2.png|32px]] [[File:Attached Stem Age 13 JE2.png|32px]] [[File:Attached Stem Age 14 JE2.png|32px]] [[File:Attached Stem Age 15 JE2.png|32px]] Overgrown attached melon stems now appear slightly different.}}
{{History||1.4.2|snap=12w36a|[[Chicken]]s now use [[wheat seeds]], melon seeds, and [[pumpkin seeds]], instead of [[wheat]] to breed.}}
{{History||1.5|snap=13w02a|[[File:Melon Stem Age 0 JE3.png|32px]] [[File:Melon Stem Age 1 JE3.png|32px]] [[File:Melon Stem Age 2 JE3.png|32px]] [[File:Melon Stem Age 3 JE3.png|32px]] [[File:Melon Stem Age 4 JE3.png|32px]] [[File:Melon Stem Age 5 JE3.png|32px]] [[File:Melon Stem Age 6 JE3.png|32px]] Melon stems now use a squished version of their texture for immature stems, depending on age.
|[[File:Melon Stem Age 8 JE3.png|32px]] [[File:Melon Stem Age 9 JE3.png|32px]] [[File:Melon Stem Age 10 JE3.png|32px]] [[File:Melon Stem Age 11 JE3.png|32px]] [[File:Melon Stem Age 12 JE3.png|32px]] [[File:Melon Stem Age 13 JE3.png|32px]] [[File:Melon Stem Age 14 JE3.png|32px]] [[File:Melon Stem Age 15 JE3.png|32px]] This also affects melon stems of ages 8–15, which are likewise stretched to accommodate its predicted size.
|[[File:Attached Stem Age 8 JE3.png|32px]] [[File:Attached Stem Age 9 JE3.png|32px]] [[File:Attached Stem Age 10 JE3.png|32px]] [[File:Attached Stem Age 11 JE3.png|32px]] [[File:Attached Stem Age 12 JE3.png|32px]] [[File:Attached Stem Age 13 JE3.png|32px]] [[File:Attached Stem Age 14 JE3.png|32px]] [[File:Attached Stem Age 15 JE3.png|32px]] Melon stems of extreme ages, which are attached to adjacent fruits, now show a stretched and tinted stem appearance.}}
{{History|||snap=13w03a|[[File:Melon Stem Age 0 JE4.png|32px]] [[File:Melon Stem Age 1 JE4.png|32px]] [[File:Melon Stem Age 2 JE4.png|32px]] [[File:Melon Stem Age 3 JE4.png|32px]] [[File:Melon Stem Age 4 JE4.png|32px]] [[File:Melon Stem Age 5 JE4.png|32px]] [[File:Melon Stem Age 6 JE4.png|32px]] [[File:Melon Stem Age 7 JE4.png|32px]] Melon stems are no longer squished or stretched to account for age.<ref>{{bug|MC-7111}}</ref>
|[[File:Melon Stem Age 8 JE4.png|32px]] [[File:Melon Stem Age 9 JE4.png|32px]] [[File:Melon Stem Age 10 JE4.png|32px]] [[File:Melon Stem Age 11 JE4.png|32px]] [[File:Melon Stem Age 12 JE4.png|32px]] [[File:Melon Stem Age 13 JE4.png|32px]] [[File:Melon Stem Age 14 JE4.png|32px]] [[File:Melon Stem Age 15 JE4.png|32px]] Melon stems with age values 8 through 15 now show a tinted [[trapdoor]] texture.
|From this version up until 14w08a, overgrown melon stems start to draw from the texture below them on the [[texture atlas]], in much the same way they previously did with terrain.png. However, as texture atlases are unstable and textures tend to change positions as new blocks and textures are added, overgrown stems change the texture they draw from every time new textures are added, which includes when textures added by [[mods]].}}
{{History|||snap=13w09a|[[File:Melon Stem Age 8 JE5.png|32px]] [[File:Melon Stem Age 9 JE5.png|32px]] [[File:Melon Stem Age 10 JE5.png|32px]] [[File:Melon Stem Age 11 JE5.png|32px]] [[File:Melon Stem Age 12 JE5.png|32px]] [[File:Melon Stem Age 13 JE5.png|32px]] [[File:Melon Stem Age 14 JE5.png|32px]] [[File:Melon Stem Age 15 JE5.png|32px]] Melon stems with age values 8–15 now show a tinted [[birch wood]] texture.}}
{{History||1.6.1|snap=13w24a|Melon and pumpkin stems have now been assigned separate textures.
|[[File:Melon Stem Age 8 JE6.png|32px]] [[File:Melon Stem Age 9 JE6.png|32px]] [[File:Melon Stem Age 10 JE6.png|32px]] [[File:Melon Stem Age 11 JE6.png|32px]] [[File:Melon Stem Age 12 JE6.png|32px]] [[File:Melon Stem Age 13 JE6.png|32px]] [[File:Melon Stem Age 14 JE6.png|32px]] [[File:Melon Stem Age 15 JE6.png|32px]] Melon stems with age values 8–15 now show a tinted [[note block]] texture.}}
{{History||1.7.2|snap=13w37a|Added the {{cmd|setblock}} [[commands|command]], allowing for invalid stem ages to be placed in the world without using external editors. This also allows them to be obtained in earlier versions via backdating.}}
{{History|||snap=13w41a|[[File:Melon Stem Age 8 JE7.png|32px]] [[File:Melon Stem Age 9 JE7.png|32px]] [[File:Melon Stem Age 10 JE7.png|32px]] [[File:Melon Stem Age 11 JE7.png|32px]] [[File:Melon Stem Age 12 JE7.png|32px]] [[File:Melon Stem Age 13 JE7.png|32px]] [[File:Melon Stem Age 14 JE7.png|32px]] [[File:Melon Stem Age 15 JE7.png|32px]] Melon stems with age values 8–15 now show a tinted [[netherrack]] texture.}}
{{History||1.8|snap=14w10a|[[File:Melon Stem Age 8 JE8.png|32px]] [[File:Melon Stem Age 9 JE8.png|32px]] [[File:Melon Stem Age 10 JE8.png|32px]] [[File:Melon Stem Age 11 JE8.png|32px]] Melon stems with data values 8–11 now display a tinted attached stem, with 8 facing west, 9 facing east, 10 facing north and 11 facing south.
|Invalid melon stems with data values 12-15 now crash the game.}}
{{History|||snap=14w25a|[[File:Melon Stem Age 0 JE5.png|32px]] [[File:Melon Stem Age 1 JE5.png|32px]] [[File:Melon Stem Age 2 JE5.png|32px]] [[File:Melon Stem Age 3 JE5.png|32px]] [[File:Melon Stem Age 4 JE5.png|32px]] [[File:Melon Stem Age 5 JE5.png|32px]] [[File:Melon Stem Age 6 JE5.png|32px]] [[File:Melon Stem Age 7 JE5.png|32px]] Melon stems now render as a single diagonal plane, or, in the case of attached stems, a diagonal and orthogonal plane.
|[[File:Attached Melon Stem (N) JE3.png|32px]] [[File:Attached Melon Stem (E) JE3.png|32px]] [[File:Attached Melon Stem (S) JE3.png|32px]] [[File:Attached Melon Stem (W) JE3.png|32px]] The attached melon stem [[model]] now fully rotates to the direction the stem points. Prior to this update, the base of the melon stem would stay the same while the long attaching section would differ, resulting in four possible attached stem appearances.
|Invalid overgrown melon stems have effectively been removed from the game, as attempting to place an out of range stem via {{cmd|setblock}} creates a stem of age 0 and loading a world with such stems existing causes a game crash.}}
{{History|||snap=14w26a|[[File:Melon Stem Age 0 JE6.png|32px]] [[File:Melon Stem Age 1 JE6.png|32px]] [[File:Melon Stem Age 2 JE6.png|32px]] [[File:Melon Stem Age 3 JE6.png|32px]] [[File:Melon Stem Age 4 JE6.png|32px]] [[File:Melon Stem Age 5 JE6.png|32px]] [[File:Melon Stem Age 6 JE6.png|32px]] [[File:Melon Stem Age 7 JE6.png|32px]] [[File:Attached Melon Stem (N) JE4.png|32px]] [[File:Attached Melon Stem (E) JE4.png|32px]] [[File:Attached Melon Stem (S) JE4.png|32px]] [[File:Attached Melon Stem (W) JE4.png|32px]] Melon stems now correctly render as crosses again.<ref>{{bug|MC-58136}}</ref>}}
{{History|||snap=14w27a|[[File:Attached Stem Age 0 14w27a.png|32px]] [[File:Attached Stem Age 1 14w27a.png|32px]] [[File:Attached Stem Age 2 14w27a.png|32px]] [[File:Attached Stem Age 3 14w27a.png|32px]] [[File:Attached Stem Age 4 14w27a.png|32px]] [[File:Attached Stem Age 5 14w27a.png|32px]] [[File:Attached Stem Age 6 14w27a.png|32px]] Due to a bug, all melon stems appear attached regardless of age or any actual attachment.<ref>{{bug|MC-60208}}</ref>}}
{{History|||snap=14w28a|All melon stems appearing attached regardless of age or any actual attachment has been fixed. However, melon stems still appear attached to adjacent fruits regardless of age due to a similar bug.<ref>{{bug|MC-61716}}</ref>}}
{{History|||snap=14w34d|Melon seeds can no longer be used for [[breeding]] [[chicken]]s.}}
{{History||1.9|snap=15w31a|Chickens can now use melon seeds to breed again.}}
{{History|||snap=15w44a|Melon seeds have been added to [[dungeon]] [[chest]]s.
|The average yield of melon seeds from [[mineshaft]] chests has been decreased.}}
{{History|||snap=15w45a|Melon stems must now be fully grown again to attach.}}
{{History||1.11|snap=16w39a|Melon seeds can now be found inside chests in the new [[woodland mansion]]s.
|Melon crops now generate inside woodland mansions.}}
{{History||1.12|snap=17w18b|Placing a melon seeds in farmland now gives the player the "A Seedy Place" [[advancement]].{{verify}}}}
{{History||1.13|snap=17w47a|The different block states for the <code>melon_stem</code> ID have been split up into their own IDs.
|Prior to [[1.13/Flattening|''The Flattening'']], this [[block]]'s numeral ID was 105, and the [[item]]'s 362.}}
{{History|||snap=17w48a|Attached melon stems no longer [[drops|drop]] seeds.}}
{{History||1.14|snap=18w43a|[[File:Attached Melon Stem (N) JE5.png|32px]] [[File:Attached Melon Stem (E) JE5.png|32px]] [[File:Attached Melon Stem (S) JE5.png|32px]] [[File:Attached Melon Stem (W) JE5.png|32px]] The texture of attached melon stems has been changed.}}
{{History|||snap=18w49a|Melon stems now generate in the updated [[savanna]] [[village]]s.}}
{{History|||snap=18w50a|Melon stems now generate in the updated [[desert]] [[village]]s.}}
{{History|||snap=19w03a|Placing melon seeds into the new [[composter]] has a 10% chance of raising the compost level by 1.}}
{{History|||snap=19w05a|Melon seeds now have a 30% chance of increasing the compost level in a composter by 1.
|Added [[Wandering Trader|wandering trader]]s, which sell melon seeds.}}
{{History||1.15|snap=19w34a|[[Bee]]s can now pollinate melon stems.}}
{{History|||snap=19w39a|Attached melon stems now [[drops|drop]] seeds again.<ref>{{bug|MC-136360}}</ref>}}
{{History||1.18|snap=Pre-release 5|[[File:Melon Seeds JE2.png|32px]] The texture of melon seeds has been changed.}}
{{History|pocket alpha}}
{{History||v0.5.0|Added melon seeds.
|[[File:Melon Stem Age 0 JE1.png|32px]] [[File:Stem Age 1 JE1.png|32px]] [[File:Melon Stem Age 2 JE1.png|32px]] [[File:Melon Stem Age 3 JE1.png|32px]] [[File:Melon Stem Age 4 JE1.png|32px]] [[File:Melon Stem Age 5 JE1.png|32px]] [[File:Melon Stem Age 6 JE1.png|32px]] [[File:Melon Stem Age 7 JE1.png|32px]] [[File:Attached Melon Stem (N) JE1.png|32px]] [[File:Attached Melon Stem (E) JE1.png|32px]] [[File:Attached Melon Stem (S) JE1.png|32px]] [[File:Attached Melon Stem (W) JE1.png|32px]]{{verify|Are these models correct?}} Added melon stems.}}
{{History||v0.6.0|[[File:Melon Seeds JE1 BE1.png|32px]] Melon seeds no longer use the pumpkin seeds texture.}}
{{History||v0.9.0|snap=?|Melon seeds can now be found in [[mineshaft]] chests.}}
{{History||v0.12.1|snap=build 1|Melon seeds are no longer available from the [[Nether reactor]].}}
{{History||v0.14.0|snap=build 1|Melon seeds can now be found in [[minecart with chest|minecarts with chests]] in [[mineshaft]]s.}}
{{History|pocket}}
{{History||1.0.0|snap=alpha 0.17.0.1|Melon seeds now generate inside [[dungeon]] [[chest]]s.}}
{{History||1.1.0|snap=alpha 1.1.0.0|Melon crops now generate inside [[woodland mansion]]s.
|Melon seeds can now be found in woodland mansion chests.}}
{{History|bedrock}}
{{History||1.2.0|snap=beta 1.2.0.2|Melon seeds can now be found inside [[bonus chest]]s.
|Melon seeds are now used to tame [[parrot]]s.}}
{{History||1.10.0|snap=beta 1.10.0.3|[[File:Attached Melon Stem (W) JE5.png|32px]]{{info needed|More accurate image}} The texture of attached melon stems has been changed.
|Melon stems now generate in [[savanna]] and [[desert]] [[village]] farms.
|Added [[wandering trader]]s, who [[trading|sell]] melon seeds.}}
{{History||1.11.0|snap=beta 1.11.0.1|Melon seeds can now be used to fill up [[composter]]s.}}
{{History||1.14.0|snap=beta 1.14.0.1|[[Bee]]s can now pollinate melon stems.}}
{{History|console}}
{{History||xbox=TU5|xbone=CU1|ps=1.0|wiiu=Patch 1|[[File:Melon Seeds JE1 BE1.png|32px]] Added melon seeds.
|[[File:Melon Stem Age 0 JE1.png|32px]] [[File:Stem Age 1 JE1.png|32px]] [[File:Melon Stem Age 2 JE1.png|32px]] [[File:Melon Stem Age 3 JE1.png|32px]] [[File:Melon Stem Age 4 JE1.png|32px]] [[File:Melon Stem Age 5 JE1.png|32px]] [[File:Melon Stem Age 6 JE1.png|32px]] [[File:Melon Stem Age 7 JE1.png|32px]] [[File:Attached Melon Stem (N) JE1.png|32px]] [[File:Attached Melon Stem (E) JE1.png|32px]] [[File:Attached Melon Stem (S) JE1.png|32px]] [[File:Attached Melon Stem (W) JE1.png|32px]]{{verify|Are these models correct?}} Added melon stems.}}
{{History||xbox=none|xbone=none|ps=1.90|wiiu=none|switch=none|[[File:Attached Melon Stem (W) JE5.png|32px]]{{info needed|More accurate image}} The texture of attached melon stems has been changed.}}
{{History|New 3DS}}
{{History||0.1.0|[[File:Melon Stem Age 0 JE1.png|32px]] [[File:Stem Age 1 JE1.png|32px]] [[File:Melon Stem Age 2 JE1.png|32px]] [[File:Melon Stem Age 3 JE1.png|32px]] [[File:Melon Stem Age 4 JE1.png|32px]] [[File:Melon Stem Age 5 JE1.png|32px]] [[File:Melon Stem Age 6 JE1.png|32px]] [[File:Melon Stem Age 7 JE1.png|32px]] [[File:Attached Melon Stem (N) JE1.png|32px]] [[File:Attached Melon Stem (E) JE1.png|32px]] [[File:Attached Melon Stem (S) JE1.png|32px]] [[File:Attached Melon Stem (W) JE1.png|32px]]{{verify|Are these models correct?}} Added melon stems.}}
{{History|foot}}
<gallery>
Melon Stem with data value 15.png|The final version of the melon stem with age 15, as seen in-game.
Melonstems.png|Melon stems of ages 1–15 on a modded version of 1.7.2, hence the melon stems using the melon top texture.
Stems of 13w02a.png|All 16 stem sizes in 13w02a, with accompanying data values.
</gallery>
=== Melon stem "item" ===
{{:Technical blocks/Melon Stem}}
== Issues ==
{{issue list}}
== Gallery ==
<gallery>
Stem All Ages.png|All stages of growth.
AllSeeds.png|All the [[seeds]] that exist in the game.
</gallery>
== See also ==
* [[Melon]]
* [[Pumpkin Seeds]]
==References==
{{Reflist}}
{{Blocks|vegetation}}
{{Items}}
[[Category:Plants]]
[[Category:Food]]
[[Category:Non-solid blocks]]
[[Category:Generated structure blocks]]
[[cs:Semínka melounu]]
[[de:Melone]]
[[es:Semillas de sandía]]
[[fr:Graines de pastèque]]
[[hu:Dinnyemagok]]
[[it:Anguria]]
[[ja:スイカの種]]
[[ko:수박씨]]
[[nl:Meloenzaden]]
[[pl:Nasiona arbuza]]
[[pt:Sementes de melancia]]
[[ru:Семена арбуза]]
[[th:เมล็ดแตงโม]]
[[zh:西瓜种子]]</li><li>[[Head|Head]]<br/>{{Block
| image =
<gallery>
Skeleton Skull.png | Skeleton
Wither Skeleton Skull.png | Wither Skeleton
Player Head.png | Player
Zombie Head.png| Zombie
Creeper Head.png | Creeper
Dragon Head.png | Dragon
Piglin Head.png | Piglin
</gallery>
| transparent = Yes
| light = No
| tool = any
| renewable =
* '''Skeleton, Wither Skeleton, Zombie, Creeper, Piglin:'''
* Yes
* '''Dragon, Player:'''
* No
| stackable = Yes (64)
| flammable = No
| lavasusceptible = No
| rarity = Uncommon
}}
A '''head''' or '''skull''' is a [[block]] modeled after the head of a specific [[entity]]. There are seven types of heads: [[player]] ([[Steve]]'s head by default), [[zombie]], [[skeleton]], [[wither skeleton]], [[creeper]], [[piglin]], and [[dragon]].
== Obtaining ==
=== Breaking ===
A mob head can be mined using any item,<ref>{{bug|MC-192905||Heads & Skulls have no assigned tool}}</ref> and drops itself when broken.
{{breaking row|horizontal=1|Mob Head|sprite=Heads}}
If a head is pushed by a [[piston]] or comes in contact with [[water]] or [[lava]], it breaks off as an [[item (entity)|item]].
When destroyed by an [[explosion]], the head ''always'' drops as an item.
===Natural generation===
Dragon heads generate on [[end ships]] found in [[End City|end cities]].
Skeleton skulls can generate in [[ancient cities]], which sometimes generate in the [[deep dark]].
=== Mob loot ===
A [[wither skeleton]] has a 2.5% chance of dropping a wither skeleton skull when killed by a player or a tamed [[wolf]]. The chance is increased by 1% per level of [[Looting]], for a maximum of 5.5% with Looting III. {{IN|bedrock}}, the chance is increased by 2% per level of [[Looting]], for a maximum of 8.5% with Looting III.
[[Skeleton]], [[wither skeleton]], [[zombie]], [[creeper]] and [[piglin]] heads are always dropped by the respective mob if it dies due to a [[charged creeper]]'s explosion. {{IN|bedrock}}, if multiple mobs are killed by the same charged creeper, all of them drop their heads, however {{in|java}} only one mob selected at random drops its head.<ref>{{bug|MC-63534|||WAI}}</ref> If an [[ender dragon]] or a [[player]] is killed by a charged creeper, it does not drop its head.<ref name=":0">{{bug|MC-132933|||WAI}}</ref>
==Usage ==
===Decoration===
Mob heads can be oriented in 16 different directions on top of a block, and 4 directions on the sides of blocks, similar to [[sign]]s. They can be placed on top of, or beside each other by shift clicking.
When placed and powered by redstone, the piglin and dragon heads plays an animation. The piglin head flaps its ears (2 times per second for the right ear and 2.5 times per second for the left ear) while the dragon head opens and closes its mouth repeatedly (2 times per second). The same animation occurs when worn by a (horizontally) moving player, zombie, skeleton, or [[armor stand]] (note: the animation does not play if the <code>NoGravity</code> tag is set to 1)
=== Wearing ===
{{See also|#Renders}}
The player can wear heads, similarly to [[pumpkin]]s or helmets. This overlays the second layer of the player's [[skin]].
====Disguise====
Wearing the corresponding mob head reduces the detection range for [[skeleton]]s (but not [[wither skeleton]]s), [[creeper]]s, [[zombie]]s, and [[piglin]]s to 50% of the normal range. This is similar to (and stacks with) the reductions in detection range from [[sneaking]] and from the [[Invisibility]] status effect.
{{IN|bedrock}}, wearing any mob head or carved pumpkin makes the player invisible to other players on a locator [[map]].
=== Withers===
{{FakeImage|{{BlockGrid|scale=2|w=Wither Skeleton Skull|s=Soul Sand|www|sss| s }}|Wither build configuration}}
[[Wither]]s can be spawned by placing soul sand or soul soil in a T shape, and putting 3 wither skeleton skulls on top of the T. The T can be horizontal or vertical. The last block placed must be one of the three wither skeleton skulls. A dispenser can also create a wither, by placing the final skull onto soul sand directly in front of and below it.
===Dispensers===
A [[dispenser]] can equip a mob head on a player, mob, or armor stand with an empty helmet slot, within the block the dispenser is facing.
[[Dispenser]]s can also complete the construction of a wither.
=== Crafting ingredient===
{{crafting usage|Wither Skeleton Skull,Creeper Head|continue=1}}
{{Crafting
|ignoreusage=1
|ingredients=Any '''Mob head''' +<br>[[Gunpowder]] +<br>Any [[Dye]]
|Gunpowder
|Wither Skeleton Skull;Skeleton Skull;Zombie Head;Head;Creeper Head;Dragon Head;Player Head
|Matching Dye
|Output= Matching Firework Star
|description=Forms Creeper shape
|foot=1
}}
===Enchantments===
Mob heads can receive the following enchantments, but only through an [[anvil]].
{| class="wikitable col-2-center col-3-right"
|+
!Name
!Max Level
![[Enchanting|Method]]
|-
|[[Curse of Binding]]
|I
|{{Inventory slot|Anvil}}
|-
|[[Curse of Vanishing]]
|I
|{{Inventory slot|Anvil}}
|-
|}
=== Note blocks ===
Placing a head above a [[note block]] causes the note block to play the corresponding mob's {{cd|ambient}} sound when activated. The only exception is the creeper head; as creepers don't make {{cd|ambient}} sounds, the note block plays the {{cd|primed}} (hissing) sound instead.
The block below the note block does not affect the mob sound it creates.
==Player skins==
{{exclusive|java|section=1}}
Human heads have an extra usage for map makers, they can be given [[Chunk format#Entity Format|NBT data]] so that they appear with the skin of any ''Minecraft'' account. This means if a player knows that a specific account has a head that is desired to display, the NBT data can be edited to make it appear.
The command to give the player a head with the skin of another player is {{cmd|give @s minecraft:player_head{SkullOwner:"<''PlayerName''>"} }}. Commonly, this kind of head is called a custom head.
Another command to give the player a head with another player's skin is {{cmd|give @s minecraft:player_head{SkullOwner:{Id:"<''PlayerUUID''>",Properties:{textures:[{Value:"<''SkinURL''>"}]} } } }}. ''SkinURL'' is a string encoded in [https://en.wikipedia.org/wiki/Base64 Base64] containing the URL of the player's skin.<ref>Example: {"textures":{"SKIN":{"url":"<nowiki>http://textures.minecraft.net/texture/292009a4925b58f02c77dadc3ecef07ea4c7472f64e0fdc32ce5522489362680"}}}</ref> A player head saves the skin of the player from the time it was created, meaning if the player changes their skin, the head still displays the original texture.<ref>{{tweet|Dinnerbone|464414369452142592|Skulls are a snapshot of the skin as it was made; just change your skin, make a skull, and change your skin back. That's intended behaviour.|May 8, 2014}}</ref>
Note that it is therefore necessary to be connected to the internet to load the texture of a skin, whatever the property used.
When they are loaded for the first time by the client, the skins textures are cached in {{code|[[.minecraft]]\assets\skins\(subfolders)\(files)}}.
If the client does not have access to the internet when it first loads, the player's head displays a regular head (Steve's skin) which is also cached.
Afterwards, even if the client reconnects to the internet, in order to display the skin correctly, it is necessary to clear the cache manually by deleting the recently created files in {{code|[[.minecraft]]\assets\skins\(subfolder)}}, then restarting the game.
When NBT-customized heads (with names and lores) are placed on the ground, they lose their names and given lores upon picking up. Therefore, using Ctrl + {{ctrl|pick block}} on a custom player head gives the player a head that still retains its textures, but with no lores and its name is reset to either {{code|[PlayerName]'s Head}} (heads obtained by MHF-Marc's Head Format or existing players in the world) or {{code|Player Head}} (heads obtained by using skin URLs).
=== Marc's Head Format===
[[File:Allmobheads.png|thumb|right|Most of the MHF mob heads provided.]]
{{exclusive|Java|section=1}}
[[Marc Watson]] created a number of accounts with specific skins so map makers could use common heads without the risk of someone changing their skins.<ref>{{reddit|1m0itx/twitter_marc_irl_mapmakers_would_it_be_useful|cc4m1cq|I'm here to make it so that people don't have to worry about having a consistent account whose skin might change.|Marc_IRL|September 9, 2013}}</ref> Nowadays, since heads do not update the skin if a player changes their skin, this is not something map-makers need to worry about, though these skins are still useful. These accounts have names in the format <code>MHF_<''Name''></code>, for example <code>MHF_PigZombie</code> is the name of a ''Minecraft'' user with a [[zombified piglin]] head. MHF stands for "Marc's Head Format".<ref>{{tweet|Marc_IRL|377453670410891264|head format. I needed to pick a prefix that was short and not already taken by other usernames.|September 10, 2013}}</ref> There are also a few blocks and "bonus" heads, for more variety. These player heads have not been updated in compliance with the [[Texture Update]], and are outdated.
Because these are names of player accounts, these heads are obtained or placed using the <code>SkullOwner</code> tag, for instance: {{cmd|/give @s minecraft:player_head{SkullOwner:"MHF_''<Name>''"}<nowiki />}}.
The following names/heads have been made available:<ref>{{tweet|Marc_IRL|542330244473311232|For those following the MHF list, I have presents for you. Full list of accounts I've made: http://pastebin.com/5mug6EBu|December 9, 2014}}</ref>
<!--
DO NOT add ANY skull to this list without a source that it is made by Mojang; unsourced additions will be reverted!
In particular:
* MHF_Apple, MHF_Wither and MHF_Tree are not made by Mojang, see {{tweet|Marc_IRL|542599419678707714}} and {{tweet|Marc_IRL|590522239616954369}}
* MHF_Guardian is unofficial, see http://redd.it/3439u0
-->
;Mobs
<div class="list-style-none" style="-moz-column-width:15em;-webkit-column-width:15em;column-width:15em">
*{{InvSprite|MHF Alex}} MHF_Alex
*{{InvSprite|MHF Blaze}} MHF_Blaze
*{{InvSprite|MHF CaveSpider}} MHF_CaveSpider
*{{InvSprite|MHF Chicken}} MHF_Chicken
*{{InvSprite|MHF Cow}} MHF_Cow
*{{InvSprite|MHF Creeper}} MHF_Creeper
*{{InvSprite|MHF Enderman}} MHF_Enderman
*{{InvSprite|MHF Ghast}} MHF_Ghast
*{{InvSprite|MHF Golem}} MHF_Golem
*{{InvSprite|MHF Herobrine}} MHF_Herobrine
*{{InvSprite|MHF LavaSlime}} MHF_LavaSlime
*{{InvSprite|MHF MushroomCow}} MHF_MushroomCow
*{{InvSprite|MHF Ocelot}} MHF_Ocelot
*{{InvSprite|MHF Pig}} MHF_Pig
*{{InvSprite|MHF PigZombie}} MHF_PigZombie
*{{InvSprite|MHF Sheep}} MHF_Sheep
*{{InvSprite|MHF Skeleton}} MHF_Skeleton
*{{InvSprite|MHF Slime}} MHF_Slime
*{{InvSprite|MHF Spider}} MHF_Spider
*{{InvSprite|MHF Squid}} MHF_Squid
*{{InvSprite|MHF Steve}} MHF_Steve
*{{InvSprite|MHF Villager}} MHF_Villager
*{{InvSprite|MHF WSkeleton}} MHF_WSkeleton
*{{InvSprite|MHF Zombie}} MHF_Zombie
</div>
;Blocks
<div class="list-style-none" style="-moz-column-width:15em;-webkit-column-width:15em;column-width:15em">
*{{InvSprite|MHF Cactus}} MHF_Cactus
*{{InvSprite|MHF Cake}} MHF_Cake
*{{InvSprite|MHF Chest}} MHF_Chest
*{{InvSprite|MHF CoconutB}} MHF_CoconutB
*{{InvSprite|MHF CoconutG}} MHF_CoconutG
*{{InvSprite|MHF Melon}} MHF_Melon
*{{InvSprite|MHF OakLog}} MHF_OakLog
*{{InvSprite|MHF Present1}} MHF_Present1
*{{InvSprite|MHF Present2}} MHF_Present2
*{{InvSprite|MHF Pumpkin}} MHF_Pumpkin
*{{InvSprite|MHF TNT}} MHF_TNT
*{{InvSprite|MHF TNT2}} MHF_TNT2
</div>
;Bonus
<div class="list-style-none" style="-moz-column-width:15em;-webkit-column-width:15em;column-width:15em">
*{{InvSprite|MHF ArrowUp}} MHF_ArrowUp
*{{InvSprite|MHF ArrowDown}} MHF_ArrowDown
*{{InvSprite|MHF ArrowLeft}} MHF_ArrowLeft
*{{InvSprite|MHF ArrowRight}} MHF_ArrowRight
*{{InvSprite|MHF Exclamation}} MHF_Exclamation
*{{InvSprite|MHF Question}} MHF_Question
</div>
==Sounds==
===Generic===
{{Sound table/Block/Stone}}
===Unique===
{{Edition|Java}}:
{{Sound table
|sound=Zombie idle1.ogg
|sound2=Zombie idle2.ogg
|sound3=Zombie idle3.ogg
|subtitle=Zombie groans
|source=record
|description=When a zombie head is played using a note block
|id=block.note_block.imitate.zombie
|translationkey=subtitles.entity.zombie.ambient
|volume=3.0
|pitch=1.0
|distance=16}}
{{Sound table
|sound=Skeleton idle1.ogg
|sound2=Skeleton idle2.ogg
|sound3=Skeleton idle3.ogg
|subtitle=Skeleton rattles
|source=record
|description=When a skeleton skull is played using a note block
|id=block.note_block.imitate.skeleton
|translationkey=subtitles.entity.skeleton.ambient
|volume=3.0
|pitch=1.0
|distance=16}}
{{Sound table
|sound=Creeper fuse.ogg
|subtitle=Creeper hisses
|source=record
|description=When a creeper head is played using a note block
|id=block.note_block.imitate.creeper
|translationkey=subtitles.entity.creeper.primed
|volume=3.0
|pitch=0.5
|distance=16}}
{{Sound table
|sound=Ender dragon idle1.ogg
|sound2=Ender dragon idle2.ogg
|sound3=Ender dragon idle3.ogg
|sound4=Ender dragon idle4.ogg
|subtitle=Dragon roars
|source=record
|description=When an ender dragon head is played using a note block
|id=block.note_block.imitate.ender_dragon
|translationkey=subtitles.entity.ender_dragon.ambient
|volume=3.0
|pitch=1.0
|distance=16}}
{{Sound table
|sound=Wither skeleton idle1.ogg
|sound2=Wither skeleton idle2.ogg
|sound3=Wither skeleton idle3.ogg
|subtitle=Wither Skeleton rattles
|source=record
|description=When a wither skeleton skull is played using a note block
|id=block.note_block.imitate.wither_skeleton
|translationkey=subtitles.entity.wither_skeleton.ambient
|volume=3.0
|pitch=1.0
|distance=16}}
{{Sound table
|sound=Piglin idle1.ogg
|sound2=Piglin idle2.ogg
|sound3=Piglin idle3.ogg
|sound4=Piglin idle4.ogg
|sound5=Piglin idle5.ogg
|subtitle=Piglin snorts
|source=record
|description=When a piglin head is played using a note block
|id=block.note_block.imitate.piglin
|translationkey=subtitles.entity.piglin.ambient
|volume=1.98
|pitch=1.0
|distance=16}}
{{Sound table
|sound=Equip generic1.ogg
|sound2=Equip generic2.ogg
|sound3=Equip generic3.ogg
|sound4=Equip generic4.ogg
|sound5=Equip generic5.ogg
|sound6=Equip generic6.ogg
|subtitle=Gear equips
|source=player
|description=When a carved pumpkin is equipped
|id=item.armor.equip_generic
|translationkey=subtitles.item.armor.equip
|volume=1.0
|pitch=1.0
|distance=16
|foot=1}}
<!--volumes and pitches seem to be approximately v=0.9 p=0.84, but those values are approximate and are not in the files. They are probably inside of the code.-->
{{Edition|Bedrock}}:
{{Sound table
|type=bedrock
|sound=Zombie idle1.ogg
|sound2=Zombie idle2.ogg
|sound3=Zombie idle3.ogg
|source=record
|description=When a zombie head is played using a note block
|id=note.zombie
|pitch=0.84 <ref group=sound name=pitch>Actually equal to <math>\frac{1}{\sqrt[4]{2}}</math>, which is about 0.8409</ref>}}
{{Sound table
|sound=Skeleton step1.ogg
|sound2=Skeleton step2.ogg
|sound3=Skeleton step3.ogg
|sound4=Skeleton step4.ogg
|source=record
|description=When a skeleton skull is played using a note block<wbr><ref group=sound name=skeletoncreeper>{{Bug|MCPE-164530}}</ref>
|id=note.skeleton
|pitch=0.84 <ref group=sound name=pitch/>}}
{{Sound table
|sound=Fuse.ogg
|source=record
|description=When a creeper head is played using a note block<wbr><ref group=sound name=skeletoncreeper/>
|id=note.creeper
|pitch=0.84 <ref group=sound name=pitch/>}}
{{Sound table
|sound=Ender dragon idle1.ogg
|sound2=Ender dragon idle2.ogg
|sound3=Ender dragon idle3.ogg
|sound4=Ender dragon idle4.ogg
|source=record
|description=When a dragon head is played using a note block
|id=note.enderdragon
|pitch=0.84 <ref group=sound name=pitch/>}}
{{Sound table
|sound=Skeleton step1.ogg
|sound2=Skeleton step2.ogg
|sound3=Skeleton step3.ogg
|sound4=Skeleton step4.ogg
|source=record
|description=When a wither skeleton skull is played using a note block<wbr>{{Until|BE 1.20.40}}<wbr><ref group=sound name=skeletoncreeper/>
|id=note.witherskeleton
|pitch=0.84 <ref group=sound name=pitch/>}}
{{Sound table
|sound=Wither skeleton step1.ogg
|sound2=Wither skeleton step2.ogg
|sound3=Wither skeleton step3.ogg
|sound4=Wither skeleton step4.ogg
|source=record
|description=When a wither skeleton skull is played using a note block<wbr>{{Upcoming|BE 1.20.40}}<wbr><ref group=sound name=skeletoncreeper/>
|id=note.witherskeleton
|pitch=0.84 <ref group=sound name=pitch/>}}
{{Sound table
|sound=Piglin angry1.ogg
|sound2=Piglin angry2.ogg
|sound3=Piglin angry3.ogg
|sound4=Piglin angry4.ogg
|source=record
|description=When a piglin head is played using a note block<wbr><ref group=sound>{{Bug|MCPE-164710}}</ref>
|id=note.piglin
|pitch=0.84 <ref group=sound name=pitch/>}}
{{Sound table
|sound=Equip generic1.ogg
|sound2=Equip generic2.ogg
|sound3=Equip generic3.ogg
|sound4=Equip generic4.ogg
|sound5=Equip generic5.ogg
|sound6=Equip generic6.ogg
|source=player
|description=When a carved pumpkin is equipped
|id=armor.equip_generic
|volume=1.0
|pitch=1.0
|foot=1}}
==Data values==
===ID===
{{edition|java}}:
{{ID table
|edition=java
|showforms=y
|generatetranslationkeys=y
|displayname=Skeleton Skull
|spritetype=block
|nameid=skeleton_skull}}
{{ID table
|displayname=Wither Skeleton Skull
|spritetype=block
|nameid=wither_skeleton_skull}}
{{ID table
|displayname=Zombie Head
|spritetype=block
|nameid=zombie_head}}
{{ID table
|displayname=Player Head
|spritetype=block
|nameid=player_head}}
{{ID table
|displayname=Creeper Head
|spritetype=block
|nameid=creeper_head}}
{{ID table
|displayname=Dragon Head
|spritetype=block
|nameid=dragon_head}}
{{ID table
|displayname=Piglin Head
|spritetype=block
|nameid=piglin_head}}
{{ID table
|displayname=Skeleton Wall Skull
|spritetype=block
|nameid=skeleton_wall_skull
|form=block}}
{{ID table
|displayname=Wither Skeleton Wall Skull
|spritetype=block
|nameid=wither_skeleton_wall_skull
|form=block}}
{{ID table
|displayname=Zombie Wall Head
|spritetype=block
|nameid=zombie_wall_head
|form=block}}
{{ID table
|displayname=Player Wall Head
|spritetype=block
|nameid=player_wall_head
|form=block}}
{{ID table
|displayname=Creeper Wall Head
|spritetype=block
|nameid=creeper_wall_head
|form=block}}
{{ID table
|displayname=Dragon Wall Head
|spritetype=block
|nameid=dragon_wall_head
|form=block}}
{{ID table
|displayname=Piglin Wall Head
|spritetype=block
|nameid=piglin_wall_head
|foot=1}}
{{ID table
|displayname=Block entity
|spritename=heads
|spritetype=block
|nameid=skull
|foot=1}}
{{edition|bedrock}}:
{{ID table
|edition=bedrock
|firstcolumnname=Head
|shownumericids=y
|showforms=y
|generatetranslationkeys=y
|displayname=Block
|spritename=skulls
|spritetype=block
|nameid=skull
|id=144
|form=block
|itemform=item.skull
|translationkey=-}}
{{ID table
|displayname=Item
|spritename=skulls
|spritetype=item
|nameid=skull
|id=516
|form=item
|translationkey=item.skull.skeleton.name, item.skull.wither.name, item.skull.zombie.name, item.skull.char.name, item.skull.creeper.name, item.skull.dragon.name, item.skull.piglin.name
|foot=1}}
{{ID table
|notnamespaced=y
|displayname=Block entity
|spritename=heads
|spritetype=block
|nameid=Skull
|foot=1}}
===Metadata===
{{see also|Data values}}
{{IN|bedrock}}, mob heads use the following data values:
{{/DV}}
===Item data===
{{el|java}}:
{{main|Player.dat format}}
Player heads use item NBT to save the owner.
<div class="treeview">
* {{nbt|compound|tag}}: The item's '''tag''' tag.
{{:Player.dat_format/Player Heads}}
</div>
{{el|bedrock}}:
:{{IN|bedrock}}, heads have no additional item tag.
:See [[Bedrock Edition level format/Item format]].
===Block states===
{{see also|Block states}}
{{/BS}}
===Block data===
A mob head has a block entity associated with it that holds additional data about the block.
{{el|java}}:
{{see also|Block entity format}}
{{/BE}}
{{el|bedrock}}:
:See [[Bedrock Edition level format/Block entity format]].
== Achievements==
{{load achievements|Camouflage;The Beginning?}}
==Advancements==
{{load advancements|Spooky Scary Skeleton;Withering Heights}}
==History==
''For a more in-depth breakdown of changes to textures and models, including a set of renders for each state combination, see [[/Asset history]]''
{{History|java}}
{{History||August 28, 2012|link={{tweet|jeb|240383066831462401}}|[[Jeb]] released images of the skeleton head, hinting of more types to come.}}
{{History||PAX 2012|link={{ytl|IqciEbjYd-I|t=03m21s}}|At [[wikipedia:PAX (event)|PAX]], [[Dinnerbone]] revealed that there would be rare [[drops]] of these [[mob]]s.<ref>http://www.twitch.tv/pax2/b/330745811 (at 3:59:00)</ref>}}
{{History||1.4.2|snap=12w36a|[[File:Skeleton Skull (item) JE1.png|32px]] [[File:Wither Skeleton Skull (item) JE1.png|32px]] [[File:Zombie Head (item) JE1.png|32px]] [[File:Player Head (item) JE1.png|32px]] [[File:Creeper Head (item) JE1.png|32px]] Added skeleton, wither skeleton, zombie, player, and creeper heads.
|Wither skeleton skulls are rarely [[drops|dropped]] by the [[wither skeleton]] upon [[death]] (2.5% chance), while the other four are obtainable only from the [[creative]] [[inventory]].}}
{{History|||snap=12w37a|[[File:Skeleton Skull (item) JE1 BE1.png|32px]] [[File:Wither Skeleton Skull (item) JE1 BE1.png|32px]] [[File:Zombie Head (item) JE1 BE1.png|32px]] [[File:Player Head (item) JE1 BE1.png|32px]] [[File:Creeper Head (item) JE1 BE1.png|32px]] Changed item textures.
|Added as a hidden and disabled feature, player heads can now have the [[skin]] of a specific [[player]]. A line in the language file implies that there either used to be, or in a future update, the possibility of obtaining a specific player's head.<ref name="en_US 12w21">Snapshot 12w37a {{cd|lang/en_US.lang}}: <code>item.skull.player.name=%s's Head</code></ref>
|Player heads do not [[drops|drop]] in vanilla, but mapmakers/modders/etc. can make them by adding an [[NBT format|NBT]] string tag <code>{"SkullOwner":"''player_name''"}</code> on the skull [[item]]s.<ref name="playerheads">{{reddit|zxn7u/its_apparently_my_cakeday_so_lets_cash_in_this}}</ref>}}
{{History||November 7, 2012|link=https://www.reddit.com/r/minecraftsuggestions/comments/12qtbz/killing_other_players_with_a_sword_should_drop/c6xqpym/?context=3|[[Jeb]] states that the official opinion is that "[dropping] player heads [on player kills] are a bit too gory for [[Minecraft]], so it's better suited for a plugin or mod."}}
{{History||1.4.6|snap=12w49a|Any kind of [[mob]] head can now be used to [[crafting|craft]] a [[firework star]] with [[creeper]]-face effect.}}
{{History||1.7.2|snap=13w36a|Custom heads can now be obtained without third party programs via {{cmd|give}}.}}
{{History||1.8|snap=14w03a|Player heads now show the [[skin]]'s hat layer (this also works when a [[mob]]/player wears the head).}}
{{History|||snap=14w29a|Heads now display a cracking animation.}}
{{History|||snap=14w30a|[[File:Skeleton Skull (item) JE2.png|32px]] [[File:Wither Skeleton Skull (item) JE2.png|32px]] [[File:Zombie Head (item) JE2.png|32px]] [[File:Player Head (item) JE2.png|32px]] [[File:Creeper Head (item) JE2.png|32px]] Player and mob heads in [[inventory|inventories]] and held by mobs/players now display as [[block]]s.
|Skulls worn by [[mob]]s and [[player]]s are now displayed on the armor layer. Previously, the skull replaced the mob/player's head texture; the hat layer appeared over the skull.
|Skeleton, zombie, and creeper heads are now available in [[survival]]. The player can obtain them by killing the appropriate mob with a charged [[creeper]].
|Creeper heads and wither skeleton skulls are now used in [[crafting]] specific [[banner]] patterns.}}
{{History|||snap=14w30b|A single charged creeper explosion no longer yields more than one [[mob]] head. The mob head that drops is chosen randomly.}}
{{History||1.8.4|snap=release|For security reasons, custom heads can now have textures only from [[mojang.com]] and [[minecraft.net]].}}
{{History||1.9|snap=15w31a|[[File:Dragon Head (8) JE2.png|32px]] Added dragon heads.
|Dragon heads are currently available only in [[creative]] mode.
|[[Mob]] heads now appear larger in the [[inventory]].}}
{{History|||snap=15w32a|Creeper, zombie, and skeleton heads can now be worn to reduce detection by the corresponding mobs by 50%.}}
{{History|||snap=15w32c|Dragon heads now generate on [[end ship]]s, meaning they are now obtainable in [[survival]].}}
{{History|||snap=15w33c|The disguise that is given by mob heads now reduces detection range to 37.5% of normal.}}
{{History|||snap=15w36a|The disguise that is given by mob heads now reduces detection range to 50% of normal again.}}
{{History|||snap=15w39a|[[Dispenser]]s can now equip mob heads onto [[player]]s, [[mob]]s and [[armor stand]]s.}}
{{History||1.13|snap=17w47a|The ID of heads have been split into 12; one of each available standard head, as well as a wall counterpart of each.
|<code>skeleton_skull</code>, <code>wither_skeleton_skull</code>, <code>player_head</code>, <code>zombie_head</code>, <code>creeper_head</code> and <code>dragon_head</code> are now available as [[item]]s and placed [[block]]s with a <code>rotation</code> block state of 0-15.
|<code>skeleton_wall_skull</code>, <code>wither_skeleton_wall_skull</code>, <code>player_wall_head</code>, <code>zombie_wall_head</code>, <code>creeper_wall_head</code> and <code>dragon_wall_head</code> are available only as placed blocks with a <code>facing</code> block state of north, south, east or west.
|Prior to [[1.13/Flattening|''The Flattening'']], this [[block]]'s numeral ID was 144, and the [[item]]'s 397.}}
{{History||1.19|snap=Deep Dark Experimental Snapshot 1|Skeleton skulls now generate as part of [[ancient cities]].}}
{{History||November 14, 2022|link=https://www.minecraft.net/en-us/article/playable-mob-sounds-coming-minecraft-1-20|Piglin heads are announced to be added in [[Java Edition 1.20]] on the Minecraft website.}}
{{History||1.19.3|snap=22w45a|[[File:Player Head (8) JE5.png|32px]] The texture of the player head has been changed.}}
{{History||1.20<br>(Experimental)|link=1.19.3|snap=22w46a|[[File:Piglin Head (8) JE1.png|32px]] Added piglin heads behind the [[Java Edition 1.20|Update 1.20 experimental datapack]].}}
{{History||1.20<br>(Experimental)|link=1.19.4|snap=23w03a|Heads can now be placed on top of note blocks without sneaking.}}
<!--
{{History||1.19.4|snap=23w05a|Heads can now be swapped by let [[helmet]]s {{ctrl|using}} in the hotbar.<ref>{{bug|MC-216270|||Fixed}}</ref>}}
{{History||?|Head can now be swapped in [[armor stand]]s by {{ctrl|using}} them/[[helmet]]s/[[carved pumpkin]]s in the armor stand's slot.}}
RE-ADD WHEN THE WORDING IS BETTER -->
{{History||1.20|snap=23w12a|Piglin heads are now available without using the "Update 1.20" experimental datapack.}}
{{History|pocket alpha}}
{{History||v0.12.1|snap=build 1|[[File:Skeleton Skull (item) JE1 BE1.png|32px]] [[File:Wither Skeleton Skull (item) JE1 BE1.png|32px]] [[File:Zombie Head (item) JE1 BE1.png|32px]] [[File:Player Head (item) JE1 BE1.png|32px]] [[File:Creeper Head (item) JE1 BE1.png|32px]] Added skeleton, wither skeleton, zombie, player, and creeper heads.
|The skeleton, wither skeleton, zombie, player and creeper heads use the [[Java Edition|Java]] textures prior to [[Java Edition 14w30a|14w30a]].}}
{{History||v0.14.0|snap=build 1|Mob heads can now be worn as armor.}}
{{History||v0.16.0|snap=build 4|Wither skeleton skulls can now be used to spawn the [[wither]].}}
{{History|pocket}}
{{History||1.0.0|snap=alpha 0.17.0.1|[[File:Dragon Head (item) BE1.png|32px]] Added dragon heads.
|Dragon heads use a two-dimensional sprite, unlike [[Java Edition|Java]] does.}}
{{History|bedrock}}
{{History||1.2.0|snap=beta 1.2.0.2|Mob heads can now be used to craft [[firework star]]s.
|Creeper heads and wither skeleton skulls are now used to [[crafting|craft]] specific patterns on [[banner]]s.}}
{{History|||snap=beta 1.2.0.11|[[File:Skeleton Skull (item) BE2.png|32px]] [[File:Wither Skeleton Skull (item) BE2.png|32px]] [[File:Zombie Head (item) BE2.png|32px]] [[File:Head (item) BE2.png|32px]] [[File:Creeper Head (item) BE2.png|32px]] [[File:Dragon Head (item) BE2.png|32px]] [[Player]] and [[mob]] heads in [[inventory|inventories]] and when held by mobs/players now display as [[block]]s.}}
{{History||1.10.0|snap=beta 1.10.0.3|Wither skeleton skulls and creeper heads can now be used to craft [[banner pattern]]s.}}
{{History||November 14, 2022|link=https://www.minecraft.net/en-us/article/playable-mob-sounds-coming-minecraft-1-20|Piglin heads are announced to be added in [[Bedrock Edition 1.20.0]] on the Minecraft website.}}
{{History||Next Major Update<br>(Experimental)|link=1.19.60|snap=beta 1.19.60.20|[[File:Piglin Head (item) BE1.png|32px]] Added piglin heads behind the "[[Bedrock Edition 1.20.0|Next Major Update]]" [[experimental]] toggle.}}
{{History|||snap=beta 1.19.60.25|Heads can now be placed on top of note blocks without sneaking.}}
{{History||1.20.0|snap=beta 1.20.0.21|Piglin heads are now available without using the "Next Major Update" experimental toggle.}}
{{History||1.20.40|snap=beta 1.20.40.20|Wither skeleton skulls now make their respective step sounds when played by a note block.}}
{{History|console}}
{{History||xbox=TU12|xbone=CU1|ps=1.0|wiiu=Patch 1|switch=1.0.1|[[File:Skeleton Skull (item) JE1 BE1.png|32px]] [[File:Wither Skeleton Skull (item) JE1 BE1.png|32px]] [[File:Zombie Head (item) JE1 BE1.png|32px]] [[File:Player Head (item) JE1 BE1.png|32px]] [[File:Creeper Head (item) JE1 BE1.png|32px]] Added skeleton, wither skeleton, zombie, player, and creeper heads to the [[creative inventory]].
|Wither skeleton skulls currently do not have a use.}}
{{History||xbox=TU19|xbone=CU7|ps=1.12|Wither skeleton skulls can now be obtained by killing [[wither skeleton]]s.
|Wither skeleton skulls can now be used to build the [[wither]].}}
{{History||xbox=TU31|xbone=CU19|ps=1.22|wiiu=Patch 3|Skeleton, zombie, and creeper heads are now available in [[survival]]. The [[player]] can obtain them by killing the appropriate [[mob]] with a charged [[creeper]].}}
{{History||xbox=TU46|xbone=CU36|ps=1.38|wiiu=Patch 15|[[File:Dragon Head (item) JE1.png|32px]] Added dragon heads.}}
{{History|new 3ds}}
{{History||0.1.0|[[File:Skeleton Skull (item) JE1 BE1.png|32px]] [[File:Wither Skeleton Skull (item) JE1 BE1.png|32px]] [[File:Zombie Head (item) JE1 BE1.png|32px]] [[File:Player Head (item) JE1 BE1.png|32px]] [[File:Creeper Head (item) JE1 BE1.png|32px]] Added skeleton, wither skeleton, zombie, player, and creeper heads.}}
{{History||1.7.10|[[File:Dragon Head (item) BE1.png|32px]] Added dragon heads.}}
{{History|foot}}
===Skull "item"===
{{:Technical blocks/Skull}}
==Issues==
{{issue list}}
== Trivia==
* Despite there being a default Steve head, heads for the other protagonist skins cannot be obtained without using custom names.
*{{IN|be}}, the skull variant for the item is stored under the {{cd|damage}} component, normally used for items with [[durability]].
*The head item's model when wore on a player is slightly larger than its placed block counterpart in the world, which in turn is also slightly larger than the actual player's head. Therefore, a player who wears their own head appears with a larger head.
==Gallery==
===Renders===
<gallery>
Steve wearing Skeleton Skull.png|
Steve wearing Wither Skeleton Skull.png|
Steve wearing Creeper Head.png|
Steve wearing Zombie Head.png|
Steve wearing Dragon Head.png|
Alex wearing Skeleton Skull.png|
Alex wearing Wither Skeleton Skull.png|
Alex wearing Creeper Head.png|
Alex wearing Zombie Head.png|
Alex wearing Dragon Head.png|
Dragon Head.gif|An animation of the dragon head when redstone power is supplied.
</gallery>
===Screenshots===
<gallery>
All The Heads.png|All of the heads.
Headsrotation.png|Heads oriented in different directions.
HeadsOnAFence.png|Heads are the same scale as [[cobblestone wall]] posts.
Playerheads.png|A picture of player heads, including some Mojang characters.
EndShipBow.png|A dragon head found at the bow of an end ship.
</gallery>
====Development====
<gallery>
1st image Mob Head.png|First screenshot released of heads.
Minecart with chest and head thing.png|Notch's head in a [[minecart with chest]].
PauseUnpause's Head 1.png|First image of held heads rendering as blocks.
PauseUnpause's Head 2.png|Second image of held heads rendering as blocks.
Pocket Edition Heads.jpg|First image of a head being worn in bedrock edition.
1.16 Dev failed head holding.jpg|First attempt to fix {{bug|MC-91869}} by [[Xilefian]].
1.16 Dev failed head holding 2.jpg|Second attempt.
</gallery>
===In other media===
<gallery>
Efe Looking at Makena Napping on a Note Block.jpg|[[Efe]] looking at [[Makena]] napping on a Note block
Efe Placing a Zombie Head on a Note Block.jpg|Efe placing a zombie head sneakily on the note block.
Makena Waking up Startled by the Zombie Noise.jpg|Makena waking up startled at the sound of zombies being played on the note block.
File:Piglin Head Animation.jpg|[[Sunny]] using a piglin head to make noise in a [[Crimson Forest]].<ref>https://www.instagram.com/p/Ct7CfOBplrG/</ref>
</gallery>
==References==
{{reflist}}
{{blocks|Utility}}
{{items}}
[[Category:Utility blocks]]
[[Category:Manufactured blocks]]
[[Category:Generated structure blocks]]
[[Category:Block entities]]
[[Category:Non-solid blocks]]
[[cs:Hlava]]
[[de:Kopf]]
[[es:Cabeza]]
[[fr:Tête]]
[[hu:Mob fejek]]
[[it:Testa di creatura]]
[[ja:Mobの頭]]
[[ko:몹 머리]]
[[nl:Wezenhoofd]]
[[pl:Głowa]]
[[pt:Cabeça de criatura]]
[[ru:Голова]]
[[uk:Голова]]
[[zh:生物头颅]]</li></ul></nowiki> | 13w02a | The terrain.png and gui/items.png files were replaced by individual block and item images, allowing for HD and animated textures. Texture packs of different resolutions can be mixed and matched. | |||
1.6.1{{Extension DPL}}<ul><li>[[Elytra|Elytra]]<br/>{{Item
| image = Elytra.png
| rarity = Uncommon
| renewable = No
| durability = 432
| stackable = No
}}
'''Elytra''' ({{Audio|ElytraPronunciation.mp3|/ˈɛl ɪ trə/|link2=''ᴇʟ-i-trə''}}<ref>“Elytron.” ''Merriam-Webster.com Dictionary'', Merriam-Webster, https://www.merriam-webster.com/dictionary/elytron. Accessed 22 May. 2022.</ref>)<!--"Elytra" is the plural of "elytron," a single half of a beetle's protective wing covers. Verbs should agree accordingly (e.g. "Elytra allow flight"). https://www.merriam-webster.com/dictionary/elytron--> are rare wings found in [[end ship]]s that are a source of flight in [[Survival]] mode.
== Obtaining ==
=== Natural generation ===
Elytra are found only in [[end city|end cities]] in [[item frame|item frames]] in the treasure room of the [[end ship]]. A [[shulker]] guards the elytra and the ship's two loot chests.
=== Repairing ===
Elytra can be enchanted with [[Mending]] so that they get [[Item repair|repaired]] as the player collects [[experience]] orbs while wearing/holding them.
Elytra can also be repaired in the player crafting grid, by combining two damaged pairs of elytra together.
{{crafting
|showname=0
|showdescription=1
|ignoreusage=1
|Damaged Elytra
|Damaged Elytra
|Output= Elytra
|description= The durability of the two pairs is added together, plus an extra 5% durability, but removes any enchantments.
|type= Transportation
}}
Similarly, two damaged elytra pairs can be combined on a [[grindstone]].
{{Grinding
|showdescription=1
|ingredients=2x Damaged [[Elytra]]
|Damaged Elytra
|Damaged Elytra
|Elytra
|description=The durability of the two pairs is added together, plus an extra 5% durability, but removes any enchantments.
}}
Elytra can also be repaired at an anvil using [[phantom membrane]]s, which has the advantage that it preserves [[enchantments]] on elytra. Each phantom membrane restores 108 durability points, exactly 25% of the elytra's total durability.
{| class="wikitable" data-description="Repairing elytra"
! scope="col" style="width:64px;" | Name
! Ingredients
! [[Anvil]] usage
|-
! scope="row" style="text-align: center;" | '''Elytra'''
| [[Elytra]] +<br>[[Phantom Membrane]]
| style="width: 260px; padding: 1px;" | {{Anvil| title = Elytra|Input1=Damaged Elytra|Input2=Phantom Membrane, 2|Output=Elytra}}
|-
|}
Each repair on the anvil, however, also increases the [[Anvil mechanics|prior work]] penalty for the Elytra, making every subsequent repair increasingly expensive and eventually reaching an upper limit where repairs are no longer allowed because they are "too expensive" (even if the player has many xp levels to spare). However, the prior work penalty can be reset to 0 for an enchanted elytra pair when it is disenchanted on a grindstone. Unenchanted elytra cannot be used on the grindstone alone.
== Usage ==
[[File:Steve in elytra.png|75px]] [[File:Alex in elytra.png|75px]]
Elytra are equipped in the [[chestplate]] slot, either by placing the item directly in the slot, by pressing {{ctrl|use item}} while [[hotbar|held in hand]], or by firing a point-blank [[dispenser]] at a target. They are gray in color by default, but they adopt the design of any [[cape]] the player is wearing. They maintain their in-world texture design even when they're [[#Repair|broken]] or [[enchanted]].
=== Flying ===
To fly, the player must press the {{ctrl|jump}} key while falling, and the elytra spread apart like a beetle's elytra. The player can aim their view around to turn or adjust their pitch. Losing altitude increases speed, and gaining altitude decreases speed. [[Firework rocket]]s can be used to increase speed. Additionally, speed is quickly lost from sharp changes in direction.
Directly hitting any surface while gliding too fast causes damage to the player and their armor proportional to flight speed (although this may be calculated from another factor). When a player dies in this way, they receive the [[death messages|death message]] "'''<player> experienced kinetic energy'''". The player does not take [[fall damage]] from colliding at a shallow angle or a low enough speed. The critical, damaging angle is about 50° with the collision surface, and the calculation for damage seems to be as if the player had fallen from their maximum potential glide height to the height of the struck surface.
A safe and simple cruise with the highest travel distance can be achieved by aiming directly at the horizon while at the glide's altitude limit. The player's speed is slow enough to allow them time to do other things during a long flight, like sort out their inventory.
In [[Creative]] mode or when the "mayfly" [[ability]] has been given, the player can alternatively hold the {{ctrl|jump}} key to fly up,{{only|bedrock}} or double press the jump key to move around freely.
Flight can be stopped by pressing the [[jump]] key.{{only|bedrock}}
==== Speed and altitude ====
Elytra have a minimum speed of about 7.2 m/s (obtained by gliding at the altitude cap with a strong upward pitch of 30°). If the diver drops to 0 speed, they quickly get accelerated back up to at least this minimum. The diver can increase speed by choosing to descend faster, but afterward, they do not regain nearly as much altitude. In the real world, drag increases with speed, and drag, in turn, slows the aircraft; Minecraft mimics this. To glide from cliff to cliff, a player's best bet is to aim slightly above the horizon.
Sharp turns are a fast way to lose speed. Quicker turns cause greater losses, while gentle movements have small effects. Making a hairpin turn can actually be used for making high-speed landings safe as well as for precise landings on small targets like rooftops. The player aims to glide just above the target, then as they're right over it they immediately reverse directions, then they make readjustments as necessary.
The lowest rate of altitude loss is about 1.5 m/sec, obtained by gliding at the altitude cap with a slight upward pitch (12° or 15°).
To get the best possible glide ratio (and thus the furthest distance out of their altitude), the diver pilot should aim directly at the horizon. This ratio is about 9.47 to 1.
[[Slow Falling]] potions greatly decrease the player's vertical (fall) speed, which also greatly decreases their ''horizontal'' speed (clearly, it depends on the vertical fall rate, as one might expect from flight modeling). The net result is that the player flies extremely slowly - but their Elytra still takes durability damage at the usual rate (1 durability per second without Unbreaking, etc.). Due to this combination, Elytra plus Slow Falling is largely a novelty that most players won't use. The [[Feather Falling]] enchantment does not affect Elytra speed and does not reduce fall damage from hitting things with elytra.
It is possible to calculate the glide range by dividing the altitude by tan of the glide angle (altitude/tan(glide angle)). For example, if the player glides from an altitude of 64 blocks above ground with a glide angle of 15 degrees, they can glide for 237 blocks (assume that they are on superflat), since floor(64 / tan(15)) is 237.
==== Stalling ====
Trying for too high a pitch reduces the player's lift. At a pitch of 30° above the horizon, the player has the lowest possible airspeed of 7.2 m/sec. Above that, the player might be considered to be in a stall. Increasing the pitch gets closer to a free-fall, and stalled flight at 60° is enough to cause fall damage. Stalling at 90° is a true free-fall.
Recovering from a stall is done by readjusting to any safe pitch as quickly as the player likes. This can be just changing to look at the horizon.
==== Powered flight ====
{{fakeImage|{{invSprite|Firework Rocket}}|Firework rockets are used for speed boosts while gliding.}}
[[Firework rocket]]s can be used for propulsion during flight by placing it in either hand and {{ctrl|using}}. Using a firework rocket while gliding quickly maximizes the player's speed for a time similar to the rocket's flight duration.
If the rocket is equipped with [[firework star]]s, it explodes at the end of its flight, inflicting damage based on the number of stars.
It is possible to gain altitude during powered flight. This makes it possible to glide for extreme distances and had been used extensively by [[far lands]]/[[World Border]] challenges.
=== Durability and Repair ===
{{fakeImage|{{invSprite|Broken Elytra}}|A broken pair of elytra.}}
[[Durability]] decreases by one point each second when gliding. A pair of elytra has 432 durability, allowing 7 minutes and 12 seconds of gliding time without enchantments, providing more than 10,000 blocks of transport distance. It is possible to apply the [[Unbreaking]] enchantment using an [[anvil]] and an [[enchanted book]], which affects the elytra, in the same way it does to [[tool]]s. Unbreaking III increases elytra's flight time to about four seconds per durability point, a total of 28 minutes and 44 seconds.
When the durability reaches 1, elytra stop working until they are repaired, adopting a tattered texture in the inventory. The damage ends at durability 1, so they can never fully break. A pair may be repaired by either using the [[Mending]] enchantment, combining two pairs in a [[grindstone]], or combining it in an anvil with [[phantom membrane]]s. In an anvil, each piece of membrane repairs elytra by 108 durability points, requiring 4 pieces to fully repair them.
Each repair on the anvil will also increase the [[Anvil mechanics|prior work]] penalty for the Elytra, making every subsequent repair increasingly expensive, with an upper limit where repairs are no longer allowed because they are "too expensive". However, the prior work penalty can be reset to 0 for an enchanted elytra pair when it is disenchanted on a grindstone (by adding nothing to it). Unenchanted elytra cannot be used on the grindstone alone.
=== Enchantments ===
Elytra can receive the following [[enchantments]] by combining in an anvil:
{| class="wikitable sortable"
|-
! Enchantment
! Max Level
![[Enchanting|Method]]
|-
| [[Unbreaking]]
| III
|{{Inventory slot|Anvil}}
|-
| [[Mending]]
| I
|{{Inventory slot|Anvil}}
|-
| [[Curse of Vanishing]]
| I
|{{Inventory slot|Anvil}}
|-
| [[Curse of Binding]]
| I
|{{Inventory slot|Anvil}}
|}
{{notelist|columns=1}}
== Sounds ==
{{edition|java}}:
{{Sound table
|sound=Equip leather1.ogg
|sound2=Equip leather2.ogg
|sound3=Equip leather3.ogg
|sound4=Equip leather4.ogg
|sound5=Equip leather5.ogg
|sound6=Equip leather6.ogg
|subtitle=Elytra rustles
|source=player
|description=When a pair of elytra is equipped
|id=item.armor.equip_elytra
|translationkey=subtitles.item.armor.equip_elytra
|volume=1.0
|pitch=1.0
|distance=16}}
{{Sound table
|sound=Elytra loop.ogg
|subtitle=MC-177084
|source=player
|description=While flying with a pair of elytra
|id=item.elytra.flying
|translationkey=-
|volume=0.0-1.0 <ref group=sound>Is a quarter of the player's velocity. If flying for less than 1 second, it is 0.0; otherwise, if flying for less than 2 seconds, it is between 0.0 and a quarter of the player's velocity (scaling up with time until 2 seconds)</ref>
|pitch=1.0 <ref group=sound>If the volume is greater than 0.8, 0.8-volume is added to the pitch</ref>
|distance=16}}
{{Sound table
|sound=Random break.ogg
|subtitle=Item breaks
|source=dependent
|description=When a pair of elytra's durability is exhausted
|id=entity.item.break
|translationkey=subtitles.entity.item.break
|volume=0.8
|pitch=0.8-1.2
|distance=16
|foot=1}}
{{edition|bedrock}}:
{{Sound table
|type=bedrock
|sound=Equip leather1.ogg
|sound2=Equip leather2.ogg
|sound3=Equip leather3.ogg
|sound4=Equip leather4.ogg
|sound5=Equip leather5.ogg
|sound6=Equip leather6.ogg
|source=player
|description=When a pair of elytra is equipped
|id=armor.equip_leather
|volume=1.0
|pitch=1.0}}
{{Sound table
|sound=Elytra loop.ogg
|source=player
|description=While flying with a pair of elytra
|id=elytra.loop
|volume=''Depends'' {{checkthecode}}
|pitch=1.0}}
{{Sound table
|sound=Random break.ogg
|source=player
|description=When a pair of elytra's durability is exhausted
|id=random.break
|volume=1.0
|pitch=0.9
|foot=1}}
== Data values ==
=== ID ===
{{edition|java}}:
{{ID table
|edition=java
|showforms=y
|generatetranslationkeys=y
|displayname=Elytra
|spritetype=item
|nameid=elytra
|form=item
|foot=1}}
{{edition|bedrock}}:
{{ID table
|edition=bedrock
|shownumericids=y
|showforms=y
|notshowbeitemforms=y
|generatetranslationkeys=y
|displayname=Elytra
|spritetype=item
|nameid=elytra
|id=564
|form=item
|foot=1}}
== Achievements ==
{{Load achievements|Super Sonic}}
== Advancements ==
{{load advancements|Sky's the Limit}}
== History ==
{{History|java}}
{{History||1.9|snap=October 5, 2015|slink=https://twitter.com/_tomcc/status/651042141397979136|[[Tommaso Checchi]] tweets that [[Jeb]] is working on a secret feature for Minecraft Java Edition, saying "it's like [[W:c:Mario:Super Mario 64|Mario 64]]."}}
{{History|||snap=October 6, 2015|slink=https://twitter.com/jeb_/status/651416814791081984|[[Jeb]] tweets a [https://web.archive.org/web/20230820173231/https://gfycat.com/serpentinehighlevelamurminnow-minecraftsuggestions-ethoslab animated GIF] revealing a [[player]] gliding around an [[end city]]. Elytra have a dragon-wing texture.}}
{{History|||snap=October 6, 2015|slink=https://twitter.com/jeb_/status/651419480187346944|Jeb tweets an [https://web.archive.org/web/20230219045525/https://i.imgur.com/LBgZCyW.png image] of folded wings, which replace the cape the player is wearing.}}
{{History|||snap=October 6, 2015|slink=https://twitter.com/jeb_/status/651423700777074688|Jeb tweets another [https://web.archive.org/web/20230820083025/https://gfycat.com/leadingindolentgangesdolphin animated GIF] of his character with Mojang-themed elytra, gliding along a [[river]] through a [[taiga]] forest.}}
{{History|||snap=15w41a|[[File:Elytra JE1 BE1.png|32px]] <br>[[File:Elytra (item) JE1 BE1.png|32px]] [[File:Broken Elytra (item) JE1 BE1.png|32px]] Added elytra.
|Elytra are currently repaired with [[leather]] when using [[anvil]].}}
{{History|||snap=15w42a|Elytra now spread slightly when the [[player]] crouches.
|The player can now take [[damage]] from gliding into walls, and crashing into a wall now has its own [[Health#Death messages|death message]].
|When flying with elytra, players are only 0.6 blocks tall. They, therefore, can now fit through 1-block gaps while gliding.
|The [[player]] can no longer go higher than the starting point of the glide.}}
{{History|||snap=15w43a|The player's point of view now shifts while gliding.}}
{{History|||snap=16w06a|Elytra now recognize the [[player]]'s [[cape]] and adopt a different elytron design for every official cape (see [[#Gallery|Gallery]]). In addition, Jeb is working on a feature to allow players to change the elytron design like regular player skins.}}
{{History|||snap=16w07a|Elytra are now activated by jumping mid-air. The player no longer glides automatically when falling.
|The cape option in the [[options|options menu]] now also disables custom elytra textures.
|Added the [[game rule]] {{cd|disableElytraMovementCheck}}.}}
{{History||1.9.1|snap=pre1|[[Sound]]s while gliding with elytra have been added.}}
{{History||1.11|snap=16w32a|Elytra can now be placed on [[armor stand]]s, just like any other [[chestplate]].}}
{{History|||snap=16w38a|Elytra are now visible on [[zombie]]s, [[skeleton]]s, and armor stands.}}
{{History|||snap=16w41a|Elytra now have their own [[sound]] when equipped.}}
{{History||1.11.1|snap=16w50a|Elytra can now be propelled through the [[air]] by using [[firework rocket]]s.}}
{{History||1.13|snap=17w47a|Prior to [[1.13/Flattening|''The Flattening'']], this [[item]]'s numeral ID was 443.}}
{{History|||snap=18w14a|Elytra now require [[phantom membrane]] to be repaired, instead of [[leather]].}}
{{History||1.14|snap=18w43a|[[File:Elytra JE2 BE2.png|32px]] <br>[[File:Elytra (item) JE2 BE2.png|32px]] [[File:Broken Elytra (item) JE2 BE2.png|32px]] The textures of the elytra have been changed.}}
{{History||1.15|snap=19w39a|The deployment animation of elytra causes [[player]] blinks when the deployment events has overlapped.}}
{{History|||snap=19w42a|The deployment and folding animations of elytra have been improved and become smoother.
|Elytra can now start to glide immediately after a jump, not only during falls.}}
{{History||1.18|snap=experimental snapshot 7|Elytra no longer use up durability when gliding regularly. Durability is now only consumed when a [[firework rocket]] is used.
|Speed boosts from firework rockets are slightly weaker.
|Now break when the item reaches 0 durability.}}
{{History|||snap=21w37a|The elytra changes in experimental snapshot 7 have been reverted.}}
{{History||1.19|snap=Pre-release 1|Equipping elytra through the inventory now plays a sound.<ref>{{bug|MC-94060||Equipping armor/elytra through inventory or dispenser doesn't play sounds|Fixed}}</ref>}}
{{History||1.19.4|snap=23w05a|Equipping elytra while held with an item already in the chestplate slot now swaps the two items.}}
{{History|pocket}}
{{History||1.0.0|snap=alpha 0.17.0.1|[[File:Elytra JE1 BE1.png|32px]] <br>[[File:Elytra (item) JE1 BE1.png|32px]] [[File:Broken Elytra (item) JE1 BE1.png|32px]] Added elytra. In-game, they are known as ''elytra wings''.}}
{{History|bedrock}}
{{History||1.2.0|snap=beta 1.2.0.2|Elytra can now be propelled through the [[air]] by using [[firework rocket]]s.}}
{{History||1.2.3|snap=beta 1.2.3.3|''Elytra Wings'' have been renamed to ''Elytra''.}}
{{History||1.6.0|snap=beta 1.6.0.5|Elytra can now be repaired in an [[anvil]] using [[phantom membrane]], instead of [[leather]].}}
{{History||1.10.0|snap=beta 1.10.0.3|[[File:Elytra JE2 BE2.png|32px]] <br>[[File:Elytra (item) JE2 BE2.png|32px]] [[File:Broken Elytra (item) JE2 BE2.png|32px]] The textures of elytra have been changed.}}
{{History|console}}
{{History||xbox=TU46|xbone=CU36|ps=1.38|wiiu=Patch 15|switch=1.0.1|[[File:Elytra JE1 BE1.png|32px]] <br>[[File:Elytra (item) JE1 BE1.png|32px]] [[File:Broken Elytra (item) JE1 BE1.png|32px]] Added elytra.}}
{{History||xbox=TU53|xbone=CU43|ps=1.49|wiiu=Patch 23|switch=1.0.3|Elytra can now be propelled through the [[air]] by using [[firework rocket]]s.}}
{{History||xbox=TU69|xbone=none|ps=1.76|wiiu=Patch 38|switch=none|Elytra are now repaired on the [[anvil]] using [[phantom membrane]] instead of [[leather]].}}
{{History||xbox=none|xbone=none|ps=1.90|wiiu=none|switch=none|[[File:Elytra JE2 BE2.png|32px]] <br>[[File:Elytra (item) JE2 BE2.png|32px]] [[File:Broken Elytra (item) JE2 BE2.png|32px]] The textures of elytra have been changed.}}
{{History|new 3ds}}
{{History||1.7.10|[[File:Elytra JE1 BE1.png|32px]] <br>[[File:Elytra (item) JE1 BE1.png|32px]] [[File:Broken Elytra (item) JE1 BE1.png|32px]] Added elytra.}}
{{History|foot}}
== Issues ==
{{issue list}}
== Trivia ==
* The singular form of elytra is an {{w|elytron}}.
* In reality, elytra are not used for flight. They are the tough forewings of beetles and earwigs that cover the wings they actually use for flight. However, like ''Minecraft'' elytra, beetles can use them for gliding.
* A flying player has a shorter hitbox than usual: A 0.6 block cube centered on the player's feet.
* It is possible to glide while on a [[ladder]], by pressing {{key|shift}} followed by {{key|space}}, causing the player to fall with a speed determined by the player's visual angle. This means that the player can descend fast on a ladder, but if the speed is too fast when hitting the ground, they can take fatal fall damage. Using a [[firework rocket]] can also speed up the player's descent.
* {{IN|java}} if the player glides into deep [[water]] with elytra equipped, the animation does not stop, giving it the appearance of a [[swimming]] animation.<ref name="MC-97190">{{bug|MC-97190||While gliding into water or lava, player continues gliding|WAI}}</ref> The animation stops once the player touches the ground. Additionally, [[firework rocket]]s can be used with elytra underwater with a short boost duration.
* Elytra do not deactivate when the player flies into [[lava]].<ref name="MC-97190"/>
* Elytra can be equipped onto some [[mob]]s using [[command]]s. This has no effect unless the mob has the {{cd|FallFlying}} tag set to {{cd|1b}}. Mobs glide forward, unable to control the movement before landing, at which time they regain their AI.
** Exceptions to this are [[squid]]s as the squid's AI causes it to attempt swimming in midair, making it fall straight down because it conflicts with the elytra mechanics.
**Because [[chicken]]s fall slowly, they can move more distance.
** [[Enderman|Endermen]], tamed [[wolf|wolves]] and tamed [[cat]]s that are not sitting cannot teleport until they hit the ground.
** Because mobs do not regain control until they hit the ground, [[vex]]es fall until they die or despawn as they cannot touch the ground.
** Mobs capable of flying, such as [[parrot]]s or vexes can steer in air, though they cannot travel up or down. Dolphins also have this ability.
* [[4J Studios]] created an elytron-centered tutorial map for console edition when elytra were first introduced to this platform, this map is themed as "ruins of an ancient civilization of ''[[Minecraft]]'' worshipers" and showcases the new amplified terrain generation. This map can be seen behind the scenes.<ref>{{Mcnet|learning-fly|Learning To Fly}}</ref> On 28 March 2017, 4J Studios added an elytron-themed [[Mini Games]] for console edition called "Glide;" it consists of Time Attack and Score Attack mode.<ref>{{Mcnet|glide-mini-game-consoles-tomorrow|Glide Mini Game on Consoles Tomorrow|March 23, 2017}}</ref><ref>{{Mcnet|mini-game-masters-glide-console|Mini Game Masters Glide onto Console|March 28, 2017}}</ref>
* A player who jumps with both elytra and the [[Slow Falling]] effect travels slightly upward, which is a cheap but time-consuming alternative to [[fireworks]] and [[Riptide]]-enchanted [[trident]]s.
* On May 5, 2019, [[Mojang]] tweeted '[[The End]] never yields enough adequate resources, sadly,' along with a sad emoji.<ref>{{tweet|Minecraft|1125053038757068802|The End never yields enough adequate resources, sadly. 😔}}</ref> The first letter of each word spells 'T E n y e a r s' (Ten Years). Attached was a picture of [[player|Steve and Alex]] wearing both a [[chestplate]] and elytra. The next day, they tweeted, "Have you noticed something ''suspic10us'' here lately?"<ref>{{tweet|Minecraft|1125415169495064576|Have you noticed something suspic10us here lately?}}</ref>
* Mojang has considered the suggestion of combining elytra with a chestplate, but eventually decided against it, stating that elytra taking up armor is an intentional decision of game balancing.<ref>
{{cite
|url=https://feedback.minecraft.net/hc/en-us/articles/360005029872-Previously-Considered-Suggestions
| title = Part of the tradeoff of having an Elytra is it takes up half your armor.
|website=Minecraft Feedback
|date=July 12, 2018}}
</ref>
== Gallery ==
<gallery>
ElytraFlight.gif|The first image of elytra, tweeted by [[Jeb]]. Click to play.
FoldedWings.png|Folded elytra, which resembles the [[cape]] the user is wearing.
Minecon2015Alternative.png|The minecon 2015 cape elytra.
Dinnerbone Elytra.png|[[Dinnerbone]] flying upside down.
ElytraEnd.png|Elytra in an [[end ship]].
PlayerElytraBack.png|A [[player]] wearing elytra.
PlayerElytraFront.png|A player using elytra.
Broken Elytra.png|Elytra with only 1 [[item durability|durability]].
UpcomingElytras.jpg|Elytra designs fitting to the official capes, posted by Jeb on {{w|Reddit}}.
FlyBlock.png|A player gliding while blocking with a [[shield]].
Suspic10us.jpg|An image of players using elytra.
Steve Gliding with Elytra.png|Steve gliding with elytra.
Alex Gliding with Elytra.png|Alex gliding with elytra.
Enchanted Elytra (item).gif|A pair of enchanted elytra.
</gallery>
=== Console exclusive ===
<gallery>
Glide Score Cavern 2.png|Screenshot of Glide mini-games.
Glide Time Cavern 2.png|Another screenshot of Glide mini-games.
GLIDE Official.jpg|''Glide'' launch poster.
Elytra Tutorial Map.jpg|Official elytra themed tutorial map.
</gallery>(These maps can be found for a price on the Microsoft Store)
=== Designs when wearing capes ===
<blockquote>Designs that are not listed here have default elytron texture or don't have any.</blockquote><gallery>
File:Mojang employees Elytra.png|Old [[Mojang]] cape
File:Mojang employees 2015 Elytra.png|New Mojang cape
File:Mojang Studios employees 2021 Elytra.png|Mojang Studios cape
File:Crowdin Translator Elytra.png|[[Crowdin]] Translator cape
File:DannyBstyle's Elytra.png|dannyBstyle's cape
File:JulianClark's Elyrtra.png|JulianClark's cape
File:Millionth Customer Elytra.png|Millionth Customer cape
File:MINECON 2011 Attendees Elytra.png|[[MINECON 2011]] Attendees cape
File:MINECON 2012 Attendees Elytra.png|[[MINECON 2012]] Attendees cape
File:MINECON 2013 Attendees Elytra.png|[[MINECON 2013]] Attendees cape
File:MINECON 2015 Attendees Elytra.png|[[MINECON 2015]] Attendees cape
File:MINECON 2016 Attendees Elytra.png|[[MINECON 2016]] Attendees cape
File:MINECON LIVE 2019 Founder's Elytra.png|[[MINECON Live 2019]] Founder's cape
File:Mojira Moderator Elytra.png|[[bug tracker|Mojira]] Moderator cape
File:MrMessiah's Elytra.png|MrMessiah's cape
File:Prismarine Elytra.png|[[Prismarine]] cape
File:Realms Mapmaker Elytra.png|[[Realms]] mapmaker's cape
File:Cobalt Elytra.png|[[Cobalt (game)|Cobalt]] cape
File:Scrolls Elytra.png|[[Scrolls]] cape
File:Turtle Elytra.png|[[Turtle]] cape
File:PancapeElyR.png|Pancape cape
File:MSCapeElyR.png|Migrator cape
File:Gr8 Escape's elytra.png|Gr8_Escape's cape
File:Valentine Elytra.png|Valentine cape
File:Vanilla Cape Elytra JE.png|Vanilla cape{{only|java}}
File:Vanilla cape elytra BE.png|Vanilla cape{{only|bedrock}}
</gallery>
== References ==
{{reflist}}
== External Links ==
*[https://www.minecraft.net/en-us/article/taking-inventory--elytra Taking Inventory: Elytra] – Minecraft.net on December 14, 2019
{{Items}}
[[de:Elytren]]
[[es:Élitros]]
[[fr:Élytres]]
[[ja:エリトラ]]
[[ko:겉날개]]
[[nl:Dekschild]]
[[pl:Elytry]]
[[pt:Élitros]]
[[ru:Элитры]]
[[tr:Elitra]]
[[zh:鞘翅]]
[[Category:Non-renewable resources]]</li><li>[[Head|Head]]<br/>{{Block
| image =
<gallery>
Skeleton Skull.png | Skeleton
Wither Skeleton Skull.png | Wither Skeleton
Player Head.png | Player
Zombie Head.png| Zombie
Creeper Head.png | Creeper
Dragon Head.png | Dragon
Piglin Head.png | Piglin
</gallery>
| transparent = Yes
| light = No
| tool = any
| renewable =
* '''Skeleton, Wither Skeleton, Zombie, Creeper, Piglin:'''
* Yes
* '''Dragon, Player:'''
* No
| stackable = Yes (64)
| flammable = No
| lavasusceptible = No
| rarity = Uncommon
}}
A '''head''' or '''skull''' is a [[block]] modeled after the head of a specific [[entity]]. There are seven types of heads: [[player]] ([[Steve]]'s head by default), [[zombie]], [[skeleton]], [[wither skeleton]], [[creeper]], [[piglin]], and [[dragon]].
== Obtaining ==
=== Breaking ===
A mob head can be mined using any item,<ref>{{bug|MC-192905||Heads & Skulls have no assigned tool}}</ref> and drops itself when broken.
{{breaking row|horizontal=1|Mob Head|sprite=Heads}}
If a head is pushed by a [[piston]] or comes in contact with [[water]] or [[lava]], it breaks off as an [[item (entity)|item]].
When destroyed by an [[explosion]], the head ''always'' drops as an item.
===Natural generation===
Dragon heads generate on [[end ships]] found in [[End City|end cities]].
Skeleton skulls can generate in [[ancient cities]], which sometimes generate in the [[deep dark]].
=== Mob loot ===
A [[wither skeleton]] has a 2.5% chance of dropping a wither skeleton skull when killed by a player or a tamed [[wolf]]. The chance is increased by 1% per level of [[Looting]], for a maximum of 5.5% with Looting III. {{IN|bedrock}}, the chance is increased by 2% per level of [[Looting]], for a maximum of 8.5% with Looting III.
[[Skeleton]], [[wither skeleton]], [[zombie]], [[creeper]] and [[piglin]] heads are always dropped by the respective mob if it dies due to a [[charged creeper]]'s explosion. {{IN|bedrock}}, if multiple mobs are killed by the same charged creeper, all of them drop their heads, however {{in|java}} only one mob selected at random drops its head.<ref>{{bug|MC-63534|||WAI}}</ref> If an [[ender dragon]] or a [[player]] is killed by a charged creeper, it does not drop its head.<ref name=":0">{{bug|MC-132933|||WAI}}</ref>
==Usage ==
===Decoration===
Mob heads can be oriented in 16 different directions on top of a block, and 4 directions on the sides of blocks, similar to [[sign]]s. They can be placed on top of, or beside each other by shift clicking.
When placed and powered by redstone, the piglin and dragon heads plays an animation. The piglin head flaps its ears (2 times per second for the right ear and 2.5 times per second for the left ear) while the dragon head opens and closes its mouth repeatedly (2 times per second). The same animation occurs when worn by a (horizontally) moving player, zombie, skeleton, or [[armor stand]] (note: the animation does not play if the <code>NoGravity</code> tag is set to 1)
=== Wearing ===
{{See also|#Renders}}
The player can wear heads, similarly to [[pumpkin]]s or helmets. This overlays the second layer of the player's [[skin]].
====Disguise====
Wearing the corresponding mob head reduces the detection range for [[skeleton]]s (but not [[wither skeleton]]s), [[creeper]]s, [[zombie]]s, and [[piglin]]s to 50% of the normal range. This is similar to (and stacks with) the reductions in detection range from [[sneaking]] and from the [[Invisibility]] status effect.
{{IN|bedrock}}, wearing any mob head or carved pumpkin makes the player invisible to other players on a locator [[map]].
=== Withers===
{{FakeImage|{{BlockGrid|scale=2|w=Wither Skeleton Skull|s=Soul Sand|www|sss| s }}|Wither build configuration}}
[[Wither]]s can be spawned by placing soul sand or soul soil in a T shape, and putting 3 wither skeleton skulls on top of the T. The T can be horizontal or vertical. The last block placed must be one of the three wither skeleton skulls. A dispenser can also create a wither, by placing the final skull onto soul sand directly in front of and below it.
===Dispensers===
A [[dispenser]] can equip a mob head on a player, mob, or armor stand with an empty helmet slot, within the block the dispenser is facing.
[[Dispenser]]s can also complete the construction of a wither.
=== Crafting ingredient===
{{crafting usage|Wither Skeleton Skull,Creeper Head|continue=1}}
{{Crafting
|ignoreusage=1
|ingredients=Any '''Mob head''' +<br>[[Gunpowder]] +<br>Any [[Dye]]
|Gunpowder
|Wither Skeleton Skull;Skeleton Skull;Zombie Head;Head;Creeper Head;Dragon Head;Player Head
|Matching Dye
|Output= Matching Firework Star
|description=Forms Creeper shape
|foot=1
}}
===Enchantments===
Mob heads can receive the following enchantments, but only through an [[anvil]].
{| class="wikitable col-2-center col-3-right"
|+
!Name
!Max Level
![[Enchanting|Method]]
|-
|[[Curse of Binding]]
|I
|{{Inventory slot|Anvil}}
|-
|[[Curse of Vanishing]]
|I
|{{Inventory slot|Anvil}}
|-
|}
=== Note blocks ===
Placing a head above a [[note block]] causes the note block to play the corresponding mob's {{cd|ambient}} sound when activated. The only exception is the creeper head; as creepers don't make {{cd|ambient}} sounds, the note block plays the {{cd|primed}} (hissing) sound instead.
The block below the note block does not affect the mob sound it creates.
==Player skins==
{{exclusive|java|section=1}}
Human heads have an extra usage for map makers, they can be given [[Chunk format#Entity Format|NBT data]] so that they appear with the skin of any ''Minecraft'' account. This means if a player knows that a specific account has a head that is desired to display, the NBT data can be edited to make it appear.
The command to give the player a head with the skin of another player is {{cmd|give @s minecraft:player_head{SkullOwner:"<''PlayerName''>"} }}. Commonly, this kind of head is called a custom head.
Another command to give the player a head with another player's skin is {{cmd|give @s minecraft:player_head{SkullOwner:{Id:"<''PlayerUUID''>",Properties:{textures:[{Value:"<''SkinURL''>"}]} } } }}. ''SkinURL'' is a string encoded in [https://en.wikipedia.org/wiki/Base64 Base64] containing the URL of the player's skin.<ref>Example: {"textures":{"SKIN":{"url":"<nowiki>http://textures.minecraft.net/texture/292009a4925b58f02c77dadc3ecef07ea4c7472f64e0fdc32ce5522489362680"}}}</ref> A player head saves the skin of the player from the time it was created, meaning if the player changes their skin, the head still displays the original texture.<ref>{{tweet|Dinnerbone|464414369452142592|Skulls are a snapshot of the skin as it was made; just change your skin, make a skull, and change your skin back. That's intended behaviour.|May 8, 2014}}</ref>
Note that it is therefore necessary to be connected to the internet to load the texture of a skin, whatever the property used.
When they are loaded for the first time by the client, the skins textures are cached in {{code|[[.minecraft]]\assets\skins\(subfolders)\(files)}}.
If the client does not have access to the internet when it first loads, the player's head displays a regular head (Steve's skin) which is also cached.
Afterwards, even if the client reconnects to the internet, in order to display the skin correctly, it is necessary to clear the cache manually by deleting the recently created files in {{code|[[.minecraft]]\assets\skins\(subfolder)}}, then restarting the game.
When NBT-customized heads (with names and lores) are placed on the ground, they lose their names and given lores upon picking up. Therefore, using Ctrl + {{ctrl|pick block}} on a custom player head gives the player a head that still retains its textures, but with no lores and its name is reset to either {{code|[PlayerName]'s Head}} (heads obtained by MHF-Marc's Head Format or existing players in the world) or {{code|Player Head}} (heads obtained by using skin URLs).
=== Marc's Head Format===
[[File:Allmobheads.png|thumb|right|Most of the MHF mob heads provided.]]
{{exclusive|Java|section=1}}
[[Marc Watson]] created a number of accounts with specific skins so map makers could use common heads without the risk of someone changing their skins.<ref>{{reddit|1m0itx/twitter_marc_irl_mapmakers_would_it_be_useful|cc4m1cq|I'm here to make it so that people don't have to worry about having a consistent account whose skin might change.|Marc_IRL|September 9, 2013}}</ref> Nowadays, since heads do not update the skin if a player changes their skin, this is not something map-makers need to worry about, though these skins are still useful. These accounts have names in the format <code>MHF_<''Name''></code>, for example <code>MHF_PigZombie</code> is the name of a ''Minecraft'' user with a [[zombified piglin]] head. MHF stands for "Marc's Head Format".<ref>{{tweet|Marc_IRL|377453670410891264|head format. I needed to pick a prefix that was short and not already taken by other usernames.|September 10, 2013}}</ref> There are also a few blocks and "bonus" heads, for more variety. These player heads have not been updated in compliance with the [[Texture Update]], and are outdated.
Because these are names of player accounts, these heads are obtained or placed using the <code>SkullOwner</code> tag, for instance: {{cmd|/give @s minecraft:player_head{SkullOwner:"MHF_''<Name>''"}<nowiki />}}.
The following names/heads have been made available:<ref>{{tweet|Marc_IRL|542330244473311232|For those following the MHF list, I have presents for you. Full list of accounts I've made: http://pastebin.com/5mug6EBu|December 9, 2014}}</ref>
<!--
DO NOT add ANY skull to this list without a source that it is made by Mojang; unsourced additions will be reverted!
In particular:
* MHF_Apple, MHF_Wither and MHF_Tree are not made by Mojang, see {{tweet|Marc_IRL|542599419678707714}} and {{tweet|Marc_IRL|590522239616954369}}
* MHF_Guardian is unofficial, see http://redd.it/3439u0
-->
;Mobs
<div class="list-style-none" style="-moz-column-width:15em;-webkit-column-width:15em;column-width:15em">
*{{InvSprite|MHF Alex}} MHF_Alex
*{{InvSprite|MHF Blaze}} MHF_Blaze
*{{InvSprite|MHF CaveSpider}} MHF_CaveSpider
*{{InvSprite|MHF Chicken}} MHF_Chicken
*{{InvSprite|MHF Cow}} MHF_Cow
*{{InvSprite|MHF Creeper}} MHF_Creeper
*{{InvSprite|MHF Enderman}} MHF_Enderman
*{{InvSprite|MHF Ghast}} MHF_Ghast
*{{InvSprite|MHF Golem}} MHF_Golem
*{{InvSprite|MHF Herobrine}} MHF_Herobrine
*{{InvSprite|MHF LavaSlime}} MHF_LavaSlime
*{{InvSprite|MHF MushroomCow}} MHF_MushroomCow
*{{InvSprite|MHF Ocelot}} MHF_Ocelot
*{{InvSprite|MHF Pig}} MHF_Pig
*{{InvSprite|MHF PigZombie}} MHF_PigZombie
*{{InvSprite|MHF Sheep}} MHF_Sheep
*{{InvSprite|MHF Skeleton}} MHF_Skeleton
*{{InvSprite|MHF Slime}} MHF_Slime
*{{InvSprite|MHF Spider}} MHF_Spider
*{{InvSprite|MHF Squid}} MHF_Squid
*{{InvSprite|MHF Steve}} MHF_Steve
*{{InvSprite|MHF Villager}} MHF_Villager
*{{InvSprite|MHF WSkeleton}} MHF_WSkeleton
*{{InvSprite|MHF Zombie}} MHF_Zombie
</div>
;Blocks
<div class="list-style-none" style="-moz-column-width:15em;-webkit-column-width:15em;column-width:15em">
*{{InvSprite|MHF Cactus}} MHF_Cactus
*{{InvSprite|MHF Cake}} MHF_Cake
*{{InvSprite|MHF Chest}} MHF_Chest
*{{InvSprite|MHF CoconutB}} MHF_CoconutB
*{{InvSprite|MHF CoconutG}} MHF_CoconutG
*{{InvSprite|MHF Melon}} MHF_Melon
*{{InvSprite|MHF OakLog}} MHF_OakLog
*{{InvSprite|MHF Present1}} MHF_Present1
*{{InvSprite|MHF Present2}} MHF_Present2
*{{InvSprite|MHF Pumpkin}} MHF_Pumpkin
*{{InvSprite|MHF TNT}} MHF_TNT
*{{InvSprite|MHF TNT2}} MHF_TNT2
</div>
;Bonus
<div class="list-style-none" style="-moz-column-width:15em;-webkit-column-width:15em;column-width:15em">
*{{InvSprite|MHF ArrowUp}} MHF_ArrowUp
*{{InvSprite|MHF ArrowDown}} MHF_ArrowDown
*{{InvSprite|MHF ArrowLeft}} MHF_ArrowLeft
*{{InvSprite|MHF ArrowRight}} MHF_ArrowRight
*{{InvSprite|MHF Exclamation}} MHF_Exclamation
*{{InvSprite|MHF Question}} MHF_Question
</div>
==Sounds==
===Generic===
{{Sound table/Block/Stone}}
===Unique===
{{Edition|Java}}:
{{Sound table
|sound=Zombie idle1.ogg
|sound2=Zombie idle2.ogg
|sound3=Zombie idle3.ogg
|subtitle=Zombie groans
|source=record
|description=When a zombie head is played using a note block
|id=block.note_block.imitate.zombie
|translationkey=subtitles.entity.zombie.ambient
|volume=3.0
|pitch=1.0
|distance=16}}
{{Sound table
|sound=Skeleton idle1.ogg
|sound2=Skeleton idle2.ogg
|sound3=Skeleton idle3.ogg
|subtitle=Skeleton rattles
|source=record
|description=When a skeleton skull is played using a note block
|id=block.note_block.imitate.skeleton
|translationkey=subtitles.entity.skeleton.ambient
|volume=3.0
|pitch=1.0
|distance=16}}
{{Sound table
|sound=Creeper fuse.ogg
|subtitle=Creeper hisses
|source=record
|description=When a creeper head is played using a note block
|id=block.note_block.imitate.creeper
|translationkey=subtitles.entity.creeper.primed
|volume=3.0
|pitch=0.5
|distance=16}}
{{Sound table
|sound=Ender dragon idle1.ogg
|sound2=Ender dragon idle2.ogg
|sound3=Ender dragon idle3.ogg
|sound4=Ender dragon idle4.ogg
|subtitle=Dragon roars
|source=record
|description=When an ender dragon head is played using a note block
|id=block.note_block.imitate.ender_dragon
|translationkey=subtitles.entity.ender_dragon.ambient
|volume=3.0
|pitch=1.0
|distance=16}}
{{Sound table
|sound=Wither skeleton idle1.ogg
|sound2=Wither skeleton idle2.ogg
|sound3=Wither skeleton idle3.ogg
|subtitle=Wither Skeleton rattles
|source=record
|description=When a wither skeleton skull is played using a note block
|id=block.note_block.imitate.wither_skeleton
|translationkey=subtitles.entity.wither_skeleton.ambient
|volume=3.0
|pitch=1.0
|distance=16}}
{{Sound table
|sound=Piglin idle1.ogg
|sound2=Piglin idle2.ogg
|sound3=Piglin idle3.ogg
|sound4=Piglin idle4.ogg
|sound5=Piglin idle5.ogg
|subtitle=Piglin snorts
|source=record
|description=When a piglin head is played using a note block
|id=block.note_block.imitate.piglin
|translationkey=subtitles.entity.piglin.ambient
|volume=1.98
|pitch=1.0
|distance=16}}
{{Sound table
|sound=Equip generic1.ogg
|sound2=Equip generic2.ogg
|sound3=Equip generic3.ogg
|sound4=Equip generic4.ogg
|sound5=Equip generic5.ogg
|sound6=Equip generic6.ogg
|subtitle=Gear equips
|source=player
|description=When a carved pumpkin is equipped
|id=item.armor.equip_generic
|translationkey=subtitles.item.armor.equip
|volume=1.0
|pitch=1.0
|distance=16
|foot=1}}
<!--volumes and pitches seem to be approximately v=0.9 p=0.84, but those values are approximate and are not in the files. They are probably inside of the code.-->
{{Edition|Bedrock}}:
{{Sound table
|type=bedrock
|sound=Zombie idle1.ogg
|sound2=Zombie idle2.ogg
|sound3=Zombie idle3.ogg
|source=record
|description=When a zombie head is played using a note block
|id=note.zombie
|pitch=0.84 <ref group=sound name=pitch>Actually equal to <math>\frac{1}{\sqrt[4]{2}}</math>, which is about 0.8409</ref>}}
{{Sound table
|sound=Skeleton step1.ogg
|sound2=Skeleton step2.ogg
|sound3=Skeleton step3.ogg
|sound4=Skeleton step4.ogg
|source=record
|description=When a skeleton skull is played using a note block<wbr><ref group=sound name=skeletoncreeper>{{Bug|MCPE-164530}}</ref>
|id=note.skeleton
|pitch=0.84 <ref group=sound name=pitch/>}}
{{Sound table
|sound=Fuse.ogg
|source=record
|description=When a creeper head is played using a note block<wbr><ref group=sound name=skeletoncreeper/>
|id=note.creeper
|pitch=0.84 <ref group=sound name=pitch/>}}
{{Sound table
|sound=Ender dragon idle1.ogg
|sound2=Ender dragon idle2.ogg
|sound3=Ender dragon idle3.ogg
|sound4=Ender dragon idle4.ogg
|source=record
|description=When a dragon head is played using a note block
|id=note.enderdragon
|pitch=0.84 <ref group=sound name=pitch/>}}
{{Sound table
|sound=Skeleton step1.ogg
|sound2=Skeleton step2.ogg
|sound3=Skeleton step3.ogg
|sound4=Skeleton step4.ogg
|source=record
|description=When a wither skeleton skull is played using a note block<wbr>{{Until|BE 1.20.40}}<wbr><ref group=sound name=skeletoncreeper/>
|id=note.witherskeleton
|pitch=0.84 <ref group=sound name=pitch/>}}
{{Sound table
|sound=Wither skeleton step1.ogg
|sound2=Wither skeleton step2.ogg
|sound3=Wither skeleton step3.ogg
|sound4=Wither skeleton step4.ogg
|source=record
|description=When a wither skeleton skull is played using a note block<wbr>{{Upcoming|BE 1.20.40}}<wbr><ref group=sound name=skeletoncreeper/>
|id=note.witherskeleton
|pitch=0.84 <ref group=sound name=pitch/>}}
{{Sound table
|sound=Piglin angry1.ogg
|sound2=Piglin angry2.ogg
|sound3=Piglin angry3.ogg
|sound4=Piglin angry4.ogg
|source=record
|description=When a piglin head is played using a note block<wbr><ref group=sound>{{Bug|MCPE-164710}}</ref>
|id=note.piglin
|pitch=0.84 <ref group=sound name=pitch/>}}
{{Sound table
|sound=Equip generic1.ogg
|sound2=Equip generic2.ogg
|sound3=Equip generic3.ogg
|sound4=Equip generic4.ogg
|sound5=Equip generic5.ogg
|sound6=Equip generic6.ogg
|source=player
|description=When a carved pumpkin is equipped
|id=armor.equip_generic
|volume=1.0
|pitch=1.0
|foot=1}}
==Data values==
===ID===
{{edition|java}}:
{{ID table
|edition=java
|showforms=y
|generatetranslationkeys=y
|displayname=Skeleton Skull
|spritetype=block
|nameid=skeleton_skull}}
{{ID table
|displayname=Wither Skeleton Skull
|spritetype=block
|nameid=wither_skeleton_skull}}
{{ID table
|displayname=Zombie Head
|spritetype=block
|nameid=zombie_head}}
{{ID table
|displayname=Player Head
|spritetype=block
|nameid=player_head}}
{{ID table
|displayname=Creeper Head
|spritetype=block
|nameid=creeper_head}}
{{ID table
|displayname=Dragon Head
|spritetype=block
|nameid=dragon_head}}
{{ID table
|displayname=Piglin Head
|spritetype=block
|nameid=piglin_head}}
{{ID table
|displayname=Skeleton Wall Skull
|spritetype=block
|nameid=skeleton_wall_skull
|form=block}}
{{ID table
|displayname=Wither Skeleton Wall Skull
|spritetype=block
|nameid=wither_skeleton_wall_skull
|form=block}}
{{ID table
|displayname=Zombie Wall Head
|spritetype=block
|nameid=zombie_wall_head
|form=block}}
{{ID table
|displayname=Player Wall Head
|spritetype=block
|nameid=player_wall_head
|form=block}}
{{ID table
|displayname=Creeper Wall Head
|spritetype=block
|nameid=creeper_wall_head
|form=block}}
{{ID table
|displayname=Dragon Wall Head
|spritetype=block
|nameid=dragon_wall_head
|form=block}}
{{ID table
|displayname=Piglin Wall Head
|spritetype=block
|nameid=piglin_wall_head
|foot=1}}
{{ID table
|displayname=Block entity
|spritename=heads
|spritetype=block
|nameid=skull
|foot=1}}
{{edition|bedrock}}:
{{ID table
|edition=bedrock
|firstcolumnname=Head
|shownumericids=y
|showforms=y
|generatetranslationkeys=y
|displayname=Block
|spritename=skulls
|spritetype=block
|nameid=skull
|id=144
|form=block
|itemform=item.skull
|translationkey=-}}
{{ID table
|displayname=Item
|spritename=skulls
|spritetype=item
|nameid=skull
|id=516
|form=item
|translationkey=item.skull.skeleton.name, item.skull.wither.name, item.skull.zombie.name, item.skull.char.name, item.skull.creeper.name, item.skull.dragon.name, item.skull.piglin.name
|foot=1}}
{{ID table
|notnamespaced=y
|displayname=Block entity
|spritename=heads
|spritetype=block
|nameid=Skull
|foot=1}}
===Metadata===
{{see also|Data values}}
{{IN|bedrock}}, mob heads use the following data values:
{{/DV}}
===Item data===
{{el|java}}:
{{main|Player.dat format}}
Player heads use item NBT to save the owner.
<div class="treeview">
* {{nbt|compound|tag}}: The item's '''tag''' tag.
{{:Player.dat_format/Player Heads}}
</div>
{{el|bedrock}}:
:{{IN|bedrock}}, heads have no additional item tag.
:See [[Bedrock Edition level format/Item format]].
===Block states===
{{see also|Block states}}
{{/BS}}
===Block data===
A mob head has a block entity associated with it that holds additional data about the block.
{{el|java}}:
{{see also|Block entity format}}
{{/BE}}
{{el|bedrock}}:
:See [[Bedrock Edition level format/Block entity format]].
== Achievements==
{{load achievements|Camouflage;The Beginning?}}
==Advancements==
{{load advancements|Spooky Scary Skeleton;Withering Heights}}
==History==
''For a more in-depth breakdown of changes to textures and models, including a set of renders for each state combination, see [[/Asset history]]''
{{History|java}}
{{History||August 28, 2012|link={{tweet|jeb|240383066831462401}}|[[Jeb]] released images of the skeleton head, hinting of more types to come.}}
{{History||PAX 2012|link={{ytl|IqciEbjYd-I|t=03m21s}}|At [[wikipedia:PAX (event)|PAX]], [[Dinnerbone]] revealed that there would be rare [[drops]] of these [[mob]]s.<ref>http://www.twitch.tv/pax2/b/330745811 (at 3:59:00)</ref>}}
{{History||1.4.2|snap=12w36a|[[File:Skeleton Skull (item) JE1.png|32px]] [[File:Wither Skeleton Skull (item) JE1.png|32px]] [[File:Zombie Head (item) JE1.png|32px]] [[File:Player Head (item) JE1.png|32px]] [[File:Creeper Head (item) JE1.png|32px]] Added skeleton, wither skeleton, zombie, player, and creeper heads.
|Wither skeleton skulls are rarely [[drops|dropped]] by the [[wither skeleton]] upon [[death]] (2.5% chance), while the other four are obtainable only from the [[creative]] [[inventory]].}}
{{History|||snap=12w37a|[[File:Skeleton Skull (item) JE1 BE1.png|32px]] [[File:Wither Skeleton Skull (item) JE1 BE1.png|32px]] [[File:Zombie Head (item) JE1 BE1.png|32px]] [[File:Player Head (item) JE1 BE1.png|32px]] [[File:Creeper Head (item) JE1 BE1.png|32px]] Changed item textures.
|Added as a hidden and disabled feature, player heads can now have the [[skin]] of a specific [[player]]. A line in the language file implies that there either used to be, or in a future update, the possibility of obtaining a specific player's head.<ref name="en_US 12w21">Snapshot 12w37a {{cd|lang/en_US.lang}}: <code>item.skull.player.name=%s's Head</code></ref>
|Player heads do not [[drops|drop]] in vanilla, but mapmakers/modders/etc. can make them by adding an [[NBT format|NBT]] string tag <code>{"SkullOwner":"''player_name''"}</code> on the skull [[item]]s.<ref name="playerheads">{{reddit|zxn7u/its_apparently_my_cakeday_so_lets_cash_in_this}}</ref>}}
{{History||November 7, 2012|link=https://www.reddit.com/r/minecraftsuggestions/comments/12qtbz/killing_other_players_with_a_sword_should_drop/c6xqpym/?context=3|[[Jeb]] states that the official opinion is that "[dropping] player heads [on player kills] are a bit too gory for [[Minecraft]], so it's better suited for a plugin or mod."}}
{{History||1.4.6|snap=12w49a|Any kind of [[mob]] head can now be used to [[crafting|craft]] a [[firework star]] with [[creeper]]-face effect.}}
{{History||1.7.2|snap=13w36a|Custom heads can now be obtained without third party programs via {{cmd|give}}.}}
{{History||1.8|snap=14w03a|Player heads now show the [[skin]]'s hat layer (this also works when a [[mob]]/player wears the head).}}
{{History|||snap=14w29a|Heads now display a cracking animation.}}
{{History|||snap=14w30a|[[File:Skeleton Skull (item) JE2.png|32px]] [[File:Wither Skeleton Skull (item) JE2.png|32px]] [[File:Zombie Head (item) JE2.png|32px]] [[File:Player Head (item) JE2.png|32px]] [[File:Creeper Head (item) JE2.png|32px]] Player and mob heads in [[inventory|inventories]] and held by mobs/players now display as [[block]]s.
|Skulls worn by [[mob]]s and [[player]]s are now displayed on the armor layer. Previously, the skull replaced the mob/player's head texture; the hat layer appeared over the skull.
|Skeleton, zombie, and creeper heads are now available in [[survival]]. The player can obtain them by killing the appropriate mob with a charged [[creeper]].
|Creeper heads and wither skeleton skulls are now used in [[crafting]] specific [[banner]] patterns.}}
{{History|||snap=14w30b|A single charged creeper explosion no longer yields more than one [[mob]] head. The mob head that drops is chosen randomly.}}
{{History||1.8.4|snap=release|For security reasons, custom heads can now have textures only from [[mojang.com]] and [[minecraft.net]].}}
{{History||1.9|snap=15w31a|[[File:Dragon Head (8) JE2.png|32px]] Added dragon heads.
|Dragon heads are currently available only in [[creative]] mode.
|[[Mob]] heads now appear larger in the [[inventory]].}}
{{History|||snap=15w32a|Creeper, zombie, and skeleton heads can now be worn to reduce detection by the corresponding mobs by 50%.}}
{{History|||snap=15w32c|Dragon heads now generate on [[end ship]]s, meaning they are now obtainable in [[survival]].}}
{{History|||snap=15w33c|The disguise that is given by mob heads now reduces detection range to 37.5% of normal.}}
{{History|||snap=15w36a|The disguise that is given by mob heads now reduces detection range to 50% of normal again.}}
{{History|||snap=15w39a|[[Dispenser]]s can now equip mob heads onto [[player]]s, [[mob]]s and [[armor stand]]s.}}
{{History||1.13|snap=17w47a|The ID of heads have been split into 12; one of each available standard head, as well as a wall counterpart of each.
|<code>skeleton_skull</code>, <code>wither_skeleton_skull</code>, <code>player_head</code>, <code>zombie_head</code>, <code>creeper_head</code> and <code>dragon_head</code> are now available as [[item]]s and placed [[block]]s with a <code>rotation</code> block state of 0-15.
|<code>skeleton_wall_skull</code>, <code>wither_skeleton_wall_skull</code>, <code>player_wall_head</code>, <code>zombie_wall_head</code>, <code>creeper_wall_head</code> and <code>dragon_wall_head</code> are available only as placed blocks with a <code>facing</code> block state of north, south, east or west.
|Prior to [[1.13/Flattening|''The Flattening'']], this [[block]]'s numeral ID was 144, and the [[item]]'s 397.}}
{{History||1.19|snap=Deep Dark Experimental Snapshot 1|Skeleton skulls now generate as part of [[ancient cities]].}}
{{History||November 14, 2022|link=https://www.minecraft.net/en-us/article/playable-mob-sounds-coming-minecraft-1-20|Piglin heads are announced to be added in [[Java Edition 1.20]] on the Minecraft website.}}
{{History||1.19.3|snap=22w45a|[[File:Player Head (8) JE5.png|32px]] The texture of the player head has been changed.}}
{{History||1.20<br>(Experimental)|link=1.19.3|snap=22w46a|[[File:Piglin Head (8) JE1.png|32px]] Added piglin heads behind the [[Java Edition 1.20|Update 1.20 experimental datapack]].}}
{{History||1.20<br>(Experimental)|link=1.19.4|snap=23w03a|Heads can now be placed on top of note blocks without sneaking.}}
<!--
{{History||1.19.4|snap=23w05a|Heads can now be swapped by let [[helmet]]s {{ctrl|using}} in the hotbar.<ref>{{bug|MC-216270|||Fixed}}</ref>}}
{{History||?|Head can now be swapped in [[armor stand]]s by {{ctrl|using}} them/[[helmet]]s/[[carved pumpkin]]s in the armor stand's slot.}}
RE-ADD WHEN THE WORDING IS BETTER -->
{{History||1.20|snap=23w12a|Piglin heads are now available without using the "Update 1.20" experimental datapack.}}
{{History|pocket alpha}}
{{History||v0.12.1|snap=build 1|[[File:Skeleton Skull (item) JE1 BE1.png|32px]] [[File:Wither Skeleton Skull (item) JE1 BE1.png|32px]] [[File:Zombie Head (item) JE1 BE1.png|32px]] [[File:Player Head (item) JE1 BE1.png|32px]] [[File:Creeper Head (item) JE1 BE1.png|32px]] Added skeleton, wither skeleton, zombie, player, and creeper heads.
|The skeleton, wither skeleton, zombie, player and creeper heads use the [[Java Edition|Java]] textures prior to [[Java Edition 14w30a|14w30a]].}}
{{History||v0.14.0|snap=build 1|Mob heads can now be worn as armor.}}
{{History||v0.16.0|snap=build 4|Wither skeleton skulls can now be used to spawn the [[wither]].}}
{{History|pocket}}
{{History||1.0.0|snap=alpha 0.17.0.1|[[File:Dragon Head (item) BE1.png|32px]] Added dragon heads.
|Dragon heads use a two-dimensional sprite, unlike [[Java Edition|Java]] does.}}
{{History|bedrock}}
{{History||1.2.0|snap=beta 1.2.0.2|Mob heads can now be used to craft [[firework star]]s.
|Creeper heads and wither skeleton skulls are now used to [[crafting|craft]] specific patterns on [[banner]]s.}}
{{History|||snap=beta 1.2.0.11|[[File:Skeleton Skull (item) BE2.png|32px]] [[File:Wither Skeleton Skull (item) BE2.png|32px]] [[File:Zombie Head (item) BE2.png|32px]] [[File:Head (item) BE2.png|32px]] [[File:Creeper Head (item) BE2.png|32px]] [[File:Dragon Head (item) BE2.png|32px]] [[Player]] and [[mob]] heads in [[inventory|inventories]] and when held by mobs/players now display as [[block]]s.}}
{{History||1.10.0|snap=beta 1.10.0.3|Wither skeleton skulls and creeper heads can now be used to craft [[banner pattern]]s.}}
{{History||November 14, 2022|link=https://www.minecraft.net/en-us/article/playable-mob-sounds-coming-minecraft-1-20|Piglin heads are announced to be added in [[Bedrock Edition 1.20.0]] on the Minecraft website.}}
{{History||Next Major Update<br>(Experimental)|link=1.19.60|snap=beta 1.19.60.20|[[File:Piglin Head (item) BE1.png|32px]] Added piglin heads behind the "[[Bedrock Edition 1.20.0|Next Major Update]]" [[experimental]] toggle.}}
{{History|||snap=beta 1.19.60.25|Heads can now be placed on top of note blocks without sneaking.}}
{{History||1.20.0|snap=beta 1.20.0.21|Piglin heads are now available without using the "Next Major Update" experimental toggle.}}
{{History||1.20.40|snap=beta 1.20.40.20|Wither skeleton skulls now make their respective step sounds when played by a note block.}}
{{History|console}}
{{History||xbox=TU12|xbone=CU1|ps=1.0|wiiu=Patch 1|switch=1.0.1|[[File:Skeleton Skull (item) JE1 BE1.png|32px]] [[File:Wither Skeleton Skull (item) JE1 BE1.png|32px]] [[File:Zombie Head (item) JE1 BE1.png|32px]] [[File:Player Head (item) JE1 BE1.png|32px]] [[File:Creeper Head (item) JE1 BE1.png|32px]] Added skeleton, wither skeleton, zombie, player, and creeper heads to the [[creative inventory]].
|Wither skeleton skulls currently do not have a use.}}
{{History||xbox=TU19|xbone=CU7|ps=1.12|Wither skeleton skulls can now be obtained by killing [[wither skeleton]]s.
|Wither skeleton skulls can now be used to build the [[wither]].}}
{{History||xbox=TU31|xbone=CU19|ps=1.22|wiiu=Patch 3|Skeleton, zombie, and creeper heads are now available in [[survival]]. The [[player]] can obtain them by killing the appropriate [[mob]] with a charged [[creeper]].}}
{{History||xbox=TU46|xbone=CU36|ps=1.38|wiiu=Patch 15|[[File:Dragon Head (item) JE1.png|32px]] Added dragon heads.}}
{{History|new 3ds}}
{{History||0.1.0|[[File:Skeleton Skull (item) JE1 BE1.png|32px]] [[File:Wither Skeleton Skull (item) JE1 BE1.png|32px]] [[File:Zombie Head (item) JE1 BE1.png|32px]] [[File:Player Head (item) JE1 BE1.png|32px]] [[File:Creeper Head (item) JE1 BE1.png|32px]] Added skeleton, wither skeleton, zombie, player, and creeper heads.}}
{{History||1.7.10|[[File:Dragon Head (item) BE1.png|32px]] Added dragon heads.}}
{{History|foot}}
===Skull "item"===
{{:Technical blocks/Skull}}
==Issues==
{{issue list}}
== Trivia==
* Despite there being a default Steve head, heads for the other protagonist skins cannot be obtained without using custom names.
*{{IN|be}}, the skull variant for the item is stored under the {{cd|damage}} component, normally used for items with [[durability]].
*The head item's model when wore on a player is slightly larger than its placed block counterpart in the world, which in turn is also slightly larger than the actual player's head. Therefore, a player who wears their own head appears with a larger head.
==Gallery==
===Renders===
<gallery>
Steve wearing Skeleton Skull.png|
Steve wearing Wither Skeleton Skull.png|
Steve wearing Creeper Head.png|
Steve wearing Zombie Head.png|
Steve wearing Dragon Head.png|
Alex wearing Skeleton Skull.png|
Alex wearing Wither Skeleton Skull.png|
Alex wearing Creeper Head.png|
Alex wearing Zombie Head.png|
Alex wearing Dragon Head.png|
Dragon Head.gif|An animation of the dragon head when redstone power is supplied.
</gallery>
===Screenshots===
<gallery>
All The Heads.png|All of the heads.
Headsrotation.png|Heads oriented in different directions.
HeadsOnAFence.png|Heads are the same scale as [[cobblestone wall]] posts.
Playerheads.png|A picture of player heads, including some Mojang characters.
EndShipBow.png|A dragon head found at the bow of an end ship.
</gallery>
====Development====
<gallery>
1st image Mob Head.png|First screenshot released of heads.
Minecart with chest and head thing.png|Notch's head in a [[minecart with chest]].
PauseUnpause's Head 1.png|First image of held heads rendering as blocks.
PauseUnpause's Head 2.png|Second image of held heads rendering as blocks.
Pocket Edition Heads.jpg|First image of a head being worn in bedrock edition.
1.16 Dev failed head holding.jpg|First attempt to fix {{bug|MC-91869}} by [[Xilefian]].
1.16 Dev failed head holding 2.jpg|Second attempt.
</gallery>
===In other media===
<gallery>
Efe Looking at Makena Napping on a Note Block.jpg|[[Efe]] looking at [[Makena]] napping on a Note block
Efe Placing a Zombie Head on a Note Block.jpg|Efe placing a zombie head sneakily on the note block.
Makena Waking up Startled by the Zombie Noise.jpg|Makena waking up startled at the sound of zombies being played on the note block.
File:Piglin Head Animation.jpg|[[Sunny]] using a piglin head to make noise in a [[Crimson Forest]].<ref>https://www.instagram.com/p/Ct7CfOBplrG/</ref>
</gallery>
==References==
{{reflist}}
{{blocks|Utility}}
{{items}}
[[Category:Utility blocks]]
[[Category:Manufactured blocks]]
[[Category:Generated structure blocks]]
[[Category:Block entities]]
[[Category:Non-solid blocks]]
[[cs:Hlava]]
[[de:Kopf]]
[[es:Cabeza]]
[[fr:Tête]]
[[hu:Mob fejek]]
[[it:Testa di creatura]]
[[ja:Mobの頭]]
[[ko:몹 머리]]
[[nl:Wezenhoofd]]
[[pl:Głowa]]
[[pt:Cabeça de criatura]]
[[ru:Голова]]
[[uk:Голова]]
[[zh:生物头颅]]</li></ul></nowiki> | 13w24a | Texture packs are no longer supported and are replaced with resource packs. | |||
| Legacy Console Edition | |||||
| TU12 | CU1 | 1.0 | Patch 1 | 1.0.1 | Added support for texture packs. |
Trivia
- The selected texture pack is saved to the options.txt file in the .minecraft folder, so the "skin:" value can be manually changed to the name of the
.zip. This can be useful if the texturepack crashes the main menu, thus making impossible to change the pack using the texture selection screen. Simply erase the pack name and it is reset to default. - Resource packs that only add textures are called "texture packs" in Minecraft Marketplace.[BE only]
- If the player's head is inside of a block while having a texture pack enabled, the visible block texture uses the one from the default texture pack.
See also
| Help | |||||||||||||||||||
|---|---|---|---|---|---|---|---|---|---|---|---|---|---|---|---|---|---|---|---|
| Menu screens |
| ||||||||||||||||||
| Game customization |
| ||||||||||||||||||
| Editions |
| ||||||||||||||||||
| Miscellaneous | |||||||||||||||||||