If this move affects many pages or may potentially be controversial, do not move the page until a consensus is reached. [discuss]
For the advanced redstone circuitry, see Redstone circuits.
The redstone repeater has three main functions: acting as a repeater, a diode, and a delayer. The block repeats signals it receives like a network bridge, so that using two not-gates every 15 blocks will no longer be necessary. Signals are also accepted only in some directions, allowing the block to function much like a diode in an electrical circuit. It also delays the signal by 1-4 ticks (selectable) so that long timing circuits of inverters will not be required for timed mechanisms any longer. Existing repeaters/delayers will still work.[1]
Crafting
| Ingredients | Input » Output |
|---|---|
| Redstone dust, 2 Redstone torches, 3 Stone |
Template:Grid/Crafting Table |
Uses
The repeater has multiple uses due to its complex nature. Each possible function is described below. These functions may be exploited in tandem to reduce the required number of repeaters in a circuit. As of the Beta 1.7, redstone wire will automatically attach to repeaters.
Repeater
The primary function of the repeater is to "refresh" the redstone signal passing through, allowing it to travel another 16 blocks. Previously this could only be accomplished by using one/two NOT gates.
As Wire/Diode
The repeater only accepts input from its "back" (the side closest to you when you place it) and only sends output to its "front" (the opposite side). It does not interact with any of its other neighbouring spaces. This makes it quite useful in tightly packed circuits.
Any of the following can serve as the input to a repeater when placed directly behind it:
- A piece of redstone wire, which will automatically attach itself to the repeater (as of 1.7)
- A redstone torch
- A block charged by wire or any other method
- Any type of switch (lever, button, pressure plate, etc.)
- Another repeater pointing in the same direction
Any of the following will receive output from a repeater when placed directly in front of it:
- Any piece of redstone wire, regardless of orientation
- Any type of block that can be charged (which will then propagate the charge in the same way as when placed over a torch)
- Any device that can be controlled by redstone (door, minecart track, note block, etc.)
- Another repeater pointing in the same direction
Notable repeater behavior includes:
- A block receiving output directly from a repeater will then propagate the charge (in the same way as when placed over a redstone torch)
- A single piece of redstone wire receiving direct output from a repeater can bypass the 'straight-up-to-the-block' rule. By default it will appear cross-shaped and can power up to three separate blocks.
As of the Beta 1.3 release, a device placed directly in front of a repeater exhibits some strange behavior. If the input to the repeater is a redstone wire or torch then the effect on the device seems to be inverted, and if the input is anything else then the device isn't affected by the repeater at all. When the repeater and device are connected by wire, everything works as expected.
Another bug in the Beta 1.3 release is that repeaters fail to update their state when their input is a block being charged by a redstone wire and the piece of wire right next to the block is destroyed. If the wire is powering the repeater when it is destroyed then the repeater will stay on until some other event triggers an update for it, like placing a block next to it.
As Clock/Delay
By right-clicking on the repeater, you can set its delay from one to four tenths of a second. Longer delays can be made with multiple repeaters; for example, two repeaters set to '4' and one to '2' will give a 1 second delay.
Repeaters greatly simplify the construction of delay lines and provide far more granular timing than chains of redstone torches. For example, a repeater with a long line of redstone for delay would blink faster than the same design with repeaters set to four every other piece of redstone, allowing for more compact slowed down clocks.
Previously, the simplest possible clock was a "5-clock" made by chaining five redstone torches (which actually has a period of 10 ticks—5 on and 5 off). This same clock can now be implemented with only one torch and one repeater, connected in a loop, with the repeater delay set to 4 (the highest setting). Setting the delay to 3 yields a 4-clock, which requires some fancy wiring to build from torches alone.
With a delay lower than 3, the torch in this circuit burns out. However, repeaters don't burn out the way torches do. If two repeaters with the same delay are connected to each other in a loop and a short pulse is introduced externally, the pulse will bounce back and forth between the repeaters indefinitely. With the delay set to 1, this circuit has a period of 2 ticks, making it a 1-clock. Unfortunately, the bouncing pulse does not survive a reload of the world, so some circuit to automatically "kickstart" it is required. Some methods for doing this can be seen here.(You can use an inverter 1-clock to reset it, which is simply 3 redstone wires in a loop connected to a block with a redstone torch (Inverter). See the picture directly to the right, take out the repeater and move the 3 redstone to the left 1 block, placing one on top of the inverter.) It is also possible to create a faster clock by running both sides of the 1-clock through repeaters and combining the outputs.
An alternative (and cheaper) design to get a delay of 4–11 seconds is possible by using a dispenser to drop a block in a water current, which ends on a wooden pressure plate and triggers a redstone signal. The drawback is that after every use, a manual reset is necessary. An example video can be seen here.
Songs/Note Block usage
The Redstone repeater is often used in combination with note blocks. In the making of a song, several repeaters are used to create rhythm in a song.
Propagating Charge Downward
Repeaters can be used to propagate charge downward. This can be used to completely 'hide' redstone circuits below 1 risen block with a button or switch. Previously, you would need at least 2 risen blocks to hide the tunneling redstone wire. You can also create a 1 width (3-17 length) column to propagate charge downward. Previously, the smallest width column that could be used was a 2x2 column.
Propagating charge downwards- the holes have redstone in them.
It is much easier to learn this technique by starting at the bottom and building upwards. Once you understand, you can also easily build it downwards. If you are building a long 1x3 column and are unable to move into adjacent blocks outside the column, you MUST start at the bottom.
Place a piece of redstone wire on the lowest point you want charge. Place a block beside the wire. Place a repeater on that block, pointing towards the wire. Then, place a block above the redstone wire. The repeater should be pointing directly into the block. This will propagate charge from the repeater, into the block, downwards into the redstone wire. When the repeater is powered, the block behaves as if it were a redstone torch, powering all adjacent blocks above and below, except for the repeater itself.
To lengthen the chain; place a block behind the tallest repeater. Place redstone wire on that block. Place a block above that redstone wire. Place a block above the tallest repeater. And place another repeater on that block, pointing in the opposite direction. Repeat if you require more height.
You will end up with a 1x3 column of blocks, with repeaters "stacked" in the middle with alternating directions. This column will delay the circuit 1 tick for every (length - 1) blocks downward, 1 tick per 2 blocks downward at the smallest length (3). You can use either a 2x2 column or a 1x17 column for the smallest delay per depth traveled, 1 tick per 16 blocks.
Delay line memory
With simple and accurate delay circuits comes the potential for delay line memory. Using repeaters, such memory can, in fact, be built on a two dimensional plane, like the 900 bit grid on the right, with a density of 1 bit per square, far denser than any memory cell that can be built with torches (around 9X as dense (not including the amount of room required for input/output/reset wiring)). There can even be multiple layers, similar to a parking deck, where the last repeater on the grid winds up a short spiral staircase to the next level, where the grid goes back. This can be repeated for as many levels as needed, as demonstrated by the 3280 bit grid shown on the bottom right.
The only downside is that it is harder to see the data stream, and therefore it is harder to know when to safely inject data into the memory stream. If the input and output sources are given many repeaters to a remote, possible even underground location to get the grid out of the way, the memory size is limited only by the amount of free space. To reset the memory grid, simply remove one repeater, or preferably, one redstone anywhere on the line and wait for the data to get flushed out, alternatively you could have a conjoining redstone line extend two blocks downwards and link a sticky piston so that when it is activated; it cuts the circuit by pushing a block in front of the redstone making its journey downwards. Since this can be done from a great distance, it's far more affective than simply removing a redstone piece. If the grid is in a remote location, then at the loop around of the remote grid, it could form a detour, using repeaters as necessary, to have a piece of redstone accessible, then have it go back into the main grid. It should be noted that in larger grids, such as the 900 bit one shown, distant repeaters may not update their graphics, making them appear frozen, but the data stream will still get carried on anyways, regardless of the graphics.
Some possible uses of delay line memory include knowing how many times a person walked through a door, or which way (useful for counting players that raided your base in SMP) the intruder went, by having the inside inject a 0b101111101 and the outside pressure plate inject a 0b101000101 data stream into the memory (101 tags indicate that it is a door sequence, or even which door it is, and the 111 or 000 says which way they went). Using this method, if one sees a 0b101000101.......101000101.....101111101.................//................0b101000101.......101000101.....101111101........., he or she can know that one intruder is still in the base. However this type of system may run into overwriting issues.
Another use of these circuits is for strobe light effects. One can imagine lining the edges of their roof and the perimeter of their house/castle and looping the output underground back to the beginning, and adding a temporary lever to use to input a random strobe sequence until the strand of light is full of a pattern that one likes, then one removes the lever and watches the strobe light running around their house.
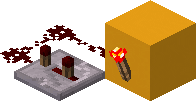
- 2011-10-12 20.37.57.png
Different ways to power a repeater
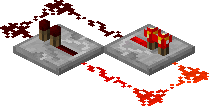
- 2011-10-12 20.40.07.png
By chaining repeaters with blocks instead of wire, the middle of a delay line can be tapped while keeping it fairly compact.

Repeaters allow redstone wires to cross in a more compact way

A simple repeater-based 4/5-clock (animated)

A 1-clock implemented as a repeater feedback loop (animated)
- 1clockstarter.PNG
A diagram of a 1-clock with starter
- 900-bit delay line memory grid.jpg
A 900-bit delay line memory grid.
- Memory Grid.png
A 3280-bit five level delay line memory grid.

Trivia
- It was originally implemented by Jeb.[2] Originally the 4 possible settings were "1, 2, 5 and 7",[3] but this was changed to "1, 2, 3, and 4" for simplicity's sake.[4]
- The block looks like two shortened redstone torches attached to a stone plate, that has the texture of the top of the old stone slab but with an arrow on it that denotes the direction of the current, for simulating diodes.
- Prior to beta 1.6, the particles generated when the block was destroyed looked like those of a Pumpkin.[5]
- If a Repeater is in a 2 block high space, like a tunnel, you will appear to sneak automatically as you walk over it. However, you will not sneak if the repeater is blocking the entrance of a tunnel. Your player animation does not change and you are not slowed down; you aren't actually really sneaking.
- You can link many repeaters together by placing a line of redstone on top of any block and then activating the redstone. However it will not work if you do not place the redstone on a block (it will work at all cases in beta 1.7). As seen/used in this video Redstone arrows floor
- If you save your world then come back to it any chains of redstone repeaters stay in the state of which was logged off. They do not change until a neighboring block is updated. Some ways to fix it can be seen here.
- If you change the time in a SMP server using an ops command, the repeaters will lock in the state that they were in when the time changed, and will freeze in the state unless they are moved to a different block. The block they are on will always freeze a repeater placed there following this.
- If you set the repeater to delay 4, it can stop a pulse that would burn out a redstone torch.
- In the coding, it is referenced as "diode".
- The reason why the torches look shorter is because the torches are actually off set from its y-axis.[6]
- Repeaters can be used as one-way doors by placing the repeater under an arch.
- In Beta 1.7 and after, redstone will now automatically face towards redstone repeaters like any other redstone mechanism. This was not the case in Beta 1.6.6 and earlier.
- Rather than using a shortened texture for the two shortened redstone torches, two regular sized redstone torches are used and the bottoms of them are placed in the block below. This can be seen by looking at a repeater through a missing chunk
- When hitting the non-powered repeater with arrow, and then powering repeater the arrow shall make the sound of arrow stuck in a block.
References
- ↑ http://twitter.com/jeb_/status/33885928657264640
- ↑ http://twitter.com/jeb_/status/33875639920492544
- ↑ http://twitter.com/jeb_/status/33888465502339073
- ↑ http://www.reddit.com/r/Minecraft/comments/fmdtp/teammojang_redstone_repeater_video/c1gzrn6
- ↑ http://notch.tumblr.com/post/5775170768/the-changelist-for-1-6
- ↑ http://i54.tinypic.com/1orvpe.png