No edit summary Tag: Visual edit |
BDJP007301 (talk | contribs) m (Revert edits by 173.18.199.154 (talk)) Tag: Rollback |
||
| Line 2: | Line 2: | ||
'''Smelting''' is a method of obtaining refined goods from raw materials by heating in a [[furnace]], [[blast furnace]], or [[smoker]]. For example, raw iron can be smelted to produce iron ingots using coal as fuel. Like [[crafting]], smelting uses recipes to determine what item is produced, but its recipes are simpler. Smelting also yields [[experience]]. |
'''Smelting''' is a method of obtaining refined goods from raw materials by heating in a [[furnace]], [[blast furnace]], or [[smoker]]. For example, raw iron can be smelted to produce iron ingots using coal as fuel. Like [[crafting]], smelting uses recipes to determine what item is produced, but its recipes are simpler. Smelting also yields [[experience]]. |
||
| − | == |
+ | == Usage and mechanics == |
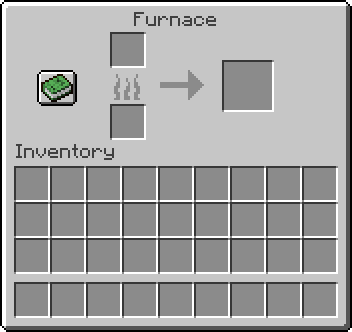
{{FakeImage|{{Furnace}}|The smelting interface.}} |
{{FakeImage|{{Furnace}}|The smelting interface.}} |
||
The [[furnace]], [[blast furnace]], and [[smoker]] share a similar interface: At the upper left is a slot for smeltable item input, below that is a slot for [[fuel]] input, and on the right is a slot where output items accumulate and can be removed by the player. Flames above the fuel slot act as a gauge showing the gradual consumption of the current fuel item, and an arrow in the middle gradually fills to show the progress of smelting the current input item. |
The [[furnace]], [[blast furnace]], and [[smoker]] share a similar interface: At the upper left is a slot for smeltable item input, below that is a slot for [[fuel]] input, and on the right is a slot where output items accumulate and can be removed by the player. Flames above the fuel slot act as a gauge showing the gradual consumption of the current fuel item, and an arrow in the middle gradually fills to show the progress of smelting the current input item. |
||
Revision as of 15:53, 5 February 2022
The furnace interface. Note the form of how the spaces are displayed.
Smelting is a method of obtaining refined goods from raw materials by heating in a furnace, blast furnace, or smoker. For example, raw iron can be smelted to produce iron ingots using coal as fuel. Like crafting, smelting uses recipes to determine what item is produced, but its recipes are simpler. Smelting also yields experience.
Usage and mechanics
The furnace, blast furnace, and smoker share a similar interface: At the upper left is a slot for smeltable item input, below that is a slot for fuel input, and on the right is a slot where output items accumulate and can be removed by the player. Flames above the fuel slot act as a gauge showing the gradual consumption of the current fuel item, and an arrow in the middle gradually fills to show the progress of smelting the current input item.
To smelt, an input item and fuel must be placed into the input and fuel slots, respectively. The furnace then begins to smelt and will continue even after the player closes the interface. (The player can still tell when a furnace is working by its block texture showing flames and fire particle effects appearing.)
The furnace burns one fuel item at a time, with the fuel gauge indicating how much of that item's burn time remains. As each fuel item is fully consumed, another one is taken from the fuel slot and the gauge starts over.
Smeltable input items are also processed one at a time, but are not removed from the input slot while smelting is in progress. The arrow indicates how much of the smelting process has completed. When the arrow is full, the input item is removed from the input stack and an output item is added to the output stack. Smelting of the next input item then begins immediately.
Smelting stops under any of four conditions:
- When the furnace runs out of smeltable items: That is, the input slot becomes empty.
- The furnace runs out of fuel: The fuel input slot is empty and the current fuel item is fully consumed (that is, the fuel gauge becomes empty).
- The output slot becomes full: Either the slot has full stack of the output, or the output contains the wrong output item for the current input item. (For example, if the output contains iron ingots but the input contains raw gold.) In this case, smelting (but not fuel consumption) is paused until the output slot becomes available (usually because items were removed by either a player or a hopper). If a fuel item burns out in this condition, a new one will not be used until the output slot is again available.
- The furnace is broken: This will drop the contents of all the slots, any accumulated experience, and the furnace itself. The currently-burning fuel item will be lost, since it is removed from the fuel slot before burning begins. The furnace item may not be dropped if it was destroyed by an explosion.
If smelting stops while a fuel item is still burning (a normal occurrence), the furnace will continue to run visually but no more input items will be processed. If the fuel is exhausted (and the fuel gauge is empty) when an item is partly smelted, the smelting progress is undone at double speed and the item remains in the input stack.
Smelting is suspended if players move far enough away from the furnace (including going to another dimension) that simulation stops in the chunk the furnace is in. It will resume when a player returns.
If the player sleeps in a bed while a furnace is smelting items, the furnace's progress remains the same as if the bed had not been used and no additional time had passed. This is because when a player sleeps in a bed, no time actually passes; the game simply sets the time of day to morning.
The furnace keeps track of experience for each item as smelting is completed for it, accumulating it in a hidden counter. It remembers the total earned experience even if a hopper is used to remove the items from the output slot. This earned experience is awarded to the next player who uses the interface to remove items manually, after which the counter is reset. (If the player takes some of the output but leaves some in the slot, the experience corresponding to those items is retained by the furnace and not awarded to the player.)
Recipes
All smelting recipes can be used in the furnace, but only subsets are available in the blast furnace and smoker.
Foods
All food recipes can be used in a furnace or smoker. Food can alternatively be cooked on a campfire, which doesn't require any fuel and is faster (when cooking 4 at a time) than a furnace, but this doesn't award any experience and is slower than a smoker.
| Product | Ingredient | Exp | Description |
|---|---|---|---|
Cooked Porkchop |
Raw Porkchop |
0.35 | Fills 8 ( |
Steak |
Raw Beef |
0.35 | Fills 8 ( |
Cooked Chicken |
Raw Chicken |
0.35 | Fills 6 ( |
Cooked Cod |
Raw Cod |
0.35 | Fills 5 ( |
Cooked Salmon |
Raw Salmon |
0.35 | Fills 6 ( |
Baked Potato |
Potato |
0.35 | Fills 5 ( |
Cooked Mutton |
Raw Mutton |
0.35 | Fills 6 ( |
Cooked Rabbit |
Raw Rabbit |
0.35 | Fills 5 ( |
Dried Kelp |
Kelp |
0.1 | Fills 1 ( |
Ores
All ore recipes can be used in a furnace or blast furnace.
The following additional ores can be smelted, but it's more efficient to mine them with an appropriate pickaxe. Mining them saves fuel and in most cases yields more product and experience, especially if the pickaxe has a Fortune enchantment. Smelting them, though, allows obtaining them from an automatic device. The ore blocks themselves can be obtained only via the Silk Touch enchantment.
| Product | Ingredient | Exp | Description |
|---|---|---|---|
Copper Ingot |
Copper Ore |
0.7 | Used to craft various items. |
Diamond |
Diamond Ore |
1 | Used to craft various items, enchanting tables, jukeboxes and diamond blocks. When normally mined drops 1 diamond and 3–7. |
Gold Ingot |
Gold Ore |
1 | Used to craft various items, and as a currency for bartering with piglins. |
Iron Ingot |
Iron Ore |
0.7 | Used to craft various items. |
Lapis Lazuli |
Lapis Lazuli Ore |
0.2 | Used for enchanting and for crafting blue dyes and lapis lazuli blocks. When normally mined drops 4–8 lapis lazuli and 2–5. |
Redstone Dust |
Redstone Ore |
0.3 | Used to craft various items and redstone blocks, brewing, or placed as redstone wire. When normally mined drops 4–5 redstone and 1–5. |
Coal |
Coal Ore |
0.1 | Used as a fuel, and to craft torches, campfires and coal blocks. When normally mined drops 1 coal and 0–2. |
Emerald |
Emerald Ore |
1 | Used for trading, and to craft emerald blocks. When normally mined drops 1 emerald and 3–7. |
Nether Quartz |
Nether Quartz Ore |
0.2 | Used to craft various items and quartz blocks. When normally mined drops 1 nether quartz and 2–5. |
Furnace-only
These recipes are exclusive to the furnace.
| Product | Ingredient | Exp | Description |
|---|---|---|---|
Glass |
0.1 | Used to make transparent structures. Also used to craft glass panes, glass bottles, stained glass, end crystals, daylight detectors, and beacons. | |
Stone |
Cobblestone |
0.1 | Used as a building material. Also used for crafting stone pressure plates, stone buttons, stone bricks, grindstones, stonecutters, redstone repeaters and comparators. Can be smelted into smooth stone. |
Smooth Sandstone |
Sandstone |
0.1 | Used as a building material. Also used for crafting smooth sandstone slabs and stairs. |
Smooth Red Sandstone |
Red Sandstone |
0.1 | Used as a building material. Also used for crafting smooth red sandstone slabs and stairs. |
Smooth Stone |
Stone |
0.1 | Used as a building material. Also used for crafting smooth stone slabs, armor stands, and blast furnaces. |
Smooth Quartz |
Block of Quartz |
0.1 | Used as a building material. Also used for crafting smooth quartz slabs and stairs. |
Brick |
Clay Ball |
0.3 | Used to make bricks and flower pots. |
Nether Brick |
Netherrack |
0.1 | Used to make nether bricks, nether brick fences and red nether bricks. |
Cracked Nether Bricks |
0.1 | Decoration block. | |
Smooth Basalt |
0.1 | Decoration block. | |
Terracotta |
Clay |
0.35 | Decoration block. Also used for crafting dyed terracotta. Can be smelted into glazed terracotta. |
Cracked Stone Bricks |
Stone Bricks |
0.1 | Decoration block. |
Cracked Polished Blackstone Bricks |
Polished Blackstone Bricks |
0.1 | Decoration block. |
Deepslate |
Cobbled Deepslate |
0.1 | Decoration block. |
Cracked Deepslate Bricks |
Deepslate Bricks |
0.1 | Decoration block. |
Cracked Deepslate Tiles |
Deepslate Tiles |
0.1 | Decoration block. |
Glazed Terracotta |
Dyed Terracotta |
0.1 | Decoration block. Can be pushed by pistons but does not stick. |
Green Dye |
Cactus |
JE:1 BE:0.2 |
Used as a dye. |
Charcoal |
Log Stripped Log Wood Stripped Wood |
0.15 | Used to craft torches, soul torches, campfires and fire charges, and as fuel for smelting or for a minecart with furnace[JE only]. Input must be an Overworld log or wood, not sticks, planks, or stems. |
Popped Chorus Fruit |
Chorus Fruit |
0.1 | Used to make purpur blocks and end rods. Cannot be eaten. |
Sponge |
Wet Sponge |
0.15 | Used to soak up water. Drying a sponge allows it to be reused. If an empty bucket is in the fuel slot when smelting finishes, it becomes a water bucket. Wet sponges can also be instantly dried when placed in the Nether. |
Lime Dye |
Sea Pickle |
0.1 | Used as a dye. |
Gear
These recipes can be used in a furnace or blast furnace to recycle unneeded gear (tools, weapons, and armor).
| Product | Ingredient | Exp | Description |
|---|---|---|---|
Iron Nugget |
Tools, armor and horse armor made from iron; chainmail armor |
0.1 | Can be crafted into lanterns, chains, or iron ingots. |
Gold Nugget |
Tools, armor and horse armor made from gold |
0.1 | Can be crafted into golden carrots, glistering melons, or gold ingots. |
For fractional experience values, first multiply this value by the number of smelted items removed from the furnace, then award the player the whole-number part, and if there is a fractional part remaining, this represents the chance of an additional experience point.
- For example, when smelting 1 coal ore and removing the coal, the value is 0.1, so every ten coal you remove grants you one experience point on average.
- When smelting 5 sea pickles and removing all 5 lime dye, the value is 0.2 × 5 = 1, so this grants only 1 point.
- The fractional experience stays within the furnace when the final total is not an integer, so the leftover experience is attributed to the next round of smelting.
Fuel
There are multiple fuels that can be used to smelt items. The type of fuel that should be used depends on the number of items in question.
For larger jobs, a single lava bucket or a block of coal can smelt more items than can fit in the furnace—both input and output are limited to a stack of 64, but a block of coal smelts 80 items, and lava can smelt 100 items.
Items that can be used as fuel in all types of furnaces
| Fuel | Burning time (seconds) [note 1] |
Number of operations per fuel | Number of operations per stack (64) of fuel [note 2] |
Seconds per log [note 3] |
Seconds per bamboo [note 4] |
Amount needed to smelt a stack (64) of items | Notes |
|---|---|---|---|---|---|---|---|
| Lava Bucket | 1000 16:40 20000 ticks |
100 | 100 | None used | None used | 0.64 | If a lava bucket is used as fuel, an empty bucket remains in the fuel slot. |
| Block of Coal | 800 13:20 16000 ticks |
80 | 5120 | None used | None used | 0.8 | |
| Dried Kelp Block | 200 3:20 4000 ticks |
20 | 1280 | None used | None used | 3.2 | |
| Blaze Rod | 120 2:00 2400 ticks |
12 | 768 | None used | None used | 5 1⁄3 | |
| Coal | 80 1:20 1600 ticks |
8 | 512 | None used | None used | 8 | |
| Charcoal | 80 1:20 1600 ticks |
8 | 512 | 70 [note 5] |
None used | 8 | |
| Any Boat | 60 1200 ticks |
6 | 6 | 48 | 2 2⁄3 | 10 2⁄3 | |
| Any Boat with Chest | 60 1200 ticks |
6 | 6 | 18 6⁄13 (~18.46) |
1 1⁄39 (~1.03) |
10 2⁄3 | |
| Bamboo Mosaic | 15 300 ticks |
1.5 | 96 | None used | 3 1⁄3 | 42 2⁄3 | |
| Bamboo Mosaic Slab | 7.5 150 ticks |
0.75 | 48 | 60 | 3 1⁄3 | 85 1⁄3 | [Java Edition only] |
| 15 300 ticks [note 6] |
1.5 | 96 | 120 [note 6] |
6 2⁄3 [note 6] |
42 2⁄3 | [Bedrock Edition only] | |
| Bamboo Mosaic Stairs | 15 300 ticks |
1.5 | 96 | None used | 3 1⁄3 | 42 2⁄3 | |
| Bee Nest | 15 300 ticks |
1.5 | 96 | None used | None used | 42 2⁄3 | [Bedrock Edition only] |
| Beehive | 15 300 ticks |
1.5 | 96 | 10 | 5⁄9 (0.5) |
42 2⁄3 | [Bedrock Edition only] |
| Chiseled Bookshelf | 15 300 ticks |
1.5 | 96 | 2 13⁄16 (2.8125) |
4⁄9 (0.4) |
42 2⁄3 | |
| Block of Bamboo or Block of Stripped Bamboo | 15 300 ticks |
1.5 | 96 | None used | 1 2⁄3 | 42 2⁄3 | [Java Edition only] |
| Overworld Log or Stripped Log | 15 300 ticks |
1.5 | 96 | 15 | None used | 42 2⁄3 | |
| Overworld Wood or Stripped Wood | 15 300 ticks |
1.5 | 96 | 11.25 | None used | 42 2⁄3 | |
| Overworld Planks | 15 300 ticks |
1.5 | 96 | 60 | 3 1⁄3 | 42 2⁄3 | |
| Overworld Wooden Slab | 7.5 150 ticks |
0.75 | 48 | 60 | 3 1⁄3 | 85 1⁄3 | [Java Edition only] |
| 15 300 ticks [note 6] |
1.5 | 96 | 120 [note 6] |
6 2⁄3 [note 6] |
42 2⁄3 | [Bedrock Edition only] | |
| Overworld Wooden Stairs | 15 300 ticks |
1.5 | 96 | 40 | 2 2⁄9 (2.2) |
42 2⁄3 | |
| Overworld Wooden Pressure Plate | 15 300 ticks |
1.5 | 96 | 30 | 1 2⁄3 | 42 2⁄3 | |
| Overworld Wooden Button | 5 100 ticks |
0.5 | 32 | 20 | 1 1⁄9 (1.1) |
128 | [Java Edition only] |
| 15 300 ticks |
1.5 | 96 | 60 | 3 1⁄3 | 42 2⁄3 | [Bedrock Edition only] | |
| Overworld Wooden Trapdoor | 15 300 ticks |
1.5 | 96 | 20 | 1 1⁄9 (1.1) |
42 2⁄3 | |
| Overworld Fence Gate | 15 300 ticks |
1.5 | 96 | 15 | 15⁄17 (~0.88) |
42 2⁄3 | |
| Overworld Wooden Fence | 15 300 ticks |
1.5 | 96 | 36 | 15⁄22 (0.681) |
42 2⁄3 | |
| Mangrove Roots | 15 300 ticks |
1.5 | 96 | None used | None used | 42 2⁄3 | [Java Edition only] |
| Ladder | 15 300 ticks |
1.5 | 96 | 51 3⁄7 (~51.43) |
3 3⁄14 (~3.21) |
42 2⁄3 | [Java Edition only] |
| Crafting Table | 15 300 ticks |
1.5 | 96 | 15 | 5⁄6 (0.83) |
42 2⁄3 | |
| Cartography Table | 15 300 ticks |
1.5 | 96 | 15 | 5⁄6 (0.83) |
42 2⁄3 | |
| Fletching Table | 15 300 ticks |
1.5 | 96 | 15 | 5⁄6 (0.83) |
42 2⁄3 | |
| Smithing Table | 15 300 ticks |
1.5 | 96 | 15 | 5⁄6 (0.83) |
42 2⁄3 | |
| Loom | 15 300 ticks |
1.5 | 96 | 30 | 1 2⁄3 | 42 2⁄3 | |
| Bookshelf | 15 300 ticks |
1.5 | 96 | 10 | 5⁄9 (0.5) |
42 2⁄3 | |
| Lectern | 15 300 ticks |
1.5 | 96 | 7.5 | 5⁄12 (0.416) |
42 2⁄3 | |
| Composter | 15 300 ticks |
1.5 | 96 | 17 1⁄7 (~17.14) |
20⁄21 (~0.95) |
42 2⁄3 | |
| Chest | 15 300 ticks |
1.5 | 96 | 7.5 | 5⁄12 (0.416) |
42 2⁄3 | |
| Trapped Chest | 15 300 ticks |
1.5 | 96 | 6 6⁄7 (~6.86) |
60⁄157 (~0.38) |
42 2⁄3 | |
| Barrel | 15 300 ticks |
1.5 | 96 | 8 4⁄7 (~8.57) |
10⁄21 (~0.48) |
42 2⁄3 | |
| Daylight Detector | 15 300 ticks |
1.5 | 96 | 40 | 2 2⁄9 (2.2) |
42 2⁄3 | |
| Jukebox | 15 300 ticks |
1.5 | 96 | 7.5 | 5⁄12 (0.416) |
42 2⁄3 | |
| Note Block | 15 300 ticks |
1.5 | 96 | 7.5 | 5⁄12 (0.416) |
42 2⁄3 | |
| Any Banner | 15 300 ticks |
1.5 | 24 | 120 | 7.5 | 42 2⁄3 | |
| Crossbow | 15 300 ticks |
1.5 | 1.5 | no|26 2⁄3 | 1 23⁄37 (1.621) |
42 2⁄3 | [Java Edition only] |
| 10 200 ticks |
1 | 1 | 17 7⁄9 (17.7) |
1 3⁄37 (1.081) |
64 | [Bedrock Edition only] | |
| Bow | 15 300 ticks |
1.5 | 1.5 | 40 | 2.5 | 42 2⁄3 | [Java Edition only] |
| 10 200 ticks |
1 | 1 | no|26 2⁄3 | 1 2⁄3 | 64 | [Bedrock Edition only] | |
| Fishing Rod | 15 300 ticks |
1.5 | 1.5 | 40 | 2.5 | 42 2⁄3 | |
| Overworld Wooden Door | 10 200 ticks |
1 | 64 | 20 | 1 1⁄9 (1.1) |
64 | |
| Overworld Sign | 10 200 ticks |
1 | 16 | 18 6⁄13 (~18.46) |
10⁄29 (~0.34) |
64 | |
| Hanging Sign | 10 200 ticks |
1 | 16 | 10 | 1 1⁄9 (1.1) |
64 | |
| Wooden Pickaxe | 10 200 ticks |
1 | 1 | 10 | 4⁄7 (~0.57) |
64 | |
| Wooden Shovel | 10 200 ticks |
1 | 1 | 20 | 1 3⁄17 (~1.18) |
64 | |
| Wooden Hoe | 10 200 ticks |
1 | 1 | 13 1⁄3 | 10⁄13 (~0.77) |
64 | |
| Wooden Axe | 10 200 ticks |
1 | 1 | 10 | 4⁄7 (~0.57) |
64 | |
| Wooden Sword | 10 200 ticks |
1 | 1 | 16 | 10⁄11 (0.90) |
64 | |
| Bowl | 5 100 ticks |
0.5 | 32 | 26 2⁄3 | 1 13⁄27 (1.481) |
128 | [Java Edition only] |
| 10 200 ticks |
1 | 64 | 53 1⁄3 | 2 26⁄27 (2.962) |
64 | [Bedrock Edition only] | |
| Any Sapling | 5 100 ticks |
0.5 | 32 | None used | None used | 128 | |
| Stick | 5 100 ticks |
0.5 | 32 | 40 | 2.5 | 128 | |
| Dead Bush | 5 100 ticks |
0.5 | 32 | None used | None used | 128 | |
| Azalea | 5 100 ticks |
0.5 | 32 | None used | None used | 128 | |
| Any Wool | 5 100 ticks |
0.5 | 32 | None used | None used | 128 | [Java Edition only] |
| Any Carpet | 3.35 67 ticks |
0.335 | 21.44 | None used | None used | 191 3⁄67 (~191.04) |
[Java Edition only] |
| Bamboo | 2.5 50 ticks |
0.25 | 16 | None used | 2.5 | 256 | |
| Scaffolding | 2.5 50 ticks |
0.25 | 16 | None used | 2.5 | 256 |
- ↑ All times given are for fuel burned in a furnace. When burned in a blast furnace or smoker, fuel is burned twice as fast but produces the same number of items.
- ↑ Items in red are not stackable, items in yellow only stack up to 16.
- ↑ Calculated as the burning time in seconds divided by the number of logs used to make one fuel when all wood ingredients are made from logs. Items in red are not made entirely of wood.
- ↑ Calculated as the burning time in seconds divided by the amount of bamboo used to make one fuel when all wood ingredient are made from bamboo. Items in red are not made entirely of bamboo.
- ↑ 80 seconds of fuel per log, but 10 seconds are needed to smelt the charcoal, so the net time is 70 seconds.
- ↑ a b c d e f Wooden slabs have the same burn time as planks due to a bug; see MCPE-94368.
Hopper automation
The smelting process can be automated with hoppers on the top and bottom of the furnace. For larger smelting jobs, a third hopper on the side of the furnace can feed in fuel and, in case of lava being used as fuel, any empty buckets come out of the bottom hopper. This automatically feeds and empties the furnace so that different materials can be smelted in the same batch with no loss.
Whenever a hopper or minecart with hopper removes items from a furnace, any experience earned from cooking or smelting the removed items is saved in the furnace and awarded to the next player who manually removes an item from the furnace's output slot. This saved experience is in addition to that earned for the manually removed item(s).
Achievements
| Icon | Achievement | In-game description | Actual requirements (if different) | Gamerscore earned | Trophy type (PS4) | |
|---|---|---|---|---|---|---|
| PS4 | Other | |||||
| Acquire Hardware | Smelt an iron ingot | Pick up an iron ingot from a furnace output. | 15G | Bronze | ||
| Delicious Fish | Catch and cook a fish! | Pick up a cooked cod after cooking it in a Furnace, Smoker, Campfire, or Soul Campfire. Doesn't work if the block used is hooked up to a hopper, as the player is not getting the item directly from the output. | 15G | Silver | ||
| Pork Chop | Cook and eat a pork chop. | — | 10G | Bronze | ||
| Renewable Energy | Smelt wood trunks using charcoal to make more charcoal. | Smelt a wooden log with charcoal as the fuel. | 10G | Bronze | ||
| Rabbit Season | Cook and Eat Rabbit Meat | — | 15G | Bronze | ||
| Dry Spell | Dry a sponge in a furnace | — | 15G | Bronze | ||
| Super Fuel | Power a Furnace with Lava | — | 20G | Bronze | ||
Advancements
| Icon | Advancement | In-game description | Parent | Actual requirements (if different) | Resource location |
|---|---|---|---|---|---|
 | Acquire Hardware | Smelt an Iron Ingot | Getting an Upgrade | Have an iron ingot in your inventory. | story/smelt_iron
|
History
| Java Edition Indev | |||||||||||||||||||||||||||||||||||
|---|---|---|---|---|---|---|---|---|---|---|---|---|---|---|---|---|---|---|---|---|---|---|---|---|---|---|---|---|---|---|---|---|---|---|---|
0.31{{Extension DPL}}<ul><li>[[Rabbit Stew|Rabbit Stew]]<br/>{{Item
| title = Rabbit Stew
| heals = {{hunger|10}}
| renewable = Yes
| stackable = No
}}
'''Rabbit stew''' is a [[food]] [[item]] that can be eaten by the [[player]].
== Obtaining ==
=== Crafting ===
{{Crafting
|shapeless=true
|B1=Cooked Rabbit
|A2=Carrot
|B2=Baked Potato
|C2=Any Mushroom
|B3=Bowl
|Output=Rabbit Stew
|type=Foodstuff
}}
=== Trading ===
{{IN|bedrock}}, novice-level Butcher villagers always offer to sell rabbit stew for one emerald as their second trade.
{{IN|java}}, novice-level Butcher villagers have a 50% chance of offering rabbit stew for one emerald.
== Usage ==
=== Food ===
To eat rabbit stew, press and hold {{control|use}} while it is selected in the hotbar. Eating one restores {{hunger|10}} [[hunger]] and 12 hunger [[Hunger#Mechanics|saturation]]. This restores more hunger than any other food type in the game except [[cake]], but has less saturation than a [[golden carrot]], a [[cooked porkchop]], or a [[steak]].
Eating rabbit stew leaves the player with an empty bowl, similar to [[mushroom stew]], [[suspicious stew]], and [[beetroot soup]].
=== Wolves ===
{{IN|bedrock}}, rabbit stew can be used to feed [[wolves]], healing them by {{hp|10|mob=1}}. However, unlike other wolf food, rabbit stew does not speed up the growth of baby wolves, and it cannot be used to breed them. It is usable only on a wolf that has less than full health.
== Sounds ==
{{Sound table/Entity/Food}}
== Data values ==
=== ID ===
{{edition|java}}:
{{ID table
|edition=java
|showforms=y
|generatetranslationkeys=y
|displayname=Rabbit Stew
|spritetype=item
|nameid=rabbit_stew
|form=item
|foot=1}}
{{edition|bedrock}}:
{{ID table
|edition=bedrock
|shownumericids=y
|showforms=y
|notshowbeitemforms=y
|generatetranslationkeys=y
|displayname=Rabbit Stew
|spritetype=item
|nameid=rabbit_stew
|id=290
|form=item
|foot=1}}
== Advancements ==
{{load advancements|Husbandry;A Balanced Diet}}
== Video ==
<div style="text-align:center">{{yt|GwCqwtydRBc}}</div>
== History ==
{{History|java}}
{{History||1.8|snap=June 30, 2014|slink={{tweet|TheMogMiner|483725253018157057}}|[[Ryan Holtz]] tweets the recipe of rabbit stew, and that it can restore hunger better than any other item other than [[golden apple]]s (which was incorrect, as golden apples restore less hunger, but a whole [[cake]] restores more).}}
{{History|||snap=14w27a|[[File:Rabbit Stew JE1 BE1.png|32px]] Added rabbit stew.}}
{{History||1.13|snap=17w47a|Prior to [[1.13/Flattening|''The Flattening'']], this [[item]]'s numeral ID was 413.}}
{{History||1.14|snap=18w43a|[[File:Rabbit Stew JE2.png|32px]] The texture of rabbit stew has been changed.
|The rabbit stew's [[recipe]] is now shapeless.}}
{{History|||snap=18w50a|[[File:Rabbit Stew JE3 BE2.png|32px]] The texture of rabbit stew has been changed.}}
{{History|||snap=19w11a|Butcher [[villager]]s now [[trading|sell]] rabbit stew.}}
{{History|pocket alpha}}
{{History||v0.13.0|snap=build 1|[[File:Rabbit Stew JE1 BE1.png|32px]] Added rabbit stew.}}
{{History|bedrock}}
{{History||1.10.0|snap=beta 1.10.0.3|[[File:Rabbit Stew JE3 BE2.png|32px]] The texture of rabbit stew has been changed.
|The recipe for rabbit stew is now shapeless.}}
{{History||1.11.0|snap=beta 1.11.0.4|Butcher [[villager]]s now [[trading|sell]] rabbit stew.}}
{{History|console}}
{{History||xbox=TU31|xbone=CU19|ps=1.22|wiiu=Patch 3|switch=1.0.1|[[File:Rabbit Stew JE1 BE1.png|32px]] Added rabbit stew.}}
{{History||xbox=none|xbone=none|ps=1.90|wiiu=none|switch=none|[[File:Rabbit Stew JE3 BE2.png|32px]] The texture of rabbit stew has been changed.
|The recipe for rabbit stew is now shapeless.}}
{{History|new 3ds}}
{{History||0.1.0|[[File:Rabbit Stew JE1 BE1.png|32px]] Added rabbit stew.}}
{{History|foot}}
== Issues ==
{{issue list}}
== Trivia ==
* If the ingredients of rabbit stew were eaten separately and the [[mushroom]] had become half of a [[mushroom stew]], they would restore a total of {{Hunger|16}} and 19.2 saturation points. Without counting the mushroom, the separate ingredients would restore {{Hunger|13}} and 15.6 saturation points. Therefore, crafting rabbit stew results in a net loss of restorative points, though it is quicker than eating all the ingredients separately.
* Rabbit stew restores more hunger and total food points (hunger + saturation) than nearly any other single item (the exception is a suspicious stew with Saturation). This is balanced by the point that the stew does not stack, and with its complex recipe it's not so easy to make "on the road". The suspicious stew shares the unstackability, but with only four ingredients it can at least be crafted in the inventory.
==Gallery==
<gallery>
Rabbit Stew Crafting.jpg|Crafting rabbit stew.
</gallery>
== References ==
{{Reflist}}
{{items}}
[[de:Kaninchenragout]]
[[es:Estofado de conejo]]
[[it:Stufato di coniglio]]
[[fr:Ragoût de lapin]]
[[ja:ウサギシチュー]]
[[ko:토끼 스튜]]
[[nl:Konijnenstoofpot]]
[[pl:Gulasz z królika]]
[[pt:Ensopado de coelho]]
[[ru:Тушёный кролик]]
[[uk:Тушкований кролик]]
[[zh:兔肉煲]]
[[Category:Food]]
[[Category:Renewable resources]]</li><li>[[Reality Vision|Reality Vision]]<br/>{{Joke feature}}
{{Item
| title = Reality Vision
| image = Reality Vision.png
| renewable = No
| stackable = Yes (64)
}}
The '''Reality vision''' was a joke [[helmet]].
== Usage ==
Reality vision was equipped via the [[helmet]] slot. When equipped, it showed a [[wikipedia:Mini-map|minimap]] in the bottom-center of the screen (which moved when the [[player]]'s camera moves). The minimap showed all [[chunk]]s that were currently rendered. The player's location was represented by a green [[beacon]] beam marker on the map.
It displayed a vision overlay (similar to the [[pumpkin]] overlay). The overlay would change to a new overlay if the player went into third person (unlike the pumpkin overlay), which made the screen appear like an old [[wikipedia:Television|television]] screen. The overlay was called <code>cantseeshit<!-- Do not change this; this is that word that is actually used-->captain.png</code> in the assets folder. It activated a [[Shaders|shader]] when equipped (<code>scan_pincushion</code>).
== Sounds ==
{{Sound table
|sound=Equipvr.ogg
|subtitle=''None''
|source=player
|description=When equipped
|id=item.reality_vision.use
|translationkey=''None''
|volume=1.0
|pitch=1.0
|distance=16
|foot=1}}
== Data values ==
=== ID ===
{{ID table
|edition=java
|shownumericids=y
|showforms=y
|generatetranslationkeys=y
|displayname=Reality Vision
|spritetype=item
|nameid=reality_vision
|id=500
|form=item
|translationkey=item.realityVision.name
|foot=1}}
== History ==
{{History|java}}
{{History||1.RV-Pre1|[[File:Reality_Vision_(item).png|32px]] [[File:Reality Vision.png|32px]] Added reality vision.}}
{{History|foot}}
== Issues ==
Reality Vision is an unsupported item due to being an [[Wikipedia:April Fools' Day|April Fools']] joke, and therefore such issues relating to them will not be fixed.
== Trivia ==
* [[Sign]]s display the text "OBEY" while equipped, a reference to the movie [[wikipedia:They Live|''They Live'']].
== Gallery ==
<gallery>
Sign2.png|The [[sign]] texture found in the game files.
OBEY.png|OBEY seen in a sign.
OBEY sign in 1.RV-Pre1..png|OBEY seen in a sign, but seen from a better perspective.
TechGear.png|A [[player]] wearing reality vision, featured in this [[wikipedia:April Fools' Day|April Fools']] joke version.
</gallery>
{{Items}}
{{Jokes}}
[[Category:Non-renewable resources]]
[[Category:Joke items]]
[[pt:Visão da realidade]]
[[es:Reality Vision]]</li></ul> | 20100129 | Flint and steel can now be used to smelt ores.[1] | |||||||||||||||||||||||||||||||||
20100219{{Extension DPL}}<ul><li>[[Clay Ball|Clay Ball]]<br/>{{Item
| image = Clay Ball.png
| stackable = Yes (64)
| renewable = Yes
}}
{{about|the item|the block|Clay|other uses|Clay (disambiguation)}}
A '''clay ball''' is the item obtained from [[clay]] used for [[crafting]] or making [[brick]]s.
== Obtaining ==
=== Block loot ===
Clay balls are obtained when a [[clay]] block is broken with a non-[[Silk Touch]] tool. Each block yields four clay balls regardless of [[Fortune]].
=== Chest loot ===
{{LootChestItem|clay-ball}}
=== Villager gifts ===
If a [[player]] has the [[Hero of the Village]] status effect, a Mason [[villager]] might throw that player a [[clay block]] as a gift. {{Only|java}} This can be placed and [[breaking|broken]] to harvest clay balls.
== Usage ==
Clay balls can be [[crafting|crafted]] back together to form [[clay]] blocks or baked in a [[furnace]] to create [[brick]]s.
=== Crafting ingredient ===
{{crafting usage}}
=== Smelting ingredient ===
{{Smelting
|showname=1
|Clay Ball
|Brick
|0.3
}}
=== Trading ===
Novice-level [[Villager|mason villagers]] buy 10 clay balls for 1 [[emerald]] as part of their [[trades]].
== Data values ==
=== ID ===
{{edition|java}}:
{{ID table
|edition=java
|showforms=y
|generatetranslationkeys=y
|displayname=Clay Ball
|spritetype=item
|nameid=clay_ball
|form=item
|foot=1}}
{{edition|bedrock}}:
{{ID table
|edition=bedrock
|shownumericids=y
|showforms=y
|notshowbeitemforms=y
|generatetranslationkeys=y
|displayname=Clay
|spritetype=item
|nameid=clay_ball
|id=384
|form=item
|foot=1}}
== History ==
{{History|java alpha}}
{{History||v1.0.11|[[File:Clay Ball JE1 BE1.png|32px]] Added clay.}}
{{History|java}}
{{History||1.13|snap=17w47a|Prior to [[1.13/Flattening|''The Flattening'']], this [[item]]'s numeral ID was 337.}}
{{History||1.14|snap=18w43a|[[File:Clay Ball JE2 BE2.png|32px]] The texture of clay has been changed.}}
{{History|||snap=18w49a|Clay can now be found in [[chest]]s in [[village]] mason houses.}}
{{History|||snap=18w50a|Clay can now be found in [[chest]]s in [[desert]] [[village]] houses.}}
{{History|||snap=19w11a|Clay is now [[trading|bought]] by [[villager]]s of the new mason profession.}}
{{History||1.16|snap=20w06a|"Clay" has been renamed to "Clay Ball."}}
{{History|pocket alpha}}
{{History||v0.2.0|[[File:Clay Ball JE1 BE1.png|32px]] Added clay. It is currently unobtainable and serves no purpose.}}
{{History||v0.3.2|4 clay items are now dropped from clay blocks when broken.
|Clay can now be crafted into clay blocks.
|Clay can now be smelted into bricks.}}
{{History|bedrock}}
{{History||1.10.0|snap=beta 1.10.0.3|[[File:Clay Ball JE2 BE2.png|32px]] The texture of clay has been changed.|10–13 clay can now be [[trading|sold]] to stone mason [[villager]]s for an [[emerald]].}}
{{History||1.11.0|snap=beta 1.11.0.1|Clay can now be found in [[village]] mason [[chest]]s and [[desert]] village house chests.}}
{{History|||snap=beta 1.11.0.4|[[Trading]] has been changed, stone mason villagers now [[trading|buy]] 10 clay for an emerald<!-- previously 10-13 -->.}}
{{History||1.19.0|snap=beta 1.19.0.24|Clay ball now [[renewable]] by placing [[mud]] above a block which has [[pointed dripstone]] underneath.}}
{{History|console}}
{{History||xbox=TU1|xbone=CU1|ps=1.0|wiiu=Patch 1|[[File:Clay Ball JE1 BE1.png|32px]] Added clay.}}
{{History||xbox=none|xbone=none|ps=1.90|wiiu=none|switch=none|[[File:Clay Ball JE2 BE2.png|32px]] The texture of clay has been changed.}}
{{History|3ds}}
{{History||0.1.0|[[File:Clay Ball JE1 BE1.png|32px]] Added clay.}}
{{History|foot}}
== Issues ==
{{issue list}}
== Gallery ==
<gallery>
File:ClayInNumerousForms.png
</gallery>
== Notes ==
{{fnlist}}
{{Items}}
[[cs:Jíl]]
[[de:Tonklumpen]]
[[es:Bola de arcilla]]
[[fr:Motte d'argile]]
[[hu:Agyag (Tárgy)]]
[[it:Zolla di argilla]]
[[ja:粘土玉]]
[[ko:점토 덩이]]
[[nl:Klei (voorwerp)]]
[[pl:Glina]]
[[pt:Bola de argila]]
[[ru:Глина]]
[[uk:Глиняна кулька]]
[[zh:黏土球]]</li><li>[[Armor Stand|Armor Stand]]<br/>{{ItemEntity
| image = Armor Stand.png
| image2 = Armor Stand BE.png
| extratext = View [[#Gallery|all renders]]
| stackable =
* '''[[JE]]:''' Yes (16)
* '''[[BE]]:''' Yes (64)
| renewable = Yes
| flammable = Yes
| size = '''Normal:'''<br>
Width: 0.5 Blocks<br>
Height: 1.975 Blocks<br>
'''Small:'''<br>
Width: 0.25 Blocks<br>
Height: 0.9875 Blocks<br>
| health = {{hp|20}}
}}
An '''armor stand''' is an inanimate [[entity]] that can wear [[armor]]. It can also hold [[Item|items]] and be posed (but these are not possible in [[Survival]] in [[Java Edition]]).
== Obtaining ==
An armor stand can be broken by quickly {{control|attack|text=attacking}} it twice, dropping itself and any armor placed onto it.
=== Crafting ===
{{Crafting
|A1= Stick
|B1= Stick
|C1= Stick
|B2= Stick
|A3= Stick
|B3= Smooth Stone Slab
|C3= Stick
|Output= Armor Stand
|type=Decoration block
}}
=== Natural generation ===
Two armor stands are found in each taiga [[village]] outdoor armory, one equipped with an [[iron helmet]], the other with an [[iron chestplate]].
== Usage ==
[[Player]]s can use armor stands to hold [[armor]], [[mob head]]s, [[carved pumpkin]]s, and [[elytra]]. [[Commands]] can be used to give them other [[item]]s. The stand does not have a GUI, so players interact with it directly. Armor stands are also able to be placed in different orientations, similar to [[banner]]s or [[sign]]s. Armor stands are [[entity|entities]], allowing them to be pushed by [[piston]]s, moved by flowing [[water]], pulled with [[fishing rod]]s, pushed by players (with knockback), and bounced by [[slime block]]s.
{{Control|use|text=Using}} armor on the stand places the armor if done on a bare spot. Conversely, clicking on armor with a bare hand removes the armor and places it in the highlighted hotbar slot. It is not possible to take or place items from the armor stand's hands unless playing on Bedrock Edition.
Armor, mob heads, or carved pumpkins can be automatically placed on armor stands with a [[dispenser]].
Armor stands can be customized further to have arms, pose, disobey gravity, dual wield and other things by summoning them using {{cmd|summon}} with [[Tutorials/Command NBT tags#Armor Stand|NBT tags]].
In maps heavily using [[command blocks]], armor stands can be used to keep [[scoreboard]] objectives that are 'global' to the map, run [[commands]], etc.
{{IN|bedrock}}, the pose of the armor stand can be changed by interacting with the armor stand (or pressing the {{btn|Pose|be=1}} button on mobile devices) while sneaking, or by using a redstone signal. There are 13 possible poses. Armor stands can also hold items by interacting with the armor stand (or pressing the {{btn|Equip|be=1}} button on mobile devices) while holding an item that cannot be worn.
;<nowiki>Below are the poses:
{| class="wikitable collapsible collapsed"
!No.!!Namespace ID!! Redstone power
!
! !! Image
|-
|0
|{{cd|animation.armor_stand.default_pose}}
|0
|
|
|[[File:Armor Stand Default Pose.png|128px]]
|-
|1
|{{cd|animation.armor_stand.no_pose}}
|1
|
|
|[[File:Armor Stand No Pose.png|128px]]
|-
|2
|{{cd|animation.armor_stand.solemn_pose}}
|2
|
|
|[[File:Armor Stand Solemn Pose.png|128px]]
|-
|3
|{{cd|animation.armor_stand.athena_pose}}
|3
|
|
|[[File:Armor Stand Athena Pose.png|128px]]
|-
|4
|{{cd|animation.armor_stand.brandish_pose}}
|4
|
|
|[[File:Armor Stand Brandish Pose.png|128px]]
|-
|5
|{{cd|animation.armor_stand.honor_pose}}
|5
|
|
|[[File:Armor Stand Honor Pose.png|128px]]
|-
|6
|{{cd|animation.armor_stand.entertain_pose}}
|6
|
|
|[[File:Armor Stand Entertain Pose.png|128px]]
|-
|7
|{{cd|animation.armor_stand.salute_pose}}
|7
|
|
|[[File:Armor Stand Salute Pose.png|128px]]
|-
|8
|{{cd|animation.armor_stand.hero_pose}}
|8, 13 or more
|
|
|[[File:Armor Stand Hero Pose.png|128px]]
|-
|9
|{{cd|animation.armor_stand.riposte_pose}}
|9
|
|
|[[File:Armor Stand Riposte Pose.png|128px]]
|-
|10
|{{cd|animation.armor_stand.zombie_pose}}
|10
|
|
|[[File:Armor Stand Zombie Pose.png|128px]]
|-
|11
|{{cd|animation.armor_stand.cancan_a_pose}}
|11
|
|
|[[File:Armor Stand Cancan A Pose.png|128px]]
|-
|12
|{{cd|animation.armor_stand.cancan_b_pose}}
|12
|
|
|[[File:Armor Stand Cancan B Pose.png|128px]]
|}
==Behavior==
Because armor stands are entities, they obey gravity, allowing them to fall and rest on non-full [[block]]s such as [[enchanting table]]s, [[snow layer]]s and [[slab]]s.
Any [[armor]] on the stand drops when the stand is broken. Armor stands can display [[enchanting|enchanted]] and all forms of [[dye]]d armor. The effects of most enchanted armor have no effect when on an armor stand, with three exceptions:
*[[Frost Walker]] creates [[frosted ice]] blocks on [[water]] as usual if an armor stand is pushed with a [[piston]].
*[[Depth Strider]] slows the movement of the armor stand when being pushed with water.
*A [[player]] may take damage from hitting an armor stand that holds armor enchanted with [[Thorns]].
Armor stands are not damaged by [[cacti]] but can be broken by [[arrow]]s. An armor stand destroyed by an explosion or a firework does not drop as an [[item (entity)|item]]. Armor stands in water and [[lava]] at the same time are not consumed by the lava.
{{IN|be}}, armor stands can be affected by [[status effect]]s. They can be 'killed' by [[Harming]] and [[Decay]] [[splash potion|splash]]/[[lingering potion]]s, lava, [[fire]], and [[campfire]]s, and they play the player death sound and fall to their side and disappear, yielding no armor stand item. If an armor stand is equipped with an item or armor, that item or armor is considered as "naturally-spawned equipment" with an 8.5% chance of dropping when the armor stand "dies" from the [[Instant Damage]] or the [[Wither (status effect)|Wither]] status effect. If the dropped item is any form of [[weapon]], [[tool]] or armor, it drops in a badly damaged state because the game considers it as "naturally-spawned equipment".<ref>{{Bug|MCPE-24341}}</ref>
The stand wobbles slightly when being hit by the player.
{{IN|java}}, it is possible to create an armor stand with arms using the {{cmd|summon}} [[command]]. It is also possible to change an armor stand without arms into a stand with arms by using the {{cmd|data}} command. The commands are as follows:
*<code>/data merge entity @e[type=armor_stand,sort=nearest,limit=1] {ShowArms:1}</code>, which changes the nearest armor stand into an armor stand with arms.
*<code>/summon minecraft:armor_stand ~ ~ ~ {ShowArms:1}</code>, which summons a new armor stand with arms shown.
*<code>/summon armor_stand ~ ~ ~ {Rotation:[0.0f]}</code>, which summons a new armor stand that faces a desired direction (dependent on changing "0.0f" to other numbers like "90.0f" or "180.0f", otherwise it faces the same way as a default armor stand).
==Sounds==
{{edition|java}}:<br>
Armor stands use the Friendly Creatures sound category for entity-dependent sound events.
{{Sound table
|sound=Armor Stand hit1.ogg
|sound2=Armor Stand hit2.ogg
|sound3=Armor Stand hit3.ogg
|sound4=Armor Stand hit4.ogg
|subtitle=Block breaking
|source=Friendly Creatures
|description=When an armor stand is damaged
|id=entity.armor_stand.hit
|translationkey=subtitles.block.generic.hit
|volume=1.0
|pitch=1.0
|distance=16}}
{{Sound table
|sound=Armor Stand break1.ogg
|sound2=Armor Stand break2.ogg
|sound3=Armor Stand break3.ogg
|sound4=Armor Stand break4.ogg
|subtitle=Block broken
|source=Friendly Creatures
|description=When an armor stand is destroyed
|id=entity.armor_stand.break
|translationkey=subtitles.block.generic.break
|volume=1.0
|pitch=1.0
|distance=16}}
{{Sound table
|sound=Stone dig1.ogg
|sound2=Stone dig2.ogg
|sound3=Stone dig3.ogg
|sound4=Stone dig4.ogg
|subtitle=Block placed
|source=Blocks
|description=When an armor stand is placed
|id=entity.armor_stand.place
|translationkey=subtitles.block.generic.place
|volume=1.0
|pitch=1.0
|distance=16}}
{{Sound table
|sound=Wood dig1.ogg
|sound2=Wood dig2.ogg
|sound3=Wood dig3.ogg
|sound4=Wood dig4.ogg
|subtitle=Block placed
|source=Friendly Creatures
|description=When an armor stand falls onto a block at a high speed{{Info needed}}
|id=entity.armor_stand.fall
|translationkey=subtitles.entity.armorstand.fall
|volume=1.0
|pitch=1.0
|distance=16
|foot=1}}
{{edition|bedrock}}:
{{Sound table
|type=bedrock
|sound=Armor Stand hit1.ogg
|sound2=Armor Stand hit2.ogg
|sound3=Armor Stand hit3.ogg
|sound4=Armor Stand hit4.ogg
|source=neutral
|description=When an armor stand is damaged
|id=mob.armor_stand.hit
|volume=1.0
|pitch=1.0}}
{{Sound table
|sound=Armor Stand break1.ogg
|sound2=Armor Stand break2.ogg
|sound3=Armor Stand break3.ogg
|sound4=Armor Stand break4.ogg
|source=neutral
|description=When an armor stand is destroyed
|id=mob.armor_stand.break
|volume=1.0
|pitch=1.0}}
{{Sound table
|sound=Stone dig1.ogg
|sound2=Stone dig2.ogg
|sound3=Stone dig3.ogg
|sound4=Stone dig4.ogg
|source=neutral
|description=When an armor stand is placed
|id=mob.armor_stand.place
|volume=1.0
|pitch=1.0}}
{{Sound table
|sound=Wood dig1.ogg
|sound2=Wood dig2.ogg
|sound3=Wood dig3.ogg
|sound4=Wood dig4.ogg
|source=neutral
|description=When an armor stand falls onto a block at a high speed{{Info needed}}
|id=mob.armor_stand.land
|volume=1.0
|pitch=1.0
|foot=1}}
==Data values==
===ID===
{{edition|java}}:
{{ID table
|edition=java
|firstcolumnname=Armor Stand
|showforms=y
|generatetranslationkeys=y
|displayname=Item
|spritename=armor-stand
|spritetype=item
|nameid=armor_stand
|form=item
|foot=1}}
{{ID table
|edition=java
|firstcolumnname=Armor Stand
|generatetranslationkeys=y
|displayname=Entity
|spritename=armor-stand
|spritetype=entity
|nameid=armor_stand
|foot=1}}
{{edition|bedrock}}:
{{ID table
|edition=bedrock
|firstcolumnname=Armor Stand
|shownumericids=y
|showforms=y
|notshowbeitemforms=y
|generatetranslationkeys=y
|displayname=Item
|spritename=armor-stand
|spritetype=item
|nameid=armor_stand
|id=552
|form=item
|foot=1}}
{{ID table
|edition=bedrock
|firstcolumnname=Armor Stand
|shownumericids=y
|generatetranslationkeys=y
|displayname=Entity
|spritename=armor-stand
|spritetype=entity
|nameid=armor_stand
|id=61
|foot=1}}
===Item data===
{{el|java}}:
{{main|Player.dat format}}
<div class="treeview">
* {{nbt|compound|tag}}: The item's '''tag''' tag.
{{:Player.dat_format/Entity Spawners}}
</div>
{{el|bedrock}}:
:{{IN|bedrock}}, armor stands have no additional item tag.
:See [[Bedrock Edition level format/Item format]].
===Entity data===
Armor stands have entity data associated with them that contain various properties of the [[entity]].
{{el|java}}:
{{main|Entity format}}
{{/ED}}
{{el|bedrock}}:
:See [[Bedrock Edition level format/Entity format]].
== Video==
Note: This video is outdated as Zoglins now attack armor stands
<div style="text-align:center">{{yt|tCFkdTfCleQ}}</div>
==History==
{{History|java}}
{{History||1.8|snap=August 5, 2014|slink={{Tweet|SeargeDP|496666952530538498}}|[[File:Armor Stand (pre-release).png|32px]] [[File:Armor Stand (item) (pre-release).png|32px]] [[Searge]] tweeted a image of an armor stand. The appearance was changed before release.}}
{{History|||snap=August 5, 2014|slink={{Tweet|SeargeDP|496673890148823040}}|Showed crafting recipe and name "[Armor Stand]", both were changed before release.}}
{{History|||snap=14w32a|[[File:Armor Stand JE1.png|32px]] Added armor stands.}}
{{History|||snap=14w32b|[[File:Armor Stand (item) JE1 BE1.png|32px]] The item texture has changed.
|Pick-block can now be used on armor stands.
|Armor stands can now no longer be crafted using [[slabs]] other than stone slabs.}}
{{History|||snap=14w32c|Added a <code>NoBasePlate</code> tag for the armor stand.}}
{{History|||snap=14w33a|Breaking [[particles]] have been added for the armor stand.}}
{{History||1.8.1|snap=pre1|Added <code>Marker</code> tag for armor stands.}}
{{History||1.9|snap=15w31a|Armor stands can now dual wield.
|<code>HandItems</code> and <code>ArmorItems</code> tags added for armor stands, which is intended to replace the <code>Equipment</code> tag.}}
{{History|||snap=15w33a|The <code>Equipment</code> tag has been removed from armor stands.}}
{{History|||snap=15w47a|The armor stand now wobbles when hit by the [[player]].}}
{{History|||snap=16w02a|Marker <code>ArmorStand</code>s now outline their equipment only when glowing.}}
{{History||1.11|snap=16w32a|The entity ID of the armor stand has been changed from <code>ArmorStand</code> to <code>armor_stand</code>.}}
{{History||1.13|snap=17w47a|Prior to [[1.13/Flattening|''The Flattening'']], this [[item]]'s numeral ID was 416.}}
{{History||1.14|snap=18w43a|[[File:Armor Stand JE2.png|32px]] The texture of armor stands has been changed to the new [[planks|oak planks]] texture.
|[[File:Armor Stand (item) JE2 BE2.png|32px]] The texture of armor stand [[item]]s has been slightly changed. (Comparison: [[File:Armor Stand (item) Texture Change 1.13 to 18w43a.gif|32px]])}}
{{History|||snap=18w50a|[[File:Armor Stand JE3.png|32px]] The texture of armor stands has been changed again.
|Armor stands now generate in taiga [[village]]s.}}
{{History||1.15|snap=19w42a|Armor stands can now be placed by [[dispenser]]s.}}
{{History||1.16|snap=20w07a|Armor stands no longer fall through fences and walls when placed.<ref>{{bug|MC-65951}}</ref>}}
{{History|||snap=20w14a|[[Zoglin]]s now attack armor stands.}}
{{History||1.17|snap=20w45a|[[File:Armor Stand 20w45a.png|32px]] The model of the armor stand has been changed.}}
{{History|||snap=20w46a|[[File:Armor Stand JE3.png|32px]] The model of the armor stand has been changed back to how it was in 1.16.}}
{{History||1.18|snap=Pre-release 5|[[File:Armor Stand JE4.png|32px]] Changed smooth stone texture on armor stand.}}
{{History||1.19.4|snap=23w03a|Armor stands now preserve custom names when placed and broken.}}
{{History||1.20<br>(Experimental)|link=1.19.4|snap=23w04a|An armor stand now appears in the smithing table GUI; arms are displayed as in Bedrock Edition.
|When an armor stand is placed, its model now changes in effect of the player's facing direction<ref>{{bug|MC-93533}}</ref>.}}
{{History|||snap=23w06a|The model no longer changes when the armory is placed. Also, the head, which tilted slightly to the lower right in the version from 1.8 up to 1.19.3, now faces forward from [[File:Armor Stand JE4.png|32px]] to [[File:Armor Stand JE5.png|32px]].}}
{{History||?|Armor can now be swapped in [[armor stand]]s by {{ctrl|using}} them in the armor stand's slot.}}
{{History|bedrock}}
{{History||1.2.0|snap=beta 1.2.0.2|[[File:Armor Stand BE1.png|32px]] [[File:Armor Stand (item) JE1 BE1.png|32px]] Added armor stands.}}
{{History||1.10.0|snap=beta 1.10.0.3|[[File:Armor Stand BE2.png|32px]] The texture of armor stands has been changed.
|[[File:Armor Stand (item) JE2 BE2.png|32px]] The texture of armor stand [[item]]s has been slightly changed.}}
{{History||1.12.0|snap=beta 1.12.0.2|[[File:Armor Stand with Leather Armor MCPE-44669.png|32px]] Leather [[armor]] no longer shows as being [[dye]]d properly when worn by armor stands.}}
{{History|||snap=beta 1.12.0.3|[[File:Armor Stand wear Chicken.png|x73px]][[File:Armor Stand wear Rabbit.png|x73px]] [[File:Armor Stand wear Salmon.gif|x73px]] [[File:Armor Stand wear Pufferfish.gif|x73px]] [[File:Armor Stand wear Slime.png|x73px]] When armor stands hold a [[raw chicken]], [[raw rabbit]], [[raw salmon]], [[pufferfish]] or a [[slime block]], they now wear these [[mob]] counterparts.<ref>{{bug|mcpe-48629}}</ref>}}
{{History||1.13.0|snap=beta 1.13.0.1|Leather armor now shows as being dyed properly when worn by armor stands.}}
{{History|||snap=beta 1.13.0.4|Armor stands no longer hold certain [[mob]]s if they are holding a [[item]] related to them.
|Armor stands now have a smoother animation when changing poses.}}
{{History||1.16.0|snap=?|Armor stands are now targeted by zoglins.}}
{{History||1.16.210|snap=beta 1.16.210.51|Armor stands are no longer attacked by [[goat]]s.}}
{{History|console}}
{{History||xbox=TU31|xbone=CU19|ps=1.22|wiiu=Patch 3|switch=1.0.1|[[File:Armor Stand JE1.png|32px]] [[File:Armor Stand (item) JE1 BE1.png|32px]] Added armor stands.}}
{{History||xbox=TU43|xbone=CU33|ps=1.36|wiiu=Patch 13|Added [[sound]]s for armor stands.}}
{{History||xbox=TU60|xbone=CU51|ps=1.64|wiiu=Patch 30|switch=1.0.11|[[File:Armor Stand BE1.png|32px]] Armor stands now have arms and the [[player]] can now change the pose of the armor stand.}}
{{History||xbox=none|xbone=none|ps=1.90|wiiu=none|switch=none|[[File:Armor Stand BE2.png|32px]] The texture of armor stands has been changed.
|[[File:Armor Stand (item) JE2 BE2.png|32px]] The texture of armor stand [[item]]s has been slightly changed.}}
{{History|foot}}
<gallery>
Armour stand 1.png|The first image of the armor stand.
JE 1.8 Dev Armor Stand crafting.png|The first image of armor stand crafting recipe.
The Bountiful Update.png|Armor stands in the [[Java Edition 1.8|1.8]] poster.
Dual Wielding Armor Stand.png|A dual wielding armor stand.
Glowing Armor Stands.png|Armor stands with the [[glowing]] effect.
Armor Stand Chess.jpg|Chess with armor stands.
</gallery>
==Issues==
{{issue list}}
==Trivia ==
*Equipping armor stands with certain [[block]]s and [[item]]s can cause rendering glitches. According to [[Searge]] this is due to transparent rendering on entities not yet being supported.<ref>{{bug|MC-67415||"Armor Stands with Slime Block rendering entities behind them"}} resolved as "Won't Fix"</ref><ref>{{bug|MC-67674||"Armor Stand wearing a Skull and Holding Stained Glass causes Graphical issues"}} resolved as "Won't Fix"</ref>
*Bedrock Edition has a version exclusive armor stand [[model]], which includes posable arms.
*Using [[redstone]] to change the stands reverse the poses, starting with the can-can pose first.
*Placing the stand within three powered [[redstone dust]] always changes its pose to the honor pose. [[Redstone Repeater|Repeaters]] also switch the stand to the honor pose if not set four blocks from one.
*Using external tools, armor stand spawners can be placed.
*Secret signatures for [[Jasper Boerstra|JAPPA]], Chi Wong, and [[Michael Stoyke|Searge]] can be found at the bottom of the armor stand texture.
== Gallery ==
===Renders===
;Armor (Java Edition)
<gallery>
Armor Stand Leather.png
Armor Stand Golden.png
Armor Stand Chainmail.png
Armor Stand Iron.png
Armor Stand Diamond.png
Armor Stand Netherite.png
</gallery>
; Armor (Bedrock Edition)
<gallery>
Armor Stand with Leather Armor BE.png
Armor Stand with Golden Armor BE.png
Armor Stand with Chain Armor BE.png
Armor Stand with Iron Armor BE.png
Armor Stand with Diamond Armor BE.png
Armor Stand with Netherite Armor BE.png
</gallery>
;Poses
<gallery>
Armor Stand Pose 0.png|
Armor Stand Pose 1.png|
Armor Stand Pose 2.png|
Armor Stand Pose 3.png|
Armor Stand Pose 4.png|
Armor Stand Pose 5.png|
Armor Stand Pose 6.png|
Armor Stand Pose 7.png|
Armor Stand Pose 8.png|
Armor Stand Pose 9.png|
Armor Stand Pose 10.png|
Armor Stand Pose 11.png|
Armor Stand Pose 12.png|
</gallery>
===Screenshots===
<gallery>
Armor Stand Demo.png|Armor stands in various positions with various [[armor]].
Armor Stand glass and sword.png|Armor stands can wear [[block]]s on their heads. This is accessible with [[command]]s such as {{cmd|item}}.
Bedrock edition armor stand poses.png|All armor stand poses as seen in {{el|be}}.
Netherite to the rescue!.png|An entire set of netherite [[armor]] on an armor stand.
Armor Stand Garage.png|An armor stand in a garage.
</gallery>
==References ==
{{reflist}}
==External Links==
*[https://www.minecraft.net/en-us/article/taking-inventory--armor-stand Taking Inventory: Armor Stand] – Minecraft.net on March 16, 2023
{{Items}}
{{Entities}}
[[Category:Storage]]
[[de:Rüstungsständer]]
[[es:Soporte para armadura]]
[[fr:Porte-armure]]
[[ja:防具立て]]
[[ko:갑옷 거치대]]
[[pl:Stojak na zbroję]]
[[pt:Suporte de armaduras]]
[[ru:Стойка для брони]]
[[th:แท่นวางชุดเกราะ]]
[[uk:Стійка для обладунків]]
[[zh:盔甲架]]</li></ul></nowiki> | Furnaces have been added to replace the cooking/smelting function of flint and steel. | ||||||||||||||||||||||||||||||||||
20100223{{Extension DPL}}<ul><li>[[Slimeball|Slimeball]]<br/>{{about|the item|the mob|Slime|the block constructed with slimeballs|Slime Block|other uses|Slime (disambiguation)}}
{{Item
| image = Slimeball.png
| renewable = Yes
| stackable = Yes (64)
}}
A '''slimeball''' is a [[crafting]] ingredient commonly dropped by [[slime]]s, and can be sneezed out by [[panda]]s.
== Obtaining ==
=== Mob loot ===
==== Slimes ====
{{see also|Tutorials/Slime farming}}
If a [[slime]]'s size is 1, it drops 0–2 slimeballs when killed. The maximum number of slimeballs is increased by 1 per level of [[Looting]], for a maximum of 5 slimeballs with Looting III.
==== Pandas ====
Baby [[panda]]s have a {{frac|1|700}} chance of [[drop]]ping one slimeball when sneezing.
=== Crafting ===
{{Crafting
|Slime Block
|Output= Slimeball,9
|type= Miscellaneous
}}
=== Trading ===
[[Wandering trader]]s sometimes offer to sell a slimeball for 4 [[emerald]]s.
== Usage ==
=== Crafting ingredient ===
{{crafting usage}}
=== Breeding ===
Slimeballs can be used to breed [[frog]]s and reduce the remaining growth duration of [[tadpole]]s by 10%. Both also follow a player holding a slimeball.
==Video==
{{Video note|This video is outdated, as slimeballs can now also be used to craft [[lead]]s and [[slime block]]s, breed [[frog]]s, and can now be obtained from baby [[panda]]s and [[wandering trader]]s.}}
{{yt|J6oR3fdbbjY}}
== Data values ==
===ID===
{{edition|java}}:
{{ID table
|edition=java
|showforms=y
|generatetranslationkeys=y
|displayname=Slimeball
|spritetype=item
|nameid=slime_ball
|form=item
|foot=1}}
{{edition|bedrock}}:
{{ID table
|edition=bedrock
|shownumericids=y
|showforms=y
|notshowbeitemforms=y
|generatetranslationkeys=y
|displayname=Slimeball
|spritetype=item
|nameid=slime_ball
|id=388
|form=item
|foot=1}}
==History==
{{History|java alpha}}
{{History||v1.0.11|[[File:Slimeball JE1 BE1.png|32px]] Added slimeballs, which are dropped from [[slime]]s. At the moment, they serve no purpose.}}
{{History|java beta}}
{{History||1.7|Slimeballs are now used to craft [[sticky piston]]s.}}
{{History|java}}
{{History||1.0.0|snap=Beta 1.9 Prerelease 2|Slimeballs are used to craft [[magma cream]].}}
{{History||1.6.1|snap=13w18a|[[Lead]]s, which were originally implemented in the [[13w16a]] snapshot, now have a [[crafting]] recipe that includes slimeballs.}}
{{History||1.8|snap=14w02a|Nine slimeballs are now used to [[crafting|craft]] a [[slime block]]. Slime blocks also act as storage [[block]]s, being able to craft back into 9 slimeballs.}}
{{History||1.13|snap=17w47a|Prior to [[1.13/Flattening|''The Flattening'']], this [[item]]'s numeral ID was 341.}}
{{History||1.14|snap=18w43a|[[File:Slimeball JE2 BE2.png|32px]] The texture of slimeballs has been changed.
|Slimeballs can now be obtained when a [[panda|baby panda]] sneezes.}}
{{History|||snap=19w05a|Slimeballs can now be bought from [[wandering trader]]s.}}
{{History||1.19|snap=22w11a|Slimeballs can now be used to breed [[frog]]s.}}
{{History|pocket alpha}}
{{History||v0.9.0|snap=build 1|[[File:Slimeball JE1 BE1.png|32px]] Added slimeballs. They are currently unobtainable and serve no purpose.}}
{{History||v0.12.1|snap=build 1|Added slimeballs to the [[creative]] [[inventory]].
|Slimeballs can now be obtained by killing [[slime]]s.
|Slimeballs are now used to craft [[magma cream]].}}
{{History||v0.14.0|snap=build 1|Slimeballs are now used to craft [[slime block]]s.}}
{{History||v0.15.0|snap=build 1|Slimeballs are now used to craft [[sticky piston]]s and [[lead]]s.}}
{{History|bedrock}}
{{History||1.8.0|snap=beta 1.8.0.8|Slimeballs can now be obtained when a [[panda|baby panda]] sneezes.}}
{{History||1.10.0|snap=beta 1.10.0.3|[[File:Slimeball JE2 BE2.png|32px]] The texture of slimeballs has been changed.
|Slimeballs can now be obtained via [[trading]] with [[wandering trader]]s.}}
{{History|console}}
{{History||xbox=TU1|xbone=CU1|ps=1.0|wiiu=Patch 1|switch=1.0.1|[[File:Slimeball JE1 BE1.png|32px]] Added slimeballs.}}
{{History||xbox=TU3|Slimeballs are now used to craft [[sticky piston]]s.}}
{{History||xbox=TU5|Slimeballs are found in the Miscellaneous tab in the [[Creative inventory]].}}
{{History||xbox=TU9|Moved slimeballs to the Materials tab in the Creative inventory.}}
{{History||xbox=none|xbone=none|ps=1.83|wiiu=none|switch=none|Slimeballs can now be obtained when a [[panda|baby panda]] sneezes.}}
{{History||xbox=none|xbone=none|ps=1.90|wiiu=none|switch=none|[[File:Slimeball JE2 BE2.png|32px]] The texture of slimeballs has been changed.}}
{{History|New 3DS}}
{{History||0.1.0|[[File:Slimeball JE1 BE1.png|32px]] Added slimeballs.}}
{{History|foot}}
==Issues ==
{{issue list}}
== External Links ==
*[https://www.minecraft.net/en-us/article/taking-inventory--slimeball Taking Inventory: Slimeball] – Minecraft.net on June 24, 2021
{{Items}}
[[Category:Renewable resources]]
[[cs:Sliz]]
[[de:Schleimball]]
[[es:Bola de slime]]
[[fr:Boule de Slime]]
[[hu:Nyálkagolyó]]
[[it:Palla di slime]]
[[ja:スライムボール]]
[[ko:슬라임볼]]
[[nl:Slijmbal]]
[[pl:Kula szlamu]]
[[pt:Bola de slime]]
[[ru:Слизь]]
[[th:ลูกเมือก]]
[[uk:Слизова кулька]]
[[zh:黏液球]]</li><li>[[Flint and Steel|Flint and Steel]]<br/>{{Item
| image = Flint and Steel.png
| rarity = Common
| renewable = Yes
| durability = 64
| stackable = No
}}
'''Flint and steel''' is a [[tool]] used to create [[fire]] or to ignite certain blocks, structures and mobs.
== Obtaining ==
=== Crafting ===
{{Crafting
|head=1
|showname=0
|showdescription=1
|Iron Ingot
|Flint
|Output=Flint and Steel
|type=Tool
}}
{{crafting
|foot=1
|ignoreusage=1
|Damaged Flint and Steel
|Damaged Flint and Steel
|Output= Flint and Steel
|description= The durability of the two tools is added together, plus an extra 5% durability.
|type= Tool
}}
=== Chest loot ===
{{LootChestItem|flint-and-steel}}
== Usage ==
=== Igniting ===
When {{control|use|text=used}} on the space above any solid top surface, on any side of any flammable block or any side of any [[obsidian]] block within a valid unlit [[nether portal]] frame regardless of if there is a solid top surface available, the flint and steel places a [[fire]] there.
Flint and steel can be used to light unlit [[campfire]]s, [[candle]]s and [[cake|cakes with candles]].
Flint and steel can be used to light [[nether portal]]s, as any fire existing within an appropriate [[obsidian]] frame will instantly be replaced with [[Nether Portal (block)|nether portal blocks]] that occupy the entirety of the frame.
Using flint and steel on [[TNT]] ignites it. The explosion damage dealt by TNT ignited with flint and steel in this specific way counts as the player's attack. If the player is {{Control|sneak|text=sneaking}} a fire is instead placed on the side of the TNT the flint and steel was used on.
A flint and steel can be used on a [[creeper]] to force it to explode. Explosions initiated in this way cannot be cancelled.
When powered, a [[dispenser]] containing flint and steel can place fires or ignite relevant blocks such as TNT or campfires in the space directly in front of it. This reduces the flint and steel's durability. A dispenser containing a flint and steel cannot detonate creepers.
=== Enchantments ===
Flint and steel can receive the following [[enchantment]]s:
{|class="wikitable col-2-center col-3-right"
|+
!Name
!Max Level
![[Enchanting|Method]]
|-
|[[Unbreaking]]
|III
|{{Inventory slot|Anvil}}
|-
|[[Mending]]
|I
|{{Inventory slot|Anvil}}
|-
|[[Curse of Vanishing]]
|I
|{{Inventory slot|Anvil}}
|}
== Sounds ==
{{edition|java}}:
{{Sound table
|rowspan=2
|sound=Flint and steel click.ogg
|subtitle=Flint and Steel click
|source=block
|description=When a flint and steel is used to place fire
|id=item.flintandsteel.use|idnote=<ref name=incorrecteventnames group=sound>{{Cite bug|MC|177457|Fire charge and flint and steel sound event names do not follow item IDs|date=April 5, 2020}}</ref>
|translationkey=subtitles.item.flintandsteel.use|translationkeynote=<ref name=incorrecteventnames group=sound/>
|volume=1.0
|pitch=0.8-1.2
|distance=16}}
{{Sound table
|subtitle=Flint and Steel click
|source=hostile
|description=When a flint and steel is used to light a creeper
|id=item.flintandsteel.use|idnote=<ref name=incorrecteventnames group=sound/>
|translationkey=subtitles.item.flintandsteel.use|translationkeynote=<ref name=incorrecteventnames group=sound/>
|volume=1.0
|pitch=0.8-1.2
|distance=16}}
{{Sound table
|sound=Random break.ogg
|subtitle=Item breaks
|source=player
|description=When a flint and steel's durability is exhausted
|id=entity.item.break
|translationkey=subtitles.entity.item.break
|volume=0.8
|pitch=0.8-1.2
|distance=16
|foot=1}}
{{edition|bedrock}};
{{Sound table
|type=bedrock
|sound=Flint and steel click.ogg
|source=block
|description=When a flint and steel is used to place fire
|id=fire.ignite
|volume=1.0
|pitch=0.8-1.2}}
{{Sound table
|sound=Random break.ogg
|source=player
|description=When a flint and steel's durability is exhausted
|id=random.break
|volume=1.0
|pitch=0.9
|foot=1}}
== Data values ==
=== ID ===
{{edition|java}}:
{{ID table
|edition=java
|showforms=y
|generatetranslationkeys=y
|displayname=Flint and Steel
|spritetype=item
|nameid=flint_and_steel
|form=item
|foot=1}}
{{edition|bedrock}}:
{{ID table
|edition=bedrock
|shownumericids=y
|showforms=y
|notshowbeitemforms=y
|generatetranslationkeys=y
|displayname=Flint and Steel
|spritetype=item
|nameid=flint_and_steel
|id=299
|form=item
|foot=1}}
== Achievements ==
{{Load achievements|Into the Nether}}
== Advancements ==
{{load advancements|We Need To Go Deeper}}
== Video ==
<div style="text-align:center">{{yt|caz8BBG48VU}}</div>
== History ==
{{more sounds|type=old|There is within the possible realm a different use sound from 2015-era Pocket Edition, can this be uploaded?}}
{{History|java indev}}
{{History||0.31|snap=20100110|[[File:Flint and Steel JE1.png|32px]] Added flint and steel.
|Flint and steel can be used to set [[fire]].}}
{{History|||snap=20100129|[[File:Flint and Steel JE2.png|32px]] The steel part of the texture has been brightened.
|Flint and steel can be used alongside [[lava]] to [[smelting|smelt]] [[ores]] and cook [[food]].<ref>http://www.youtube.com/watch?v=OpmK7rDU5bA</ref>}}
{{History|||snap=20100201-2|Flint and steel can now sometimes be dropped as loot from killing [[mobs]].}}
{{History||20100219|[[File:Flint and Steel JE3 BE1.png|32px]] The texture of flint and steel has been changed, due to its new crafting recipe.
|Flint and steel can no longer drop from mobs.
|Flint and steel can now be crafted from an [[iron ingot]] and the newly added [[flint]].
|[[Furnace]]s have been added to replace the cooking and [[smelting]] function of flint and steel.}}
{{History|java beta}}
{{History||1.7|Flint and steel, along with [[fire]] itself, [[explosion]]s and [[Mechanics/Redstone/Circuit|redstone]] are now the only ways to activate [[TNT]].<ref>{{tweet|jeb_|78154891637436416}}</ref>}}
{{History|java}}
{{History||1.3.1|snap=12w21a|The [[player]] can now [[trading|buy]] 1 flint and steel from farmer [[villager]]s for 3 [[emerald]]s, making flint and steel [[renewable]].}}
{{History||1.4.2|snap=12w38a|The [[sound]] when using flint and steel has been changed.}}
{{History||1.5|snap=13w04a|[[Dispenser]]s are now able to use flint and steel on the [[block]] in front of them.}}
{{History||1.6.1|snap=13w18a|Flint and steel can now be found in the new [[chest]]s in [[nether fortress]]es.}}
{{History|||snap=13w25a|Flint and steel now loses [[durability]] when igniting [[TNT]].}}
{{History||1.7.2|snap=13w36a|Flint and steel now has a shapeless crafting recipe.
{{{!}} class{{=}}"collapsible collapsed" data-description{{=}}"Old recipe"
! Old recipe
{{!}}-
{{!}}
{{Crafting
|A1=Iron Ingot
|B2=Flint
|Output=Flint and Steel
|ignoreusage=1
}}
{{!}}}
|Using flint and steel on a [[creeper]] now causes it to [[explosion|explode]].}}
{{History||1.8|snap=14w02a|[[Villager]]s no longer [[trading|sell]] flint and steel, making it no longer renewable. However, if a villager selling flint and steel already exists in the world, it can be continuously traded with to obtain flint and steel renewably.}}
{{History||1.9|snap=15w43a|The average yield of flint and steel in [[nether fortress]] [[chest]]s has been slightly reduced.}}
{{History||1.13|snap=17w47a|Prior to [[1.13/Flattening|''The Flattening'']], this [[item]]'s numeral ID was 259.}}
{{History||1.14|snap=18w43a|[[File:Flint and Steel JE4 BE2.png|32px]] The texture of flint and steel has been changed.}}
{{History||1.16|snap=20w07a|[[Gravel]] now can be given by the [[piglin]]s when [[bartering]], making flint and steel renewable again.}}
{{History|||snap=20w16a|Flint and steel can now be found inside [[ruined portal]] chests.}}
{{History|pocket alpha}}
{{History||v0.4.0|[[File:Flint and Steel JE3 BE1.png|32px]] Added flint and steel.}}
{{History||v0.7.0|Flint and steel can now be used to set [[fire]].}}
{{History||v0.7.4|Using flint and steel on a [[creeper]] now causes it to [[explosion|explode]].}}
{{History||v0.8.0|snap=build 1|Added flint and steel to the [[creative]] [[inventory]].}}
{{History||v0.12.1|snap=build 1|Flint and steel can now be used to activate a [[nether portal]].
|Flint and steel can now be found in [[nether fortress]]es.
|Flint and steel can now be [[enchanted]] in [[anvil]]s.}}
{{History||v0.14.0|snap=build 1|Flint and steel can now be used inside [[dispenser]]s when powered.}}
{{History|bedrock}}
{{History||1.10.0|snap=beta 1.10.0.3|[[File:Flint and Steel JE4 BE2.png|32px]] The texture of flint and steel has been changed.}}
{{History||1.16.0|snap=beta 1.16.0.51|Flint and steel can now be obtained by [[bartering]] with [[piglin]]s.|Flint and steel can now be enchanted with [[Curse of Vanishing]] through an [[anvil]].}}
{{History|||snap=beta 1.16.0.57|Flint and steel are no longer obtainable from [[bartering]].
|Flint and steel can now be found inside [[ruined portal]] chests.}}
{{History|console}}
{{History||xbox=TU1|xbone=CU1|ps=1.0|wiiu=Patch 1|switch=1.0.1|[[File:Flint and Steel JE3 BE1.png|32px]] Added flint and steel.}}
{{History||xbox=TU3|Flint and steel, along with [[fire]] itself, [[explosion]]s and [[redstone (disambiguation)|redstone]] are now the only ways to activate [[TNT]].}}
{{History||xbox=TU31|xbone=CU19|ps=1.22|wiiu=Patch 3|Flint and steel now makes [[sound]]s when igniting [[block]]s.}}
{{History||xbox=none|xbone=none|ps=1.90|wiiu=none|switch=none|[[File:Flint and Steel JE4 BE2.png|32px]] The texture of flint and steel has been changed.}}
{{History|New 3DS}}
{{History||0.1.0|[[File:Flint and Steel JE3 BE1.png|32px]] Added flint and steel.}}
{{History|foot}}
Historical sounds:
{| class="wikitable"
! Sound
! From
! to
! Pitch
|-
| {{sound||Flint and Steel old.ogg}}
| ?
| ?
| ?
|}
== Issues ==
{{issue list}}
== Trivia ==
* In [[Adventure mode]], flint and steel cannot light fires, nor can it ignite nether portals (unless it has the tag {{cd|CanPlaceOn:obsidian}}). However, it can still ignite TNT and creepers.
* The name "Flint and Steel" may be misleading and is inaccurate considering the game doesn’t have and possibly will have [[Java Edition mentioned features#Steel|steel]] in the game and it's crafted with iron instead. This is similar to the [[Old Growth Taiga|Old Growth Pine Taiga]], as there are no pines in the game and they have [[Spruce|Spruce Trees]] instead.
**In real life, Iron can’t be used as a fire striker, so Mojang had to rename it to Flint and Steel so it makes more sense. This explains why it is called Flint and Steel, but there is no steel in the game.
**Steel was mentioned by Mojang, as a “stronger” iron, but shortly rejected, and there are no currently no plans to add it to the game.
* Flint and steel cannot light end portals.
* Flint and Steel is the first item to mention another item that is not in the game.
*In the April Fools Snapshot, [[Java Edition 23w13a or b]], one of the possible voted was “Flint and Steel can ignite any block”.
==References==
{{Reflist}}
{{Items}}
[[Category:Renewable resources]]
[[cs:Křesadlo]]
[[de:Feuerzeug]]
[[es:Mechero]]
[[fr:Briquet]]
[[hu:Kovakő acéllal]]
[[ja:火打石と打ち金]]
[[ko:부싯돌과 부시]]
[[nl:Vuursteen en staal]]
[[pl:Krzesiwo]]
[[pt:Pederneira]]
[[ru:Огниво]]
[[zh:打火石]]</li></ul> | The first smeltable item has been added, cobblestone, which can be smelted into stone. | ||||||||||||||||||||||||||||||||||
| Java Edition | |||||||||||||||||||||||||||||||||||
1.3.1{{Extension DPL}}<ul><li>[[Raw Mutton|Raw Mutton]]<br/>{{Distinguish|Cooked Mutton}}
{{Item
| title = Raw Mutton
| image = Raw Mutton.png
| heals = {{hunger|2}}
| renewable = Yes
| stackable = Yes (64)
}}
'''Raw mutton''' is a [[food]] item dropped by [[sheep]] when killed.
== Obtaining ==
=== Mob loot ===
An adult [[sheep]] drops 1–2 raw mutton when killed. The maximum amount is increased by 1 per level of [[Looting]], for a maximum of 1–5 with Looting III. If killed while on fire, a sheep drops [[cooked mutton]] instead.
=== Chest loot ===
{{LootChestItem|raw-mutton}}
== Usage ==
=== Food ===
To eat raw mutton, press and hold {{control|use}} while it is selected in the [[hotbar]]. Eating one restores {{hunger|2}} [[hunger]] and 1.2 [[Hunger#Mechanics|saturation]].
=== Smelting ingredient ===
{{Smelting
|showname=1
|Raw Mutton
|Cooked Mutton
|0.35
}}
=== Wolves ===
Raw mutton can be used to [[breed]] and heal tamed [[wolves]], lead them around, and make baby tamed wolves grow up faster by 10% of the remaining time.
=== Trading ===
Journeyman-level butcher [[villager]]s have a 50% chance to buy 7 raw mutton for an [[emerald]] as part of their trades.{{only|bedrock}}
Journeyman-level butcher villagers always offer to buy 7 raw mutton for an emerald.{{only|java}}
==Sounds==
{{Sound table/Entity/Food}}
== Data values ==
=== ID ===
{{edition|java}}:
{{ID table
|edition=java
|showforms=y
|generatetranslationkeys=y
|displayname=Raw Mutton
|spritetype=item
|nameid=mutton
|form=item
|foot=1}}
{{edition|bedrock}}:
{{ID table
|edition=bedrock
|showaliasids=y
|shownumericids=y
|showforms=y
|notshowbeitemforms=y
|generatetranslationkeys=y
|displayname=Raw Mutton
|spritetype=item
|nameid=mutton
|aliasid=muttonraw
|id=550
|form=item
|translationkey=item.muttonRaw.name
|foot=1}}
== Advancements ==
{{load advancements|Husbandry;A Balanced Diet}}
== Video ==
<div style="text-align:center">{{yt|PXlW-sZygTs}}</div>
== History ==
{{History||September 23, 2011|link={{tweet|jeb|117313469900009472}}|Mutton is mentioned by [[Jeb]].}}
{{History||September 11, 2012|link={{tweet|jeb|245503714167750656}}|Jeb again mentions the possibility of mutton as well as calamari being added into the game.}}
{{History|java}}
{{History||June 30, 2014|link=https://twitter.com/TheMogMiner/status/483636993780232192|[[Ryan Holtz]] tweets images of raw mutton and some other new items.}}
{{History||1.8|snap=14w27a|[[File:Raw Mutton JE1.png|32px]] Added raw mutton.}}
{{History||1.8|snap=14w33b|[[File:Raw Mutton JE2 BE1.png|32px]] The texture of raw mutton has been changed. The new texture was created by [[wikipedia:Reddit|Reddit]] user [http://www.reddit.com/u/zeldahuman zeldahuman].<ref>{{reddit|2bjzes/a_reminder_of_the_blocks_and_items_added_in_18_so|cj69zie|context=3}}</ref><ref>{{reddit|2c5f35/minecraft_snapshot_14w31a_has_been_released|cjct7gb}}</ref>}}
{{History||1.13|snap=17w47a|Prior to [[1.13/Flattening|''The Flattening'']], this [[item]]'s numeral ID was 423.}}
{{History||1.14|snap=18w43a|[[File:Raw Mutton JE3 BE2.png|32px]] The texture of raw mutton has been changed.}}
{{History|||snap=18w49a|Raw mutton can now be found in [[chest]]s in [[village]] butcher shops.}}
{{History|||snap=19w11a|Butcher villagers now [[trading|buy]] raw mutton.}}
{{History|pocket alpha}}
{{History||v0.15.0|snap=build 1|[[File:Raw Mutton JE2 BE1.png|32px]] Added raw mutton.}}
{{History|bedrock}}
{{History||1.10.0|snap=beta 1.10.0.3|[[File:Raw Mutton JE3 BE2.png|32px]] The texture of raw mutton has been changed.}}
{{History||1.11.0|snap=beta 1.11.0.1|Raw mutton can now be found in [[village]] butcher [[chest]]s.}}
{{History|||snap=beta 1.11.0.4|Raw mutton can now be [[trading|sold]] to butcher [[villager]]s.}}
{{History||1.16.0|snap=beta 1.16.0.57|Trading has been changed; journeyman butcher villagers now buy 7 raw mutton for an emerald instead of 8.}}
{{History||1.16.100|snap=beta 1.16.100.56|The ID of raw mutton has been changed from <code>muttonraw</code> to <code>mutton</code>.}}
{{History||1.16.210|snap=beta 1.16.210.51|Raw mutton is [[drops|dropped]] by [[goats]].}}
{{History||1.17.0|snap=beta 1.17.0.52|Goats no longer drop raw mutton.}}
{{History|console}}
{{History||xbox=TU31|xbone=CU19|ps=1.22|wiiu=Patch 3|[[File:Raw Mutton JE2 BE1.png|32px]] Added raw mutton.}}
{{History|PS4}}
{{History||1.90|[[File:Raw Mutton JE3 BE2.png|32px]] The texture of raw mutton has been changed.}}
{{History|3ds}}
{{History||0.1.0|[[File:Raw Mutton JE2 BE1.png|32px]] Added raw mutton.}}
{{History|foot}}
== Issues ==
{{issue list}}
== Gallery ==
<gallery>
Rabbit Items 3 Ryan Holtz.png|First image of the item by [[Ryan Holtz]].
Pocket Edition Mutton.jpg|First image of the item in ''Bedrock Edition'' by [[Jason Major]].
</gallery>
== References ==
{{reflist}}
{{items}}
[[de:Rohes Hammelfleisch]]
[[es:Cordero crudo]]
[[fr:Mouton cru]]
[[ja:生の羊肉]]
[[ko:익히지 않은 양고기]]
[[nl:Rauw schapenvlees]]
[[pl:Surowa baranina]]
[[pt:Carneiro cru]]
[[ru:Сырая баранина]]
[[zh:生羊肉]]
[[Category:Food]]
[[Category:Renewable resources]]</li><li>[[Copper Horn|Copper Horn]]<br/>{{About|the removed item|the current item|Goat Horn}}
{{outdated feature|edition=bedrock}}
{{Item
| renewable = Yes
| stackable = No
}}
A '''copper horn''' was an [[item]] crafted from a [[goat horn]] and [[copper ingots]].
== Obtaining ==
=== Crafting ===
{{Crafting
|ignoreusage=1
|A2=Copper Ingot
|B2=Goat Horn
|B3=Copper Ingot
|C2=Copper Ingot
|Output=Copper Horn
}}
=== Natural generation ===
Copper horns were found in pillager outpost chests.
== Usage ==
Copper horns were used to play sounds. They took one second to use and had a four second cooldown. There were ten variations of copper horns, and each of them played three different sounds: when looking up, crouching, or neither of those. In total, there were thirty different sounds that could be played using copper horns. The sound a copper horn plays based on multiple conditions, which are in order as follows:
* If crouching, the bass tune was played.
* Else, if looking up (by 45 degrees), the harmony tune was played.
* Else, the melody tune was played.
== Sounds ==
Sound names in the item tooltip are created using the harmony, melody, and bass sounds in that order.
=== Harmony ===
{{Sound table
|type=bedrock
|sound=harmony0.ogg
|description="Great" ("Great Sky Falling")
|source=hostile
|id=horn.call.0
|volume=1.0
|pitch=1.0}}
{{Sound table
|sound=harmony1.ogg
|description="Old" ("Old Hymn Resting")
|source=hostile
|id=horn.call.1
|volume=1.0
|pitch=1.0}}
{{Sound table
|sound=harmony2.ogg
|description="Pure" ("Pure Water Desire")
|source=hostile
|id=horn.call.2
|volume=1.0
|pitch=1.0}}
{{Sound table
|sound=harmony3.ogg
|description="Humble" ("Humble Fire Memory")
|source=hostile
|id=horn.call.3
|volume=1.0
|pitch=1.0}}
{{Sound table
|sound=harmony4.ogg
|description="Dry" ("Dry Urge Anger")
|source=hostile
|id=horn.call.4
|volume=1.0
|pitch=1.0}}
{{Sound table
|sound=harmony5.ogg
|description="Clear" ("Clear Temper Journey")
|source=hostile
|id=horn.call.5
|volume=1.0
|pitch=1.0}}
{{Sound table
|sound=harmony6.ogg
|description="Fresh" ("Fresh Nest Thought")
|source=hostile
|id=horn.call.6
|volume=1.0
|pitch=1.0}}
{{Sound table
|sound=harmony7.ogg
|description="Secret" ("Secret Lake Tear")
|source=hostile
|id=horn.call.7
|volume=1.0
|pitch=1.0}}
{{Sound table
|sound=harmony8.ogg
|description="Fearless" ("Fearless River Gift")
|source=hostile
|id=horn.call.8
|volume=1.0
|pitch=1.0}}
{{Sound table
|sound=harmony9.ogg
|description="Sweet" ("Sweet Moon Love")
|source=hostile
|id=horn.call.9
|volume=1.0
|pitch=1.0
|foot=1}}
=== Melody ===
{{Sound table
|type=bedrock
|sound=melody0.ogg
|description="Sky" ("Great Sky Falling")
|source=hostile
|id=horn.melody.0
|volume=1.0
|pitch=1.0}}
{{Sound table
|sound=melody1.ogg
|description="Hymn" ("Old Hymn Resting")
|source=hostile
|id=horn.melody.1
|volume=1.0
|pitch=1.0}}
{{Sound table
|sound=melody2.ogg
|description="Water" ("Pure Water Desire")
|source=hostile
|id=horn.melody.2
|volume=1.0
|pitch=1.0}}
{{Sound table
|sound=melody3.ogg
|description="Fire" ("Humble Fire Memory")
|source=hostile
|id=horn.melody.3
|volume=1.0
|pitch=1.0}}
{{Sound table
|sound=melody4.ogg
|description="Urge" ("Dry Urge Anger")
|source=hostile
|id=horn.melody.4
|volume=1.0
|pitch=1.0}}
{{Sound table
|sound=melody5.ogg
|description="Temper" ("Clear Temper Journey")
|source=hostile
|id=horn.melody.5
|volume=1.0
|pitch=1.0}}
{{Sound table
|sound=melody6.ogg
|description="Nest" ("Fresh Nest Thought")
|source=hostile
|id=horn.melody.6
|volume=1.0
|pitch=1.0}}
{{Sound table
|sound=melody7.ogg
|description="Lake" ("Secret Lake Tear")
|source=hostile
|id=horn.melody.7
|volume=1.0
|pitch=1.0}}
{{Sound table
|sound=melody8.ogg
|description="River" ("Fearless River Gift")
|source=hostile
|id=horn.melody.8
|volume=1.0
|pitch=1.0}}
{{Sound table
|sound=melody9.ogg
|description="Moon" ("Sweet Moon Love")
|source=hostile
|id=horn.melody.9
|volume=1.0
|pitch=1.0
|foot=1}}
=== Bass ===
{{Sound table
|type=bedrock
|sound=bass0.ogg
|description="Falling" ("Great Sky Falling")
|source=hostile
|id=horn.bass.0
|volume=1.0
|pitch=1.0}}
{{Sound table
|sound=bass1.ogg
|description="Resting" ("Old Hymn Resting")
|source=hostile
|id=horn.bass.1
|volume=1.0
|pitch=1.0}}
{{Sound table
|sound=bass2.ogg
|description="Desire" ("Pure Water Desire")
|source=hostile
|id=horn.bass.2
|volume=1.0
|pitch=1.0}}
{{Sound table
|sound=bass3.ogg
|description="Memory" ("Humble Fire Memory")
|source=hostile
|id=horn.bass.3
|volume=1.0
|pitch=1.0}}
{{Sound table
|sound=bass4.ogg
|description="Anger" ("Dry Urge Anger")
|source=hostile
|id=horn.bass.4
|volume=1.0
|pitch=1.0}}
{{Sound table
|sound=bass5.ogg
|description="Journey" ("Clear Temper Journey")
|source=hostile
|id=horn.bass.5
|volume=1.0
|pitch=1.0}}
{{Sound table
|sound=bass6.ogg
|description="Thought" ("Fresh Nest Thought")
|source=hostile
|id=horn.bass.6
|volume=1.0
|pitch=1.0}}
{{Sound table
|sound=bass7.ogg
|description="Tear" ("Secret Lake Tear")
|source=hostile
|id=horn.bass.7
|volume=1.0
|pitch=1.0}}
{{Sound table
|sound=bass8.ogg
|description="Gift" ("Fearless River Gift")
|source=hostile
|id=horn.bass.8
|volume=1.0
|pitch=1.0}}
{{Sound table
|sound=bass9.ogg
|description="Love" ("Sweet Moon Love")
|source=hostile
|id=horn.bass.9
|volume=1.0
|pitch=1.0
|foot=1}}
==Data Values==
===ID===
{{ID table
|edition=bedrock
|shownumericids=y
|showforms=y
|notshowbeitemforms=y
|generatetranslationkeys=y
|displayname=Copper Horn
|spritetype=item
|nameid=copper_horn
|form=item
|foot=1}}
== History ==
{{h|bedrock}}
{{h||Vanilla Experiments<br>(experimental)|link=1.18.30|snap=beta 1.18.30.26|[[File:Copper Horn BE1.png|32px]]Added copper horns.}}
{{h|||snap=beta 1.18.30.28|[[File:Copper Horn BE2.png|32px]]Changed the texture of copper horns.}}
{{h||1.19.0|snap=beta 1.19.0.24|Removed copper horns.}}
{{h|foot}}
== Trivia ==
* Copper horns were removed from the game as they didn't live up to the developers' design goals, and as such are no longer supported.<ref>{{cite|url=https://feedback.minecraft.net/hc/en-us/articles/5540500564365| title = Minecraft Beta & Preview - 1.19.0.24/25|website=feedback.minecraft.net|date=April 14, 2022}}</ref>
* This is the first item in {{el|be}} to have been completely removed instead of just made unobtainable. This is likely due to the fact it never made it out of [[experimental gameplay]].
** If a world that contained this item is loaded into a newer version, the horn will disappear upon loading.
== References ==
{{reflist}}
{{Items}}
{{Removed features}}
[[Category:Renewable resources]]
[[de:Ziegenhorn]]
[[es:Cuerno de cobre]]
[[fr:Corne de chèvre]]
[[it:Corno di capra]]
[[lzh:銅號]]
[[pl:Kozi róg]]
[[pt:Chifre de cobre]]
[[ru:Козий рог]]
[[zh:铜制号角]]</li></ul> | 12w18a | Wooden tools now work in furnaces as one full furnace use. | |||||||||||||||||||||||||||||||||
| 12w22a | Smelting various ores in furnaces now reward players with experience points. | ||||||||||||||||||||||||||||||||||
| When using lava for fuel, the player can now get the bucket back. | |||||||||||||||||||||||||||||||||||
1.8{{Extension DPL}}<ul><li>[[Ghast Tear|Ghast Tear]]<br/>{{Item
| image = Ghast Tear.png
| renewable = Yes
| stackable = Yes (64)
}}
'''Ghast tears''' are items [[Drops|dropped]] by [[ghast]]s. They can be used to make potions of [[Regeneration]] and [[end crystal]]s.
== Obtaining ==
=== Mob loot ===
[[Ghast]]s drop 0–1 ghast tears. [[Looting]] increases the maximum ghast tears dropped by one per level, for a maximum of 4 ghast tears with Looting III. Looting also works when knocking back a [[fireball]] with an enchanted item.
== Usage ==
=== Brewing ingredient ===
{{brewing
|showname=1
|head=1
|Ghast Tear
|Mundane Potion
|base=Water Bottle
}}
{{brewing
|foot=1
|Ghast Tear
|Potion of Regeneration
}}
=== Crafting ingredient ===
{{crafting usage}}
== Data values ==
=== ID ===
{{edition|java}}:
{{ID table
|edition=java
|showforms=y
|generatetranslationkeys=y
|displayname=Ghast Tear
|spritetype=item
|nameid=ghast_tear
|form=item
|foot=1}}
{{edition|bedrock}}:
{{ID table
|edition=bedrock
|shownumericids=y
|showforms=y
|notshowbeitemforms=y
|generatetranslationkeys=y
|displayname=Ghast Tear
|spritetype=item
|nameid=ghast_tear
|id=424
|form=item
|foot=1}}
== History ==
{{History|java}}
{{History||1.0.0|snap=Beta 1.9 Prerelease|[[File:Ghast Tear JE1 BE1.png|32px]] Added ghast tears.}}
{{History|||snap=Beta 1.9 Prerelease 3|Ghast tears can now be brewed in a [[water bottle]] to create a [[mundane potion]], or in an [[awkward potion]] to create a [[potion of Healing]].}}
{{History|||snap=Beta 1.9 Prerelease 4|Ghast tears now create [[potion of regeneration|potions of Regeneration]]. This was due to the sheer difficulty in obtaining them.<ref>{{tweet|jeb|123671273904680960|Since Ghast Tears are so hard to get, I've decided to replace the "Instant Health" with "Regeneration" for them|October 11, 2011}}</ref> [[Glistering melon]]s have been added to create potions of Healing, instead.}}
{{History||1.9|snap=15w44b|A ghast tear is now used to [[crafting|craft]] an [[end crystal]].}}
{{History||1.13|snap=17w47a|Prior to [[1.13/Flattening|''The Flattening'']], this [[item]]'s numeral ID was 370.}}
{{History||1.14|snap=18w43a|[[File:Ghast Tear JE2 BE2.png|32px]] The texture of ghast tears has been changed.}}
{{History|pocket alpha}}
{{History||v0.12.1|snap=build 1|[[File:Ghast Tear JE1 BE1.png|32px]] Added ghast tears.|Ghast tears are currently unobtainable as [[ghast]]s don’t [[drops|drop]] them.}}
{{History|||snap=build 7|Ghasts now drop ghast tears.<ref>{{bug|MCPE-9338}}</ref>}}
{{History|pocket}}
{{History||1.0.0|snap=alpha 0.17.0.1|A ghast tear is now used to [[crafting|craft]] an [[end crystal]].}}
{{History|bedrock}}
{{History||1.10.0|snap=beta 1.10.0.3|[[File:Ghast Tear JE2 BE2.png|32px]] The texture of ghast tears has been changed.}}
{{History|console}}
{{History||xbox=TU7|xbone=CU1|ps=1.0|wiiu=Patch 1|switch=1.0.1|[[File:Ghast Tear JE1 BE1.png|32px]] Added ghast tears.}}
{{History||xbox=none|xbone=none|ps=1.90|wiiu=none|switch=none|[[File:Ghast Tear JE2 BE2.png|32px]] The texture of ghast tears has been changed.}}
{{History|New 3DS}}
{{History||0.1.0|[[File:Ghast Tear JE1 BE1.png|32px]] Added ghast tears.}}
{{History|foot}}
== Issues ==
{{issue list}}
== References ==
{{reflist}}
{{items}}
[[Category:Renewable resources]]
[[Category:Brewing recipe]]
[[cs:Ďasova slza]]
[[de:Ghast-Träne]]
[[es:Lágrima de ghast]]
[[fr:Larme de Ghast]]
[[hu:Kísértetkönny]]
[[it:Lacrima di ghast]]
[[ja:ガストの涙]]
[[ko:가스트 눈물]]
[[nl:Ghasttraan]]
[[pl:Łza ghasta]]
[[pt:Lágrima de ghast]]
[[ru:Слеза гаста]]
[[uk:Сльоза ґаста]]
[[zh:恶魂之泪]]</li><li>[[Raw Salmon|Raw Salmon]]<br/>{{about|the item|the mob|Salmon}}
{{Item
| title = Raw Salmon
| image = Raw Salmon.png
| renewable = Yes
| heals = {{hunger|2}}
| stackable = Yes (64)
}}
'''Raw salmon''' is a food item that can be eaten by the [[player]] or cooked to make [[cooked salmon]].
== Obtaining ==
=== Mob loot ===
====Salmon====
[[Salmon]] always drops 1 raw salmon when killed, unaffected by Looting.<ref>{{bug|MC-212795||Salmon & Fish mobs are not affected by Looting}}</ref> If it is killed while on [[fire]], it drops 1 [[Cooked Salmon|cooked salmon]] instead.
====Guardians and elder guardians ====
[[Guardian|Guardians]] and [[Elder Guardian|elder guardians]] have a 2.5% chance to drop a random fish, with 25% of them being raw salmon, which drops as cooked if the guardian was on fire. The chance of getting the fish drop is increased by 1% per level with [[Looting]] (for a maximum of 5.5% with Looting III), but the type of fish is not affected.
====Polar bears====
[[Polar bear]]s have a 25% chance of dropping 0–2 raw salmon when killed. The maximum amount can be increased by 1 per level of Looting, for a maximum of 0-5 with Looting III. If killed while on fire, they drop cooked salmon instead.
=== Fishing ===
{{main|Fishing}}Raw salmon can be obtained from [[fishing]]. The wait time of one being caught is decreased with the [[Lure]] enchantment and the chance of one being caught is slightly decreased with the [[Luck of the Sea]] enchantment (named as such because it increases treasure, not fish).
Catching salmon awards 1-6 experience.
=== Chest loot ===
{{LootChestItem|raw-salmon}}
=== Villager gifts ===
{{in|java}}, Fisherman villagers throw raw salmon at [[player]]s under the [[Hero of the Village]] effect.
== Usage ==
=== Smelting ingredient ===
{{smelting
|Raw Salmon
|Cooked Salmon
|0.35
}}
=== Food ===
Raw salmon restores {{hunger|2}} [[hunger]] and 0.2 [[Hunger#Mechanics|saturation]].
=== Cats ===
Raw salmon can be used to tame [[cat]]s with {{frac|1|3}} chance of success, get cats off of [[chest]]s, and [[bed]]s, [[breed]] cats, and make baby cats grow up faster by 10% of the remaining time. Additionally, raw salmon can be used to heal cats by {{hp|2|mob=1}}.
Raw salmon can be used to gain [[ocelot]] trust, breed ocelots, and make baby ocelots grow up by 10%.
=== Dolphins ===
A [[dolphin]] can be fed raw salmon to increase its trust of the player and cause it to interact with the player more often. However, unlike most other animal mobs, this does not cause them to breed.
Additionally, dolphins swim to the nearest chest in a [[shipwreck]] or [[underwater ruin]] after they are fed raw salmon. If the chest in the nearest structure is broken, they swim to another structure with a chest.
=== Trading ===
Apprentice-level Fisherman [[villager]]s have 50%{{only|bedrock}} or {{frac|2|3}}{{only|java}} chance to buy 6 raw salmon and one [[emerald]] for 6 cooked salmon.
Journeyman-level Fisherman villagers offer to buy 13 raw salmon for an emerald.
=== Wolves ===
{{IN|bedrock}}, raw salmon can be fed only to [[wolves]] not at full health, healing them by {{hp|2|mob=1}}. Unlike other wolf food, raw salmon cannot be used to breed wolves or to accelerate the growth of baby wolves.
==Sounds==
{{Sound table/Entity/Food}}
== Data values ==
=== ID ===
{{edition|java}}:
{{ID table
|edition=java
|showitemtags=y
|showforms=y
|generatetranslationkeys=y
|displayname=Raw Salmon
|spritetype=item
|nameid=salmon
|itemtags=fishes
|form=item
|foot=1}}
{{edition|bedrock}}:
{{ID table
|edition=bedrock
|shownumericids=y
|showforms=y
|notshowbeitemforms=y
|generatetranslationkeys=y
|displayname=Raw Salmon
|spritetype=item
|nameid=salmon
|id=265
|form=item
|foot=1}}
== Achievements ==
{{load achievements|Lion Hunter}}
== Advancements ==
{{load advancements|Husbandry;A Balanced Diet;Fishy Business;A Complete Catalogue}}
== Video ==
<span style="display:inline-block">{{yt|s_GcAFeoREk}}</span>
== History ==
{{History|java}}
{{History||1.7.2|snap=13w36a|[[File:Raw Salmon JE1 BE1.png|32px]] Added raw salmon.}}
{{History||1.8|snap=14w25a|Raw salmon is now obtainable rare drops from [[guardian]]s and [[elder guardians]].}}
{{History||1.9|snap=15w44a|Raw salmon can now be found in [[bonus chest]]s.}}
{{History||1.10|snap=16w20a|Raw salmon is now dropped from [[polar bear]]s.}}
{{History||1.13|snap=17w47a|The different data values for the <code>fish</code> and <code>cooked_fish</code> IDs have been split up into their own IDs.
|Prior to [[1.13/Flattening|''The Flattening'']], these [[item]]s' numeral IDs were 349 and 250.}}
{{History|||snap=18w08b|Salmon has been added as a [[mob]], which drops raw salmon when killed (cooked while on [[fire]]).
|[[File:Raw Salmon JE2 BE2.png|32px]] The texture for raw salmon has been changed.}}
{{History||1.14|snap=18w48a|Raw salmon can now be found in chests in [[village]] fisher cottages.}}
{{History|||snap=19w11a|Fisherman [[villager]]s now [[trading|buy]] raw salmon.}}
{{History|||snap=19w13a|Fisherman villagers now give raw salmon to players under the [[Hero of the Village]] effect.}}
{{History|pocket alpha}}
{{History||v0.11.0|snap=build 1|[[File:Raw Salmon JE1 BE1.png|32px]] Added raw salmon.}}
{{History||v0.12.1|snap=build 1|Salmon now restores [[hunger]] instead of [[health]].
|Raw salmon can now be used to tame [[ocelot]]s.}}
{{History||v0.16.0|snap=build 1|Salmon is now [[drops|dropped]] by [[guardian]]s and [[elder guardian]]s.}}
{{History|pocket}}
{{History||1.0.0|snap=alpha 0.17.0.1|Added [[polar bear]]s, which drop raw salmon.}}
{{History|bedrock}}
{{History||1.2.0|snap=beta 1.2.0.2|Raw salmon is now found inside [[bonus chest]]s.}}
{{History||1.4.0|snap=beta 1.2.14.2|Salmon has been added as a [[mob]], which drops raw salmon when killed (cooked while on [[fire]]).
|[[File:Raw Salmon JE2 BE2.png|32px]] The texture for raw salmon has been changed.}}
{{History|||snap=beta 1.2.20.1|Added [[dolphin]]s, which can be [[breeding|bred]] with raw salmon.}}
{{History||1.5.0|snap=beta 1.5.0.0|Raw salmon can no longer be used to breed dolphins.
|Giving raw salmon to dolphins now leads the [[player]] to nearest [[underwater ruins]] or [[shipwreck]].}}
{{History||1.8.0|snap=beta 1.8.0.8|Raw salmon can no longer be used to tame [[ocelot]]s.
|Raw salmon can now be used to [[breeding|breed]] ocelots.
|Added stray [[cat]]s, which can be tamed by being fed raw salmon.}}
{{History||1.11.0|snap=beta 1.11.0.4|Raw salmon can now be [[trading|sold]] to fisherman [[villager]]s.}}
{{History||1.16.100|snap=beta 1.16.100.52|If [[salmon]] is [[death|killed]] while on [[fire]], then they now drop [[cooked salmon]] instead of a raw salmon.}}
{{History|console}}
{{History||xbox=TU31|xbone=CU19|ps=1.22|wiiu=Patch 3|[[File:Raw Salmon JE1 BE1.png|32px]] Added raw salmon.}}
{{History||xbox=TU69|ps=1.76|wiiu=Patch 38|[[File:Raw Salmon JE2 BE2.png|32px]] The texture for raw salmon have been changed.}}
{{History|new 3ds}}
{{History||0.1.0|[[File:Raw Salmon JE1 BE1.png|32px]] Added raw salmon.}}
{{History|foot}}
== Issues ==
{{issue list}}
== See also ==
* [[Fishing]]
== References ==
{{reflist}}
{{items}}
[[de:Roher Lachs]]
[[es:Salmón crudo]]
[[ja:生鮭]]
[[ko:생연어]]
[[pt:Salmão cru]]
[[ru:Сырой лосось]]
[[tr:Çiğ Somon]]
[[zh:生鲑鱼]]
[[Category:Renewable resources]]
[[Category:Food]]</li></ul> | 14w04a | When a furnace runs out of fuel, the smelting progress now rewinds at double speed. | |||||||||||||||||||||||||||||||||
1.13{{Extension DPL}}<ul><li>[[:Category:Fungi|Category:Fungi]]<br/>All pages covering blocks that are fungi.
[[Category:Blocks]]
[[Category:Items]]
[[ja:カテゴリ:菌類]]</li><li>[[Magenta Dye|Magenta Dye]]<br/>{{Item
| image = Magenta Dye.png
| renewable = Yes
| stackable = Yes (64)
}}
'''Magenta dye''' is a [[Dye#Quasi-Primary|quasi-primary color dye]].
== Obtaining ==
=== Crafting ===
{{Crafting
|head=1
|showdescription=1
|showname=0
|Allium
|Output=Magenta Dye
|type=Material
}}
{{Crafting
|Lilac
|Output=Magenta Dye,2
|type=Material
}}
{{Crafting
|Purple Dye
|Pink Dye
|Output=Magenta Dye,2
|type=Material
}}
{{Crafting
|Blue Dye
|Red Dye
|Pink Dye
|Output=Magenta Dye,3
|type=Material
}}
{{Crafting
|Lapis Lazuli
|Red Dye
|Pink Dye
|Output=Magenta Dye,3
|type=Material
|description={{only|bedrock|education}}
}}
{{Crafting
|Blue Dye
|Red Dye
|Red Dye
|White Dye
|Output=Magenta Dye,4
|type=Material
}}
{{Crafting
|Lapis Lazuli;Lapis Lazuli;Blue Dye
|Red Dye;Red Dye;Red Dye
|Red Dye;Red Dye;Red Dye
|Bone Meal;White Dye;Bone Meal
|Output=Magenta Dye,4
|type=Material
|description={{only|bedrock|education}}
|foot=1
}}
=== Trading ===
[[Wandering trader]]s sell 3 magenta dye for an [[emerald]].
== Usage ==
{{dye usage}}
=== Crafting ingredient ===
{{crafting usage|ignore=Banner|continue=1}}
{{banner crafting usage}}
=== Loom ingredient ===
{{Banner loom usage|Magenta Dye}}
=== Trading ===
Expert-level shepherd villagers have a {{frac|1|6}} chance to buy 12 magenta dye for an emerald.
== Data values ==
=== ID ===
{{edition|java}}:
{{ID table
|edition=java
|showforms=y
|generatetranslationkeys=y
|displayname=Magenta Dye
|spritetype=item
|nameid=magenta_dye
|form=item
|foot=1}}
{{edition|bedrock}}:
{{ID table
|edition=bedrock
|showaliasids=y
|shownumericids=y
|showforms=y
|notshowbeitemforms=y
|generatetranslationkeys=y
|displayname=Magenta Dye
|spritetype=item
|nameid=magenta_dye
|aliasid=dye / 13
|id=408
|form=item
|translationkey=item.dye.magenta.name
|foot=1}}
== Video ==
{{yt|IkaIFDQJNUU}}
== History ==
{{History|java beta}}
{{History||1.2|[[File:Magenta Dye JE1 BE1.png|32px]] Added magenta dye.}}
{{History|java}}
{{History||1.4.2|snap=12w34a|Added the ability to [[Armor#Dyeing|dye]] leather [[armor]] and [[wolf]] collars.}}
{{History||1.4.6|snap=12w49a|Magenta dye can now be [[crafting|crafted]] with [[gunpowder]] to create a [[firework star]].}}
{{History||1.6.1|snap=13w19a|[[Stained clay]] can now be crafted.}}
{{history||1.7.2|snap=13w36a|With the addition of new [[flower]]s, many secondary and tertiary dyes are now primary [[dye]]s.}}
{{History||1.7.2|snap=13w41a|[[Stained glass]] can now be crafted.}}
{{History||1.8|snap=14w30a|Added [[banner]]s, which can be dyed.}}
{{History||1.11|snap=16w39a|Added [[shulker box]]es, which can be dyed.}}
{{History||1.12|snap=17w15a|Added ability to dye [[bed]]s.}}
{{History||1.13|snap=17w47a|The different data values for the <code>dye</code> ID have now been split up into their own IDs.
|Prior to [[1.13/Flattening|''The Flattening'']], this [[item]]'s numeral ID was 351.}}
{{History||1.14|snap=18w43a|Magenta dye is now crafted using [[blue dye]] and [[white dye]], instead of [[lapis lazuli]] and [[bone meal]].
|[[File:Magenta Dye JE2 BE2.png|32px]] The texture of magenta dye has now been changed.}}
{{History|||snap=18w44a|Magenta dye can now change the text color on [[sign]]s to magenta.}}
{{History|||snap=19w05a|Added the [[wandering trader]], which sells magenta dye.}}
{{History|||snap=19w11a|Magenta dye can now be [[trading|bought]] by shepherd villagers.}}
{{History||1.17|snap=20w45a|Magenta dye can now be used to craft [[magenta candle]]s.}}
{{History|||snap=21w19a|Magenta dye can no longer be used to craft magenta candles.}}
{{History|||snap=Pre-release 1|Magenta dye can now once again be used to craft magenta candles.}}
{{History||1.20<br>(Experimental)|link=1.19.3|snap=22w42a|Magenta dye can now change the text color on [[hanging sign]]s to magenta.}}
{{History|pocket alpha}}
{{History||v0.3.0|[[File:Magenta Dye JE1 BE1.png|32px]] Added magenta dye. It is currently unobtainable and serves no purpose.}}
{{History||v0.4.0|Magenta dye is now craftable with one [[lapis lazuli]], two [[rose red]]s, and one [[bone meal]].
|Magenta dye can now be used to craft magenta wool.}}
{{History||v0.6.0|Magenta dye can now be used to dye [[sheep]].}}
{{History||v0.8.0|snap=build 1|Magenta dye can now additionally be crafted with one [[purple dye]] and one [[pink dye]], or with one [[lapis lazuli]], one [[rose red]], and one pink dye.}}
{{History||v0.9.0|snap=build 11|Magenta dye can now be used to craft colored [[terracotta]].}}
{{History||v0.11.0|snap=build 1|Magenta dye can now be used to dye tamed [[wolf]] collars.}}
{{History||v0.14.0|snap=build 1|Magenta dye can now be used to dye [[water]] in [[cauldron]]s.}}
{{History|pocket}}
{{History||1.0.0|snap=alpha 0.17.0.1|Magenta dye can now be used to dye [[shulker]]s.}}
{{History||1.1.0|snap=alpha 1.1.0.0|Magenta dye can now be used to craft [[concrete powder]], colored [[bed]]s and dyed [[shulker box]]es.}}
{{History|bedrock}}
{{History||1.2.0|snap=beta 1.2.0.2|Magenta dye can now be used to craft [[firework star]]s, [[stained glass]] and patterns on [[banner]]s.}}
{{History||1.4.0|snap=beta 1.2.20.1|Magenta dye can now be used to craft [[balloon]]s and [[glow stick]]s.}}
{{History||1.8.0|snap=beta 1.8.0.8|Magenta dye can now be used to dye tamed [[cat]] collars.}}
{{History||1.10.0|snap=beta 1.10.0.3|Magenta dye is now [[trading|sold]] by [[wandering trader]]s.
|Magenta dye can now be used to dye white [[carpet]]s and regular [[glass pane]]s.
|[[File:Magenta Dye JE2 BE2.png|32px]] The texture of magenta dye has now been changed.}}
{{History||1.11.0|snap=beta 1.11.0.4|Magenta dye can now be [[trading|sold]] to shepherd [[villager]]s.}}
{{History||1.16.100|snap=beta 1.16.100.56|The ID of magenta dye has been changed from <code>dye/13</code> to <code>magenta_dye</code>.}}
{{History|console}}
{{History||xbox=TU1|xbone=CU1|ps=1.00|switch=1.0.1|wiiu=Patch 1|[[File:Magenta Dye JE1 BE1.png|32px]] Added magenta dye.}}
{{History|PS4}}
{{History||1.90|[[File:Magenta Dye JE2 BE2.png|32px]] The texture of magenta dye has now been changed.}}
{{History|new 3ds}}
{{History||0.1.0|[[File:Magenta Dye JE1 BE1.png|32px]] Added magenta dye.}}
{{History|foot}}
== Issues ==
{{issue list}}
== References ==
{{reflist}}
{{Items}}
[[Category:Dyes]]
[[cs:Purpurové barvivo]]
[[de:Magenta Farbstoff]]
[[es:Tinte magenta]]
[[fr:Teinture magenta]]
[[hu:Bíborvörös festék]]
[[ja:赤紫色の染料]]
[[ko:자홍색 염료]]
[[nl:Magenta kleurstof]]
[[pl:Karmazynowy barwnik]]
[[pt:Corante magenta]]
[[ru:Сиреневый краситель]]
[[zh:品红色染料]]
[[Category:Renewable resources]]</li></ul> | 18w06a | The smelting GUI now includes a recipe tab, which allows players to know how to smelt previously-smelted items, automatically fill in the item to be smelted and filter out the recipes to what they can make from their inventory. | |||||||||||||||||||||||||||||||||
| Custom recipes are now loaded from data packs in data/(namespace)/recipes/(name).json. | |||||||||||||||||||||||||||||||||||
| Turning off the vanilla data pack now also removes all recipes. | |||||||||||||||||||||||||||||||||||
| 18w07a | Dried kelp blocks have been added as a new fuel. | ||||||||||||||||||||||||||||||||||
1.14{{Extension DPL}}<ul><li>[[:Category:Minecraft Earth items|Category:Minecraft Earth items]]<br/>All items in ''[[Minecraft Earth]]''.
[[Category:Items]]
[[Category:Minecraft Earth|Items]]</li><li>[[:Category:Dyes|Category:Dyes]]<br/>These are items that can be used to dye sheep, wool blocks, or combined to make other dyes.
[[Category:Items]]
[[es:Categoría:Tintes]]
[[fr:Catégorie:Teinture]]
[[hu:Kategória:Festékek]]
[[zh:Category:染料]]</li></ul> | 18w43a | Added bamboo, which can now be used as a fuel. | |||||||||||||||||||||||||||||||||
| Dead Bushes can now be used as a fuel, smelting .5 items. | |||||||||||||||||||||||||||||||||||
| 18w45a | Added scaffolding, which can now be used as a fuel. | ||||||||||||||||||||||||||||||||||
| 18w50a | Ores can now be smelted using a blast furnace and food using a smoker. | ||||||||||||||||||||||||||||||||||
| 19w02a | Items can now be smelted using a campfire. | ||||||||||||||||||||||||||||||||||
1.15{{Extension DPL}}<ul><li>[[:Category:Armor|Category:Armor]]<br/>[[Category:Items]]</li><li>[[Obsidian Boat|Obsidian Boat]]<br/>{{for|other uses|Obsidian (disambiguation)}} {{for|other kinds of boats|Boat (disambiguation)}}
{{Joke feature}}
{{ItemEntity
|title=Obsidian Boat
|image=Obsidian Boat.png
|image2=Obsidian Boat (item).png
|stackable=No
|renewable=Yes
}}
The '''obsidian boat''' was a joke [[boat]] variant released in an April Fools' joke version.
== Obtaining ==
=== Crafting ===
{{crafting
|A2 = Obsidian |C2 = Obsidian
|A3 = Obsidian |B3 = Obsidian |C3 = Obsidian
|Output= Obsidian Boat
|ignoreusage=1
}}
== Usage ==
Obsidian boats sank in [[water]] instead of floating. They also sank in lava like other boats but did not get destroyed in it.
== Sounds ==
Obsidian boats used the Friendly Creatures sound category for entity-dependent sound events, although did not have any sounds of their own.
== Data values ==
=== ID ===
{{ID table
|shownumericids=y
|showforms=y
|generatetranslationkeys=java
|displayname=Obsidian Boat
|spritetype=item
|nameid=obsidian_boat
|id=432
|form=item
|translationkey=item.obsidian_boat.name
|foot=1}}
{{ID table
|shownumericids=y
|generatetranslationkeys=java
|displayname=Obsidian Boat
|spritetype=entity
|nameid=boat
|id=41
|translationkey=entity.Boat.name
|foot=1}}
=== Entity data ===
{{/ED}}
== History ==
{{History|java}}
{{History||1.10|snap=15w14a|link=Java Edition 15w14a|[[File:Obsidian_Boat_(item).png|32px]] [[File:Obsidian Boat.png|32px]] Added the obsidian boat.}}
{{History|foot}}
== Issues ==
Obsidian boat is a joke feature and as such issues relating to them cannot be fixed.
{{Items}}
{{Entities}}
{{Jokes}}
[[Category:Joke items]]
[[Category:Joke entities]]
[[it:Barca di ossidiana]]
[[ja:黒曜石のボート]]
[[pt:Bote de obsidiana]]
[[uk:Обсидіановий човен]]
[[zh:15w14a]]</li></ul> | 19w37a | Boats used as fuel now smelt 6 items instead of 1. | |||||||||||||||||||||||||||||||||
| Pre-release 1 | Scaffolding used as fuel now smelts 2 items instead of 0.25. | ||||||||||||||||||||||||||||||||||
1.17{{Extension DPL}}<ul><li>[[Debug Stick|Debug Stick]]<br/>{{about|the item|other uses|Debug}}
{{exclusive|java}}
{{Item
| image = Debug Stick.gif
| rarity = Epic
| renewable = No
| stackable = No
}}
The '''debug stick''' is an [[item]] used to edit the [[block states]] of [[block]]s. It is visually identical to a regular [[stick]], but with a glint (as if [[Enchanting|enchanted]]).
== Obtaining ==
The debug stick is obtainable via [[commands]] such as {{cmd|/give}} or {{Cmd|/item}}, or the Creative inventory if the player has the appropriate permissions. It can be obtained only in worlds with cheats on.
== Usage ==
The debug stick can be used to change block states. {{control|Hitting}} the block allows players to select the block state key they wish to change, for an example, switching between the ''conditional'' and the ''facing'' block state keys for a [[command block]]. {{control|Using}} the block allows them to cycle through the valid values for the block state key, again as an example, the player can make the command block face, ''down'', ''east'', ''north'', ''south'', ''up'', or ''west'' if they chose the ''facing'' block state key. {{control|Sneaking}} while {{control|hitting}} or {{control|using}} cycles through the block state keys or values in reverse order.
It is notable that {{Control|using}} debug stick directly on an interactive block without {{Control|sneaking}} uses the block itself instead of the stick.<ref>{{bug|MC-200199}} </ref>
The debug stick cannot be used while in Survival or Adventure mode. It works only in creative mode with cheats enabled. In modes other than Creative, it acts like a regular item — although when {{control|using}} it on a block, the player swings the stick as if interacting with it (but nothing happens).
== Data values ==
=== ID ===
{{ID table
|edition=java
|showforms=y
|generatetranslationkeys=y
|displayname=Debug Stick
|spritetype=item
|nameid=debug_stick
|form=item
|foot=1}}
=== Item data ===
<div class="treeview">
* {{nbt|compound|tag}}: The item's '''tag''' tag.
{{:Player.dat_format/Debug Sticks}}
</div>
== History ==
{{History|java}}
{{History||1.13|snap=17w47a|[[File:Debug Stick.gif|32px]] Added debug sticks.}}
{{History||1.16|snap=20w10a|Debug sticks are now capable of editing [[fire]] due to its added hitbox.}}
{{History||1.19.3|snap=22w44a|The debug stick is now available in the creative inventory, but only if cheats are enabled.}}
{{History|||snap=22w45a|Moved the debug stick behind the Operator Utilities tab in the creative inventory. The tab is only available if cheats are enabled and the "Operator Items Tab" option in the controls menu is turned on.}}
{{History|foot}}
== Issues ==
The debug stick is not supported, and any issues resulting of its usage are closed as "Won't Fix" in the issue tracker.<br/> Issues with the stick itself are considered valid.<ref>https://bugs.mojang.com/browse/MC-122323?focusedCommentId=419481&page=com.atlassian.jira.plugin.system.issuetabpanels:comment-tabpanel#comment-419481</ref><ref>{{reddit|7es23r||Just be aware that any weird state you create with it you cannot naturally create and any bugs that come from it will be shot down as 'Wont fix' :D|_Grum|November 22, 2017}}</ref>
{{issue list}}
== Trivia ==
*An [[add-on]] made by Mineplex was showcased in [[MINECON Live 2019]], which had an editor stick for {{el|be}}, similar to the Debug Stick.<ref>{{ytl|OZqNaEX8208|MINECON Live 2019 @ 1:05:02|Minecraft|September 28, 2019|t=3902}}</ref>
== Gallery ==
<gallery>
Technically Updated.jpg|Artwork of Steve and Alex wielding debug sticks.
</gallery>
== See also ==
*[[Block states]]
== References ==
{{Reflist}}
{{Items}}
[[Category:Non-renewable resources]]
[[de:Debug-Stab]]
[[es:Palo de depuración]]
[[fr:Bâton de débogage]]
[[ja:デバッグ棒]]
[[ko:디버그 막대기]]
[[pl:Patyk debugujący]]
[[pt:Graveto de depuração]]
[[ru:Палка отладки]]
[[zh:调试棒]]</li><li>[[Campfire|Campfire]]<br/>{{Block
| image = <gallery>
Campfire.gif|Campfire
Soul Campfire.gif|Soul Campfire
Unlit Campfire.png|Unlit
</gallery>
| image2 = <gallery>
Campfire (item) JE2.png|Campfire
Soul Campfire (item) JE2.png|Soul Campfire
</gallery>
| invimage = Campfire
| invimage2 = Soul Campfire
| transparent = No
| light = '''Campfire''': <br>Yes (15) when lit<br>'''Soul Campfire''': <br>Yes (10) when lit
| tool = axe
| renewable = Yes
| stackable = Yes (64)
| flammable = No
| lavasusceptible = Yes
}}
A '''campfire''' is a block that can be used to cook [[food]], pacify [[bee]]s, act as a spread-proof [[light source]], smoke signal or damaging trap block.
A '''soul campfire''' is a dimmer variant of the campfire with turquoise flames. Soul campfires deal more damage than normal campfires.
== Obtaining ==
=== Breaking ===
Campfires can be mined with any tool, or without a tool, but [[axe]]s are the fastest. A regular campfire drops 2{{only|java|short=1}} or 4{{only|bedrock|short=1}} [[charcoal]], a soul campfire drops [[soul soil]], and either one also drops any items placed on it. If mined with a tool enchanted with [[Silk Touch]], the campfire instead drops itself as an item.
{{IN|BE}}, either kind of campfire can also be broken by pushing it with a [[piston]] or [[sticky piston]]. Pistons cannot move or break campfires {{in|je}}.
{{breaking row
|Campfire, Soul Campfire
|axe
|horizontal=1}}
=== Natural generation ===
Campfires can generate in {{BiomeLink|taiga}} and {{BiomeLink|snowy taiga}}{{only|be}} [[village]]s.
Campfires also generate in camps inside [[ancient city|ancient cities]], beneath a pile of blue, light blue and cyan [[wool]] blocks.
=== Crafting ===
{{Crafting
|head=1
|B1= Stick
|A2= Stick
|B2= Coal; Charcoal
|C2= Stick
|A3= Any Log or Stem; Any Stripped Log or Stem; Any Wood or Hyphae; Any Stripped Wood or Hyphae
|B3= Any Log or Stem; Any Stripped Log or Stem; Any Wood or Hyphae; Any Stripped Wood or Hyphae
|C3= Any Log or Stem; Any Stripped Log or Stem; Any Wood or Hyphae; Any Stripped Wood or Hyphae
|Output= Campfire
|type= Decoration block
}}
{{Crafting
|foot=1
|B1= Stick
|A2= Stick
|B2= Soul Sand; Soul Soil
|C2= Stick
|A3= Any Log or Stem; Any Stripped Log or Stem; Any Wood or Hyphae; Any Stripped Wood or Hyphae
|B3= Any Log or Stem; Any Stripped Log or Stem; Any Wood or Hyphae; Any Stripped Wood or Hyphae
|C3= Any Log or Stem; Any Stripped Log or Stem; Any Wood or Hyphae; Any Stripped Wood or Hyphae
|Output= Soul Campfire
|type= Decoration block
}}
=== Trading ===
{{IN|bedrock}}, apprentice-level fisherman [[villager]]s have a 50% chance of selling a campfire for 5 [[emerald]]s.
{{IN|java}}, apprentice-level fisherman villagers have a {{frac|2|3}} chance of selling a campfire for 2 [[emerald]]s.
== Usage ==
Lit campfires emit a light level of 15 and lit soul campfires emit a light level of 10. Unlike [[fire]], campfires do not spread under any circumstances.
Campfires are lit by default when placed. Campfires can be manually lit by {{control|using}} or [[Dispenser|dispensing]] [[flint and steel]] on them, shooting it with a flaming arrow, or using or dispensing fire charges, blaze fireballs, and ghast fireballs when {{cmd|gamerule|mobGriefing}} is true. {{IN|bedrock}}, campfires can also be lit by {{control|using}} an item enchanted with [[fire aspect]], or stepping on it while burning.
Campfires can be extinguished by [[waterlogging]] it (placing [[water]] in the same block space), throwing a [[splash water bottle]] on it, or {{control|using}} a [[shovel]] on it. {{IN|bedrock}}, campfires can also be extinguished by placing a water source or allowing water to flow in the space above the campfire. As with [[torches]], rain does not extinguish campfires.<ref>{{bug|MC-141920||Rain doesn't put out campfire|Works as Intended}}</ref>
Using [[flint and steel]] on the side of a waterlogged or lit campfire sets the adjacent air block on fire instead.
Any items cooking on a campfire always drop when the campfire block is broken.
=== Particles and smoke signals ===
[[File:Campfire with smoke.gif|thumb|Campfire emitting smoke.]]
Campfires produce smoke particles that float up around 10 blocks before disappearing. If a [[hay bale]] is placed below, the campfire becomes a signal fire and the smoke floats up 24 blocks instead.
Campfire smoke particles can partially pass through a block directly above it, but do not pass through blocks more than one block directly above it.
Although a trap door is thinner than a slab, a trap door can block the smoke completely, preventing the smoke from floating up.
Campfires emit extra smoke particles during rain, similar to [[lava]].
Campfires also emit occasional ember particles, similar to lava. Soul campfires, however, do not emit embers.<ref>{{bug|MC-185482||Soul campfires do not emit ember particles|Works as Intended}}</ref>
=== Damage ===
Campfires damage [[mob]]s standing on top of them even if underwater (with exceptions such as [[shulker]]s, [[zombified piglin]]s or [[guardian]]s), but only if lit. Campfires deal {{hp|1}} and soul campfires deal {{hp|2}} of damage every tick (although [[damage immunity]] reduces this to once every half-second) Campfires do not cause lasting burning or destroy items. Damage taken is considered [[Damage#Fire|fire damage]] and is reduced by [[armor]] (which loses [[Item durability#Armor durability|durability]]), the [[Resistance]] potion effects, and the [[Protection]] and [[Fire Protection]] enchantments. The player can avoid being damaged at all, either by using a [[potion of fire resistance]] or wearing [[Frost Walker]] boots.
Regardless of [[Solid block#Height|height]], all blocks prevent damage done to mobs or players above campfires. The campfire deals damage only to entities occupying its block.
=== Cooking ===
[[File:Campfire (Cooking).gif|thumb]]
The player can place {{tooltip|raw food|raw beef, raw chicken, raw rabbit, raw porkchop, raw mutton, raw cod, raw salmon, potato, kelp}} on a lit campfire by {{control|using}} the food item on it. Up to four food items can be placed on a single campfire, which cooks the items simultaneously. Unlike other blocks that can cook food, campfires do not require any kind of fuel to cook. On a campfire, foods produce small smoke particles, indicating they are being cooked. Food items take 30 seconds (600 [[tick]]s) to cook, compared to 10 seconds for [[furnace]]s or 5 seconds for [[smoker]]s. Assuming that one uses all four slots to cook at once, the Campfire is, therefore, more efficient than furnaces (taking 10 seconds less per four items and no fuel) for cooking, but must be watched so as to pick up the food and refill it once it is done. It is slower than a smoker by about ten seconds, but its lack of fuel consumption could be seen as a worthwhile trade-off. Once finished cooking, items pop off the campfire. If the campfire is extinguished while cooking food, it resets as if it had not been cooked at all. Food items can be placed on an unlit campfire.
Other items can be placed on campfires using external editors, mods or add-ons.
=== Hoppers ===
Campfires do not have an [[Inventory#External inventories|external inventory]]. Raw food cannot be loaded into the campfire with a [[hopper]].
A hopper placed directly underneath a campfire pulls through any items dropped into the campfire. Any drops from a mob that dies in the campfire get pulled into the hopper.
=== Bees ===
Placing a campfire under a [[beehive]] or [[bee nest]] allows players to harvest [[honey bottle]]s or [[honeycomb]] without provoking the [[bee]]s.
There must be unobstructed air between the campfire and the beehive or bee nest. [[Carpet]]s are an exception.{{only|JE}}
=== Piglins ===
Lit soul campfires repel [[piglin]]s that are not currently attacking. This occurs when the [[piglin]] is within an 8 block radius of the soul campfire.
=== Light source ===
Standard lit campfires emit a light level of 15, while soul campfires emit a light level of 10. Like most other sources of light, campfires melt nearby [[snow]] and [[ice]]. Due to their lower light level, soul campfires do not melt snow or ice.
=== Note blocks ===
Campfires can be placed under [[note block]]s to produce "bass" sounds.
=== Converting soul sand to soul soil ===
Soul campfires can be used to convert [[soul sand]] into [[soul soil]]. If a soul campfire is crafted using soul sand, placed, and then broken without [[Silk Touch]], that soul campfire drops soul soil.<ref>{{bug|MC-178579||Soul campfires can be used to convert soul sand into soul soil|Works as Intended}}</ref>
=== Piston interactivity ===
{{IN|BE}}, pushing a campfire or soul campfire with a [[piston]] or [[sticky piston]] breaks it. Unlike other methods, breaking with a piston drops only one [[charcoal]] instead of two. Campfires cannot be pulled by sticky pistons.
{{IN|JE}}, pistons do not interact with campfires. Campfires neither move nor break when pushed or pulled by pistons.
== Sounds ==
=== Generic ===
{{Sound table/Block/Wood}}
=== Unique ===
{{edition|java}}:
{{Sound table
|sound=Campfire crackle1.ogg
|sound2=Campfire crackle2.ogg
|sound3=Campfire crackle3.ogg
|sound4=Campfire crackle4.ogg
|sound5=Campfire crackle5.ogg
|sound6=Campfire crackle6.ogg
|subtitle=Campfire crackles
|source=block
|description=Randomly while lit
|id=block.campfire.crackle
|translationkey=subtitles.block.campfire.crackle
|volume=0.5-1.5
|pitch=0.6-1.3
|distance=16}}
{{Sound table
|sound=Flint and steel click.ogg
|subtitle=Flint and steel click
|source=block
|description=When a campfire is lit with a flint and steel
|id=item.flintandsteel.use
|translationkey=subtitles.item.flintandsteel.use
|volume=1.0
|pitch=0.8-1.2
|distance=16}}
{{Sound table
|sound=Ghast fireball4.ogg
|subtitle=Fireball whooshes
|source=block
|description=When a campfire is lit with a fire charge
|id=item.firecharge.use
|translationkey=subtitles.item.firecharge.use
|volume=1.0
|pitch=0.8-1.2
|distance=16}}
{{Sound table
|rowspan=2
|sound=Fizz.ogg
|subtitle=Fire extinguishes
|source=block
|description=When a campfire is extinguished with water
|id=entity.generic.extinguish_fire
|translationkey=subtitles.entity.generic.extinguish_fire
|volume=1.0
|pitch=1.0
|distance=16}}
{{Sound table
|subtitle=Fire extinguished
|source=block
|description=When a campfire is extinguished
|id=block.fire.extinguish
|translationkey=subtitles.block.fire.extinguish
|volume=0.5
|pitch=2.0
|distance=16
|foot=1}}
{{edition|bedrock}}:
{{Sound table
|type=bedrock
|sound=Campfire crackle1.ogg
|sound2=Campfire crackle2.ogg
|sound3=Campfire crackle3.ogg
|sound4=Campfire crackle4.ogg
|sound5=Campfire crackle5.ogg
|sound6=Campfire crackle6.ogg
|source=block
|description=Randomly while lit
|id=block.campfire.crackle
|volume=1.0 {{Until|BE 1.19.80}}<br>0.5-1.5 {{Upcoming|BE 1.19.80}}
|pitch=1.0 {{Until|BE 1.19.80}}<br>0.6-1.3 {{Upcoming|BE 1.19.80}}}}
{{Sound table
|sound=Flint and steel click.ogg
|source=block
|description=When a campfire is lit
|id=fire.ignite
|volume=1.0
|pitch=0.8-1.2}}
{{Sound table
|sound=Ghast fireball4.ogg
|source=hostile
|description=When a campfire is lit with a fire charge
|id=mob.ghast.fireball
|volume=1.0
|pitch=1.0}}
{{Sound table
|sound=Fizz.ogg
|source=block
|description=When a campfire is extinguished
|id=random.fizz
|volume=0.5
|pitch=1.8-2.4
|foot=1}}
== Data values ==
=== ID ===
{{edition|java}}:
{{ID table
|edition=java
|showblocktags=y
|showforms=y
|generatetranslationkeys=y
|displayname=Campfire
|spritetype=block
|nameid=campfire
|blocktags=campfires}}
{{ID table
|displayname=Soul Campfire
|spritetype=block
|nameid=soul_campfire
|blocktags=campfires, piglin_repellents
|itemtags=piglin_repellents
|foot=1}}
{{ID table
|displayname=Block entity
|spritename=campfire
|spritetype=block
|nameid=campfire
|foot=1}}
{{edition|bedrock}}:
{{ID table
|edition=bedrock
|firstcolumnname=Campfire
|shownumericids=y
|showforms=y
|generatetranslationkeys=y
|displayname=Normal block
|spritename=campfire
|spritetype=block
|nameid=campfire
|id=464
|form=block
|itemform=item.campfire}}
{{ID table
|displayname=Normal item
|spritename=campfire
|spritetype=item
|nameid=campfire
|id=589
|form=item
|translationkey=tile.campfire.name}}
{{ID table
|displayname=Soul block
|spritename=soul-campfire
|spritetype=block
|nameid=soul_campfire
|id=545
|form=block
|itemform=item.soul_campfire}}
{{ID table
|displayname=Soul item
|spritename=soul-campfire
|spritetype=item
|nameid=soul_campfire
|id=622
|form=item
|translationkey=tile.soul_campfire.name
|foot=1}}
{{ID table
|notnamespaced=y
|displayname=Block entity
|spritename=campfire
|spritetype=block
|nameid=Campfire
|foot=1}}
=== Block states ===
{{see also|Block states}}
{{/BS}}
=== Block data ===
A campfire has a [[block entity]] associated with it that holds additional data about the [[block]].
{{el|java}}:
{{see also|Block entity format}}
{{/BE}}
{{el|bedrock}}:
: See [[Bedrock Edition level format/Block entity format]].
== Achievements ==
{{load achievements|Bee our guest}}
== Advancements ==
{{Load advancements|Bee Our Guest}}
== History ==
{{History||September 26, 2018|link={{tweet|minecraft|1044587405779451906}}|Campfires are announced to be part of the [[biome]] vote at [[MINECON Earth 2018]].}}
{{History||September 29, 2018|link={{ytl|HoMDyRqMNMA}}|Campfires are showcased at [[MINECON Earth 2018]].}}
{{History||September 29, 2018|link={{tweet|minecraft|1046097775199498325}}|[[Taiga]] wins the [[biome]] vote, meaning campfires are to be added to the game in [[Java Edition 1.14|1.14]].}}
{{History|java}}
{{History||1.14|snap=19w02a|[[File:Campfire JE1 BE1.gif|32px]] [[File:Unlit Campfire JE1 BE1.png|32px]] Added campfires.}}
{{History|||snap=19w03a|[[File:Campfire (item) JE1 BE1.png|32px]] [[File:Campfire JE2 BE2.gif|32px]] [[File:Unlit Campfire JE2 BE2.png|32px]] The [[model]] and texture of the campfire have been changed.
|Lit campfires now produce spark [[particles]].
|The [[light]] level of campfires has been changed from 9 to 15.
|Campfires are now directionally placed.
|Lit campfires produce smoke plume [[particles]] more often.}}
{{History|||snap=19w04a|Campfires now spawn in [[taiga]] [[village]]s on the ground and inside chimneys.
|Crouching on a campfire no longer prevents the player from taking damage from it.<ref>{{Bug|MC-141913||Sneaking on a campfire prevents damage|Fixed}}</ref>}}
{{History|||snap=19w08a|Campfires can now be extinguished by [[splash water bottle]]s.}}
{{History|||snap=19w11a|Fisherman [[villager]]s now [[trading|sell]] campfires.}}
{{History||1.14.1|snap=Pre-Release 2|Campfires can now be lit by flaming [[arrow]]s.}}
{{History||1.14.2|snap=Pre-Release 1|Flaming arrows can no longer light [[waterlogging|waterlogged]] campfires.}}
{{History||1.15|snap=19w34a|Campfires under [[bee nest]]s and [[bee hive]]s now prevent [[bee]]s from aggravating toward [[player]]s who harvest them.}}
{{History|||snap=19w37a|Campfires can now be extinguished using a [[shovel]].}}
{{History|||snap=19w42a|Campfires can now be lit by small [[fireball]]s.}}
{{History||1.16|snap=20w11a|Campfires can now be lit by any burning [[projectile]].}}
{{History|||snap=20w13a|Campfires can now be [[crafting|crafted]] using [[stems]] and [[hyphae]].}}
{{History|||snap=20w15a|[[File:Soul Campfire (item) JE1 BE1.png|32px]] [[File:Soul Campfire.gif|32px]] Added soul campfires.}}
{{History|||snap=20w22a|Campfires now [[drops|drop]] the [[food]] being cooked when they are put out with a [[shovel]] or [[water bottle]].}}
{{History|||snap=Pre-release 3|[[File:Unlit Campfire with foods on it.png|32px]] Food can now be placed on unlit campfires. However, due to a bug,<ref>{{Bug|MC-188448||Food pops off of campfire when extinguished|Fixed}}</ref> food pops off of campfires when extinguished.}}
{{History||1.17|snap=20w46a|Food no longer pops off of campfires when extinguished.}}
{{History||1.18|snap=21w41a|[[File:Campfire (item) JE2.png|32px]] [[File:Soul Campfire (item) JE2.png|32px]] Changed campfire and soul campfire textures as items.}}
{{History||1.19|snap=22w13a|Campfires now generate in camps inside [[ancient city|ancient cities]].}}
{{History||1.19.4|snap=23w07a|The soul campfire recipes are no longer unlocked by [[stick]]s.<ref>{{bug|MC-238920}}</ref>}}
{{History||1.20<br>(Experimental)|link=1.19.4|snap=1.19.4-pre1|Cherry logs, wood, and their stripped variations can now used to craft campfire and soul campfire.<ref>{{bug|MC-260149}}</ref>}}
{{History|bedrock}}
{{History||1.10.0|snap=beta 1.10.0.3|[[File:Campfire JE1 BE1.gif|32px]] [[File:Unlit Campfire JE1 BE1.png|32px]] Added campfires.
|Campfires are available only through [[Experimental Gameplay]].}}
{{History||1.11.0|snap=beta 1.11.0.1|Campfires have been fully implemented.
|[[File:Campfire_(item)_JE1_BE1.png|32px]] [[File:Campfire JE2 BE2.gif|32px]] [[File:Unlit Campfire JE2 BE2.png|32px]] The [[model]] and texture of the campfire have been changed.}}
{{History|||snap=beta 1.11.0.4|Campfires can now be [[trading|bought]] from fishermen [[villager]]s.}}
{{History||1.13.0|snap=?|Campfires now emit embers similar to [[lava]].}}
{{History||1.14.0|snap=beta 1.14.0.1|Campfires under [[bee nest]]s and [[beehive]]s now prevent [[bee]]s from aggravating toward [[player]]s who harvest them.}}
{{History||1.16.0|snap=beta 1.16.0.57|[[File:Soul_Campfire_(item)_JE1_BE1.png|32px]] [[File:Soul Campfire.gif|32px]] Added soul campfires.}}
{{History||1.16.20|snap=beta 1.16.20.50|Soul campfires now emit [[light]] level of 10.}}
{{History||1.16.100|snap=beta 1.16.100.54|Soul campfires now deal double the damage that normal campfires deal.|Soul campfires now drop [[Soul Soil]] instead of [[Charcoal]] when mined.}}
{{History||1.17.30|snap=beta 1.17.30.23|Campfires are now stackable in the inventory.}}
{{History||1.18.10|snap=beta 1.18.10.20|[[File:Campfire (item) JE2.png|32px]] [[File:Soul Campfire (item) JE2.png|32px]] Changed campfire and soul campfire textures as items.}}
{{History||1.19.60|snap=beta 1.19.60.23|Campfires no longer set players and mobs on fire.}}
{{History||1.19.80|snap=beta 1.19.80.22|Campfires now damage mobs standing on top of them.}}
{{History||1.20.30|snap=beta 1.20.30.20|Campfires now use the <code>minecraft:cardinal_direction</code> [[block state]] instead of <code>direction</code>.}}
{{History|console}}
{{History||ps=1.91|[[File:Campfire_(item)_JE1_BE1.png|32px]] [[File:Campfire JE2 BE2.gif|32px]] [[File:Unlit Campfire JE2 BE2.png|32px]] Added campfires.}}
{{History|foot}}
== Issues ==
{{Issue list}}
== Gallery ==
<gallery>
Cozy Cabin Smoke.jpg|Campfire smoke coming out of a cozy cabin.
Cozy Cabin Campfire.jpg|Campfire near a cozy cabin.
1.14 Dev Campfire.jpg|Dev screenshot.
Campfire in taiga village.png|A few naturally generating campfires in a [[taiga]] biome [[village]].
Campfire with hay bale vs without.png|A comparison between a campfire with a [[hay bale]] below it (left) and one without (right).
Campfire Particles.png|The number of particles depends on the height of the top block.
Campfire cooking.png|Cooking porkchops with a campfire.
Campfire (cooking) JE1 BE1.gif|Cooking with a campfire in [[Java Edition 19w02a]].
</gallery>
== References ==
{{reflist}}
{{Blocks|Utility}}
{{Items}}
[[Category:Utility blocks]]
[[Category:Manufactured blocks]]
[[Category:Generated structure blocks]]
[[Category:Block entities]]
[[Category:Storage]]
[[Category:Light sources]]
[[de:Lagerfeuer]]
[[fr:Feu de camp]]
[[ja:焚き火]]
[[ko:모닥불]]
[[pl:Ognisko]]
[[pt:Fogueira]]
[[ru:Костёр]]
[[th:แคมป์ไฟ]]
[[zh:营火]]</li></ul> | 21w05a | Added Azalea and Flowering Azalea, which can now be used as a fuel. | |||||||||||||||||||||||||||||||||
| Pocket Edition Alpha | |||||||||||||||||||||||||||||||||||
v0.3.2{{Extension DPL}}<ul><li>[[Pottery Sherd|Pottery Sherd]]<br/>{{Item
| image=Angler Pottery Sherd.png
| extratext = View [[#Items|all items]]
| renewable = No
| stackable = Yes (64)
}}
<!-- IT IS SHERD, NOT SHARD! DO NOT CHANGE TO SHARD, AS IT IS NAMED SHERD IN-GAME! -->
'''Pottery sherds'''<ref group="note">The word "[[wiktionary:sherd#English|sherd]]" or "[[wiktionary:potsherd#English|potsherd]]" is used by archaeologists to refer to fragments of pottery or other ceramics in order to differentiate them from "shards" of glass, metal, minerals and other materials.
</ref> are a set of twenty [[item]]s used to craft [[decorated pot]]s with ornamental designs. They can be obtained only by [[brush]]ing [[suspicious block]]s, with the variants of sherd obtainable being dependent on the structure.
== Obtaining ==
=== Breaking ===
When a [[decorated pot]] is broken with a [[pickaxe]], [[axe]], [[shovel]], [[hoe]] or [[sword]] that is ''not'' enchanted with [[Silk Touch]], it drops all of the pottery sherds and [[brick]]s used to craft it.
=== Suspicious block loot ===
Pottery sherds can be found as [[suspicious block]] loot in [[trail ruins]], [[ocean ruins]], [[desert pyramids]] and [[desert well]]s, and can be extracted from these blocks using a [[brush]].
{{#invoke:LootChest|base3|angler-pottery-sherd,archer-pottery-sherd,arms-up-pottery-sherd,blade-pottery-sherd,brewer-pottery-sherd,burn-pottery-sherd,danger-pottery-sherd,explorer-pottery-sherd,friend-pottery-sherd,heart-pottery-sherd,heartbreak-pottery-sherd,howl-pottery-sherd,miner-pottery-sherd,mourner-pottery-sherd,plenty-pottery-sherd,prize-pottery-sherd,sheaf-pottery-sherd,shelter-pottery-sherd,skull-pottery-sherd,snort-pottery-sherd}}
== Usage ==
=== Crafting ingredient ===
{{Crafting
|ingredients=Any Pottery Sherd or [[Brick]]
|B1= Any Pottery Sherd
|A2= Any Pottery Sherd |C2= Any Pottery Sherd
|B3= Any Pottery Sherd
|Output= Decorated Pot
|type= Decoration block
}}
== Data values ==
=== ID ===
{{edition|java}}:
{{ID table
|edition=java
|showforms=y
|generatetranslationkeys=y
|displayname=Angler Pottery Sherd
|spritetype=item
|nameid=angler_pottery_sherd
|form=item}}
{{ID table
|displayname=Archer Pottery Sherd
|spritetype=item
|nameid=archer_pottery_sherd
|form=item}}
{{ID table
|displayname=Arms Up Pottery Sherd
|spritetype=item
|nameid=arms_up_pottery_sherd
|form=item}}
{{ID table
|displayname=Blade Pottery Sherd
|spritetype=item
|nameid=blade_pottery_sherd
|form=item}}
{{ID table
|displayname=Brewer Pottery Sherd
|spritetype=item
|nameid=brewer_pottery_sherd
|form=item}}
{{ID table
|displayname=Burn Pottery Sherd
|spritetype=item
|nameid=burn_pottery_sherd
|form=item}}
{{ID table
|displayname=Danger Pottery Sherd
|spritetype=item
|nameid=danger_pottery_sherd
|form=item}}
{{ID table
|displayname=Explorer Pottery Sherd
|spritetype=item
|nameid=explorer_pottery_sherd
|form=item}}
{{ID table
|displayname=Friend Pottery Sherd
|spritetype=item
|nameid=friend_pottery_sherd
|form=item}}
{{ID table
|displayname=Heart Pottery Sherd
|spritetype=item
|nameid=heart_pottery_sherd
|form=item}}
{{ID table
|displayname=Heartbreak Pottery Sherd
|spritetype=item
|nameid=heartbreak_pottery_sherd
|form=item}}
{{ID table
|displayname=Howl Pottery Sherd
|spritetype=item
|nameid=howl_pottery_sherd
|form=item}}
{{ID table
|displayname=Miner Pottery Sherd
|spritetype=item
|nameid=miner_pottery_sherd
|form=item}}
{{ID table
|displayname=Mourner Pottery Sherd
|spritetype=item
|nameid=mourner_pottery_sherd
|form=item}}
{{ID table
|displayname=Plenty Pottery Sherd
|spritetype=item
|nameid=plenty_pottery_sherd
|form=item}}
{{ID table
|displayname=Prize Pottery Sherd
|spritetype=item
|nameid=prize_pottery_sherd
|form=item}}
{{ID table
|displayname=Sheaf Pottery Sherd
|spritetype=item
|nameid=sheaf_pottery_sherd
|form=item}}
{{ID table
|displayname=Shelter Pottery Sherd
|spritetype=item
|nameid=shelter_pottery_sherd
|form=item}}
{{ID table
|displayname=Skull Pottery Sherd
|spritetype=item
|nameid=skull_pottery_sherd
|form=item}}
{{ID table
|displayname=Snort Pottery Sherd
|spritetype=item
|nameid=snort_pottery_sherd
|form=item
|foot=1}}
{{edition|bedrock}}:
{{ID table
|edition=bedrock
|shownumericids=y
|showforms=y
|notshowbeitemforms=y
|generatetranslationkeys=y
|displayname=Angler Pottery Sherd
|spritetype=item
|nameid=angler_pottery_sherd
|id=664
|form=item}}
{{ID table
|displayname=Archer Pottery Sherd
|spritetype=item
|nameid=archer_pottery_sherd
|id=665
|form=item}}
{{ID table
|displayname=Arms Up Pottery Sherd
|spritetype=item
|nameid=arms_up_pottery_sherd
|id=666
|form=item}}
{{ID table
|displayname=Blade Pottery Sherd
|spritetype=item
|nameid=blade_pottery_sherd
|id=667
|form=item}}
{{ID table
|displayname=Brewer Pottery Sherd
|spritetype=item
|nameid=brewer_pottery_sherd
|id=668
|form=item}}
{{ID table
|displayname=Burn Pottery Sherd
|spritetype=item
|nameid=burn_pottery_sherd
|id=669
|form=item}}
{{ID table
|displayname=Danger Pottery Sherd
|spritetype=item
|nameid=danger_pottery_sherd
|id=670
|form=item}}
{{ID table
|displayname=Explorer Pottery Sherd
|spritetype=item
|nameid=explorer_pottery_sherd
|id=671
|form=item}}
{{ID table
|displayname=Friend Pottery Sherd
|spritetype=item
|nameid=friend_pottery_sherd
|id=672
|form=item}}
{{ID table
|displayname=Heart Pottery Sherd
|spritetype=item
|nameid=heart_pottery_sherd
|id=673
|form=item}}
{{ID table
|displayname=Heartbreak Pottery Sherd
|spritetype=item
|nameid=heartbreak_pottery_sherd
|id=674
|form=item}}
{{ID table
|displayname=Howl Pottery Sherd
|spritetype=item
|nameid=howl_pottery_sherd
|id=675
|form=item}}
{{ID table
|displayname=Miner Pottery Sherd
|spritetype=item
|nameid=miner_pottery_sherd
|id=676
|form=item}}
{{ID table
|displayname=Mourner Pottery Sherd
|spritetype=item
|nameid=mourner_pottery_sherd
|id=677
|form=item}}
{{ID table
|displayname=Plenty Pottery Sherd
|spritetype=item
|nameid=plenty_pottery_sherd
|id=678
|form=item}}
{{ID table
|displayname=Prize Pottery Sherd
|spritetype=item
|nameid=prize_pottery_sherd
|id=679
|form=item}}
{{ID table
|displayname=Sheaf Pottery Sherd
|spritetype=item
|nameid=sheaf_pottery_sherd
|id=680
|form=item}}
{{ID table
|displayname=Shelter Pottery Sherd
|spritetype=item
|nameid=shelter_pottery_sherd
|id=681
|form=item}}
{{ID table
|displayname=Skull Pottery Sherd
|spritetype=item
|nameid=skull_pottery_sherd
|id=682
|form=item}}
{{ID table
|displayname=Snort Pottery Sherd
|spritetype=item
|nameid=snort_pottery_sherd
|id=683
|form=item
|foot=1}}
== Achievements ==
{{Load achievements|Careful restoration}}
== Advancements ==
{{Load advancements|Respecting the Remnants;Careful Restoration}}
== History ==
{{History||October 3, 2020|[[File:Blue Ceramic Shard.png|32px]][[File:Orange Ceramic Shard.png|32px]][[File:Ceramic Shard 1.png|32px]][[File:Ceramic Shard 2.png|32px]][[File:Ceramic Shard 3.png|32px]][[File:Ceramic Shard 4.png|32px]] Ceramic shards were announced at [[Minecraft Live 2020]].|link=https://youtu.be/DBvZ2Iqmm3M?t=2216}}
{{History||February 10, 2023|[[Sofia Dankis]] posted an article about upcoming archaeology features, including pottery shards.|link=https://www.minecraft.net/en-us/article/archeology-coming-minecraft-120}}
{{History|java}}
{{History||1.20<br>(Experimental)|link=1.19.4|snap=23w07a|[[File:Archer Pottery Sherd JE1.png|32px]] [[File:Arms Up Pottery Sherd JE1 BE2.png|32px]] [[File:Prize Pottery Sherd JE1 BE2.png|32px]] [[File:Skull Pottery Sherd JE1 BE2.png|32px]] Added pottery shards behind the [[Java Edition 1.20|Update 1.20 experimental datapack]].}}
{{History|||snap=1.19.4 Pre-release 3|[[File:Archer Pottery Sherd JE2 BE2.png|32px]] Changed the texture of archer pottery shard.}}
{{History||1.20|snap=23w12a|Pottery shards are now out of the 1.20 experimental data pack.|[[File:Angler Pottery Sherd JE1 BE1.png|32px]] [[File:Blade Pottery Sherd JE1 BE1.png|32px]] [[File:Brewer Pottery Sherd JE1 BE1.png|32px]] [[File:Burn Pottery Sherd JE1 BE1.png|32px]] [[File:Danger Pottery Sherd JE1 BE1.png|32px]] [[File:Explorer Pottery Sherd JE1 BE1.png|32px]] [[File:Friend Pottery Sherd JE1 BE1.png|32px]] [[File:Heart Pottery Sherd JE1 BE1.png|32px]] [[File:Heartbreak Pottery Sherd JE1 BE1.png|32px]] [[File:Howl Pottery Sherd JE1 BE1.png|32px]] [[File:Miner Pottery Sherd JE1 BE1.png|32px]] [[File:Mourner Pottery Sherd JE1 BE1.png|32px]] [[File:Plenty Pottery Sherd JE1 BE1.png|32px]] [[File:Sheaf Pottery Sherd JE1 BE1.png|32px]] [[File:Shelter Pottery Sherd JE1 BE1.png|32px]] [[File:Snort Pottery Sherd JE1 BE1.png|32px]] Added another sixteen pottery shards.
|The probability for the archer, prize, and skull pottery shards to generate in the [[suspicious sand]] in [[desert temple]] and in [[desert well]] has been changed from 1/7 to 1/8, for the arms up pottery sherd to generate in the suspicious sand in [[desert well]] has been changed from 3/7 to 1/4.}}
{{History|||snap=23w16a|Renamed "Pottery Shard" to "Pottery Sherd".|Burn, danger, friend, heart, heartbreak, howl and sheaf pottery sherds no longer generates in [[suspicious sand]] in [[trail ruins]].|Due to the split of the archaeological loot tables for the suspicious gravel within the [[trail ruins]]; burn, danger, friend, heart, heartbreak, howl and sheaf pottery sherds now are in the rare loot.}}
{{History|||snap=23w17a|The probability of the burn, danger, friend, heart, heartbreak, howl, and sheaf pottery sherds to generate in [[suspicious gravel]] in [[trail ruins]] has been changed from 1/11 to 1/12.{{verify}}|The player now gets the [[advancement]] "Respecting the remnants" when they brush a [[suspicious sand]] or a [[suspicious gravel]] to obtain a pottery sherd, "Careful restoration" when they craft a decorated pot using 4 pottery sherds.}}
{{History|bedrock}}
{{History||Next Major Update<br>(Experimental)|link=Bedrock Edition 1.19.70|snap=beta 1.19.70.23|[[File:Archer Pottery Sherd BE1.png|32px]] [[File:Arms Up Pottery Sherd BE1.png|32px]] [[File:Prize Pottery Sherd BE1.png|32px]] [[File:Skull Pottery Sherd BE1.png|32px]] Added pottery shards behind the "[[Bedrock Edition 1.20.0|Next Major Update]]" [[experimental]] toggle.}}
{{History|||snap=beta 1.19.80.20|[[File:Archer Pottery Sherd JE2 BE2.png|32px]] Changed the texture of archer pottery shard.}}
{{h|||snap=beta 1.19.80.22|[[File:Angler Pottery Sherd JE1 BE1.png|32px]] [[File:Blade Pottery Sherd JE1 BE1.png|32px]] [[File:Brewer Pottery Sherd JE1 BE1.png|32px]] [[File:Burn Pottery Sherd JE1 BE1.png|32px]] [[File:Danger Pottery Sherd JE1 BE1.png|32px]] [[File:Explorer Pottery Sherd JE1 BE1.png|32px]] [[File:Friend Pottery Sherd JE1 BE1.png|32px]] [[File:Heart Pottery Sherd JE1 BE1.png|32px]] [[File:Heartbreak Pottery Sherd JE1 BE1.png|32px]] [[File:Howl Pottery Sherd JE1 BE1.png|32px]] [[File:Miner Pottery Sherd JE1 BE1.png|32px]] [[File:Mourner Pottery Sherd JE1 BE1.png|32px]] [[File:Plenty Pottery Sherd JE1 BE1.png|32px]] [[File:Sheaf Pottery Sherd JE1 BE1.png|32px]] [[File:Shelter Pottery Sherd JE1 BE1.png|32px]] [[File:Snort Pottery Sherd JE1 BE1.png|32px]] Added another sixteen pottery shards.
|[[File:Arms Up Pottery Sherd JE1 BE2.png|32px]] [[File:Prize Pottery Sherd JE1 BE2.png|32px]] [[File:Skull Pottery Sherd JE1 BE2.png|32px]] Changed the texture of arms up, prize and skull pottery shards.<ref>{{bug|MCPE-167202}}</ref>}}
{{History||Next Major Update<br>(Experimental)|link=Bedrock Edition 1.20.0|snap=beta 1.20.0.20|Miner pottery shard can generate in desert pyramids.}}
{{History||1.20.0|snap=beta 1.20.0.21|Pottery shards are now available without using the "Next Major Update" experimental toggle.}}
{{History|||snap=beta 1.20.0.22|Renamed "Pottery Shard" to "Pottery Sherd".}}
{{History|foot}}
== Issues ==
{{issue list}}
== Trivia ==
* Many pottery sherds are based on another in-game mob or item:
** The angler pottery sherd depicts a [[fishing rod]].
** The archer pottery sherd depicts a [[bow]] and [[arrow]].
** The blade pottery sherd depicts a [[sword]].
** The brewer pottery sherd depicts a [[potion]].
** The burn pottery sherd depicts [[fire]].
** The danger pottery sherd depicts a [[creeper]].
** The explorer pottery sherd depicts a [[map]].
** The friend pottery sherd depicts the unibrow and nose of a [[villager]] or [[iron golem]].
** The howl pottery sherd depicts a [[wolf]].
** The miner pottery sherd depicts a [[pickaxe]].
** The mourner pottery sherd depicts an early design for the [[warden]].
** The plenty pottery sherd depicts a [[chest]].
** The sheaf pottery sherd depicts [[wheat]].
** The skull pottery sherd depicts a [[skeleton]].
** The snort pottery sherd depicts a [[sniffer]].
**The prize pottery sherd depicts a diamond cut [[diamond]]
***It could depict a [[MCE:Ruby|ruby]] from ''Minecraft Earth'', as well.
**The arms up pottery sherd depicts a [[character]] with their arms up.
**The heart and heartbreak pottery sherds depict a [[Health|heart]] and broken heart respectively.
**The shelter pottery sherd depicts a [[tree]].
==Gallery==
=== Items ===
<gallery>
Angler Pottery Sherd.png|Angler Pottery Sherd
Archer Pottery Sherd.png|Archer Pottery Sherd
Arms Up Pottery Sherd.png|Arms Up Pottery Sherd
Blade Pottery Sherd.png|Blade Pottery Sherd
Brewer Pottery Sherd.png|Brewer Pottery Sherd
Burn Pottery Sherd.png|Burn Pottery Sherd
Danger Pottery Sherd.png|Danger Pottery Sherd
Explorer Pottery Sherd.png|Explorer Pottery Sherd
Friend Pottery Sherd.png|Friend Pottery Sherd
Heart Pottery Sherd.png|Heart Pottery Sherd
Heartbreak Pottery Sherd.png|Heartbreak Pottery Sherd
Howl Pottery Sherd.png|Howl Pottery Sherd
Miner Pottery Sherd.png|Miner Pottery Sherd
Mourner Pottery Sherd.png|Mourner Pottery Sherd
Plenty Pottery Sherd.png|Plenty Pottery Sherd
Prize Pottery Sherd.png|Prize Pottery Sherd
Sheaf Pottery Sherd.png|Sheaf Pottery Sherd
Shelter Pottery Sherd.png|Shelter Pottery Sherd
Skull Pottery Sherd.png|Skull Pottery Sherd
Snort Pottery Sherd.png|Snort Pottery Sherd
</gallery>
=== Development images ===
<gallery>
JE 1.17 Development Archeology.jpg|Blue ceramic shard.
JE 1.17 Development Archeology 2.jpg|Ceramic shards.
</gallery>
=== Official artwork ===
<gallery>
Pottery Sherd Pixel Art.png|Pixel artwork of [[Ari]] holding a skull pottery sherd.
File:T&T Thumbnail.jpg|Ari holding up a different sherd.
</gallery>
== References ==
<references />
== Notes ==
<references group="note"/>
{{Items}}
[[Category:Non-renewable resources]]
[[de:Töpferscherbe]]
[[es:Fragmento de cerámica]]
[[fr:Tesson de poterie]]
[[ja:壺の欠片]]
[[pt:Óstraco]]
[[zh:陶片]]</li><li>[[Snowball|Snowball]]<br/>{{about|the throwable item|the enchantment in ''Minecraft Dungeons''|MCD:Snowball}}
{{ItemEntity
|image=Snowball.png
|renewable=Yes
|stackable=Yes (16)<br>
Yes (64){{upcoming|java Combat Tests}}
|size=Height: 0.25 Blocks<br>Width: 0.25 Blocks
}}
'''Snowballs''' are throwable combat items that hit but do not damage most [[Mob|mobs]] on impact.
== Obtaining ==
{{see also|Tutorials/Snow farming}}
=== Mining ===
A [[shovel]] without the [[Silk Touch]] enchantment can get 4 snowballs by breaking a [[snow block]], and 1–8 snowballs by breaking or blasting [[snow layer]]s – one per layer. The [[Fortune]] enchantment does not affect these amounts.
{{IN|bedrock}}, snowballs are dropped from snow layers even when mined with a Silk Touch shovel.<ref>{{bug|MCPE-59729||Snow layers don't drop themselves when mined with a silk touch enchanted shovel}}</ref>
==== Explosions ====
Creeper and TNT [[explosion]]s leave snowballs in the resulting debris field if near snow.
==== Ravagers ====
{{IN|BE}}, Ravagers destroy snow layers, dropping snowballs.
==== Pistons ====
{{IN|BE}}, a block or piston head pushed into the position of snow layers destroys the snow layers, dropping snowballs. 1-3 layers drops 1 snowball, 4-5 layers drops 2 snowballs, 6-7 layers drops 3 snowballs and 8 layers drops 4 snowballs.
=== Mob loot ===
[[Snow golem]]s drop 0–15 snowballs upon death, unaffected by [[Looting]].
=== Chest loot ===
{{LootChestItem|snowball}}
== Usage ==
=== Crafting ingredient ===
{{crafting usage}}
=== Combat ===
[[File:Throwing a snowball on a pig.gif|300px|thumbnail|right|Throwing a snowball on a pig animation.]]
Snowballs can be thrown by {{control|using}} them. There is no charging time or cooldown for firing them,{{Until|java Combat Tests}} meaning they can be thrown as fast as the player can click.
Like other projectiles, snowballs are affected by gravity: their range is the same as those of [[egg]]s and [[ender pearl]]s, less than that of [[arrow]]s fired from [[bow]]s, and more than that of [[splash potion]]s. In [[Bedrock Edition]], players will receive damage and will be knockbacked.
Snowballs deal {{hp|3}} each to [[blaze]]s but they deal no damage to other mobs. Mobs still receive knockback and act the same as if they were being damaged (for example, [[zombified piglin]]s who are hit by snowballs become aggressive). Players {{in|BE}} receive knockback, while players {{in|JE}} are unaffected.<ref>{{bug|MC-3179|||WAI}}</ref>{{Until|java Combat Tests}}
When fighting the [[ender dragon]], [[end crystal]]s are able to be destroyed by snowballs being thrown at them.
Snowball, like other projectiles, can be used to distract the [[warden]]. A warden walks towards the location where the snowball lands to inspect it, giving the player time to escape. However, if snowballs are fired too frequently (at least twice in 5 seconds), the warden walks straight to the player instead.
In the new versions they can hit players but just only in bedrock
=== Dispenser ===
Snowballs can be fired from [[dispenser]]s.
== Sounds ==
{{Edition|Java}}:<br>
Thrown snowballs use the Friendly Creatures sound category for entity-dependent sound events.
{{Sound table
|rowspan=3
|sound=Bow shoot.ogg
|subtitle=Snowball flies
|source=neutral
|description=When a player throws a snowball
|id=entity.snowball.throw
|translationkey=subtitles.entity.snowball.throw
|volume=0.5
|pitch={{frac|1|3}}-0.5
|distance=16}}
{{Sound table
|subtitle=Snowball flies
|source=neutral
|description=When a snow golem shoots a snowball
|id=entity.snow_golem.shoot
|translationkey=subtitles.entity.snowball.throw
|volume=1.0
|pitch={{frac|1|3}}-0.5
|distance=16}}
{{Sound table
|subtitle=Dispensed item
|source=block
|description=When a dispenser shoots a snowball
|id=block.dispenser.launch
|translationkey=subtitles.block.dispenser.dispense
|volume=1.0
|pitch=1.2
|distance=16
|foot=1}}
{{Edition|Bedrock}}:
{{Sound table
|type=bedrock
|rowspan=3
|sound=Bow shoot.ogg
|source=player
|description=When a player throws a snowball
|id=random.bow
|volume=0.5
|pitch=0.33-0.5}}
{{Sound table
|source=neutral
|description=When a snow golem shoots a snowball
|id=mob.snowgolem.shoot
|volume=1.0
|pitch=0.8-1.2}}
{{Sound table
|source=player
|description=When a dispenser shoots a snowball
|id=random.bow
|volume=1.0
|pitch=0.83-1.25
|foot=1}}
== Data values ==
=== ID ===
{{edition|java}}:
{{ID table
|edition=java
|firstcolumnname=Item
|showforms=y
|generatetranslationkeys=y
|displayname=Snowball
|spritetype=item
|nameid=snowball
|form=item
|foot=1}}
{{ID table
|edition=java
|firstcolumnname=Entity
|showentitytags=y
|generatetranslationkeys=y
|displayname=Snowball
|spritetype=entity
|nameid=snowball
|entitytags=impact_projectiles
|foot=1}}
{{edition|bedrock}}:
{{ID table
|edition=bedrock
|firstcolumnname=Item
|shownumericids=y
|showforms=y
|notshowbeitemforms=y
|generatetranslationkeys=y
|displayname=Snowball
|spritetype=item
|nameid=snowball
|id=374
|form=item
|foot=1}}
{{ID table
|edition=bedrock
|firstcolumnname=Entity
|shownumericids=y
|generatetranslationkeys=y
|displayname=Snowball
|spritetype=entity
|nameid=snowball
|id=81
|foot=1}}
=== Entity Data ===
Snowballs have entity data that define various properties of the entity.
{{el|java}}:
{{main|Entity format}}
{{/ED}}
{{el|bedrock}}:
: See [[Bedrock Edition level format/Entity format]].
== Advancements ==
{{Load advancements|Bullseye}}
== Video ==
<div style="text-align:center">{{yt|2E-c9P8kyfg}}</div>
==History==
{{History|java alpha}}
{{History||v1.0.5|[[File:Snowball JE1 BE1.png|32px]] Added snowballs.
|Snowballs are used to craft [[snow block]]s.
|Snowballs could stack up to 64.}}
{{History||v1.0.5_01|Snowballs now stack to 8.
|Added a new snowball [[sound]] effect.
|Harvesting snowballs now requires a [[shovel]].}}
{{History||v1.0.6|Snowballs now stack up to 16.
|Thrown snowballs no longer disappear.}}
{{History||v1.1.1|It is no longer possible to obtain more than four snowballs from a solid [[snow block]] (the [[player]] was previously able to obtain 4-6 snowballs per snow block allowing an infinite number of snowballs to be made).}}
{{History||v1.2.0|snap=preview|[[Fireball]]s use the same texture as the snowball.}}
{{History|java beta}}
{{History||1.2|Snowballs can now be fired by [[dispenser]]s.}}
{{History|java}}
{{History||1.0.0|snap=Beta 1.9 Prerelease|[[Fireball]]s no longer use the snowball texture.}}
{{History|||snap=RC1|Snowball throwing sound was changed.}}
{{History||1.9|snap=15w32a|Snowballs no longer damage the [[ender dragon]].}}
{{History|||snap=15w36b|Snowballs now produce particles when thrown at an entity.}}
{{History|||snap=15w49a|Snowballs, as well as all projectiles, now take the thrower's motion into account when fired.}}
{{History||1.11|snap=16w32a|The entity ID has been changed from <code>Snowball</code> to <code>snowball</code>.}}
{{History||1.13|snap=17w47a|Prior to [[1.13/Flattening|''The Flattening'']], this [[item]]'s numeral ID was 332.}}
{{History||1.14|snap=18w43a|[[File:Snowball JE2 BE2.png|32px]] The texture of snowballs has been changed.}}
{{History|||snap=18w49a|Snowballs can now be found in [[chest]]s in [[snowy tundra]] [[village]] houses.}}
{{History|||snap=19w08a|[[File:Snowball JE3 BE3.png|32px]] The texture of snowballs has been changed, once again.}}
{{History||1.16.2|snap=Pre-Release 1|Snowballs are now affected by [[bubble column]]s.}}
{{History||1.19|snap=Deep Dark Experimental Snapshot 1|Snowballs now generate in [[ancient city]] chests.}}
{{History|upcoming java}}
{{History||Combat Tests|snap=Combat Test 4|Snowballs now stack to 64, once again.
|Snowballs now have 4-tick cooldown and are not rendered for the first 2 ticks to prevent screen flickering.}}
{{History|pocket alpha}}
{{History||v0.2.0|[[File:Snowball JE1 BE1.png|32px]] Added snowballs. They are currently unobtainable and serve no purpose.}}
{{History||v0.3.0|Snowballs now drop as an item when mining [[snow block]]s and [[snow layer]]s.
|Snowballs can be used to craft [[snow block]]s.}}
{{History||v0.4.0|Snowballs can now be thrown.}}
{{History||v0.11.0|snap=build 14|Snowballs are now available in the [[creative]] inventory.}}
{{History||v0.12.0|Snowballs now deal [[damage]] to [[blaze]]s.}}
{{History||v0.12.1|snap=build 1|Added [[snow golem]]s, which [[drops|drop]] snowballs.}}
{{History|bedrock}}
{{History||1.2.0|Snowballs now deal knockback to [[player]]s.}}
{{History||1.10.0|snap=beta 1.10.0.3|[[File:Snowball JE2 BE2.png|32px]] The texture of snowballs has been changed.}}
{{History||1.11.0|snap=beta 1.11.0.1|Snowballs can now be found in some [[snowy tundra]] [[village]] house [[chest]]s.}}
{{History|||snap=beta 1.11.0.5|[[File:Snowball JE3 BE3.png|32px]] The texture of snowballs has been changed, once again.}}
{{History|console}}
{{History||xbox=TU1|xbone=CU1|ps=1.0|switch=1.0.1|wiiu=Patch 1|[[File:Snowball JE1 BE1.png|32px]] Added snowballs.}}
{{History||xbox=none|xbone=none|ps=1.90|switch=none|wiiu=none|[[File:Snowball JE3 BE3.png|32px]] The texture of snowballs has been changed.}}
{{History|3DS}}
{{History||0.1.0|[[File:Snowball JE1 BE1.png|32px]] Added snowballs.}}
{{History|foot}}
== Issues ==
{{issue list}}
== Trivia ==
* A thrown snowball faces the player in the first-person view, while it appears horizontally rotated in third-person view. This is the case for all throwable items ([[ender pearl]]s, [[egg]]s, snowballs, and all throwable [[potion]]s).
== References ==
{{reflist}}
== External Links ==
*[https://www.minecraft.net/en-us/article/taking-inventory--snowball Taking Inventory: Snowball] – Minecraft.net on August 3, 2019
{{Items}}
{{entities}}
[[Category:Combat]]
[[cs:Sněhová koule]]
[[de:Schneeball]]
[[es:Bola de nieve]]
[[fr:Boule de neige]]
[[hu:Hógolyó]]
[[ja:雪玉]]
[[ko:눈덩이]]
[[nl:Sneeuwbal]]
[[pl:Śnieżka]]
[[pt:Bola de neve]]
[[ru:Снежок]]
[[th:บอลหิมะ]]
[[uk:Сніжок]]
[[zh:雪球]]</li></ul> | Furnaces have been added, which means that every available block and item can now be gathered, crafted or smelted into (no more unlimited items). | ||||||||||||||||||||||||||||||||||
v0.8.0{{Extension DPL}}<ul><li>[[:Category:Tools|Category:Tools]]<br/>[[Category:Items]]
[[fr:Catégorie:Outil]]
[[it:Categoria:Attrezzi]]</li><li>[[Pottery Sherd|Pottery Sherd]]<br/>{{Item
| image=Angler Pottery Sherd.png
| extratext = View [[#Items|all items]]
| renewable = No
| stackable = Yes (64)
}}
<!-- IT IS SHERD, NOT SHARD! DO NOT CHANGE TO SHARD, AS IT IS NAMED SHERD IN-GAME! -->
'''Pottery sherds'''<ref group="note">The word "[[wiktionary:sherd#English|sherd]]" or "[[wiktionary:potsherd#English|potsherd]]" is used by archaeologists to refer to fragments of pottery or other ceramics in order to differentiate them from "shards" of glass, metal, minerals and other materials.
</ref> are a set of twenty [[item]]s used to craft [[decorated pot]]s with ornamental designs. They can be obtained only by [[brush]]ing [[suspicious block]]s, with the variants of sherd obtainable being dependent on the structure.
== Obtaining ==
=== Breaking ===
When a [[decorated pot]] is broken with a [[pickaxe]], [[axe]], [[shovel]], [[hoe]] or [[sword]] that is ''not'' enchanted with [[Silk Touch]], it drops all of the pottery sherds and [[brick]]s used to craft it.
=== Suspicious block loot ===
Pottery sherds can be found as [[suspicious block]] loot in [[trail ruins]], [[ocean ruins]], [[desert pyramids]] and [[desert well]]s, and can be extracted from these blocks using a [[brush]].
{{#invoke:LootChest|base3|angler-pottery-sherd,archer-pottery-sherd,arms-up-pottery-sherd,blade-pottery-sherd,brewer-pottery-sherd,burn-pottery-sherd,danger-pottery-sherd,explorer-pottery-sherd,friend-pottery-sherd,heart-pottery-sherd,heartbreak-pottery-sherd,howl-pottery-sherd,miner-pottery-sherd,mourner-pottery-sherd,plenty-pottery-sherd,prize-pottery-sherd,sheaf-pottery-sherd,shelter-pottery-sherd,skull-pottery-sherd,snort-pottery-sherd}}
== Usage ==
=== Crafting ingredient ===
{{Crafting
|ingredients=Any Pottery Sherd or [[Brick]]
|B1= Any Pottery Sherd
|A2= Any Pottery Sherd |C2= Any Pottery Sherd
|B3= Any Pottery Sherd
|Output= Decorated Pot
|type= Decoration block
}}
== Data values ==
=== ID ===
{{edition|java}}:
{{ID table
|edition=java
|showforms=y
|generatetranslationkeys=y
|displayname=Angler Pottery Sherd
|spritetype=item
|nameid=angler_pottery_sherd
|form=item}}
{{ID table
|displayname=Archer Pottery Sherd
|spritetype=item
|nameid=archer_pottery_sherd
|form=item}}
{{ID table
|displayname=Arms Up Pottery Sherd
|spritetype=item
|nameid=arms_up_pottery_sherd
|form=item}}
{{ID table
|displayname=Blade Pottery Sherd
|spritetype=item
|nameid=blade_pottery_sherd
|form=item}}
{{ID table
|displayname=Brewer Pottery Sherd
|spritetype=item
|nameid=brewer_pottery_sherd
|form=item}}
{{ID table
|displayname=Burn Pottery Sherd
|spritetype=item
|nameid=burn_pottery_sherd
|form=item}}
{{ID table
|displayname=Danger Pottery Sherd
|spritetype=item
|nameid=danger_pottery_sherd
|form=item}}
{{ID table
|displayname=Explorer Pottery Sherd
|spritetype=item
|nameid=explorer_pottery_sherd
|form=item}}
{{ID table
|displayname=Friend Pottery Sherd
|spritetype=item
|nameid=friend_pottery_sherd
|form=item}}
{{ID table
|displayname=Heart Pottery Sherd
|spritetype=item
|nameid=heart_pottery_sherd
|form=item}}
{{ID table
|displayname=Heartbreak Pottery Sherd
|spritetype=item
|nameid=heartbreak_pottery_sherd
|form=item}}
{{ID table
|displayname=Howl Pottery Sherd
|spritetype=item
|nameid=howl_pottery_sherd
|form=item}}
{{ID table
|displayname=Miner Pottery Sherd
|spritetype=item
|nameid=miner_pottery_sherd
|form=item}}
{{ID table
|displayname=Mourner Pottery Sherd
|spritetype=item
|nameid=mourner_pottery_sherd
|form=item}}
{{ID table
|displayname=Plenty Pottery Sherd
|spritetype=item
|nameid=plenty_pottery_sherd
|form=item}}
{{ID table
|displayname=Prize Pottery Sherd
|spritetype=item
|nameid=prize_pottery_sherd
|form=item}}
{{ID table
|displayname=Sheaf Pottery Sherd
|spritetype=item
|nameid=sheaf_pottery_sherd
|form=item}}
{{ID table
|displayname=Shelter Pottery Sherd
|spritetype=item
|nameid=shelter_pottery_sherd
|form=item}}
{{ID table
|displayname=Skull Pottery Sherd
|spritetype=item
|nameid=skull_pottery_sherd
|form=item}}
{{ID table
|displayname=Snort Pottery Sherd
|spritetype=item
|nameid=snort_pottery_sherd
|form=item
|foot=1}}
{{edition|bedrock}}:
{{ID table
|edition=bedrock
|shownumericids=y
|showforms=y
|notshowbeitemforms=y
|generatetranslationkeys=y
|displayname=Angler Pottery Sherd
|spritetype=item
|nameid=angler_pottery_sherd
|id=664
|form=item}}
{{ID table
|displayname=Archer Pottery Sherd
|spritetype=item
|nameid=archer_pottery_sherd
|id=665
|form=item}}
{{ID table
|displayname=Arms Up Pottery Sherd
|spritetype=item
|nameid=arms_up_pottery_sherd
|id=666
|form=item}}
{{ID table
|displayname=Blade Pottery Sherd
|spritetype=item
|nameid=blade_pottery_sherd
|id=667
|form=item}}
{{ID table
|displayname=Brewer Pottery Sherd
|spritetype=item
|nameid=brewer_pottery_sherd
|id=668
|form=item}}
{{ID table
|displayname=Burn Pottery Sherd
|spritetype=item
|nameid=burn_pottery_sherd
|id=669
|form=item}}
{{ID table
|displayname=Danger Pottery Sherd
|spritetype=item
|nameid=danger_pottery_sherd
|id=670
|form=item}}
{{ID table
|displayname=Explorer Pottery Sherd
|spritetype=item
|nameid=explorer_pottery_sherd
|id=671
|form=item}}
{{ID table
|displayname=Friend Pottery Sherd
|spritetype=item
|nameid=friend_pottery_sherd
|id=672
|form=item}}
{{ID table
|displayname=Heart Pottery Sherd
|spritetype=item
|nameid=heart_pottery_sherd
|id=673
|form=item}}
{{ID table
|displayname=Heartbreak Pottery Sherd
|spritetype=item
|nameid=heartbreak_pottery_sherd
|id=674
|form=item}}
{{ID table
|displayname=Howl Pottery Sherd
|spritetype=item
|nameid=howl_pottery_sherd
|id=675
|form=item}}
{{ID table
|displayname=Miner Pottery Sherd
|spritetype=item
|nameid=miner_pottery_sherd
|id=676
|form=item}}
{{ID table
|displayname=Mourner Pottery Sherd
|spritetype=item
|nameid=mourner_pottery_sherd
|id=677
|form=item}}
{{ID table
|displayname=Plenty Pottery Sherd
|spritetype=item
|nameid=plenty_pottery_sherd
|id=678
|form=item}}
{{ID table
|displayname=Prize Pottery Sherd
|spritetype=item
|nameid=prize_pottery_sherd
|id=679
|form=item}}
{{ID table
|displayname=Sheaf Pottery Sherd
|spritetype=item
|nameid=sheaf_pottery_sherd
|id=680
|form=item}}
{{ID table
|displayname=Shelter Pottery Sherd
|spritetype=item
|nameid=shelter_pottery_sherd
|id=681
|form=item}}
{{ID table
|displayname=Skull Pottery Sherd
|spritetype=item
|nameid=skull_pottery_sherd
|id=682
|form=item}}
{{ID table
|displayname=Snort Pottery Sherd
|spritetype=item
|nameid=snort_pottery_sherd
|id=683
|form=item
|foot=1}}
== Achievements ==
{{Load achievements|Careful restoration}}
== Advancements ==
{{Load advancements|Respecting the Remnants;Careful Restoration}}
== History ==
{{History||October 3, 2020|[[File:Blue Ceramic Shard.png|32px]][[File:Orange Ceramic Shard.png|32px]][[File:Ceramic Shard 1.png|32px]][[File:Ceramic Shard 2.png|32px]][[File:Ceramic Shard 3.png|32px]][[File:Ceramic Shard 4.png|32px]] Ceramic shards were announced at [[Minecraft Live 2020]].|link=https://youtu.be/DBvZ2Iqmm3M?t=2216}}
{{History||February 10, 2023|[[Sofia Dankis]] posted an article about upcoming archaeology features, including pottery shards.|link=https://www.minecraft.net/en-us/article/archeology-coming-minecraft-120}}
{{History|java}}
{{History||1.20<br>(Experimental)|link=1.19.4|snap=23w07a|[[File:Archer Pottery Sherd JE1.png|32px]] [[File:Arms Up Pottery Sherd JE1 BE2.png|32px]] [[File:Prize Pottery Sherd JE1 BE2.png|32px]] [[File:Skull Pottery Sherd JE1 BE2.png|32px]] Added pottery shards behind the [[Java Edition 1.20|Update 1.20 experimental datapack]].}}
{{History|||snap=1.19.4 Pre-release 3|[[File:Archer Pottery Sherd JE2 BE2.png|32px]] Changed the texture of archer pottery shard.}}
{{History||1.20|snap=23w12a|Pottery shards are now out of the 1.20 experimental data pack.|[[File:Angler Pottery Sherd JE1 BE1.png|32px]] [[File:Blade Pottery Sherd JE1 BE1.png|32px]] [[File:Brewer Pottery Sherd JE1 BE1.png|32px]] [[File:Burn Pottery Sherd JE1 BE1.png|32px]] [[File:Danger Pottery Sherd JE1 BE1.png|32px]] [[File:Explorer Pottery Sherd JE1 BE1.png|32px]] [[File:Friend Pottery Sherd JE1 BE1.png|32px]] [[File:Heart Pottery Sherd JE1 BE1.png|32px]] [[File:Heartbreak Pottery Sherd JE1 BE1.png|32px]] [[File:Howl Pottery Sherd JE1 BE1.png|32px]] [[File:Miner Pottery Sherd JE1 BE1.png|32px]] [[File:Mourner Pottery Sherd JE1 BE1.png|32px]] [[File:Plenty Pottery Sherd JE1 BE1.png|32px]] [[File:Sheaf Pottery Sherd JE1 BE1.png|32px]] [[File:Shelter Pottery Sherd JE1 BE1.png|32px]] [[File:Snort Pottery Sherd JE1 BE1.png|32px]] Added another sixteen pottery shards.
|The probability for the archer, prize, and skull pottery shards to generate in the [[suspicious sand]] in [[desert temple]] and in [[desert well]] has been changed from 1/7 to 1/8, for the arms up pottery sherd to generate in the suspicious sand in [[desert well]] has been changed from 3/7 to 1/4.}}
{{History|||snap=23w16a|Renamed "Pottery Shard" to "Pottery Sherd".|Burn, danger, friend, heart, heartbreak, howl and sheaf pottery sherds no longer generates in [[suspicious sand]] in [[trail ruins]].|Due to the split of the archaeological loot tables for the suspicious gravel within the [[trail ruins]]; burn, danger, friend, heart, heartbreak, howl and sheaf pottery sherds now are in the rare loot.}}
{{History|||snap=23w17a|The probability of the burn, danger, friend, heart, heartbreak, howl, and sheaf pottery sherds to generate in [[suspicious gravel]] in [[trail ruins]] has been changed from 1/11 to 1/12.{{verify}}|The player now gets the [[advancement]] "Respecting the remnants" when they brush a [[suspicious sand]] or a [[suspicious gravel]] to obtain a pottery sherd, "Careful restoration" when they craft a decorated pot using 4 pottery sherds.}}
{{History|bedrock}}
{{History||Next Major Update<br>(Experimental)|link=Bedrock Edition 1.19.70|snap=beta 1.19.70.23|[[File:Archer Pottery Sherd BE1.png|32px]] [[File:Arms Up Pottery Sherd BE1.png|32px]] [[File:Prize Pottery Sherd BE1.png|32px]] [[File:Skull Pottery Sherd BE1.png|32px]] Added pottery shards behind the "[[Bedrock Edition 1.20.0|Next Major Update]]" [[experimental]] toggle.}}
{{History|||snap=beta 1.19.80.20|[[File:Archer Pottery Sherd JE2 BE2.png|32px]] Changed the texture of archer pottery shard.}}
{{h|||snap=beta 1.19.80.22|[[File:Angler Pottery Sherd JE1 BE1.png|32px]] [[File:Blade Pottery Sherd JE1 BE1.png|32px]] [[File:Brewer Pottery Sherd JE1 BE1.png|32px]] [[File:Burn Pottery Sherd JE1 BE1.png|32px]] [[File:Danger Pottery Sherd JE1 BE1.png|32px]] [[File:Explorer Pottery Sherd JE1 BE1.png|32px]] [[File:Friend Pottery Sherd JE1 BE1.png|32px]] [[File:Heart Pottery Sherd JE1 BE1.png|32px]] [[File:Heartbreak Pottery Sherd JE1 BE1.png|32px]] [[File:Howl Pottery Sherd JE1 BE1.png|32px]] [[File:Miner Pottery Sherd JE1 BE1.png|32px]] [[File:Mourner Pottery Sherd JE1 BE1.png|32px]] [[File:Plenty Pottery Sherd JE1 BE1.png|32px]] [[File:Sheaf Pottery Sherd JE1 BE1.png|32px]] [[File:Shelter Pottery Sherd JE1 BE1.png|32px]] [[File:Snort Pottery Sherd JE1 BE1.png|32px]] Added another sixteen pottery shards.
|[[File:Arms Up Pottery Sherd JE1 BE2.png|32px]] [[File:Prize Pottery Sherd JE1 BE2.png|32px]] [[File:Skull Pottery Sherd JE1 BE2.png|32px]] Changed the texture of arms up, prize and skull pottery shards.<ref>{{bug|MCPE-167202}}</ref>}}
{{History||Next Major Update<br>(Experimental)|link=Bedrock Edition 1.20.0|snap=beta 1.20.0.20|Miner pottery shard can generate in desert pyramids.}}
{{History||1.20.0|snap=beta 1.20.0.21|Pottery shards are now available without using the "Next Major Update" experimental toggle.}}
{{History|||snap=beta 1.20.0.22|Renamed "Pottery Shard" to "Pottery Sherd".}}
{{History|foot}}
== Issues ==
{{issue list}}
== Trivia ==
* Many pottery sherds are based on another in-game mob or item:
** The angler pottery sherd depicts a [[fishing rod]].
** The archer pottery sherd depicts a [[bow]] and [[arrow]].
** The blade pottery sherd depicts a [[sword]].
** The brewer pottery sherd depicts a [[potion]].
** The burn pottery sherd depicts [[fire]].
** The danger pottery sherd depicts a [[creeper]].
** The explorer pottery sherd depicts a [[map]].
** The friend pottery sherd depicts the unibrow and nose of a [[villager]] or [[iron golem]].
** The howl pottery sherd depicts a [[wolf]].
** The miner pottery sherd depicts a [[pickaxe]].
** The mourner pottery sherd depicts an early design for the [[warden]].
** The plenty pottery sherd depicts a [[chest]].
** The sheaf pottery sherd depicts [[wheat]].
** The skull pottery sherd depicts a [[skeleton]].
** The snort pottery sherd depicts a [[sniffer]].
**The prize pottery sherd depicts a diamond cut [[diamond]]
***It could depict a [[MCE:Ruby|ruby]] from ''Minecraft Earth'', as well.
**The arms up pottery sherd depicts a [[character]] with their arms up.
**The heart and heartbreak pottery sherds depict a [[Health|heart]] and broken heart respectively.
**The shelter pottery sherd depicts a [[tree]].
==Gallery==
=== Items ===
<gallery>
Angler Pottery Sherd.png|Angler Pottery Sherd
Archer Pottery Sherd.png|Archer Pottery Sherd
Arms Up Pottery Sherd.png|Arms Up Pottery Sherd
Blade Pottery Sherd.png|Blade Pottery Sherd
Brewer Pottery Sherd.png|Brewer Pottery Sherd
Burn Pottery Sherd.png|Burn Pottery Sherd
Danger Pottery Sherd.png|Danger Pottery Sherd
Explorer Pottery Sherd.png|Explorer Pottery Sherd
Friend Pottery Sherd.png|Friend Pottery Sherd
Heart Pottery Sherd.png|Heart Pottery Sherd
Heartbreak Pottery Sherd.png|Heartbreak Pottery Sherd
Howl Pottery Sherd.png|Howl Pottery Sherd
Miner Pottery Sherd.png|Miner Pottery Sherd
Mourner Pottery Sherd.png|Mourner Pottery Sherd
Plenty Pottery Sherd.png|Plenty Pottery Sherd
Prize Pottery Sherd.png|Prize Pottery Sherd
Sheaf Pottery Sherd.png|Sheaf Pottery Sherd
Shelter Pottery Sherd.png|Shelter Pottery Sherd
Skull Pottery Sherd.png|Skull Pottery Sherd
Snort Pottery Sherd.png|Snort Pottery Sherd
</gallery>
=== Development images ===
<gallery>
JE 1.17 Development Archeology.jpg|Blue ceramic shard.
JE 1.17 Development Archeology 2.jpg|Ceramic shards.
</gallery>
=== Official artwork ===
<gallery>
Pottery Sherd Pixel Art.png|Pixel artwork of [[Ari]] holding a skull pottery sherd.
File:T&T Thumbnail.jpg|Ari holding up a different sherd.
</gallery>
== References ==
<references />
== Notes ==
<references group="note"/>
{{Items}}
[[Category:Non-renewable resources]]
[[de:Töpferscherbe]]
[[es:Fragmento de cerámica]]
[[fr:Tesson de poterie]]
[[ja:壺の欠片]]
[[pt:Óstraco]]
[[zh:陶片]]</li></ul> | ? | Wooden tools can now be used as fuel. | |||||||||||||||||||||||||||||||||
| Lava buckets can now be placed to smelt items (100 items). | |||||||||||||||||||||||||||||||||||
v0.11.0{{Extension DPL}}<ul><li>[[Eye of Ender|Eye of Ender]]<br/>{{redirect|Ender Eye|the boss|Ender Dragon|item that teleports the player to where it lands|Ender Pearl}}
{{ItemEntity
|image=Eye of Ender.png
|stackable=Yes (64)
|renewable=Yes
|size=Height: 0.25 Blocks<br>Width: 0.25 Blocks
|networkid='''[[JE]]''': 72
}}
An '''eye of ender''' is a craftable item used to locate [[stronghold]]s and activate the [[end portal]]s within them.
== Obtaining ==
=== Crafting ===
{{Crafting
|Blaze Powder
|Ender Pearl
|Output=Eye of Ender
|type=Miscellaneous
}}
== Usage ==
=== Locating strongholds ===
[[File:Eye of Ender (break).gif|thumb|right|An animation of an eye of ender shattering.]]
To locate [[stronghold]]s (and the [[end portal]]s they house):
* Pressing {{control|use}} while holding an eye of ender causes it to fly approximately 12 blocks in the direction of the nearest stronghold, traveling through any blocks necessary, and leave a trail of purple particles, the same particle effect used for [[endermen]] and [[ender chests]].
** The eye leads to the [[chunk]] where a spiral staircase, the first room generated in the stronghold, is located.
** The center of this entrance staircase is always exactly at the chunk coordinates 4, ~, 4, although the eye of ender leads to chunk coordinates 0, ~, 0 (the northwest corner of the chunk).
* While over 12 blocks away from the northwest corner of the staircase chunk, the eye will travel upward to offer an easily-visible indication of the horizontal direction the player must travel.
* When closer than 12 blocks to the northwest corner of the staircase chunk, the eye will travel downward, to indicate the player is above a stronghold and must mine downward.
* After two or three seconds of travel, the eye floats in the air briefly, then either falls (becoming collectable again) or shatters in mid-air. The eye has a 20% chance of shattering (80% chance of surviving) per throw, therefore throwing it three times has approximately 50% overall chance to shatter the eye (0.8<sup>3</sup>=51.2%).
* The eye of ender's flying function works only in the [[Overworld]]. It does nothing in [[the Nether]], [[the End]], [[custom dimension]]s{{verify|type=current}}, or in worlds with no strongholds.
Note that the eyes may point to an incorrect location if the target chunks were generated with a different biomes map in an older version or through different generation settings.<ref>See also {{bug|MC-135996}}</ref>
=== Activating end portals ===
[[File:Active End Portal.png|thumb|right|An end portal activated with eyes of ender.]]
Once an end portal is found, the eyes of ender are required to activate it. End portals require a total of 12 eyes of ender in order to activate, though each individual frame-block has a 10% chance of containing an eye of ender when generated. Eyes can be placed in empty [[End portal frame]]s by pressing {{control|use}} on them until the entire ring of 12 is filled, thereby activating the portal. Due to the fact that there is a 10% chance of each individual end portal frame having an eye in it, there is a one out of one trillion chance of every frame having an eye in it thereby activating the portal even if the player doesn't have any eyes of ender.
{| class="wikitable sortable mw-collapsible"
|+End Portal Pre-Filled Eyes
!Eyes
!0
!1
!2
!3
!4
!5-12
|-
|Exactly
|28%
|38%
|23%
|9%
|2%
|<1%
|-
|Or More
|100%
|72%
|34%
|11%
|3%
|<1%
|}
=== Crafting ingredient ===
{{crafting usage}}
== Sounds ==
{{Edition|Java}}:<br>
Eyes of ender use the Friendly Creatures sound category for entity-dependent sound events.
{{Sound table
|sound=Ender Eye death1.ogg
|sound2=Ender Eye death2.ogg
|subtitle=Eye of Ender falls <ref group=sound name=LousyEvents>{{Bug|MC-98316||Wrong subtitles caused by missing distinction}}</ref>
|source=neutral
|description=When an eye of ender drops or breaks
|id=entity.ender_eye.death|idnote=<ref group=sound name=LousyEvents/>
|translationkey=subtitles.entity.ender_eye.death|translationkeynote=<ref group=sound name=LousyEvents/>
|volume=1.3
|pitch=1.0
|distance=16}}
{{Sound table
|sound=Ender Eye launch1.ogg
|sound2=Ender Eye launch2.ogg
|subtitle=Eye of Ender shoots
|source=neutral
|description=When an eye of ender is thrown
|id=entity.ender_eye.launch
|translationkey=subtitles.entity.ender_eye.launch
|volume=0.5
|pitch={{frac|1|3}}-0.5
|distance=16}}
{{Sound table
|sound=End portal eye place1.ogg
|sound2=End portal eye place2.ogg
|sound3=End portal eye place3.ogg
|subtitle=Eye of Ender attaches
|source=block
|description=When an eye of ender is placed in an end portal frame
|id=block.end_portal_frame.fill
|translationkey=subtitles.block.end_portal_frame.fill
|volume=1.0
|pitch=1.0
|distance=16
|foot=1}}
{{Edition|Bedrock}}:
{{Sound table
|type=bedrock
|sound=Item Frame break1.ogg
|sound2=Item Frame break2.ogg
|sound3=Item Frame break3.ogg
|source=block
|description=When an eye of ender breaks <ref group=sound>{{Bug|MCPE-115646}}</ref>
|id=block.itemframe.break}}
{{Sound table
|sound=Bow shoot.ogg
|source=player
|description=When an eye of ender is thrown
|id=random.bow
|volume=0.5
|pitch=0.33-0.5}}
{{Sound table
|sound=End portal eye place1.ogg
|sound2=End portal eye place2.ogg
|sound3=End portal eye place3.ogg
|source=block
|description=When an eye of ender is placed in an end portal frame
|id=block.end_portal_frame.fill
|volume=0.3
|pitch=0.9/1.0/1.1
|foot=1}}
==Data values==
===ID===
{{edition|java}}:
{{ID table
|edition=java
|firstcolumnname=Item
|showforms=y
|generatetranslationkeys=y
|displayname=Eye of Ender
|spritetype=item
|nameid=ender_eye
|form=item
|foot=1}}
{{ID table
|edition=java
|firstcolumnname=Entity
|generatetranslationkeys=y
|displayname=Eye of Ender
|spritetype=entity
|nameid=eye_of_ender
|foot=1}}
{{edition|bedrock}}:
{{ID table
|edition=bedrock
|firstcolumnname=Item
|shownumericids=y
|showforms=y
|notshowbeitemforms=y
|generatetranslationkeys=y
|displayname=Eye of Ender
|spritetype=item
|nameid=ender_eye
|id=433
|form=item
|foot=1}}
{{ID table
|edition=bedrock
|firstcolumnname=Entity
|shownumericids=y
|generatetranslationkeys=y
|displayname=Eye of Ender
|spritetype=entity
|nameid=eye_of_ender_signal
|id=70
|foot=1}}
===Entity data===
The purple particles left by eyes of ender have entity data that define various properties of the entity.
{{el|java}}:
{{main|Entity format}}
{{/ED}}
{{el|bedrock}}:
:See [[Bedrock Edition level format/Entity format]].
==Advancements==
{{load advancements|Eye Spy}}
==Video ==
{{Video note|This video does not mention that eyes of ender can be used to craft [[ender chest]]s or [[end crystal]]s.}}
<div style="text-align:center">{{yt|E0AhoxYLomc}}</div>
==History==
{{History|java}}
{{History||1.0.0|snap=Beta 1.9 Prerelease 3|[[File:Eye of Ender JE1 BE1.png|32px]] Added eyes of ender.
|Eyes of ender can be used on a [[end portal frame|portal block]] to repair them, but repairing them does nothing.}}
{{History|||snap=Beta 1.9 Prerelease 4|Each eye can now be placed in a [[end portal frame|portal block]] or used to hone in on a [[stronghold]]. [[Jens Bergensten|Jeb]] demonstrated the new uses for an eye in his livestream.<ref>http://www.twitch.tv/jebox/b/297000418</ref> An [[end portal]] within a stronghold could be seen in the stream with two eyes inserted into blocks.
|In older worlds with chunks generated before [[Java Edition Beta 1.9 Prerelease 3|Beta 1.9 Prerelease 3]], the eyes may mislead the [[player]] to a place where there isn't a [[stronghold]] at all. This happens because the eyes lead to where a stronghold should be based on the world seed in the current version, but before Beta 1.9 Prerelease 3 strongholds generated differently based on the seed. Therefore, if the player saved the coordinates the eye traveled to in an old world and generated a new world with the same seed, the player could travel to those same coordinates and find a stronghold.}}
{{History|||snap=Beta 1.9 Prerelease 6|Eyes of ender no longer render like a tool in third person.}}
{{History|||snap=RC1|The throwing sound of eyes of ender has been changed.}}
{{History||1.3.1|snap=12w21a|Eyes of ender can now be used to craft [[ender chest]]s.
|Priest [[villager]]s would [[trading|buy]] 2–3 eyes of ender for one [[emerald]].}}
{{History|||snap=12w22a|Priest villagers no longer buy eyes of ender, instead selling them for 7–10 emeralds.}}
{{History||1.6.4|snap=1.6.3-pre|Eyes of ender now lead to [[stronghold]]s based on the structure data saved in the world file instead of calculating their approximate location via the [[seed (level generation)|world seed]]. Therefore, strongholds generated in old versions can still be found even if the distribution of strongholds is changed.}}
{{History||1.7.2|snap=13w41a|Eyes of Ender now lead to the entrance of a stronghold instead of the portal room.}}
{{History||1.8|snap=14w02a|With changes that have been made to villagers and the [[trading]] system, cleric villagers now sell eyes of ender for 7–11 [[emerald]]s, as one of their tier III trades.}}
{{History||1.9|snap=15w41a|Eyes of ender are no longer [[trading|sold]] by cleric [[villager]]s.}}
{{History|||snap=15w44b|An eye of ender is now used to craft an [[end crystal]].}}
{{History|||snap=pre3|Eyes of ender now point to the 125 new strongholds.<ref>{{bug|MC-91173}} resolved as "Fixed"</ref>}}
{{History||1.11|snap=16w32a|The [[entity]] ID has been changed from <code>EyeOfEnderSignal</code> to <code>eye_of_ender_signal</code>.}}
{{History||1.12|snap=17w17a|A new ''pop'' [[sound]] has been added when a thrown eye of ender bursts.}}
{{History||1.13|snap=17w47a|Prior to [[1.13/Flattening|''The Flattening'']], this [[item]]'s numeral ID was 381.}}
{{History|||snap=pre5|The [[entity]] ID has been changed to <code>eye_of_ender</code>.}}
{{History||1.14|snap=18w43a|[[File:Eye of Ender JE2 BE2.png|32px]] The texture of eyes of ender has been changed.}}
{{History||1.19|snap=22w11a|Eyes of Ender now lead to the corner of the chunk (0, ~, 0) instead of the center (8-9, ~, 8-9).<ref>{{bug|MC-253394}}</ref>}}
{{History|pocket}}
{{History||1.0.0|snap=alpha 0.17.0.1|[[File:Eye of Ender JE1 BE1.png|32px]] Added eyes of ender.}}
{{History|bedrock}}
{{History||1.10.0|snap=beta 1.10.0.3|[[File:Eye of Ender JE2 BE2.png|32px]] The texture of eyes of ender has been changed.}}
{{History||1.16.0|snap=beta 1.15.0.51|The [[particles]] of eyes of ender have been changed to match {{el|je}}.}}
{{History|console}}
{{History||xbox=TU7|xbone=CU1|ps=1.0|wiiu=Patch 1|[[File:Eye of Ender JE1 BE1.png|32px]] Added eyes of ender.}}
{{History||xbox=none|xbone=none|ps=1.90|wiiu=none|switch=none|[[File:Eye of Ender JE2 BE2.png|32px]] The texture of eyes of ender has been changed.}}
{{History|new 3ds}}
{{History||1.7.10|[[File:Eye of Ender JE1 BE1.png|32px]] Added eyes of ender.}}
{{History|foot}}
=== Historical images ===
<gallery>
File:Held_Eye_of_Ender.png|The eye of ender used to appear large in third-person view.
</gallery>
==Issues==
{{issue list}}
==Trivia ==
*When thrown in third-person view, the eyes of ender fly out from the player's feet instead of their hand.
*Before [[Java Edition 1.9]], eyes of ender can be purchased from cleric villagers, which means players can find a [[stronghold]] and go to [[the End]] without accessing [[the Nether]] at all.
*{{IN|bedrock}} if the player travels beyond a certain radius (roughly 740,000 blocks), eyes of ender always point to a stronghold near spawn, even though strongholds continue to generate past this limit. If one travels to this limit, they can see eyes of ender suddenly switching direction. A similar phenomenon occurs with the {{cmd|locate}} command.
==Gallery==
===Screenshots===
<gallery>
Stronghold Portal Room.png|An end portal frame containing a few eyes of ender.
EnderChestexample.png|An [[ender chest]] depicting an eye of ender on the front.
</gallery>
===In other media===
<gallery>
File:Eye of Ender JINX.jpg|Official T-shirt artwork "Eye of Ender" sold by JINX.
File:Happy Halloween Eye.jpg|A Halloween T-Shirt design featuring an eye of ender.
</gallery>
==External links==
*[http://www.strongholdfinder.com/ A super-easy stronghold triangulation tool]
*[http://jsfiddle.net/42EDX/40/ JSFiddle Eye of Ender triangulator - can guess the location of other 2 strongholds in the first ring]
*[https://ens-gijs.github.io/minecraft-stronghold-locator/ Minecraft Stronghold Locator Eye of Ender throw plotting visualizer - zoomable to show all possible stronghold rings]
*[https://github.com/winny-/stronghold Python Eye of Ender throw plotting tool]
*[http://www.purplefrog.com/~thoth/MinecraftStronghold/stronghold.html HTML Eye of Ender throw plotting visualizer (not updated after 1.9 stronghold placement changes)]
*[http://chunkbase.com/apps/stronghold-finder Chunk Base Stronghold Finder (seed-based)]
*[https://github.com/toolbox4minecraft/amidst/releases Amidst - File-based world visualizer]
*[http://minecraft.tournier.org/StrongholdLocator/ Find strongholds by analyzing stronghold.dat file]
== References==
{{reflist}}
{{Items}}
{{entities}}
[[cs:Endové oko]]
[[de:Enderauge]]
[[es:Ojo de ender]]
[[fr:Œil de l'Ender]]
[[hu:Végzet szeme]]
[[ja:エンダーアイ]]
[[ko:엔더의 눈]]
[[nl:Enderoog]]
[[pl:Oko Endera]]
[[pt:Olho de ender]]
[[ru:Око Края]]
[[th:ดวงตาแห่งเอนเดอร์]]
[[uk:Око Краю]]
[[zh:末影之眼]]</li><li>[[Shears|Shears]]<br/>{{Item
| image = Shears.png
| rarity = Common
| renewable = Yes
| durability = 238
| stackable = No
}}
'''Shears''' are tools required to obtain some organic blocks or otherwise mine them faster as well as to shear certain entities and blocks.
==Obtaining==
===Crafting===
{{Crafting
|head=1
|showdescription=1
|B2= Iron Ingot
|A3= Iron Ingot
|Output= Shears
|type= Tool
}}
{{crafting
|foot=1
|ignoreusage=1
|Damaged Shears
|Damaged Shears
|Output= Shears
|description= The durability of the two shears is added together, plus an extra 5% durability.
|type= Tool
}}
Despite using [[Iron Ingot|iron]] in its crafting recipe, shears cannot be smelted into [[iron nugget]]s.<ref>{{bug|MC-111738}}</ref>
===Trading===
Novice-level Shepherd [[villager]]s have a 40% chance to sell shears for 2 [[emerald]]s in Java Edition. This trade is always offered in Bedrock Edition.
===Chest loot===
{{LootChestItem|shears}}
==Usage==
===Shearing===
Shears lose 1 [[durability]] when used to shear something.
Shears can be {{Control|use|text=used}} on a [[sheep]] to remove its coat and drop 1–3 [[wool]] of the corresponding color. The same sheep can be sheared again after it eats from a [[grass block]] to regenerate its coat.
Shearing a [[mooshroom]] drops 5 [[mushroom]]s of the corresponding color and irreversibly turns it into a normal [[cow]].
Shearing a [[snow golem]] irreversibly removes its pumpkin, dropping it and revealing its face.
Shearing either a [[beehive]] or [[bee nest]] that is full of honey makes it drop 3 [[honeycomb]]s and resets it to honey level 0. The same beehive or bee nest can be sheared again if it is able to reach full honey again. If sheared by hand without a [[campfire]] below the hive or nest all bees within will exit and all nearby bees will attack the offending player.
[[Dispenser]]s can use shears in any of the above listed ways, interacting with any valid block or entity in front of the dispenser's face. This decreases the shears' [[durability]]. A dispenser shearing a beehive or bee nest will not anger bees or cause them to leave even if there is not a campfire below it.
Shearing a [[pumpkin]] turns it into a [[carved pumpkin]], dropping 4 [[pumpkin seeds]].
{{IN|java}}, shearing the tip of [[cave vines]], [[kelp]], [[weeping vines]], or [[twisting vines]] sets its age value to 25 and stops further growth.
===Breaking blocks===
Shears use 1 [[durability]] when is used to break any block, even if it [[instant mining|breaks instantly]] by hand.
Shears can be used to harvest [[cobweb|cobwebs]], [[leaves]], [[grass|grass, tall grass]], [[seagrass|seagrass, tall seagrass]], [[fern|ferns, large fern]]s, [[dead bush]]es, [[nether sprouts]], [[vines]], [[glow lichen]] or [[hanging roots]] and obtain them in item form. They can also be used to break [[tripwire]] connected to a [[tripwire hook]] without activating it.
When shears are used to break [[Weeping Vines|weeping vines]] or [[Twisting Vines|twisting vines]] they are guaranteed to drop in item form instead of the usual 33% chance. This only applies to vines directly broken by shears and not vines that are broken due to the destruction of their supporting vines.
The following table shows information about blocks that can be broken with shears. Colors indicate what gets dropped when the block is broken:
*White: The original block.
*Blue: The block's normal drop (i.e. string, sticks, seeds, saplings, apples).
*Red: Nothing.
{| class="wikitable" style="text-align:center" data-description="Blocks broken with shears"
!
!No shears breaking time
!Shears breaking time
|-
! style="text-align:left" |{{BlockLink|Cobweb}}
| {{tc|no|20 s}}<ref group="note">Breaking cobwebs with a sword is as fast as breaking with shears, and yields string. This costs double durability.</ref>
|0.4 s
|-
! style="text-align:left" |{{BlockLink|Dead Bush}}
| {{tc|planned|0 s}}
|0 s
|-
! style="text-align:left" |{{BlockLink|id=fern|Grass|Fern}}
| {{tc|planned|0 s}}
|0 s
|-
! style="text-align:left" |{{BlockLink|Grass}}
| {{tc|planned|0 s}}
| 0 s
|-
! style="text-align:left" |{{BlockLink|Nether Sprouts}}
| {{tc|no|0 s}}<ref group="note">{{IN|bedrock}}, the item drops when breaking it with fists.</ref>
|0 s
|-
! style="text-align:left" |{{BlockLink|Leaves}}
| {{tc|planned|0.35 s}}
|0.05 s
|-
! style="text-align:left" |{{BlockLink|id=tripwire|String#Tripwire|Tripwire}}
|0 s
|0 s<ref group="note">Using shears does not trigger a redstone pulse.</ref>
|-
! style="text-align:left" |{{BlockLink|Vines}}
| {{tc|no|0.35 s}}
|0.35 s
|-
! style="text-align:left" |{{BlockLink|Wool}}
|1.25 s
|0.25 s
|-
! style="text-align:left" |{{BlockLink|Seagrass}}
| {{tc|no|0 s}}
|0 s
|-
! style="text-align:left" | {{BlockLink|Glow Lichen}}
| {{tc|no|0.3 s}}
|0.3 s
|-
! style="text-align:left" |{{BlockLink|Hanging Roots}}
| {{tc|no|0 s}}
|0 s
|-
! style="text-align:left" |{{BlockSprite|Twisting Vines Plant}}{{BlockLink|Twisting Vines}}<br> {{BlockSprite|Weeping Vines Plant}}{{BlockLink|Weeping Vines}}
|0 s
|0 s<ref group="note">Using shears will increase the chance of dropping from 33% to 100%.</ref>
|}
{{notelist}}
===Enchantments===
Shears can receive the following [[Enchanting|enchantments]]:
{| class="wikitable col-2-center col-3-right"
|+
!Name
! Max Level
![[Enchanting|Method]]
|-
|[[Efficiency]]
|V
|{{Inventory slot|Anvil}}
|-
|[[Unbreaking]]
| III
|{{Inventory slot|Anvil}}
|-
|[[Mending]]
|I
|{{Inventory slot|Anvil}}
|-
|[[Curse of Vanishing]]
|I
|{{Inventory slot|Anvil}}
|-
|[[Silk Touch]]{{only|be|short=1}}
|I
|{{Inventory slot|Anvil}}
|}
{{notelist}}
== Sounds ==
{{edition|java}}:
{{Sound table
|rowspan=4
|sound=Shear.ogg
|subtitle=Shears click
|source=player
|description=When a mooshroom is sheared
|id=entity.mooshroom.shear
|translationkey=subtitles.item.shears.shear
|volume=1.0
|pitch=1.0
|distance=16}}
{{Sound table
|subtitle=Shears click
|source=player
|description=When a sheep is sheared
|id=entity.sheep.shear
|translationkey=subtitles.item.shears.shear
|volume=1.0
|pitch=1.0
|distance=16}}
{{Sound table
|subtitle=Shears click
|source=player
|description=When a snow golem is sheared
|id=entity.snow_golem.shear
|translationkey=subtitles.item.shears.shear
|volume=1.0
|pitch=1.0
|distance=16}}
{{Sound table
|subtitle=Plant cropped
|source=block
|description=When a growing plant is cropped
|id=block.growing_plant.crop
|translationkey=subtitles.block.growing_plant.crop
|volume=1.0
|pitch=1.0
|distance=16}}
{{Sound table
|sound=Beehive shear.ogg
|source=block
|subtitle=Shears scrape
|description=When honeycombs are harvested from a beehive
|id=block.beehive.shear
|translationkey=subtitles.block.beehive.shear
|volume=0.8
|pitch=1.0/0.8/0.9
|distance=16}}
{{Sound table
|sound=Pumpkin carve1.ogg
|sound2=Pumpkin carve2.ogg
|source=block
|subtitle=Shears carve
|description=When a pumpkin is carved
|id=block.pumpkin.carve
|translationkey=subtitles.block.pumpkin.carve
|volume=1.0
|pitch=1.0
|distance=16}}
{{Sound table
|sound=Random break.ogg
|subtitle=Item breaks
|source=player
|description=When a pair of shears' durability is exhausted
|id=entity.item.break
|translationkey=subtitles.entity.item.break
|volume=0.8
|pitch=0.8-1.2
|distance=16
|foot=1}}
{{edition|bedrock}}:<br>
Pumpkins do not have carve sounds.
{{Sound table
|type=bedrock
|sound=Shear.ogg
|source=player
|description=When something is sheared
|id=mob.sheep.shear
|volume=1.0
|pitch=1.0}}
{{Sound table
|sound=Beehive shear.ogg
|source=block
|description=When honeycombs are harvested from a beehive
|id=block.beehive.shear
|volume=0.8
|pitch=0.8-1.0}}
{{Sound table
|sound=Random break.ogg
|source=player
|description=When a pair of shears' durability is exhausted
|id=random.break
|volume=1.0
|pitch=0.9
|foot=1}}
==Data values==
===ID===
{{edition|java}}:
{{ID table
|edition=java
|showforms=y
|generatetranslationkeys=y
|displayname=Shears
|spritetype=item
|nameid=shears
|form=item
|foot=1}}
{{edition|bedrock}}:
{{ID table
|edition=bedrock
|shownumericids=y
|showforms=y
|notshowbeitemforms=y
|generatetranslationkeys=y
|displayname=Shears
|spritetype=item
|nameid=shears
|id=421
|form=item
|foot=1}}
==Achievements==
{{load achievements|Have a Shearful Day}}<div style="text-align:center"></div>
==History==
{{History||June 3, 2011|link=https://twitter.com/jeb_/status/76570646074765312|Shears were first mentioned by [[Jeb]] on [[wikipedia:Twitter|Twitter]]. The tweet revealing Jeb's work on shears was written in Swedish (''Jag jobbar på shears nu''), which translates to "I'm working on shears now".}}
{{History||June 7, 2011|link=https://twitter.com/jeb_/status/78154891637436416|Jeb tweets about how shears were originally planned as a way to defuse [[TNT]], but he dropped this shortly after deciding TNT would detonate only with [[redstone]] or [[fire]].}}
{{History|java beta}}
{{History||1.7|[[File:Shears JE1 BE1.png|32px]] Added shears.
|Before [[Beta 1.7]], [[sheep]] would drop 1-3 [[wool]] blocks at most when hit, but shears can harvest up to 4 wool blocks per sheep.}}
{{History||1.8|snap=Pre-release|Shears can now be used to harvest a [[fern]], [[vines]] and [[grass]].}}
{{History|java}}
{{History||1.0.0|snap=Beta 1.9 Prerelease|Shears now harvest [[red mushroom]]s from a [[mooshroom]] and turn it back into a normal [[cow]].}}
{{History||1.1|snap=11w49a|[[Sheep]] now drop only 1-3 wool blocks when sheared, but they can also regrow their wool by eating [[grass block|grass]], which is part of a plan to have [[animal]]s stay in the game longer.<ref>{{Tweet|jeb|76647002317930496}}</ref>}}
{{History||1.2.1|snap=12w05a|Shears can now be used to harvest [[dead bush]]es.}}
{{History|||snap=12w06a|Shears are now [[renewable]], due to [[zombie]]s occassionally dropping iron ingots.}}
{{History||1.3.1|snap=12w21a|Shears can now be [[trading|bought]] from farmer [[villager]]s for 3 [[emerald]]s each.}}
{{History|||snap=12w22a|Shears can now be used to break [[tripwire]] string and not set it off.}}
{{History||1.4.2|snap=12w38a|Added a [[sound]] when using shears on [[sheep]].}}
{{History||1.4.6|snap=12w50a|Shears can now be [[enchanting|enchanted]].}}
{{History||1.8|snap=14w02a|[[Trading]] has been changed: Shepherd [[villager]]s now [[trading|sell]] shears for 3–4 [[emerald]]s each.
|Farmers no longer trade shears.}}
{{History|||snap=pre1|Shears now lose [[item durability|durability]] when breaking [[wool]] blocks. In previous versions, shears would take [[item durability|durability]] [[damage]] only when destroyed or when breaking [[tall grass]] or [[leaves]], the damage remaining the same for all other [[block]]s.<ref>{{bug|MC-5313}}</ref>}}
{{History||1.9|snap=15w34a|Shears may now be used in a crafting grid to zoom in [[map]]s.}}
{{History|||snap=15w45a|Shears no longer zoom in maps.}}
{{History|||snap=15w47b|Shears can no longer be enchanted with [[Silk Touch]].
|Shears now lose durability when used to break any block (formerly lost durability only from [[leaves]], [[web]], [[grass]], [[vines]], [[tripwire]] and [[wool]]).}}
{{History|||snap=15w47c|Shears now harvest [[cobweb]] without requiring [[Silk Touch]].}}
{{History|||snap=15w49a|[[Snow golem]]'s [[pumpkin]] can now be removed with shears.}}
{{History||1.13|snap=17w47a|When shears are {{control|used}} on an un-carved [[pumpkin]], it now turns into a carved pumpkin and drops 4 [[pumpkin seeds]].
|Prior to [[1.13/Flattening|''The Flattening'']], this [[item]]'s numeral ID was 359.}}
{{History||1.14|snap=18w43a|Shears placed in a [[dispenser]] can now shear [[sheep]].
|[[File:Shears JE2 BE2.png|32px]] The texture of shears has been changed.}}
{{History|||snap=18w49a|Shears can now be found in [[chest]]s in [[village]] shepherd houses.}}
{{History||1.15|snap=19w34a|Shears can now be used on [[bee nest]]s and [[beehive]]s to harvest [[honeycomb]].}}
{{History||1.16|snap=20w15a|Shears placed in a dispenser can now shear [[mooshrooms]] and [[snow golem]]s.}}
{{History||1.16.2|snap=pre1|Shears are now required in order to pick up [[roots]].}}
{{History||1.16.2|snap=pre2|Shears are no longer required to pick up [[roots]].}}
{{History||1.17|snap=?|Shears are now required in order to pick up [[hanging roots]].}}
{{History||1.18|snap=21w37a|Shears can now stop [[cave vines]], [[kelp]], [[weeping vines]], and [[twisting vines]] from aging.}}
{{History||1.19|snap=22w11a|Shears are now required in order to pick up [[mangrove leaves]].}}
{{History|pocket alpha}}
{{History||v0.2.0|[[File:Shears JE1 BE1.png|32px]] Added shears.}}
{{History||v0.3.2|Survival [[player]]s no longer start out with infinite durability shears in the [[inventory]].}}
{{History||v0.4.0|Removed shears from the creative inventory.}}
{{History||v0.8.0|snap=build 3|Re-added shears to [[creative]] mode.}}
{{History||v0.9.0|snap=build 1|Shears can now be used to transform [[mooshroom]]s into [[cow]]s.}}
{{History||v0.12.1|snap=build 3|Shearing a [[snow golem]] now removes its [[pumpkin]].
|Shears can now be [[enchanting|enchanted]] in an [[anvil]].}}
{{History||v0.13.0|snap=build 1|Shears can now be used to break [[tripwire]] string without triggering it.}}
{{History||v0.15.0|snap=build 1|Shears now lose durability when used to break any [[block]].}}
{{History|pocket}}
{{History||1.0.4|snap=alpha 1.0.4.0|Shears can now be [[trading|bought]] from shepherd [[villager]]s.}}
{{History||1.1.0|snap=alpha 1.1.0.0|Breaking a [[melon|melon block]] with shears now always drop 9 [[melon slice|melons]].}}
{{History|bedrock}}
{{History||1.4.0|snap=beta 1.2.13.8|Shears can now be used to turn un-carved [[pumpkin]]s into [[carved pumpkin]] and spit out 4 [[pumpkin seeds]].}}
{{History||?|Shears now harvest [[cobweb]] without requiring [[Silk Touch]].}}
{{History||1.10.0|snap=beta 1.10.0.3|Shears placed in a [[dispenser]] can now shear [[sheep]].
|[[File:Shears JE2 BE2.png|32px]] The texture of shears has been changed.}}
{{History||1.11.0|snap=beta 1.11.0.1|Shears can now be found in [[village]] shepherd houses.}}
{{History|||snap=beta 1.11.0.4|Shears [[trading|sold]] by shepherd [[villager]]s now cost only 2 [[emerald]]s.}}
{{History||1.14.0|snap=beta 1.14.0.1|Shears can now be used on [[bee nest]]s and [[beehive]]s to harvest [[honeycomb]].}}
{{History|console}}
{{History||xbox=TU3|xbone=CU1|ps=1.0|wiiu=Patch 1|switch=1.0.1|[[File:Shears JE1 BE1.png|32px]] Added shears.}}
{{History||xbox=TU69|xbone=none|ps=1.76|wiiu=Patch 38|switch=none|Shears can now be used to turn regular [[pumpkin]]s into [[carved pumpkin]]s.}}
{{History||xbox=none|xbone=none|ps=1.90|wiiu=none|switch=none|[[File:Shears JE2 BE2.png|32px]] The texture of shears has been changed.
|Shears placed in a [[dispenser]] can now shear [[sheep]].}}
{{History|New 3DS}}
{{History||0.1.0|[[File:Shears JE1 BE1.png|32px]] Added shears.}}
{{History|foot}}
==Issues==
{{issue list}}
==Gallery==
<gallery>
File:Enchanted Shears.gif|An enchanted pair of shears.
</gallery>
==References==
{{reflist}}
==External links==
*[https://www.minecraft.net/en-us/article/taking-inventory--shears Taking Inventory: Shears] – Minecraft.net on November 20, 2019
{{Items}}
[[cs:Nůžky]]
[[de:Schere]]
[[es:Tijeras]]
[[fr:Cisailles]]
[[hu:Metszőolló]]
[[it:Cesoie]]
[[ja:ハサミ]]
[[ko:가위]]
[[nl:Schaar]]
[[pl:Nożyce]]
[[pt:Tesoura]]
[[ru:Ножницы]]
[[zh:剪刀]]
[[Category:Renewable resources]]</li></ul> | build 1 | Added boats and fishing rods, which can now be used as fuel. | |||||||||||||||||||||||||||||||||
v0.12.1
Template loop detected: Template:History Template loop detected: Template:History Template loop detected: Template:History Template loop detected: Template:History Template loop detected: Template:History Template loop detected: Template:History Template loop detected: Template:History Template loop detected: Template:History Template loop detected: Template:History Template loop detected: Template:History Template loop detected: Template:History Template loop detected: Template:History Template loop detected: Template:History Template loop detected: Template:History Template loop detected: Template:History Template loop detected: Template:History Template loop detected: Template:History Template loop detected: Template:History Template loop detected: Template:History Template loop detected: Template:History Template loop detected: Template:History Template loop detected: Template:History Template loop detected: Template:History Template loop detected: Template:History Template loop detected: Template:History Template loop detected: Template:History Template loop detected: Template:History Template loop detected: Template:History Template loop detected: Template:History Template loop detected: Template:History Template loop detected: Template:History Template loop detected: Template:History Template loop detected: Template:History Template loop detected: Template:History Template loop detected: Template:History Template loop detected: Template:History Template loop detected: Template:History Template loop detected: Template:History Template loop detected: Template:History Template loop detected: Template:History Template loop detected: Template:History Template loop detected: Template:History
| build 1 | Added blaze rods, which can now be used as fuel. | |||||||||||||||||||||||||||||||||
v0.13.0{{Extension DPL}}<ul><li>[[La Baguette|La Baguette]]<br/>{{Exclusive|Java}}
{{Joke feature}}
{{WIP}}
{{Item
| rarity = Common
| renewable = Yes
| durability = 59
| stackable = No
}}
'''La Baguette''' is a joke weapon from [[Java Edition 23w13a_or_b]]. Its stats are identical to a wooden [[sword]], though La Baguette cannot be used to fuel furnaces.
== Obtaining ==
One [[Le Tricolore|tricolore]] and one baguette is given to all players when [[French mode]] gets activated.
=== Repairing ===
==== Grinding ====
{{Grinding
|showdescription=1
|ingredients=2x La Baguette
|La Baguette
|La Baguette
|La Baguette
|description=The durability of the two baguettes is added together, plus an extra 5% durability. Any enchantments, besides curses, would be removed.
}}
====Unit repair====
Strangely, La Baguette can be repaired using planks rather than bread, just like a wooden sword.
{{Anvil|Input1=Damaged La Baguette|Input2=Damaged La Baguette; Any Planks|Output=La Baguette}}
==Usage==
La Baguette functions identically to a wooden sword.
===Attacking===
It can be used to damage mobs for {{hp|4}} health points. La Baguette has an attack speed of 1.6 and takes 0.625 seconds to [[Damage#Attack cooldown|recover]].
=== Breaking ===
La Baguette, just like other swords, can be used to break certain blocks 50% faster. See [[Sword#Sword breaking times]] for more.
=== Enchantments ===
La Baguette, like other swords, can receive the following [[enchantment]]s:
{| class="wikitable sortable col-2-center col-3-right"
|+
!Name
!Max Level
![[Enchanting|Method]]
!Weight
|-
|[[Fire Aspect]]
|II
|{{Inventory slot|Enchanting Table}}{{Inventory slot|Anvil}}
|2
|-
|[[Looting]]
|III
|{{Inventory slot|Enchanting Table}}{{Inventory slot|Anvil}}
|2
|-
|[[Unbreaking]]
|III
|{{Inventory slot|Enchanting Table}}{{Inventory slot|Anvil}}
|5
|-
|[[Sharpness]]<ref group=note name=note1>Sharpness, Smite, and Bane of Arthropods are mutually exclusive.</ref>
|V
|{{Inventory slot|Enchanting Table}}{{Inventory slot|Anvil}}
|10
|-
|[[Smite]]<ref group=note name=note1/>
|V
|{{Inventory slot|Enchanting Table}}{{Inventory slot|Anvil}}
|5
|-
|[[Bane of Arthropods]]<ref group="note" name=note1/>
|V
|{{Inventory slot|Enchanting Table}}{{Inventory slot|Anvil}}
|5
|-
|[[Knockback]]
|II
|{{Inventory slot|Enchanting Table}}{{Inventory slot|Anvil}}
|5
|-
|[[Mending]]
|I
|{{Inventory slot|Anvil}}
|2
|-
|[[Curse of Vanishing]]
|I
|{{Inventory slot|Anvil}}
|1
|-
|[[Sweeping Edge]]{{Only|java|short=1}}
|III
|{{Inventory slot|Enchanting Table}}{{Inventory slot|Anvil}}
|2
|}
{{Notelist}}
==Trivia==
This item is simply called "Baguette" in the official French translation, without an article.
{{Items}}
{{Jokes}}
[[Category:Tools]]
[[Category:Combat]]
[[ja:La Baguette]]
[[pt:La Baguette]]
[[Category:Joke items]]</li><li>[[Pumpkin Seeds|Pumpkin Seeds]]<br/>{{Block
| image = <gallery>
Pumpkin Stem Age 0.png | Age 0
Pumpkin Stem Age 1.png | Age 1
Pumpkin Stem Age 2.png | Age 2
Pumpkin Stem Age 3.png | Age 3
Pumpkin Stem Age 4.png | Age 4
Pumpkin Stem Age 5.png | Age 5
Pumpkin Stem Age 6.png | Age 6
Pumpkin Stem Age 7.png | Age 7
</gallery>
|image2 = <gallery>
Attached Pumpkin Stem (N).png | North
Attached Pumpkin Stem (E).png | East
Attached Pumpkin Stem (S).png | South
Attached Pumpkin Stem (W).png | West
</gallery>
| transparent = Yes
| light = No
| tool = none
| renewable = Yes
| stackable = Yes (64)
| flammable = No
| lavasusceptible = No
}}
'''Pumpkin seeds''' are items obtained from pumpkins that can be used to grow pumpkin stems.
'''Pumpkin stems''' are plants grown on [[farmland]] that, over time, grow [[pumpkin]]s on dirt, mud and moss blocks adjacent to them.
== Obtaining ==
=== Breaking ===
When broken, a pumpkin stem drops 0–3 pumpkin seeds. The chance for pumpkin seeds to drop increases with the stem's age.
{| class="wikitable"
! rowspan="3" |[[Resource location]]
! rowspan="3" | Source
! colspan="4" | Default
|-
| colspan="1" rowspan="2" style="text-align:center" | Nothing || colspan="3" style="text-align:center" |{{ItemLink|Pumpkin Seeds|Pumpkin seeds}}
|-
| style="text-align:center" | 1 || style="text-align:center" | 2 || style="text-align:center" | 3
|-
| rowspan="8" |<code>blocks/pumpkin_stem</code>
|{{BlockLink|Pumpkin Stem|Pumpkin stem}} <code>age = 0</code>
| style="text-align:center" |81.3%|| style="text-align:center" |17.42%|| style="text-align:center" |1.24%|| style="text-align:center" |0.03%
|-
|{{BlockLink|Pumpkin Stem|Pumpkin stem}} <code>age = 1</code>
| style="text-align:center" |65.1%|| style="text-align:center" |30.04%|| style="text-align:center" |4.62%|| style="text-align:center" |0.24%
|-
|{{BlockLink|Pumpkin Stem|Pumpkin stem}} <code>age = 2</code>
| style="text-align:center" |51.2%|| style="text-align:center" |38.4%|| style="text-align:center" |9.6%|| style="text-align:center" |0.8%
|-
|{{BlockLink|Pumpkin Stem|Pumpkin stem}} <code>age = 3</code>
| style="text-align:center" |39.44%|| style="text-align:center" |43.02%|| style="text-align:center" |15.64%|| style="text-align:center" |1.9%
|-
|{{BlockLink|Pumpkin Stem|Pumpkin stem}} <code>age = 4</code>
| style="text-align:center" |29.13%|| style="text-align:center" |44.44%|| style="text-align:center" |22.22%|| style="text-align:center" |3.7%
|-
|{{BlockLink|Pumpkin Stem|Pumpkin stem}} <code>age = 5</code>
| style="text-align:center" |21.6%|| style="text-align:center" |43.2%|| style="text-align:center" |28.8%|| style="text-align:center" |6.4%
|-
|{{BlockLink|Pumpkin Stem|Pumpkin stem}} <code>age = 6</code>
| style="text-align:center" |15.17%|| style="text-align:center" |39.82%|| style="text-align:center" |34.84%|| style="text-align:center" |10.16%
|-
|{{BlockLink|Pumpkin Stem|Pumpkin stem}} <code>age = 7</code>
| style="text-align:center" |10.16%|| style="text-align:center" |34.84%|| style="text-align:center" |39.82%|| style="text-align:center" |15.17%
|-
| rowspan="1" |<code>blocks/attached_pumpkin_stem</code>
|{{BlockLink|Attached Pumpkin Stem|Attached Pumpkin stem}}
| style="text-align:center" |10.16%|| style="text-align:center" |34.84%|| style="text-align:center" |39.82%|| style="text-align:center" |15.17%
|}
=== Natural generation ===
Pumpkin stems generate naturally in stem farm rooms in [[woodland mansion]]s.
Pumpkin stems generate in [[taiga]] and [[snowy taiga]]{{only|be|short=1}} [[village]] farms.
=== Chest loot ===
{{LootChestItem|pumpkin-seeds}}
=== Crafting ===
{{Crafting
|Pumpkin
|Output= Pumpkin Seeds,4
|type= Material
}}
=== Trading ===
[[Wandering trader]]s sell pumpkin seeds for 1 [[emerald]].
=== Post-generation ===
Shearing an uncarved pumpkin yields 4 pumpkin seeds.
== Usage ==
=== Farming ===
{{see also|Tutorials/Pumpkin and melon farming}}
Pumpkin seeds can be planted only on [[farmland]], as stems. Over time, a stem grows through several stages{{Needs testing}} and, at its final growth stage, will produce [[pumpkin]]s on any adjacent [[dirt]], [[Coarse Dirt|coarse dirt]], [[Rooted Dirt|rooted dirt]], [[Grass Block|grass block]], [[farmland]], [[podzol]], [[mycelium]], [[Moss Block|moss block]], [[mud]] or [[Muddy Mangrove Roots|muddy mangrove roots]]. If a pumpkin is already occupying a spot adjacent to a stem it does not grow more pumpkins until the pumpkin is removed. A single stem can grow an unlimited number of pumpkins. Pumpkin stems need a minimum light level of 10 in the block above the stem to grow and give pumpkins. Pumpkin seeds are affected by [[bone meal]] only with respect to stem growth; bone meal does not help produce the actual pumpkins.
=== Breeding ===
Like other seeds, pumpkin seeds can be used to [[breed]] [[chicken]]s, lead chickens around, and make baby chickens grow up faster by 10% of the remaining time.
=== Taming ===
Like other seeds, pumpkin seeds can be used to tame [[parrot]]s.
=== Composting ===
Placing pumpkin seeds into a [[composter]] has a 30% chance of raising the compost level by 1.
== Pumpkin stem ==
A '''pumpkin stem''' is the block that is planted on [[farmland]] when pumpkin seeds are used on it. It starts underground, and rises up as the plant grows. The stem is colored green when young, and then yellow once fully grown.
The stem curves once a pumpkin has grown from it. A fully-grown single stem connects to any [[pumpkin]] in an adjacent square, thus there are 5 possible appearances to a stem. If there are multiple pumpkins it can connect to, it favors the east, then west, north, and south. When the pumpkin is removed, the stem returns to its straight shape.
== Sounds ==
{{Sound table/Block/Hard crop}}
== Data values ==
=== ID ===
{{edition|java}}:
{{ID table
|edition=java
|showblocktags=y
|showforms=y
|generatetranslationkeys=y
|displayname=Pumpkin Stem
|spritetype=block
|nameid=pumpkin_stem
|blocktags=bee_growables, crops
|form=block}}
{{ID table
|displayname=Attached Pumpkin Stem
|spritetype=block
|nameid=attached_pumpkin_stem
|form=block}}
{{ID table
|displayname=Pumpkin Seeds
|spritetype=item
|nameid=pumpkin_seeds
|form=item
|foot=1}}
{{edition|bedrock}}:
{{ID table
|edition=bedrock
|shownumericids=y
|showforms=y
|generatetranslationkeys=y
|displayname=Pumpkin Stem
|spritetype=block
|nameid=pumpkin_stem
|id=104
|form=block}}
{{ID table
|displayname=Pumpkin Seeds
|spritetype=item
|nameid=pumpkin_seeds
|id=292
|form=item
|foot=1}}
=== Block states ===
{{see also|Block states}}
{{/BS}}
== Advancements ==
{{load advancements|A Seedy Place}}
== History ==
{{info needed section|check if stems floated above farmland upon initial implementation}}
{{History|java beta}}
{{History||1.8|snap=Pre-release|[[File:Pumpkin Seeds JE1 BE1.png|32px]] Added pumpkin seeds.
|[[File:Pumpkin Stem Age 0 JE1.png|32px]] [[File:Pumpkin Stem Age 1 JE1.png|32px]] [[File:Pumpkin Stem Age 2 JE1.png|32px]] [[File:Pumpkin Stem Age 3 JE1.png|32px]] [[File:Pumpkin Stem Age 4 JE1.png|32px]] [[File:Pumpkin Stem Age 5 JE1.png|32px]] [[File:Pumpkin Stem Age 6 JE1.png|32px]] [[File:Pumpkin Stem Age 7 JE1.png|32px]] Added the pumpkin stem, with seven stages of growth.
|Pumpkin seeds can be found in the new [[mineshaft]] [[chest]]s.
|[[File:Attached Pumpkin Stem (N) JE1.png|32px]] [[File:Attached Pumpkin Stem (E) JE1.png|32px]] [[File:Attached Pumpkin Stem (S) JE1.png|32px]] [[File:Attached Pumpkin Stem (W) JE1.png|32px]] The pumpkin stem has four slightly visually distinct appearances for each facing direction - the bent part of the stem rotates, but the other two planes do not.
|[[File:Pumpkin Stem Age 8 JE1.png|32px]] [[File:Pumpkin Stem Age 9 JE1.png|32px]] [[File:Pumpkin Stem Age 10 JE1.png|32px]] [[File:Pumpkin Stem Age 11 JE1.png|32px]] [[File:Pumpkin Stem Age 12 JE1.png|32px]] [[File:Pumpkin Stem Age 13 JE1.png|32px]] [[File:Pumpkin Stem Age 14 JE1.png|32px]] [[File:Pumpkin Stem Age 15 JE1.png|32px]] Pumpkin stem data values from 8 through 15 now show a glitched formation, with a floating stem with an attached stem cross eventually emerging below.
|[[File:Attached Stem Age 8 JE1.png|32px]] [[File:Attached Stem Age 9 JE1.png|32px]] [[File:Attached Stem Age 10 JE1.png|32px]] [[File:Attached Stem Age 11 JE1.png|32px]] [[File:Attached Stem Age 12 JE1.png|32px]] [[File:Attached Stem Age 13 JE1.png|32px]] [[File:Attached Stem Age 14 JE1.png|32px]] [[File:Attached Stem Age 15 JE1.png|32px]] Pumpkin stem blocks with data values higher than 7 can attach to adjacent fruits, which results in buggy stem textures with [[vines]] in the mix due to vines being below attached stems in [[terrain.png]].}}
{{History|||snap=Pre-release 2 ;)|Pumpkin stems can now be grown faster using [[bone meal]].}}
{{History|java}}
{{History||1.0.0|snap=Beta 1.9 Prerelease 2|Pumpkins can now be [[crafting|crafted]] into [[pumpkin seeds]].}}
{{History||1.3.1|snap=1.3|The texture of pumpkin stems has been moved one pixel to the left in [[terrain.png]].
|[[File:Pumpkin Stem Age 0 JE2.png|32px]] [[File:Pumpkin Stem Age 1 JE2.png|32px]] [[File:Pumpkin Stem Age 2 JE2.png|32px]] [[File:Pumpkin Stem Age 3 JE2.png|32px]] [[File:Pumpkin Stem Age 4 JE2.png|32px]] [[File:Pumpkin Stem Age 5 JE2.png|32px]] [[File:Pumpkin Stem Age 6 JE2.png|32px]] [[File:Pumpkin Stem Age 7 JE2.png|32px]] Stems now appear slightly different.
|[[File:Pumpkin Stem Age 8 JE2.png|32px]] [[File:Pumpkin Stem Age 9 JE2.png|32px]] [[File:Pumpkin Stem Age 10 JE2.png|32px]] [[File:Pumpkin Stem Age 11 JE2.png|32px]] [[File:Pumpkin Stem Age 12 JE2.png|32px]] [[File:Pumpkin Stem Age 13 JE2.png|32px]] [[File:Pumpkin Stem Age 14 JE2.png|32px]] [[File:Pumpkin Stem Age 15 JE2.png|32px]] Overgrown attached pumpkin stems now appear slightly different.
|[[File:Attached Pumpkin Stem (N) JE2.png|32px]] [[File:Attached Pumpkin Stem (E) JE2.png|32px]] [[File:Attached Pumpkin Stem (S) JE2.png|32px]] [[File:Attached Pumpkin Stem (W) JE2.png|32px]] Attached pumpkin stems now appear slightly different.
|[[File:Attached Stem Age 8 JE2.png|32px]] [[File:Attached Stem Age 9 JE2.png|32px]] [[File:Attached Stem Age 10 JE2.png|32px]] [[File:Attached Stem Age 11 JE2.png|32px]] [[File:Attached Stem Age 12 JE2.png|32px]] [[File:Attached Stem Age 13 JE2.png|32px]] [[File:Attached Stem Age 14 JE2.png|32px]] [[File:Attached Stem Age 15 JE2.png|32px]] Overgrown attached pumpkin stems now appear slightly different.}}
{{History||1.4.2|snap=12w36a|[[Chicken]]s now use [[wheat seeds]], [[melon seeds]] and pumpkin seeds, instead of [[wheat]] to [[breeding|breed]].}}
{{History||1.5|snap=13w02a|[[File:Pumpkin Stem Age 0 JE3.png|32px]] [[File:Pumpkin Stem Age 1 JE3.png|32px]] [[File:Pumpkin Stem Age 2 JE3.png|32px]] [[File:Pumpkin Stem Age 3 JE3.png|32px]] [[File:Pumpkin Stem Age 4 JE3.png|32px]] [[File:Pumpkin Stem Age 5 JE3.png|32px]] [[File:Pumpkin Stem Age 6 JE3.png|32px]] Pumpkin stems now use a squished version of their texture for immature stems, depending on age.
|[[File:Pumpkin Stem Age 8 JE3.png|32px]] [[File:Pumpkin Stem Age 9 JE3.png|32px]] [[File:Pumpkin Stem Age 10 JE3.png|32px]] [[File:Pumpkin Stem Age 11 JE3.png|32px]] [[File:Pumpkin Stem Age 12 JE3.png|32px]] [[File:Pumpkin Stem Age 13 JE3.png|32px]] [[File:Pumpkin Stem Age 14 JE3.png|32px]] [[File:Pumpkin Stem Age 15 JE3.png|32px]] This also affects pumpkin stems of ages 8-15, which are likewise stretched to accommodate its predicted size.
|[[File:Attached Stem Age 8 JE3.png|32px]] [[File:Attached Stem Age 9 JE3.png|32px]] [[File:Attached Stem Age 10 JE3.png|32px]] [[File:Attached Stem Age 11 JE3.png|32px]] [[File:Attached Stem Age 12 JE3.png|32px]] [[File:Attached Stem Age 13 JE3.png|32px]] [[File:Attached Stem Age 14 JE3.png|32px]] [[File:Attached Stem Age 15 JE3.png|32px]] Pumpkin stems of extreme ages, which are attached to adjacent fruits, now show a stretched and tinted stem appearance.}}
{{History|||snap=13w03a|[[File:Pumpkin Stem Age 0 JE4.png|32px]] [[File:Pumpkin Stem Age 1 JE4.png|32px]] [[File:Pumpkin Stem Age 2 JE4.png|32px]] [[File:Pumpkin Stem Age 3 JE4.png|32px]] [[File:Pumpkin Stem Age 4 JE4.png|32px]] [[File:Pumpkin Stem Age 5 JE4.png|32px]] [[File:Pumpkin Stem Age 6 JE4.png|32px]] [[File:Pumpkin Stem Age 7 JE4.png|32px]] Pumpkin stems are no longer squished or stretched to account for age.<ref>{{bug|MC-7111}}</ref>
|[[File:Pumpkin Stem Age 8 JE4.png|32px]] [[File:Pumpkin Stem Age 9 JE4.png|32px]] [[File:Pumpkin Stem Age 10 JE4.png|32px]] [[File:Pumpkin Stem Age 11 JE4.png|32px]] [[File:Pumpkin Stem Age 12 JE4.png|32px]] [[File:Pumpkin Stem Age 13 JE4.png|32px]] [[File:Pumpkin Stem Age 14 JE4.png|32px]] [[File:Pumpkin Stem Age 15 JE4.png|32px]] Pumpkin stems with age values 8 through 15 now show a tinted [[trapdoor]] texture.
|From this version up until 14w08a, overgrown pumpkin stems start to draw from the texture below them on the [[texture atlas]], in much the same way they previously did with terrain.png. However, as texture atlases are unstable and textures tend to change positions as new blocks and textures are added, overgrown stems change the texture they draw from every time new textures are added, which includes when textures added by [[mods]].}}
{{History|||snap=13w09a|[[File:Pumpkin Stem Age 8 JE5.png|32px]] [[File:Pumpkin Stem Age 9 JE5.png|32px]] [[File:Pumpkin Stem Age 10 JE5.png|32px]] [[File:Pumpkin Stem Age 11 JE5.png|32px]] [[File:Pumpkin Stem Age 12 JE5.png|32px]] [[File:Pumpkin Stem Age 13 JE5.png|32px]] [[File:Pumpkin Stem Age 14 JE5.png|32px]] [[File:Pumpkin Stem Age 15 JE5.png|32px]] Pumpkin stems with age values 8 through 15 now show a tinted [[birch wood]] texture.}}
{{History||1.6.1|snap=13w24a|Melon and pumpkin stems have now been assigned separate textures.
|[[File:Pumpkin Stem Age 8 JE6.png|32px]] [[File:Pumpkin Stem Age 9 JE6.png|32px]] [[File:Pumpkin Stem Age 10 JE6.png|32px]] [[File:Pumpkin Stem Age 11 JE6.png|32px]] [[File:Pumpkin Stem Age 12 JE6.png|32px]] [[File:Pumpkin Stem Age 13 JE6.png|32px]] [[File:Pumpkin Stem Age 14 JE6.png|32px]] [[File:Pumpkin Stem Age 15 JE6.png|32px]] Pumpkin stems with age values 8 through 15 now show a tinted curving [[rail]] texture.}}
{{History||1.7.2|snap=13w37a|Added the {{cmd|setblock}} command, allowing for invalid pumpkin stem ages to be placed in the world without using external editors. This also allows them to be obtained in earlier versions via backdating.}}
{{History|||snap=13w41a|[[File:Pumpkin Stem Age 8 JE7.png|32px]] [[File:Pumpkin Stem Age 9 JE7.png|32px]] [[File:Pumpkin Stem Age 10 JE7.png|32px]] [[File:Pumpkin Stem Age 11 JE7.png|32px]] [[File:Pumpkin Stem Age 12 JE7.png|32px]] [[File:Pumpkin Stem Age 13 JE7.png|32px]] [[File:Pumpkin Stem Age 14 JE7.png|32px]] [[File:Pumpkin Stem Age 15 JE7.png|32px]] Pumpkin stems with age values 8 through 15 now show a tinted lit [[furnace]] texture.}}
{{History|||snap=13w43a|[[File:Pumpkin Stem Age 8 JE8.png|32px]] [[File:Pumpkin Stem Age 9 JE8.png|32px]] [[File:Pumpkin Stem Age 10 JE8.png|32px]] [[File:Pumpkin Stem Age 11 JE8.png|32px]] [[File:Pumpkin Stem Age 12 JE8.png|32px]] [[File:Pumpkin Stem Age 13 JE8.png|32px]] [[File:Pumpkin Stem Age 14 JE8.png|32px]] [[File:Pumpkin Stem Age 15 JE8.png|32px]] Pumpkin stems with age values 8 through 15 now show a tinted [[pumpkin]] top texture.}}
{{History||1.8|snap=14w10a|[[File:Pumpkin Stem Age 8 JE9.png|32px]] [[File:Pumpkin Stem Age 9 JE9.png|32px]] [[File:Pumpkin Stem Age 10 JE9.png|32px]] [[File:Pumpkin Stem Age 11 JE9.png|32px]] Pumpkin stems with data values 8-11 now display a tinted attached stem, with 8 facing west, 9 facing east, 10 facing north and 11 facing south.
|Invalid pumpkin stems with data values 12-15 now crash the game.}}
{{History|||snap=14w25a|[[File:Pumpkin Stem Age 0 JE5.png|32px]] [[File:Pumpkin Stem Age 1 JE5.png|32px]] [[File:Pumpkin Stem Age 2 JE5.png|32px]] [[File:Pumpkin Stem Age 3 JE5.png|32px]] [[File:Pumpkin Stem Age 4 JE5.png|32px]] [[File:Pumpkin Stem Age 5 JE5.png|32px]] [[File:Pumpkin Stem Age 6 JE5.png|32px]] [[File:Pumpkin Stem Age 7 JE5.png|32px]] Pumpkin stems now render as a single diagonal plane, or, in the case of attached stems, a diagonal and orthogonal plane.
|[[File:Attached Pumpkin Stem (N) JE3.png|32px]] [[File:Attached Pumpkin Stem (E) JE3.png|32px]] [[File:Attached Pumpkin Stem (S) JE3.png|32px]] [[File:Attached Pumpkin Stem (W) JE3.png|32px]] The attached pumpkin stem [[model]] now fully rotates to the direction the stem points. Prior to this update, the base of the pumpkin stem would stay the same while the long attaching section would differ, resulting in four possible attached stem appearances.
|Invalid overgrown pumpkin stems have now effectively been removed from the game, as attempting to place an out of range stem via {{cmd|setblock}} creates a stem of age 0 and loading a world with existing such stems cause a game crash.}}
{{History|||snap=14w26a|[[File:Pumpkin Stem Age 0 JE6.png|32px]] [[File:Pumpkin Stem Age 1 JE6.png|32px]] [[File:Pumpkin Stem Age 2 JE6.png|32px]] [[File:Pumpkin Stem Age 3 JE6.png|32px]] [[File:Pumpkin Stem Age 4 JE6.png|32px]] [[File:Pumpkin Stem Age 5 JE6.png|32px]] [[File:Pumpkin Stem Age 6 JE6.png|32px]] [[File:Pumpkin Stem Age 7 JE6.png|32px]] [[File:Attached Pumpkin Stem (N) JE4.png|32px]] [[File:Attached Pumpkin Stem (E) JE4.png|32px]] [[File:Attached Pumpkin Stem (S) JE4.png|32px]] [[File:Attached Pumpkin Stem (W) JE4.png|32px]] Pumpkin stems now correctly render as crosses again.<ref>{{bug|MC-58136}}</ref>}}
{{History|||snap=14w27a|[[File:Attached Stem Age 0 14w27a.png|32px]] [[File:Attached Stem Age 1 14w27a.png|32px]] [[File:Attached Stem Age 2 14w27a.png|32px]] [[File:Attached Stem Age 3 14w27a.png|32px]] [[File:Attached Stem Age 4 14w27a.png|32px]] [[File:Attached Stem Age 5 14w27a.png|32px]] [[File:Attached Stem Age 6 14w27a.png|32px]] Due to a bug, all pumpkin stems now appear attached regardless of age or any actual attachment.<ref>{{bug|MC-60208}}</ref>}}
{{History|||snap=14w28a|All pumpkin stems appearing attached regardless of the age of any actual attachment has been fixed. However, pumpkin stems still appear attached to adjacent fruits regardless of age due to a similar bug.<ref>{{bug|MC-61716}}</ref>}}
{{History|||snap=14w34d|Pumpkin seeds no longer can be used to breed [[chicken]]s.}}
{{History||1.9|snap=15w31a|Chickens can now use pumpkin seeds to [[breeding|breed]] again.}}
{{History|||snap=15w44a|Pumpkin seeds have been added to [[dungeon]] [[chest]]s.
|The average yield of pumpkin seeds in [[mineshaft]] chests has been decreased.}}
{{History|||snap=15w45a|Pumpkin stems must now be fully grown again to attach.}}
{{History||1.11|snap=16w39a|Pumpkin seeds are now found in the new [[woodland mansion]] chests.
|Pumpkin stems now generate inside [[woodland mansion]]s.}}
{{History||1.13|snap=17w47a|The different [[block]] states for the <code>pumpkin_stem</code> ID have been split up into their own IDs.
|Pumpkin seeds can now be obtained by [[shear]]ing an uncarved pumpkin.
|Prior to [[1.13/Flattening|''The Flattening'']], this [[block]]'s numeral ID was 104, and the [[item]]'s 361.}}
{{History|||snap=17w48a|Attached pumpkin stems no longer [[drops|drop]] seeds.}}
{{History||1.14|snap=18w43a|[[File:Pumpkin Stem Age 0 JE7.png|32px]] [[File:Pumpkin Stem Age 1 JE7.png|32px]] [[File:Pumpkin Stem Age 2 JE7.png|32px]] [[File:Pumpkin Stem Age 3 JE7.png|32px]] [[File:Pumpkin Stem Age 4 JE7.png|32px]] [[File:Pumpkin Stem Age 5 JE7.png|32px]] [[File:Pumpkin Stem Age 6 JE7.png|32px]] [[File:Pumpkin Stem Age 7 JE7.png|32px]] The stem texture has changed.
|[[File:Attached Pumpkin Stem (N) JE5.png|32px]] [[File:Attached Pumpkin Stem (E) JE5.png|32px]] [[File:Attached Pumpkin Stem (S) JE5.png|32px]] [[File:Attached Pumpkin Stem (W) JE5.png|32px]] The pumpkin stem texture change also affects the base cross on pumpkin stems.}}
{{History|||snap=18w50a|Pumpkin stems now generate in the updated [[taiga]] [[village]] farms.
|Pumpkin seeds can now be found in [[chest]]s in taiga village houses.}}
{{History|||snap=19w03a|Placing pumpkin seeds into the new [[composter]] has a 10% chance of raising the compost level by 1.}}
{{History|||snap=19w05a|Pumpkin seeds now have a 30% chance of increasing the compost level in a composter by 1.
|Added [[Wandering Trader|wandering trader]]s, which sell pumpkin seeds.}}
{{History||1.15|snap=19w34a|[[Bee]]s can now pollinate pumpkin stems.}}
{{History|||snap=19w39a|Attached pumpkin stems now [[drops|drop]] seeds again.<ref>{{bug|MC-136360}}</ref>}}
{{History|pocket alpha}}
{{History||v0.8.0|snap=build 1|[[File:Pumpkin Seeds JE1 BE1.png|32px]] Added pumpkin seeds.
|[[File:Pumpkin Stem Age 0 JE1.png|32px]] [[File:Pumpkin Stem Age 1 JE1.png|32px]] [[File:Pumpkin Stem Age 2 JE1.png|32px]] [[File:Pumpkin Stem Age 3 JE1.png|32px]] [[File:Pumpkin Stem Age 4 JE1.png|32px]] [[File:Pumpkin Stem Age 5 JE1.png|32px]] [[File:Pumpkin Stem Age 6 JE1.png|32px]] [[File:Pumpkin Stem Age 7 JE1.png|32px]] [[File:Attached Pumpkin Stem (N) JE1.png|32px]] [[File:Attached Pumpkin Stem (E) JE1.png|32px]] [[File:Attached Pumpkin Stem (S) JE1.png|32px]] [[File:Attached Pumpkin Stem (W) JE1.png|32px]]{{verify|Were these the models used by this edition?}} Added pumpkin stems.
|Pumpkin seeds are obtainable from the [[Nether reactor]].}}
{{History||v0.12.1|snap=build 1|Pumpkin seeds are no longer available from the Nether reactor.}}
{{History||v0.14.0|snap=build 1|Pumpkin seeds can now be found in [[minecart with chest]]s inside [[mineshaft]]s.}}
{{History|pocket}}
{{History||1.1.0|snap=alpha 1.1.0.0|Pumpkin stems now generate inside [[woodland mansion]]s.}}
{{History|bedrock}}
{{History||1.2.0|snap=beta 1.2.0.2|Pumpkin seeds are now used to tame [[parrot]]s.}}
{{History||1.4.0|snap=beta 1.2.13.8|Pumpkin seeds can now be obtained by [[shear]]ing an uncarved [[pumpkin]].}}
{{History||1.10.0|snap=beta 1.10.0.3|[[File:Attached Pumpkin Stem (W) JE5.png|32px]]{{info needed|More accurate image}} The texture of attached pumpkin stems has been changed.
|Pumpkin seeds can now be [[trading|bought]] from [[wandering trader]]s.
|A single pumpkin crop now generates in the new [[taiga]] and [[snowy taiga]] [[village]]s.}}
{{History||1.11.0|snap=beta 1.11.0.1|A single pumpkin seed can now be used to fill the [[composter]].
|Pumpkin seeds can now be found in [[taiga]] and [[snowy taiga]] [[village]] house [[chest]]s.}}
{{History|console}}
{{History||xbox=TU5|xbone=CU1|ps=1.0|wiiu=Patch 1|[[File:Pumpkin Seeds JE1 BE1.png|32px]] Added pumpkin seeds.
|[[File:Pumpkin Stem Age 0 JE1.png|32px]] [[File:Pumpkin Stem Age 1 JE1.png|32px]] [[File:Pumpkin Stem Age 2 JE1.png|32px]] [[File:Pumpkin Stem Age 3 JE1.png|32px]] [[File:Pumpkin Stem Age 4 JE1.png|32px]] [[File:Pumpkin Stem Age 5 JE1.png|32px]] [[File:Pumpkin Stem Age 6 JE1.png|32px]] [[File:Pumpkin Stem Age 7 JE1.png|32px]] [[File:Attached Pumpkin Stem (N) JE1.png|32px]] [[File:Attached Pumpkin Stem (E) JE1.png|32px]] [[File:Attached Pumpkin Stem (S) JE1.png|32px]] [[File:Attached Pumpkin Stem (W) JE1.png|32px]]{{verify|Were these the models used by this edition?}} Added pumpkin stems.}}
{{History||xbox=TU69|ps=1.76|wiiu=Patch 38|Pumpkin seeds can now be obtained by [[shear]]ing an uncarved [[pumpkin]].}}
{{History||xbox=none|xbone=none|ps=1.90|wiiu=none|switch=none|[[File:Attached Pumpkin Stem (W) JE5.png|32px]]{{info needed|More accurate image}} The texture of attached pumpkin stems has been changed.}}
{{History|New 3DS}}
{{History||0.1.0|[[File:Pumpkin Stem Age 0 JE1.png|32px]] [[File:Pumpkin Stem Age 1 JE1.png|32px]] [[File:Pumpkin Stem Age 2 JE1.png|32px]] [[File:Pumpkin Stem Age 3 JE1.png|32px]] [[File:Pumpkin Stem Age 4 JE1.png|32px]] [[File:Pumpkin Stem Age 5 JE1.png|32px]] [[File:Pumpkin Stem Age 6 JE1.png|32px]] [[File:Pumpkin Stem Age 7 JE1.png|32px]] [[File:Attached Pumpkin Stem (N) JE1.png|32px]] [[File:Attached Pumpkin Stem (E) JE1.png|32px]] [[File:Attached Pumpkin Stem (S) JE1.png|32px]] [[File:Attached Pumpkin Stem (W) JE1.png|32px]]{{verify|Were these the models used by this edition?}} Added pumpkin stems.}}
{{History|foot}}
<gallery>
Pumpkin Stem with data value 15.png|The final version of the pumpkin stem with age 15, as seen in-game.
Pumpkinstems.png|Pumpkin stems of ages 1 to 15 on a modded version of [[Java Edition 1.7.2|1.7.2]], hence the nearby melon stems using the melon top texture.
Stems of 13w02a.png|All 16 stem sizes in [[Java Edition 13w02a|13w02a]], with accompanying data values.
</gallery>
=== Pumpkin stem "item" ===
{{:Technical blocks/Pumpkin Stem}}
== Issues ==
{{issue list}}
== Gallery ==
<gallery>
Stem All Ages.png|All stages of growth.
AllSeeds.png|All the [[seeds]] that exist in the game.
</gallery>
== References ==
{{reflist}}
{{Blocks|vegetation}}
{{Items}}
[[Category:Plants]]
[[Category:Food]]
[[Category:Non-solid blocks]]
[[Category:Generated structure blocks]]
[[cs:Dýňová semínka]]
[[de:Kürbiskerne]]
[[es:Semillas de calabaza]]
[[fr:Graines de citrouille]]
[[hu:Tökmagok]]
[[ja:カボチャの種]]
[[ko:호박씨]]
[[nl:Pompoenpitten]]
[[pl:Nasiona dyni]]
[[pt:Sementes de abóbora]]
[[ru:Семена тыквы]]
[[th:เมล็ดฝักทอง]]
[[zh:南瓜种子]]</li></ul> | build 1 | Added note blocks and daylight sensors, which can now be used as fuel. | |||||||||||||||||||||||||||||||||
v0.16.0{{Extension DPL}}<ul><li>[[Smarter Watch|Smarter Watch]]<br/>{{Joke feature}}{{Exclusive|Java}}{{Item
| title = Smarter Watch
| image = Smarter Watch.png
| renewable = No
| stackable = Yes (64)
}}
The '''Smarter Watch''' was a joke offhand [[item]].
== Usage ==
Smarter watches were "equipped" by having them placed into the offhand slot. Upon equipping, they would display the current time above the hotbar, in minutes and seconds, with one minute of in-game time being 5/6 of a real-time second, and one in-game hour being 5/6 of a real-time minute or 50 seconds.
The smarter watch would also notify the [[player]] of statistics milestones, alongside taken [[damage]], [[item]] specific info, [[crafting]] items and more.{{info needed|What exactly?}}
== Sounds ==
{{Sound table
|sound=Tick1.ogg
|sound2=Tick2.ogg
|subtitle=''None''
|source=player
|description=When a notification is displayed
|id=item.smarter_watch.notice
|translationkey=''None''
|volume=1.0
|pitch=1.0
|distance=16
|foot=1}}
== Data values ==
=== ID ===
{{ID table
|edition=java
|shownumericids=y
|showforms=y
|generatetranslationkeys=y
|displayname=Smarter Watch
|spritetype=item
|nameid=smarter_watch
|id=502
|form=item
|translationkey=item.smarterWatch.name
|foot=1}}
== History ==
{{History|java}}
{{History||1.RV|snap=1.RV-Pre1|[[File:Smarter_Watch_(item).png|32px]] [[File:Smarter Watch.png|32px]] Added the smarter watch.}}
{{History|foot}}
== Issues ==
Smarter Watches are an unsupported [[item]] due to being an [[Wikipedia:April Fools' Day|April Fools']] joke, and therefore issues relating to them will not be fixed.
== Gallery ==
<gallery>
TechGear.png|A [[player]] wearing the smarter watch, featured in this [[wikipedia:April Fools' Day|April Fools']] joke version.
</gallery>
{{Items}}
{{Jokes}}
[[Category:Non-renewable resources]]
[[Category:Joke items]]
[[pt:Relógio inteligente]]</li><li>[[Map|Map]]<br/>{{about|the craftable map|maps showing the locations of certain structures|Explorer Map|other uses|Map (disambiguation)}}
{{distinguish|World}}
{{Item
| image = Map Zoom 4.png
| renewable = Yes
| stackable = Yes (64)
}}
A '''map''' is an [[item]] used to view explored [[Chunk|terrain]] and mark landmarks.
==Obtaining==
===Crafting===
{{crafting
|head=1
|showname=0
|showdescription=1
|A1= Paper
|B1= Paper
|C1= Paper
|A2= Paper
|B2= Compass
|C2= Paper
|A3= Paper
|B3= Paper
|C3= Paper
|Output= Empty Map
|type= Miscellaneous
|description=This variation is called an "empty locator map" {{in|bedrock}}, or an "empty map" {{in|java}}.
When the player first creates a map, it is blank. It needs to be activated by holding it and pressing ''{{Control|use item}}''. after which it records terrain and location markers as the player travels within (or close to) the area it maps.
}}
{{crafting
|A1= Paper
|B1= Paper
|C1= Paper
|A2= Paper
|B2= Paper
|C2= Paper
|A3= Paper
|B3= Paper
|C3= Paper
|Output= Empty Map
|type= Miscellaneous
|description={{only|bedrock}}
This variation is called an "empty map". It does not show location markers. It is intended for cloning and zooming locator maps without having to consume an additional [[compass]] (thereby saving [[iron ingot]]s and [[redstone dust]]), but it can also be {{Control|use|text=activated}} and later converted to a locator map by combining it with a compass on an [[anvil]], [[crafting table]], or [[cartography table]].
|foot=1
}}
=== Natural generation ===
==== Chest loot ====
{{LootChestItem|empty-map,map
}}
=== Cartography table ===
A map can also be created using a single paper on a [[cartography table]] to create an empty map, or a paper with a compass for an empty locator map.{{only|bedrock}}
=== Starting map ===
{{exclusive|bedrock|section=1}}
When creating a new world {{in|bedrock}}, the player can enable the "Starting Map" option to spawn with an empty locator map in the hotbar. The map's zoom scale is 1:8. The map is updated only while the player holds it.
=== Trading ===
Novice-level cartographer [[Villager|villagers]] sell a single empty map for 7 [[Emerald|emeralds]] as their trades.
{{IN|java}}, cartographer villagers may give players with the [[Hero of the Village]] effect an empty map.
== Usage ==
{{See also|Tutorials/Mapping}}
=== Mapping ===
Crafting a map creates an empty map. The map is drawn for the first time when it is held and used (with ''{{control|use item}}''). This map can then be adjusted to different zoom levels. After conversion to a drawn map item, it starts to draw a top-down view of the player's surroundings, with North pointing to the top of the map. A pointed oval pointer indicates the player's position on the map, and moves in real-time as the player moves across the terrain shown on the map. The map does ''not'' center on the player when created, rather, the world is broken up into large invisible grid squares, and the map displays the area of whichever grid square it is in when it is first used. For example, if a player uses a new map in a certain grid square, and then moves a distance away and uses another fresh map but is still within the same grid square, both maps appear identical. To make a map that is not identical to the first one, the player would have to move outside of the edges of the first map (because then they would be in a new grid square). This way, no two maps of the same size can ever partially overlap and every map can display only a fixed area.
To record the world on a map, that specific map must be held in the player's hands while the player moves around the world. The world is recorded as-is during exploration, meaning that if the world is modified, a player must revisit the area while holding the map to update the map's view. Maps can also be [[Map#Cloning|cloned]]. If a player holds a map whose one or more clones are on display in item frames, updates are made on all clone-connected maps.
Other players are displayed on the map only if they have a map in their inventory cloned from the one being looked at. When placing a map into an [[item frame]], the map displays with a green pointer shown at the location of the item frame. This is to help the player see where they are in relation to the area that the map is showing. If the player leaves a map in an item frame and views a clone of it, the green pointer remains in the spot of the framed copy. This can be used to set up waypoints. Unexplored areas are transparent, making the item frame visible.
When the player leaves the area shown on a specific map, the player pointer transforms into a white dot that moves on that map. The marker shrinks to a smaller white dot if the player is far from the map's center: the area is 320 by 320 blocks per scale factor. The dot moves along the edge of the map to show the relative location of the player. However {{in|bedrock}}, the pointer remains as an arrow but shrinks until the player is near the area shown on the map.
While maps in [[the Nether]] work, they show only the red-and-gray pattern, regardless of the blocks placed. The only useful function is finding where the player is in relation to placed framed maps, which show as green pointers. Additionally, the player pointer rapidly spins and is not a good indicator of direction. Placing a [[banner]] in [[the Nether]] still shows it on the map as usual. Having a smaller map image while riding a [[strider]] in the Nether can help one to see one's footing while traveling over [[lava]].
{{IN|java}}, when using a map from another dimension, the map shows the player's position and direction when they were last in the dimension of the map. {{IN|bedrock}}, however, the player can use maps from one dimension while in another dimension. For locator maps, the place marker changes color depending on the dimension that the player is currently in (white for the Overworld, red for [[the Nether]], and magenta for [[the End]]). An Overworld map in the Nether shows the player's corresponding location and direction in the Overworld.<ref name=multiverse>{{ytl|EpP1diZdEdI}}</ref> Similarly, a Nether Map in the Overworld shows the player's corresponding location in the Overworld, but the place marker spins, just like a Nether map in the Nether. An Overworld map in the End shows the world spawn.<ref name=multiverse/> A Nether map cannot be used in the End — the map appears, but the place marker is not shown anywhere — and similarly, an End map cannot be used in the Overworld or the Nether.
A player can make a large piece of pixel art (128×128) facing upward, center a map on it, and place that map in an [[item frame]] to create a custom picture. Locking is recommended. See [[Map item format#Map Pixel Art]] for details on the techniques.
Maps display as a mini-map when held in the off-hand, or if the off-hand slot is occupied; the map is full-sized only when held in the dominant hand with both hands free.
A map always positions itself facing towards North when placed horizontally within an item frame regardless of how the map is placed.
=== Map content ===
{{Main|Map item format}}
Maps consist of square pixels arranged like pixels in a 128×128 square pattern, with each pixel representing a square portion of land. {{IN|java}}, the [[Map item format#Color table|color of a map pixel]] generally matches the color of the most common [[opaque]] block in the corresponding area, as seen from the sky. 'Minority blocks' in the target area have no effect on the color of the pixel, thus small features tend to be undetectable on zoomed-out maps.
{{IN|bedrock}}, the [[Map item format#Color table|color of a map pixel]] instead matches the single top-most opaque block in a grid sized by the map magnification pixel size (see the table in the "Player marker and pointer" section below). For example, a 3/4 magnification map has a pixel size of 8x8 blocks; this means the map will read only the top-most opaque blocks at the 0,0 coordinate, the 8,0 coordinate, the 0,8 coordinate, etcetera, ignoring all other blocks in the area. This means that {{in|bedrock}}, map pixel art requires only one block per pixel regardless of map magnification.
{{IN|bedrock}}, grass, foliage and water colors that are biome-dependent are represented accurately on a map.
{| class="wikitable"
|-
! style="width: 300px;" | {{el|je}}
! style="width: 300px;" | {{el|be}}
|-
| style="text-align: center;" | [[File:Map Zoom 4.png|alt=All banners marked on a map, alongside a named banner.|216px]]
| style="text-align: center;" | [[File:Map item BE.png|216px]]
|-
| Biome colors on ''Java Edition''.
| Biome colors on ''Bedrock Edition''.
|-
|}
Maps also show ground up to about 15 blocks below the surface of the water in oceans as slightly lighter blue, to show where the ground rises. This is not true with land above water. Higher elevations in the world mean lighter colors on the map. The map records the surface even as the player moves below the surface.
A standard map represents 128x128 blocks (1 block per pixel, 8x8 [[chunks]]) but maps can be zoomed-out to represent up to 2048x2048 blocks (16 square blocks per pixel, 128x128 [[chunks]]).
Some relevant distances: 64 blocks (4 chunks) is the update radius from a player in the Overworld and the End. However, it is half this (32 blocks) in the Nether. Also, 1024 blocks is the minimum Overworld distance from a [[nether portal]], at which players can build another portal and expect to reach a new location in the Nether. This is the distance across a 1:8 map, and also from a 1:16 map's center to its edge.
=== Player marker and pointer ===
{{IN|java}}, every map contains a marker that marks the position of the player, and points in the same direction as the player. When a player moves out of a map, a big white dot appears and moves relative to the player's position. The pointer either disappears when the player moves away a certain distance from the border of the map or, in case of [[explorer map]]s, the big white dot changes to a smaller white dot. The distance required for the small white dot to appear(explorer maps) or for the big dot to vanish (normal maps) changes with the scaling of the map.
* '''Level 0/4 :''' 128×128 blocks (each map pixel represents 1 block)
* '''Level 1/4 :''' 256×256 blocks (2×2 blocks per map pixel)
* '''Level 2/4 :''' 512×512 blocks (4×4 blocks per map pixel)
* '''Level 3/4 :''' 1024×1024 blocks (8×8 blocks per map pixel)
* '''Level 4/4 :''' 2048×2048 blocks (16×16 blocks per map pixel)
{{IN|bedrock}}, a map can be crafted with or without this marker, and a map without a position marker can add one later by adding a compass to the map. When a map is crafted without a compass, it's simply called an "empty map", but when crafted with a compass, it's called an "empty locator map". The marker also turns red if the player enters the Nether with an Overworld map and shows the player's Overworld location relative to the Nether location. A map created in the End has a purple marker showing the player's location. If an Overworld map is used in the End, a magenta dot appears on the player's spawn point.{{/BE|position}}
{{crafting
|name=Map<br>(with marker)
|ingredients=[[Map]] or Empty Map +<br>[[Compass]]
|showdescription=1
|Map (no markers);Empty Map
|Compass
|Output= Locator Map;Empty Locator Map
|type= Miscellaneous
|description={{el|be}} only.
Maps crafted from only paper do not show the location marker; to add it, a compass must be added to the map.
|foot=1
}}
{{IN|bedrock}}, a cartography table can also be used to add a pointer to create a locator map or empty locator map. This can be done by adding a compass to paper, or to an empty map or map.
=== Zooming out ===
[[File:Cartography table UI zoom.png|thumb|300px|{{IN|java}}, cartography table's UI, showing the map is being zoomed out.]]
A [[cartography table]] can also be used to zoom out, taking only one piece of paper per zoom level.
A blank map can not be zoomed out. A map has to have something already marked on it for the zooming to be possible.
{{Crafting
|A1= Paper |B1= Paper |C1= Paper
|A2= Paper |B2= Map;Locator Map |C2= Paper
|A3= Paper |B3= Paper |C3= Paper
|Output= Map;Locator Map
|showdescription=1
|description=Locator Map {{el|be}} only.
}}
{{/BE|zoom}}
==== Zoom details ====
The zooming function starts from when the map is created (zoom level 0) up to its fourth zoom step (zoom level 4).
{| class="wikitable" style="text-align: center" data-description="Zoom levels"
! colspan="2" |
! Zoom step 0
! Zoom step 1
! Zoom step 2
! Zoom step 3
! Zoom step 4
|-
! colspan="2" |
| [[File:Map Zoom 0.png|116px|Zoom step 0, 1:1]]
| [[File:Map Zoom 1.png|116px|Zoom step 1, 1:2]]
| [[File:Map Zoom 2.png|116px|Zoom step 2, 1:4]]
| [[File:Map Zoom 3.png|116px|Zoom step 3, 1:8]]
| [[File:Map Zoom 4.png|116px|Zoom step 4, 1:16]]
|-
! colspan="2" | Zoom level
| 0/4
| 1/4
| 2/4
| 3/4
| 4/4
|-
! colspan="2" | 1 map pixel represents
| 1 block
| 2×2 blocks
| 4×4 blocks
| 8×8 blocks
| 16×16 blocks<br>(1×1 chunk)
|-
! colspan="2" | Scaling ratio
| 1:1
| 1:2
| 1:4
| 1:8
| 1:16
|-
! rowspan="2" colspan="2" | Map covers an area of
| 128×128 blocks
| 256×256 blocks
| 512×512 blocks
| 1024×1024 blocks
| 2048×2048 blocks
|-
| 8×8 chunks
| 16×16 chunks
| 32×32 chunks
| 64×64 chunks
| 128×128 chunks
|-
! colspan="2" | Smallest discernible features
| Blocks
| Trees, Paths
| Lakes, Buildings
| Mountains, Rivers
| Biomes, Mountain Ranges
|-
! colspan="2" | Use cases
| Pixel art, Base plans
| Base surroundings
| Structure mapping
| Landscape mapping
| Biome mapping
|-
! rowspan="2" | Total paper needed to zoom out from Level 0
! in anvil{{only|bedrock|short=1}} or crafting table
| -
| {{ItemSprite|Paper}} 8
| {{ItemSprite|Paper}} 16
| {{ItemSprite|Paper}} 24
| {{ItemSprite|Paper}} 32
|-
! in cartography table
| -
| {{ItemSprite|Paper}} 1
| {{ItemSprite|Paper}} 2
| {{ItemSprite|Paper}} 3
| {{ItemSprite|Paper}} 4
|}
Maps are always aligned to a grid at all zoom levels. That means zooming out any different map in a specific area covered by that map always has the same center. As such, maps are aligned by map width (1024 blocks for a level 3 maps) minus 64. A level 3 map generated at spawn covers X and Z coordinates from -64 to 959. All maps generated in this area zoom out to the same coordinates, guaranteeing that they are always 'aligned' on a map wall. For a zoomed-out map to cover a new area, it must start with a base (level 0) map that is in that area.
At zoom level 0, a map created on the point (0,0) has (0,0) at the center of the map. At higher zoom levels of the same map, the coordinate (0,0) is in the top left square of the map.
{{IN|java}}, zoom level can be seen on a map by turning on Advanced Tooltips (a [[Debug screen#More debug keys|debug screen]] option that can be toggled by using the key combination {{key|F3+H}}). The tooltip of the map then shows the zoom level, scaling factors, and map ID.
=== Cloning ===
[[File:Cartography table UI clone.png|thumb|300px|{{IN|Java}}, cartography table's UI, showing the map is being cloned.]]
A mix of empty maps and empty locator maps may be used. Whether the cloned maps show position markers is dependent only on the input map.
A [[cartography table]] can also be used to clone a map.
The parts of the world that have already been explored and mapped are copied, and newly explored areas appear on both instances. If one of the maps is later zoomed out, then the maps lose their connection to each other and function as completely separate maps that have to be individually filled by exploring.
In Creative mode, a map in an item frame may be cloned by using {{control|pick block}} on it, as long as that map is not also in the player's inventory.
It doesn't matter if the map to be cloned is at a higher zoom level (made of more paper) than the blank map. Upon copying the map, both resulting maps have the same magnification as the starting map.
{{/BE|clone}}
=== Crafting ingredient ===
{{crafting usage|Map, Empty Map}}
=== Marking points ===
{{IN|java}} the player has the ability to mark spots on a map. To do this, {{control|use}} a map on a placed-down [[banner]], and the spot of the banner gets marked on the map. The mark takes the color of whatever the base color is for the banner, and if the banner has a name, the mark shows that name. Banner marks on a map are always oriented with their top facing north, regardless of the banner's actual orientation. If the banner is destroyed, the mark of the banner remains at first, but if the player gets closer to where the banner previously was, it disappears as the area is updated on the map.
If a map is mounted on an item frame and is within the area it depicts, the mounted map displays its current location with a green indicator rotated to match its orientation.
[[File:Map Marker Bedrock on Item frame.png|thumb|181x181px|{{IN|bedrock}} this is what a map lying on an item frame looks like, while showing markers.]]
{{IN|bedrock}} the player can place copies of locator maps in [[item frame]]s in order to create a land mark. The marker is a green dot that resembles the shape of the player's marker, but in green color. The position the marker points at depends on the direction the item frame is facing. It is worth noting that the markers work only on copies of the same map. Other maps of the same area do not show the existing markers that the player(s) had placed.
If a player has a cloned map in their inventory, their pointer appears white when viewed on the same map held by another player. Hence, if all players have the same cloned map in their inventory, all markers would appear white when the clone map is viewed.
{| class="wikitable"
|-
! style="width: 300px;" | {{el|je}}
! style="width: 300px;" | {{el|be}}
|-
| style="text-align: center;" | [[File:Banner marked map.png|alt=All banners marked on a map, alongside a named banner.|216px]]
| style="text-align: center;" | [[File:Tracking map with markers bedrock.png|216px]]
|-
| How every banner appears {{IN|java}} on a map, including named banners.
| {{IN|bedrock}} this is how a locator map shows map markers while held by a player.
|-
|}
===Locking===
[[File:Cartography table UI lock.png|thumb|300px|{{IN|Java}}, cartography table's UI, showing the map is being locked.]]
Maps can be locked when using a [[glass pane]] in a [[cartography table]]. This creates a new map containing the same data and locks it. All copies of this new map are also locked. A locked map never changes, even when the depicted terrain changes. {{IN|Be}}, locked maps have a unique texture.
{| class="wikitable" style="text-align: center;"
|-
! Condition
! style="width: 200px;" | Newly created map
! style="width: 200px;" | Map after terrain alteration
|-
! Unlocked map
| [[File:Map Zoom 0.png|174px]] || [[File:Unlocked Map.png|174px]]
|-
! Locked map
| [[File:Map Zoom 0.png|174px]] || [[File:Map Zoom 0.png|174px]]
|-
|}
{{-}}
== Sounds ==
{{Edition|Java}}:
{{Sound table
|rowspan=2
|sound=Drawmap1.ogg
|sound2=Drawmap2.ogg
|sound3=Drawmap3.ogg
|subtitle=Map drawn
|source=player
|description=When a map is drawn
|id=ui.cartography_table.take_result
|translationkey=subtitles.ui.cartography_table.take_result
|volume=1.0
|pitch=1.0
|distance=16}}
{{Sound table
|subtitle=Map drawn
|source=block
|description=When a map is edited using a cartography table
|id=ui.cartography_table.take_result
|translationkey=subtitles.ui.cartography_table.take_result
|volume=1.0
|pitch=1.0
|distance=16
|foot=1}}
{{Edition|Bedrock}}:
{{Sound table
|type=bedrock
|rowspan=2
|sound=Drawmap1.ogg
|sound2=Drawmap2.ogg
|sound3=Drawmap3.ogg
|source=block
|description=When a map is drawn<wbr>{{Upcoming|BE 1.20.20.20}}
|id=ui.cartography_table.take_result|idnote={{Verify|Could be block.cartography_table.use}}
|volume=0.8
|pitch=1.0}}
{{Sound table
|type=bedrock
|source=block
|description=When a map is edited using a cartography table
|id=ui.cartography_table.take_result
|volume=0.8
|pitch=1.0
|foot=1}}
== Data values ==
=== ID ===
{{edition|java}}:
{{ID table
|edition=java
|showforms=y
|generatetranslationkeys=y
|displayname=Empty Map
|spritetype=item
|nameid=map
|form=item}}
{{ID table
|displayname=Map
|spritetype=item
|nameid=filled_map
|form=item
|translationkey=item.minecraft.filled_map, filled_map.buried_treasure, filled_map.explorer_jungle{{upcoming|java 1.20.2}}, filled_map.explorer_swamp{{upcoming|java 1.20.2}}, filled_map.mansion, filled_map.monument, filled_map.unknown, filled_map.village_desert{{upcoming|java 1.20.2}}, filled_map.village_plains{{upcoming|java 1.20.2}}, filled_map.village_savanna{{upcoming|java 1.20.2}}, filled_map.village_snowy{{upcoming|java 1.20.2}}, filled_map.village_taiga{{upcoming|java 1.20.2}}
|foot=1}}
{{edition|bedrock}}:
{{ID table
|edition=bedrock
|showaliasids=y
|shownumericids=y
|showforms=y
|notshowbeitemforms=y
|generatetranslationkeys=y
|displayname=Empty Map
|spritetype=item
|nameid=empty_map
|aliasid=emptymap
|id=515
|form=item
|translationkey=item.emptyMap.name, item.emptyLocatorMap.name}}
{{ID table
|displayname=Map
|spritetype=item
|spritename=map-be
|nameid=filled_map
|aliasid=map
|id=420
|form=item
|translationkey=item.map.name, item.map.exploration.mansion.name, item.map.exploration.monument.name, item.map.exploration.treasure.name
|foot=1}}
=== Metadata ===
{{see also|Bedrock Edition data values}}
{{IN|bedrock}}, maps use the following data values:
{{/DV}}
=== Item data ===
{{el|java}}:
{{main|Player.dat format}}
<div class="treeview">
* {{nbt|compound|tag}}: The item's '''tag''' tag.
{{:Player.dat_format/Maps}}
</div>
{{el|bedrock}}:
: See [[Bedrock Edition level format/Item format]].
=== Map icons ===
{{see also|Player.dat format|Map item format|map_icons.png}}
Map icons are 8×8 in ''Java Edition'', but 16×16 in Bedrock Edition. As such, there are minor misalignment issues in ''Java Edition''.<ref>{{bug|MC-214649|||WF}}</ref>
[[File:Map icons.png|thumb|128px|Map icons texture {{in|Java}}]]
[[File:Map icons BE.png|thumb|128px|Map icons texture {{in|Bedrock}}]]
{| class="wikitable"
|-
! Java ID !! Bedrock ID !! Text ID !! Appearance !! Purpose !! Shown in item frames?
|-
| 0 || ||<code>player</code> || [[File:Player (texture) JE1 BE1.png|16px]] [[File:Player (texture) BE2.png|16px]] White marker || Players (on map) || No
|-
| 1 || 1 ||<code>frame</code> || [[File:Green Marker (texture) JE1 BE1.png|16px]] [[File:Green Marker (texture) BE2.png|16px]] Green marker || The current map in an item frame || Yes
|-
| 2 || ||<code>red_marker</code> || [[File:Red Marker (texture) JE1 BE1.png|16px]] [[File:Red Marker (texture) BE2.png|16px]] Red marker || Position converted to Overworld when opening Overworld map in the Nether{{Only|bedrock}} || No
|-
| 3 || ||<code>blue_marker</code> || [[File:Blue Marker (texture) JE1 BE1.png|16px]] [[File:Blue Marker (texture) BE2.png|16px]] Blue marker || Other players || No
|-
| 4 || ||<code>target_x</code> || [[File:Target X (texture) JE1 BE1.png|16px]] White X || Unused || Yes
|-
| 5 ||5
|<code>target_point</code> || [[File:Target Point (texture) JE1 BE1.png|16px]] [[File:Target Point (texture) BE2.png|16px]] Red triangle || Unused || Yes
|-
| 6 || 6 ||<code>player_off_map</code> || [[File:Player Off Map (texture) JE1 BE1.png|16px]] Large white dot || Players off map, nearby{{only|java}} || No
|-
| 7 || 13 ||<code>player_off_limits</code> || [[File:Player Off Limits (texture) JE1.png|16px]] [[File:Player Off Limits (texture) BE.png|16px]] Small white dot || Players off map, far away{{only|java}} || No
|-
| 8 ||14
|<code>mansion</code> || [[File:Mansion (texture) JE1.png|16px]] [[File:Mansion (Texture) BE2.png|frameless|16x16px]] Woodland mansion || Woodland mansion || Yes
|-
| 9 || 15 ||<code>monument</code> || [[File:Monument (texture) JE1.png|16px]] [[File:Monument Texture BE2.png|frameless|16x16px]] Ocean monument || Ocean monument || Yes
|-
| 10 - 25 || ||<code>{{tooltip|banner_*|banner_white, banner_orange, banner_magenta, banner_light_blue, banner_yellow, banner_lime, banner_pink, banner_gray, banner_light_gray, banner_cyan, banner_purple, banner_blue, banner_brown, banner_green, banner_red, banner_black}}</code> || [[File:Banner White (texture) JE1.png|16px]] [[File:Banner Light Gray (texture) JE1.png|16px]] [[File:Banner Gray (texture) JE1.png|16px]] [[File:Banner Black (texture) JE1.png|16px]] [[File:Banner Brown (texture) JE1.png|16px]] [[File:Banner Red (texture) JE1.png|16px]] [[File:Banner Orange (texture) JE1.png|16px]] [[File:Banner Yellow (texture) JE1.png|16px]] [[File:Banner Lime (texture) JE1.png|16px]] [[File:Banner Green (texture) JE1.png|16px]] [[File:Banner Cyan (texture) JE1.png|16px]] [[File:Banner Light Blue (texture) JE1.png|16px]] [[File:Banner Blue (texture) JE1.png|16px]] [[File:Banner Magenta (texture) JE1.png|16px]] [[File:Banner Purple (texture) JE1.png|16px]] [[File:Banner Pink (texture) JE1.png|16px]]<br>Banners in all 16 wool colors{{only|java}}|| Banner markers || Yes
|-
| 26 ||4
|<code>red_x</code> || [[File:Red X (texture) JE1.png|16px]] [[File:Target X (texture) BE2.png|16px]] Red X || Buried treasure || Yes
|-
| || 8 || || [[File:Magenta Marker (texture) BE1.png|16px]] Magenta marker
| Position converted to Overworld when opening Overworld map in the End{{Only|bedrock}} || No
|-
| || 9 || || [[File:Orange Marker (texture) BE1.png|16px]] Orange marker{{more info}}
|Other players
|Yes
|-
| || 10 || || [[File:Yellow Marker (texture) BE1.png|16px]] Yellow marker
| Other players || No
|-
| || 11 || || [[File:Cyan Marker (texture) BE1.png|16px]] Cyan marker
| Other players || No
|-
| -
|12
| || [[File:Green Point (texture) BE1.png|16px]] Green Triangle
| Other structure such as stronghold, fortress, end city, etc. when used as explorer map destination{{Only|bedrock}} || Yes
|}
It should be noted that even if the player used a NBT editor to add an additional icon on the map, ''Minecraft'' shows only the first one listed when the player loads up their world.
== Achievements ==
{{load achievements|Map Room}}
== History ==
{{see also|section=24|map_icons.png|Java Edition history of textures#Map icons}}
{{more images|section=24|{{bug|MC-72962}}}}
{{History||April 27, 2011|link=https://web.archive.org/web/0/http://notch.tumblr.com/post/4988431144/the-maps|[[Notch]] unveiled screenshots of the map.}}
{{History||April 28, 2011|link={{tweet|notch|63500114005721088}}|[[Notch]] said that he would try to make maps place-able on [[wall]]s.}}
{{History|java beta}}
{{History||1.6|snap=Test Build 3|[[File:Map (item) JE1 BE1.png|32px]] Added maps.}}
{{History||1.6.6|The ability to auto-craft maps using shift-click has been disabled.}}
{{History||1.8|snap=Pre-release|Maps can now be found in library chests in the brand-new [[stronghold]]s.
|Auto crafting maps has been restored. Map cloning, therefore, is unavailable for a period of time.}}
{{History||1.8.1|Maps now work both while walking and flying.}}
{{History|java}}
{{History||1.0.0|snap=Beta 1.9 Prerelease 5|Prior to this update, the [[sun]] in ''[[Minecraft]]'' rose in the North, which threw off many [[player]]s and led to a common misconception that ''Minecraft'' maps/[[world]]s were oriented with East at the top. The sun now rises in the east and sets in the west, making navigation much more intuitive.
|Before the change in sun position, it was commonly said that ''Minecraft'' maps/worlds are oriented with East at the top; sunrise, by definition, occurs at the East, which means it is certainly true that the maps were oriented "East" since the Sun rose from the top (North). However, [[Jeb]] asserted (and [[Notch]] agreed) that the sun rose in the north.<ref>{{Tweet|jeb|87815841160237056}}</ref><ref>{{Tweet|notch|88155424880201728}}</ref> Most mods and map-making tools, however, used the terms East and North consistent with their actual definitions (e.g. a [[Programs and editors/Cartograph|Cartograph]]-generated map with North at the top is rotated 90 degrees from the in-game map).}}
{{History||1.4.2|snap=12w34a|[[File:Empty Map JE1 BE1.png|32px]] [[Crafting]] a map now creates an empty map. The map is drawn for the first time when it is held and right clicked, and is centered near the location of the [[player]] when clicked (not as before where it was centered on the location it was crafted.)
|Previously, in order to map a new area, the map had to be ''crafted'' in that area (rather than carrying a previously-crafted map to the new area). The point where a map is crafted becomes its permanent center, and could never be changed.
|The pointer no longer disappears when leaving the map, but transforms into a white dot, indicating on what side of the map the player is located.
|Maps now align to a grid, making it easier to create adjacent maps.
|Maps can now be zoomed out (but not zoomed in).
|Maps can now be cloned and scaled.}}
{{History||1.4.2|snap=12w34b|Maps now have a ''zoom level'', which was fixed at 1:8 prior to snapshot [[Java Edition 12w34a|12w34a]],<ref name="mapinfo">https://web.archive.org/web/0/http://notch.tumblr.com/post/4988431144/the-maps</ref> but now starts at 1:1 and can be increased up to 1:16 by re-crafting an existing map.
|Maps are no longer numbered on the top-left corner and is labeled through the tooltip.}}
{{History|||snap=12w36a|New maps are now crafted at a scale factor of 1:1. A zoomed in map can be zoomed out by re-crafting it with another 8 sheets of [[paper]] on a [[crafting table]]. Each time this is done, the scale increases - 1:1, 1:2, 1:4, 1:8, 1:16 with a map scale of 1:16 being the current maximum.}}
{{History||1.7.2|snap=13w38a|The map size has been increased when placed on a [[wall]] using the [[item frame]].
|More colors have been added to maps for different [[block]]s.<ref name="infodump2">https://web.archive.org/web/0/https://www.mojang.com/2013/10/minecraft-1-7-the-update-that-changed-the-world</ref>}}
{{History||1.8|snap=14w31a|Zoomed maps now conform to an expanded grid based on their zoom level. Previously, careful considerations would need to be taken to creating a wall of adjoining maps.}}
{{History||1.8.1|snap=pre1|Some colors have been changed on maps to more accurately represent their respective [[block]].}}
{{History||1.9|snap=15w31a|Maps now display as a mini-map when held in the off-hand, or if the off-hand slot is occupied; the (old) large version is visible only when held in the dominant hand with the secondary hand free.}}
{{History|||snap=15w34a|New maps can now be [[crafting|crafted]] at a scale factor of 1:4.
|A crafting recipe has been added for zooming in maps.}}
{{History|||snap=15w43a|The average yield of empty maps from [[stronghold]] library [[chest]]s has been doubled.}}
{{History|||snap=15w45a|New maps are once again [[crafting|crafted]] at a scale factor of 1:1, as they had been before snapshot [[15w34a]].
|The [[crafting]] recipe, that was introduced in 15w34a, for zooming in maps has been removed.}}
{{History|||snap=15w49a|Map making now uses armor equipping sounds.}}
{{History||1.11|snap=16w39a|Maps now work in [[the End]].
|Empty maps are now [[trading|sold]] by cartographer [[villager]]s as their tier 3 [[trading|trade]].
|Added [[explorer map]]s, sold by cartographers as their tier 4 trades.}}
{{History||1.12|snap=17w17a|Maps now have separate colors for colored [[terracotta]] blocks from other colored blocks.}}
{{History||1.13|snap=17w47a|Prior to [[1.13/Flattening|''The Flattening'']], these [[item]]s' numeral IDs were 358 and 395.
|Maps now use additional NBT to specify which map they contain. Prior to this version, they used the [[damage]] value instead.
|Map IDs are no longer limited to 32,768.}}
{{History|||snap=17w50a|Maps can now be placed on floor and ceiling [[item frame]]s.}}
{{History|||snap=18w10a|Spots on maps can now be marked using [[banner]]s.}}
{{History|||snap=18w11a|Empty maps can now generate in [[shipwreck]] [[chest]]s.}}
{{History|||snap=pre7|Maps have been changed slightly, in regard to which [[block]]s are shown and which blocks are not.}}
{{History||1.14|snap=18w43a|[[File:Empty Map JE2 BE2.png|32px]] [[File:Map (item) JE2 BE2.png|32px]] The textures of maps have been changed.}}
{{History|||snap=18w48a|Empty maps can now be found in chests in [[village]] cartographer houses.}}
{{History|||snap=19w02a|Maps can now be cloned and zoomed out (extended) by using a [[cartography table]].
|Maps can now be locked by using a [[glass pane]] with a cartography table.
|The recipes for cloning and zooming out maps have been removed.}}
{{History|||snap=19w06a|Map making is now silent again.}}
{{History|||snap=19w13a|Cartographer villagers now give empty maps to players under the [[Hero of the Village]] effect.}}
{{History||1.16|snap=20w21a|Map making sounds are now the same as when using a cartography table.}}
{{History|pocket alpha}}
{{History||v0.14.0|snap=build 1|[[File:Empty Map JE1 BE1.png|32px]] [[File:Map (item) JE1 BE1.png|32px]] Added maps.
|Maps are crafted using nine [[paper]], one for every slot of the [[crafting]] grid.
|Maps must be combined with a [[compass]] using an [[anvil]] in order to show the [[player]]'s position.
|Maps can be zoomed using an anvil.}}
{{History|||snap=build 3|New maps are now [[crafting|crafted]] at full zoom.
|Empty maps now have a "Create Map" button to initialize them.}}
{{History|||snap=build 7|New maps are now crafted at a scale factor of 1:1.}}
{{History||v0.15.0|snap=unknown|Maps can now be crafted either with 8 pieces of [[paper]] and a [[compass]] ''or'' 9 pieces of paper, to get a map with or without a position marker.}}
{{History||v0.16.0|snap=build 1|Different colors have been added to maps for different [[biome]]s.}}
{{History|pocket}}
{{History||1.0.0|snap=?|[[Windows 10 Edition]] can now use the [[anvil]] as well as the [[crafting table]] to clone, zoom and apply markers, just as [[Pocket Edition]] in general could.
|Maps can now be found inside [[stronghold]] library [[chest]]s.}}
{{History||1.1.0|snap=alpha 1.1.0.0|Empty maps with direction markers built-in are now called "locator maps".}}
{{History|||snap=alpha 1.1.0.3|"Locator maps" are now called "empty locator maps".
|Empty maps are now [[trading|sold]] by cartographer [[villager]]s for 7-11 [[emerald]]s as their tier 3 [[trading|trade]].}}
{{History|bedrock}}
{{History||1.4.0|snap=beta 1.2.14.2|Maps can now be found inside map room [[chest]]s in [[shipwreck]]s.}}
{{History||?|The texture of the filled map overlay has been changed.}}
{{History||?|Maps now function in dimensions other than the dimension in which they were created.}}
{{History||1.10.0|snap=beta 1.10.0.3|Maps can now be found in cartographer house [[chest]]s in [[village]]s.
|[[File:Empty Map JE2 BE2.png|32px]] The texture of empty maps has been changed.}}
{{History||1.11.0|snap=beta 1.11.0.1|Empty maps can now be created from 1 [[paper]] in [[cartography table]]s.
|Maps can now be zoomed, cloned, renamed, and have pointers added in cartography tables.}}
{{History|||snap=beta 1.11.0.4|Cartographer [[villager]]s now [[trading|sell]] empty map for an [[emerald]] as their first tier [[trading|trades]].
|Empty locator maps can now be [[trading|bought]] from cartographer villagers.}}
{{History||1.13.0|snap=beta 1.13.0.1|[[File:Map (item) BE3.png|32px]] [[File:Locked Map (item) BE2.png|32px]] Filled maps and locked maps now have unique inventory icons.}}
{{History||1.16.0|snap=beta 1.16.0.57|Trading has been changed, novice-level cartographer now sell an empty map for 7 emeralds. Cartographer villager no longer sell empty locator map.}}
{{History||1.16.100|snap=beta 1.16.100.56|The ID of maps have been changed from <code>emptymap</code> to <code>empty_map</code> and <code>map</code> to <code>filled_map</code>.}}
{{History|console}}
{{History||xbox=TU1|xbone=CU1|ps=1.00|wiiu=Patch 1|switch=1.0.1|[[File:Map (item) JE1 BE1.png|32px]] Added maps.
|The [[player]] spawns with a free map.
|Maps are available only as zoom step 3 maps centered at coordinates 0,0. Biome colors do not appear on maps.}}
{{History||xbox=none|xbone=CU1|ps=1.0|wiiu=none|Larger sized worlds on Xbox One, Playstation 4, and Nintendo Switch have zoom step 3 maps aligned to a grid with maps centered at 0, 1024, or 2048 on the X or Z coordinates.}}
{{History||xbox=TU21|xbone=CU9|ps=1.14|wiiu=Patch 1|[[File:Empty Map JE1 BE1.png|32px]] [[Crafting]] a map now produces an empty map.}}
{{History||xbox=TU46|xbone=CU36|ps=1.38|wiiu=Patch 15|The outer end islands appear on different maps; even on Xbox 360, Playstation 3, Vita, and Wii U editions.}}
{{History||xbox=none|xbone=none|ps=1.90|wiiu=none|switch=none|[[File:Empty Map JE2 BE2.png|32px]] [[File:Map (item) JE2 BE2.png|32px]] The textures of maps have been changed.}}
{{History||ps=1.91|Maps can now be created and used in [[cartography table]]s.}}
{{History|foot}}
== Issues ==
{{issue list}}
== Trivia ==
* Use of the {{key|F1}} key can allow the player to hold a map without blocking their view at all.
* In ''Java Edition'', a map created using {{cmd|give}} can be any map by using the Map parameter to specify the map number desired. E.g. {{cmd|give [player] minecraft:filled_map{map:5<nowiki>}}} gives the specified player map_5. If no data value is supplied it defaults to map_0. If map_0 has not ever been crafted, it is centered on x=0, z=0.
* The maps are stored separately as their own data (<code>.dat</code>) file as <code>map_x.dat</code> with (x) being the map number, see [[map item format]] for more info. By manipulating this number, players can organize their maps to suit them, or if they accidentally create a map in the same location, they can delete their extra map so as to save the number they make.
* Certain programs can be used to make customized maps with images or text on them instead of actual maps, many people use these in adventure maps to show pictures or to tell a story.
* Since all copies of a map are links to the same file, copying an unfinished map keeps it synchronized with the copy as the player fills it in. Thus, a copy stored in a chest can act as a remote backup.
* A map that is in an item frame does not update itself until a player picks it up, lets it reload, and places it back again. However, if a player holds a clone of the map, both maps update.
* Filled maps are the only items that make 90 degree rotations in item frames, and also the only items that can expand the item frame into full block wide.
* On [[Legacy Console Edition]], the player always spawns with a map in their inventory after creating a world. This was later added to Bedrock Edition as an optional feature in the world creation menu.
* Maps on Legacy Console Edition always show the player's current coordinates, as a substitute for the optional [[Coordinates|coordinate display]] in other editions.
* A map cannot be created on [[New Nintendo 3DS Edition]]. Instead, the map is always displayed on the bottom screen along with the coordinates. Biome colors do not appear on maps.
== Gallery ==
<gallery>
MapItem1.png|A fully zoomed map.
MapRotation.png|Having a map in hand does not stop the ability to see ahead.
MapItem3.png|A world being recorded onto a map.
Mcmap4.png|Nearly fully explored map.
Zoomed Map.png|A map edited to the scale of 1.
Sky Map.png|A map mapping the [[Sky Dimension]].
MapOfVillage.png|A village and how it is represented on a map.
Pumpkin map.png|A map containing a custom image made by placing a large number of blocks.
Complete Map.png|A completely explored map.
MapZooms.png|A diagram showing how maps zoomed out before [[Java Edition 1.8]]. Notice how the larger maps have borders made of half and quarter small maps.
Map18zooms.png|From 1.8, zoomed maps are aligned to this grid exactly.
Large Biome Map.png|A map of a [[Large Biomes]] world.
Map0140-0160.png|A comparison of maps between versions in Pocket Edition Alpha [[Pocket Edition Alpha 0.14.0|0.14.0]] and [[Pocket Edition Alpha 0.16.0|0.16.0]].
Mycelium Map.png|A map view of a mushroom biome, showing that mycelium appears purple on a map.
MiniMap.png|Maps held in the off-hand or in either hand while [[dual wielding]] appear as mini-maps.
Partly filled treasure map.png|Partly filled treasure map with an odd area at the bottom left. Normally a partly filled map would look striped (as in the top left), but this map seems to be bugged and is possibly showing caves, or something, in the bottom left.
Partly filled ocean explorer map.png|Partly filled ocean explorer map. Updating the game from an older version (in this case the area was first generated before 1.18) and buying a map after updating (in this case in 1.19.4) can result in the map displaying rivers and terrain where there is really a frozen sea.
Map Stained Glass 1.png|Stained glasses' appearances on maps before and after 1.13.
Map Stained Glass 2.png|Stained glasses' appearances on maps before and after 1.13.
Map Various Blocks 1.png|Various blocks' appearances on maps before and after 1.13.
Map Various Blocks 2.png|Various blocks' appearances on maps before and after 1.13.
Better Together Map.jpg|Holding a map in the offhand in ''Bedrock Edition''.
Better Together Map Icon.jpg|Holding a map in both hands in ''Bedrock Edition''.
File:MapFailedtoFill.png|A map that has not yet filled. A rare bug in Java.
</gallery>
=== The Nether ===
<gallery>
Nethermap.png|A map in [[the Nether]].
Maponnether.png|A map in the Nether; the arrow turns around itself, like in [[compass]].
</gallery>
=== The End ===
<gallery>
Jeb End Map.png|The first image of a map in [[the End]].
Endmap.png|A map in the End.
</gallery>
=== Maps in item frames ===
<gallery>
FramedMap.png|A map displayed on an item frame, as it looked before [[Java Edition 1.7.2]].
Structure Map Collection.png|Multiple maps in item frames. Notice a [[village]], two [[desert temple]]s and a lava lake.
Minecraft maps 3by3.png|A collection of 9 connected full maps.
Full Map.png|A combination of 25 maps pasted together as one map.
Map wall BE.png|A map wall on ''Bedrock Edition'', showing large areas of biome colors for each biome.
Map's in item frames.png|Maps can be placed into [[item frame]]s so they can be viewed together.
Comparing Maps.png|The comparison between 3 zooms of maps.
SuperflatMap.png|A map in a [[Superflat]] world, with some [[village]]s.
MapWallWithMarkers.png|A 3x3 map wall with banner markers.
HEYYEYAAEYAAAEYAEYAA.png|He-Man map art.
Map Player Icons 1.png|First image of player icons on maps.
Map Player Icons 2.png|Second image of player icons on maps.
</gallery>
== See also ==
* [[Explorer Map]]
* [[Clock]]
* [[Tutorials/Navigation|Navigation]]
== References ==
{{Reflist}}
{{Items}}
[[cs:Mapa]]
[[de:Karte]]
[[es:Mapa]]
[[fr:Carte (objet)]]
[[hu:Térkép (tárgy)]]
[[ja:地図]]
[[ko:지도]]
[[nl:Kaart]]
[[pl:Mapa]]
[[pt:Mapa]]
[[ru:Карта]]
[[tr:Harita]]
[[th:แผนที่]]
[[uk:Мапа]]
[[zh:地图]]
[[Category:Renewable resources]]</li></ul></nowiki> | ? | The furnace's interface has been changed. | |||||||||||||||||||||||||||||||||
| Pocket Edition | |||||||||||||||||||||||||||||||||||
1.0.0{{Extension DPL}}<ul><li>[[Raw Gold|Raw Gold]]<br/>{{Item
| image = Raw Gold.png
| renewable = No
| stackable = Yes (64)
}}
'''Raw gold''' is a raw metal resource obtained from mining [[gold ore]].
== Obtaining ==
=== Mining ===
[[Gold ore]] and [[deepslate gold ore]] mined with an [[iron pickaxe]] or higher drops 1 unit of raw gold. If the pickaxe is enchanted with [[Fortune]], it can drop an extra unit per level of Fortune, allowing for a maximum of 4 with Fortune III. If the ore is mined using a pickaxe enchanted with [[Silk Touch]], it drops the ore block instead.
=== Crafting ===
{{Crafting
|showname=1
|Block of Raw Gold
|Output=Raw Gold,9
|type=Material
|foot=1
}}
== Usage ==
The primary usage of raw gold is smelting it into [[gold ingot]]s.
=== Crafting ===
{{crafting usage|Raw Gold}}
=== Smelting ingredient ===
{{Smelting
|showname=2
|Raw Gold
|Gold Ingot
|1.0
}}
=== Piglins ===
{{EntityLink|Piglin|Piglins}} are attracted to raw gold. They run toward any raw gold on the ground, and inspect it for 6 to 8 seconds before putting it in their inventory.
== Advancements ==
{{load advancements|Oh Shiny}}
== Data values ==
=== ID ===
{{edition|java}}:
{{ID table
|edition=java
|showitemtags=y
|showforms=y
|generatetranslationkeys=y
|displayname=Raw Gold
|spritetype=item
|nameid=raw_gold
|itemtags=piglin_loved
|form=item
|foot=1}}
{{edition|bedrock}}:
{{ID table
|edition=bedrock
|shownumericids=y
|showforms=y
|notshowbeitemforms=y
|generatetranslationkeys=y
|displayname=Raw Gold
|spritetype=item
|nameid=raw_gold
|form=item
|id=506
|foot=1}}
== History ==
{{History|java}}
{{History||1.17|snap=21w14a|[[File:Raw Gold JE1.png|32px]] Added raw gold.}}
{{History|||snap=April 13, 2021|slink={{Tweet|JasperBoerstra|1381991999952277513}}|[[File:Raw Gold JE2.png|32px]] [[JAPPA]] shows a new raw gold texture.}}
{{History|||snap=21w15a|[[File:Raw Gold JE2.png|32px]] The texture of raw gold has been changed.
|Raw gold can now be used to craft [[block of raw gold]].}}
{{History|||snap=April 16, 2021|slink={{Tweet|JasperBoerstra|1383047666037325829}}|[[File:Raw Gold (pre-release).png|32px]] [[JAPPA]] shows a new raw gold texture again.}}
{{History|||snap=21w16a|[[File:Raw Gold JE3.png|32px]] The texture of raw gold has been changed.}}
{{History|Bedrock}}
{{History||1.17.0|snap=beta 1.17.0.50|[[File:Raw Gold JE2.png|32px]] Added raw gold.}}
{{History|||snap=beta 1.17.0.52|Raw gold are now available without enabling [[experimental gameplay]].}}
{{History|||snap=beta 1.17.0.54|[[File:Raw Gold JE3.png|32px]] The texture of raw gold has been changed.}}
{{History|foot}}
== Issues ==
{{Issue list}}
==Gallery==
<gallery>
JE 1.17 Dev Raw Metals.jpg|Jappa shows raw ore textures.
Jappa Raw Ores 1.jpg|Jappa shows raw ore textures.
Jappa Raw Ores 2.png|Jappa shows raw ore textures.
Jappa Raw Ores 3.jpg|Jappa shows raw ore textures.
Jappa Raw Ores 4.jpg|Jappa shows raw ore textures.
Jappa Raw Ores 5.jpg|Jappa shows raw ore textures.
</gallery>
{{Items}}
[[Category:Non-renewable resources]]
[[de:Rohgold]]
[[es:Oro en bruto]]
[[fr:Or brut]]
[[ja:金の原石]]
[[pl:Surowe złoto]]
[[pt:Ouro bruto]]
[[ru:Необработанное золото]]
[[uk:Необроблене золото]]
[[zh:粗金]]</li><li>[[Glow Berries|Glow Berries]]<br/>{{Block
|image=<gallery>
Cave Vines (head).png|Without Berries
Cave Vines (berries).png|With Berries
</gallery>
|image2 = Glow Berries JE1 BE1.png
|extratext=[[#Gallery|View all renders]]
|rarity=Common
|renewable=Yes
|stackable=Yes (64)
|tool=Any
|light=Yes
|transparent=Yes
|heals={{hunger|2}}
|flammable=Yes
|lavasusceptible=No
}}
'''Glow berries''' are a [[food]] [[item]] obtained from cave vines and can be used to plant them.
'''Cave vines''' are a climbable, [[Bone Meal|bonemealable]] plant that hangs off ceilings and grows glow berries. Cave vines with glow berries produce [[light]] and drop glow berries when broken or harvested. Cave vines with no glow berries will not drop anything.
== Obtaining ==
=== Natural generation ===
Cave vines can be found in [[lush caves]], hanging from cave ceilings.
=== Chest loot ===
{{LootChestItem|glow-berries}}
=== Post-generation ===
Glow berries can be collected from a cave vine by {{control|using}} or {{control|breaking}} the vine. This yields one glow berry when the vine is bearing them and nothing when it is not. A cave vine also breaks if [[water]] runs over its location or if a [[piston]] extends or pushes a block into its location.
{{IN|bedrock}}, using a tool with [[Silk Touch]] on cave vines always yields a glow berry, even if the vine appears empty.
[[Fortune]] has no effect on the number of glow berries dropped.
== Usage ==
=== Placement ===
Glow berries can be placed on and grown from the bottom of most blocks. They have no specific lighting requirements. When placed, they can be of any length.
=== Growth ===
Placing glow berries on the bottom of a block creates a cave vine that grows downward one block at a time as long as [[air]] is beneath it and its maximum height (2 to 26 blocks) has not been reached. Each newly-grown cave vine block has a 1 in 9 chance of bearing glow berries. Only this tip can ever naturally grow them.{{only|JE}}{{More info|exact growth rate and chance to bear glow berries}}
{{control|Using}} [[bone meal]] on a cave vine produces glow berries if the vine was not bearing any.
{{IN|Java}}, cave vines stop growing if [[shears]] are {{control|used}} on the tip.
{{IN|bedrock}}, if placing glow berries in the Nether, cave vines are able to grow and produces glow berries.
=== Food ===
To eat glow berries, press and hold {{control|use}} while it is selected in the hotbar. Eating one restores {{hunger|2}} [[hunger]] and 0.4 hunger [[Hunger#Mechanics|saturation]] points, like [[sweet berries]].
=== Light ===
When bearing glow berries, cave vines give off a [[light]] level of 14.
=== Composting ===
Placing glow berries into a [[composter]] by {{control|using}} them on it has a 30% chance of raising the compost level by 1.
=== Breeding ===
Glow berries can be fed to [[fox]]es to [[breeding|breed]] them. Foxes are similar to cats when being fed as a wild animal; a sudden movement by the player may cause the fox to flee even if the player holds glow berries. The resulting baby fox trusts the [[player]] and does not flee.
Glow berries can be {{control|used}} on baby foxes to reduce the time until they grow by 10%.
==Sounds==
===Glow berries===
{{Sound table/Entity/Food}}
===Cave vines===
====Generic====
{{Sound table/Block/Cave vines}}
==== Unique ====
{{edition|java}}:
{{Sound table
|sound=Berries pick1.ogg
|sound2=Berries pick2.ogg
|subtitle=Berries pop
|source=block
|description=When glow berries are picked
|id=block.cave_vines.pick_berries
|translationkey=subtitles.item.berries.pick
|volume=1.0
|pitch=0.8-1.2
|distance=16}}
{{Sound table
|sound=Shear.ogg
|subtitle=Plant cropped
|source=block
|description=When the tip of cave vines are cropped with [[Shears#Cropping growing plants|shears]]
|id=block.growing_plant.crop
|translationkey=subtitles.block.growing_plant.crop
|volume=1.0
|pitch=1.0
|distance=16
|foot=1}}
{{edition|bedrock}}:
{{Sound table
|type=bedrock
|sound=Berries pick1.ogg
|sound2=Berries pick2.ogg
|source=block
|description=When glow berries are picked
|id=pick_berries.cave_vines
|volume=1.0
|pitch=0.8-1.2
|foot=1}}
==Data values==
===ID===
{{edition|java}}:
{{ID table
|edition=java
|showblocktags=y
|showitemtags=y
|showforms=y
|generatetranslationkeys=y
|displayname=Cave Vines
|spritetype=block
|nameid=cave_vines
|blocktags=cave_vines,lush_plants_replaceable
|form=block
}}
{{ID table
|displayname=Cave Vines Plant
|spritetype=block
|nameid=cave_vines_plant
|blocktags=cave_vines,lush_plants_replaceable
|form=block
}}
{{ID table
|displayname=Glow Berries
|spritetype=item
|nameid=glow_berries
|itemtags=fox_food
|form=item
|foot=1}}
{{el|be}}:
{{ID table
|edition=bedrock
|shownumericids=y
|showforms=y
|generatetranslationkeys=y
|displayname=Cave Vines
|nameid=cave_vines
|spritetype=block
|id=577}}
{{ID table
|displayname=Cave Vines Body With Berries
|nameid=cave_vines_body_with_berries
|spritename=lit-cave-vines-plant
|spritetype=block
|id=630}}
{{ID table
|displayname=Cave Vines Head With Berries
|spritename=lit-cave-vines
|nameid=cave_vines_head_with_berries
|spritetype=block
|id=631}}
{{ID table
|displayname=Glow Berries
|spritetype=item
|nameid=glow_berries
|form=item
|id=638
|foot=1}}
=== Block states===
{{See also|Block states}}
{{/BS}}
==Advancements==
{{load advancements|Husbandry;A Balanced Diet}}
==History==
{{History||October 3, 2020|link={{ytl|DWZIfsaIgtE|t=1781}}|[[File:Cave Vines Plant JE1 BE1.png|32px]] [[File:Cave Vines Plant (berries) JE1 BE1.png|32px]] [[File:Cave Vines (head) JE1 BE1.png|32px]] [[File:Cave Vines (berries) JE1 BE1.png|32px]] Cave vines (named as glow berries) are shown as part of lush caves at [[Minecraft Live 2020]].}}
{{History|java}}
{{History||1.17|snap=21w05a|[[File:Glow Berries JE1 BE1.png|32px]] Added glow berries.
|[[File:Cave Vines Plant JE1 BE1.png|32px]] [[File:Cave Vines Plant (berries) JE1 BE1.png|32px]] [[File:Cave Vines (head) JE1 BE1.png|32px]] [[File:Cave Vines (berries) JE1 BE1.png|32px]] Added cave vines.}}
{{History|||snap=21w11a|Renamed from "cave vines head" and "cave vines body" to "cave vines" and "cave vines plant", respectively.
|The IDs have also changed.
|Cave vines now always give 14 light, regardless of the type of part.
|Now slow down the player.
|Can now be climbed.}}
{{History|||snap=21w13a|Glow berries now generate as loot in [[mineshaft]] [[Minecart with Chest|chest minecarts]].}}
{{History||1.18|snap=Experimental Snapshot 1|With the implementation of cave biomes including lush caves, caves vines can now generate in normal worlds.}}
{{History|||snap=21w37a|Cave vines stop growing if [[shears]] are used on the tip.}}
{{History|||snap=21w41a|[[File:Cave Vines Plant JE2.png|32px]] [[File:Cave Vines Plant (berries) JE2.png|32px]] Changed cave vines plant texture.}}
{{History||1.19|snap=22w13a|Glow Berries may now be found in [[ancient city]] [[chest]]s.}}
{{History|bedrock}}
{{History||Caves & Cliffs (experimental)|link=Bedrock Edition 1.17.0|snap=beta 1.16.220.52|[[File:Glow Berries JE1 BE1.png|32px]] Added glow berries.
|[[File:Cave Vines Plant JE1 BE1.png|32px]] [[File:Cave Vines Plant (berries) JE1 BE1.png|32px]] [[File:Cave Vines (head) JE1 BE1.png|32px]] [[File:Cave Vines (berries) JE1 BE1.png|32px]] Added cave vines.}}
{{History||1.17.0|snap=beta 1.16.230.54|Glow Berries now generate as loot in [[mineshaft]] [[Minecart with Chest|chest minecarts]].}}
{{History|||snap=beta 1.17.0.52|Glow Berries are now available without enabling [[experimental gameplay]].}}
{{History||1.17.20|snap=beta 1.17.20.20|Cave Vines can now be pollinated by [[bee]]s.}}
{{History||1.18.10|snap=beta 1.18.10.20|[[File:Cave Vines Plant JE2.png|32px]] [[File:Cave Vines Plant (berries) JE2.png|32px]] Changed cave vines plant texture.}}
{{History||1.19.20|snap=beta 1.19.20.20|Cave vines can now be destroyed by [[ravagers]].}}
{{History|foot}}
<gallery>
Lush_caves_overview_concept_art.jpg|Concept art for the lush caves and vegetation including Glow Berries.
JE_1.17_Development_Lush_Caves.jpg|A view of the lush caves with glow berries from Minecraft Live 2020.
Lushcaves_minecon.png|Lush cave in MINECON.
Cavesworkinprogress.jpg|A view of the lush caves with glow berries, tweeted by LadyAgnes.
Livestream_lush_cave.jpg|Another view of the lush caves with glow berries, in an interview with LadyAgnes.
Glow Berry Fox.jpg|A fox under a glow berry vine.
</gallery>
===Cave vines "item"===
{{:Technical blocks/Cave Vines}}
==Issues==
{{Issue list}}
==Trivia==
*They are the first item to be usable as both a food and a light source.
==Gallery==
<gallery>
Cave Vines (plant).png
Cave Vines (berries, plant).png
Cave Vines (head).png
Cave Vines (berries).png
Cave_Vines_Age2_(Possibility_pattern_1)_JE1.png|A possible pattern of the cave vines at Age 2.
Cave_Vines_Age2_(Possibility_pattern_2)_JE1.png|And another pattern.
</gallery>
{{Blocks|vegetation}}
{{Items}}
[[Category:Food]]
[[Category:Plants]]
[[Category:Natural blocks]]
[[Category:Non-solid blocks]]
[[Category:Light sources]]
[[Category:Flammable blocks]]
[[Category:Climbable blocks]]
[[de:Leuchtbeeren]]
[[es:Bayas luminosas]]
[[fr:Baies lumineuses]]
[[it:Bacche luminose]]
[[ja:グロウベリー]]
[[pt:Bagas brilhantes]]
[[ru:Светящиеся ягоды]]
[[zh:发光浆果]]</li></ul> | alpha 0.17.0.1 | Added new furnace UI for classic UI. | |||||||||||||||||||||||||||||||||
| Bedrock Edition | |||||||||||||||||||||||||||||||||||
1.2.0{{Extension DPL}}<ul><li>[[Horse Armor|Horse Armor]]<br/>{{Item
| image = <gallery>
Leather Horse Armor.png | Leather
Iron Horse Armor.png | Iron
Golden Horse Armor.png | Golden
Diamond Horse Armor.png | Diamond
</gallery>
| image2 = <gallery>
Leather Horse Armor (item).png|Leather
Iron Horse Armor (item).png|Iron
Golden Horse Armor (item).png|Golden
Diamond Horse Armor (item).png|Diamond
</gallery>
| extratext = View [[#Gallery|all renders]]
| renewable =
* '''Leather''': Yes
* '''All others''': No
| stackable = No
}}
'''Horse armor''' is a special type of [[armor]] that can be given to a [[horse]] to wear.
== Obtaining ==
===Chest loot===
{{LootChestItem|iron-horse-armor}}
{{LootChestItem|golden-horse-armor}}
{{LootChestItem|diamond-horse-armor}}
===Crafting===
{{crafting
|A1= Leather
|C1= Leather
|A2= Leather
|B2= Leather
|C2= Leather
|A3= Leather
|C3= Leather
|Output= Leather Horse Armor
|type=Miscellaneous
}}
Only leather horse armor can be crafted; other horse armor can be obtained only from chest loot from some generated structures.
===Trading===
Expert-level [[leatherworker]] villagers [[trading|sell]] leather horse armor for 6 [[emerald]]s as part of their trade.
==Usage==
Only normal adult horses can wear armor; foals, [[donkey]]s, [[mule]]s, and undead variants such as [[skeleton horse]]s and [[zombie horse]]s cannot be equipped with armor.
=== Types ===
Horse armor has leather, iron, gold, and diamond variants. However, horse armor does not have netherite or chainmail variants.
=== Armor Stands ===
Horse armor cannot be placed or displayed on [[armor stand]]s.
===Protection===
Horse armor can be equipped to horses either by manually placing it in its respective slot by pressing E while riding the horse ({{SlotSprite|Horse Armor}}), or by right-clicking the horse with it.
There is a gradual increase in the defense given from a horse wearing the different types of armor. Note that golden horse armor provides more protection than iron horse armor, whereas the opposite is true for [[armor|player armor]].
{| class="wikitable" data-description="Armor defense"
|-
! Material !! [[Armor]]
|-
! [[Leather]]
| {{armor|3}}
|-
! [[Iron]]
| {{armor|5}}
|-
! [[Gold]]
| {{armor|7}}
|-
! [[Diamond]]
| {{armor|11}}
|}
When a horse dies while equipped with any horse armor, it drops its normal loot, saddle (if it had one), and the horse armor.
Leather horse armor protects horses from freezing in [[powder snow]], but it does not negate other powder snow effects (e.g., falling through, inability to jump).
===Durability===
Unlike [[armor|player armor]], horse armor does not have durability. This means a single horse armor can be used infinitely unless destroyed.
=== Enchanting ===
Unlike [[armor|player armor]], horse armor cannot be enchanted in survival mode. However, {{in|java}} Creative mode, horse armor can be used with an [[anvil]] to enchant with [[Depth Strider]], [[Thorns]], [[Respiration]], [[Feather Falling]], and [[Curse of vanishing]]. Other enchantments can be applied, but they have no effect.
=== Dyeing ===
Leather horse armor can be dyed 12,326,391 different colors (using lone dyes or dye combinations) and put onto a horse to display that color. These changes can be reverted by {{control|using}} a filled [[cauldron]] with dyed leather horse armor.
===Smelting usage===
{{Smelting|showname=1|Iron Horse Armor;Golden Horse Armor|Iron Nugget;Gold Nugget|0,1}}
===Piglins===
{{EntityLink|Piglin|Piglins}} are attracted to golden horse armor and run toward any golden horse armor on the ground, inspecting it for 6 to 8 seconds before putting it in their inventory.
== Sounds ==
{{Edition|Java}}:
{{Sound table
|sound=Horse armor.ogg
|subtitle=Horse armor equips
|source=neutral
|description=When armor is equipped to a horse
|id=entity.horse.armor
|translationkey=subtitles.entity.horse.armor
|volume=0.5
|pitch=1.0
|distance=16
|foot=1}}
{{Edition|Bedrock}}:
{{Sound table
|type=bedrock
|sound=Horse armor.ogg
|source=neutral
|description=When armor is equipped to a horse
|id=mob.horse.armor
|volume=0.6
|pitch=1.0
|foot=1}}
== Data values ==
=== ID ===
{{edition|java}}:
{{ID table
|edition=java
|showforms=y
|generatetranslationkeys=y
|displayname=Leather Horse Armor
|spritetype=item
|nameid=leather_horse_armor
|form=item}}
{{ID table
|displayname=Iron Horse Armor
|spritetype=item
|nameid=iron_horse_armor
|form=item}}
{{ID table
|displayname=Diamond Horse Armor
|spritetype=item
|nameid=diamond_horse_armor
|form=item}}
{{ID table
|displayname=Golden Horse Armor
|spritetype=item
|nameid=golden_horse_armor
|form=item
|foot=1}}
{{edition|bedrock}}:
{{ID table
|edition=bedrock
|shownumericids=y
|showforms=y
|showaliasids=y
|notshowbeitemforms=y
|generatetranslationkeys=y
|displayname=Leather Horse Armor
|spritetype=item
|nameid=leather_horse_armor
|aliasid=horsearmorleather
|id=530
|form=item
|translationkey=item.horsearmorleather.name}}
{{ID table
|displayname=Iron Horse Armor
|spritetype=item
|nameid=iron_horse_armor
|aliasid=horsearmoriron
|id=531
|form=item
|translationkey=item.horsearmoriron.name}}
{{ID table
|displayname=Diamond Horse Armor
|spritetype=item
|nameid=diamond_horse_armor
|aliasid=horsearmordiamond
|id=533
|form=item
|translationkey=item.horsearmordiamond.name}}
{{ID table
|displayname=Golden Horse Armor
|spritetype=item
|nameid=golden_horse_armor
|aliasid=horsearmorgold
|id=532
|form=item
|translationkey=item.horsearmorgold.name
|foot=1}}
=== Item data ===
When leather horse armor is dyed, it has the following NBT:
{{el|java}}:
{{main|Player.dat format}}
<div class="treeview">
* {{nbt|compound|tag}}: Parent tag.
** {{nbt|compound|display}}: Display properties.
*** {{nbt|int|color}}: The color of the leather armor. The tooltip displays "Dyed" if advanced tooltips are disabled, otherwise it displays the hexadecimal color value. Color codes are calculated from the Red, Green and Blue components using this formula:<br>'''<span style="color:red">Red</span>[[wikipedia:Logical shift|<<]]16 + <span style="color:green">Green</span><<8 + <span style="color:blue">Blue</span>'''<ref>For positive values larger than 0x00FFFFFF, the top byte is ignored. All negative values produce white.</ref>
</div>
{{el|bedrock}}:
: See [[Bedrock Edition level format/Item format]].
== History ==
{{History|java}}
{{History||1.6.1|snap=13w16a|[[File:Iron Horse Armor JE1 BE1.png|32px]] [[File:Golden Horse Armor JE1 BE1.png|32px]] [[File:Diamond Horse Armor JE1 BE1.png|32px]]<br>[[File:Iron Horse Armor (item) JE1 BE1.png|32px]] [[File:Golden Horse Armor (item) JE1 BE1.png|32px]] [[File:Diamond Horse Armor (item) JE1 BE1.png|32px]] Added horse armor.
|Horse armor can be [[crafting|crafted]] using the following recipe.
{{{!}} class{{=}}"collapsible collapsed"
! Recipe
{{!}}-
{{!}}
{{Crafting Table
|C1=Iron Ingot; Gold Ingot; Diamond
|A2=Iron Ingot; Gold Ingot; Diamond
|B2=Any Wool
|C2=Iron Ingot; Gold Ingot; Diamond
|A3=Iron Ingot; Gold Ingot; Diamond
|B3=Iron Ingot; Gold Ingot; Diamond
|C3=Iron Ingot; Gold Ingot; Diamond
|Output=Iron Horse Armor; Golden Horse Armor; Diamond Horse Armor
}}
{{!}}}
}}
{{History|||snap=13w18a|The crafting recipe for horse armor has been removed.
|Horse armor can now be found in [[chest]]s in [[jungle temple|jungle]] & [[desert temple]]s, [[dungeon]]s, [[nether fortress]]es, [[stronghold]] altar rooms and [[village]] blacksmith buildings.
|Iron horse armor can now additionally be found in [[mineshaft]] chests.}}
{{History|||snap=13w21a|Horse armor is no longer stackable, to be consistent with other types of [[armor]].}}
{{History||1.9|snap=15w31a|Horse armor has been added to [[end city]] [[chest]]s.}}
{{History|||snap=15w43a|The average yield of horse armor in [[nether fortress]] chests has slightly decreased.}}
{{History|||snap=15w44a|The average yield of horse armor in [[desert temple]] chests has increased.
|The average yield of iron horse armor from [[dungeon]] chests has slightly decreased.
|Iron horse armor has been removed from [[mineshaft]] [[chest]]s.}}
{{History||1.11.1|snap=16w50a|Golden and iron horse armor can now be [[smelting|smelted]] down into one of their respective [[nugget]]s.}}
{{History||1.13|snap=17w45a|[[File:Iron Horse Armor JE2.png|32px]] [[File:Golden Horse Armor JE2.png|32px]] [[File:Diamond Horse Armor JE2.png|32px]] The textures of horse armor have been changed, as the [[model]] of [[horse]]s has changed.}}
{{History|||snap=17w46a|[[File:Iron Horse Armor 17w46a.png|32px]] [[File:Golden Horse Armor 17w46a.png|32px]] [[File:Diamond Horse Armor 17w46a.png|32px]] The model of horse armor has been changed, but the textures of horse armor have remained unaltered.}}
{{History|||snap=17w47a|Prior to [[1.13/Flattening|''The Flattening'']], these [[item]]s' numeral IDs were 417, 418 and 419.}}
{{History|||snap=18w03a|[[File:Iron Horse Armor JE3.png|32px]] [[File:Golden Horse Armor JE3 BE2.png|32px]] [[File:Diamond Horse Armor JE3 BE2.png|32px]] The textures of horse armor have been changed, as the [[model]] of [[horse]]s has changed.}}
{{History|||snap=18w22a|[[File:Iron Horse Armor JE4 BE2.png|32px]] The texture of iron horse armor when equipped has been changed.<ref>{{bug|MC-124357}}</ref>}}
{{History|||snap=pre2|A bug with the [[horse]] skin and horse armor textures not applying correctly has been fixed.<ref>{{bug|MC-124364}}</ref>}}
{{History||1.14|snap=18w50a|[[File:Iron Horse Armor (item) JE2 BE2.png|32px]] [[File:Golden Horse Armor (item) JE2 BE2.png|32px]] [[File:Diamond Horse Armor (item) JE2 BE2.png|32px]] The textures of horse armor [[item]]s have been changed.}}
{{History|||snap=February 20, 2019|slink=https://twitter.com/_LadyAgnes/status/1098134917299531776?s=19|Leather horse armor announced for {{el|je}}.}}
{{History|||snap=19w08a|[[File:Iron Horse Armor JE5 BE3.png|32px]] [[File:Golden Horse Armor JE4 BE3.png|32px]] [[File:Diamond Horse Armor JE4 BE3.png|32px]]<br>[[File:Iron Horse Armor (item) JE3.png|32px]] [[File:Golden Horse Armor (item) JE3 BE3.png|32px]] [[File:Diamond Horse Armor (item) JE3 BE3.png|32px]] The textures of iron, gold and diamond horse armor have been changed.
|[[File:Leather Horse Armor JE1 BE3.png|32px]] [[File:Leather Horse Armor (item) JE1.png|32px]] Added leather horse armor, which can be [[dyeing|dyed]] 12,326,391 different colors, similar to leather [[armor]].}}
{{History|||snap=19w11a|Leatherworker [[villager]]s now [[trading|sell]] leather horse armor.}}
{{History||1.14.1|snap=Pre-Release 1|[[File:Leather Horse Armor (item) JE2.png|32px]] The texture of leather horse armor [[item]] has been changed to be more consistent with the other types of horse armor.
|[[File:Iron Horse Armor (item) JE4 BE3.png|32px]] The texture of iron horse armor item has been changed.}}
{{History||1.16|snap=20w15a|Horse armor placed in a dispenser can now be put on tamed horses.}}
{{History|||snap=20w16a|Golden horse armor now generates in [[ruined portal]] chests.}}
{{History||1.17|snap=21w13a|Leather horse armor now protects [[horse]]s from [[freezing]].}}
{{History||1.19|snap=22w13a|Diamond horse armor may now be found in [[ancient city]] [[chest]]s.}}
{{History|pocket alpha}}
{{History||v0.15.0|snap=build 1|[[File:Leather Horse Armor BE1.png|32px]] [[File:Iron Horse Armor JE1 BE1.png|32px]] [[File:Golden Horse Armor JE1 BE1.png|32px]] [[File:Diamond Horse Armor JE1 BE1.png|32px]]<br>[[File:Leather Horse Armor (item) BE1.png|32px]] [[File:Iron Horse Armor (item) JE1 BE1.png|32px]] [[File:Golden Horse Armor (item) JE1 BE1.png|32px]] [[File:Diamond Horse Armor (item) JE1 BE1.png|32px]] Added horse armor and [[dyeing|dyeable]] leather horse armor as a version exclusive.}}
{{History|pocket}}
{{History||1.0.0|snap=alpha 0.17.0.1|Horse armor can now be found inside [[end city]] [[chest]]s.}}
{{History||1.1.0|snap=alpha 1.1.0.0|Iron and golden horse armor are now [[smelting|smeltable]].}}
{{History|bedrock}}
{{History||1.2.6|snap=beta 1.2.6.2|[[File:Leather Horse Armor BE2.png|32px]] [[File:Iron Horse Armor JE4 BE2.png|32px]] [[File:Golden Horse Armor JE3 BE2.png|32px]] [[File:Diamond Horse Armor JE3 BE2.png|32px]] The textures of horse armor have been changed, as the [[model]] of [[horse]]s has been changed.}}
{{History||1.10.0|snap=beta 1.10.0.3|Horse armor can now be found in [[plains]] [[village]] weaponsmith [[chest]]s.
|[[File:Leather Horse Armor JE1 BE3.png|32px]] [[File:Iron Horse Armor JE5 BE3.png|32px]] [[File:Golden Horse Armor JE4 BE3.png|32px]] [[File:Diamond Horse Armor JE4 BE3.png|32px]]<br>[[File:Leather Horse Armor (item) BE2.png|32px]] [[File:Iron Horse Armor (item) JE2 BE2.png|32px]] [[File:Golden Horse Armor (item) JE2 BE2.png|32px]] [[File:Diamond Horse Armor (item) JE2 BE2.png|32px]] The textures of all horse armor have been changed.}}
{{History||1.11.0|snap=beta 1.11.0.1|Horse armor can now be found in [[savanna]], [[desert]], [[taiga]], [[snowy taiga]] and [[snowy tundra]] [[village]] weaponsmith [[chest]]s.}}
{{History|||snap=beta 1.11.0.4|Leather horse armor can now be [[trading|bought]] from leatherworker [[villager]]s.}}
{{History|||snap=beta 1.11.0.5|[[File:Leather Horse Armor (item) BE3.png|32px]] [[File:Iron Horse Armor (item) JE4 BE3.png|32px]] [[File:Golden Horse Armor (item) JE3 BE3.png|32px]] [[File:Diamond Horse Armor (item) JE3 BE3.png|32px]] The textures of all horse armor [[item]]s have been changed.}}
{{History||1.17.0|snap=beta 1.16.230.54|Leather horse armor now protects [[horse]]s from [[freezing]].}}
{{History|console}}
{{History||xbox=TU19|xbone=CU7|ps=1.12|wiiu=Patch 1|switch=1.0.1|[[File:Iron Horse Armor JE1 BE1.png|32px]] [[File:Golden Horse Armor JE1 BE1.png|32px]] [[File:Diamond Horse Armor JE1 BE1.png|32px]]<br>[[File:Iron Horse Armor (item) JE1 BE1.png|32px]] [[File:Golden Horse Armor (item) JE1 BE1.png|32px]] [[File:Diamond Horse Armor (item) JE1 BE1.png|32px]] Added horse armor.}}
{{History||xbox=TU53|xbone=CU43|ps=1.49|wiiu=Patch 23|switch=1.0.3|Iron and golden horse armor are now [[smelting|smeltable]].}}
{{History||xbox=TU60|xbone=CU51|ps=1.64|wiiu=Patch 30|switch=1.0.11|[[File:Leather Horse Armor BE1.png|32px]]<br>[[File:Leather Horse Armor (item) BE1.png|32px]] Added leather horse armor.}}
{{History||xbox=none|xbone=none|ps=1.90|wiiu=none|switch=none|[[File:Leather Horse Armor JE1 BE3.png|32px]] [[File:Iron Horse Armor JE5 BE3.png|32px]] [[File:Golden Horse Armor JE4 BE3.png|32px]] [[File:Diamond Horse Armor JE4 BE3.png|32px]]<br>[[File:Leather Horse Armor (item) BE3.png|32px]] [[File:Iron Horse Armor (item) JE3.png|32px]] [[File:Golden Horse Armor (item) JE3 BE3.png|32px]] [[File:Diamond Horse Armor (item) JE3 BE3.png|32px]] The textures of leather, iron, gold and diamond horse armor have been changed.}}
{{History|3ds}}
{{History||0.1.0|[[File:Leather Horse Armor BE1.png|32px]] [[File:Iron Horse Armor JE1 BE1.png|32px]] [[File:Golden Horse Armor JE1 BE1.png|32px]] [[File:Diamond Horse Armor JE1 BE1.png|32px]]<br>[[File:Leather Horse Armor (item) BE1.png|32px]] [[File:Iron Horse Armor (item) JE1 BE1.png|32px]] [[File:Golden Horse Armor (item) JE1 BE1.png|32px]] [[File:Diamond Horse Armor (item) JE1 BE1.png|32px]] Added horse armor.}}
{{History|foot}}
== Issues ==
{{issue list}}
== Gallery ==
<gallery>
Leather Horse Armor.png | Undyed Leather armor
White Leather Horse Armor.png | White Leather armor
Light Gray Leather Horse Armor.png | Light Gray Leather armor
Gray Leather Horse Armor.png | Gray Leather armor
Black Leather Horse Armor.png | Black Leather armor
Brown Leather Horse Armor.png | Brown Leather armor
Red Leather Horse Armor.png | Red Leather armor
Orange Leather Horse Armor.png | Orange Leather armor
Yellow Leather Horse Armor.png | Yellow Leather armor
Lime Leather Horse Armor.png | Lime Leather armor
Green Leather Horse Armor.png | Green Leather armor
Cyan Leather Horse Armor.png | Cyan Leather armor
Light Blue Leather Horse Armor.png | Light Blue Leather armor
Blue Leather Horse Armor.png | Blue Leather armor
Purple Leather Horse Armor.png | Purple Leather armor
Magenta Leather Horse Armor.png | Magenta Leather armor
Pink Leather Horse Armor.png | Pink Leather armor
</gallery>
=== Screenshots ===
<gallery>
Armored Horse.png|A [[horse]] equipped with iron horse armor and bound to a fence post by a [[lead]].
13w21a-new-HorseUI-inventory.png|The GUI for horses implemented in [[Java Edition 13w21a|13w21a]], which allows the removal and switching of armor.
GodSpawner.png|A golden horse armor found in a [[dungeon]] chest, which coincidentally contains an [[enchanted golden apple]].
Horses with armor.png|4 [[horse]]s equipped with [[leather]], [[iron]], [[gold]], and [[diamond]] armor.
Leather Horse Armor 1.jpg|First image of leather horse armor.
Leather Horse Armor 2.jpg|Second image of leather horse armor.
Leather Horse Armor 3.jpg|Third image of leather horse armor.
Leather Horse Armor 4.jpg|Fourth image of leather horse armor.
Leather Horse Armor 5.jpg|Fifth image of leather horse armor.
</gallery>
== Notes ==
{{Notelist}}
== References ==
{{Reflist}}
{{items}}
[[Category:Armor]]
[[de:Rossharnisch]]
[[es:Armadura para caballo]]
[[fr:Armure pour cheval]]
[[it:Bardatura]]
[[ja:馬鎧]]
[[ko:말 갑옷]]
[[nl:Paardenharnas]]
[[pl:Zbroja końska]]
[[pt:Armadura para cavalo]]
[[ru:Конская броня]]
[[uk:Кінські обладунки]]
[[zh:马铠]]</li><li>[[Shears|Shears]]<br/>{{Item
| image = Shears.png
| rarity = Common
| renewable = Yes
| durability = 238
| stackable = No
}}
'''Shears''' are tools required to obtain some organic blocks or otherwise mine them faster as well as to shear certain entities and blocks.
==Obtaining==
===Crafting===
{{Crafting
|head=1
|showdescription=1
|B2= Iron Ingot
|A3= Iron Ingot
|Output= Shears
|type= Tool
}}
{{crafting
|foot=1
|ignoreusage=1
|Damaged Shears
|Damaged Shears
|Output= Shears
|description= The durability of the two shears is added together, plus an extra 5% durability.
|type= Tool
}}
Despite using [[Iron Ingot|iron]] in its crafting recipe, shears cannot be smelted into [[iron nugget]]s.<ref>{{bug|MC-111738}}</ref>
===Trading===
Novice-level Shepherd [[villager]]s have a 40% chance to sell shears for 2 [[emerald]]s in Java Edition. This trade is always offered in Bedrock Edition.
===Chest loot===
{{LootChestItem|shears}}
==Usage==
===Shearing===
Shears lose 1 [[durability]] when used to shear something.
Shears can be {{Control|use|text=used}} on a [[sheep]] to remove its coat and drop 1–3 [[wool]] of the corresponding color. The same sheep can be sheared again after it eats from a [[grass block]] to regenerate its coat.
Shearing a [[mooshroom]] drops 5 [[mushroom]]s of the corresponding color and irreversibly turns it into a normal [[cow]].
Shearing a [[snow golem]] irreversibly removes its pumpkin, dropping it and revealing its face.
Shearing either a [[beehive]] or [[bee nest]] that is full of honey makes it drop 3 [[honeycomb]]s and resets it to honey level 0. The same beehive or bee nest can be sheared again if it is able to reach full honey again. If sheared by hand without a [[campfire]] below the hive or nest all bees within will exit and all nearby bees will attack the offending player.
[[Dispenser]]s can use shears in any of the above listed ways, interacting with any valid block or entity in front of the dispenser's face. This decreases the shears' [[durability]]. A dispenser shearing a beehive or bee nest will not anger bees or cause them to leave even if there is not a campfire below it.
Shearing a [[pumpkin]] turns it into a [[carved pumpkin]], dropping 4 [[pumpkin seeds]].
{{IN|java}}, shearing the tip of [[cave vines]], [[kelp]], [[weeping vines]], or [[twisting vines]] sets its age value to 25 and stops further growth.
===Breaking blocks===
Shears use 1 [[durability]] when is used to break any block, even if it [[instant mining|breaks instantly]] by hand.
Shears can be used to harvest [[cobweb|cobwebs]], [[leaves]], [[grass|grass, tall grass]], [[seagrass|seagrass, tall seagrass]], [[fern|ferns, large fern]]s, [[dead bush]]es, [[nether sprouts]], [[vines]], [[glow lichen]] or [[hanging roots]] and obtain them in item form. They can also be used to break [[tripwire]] connected to a [[tripwire hook]] without activating it.
When shears are used to break [[Weeping Vines|weeping vines]] or [[Twisting Vines|twisting vines]] they are guaranteed to drop in item form instead of the usual 33% chance. This only applies to vines directly broken by shears and not vines that are broken due to the destruction of their supporting vines.
The following table shows information about blocks that can be broken with shears. Colors indicate what gets dropped when the block is broken:
*White: The original block.
*Blue: The block's normal drop (i.e. string, sticks, seeds, saplings, apples).
*Red: Nothing.
{| class="wikitable" style="text-align:center" data-description="Blocks broken with shears"
!
!No shears breaking time
!Shears breaking time
|-
! style="text-align:left" |{{BlockLink|Cobweb}}
| {{tc|no|20 s}}<ref group="note">Breaking cobwebs with a sword is as fast as breaking with shears, and yields string. This costs double durability.</ref>
|0.4 s
|-
! style="text-align:left" |{{BlockLink|Dead Bush}}
| {{tc|planned|0 s}}
|0 s
|-
! style="text-align:left" |{{BlockLink|id=fern|Grass|Fern}}
| {{tc|planned|0 s}}
|0 s
|-
! style="text-align:left" |{{BlockLink|Grass}}
| {{tc|planned|0 s}}
| 0 s
|-
! style="text-align:left" |{{BlockLink|Nether Sprouts}}
| {{tc|no|0 s}}<ref group="note">{{IN|bedrock}}, the item drops when breaking it with fists.</ref>
|0 s
|-
! style="text-align:left" |{{BlockLink|Leaves}}
| {{tc|planned|0.35 s}}
|0.05 s
|-
! style="text-align:left" |{{BlockLink|id=tripwire|String#Tripwire|Tripwire}}
|0 s
|0 s<ref group="note">Using shears does not trigger a redstone pulse.</ref>
|-
! style="text-align:left" |{{BlockLink|Vines}}
| {{tc|no|0.35 s}}
|0.35 s
|-
! style="text-align:left" |{{BlockLink|Wool}}
|1.25 s
|0.25 s
|-
! style="text-align:left" |{{BlockLink|Seagrass}}
| {{tc|no|0 s}}
|0 s
|-
! style="text-align:left" | {{BlockLink|Glow Lichen}}
| {{tc|no|0.3 s}}
|0.3 s
|-
! style="text-align:left" |{{BlockLink|Hanging Roots}}
| {{tc|no|0 s}}
|0 s
|-
! style="text-align:left" |{{BlockSprite|Twisting Vines Plant}}{{BlockLink|Twisting Vines}}<br> {{BlockSprite|Weeping Vines Plant}}{{BlockLink|Weeping Vines}}
|0 s
|0 s<ref group="note">Using shears will increase the chance of dropping from 33% to 100%.</ref>
|}
{{notelist}}
===Enchantments===
Shears can receive the following [[Enchanting|enchantments]]:
{| class="wikitable col-2-center col-3-right"
|+
!Name
! Max Level
![[Enchanting|Method]]
|-
|[[Efficiency]]
|V
|{{Inventory slot|Anvil}}
|-
|[[Unbreaking]]
| III
|{{Inventory slot|Anvil}}
|-
|[[Mending]]
|I
|{{Inventory slot|Anvil}}
|-
|[[Curse of Vanishing]]
|I
|{{Inventory slot|Anvil}}
|-
|[[Silk Touch]]{{only|be|short=1}}
|I
|{{Inventory slot|Anvil}}
|}
{{notelist}}
== Sounds ==
{{edition|java}}:
{{Sound table
|rowspan=4
|sound=Shear.ogg
|subtitle=Shears click
|source=player
|description=When a mooshroom is sheared
|id=entity.mooshroom.shear
|translationkey=subtitles.item.shears.shear
|volume=1.0
|pitch=1.0
|distance=16}}
{{Sound table
|subtitle=Shears click
|source=player
|description=When a sheep is sheared
|id=entity.sheep.shear
|translationkey=subtitles.item.shears.shear
|volume=1.0
|pitch=1.0
|distance=16}}
{{Sound table
|subtitle=Shears click
|source=player
|description=When a snow golem is sheared
|id=entity.snow_golem.shear
|translationkey=subtitles.item.shears.shear
|volume=1.0
|pitch=1.0
|distance=16}}
{{Sound table
|subtitle=Plant cropped
|source=block
|description=When a growing plant is cropped
|id=block.growing_plant.crop
|translationkey=subtitles.block.growing_plant.crop
|volume=1.0
|pitch=1.0
|distance=16}}
{{Sound table
|sound=Beehive shear.ogg
|source=block
|subtitle=Shears scrape
|description=When honeycombs are harvested from a beehive
|id=block.beehive.shear
|translationkey=subtitles.block.beehive.shear
|volume=0.8
|pitch=1.0/0.8/0.9
|distance=16}}
{{Sound table
|sound=Pumpkin carve1.ogg
|sound2=Pumpkin carve2.ogg
|source=block
|subtitle=Shears carve
|description=When a pumpkin is carved
|id=block.pumpkin.carve
|translationkey=subtitles.block.pumpkin.carve
|volume=1.0
|pitch=1.0
|distance=16}}
{{Sound table
|sound=Random break.ogg
|subtitle=Item breaks
|source=player
|description=When a pair of shears' durability is exhausted
|id=entity.item.break
|translationkey=subtitles.entity.item.break
|volume=0.8
|pitch=0.8-1.2
|distance=16
|foot=1}}
{{edition|bedrock}}:<br>
Pumpkins do not have carve sounds.
{{Sound table
|type=bedrock
|sound=Shear.ogg
|source=player
|description=When something is sheared
|id=mob.sheep.shear
|volume=1.0
|pitch=1.0}}
{{Sound table
|sound=Beehive shear.ogg
|source=block
|description=When honeycombs are harvested from a beehive
|id=block.beehive.shear
|volume=0.8
|pitch=0.8-1.0}}
{{Sound table
|sound=Random break.ogg
|source=player
|description=When a pair of shears' durability is exhausted
|id=random.break
|volume=1.0
|pitch=0.9
|foot=1}}
==Data values==
===ID===
{{edition|java}}:
{{ID table
|edition=java
|showforms=y
|generatetranslationkeys=y
|displayname=Shears
|spritetype=item
|nameid=shears
|form=item
|foot=1}}
{{edition|bedrock}}:
{{ID table
|edition=bedrock
|shownumericids=y
|showforms=y
|notshowbeitemforms=y
|generatetranslationkeys=y
|displayname=Shears
|spritetype=item
|nameid=shears
|id=421
|form=item
|foot=1}}
==Achievements==
{{load achievements|Have a Shearful Day}}<div style="text-align:center"></div>
==History==
{{History||June 3, 2011|link=https://twitter.com/jeb_/status/76570646074765312|Shears were first mentioned by [[Jeb]] on [[wikipedia:Twitter|Twitter]]. The tweet revealing Jeb's work on shears was written in Swedish (''Jag jobbar på shears nu''), which translates to "I'm working on shears now".}}
{{History||June 7, 2011|link=https://twitter.com/jeb_/status/78154891637436416|Jeb tweets about how shears were originally planned as a way to defuse [[TNT]], but he dropped this shortly after deciding TNT would detonate only with [[redstone]] or [[fire]].}}
{{History|java beta}}
{{History||1.7|[[File:Shears JE1 BE1.png|32px]] Added shears.
|Before [[Beta 1.7]], [[sheep]] would drop 1-3 [[wool]] blocks at most when hit, but shears can harvest up to 4 wool blocks per sheep.}}
{{History||1.8|snap=Pre-release|Shears can now be used to harvest a [[fern]], [[vines]] and [[grass]].}}
{{History|java}}
{{History||1.0.0|snap=Beta 1.9 Prerelease|Shears now harvest [[red mushroom]]s from a [[mooshroom]] and turn it back into a normal [[cow]].}}
{{History||1.1|snap=11w49a|[[Sheep]] now drop only 1-3 wool blocks when sheared, but they can also regrow their wool by eating [[grass block|grass]], which is part of a plan to have [[animal]]s stay in the game longer.<ref>{{Tweet|jeb|76647002317930496}}</ref>}}
{{History||1.2.1|snap=12w05a|Shears can now be used to harvest [[dead bush]]es.}}
{{History|||snap=12w06a|Shears are now [[renewable]], due to [[zombie]]s occassionally dropping iron ingots.}}
{{History||1.3.1|snap=12w21a|Shears can now be [[trading|bought]] from farmer [[villager]]s for 3 [[emerald]]s each.}}
{{History|||snap=12w22a|Shears can now be used to break [[tripwire]] string and not set it off.}}
{{History||1.4.2|snap=12w38a|Added a [[sound]] when using shears on [[sheep]].}}
{{History||1.4.6|snap=12w50a|Shears can now be [[enchanting|enchanted]].}}
{{History||1.8|snap=14w02a|[[Trading]] has been changed: Shepherd [[villager]]s now [[trading|sell]] shears for 3–4 [[emerald]]s each.
|Farmers no longer trade shears.}}
{{History|||snap=pre1|Shears now lose [[item durability|durability]] when breaking [[wool]] blocks. In previous versions, shears would take [[item durability|durability]] [[damage]] only when destroyed or when breaking [[tall grass]] or [[leaves]], the damage remaining the same for all other [[block]]s.<ref>{{bug|MC-5313}}</ref>}}
{{History||1.9|snap=15w34a|Shears may now be used in a crafting grid to zoom in [[map]]s.}}
{{History|||snap=15w45a|Shears no longer zoom in maps.}}
{{History|||snap=15w47b|Shears can no longer be enchanted with [[Silk Touch]].
|Shears now lose durability when used to break any block (formerly lost durability only from [[leaves]], [[web]], [[grass]], [[vines]], [[tripwire]] and [[wool]]).}}
{{History|||snap=15w47c|Shears now harvest [[cobweb]] without requiring [[Silk Touch]].}}
{{History|||snap=15w49a|[[Snow golem]]'s [[pumpkin]] can now be removed with shears.}}
{{History||1.13|snap=17w47a|When shears are {{control|used}} on an un-carved [[pumpkin]], it now turns into a carved pumpkin and drops 4 [[pumpkin seeds]].
|Prior to [[1.13/Flattening|''The Flattening'']], this [[item]]'s numeral ID was 359.}}
{{History||1.14|snap=18w43a|Shears placed in a [[dispenser]] can now shear [[sheep]].
|[[File:Shears JE2 BE2.png|32px]] The texture of shears has been changed.}}
{{History|||snap=18w49a|Shears can now be found in [[chest]]s in [[village]] shepherd houses.}}
{{History||1.15|snap=19w34a|Shears can now be used on [[bee nest]]s and [[beehive]]s to harvest [[honeycomb]].}}
{{History||1.16|snap=20w15a|Shears placed in a dispenser can now shear [[mooshrooms]] and [[snow golem]]s.}}
{{History||1.16.2|snap=pre1|Shears are now required in order to pick up [[roots]].}}
{{History||1.16.2|snap=pre2|Shears are no longer required to pick up [[roots]].}}
{{History||1.17|snap=?|Shears are now required in order to pick up [[hanging roots]].}}
{{History||1.18|snap=21w37a|Shears can now stop [[cave vines]], [[kelp]], [[weeping vines]], and [[twisting vines]] from aging.}}
{{History||1.19|snap=22w11a|Shears are now required in order to pick up [[mangrove leaves]].}}
{{History|pocket alpha}}
{{History||v0.2.0|[[File:Shears JE1 BE1.png|32px]] Added shears.}}
{{History||v0.3.2|Survival [[player]]s no longer start out with infinite durability shears in the [[inventory]].}}
{{History||v0.4.0|Removed shears from the creative inventory.}}
{{History||v0.8.0|snap=build 3|Re-added shears to [[creative]] mode.}}
{{History||v0.9.0|snap=build 1|Shears can now be used to transform [[mooshroom]]s into [[cow]]s.}}
{{History||v0.12.1|snap=build 3|Shearing a [[snow golem]] now removes its [[pumpkin]].
|Shears can now be [[enchanting|enchanted]] in an [[anvil]].}}
{{History||v0.13.0|snap=build 1|Shears can now be used to break [[tripwire]] string without triggering it.}}
{{History||v0.15.0|snap=build 1|Shears now lose durability when used to break any [[block]].}}
{{History|pocket}}
{{History||1.0.4|snap=alpha 1.0.4.0|Shears can now be [[trading|bought]] from shepherd [[villager]]s.}}
{{History||1.1.0|snap=alpha 1.1.0.0|Breaking a [[melon|melon block]] with shears now always drop 9 [[melon slice|melons]].}}
{{History|bedrock}}
{{History||1.4.0|snap=beta 1.2.13.8|Shears can now be used to turn un-carved [[pumpkin]]s into [[carved pumpkin]] and spit out 4 [[pumpkin seeds]].}}
{{History||?|Shears now harvest [[cobweb]] without requiring [[Silk Touch]].}}
{{History||1.10.0|snap=beta 1.10.0.3|Shears placed in a [[dispenser]] can now shear [[sheep]].
|[[File:Shears JE2 BE2.png|32px]] The texture of shears has been changed.}}
{{History||1.11.0|snap=beta 1.11.0.1|Shears can now be found in [[village]] shepherd houses.}}
{{History|||snap=beta 1.11.0.4|Shears [[trading|sold]] by shepherd [[villager]]s now cost only 2 [[emerald]]s.}}
{{History||1.14.0|snap=beta 1.14.0.1|Shears can now be used on [[bee nest]]s and [[beehive]]s to harvest [[honeycomb]].}}
{{History|console}}
{{History||xbox=TU3|xbone=CU1|ps=1.0|wiiu=Patch 1|switch=1.0.1|[[File:Shears JE1 BE1.png|32px]] Added shears.}}
{{History||xbox=TU69|xbone=none|ps=1.76|wiiu=Patch 38|switch=none|Shears can now be used to turn regular [[pumpkin]]s into [[carved pumpkin]]s.}}
{{History||xbox=none|xbone=none|ps=1.90|wiiu=none|switch=none|[[File:Shears JE2 BE2.png|32px]] The texture of shears has been changed.
|Shears placed in a [[dispenser]] can now shear [[sheep]].}}
{{History|New 3DS}}
{{History||0.1.0|[[File:Shears JE1 BE1.png|32px]] Added shears.}}
{{History|foot}}
==Issues==
{{issue list}}
==Gallery==
<gallery>
File:Enchanted Shears.gif|An enchanted pair of shears.
</gallery>
==References==
{{reflist}}
==External links==
*[https://www.minecraft.net/en-us/article/taking-inventory--shears Taking Inventory: Shears] – Minecraft.net on November 20, 2019
{{Items}}
[[cs:Nůžky]]
[[de:Schere]]
[[es:Tijeras]]
[[fr:Cisailles]]
[[hu:Metszőolló]]
[[it:Cesoie]]
[[ja:ハサミ]]
[[ko:가위]]
[[nl:Schaar]]
[[pl:Nożyce]]
[[pt:Tesoura]]
[[ru:Ножницы]]
[[zh:剪刀]]
[[Category:Renewable resources]]</li></ul> | beta 1.2.0.2 | Added jukeboxes and banners, which can now be used as fuel. | |||||||||||||||||||||||||||||||||
1.4.0{{Extension DPL}}<ul><li>[[Camera|Camera]]<br/>{{about|the entity|the command|commands/camera}}
{{exclusive|edu}}
{{unobtainable|edition=be}}
{{ItemEntity
|imagesize=80px
|renewable=No
|stackable=Yes (64)
|health={{hp|4}}
|image=Camera.png}}
{{Block
| title = Camera Block
| image = Camera (block).png
| invimage = none
| transparent = No
| light = 0
| tool = any
| stackable = Yes (64)
| flammable = No
| lavasusceptible = No
| renewable = No
}}
The '''camera''' is an [[entity]] that is capable of capturing and storing images. {{IN|edu}}, it works together with the [[portfolio]] item to create collections of [[photo]]s.<ref>https://education.minecraft.net/support/knowledge-base/using-cameras-portfolios/</ref>
== Obtaining ==
The camera can be obtained in the [[Creative inventory]] in ''Minecraft Education''. It can be obtained either by NBT editors, inventory editors, or glitches in Bedrock Edition.
To get the block form of the camera in Bedrock Edition using an NBT editor, you need to set the item name of the block in the inventory slot (<code>name:</code> ) to <code>item.camera</code>, then you need to add a compound tag called <code>Block</code> and inside of that put the int tag <code>version: 18040335</code> and the text tag <code>name: minecraft:camera</code> into the block compound tag. For the usable "[[spawn egg]]" form of the camera, you only need to set the item name of the block in the inventory slot (<code>name:</code> ) to <code>camera</code>; you do not need to add the block compound for this form of the camera.
== Usage ==
Using a camera from the [[inventory]] captures a first-person screenshot. It can also be placed, creating a camera [[entity]] that can track the user, and take pictures from the camera's perspective. Photos that are taken using the camera appear in the [[portfolio]].
Close-up snapshots of an [[item]] on the ground can be taken by holding the Shift key while right-clicking.
Photos that are taken with the camera block are stored in <code>%localappdata%\Packages\MinecraftUWP_8wekyb3d8bbwe\LocalState\screenshots</code>.
== Sounds ==
=== Generic ===
{{Sound table/Block/Normal/BE}}
=== Unique ===
{{Sound table
|sound=Camera1.ogg
|sound2=Camera2.ogg
|sound3=Camera3.ogg
|type=bedrock
|description=When a picture is taken with a camera
|source=Players
|id=camera.take_picture
|volume=1.0
|pitch=1.0
|foot=1}}
== Data values ==
=== ID ===
{{ID table
|edition=bedrock
|firstcolumnname=Camera
|shownumericids=y
|showforms=y
|generatetranslationkeys=y
|displayname=Block
|spritename=camera
|spritetype=block
|nameid=camera
|id=242
|form=block
|itemform=item.camera}}
{{ID table
|displayname=Item
|spritename=camera
|spritetype=item
|translationtype=item
|nameid=camera
|id=593
|form=item
|foot=1}}
{{ID table
|edition=bedrock
|firstcolumnname=Camera
|shownumericids=y
|generatetranslationkeys=y
|displayname=Entity
|spritename=camera
|spritetype=entity
|nameid=tripod_camera
|id=62
|foot=1}}
=== Entity data ===
See [[Bedrock Edition level format/Entity format]].
== Video ==
{{yt|1XLRGFibFNQ}}
== History ==
{{History|pocket alpha}}
{{History||v0.1.0|[[File:Camera BE1.png|50px]] [[File:Camera (item texture) BE1.png|32px]] The textures and model of the camera can be found in the game apk file.<ref name="found">[{{Reddit|jkkmr/found_image_file_for_camera_in_minecraft_portable}} Reddit - Found image file for camera in Minecraft Portable Edition Demo APK file.]</ref><ref>https://web.archive.org/web/20160604161800/https://twitter.com/Kappische/status/103548954368679936</ref>}}
{{History||v0.2.0|[[File:Camera BE2.png|50px]] [[File:Music Disc Blocks JE1 BE1.png|32px]] Added cameras
|Changed item and tripod textures.
|To use a camera, equip it in the [[player]]'s hand, then look in the direction the player wants the picture to be taken. Long-press the screen, and a camera [[drops]] to the ground where the player are standing. Step back, then press on the camera until it starts emitting smoke [[particles]]. The smoke means a picture has been taken, and the camera may disappear immediately afterward.
|Cameras have infinite uses.
|Entity id 62 and item id 456.<ref>https://www.minecraftforum.net/topic/1233138-i-found-the-camera-id/</ref>}}
{{History||v0.5.0|The camera is now invisible and makes the standard player [[damage]] [[sound]].}}
{{History||v0.7.0|Added the "F1" feature (Hide GUI), which has now made the camera obsolete.}}
{{History||v0.8.0|snap=build 2|[[File:Egg JE1 BE1.png|32px]] Item form now uses [[egg]] texture.}}
{{History||v0.9.0|snap=build 1|The camera [[entity]] has been removed. [[Tommaso]] also stated: ''"It doesn't mean that it's dead forever, in fact I have a lot of ideas for it! I think it will be back when have [[shader]]s, sharing and [[redstone]]."''<ref>{{Reddit|sub=MCPE|281sep/camera|ci6znr8}}</ref>}}
{{History||v0.14.0|snap=build 1|[[File:Camera BE3.png|32px]] [[File:Camera (item) BE2.png|32px]] Re-added the camera. It is accessible only with [[inventory]] editors.
|In this version, if the player spawns a camera, leaves the [[world]] and joins back, it summons [[lightning]].}}
{{History||v0.14.2|The camera [[item]] ID has been changed to 498, but it cannot be used at the moment. The [[entity]] can now be spawned with a [[spawn egg]] with a [[damage]] value of 62.
|According to the language files of the game, the empty label that shows up whenever hovering a finger to a camera would now say "Take Picture". However, the button doesn't do anything.}}
{{History||v0.15.0|snap=build 1|The previous empty label on the camera mentioned above now displays the words "Take Picture".
|The [[health]] of the camera [[entity]] is now {{hp|2}} instead {{hp|4}}.
|The camera no longer summons [[lightning]].}}
{{History||v0.16.0|snap=build 1|The camera now has a [[block]] form in [[inventory]], but still spawns the entity. However, the block can be placed only with [[commands]] and editing.
|"Take picture" button on the camera works now, but no image files are created.
|The oldest ID for camera (456) now refers to [[portfolio]].}}
{{History|||snap=build 2|[[File:Camera Block.png|32px]] The camera now has an [[item]] form and the [[block]] has been removed. However, it is still obtainable in servers.
|[[Portfolio]], which works together with the camera to create collections of pictures, has been removed.}}
{{History|||snap=build 4|Camera item form has been removed, and the camera can no longer be obtained or placed using any [[commands|command]].}}
{{History|bedrock}}
{{History||1.8.0|snap=beta 1.8.0.8|[[File:Camera BE3.png|32px]] [[File:Camera Block.png|32px]] The camera has been reimplemented.
|The camera [[entity]] can now be spawned with a [[spawn egg]] with [[damage]] value 258.}}
{{History||1.12.0|snap=beta 1.12.0.2|The camera can now be obtained with the {{cmd|give}} [[commands|command]].}}
{{History||1.13.0|snap=beta 1.13.0.1|The camera can no longer be obtained with the {{cmd|give}} command.
|Functionality has been added to the camera. Screenshots that are taken by the camera can now be saved into the {{cd|screenshots}} folder.
|Cameras are now a part of the {{el|ee}} toggle as a hidden feature.
|Cameras no longer have a [[death]] animation when killed by the [[player]] and instead, instantly emit smoke [[particles]].}}
{{History||1.16.100|snap=beta 1.16.100.50|The camera can now be obtained with the {{cmd|give}} [[commands|command]] once again.}}
{{History|||snap=beta 1.16.100.55|The camera can no longer be obtained with the {{cmd|give}} command.}}
{{History|education}}
{{History||1.0|[[File:Camera BE3.png|32px]] [[File:Camera Block.png|32px]] Added cameras.}}
{{History||1.4.0|Cameras no longer have a [[death]] animation when killed by the [[player]] and instead instantly emit smoke [[particles]].}}
{{History|foot}}
=== Future ===
At the Minecraft [[Pocket Edition]] panel at [[MineCon 2012]], as well as one of [[Johan Bernhardsson|Jbernhardsson]]'s livestreams, it was stated that future plans include trying to have a proper use for cameras, perhaps an easier way to take screenshots and share them with others.<ref>{{ytl|YMhyX_lKWV4}}</ref> In the BlockTalk Q&A, the camera was briefly mentioned as part of a broader "sharing" theme planned for {{el|be}} in the future.<ref>{{ytl|Ruf6tvqsD84}}</ref>
It later got implemented into {{el|ee}}, using the camera to make screenshots and share them in a special book.
== Issues ==
{{Issue list}}
== Trivia ==
* A camera prevents a [[Book and Quill]] from working. Attempting to craft it or obtain it by commands gives a regular book instead, due to non-implementation of photo attaching to written books.
* The camera can take a screenshot, which appears a bit smaller with a thick paper outline having cuts on its edges, making it look like an old photograph.
* This feature is hidden from the Creative inventory and from the /give command item menu.
== Gallery ==
<gallery>
PEcameras030.jpg|A row of cameras, as seen in [[Pocket Edition v0.3.0 alpha|v0.3.0]].
PEcameraphoto.jpg|Example image taken by the camera [[entity]].
CameraUse-1.png|The first method of using cameras.
CameraUse-2.png|The second method of using cameras.
Dinnerbone Camera.png|A camera spawned using a [[spawn egg]] named "[[Dinnerbone]]" in the v0.15.0 beta.
Cam2.png|A camera falling from a [[tree]]. This shows that cameras are entities.
Education Edition Exclusive Features.png|The camera and camera block placed in a world along with other Education Edition features.
Screenshot by camera.jpg|An example of the screenshot taken by a camera in [[Bedrock Edition beta 1.13.0.1|beta 1.13.0.1]].
File:Say Cheese.jpeg|[[Steve]], [[Alex]], [[Jesse]], and an [[Agent]] getting their picture taken.
</gallery>
== See also ==
* [[Portfolio]]
* [[Screenshot]]
== References ==
{{Reflist}}
{{Items}}
{{Entities}}
{{Education Edition}}
[[Category:Education Edition entities]]
[[Category:Education Edition items]]
[[Category:Tools]]
[[cs:Kamera]]
[[de:Kamera]]
[[el:Camera]]
[[es:Cámara]]
[[fr:Appareil photo]]
[[hu:Kamera]]
[[ja:カメラ]]
[[ko:카메라]]
[[nl:Camera]]
[[pl:Kamera]]
[[pt:Câmera]]
[[ru:Камера]]
[[uk:Камера]]
[[zh:相机]]</li><li>[[Campfire|Campfire]]<br/>{{Block
| image = <gallery>
Campfire.gif|Campfire
Soul Campfire.gif|Soul Campfire
Unlit Campfire.png|Unlit
</gallery>
| image2 = <gallery>
Campfire (item) JE2.png|Campfire
Soul Campfire (item) JE2.png|Soul Campfire
</gallery>
| invimage = Campfire
| invimage2 = Soul Campfire
| transparent = No
| light = '''Campfire''': <br>Yes (15) when lit<br>'''Soul Campfire''': <br>Yes (10) when lit
| tool = axe
| renewable = Yes
| stackable = Yes (64)
| flammable = No
| lavasusceptible = Yes
}}
A '''campfire''' is a block that can be used to cook [[food]], pacify [[bee]]s, act as a spread-proof [[light source]], smoke signal or damaging trap block.
A '''soul campfire''' is a dimmer variant of the campfire with turquoise flames. Soul campfires deal more damage than normal campfires.
== Obtaining ==
=== Breaking ===
Campfires can be mined with any tool, or without a tool, but [[axe]]s are the fastest. A regular campfire drops 2{{only|java|short=1}} or 4{{only|bedrock|short=1}} [[charcoal]], a soul campfire drops [[soul soil]], and either one also drops any items placed on it. If mined with a tool enchanted with [[Silk Touch]], the campfire instead drops itself as an item.
{{IN|BE}}, either kind of campfire can also be broken by pushing it with a [[piston]] or [[sticky piston]]. Pistons cannot move or break campfires {{in|je}}.
{{breaking row
|Campfire, Soul Campfire
|axe
|horizontal=1}}
=== Natural generation ===
Campfires can generate in {{BiomeLink|taiga}} and {{BiomeLink|snowy taiga}}{{only|be}} [[village]]s.
Campfires also generate in camps inside [[ancient city|ancient cities]], beneath a pile of blue, light blue and cyan [[wool]] blocks.
=== Crafting ===
{{Crafting
|head=1
|B1= Stick
|A2= Stick
|B2= Coal; Charcoal
|C2= Stick
|A3= Any Log or Stem; Any Stripped Log or Stem; Any Wood or Hyphae; Any Stripped Wood or Hyphae
|B3= Any Log or Stem; Any Stripped Log or Stem; Any Wood or Hyphae; Any Stripped Wood or Hyphae
|C3= Any Log or Stem; Any Stripped Log or Stem; Any Wood or Hyphae; Any Stripped Wood or Hyphae
|Output= Campfire
|type= Decoration block
}}
{{Crafting
|foot=1
|B1= Stick
|A2= Stick
|B2= Soul Sand; Soul Soil
|C2= Stick
|A3= Any Log or Stem; Any Stripped Log or Stem; Any Wood or Hyphae; Any Stripped Wood or Hyphae
|B3= Any Log or Stem; Any Stripped Log or Stem; Any Wood or Hyphae; Any Stripped Wood or Hyphae
|C3= Any Log or Stem; Any Stripped Log or Stem; Any Wood or Hyphae; Any Stripped Wood or Hyphae
|Output= Soul Campfire
|type= Decoration block
}}
=== Trading ===
{{IN|bedrock}}, apprentice-level fisherman [[villager]]s have a 50% chance of selling a campfire for 5 [[emerald]]s.
{{IN|java}}, apprentice-level fisherman villagers have a {{frac|2|3}} chance of selling a campfire for 2 [[emerald]]s.
== Usage ==
Lit campfires emit a light level of 15 and lit soul campfires emit a light level of 10. Unlike [[fire]], campfires do not spread under any circumstances.
Campfires are lit by default when placed. Campfires can be manually lit by {{control|using}} or [[Dispenser|dispensing]] [[flint and steel]] on them, shooting it with a flaming arrow, or using or dispensing fire charges, blaze fireballs, and ghast fireballs when {{cmd|gamerule|mobGriefing}} is true. {{IN|bedrock}}, campfires can also be lit by {{control|using}} an item enchanted with [[fire aspect]], or stepping on it while burning.
Campfires can be extinguished by [[waterlogging]] it (placing [[water]] in the same block space), throwing a [[splash water bottle]] on it, or {{control|using}} a [[shovel]] on it. {{IN|bedrock}}, campfires can also be extinguished by placing a water source or allowing water to flow in the space above the campfire. As with [[torches]], rain does not extinguish campfires.<ref>{{bug|MC-141920||Rain doesn't put out campfire|Works as Intended}}</ref>
Using [[flint and steel]] on the side of a waterlogged or lit campfire sets the adjacent air block on fire instead.
Any items cooking on a campfire always drop when the campfire block is broken.
=== Particles and smoke signals ===
[[File:Campfire with smoke.gif|thumb|Campfire emitting smoke.]]
Campfires produce smoke particles that float up around 10 blocks before disappearing. If a [[hay bale]] is placed below, the campfire becomes a signal fire and the smoke floats up 24 blocks instead.
Campfire smoke particles can partially pass through a block directly above it, but do not pass through blocks more than one block directly above it.
Although a trap door is thinner than a slab, a trap door can block the smoke completely, preventing the smoke from floating up.
Campfires emit extra smoke particles during rain, similar to [[lava]].
Campfires also emit occasional ember particles, similar to lava. Soul campfires, however, do not emit embers.<ref>{{bug|MC-185482||Soul campfires do not emit ember particles|Works as Intended}}</ref>
=== Damage ===
Campfires damage [[mob]]s standing on top of them even if underwater (with exceptions such as [[shulker]]s, [[zombified piglin]]s or [[guardian]]s), but only if lit. Campfires deal {{hp|1}} and soul campfires deal {{hp|2}} of damage every tick (although [[damage immunity]] reduces this to once every half-second) Campfires do not cause lasting burning or destroy items. Damage taken is considered [[Damage#Fire|fire damage]] and is reduced by [[armor]] (which loses [[Item durability#Armor durability|durability]]), the [[Resistance]] potion effects, and the [[Protection]] and [[Fire Protection]] enchantments. The player can avoid being damaged at all, either by using a [[potion of fire resistance]] or wearing [[Frost Walker]] boots.
Regardless of [[Solid block#Height|height]], all blocks prevent damage done to mobs or players above campfires. The campfire deals damage only to entities occupying its block.
=== Cooking ===
[[File:Campfire (Cooking).gif|thumb]]
The player can place {{tooltip|raw food|raw beef, raw chicken, raw rabbit, raw porkchop, raw mutton, raw cod, raw salmon, potato, kelp}} on a lit campfire by {{control|using}} the food item on it. Up to four food items can be placed on a single campfire, which cooks the items simultaneously. Unlike other blocks that can cook food, campfires do not require any kind of fuel to cook. On a campfire, foods produce small smoke particles, indicating they are being cooked. Food items take 30 seconds (600 [[tick]]s) to cook, compared to 10 seconds for [[furnace]]s or 5 seconds for [[smoker]]s. Assuming that one uses all four slots to cook at once, the Campfire is, therefore, more efficient than furnaces (taking 10 seconds less per four items and no fuel) for cooking, but must be watched so as to pick up the food and refill it once it is done. It is slower than a smoker by about ten seconds, but its lack of fuel consumption could be seen as a worthwhile trade-off. Once finished cooking, items pop off the campfire. If the campfire is extinguished while cooking food, it resets as if it had not been cooked at all. Food items can be placed on an unlit campfire.
Other items can be placed on campfires using external editors, mods or add-ons.
=== Hoppers ===
Campfires do not have an [[Inventory#External inventories|external inventory]]. Raw food cannot be loaded into the campfire with a [[hopper]].
A hopper placed directly underneath a campfire pulls through any items dropped into the campfire. Any drops from a mob that dies in the campfire get pulled into the hopper.
=== Bees ===
Placing a campfire under a [[beehive]] or [[bee nest]] allows players to harvest [[honey bottle]]s or [[honeycomb]] without provoking the [[bee]]s.
There must be unobstructed air between the campfire and the beehive or bee nest. [[Carpet]]s are an exception.{{only|JE}}
=== Piglins ===
Lit soul campfires repel [[piglin]]s that are not currently attacking. This occurs when the [[piglin]] is within an 8 block radius of the soul campfire.
=== Light source ===
Standard lit campfires emit a light level of 15, while soul campfires emit a light level of 10. Like most other sources of light, campfires melt nearby [[snow]] and [[ice]]. Due to their lower light level, soul campfires do not melt snow or ice.
=== Note blocks ===
Campfires can be placed under [[note block]]s to produce "bass" sounds.
=== Converting soul sand to soul soil ===
Soul campfires can be used to convert [[soul sand]] into [[soul soil]]. If a soul campfire is crafted using soul sand, placed, and then broken without [[Silk Touch]], that soul campfire drops soul soil.<ref>{{bug|MC-178579||Soul campfires can be used to convert soul sand into soul soil|Works as Intended}}</ref>
=== Piston interactivity ===
{{IN|BE}}, pushing a campfire or soul campfire with a [[piston]] or [[sticky piston]] breaks it. Unlike other methods, breaking with a piston drops only one [[charcoal]] instead of two. Campfires cannot be pulled by sticky pistons.
{{IN|JE}}, pistons do not interact with campfires. Campfires neither move nor break when pushed or pulled by pistons.
== Sounds ==
=== Generic ===
{{Sound table/Block/Wood}}
=== Unique ===
{{edition|java}}:
{{Sound table
|sound=Campfire crackle1.ogg
|sound2=Campfire crackle2.ogg
|sound3=Campfire crackle3.ogg
|sound4=Campfire crackle4.ogg
|sound5=Campfire crackle5.ogg
|sound6=Campfire crackle6.ogg
|subtitle=Campfire crackles
|source=block
|description=Randomly while lit
|id=block.campfire.crackle
|translationkey=subtitles.block.campfire.crackle
|volume=0.5-1.5
|pitch=0.6-1.3
|distance=16}}
{{Sound table
|sound=Flint and steel click.ogg
|subtitle=Flint and steel click
|source=block
|description=When a campfire is lit with a flint and steel
|id=item.flintandsteel.use
|translationkey=subtitles.item.flintandsteel.use
|volume=1.0
|pitch=0.8-1.2
|distance=16}}
{{Sound table
|sound=Ghast fireball4.ogg
|subtitle=Fireball whooshes
|source=block
|description=When a campfire is lit with a fire charge
|id=item.firecharge.use
|translationkey=subtitles.item.firecharge.use
|volume=1.0
|pitch=0.8-1.2
|distance=16}}
{{Sound table
|rowspan=2
|sound=Fizz.ogg
|subtitle=Fire extinguishes
|source=block
|description=When a campfire is extinguished with water
|id=entity.generic.extinguish_fire
|translationkey=subtitles.entity.generic.extinguish_fire
|volume=1.0
|pitch=1.0
|distance=16}}
{{Sound table
|subtitle=Fire extinguished
|source=block
|description=When a campfire is extinguished
|id=block.fire.extinguish
|translationkey=subtitles.block.fire.extinguish
|volume=0.5
|pitch=2.0
|distance=16
|foot=1}}
{{edition|bedrock}}:
{{Sound table
|type=bedrock
|sound=Campfire crackle1.ogg
|sound2=Campfire crackle2.ogg
|sound3=Campfire crackle3.ogg
|sound4=Campfire crackle4.ogg
|sound5=Campfire crackle5.ogg
|sound6=Campfire crackle6.ogg
|source=block
|description=Randomly while lit
|id=block.campfire.crackle
|volume=1.0 {{Until|BE 1.19.80}}<br>0.5-1.5 {{Upcoming|BE 1.19.80}}
|pitch=1.0 {{Until|BE 1.19.80}}<br>0.6-1.3 {{Upcoming|BE 1.19.80}}}}
{{Sound table
|sound=Flint and steel click.ogg
|source=block
|description=When a campfire is lit
|id=fire.ignite
|volume=1.0
|pitch=0.8-1.2}}
{{Sound table
|sound=Ghast fireball4.ogg
|source=hostile
|description=When a campfire is lit with a fire charge
|id=mob.ghast.fireball
|volume=1.0
|pitch=1.0}}
{{Sound table
|sound=Fizz.ogg
|source=block
|description=When a campfire is extinguished
|id=random.fizz
|volume=0.5
|pitch=1.8-2.4
|foot=1}}
== Data values ==
=== ID ===
{{edition|java}}:
{{ID table
|edition=java
|showblocktags=y
|showforms=y
|generatetranslationkeys=y
|displayname=Campfire
|spritetype=block
|nameid=campfire
|blocktags=campfires}}
{{ID table
|displayname=Soul Campfire
|spritetype=block
|nameid=soul_campfire
|blocktags=campfires, piglin_repellents
|itemtags=piglin_repellents
|foot=1}}
{{ID table
|displayname=Block entity
|spritename=campfire
|spritetype=block
|nameid=campfire
|foot=1}}
{{edition|bedrock}}:
{{ID table
|edition=bedrock
|firstcolumnname=Campfire
|shownumericids=y
|showforms=y
|generatetranslationkeys=y
|displayname=Normal block
|spritename=campfire
|spritetype=block
|nameid=campfire
|id=464
|form=block
|itemform=item.campfire}}
{{ID table
|displayname=Normal item
|spritename=campfire
|spritetype=item
|nameid=campfire
|id=589
|form=item
|translationkey=tile.campfire.name}}
{{ID table
|displayname=Soul block
|spritename=soul-campfire
|spritetype=block
|nameid=soul_campfire
|id=545
|form=block
|itemform=item.soul_campfire}}
{{ID table
|displayname=Soul item
|spritename=soul-campfire
|spritetype=item
|nameid=soul_campfire
|id=622
|form=item
|translationkey=tile.soul_campfire.name
|foot=1}}
{{ID table
|notnamespaced=y
|displayname=Block entity
|spritename=campfire
|spritetype=block
|nameid=Campfire
|foot=1}}
=== Block states ===
{{see also|Block states}}
{{/BS}}
=== Block data ===
A campfire has a [[block entity]] associated with it that holds additional data about the [[block]].
{{el|java}}:
{{see also|Block entity format}}
{{/BE}}
{{el|bedrock}}:
: See [[Bedrock Edition level format/Block entity format]].
== Achievements ==
{{load achievements|Bee our guest}}
== Advancements ==
{{Load advancements|Bee Our Guest}}
== History ==
{{History||September 26, 2018|link={{tweet|minecraft|1044587405779451906}}|Campfires are announced to be part of the [[biome]] vote at [[MINECON Earth 2018]].}}
{{History||September 29, 2018|link={{ytl|HoMDyRqMNMA}}|Campfires are showcased at [[MINECON Earth 2018]].}}
{{History||September 29, 2018|link={{tweet|minecraft|1046097775199498325}}|[[Taiga]] wins the [[biome]] vote, meaning campfires are to be added to the game in [[Java Edition 1.14|1.14]].}}
{{History|java}}
{{History||1.14|snap=19w02a|[[File:Campfire JE1 BE1.gif|32px]] [[File:Unlit Campfire JE1 BE1.png|32px]] Added campfires.}}
{{History|||snap=19w03a|[[File:Campfire (item) JE1 BE1.png|32px]] [[File:Campfire JE2 BE2.gif|32px]] [[File:Unlit Campfire JE2 BE2.png|32px]] The [[model]] and texture of the campfire have been changed.
|Lit campfires now produce spark [[particles]].
|The [[light]] level of campfires has been changed from 9 to 15.
|Campfires are now directionally placed.
|Lit campfires produce smoke plume [[particles]] more often.}}
{{History|||snap=19w04a|Campfires now spawn in [[taiga]] [[village]]s on the ground and inside chimneys.
|Crouching on a campfire no longer prevents the player from taking damage from it.<ref>{{Bug|MC-141913||Sneaking on a campfire prevents damage|Fixed}}</ref>}}
{{History|||snap=19w08a|Campfires can now be extinguished by [[splash water bottle]]s.}}
{{History|||snap=19w11a|Fisherman [[villager]]s now [[trading|sell]] campfires.}}
{{History||1.14.1|snap=Pre-Release 2|Campfires can now be lit by flaming [[arrow]]s.}}
{{History||1.14.2|snap=Pre-Release 1|Flaming arrows can no longer light [[waterlogging|waterlogged]] campfires.}}
{{History||1.15|snap=19w34a|Campfires under [[bee nest]]s and [[bee hive]]s now prevent [[bee]]s from aggravating toward [[player]]s who harvest them.}}
{{History|||snap=19w37a|Campfires can now be extinguished using a [[shovel]].}}
{{History|||snap=19w42a|Campfires can now be lit by small [[fireball]]s.}}
{{History||1.16|snap=20w11a|Campfires can now be lit by any burning [[projectile]].}}
{{History|||snap=20w13a|Campfires can now be [[crafting|crafted]] using [[stems]] and [[hyphae]].}}
{{History|||snap=20w15a|[[File:Soul Campfire (item) JE1 BE1.png|32px]] [[File:Soul Campfire.gif|32px]] Added soul campfires.}}
{{History|||snap=20w22a|Campfires now [[drops|drop]] the [[food]] being cooked when they are put out with a [[shovel]] or [[water bottle]].}}
{{History|||snap=Pre-release 3|[[File:Unlit Campfire with foods on it.png|32px]] Food can now be placed on unlit campfires. However, due to a bug,<ref>{{Bug|MC-188448||Food pops off of campfire when extinguished|Fixed}}</ref> food pops off of campfires when extinguished.}}
{{History||1.17|snap=20w46a|Food no longer pops off of campfires when extinguished.}}
{{History||1.18|snap=21w41a|[[File:Campfire (item) JE2.png|32px]] [[File:Soul Campfire (item) JE2.png|32px]] Changed campfire and soul campfire textures as items.}}
{{History||1.19|snap=22w13a|Campfires now generate in camps inside [[ancient city|ancient cities]].}}
{{History||1.19.4|snap=23w07a|The soul campfire recipes are no longer unlocked by [[stick]]s.<ref>{{bug|MC-238920}}</ref>}}
{{History||1.20<br>(Experimental)|link=1.19.4|snap=1.19.4-pre1|Cherry logs, wood, and their stripped variations can now used to craft campfire and soul campfire.<ref>{{bug|MC-260149}}</ref>}}
{{History|bedrock}}
{{History||1.10.0|snap=beta 1.10.0.3|[[File:Campfire JE1 BE1.gif|32px]] [[File:Unlit Campfire JE1 BE1.png|32px]] Added campfires.
|Campfires are available only through [[Experimental Gameplay]].}}
{{History||1.11.0|snap=beta 1.11.0.1|Campfires have been fully implemented.
|[[File:Campfire_(item)_JE1_BE1.png|32px]] [[File:Campfire JE2 BE2.gif|32px]] [[File:Unlit Campfire JE2 BE2.png|32px]] The [[model]] and texture of the campfire have been changed.}}
{{History|||snap=beta 1.11.0.4|Campfires can now be [[trading|bought]] from fishermen [[villager]]s.}}
{{History||1.13.0|snap=?|Campfires now emit embers similar to [[lava]].}}
{{History||1.14.0|snap=beta 1.14.0.1|Campfires under [[bee nest]]s and [[beehive]]s now prevent [[bee]]s from aggravating toward [[player]]s who harvest them.}}
{{History||1.16.0|snap=beta 1.16.0.57|[[File:Soul_Campfire_(item)_JE1_BE1.png|32px]] [[File:Soul Campfire.gif|32px]] Added soul campfires.}}
{{History||1.16.20|snap=beta 1.16.20.50|Soul campfires now emit [[light]] level of 10.}}
{{History||1.16.100|snap=beta 1.16.100.54|Soul campfires now deal double the damage that normal campfires deal.|Soul campfires now drop [[Soul Soil]] instead of [[Charcoal]] when mined.}}
{{History||1.17.30|snap=beta 1.17.30.23|Campfires are now stackable in the inventory.}}
{{History||1.18.10|snap=beta 1.18.10.20|[[File:Campfire (item) JE2.png|32px]] [[File:Soul Campfire (item) JE2.png|32px]] Changed campfire and soul campfire textures as items.}}
{{History||1.19.60|snap=beta 1.19.60.23|Campfires no longer set players and mobs on fire.}}
{{History||1.19.80|snap=beta 1.19.80.22|Campfires now damage mobs standing on top of them.}}
{{History||1.20.30|snap=beta 1.20.30.20|Campfires now use the <code>minecraft:cardinal_direction</code> [[block state]] instead of <code>direction</code>.}}
{{History|console}}
{{History||ps=1.91|[[File:Campfire_(item)_JE1_BE1.png|32px]] [[File:Campfire JE2 BE2.gif|32px]] [[File:Unlit Campfire JE2 BE2.png|32px]] Added campfires.}}
{{History|foot}}
== Issues ==
{{Issue list}}
== Gallery ==
<gallery>
Cozy Cabin Smoke.jpg|Campfire smoke coming out of a cozy cabin.
Cozy Cabin Campfire.jpg|Campfire near a cozy cabin.
1.14 Dev Campfire.jpg|Dev screenshot.
Campfire in taiga village.png|A few naturally generating campfires in a [[taiga]] biome [[village]].
Campfire with hay bale vs without.png|A comparison between a campfire with a [[hay bale]] below it (left) and one without (right).
Campfire Particles.png|The number of particles depends on the height of the top block.
Campfire cooking.png|Cooking porkchops with a campfire.
Campfire (cooking) JE1 BE1.gif|Cooking with a campfire in [[Java Edition 19w02a]].
</gallery>
== References ==
{{reflist}}
{{Blocks|Utility}}
{{Items}}
[[Category:Utility blocks]]
[[Category:Manufactured blocks]]
[[Category:Generated structure blocks]]
[[Category:Block entities]]
[[Category:Storage]]
[[Category:Light sources]]
[[de:Lagerfeuer]]
[[fr:Feu de camp]]
[[ja:焚き火]]
[[ko:모닥불]]
[[pl:Ognisko]]
[[pt:Fogueira]]
[[ru:Костёр]]
[[th:แคมป์ไฟ]]
[[zh:营火]]</li></ul> | beta 1.2.13.8 | Added stripped logs, which can now be used as fuel. | |||||||||||||||||||||||||||||||||
| beta 1.2.14.2 | Added dried kelp blocks, which can now be used as fuel. | ||||||||||||||||||||||||||||||||||
1.8.0{{Extension DPL}}<ul><li>[[:Category:Plants|Category:Plants]]<br/>All pages covering blocks of such things as tall grass and flowers.
[[Category:Blocks]]
[[Category:Items]]
[[cs:Kategorie:Rostliny]]
[[es:Categoría:Plantas]]
[[fr:Catégorie:Plante]]
[[hu:Kategória:Növények]]
[[it:Categoria:Piante]]
[[ja:カテゴリ:植物]]
[[ko:분류:식물]]
[[nl:Categorie:Planten]]
[[pl:Kategoria:Rośliny]]
[[pt:Categoria:Plantas]]
[[ru:Категория:Растения]]
[[th:หมวดหมู่:พืช]]
[[zh:Category:植物]]</li><li>[[:Category:Minecraft: Story Mode items|Category:Minecraft: Story Mode items]]<br/>[[Category:Minecraft: Story Mode]]
[[Category:Items]]</li></ul> | beta 1.8.0.8 | Added bamboo and scaffolding, which can now be used as fuel. | |||||||||||||||||||||||||||||||||
1.10.0{{Extension DPL}}<ul><li>[[Block Inspector|Block Inspector]]<br/>{{MinecraftEdu feature}}
{{stub}}
{{Item
| image = BlockInspector.png
| stackable = No {{verify}}
}}
'''Block Inspector''' is an item used to display the name of the block the player is looking at on screen.
== Data values ==
{{ID table
|generatetranslationkeys=java
|displayname=Block Inspector
|spritetype=item
|nameid=block_inspector|foot=1}}
==History==
{{History|MinecraftEDU}}
{{History||0.9848|[[File:BlockInspector.png|32px]] Added block inspectors.}}
{{History|foot}}
{{Items}}</li><li>[[Golden Apple|Golden Apple]]<br/>{{Distinguish|Enchanted Golden Apple}}
{{Item
| image = Golden Apple.png
| rarity = Rare
| heals = {{hunger|4}}
|effects=: {{EffectLink|Absorption}} (2:00)
: {{EffectLink|Regeneration}} II (0:05)
|renewable = Yes
|stackable = Yes (64)
}}
A '''golden apple''' is a [[food]] item that bestows beneficial effects when consumed, and is also used to cure a [[Zombie Villager|zombie villager]] under the [[Weakness]] effect into a normal [[villager]].
== Obtaining ==
=== Crafting ===
{{Crafting
|A1= Gold Ingot
|B1= Gold Ingot
|C1= Gold Ingot
|A2= Gold Ingot
|B2= Apple
|C2= Gold Ingot
|A3= Gold Ingot
|B3= Gold Ingot
|C3= Gold Ingot
|Output= Golden Apple
|type= Foodstuff
}}
=== Chest loot ===
On the base of <code>ancient_city/city_center/city_center_2</code>, a single golden apple is contained in the [[chest]]. Eating it at that location unlocks the [[piston]] doors to the [[redstone]] labs beneath.
{{LootChestItem|golden-apple}}
== Usage ==
{{see also|Tutorials/Hunger management|title1=Hunger management}}
To eat a golden apple, press and hold {{control|use}} while it is selected in the hotbar. It restores {{hunger|4}} points of hunger and 9.6 hunger [[Hunger#Mechanics|saturation]].
Unlike most foods, golden apples can be eaten when the hunger bar is full.
The golden apple provides:
*[[Absorption]] I for 2 minutes (providing {{hp|4|absorption=1}} points of absorption health)
*[[Regeneration]] II ({{hp|1}} every 25 ticks, {{hp|2|notag=1}} × 0.4 per second) for 5 seconds (long enough to heal {{hp|4}} points of damage)
=== Curing zombie villagers ===
{{main|Zombie Villager#Curing}}
A golden apple and a [[potion of weakness]] can be used to convert a [[zombie villager]] into a regular [[villager]].
=== Horses ===
Golden apples can be used for improving the chances of taming a [[horse]] by 10%, for [[breeding]] and leading horses, and for speeding up the growth of baby horses by 4 minutes.
===Piglins===
{{EntityLink|Piglin|Piglins}} are attracted to golden apples. They run toward any golden apples on the ground, and inspect it for 6 to 8 seconds before putting it in their inventory. However, piglins do not eat golden apples (or any [[food]]).
== Sounds ==
{{Sound table/Entity/Food}}
== Data values ==
=== ID ===
{{edition|java}}:
{{ID table
|edition=java
|showforms=y
|generatetranslationkeys=y
|displayname=Golden Apple
|spritetype=item
|nameid=golden_apple
|form=item
|foot=1}}
{{edition|bedrock}}:
{{ID table
|edition=bedrock
|shownumericids=y
|showforms=y
|notshowbeitemforms=y
|generatetranslationkeys=y
|displayname=Golden Apple
|spritetype=item
|nameid=golden_apple
|id=258
|form=item
|foot=1}}
== Achievements ==
{{load achievements|Zombie Doctor;Oooh, shiny!}}
== Advancements ==
{{load advancements|Zombie Doctor;Oh Shiny;A Furious Cocktail;How Did We Get Here;Husbandry;A Balanced Diet}}
== History ==
{{History|java infdev}}
{{History||February 23, 2010|link=http://www.minecraftforum.net/topic/2750582-the-secret-history-of-minecraft/|A [[player]] named JTE put a [[crafting]] recipe for golden apples as a joke at the bottom of a crafting guide she made. The recipe used [[gold ingot]]s instead of [[block of gold|gold blocks]].}}
{{History||20100227-1|[[File:Golden Apple JE1 BE1.png|32px]] Added golden apples.
|Golden apples heal a full {{hp|20}} [[health]] points, making them the best [[food]] in the entire game.
|Golden apples are [[crafting|crafted]] with an [[apple]] and eight [[gold block|blocks of gold]].
|However, since apples were not yet obtainable in normal gameplay, golden apples were not obtainable either.}}
{{History||20100625-2|Golden apples can now be rarely found in [[dungeon]]s, making them obtainable in normal gameplay.}}
{{History|java beta}}
{{History||1.8|snap=Pre-release|Due to the addition of [[hunger]], golden apples have been changed so that they restore {{hunger|10}}, instead of {{hp|20}} [[health]] points, but also give [[Regeneration]] for 30 seconds.
|[[Apple]]s can now be found in [[stronghold]] storeroom [[chest]]s, making golden apples craftable in normal gameplay for the first time.}}
{{History|java}}
{{History||1.0.0|snap=Beta 1.9 Prerelease 2|Golden apples have been given 'glint' (animated purple glow) when viewed from the [[player]]'s [[inventory]], and its tooltip has now changed from the standard white to a magenta color.}}
{{History|||snap=Beta 1.9 Prerelease 3|Golden apples can now be found in the new [[stronghold]] altar [[chest]]s.}}
{{History||1.1|snap=11w48a|Golden apples are now easier to [[crafting|craft]]. Standard [[apple]]s now rarely [[drops|drop]] from oak [[leaves]], meaning that [[player]]s no longer need to venture into [[stronghold]]s/[[dungeon]]s to find one.
|As [[gold]] is also renewable via [[Zombified Piglin|zombie pigmen]], golden apples have become a [[renewable resource]].}}
{{History|||snap=release|Golden apples have been changed, so that they now restore {{hunger|4}} and give only 4 seconds of [[Regeneration]].
|The [[crafting]] recipe of golden apples has been modified, requiring 8 [[gold nugget]]s instead of 8 [[blocks of gold]] to craft. Although its natural spawn is rare, it is easier to obtain through crafting.}}
{{History||1.3.1|snap=12w21a|With the addition of [[enchanted golden apple]]s, which got a purple tooltip, the standard golden apple's tooltip changed to blue. However, the standard golden apple's effects remain unchanged.}}
{{History||1.4.2|snap=12w32a|Golden apples can now be fed to [[zombie villager]]s with the [[Weakness]] debuff causing them to revert to [[villager]]s after a delay of about 3 minutes.}}
{{History||1.6.1|snap=13w23a|Golden apples now use 8 [[gold ingot]]s instead of 8 [[gold nugget]]s.
|The [[Regeneration]] effect of golden apples has been slowed down.}}
{{History|||snap=13w23b|Golden apples now give the player [[Health Boost]] for 1:30 and [[Regeneration]] II for 0:10. This temporarily gives the [[player]] 4 extra base [[health]] points, and it heals a total of {{hp|4}} health points.}}
{{History|||snap=13w24b|The Health Boost effect has been replaced with [[Absorption]], lasting 1:30.}}
{{History|||snap=13w25a|Absorption from golden apples now lasts 2:00.}}
{{History|||snap=?|Golden apples can now be used to tame, breed and heal horses and donkeys.}}
{{History||1.9|snap=15w37a|The [[Regeneration]] effect from golden apples has been reduced to Regeneration I (from II in [[Java Edition 1.8]]).}}
{{History|||snap=15w43a|A single golden apple can now sometimes be found in [[igloo]] [[chest]]s.}}
{{History|||snap=15w43b|A single golden apple is now always found in igloo chests.}}
{{History|||snap=15w44a|The [[Regeneration]] effect from golden apples has been returned to Regeneration II, as it had been in [[Java Edition 1.8|1.8]].
|The average yield of golden apples from [[dungeon]] chests has been increased.
|Golden apples have been added to [[desert temple]] and [[mineshaft]] chests.}}
{{History||1.11|snap=16w39a|Golden apples are now found in the new [[woodland mansion]] chests.}}
{{History||1.13|snap=17w47a|The names and IDs have been split into golden apple and enchanted golden apple.
|Prior to [[1.13/Flattening|''The Flattening'']], this [[item]]'s numeral ID was 322.}}
{{History|||snap=18w09a|Golden apples can now generate in the [[chest]]s of [[underwater ruins]].}}
{{History||1.14|snap=18w43a|[[File:Golden Apple JE2 BE2.png|32px]] The texture for golden apples has been changed.}}
{{History||1.16|snap=20w16a|Golden apples can now be found inside [[ruined portal]] chests.}}
{{History|||snap=20w18a|Golden apples are now less common in ruined portal [[chest]]s.}}
{{History||1.16.2|snap=20w30a|Golden apples are now found in [[bastion remnant]] chests.}}
{{History||1.18|snap=experimental snapshot 6|Horses, donkeys and mules now follow players holding golden apples.}}
{{History||1.19|snap=22w14a|A single golden apple may now be found in the chest at {{cd|city_center_2}} in [[Ancient City|ancient cities]].}}
{{History|pocket alpha}}
{{History||v0.12.1|snap=build 1|[[File:Golden Apple JE1 BE1.png|32px]] Added golden apples.}}
{{History|||snap=build 3|A [[crafting]] recipe has been added for golden apples.}}
{{History|bedrock}}
{{History||1.4.0|snap=beta 1.2.20.1|Golden apples can now generate in the [[chest]]s of [[underwater ruins]].}}
{{History||1.10.0|snap=beta 1.10.0.3|[[File:Golden Apple JE2 BE2.png|32px]] The texture for golden apples has been changed.}}
{{History||1.16.0|snap=beta 1.16.0.57|Golden apples can now be found inside [[ruined portal]] chests.}}
{{History|console}}
{{History||xbox=TU1|xbone=CU1|ps=1.0|wiiu=Patch 1|switch=1.0.1|[[File:Golden Apple JE1 BE1.png|32px]] Added golden apples.}}
{{History||xbox=TU5|Due to the addition of [[hunger]], golden apples have been changed, so that they restore {{hunger|10}} instead of {{hp|20}} health points, but also give [[Regeneration]] for 30 seconds.}}
{{History||xbox=TU19|xbone=CU7|ps=1.12|Golden apples now give extra "[[Absorption]]" health for a short period.}}
{{History||xbox=none|xbone=none|ps=1.90|wiiu=none|switch=none|[[File:Golden Apple JE2 BE2.png|32px]] The texture for golden apples has been changed.}}
{{History|New 3DS}}
{{History||0.1.0|[[File:Golden Apple JE1 BE1.png|32px]] Added golden apples.}}
{{History|foot}}
== Issues ==
{{issue list}}
== Trivia ==
Prior to [[Java Edition Beta 1.8]], the golden apple outwardly restored the player's full {{hp|20}} health points; Internally however, it is set to restore over double that, at {{hp|42}} health points. This is most likely a reference to [https://en.wikipedia.org/wiki/The_Hitchhiker's_Guide_to_the_Galaxy The Hitchhiker's Guide to the Galaxy], making it restore (the meaning of) life, 42 (health points). This is far before either the [[Absorption]] or [[Health Boost]] effects, causing this reference go unnoticed.
== Gallery ==
<gallery>
File:GoldenAppleComparison.png|A comparison of the two golden apple variations.
File:Golden apple in dungen 2013.png|A golden apple found in a dungeon.
File:Notch Apple In Mansion Chest.png|An extremely rare occasion where a regular golden apple and an enchanted apple being found in the same woodland mansion chest {{in|ee}}.
File:GoldenAppleDungeonChest.png|Golden apple in a [[dungeon]] chest, prior to 1.3.1. It resembles the enchanted golden apple.
File:Golden Apple Mineshaft Loot.png|A golden apple was found in a minecart chest in an abandoned mineshaft.
</gallery>
{{Items}}
[[Category:Renewable resources]]
[[Category:Food]]
[[cs:Zlaté jablko]]
[[de:Goldener Apfel]]
[[es:Manzana dorada]]
[[fr:Pomme dorée]]
[[hu:Aranyalma]]
[[it:Mela d'oro]]
[[ja:金のリンゴ]]
[[ko:황금 사과]]
[[nl:Gouden appel]]
[[pl:Złote jabłko]]
[[pt:Maçã dourada]]
[[ru:Золотое яблоко]]
[[th:แอปเปิ้ลทอง]]
[[tr:Altın Elma]]
[[uk:Золоте яблуко]]
[[zh:金苹果]]</li></ul> | beta 1.10.0.3 | Dead bush can now be used as fuel. | |||||||||||||||||||||||||||||||||
1.11.0{{Extension DPL}}<ul><li>[[Copper Ingot|Copper Ingot]]<br/>{{About|the ingot|the ore|Copper Ore|the mineral block|Block of Copper}}
{{Item
| image = Copper Ingot.png
| renewable = Yes
| stackable = Yes (64)
}}
'''Copper ingots''' are [[metal]] ingots obtained from smelting [[raw copper]] or killing [[drowned]].
== Obtaining ==
=== Crafting ===
{{Crafting
|Block of Copper;Waxed Block of Copper|Output=Copper Ingot,9
|type=Miscellaneous
}}
=== Smelting ===
Copper ingots can be obtained by smelting [[raw copper]] in a [[furnace]] or [[blast furnace]], as well as the ore itself if mined using [[Silk Touch]].
{{Smelting
|head=1
|Raw Copper
|Copper Ingot
|0.7
}}
{{Smelting
|foot=1
|Copper Ore; Deepslate Copper Ore
|Copper Ingot
|0.7
}}
=== Mob loot ===
==== Drowned ====
When killed by a [[player]] or a tamed [[wolf]], a [[drowned]] has a 11% ({{frac|11|100}}) chance of dropping a copper ingot. With the [[Looting]] enchantment, the chance can be increased to 13% ({{frac|13|100}}) with Looting I, 15% ({{frac|3|20}}) with Looting II, and 17% ({{frac|17|100}}) with Looting III.
== Usage ==
=== Crafting ingredient ===
{{crafting usage}}
=== Smithing ingredient ===
{{Smithing
|head=1
|ingredients=Any Armor Trim +<br/>Any Armor Piece + <br/>Copper Ingot
|Any Armor Trim Smithing Template
|Netherite Chestplate
|Copper Ingot
|Copper Trim Netherite Chestplate
|showdescription=1
|description = All armor types can be used in this recipe,<br/>a netherite chestplate is shown as an example.<br/>
|tail=1
}}
;Trim color palette
The following color palette is shown on the designs on trimmed armor:
*{{TrimPalette|copper ingot}}
== Data values ==
=== ID ===
{{edition|java}}:
{{ID table
|edition=java
|showforms=y
|generatetranslationkeys=y
|displayname=Copper Ingot
|spritetype=item
|nameid=copper_ingot
|form=item
|foot=1}}
{{edition|bedrock}}:
{{ID table
|edition=bedrock
|shownumericids=y
|showforms=y
|notshowbeitemforms=y
|generatetranslationkeys=y
|displayname=Copper Ingot
|spritetype=item
|nameid=copper_ingot
|form=item
|id=504
|foot=1}}
== History ==
{{History|java}}
{{History||1.17|snap=20w45a|[[File:Copper Ingot JE1.png|32px]] Added copper ingots.}}
{{History|||snap=20w46a|[[File:Copper Ingot JE2 BE1.png|32px]] The texture of copper ingots has been changed.|Crafting copper ingots from and into copper blocks now outputs/requires only 4 ingots.}}
{{History|||snap=21w05a|[[Drowned]] can now drop copper ingots when killed instead of [[gold ingots]], making copper ingots renewable.}}
{{History|||snap=21w10a|Copper ingots can now be smelted from [[deepslate copper ore]].}}
{{History|||snap=21w14a|Copper ingots can now be smelted from [[raw copper]].}}
{{History|||snap=21w17a|The amount of copper ingots required to make a [[block of copper]] has been changed back to 9.}}
{{History||1.17.1|snap=Pre-release 1|Increased the chance of [[drowned]] dropping a copper ingot from 5% to 11% and the increase of this chance for each level of [[Looting]] enchantment from 1% to 2% to match {{el|be}}.}}
{{History||1.20<br>(Experimental)|link=1.19.4|snap=23w04a|Copper ingots can now be used as an armor trim material.}}
{{History|||snap=1.19.4 Pre-release 1|Copper ingots can now be used to craft [[brush]]es.}}
{{History|bedrock}}
{{History||Caves & Cliffs (experimental)|link=Bedrock Edition 1.17.0|snap=beta 1.16.210.57|[[File:Copper Ingot JE2 BE1.png|32px]] Added copper ingots.}}
{{History||1.17.0|snap=beta 1.17.0.50|Copper ingots can now be used to craft [[spyglass|spyglasses]].}}
{{History|||snap=beta 1.17.0.52|Copper ingots are now available without enabling [[experimental gameplay]].}}
{{History|||snap=beta 1.17.0.54|The amount of copper ingots required to make a [[block of copper]] has been changed to 9.}}
{{History||Vanilla Experiments (experimental)|link=1.18.30|snap=beta 1.18.30.26|Copper ingots can now be used to craft copper horns.}}
{{History||1.19.0|snap=beta 1.19.0.24|Copper ingots can no longer be used to craft copper horns, as copper horns have been removed.}}
{{History||1.20.0<br>(Experimental)|link=Bedrock Edition 1.19.80|snap=beta 1.19.80.20|Copper ingots can now be used to craft [[brush]]es.}}
{{History|||snap=beta 1.19.80.21|Copper ingots can now be used as an armor trim material.}}
{{History|foot}}
== Issues ==
{{Issue list}}
== External Links ==
*[https://www.minecraft.net/en-us/article/taking-inventory--copper-ingot Taking Inventory:Copper Ingot] – Minecraft.net on December 22, 2022
{{Items}}
[[Category:Renewable resources]]
[[de:Kupferbarren]]
[[es:Lingote de cobre]]
[[fr:Lingot de cuivre]]
[[it:Lingotto di rame]]
[[ja:Copper Ingot]]
[[ko:구리괴]]
[[pl:Sztabka miedzi]]
[[pt:Barra de cobre]]
[[ru:Медный слиток]]
[[uk:Мідний злиток]]
[[zh:铜锭]]</li><li>[[Wheat Seeds|Wheat Seeds]]<br/>{{Block
| group = Age 0
| 1-1 = Wheat Age 0.png
| 1-2 = Wheat Age 0 BE.png
| group2 = Age 7
| 2-1 = Wheat Age 7.png
| 2-2 = Wheat Age 7 BE.png
| image = Wheat Seeds.png
| extratext = [[#Renders|View all renders]]
| invimage = Wheat Seeds
| transparent = Yes
| light = No
| tool = N/A
| renewable = Yes
| stackable = Yes (64)
| flammable = No
| lavasusceptible = No
}}
'''Wheat seeds''' ({{in|java}}) or '''seeds''' ({{in|bedrock}}) are [[item]]s obtained by breaking [[grass]], or more abundantly harvested from wheat crops, and are used to plant them.
'''Wheat crops''' are planted in [[farmland]] and used to grow [[wheat]] and wheat seeds.
== Obtaining ==
=== Breaking ===
Harvesting fully-grown [[wheat]] [[crops]] yields from 1 to 4 seeds per crop harvested (about {{frac|2|5|7}} seeds/crop harvested on average).
In '''Bedrock edition''' yields are 0-3.[https://bugs.mojang.com/browse/MCPE-169402]<sup><nowiki>https://bugs.mojang.com/browse/MCPE-169402</sup>
Wheat seeds can be obtained from breaking all variants of [[grass]], which yields 0 to 1 seed. If harvested with a [[Fortune]] enchanted tool the drop rate from grass is increased.
The looting is calculated by a binomial distribution: a drop is attempted three times with a success rate of around 57% to yield the 0–3 drops. Each level of Fortune enchantment increases the number of attempts by one.
{| class="wikitable"
! rowspan="3" |[[Resource location]]
! rowspan="3" | Source
! colspan="5" | Drops
|- style="text-align:center"
! rowspan="2" |{{ItemLink|Wheat}}
! colspan="4" |{{ItemText|Wheat Seeds}}
|- style="text-align:center"
! Default tool
! With [[Fortune]] I
! With Fortune II
! With Fortune III
|- style="text-align:center"
| rowspan="2" |<code>blocks/wheat</code>
|{{BlockLink|Wheat}} (age 0–6)
| 0 {{ItemSprite|Wheat}}
| 1 {{ItemSprite|Wheat Seeds}}|| 1 {{ItemSprite|Wheat Seeds}}|| 1 {{ItemSprite|Wheat Seeds}}|| 1 {{ItemSprite|Wheat Seeds}}
|- style="text-align:center"
|{{BlockLink|Wheat}} (age 7)
| 1 {{ItemSprite|Wheat}}
| 1 {{ItemSprite|Wheat Seeds}} (~7.87%) ''or''<br>2 {{ItemSprite|Wheat Seeds}} (~31.49%) ''or''<br>3 {{ItemSprite|Wheat Seeds}} (~41.98%) ''or''<br>4 {{ItemSprite|Wheat Seeds}} (~18.66%)
| 1 {{ItemSprite|Wheat Seeds}} (~3.37%) ''or''<br>2 {{ItemSprite|Wheat Seeds}} (~17.99%) ''or''<br>3 {{ItemSprite|Wheat Seeds}} (~35.98%) ''or''<br>4 {{ItemSprite|Wheat Seeds}} (~31.99%) ''or''<br>5 {{ItemSprite|Wheat Seeds}} (~10.66%)
| 1 {{ItemSprite|Wheat Seeds}} (~1.44%) ''or''<br>2 {{ItemSprite|Wheat Seeds}} (~9.64%) ''or''<br>3 {{ItemSprite|Wheat Seeds}} (~25.70%) ''or''<br>4 {{ItemSprite|Wheat Seeds}} (~34.27%) ''or''<br>5 {{ItemSprite|Wheat Seeds}} (~22.85%) ''or''<br>6 {{ItemSprite|Wheat Seeds}} (~6.09%)
| 1 {{ItemSprite|Wheat Seeds}} (~0.62%) ''or''<br>2 {{ItemSprite|Wheat Seeds}} (~4.96%) ''or''<br>3 {{ItemSprite|Wheat Seeds}} (~16.52%) ''or''<br>4 {{ItemSprite|Wheat Seeds}} (~29.38%) ''or''<br>5 {{ItemSprite|Wheat Seeds}} (~29.38%) ''or''<br>6 {{ItemSprite|Wheat Seeds}} (~15.67%) ''or''<br>7 {{ItemSprite|Wheat Seeds}} (~3.48%)
|}
=== Natural generation ===
[[Village]] farm plots have a chance of being wheat crops. The exact chance depends on the style of the village:
{| class="wikitable"
! Village style !! Chance
|-
| {{EnvSprite|savanna-village}} Savanna || 80%
|-
| {{EnvSprite|desert-village}} Desert || 70%
|-
| {{EnvSprite|taiga-village}} Taiga || 60%
|-
| {{EnvSprite|plains-village}} Plains || 50%
|-
| {{EnvSprite|snowy-village}} Snowy || 20%
|}
=== Chest loot ===
{{LootChestItem|wheat-seeds}}
=== Trading ===
[[Wandering trader]]s sell wheat seeds for an [[emerald]].
=== Villager gifts ===
{{exclusive|java|section=1}}
Nitwit and unemployed [[villager]]s throw wheat seeds at players under the [[Hero of the Village]] effect.
== Usage ==
=== Crop ===
{{main|Tutorials/Crop farming|title1=Crop Farming}}
[[File:Crop states.png|thumb|Different stages of crop growth.]]
Wheat seeds can be placed on [[farmland]] by right-clicking, where they grow through eight stages. When left alone, wheat seeds planted on farmland grow to become wheat crops, which can be harvested by the player. Planted seeds require a light level of 9 or greater to continue growing. If the light level is 7 or below, the crops instantly un-plant themselves ("pop off"). It is not possible to plant seeds if the light level is too low.
Crops grow faster if the farmland they are planted in is [[Farmland#Hydration|hydrated]]. Using [[bone meal]] on crops also increases the speed of growth by randomly increasing their growth stage by 2 to 5.
Breaking the final stage produces 1 to 4 wheat seeds (or more with Fortune) and 1 [[wheat]]. If they are harvested early, they drop 1 seed without any wheat. Crops break if pushed by a [[piston]] or if their supporting farmland breaks or turns to dirt (i.e. by being trampled), dropping their usual drops.
=== Breeding ===
Like other seeds, wheat seeds can be used to breed [[chicken]]s and reduce the remaining growth duration of baby chickens by 10%. Chickens also follow a player holding wheat seeds.
=== Taming ===
Like other seeds, wheat seeds can be used to tame [[parrot]]s.
=== Composting ===
Placing wheat seeds into a [[composter]] has a 30% chance of raising the compost level by 1. A stack of wheat seeds yields an average of 2.74 [[bonemeal]].
== Sounds ==
{{Sound table/Block/Crop}}
== Data values ==
=== ID ===
{{edition|java}}:
{{ID table
|edition=java
|showblocktags=y
|showforms=y
|generatetranslationkeys=y
|displayname=Wheat Crops
|spritetype=block
|nameid=wheat
|blocktags=bee_growables, crops
|form=block}}
{{ID table
|displayname=Wheat Seeds
|spritetype=item
|nameid=wheat_seeds
|form=item
|foot=1}}
{{edition|bedrock}}:
{{ID table
|edition=bedrock
|shownumericids=y
|showforms=y
|generatetranslationkeys=y
|displayname=Wheat
|spritetype=block
|nameid=wheat
|id=59
|form=block
|itemform=item.wheat}}
{{ID table
|displayname=Seeds
|spritetype=item
|nameid=wheat_seeds
|id=291
|form=item
|foot=1}}
=== Block states ===
{{see also|Block states}}
{{/BS}}
== Advancements ==
{{load advancements|A Seedy Place}}
== History ==
''For a more in-depth breakdown of changes to wheat textures and models, including a set of renders for each state, see [[/Asset history]]''
{{History|java classic}}
{{History||May 21, 2009|link=wordofnotch:110762705|[[Notch]] shows interest in adding [[crops]] on [[farmland]].}}
{{History|java indev}}
{{History||Minecraft Indev|snap=20100206|link=Minecraft Indev|slink=Java Edition Indev 20100206|[[File:Wheat Seeds JE1 BE1.png|32px]] Added seeds.
|[[File:Wheat Age 0 JE1.png|32px]] [[File:Wheat Age 1 JE1.png|32px]] [[File:Wheat Age 2 JE1.png|32px]] [[File:Wheat Age 3 JE1.png|32px]] [[File:Wheat Age 4 JE1.png|32px]] [[File:Wheat Age 5 JE1.png|32px]] [[File:Wheat Age 6 JE1.png|32px]] [[File:Wheat Age 7 JE1.png|32px]] Added crops.
|Seeds can be planted on farmland.
|Seeds have a chance of [[drop]]ping while using a [[hoe]] on a [[grass block]].}}
{{History|java beta}}
{{History||1.5|Crops destroyed by [[water]] now drop both seeds and wheat. Prior to this update, they dropped only wheat when destroyed by water.}}
{{History||1.6|snap=Test Build 3|Seeds can no longer be tilled from a grass block.
|Seeds are now found by destroying [[tall grass]] or by harvesting fully-grown crops.}}
{{History||1.8|snap=Pre-release|Crops can now be found in [[village]] farms.}}
{{History|java}}
{{History||1.4.2|snap=12w36a|[[Chicken]]s now use seeds instead of wheat to [[breeding|breed]].}}
{{History||1.8|snap=14w02a|[[Villager]]s can now harvest and plant seeds to grow crops.}}
{{History|||snap=14w06a|[[File:Wheat Age 0 JE2.png|32px]] [[File:Wheat Age 1 JE2.png|32px]] [[File:Wheat Age 2 JE2.png|32px]] [[File:Wheat Age 3 JE2.png|32px]] [[File:Wheat Age 4 JE2.png|32px]] [[File:Wheat Age 5 JE2.png|32px]] [[File:Wheat Age 6 JE2.png|32px]] [[File:Wheat Age 7 JE2.png|32px]] Crops are now a pixel higher - previously they were offset one pixel down as to match farmland. This is likely an accidental result of model conversion.}}
{{History|||snap=14w10a|[[File:Missing Model JE2.png|32px]] [[File:Missing Model JE2.png|32px]] [[File:Missing Model JE2.png|32px]] [[File:Missing Model JE2.png|32px]] [[File:Missing Model JE2.png|32px]] [[File:Missing Model JE2.png|32px]] [[File:Missing Model JE2.png|32px]] [[File:Missing Model JE2.png|32px]] Crops of all stages [[Missing model|no longer have a model]].}}
{{History|||snap=14w10b|[[File:Wheat Age 0 JE4.png|32px]] [[File:Wheat Age 1 JE4.png|32px]] [[File:Wheat Age 2 JE4.png|32px]] [[File:Wheat Age 3 JE4.png|32px]] [[File:Wheat Age 4 JE4.png|32px]] [[File:Wheat Age 5 JE4.png|32px]] [[File:Wheat Age 6 JE4.png|32px]] [[File:Wheat Age 7 JE4.png|32px]] Crops now have models again.<ref>{{bug|MC-50232|||Fixed}}</ref> In addition, they are now offset downwards by one pixel once more.<ref>{{bug|MC-50155|||Fixed}}</ref>}}
{{History|||snap=14w25a|[[File:Wheat Age 0 JE5.png|32px]] [[File:Wheat Age 1 JE5.png|32px]] [[File:Wheat Age 2 JE5.png|32px]] [[File:Wheat Age 3 JE5.png|32px]] [[File:Wheat Age 4 JE5.png|32px]] [[File:Wheat Age 5 JE5.png|32px]] [[File:Wheat Age 6 JE5.png|32px]] [[File:Wheat Age 7 JE5.png|32px]] Crops model are now shaded.}}
{{History|||snap=14w27a|[[File:Wheat Age 0 JE6.png|32px]] [[File:Wheat Age 1 JE6.png|32px]] [[File:Wheat Age 2 JE6.png|32px]] [[File:Wheat Age 3 JE6.png|32px]] [[File:Wheat Age 4 JE6.png|32px]] [[File:Wheat Age 5 JE6.png|32px]] [[File:Wheat Age 6 JE6.png|32px]] [[File:Wheat Age 7 JE6.png|32px]] Crops are no longer shaded.}}
{{History||1.9|snap=15w38a|The drop chances of crops has been slightly improved from an average of {{frac|1|3|5}} per [[crop]] harvested to {{frac|1|5|7}}.}}
{{History||1.11|snap=16w39a|Crops now generate inside [[woodland mansion]]s.}}
{{History||1.12|snap=17w18b|Placing a wheat seeds in farmland now gives the player the "A Seedy Place" [[advancement]].}}
{{History|||snap=pre3|Seeds are now used to tame [[parrot]]s.}}
{{History||1.13|snap=17w47a|Prior to [[1.13/Flattening|''The Flattening'']], this block's numeral ID was 59, and the item's was 295.}}
{{History|||snap=18w14a|Seeds no longer become destroyed when an [[entity]] jumps on them if they have the [[Slow Falling]] status effect.}}
{{History|||snap=18w20a|"Seeds" have been renamed to "Wheat Seeds".
|"Crops" have been renamed to "Wheat Crops".}}
{{History||1.14|snap=18w43a|[[File:Wheat Age 0 JE7.png|32px]] [[File:Wheat Age 1 JE7.png|32px]] [[File:Wheat Age 2 JE7.png|32px]] [[File:Wheat Age 3 JE7.png|32px]] [[File:Wheat Age 4 JE7.png|32px]] [[File:Wheat Age 5 JE7.png|32px]] [[File:Wheat Age 6 JE7.png|32px]] [[File:Wheat Age 7 JE7.png|32px]] The textures of wheat crops have been changed.
|The drop rate of fully grown wheat seeds has been changed from 0-3 to 1-4.}}
{{History|||snap=18w44a|[[File:Wheat Age 6 JE8.png|32px]] [[File:Wheat Age 7 JE8.png|32px]] The textures of wheat crops of age 6 and 7 have been changed again.}}
{{History|||snap=18w47a|[[File:Wheat Age 0 JE8.png|32px]] [[File:Wheat Age 1 JE8.png|32px]] [[File:Wheat Age 2 JE8.png|32px]] [[File:Wheat Age 3 JE8.png|32px]] [[File:Wheat Age 4 JE8.png|32px]] [[File:Wheat Age 5 JE8.png|32px]] [[File:Wheat Age 6 JE9.png|32px]] [[File:Wheat Age 7 JE9.png|32px]] The textures of wheat crops have been changed, once again.}}
{{History|||snap=18w48a|Wheat seeds can now be found in [[chest]]s in [[village]] fisher cottages.}}
{{History|||snap=18w49a|Wheat seeds can now be found in chests in [[savanna]] village houses.}}
{{History|||snap=19w03a|Placement and breaking [[sound]]s have been added to wheat crops.
|Placing wheat seeds into the new [[composter]] has a 10% chance of raising the compost level by 1.}}
{{History|||snap=19w05a|Wheat seeds now have a 30% chance of increasing the compost level in a composter by 1.
|Added [[Wandering Trader|wandering trader]]s, which sell wheat seeds.}}
{{History|||snap=19w13a|Nitwit and unemployed villagers now give wheat seeds to players under the [[Hero of the Village]] effect.}}
{{History||1.15|snap=19w34a|[[Bee]]s can now pollinate wheat crops.}}
{{History||1.17|snap=21w13a|[[File:Wheat Age 0.png|32px]] [[File:Wheat Age 1.png|32px]] [[File:Wheat Age 2.png|32px]] [[File:Wheat Age 3.png|32px]] [[File:Wheat Age 4.png|32px]] [[File:Wheat Age 5.png|32px]] [[File:Wheat Age 6.png|32px]] [[File:Wheat Age 7.png|32px]] The "crop" template model has changed such that pixels appear in the same physical positions on opposite sides of texture planes.<ref>{{bug|MC-199242|||Fixed}}</ref>}}
{{History||1.20|snap=23w12a|Wheat seeds can now be found in [[suspicious gravel]] and [[suspicious sand]] in [[trail ruins]].}}
{{History|||snap=23w16a|Wheat seeds no longer generates in [[suspicious sand]] in [[trail ruins]].|Due to the split of the archaeological loot tables for suspicious gravel within [[trail ruins]], wheat seeds are now common loot.}}
{{History|pocket alpha}}
{{History||v0.4.0|[[File:Wheat Seeds JE1 BE1.png|32px]] Added seeds.
|[[File:Wheat Age 0 JE6 BE1.png|32px]] [[File:Wheat Age 1 JE6 BE1.png|32px]] [[File:Wheat Age 2 JE6 BE1.png|32px]] [[File:Wheat Age 3 JE6 BE1.png|32px]] [[File:Wheat Age 4 JE6 BE1.png|32px]] [[File:Wheat Age 5 JE6 BE1.png|32px]] [[File:Wheat Age 6 JE6 BE1.png|32px]] [[File:Wheat Age 7 JE6 BE1.png|32px]] Added crops.
|Seeds can be obtained by tilling [[grass block]]s.}}
{{History||v0.9.0|snap=build 1|[[File:Wheat Age 0 BE2.png|32px]] [[File:Wheat Age 1 BE2.png|32px]] [[File:Wheat Age 2 BE2.png|32px]] [[File:Wheat Age 3 BE2.png|32px]] [[File:Wheat Age 4 BE2.png|32px]] [[File:Wheat Age 5 BE2.png|32px]] [[File:Wheat Age 6 BE2.png|32px]] [[File:Wheat Age 7 BE2.png|32px]] Faces now renders from both sides, resulting in z-fighting.
|Seeds can now be used to [[breeding|breed]] [[chicken]].
|Crops can now be found in [[village]] farms.}}
{{History|||snap=build 2|[[File:Wheat Age 0 BE3.png|32px]] [[File:Wheat Age 1 BE3.png|32px]] [[File:Wheat Age 2 BE3.png|32px]] [[File:Wheat Age 3 BE3.png|32px]] [[File:Wheat Age 4 BE3.png|32px]] [[File:Wheat Age 5 BE3.png|32px]] [[File:Wheat Age 6 BE3.png|32px]] [[File:Wheat Age 7 BE3.png|32px]] Removed some faces to fix z-fighting.}}
{{History||v0.12.1|snap=build 1|Farmer [[villager]]s can now pick up, harvest and plant seeds to grow [[wheat]].}}
{{History|||snap=build 2|Crops now always drop seeds when mined, regardless of growth stage.}}
{{History|||snap=build 8|Seeds can no longer be obtained by tilling [[grass block]]s.}}
{{History||v0.16.2|Seeds can now be found in [[chest]]s inside the large house of [[snowy tundra]] and [[snowy taiga]] [[village]]s.}}
{{History|pocket}}
{{History||1.1.0|snap=alpha 1.1.0.0|Crops now generate inside [[woodland mansion]]s.}}
{{History|bedrock}}
{{History||1.2.0|snap=beta 1.2.0.2|Seeds are now used to tame [[parrot]]s.}}
{{History||1.6.0|snap=beta 1.6.0.1|Seeds no longer become destroyed when an [[entity]] jumps on them if they have the [[Slow Falling]] status effect.}}
{{History||1.10.0|snap=beta 1.10.0.3|Seeds can now be bought from [[wandering trader]]s.
|Placement and breaking [[sound]]s have been added to crops.
|[[File:Wheat Age 0 BE.png|32px]] [[File:Wheat Age 1 BE.png|32px]] [[File:Wheat Age 2 BE.png|32px]] [[File:Wheat Age 3 BE.png|32px]] [[File:Wheat Age 4 BE.png|32px]] [[File:Wheat Age 5 BE.png|32px]] [[File:Wheat Age 6 BE.png|32px]] [[File:Wheat Age 7 BE.png|32px]] The textures of crops have been changed.}}
{{History||1.11.0|snap=beta 1.11.0.1|Seeds can now be found in [[savanna]] [[village]] house [[chest]]s.
|Seeds can now be used to fill up [[composter]]s.}}
{{History||1.14.0|snap=beta 1.14.0.1|[[Bee]]s can now pollinate crops.}}
{{History|console}}
{{History||xbox=TU1|xbone=CU1|ps=1.0|wiiu=Patch 1|switch=1.0.1|[[File:Wheat Seeds JE1 BE1.png|32px]] Added seeds.
|[[File:Wheat Age 0 JE6 BE1.png|32px]] [[File:Wheat Age 1 JE6 BE1.png|32px]] [[File:Wheat Age 2 JE6 BE1.png|32px]] [[File:Wheat Age 3 JE6 BE1.png|32px]] [[File:Wheat Age 4 JE6 BE1.png|32px]] [[File:Wheat Age 5 JE6 BE1.png|32px]] [[File:Wheat Age 6 JE6 BE1.png|32px]] [[File:Wheat Age 7 JE6 BE1.png|32px]] Added crops.}}
{{History||xbox=none|xbone=none|ps=1.90|wiiu=none|switch=none|[[File:Wheat Age 0 JE8.png|32px]] [[File:Wheat Age 1 JE8.png|32px]] [[File:Wheat Age 2 JE8.png|32px]] [[File:Wheat Age 3 JE8.png|32px]] [[File:Wheat Age 4 JE8.png|32px]] [[File:Wheat Age 5 JE8.png|32px]] [[File:Wheat Age 6 JE9.png|32px]] [[File:Wheat Age 7 JE9.png|32px]] The textures of crops have been changed.}}
{{History|New 3DS}}
{{History||0.1.0|[[File:Wheat Seeds JE1 BE1.png|32px]] Added seeds.
|[[File:Wheat Age 0 JE6 BE1.png|32px]] [[File:Wheat Age 1 JE6 BE1.png|32px]] [[File:Wheat Age 2 JE6 BE1.png|32px]] [[File:Wheat Age 3 JE6 BE1.png|32px]] [[File:Wheat Age 4 JE6 BE1.png|32px]] [[File:Wheat Age 5 JE6 BE1.png|32px]] [[File:Wheat Age 6 JE6 BE1.png|32px]] [[File:Wheat Age 7 JE6 BE1.png|32px]] Added crops.}}
{{History|foot}}
=== Wheat "item" ===
{{:Technical blocks/Crops}}
== Issues ==
{{issue list}}
== Gallery ==
===Renders===
;Java Edition
<gallery>
Wheat Age 0.png|
Wheat Age 1.png|
Wheat Age 2.png|
Wheat Age 3.png|
Wheat Age 4.png|
Wheat Age 5.png|
Wheat Age 6.png|
Wheat Age 7.png|
</gallery>
;Bedrock Edition
<gallery>
Wheat Age 0 BE.png|
Wheat Age 1 BE.png|
Wheat Age 2 BE.png|
Wheat Age 3 BE.png|
Wheat Age 4 BE.png|
Wheat Age 5 BE.png|
Wheat Age 6 BE.png|
Wheat Age 7 BE.png|
</gallery>
===Screenshots===
<gallery>
AllSeeds.png|All the seeds that exist.
Wheat.jpg|Wheat crops in Pocket Edition.
Village Wheat Beetroot Farm.png| Wheat generated in a village.
</gallery>
== References ==
{{reflist}}
{{Blocks|vegetation}}
{{Items}}
[[Category:Plants]]
[[Category:Food]]
[[Category:Non-solid blocks]]
[[Category:Generated structure blocks]]
[[de:Weizensamen]]
[[es:Semillas de trigo]]
[[fr:Graines de blé]]
[[hu:Búzamagok]]
[[it:Semi di grano]]
[[ja:小麦の種]]
[[ko:밀 씨앗]]
[[nl:Zaden]]
[[pl:Nasiona zboża]]
[[pt:Sementes de trigo]]
[[ru:Семена пшеницы]]
[[zh:小麦种子]]</li></ul></nowiki> | beta 1.11.0.1 | Items can now be smelted using a campfire. | |||||||||||||||||||||||||||||||||
| Signs can now be used as fuel. | |||||||||||||||||||||||||||||||||||
| Ores can now be smelted using a blast furnace and food using a smoker. | |||||||||||||||||||||||||||||||||||
| New Nintendo 3DS Edition | |||||||||||||||||||||||||||||||||||
1.1.06{{Extension DPL}}<ul><li>[[Raw Mutton|Raw Mutton]]<br/>{{Distinguish|Cooked Mutton}}
{{Item
| title = Raw Mutton
| image = Raw Mutton.png
| heals = {{hunger|2}}
| renewable = Yes
| stackable = Yes (64)
}}
'''Raw mutton''' is a [[food]] item dropped by [[sheep]] when killed.
== Obtaining ==
=== Mob loot ===
An adult [[sheep]] drops 1–2 raw mutton when killed. The maximum amount is increased by 1 per level of [[Looting]], for a maximum of 1–5 with Looting III. If killed while on fire, a sheep drops [[cooked mutton]] instead.
=== Chest loot ===
{{LootChestItem|raw-mutton}}
== Usage ==
=== Food ===
To eat raw mutton, press and hold {{control|use}} while it is selected in the [[hotbar]]. Eating one restores {{hunger|2}} [[hunger]] and 1.2 [[Hunger#Mechanics|saturation]].
=== Smelting ingredient ===
{{Smelting
|showname=1
|Raw Mutton
|Cooked Mutton
|0.35
}}
=== Wolves ===
Raw mutton can be used to [[breed]] and heal tamed [[wolves]], lead them around, and make baby tamed wolves grow up faster by 10% of the remaining time.
=== Trading ===
Journeyman-level butcher [[villager]]s have a 50% chance to buy 7 raw mutton for an [[emerald]] as part of their trades.{{only|bedrock}}
Journeyman-level butcher villagers always offer to buy 7 raw mutton for an emerald.{{only|java}}
==Sounds==
{{Sound table/Entity/Food}}
== Data values ==
=== ID ===
{{edition|java}}:
{{ID table
|edition=java
|showforms=y
|generatetranslationkeys=y
|displayname=Raw Mutton
|spritetype=item
|nameid=mutton
|form=item
|foot=1}}
{{edition|bedrock}}:
{{ID table
|edition=bedrock
|showaliasids=y
|shownumericids=y
|showforms=y
|notshowbeitemforms=y
|generatetranslationkeys=y
|displayname=Raw Mutton
|spritetype=item
|nameid=mutton
|aliasid=muttonraw
|id=550
|form=item
|translationkey=item.muttonRaw.name
|foot=1}}
== Advancements ==
{{load advancements|Husbandry;A Balanced Diet}}
== Video ==
<div style="text-align:center">{{yt|PXlW-sZygTs}}</div>
== History ==
{{History||September 23, 2011|link={{tweet|jeb|117313469900009472}}|Mutton is mentioned by [[Jeb]].}}
{{History||September 11, 2012|link={{tweet|jeb|245503714167750656}}|Jeb again mentions the possibility of mutton as well as calamari being added into the game.}}
{{History|java}}
{{History||June 30, 2014|link=https://twitter.com/TheMogMiner/status/483636993780232192|[[Ryan Holtz]] tweets images of raw mutton and some other new items.}}
{{History||1.8|snap=14w27a|[[File:Raw Mutton JE1.png|32px]] Added raw mutton.}}
{{History||1.8|snap=14w33b|[[File:Raw Mutton JE2 BE1.png|32px]] The texture of raw mutton has been changed. The new texture was created by [[wikipedia:Reddit|Reddit]] user [http://www.reddit.com/u/zeldahuman zeldahuman].<ref>{{reddit|2bjzes/a_reminder_of_the_blocks_and_items_added_in_18_so|cj69zie|context=3}}</ref><ref>{{reddit|2c5f35/minecraft_snapshot_14w31a_has_been_released|cjct7gb}}</ref>}}
{{History||1.13|snap=17w47a|Prior to [[1.13/Flattening|''The Flattening'']], this [[item]]'s numeral ID was 423.}}
{{History||1.14|snap=18w43a|[[File:Raw Mutton JE3 BE2.png|32px]] The texture of raw mutton has been changed.}}
{{History|||snap=18w49a|Raw mutton can now be found in [[chest]]s in [[village]] butcher shops.}}
{{History|||snap=19w11a|Butcher villagers now [[trading|buy]] raw mutton.}}
{{History|pocket alpha}}
{{History||v0.15.0|snap=build 1|[[File:Raw Mutton JE2 BE1.png|32px]] Added raw mutton.}}
{{History|bedrock}}
{{History||1.10.0|snap=beta 1.10.0.3|[[File:Raw Mutton JE3 BE2.png|32px]] The texture of raw mutton has been changed.}}
{{History||1.11.0|snap=beta 1.11.0.1|Raw mutton can now be found in [[village]] butcher [[chest]]s.}}
{{History|||snap=beta 1.11.0.4|Raw mutton can now be [[trading|sold]] to butcher [[villager]]s.}}
{{History||1.16.0|snap=beta 1.16.0.57|Trading has been changed; journeyman butcher villagers now buy 7 raw mutton for an emerald instead of 8.}}
{{History||1.16.100|snap=beta 1.16.100.56|The ID of raw mutton has been changed from <code>muttonraw</code> to <code>mutton</code>.}}
{{History||1.16.210|snap=beta 1.16.210.51|Raw mutton is [[drops|dropped]] by [[goats]].}}
{{History||1.17.0|snap=beta 1.17.0.52|Goats no longer drop raw mutton.}}
{{History|console}}
{{History||xbox=TU31|xbone=CU19|ps=1.22|wiiu=Patch 3|[[File:Raw Mutton JE2 BE1.png|32px]] Added raw mutton.}}
{{History|PS4}}
{{History||1.90|[[File:Raw Mutton JE3 BE2.png|32px]] The texture of raw mutton has been changed.}}
{{History|3ds}}
{{History||0.1.0|[[File:Raw Mutton JE2 BE1.png|32px]] Added raw mutton.}}
{{History|foot}}
== Issues ==
{{issue list}}
== Gallery ==
<gallery>
Rabbit Items 3 Ryan Holtz.png|First image of the item by [[Ryan Holtz]].
Pocket Edition Mutton.jpg|First image of the item in ''Bedrock Edition'' by [[Jason Major]].
</gallery>
== References ==
{{reflist}}
{{items}}
[[de:Rohes Hammelfleisch]]
[[es:Cordero crudo]]
[[fr:Mouton cru]]
[[ja:生の羊肉]]
[[ko:익히지 않은 양고기]]
[[nl:Rauw schapenvlees]]
[[pl:Surowa baranina]]
[[pt:Carneiro cru]]
[[ru:Сырая баранина]]
[[zh:生羊肉]]
[[Category:Food]]
[[Category:Renewable resources]]</li><li>[[Le Tricolore|Le Tricolore]]<br/>{{Exclusive|Java}}
{{Joke feature}}
{{Item
| image =
| renewable = Yes
| stackable = Yes (64)
}}
'''Le Tricolore''' (French for ''The Tricolour'') is a joke item from [[Java Edition 23w13a_or_b]].
== Obtaining ==
One le tricolore and one [[la baguette]] is given to all players when [[French mode]] gets activated. Deactivating the mode will remove le tricolore from the player's inventory (but not la baguette; [[container]]s such as [[chest]]s are not affected).
Le Tricolore is not available in the creative inventory, but can be obtained by using the {{cmd|give}} command.
== Data values ==
=== ID ===
{{ID table
|showforms=y
|generatetranslationkeys=java
|displayname=Le Tricolore
|spritetype=item
|nameid=le_tricolore
|form=item
|foot=1}}
== History ==
{{History|java}}
{{History||23w13a or b|[[File:Le Tricolore.png|32px]] Added Le Tricolore.}}
{{History|foot}}
{{Items}}
{{Jokes}}
[[Category:Joke items]]
[[ja:Le Tricolore]]
[[pt:Le Tricolore]]</li></ul> | Smelting various ores in furnaces now rewards players with experience points. | ||||||||||||||||||||||||||||||||||
Trivia
- A wooden tool burns the same regardless of its remaining durability. A used-up tool is just as effective as fuel as a new tool.
- "Smelting" is a broad term in the context of Minecraft while in the real world, smelting has a more precise definition.[2]
See also
References
- ↑ "Crafting and Mining in Minecraft" – Nizzotch on YouTube, January 29, 2010
- ↑ "Block of the Week: Furnace" – Minecraft.net, September 15, 2017