Mcpe4the108 (talk | contribs) m (→History) |
(→Post-generation: My bad I didn't know it is Bedrock-exclusive. Here are some format fixes as apology.) |
||
| (7 intermediate revisions by 5 users not shown) | |||
| Line 19: | Line 19: | ||
== Obtaining == |
== Obtaining == |
||
| − | + | Cave vines can be found in [[lush caves]], <!--which can only generate using the [[buffet]] or custom [[world type]] {{in|je}}, or if the Caves & Cliffs [[experimental gameplay]] toggle is enabled {{in|be}}. Otherwise, the only way they are currently found naturally is in [[Minecart with Chest|chest minecarts]] in [[mineshaft]]s.-->hanging from cave ceilings. |
|
=== Post-generation === |
=== Post-generation === |
||
| − | Glow berries can be collected from a cave vine by {{control|using}} or {{control|breaking}} the vine. This yields one glow berry when the vine is bearing them and nothing when it is not. A cave vine also breaks if [[water]] runs over its location or if a [[piston]] extends or pushes a block into its location. |
+ | Glow berries can be collected from a cave vine by {{control|using}} or {{control|breaking}} the vine. This yields one glow berry when the vine is bearing them and nothing when it is not. A cave vine also breaks if [[water]] runs over its location or if a [[piston]] extends or pushes a block into its location. |
| + | {{IN|bedrock}}, using a tool with [[Silk Touch]] on cave vines always yields a glow berry, even if the vine appears empty. |
||
| − | Using [[bone meal]] on an empty cave vine causes the cave vine to produce berries, which can be harvested by using or breaking the vine. |
||
[[Fortune]] has no effect on the amount of glow berries dropped. |
[[Fortune]] has no effect on the amount of glow berries dropped. |
||
| Line 39: | Line 39: | ||
{{control|Using}} [[bone meal]] on a cave vine produces glow berries if the vine was not bearing any. |
{{control|Using}} [[bone meal]] on a cave vine produces glow berries if the vine was not bearing any. |
||
| + | |||
| + | Cave vines will stop growing if [[shears]] are used on the tip. |
||
=== Food === |
=== Food === |
||
| Line 155: | Line 157: | ||
|Can now be climbed.}} |
|Can now be climbed.}} |
||
{{History|||snap=21w13a|Glow berries now generate as loot in [[mineshaft]] [[Minecart with Chest|chest minecarts]].}} |
{{History|||snap=21w13a|Glow berries now generate as loot in [[mineshaft]] [[Minecart with Chest|chest minecarts]].}} |
||
| + | {{History||1.18|snap=Experimental Snapshot 1|With the implementation of cave biomes including lush caves, caves vines can now generate in normal worlds.}} |
||
| ⚫ | |||
| − | {{History|| |
+ | {{History|||snap=21w37a|Cave vines will now stop growing if [[shears]] are used on the tip.}} |
{{History|||snap=21w41a|{{animate|Cave Vines Plant JE2.png; Cave Vines Plant (berries) JE2.png|32px}} Changed cave vines plant texture.}} |
{{History|||snap=21w41a|{{animate|Cave Vines Plant JE2.png; Cave Vines Plant (berries) JE2.png|32px}} Changed cave vines plant texture.}} |
||
| Line 163: | Line 165: | ||
|{{animate|Cave Vines Plant JE1 BE1.png; Cave Vines Plant (berries) JE1 BE1.png|32px}} {{animate|Cave Vines (head) JE1 BE1.png; Cave Vines (berries) JE1 BE1.png|32px}} Added cave vines.}} |
|{{animate|Cave Vines Plant JE1 BE1.png; Cave Vines Plant (berries) JE1 BE1.png|32px}} {{animate|Cave Vines (head) JE1 BE1.png; Cave Vines (berries) JE1 BE1.png|32px}} Added cave vines.}} |
||
{{History||1.17.0|snap=beta 1.16.230.54|Glow Berries now generate as loot in [[mineshaft]] [[Minecart with Chest|chest minecarts]].}} |
{{History||1.17.0|snap=beta 1.16.230.54|Glow Berries now generate as loot in [[mineshaft]] [[Minecart with Chest|chest minecarts]].}} |
||
| − | {{History|||snap=beta 1.17.0.52|Glow Berries are now |
+ | {{History|||snap=beta 1.17.0.52|Glow Berries are now available without enabling [[experimental gameplay]].}} |
{{History||1.17.20|snap=beta 1.17.20.20|Cave Vines can now be pollinated by [[bee]]s.}} |
{{History||1.17.20|snap=beta 1.17.20.20|Cave Vines can now be pollinated by [[bee]]s.}} |
||
| ⚫ | |||
| + | {{History||1.18.10|snap=beta 1.18.10.20|{{animate|Cave Vines Plant JE2.png; Cave Vines Plant (berries) JE2.png|32px}} Changed cave vines plant texture.}} |
||
{{History|foot}} |
{{History|foot}} |
||
Revision as of 06:48, 4 December 2021
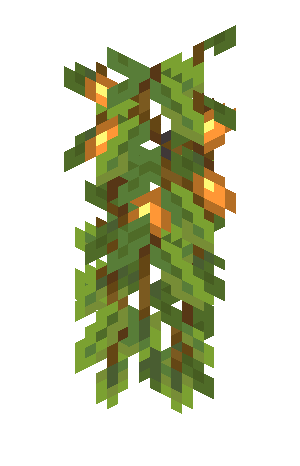
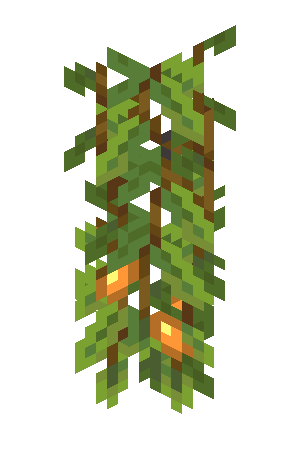
Glow berries are a food item that is collected from cave vines and can be used to plant them.
Cave vines are a plant used to grow glow berries.
Obtaining
Cave vines can be found in lush caves, hanging from cave ceilings.
Post-generation
Glow berries can be collected from a cave vine by using or breaking the vine. This yields one glow berry when the vine is bearing them and nothing when it is not. A cave vine also breaks if water runs over its location or if a piston extends or pushes a block into its location.
In Bedrock Edition, using a tool with Silk Touch on cave vines always yields a glow berry, even if the vine appears empty.
Fortune has no effect on the amount of glow berries dropped.
Chest loot
| Item | Structure | Container | Quantity | Chance |
|---|---|---|---|---|
| Java Edition | ||||
| Glow Berries | Mineshaft | Chest | 3–6 | 38.7% |
| Ancient City | Chest | 1–15 | 23.2% | |
| Bedrock Edition | ||||
| Glow Berries | Mineshaft | Chest | 3–6 | 38.7% |
| Ancient City | Chest | 1–15 | 23.2% | |
Usage
Placement
Glow berries can be placed on and grown from the bottom of a block. They have no specific lighting requirements. When placed, they can be of any length.
Growth
Placing glow berries on the bottom of a block creates a cave vine that grows downward one block at a time as long as air is beneath it or its maximum height (2 to 26 blocks) is not reached. Each newly-grown cave vine block has a 1 in 9 chance of bearing glow berries. Only this tip can ever naturally grow them.[Java Edition only][more information needed]
Using bone meal on a cave vine produces glow berries if the vine was not bearing any.
Cave vines will stop growing if shears are used on the tip.
Food
To eat glow berries, press and hold use while it is selected in the hotbar. Eating one restores 2 (![]() ) hunger and 0.4 hunger saturation points, like sweet berries.
) hunger and 0.4 hunger saturation points, like sweet berries.
Light
When bearing glow berries, cave vines give off a light level of 14.
Composting
Placing glow berries into a composter by using them on it has a 30% chance of raising the compost level by 1.
Breeding
Glow berries can be fed to foxes to breed them. Foxes are similar to cats when being fed as a wild animal; a sudden movement by the player may cause the fox to flee even if the player holds glow berries. The resulting baby fox trusts the player and does not flee.
Glow berries can be used on baby foxes to reduce the time until they grow by 10%.
Sounds
Glow berries
| Sound | Subtitles | Source | Description | Resource location | Translation key | Volume | Pitch | Attenuation distance |
|---|---|---|---|---|---|---|---|---|
| Eating | Players | While a player is eating something | entity | subtitles | varies [sound 1] | 0.8-1.2 | 16 | |
| Eating | Friendly Creatures | When a player finishes eating something | entity | subtitles | 1.0 | 0.6-1.4 | 16 | |
| Burp | Players | When a player finishes eating something | entity | subtitles | 0.5 | 0.9-1.0 | 16 |
- ↑ Can be 0.5, 1.0, or 1.5
| Sound | Source | Description | Resource location | Volume | Pitch |
|---|---|---|---|---|---|
| Players | While a player is eating something | random | 0.5-1.1 | 0.8-1.2 | |
| Players | When a player finishes eating something | random | 0.5 | 0.9-1.0 |
Cave vines
Generic
| Sound | Subtitles | Source | Description | Resource location | Translation key | Volume | Pitch | Attenuation distance |
|---|---|---|---|---|---|---|---|---|
| Block broken | Blocks | Once the block has broken | block | subtitles | 1.0 | 0.8 | 16 | |
| Block placed | Blocks | When the block is placed | block | subtitles | 1.0 | 0.8 | 16 | |
| Block breaking | Blocks | While the block is in the process of being broken | block | subtitles | 0.25 | 0.5 | 16 | |
| None[sound 1] | Entity-Dependent | Falling on the block with fall damage | block | None[sound 1] | 0.5 | 0.75 | 16 | |
| Footsteps | Entity-Dependent | Walking on the block | block | subtitles | 0.15 | 1.0 | 16 |
| Sound | Source | Description | Resource location | Volume | Pitch |
|---|---|---|---|---|---|
| Blocks | Once the block has broken | dig | 1.0 | 0.8-1.0 | |
| Blocks | When the block is placed | dig | 1.0 | 0.8-1.0 | |
| Blocks | While the block is in the process of being broken | hit | 0.3 | 0.5 | |
| Players | Falling on the block with fall damage | fall | 0.4 | 1.0 | |
| Players | Walking on the block | step | 0.3 | 1.0 | |
| Players | Jumping from the block | jump | 0.12 | 1.0 | |
| Players | Falling on the block without fall damage | land | 0.22 | 1.0 |
Unique
| Sound | Subtitles | Source | Description | Resource location | Translation key | Volume | Pitch | Attenuation distance |
|---|---|---|---|---|---|---|---|---|
| Berries pop | Blocks | ? | block | subtitles | ? | ? | 16 |
Data values
ID
| Name | Identifier | Form | Block tags (JE) | Item tags (JE) | Translation key |
|---|---|---|---|---|---|
| Cave Vines | cave_vines | Block | cave_vineslush_plants_replaceable | — | block.minecraft.cave_vines |
| Cave Vines Plant | cave_vines_plant | Block | cave_vineslush_plants_replaceable | — | block.minecraft.cave_vines_plant |
| Glow Berries | glow_berries | Item | — | fox_food | item.minecraft.glow_berries |
| Name | Identifier | Numeric ID | Form | Translation key |
|---|---|---|---|---|
| Cave Vines | cave_vines | 577 | Block & Giveable Item[i 1] | tile.cave_vines.name |
| Cave Vines Body With Berries | cave_vines_body_with_berries | 630 | Block & Giveable Item[i 1] | tile.cave_vines_body_with_berries.name |
| Cave Vines Head With Berries | cave_vines_head_with_berries | 631 | Block & Giveable Item[i 1] | tile.cave_vines_head_with_berries.name |
| Glow Berries | glow_berries | ? | Item | item.glow_berries.name |
Block states
Java Edition:
Cave Vines:
| Name | Default value | Allowed values | Description |
|---|---|---|---|
| berries | false | falsetrue | Whether this cave vine has berries. |
| age | 0 | 012345678910111213141516171819202122232425 | How old this cave vine is. |
Cave Vines Plant:
| Name | Default value | Allowed values | Description |
|---|---|---|---|
| berries | false | falsetrue | Whether this cave vine has berries. |
Bedrock Edition:
Cave Vines, Cave Vines Body With Berries, Cave Vines Head With Berries:
| Name | Metadata Bits | Default value | Allowed values | Values for Metadata Bits |
Description |
|---|---|---|---|---|---|
| growing_plant_age | Not Supported | 0 | 012345678910111213141516171819202122232425 | Unsupported | How old this cave vine is. |
Advancements
| Icon | Advancement | In-game description | Parent | Actual requirements (if different) | Resource location |
|---|---|---|---|---|---|
 | Husbandry | The world is full of friends and food | — | Consume anything that can be consumed. | husbandry/root
|
 | A Balanced Diet | Eat everything that is edible, even if it's not good for you | A Seedy Place | Eat each of these 40 foods:
| husbandry/balanced_diet
|
History
| October 3, 2020 | |||||
|---|---|---|---|---|---|
| Java Edition | |||||
1.17{{Extension DPL}}<ul><li>[[:Category:Planned items|Category:Planned items]]<br/>All pages relating to items that have been officially announced, but are not yet in the game.
__EXPECTUNUSEDCATEGORY__
[[Category:Items]]
[[Category:Planned]]
[[pt:Itens planejados]]</li><li>[[:Category:Storage|Category:Storage]]<br/>Blocks and items used to '''store''' other blocks or items.
[[Category:Blocks]][[Category:Items]]
[[ja:カテゴリ:ストレージ]]
[[zh:Category:储物]]</li></ul> | 21w05a | ||||
| 21w11a | Renamed from "cave vines head" and "cave vines body" to "cave vines" and "cave vines plant", respectively. | ||||
| The IDs have also changed. | |||||
| Cave vines now always give 14 light, regardless of the type of part. | |||||
| Now slow down the player. | |||||
| Can now be climbed. | |||||
| 21w13a | Glow berries now generate as loot in mineshaft chest minecarts. | ||||
1.18{{Extension DPL}}<ul><li>[[3D|3D]]<br/>{{about|the edible item|the April Fools' snapshot itself|Java Edition 3D Shareware v1.34}}
{{Joke feature}}
{{Item
| image = 3D (item).png
| renewable = Yes
| stackable = Yes (64)
}}
'''3D''' was a joke item from [[Java Edition 3D Shareware v1.34]]. Eating it shows a picture of the developer cast.
== Obtaining ==
=== Mob drops ===
3D was dropped by a creeper summoned by the cheat code "'''NEEEERD'''".
== Usage ==
Eating the 3D item when the hunger bar was not full shows a picture of the developer cast of Minecraft.
== Data values ==
=== ID ===
{{ID table
|showforms=y
|generatetranslationkeys=java
|displayname=3D
|spritetype=item
|nameid=3d
|form=item
|foot=1}}
== History ==
{{History|java}}
{{History||3D Shareware v1.34|[[File:3D (item).png|32px]] Added the 3D item.}}
{{History|foot}}
== Gallery ==
<gallery>
File:3D Shareware Mojang Team.png|The developer cast of Minecraft.
File:Tasty 3D Item.gif|The "'''Tasty!'''" 3D Item lore.
</gallery>
{{Items}}
{{Jokes}}
[[Category:Non-renewable resources]]
[[Category:Joke items]]</li><li>[[Iron Ingot|Iron Ingot]]<br/>{{About|the ingot|the ore|Iron Ore|the mineral block|Block of Iron|the nugget|Iron Nugget|the raw mineral|Raw Iron}}
{{Item
| image = Iron Ingot.png
|type=
| renewable = Yes
| stackable = Yes (64)
}}
'''Iron ingots''' are versatile [[metal]] ingots used extensively in [[crafting]].
== Obtaining ==
=== Chest loot ===
{{LootChestItem|iron-ingot}}
=== Crafting ===
{{Crafting
|head=1
|showname=0
|Block of Iron
|Output=Iron Ingot,9
|type=Material
}}
{{Crafting
|A1= Iron Nugget
|B1= Iron Nugget
|C1= Iron Nugget
|A2= Iron Nugget
|B2= Iron Nugget
|C2= Iron Nugget
|A3= Iron Nugget
|B3= Iron Nugget
|C3= Iron Nugget
|Output=Iron Ingot
|type= Material
|foot=1
}}
=== Smelting ===
{{see also|Iron Ore#Natural generation}}[[Smelting]] raw iron in a [[furnace]] or [[blast furnace]] is the most common way to obtain iron ingots.
{{Smelting
|head=1
|Iron Ore;Deepslate Iron Ore
|Iron Ingot
|0,7
}}
{{Smelting
|foot=1
|Raw Iron
|Iron Ingot
|0,7
}}
=== Compound creation ===
Iron Ingot can be created from its base [[element]]s, using the [[compound creator]].{{only|bedrock|education}}
{| class="wikitable"
!Name
!Elements
!Example recipe
|- <!-- Temporarily using crafting grid as a substitute for the compound creator (template not yet available), since the layout is the same, even if the appearance is different -->
!Iron Ingot
|Iron <br>
|{{Crafting Table
|shapeless= 1
|A2=Iron
|Output=Iron Ingot}}
|}
=== Mob loot ===
{{see also|Tutorials/Iron golem farming}}
[[Iron golem]]s drop 3-5 iron ingots upon death, regardless of the way they die. The looting enchantment does not increase the amount of iron ingots dropped.
[[Zombie]]s, [[husk]]s, and [[zombie villager]]s have a 2.5% ({{frac|1|40}}) chance of dropping either an iron ingot, [[carrot]], or [[potato]] when killed by a player or tamed wolf. This is increased by 1% ({{frac|1|100}}) per level of looting. This gives iron ingots the following chances of dropping:
* {{frac|1|120}} (about 0.83%)
* {{frac|7|600}} (about 1.17%) with Looting I
* {{frac|9|600}} (1.50%) with Looting II
* {{frac|11|600}} (about 1.83%) with Looting III
== Usage ==
=== Crafting ingredient ===
{{crafting usage}}
=== Trading ===
Apprentice-level Armorer, Toolsmith, and Weaponsmith [[Villager|villagers]] buy 3 iron ingots for an [[emerald]] as their third trade.{{only|bedrock}}
Apprentice-level Armorer villagers have a 50% chance to buy 4 iron ingots for one emerald, and apprentice-level Toolsmith and Weaponsmith villagers always offer to buy 4 iron ingots for one emerald.{{only|java}}
=== Repairing ===
Iron ingots are the repair items for the iron [[tier]] and chainmail and iron [[armor material]]s, and thus can be used to [[item repair|repair]] the following items in an [[anvil]]:
* {{ItemLink|Chainmail Helmet}}
* {{ItemLink|Chainmail Chestplate}}
* {{ItemLink|Chainmail Leggings}}
* {{ItemLink|Chainmail Boots}}
* {{ItemLink|Iron Helmet}}
* {{ItemLink|Iron Chestplate}}
* {{ItemLink|Iron Leggings}}
* {{ItemLink|Iron Boots}}
* {{ItemLink|Iron Sword}}
* {{ItemLink|Iron Axe}}
* {{ItemLink|Iron Pickaxe}}
* {{ItemLink|Iron Shovel}}
* {{ItemLink|Iron Hoe}}
=== Healing iron golems ===
{{control|Using}} an iron ingot on an [[iron golem]] restores its health by {{hp|25}}.
=== Beacons ===
Iron ingots can be used to select powers from a [[beacon]]. The player must select one of the available powers, and then insert an iron ingot in the item slot.
An iron ingot can be substituted for an [[emerald]], a [[gold ingot]], a [[diamond]], or a [[netherite ingot]].
=== Smithing ingredient ===
{{Smithing
|head=1
|ingredients=Any Armor Trim +<br/>Any Armor Piece + <br/>Iron Ingot
|Any Armor Trim Smithing Template
|Netherite Chestplate
|Iron Ingot
|Iron Trim Netherite Chestplate
|showdescription=1
|description = All armor types can be used in this recipe,<br/>a netherite chestplate is shown as an example.<br/>
|tail=1
}}
;Trim color palette
The following color palettes are shown on the designs on trimmed armor:
*{{TrimPalette|iron ingot}}
*{{TrimPalette|iron ingot|darker=1}} (a darker color palette is used when an iron armor piece is trimmed using an iron ingot).
== Achievements ==
{{load achievements|Acquire Hardware}}
== Advancements ==
{{load advancements|Acquire Hardware}}
== Data values ==
=== ID ===
{{edition|java}}:
{{ID table
|edition=java
|showitemtags=y
|showforms=y
|generatetranslationkeys=y
|displayname=Iron Ingot
|spritetype=item
|nameid=iron_ingot
|itemtags=beacon_payment_items
|form=item
|foot=1}}
{{edition|bedrock}}:
{{ID table
|edition=bedrock
|shownumericids=y
|showforms=y
|notshowbeitemforms=y
|generatetranslationkeys=y
|displayname=Iron Ingot
|spritetype=item
|nameid=iron_ingot
|id=305
|form=item
|foot=1}}
== History ==
{{History|java indev}}
{{History||0.31|snap=20100128|[[File:Iron Ingot JE1.png|32px]] Added iron ingots.}}
{{History|||snap=20100129|[[File:Iron Ingot JE2 BE1.png|32px]] The texture of iron ingots has been changed.
|Iron ingots can be [[smelting|smelted]] from [[iron ore]] and [[drops|drop]] 3–5 iron ingots.
|Iron ingots can be used to craft [[iron block]]s, [[flint and steel]] and iron [[sword]]s, [[shovel]]s, [[pickaxe]]s and [[axe]]s.}}
{{History|||snap=20100130|Iron ingots are now used to craft [[arrow]]s.|[[Iron block]]s now require 9 iron ingots (3×3) instead 4 (2×2) to be [[crafting|crafted]], making them much more expensive.}}
{{History||20100206|Iron ingots can now be used to [[crafting|craft]] iron [[hoe]]s.}}
{{History||?|[[Smelting]] now [[drops]] only 1 iron ingot (down from 3–5).}}
{{History||20100218|Iron ingots are now used to craft iron [[helmet]]s, [[chestplate]]s, [[leggings]] and [[boots]].}}
{{History|java infdev}}
{{History||20100615|Iron ingots are now used to craft [[bucket]]s.}}
{{History||20100618|Iron ingots are now used to craft [[rail]]s and [[minecart]]s.}}
{{History||20100625-2|Iron ingots can be found in [[dungeon]] [[chest]]s.}}
{{History|java alpha}}
{{History||v1.0.1|Iron ingots are now used to [[crafting|craft]] iron [[door]]s.}}
{{History||v1.0.14|Iron ingots are no longer used to craft [[arrow]]s.}}
{{History||v1.1.0|Iron ingots are now used to craft [[compass]]es.}}
{{History|java beta}}
{{History||1.5|Iron ingots are now used to craft [[detector rail]]s.}}
{{History||1.7|Iron ingots are now used to craft [[piston]]s and [[shears]].}}
{{History||1.8|snap=Pre-release|Iron ingots are found in the new [[stronghold]] storeroom and [[mineshaft]] [[chest]]s.
|Iron ingots are now used to craft [[iron bars]].}}
{{History|java}}
{{History||1.0.0|snap=Beta 1.9 Prerelease 2|Iron ingots are now used to craft [[cauldron]]s.}}
{{History|||snap=Beta 1.9 Prerelease 3|Iron ingots are now found in the new stronghold altar [[chest]]s.}}
{{History||1.1|snap=12w01a|Iron ingots are now found in [[village]] blacksmith chests.}}
{{History||1.2.1|snap=12w06a|[[Zombie]]s now rarely [[drops|drop]] iron ingots, making it a [[renewable resource]].}}
{{History|||snap=12w08a|[[Iron golem]]s now drop 3–5 iron ingots.}}
{{History||1.3.1|snap=12w21a|Added [[desert temple]]s, with a hidden [[chest]] room and loot containing iron ingots.
|Blacksmith [[villager]]s now [[trading|buy]] 8–9 iron ingots for 1 [[emerald]].}}
{{History|||snap=12w22a|Added [[jungle temple]]s, which contain loot [[chest]]s with iron ingots.
|Iron ingots are now used to craft [[tripwire hook]]s.}}
{{History||1.4.2|snap=12w32a|Iron ingots can be used to activate [[beacon]]s.}}
{{History|||snap=12w41a|Iron ingots are now used to craft [[anvil]]s.}}
{{History|||snap=12w42a|Anvils now need 4 iron ingots to [[craft]] instead of 1.}}
{{History||1.5|snap=13w01a|Iron ingots are now used to [[crafting|craft]] heavy [[weighted pressure plate]]s.}}
{{History|||snap=13w02a|Iron ingots are now used to craft [[hopper]]s and [[activator rail]]s.}}
{{History||1.6.1|snap=13w16a|Iron ingot is now used to craft iron [[horse armor]] and [[horse saddle]].}}
{{History|||snap=13w18a|Iron ingot is no longer used to craft iron [[horse armor]] and [[horse saddle]].|Iron ingots are now found in [[nether fortress]] [[chest]]s.}}
{{History||1.8|snap=14w02a|[[Trading]] for iron ingots has been changed: armorer, weapon smith and tool smith [[villager]]s now [[trading|buy]] 7–9 iron ingots for 1 [[emerald]].}}
{{History|||snap=14w07a|Iron ingots are now used to craft [[iron trapdoor]]s.}}
{{History||1.9|snap=15w31a|Iron ingots are now found in [[end city]] ship [[chest]]s.}}
{{History|||snap=15w33c|Iron ingots are now used to craft [[shield]]s.}}
{{History|||snap=15w44a|The average yield from [[dungeon]] and [[desert temple]] chests has been substantially decreased.
|The average yield from [[mineshaft]] and [[nether fortress]] chests has been slightly decreased.}}
{{History||1.11|snap=16w39a|Iron ingots are now found in the new [[woodland mansion]] chests.}}
{{History||1.11.1|snap=16w50a|Iron ingots are now used to craft [[iron nugget]]s.}}
{{History||1.13|snap=17w47a|Prior to [[1.13/Flattening|''The Flattening'']], this [[item]]'s numeral ID was 265.}}
{{History|||snap=18w10a|Iron ingots now generate in [[buried treasure]] [[chest]]s.}}
{{History|||snap=18w11a|Iron ingots can now be found in the chests of [[shipwreck]]s.}}
{{History||1.14|snap=18w43a|Iron ingots can now be used to craft [[crossbow]]s.
|[[File:Iron Ingot JE3 BE2.png|32px]] The texture of iron ingots has been changed.}}
{{History|||snap=18w47a|Iron ingots can now be found inside of loot [[chest]]s on top of [[pillager outpost]]s.}}
{{History|||snap=18w50a|Iron ingots can now be found in chests in [[village]] toolsmith houses.
|Iron ingots can now be used to craft a [[blast furnace]].}}
{{History|||snap=19w04a|Iron ingots can now be used to craft [[stonecutter]]s.}}
{{History||1.15|snap=19w41a|Iron ingots can now be used to heal [[iron golem]]s.}}
{{History||1.16|snap=20w16a|Iron ingots now generate in [[bastion remnants]] chests.
|Iron ingots are now used to craft [[chain]]s.}}
{{History||1.16.2|snap=20w30a|The average yield of iron ingots from bastion remnant chests has been slightly increased.}}
{{History||1.17|snap=21w08a|Iron ingots can now be smelted from [[deepslate iron ore]].}}
{{History|||snap=21w14a|Iron ingots can now be smelted from [[raw iron]].}}
{{History||1.20<br>(Experimental)|link=1.19.4|snap=23w04a|Iron ingots can now be used as an armor trim material.}}
{{History|||snap=23w05a|Iron ingots can now be trimmed with iron [[armor]].}}
{{History|pocket alpha}}
{{History||v0.2.0|[[File:Iron Ingot JE2 BE1.png|32px]] Added iron ingots. They are currently unobtainable and serve no purpose.}}
{{History||v0.3.2|Iron ingots are now obtainable by [[smelting]] iron ore in a [[furnace]].
|Iron ingots can be used to craft [[shears]], [[blocks of iron]] and iron [[pickaxe]]s, [[axe]]s, [[sword]]s and [[shovel]]s.}}
{{History||v0.4.0|Iron ingots are now used to craft [[flint and steel]] and iron [[hoe]]s.}}
{{History||v0.5.0|Iron ingots are now used to craft [[nether reactor core]]s.}}
{{History||v0.6.0|Iron ingots are now used to craft iron [[armor]].}}
{{History||v0.7.0|Iron ingots are now used to craft [[bucket]]s.}}
{{History||v0.8.0|snap=build 1|Iron ingots are now used to craft [[compass]]es and [[iron bars]].}}
{{History|||snap=build 2|Iron ingots are now used to craft [[minecart]]s and [[rail]]s.}}
{{History||v0.9.0|snap=build 1|Iron ingots can now be found in [[village]] blacksmith [[chest]]s, [[stronghold]] altar chests and [[dungeon]] chests.
|[[Zombie]]s now rarely drop iron ingots.}}
{{History||v0.12.1|snap=build 1|Iron ingots are no longer used to craft [[nether reactor core]]s and are instead dropped by it.
|Iron ingots are now used to craft [[anvil]]s.
|Iron ingots are now found in [[nether fortress]] chests.
|Added [[iron golem]]s, which [[drops|drop]] iron ingots.
|Iron ingots can now be used to repair iron [[tool]]s, [[armor]] and [[weapon]]s in [[anvil]]s.
|Added [[zombie villager]]s, which rarely drop iron ingots.}}
{{History||v0.13.0|snap=build 1|Iron ingots are now used to craft [[tripwire hook]]s, [[detector rail]]s, [[iron trapdoor]]s and heavy [[weighted pressure plate]]s.
|Added [[desert temple]]s, which have hidden [[chest]] rooms and loot containing iron ingots.}}
{{History||v0.14.0|snap=build 1|Iron ingots are now used to craft [[hoppers]] and [[cauldron]]s.
|Iron ingots can now be found in [[minecart with chest|minecart chests]] generated in [[mineshaft]]s.}}
{{History||v0.15.0|snap=build 1|Iron ingots are now used to craft [[piston]]s.
|Added [[jungle temple]]s, which have hidden [[chest]] rooms and main treasure rooms that have loot containing iron ingots.
|Added [[husk]]s, which rarely [[drops|drop]] iron ingots.}}
{{History||v0.16.0|snap=build 4|Iron ingots can now be used to activate [[beacon]]s.}}
{{History|pocket}}
{{History||1.0.0|snap=alpha 0.17.0.1|Iron ingots can now be found in [[end city]] ship [[chest]]s.
|Iron ingots can now be found in [[stronghold]] storeroom chests.}}
{{History||1.0.4|snap=alpha 1.0.4.0|Added [[trading]]—armorer, weaponsmith and toolsmith [[villager]]s now [[trading|buy]] 7–9 iron ingots for 1 [[emerald]].}}
{{History||1.1.0|snap=alpha 1.1.0.0|Iron ingots can now be [[crafting|crafted]] using [[iron nugget]]s.
|Iron ingots can now be used to [[crafting|craft]] iron nuggets.
|Iron ingots can now be found in [[woodland mansion]] [[chest]]s.}}
{{History|bedrock}}
{{History||1.4.0|snap=beta 1.2.14.2|Iron ingots now generate in [[buried treasure]] [[chest]]s.
|Iron ingots can now be found in [[shipwreck]] treasure chests.}}
{{History||1.8.0|snap=beta 1.8.0.10|Iron ingots can now be used to craft [[crossbow]]s.}}
{{History||1.10.0|snap=beta 1.10.0.3|Iron ingots can now be found inside [[pillager outpost]]s and plains [[village]]s' weaponsmith chests.
|Iron ingots can now be used to craft [[blast furnace]]s, [[stonecutter]]s and [[shield]]s.
|[[File:Iron Ingot JE3 BE2.png|32px]] The texture of iron ingots has been changed.}}
{{History||1.11.0|snap=beta 1.11.0.1|Iron ingots can now be found in [[village]] armorer and toolsmith [[chest]]s.
|Iron ingots can now be found in [[savanna]], [[taiga]], [[desert]] and [[snowy taiga]] village weaponsmiths.}}
{{History|||snap=beta 1.11.0.4|Armorer, toolsmith, and weaponsmith [[villager]]s now [[trading|buy]] 4 iron ingots for an [[emerald]].}}
{{History||1.16.0|snap=beta 1.16.0.57|Iron ingots now generate in bastion remnants chests.}}
{{History||1.17.0|snap=beta 1.16.230.52|Iron ingots can now be smelted from [[deepslate iron ore]].}}
{{History|||snap=beta 1.17.0.50|Iron ingots can now be smelted from [[raw iron]].}}
{{History||1.18.10|snap=beta 1.18.10.26|Iron ingots can now be used to heal iron golems.}}
{{History||1.19.80|snap=beta 1.19.80.21|Iron ingots can now be used as an armor trim material.}}
{{History|console}}
{{History||xbox=TU1|xbone=CU1|ps=1.0|wiiu=Patch 1|switch=1.0.1|[[File:Iron Ingot JE2 BE1.png|32px]] Added iron ingots.}}
{{History||xbox=none|xbone=none|ps=1.90|wiiu=none|switch=none|[[File:Iron Ingot JE3 BE2.png|32px]] The texture of iron ingots has been changed.}}
{{History|new3DS}}
{{History||0.1.0|[[File:Iron Ingot JE2 BE1.png|32px]] Added iron ingots.}}
{{History|foot}}
== Issues ==
{{issue list}}
== Trivia ==
* To craft each recipe once, a player would need 152 iron ingots, including 27 for the iron blocks in an [[anvil]], while using the extra tripwire hook for the [[crossbow]] and the [[iron nuggets]] for the [[chain]].
== See also ==
* {{BlockLink|Block of Iron}}
* {{ItemSprite|Iron Chestplate}} [[Iron armor]]
* {{ItemLink|Iron Nugget}}
* {{BlockLink|Iron Ore}}
* [[Ores]]
== External links ==
* {{Mcnet|taking-inventory--iron-ignot|Taking Inventory: Iron Ingot}}
{{Items}}
[[cs:Železný ingot]]
[[de:Eisenbarren]]
[[es:Lingote de hierro]]
[[fr:Lingot de fer]]
[[hu:Vasrúd]]
[[it:Lingotto di ferro]]
[[ja:鉄インゴット]]
[[ko:철괴]]
[[nl:IJzerstaaf]]
[[pl:Sztabka żelaza]]
[[pt:Barra de ferro]]
[[ru:Железный слиток]]
[[uk:Залізний зливок]]
[[zh:铁锭]]
[[Category:Renewable resources]]</li></ul> | Experimental Snapshot 1 | With the implementation of cave biomes including lush caves, caves vines can now generate in normal worlds. | |||
| 21w37a | Cave vines will now stop growing if shears are used on the tip. | ||||
| 21w41a | |||||
| Bedrock Edition | |||||
| Caves & Cliffs (experimental) | beta 1.16.220.52 | ||||
1.17.0{{Extension DPL}}<ul><li>[[Minecart with Hopper|Minecart with Hopper]]<br/>{{ItemEntity
|image=Minecart with Hopper.png
|renewable=Yes
|stackable=No
|size=Height: 0.7 Blocks<br>Width: 0.98 Blocks
|networkid='''[[JE]]''': 10
|drops=1 {{ItemLink|Minecart with Hopper}}<br>plus contents
|health={{hp|6}}
}}
A '''minecart with hopper''' is a [[minecart]] with a [[hopper]] inside. Unlike a normal hopper, it pulls items from containers much more quickly, cannot push items into containers, can collect [[Item (entity)|item entities]] through a single layer of [[solid block]]s and is locked and unlocked via [[Activator Rail|activator rails]].
== Obtaining ==
=== Crafting ===
{{Crafting
|Output= Minecart with Hopper
|type= Transportation
|Hopper|Minecart}}
Minecarts with hoppers can be retrieved by attacking them. By doing so it drop as an [[item (entity)|item]] and any other contents of the hopper are dropped as well.
== Usage ==
[[File:Minecart with Hopper GUI.png|thumb|176px|The GUI of a minecart with hopper.]]
Minecarts with hoppers are placed similarly to other [[minecart]]s.
A minecart with hopper pulls in items lying nearby (within a range slightly larger than the cart itself), or inside a container directly above the minecart, at a rate of 1 item every [[game tick]] (20 items per second), eight times as fast as a normal hopper. It also picks up items that are lying on a block directly above the track. It does not push items into containers, but a hopper underneath the track can remove items from a minecart with hopper on the track. Ordinary hoppers can also drop items into a minecart with hopper like other containers, at the normal speed of 2.5 items per second. In Bedrock Edition, a minecart with hopper on curved rail pulls in items in a hopper lying in front of its moving direction and 1 block above if hopper's output funnel is pointed downward and no block is below that hopper.<ref>{{bug|MCPE-94293}}</ref>
The hopper can be disabled by passing over a powered [[activator rail]], and can be reenabled by an inactive activator rail.
An empty minecart with hopper can travel more than 85 blocks without stopping (as opposed to a normal cart going less than 12 blocks) from a dead stop using a 2 powered track starter even with another cart in front of them. However, the distance traveled by a minecart with hopper depends on the hopper's load. Using a 1 powered rail starter track, a minecart with an empty hopper travels 64 blocks until it stops (as opposed to an empty normal minecart going 8 blocks). The distance traveled diminishes non-linearly with increased hopper load; a minecart with a full hopper can travel only 16 blocks in this setup.
{{See also|Tutorials/Storage minecarts}}
== Sounds ==
{{Edition|Java}}:<br>
Minecarts with hoppers use the Friendly Creatures sound category for entity-dependent sound events.<ref group=sound name=rollsource>{{bug|MC-42132}}</ref>
{{Sound table
|sound=Minecart rolling.ogg
|subtitle=Minecart rolls
|source=Friendly Creatures <ref group=sound name=rollsource/>
|overridesource=1
|description=While a minecart with hopper is moving
|id=entity.minecart.riding
|translationkey=subtitles.entity.minecart.riding
|volume=0.0-0.35 <ref group=sound>Relates linearly with horizontal velocity (max 0.5)</ref>
|pitch=0.0-1.0 <ref group=sound>Will increase by 0.0025 per tick if the minecart's horizontal velocity is more than 0.01</ref>
|distance=16
|foot=1}}
{{Edition|Bedrock}}:
{{Sound table
|type=bedrock
|sound=Minecart rolling.ogg
|source=neutral
|description=While a minecart with hopper is moving
|id=minecart.base
|foot=1}}
== Data values ==
=== ID ===
{{edition|java}}:
{{ID table
|edition=java
|firstcolumnname=Item
|showforms=y
|generatetranslationkeys=y
|displayname=Minecart with Hopper
|spritetype=item
|nameid=hopper_minecart
|form=item
|foot=1}}
{{ID table
|edition=java
|firstcolumnname=Entity
|generatetranslationkeys=y
|displayname=Minecart with Hopper
|spritetype=entity
|nameid=hopper_minecart
|foot=1}}
{{edition|bedrock}}:
{{ID table
|edition=bedrock
|firstcolumnname=Item
|shownumericids=y
|showforms=y
|notshowbeitemforms=y
|generatetranslationkeys=y
|displayname=Minecart with Hopper
|spritetype=item
|nameid=hopper_minecart
|id=526
|form=item
|foot=1}}
{{ID table
|edition=bedrock
|firstcolumnname=Entity
|shownumericids=y
|generatetranslationkeys=y
|displayname=Minecart with Hopper
|spritetype=entity
|nameid=hopper_minecart
|id=96
|foot=1}}
=== Entity data ===
Minecarts with hoppers have entity data associated with them that contain various properties of the entity.
{{el|java}}:
{{main|Entity format}}
{{/ED}}
{{el|bedrock}}:
: See [[Bedrock Edition level format/Entity format]].
== Video ==
<div style="text-align:center">{{yt|I5etC7LeCac}}</div>
== History ==
{{History|java}}
{{History||1.5|snap=13w03a|[[File:Minecart with Hopper JE1 BE1.png|32px]] [[File:Minecart with Hopper (item) JE1 BE1.png|32px]] Added minecart with hopper.}}
{{History||1.9|snap=15w43a|Loot tables are added; minecarts with hopper now can use loot tables.}}
{{History||1.9.1|snap=pre2|The title of the [[inventory]] is changed from 'Hopper minecart' to 'Minecart with Hopper'.}}
{{History||1.11|snap=16w32a|The entity ID of the minecart with hopper has now been changed from <code>MinecartHopper</code> to <code>hopper_minecart</code>.}}
{{History||1.13|snap=17w47a|Prior to [[1.13/Flattening|''The Flattening'']], this [[item]]'s numeral ID was 408.}}
{{History||1.14|snap=18w43a|[[File:Minecart with Hopper JE2 BE2.png|32px]] [[File:Minecart with Hopper (item) JE2 BE2.png|32px]] The textures of the minecart with hopper have now been changed.}}
{{History||1.15|snap=19w38a|[[File:Minecart with Hopper 19w38a.png|32px]] The hopper now appears dark, same as suffocating mobs.}}
{{History|||snap=19w39a|The hopper now renders correctly.}}
{{History||1.16.2|snap=Pre-release 1|Opening or destroying a minecart with hopper now angers nearby [[piglin]]s.}}
{{History||1.19|snap=22w13a|The crafting recipe for a minecart with hopper is now shapeless.|Breaking a minecart with hopper will now drop the item instead of the minecart and hopper separately, though the contents of the hopper are still dropped.<ref>{{bug|MC-249493|||Fixed}}</ref>}}
{{History||1.19.4|snap=23w06a|Minecart with hopper now no longer aggravates [[piglin]]s when opened.}}
{{History|pocket alpha}}
{{History||v0.14.0|snap=build 1|[[File:Minecart with Hopper JE1 BE1.png|32px]] [[File:Minecart with Hopper (item) JE1 BE1.png|32px]] Added minecart with hopper.}}
{{History|pocket}}
{{History||1.1.0|snap=alpha 1.1.0.0|The entity ID of the minecart with hopper has now been changed from <code>minecarthopper</code> to <code>hopper_minecart</code>.}}
{{History|bedrock}}
{{History||1.10.0|snap=beta 1.10.0.3|[[File:Minecart with Hopper JE2 BE2.png|32px]] [[File:Minecart with Hopper (item) JE2 BE2.png|32px]] The textures of the minecart with hopper have now been changed.}}
{{History||1.19.0|snap=beta 1.19.0.30|Breaking a minecart with hopper will now drop the item instead of the minecart and hopper separately, though the contents of the hopper are still dropped.}}
{{History|console}}
{{History||xbox=TU19|xbone=CU7|ps=1.12|wiiu=Patch 1|switch=1.0.1|[[File:Minecart with Hopper JE1 BE1.png|32px]] [[File:Minecart with Hopper (item) JE1 BE1.png|32px]] Added minecart with hopper.}}
{{History||xbox=none|xbone=none|ps=1.90|wiiu=none|switch=none|[[File:Minecart with Hopper JE2 BE2.png|32px]] [[File:Minecart with Hopper (item) JE2 BE2.png|32px]] The textures of the minecart with hopper have now been changed.}}
{{History|new 3ds}}
{{History||0.1.0|[[File:Minecart with Hopper JE1 BE1.png|32px]] [[File:Minecart with Hopper (item) JE1 BE1.png|32px]] Added minecart with hopper.
|Minecarts with hopper emit smoke [[particles]] when destroyed.}}
{{History|foot}}
== Issues ==
{{issue list}}
== Gallery ==
<gallery>
File:First hopper Minecart Image.png|The first image of hopper carts released by Dinnerbone.<ref>{{Tweet|Dinnerbone|291215700213772289|Well you guys got that quick. The letters in the hotbar were for <nowiki>[imgur link]|January 15, 2013}}</ref>
File:13w03a Banner.png|The 13w03a banner showing a minecart with hopper and a [[dropper]].
</gallery>
== References ==
{{reflist}}
{{items}}
{{entities}}
[[Category:Mechanics]]
[[Category:Storage]]
[[cs:Vozík s násypkou]]
[[de:Trichterlore]]
[[es:Vagoneta con tolva]]
[[fr:Wagonnet à entonnoir]]
[[hu:Tölcsér csille]]
[[it:Carrello da miniera]]
[[ja:ホッパー付きのトロッコ]]
[[ko:호퍼가 실린 광산 수레]]
[[nl:Mijnkar met trechter]]
[[pl:Wagonik z lejem]]
[[pt:Carrinho de mina com funil]]
[[ru:Вагонетка с воронкой]]
[[uk:Вагонетка з лійкою]]
[[zh:漏斗矿车]]</li><li>[[String|String]]<br/>{{Block
| image = <gallery>
String JE2 BE2.png | String
Tripwire (NESW).png | Tripwire
</gallery>
| extratext = View [[#Gallery|all renders]]
| transparent = Yes
| light = No
| tool = any
| renewable = Yes
| stackable = Yes (64)
| flammable = No
| lavasusceptible = No
}}
'''String''' is an item used in [[crafting]] recipes such as [[bow]]s, [[fishing rod]]s and [[lead]]s. When placed as a [[block]], string becomes '''tripwire''', which can be combined with [[Tripwire Hook|tripwire hooks]] to form a tripwire circuit.
== Obtaining==
String can be obtained from [[drop]]s, breaking [[cobweb]]s, [[fishing]], [[bartering]], and as gifts from [[cat]]s. String can be looted from [[jungle temple]]s, [[desert pyramid]] chests, and [[dungeon]]s.
===Breaking ===
Tripwire can be {{control|mine|text=mined}} instantly with any [[tool]], dropping string. Tripwire is also removed and drops string as an [[item]] when:
*[[Water]] flows into its space
* A [[piston]] pushes it or moves a [[block]] into its space
Tripwire is destroyed without dropping string if [[lava]] flows into its space.
A [[cobweb]] drops string when it is broken in these ways (see also {{section link|Cobweb|Usage}}):
*Breaking a cobweb with a [[sword]]
*Pushing a cobweb with a [[piston]]
*[[Water]] breaking a cobweb by flowing over it (flowing [[lava]] destroys cobwebs without leaving string)
===Natural generation===
Five pieces of tripwire generate naturally in every [[jungle temple]].
===Mob loot ===
[[Spider]]s and [[cave spider]]s drop 0–2 string upon death. The maximum is increased by 1 per level of [[Looting]], for a maximum of 0–5 string with Looting III.
[[Strider]]s drop 2–5 string upon death. The maximum is increased by 1 per level of [[Looting]], for a maximum of 2–8 string with Looting III.{{only|Java|short=1}}
[[Cat]]s drop 0–2 string upon death, unaffected by Looting.<ref>{{bug|MC-200707||Looting does not increase drops for iron golems and cats}}</ref>
===Chest loot===
{{LootChestItem|string}}
===Fishing===
String has a 0.6% ({{frac|3|500}}) chance of being caught when [[fishing]] with an unenchanted fishing rod. The chance decreases to 0.5% ({{frac|1|200}}), 0.4% ({{frac|1|250}}), and 0.3% ({{frac|3|1000}}) if the fishing rod is enchanted with [[Luck of the Sea]] at enchantment levels I, II, and III, respectively.
===Cat gifts===
{{main|Cat#Gifts}}
Tamed [[cat]]s have a 70% chance of giving the [[player]] a gift when they wake up from a [[bed]], and the gift has a 16.13% chance to be a string.
===Bartering ===
[[Piglin]]s may [[barter]] 3-9 string when given a [[gold ingot]].
== Usage==
String can be used as a crafting ingredient and tripwire can be used as a [[redstone circuit]] component. It can also be used to keep [[player]]s from ender-pearling through that space.
=== Crafting ingredient===
{{crafting usage}}
===Redstone component===
{{redirect|Tripwire|tripwire hooks|Tripwire Hook}}
{{see also|Redstone circuits}}
String can be placed as tripwire, which can be used to detect [[entity|entities]] as part of a tripwire circuit. [[Observer]]s can also be used with a tripwire to generate redstone signals.
;Placement
To place tripwire, {{control|use}} string while pointing at a surface facing the space the tripwire should occupy.
{{Schematic | caption =
'''Tripwire Circuit'''
|SB|th-$w|tw-$ew|th-$e|SB
}}
:In order to activate [[tripwire hook]]s, tripwire must be part of a "tripwire circuit": a straight line of [[block]]s consisting of a block with a tripwire hook attached to it, a "tripwire line" (1 to 40 blocks of tripwire), and a second tripwire hook attached to another block.
;Activation
Tripwire activates if almost any [[entity]] ([[player]]s, [[mob]]s, [[minecart]]s, [[boat]]s, [[item]]s, [[arrow]]s, etc.) intersects its collision mask. The tripwire remains active until there are no entities intersecting its collision mask. Thrown [[potion]]s, some arrows, thrown [[ender pearl]]s, and thrown [[eyes of ender]] do not activate tripwire.
;Behavior
An active tripwire updates adjacent [[block]]s (for example, it can activate a [[Tutorials/Block update detector|BUD circuit]]). Additionally, active tripwires that are part of valid tripwire circuits cause the attached tripwire hooks to activate (producing [[redstone]] power). Active tripwires do ''not'' themselves produce redstone power.
When tripwire is broken (including by being washed away by spreading [[water]] {{in|java}}) after being part of a valid tripwire circuit, it activates the attached tripwire hooks. {{IN|JE}}, it activates for 5 redstone ticks (10 game [[tick]]s, or 0.5 seconds barring lag). {{IN|BE}}, it activates for 6 redstone ticks (14 game [[tick]]s, or 0.6 seconds barring lag). It does not produce the signal if it is broken using [[shear]]s.
===Trading===
Novice-level fisherman [[villager]]s have a 50% chance to buy 20 string as part of their first-tier trade.
Journeyman-level fletcher villagers buy 14 string for 1 [[emerald]] as part of their trade.
==Sounds==
=== Generic===
{{Sound table/Block/Normal}}
===Unique===
{{edition|java}}:
{{Sound table
|rowspan=3
|sound=Click.ogg
|subtitle=Tripwire attaches
|source=block
|description=When a tripwire line is completed
|id=block.tripwire.attach
|translationkey=subtitles.block.tripwire.attach
|volume=0.4
|pitch=0.7
|distance=16}}
{{Sound table
|subtitle=Tripwire clicks
|source=block
|description=When a tripwire line deactivates
|id=block.tripwire.click_off
|translationkey=subtitles.block.tripwire.click
|volume=0.4
|pitch=0.5
|distance=16}}
{{Sound table
|subtitle=Tripwire clicks
|source=block
|description=When a tripwire line activates
|id=block.tripwire.click_on
|translationkey=subtitles.block.tripwire.click
|volume=0.4
|pitch=0.6
|distance=16}}
{{Sound table
|sound=Arrow hit1.ogg
|sound2=Arrow hit2.ogg
|sound3=Arrow hit3.ogg
|sound4=Arrow hit4.ogg
|subtitle=Tripwire detaches
|source=block
|description=When a tripwire hook in a tripwire line is destroyed
|id=block.tripwire.detach
|translationkey=subtitles.block.tripwire.detach
|volume=0.4
|pitch={{frac|12|11}}-{{frac|4|3}}
|distance=16
|foot=1}}
{{edition|bedrock}}:
{{Sound table
|type=bedrock
|rowspan=3
|sound=Click.ogg
|source=block
|description=When a tripwire line is completed
|id=block.click
|volume=0.2
|pitch=0.7}}
{{Sound table
|type=bedrock
|source=block
|description=When a tripwire line deactivates
|id=random.click
|volume=0.2
|pitch=0.5}}
{{Sound table
|source=block
|description=When a tripwire line activates
|id=random.click
|volume=0.2
|pitch=0.6}}
{{Sound table
|sound=Arrow hit1.ogg
|sound2=Arrow hit2.ogg
|sound3=Arrow hit3.ogg
|sound4=Arrow hit4.ogg
|source=block
|description=When a tripwire hook in a tripwire line is destroyed
|id=block.bowhit
|volume=0.4
|pitch=1.1-1.33
|foot=1}}
==Data values==
===ID===
{{edition|java}}:
{{ID table
|edition=java
|showblocktags=y
|showforms=y
|generatetranslationkeys=y
|displayname=Tripwire
|spritetype=block
|nameid=tripwire
|blocktags=wall_post_override
|form=block}}
{{ID table
|displayname=String
|spritetype=item
|nameid=string
|form=item
|foot=1}}
{{edition|bedrock}}:
{{ID table
|edition=bedrock
|shownumericids=y
|showaliasids=y
|showforms=y
|generatetranslationkeys=y
|displayname=Tripwire
|spritetype=block
|nameid=trip_wire
|aliasid=tripWire
|id=132
|form=block
|itemform=trip_wire
|translationkey=tile.tripWire.name}}
{{ID table
|displayname=String
|spritetype=item
|nameid=string
|id=326
|form=item
|foot=1}}
===Block states===
{{see also|Block states}}
{{/BS}}
==Video==
<div style="text-align:center">
<span style="display:inline-block">{{yt|WUlhmu3JbcQ}}</span>
<span style="display:inline-block">{{yt|-7jEtrETxwc}}</span>
</div>
==History==
{{History|java indev}}
{{History||0.31|snap=20100129|[[File:String JE1 BE1.png|32px]] Added string.}}
{{History|||snap=20100130|[[Bow]]s can now be [[crafting|crafted]] using string.}}
{{History|||snap=20100201-2|[[Wool|Cloth]] can now be crafted using nine string.}}
{{History||20100219|[[Spider]]s now [[drops|drop]] string.}}
{{History|java infdev}}
{{History||20100625-2|String can now be found inside [[chest]]s in the new [[dungeon]]s.}}
{{History|java alpha}}
{{History||v1.1.1|String can now be used to craft [[fishing rod]]s.}}
{{History|java beta}}
{{History||1.5|Introduced [[cobweb]]s, which [[drops|drop]] string when [[breaking|broken]] with a [[sword]].}}
{{History||1.6.6|Wool is now crafted from four string rather than nine.}}
{{History||1.7|Cobwebs now drop string when broken using [[shears]].}}
{{History||1.8|snap=Pre-release|Cobwebs now generate naturally, making them a viable method to obtain string.}}
{{History|java}}
{{History||May 28, 2012|link=none|Tripwire was first revealed on [[Dinnerbone]]'s [[wikipedia:Twitter|Twitter]].<ref>{{tweet|Dinnerbone|207154562711289856|It's a tripwire, yeah.|May 28, 2012}}</ref><ref>{{tweet|Dinnerbone|207155073023868928|You place it yourself. String is now placeable|May 28, 2012}}</ref> Dinnerbone released a [{{ytl|mWuvXIzYcTc}} video] showing him experimenting with tripwire before its release.}}
{{History||1.3.1|snap=12w22a|String can now be placed on the ground as tripwire.}}
{{History|||snap=12w23a|Tripwire can now activated by most [[entity|entities]] (including [[arrow]]s).
|The max distance of tripwire has now been increased from 18 to 40 [[block]]s.
|Tripwire now has a translucent texture.}}
{{History||1.6.1|snap=13w18a|String can now be used to craft [[lead]]s.}}
{{History||1.8|snap=14w02a|String can now be [[trading|sold]] to fletcher and fisherman [[villager]]s, at 15–20 string for 1 [[emerald]].}}
{{History|||snap=release|Tripwire is now translucent.}}
{{History||1.9|snap=15w44a|String now generates in [[desert temple]] [[chest]]s.
|The average yield of string in [[dungeon]] chests has now more than doubled.}}
{{History|||snap=15w49a|The <code>suspended</code> block state has now been removed from tripwire.}}
{{History||1.11|snap=16w39a|String can now be found in [[woodland mansion]] [[chest]]s.}}
{{History||1.13|snap=17w47a|Prior to [[1.13/Flattening|''The Flattening'']], this [[block]]'s numeral ID was 132 and the [[item]]'s was 287.
|Tripwire can now be disarmed.}}
{{History||1.14|snap=18w43a|String can now be used to craft [[crossbow]]s and a [[loom]].
|[[File:String JE2 BE2.png|32px]] The texture of string has now been changed.}}
{{History|||snap=18w44a|[[Cat]]s now drop 0-2 string upon death.
|Cats now offer string as [[Cat#Gifts|gift]]s.}}
{{History|||snap=18w45a|String can now be used to craft [[scaffolding]].}}
{{History|||snap=18w47a|String can now be found inside [[pillager outpost]] [[chest]]s.}}
{{History||1.16|snap=20w09a|String can now be obtained through [[bartering]] with [[piglin]]s.}}
{{History|||snap=20w13a|[[Strider]]s now [[drops|drop]] string upon [[death]].}}
{{History|||snap=20w16a|String now generates in [[bastion remnant]] chests.}}
{{History||1.17|snap=20w45a|String can now be used to craft [[bundle]]s and [[candle]]s.}}
{{History|||snap=21w13a|The model of the tripwire has been tweaked that the underside texture is mirrored.}}
{{History|||snap=21w19a|String can no longer be used to craft bundles and candles.}}
{{History|||snap=Pre-release 1|String can once again used to craft candles.}}
{{History||1.18|snap=Experimental Snapshot 1|String can now once again be used to craft bundles.}}
{{History|||snap=21w37a|String once again can no longer be used to craft bundles.}}
{{History||1.20<br>(Experimental)|link=1.19.3|snap=22w42a|String can now once again be used to craft bundles.}}
{{History||1.20<br>(Experimental)|link=1.19.4|snap=23w07a|String can now be used to craft [[brush]]es.}}
{{History|||snap=1.19.4-pre1|String can no longer be used to craft [[brush]]es.}}
{{History||1.20|snap=23w12a|String can now be found in [[suspicious gravel]] and [[suspicious sand]] in [[trail ruins]].}}
{{History|||snap=23w16a|String no longer generates in [[suspicious sand]] in [[trail ruins]].|Due to the split of the archaeological loot tables for the suspicious gravel within the [[trail ruins]]; string now is in the common loot.}}
{{History|pocket alpha}}
{{History||v0.2.0|[[File:String JE1 BE1.png|32px]] Added string. It is currently unobtainable and serves no purpose.}}
{{History||v0.3.3|Added spiders, which drop string when they die.
|String can now be used to [[crafting|craft]] [[bow]]s.}}
{{History||v0.4.0|String can now be crafted into [[wool]].}}
{{History||v0.11.0|snap=build 1|String can now be used to craft [[fishing rod]]s.
|String can now be caught as a junk [[item]] from [[fishing]].}}
{{History||v0.13.0|snap=build 1|String can now be placed on the ground as a tripwire.
|String can now be found in [[desert temple]] [[chest]]s.}}
{{History||v0.15.0|snap=build 1|String can now be used to craft [[lead]]s.
|Tripwire now generates in [[jungle temple]]s.}}
{{History|pocket}}
{{History||1.0.4|snap=alpha 1.0.4.0|15-20 String can now be [[trading|sold]] to fletcher and fisherman [[villager]]s for an [[emerald]].}}
{{History||1.1.0|snap=alpha 1.1.0.0|String can now be found in [[woodland mansion]] [[chest]]s.
|[[Cobweb]]s can now be used to [[crafting|craft]] 9 string.}}
{{History|bedrock}}
{{History||1.8.0|snap=beta 1.8.0.8|Tamed [[cat]]s can now give the [[player]] string as gifts.
|String can now be used to craft [[scaffolding]].
|[[Cat]]s now [[drops|drop]] 0–2 string.}}
{{History|||snap=beta 1.8.0.10|String can now be used to craft [[crossbow]]s.}}
{{History||1.9.0|snap=beta 1.9.0.0|Tripwire string that is broken now activates, unless broken with [[shears]].}}
{{History||1.10.0|snap=beta 1.10.0.3|String can now be found in [[pillager outpost]] chests.
|String can now be used to craft a [[loom]].
|[[File:String JE2 BE2.png|32px]] The texture of string has now been changed.}}
{{History||1.11.0|snap=beta 1.11.0.4|[[Trading]] has now been changed, fisherman [[villager]]s now have a 50% chance to [[trading|buy]] 20 string as part of their first-tier trade.
|Fletcher villagers now buy 14 string for an [[emerald]] as their third-tier trade.}}
{{History||1.16.0|snap=beta 1.16.0.57|String can now be obtained through [[bartering]] with [[piglin]]s.
|Added [[strider]]s, which [[drops|drop]] string upon [[death]].
|String can now be found in [[bastion remnant]] chests.}}
{{History||1.17.10|snap=beta 1.17.10.22|String can now be used to craft [[candles]].}}
{{History||1.18.30|snap=beta 1.18.30.26|The ID of tripwire block is changed from <code>tripWire</code> to <code>trip_wire</code>}}
{{History||1.20.10|snap=beta 1.20.10.20|String can no longer be crafted from cobwebs.}}
{{History|console}}
{{History||xbox=TU1|xbone=CU1|ps=1.0|wiiu=Patch 1|switch=1.0.1|[[File:String JE1 BE1.png|32px]] Added string.}}
{{History||xbox=TU14|ps=1.04|String can now be placed on the ground as [[tripwire]].}}
{{History||xbox=none|xbone=none|ps=1.88|wiiu=none|switch=none|Tripwires are now activated when [[breaking|broken]], unless broken with [[shears]].}}
{{History||xbox=none|xbone=none|ps=1.90|wiiu=none|switch=none|[[File:String JE2 BE2.png|32px]] The texture of string has now been changed.}}
{{History|new 3ds}}
{{History||0.1.0|[[File:String JE1 BE1.png|32px]] Added string.}}
{{History|foot}}
===Tripwire "item"===
{{:Technical blocks/Tripwire}}
== Issues ==
{{Issue list}}
== Gallery ==
<gallery>
Tripwire (NS).png|
Tripwire (N).png|
Tripwire (E).png|
Tripwire (S).png|
Tripwire (W).png|
Tripwire (EW).png|
Tripwire (NE).png|
Tripwire (ES).png|
Tripwire (SW).png|
Tripwire (NW).png|
Tripwire (ESW).png|
Tripwire (NSW).png|
Tripwire (NEW).png|
Tripwire (NES).png|
</gallery>
=== Screenshots ===
<gallery>
DinnerboneTripwireDev3.png|The first image of tripwires [[dinnerbonetweet:207154292593917952|released]] by Mojang.
DinnerboneTripwireDev4.png|An image [[dinnerbonetweet:207294114398605312|released]] by Mojang testing visibility of tripwires from a distance at night.
DinnerboneTripwireDev5.png|The same room viewed from the same angle, in daytime.
Dinnerbone String.png|Power lines made of suspended string blocks.
</gallery>
==References==
{{Reflist}}
== External Links ==
*[https://www.minecraft.net/en-us/article/taking-inventory--string Taking Inventory: String] – Minecraft.net on May 14, 2020
{{Redstone}}
{{Items}}
{{Blocks|Utility}}
[[Category:Redstone mechanics]]
[[Category:Mechanics]]
[[Category:Mechanisms]]
[[Category:Generated structure blocks]]
[[Category:Non-solid blocks]]
[[cs:Vlákno]]
[[de:Faden]]
[[es:Hilo]]
[[fr:Ficelle]]
[[hu:Fonál]]
[[it:Cordicella]]
[[ja:糸]]
[[ko:실]]
[[nl:Draad]]
[[pl:Nić]]
[[pt:Linha]]
[[ru:Нить]]
[[th:เส้นใย]]
[[uk:Нитка]]
[[zh:线]]</li></ul></nowiki> | beta 1.16.230.54 | Glow Berries now generate as loot in mineshaft chest minecarts. | |||
| beta 1.17.0.52 | Glow Berries are now available without enabling experimental gameplay. | ||||
1.17.20{{Extension DPL}}<ul><li>[[Chalkboard|Chalkboard]]<br/>{{Education feature}}
{{unobtainable|edition=be}}{{Block
|image=<gallery>
Chalkboard Slate.png|Slate
Chalkboard Poster.png|Poster
Chalkboard Board.png|Board
</gallery>
|invimage=Slate
|invimage2=Poster
|invimage3=Board
|transparent=Yes
|renewable=No
|light=No
|tool=None
|stackable=Yes (16)
|flammable=No
}}
A '''chalkboard''' is a [[block]] that can display more text than a [[sign]].<ref>https://education.minecraft.net/support/knowledge-base/using-slates-posters-boards/</ref> Three sizes are available: 1×1 (slate), 2×1 (poster), and 3×2 (board).
== Obtaining ==
In ''[[Education Edition]]'', chalkboards can be obtained in the [[Creative inventory]] or through the {{cmd|give}} command.
In ''[[Bedrock Edition]]'', chalkboards cannot be obtained by commands or the creative inventory, and can only be obtained by using glitches or inventory editors.
== Usage ==
A chalkboard can be used similarly to a [[sign]], to display text. Once placed, select the chalkboard and enter the desired text and click the "OK" button. The "×" in the upper right corner of the board closes the edit screen.
=== Placement ===
Chalkboards may be placed on the top or side of other blocks (including non-solid blocks like [[fence]]s, [[glass]], [[rail]]s, and other chalkboards). To place a chalkboard, {{control|use}} a chalkboard item while pointing at the block the chalkboard should be attached to. To place a chalkboard on a block that can be interacted with by the {{control|use}} control (for example, [[chest]]s, [[note block]]s, etc.), {{control|sneak}} while placing the chalkboard.
1×1 slates placed on the top of a block stand on a short post, facing in the direction of the player who placed it, in any of 16 different directions. 2×1 posters and 2×3 boards can be placed in any of 4 different directions. Chalkboards placed on the side of a block simply float there, even if the block doesn't make contact with the chalkboards.
=== Text ===
When entering text, six lines of text are available for the slates and posters, while fifteen lines of text are available for the 2×3 boards. To switch between lines, the player can press Enter or the up/down arrow keys. The location of text currently selected has a flashing cursor.
While editing, typing and backspacing can occur at any point in the line by moving the cursor using the left and right arrow keys. Once the end of the line has been reached, the word is hyphenated and is continued on the next line.
After the editing window is closed, right-clicking on a chalkboard reopens the editing menu. Copy and paste can be performed, and no more than the basic/shifted keyboard characters may be entered.
=== Interaction ===
Chalkboards act as though they have a {{control|use}} action, so {{control|sneaking}} is required to place blocks or use items while the cursor is pointed at them.
Unlike signs, boards block a [[piston]] from moving.
Boards have no collision box (they are completely non-solid), so [[item]]s and [[mob]]s can move through boards blocks. Other blocks (including other boards) can be placed on any edge of a board.
[[Water]] and [[lava]] flow around boards. Lava can create [[fire]] in [[air]] blocks next to boards as if the boards were flammable, but the boards do not burn.
== Sounds ==
{{Sound table/Block/Stone/BE}}
== Data values ==
=== ID ===
{{ID table
|edition=bedrock
|shownumericids=y
|showforms=y
|generatetranslationkeys=y
|displayname=Block
|spritename=chalkboard
|spritetype=block
|nameid=chalkboard
|id=230
|form=block
|translationkey=tile.chalkboard.oneByOne.name, tile.chalkboard.twoByOne.name, tile.chalkboard.threeByTwo.name}}
{{ID table
|displayname=Item
|spritename=board
|spritetype=item
|nameid=board
|translationkey=tile.chalkboard.oneByOne.name, tile.chalkboard.twoByOne.name, tile.chalkboard.threeByTwo.name
|id=454
|form=item
|foot=1}}
=== Metadata ===
{{see also|Data values}}
Chalkboards uses the following data values:
*Slate: 1
*Board: 2
*Poster: 3
<!--{{/DV}}-->
=== Block states ===
{{see also|Block states}}
{{info needed}}
<!--{{/BS}}-->
== History ==
{{History|pocket alpha}}
{{History||v0.16.0|snap=build 1|[[File:Chalkboard Slate.png|32px]] [[File:Chalkboard Poster.png|32px]] [[File:Chalkboard Board.png|32px]]<br>[[File:Chalkboard_Slate_(item)_BE1.png|32px]] [[File:Chalkboard_Poster_(item)_BE1.png|32px]] [[File:Chalkboard_Board_(item)_BE1.png|32px]] Added chalkboards, likely as an accidental addition.
|Chalkboards can be obtained and placed using the {{cmd|give}} and {{cmd|setblock}} [[command]]s respectively. However, they serve no purpose.}}
{{History|||snap=build 2|Chalkboards have now been removed. However, the textures still exist.}}
{{History|bedrock}}
{{History||1.11.0|snap=beta 1.11.0.1|Re-added chalkboards. They still exist as entities, but can't be spawned. The items can't be spawned either.}}
{{h||1.17.30|snap=beta 1.17.30.20|Chalkboards can now be placed consistently.}}
{{History|education}}
{{History||MinecraftEdu|link=MinecraftEdu|[[File:Oak Sign JE1 BE1.png|30px]] [[MinecraftEdu]], Education Edition's predecessor, had "[[Big Sign]]s", 3 block wide signs that served a similar purpose.}}
{{History||1.0|[[File:Chalkboard Slate.png|32px]] [[File:Chalkboard Poster.png|32px]] [[File:Chalkboard Board.png|32px]]<br>[[File:Chalkboard_Slate_(item)_BE1.png|32px]] [[File:Chalkboard_Poster_(item)_BE1.png|32px]] [[File:Chalkboard_Board_(item)_BE1.png|32px]] Added chalkboards.}}
{{History||1.0.2|The UI of chalkboards now has a locked option.
|[[Player|Students]] now can place their own chalkboards even without a worldbuilder ability.}}
{{History|foot}}
== Gallery ==
<gallery>
Education Edition Exclusive Features.png|The chalkboard placed in a world along with other Education Edition features.
Chalkboardsingamepe.png|The chalkboard in [[Pocket Edition v0.16.0 alpha build 1]].
</gallery>
== References ==
{{Reflist}}
{{Blocks|Utility}}
{{Items}}
{{Education Edition}}
[[Category:Utility blocks]]
[[Category:Block entities]]
[[Category:Education Edition blocks]]
[[Category:Education Edition items]]
[[pt:Lousa]]
[[de:Tafel]]
[[fr:Ardoise]]
[[ja:黒板]]
[[pl:Tablica kredowa]]
[[ru:Доска]]
[[uk:Дошка]]
[[zh:黑板]]</li><li>[[:Category:Armor|Category:Armor]]<br/>[[Category:Items]]</li></ul> | beta 1.17.20.20 | Cave Vines can now be pollinated by bees. | |||
| Upcoming Bedrock Edition | |||||
1.18.10{{Extension DPL}}<ul><li>[[Eye of Ender|Eye of Ender]]<br/>{{redirect|Ender Eye|the boss|Ender Dragon|item that teleports the player to where it lands|Ender Pearl}}
{{ItemEntity
|image=Eye of Ender.png
|stackable=Yes (64)
|renewable=Yes
|size=Height: 0.25 Blocks<br>Width: 0.25 Blocks
|networkid='''[[JE]]''': 72
}}
An '''eye of ender''' is a craftable item used to locate [[stronghold]]s and activate the [[end portal]]s within them.
== Obtaining ==
=== Crafting ===
{{Crafting
|Blaze Powder
|Ender Pearl
|Output=Eye of Ender
|type=Miscellaneous
}}
== Usage ==
=== Locating strongholds ===
[[File:Eye of Ender (break).gif|thumb|right|An animation of an eye of ender shattering.]]
To locate [[stronghold]]s (and the [[end portal]]s they house):
* Pressing {{control|use}} while holding an eye of ender causes it to fly approximately 12 blocks in the direction of the nearest stronghold, traveling through any blocks necessary, and leave a trail of purple particles, the same particle effect used for [[endermen]] and [[ender chests]].
** The eye leads to the [[chunk]] where a spiral staircase, the first room generated in the stronghold, is located.
** The center of this entrance staircase is always exactly at the chunk coordinates 4, ~, 4, although the eye of ender leads to chunk coordinates 0, ~, 0 (the northwest corner of the chunk).
* While over 12 blocks away from the northwest corner of the staircase chunk, the eye will travel upward to offer an easily-visible indication of the horizontal direction the player must travel.
* When closer than 12 blocks to the northwest corner of the staircase chunk, the eye will travel downward, to indicate the player is above a stronghold and must mine downward.
* After two or three seconds of travel, the eye floats in the air briefly, then either falls (becoming collectable again) or shatters in mid-air. The eye has a 20% chance of shattering (80% chance of surviving) per throw, therefore throwing it three times has approximately 50% overall chance to shatter the eye (0.8<sup>3</sup>=51.2%).
* The eye of ender's flying function works only in the [[Overworld]]. It does nothing in [[the Nether]], [[the End]], [[custom dimension]]s{{verify|type=current}}, or in worlds with no strongholds.
Note that the eyes may point to an incorrect location if the target chunks were generated with a different biomes map in an older version or through different generation settings.<ref>See also {{bug|MC-135996}}</ref>
=== Activating end portals ===
[[File:Active End Portal.png|thumb|right|An end portal activated with eyes of ender.]]
Once an end portal is found, the eyes of ender are required to activate it. End portals require a total of 12 eyes of ender in order to activate, though each individual frame-block has a 10% chance of containing an eye of ender when generated. Eyes can be placed in empty [[End portal frame]]s by pressing {{control|use}} on them until the entire ring of 12 is filled, thereby activating the portal. Due to the fact that there is a 10% chance of each individual end portal frame having an eye in it, there is a one out of one trillion chance of every frame having an eye in it thereby activating the portal even if the player doesn't have any eyes of ender.
{| class="wikitable sortable mw-collapsible"
|+End Portal Pre-Filled Eyes
!Eyes
!0
!1
!2
!3
!4
!5-12
|-
|Exactly
|28%
|38%
|23%
|9%
|2%
|<1%
|-
|Or More
|100%
|72%
|34%
|11%
|3%
|<1%
|}
=== Crafting ingredient ===
{{crafting usage}}
== Sounds ==
{{Edition|Java}}:<br>
Eyes of ender use the Friendly Creatures sound category for entity-dependent sound events.
{{Sound table
|sound=Ender Eye death1.ogg
|sound2=Ender Eye death2.ogg
|subtitle=Eye of Ender falls <ref group=sound name=LousyEvents>{{Bug|MC-98316||Wrong subtitles caused by missing distinction}}</ref>
|source=neutral
|description=When an eye of ender drops or breaks
|id=entity.ender_eye.death|idnote=<ref group=sound name=LousyEvents/>
|translationkey=subtitles.entity.ender_eye.death|translationkeynote=<ref group=sound name=LousyEvents/>
|volume=1.3
|pitch=1.0
|distance=16}}
{{Sound table
|sound=Ender Eye launch1.ogg
|sound2=Ender Eye launch2.ogg
|subtitle=Eye of Ender shoots
|source=neutral
|description=When an eye of ender is thrown
|id=entity.ender_eye.launch
|translationkey=subtitles.entity.ender_eye.launch
|volume=0.5
|pitch={{frac|1|3}}-0.5
|distance=16}}
{{Sound table
|sound=End portal eye place1.ogg
|sound2=End portal eye place2.ogg
|sound3=End portal eye place3.ogg
|subtitle=Eye of Ender attaches
|source=block
|description=When an eye of ender is placed in an end portal frame
|id=block.end_portal_frame.fill
|translationkey=subtitles.block.end_portal_frame.fill
|volume=1.0
|pitch=1.0
|distance=16
|foot=1}}
{{Edition|Bedrock}}:
{{Sound table
|type=bedrock
|sound=Item Frame break1.ogg
|sound2=Item Frame break2.ogg
|sound3=Item Frame break3.ogg
|source=block
|description=When an eye of ender breaks <ref group=sound>{{Bug|MCPE-115646}}</ref>
|id=block.itemframe.break}}
{{Sound table
|sound=Bow shoot.ogg
|source=player
|description=When an eye of ender is thrown
|id=random.bow
|volume=0.5
|pitch=0.33-0.5}}
{{Sound table
|sound=End portal eye place1.ogg
|sound2=End portal eye place2.ogg
|sound3=End portal eye place3.ogg
|source=block
|description=When an eye of ender is placed in an end portal frame
|id=block.end_portal_frame.fill
|volume=0.3
|pitch=0.9/1.0/1.1
|foot=1}}
==Data values==
===ID===
{{edition|java}}:
{{ID table
|edition=java
|firstcolumnname=Item
|showforms=y
|generatetranslationkeys=y
|displayname=Eye of Ender
|spritetype=item
|nameid=ender_eye
|form=item
|foot=1}}
{{ID table
|edition=java
|firstcolumnname=Entity
|generatetranslationkeys=y
|displayname=Eye of Ender
|spritetype=entity
|nameid=eye_of_ender
|foot=1}}
{{edition|bedrock}}:
{{ID table
|edition=bedrock
|firstcolumnname=Item
|shownumericids=y
|showforms=y
|notshowbeitemforms=y
|generatetranslationkeys=y
|displayname=Eye of Ender
|spritetype=item
|nameid=ender_eye
|id=433
|form=item
|foot=1}}
{{ID table
|edition=bedrock
|firstcolumnname=Entity
|shownumericids=y
|generatetranslationkeys=y
|displayname=Eye of Ender
|spritetype=entity
|nameid=eye_of_ender_signal
|id=70
|foot=1}}
===Entity data===
The purple particles left by eyes of ender have entity data that define various properties of the entity.
{{el|java}}:
{{main|Entity format}}
{{/ED}}
{{el|bedrock}}:
:See [[Bedrock Edition level format/Entity format]].
==Advancements==
{{load advancements|Eye Spy}}
==Video ==
{{Video note|This video does not mention that eyes of ender can be used to craft [[ender chest]]s or [[end crystal]]s.}}
<div style="text-align:center">{{yt|E0AhoxYLomc}}</div>
==History==
{{History|java}}
{{History||1.0.0|snap=Beta 1.9 Prerelease 3|[[File:Eye of Ender JE1 BE1.png|32px]] Added eyes of ender.
|Eyes of ender can be used on a [[end portal frame|portal block]] to repair them, but repairing them does nothing.}}
{{History|||snap=Beta 1.9 Prerelease 4|Each eye can now be placed in a [[end portal frame|portal block]] or used to hone in on a [[stronghold]]. [[Jens Bergensten|Jeb]] demonstrated the new uses for an eye in his livestream.<ref>http://www.twitch.tv/jebox/b/297000418</ref> An [[end portal]] within a stronghold could be seen in the stream with two eyes inserted into blocks.
|In older worlds with chunks generated before [[Java Edition Beta 1.9 Prerelease 3|Beta 1.9 Prerelease 3]], the eyes may mislead the [[player]] to a place where there isn't a [[stronghold]] at all. This happens because the eyes lead to where a stronghold should be based on the world seed in the current version, but before Beta 1.9 Prerelease 3 strongholds generated differently based on the seed. Therefore, if the player saved the coordinates the eye traveled to in an old world and generated a new world with the same seed, the player could travel to those same coordinates and find a stronghold.}}
{{History|||snap=Beta 1.9 Prerelease 6|Eyes of ender no longer render like a tool in third person.}}
{{History|||snap=RC1|The throwing sound of eyes of ender has been changed.}}
{{History||1.3.1|snap=12w21a|Eyes of ender can now be used to craft [[ender chest]]s.
|Priest [[villager]]s would [[trading|buy]] 2–3 eyes of ender for one [[emerald]].}}
{{History|||snap=12w22a|Priest villagers no longer buy eyes of ender, instead selling them for 7–10 emeralds.}}
{{History||1.6.4|snap=1.6.3-pre|Eyes of ender now lead to [[stronghold]]s based on the structure data saved in the world file instead of calculating their approximate location via the [[seed (level generation)|world seed]]. Therefore, strongholds generated in old versions can still be found even if the distribution of strongholds is changed.}}
{{History||1.7.2|snap=13w41a|Eyes of Ender now lead to the entrance of a stronghold instead of the portal room.}}
{{History||1.8|snap=14w02a|With changes that have been made to villagers and the [[trading]] system, cleric villagers now sell eyes of ender for 7–11 [[emerald]]s, as one of their tier III trades.}}
{{History||1.9|snap=15w41a|Eyes of ender are no longer [[trading|sold]] by cleric [[villager]]s.}}
{{History|||snap=15w44b|An eye of ender is now used to craft an [[end crystal]].}}
{{History|||snap=pre3|Eyes of ender now point to the 125 new strongholds.<ref>{{bug|MC-91173}} resolved as "Fixed"</ref>}}
{{History||1.11|snap=16w32a|The [[entity]] ID has been changed from <code>EyeOfEnderSignal</code> to <code>eye_of_ender_signal</code>.}}
{{History||1.12|snap=17w17a|A new ''pop'' [[sound]] has been added when a thrown eye of ender bursts.}}
{{History||1.13|snap=17w47a|Prior to [[1.13/Flattening|''The Flattening'']], this [[item]]'s numeral ID was 381.}}
{{History|||snap=pre5|The [[entity]] ID has been changed to <code>eye_of_ender</code>.}}
{{History||1.14|snap=18w43a|[[File:Eye of Ender JE2 BE2.png|32px]] The texture of eyes of ender has been changed.}}
{{History||1.19|snap=22w11a|Eyes of Ender now lead to the corner of the chunk (0, ~, 0) instead of the center (8-9, ~, 8-9).<ref>{{bug|MC-253394}}</ref>}}
{{History|pocket}}
{{History||1.0.0|snap=alpha 0.17.0.1|[[File:Eye of Ender JE1 BE1.png|32px]] Added eyes of ender.}}
{{History|bedrock}}
{{History||1.10.0|snap=beta 1.10.0.3|[[File:Eye of Ender JE2 BE2.png|32px]] The texture of eyes of ender has been changed.}}
{{History||1.16.0|snap=beta 1.15.0.51|The [[particles]] of eyes of ender have been changed to match {{el|je}}.}}
{{History|console}}
{{History||xbox=TU7|xbone=CU1|ps=1.0|wiiu=Patch 1|[[File:Eye of Ender JE1 BE1.png|32px]] Added eyes of ender.}}
{{History||xbox=none|xbone=none|ps=1.90|wiiu=none|switch=none|[[File:Eye of Ender JE2 BE2.png|32px]] The texture of eyes of ender has been changed.}}
{{History|new 3ds}}
{{History||1.7.10|[[File:Eye of Ender JE1 BE1.png|32px]] Added eyes of ender.}}
{{History|foot}}
=== Historical images ===
<gallery>
File:Held_Eye_of_Ender.png|The eye of ender used to appear large in third-person view.
</gallery>
==Issues==
{{issue list}}
==Trivia ==
*When thrown in third-person view, the eyes of ender fly out from the player's feet instead of their hand.
*Before [[Java Edition 1.9]], eyes of ender can be purchased from cleric villagers, which means players can find a [[stronghold]] and go to [[the End]] without accessing [[the Nether]] at all.
*{{IN|bedrock}} if the player travels beyond a certain radius (roughly 740,000 blocks), eyes of ender always point to a stronghold near spawn, even though strongholds continue to generate past this limit. If one travels to this limit, they can see eyes of ender suddenly switching direction. A similar phenomenon occurs with the {{cmd|locate}} command.
==Gallery==
===Screenshots===
<gallery>
Stronghold Portal Room.png|An end portal frame containing a few eyes of ender.
EnderChestexample.png|An [[ender chest]] depicting an eye of ender on the front.
</gallery>
===In other media===
<gallery>
File:Eye of Ender JINX.jpg|Official T-shirt artwork "Eye of Ender" sold by JINX.
File:Happy Halloween Eye.jpg|A Halloween T-Shirt design featuring an eye of ender.
</gallery>
==External links==
*[http://www.strongholdfinder.com/ A super-easy stronghold triangulation tool]
*[http://jsfiddle.net/42EDX/40/ JSFiddle Eye of Ender triangulator - can guess the location of other 2 strongholds in the first ring]
*[https://ens-gijs.github.io/minecraft-stronghold-locator/ Minecraft Stronghold Locator Eye of Ender throw plotting visualizer - zoomable to show all possible stronghold rings]
*[https://github.com/winny-/stronghold Python Eye of Ender throw plotting tool]
*[http://www.purplefrog.com/~thoth/MinecraftStronghold/stronghold.html HTML Eye of Ender throw plotting visualizer (not updated after 1.9 stronghold placement changes)]
*[http://chunkbase.com/apps/stronghold-finder Chunk Base Stronghold Finder (seed-based)]
*[https://github.com/toolbox4minecraft/amidst/releases Amidst - File-based world visualizer]
*[http://minecraft.tournier.org/StrongholdLocator/ Find strongholds by analyzing stronghold.dat file]
== References==
{{reflist}}
{{Items}}
{{entities}}
[[cs:Endové oko]]
[[de:Enderauge]]
[[es:Ojo de ender]]
[[fr:Œil de l'Ender]]
[[hu:Végzet szeme]]
[[ja:エンダーアイ]]
[[ko:엔더의 눈]]
[[nl:Enderoog]]
[[pl:Oko Endera]]
[[pt:Olho de ender]]
[[ru:Око Края]]
[[th:ดวงตาแห่งเอนเดอร์]]
[[uk:Око Краю]]
[[zh:末影之眼]]</li><li>[[Poisonous Potato|Poisonous Potato]]<br/>{{Item
| title = Poisonous Potato
| image = Poisonous Potato.png
| heals = {{hunger|2}}
|effects={{EffectLink|Poison}} (0:05) (60% chance)
| stackable = Yes (64)
| renewable = Yes
}}
A '''poisonous potato''' is a type of [[potato]] that can [[poison]] the [[player]].
== Obtaining ==
The poisonous potato is a rare [[drop]] when harvesting (destroying) [[potato|potato crops]]; a fully grown plant has a 2% chance of dropping one in addition to the 2-5 regular potatoes.
=== Chest loot ===
{{LootChestItem|poisonous-potato}}
== Usage ==
Poisonous potatoes cannot be planted on [[farmland]] or [[Baked Potato|baked]]. They also have no use with the [[composter]].<ref>{{bug|MC-142373|resolution=WAI}}</ref>
=== Food ===
{{see also|Tutorials/Hunger management|title1=Hunger management}}
To eat a poisonous potato, press and hold {{control|use}} while it is selected in the hotbar. Eating one restores {{hunger|2}} [[hunger]] and 1.2 hunger [[Hunger#Mechanics|saturation]] and has a 60% chance of applying 5 seconds of [[Poison]] II, draining {{hp|4|poisoned=1}} points of [[health]].
Interestingly, a poisonous potato actually restores double the hunger and saturation than a normal, unpoisoned potato. (A normal potato gives {{hunger|1}} hunger and 0.6 saturation points.)
==Sounds==
{{Sound table/Entity/Food}}
== Advancements ==
{{load advancements|Husbandry;A Balanced Diet}}
== Data values ==
=== ID ===
{{edition|java}}:
{{ID table
|edition=java
|showforms=y
|generatetranslationkeys=y
|displayname=Poisonous Potato
|spritetype=item
|nameid=poisonous_potato
|form=item
|foot=1}}
{{edition|bedrock}}:
{{ID table
|edition=bedrock
|shownumericids=y
|showforms=y
|notshowbeitemforms=y
|generatetranslationkeys=y
|displayname=Poisonous Potato
|spritetype=item
|nameid=poisonous_potato
|id=282
|form=item
|foot=1}}
== History ==
{{History|java}}
{{History||1.4.2|snap=12w34a|[[File:Poisonous Potato JE1 BE1.png|32px]] Added poisonous potatoes.}}
{{History||1.13|snap=17w47a|Prior to [[Java_Edition_1.13/Flattening|''The Flattening'']], this [[item]]'s numeral ID was 394.}}
{{History|||snap=18w11a|Poisonous potatoes now generate in the [[chest]]s of [[shipwreck]]s.}}
{{History||1.14|snap=18w43a|[[File:Poisonous Potato JE2.png|32px]] The texture of poisonous potatoes has been changed.}}
{{History|||snap=18w50a|[[File:Poisonous Potato JE3 BE2.png|32px]] The texture of poisonous potatoes has been changed, once again.}}
{{History|pocket alpha}}
{{History||v0.12.1|snap=build 1|[[File:Poisonous Potato JE1 BE1.png|32px]] Added poisonous potatoes.}}
{{History|bedrock}}
{{History||1.4.0|snap=beta 1.2.14.2|Poisonous potatoes can now be found inside of [[shipwreck]] [[chest]]s.}}
{{History||1.10.0|snap=beta 1.10.0.3|[[File:Poisonous Potato JE3 BE2.png|32px]] The texture of poisonous potatoes has been changed.}}
{{History|console}}
{{History||xbox=TU14|xbone=CU1|ps=1.04|wiiu=Patch 1|switch=1.0.1|[[File:Poisonous Potato JE1 BE1.png|32px]] Added poisonous potatoes.}}
{{History||xbox=none|xbone=none|ps=1.90|wiiu=none|switch=none|[[File:Poisonous Potato JE3 BE2.png|32px]] The texture of poisonous potatoes has been changed.}}
{{History|New 3DS}}
{{History||0.1.0|[[File:Poisonous Potato JE1 BE1.png|32px]] Added poisonous potatoes.}}
{{History|foot}}
== Issues ==
{{issue list}}
== References ==
{{reflist}}
{{Items}}
[[Category:Plants]]
[[cs:Jedovatá brambora]]
[[de:Giftige Kartoffel]]
[[es:Patata envenenada]]
[[fr:Pomme de terre empoisonnée]]
[[hu:Mérgező burgonya]]
[[it:Patata velenosa]]
[[ja:青くなったジャガイモ]]
[[ko:독이 있는 감자]]
[[nl:Giftige aardappel]]
[[pl:Trujący ziemniak]]
[[pt:Batata venenosa]]
[[ru:Ядовитый картофель]]
[[th:มันฝรั่งพิษ]]
[[uk:Отруйна картопля]]
[[zh:毒马铃薯]]
[[Category:Food]]
[[Category:Renewable resources]]</li></ul> | beta 1.18.10.20 | ||||

Concept art for the lush caves and vegetation including Glow Berries.
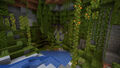
A view of the lush caves with glow berries from Minecraft Live 2020.
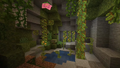
Lush cave in MINECON.

A view of the lush caves with glow berries, tweeted by LadyAgnes.
Another view of the lush caves with glow berries, in an interview with LadyAgnes.
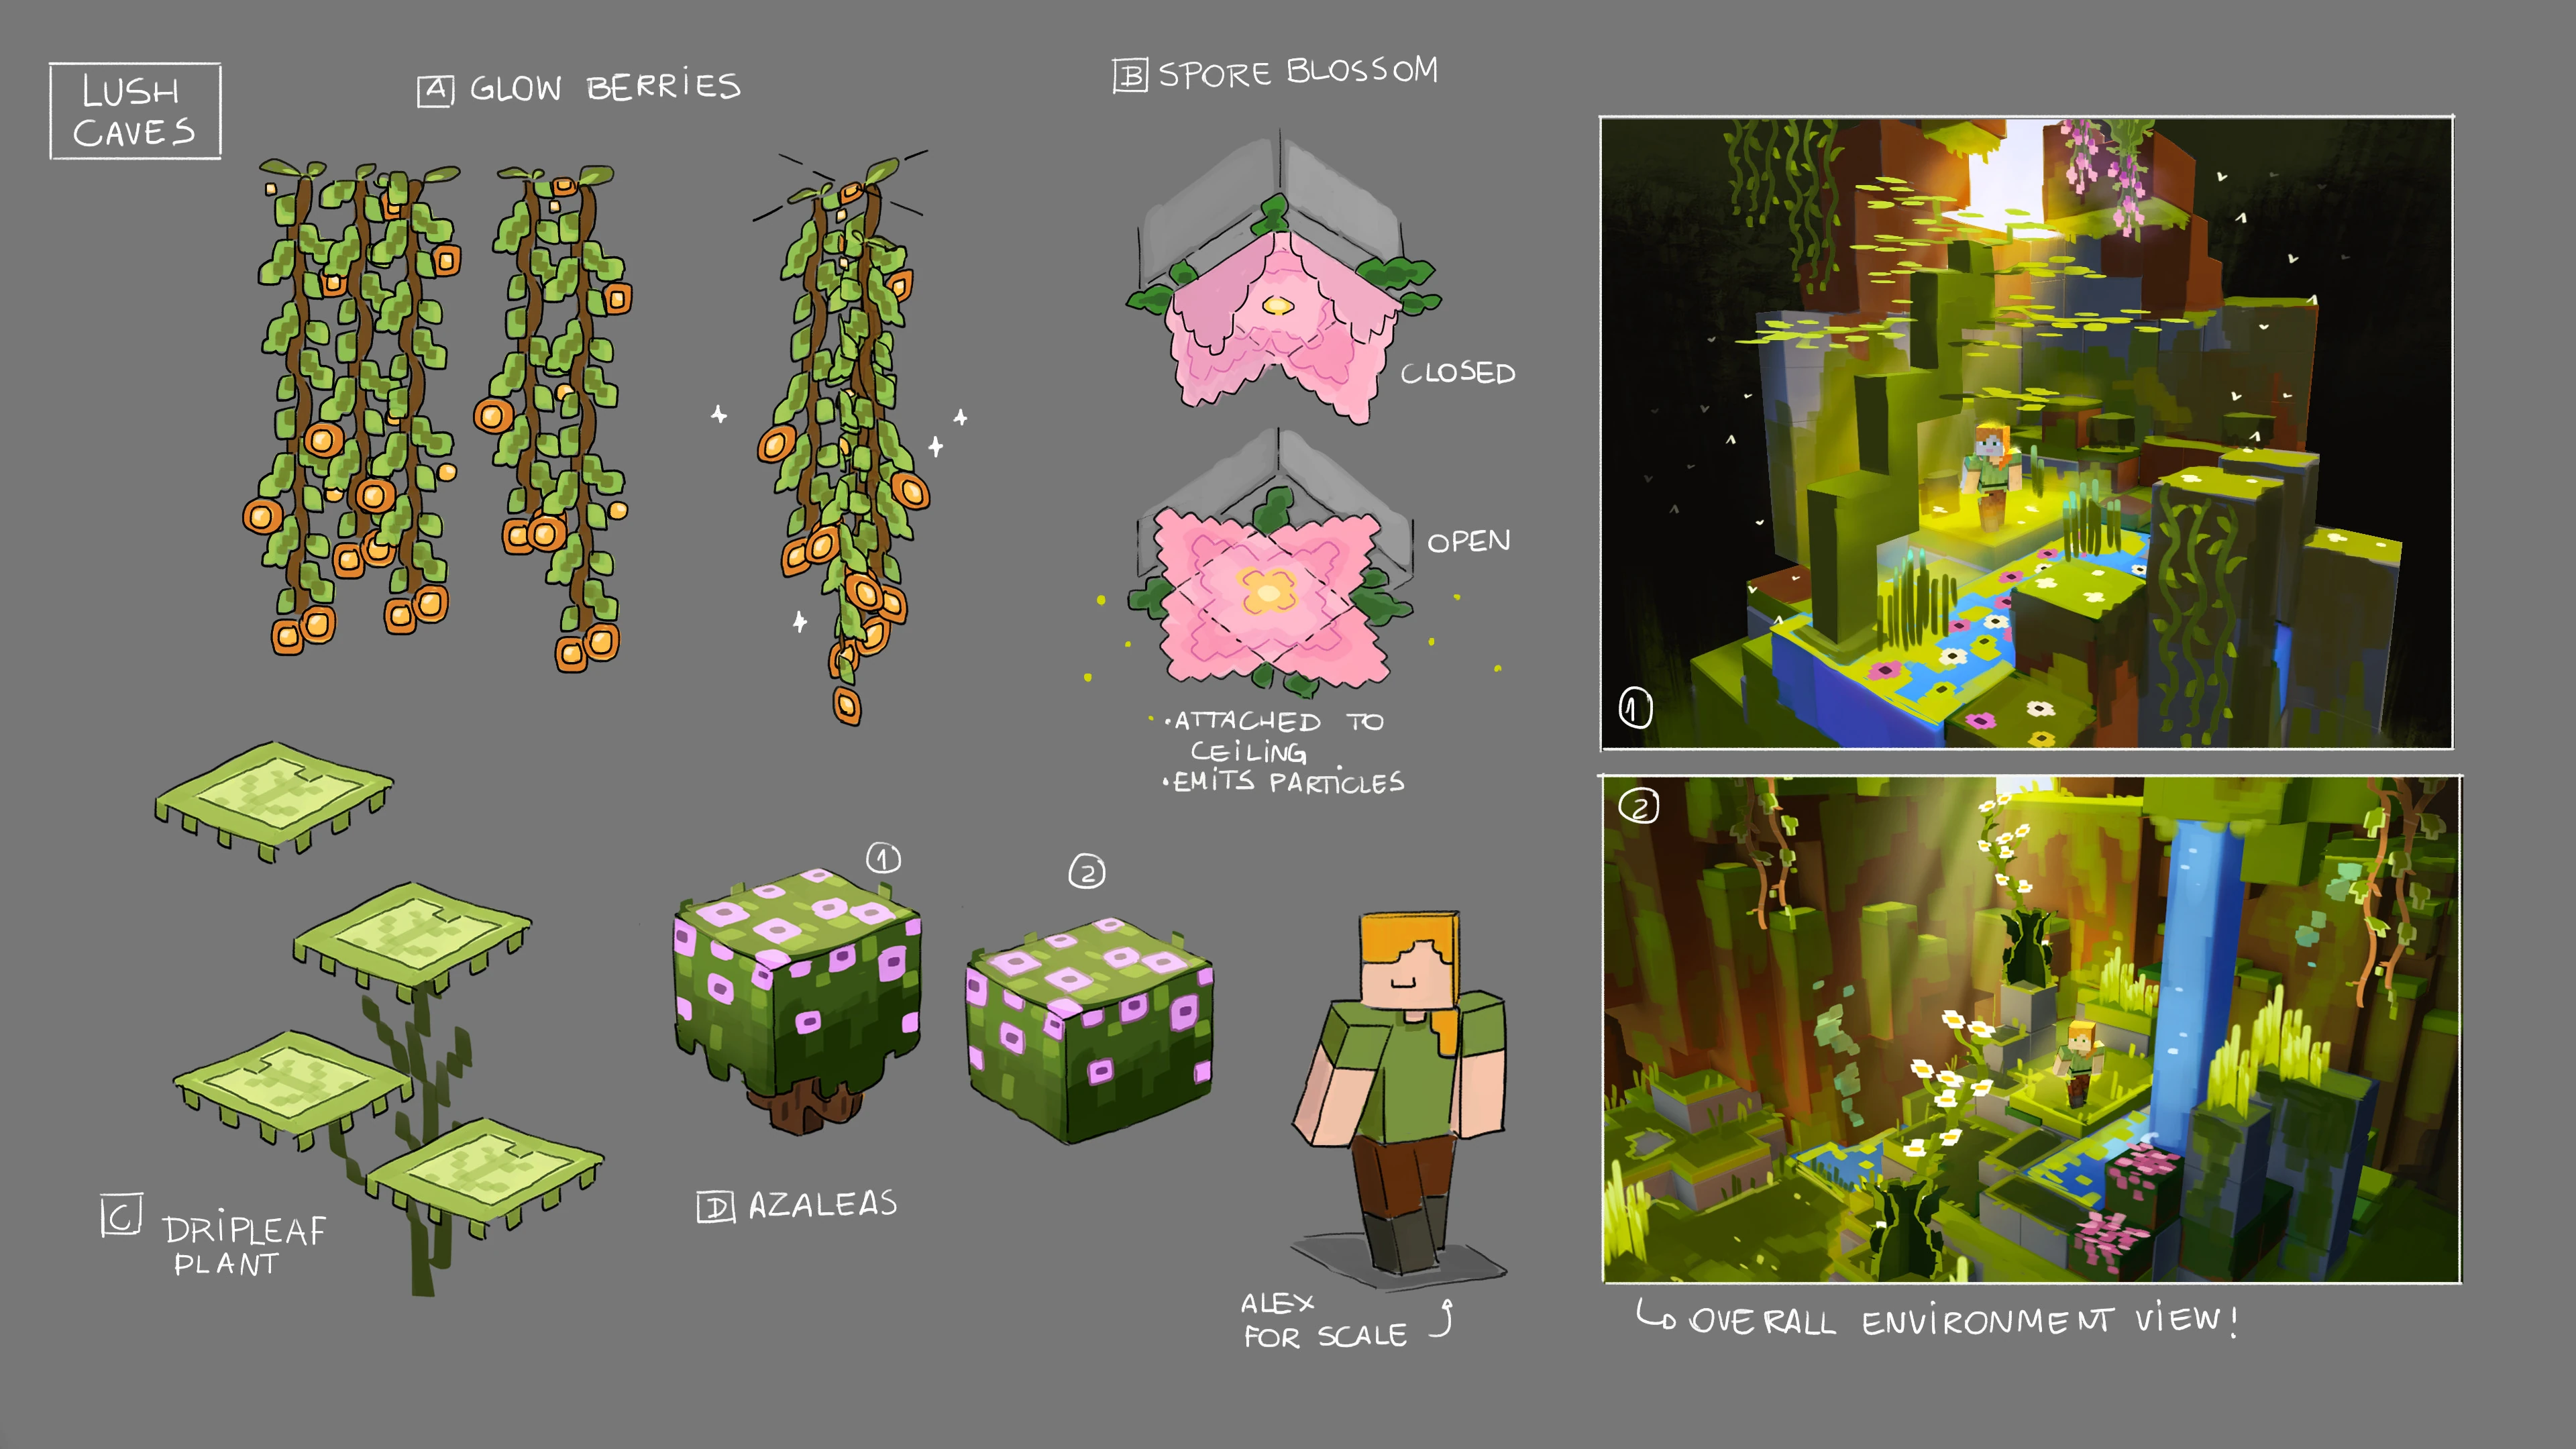
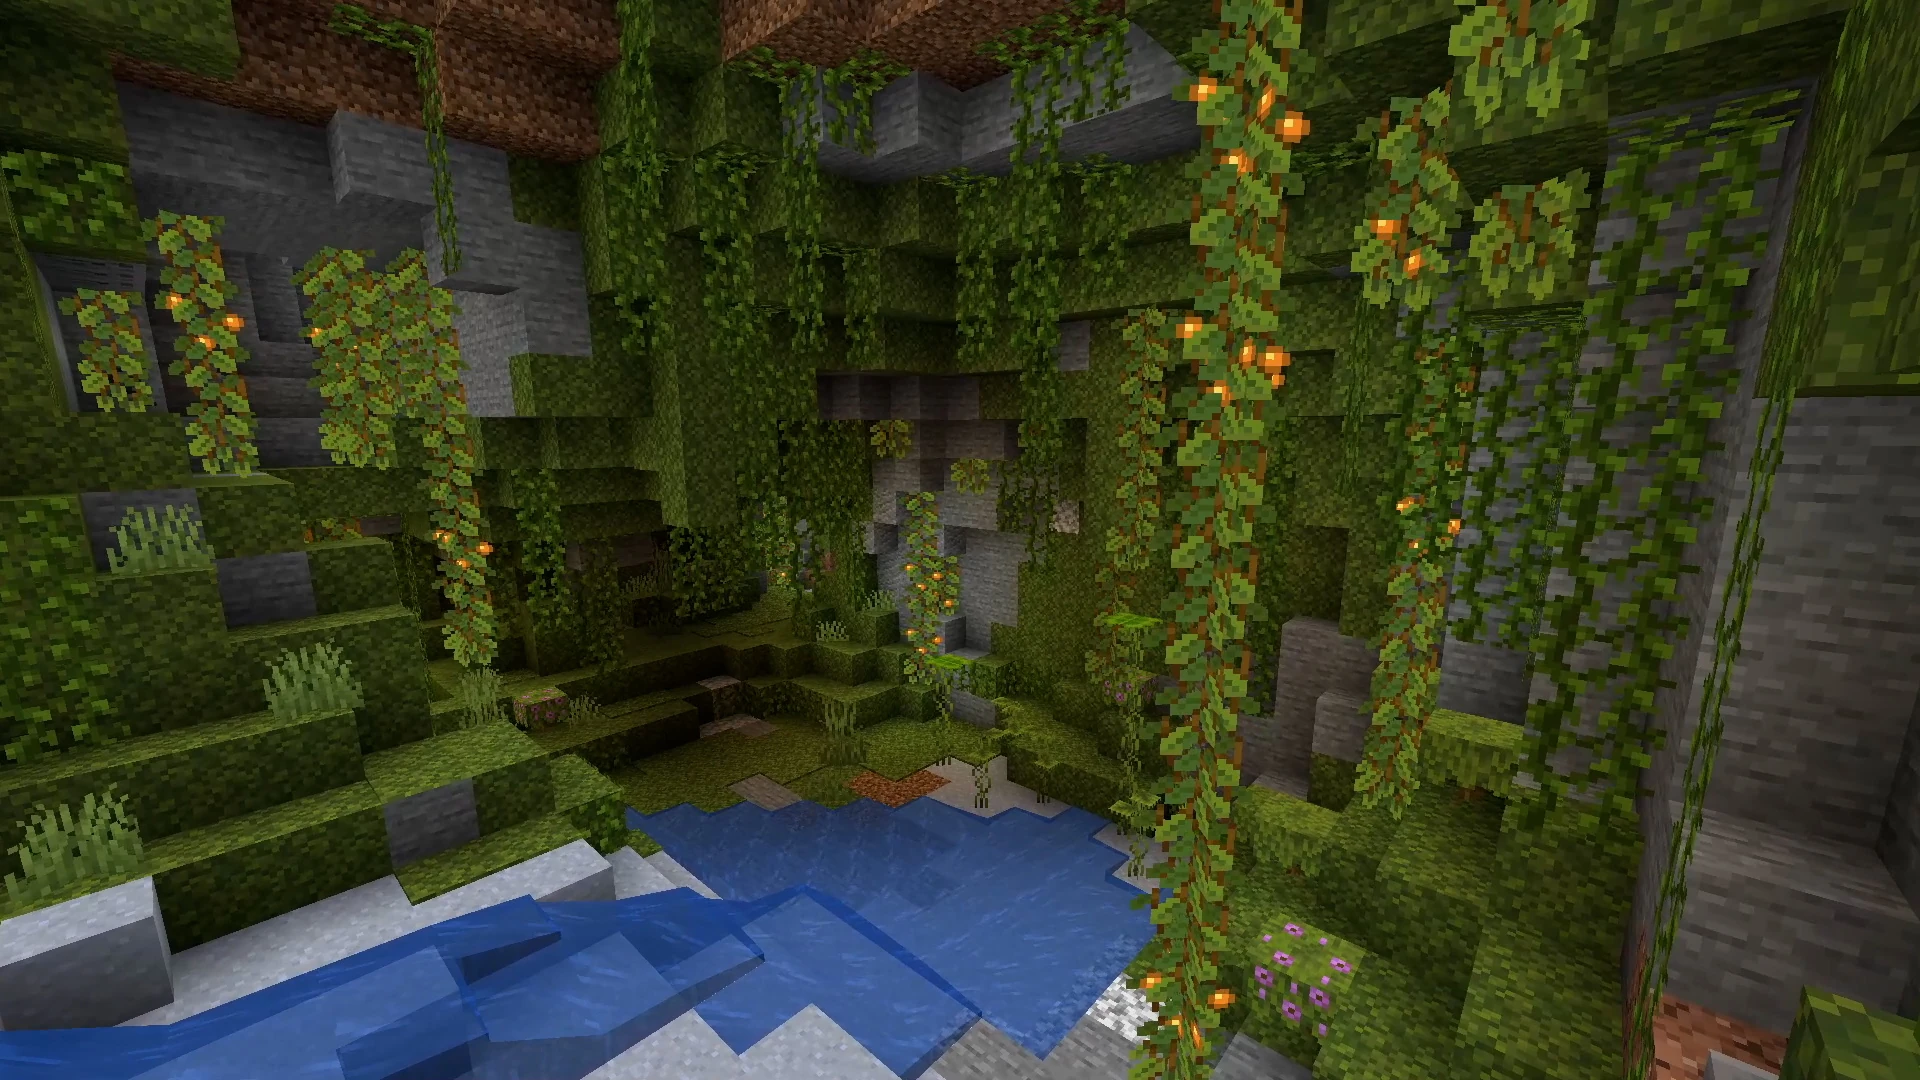
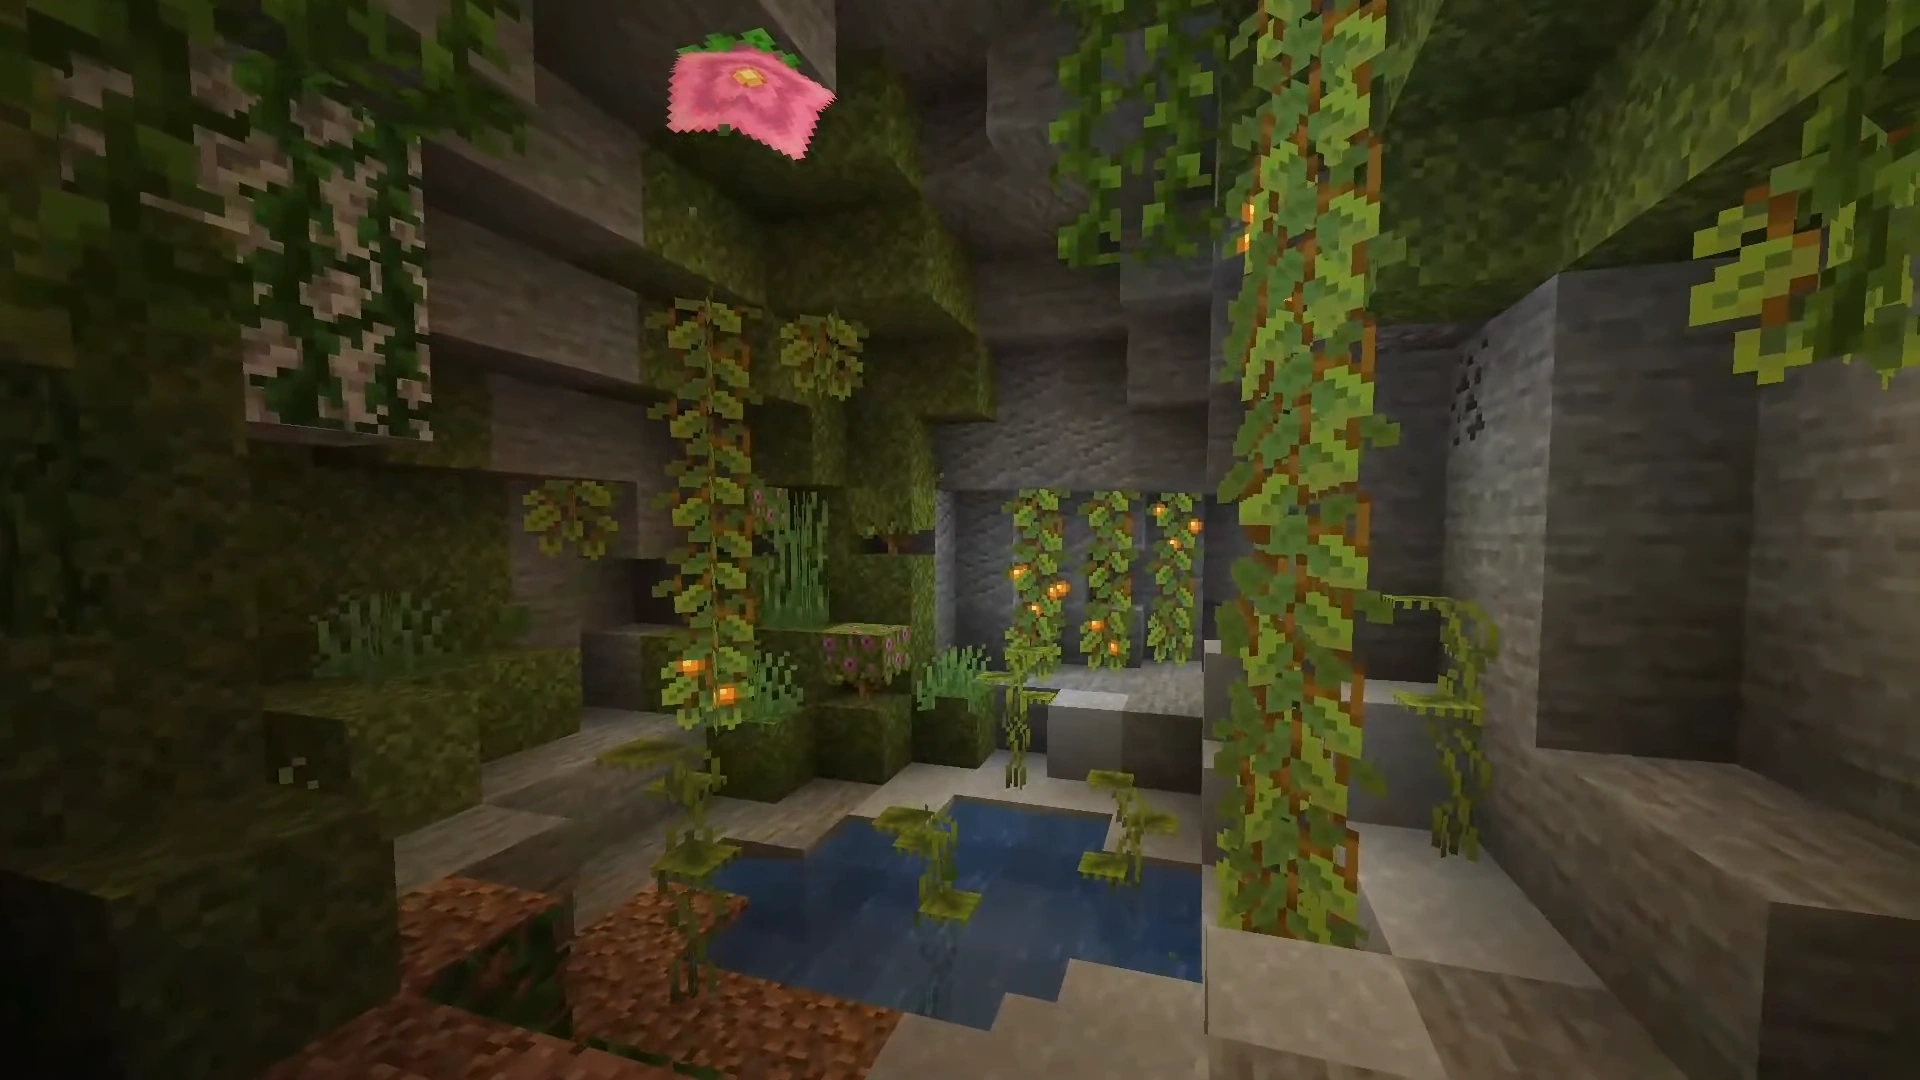

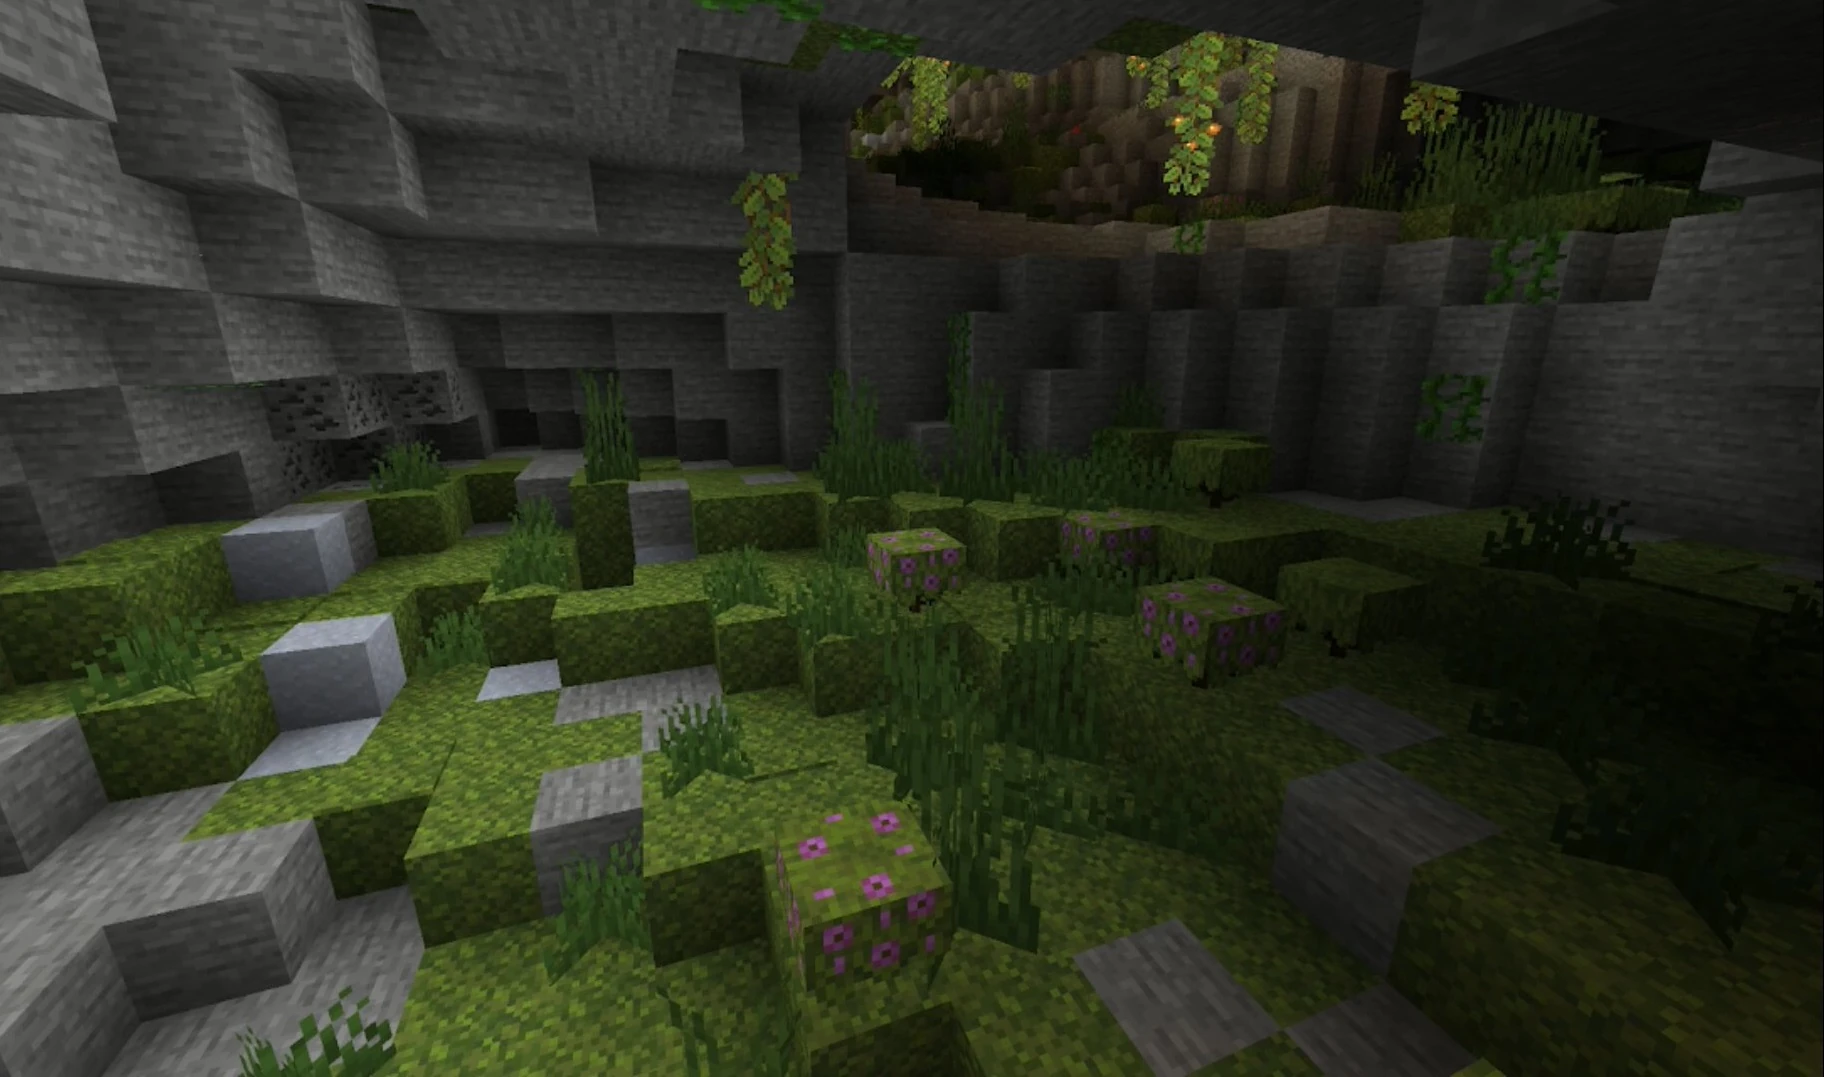
Cave vines "item"
- The following content is transcluded from Technical blocks/Cave Vines.
| Bedrock Edition | |||||
|---|---|---|---|---|---|
1.16.220{{Extension DPL}}<ul><li>[[Item Frame|Item Frame]]<br/>{{redirect|Frame}}
{{ItemEntity
| group = Item Frame
| 1-1 = Item Frame.png
| 1-2 = Item Frame (item).png
| group2 = Glow Item Frame
| 2-1 = Glow Item Frame.png
| 2-2 = Glow Item Frame (item).png
| extratext = [[#Renders|View all renders]]
| renewable = Yes
| stackable = Yes (64)
| drops = {{ItemLink|Item Frame}} (1)<br>
or
{{ItemLink|Glow Item Frame}} (1)<br>{{EnvSprite|items}} The item it contains.
}}
An '''item frame''' is an [[entity]]{{only|java|short=y}} or [[block entity]]{{only|bedrock|short=y}} that displays the item or block that is inside it.
A '''glow item frame''' keeps itself and the item inside it illuminated, even in the dark.
== Obtaining ==
=== Breaking ===
{{IN|je}}, an empty item frame can be broken simply by punching it. If the item frame contains an item, punching it drops the item, leaving the frame on the wall.
Because item frames are [[entities]] {{in|java}}, they can be broken in [[Adventure]] mode. They will also be targeted by commands using the @e selector.{{only|java}}
=== Natural generation ===
An item frame containing a pair of [[elytra]] generates in each [[end ship]].
[[File:BoatElytra.png|thumb|An item frame naturally generating in an end ship.]]
=== Crafting ===
{{Crafting
|head=1
|A1= Stick |B1= Stick |C1= Stick
|A2= Stick |B2= Leather |C2= Stick
|A3= Stick |B3= Stick |C3= Stick
|Output= Item Frame
|type= Decoration block
}}
{{Crafting
|foot=1
|Glow Ink Sac
|Item Frame
|Output= Glow Item Frame
|type= Decoration block
}}
=== Trading ===
Expert-level [[Trading#Cartographer|cartographer]] [[villager]]s have a chance to sell an item frame for 7 [[emerald]]s.
== Usage ==
=== Item display ===
[[File:Item Frame (map filled partial).png|thumb|150px|Item frame with partially filled map]]
Item frames can be placed on the sides of [[cactus]] blocks, [[pressure plate]]s, [[fence]]s, [[tree]]s, [[slab]]s, [[cobblestone wall]]s, [[chest]]s, [[door]]s, and all [[solid block]]s. They can also be placed on the top and bottom of these blocks. To place on chests and doors, the player needs to be [[sneaking]]. As item frames are an entity, multiple item frames can occupy the same block, although on different faces. It also allows non-solid blocks to occupy the same space.{{only|java}}
Players can place items in the frame by {{control|using}} the item. If a [[map]] is placed in an item frame, it enlarges to show the map in the size of a full block, with the item frame's location displayed as a green pointer on the map, pointing in the direction the item frame is facing. If this is done in the Nether, the green cursor spins around similar to the white cursor (players). If an item in an item frame has been renamed using an [[anvil]], it displays its custom name when the cursor is over the item frame. If the player places a block inside the frame, it is displayed in miniature half in, half out of the block. This can be most notably seen on stairs or slabs.
{{control|Pick block}} may be used on item frames by players in creative mode only, the control has no effect for players in Survival or Adventure mode. When the item frame is displaying an item, {{control|pick block}} picks the displayed item instead of the item frame.
Item frames can be placed on the lid of a [[shulker box]] that is positioned horizontally, but pop off when the lid is opened.{{only|java}}
=== Rotation ===
The displayed item can then be rotated by right-clicking the frame. Items displayed in the item frame can turn 45° diagonally, with a total of 8 possibilities (90° and 4 possibilities if it is a map), and the frame outputs a [[Mechanics/Redstone/Circuit#Power level|redstone signal]] depending on the rotation phase that can be interpreted by a [[redstone comparator]] (note that this rotation value is separate from the clock or compass rotation). As long as the frame remains placed, it remembers the orientation of the last item it held, and uses it for the next item it holds.{{only|java}}
=== Glow item frames ===
[[File:Item Frames Comparison.png|thumb|260px|Comparison between ordinary item frame and glow item frame in the dark.]]
When an item is placed inside a glow item frame, it appears to glow, even though it does not emit any [[light level]].
== Sounds ==
Item frames and glow item frames share the same sounds.
=== Generic ===
{{Edition|Bedrock}}:<!--Item frames are blocks in BE, so they get the generic section.-->
{{Sound table/Block/Item frame/BE}}
=== Unique ===
{{Edition|Java}}:
{{Sound table
|rowspan=2
|sound=Item Frame add item1.ogg
|sound2=Item Frame add item2.ogg
|soumd3=Item Frame add item3.ogg
|sound4=Item Frame add item4.ogg
|subtitle=Item Frame fills
|source=neutral
|description=When an item is placed in an item frame
|id=entity.item_frame.add_item
|translationkey=subtitles.entity.item_frame.add_item
|volume=1.0
|pitch=1.0
|distance=16}}
{{Sound table
|subtitle=Glow Item Frame fills
|source=neutral
|description=When an item is placed in a glow item frame
|id=entity.glow_item_frame.add_item
|translationkey=subtitles.entity.glow_item_frame.add_item
|volume=1.0
|pitch=1.0
|distance=16}}
{{Sound table
|rowspan=2
|sound=Item Frame break1.ogg
|sound2=Item Frame break2.ogg
|sound3=Item Frame break3.ogg
|subtitle=Item Frame breaks<ref group=sound name=breaks>{{bug|MC-194948}}</ref>
|source=neutral
|description=When an item frame is broken or pops off
|id=entity.item_frame.break
|translationkey=subtitles.entity.item_frame.break
|volume=1.0
|pitch=1.0
|distance=16}}
{{Sound table
|subtitle=Glow Item Frame breaks<ref group=sound name=breaks/>
|source=neutral
|description=When a glow item frame is broken or pops off
|id=entity.glow_item_frame.break
|translationkey=subtitles.entity.glow_item_frame.break
|volume=1.0
|pitch=1.0
|distance=16}}
{{Sound table
|rowspan=2
|sound=Item Frame place1.ogg
|sound2=Item Frame place2.ogg
|sound3=Item Frame place3.ogg
|sound4=Item Frame place4.ogg
|subtitle=Item Frame placed
|source=neutral
|description=When an item frame is placed
|id=entity.item_frame.place
|translationkey=subtitles.entity.item_frame.place
|volume=1.0
|pitch=1.0
|distance=16}}
{{Sound table
|subtitle=Glow Item Frame placed
|source=neutral
|description=When a glow item frame is placed
|id=entity.glow_item_frame.place
|translationkey=subtitles.entity.glow_item_frame.place
|volume=1.0
|pitch=1.0
|distance=16}}
{{Sound table
|rowspan=2
|sound=Item Frame remove item1.ogg
|sound2=Item Frame remove item2.ogg
|sound3=Item Frame remove item3.ogg
|sound4=Item Frame remove item4.ogg
|subtitle=Item Frame empties
|source=neutral
|description=When an item is removed from an item frame
|id=entity.item_frame.remove_item
|translationkey=subtitles.entity.item_frame.remove_item
|volume=1.0
|pitch=1.0
|distance=16}}
{{Sound table
|subtitle=Glow Item Frame empties
|source=neutral
|description=When an item is removed from a glow item frame
|id=entity.glow_item_frame.remove_item
|translationkey=subtitles.entity.glow_item_frame.remove_item
|volume=1.0
|pitch=1.0
|distance=16}}
{{Sound table
|rowspan=2
|sound=Item Frame rotate item1.ogg
|sound2=Item Frame rotate item2.ogg
|sound3=Item Frame rotate item3.ogg
|sound4=Item Frame rotate item4.ogg
|subtitle=Item Frame clicks
|source=neutral
|description=When an item is rotated in an item frame
|id=entity.item_frame.rotate_item
|translationkey=subtitles.entity.item_frame.rotate_item
|volume=1.0
|pitch=1.0
|distance=16}}
{{Sound table
|subtitle=Glow Item Frame clicks
|source=neutral
|description=When an item is rotated in an item frame
|id=entity.glow_item_frame.rotate_item
|translationkey=subtitles.entity.glow_item_frame.rotate_item
|volume=1.0
|pitch=1.0
|distance=16
|foot=1}}
{{Edition|Bedrock}}:
{{Sound table
|type=bedrock
|sound=Item Frame add item1.ogg
|sound2=Item Frame add item2.ogg
|soumd3=Item Frame add item3.ogg
|sound4=Item Frame add item4.ogg
|source=block
|description=When an item is placed in an item frame
|id=block.itemframe.add_item
|volume=1.0
|pitch=1.0}}
{{Sound table
|sound=Item Frame remove item1.ogg
|sound2=Item Frame remove item2.ogg
|sound3=Item Frame remove item3.ogg
|sound4=Item Frame remove item4.ogg
|source=block
|description=When an item is removed from an item frame
|id=block.itemframe.remove_item
|volume=1.0
|pitch=1.0}}
{{Sound table
|sound=Item Frame rotate item1.ogg
|sound2=Item Frame rotate item2.ogg
|sound3=Item Frame rotate item3.ogg
|sound4=Item Frame rotate item4.ogg
|source=block
|description=When an item is rotated in an item frame
|id=block.itemframe.rotate_item
|volume=1.0
|pitch=1.0
|foot=1}}
== Achievements ==
{{load achievements|Map room}}
== Data values ==
=== ID ===
{{edition|java}}:
{{ID table
|edition=java
|firstcolumnname=Item
|showforms=y
|generatetranslationkeys=y
|displayname=Item Frame
|spritetype=item
|nameid=item_frame
|form=item}}
{{ID table
|displayname=Glow Item Frame
|spritetype=item
|nameid=glow_item_frame
|form=item
|foot=1}}
{{ID table
|edition=java
|firstcolumnname=Entity
|generatetranslationkeys=y
|displayname=Item Frame
|spritetype=entity
|nameid=item_frame}}
{{ID table
|displayname=Glow Item Frame
|spritetype=entity
|nameid=glow_item_frame
|foot=1}}
{{edition|bedrock}}:
{{ID table
|edition=bedrock
|firstcolumnname=Item Frame
|shownumericids=y
|showforms=y
|generatetranslationkeys=y
|displayname=Item
|spritename=item-frame
|spritetype=item
|nameid=frame
|id=513
|form=item}}
{{ID table
|displayname=Block
|spritename=item-frame
|spritetype=block
|nameid=frame
|id=199
|form=block
|translationkey=-
|itemform=item.frame}}
{{ID table
|displayname=Item
|spritename=glow-item-frame
|spritetype=item
|nameid=glow_frame
|id=623
|form=item}}
{{ID table
|displayname=Block
|spritename=glow-item-frame
|spritetype=block
|nameid=glow_frame
|form=block
|id=594
|itemform=item.glow_frame
|translationkey=-
|foot=1}}
{{ID table
|notnamespaced=y
|displayname=Block entity
|spritename=item-frame
|spritetype=block
|nameid=ItemFrame}}
{{ID table
|displayname=Block entity
|spritename=glow-item-frame
|spritetype=block
|nameid=GlowItemFrame
|foot=1}}
=== Block states===
{{see also|Block states}}
{{/BS}}<br />
===Item data===
{{el|java}}:{{main|Player.dat format}}<div class="treeview">
*{{nbt|compound|tag}}'''<span data-ve-ignore="true" class="nowrap"> tag</span>''': The item's '''tag''' tag.
{{:Player.dat_format/Entity Spawners}}Unlike spawn eggs, cannot change the type of entity created using the <code>id</code> tag. Data that item frames do not normally use (see below) has no effect.
</div>
===Entity data===
{{main|Entity format}}
{{IN|java}}, item frames have entity data that define various properties of the entity.
{{/ED}}
===Block data===
{{IN|bedrock}}, an item frame has a block entity associated with it that holds additional data about the block.
See [[Bedrock Edition level format/Block entity format]].
== Video==
<div style="text-align:center">{{yt|rJLj95DBb-w}}</div>
==History==
{{History|java}}
{{History||August 15, 2012|link={{tweet|Dinnerbone|235724805196877824}}|[[File:Item Frame (pre-release).png|32px]] [[Dinnerbone]] showed the first image of item frames.}}
{{History||August 15, 2012|link={{tweet|Dinnerbone|235742974271700993}}|[[File:Item Frame (item) (pre-release).png|32px]] Dinnerbone showed item frame in item form.}}
{{History||August 15, 2012|link={{tweet|jeb_|235746335368814592}}|[[File:Item Frame (pre-release 2).png|32px]] [[Jeb]] showed the item frames with new model.}}
{{History||August 16, 2012|link={{tweet|Dinnerbone|236062188555624448}}|[[File:Item Frame (item) JE1 BE1.png|32px]] Dinnerbone showed the item frame in item form with new texture.}}
{{History||1.4.2|snap=12w34a|[[File:Item Frame JE1 BE1.png|32px]] [[File:Item Frame (item) JE1 BE1.png|32px]] Added item frames.
|There is currently a bug where attempting to place an item frame in [[multiplayer]] causes an internal server error, as well as other bugs.}}
{{History|||snap=12w34b|The multiplayer item frame bug has been fixed.}}
{{History|||snap=12w38a|Item frames no longer despawn when the [[player]] moves 20 [[block]]s away.}}
{{History||1.7.2|snap=13w36a|Items renamed using an [[anvil]] now display their name when looked at up close.}}
{{History|||snap=13w38a|[[Map]]s placed in an item frame now cover the whole block face, allowing seamless tiling of adjacent maps. This makes undiscovered areas of maps invisible.}}
{{History|||snap=13w43a|[[File:Item Frame (map) JE1 BE1.png|32px]] Incomplete maps placed in item frames now display the item frame texture underneath.}}
{{History||1.8|snap=14w04a|[[Item]]s and [[block]]s displayed in the item frame now rotate 45 degrees when rotated instead of 90 degrees, and a [[comparator]] outputs a [[redstone]] signal depending on the rotation phase.}}
{{History|||snap=14w10a|Multiple item frames can no longer be placed on the same block face.}}
{{History||1.9|snap=15w41a|An item frame now generates in the treasure room of [[end ship]]s, above the [[shulker]] that guards the treasure. It holds [[elytra]].}}
{{History|||snap=15w49a|Item frames are no longer destroyed by [[lightning]] bolts.}}
{{History|||snap=15w50a|Added [[sound]]s to item frames: <code>entity.itemframe.add_item</code>, <code>entity.itemframe.break</code>, <code>entity.itemframe.place</code>, <code>entity.itemframe.remove_item</code>, and <code>entity.itemframe.rotate_item</code>.}}
{{History||1.11|snap=16w32a|The [[entity]] ID of item frames has been changed from <code>ItemFrame</code> to <code>item_frame</code>.}}
{{History||1.13|snap=17w47a|Prior to [[1.13/Flattening|''The Flattening'']], this [[item]]'s numeral ID was 389.}}
{{History|||snap=17w50a|Item frames can now be put on floors and ceilings.}}
{{History||1.14|snap=18w43a|[[File:Item Frame JE2 BE2.png|32px]] [[File:Item Frame (map) JE2 BE2.png|32px]] [[File:Item Frame (item) JE2 BE2.png|32px]] The textures of item frames have been changed.}}
{{History|||snap=19w11a|Item frames are now [[trading|sold]] by cartographer [[villager]]s.}}
{{History||1.15|snap=19w38a|[[File:Item Frame 19w38a.png|32px]] [[File:Item Frame Map 19w38a.png|32px]] Item frames now appear dark, same as suffocating [[mob]]s.<ref>{{bug|mc-161283|||Fixed}}</ref>}}
{{History|||snap=19w39a|Item frames are now colored correctly.}}
{{History||1.16|snap=20w10a|The NBT <code>Invisible</code> and <code>Fixed</code> have been added to item frames.}}
{{History||1.17|snap=21w03a|[[File:Glow Item Frame JE1 BE3.png|32px]] [[File:Glow Item Frame (map) JE1 BE3.png|32px]] [[File:Glow Item Frame (item) JE1 BE1.png|32px]] Added glow item frames.}}
{{History|||snap=21w10a|Added new [[subtitles]] for glow item frames.}}
{{History||1.18|snap=21w41a|[[File:Item Frame (item) JE3.png|32px]] [[File:Glow Item Frame (item) JE2.png|32px]] The textures of item frames and glow item frames as item have been changed.}}
{{History||1.19|snap=22w15a|Item frames now adjusts its hitbox to account for the larger size of a framed [[map]].}}
{{History|||snap=Pre-release 3|Reverted the change in 22w15a.}}
{{History|pocket alpha}}
{{History||v0.14.0|snap=build 1|[[File:Item Frame JE1 BE1.png|32px]] [[File:Item Frame (map) JE1 BE1.png|32px]] [[File:Item Frame (item) JE1 BE1.png|32px]] Added item frames.
|Item frames are considered as a [[block entity]] instead of an [[entity]].<ref>{{tweet|_tomcc|690127591525728257|Let's create some drama: ItemFrames in MCPE will behave like signs and won't be placeable in blocks, and can't put many in the same block.|21 Jan 2016}}</ref>}}
{{History|pocket}}
{{History||1.0.0|snap=alpha 0.17.0.1|An item frame containing [[elytra]] now generates in [[end city]] ships.}}
{{History|bedrock}}
{{History||1.10.0|snap=beta 1.10.0.3|[[File:Item Frame JE2 BE2.png|32px]] [[File:Item Frame (map) JE2 BE2.png|32px]] [[File:Item Frame (item) JE2 BE2.png|32px]] The textures of item frames have been changed.}}
{{History||1.11.0|snap=beta 1.11.0.4|Item frames can now be [[trading|bought]] from cartographer [[villager]]s.}}
{{History||1.13.0|snap=beta 1.13.0.9|Item frames can now be placed on the top and bottom of [[block]]s.}}
{{History||1.16.0|snap=beta 1.16.0.57|Trading has been changed, item frames are now offered by expert-level cartographer villager.}}
{{History||Caves & Cliffs (experimental)|link=Bedrock Edition 1.17.0|snap=beta 1.16.210.59|[[File:Item Frame.png|32px]] [[File:Item Frame (map) JE2 BE2.png|32px]] [[File:Glow Item Frame (item) JE1 BE1.png|32px]] Added glow item frames.
|Has the default item frame block texture.}}
{{History|||snap=beta 1.16.210.60|Temporarily removed glow item frames due to a crash.}}
{{History|||snap=beta 1.16.220.50|[[File:Item Frame JE2 BE2.png|32px]] [[File:Item Frame (map) JE2 BE2.png|32px]] [[File:Glow Item Frame (item) JE1 BE1.png|32px]] Re-added glow item frames.}}
{{History|||snap=beta 1.16.220.52|[[File:Glow Item Frame BE2.png|32px]] [[File:Glow Item Frame (map) BE2.png|32px]] Glow Item Frame block texture uses update block texture due to a bug.}}
{{History||1.17.0|snap=beta 1.16.230.52|[[File:Item Frame.png|32px]] [[File:Item Frame (map) JE2 BE2.png|32px]] The glow item frame block textures have been reverted back to the previous one.}}
{{History|||snap=beta 1.17.0.50|[[File:Glow Item Frame JE1 BE3.png|32px]] [[File:Glow Item Frame (map) JE1 BE3.png|32px]] The textures of glow item frames have been changed to match Java Edition.
|Now produces [[redstone]] signals.}}
{{History|||snap=beta 1.17.0.52|Maps now glow in glow item frames.
|Glow Item Frames are no longer available only through [[Experimental Gameplay]].}}
{{History||1.18.10|snap=beta 1.18.10.20|[[File:Item Frame (item) JE3.png|32px]] [[File:Glow Item Frame (item) JE2.png|32px]] The textures of item frames and glow item frames as item have been changed.}}
{{History|console}}
{{History||xbox=TU9|xbone=CU1|ps=1.0|wiiu=Patch 1|switch=1.0.1|[[File:Item Frame LCE1.png|32px]] [[File:Item Frame (item) JE1 BE1.png|32px]] Added item frames.}}
{{History||xbox=TU11|The limit for item frames in a world has been increased. A message is now displayed when the maximum number of item frames are reached.}}
{{History||xbox=TU12|[[File:Item Frame JE1 BE1.png|32px]] The entity texture of item frames has been changed.}}
{{History||xbox=TU31|xbone=CU19|ps=1.22|wiiu=Patch 3|[[Item]]s and [[block]]s displayed in the item frame now rotate 45 degrees when rotated instead of 90 degrees, and a [[redstone comparator|comparator]] now outputs a [[redstone]] signal depending on the rotation phase.}}
{{History||xbox=TU43|xbone=CU33|ps=1.36|wiiu=Patch 13|Added [[sound]]s for item frames.}}
{{History||xbox=TU56|xbone=CU47|ps=1.55|wiiu=Patch 26|switch=1.0.6|If the [[item]] in the item frame has a name (from an [[anvil]]) it now shows as if there is a name tag on the item frame.}}
{{History||xbox=none|xbone=none|ps=1.90|wiiu=none|switch=none|[[File:Item Frame JE2 BE2.png|32px]] [[File:Item Frame (map) JE2 BE2.png|32px]] [[File:Item Frame (item) JE2 BE2.png|32px]] The textures of item frames have been changed.}}
{{History|new 3ds}}
{{History||0.1.0|[[File:Item Frame JE1 BE1.png|32px]] [[File:Item Frame (map) JE1 BE1.png|32px]] [[File:Item Frame (item) JE1 BE1.png|32px]] Added item frames.}}
{{History|foot}}
== Issues==
{{issue list}}
== Trivia==
*The item frame is based upon a suggestion on [[wikipedia:Reddit|Reddit]], like the [[ender chest]] and [[flower pot]].<ref>{{Tweet|dinnerbone|235747041286975488}}</ref>
*The item frame is the only entity to reference a block [[model]].{{only|java|short=1}} Because of this, the texture of the frame border is the same as the birch planks texture.
*Item frame is the '''only''' placeable item that can interfere with other non-full block entities.
*Due to the way layer textures are displayed in Minecraft, maps float on item frames, similar to how icons float on the map itself.
== Gallery ==
=== Renders ===
<gallery>
Item Frame.png | Item Frame
Item Frame (map).png | Map Item Frame
Glow Item Frame.png | Glow Item Frame
Glow Item Frame (map).png | Map Glow Item Frame
Item Frame with Item.png | With item
Item Frame with rotated Item.png | With rotated item
Item Frame with Block.png | With block
Item Frame with rotated Block.png | With rotated block
</gallery>
=== Screenshots ===
<gallery>
Slab Frame.png|An item frame on the side of a slab.
ItemFrameBoxed.png|Four item frames in a one-block space.{{only|java}}
Item Frames Woodbase.png|The frame itself uses the texture of birch planks.
Item Frame rotation.gif|The rotation of an item in an item frame.
Front-back-itemframe.png|The front and back of an item frame are the same.
Big skills right there.png|A glow item frame inside a glow item frame.
Frame fireplace.png|An image of a fireplace retweeted by Dinnerbone.
11 Framed.png|[[11]] in an item frame.
</gallery>
=== Development images ===
<gallery>
Suggestion for itemframes.png|Original Reddit image suggesting item frames and flower pots.
Item frame2.png|Dinnerbone's first screenshot showing armor and weapons.
Item frame3.png|Dinnerbone's second screenshot showing a map, a compass, and two diamond swords.
Item frame4.png|Dinnerbone's third screenshot showing a golden sword in all directions, the item frame item itself, and a working clock.
Item frame1.png|Jeb's screenshot of the item frame.
FlowerPot.png|Snapshot showing plant pots and item frames.
Item frame5.png|Snapshot image of an ender pearl in an item frame.
SOATPC.png|An image tweeted by Dinnerbone showing how hovering over an item frame containing a renamed item shows a name tag.
Pocket Edition Item Frames.jpg|First image of item frames in ''Bedrock Edition''.
</gallery>
== See also ==
*{{ItemLink|Painting}}
== References ==
{{Reflist}}
{{Blocks|Utility}}
{{items}}
{{entities}}
[[Category:Block entities]]
[[Category:Utility blocks]]
[[Category:Manufactured blocks]]
[[Category:Generated structure blocks]]
[[Category:Storage]]
[[cs:Rámeček]]
[[de:Rahmen]]
[[es:Marco]]
[[fr:Cadre]]
[[hu:Eszköz keret]]
[[it:Cornice]]
[[ja:額縁]]
[[ko:아이템 액자]]
[[nl:Voorwerplijst]]
[[pl:Ramka na przedmiot]]
[[pt:Moldura]]
[[ru:Рамка]]
[[th:กรอบโชว์สิ่งของ]]
[[zh:物品展示框]]</li><li>[[Lead|Lead]]<br/>{{About|the item used for leashing and leading mobs|the element|Element#Lead}}
{{Item
| image = Lead.png
| stackable = Yes (64)
| renewable = Yes
}}
'''Leads''' are [[tool]]s used to leash and lead passive and neutral [[animal]]s, [[golem]]s and some [[monster]]s.
== Obtaining ==
=== Chest loot ===
{{LootChestItem|lead}}
=== Crafting ===
{{Crafting
|A1= String
|B1= String
|A2= String
|B2= Slimeball
|C3= String
|Output= Lead,2
|type= Tool
}}
=== Mob loot ===
[[Wandering Trader|Wandering trader]]s always spawn with 2 [[llama|trader llama]]s, each held with a lead. When a trader llama is detached, either by killing it or the wandering trader, dragging them far apart, or putting the llama in a [[boat]] or a [[minecart]], the lead drops at the llama's position.
== Usage ==
=== Crafting ingredient ===
{{crafting usage}}
=== Leashing mobs ===
[[File:SuspendedPigs.png|190px|thumb|One block tall mobs, such as pigs, suspend at 7 blocks above the ground.]]
[[File:SuspendedCows.png|190px|thumb|Two block tall mobs, such as cows, also suspend at 7 blocks above the ground.]]
{{control|Using}} a lead on a [[mob]] ties the lead to the mob, allowing it to be moved by the player. Multiple mobs can be held by leads at once, but each mob held requires its own lead.
It is possible to leash the following mobs and other entities:
{{columns-list|colwidth=20em|
* {{EntityLink|Allay}}
* {{EntityLink|Axolotl}}
* {{EntityLink|Bee}}
* {{EntityLink|Boat}}{{only|bedrock}}
* {{EntityLink|Camel}}
* {{EntityLink|Cat}}
* {{EntityLink|Chicken}}
* {{EntityLink|Chicken Jockey}} (only the mount)
* {{EntityLink|Cow}}
* {{EntityLink|Dolphin}}
* {{EntityLink|Donkey}}
* {{EntityLink|Fox}}
* {{EntityLink|Frog}}
* {{EntityLink|Glow Squid}}
* {{EntityLink|Goat}}
* {{EntityLink|Hoglin}}
* {{EntityLink|Horse}}
* {{EntityLink|Iron Golem}}
* {{EntityLink|Llama}}
* {{EntityLink|Mooshroom}}
* {{EntityLink|Mule}}
* {{EntityLink|Ocelot}}
* {{EntityLink|Parrot}}
* {{EntityLink|Pig}}
* {{EntityLink|Polar Bear}}
* {{EntityLink|Rabbit}}
* {{EntityLink|Sheep}}
* {{EntityLink|Skeleton Horse}}
* {{EntityLink|Skeleton Horseman}} (only the mount)
* {{EntityLink|Sniffer}}
* {{EntityLink|Snow Golem}}
* {{EntityLink|Squid}}
* {{EntityLink|Strider}}
* {{EntityLink|Trader Llama}}
* {{EntityLink|Wolf}}
* {{EntityLink|Zoglin}}
* {{EntityLink|Zombie Horse}}}}
Additionally, [[villager]]s, [[wandering trader]]s, and [[monster]]s other than the ones listed above, can be leashed using a map editor or [[NBT]] editor.
With a mob on a lead held by the player, {{control|using}} the lead on any type of [[fence]] (or [[wall]]{{only|bedrock|short=1}}) attaches the lead to it with a visible knot, tying the mob to it. To attach it to a wall on Bedrock Edition, the player must hold a lead in the main hand.<ref>{{bug|MCPE-108078}}</ref> Multiple leads may be attached to one fence post. A mob tied to a fence tends to stay within 5 blocks of the fence post.
A lead is broken by pressing the {{control|use item}} control on the mob again, hitting the knot, or removing the attached fence post. Leads also break when hit by projectiles. Whenever a lead is removed or broken, it drops as an [[item (entity)|item]] at the location of the mob. However, it does not drop when unleashed in Creative mode.{{only|java}}<ref>{{bug|MCPE-79639}}</ref> A lead does not break if the attached animal dies.
A lead can stretch a maximum of 10 blocks. If the mob is able to move towards the player or fence post, it does so. If not, or if the mob is moving very quickly away from the player, the lead breaks.
When the player or the knot is more than 7 blocks above the ground, the mob being leashed becomes suspended.
Most mobs that can be leashed can still be leashed even if attacking the player leashing them, and any attached leads do not break.
[[Wolf|Wolves]] cannot be leashed after becoming angry. Despite this, if they become angry while already leashed, the lead does not break, but it cannot be reattached when broken through other methods while the wolf is still angry.
A lead attached to a hoglin breaks if it becomes a [[zoglin]].
A lead does not prevent mobs from despawning if they normally would despawn.
When moving downwards and accelerating towards the ground, leashed mobs accumulate fall damage and take it if they hit the ground while still accelerating. When moving up or decelerating (such as when the lead is stretched to its limit), the fall distance is set to one block and the mob therefore does not take any fall damage if it touches the ground.
If the player walks into and back out of a [[nether portal]] while holding a lead connected to a mob, the lead remains attached to the mob. However, if a mob attached to a lead walks into a nether portal, the lead breaks and drops as an item in the other dimension.
A lead can be used to remove a mob from a boat without needing to break the boat, if the mob can normally be leashed.
If a chunk unloads while containing a leashed mob (either by the player walking too far away, or traveling to another dimension via a portal), the lead breaks and drops as an item, leaving the mob free to wander around.
== Sounds ==
{{Edition|Java}}:
{{Sound table
|sound=Lead Knot break1.ogg
|sound2=Lead Knot break2.ogg
|sound3=Lead Knot break3.ogg
|subtitle=Leash Knot breaks
|source=neutral
|description=When a leash knot is destroyed
|id=entity.leash_knot.break
|translationkey=subtitles.entity.leashknot.break
|volume=1.0
|pitch=1.0
|distance=16}}
{{Sound table
|sound=Lead Knot place1.ogg
|sound2=Lead Knot place2.ogg
|sound3=Lead Knot place3.ogg
|subtitle=Leash Knot tied
|source=neutral
|description=When a leash knot is placed on a fence
|id=entity.leash_knot.place
|translationkey=subtitles.entity.leashknot.place
|volume=1.0
|pitch=1.0
|distance=16
|foot=1}}
{{Edition|Bedrock}}:
{{Sound table
|type=bedrock
|sound=Lead Knot break1.ogg
|sound2=Lead Knot break2.ogg
|sound3=Lead Knot break3.ogg
|source=neutral
|description=When a leash knot is broken by {{ctrl|interacting}} with it
|id=leashknot.break
|volume=1.0
|pitch=1.0}}
{{Sound table
|sound=Lead Knot place1.ogg
|sound2=Lead Knot place2.ogg
|sound3=Lead Knot place3.ogg
|source=neutral
|description=When a leash knot is placed on a fence or wall
|id=leashknot.place
|volume=1.0
|pitch=1.0
|foot=1}}
== Leash Knot ==
'''Leash knot''' is an entity created when the [[player]] right-clicks the fence while having a mob leashed.
{{Entity| title = Leash Knot| image = Knot.png|imagesize= 100px|networkid='''[[JE]]''': 77}}
=== Data values ===
==== ID ====
{{edition|java}}:
{{ID table
|edition=java
|generatetranslationkeys=y
|displayname=Leash Knot
|spritetype=entity
|nameid=leash_knot
|foot=1}}
{{edition|bedrock}}:
{{ID table
|edition=bedrock
|shownumericids=y
|notshowbeitemforms=y
|generatetranslationkeys=y
|displayname=Leash Knot
|spritetype=entity
|nameid=leash_knot
|id=88
|foot=1}}
==== Entity data ====
Leash knots have entity data that define various properties of the entity.
{{el|java}}:
{{main|Entity format}}
{{/ED}}
{{el|bedrock}}:
: See [[Bedrock Edition level format/Entity format]].
== Data values ==
=== ID ===
{{edition|java}}:
{{ID table
|edition=java
|showforms=y
|generatetranslationkeys=y
|displayname=Lead
|spritetype=item
|nameid=lead
|form=item
|foot=1}}
{{edition|bedrock}}:
{{ID table
|edition=bedrock
|shownumericids=y
|showforms=y
|notshowbeitemforms=y
|generatetranslationkeys=y
|displayname=Lead
|spritetype=item
|nameid=lead
|id=547
|form=item
|foot=1}}
== Achievements ==
{{load achievements|So I Got That Going for Me}}
== Advancements ==
{{load advancements|When the Squad Hops into Town}}
== History ==
{{missing information|The history of a lot of mobs be leashed}}
{{History|java}}
{{History||1.6.1|snap=13w16a|[[File:Lead JE1 BE1.png|32px]] Added leads.
|Leads do not currently have a tooltip and are called “leashes” in [http://www.mojang.com/2013/04/minecraft-snapshot-13w16a-and-new-launcher/ the change notes].}}
{{History|||snap=13w16b|Leads have been given a tooltip.}}
{{History|||snap=13w18a|Leads have been given a [[crafting]] recipe.}}
{{History||1.9|snap=15w50a|Added a [[sound]] for leads: <code>entity.leashknot.place</code>.}}
{{History||1.11|snap=16w32a|The [[entity]] ID of the knot has been changed from <code>LeashKnot</code> to <code>leash_knot</code>.}}
{{History|||snap=16w39a|Leads can now be found in [[woodland mansion]] chests.}}
{{History||1.13|snap=17w47a|Prior to [[1.13/Flattening|''The Flattening'']], this [[item]]'s numeral ID was 420.}}
{{History||1.14|snap=18w43a|[[File:Lead JE2 BE2.png|32px]] The texture of leads has been changed.}}
{{History|||snap=19w05a|Added [[wandering trader]]s, which are naturally equipped with leads.}}
{{History||1.15|snap=?|[[Bee]]s can now be leashed.}}
{{History||1.16|snap=20w09a|[[Skeleton horse]]s and [[zombie horse]]s can now be leashed.<ref>{{bug|MC-166246}}</ref>}}
{{History|||snap=?|[[Hoglin]]s can now be leashed.}}
{{History||1.16.2|snap=20w27a|[[Zoglin]]s can now be leashed.}}
{{History||1.17|snap=21w19a|[[Squid]]s and [[glow squid]]s can now be leashed.<ref>{{bug|MC-136647}}</ref>}}
{{History|||snap=?|[[Axolotl]]s can now be leashed.}}
{{History||1.19|snap=22w13a|Lead may now be found in [[ancient city]] [[chest]]s.}}
{{History|||snap=?|[[Frog]]s can now be leashed.}}
{{History||1.19.3|snap=22w42a|[[Camel]]s can now be leashed.|Mobs no longer accumulate fall damage when dangling on leads.<ref>{{bug|MC-14167||Mobs build up fall damage when dangling on a lead|Fixed}}</ref>}}
{{History||1.20 (Experimental)|link=1.19.4|snap=?|[[Sniffer]]s can now be leashed.}}
{{History||1.20|snap=23w12a|Lead can now be found in [[suspicious gravel]] and [[suspicious sand]] in [[trail ruins]].}}
{{History|||snap=23w16a|Lead no longer generates in [[suspicious sand]] in [[trail ruins]].|Due to the split of the archaeological loot tables for the suspicious gravel within the [[trail ruins]]; lead now is in the common loot.}}
{{History|pocket alpha}}
{{History||v0.15.0|snap=build 1|[[File:Lead JE1 BE1.png|32px]] Added leads.}}
{{History|pocket}}
{{History||1.1.0|snap=alpha 1.1.0.0|Leads now have better "physics".
|The [[entity]] ID of the knot has been changed from <code>leashknot</code> to <code>leash_knot</code>.
|Leads can now be found inside [[woodland mansion]] [[chest]]s.}}
{{History|bedrock}}
{{History||1.4.0|snap=beta 1.2.14.2|Leads can now be found inside [[buried treasure]] [[chest]]s.
|Leads can now be used on [[boat]]s.}}
{{History||1.4.0|snap=beta 1.2.20.1|Leads can now be used to craft [[balloon]]s.}}
{{History||1.10.0|snap=beta 1.10.0.3|[[File:Lead JE2 BE2.png|32px]] The texture of leads has been changed.
|[[Wandering trader]]s now [[drops|drop]] leads after they are detached from trader [[llama]]s.}}
{{History||1.14.0|snap=beta 1.14.0.1|Leads can now be used on [[polar bear]]s, [[ocelot]]s, [[parrot]]s, [[dolphin]]s and old [[villager]]s.}}
{{History||1.19.0|snap=beta 1.19.0.20|Allays can now be leashed.}}
{{History|console}}
{{History||xbox=TU19|xbone=CU7|ps=1.12|wiiu=Patch 1|switch=1.0.1|[[File:Lead JE1 BE1.png|32px]] Added leads.}}
{{History||xbox=TU43|xbone=CU33|ps=1.36|wiiu=Patch 13|[[Sound]]s have been added for leads.}}
{{History|Ps4}}
{{History||1.90|[[File:Lead JE2 BE2.png|32px]] The texture of leads has been changed.}}
{{History|3ds}}
{{History||0.1.0|[[File:Lead JE1 BE1.png|32px]] Added leads.}}
{{History|foot}}
== Issues ==
{{issue list|Lead|Leash}}
== Trivia ==
[[File:Steve wearing Lead.png|100px]] [[File:Alex wearing Lead.png|100px]]
* The lead is named as "leash" in the texture file.
* If a [[player]] goes to sleep while holding a mob on a lead, the lead remains attached.
* {{IN|Java}}, when using the {{cmd|item}} command to put a lead in a player's head slot, the item gets rotated and positioned in such a way that it looks like the player is wearing a monocle.
== Gallery ==
<gallery>
Multiple_Leash.png|Many animals can be tied to one fence post.
HorseLeashedOnAFence.png|A [[horse]] wearing [[golden horse armor]] that is leashed to a fence post.
ThreeTiedSheep.png|Three sheep tied to the same fence.
More accurate lead mobs.png|A shot of all the mobs that could be tied with leads as of 1.6.1, except donkeys and mules.
Yo Yo.png|With the use of the leash, it is possible to suspend animals in the air by tying the leash on high-up fence posts.
YoYo.png|A [[donkey]] with the Grumm/Dinnerbone [[name tag]] [[easter egg]] tied to a fence with a lead to make a yo-yo.
Flying_Sheep.png|Several [[sheep]] hanging in the air in [[Creative]] mode.
Pocket Edition Lead.jpg|First image of a lead in ''Bedrock Edition''.
</gallery>
== References ==
{{Reflist}}
== External Links ==
*[https://www.minecraft.net/en-us/article/taking-inventory-lead Taking Inventory: Lead] – Minecraft.net on April 8, 2022
{{items}}
{{entities}}
[[Category:Tools]]
[[de:Leine]]
[[es:Rienda]]
[[fr:Laisse]]
[[hu:Lasszó]]
[[it:Guinzaglio]]
[[ja:リード]]
[[ko:끈]]
[[nl:Leidtouw]]
[[pl:Smycz]]
[[pt:Laço]]
[[ru:Поводок]]
[[th:เชือกจูง]]
[[zh:拴绳]]
[[Category:Renewable resources]]</li></ul> | beta 1.16.220.52 | Added cave vines as an item, with an unknown texture. They can be obtained via pick block. | |||
1.17.0{{Extension DPL}}<ul><li>[[Blue Dye|Blue Dye]]<br/>{{Item
|image = Blue_Dye_JE1_BE1.png
|renewable = Yes
|stackable = Yes (64)
}}
'''Blue dye''' is a [[Dye#Primary|primary dye color]].
== Obtaining ==
=== Crafting ===
{{Crafting
|Lapis Lazuli
|Output=Blue Dye
|type=Material
|head=1
}}
{{Crafting
|Cornflower
|Output=Blue Dye
|type=Material
|foot=1
}}
=== Chest loot ===
{{#invoke:LootChest|base3|blue-dye}}
== Usage ==
{{dye usage}}
=== Crafting ingredient ===
{{crafting usage|ignore=Banner|continue=1}}
{{banner crafting usage}}
=== Loom ingredient ===
{{Banner loom usage|Blue Dye}}
=== Trading ===
Expert-level shepherd villagers have a {{frac|1|6}} chance to buy 12 blue dye for an emerald.
== Data values ==
=== ID ===
{{edition|java}}:
{{ID table
|edition=java
|showforms=y
|generatetranslationkeys=y
|displayname=Blue Dye
|spritetype=item
|nameid=blue_dye
|form=item
|foot=1}}
{{edition|bedrock}}:
{{ID table
|edition=bedrock
|showaliasids=y
|shownumericids=y
|showforms=y
|notshowbeitemforms=y
|generatetranslationkeys=y
|displayname=Blue Dye
|spritetype=item
|nameid=blue_dye
|aliasid=dye / 18
|id=399
|form=item
|translationkey=item.dye.blue_new.name
|foot=1}}
== History ==
{{History|java}}
{{History||1.14|snap=18w43a|[[File:Blue_Dye_JE1_BE1.png|32px]] Added blue dye.}}
{{History|||snap=18w44a|Blue dyes now can changed the text color on the [[sign]]s to blue.}}
{{History|||snap=19w05a|Added the [[wandering trader]], which sell blue dyes.}}
{{History|||snap=19w11a|Blue dyes can now be [[trading|bought]] by shepherd villagers.}}
{{History||1.17|snap=20w45a|Blue dyes can now used to craft newly added [[blue candle]]s.}}
{{History|||snap=21w19a|Blue dyes can no longer used to craft blue candles.}}
{{History|||snap=Pre-release 1|Blue dyes can once again used to craft blue candles.}}
{{History||1.20<br>(Experimental)|link=1.19.3|snap=22w42a|Blue dyes can now change the text color on [[hanging sign]]s to blue.}}
{{History||1.20|snap=23w12a|Blue dye can now be found in [[suspicious gravel]] and [[suspicious sand]] in [[trail ruins]].}}
{{History|||snap=23w16a|Blue dye no longer generates in [[suspicious sand]] in [[trail ruins]].|Due to the split of the archaeological loot tables for the suspicious gravel within the [[trail ruins]]; blue dye now is in the common loot.}}
{{History|bedrock}}
{{History||1.8.0|snap=beta 1.8.0.10|[[File:Blue_Dye_JE1_BE1.png|32px]] Added blue dye.}}
{{History||1.9.0|snap=beta 1.9.0.0|Added [[flower|cornflowers]], which can be used to [[crafting|craft]] blue dye.}}
{{History||1.10.0|snap=beta 1.10.0.3|Blue dye can now be used to [[dye]] white [[carpet]]s and uncolored [[glass pane]]s.}}
{{History||1.11.0|snap=beta 1.11.0.4|Blue dye can now be [[trading|sold]] to shepherd [[villager]]s.}}
{{History||1.16.100|snap=beta 1.16.100.56|The ID of blue dye has been changed from <code>dye/18</code> to <code>blue_dye</code>.}}
{{History|ps4}}
{{History||1.83|[[File:Blue_Dye_JE1_BE1.png|32px]] Added blue dye.}}
{{History|foot}}
== Issues ==
{{issue list}}
== References ==
{{Reflist}}
{{Items}}
[[Category:Items]]
[[Category:Dyes]]
[[Category:Renewable resources]]
[[de:Blauer Farbstoff]]
[[es:Tinte azul]]
[[fr:Teinture bleue]]
[[ja:青色の染料]]
[[ko:파란색 염료]]
[[pl: Niebieski barwnik]]
[[pt:Corante azul]]
[[zh:蓝色染料]]</li><li>[[Melon Seeds|Melon Seeds]]<br/>{{Block
|image = <gallery>
Melon Stem Age 0.png | Age 0
Melon Stem Age 1.png | Age 1
Melon Stem Age 2.png | Age 2
Melon Stem Age 3.png | Age 3
Melon Stem Age 4.png | Age 4
Melon Stem Age 5.png | Age 5
Melon Stem Age 6.png | Age 6
Melon Stem Age 7.png | Age 7
</gallery>
| image2 = <gallery>
Attached Melon Stem (N).png | North
Attached Melon Stem (E).png | East
Attached Melon Stem (S).png | South
Attached Melon Stem (W).png | West
</gallery>
| transparent = Yes
| light = No
| tool = none
| renewable = Yes
| stackable = Yes (64)
| flammable = No
| lavasusceptible = No
}}'''Melon seeds''' are items obtained from [[Melon Slice|melon slices]] that can be used to grow melon stems.
'''Melon stems''' are plants grown on [[farmland]] that, over time, grow [[melon]]s on dirt, mud and moss blocks adjacent to them.
== Obtaining ==
=== Breaking ===
When broken, a melon stem drops 0–3 melon seeds. The chance for melon seeds to drop increases with the stem's age.
{| class="wikitable"
! rowspan="3" |[[Resource location]]
! rowspan="3" | Source
! colspan="4" | Default
|-
| colspan="1" rowspan="2" style="text-align:center" | Nothing || colspan="3" style="text-align:center" |{{ItemLink|Melon Seeds|Melon seeds}}
|-
| style="text-align:center" | 1 || style="text-align:center" | 2 || style="text-align:center" | 3
|-
| rowspan="8" |<code>blocks/melon_stem</code>
|{{BlockLink|Melon Stem|Melon stem}} <code>age = 0</code>
| style="text-align:center" |81.3%|| style="text-align:center" |17.42%|| style="text-align:center" |1.24%|| style="text-align:center" |0.03%
|-
|{{BlockLink|Melon Stem|Melon stem}} <code>age = 1</code>
| style="text-align:center" |65.1%|| style="text-align:center" |30.04%|| style="text-align:center" |4.62%|| style="text-align:center" |0.24%
|-
|{{BlockLink|Melon Stem|Melon stem}} <code>age = 2</code>
| style="text-align:center" |51.2%|| style="text-align:center" |38.4%|| style="text-align:center" |9.6%|| style="text-align:center" |0.8%
|-
|{{BlockLink|Melon Stem|Melon stem}} <code>age = 3</code>
| style="text-align:center" |39.44%|| style="text-align:center" |43.02%|| style="text-align:center" |15.64%|| style="text-align:center" |1.9%
|-
|{{BlockLink|Melon Stem|Melon stem}} <code>age = 4</code>
| style="text-align:center" |29.13%|| style="text-align:center" |44.44%|| style="text-align:center" |22.22%|| style="text-align:center" |3.7%
|-
|{{BlockLink|Melon Stem|Melon stem}} <code>age = 5</code>
| style="text-align:center" |21.6%|| style="text-align:center" |43.2%|| style="text-align:center" |28.8%|| style="text-align:center" |6.4%
|-
|{{BlockLink|Melon Stem|Melon stem}} <code>age = 6</code>
| style="text-align:center" |15.17%|| style="text-align:center" |39.82%|| style="text-align:center" |34.84%|| style="text-align:center" |10.16%
|-
|{{BlockLink|Melon Stem|Melon stem}} <code>age = 7</code>
| style="text-align:center" |10.16%|| style="text-align:center" |34.84%|| style="text-align:center" |39.82%|| style="text-align:center" |15.17%
|-
| rowspan="1" |<code>blocks/attached_melon_stem</code>
|{{BlockLink|Attached Melon Stem|Attached Melon stem}}
| style="text-align:center" |10.16%|| style="text-align:center" |34.84%|| style="text-align:center" |39.82%|| style="text-align:center" |15.17%
|}
=== Natural generation ===
Melon stems generate naturally in stem farm inside [[woodland mansion]]s.
Melon stems generate in 20% of the farm plots in [[savanna]] [[village]]s, and 10% of the farm plots in [[desert]] villages.
=== Chest loot ===
{{LootChestItem|melon-seeds}}
=== Crafting ===
{{Crafting
|Melon Slice
|Output= Melon Seeds
|type= Material
}}
=== Trading ===
[[Wandering trader]]s sell melon seeds for 1 [[emerald]].
== Usage ==
=== Farming ===
{{see also|Tutorials/Pumpkin and melon farming}}
Melon seeds can be planted only on [[farmland]], as stems. Over time, a stem grows through several stages<sup>[''[[Talk:Pumpkin Seeds|needs testing]]'']</sup> and, at its final growth stage, will produce [[melon]]s on any adjacent [[dirt]], [[Coarse Dirt|coarse dirt]], [[Rooted Dirt|rooted dirt]], [[Grass Block|grass block]], [[farmland]], [[podzol]], [[mycelium]], [[Moss Block|moss block]], [[mud]] or [[Muddy Mangrove Roots|muddy mangrove roots]]. If a melon is already occupying a spot adjacent to a stem it does not grow more melons until the melons is removed. A single stem can grow an unlimited number of melons. Melon stems need a minimum light level of 10 in the block above the stem to grow and give melons. Melon seeds are affected by [[bone meal]] only with respect to stem growth; bone meal does not help produce the actual melons.
=== Breeding ===
Like other seeds, melon seeds can be used to [[breed]] [[chicken]]s, lead chickens around, and make baby chickens grow up faster by 10% of the remaining time.
=== Taming ===
Like other seeds, melon seeds can be used to tame [[parrot]]s.
=== Composting ===
Placing melon seeds into a [[composter]] has a 30% chance of raising the compost level by 1.
== Melon Stem ==
A '''melon stem''' is the block that is planted on [[farmland]] when melon seeds are used on it. It starts underground, and rises up as the plant grows. The stem is colored green when young, and then yellow once fully grown.
The stem curves once a melon has grown from it. A fully-grown single stem connects to any [[melon]] in an adjacent square, thus there are 5 possible appearances to a stem. If there are multiple melons it can connect to, it favors the east, then west, north, and south. When the melon is removed, the stem returns to its straight shape.
== Sounds ==
{{Sound table/Block/Hard crop}}
== Data values ==
=== ID ===
{{edition|java}}:
{{ID table
|edition=java
|showblocktags=y
|showforms=y
|generatetranslationkeys=y
|displayname=Melon Stem
|spritetype=block
|nameid=melon_stem
|blocktags=bee_growables, crops
|form=block}}
{{ID table
|displayname=Attached Melon Stem
|spritetype=block
|nameid=attached_melon_stem
|form=block}}
{{ID table
|displayname=Melon Seeds
|spritetype=item
|nameid=melon_seeds
|form=item
|foot=1}}
{{edition|bedrock}}:
{{ID table
|edition=bedrock
|shownumericids=y
|showforms=y
|generatetranslationkeys=y
|displayname=Melon Stem
|spritetype=block
|nameid=melon_stem
|id=105
|form=block
|translationkey=-}}
{{ID table
|displayname=Melon Seeds
|spritetype=item
|nameid=melon_seeds
|id=293
|form=item
|foot=1}}
=== Block states ===
{{see also|Block states}}
{{/BS}}
== Advancements ==
{{load advancements|A Seedy Place}}
== History ==
{{info needed section|check if stems floated above farmland upon initial implementation}}
{{History|java beta}}
{{History||1.8|snap=Pre-release|[[File:Melon Seeds JE1 BE1.png|32px]] Added melon seeds.
|[[File:Melon Stem Age 0 JE1.png|32px]] [[File:Stem Age 1 JE1.png|32px]] [[File:Melon Stem Age 2 JE1.png|32px]] [[File:Melon Stem Age 3 JE1.png|32px]] [[File:Melon Stem Age 4 JE1.png|32px]] [[File:Melon Stem Age 5 JE1.png|32px]] [[File:Melon Stem Age 6 JE1.png|32px]] [[File:Melon Stem Age 7 JE1.png|32px]] Added the melon stem, with seven stages of growth.
|Melon seeds can found in the new [[mineshaft]] [[chest]]s.
|[[File:Attached Melon Stem (N) JE1.png|32px]] [[File:Attached Melon Stem (E) JE1.png|32px]] [[File:Attached Melon Stem (S) JE1.png|32px]] [[File:Attached Melon Stem (W) JE1.png|32px]] Melon stems have four slightly visually distinct appearances for each facing direction - the bent part of the stem rotates, but the other two planes do not.
|[[File:Melon Stem Age 8 JE1.png|32px]] [[File:Melon Stem Age 9 JE1.png|32px]] [[File:Melon Stem Age 10 JE1.png|32px]] [[File:Melon Stem Age 11 JE1.png|32px]] [[File:Melon Stem Age 12 JE1.png|32px]] [[File:Melon Stem Age 13 JE1.png|32px]] [[File:Melon Stem Age 14 JE1.png|32px]] [[File:Melon Stem Age 15 JE1.png|32px]] Melon stem data values 8–15 now show a glitched formation, with a floating stem with an attached stem cross eventually emerging below.
|[[File:Attached Stem Age 8 JE1.png|32px]] [[File:Attached Stem Age 9 JE1.png|32px]] [[File:Attached Stem Age 10 JE1.png|32px]] [[File:Attached Stem Age 11 JE1.png|32px]] [[File:Attached Stem Age 12 JE1.png|32px]] [[File:Attached Stem Age 13 JE1.png|32px]] [[File:Attached Stem Age 14 JE1.png|32px]] [[File:Attached Stem Age 15 JE1.png|32px]] Melon stem blocks with data values higher than 7 can now attach to adjacent fruits, which results in buggy stem textures with [[vines]] in the mix due to vines being below attached stems in [[terrain.png]].}}
{{History|||snap=Pre-release 2 ;)|Melon stems can now be grown faster using [[bone meal]].}}
{{History|java}}
{{History||1.3.1|snap=1.3|The texture of melon stems has been moved one pixel to the left in [[terrain.png]].
|[[File:Melon Stem Age 0 JE2.png|32px]] [[File:Melon Stem Age 1 JE2.png|32px]] [[File:Melon Stem Age 2 JE2.png|32px]] [[File:Melon Stem Age 3 JE2.png|32px]] [[File:Melon Stem Age 4 JE2.png|32px]] [[File:Melon Stem Age 5 JE2.png|32px]] [[File:Melon Stem Age 6 JE2.png|32px]] [[File:Melon Stem Age 7 JE2.png|32px]] Stems now appear slightly different.
|[[File:Melon Stem Age 8 JE2.png|32px]] [[File:Melon Stem Age 9 JE2.png|32px]] [[File:Melon Stem Age 10 JE2.png|32px]] [[File:Melon Stem Age 11 JE2.png|32px]] [[File:Melon Stem Age 12 JE2.png|32px]] [[File:Melon Stem Age 13 JE2.png|32px]] [[File:Melon Stem Age 14 JE2.png|32px]] [[File:Melon Stem Age 15 JE2.png|32px]] Overgrown stems now appear slightly different.
|[[File:Attached Melon Stem (N) JE2.png|32px]] [[File:Attached Melon Stem (E) JE2.png|32px]] [[File:Attached Melon Stem (S) JE2.png|32px]] [[File:Attached Melon Stem (W) JE2.png|32px]] Attached melon stems now appear slightly different.
|[[File:Attached Stem Age 8 JE2.png|32px]] [[File:Attached Stem Age 9 JE2.png|32px]] [[File:Attached Stem Age 10 JE2.png|32px]] [[File:Attached Stem Age 11 JE2.png|32px]] [[File:Attached Stem Age 12 JE2.png|32px]] [[File:Attached Stem Age 13 JE2.png|32px]] [[File:Attached Stem Age 14 JE2.png|32px]] [[File:Attached Stem Age 15 JE2.png|32px]] Overgrown attached melon stems now appear slightly different.}}
{{History||1.4.2|snap=12w36a|[[Chicken]]s now use [[wheat seeds]], melon seeds, and [[pumpkin seeds]], instead of [[wheat]] to breed.}}
{{History||1.5|snap=13w02a|[[File:Melon Stem Age 0 JE3.png|32px]] [[File:Melon Stem Age 1 JE3.png|32px]] [[File:Melon Stem Age 2 JE3.png|32px]] [[File:Melon Stem Age 3 JE3.png|32px]] [[File:Melon Stem Age 4 JE3.png|32px]] [[File:Melon Stem Age 5 JE3.png|32px]] [[File:Melon Stem Age 6 JE3.png|32px]] Melon stems now use a squished version of their texture for immature stems, depending on age.
|[[File:Melon Stem Age 8 JE3.png|32px]] [[File:Melon Stem Age 9 JE3.png|32px]] [[File:Melon Stem Age 10 JE3.png|32px]] [[File:Melon Stem Age 11 JE3.png|32px]] [[File:Melon Stem Age 12 JE3.png|32px]] [[File:Melon Stem Age 13 JE3.png|32px]] [[File:Melon Stem Age 14 JE3.png|32px]] [[File:Melon Stem Age 15 JE3.png|32px]] This also affects melon stems of ages 8–15, which are likewise stretched to accommodate its predicted size.
|[[File:Attached Stem Age 8 JE3.png|32px]] [[File:Attached Stem Age 9 JE3.png|32px]] [[File:Attached Stem Age 10 JE3.png|32px]] [[File:Attached Stem Age 11 JE3.png|32px]] [[File:Attached Stem Age 12 JE3.png|32px]] [[File:Attached Stem Age 13 JE3.png|32px]] [[File:Attached Stem Age 14 JE3.png|32px]] [[File:Attached Stem Age 15 JE3.png|32px]] Melon stems of extreme ages, which are attached to adjacent fruits, now show a stretched and tinted stem appearance.}}
{{History|||snap=13w03a|[[File:Melon Stem Age 0 JE4.png|32px]] [[File:Melon Stem Age 1 JE4.png|32px]] [[File:Melon Stem Age 2 JE4.png|32px]] [[File:Melon Stem Age 3 JE4.png|32px]] [[File:Melon Stem Age 4 JE4.png|32px]] [[File:Melon Stem Age 5 JE4.png|32px]] [[File:Melon Stem Age 6 JE4.png|32px]] [[File:Melon Stem Age 7 JE4.png|32px]] Melon stems are no longer squished or stretched to account for age.<ref>{{bug|MC-7111}}</ref>
|[[File:Melon Stem Age 8 JE4.png|32px]] [[File:Melon Stem Age 9 JE4.png|32px]] [[File:Melon Stem Age 10 JE4.png|32px]] [[File:Melon Stem Age 11 JE4.png|32px]] [[File:Melon Stem Age 12 JE4.png|32px]] [[File:Melon Stem Age 13 JE4.png|32px]] [[File:Melon Stem Age 14 JE4.png|32px]] [[File:Melon Stem Age 15 JE4.png|32px]] Melon stems with age values 8 through 15 now show a tinted [[trapdoor]] texture.
|From this version up until 14w08a, overgrown melon stems start to draw from the texture below them on the [[texture atlas]], in much the same way they previously did with terrain.png. However, as texture atlases are unstable and textures tend to change positions as new blocks and textures are added, overgrown stems change the texture they draw from every time new textures are added, which includes when textures added by [[mods]].}}
{{History|||snap=13w09a|[[File:Melon Stem Age 8 JE5.png|32px]] [[File:Melon Stem Age 9 JE5.png|32px]] [[File:Melon Stem Age 10 JE5.png|32px]] [[File:Melon Stem Age 11 JE5.png|32px]] [[File:Melon Stem Age 12 JE5.png|32px]] [[File:Melon Stem Age 13 JE5.png|32px]] [[File:Melon Stem Age 14 JE5.png|32px]] [[File:Melon Stem Age 15 JE5.png|32px]] Melon stems with age values 8–15 now show a tinted [[birch wood]] texture.}}
{{History||1.6.1|snap=13w24a|Melon and pumpkin stems have now been assigned separate textures.
|[[File:Melon Stem Age 8 JE6.png|32px]] [[File:Melon Stem Age 9 JE6.png|32px]] [[File:Melon Stem Age 10 JE6.png|32px]] [[File:Melon Stem Age 11 JE6.png|32px]] [[File:Melon Stem Age 12 JE6.png|32px]] [[File:Melon Stem Age 13 JE6.png|32px]] [[File:Melon Stem Age 14 JE6.png|32px]] [[File:Melon Stem Age 15 JE6.png|32px]] Melon stems with age values 8–15 now show a tinted [[note block]] texture.}}
{{History||1.7.2|snap=13w37a|Added the {{cmd|setblock}} [[commands|command]], allowing for invalid stem ages to be placed in the world without using external editors. This also allows them to be obtained in earlier versions via backdating.}}
{{History|||snap=13w41a|[[File:Melon Stem Age 8 JE7.png|32px]] [[File:Melon Stem Age 9 JE7.png|32px]] [[File:Melon Stem Age 10 JE7.png|32px]] [[File:Melon Stem Age 11 JE7.png|32px]] [[File:Melon Stem Age 12 JE7.png|32px]] [[File:Melon Stem Age 13 JE7.png|32px]] [[File:Melon Stem Age 14 JE7.png|32px]] [[File:Melon Stem Age 15 JE7.png|32px]] Melon stems with age values 8–15 now show a tinted [[netherrack]] texture.}}
{{History||1.8|snap=14w10a|[[File:Melon Stem Age 8 JE8.png|32px]] [[File:Melon Stem Age 9 JE8.png|32px]] [[File:Melon Stem Age 10 JE8.png|32px]] [[File:Melon Stem Age 11 JE8.png|32px]] Melon stems with data values 8–11 now display a tinted attached stem, with 8 facing west, 9 facing east, 10 facing north and 11 facing south.
|Invalid melon stems with data values 12-15 now crash the game.}}
{{History|||snap=14w25a|[[File:Melon Stem Age 0 JE5.png|32px]] [[File:Melon Stem Age 1 JE5.png|32px]] [[File:Melon Stem Age 2 JE5.png|32px]] [[File:Melon Stem Age 3 JE5.png|32px]] [[File:Melon Stem Age 4 JE5.png|32px]] [[File:Melon Stem Age 5 JE5.png|32px]] [[File:Melon Stem Age 6 JE5.png|32px]] [[File:Melon Stem Age 7 JE5.png|32px]] Melon stems now render as a single diagonal plane, or, in the case of attached stems, a diagonal and orthogonal plane.
|[[File:Attached Melon Stem (N) JE3.png|32px]] [[File:Attached Melon Stem (E) JE3.png|32px]] [[File:Attached Melon Stem (S) JE3.png|32px]] [[File:Attached Melon Stem (W) JE3.png|32px]] The attached melon stem [[model]] now fully rotates to the direction the stem points. Prior to this update, the base of the melon stem would stay the same while the long attaching section would differ, resulting in four possible attached stem appearances.
|Invalid overgrown melon stems have effectively been removed from the game, as attempting to place an out of range stem via {{cmd|setblock}} creates a stem of age 0 and loading a world with such stems existing causes a game crash.}}
{{History|||snap=14w26a|[[File:Melon Stem Age 0 JE6.png|32px]] [[File:Melon Stem Age 1 JE6.png|32px]] [[File:Melon Stem Age 2 JE6.png|32px]] [[File:Melon Stem Age 3 JE6.png|32px]] [[File:Melon Stem Age 4 JE6.png|32px]] [[File:Melon Stem Age 5 JE6.png|32px]] [[File:Melon Stem Age 6 JE6.png|32px]] [[File:Melon Stem Age 7 JE6.png|32px]] [[File:Attached Melon Stem (N) JE4.png|32px]] [[File:Attached Melon Stem (E) JE4.png|32px]] [[File:Attached Melon Stem (S) JE4.png|32px]] [[File:Attached Melon Stem (W) JE4.png|32px]] Melon stems now correctly render as crosses again.<ref>{{bug|MC-58136}}</ref>}}
{{History|||snap=14w27a|[[File:Attached Stem Age 0 14w27a.png|32px]] [[File:Attached Stem Age 1 14w27a.png|32px]] [[File:Attached Stem Age 2 14w27a.png|32px]] [[File:Attached Stem Age 3 14w27a.png|32px]] [[File:Attached Stem Age 4 14w27a.png|32px]] [[File:Attached Stem Age 5 14w27a.png|32px]] [[File:Attached Stem Age 6 14w27a.png|32px]] Due to a bug, all melon stems appear attached regardless of age or any actual attachment.<ref>{{bug|MC-60208}}</ref>}}
{{History|||snap=14w28a|All melon stems appearing attached regardless of age or any actual attachment has been fixed. However, melon stems still appear attached to adjacent fruits regardless of age due to a similar bug.<ref>{{bug|MC-61716}}</ref>}}
{{History|||snap=14w34d|Melon seeds can no longer be used for [[breeding]] [[chicken]]s.}}
{{History||1.9|snap=15w31a|Chickens can now use melon seeds to breed again.}}
{{History|||snap=15w44a|Melon seeds have been added to [[dungeon]] [[chest]]s.
|The average yield of melon seeds from [[mineshaft]] chests has been decreased.}}
{{History|||snap=15w45a|Melon stems must now be fully grown again to attach.}}
{{History||1.11|snap=16w39a|Melon seeds can now be found inside chests in the new [[woodland mansion]]s.
|Melon crops now generate inside woodland mansions.}}
{{History||1.12|snap=17w18b|Placing a melon seeds in farmland now gives the player the "A Seedy Place" [[advancement]].{{verify}}}}
{{History||1.13|snap=17w47a|The different block states for the <code>melon_stem</code> ID have been split up into their own IDs.
|Prior to [[1.13/Flattening|''The Flattening'']], this [[block]]'s numeral ID was 105, and the [[item]]'s 362.}}
{{History|||snap=17w48a|Attached melon stems no longer [[drops|drop]] seeds.}}
{{History||1.14|snap=18w43a|[[File:Attached Melon Stem (N) JE5.png|32px]] [[File:Attached Melon Stem (E) JE5.png|32px]] [[File:Attached Melon Stem (S) JE5.png|32px]] [[File:Attached Melon Stem (W) JE5.png|32px]] The texture of attached melon stems has been changed.}}
{{History|||snap=18w49a|Melon stems now generate in the updated [[savanna]] [[village]]s.}}
{{History|||snap=18w50a|Melon stems now generate in the updated [[desert]] [[village]]s.}}
{{History|||snap=19w03a|Placing melon seeds into the new [[composter]] has a 10% chance of raising the compost level by 1.}}
{{History|||snap=19w05a|Melon seeds now have a 30% chance of increasing the compost level in a composter by 1.
|Added [[Wandering Trader|wandering trader]]s, which sell melon seeds.}}
{{History||1.15|snap=19w34a|[[Bee]]s can now pollinate melon stems.}}
{{History|||snap=19w39a|Attached melon stems now [[drops|drop]] seeds again.<ref>{{bug|MC-136360}}</ref>}}
{{History||1.18|snap=Pre-release 5|[[File:Melon Seeds JE2.png|32px]] The texture of melon seeds has been changed.}}
{{History|pocket alpha}}
{{History||v0.5.0|Added melon seeds.
|[[File:Melon Stem Age 0 JE1.png|32px]] [[File:Stem Age 1 JE1.png|32px]] [[File:Melon Stem Age 2 JE1.png|32px]] [[File:Melon Stem Age 3 JE1.png|32px]] [[File:Melon Stem Age 4 JE1.png|32px]] [[File:Melon Stem Age 5 JE1.png|32px]] [[File:Melon Stem Age 6 JE1.png|32px]] [[File:Melon Stem Age 7 JE1.png|32px]] [[File:Attached Melon Stem (N) JE1.png|32px]] [[File:Attached Melon Stem (E) JE1.png|32px]] [[File:Attached Melon Stem (S) JE1.png|32px]] [[File:Attached Melon Stem (W) JE1.png|32px]]{{verify|Are these models correct?}} Added melon stems.}}
{{History||v0.6.0|[[File:Melon Seeds JE1 BE1.png|32px]] Melon seeds no longer use the pumpkin seeds texture.}}
{{History||v0.9.0|snap=?|Melon seeds can now be found in [[mineshaft]] chests.}}
{{History||v0.12.1|snap=build 1|Melon seeds are no longer available from the [[Nether reactor]].}}
{{History||v0.14.0|snap=build 1|Melon seeds can now be found in [[minecart with chest|minecarts with chests]] in [[mineshaft]]s.}}
{{History|pocket}}
{{History||1.0.0|snap=alpha 0.17.0.1|Melon seeds now generate inside [[dungeon]] [[chest]]s.}}
{{History||1.1.0|snap=alpha 1.1.0.0|Melon crops now generate inside [[woodland mansion]]s.
|Melon seeds can now be found in woodland mansion chests.}}
{{History|bedrock}}
{{History||1.2.0|snap=beta 1.2.0.2|Melon seeds can now be found inside [[bonus chest]]s.
|Melon seeds are now used to tame [[parrot]]s.}}
{{History||1.10.0|snap=beta 1.10.0.3|[[File:Attached Melon Stem (W) JE5.png|32px]]{{info needed|More accurate image}} The texture of attached melon stems has been changed.
|Melon stems now generate in [[savanna]] and [[desert]] [[village]] farms.
|Added [[wandering trader]]s, who [[trading|sell]] melon seeds.}}
{{History||1.11.0|snap=beta 1.11.0.1|Melon seeds can now be used to fill up [[composter]]s.}}
{{History||1.14.0|snap=beta 1.14.0.1|[[Bee]]s can now pollinate melon stems.}}
{{History|console}}
{{History||xbox=TU5|xbone=CU1|ps=1.0|wiiu=Patch 1|[[File:Melon Seeds JE1 BE1.png|32px]] Added melon seeds.
|[[File:Melon Stem Age 0 JE1.png|32px]] [[File:Stem Age 1 JE1.png|32px]] [[File:Melon Stem Age 2 JE1.png|32px]] [[File:Melon Stem Age 3 JE1.png|32px]] [[File:Melon Stem Age 4 JE1.png|32px]] [[File:Melon Stem Age 5 JE1.png|32px]] [[File:Melon Stem Age 6 JE1.png|32px]] [[File:Melon Stem Age 7 JE1.png|32px]] [[File:Attached Melon Stem (N) JE1.png|32px]] [[File:Attached Melon Stem (E) JE1.png|32px]] [[File:Attached Melon Stem (S) JE1.png|32px]] [[File:Attached Melon Stem (W) JE1.png|32px]]{{verify|Are these models correct?}} Added melon stems.}}
{{History||xbox=none|xbone=none|ps=1.90|wiiu=none|switch=none|[[File:Attached Melon Stem (W) JE5.png|32px]]{{info needed|More accurate image}} The texture of attached melon stems has been changed.}}
{{History|New 3DS}}
{{History||0.1.0|[[File:Melon Stem Age 0 JE1.png|32px]] [[File:Stem Age 1 JE1.png|32px]] [[File:Melon Stem Age 2 JE1.png|32px]] [[File:Melon Stem Age 3 JE1.png|32px]] [[File:Melon Stem Age 4 JE1.png|32px]] [[File:Melon Stem Age 5 JE1.png|32px]] [[File:Melon Stem Age 6 JE1.png|32px]] [[File:Melon Stem Age 7 JE1.png|32px]] [[File:Attached Melon Stem (N) JE1.png|32px]] [[File:Attached Melon Stem (E) JE1.png|32px]] [[File:Attached Melon Stem (S) JE1.png|32px]] [[File:Attached Melon Stem (W) JE1.png|32px]]{{verify|Are these models correct?}} Added melon stems.}}
{{History|foot}}
<gallery>
Melon Stem with data value 15.png|The final version of the melon stem with age 15, as seen in-game.
Melonstems.png|Melon stems of ages 1–15 on a modded version of 1.7.2, hence the melon stems using the melon top texture.
Stems of 13w02a.png|All 16 stem sizes in 13w02a, with accompanying data values.
</gallery>
=== Melon stem "item" ===
{{:Technical blocks/Melon Stem}}
== Issues ==
{{issue list}}
== Gallery ==
<gallery>
Stem All Ages.png|All stages of growth.
AllSeeds.png|All the [[seeds]] that exist in the game.
</gallery>
== See also ==
* [[Melon]]
* [[Pumpkin Seeds]]
==References==
{{Reflist}}
{{Blocks|vegetation}}
{{Items}}
[[Category:Plants]]
[[Category:Food]]
[[Category:Non-solid blocks]]
[[Category:Generated structure blocks]]
[[cs:Semínka melounu]]
[[de:Melone]]
[[es:Semillas de sandía]]
[[fr:Graines de pastèque]]
[[hu:Dinnyemagok]]
[[it:Anguria]]
[[ja:スイカの種]]
[[ko:수박씨]]
[[nl:Meloenzaden]]
[[pl:Nasiona arbuza]]
[[pt:Sementes de melancia]]
[[ru:Семена арбуза]]
[[th:เมล็ดแตงโม]]
[[zh:西瓜种子]]</li></ul> | beta 1.16.230.50 | Cave Vines can no longer be obtained via pick block. | |||
Issues
Issues relating to "Glow Berries" are maintained on the bug tracker. Report issues there.
Trivia
- They are the first item to be usable as both a food and a light source.
Gallery

A possible pattern of the cave vines at Age 2.

And another pattern.