A command block is a block that can execute commands. Because it cannot be obtained or edited in Survival mode without cheats, it is primarily used on multiplayer servers, in Creative worlds, and custom maps.
An impulse command block is the default block type; it executes only once when activated.
A chain command block executes every time when triggered.
A repeating command block executes every game tick as long as it is activated.
Obtaining[]
In Java Edition, command blocks are available in the Creative inventory under the "Operator Utilities" tab, if the "Operator Items Tab" setting in the "Controls" Options tab is set to "ON". Across both Java and Bedrock editions, they can either be obtained by using the pick block control, or by using various commands, such as /give @s minecraft:command_block, or /setblock ~ ~ ~ command_block.
Just like other blocks that can store NBT data, using pick block + CTRL copies the command and options inside the command block. This allows it to be placed elsewhere without having to re-enter the data inside.
Command blocks are not flammable, and have the same blast resistance as bedrock. Command blocks, structure blocks, and jigsaw blocks cannot be mined in Survival.
Command blocks can be placed by a non-operator player.
Usage[]
A command block can execute commands when activated by redstone power. It always has permissions of 2 level[Java Edition only]/1 level[Bedrock Edition only], so it can be used to allow a specific use of a command by players who can't use that command in general (for example, allowing anyone to obtain a specific item with /give without allowing everyone to /give themselves whatever they want).
A command block has an orientation that determines the chain command block to activate, and the blocks to be checked to see if a command block in "Conditional" mode executes.
To execute the command, in Java Edition in multiplayer enable-command-block in the server.properties file must be set to true (default is false); in Bedrock Edition "Command Blocks Enabled" in options must be enabled.
Modification[]

Java Edition command block GUI
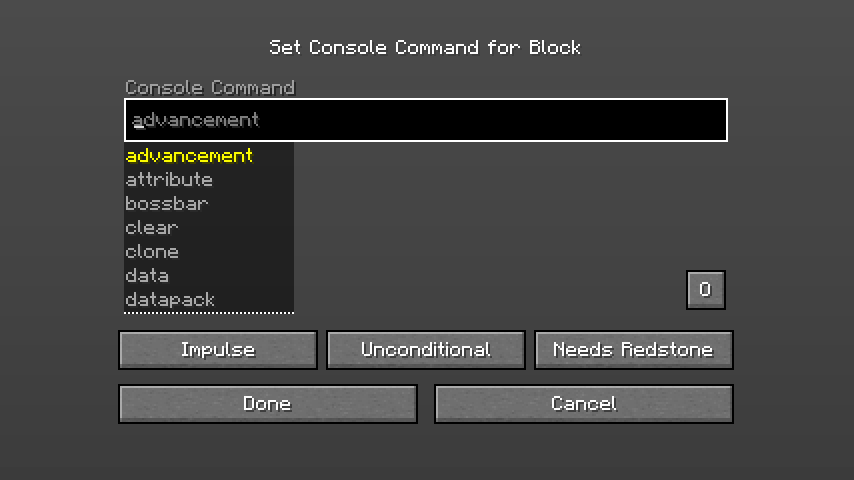
To enter command or modify the command block, use the Use Item control on the command block to open the command block GUI (graphical user interface). The GUI opens only if the player is in Creative mode, and has the proper permissions. That means, in singleplayer, "Allow Cheats"[JE only] or "Activate Cheats"[BE only] in options must be enabled. In multiplayer, Gui can be opened only by operators in Creative mode, and in Java Edition op-permission-level in the server.properties file must be set to 2 or above (default is 4).
In Java Edition to enter command or modify the command block, enable-command-block in the server.properties file must be set to true (default is false).
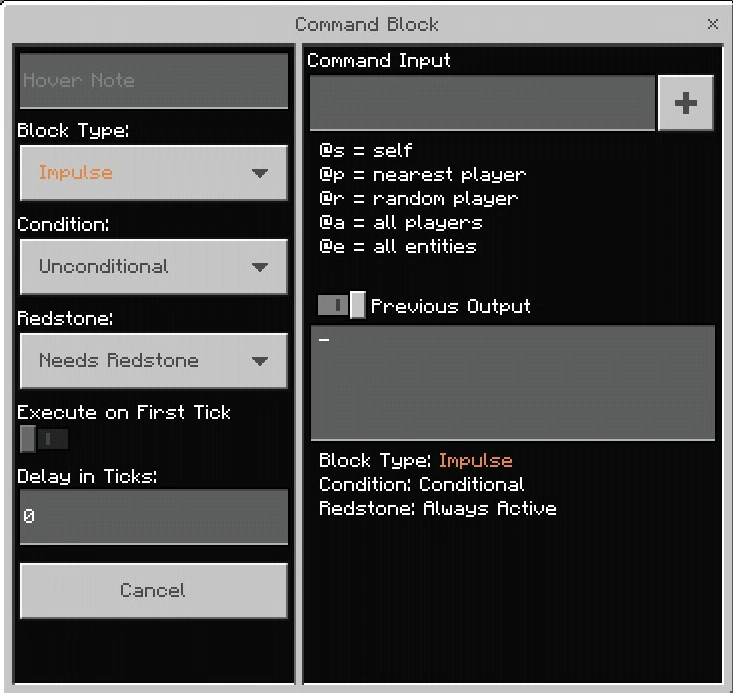
Bedrock edition command block GUI
In Java Edition, opening the GUI in singleplayer pauses the game.
- Commands can be entered in the top text pane. The text limit for commands in a command block is 32,500 characters, but the text pane can show only a small portion of this amount at a time.
- Commands in a command block do not need to be prefixed with the forward-slash (
/) as they do in the chat window, but doing so still works.
- Press Tab ↹ to complete words or cycle through options.
- In Bedrock Edition, below the console command text pane are some reminder tips about how to use target selectors.
- Previous Output
- The bottom text pane displays the output message (success or failure) of the last executed command (it is blank[JE only] or "
-"[BE only] initially). Its text is not editable.
- A button to the right of the Previous Output text pane[JE only] or the left of the "Previous Output"[BE only] specifies whether the last output should be stored and displayed. It is
O[JE only]/enabled[BE only] when the output text should be stored andX[JE only]/disabled[BE only] when the output text should not be stored. For worlds with many command blocks, especially command blocks running on fast clocks, not storing the output text can reduce memory and storage requirements.
- If gamerule
sendCommandFeedbackis true (the default), default toO[JE only]/enabled[BE only]. Otherwise defaults toX[JE only]/disabled[BE only].
- Block Type
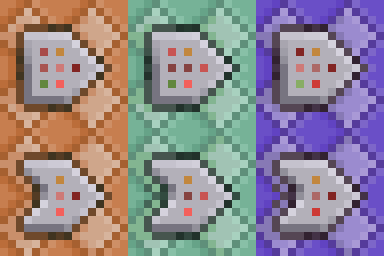
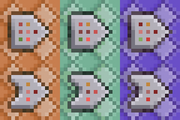
Left: "Impulse" block type.
Middle: "Chain" block type.
Right: "Repeating" block type.
Top: "Unconditional" mode.
Bottom: "Conditional" mode.
- Click the "Impulse/Chain/Repeat"[JE only]/"Block Type"[BE only] button to change the command block's type. The default state is "Impulse", but non-default command blocks can be obtained and placed. The command block also changes color when changing its command block type:
- "Impulse" command blocks are orange. They execute once every time they are activated.
- "Chain" command blocks are green. They execute once every time they are triggered if they have been activated.
- "Repeat" command blocks are purple. They execute their commands once every one game tick (or more[BE only]) as long as they are activated.
- Condition
- Click the "Conditional/Unconditional"[JE only]/"Condition"[BE only] button to change the command block's conditional behavior:
- "Conditional": A command block in conditional mode executes its command only when the command block behind it has executed successfully ("Success count" is greater than 0).
- "Unconditional" (default): A command block in unconditional mode executes its command even if there's a command block behind it that didn't execute its command successfully.
- "Behind it" in the sense of opposite to the direction the command block is facing, regardless of chain direction or even if chaining is occurring.
- Redstone
- Click the "Always Active/Needs Redstone"[JE only]/"Redstone"[BE only] button to change the command block's activation requirements:
- "Needs Redstone" (the default for impulse and repeat command blocks): A command block in the "Needs Redstone" setting can be activated only with redstone.
- "Always Active" (the default for chain command blocks): The command block is activated when set to "Always Active". Then it is always active even without redstone activation.
- Execute on First Tick[BE only]
- Specifies whether a repeat command block executes its command as soon as it is activated. If it's disabled, executes the first time after the delay from the time when it is activated.
- Delay in Ticks[BE only]
- For impulse or chain command block, specifies how many game ticks it delays before executing a command after it is activated or triggered.
- For repeat command block, specifies how many game ticks it delays to execute again.
- Note that for impulse or repeat command block, 0 and 1 work the same; the game takes 0 as 1. However, For chain command block, 0 and 1 are different.
- Hover Note[BE only]
- Specifies the name of the command block, which can be seen when you point to the block. It is also used for message commands. If the command block had been named in an anvil before placement, that name is used as well. If it is empty, defaults to
!.
- Done
- In Java Edition, click the "Done" button or ↵ Enter to save the command and leave the command block GUI.
- In Bedrock Edition, close the GUI to save the command and changes.
- Cancel
- Click the "Cancel" button or Esc[JE only]to leave the command block GUI without saving any changes.
Activation[]
Command blocks are redstone mechanisms and can be activated by:
- An adjacent active power component: for example, a lever, a block of redstone, a daylight sensor, a button etc.
- An adjacent powered block (for example, an opaque block with an active redstone torch under it)
- A powered redstone comparator or redstone repeater facing the mechanism component
- Powered redstone dust configured to point at the command block (or on top of it) or directionless; a command block is not activated by adjacent powered redstone dust that is configured to point away from it.
A command block can also be activated by setting it to "Always Active" mode.
When activated, a command block executes its command, depending on the command block's type:
- An impulse command block executes its command once.
- A chain command block does not execute its command until it is triggered.
- A repeat command block executes its command once every one game tick (or more[BE only]) until no longer activated.
Execution[]
An impulse command block, when it is activated, checks whether the command block behind it has executed successfully (if in conditional mode). After the delay of 1 game tick (or more[BE only]), if the condition is met before the delay (if in "Conditional" mode), it executes its command once and triggers the chain command block it is pointing to.
A repeat command block, when it is activated, after 1 game tick (always 1 no matter how many "Delay in Ticks" is), checks whether the command block behind it has executed successfully (if in conditional mode). If the condition is met, and if "Execute on First Tick" is enabled in Bedrock Edition, it executes its command once and triggers the chain command block it is pointing to. If it is still activated, it then checks, executes, and triggers the chain command block again after 1 game tick (or more[BE only]).
When executing a command, it also updates its success count: If in "Conditional" mode, if the command block behind it didn't execute successfully, it sets its success count to 0. Otherwise, it sets it to the success count of the command.
Also:
- When an impulse or repeat command block in "Needs Redstone" mode with a command is placed or is cloned by a command to a powered location, the new command block executes its command only if it hasn't been activated with redstone. In Java Edition, it also needs a block update to execute its command.
- When an impulse or repeat command block in "Always Active" mode with a command is placed or is cloned by a command to a powered location, the new command block executes its command only if it hasn't been activated with redstone.
- When an impulse or chain command block is set to "Repeat", if it has been activated, checks whether the command block behind it has executed successfully (if in conditional mode). After 1 game tick (always 1 no matter how many "Delay in Ticks" is), if the condition is met, it executes its command once and triggers the chain command block it is pointing to. Then it checks, executes, and triggers the chain command block again after 1 game tick (or more[BE only]).
Trigger and chaining[]
If any command block having executed its command (whether successfully or unsuccessfully) faces a chain command block, it triggers the chain command block to also attempt execution.
When a chain command block is triggered,
- If it has been activated,
- It checks whether it is in "Conditional" mode and the command block behind it hasn't executed successfully (Behind in the sense of the direction it is facing, not in the sense of which command block chained to it),
- If true, it triggers another chain command block it is facing, without executing the command.
- If false, it checks whether it has been already executed in this game tick. If false, it executes the command and triggers another chain command block it is facing. If true, it does nothing. That means that chained execution cannot be passed to a command block that has already executed in that game tick (loops execute only once).
- It checks whether it is in "Conditional" mode and the command block behind it hasn't executed successfully (Behind in the sense of the direction it is facing, not in the sense of which command block chained to it),
- If it has not been activated, it triggers the chain command block it is facing to attempt execution.
Chained command blocks execute simultaneously in the same game tick in the order they are chained.
In Bedrock Edition, it can also delay before executing commands if "Delay in Ticks" is not 0:
- When it is triggered,
- If it has been activated, the chain command block checks whether the command block behind it has executed successfully (if in conditional mode), then it delays.
- After a delay, if the condition is met before the delay (if in "Conditional" mode), it executes its command once and triggers the chain command block it is pointing to no matter whether the condition met.
- If it has not been activated, it triggers (without delay) the chain command block it is facing to attempt execution.
- If it has been activated, the chain command block checks whether the command block behind it has executed successfully (if in conditional mode), then it delays.
In Java Edition, it can execute multiple times in the same game tick if "UpdateLastExecution" is set to false. In this case, it does not check whether it has already executed in this game tick.
If the chain command block has been activated when triggered, it also updates its success count: If in "Conditional" mode, if the command block behind it didn't execute successfully, it sets its success count to 0. Otherwise, it sets it to the success count of the command.
Output[]
When activated, a command block can produce multiple types of output:
Success count[]
- A command block can power a redstone comparator facing away from it (possibly separated by a block) with signal strength specific to the success count. Success count is an integer between 0 to 2,147,483,647 (inclusive).
- The signal strength always reflects the last command executed, even after the command block is deactivated.
- In Java Edition, success count is usually 0 or 1, except for
/functionand/execute.
- In Bedrock Edition, success count is an integer related to the command (e.g., the number of players affected by the command, the number of blocks that were altered, the value returned by the command, etc.)
- In Java Edition, leaving the command block GUI by clicking "Done" or pressing ↵ Enter resets the success count to 0, regardless of whether changes were made in the GUI. In Bedrock Edition, leaving the GUI with changes resets the success count to 0.
Message[]
- The output message describes the success or failure of the executed command, and may be written to multiple destinations:
- Previous Output: The output message is always written to the "Previous Output" text pane of the command block GUI.
- Chat: The output message is written to the chat text in singleplayer mode, or broadcast to all other ops in multiplayer mode, unless it has been suppressed with
/gamerule commandBlockOutput false. Some commands may write additional text to the chat as their normal function, which won't be suppressed (for example, the/saycommand writes a message to the chat of all players), separate from the output message. Chat messages that would usually be prefaced by a player's name (such as from the/me,/sayand/tellcommands) use@[Java Edition only] /![Bedrock Edition only] as the player name. If the command block had been named in an anvil before placement, that name is used instead. In Bedrock Edition, it can also modified in the GUI.
- Logs: The output message is written to multiplayer server logs unless it has been suppressed with
/gamerule logAdminCommands false.
Notes[]
Command blocks execute commands with OP level 2. The following commands cannot be used in a command block: /ban, /banlist, /ban-ip, /debug, /deop, /kick[JE only], /op, /pardon, /pardon-ip, /publish, /reload[BE only], /save-all, /save-off, /save-on, /stop, and /whitelist (i.e., /debug, /publish, and all of the multiplayer-only commands except /list).
Easter eggs[]
Running "Searge" (case insensitive) as the command in the command block without a preceding "/" will set the previous output to "#itzlipofutzli". Its success count is 1.
Piston interactivity[]
Command blocks cannot be pushed by pistons. They also cannot be pushed or pulled by sticky pistons.
Sounds[]
| Sound | Subtitles | Source | Description | Resource location | Translation key | Volume | Pitch | Attenuation distance |
|---|---|---|---|---|---|---|---|---|
| Block broken | Blocks | Once the block has broken | block | subtitles | 1.0 | 1.2 | 16 | |
| Block placed | Blocks | When the block is placed | block | subtitles | 1.0 | 1.2 | 16 | |
| Block breaking | Blocks | While the block is in the process of being broken | block | subtitles | 0.25 | 0.75 | 16 | |
| None[sound 1] | Entity-Dependent | Falling on the block with fall damage | block | None[sound 1] | 0.5 | 1.25 | 16 | |
| Footsteps | Entity-Dependent | Walking on the block | block | subtitles | 0.15 | 1.5 | 16 |
| Sound | Source | Description | Resource location | Volume | Pitch |
|---|---|---|---|---|---|
| Blocks | Once the block has broken | dig | 1.0 | 1.1-1.2 | |
| Blocks | When the block is placed | use | 1.0 | 1.2-1.25 | |
| Blocks | While the block is in the process of being broken | hit | 0.3 | 0.75 | |
| Players | Falling on the block with fall damage | fall | 0.4 | 1.0 | |
| Players | Walking on the block | step | 0.35 | 1.0 | |
| Players | Jumping from the block | jump | 0.12 | 1.0 | |
| Players | Falling on the block without fall damage | land | 0.22 | 1.0 |
Data values[]
ID[]
| Name | Identifier | Form | Block tags | Translation key |
|---|---|---|---|---|
| Command Block | command_block | Block & Item | dragon_immune wither_immune | block.minecraft.command_block |
| Chain Command Block | chain_command_block | Block & Item | dragon_immune wither_immune | block.minecraft.chain_command_block |
| Repeating Command Block | repeating_command_block | Block & Item | dragon_immune wither_immune | block.minecraft.repeating_command_block |
| Name | Identifier |
|---|---|
| Block entity | command_block |
| Name | Identifier | Numeric ID | Form | Item ID[i 1] | Translation key |
|---|---|---|---|---|---|
| Command Block | command_block | 137 | Block & Giveable Item[i 2] | Identical[i 3] | tile.command_block.name |
| Chain Command Block | chain_command_block | 189 | Block & Giveable Item[i 2] | Identical[i 3] | tile.chain_command_block.name |
| Repeating Command Block | repeating_command_block | 188 | Block & Giveable Item[i 2] | Identical[i 3] | tile.repeating_command_block.name |
| Name | Savegame ID |
|---|---|
| Block entity | CommandBlock |
Block states[]
| Name | Default value | Allowed values | Description |
|---|---|---|---|
| conditional | false | falsetrue | True if the command block is in conditional mode. |
| facing | north | downeastnorthsouthupwest | The direction the command block is pointing. |
| Name | Metadata Bits | Default value | Allowed values | Values for Metadata Bits |
Description |
|---|---|---|---|---|---|
| conditional_bit | 0x8 | false | falsetrue | 01 | True if the command block is in conditional mode. |
| facing_direction | 0x10x20x4 | 0 | 012345 | 012345 | The direction the command block is pointing.
|
Block data[]
A command block has a block entity associated with it that holds additional data about the block.
- Block entity data
- Tags common to all block entities
- auto: 1 or 0 (true/false) - Allows to activate the command without the requirement of a redstone signal.
- Command: The command to issue to the server.
- conditionMet: 1 or 0 (true/false) - Indicates whether a conditional command block had its condition met when last activated. True if not a conditional command block.
- CustomName: Optional. The name JSON text component of this command block, replacing the usual '@' when using commands such as
/sayand/tell. - LastExecution: stores the tick a chain command block was last executed in.
- LastOutput: The last line of output generated by the command block. Still stored even if the game rule
commandBlockOutputisfalse. Appears in the GUI of the block when right-clicked, and includes a timestamp of when the output was produced. - powered: 1 or 0 (true/false) - States whether or not the command block is powered by redstone or not.
- SuccessCount: Represents the strength of the analog signal output by redstone comparators attached to this command block.
- TrackOutput: 1 or 0 (true/false) - Determines whether the LastOutput is stored. Can be toggled in the GUI by clicking a button near the "Previous Output" textbox. Caption on the button indicates current state: "O" if true, "X" if false.
- UpdateLastExecution: 1 or 0 (true/false) - Defaults to true. If set to false, loops can be created where the same command block can run multiple times in one tick.
History[]
| Java Edition | |||||
|---|---|---|---|---|---|
| July 27, 2012 | Jeb began tweeting of a new block he had created to start expanding Adventure mode. He began posting pictures, ideas and hints of what the block can do. | ||||
| July 31, 2012 | During Notch's AMA on Reddit, he hinted the block may be in Java Edition 1.4. | ||||
1.4.2{{Extension DPL}}<ul><li>[[Blaze Rod|Blaze Rod]]<br/>{{Item
| image = Blaze Rod.png
| renewable = Yes
| stackable = Yes (64)
}}
'''Blaze rods''' are [[item]]s exclusively obtained from [[blaze]]s. They act as a fuel for both brewing and [[smelting]], and are required to craft [[eye of ender|eyes of ender]] used to access to [[the End]].
== Obtaining ==
=== Mob loot ===
When killed by a player or tamed [[wolf]], a [[blaze]] has a 50% chance to drop a blaze rod. The [[Looting]] [[enchantment]] can increase the drops by one per level, for a maximum of 4 blaze rods. Blazes do not drop any blaze rods if killed by any other source.
== Usage ==
=== Crafting ingredient ===
{{crafting usage}}
=== Fuel ===
When used in a [[furnace]], a blaze rod lasts 120 seconds (12 items).
== Achievements ==
{{load achievements|Into Fire}}
== Advancements ==
{{load advancements|Into Fire}}
== Video ==
{{Video note|This video does not mention the crafting of [[End Rod]]s.|minor}}
<div style="text-align:center">{{yt|_mhRHuRlICY}}</div>
== Data values ==
=== ID ===
{{el|java}}:
{{ID table
|edition=java
|showforms=y
|generatetranslationkeys=y
|displayname=Blaze Rod
|spritetype=item
|nameid=blaze_rod
|form=item
|foot=1}}
{{el|bedrock}}:
{{ID table
|edition=bedrock
|shownumericids=y
|showforms=y
|notshowbeitemforms=y
|generatetranslationkeys=y
|displayname=Blaze Rod
|spritetype=item
|nameid=blaze_rod
|id=423
|form=item
|foot=1}}
== History ==
{{History|java}}
{{History||1.0.0|snap=Beta 1.9 Prerelease|[[File:Blaze Rod JE1 BE1.png|32px]] Added blaze rods.}}
{{History|||snap=Beta 1.9 Prerelease 2|Blaze rods are now used to craft [[blaze powder]].}}
{{History|||snap=Beta 1.9 Prerelease 3|Blaze rods are now used to craft [[brewing stand]]s.}}
{{History||1.8|snap=14w07a|Blaze rods are now held similarly to [[tools]].}}
{{History||1.9|snap=15w44b|Blaze rods are now used to craft [[end rod]]s.}}
{{History||1.13|snap=17w47a|Prior to [[1.13/Flattening|''The Flattening'']], this [[item]]'s numeral ID was 369.}}
{{History|pocket alpha}}
{{History||v0.12.1|snap=build 1|[[File:Blaze Rod JE1 BE1.png|32px]] Added blaze rods.
|Blaze rods can be used to craft [[blaze powder]] and [[brewing stand]]s.}}
{{History|pocket}}
{{History||1.0.0|snap=alpha 0.17.0.1|Blaze rods are now used to craft [[end rod]]s.}}
{{History|console}}
{{History||xbox=TU7|xbone=CU1|ps=1.00|wiiu=Patch 1|switch=1.0.1|[[File:Blaze Rod JE1 BE1.png|32px]] Added blaze rods.
|Blaze rods can be used to craft [[blaze powder]] and [[brewing stand]]s.}}
{{History||xbox=TU46|xbone=CU36|ps=1.38|wiiu=Patch 15|Blaze rods are now used to craft [[end rod]]s.}}
{{History|New 3DS}}
{{History||0.1.0|[[File:Blaze Rod JE1 BE1.png|32px]] Added blaze rods.
|Blaze rods can be used to craft [[blaze powder]] and [[brewing stand]]s.}}
{{History|foot}}
== Issues ==
{{issue list}}
== Trivia ==
* As part of an official collaboration, blaze rods are included in a free add-on for the roleplaying game [https://en.wikipedia.org/wiki/Dungeons_%26_Dragons ''Dungeons and Dragons''].<ref>https://www.google.com/url?sa=t&rct=j&q=&esrc=s&source=web&cd=&cad=rja&uact=8&ved=2ahUKEwj9uvqlwIT-AhV7LUQIHYlVDiwQFnoECBAQAQ&url=https%3A%2F%2Fwww.minecraft.net%2Fcontent%2Fdam%2Fgames%2Fminecraft%2Fsoftware%2FMinecraft-Monstrous-Compendium.pdf&usg=AOvVaw0aKOqpKAHSH11qgZhN_Bhx</ref> In the game, they are worth 100 gold pieces, create light, and can be broken to create an explosion.
* They are the spinning things surrounding the blaze's head
{{items}}
== References ==
{{Reflist}}
[[Category:Renewable resources]]
[[cs:Ohnivá hůl]]
[[de:Lohenrute]]
[[el:Οι ράβδοι των Blaze]]
[[es:Vara de blaze]]
[[fr:Bâton de Blaze]]
[[hu:Lángrúd]]
[[it:Verga di blaze]]
[[ja:ブレイズロッド]]
[[ko:블레이즈 막대]]
[[lzh:炎靈桿]]
[[nl:Blazestaf]]
[[pl:Płomienna różdżka]]
[[pt:Vara de blaze]]
[[ru:Огненный стержень]]
[[th:แท่งเบลซ]]
[[tr:Alaz Çubuğu]]
[[uk:Стрижень Блейза]]
[[zh:烈焰棒]]</li><li>[[Raw Beef|Raw Beef]]<br/>{{Item
| title = Raw Beef
| image = Raw Beef.png
| heals = {{hunger|3}}
| renewable = Yes
| stackable = Yes (64)
}}
'''Raw beef''' is a [[food]] item that can be eaten by the [[player]] or cooked in a [[furnace]], [[smoker]], or [[campfire]] to make [[steak]].
== Obtaining ==
=== Mob loot ===
When adult [[cow]]s and [[mooshroom]]s are killed, they drop 1-3 raw beef. The maximum amount is increased by 1 per level of [[Looting]], for a maximum of 1-6 with Looting III. If killed while on fire, they drop [[steak]] instead.
=== Chest loot ===
{{LootChestItem|raw-beef}}
== Usage ==
=== Food ===
To eat raw beef, press and hold {{control|use}} while it is selected in the hotbar. Eating one restores {{hunger|3}} hunger and 1.8 hunger [[Hunger#Mechanics|saturation]].
=== Smelting ingredient ===
{{Smelting
|showname=1
|Raw Beef
|Steak
|0.35
}}
=== Wolves ===
Raw beef can be used to [[breed]] and heal tamed [[wolves]], lead them around, and make baby tamed wolves grow up faster by 10% of the remaining time.
=== Trading ===
Journeyman-level Butcher villagers have a 50% chance to buy 10 raw beef for an emerald.{{only|bedrock}}
Journeyman-level Butcher villagers always offer buy 10 raw beef for an emerald.{{only|java}}
==Sounds==
{{Sound table/Entity/Food}}
== Advancements ==
{{load advancements|Husbandry;A Balanced Diet}}
== Data values ==
=== ID ===
{{edition|java}}:
{{ID table
|edition=java
|showforms=y
|generatetranslationkeys=y
|displayname=Raw Beef
|spritetype=item
|nameid=beef
|form=item
|foot=1}}
{{edition|bedrock}}:
{{ID table
|edition=bedrock
|shownumericids=y
|showforms=y
|notshowbeitemforms=y
|generatetranslationkeys=y
|displayname=Raw Beef
|spritetype=item
|nameid=beef
|id=273
|form=item
|foot=1}}
== History ==
{{History|java beta}}
{{History||1.8|snap=Pre-release|[[File:Raw Beef JE1 BE1.png|32px]] Added raw beef.|Raw beef is one of the new [[food]] items, [[drops|dropped]] by [[cow]]s in addition to their [[leather]].}}
{{History|java}}
{{History||1.2.1|snap=12w03a|Raw beef can now be used to breed wolves.}}
{{History||1.3.1|snap=12w21a|Raw beef can now be [[trading|sold]] to butcher [[villager]]s, at 14–17 raw beef for 1 [[emerald]].}}
{{History|||snap=1.3|[[File:Raw Beef JE2.png|32px]] The texture of raw beef has been changed.}}
{{History||1.4.2|snap=12w37a|[[File:Raw Beef JE3 BE2.png|32px]] The texture of raw beef has been changed, so that it no longer has a dark outline.}}
{{History||1.8|snap=14w02a|[[Villager]]s no longer [[trading|trade]] for raw beef.}}
{{History||1.13|snap=17w47a|Prior to [[1.13/Flattening|''The Flattening'']], this [[item]]'s numeral ID was 363.}}
{{History||1.14|snap=18w43a|[[File:Raw Beef JE4 BE3.png|32px]] The texture of raw beef has been changed.}}
{{History|||snap=18w49a|Raw beef can now be found in [[chest]]s in [[village]] butcher shops.}}
{{History|||snap=19w11a|Butcher [[villager]]s now [[trading|buy]] raw beef.}}
{{History|pocket alpha}}
{{History||v0.4.0|[[File:Raw Beef JE1 BE1.png|32px]] Added raw beef.}}
{{History||v0.5.0|Raw beef now restores {{hp|3}} instead of {{hp|1}}.}}
{{History||v0.8.0|snap=build 1|[[File:Raw Beef JE3 BE2.png|32px]] The texture of raw beef has been changed, so that it no longer has a dark outline.}}
{{History||v0.9.0|snap=build 1|Raw beef has been added to [[Creative]] mode.}}
{{History||v0.12.1|snap=build 1|Raw beef now restores [[hunger]] instead of [[health]].}}
{{History|bedrock}}
{{History||1.10.0|snap=beta 1.10.0.3|[[File:Raw Beef JE4 BE3.png|32px]] The texture of raw beef has been changed.}}
{{History||1.11.0|snap=beta 1.11.0.1|Raw beef can now be found in [[village]] butcher [[chest]]s.}}
{{History|||snap=beta 1.11.0.4|Raw beef can now be [[trading|sold]] to butcher [[villager]]s.}}
{{History|console}}
{{History||xbox=TU5|xbone=CU1|ps=1.0|wiiu=Patch 1|[[File:Raw Beef JE1 BE1.png|32px]] Added raw beef.}}
{{History||xbox=TU12|[[File:Raw Beef JE3 BE2.png|32px]] The texture of raw beef has been changed, so that it no longer has a dark outline.}}
{{History||xbox=none|xbone=none|ps=1.90|wiiu=none|switch=none|[[File:Raw Beef JE4 BE3.png|32px]] The texture of raw beef has been changed.}}
{{History|New 3DS}}
{{History||0.1.0|[[File:Raw Beef JE3 BE2.png|32px]] Added raw beef.}}
{{History|foot}}
== Issues ==
{{issue list}}
== Gallery ==
<gallery>
File:Jeb steak.png|Raw Beef and [[Steak]] in a preview screenshot.
</gallery>
{{Items}}
[[de:Rohes Rindfleisch]]
[[es:Filete crudo]]
[[fr:Bœuf cru]]
[[hu:Nyers marhahús]]
[[ja:生の牛肉]]
[[ko:익히지 않은 소고기]]
[[nl:Rauwe biefstuk]]
[[pl:Surowa wołowina]]
[[pt:Bife cru]]
[[ru:Сырая говядина]]
[[uk:Сира яловичина]]
[[zh:生牛肉]]
[[Category:Food]]
[[Category:Renewable resources]]</li></ul> | 12w32a | ||||
| 12w38a | Added the game rule commandBlockOutput. | ||||
1.5{{Extension DPL}}<ul><li>[[Milk Bucket|Milk Bucket]]<br/>{{Item
| title=Milk Bucket
| image = Milk Bucket.png
| renewable = Yes
| effects = Clears all
| stackable = No
}}
A '''milk bucket'''{{fn|Known as '''Milk Bucket''' {{in|java}} and '''Milk''' {{in|bedrock}}.}} is a [[drink]] obtained from {{Control|use|text=using}} a [[bucket]] on [[cow]]s, [[mooshroom]]s and [[goat]]s that can be consumed to clear all [[Effect|effects]].
== Obtaining ==
=== Harvesting ===
Milk buckets can be obtained from [[cow]]s, [[mooshroom]]s, and [[goat]]s by pressing {{control|use}} while looking at them with an empty [[bucket]].
=== Mob loot ===
A milk bucket has a chance of dropping from a [[wandering trader]], if the trader is killed while holding it.{{only|java}}
== Usage ==
Holding {{control|use}} with a milk bucket starts the drinking sound and animation. {{IN|java}}, the animation is shown only in first-person camera mode.
When consumed, milk immediately removes all status [[effect]]s from the [[player]]. [[Fire]] is not a status effect; therefore, drinking milk doesn't extinguish a burning player.
The benefits of area status effects granted by [[beacon]]s and [[Conduit Power|conduit power]] are restored almost immediately in Bedrock Edition and after a few seconds in ''Java Edition''.
=== Crafting ingredient ===
{{crafting usage|Milk Bucket}}
== Sounds ==
{{el|je}}:
{{Sound table
|sound=Drink.ogg
|subtitle=Sipping
|source=player
|description=While a player is drinking milk
|id=entity.generic.drink
|translationkey=subtitles.entity.generic.drink
|volume=0.5
|pitch=0.9-1.0
|distance=16}}
{{Sound table
|sound=Cow milk1.ogg
|sound2=Cow milk2.ogg
|sound3=Cow milk3.ogg
|source=player
|subtitle=Cow gets milked
|description=When a cow is milked
|id=entity.cow.milk
|translationkey=subtitles.entity.cow.milk
|volume=1.0
|pitch=1.0
|distance=16}}
{{Sound table
|sound=Mooshroom milk1.ogg
|sound2=Mooshroom milk2.ogg
|sound3=Mooshroom milk3.ogg
|subtitle=Goat gets milked
|description=When a regular goat is milked
|source=neutral
|id=entity.goat.milk
|translationkey=subtitles.entity.goat.milk
|volume=1.0
|pitch=1.0
|distance=16}}
{{Sound table
|sound=Goat screaming milk1.ogg
|sound2=Goat screaming milk2.ogg
|sound3=Goat screaming milk3.ogg
|sound4=Goat screaming milk4.ogg
|sound5=Goat screaming milk5.ogg
|subtitle=Goat gets milked
|description=When a screaming goat is milked
|source=neutral
|id=entity.goat.screaming.milk
|translationkey=subtitles.entity.goat.milk
|volume=1.0
|pitch=1.0
|distance=16}}
{{Sound table
|sound=Wandering trader drink milk1.ogg
|sound2=Wandering trader drink milk2.ogg
|sound3=Wandering trader drink milk3.ogg
|sound4=Wandering trader drink milk4.ogg
|sound5=Wandering trader drink milk5.ogg
|subtitle=Wandering Trader drinks milk
|source=neutral
|description=While a wandering trader is drinking milk to become visible during daytime
|id=entity.wandering_trader.drink_milk
|translationkey=subtitles.entity.wandering_trader.drink_milk
|volume=0.5
|pitch=0.9-1.0
|distance=16
|foot=1}}
{{el|be}}:
{{Sound table
|type=bedrock
|sound=Drink.ogg
|source=player
|description=While a player is drinking milk
|id=random.drink
|volume=0.35
|pitch=0.9-1.1}}
{{Sound table
|sound=Cow milk1.ogg
|sound2=Cow milk2.ogg
|sound3=Cow milk3.ogg
|source=neutral
|description=When a cow is milked
|id=mob.cow.milk
|volume=1.0
|pitch=1.0}}
{{Sound table
|sound=Mooshroom milk1.ogg
|sound2=Mooshroom milk2.ogg
|sound3=Mooshroom milk3.ogg
|description=When a regular goat is milked
|source=neutral
|id=mob.mooshroom.suspicious_milk
|volume=1.0
|pitch=1.0/0.9/1.1}}
{{Sound table
|sound=Goat screaming milk1.ogg
|sound2=Goat screaming milk2.ogg
|sound3=Goat screaming milk3.ogg
|sound4=Goat screaming milk4.ogg
|sound5=Goat screaming milk5.ogg
|description=When a screaming goat is milked
|source=neutral
|id=mob.goat.milk.screamer
|volume=1.0
|pitch=1.0}}
{{Sound table
|sound=Wandering trader drink milk1.ogg
|sound2=Wandering trader drink milk2.ogg
|sound3=Wandering trader drink milk3.ogg
|sound4=Wandering trader drink milk4.ogg
|sound5=Wandering trader drink milk5.ogg
|source=neutral
|description=While a wandering trader is drinking milk to become visible during daytime
|id=mob.wanderingtrader.drink_milk
|volume=1.0
|pitch=0.8-1.2
|foot=1}}
== Data values ==
=== ID ===
{{edition|java}}:
{{ID table
|edition=java
|showforms=y
|generatetranslationkeys=y
|displayname=Milk Bucket
|spritetype=item
|nameid=milk_bucket
|form=item
|foot=1}}
{{edition|bedrock}}:
{{ID table
|edition=bedrock
|showaliasids=y
|shownumericids=y
|showforms=y
|notshowbeitemforms=y
|generatetranslationkeys=y
|displayname=Milk
|spritetype=item
|nameid=milk_bucket
|aliasid=bucket / 1
|id=361
|form=item
|translationkey=item.milk.name
|foot=1}}
== Achievements ==
{{load achievements|The Lie}}
== Advancements ==
{{Load advancements|Husbandry}}
== Video ==
<div style="text-align:center">{{yt|eyxea_d0b3s}}</div>
== History ==
{{History|java alpha}}
{{History||v1.0.8|[[File:Milk Bucket JE1 BE1.png|32px]] Milk has been introduced, but it has no purpose and is obtainable only through inventory editing.}}
{{History||v1.0.11|Milk can now be obtained by {{control|use|text=milking}} a [[cow]] with a [[bucket]]. However, it is not yet drinkable.}}
{{History||v1.0.17|Milk buckets can now be emptied.}}
{{History|java beta}}
{{History||1.2|Milk has been incorporated into the [[crafting]] recipe of [[cake]].}}
{{History||1.2_01|[[Squid]] can now be milked by right-clicking on their mouth if part of their body was exposed to [[air]] or if they were not touching another [[block]]. An easy way to accomplish this is to pull a squid with a [[fishing rod]] away from other blocks and then milk it.}}
{{History||1.3_01|Squid milking has been removed.}}
{{History|java}}
{{History||1.0.0|snap=Beta 1.9 Prerelease|Milk can now be obtained by milking [[mooshroom]]s.}}
{{History|||snap=Beta 1.9 Prerelease 2|Milk has been made drinkable.
|According to a tweet by [[Jeb]] on September 30th 2011, milk was made a cure for all status effects.<ref>{{tweet|jeb_|119842906528944129|@Nexusdog_UK I haven't! In beta 1.9 pre2 milk works like a clear-everything drink|September 30, 2011}}</ref>
|Milk is no longer emptiable.}}
{{History||1.13|snap=17w47a|Prior to [[1.13/Flattening|''The Flattening'']], this [[item]]'s numeral ID was 335.}}
{{History|||snap=18w20a|"Milk" has been renamed to "Milk Bucket".}}
{{History||1.14|snap=18w43a|[[File:Milk Bucket JE2 BE2.png|32px]] The texture of milk buckets has been changed.}}
{{History||1.14|snap=19w06a|[[Wandering trader]]s now drink from milk buckets at dawn, and have a change to drop them.}}
{{History||1.17|snap=21w13a|Milk can now be obtained by milking [[goat]]s.}}
{{History|upcoming java}}
{{History||Villager Trade Rebalance<br>(Experimental)|link=Java Edition 1.20.2|snap=23w31a|Wander traders now have a chance to [[trading|buy]] a milk bucket from the player.}}
{{History|pocket alpha}}
{{History||v0.7.0|[[File:Milk Bucket JE1 BE1.png|32px]] Added milk buckets.
|Milk buckets are not yet drinkable.}}
{{History||v0.11.0|snap=build 4|Drinking milk now removes [[status effects]].
|Added milk buckets to the Creative inventory.{{verify|type=update}}{{info needed}}<!---same update?--->}}
{{History|bedrock}}
{{History||1.4.0|snap=beta 1.2.14.2|Moved all bucket items, including milk, from the Equipment tab to the Items tab in the [[Creative inventory]].{{verify|type=update}}{{info needed}}<!---please check snapshots, only 1 major release version was checked each--->}}
{{History||1.10.0|snap=beta 1.10.0.3|[[File:Milk Bucket JE2 BE2.png|32px]] The texture of milk buckets has been changed.}}
{{History||1.16.100|snap=beta 1.16.100.56|The ID of milk has been changed from <code>bucket/1</code> to <code>milk_bucket</code>.}}
{{History||1.16.200|snap=beta 1.16.200.52|Milk can now be obtained by milking [[goat]]s.}}
{{History|console}}
{{History||xbox=TU1|xbone=CU1|ps=1.0|wiiu=Patch 1|switch=1.0.1|[[File:Milk Bucket JE1 BE1.png|32px]] Added milk buckets.}}
{{History|Ps4}}
{{History||1.90|[[File:Milk Bucket JE2 BE2.png|32px]] The texture of milk buckets has been changed.}}
{{History|New 3DS}}
{{History||0.1.0|[[File:Milk Bucket JE1 BE1.png|32px]] Added milk buckets.}}
{{History|foot}}
== Issues ==
{{issue list}}
== See also ==
*[[Water Bucket]]
*[[Lava]]
*[[Food]]
*[[Cake]]
*[[Honey Bottle]] (alternative to remove poison effect)
*[[Medicine]]
== Notes ==
{{fnlist}}
== References ==
{{reflist}}
== External Links ==
*[https://www.minecraft.net/en-us/article/taking-inventory--milk-bucket Taking Inventory: Milk Bucket] – Minecraft.net on October 8, 2019
{{Items}}
[[Category:Food]]
[[Category:Renewable resources]]
[[Category:Tools]]
[[cs:Mléko]]
[[de:Milcheimer]]
[[es:Cubo con leche]]
[[fr:Seau de lait]]
[[hu:Tej]]
[[it:Secchio di latte]]
[[ja:ミルク入りバケツ]]
[[ko:우유 양동이]]
[[nl:Emmer melk]]
[[pl:Wiadro mleka]]
[[pt:Balde de leite]]
[[ru:Ведро с молоком]]
[[th:ถังนม]]
[[uk:Відро молока]]
[[zh:奶桶]]</li><li>[[Gray Dye|Gray Dye]]<br/>{{Item
| image = Gray Dye.png
| renewable = Yes
| stackable = Yes (64)
}}
'''Gray dye'''{{fn|Known as '''Grey Dye''' in British, Canadian, Australian, and New Zealand English variants.}} is a [[Dyeing#Secondary colors|secondary color]] dye.
== Obtaining ==
=== Crafting ===
{{Crafting
|Black Dye
|White Dye
|Output=Gray Dye,2
|type=Material
|head=1
|showdescription=1
|showname=0
}}
{{Crafting
|Ink Sac;Black Dye;Ink Sac
|Bone Meal;Bone Meal;White Dye
|Output=Gray Dye,2
|type=Material
|description={{only|bedrock|education}}
|foot=1
}}
=== Trading ===
[[Wandering trader]]s sell 3 gray dye for an [[emerald]].{{only|bedrock}}
== Usage ==
{{dye usage}}
=== Crafting ingredient ===
{{crafting usage|ignore=Banner|continue=1}}
{{banner crafting usage}}
=== Loom ingredient ===
{{Banner loom usage|Gray Dye}}
=== Trading ===
Journeyman-level villagers have a 20% chance to buy 12 gray dye for an emerald.
== Data values ==
=== ID ===
{{edition|java}}:
{{ID table
|edition=java
|showforms=y
|generatetranslationkeys=y
|displayname=Gray Dye
|spritetype=item
|nameid=gray_dye
|form=item
|foot=1}}
{{edition|bedrock}}:
{{ID table
|edition=bedrock
|showaliasids=y
|shownumericids=y
|showforms=y
|notshowbeitemforms=y
|generatetranslationkeys=y
|displayname=Gray Dye
|spritetype=item
|nameid=gray_dye
|aliasid=dye / 8
|id=403
|form=item
|translationkey=item.dye.gray.name
|foot=1}}
== Video ==
{{yt|wGalHy0_fj0}}
== History ==
{{History|java beta}}
{{History||1.2|[[File:Gray Dye JE1 BE1.png|32px]] Added gray dye.}}
{{History|java}}
{{History||1.4.2|snap=12w34a|Added the ability to [[Armor#Dyeing|dye]] leather [[armor]] and [[wolf]] collars.}}
{{History||1.4.6|snap=12w49a|Gray dye can be now [[crafting|crafted]] with [[gunpowder]] to create a [[firework star]].}}
{{History||1.6.1|snap=13w19a|[[Stained clay]] can now be crafted.}}
{{history||1.7.2|snap=13w36a|With the addition of new [[flower]]s, many secondary and tertiary dyes are now primary [[dye]]s.}}
{{History|||snap=13w41a|[[Stained glass]] can now be crafted.}}
{{History||1.8|snap=14w30a|Added [[banner]]s, which can be dyed.}}
{{History||1.11|snap=16w39a|Added the ability to dye [[shulker box]]es.}}
{{History||1.12|snap=17w15a|Added the ability to dye [[bed]]s.}}
{{History||1.13|snap=17w47a|The different data values for the <code>dye</code> ID have now been split up into their own IDs.
|Prior to [[1.13/Flattening|''The Flattening'']], this [[item]]'s numeral ID was 351.}}
{{History||1.14|snap=18w43a|Gray dye is now [[crafting|crafted]] using [[black dye|black]] and [[white dye]]s, instead of [[ink sac]] and [[bone meal]].
|[[File:Gray Dye JE2 BE2.png|32px]] The texture of gray dye has now been changed.}}
{{History|||snap=18w44a|Gray dye can now change the text color on the [[sign]]s to gray.}}
{{History|||snap=19w05a|Added the [[wandering trader]], which sell gray dyes.}}
{{History|||snap=19w11a|Gray dye can now be [[trading|bought]] by shepherd villagers.}}
{{History||1.17|snap=20w45a|Gray dye can now used to craft [[gray candle]]s.}}
{{History|||snap=21w19a|Gray dye can no longer be used to craft gray candles.}}
{{History|||snap=Pre-release 1|Gray dye can once again be used to craft gray candles.}}
{{History||1.20<br>(Experimental)|link=1.19.3|snap=22w42a|Gray dye can now change the text color on [[hanging sign]]s to gray.}}
{{History|pocket alpha}}
{{History||v0.3.0|[[File:Gray Dye JE1 BE1.png|32px]] Added gray dye. It is currently unobtainable and serves no purpose.}}
{{History||v0.8.0|snap=build 1|Gray dye can be [[craft]]ed with [[bone meal]] and an [[ink sac]], despite there being no way of obtaining ink sacs at the time.}}
{{History|||snap=build 3|Gray dye is now available in [[creative]] mode.}}
{{History||v0.9.0|snap=build 3|Gray dye can now be obtained in [[survival]] mode.}}
{{History|||snap=build 11|Gray dye can now be used to craft colored [[terracotta]].}}
{{History||v0.11.0|snap=build 1|Gray dye can now be used to dye tamed [[wolf]] collars.}}
{{History||v0.14.0|snap=build 1|Gray dye can now be used to dye [[water]] in [[cauldron]]s.}}
{{History|pocket}}
{{History||1.0.0|snap=alpha 0.17.0.1|Gray dye can now be used to dye [[shulker]]s.}}
{{History||1.1.0|snap=alpha 1.1.0.0|Gray dye can now be used to craft [[concrete powder]], colored [[bed]]s and dyed [[shulker box]]es.}}
{{History|bedrock}}
{{History||1.2.0|snap=beta 1.2.0.2|Gray dye can now be used to craft [[firework star]]s, [[stained glass]] and patterns on [[banner]]s.}}
{{History||1.4.0|snap=beta 1.2.20.1|Gray dye can now be used to craft [[balloon]]s and [[glow stick]]s.}}
{{History||1.8.0|snap=beta 1.8.0.8|Gray dye can now be used to dye tamed [[cat]] collars.}}
{{History||1.10.0|snap=beta 1.10.0.3|Gray dye is now [[trading|sold]] by [[wandering trader]]s.
|Gray dye can now be used to dye white [[carpet]]s and undyed [[glass pane]]s.
|[[File:Gray Dye JE2 BE2.png|32px]] The texture of gray dye has now been changed.}}
{{History||1.11.0|snap=beta 1.11.0.1|Gray dye can now be [[trading|sold]] to shepherd [[villager]]s.}}
{{History||1.16.100|snap=beta 1.16.100.56|The ID of gray dye has been changed from <code>dye/8</code> to <code>gray_dye</code>.}}
{{History|console}}
{{History||xbox=TU1|xbone=CU1|ps=1.00|switch=1.0.1|wiiu=Patch 1|[[File:Gray Dye JE1 BE1.png|32px]] Added gray dye.}}
{{History|PS4}}
{{History||1.90|[[File:Gray Dye JE2 BE2.png|32px]] The texture of gray dye has now been changed.}}
{{History|new 3ds}}
{{History||0.1.0|[[File:Gray Dye JE1 BE1.png|32px]] Added gray dye.}}
{{History|foot}}
== Issues ==
{{Issue list}}
== Notes ==
{{fnlist}}
== References ==
{{Reflist}}
{{Items}}
[[Category:Dyes]]
[[Category:Renewable resources]]
[[cs:Šedé barvivo]]
[[de:Grauer Farbstoff]]
[[es:Tinte gris]]
[[fr:Teinture grise]]
[[hu:Szürke festék]]
[[ja:灰色の染料]]
[[ko:회색 염료]]
[[nl:Grijze kleurstof]]
[[pl:Szary barwnik]]
[[pt:Corante cinza]]
[[ru:Серый краситель]]
[[zh:灰色染料]]</li></ul> | 13w03a | Command block success can now power a redstone comparator. | |||
| 13w04a | Command blocks renamed with an anvil now use their name instead of @ in the chat. | ||||
| 13w10a | Pressing Esc in a command block will exit its GUI. | ||||
1.6.1{{Extension DPL}}<ul><li>[[Brush|Brush]]<br/>{{Item
|image=Brush.png
|rarity=Common
|renewable=Yes
|durability=64
|stackable=No
}}
A '''brush''' is a [[tool]] used in [[archaeology]] to excavate [[suspicious block]]s for different items.
==Obtaining==
===Crafting===
{{Crafting
|head=1
|showname=0
|showdescription=1
|B1=Feather
|B2=Copper Ingot
|B3=Stick
|Output=Brush
|type=Tool
}}
{{crafting
|foot=1
|ignoreusage=1
|Damaged Brush
|Damaged Brush
|Output=Brush
|description=The durability of the two brushes is added together, plus an extra 5% durability.
|type=Tool
}}
==Usage==
{{Main|Suspicious Block}}
{{Control|Using}} the brush on any block displays a brushing animation, slowing down the player and creating breaking [[particles]], but not actually damaging the block or brush. When continuously brushing a [[suspicious block]], a random item slowly emerges from it until it drops out, and the block turns into regular [[sand]] or regular [[gravel]], depleting 1 [[durability]] point on the brush. It takes 96 [[game tick]]s (4.8 seconds) to brush a single suspicious block.
=== Enchantments ===
A brush can receive the following [[enchantment]]s:
{|class="wikitable col-2-center col-3-right"
|+
!Name
!Max Level
![[Enchanting|Method]]
|-
|[[Unbreaking]]
|III
|{{Inventory slot|Anvil}}
|-
|[[Mending]]
|I
|{{Inventory slot|Anvil}}
|-
|[[Curse of Vanishing]]
|I
|{{Inventory slot|Anvil}}
|}
== Sounds ==
{{Edition|Java}}:
{{Sound table
<!--All of these sounds are, in fact, different-->
|sound=Brushing sand1.ogg
|sound2=Brushing sand2.ogg
|sound3=Brushing sand3.ogg
|sound4=Brushing sand4.ogg
|subtitle=Brushing Sand
|source=block
|description=While a brush is brushing suspicious sand
|id=item.brush.brushing.sand
|translationkey=subtitles.item.brush.brushing.sand
|volume=0.6
|pitch=0.6
|distance=16}}
{{Sound table
|sound=Brushing gravel1.ogg
|sound2=Brushing gravel2.ogg
|sound3=Brushing gravel3.ogg
|sound4=Brushing gravel4.ogg
|subtitle=Brushing Gravel
|source=block
|description=While a brush is brushing suspicious gravel
|id=item.brush.brushing.gravel
|translationkey=subtitles.item.brush.brushing.gravel
|volume=0.6
|pitch=0.6
|distance=16}}
{{Sound table
|sound=Brushing generic1.ogg
|sound2=Brushing generic2.ogg
|sound3=Brushing generic3.ogg
|sound4=Brushing generic4.ogg
|subtitle=Brushing
|source=block
|description=While a brush is brushing any other block
|id=item.brush.brushing.generic
|translationkey=subtitles.item.brush.brushing.generic
|volume=0.6
|pitch=0.6
|distance=16}}
{{Sound table
|sound=Brushing sand completed1.ogg
|sound2=Brushing sand completed2.ogg
|sound3=Brushing sand completed3.ogg
|sound4=Brushing sand completed4.ogg
|sound5=Brushing sand completed5.ogg
|subtitle=Brushing Sand completed
|source=Players<ref group=sound name=badsource>{{Bug|MC-260202}}</ref>|overridesource=1
|description=When a brush finishes brushing suspicious sand
|id=item.brush.brushing.sand.complete
|translationkey=subtitles.item.brush.brushing.sand.complete
|volume=1.0
|pitch=1.0
|distance=16}}
{{Sound table
|sound=Brushing gravel completed1.ogg
|sound2=Brushing gravel completed2.ogg
|sound3=Brushing gravel completed3.ogg
|sound4=Brushing gravel completed4.ogg
|subtitle=Brushing Gravel completed
|source=Players<ref group=sound name=badsource/>|overridesource=1
|description=When a brush finishes brushing suspicious gravel
|id=item.brush.brushing.gravel.complete
|translationkey=subtitles.item.brush.brushing.gravel.complete
|volume=1.0
|pitch=1.0
|distance=16
|foot=1}}
{{Edition|Bedrock}}:
{{Sound table
|type=bedrock
|sound=Brushing sand1.ogg
|sound2=Brushing sand2.ogg
|sound3=Brushing sand3.ogg
|sound4=Brushing sand4.ogg
|source=player
|description=While a brush is brushing suspicious sand
|id=brush.suspicious_sand
|volume=1.0
|pitch=0.8-1.0}}
{{Sound table
|sound=Brushing gravel1.ogg
|sound2=Brushing gravel2.ogg
|sound3=Brushing gravel3.ogg
|sound4=Brushing gravel4.ogg
|source=player
|description=While a brush is brushing suspicious gravel
|id=brush.suspicious_gravel
|volume=1.0
|pitch=0.8-1.0}}
{{Sound table
|sound=Brushing generic1.ogg
|sound2=Brushing generic2.ogg
|sound3=Brushing generic3.ogg
|sound4=Brushing generic4.ogg
|source=player
|description=While a brush is brushing any other block
|id=brush.generic
|volume=1.0
|pitch=0.8-1.0}}
{{Sound table
|sound=Brushing sand completed1.ogg
|sound2=Brushing sand completed2.ogg
|sound3=Brushing sand completed3.ogg
|sound4=Brushing sand completed4.ogg
|sound5=Brushing sand completed5.ogg
|source=player
|description=When a brush finishes brushing suspicious sand
|id=brush_completed.suspicious_sand
|volume=1.0
|pitch=0.8-1.0}}
{{Sound table
|sound=Brushing gravel completed1.ogg
|sound2=Brushing gravel completed2.ogg
|sound3=Brushing gravel completed3.ogg
|sound4=Brushing gravel completed4.ogg
|source=player
|description=When a brush finishes brushing suspicious gravel
|id=brush_completed.suspicious_gravel
|volume=1.0
|pitch=0.8-1.0
|foot=1}}
== Data values ==
=== ID ===
{{edition|java}}:
{{ID table
|edition=java
|showforms=y
|generatetranslationkeys=y
|displayname=Brush
|spritetype=item
|nameid=brush
|form=item
|foot=1}}
{{edition|bedrock}}:
{{ID table
|edition=bedrock
|shownumericids=y
|showforms=y
|notshowbeitemforms=y
|generatetranslationkeys=y
|displayname=Brush
|spritetype=item
|nameid=brush
|id=684
|form=item
|foot=1}}
== Advancements ==
{{load advancements|Respecting the Remnants}}
== History ==
{{History||October 3, 2020|link=https://youtu.be/DBvZ2Iqmm3M?t=2178|[[File:Brush (pre-release 1).png|32px]][[File:Brush 2.png|32px]] Brushes were announced at [[Minecraft Live 2020]] with two variants.}}
{{History||?|link=https://youtu.be/klP9SrJFDU8?t=206|[[File:Brush (pre-release 2).png|32px]] Changed the brush's item texture.}}
{{History||February 10, 2023|[[File:Brush JE1 BE1.png|32px]] [[Sofia Dankis]] posted an article about upcoming archaeology features, including brushes.|link=https://www.minecraft.net/en-us/article/archeology-coming-minecraft-120}}
{{History|java}}
{{History||1.20<br>(Experimental)|link=1.19.4|snap=23w07a|[[File:Brush JE1 BE1.png|32px]] Added brushes with an updated texture behind the [[Java Edition 1.20|Update 1.20 experimental datapack]].|The crafting recipe was originally three [[string]] and two [[stick]]s.
{{{!}} class{{=}}"collapsible collapsed" data-description{{=}}"Recipe"
! Recipe
{{!}}-
{{!}}{{Crafting Table
|A1 = String
|B1 = String
|C1 = String
|B2 = Stick
|B3 = Stick
|Output = Brush
|type = Tool
|ignoreusage=1}}
{{!}}}
}}
{{History|||snap=1.19.4 Pre-release 1|The crafting recipe for brushes has been changed:
{{{!}} class{{=}}"collapsible collapsed" data-description{{=}}"Recipe"
! Recipe
{{!}}-
{{!}}{{Crafting Table
|B1 = Feather
|B2 = Copper Ingot
|B3 = Stick
|Output = Brush
|type = Tool
|ignoreusage=1}}
{{!}}}
}}
{{History||1.20|snap=23w12a|Brushes are now available without using the "Update 1.20" experimental data pack.
|Brushes can now brush [[suspicious gravel]].}}
{{History|||snap=23w14a|The brushing sound of brush is now controlled by the "Blocks" sound slider instead of the "Players" sound slider.}}
{{History|||snap=23w17a|The player now gets the [[advancement]] "Respecting the Remnants" when they use a brush on a [[suspicious block]] to obtain a [[pottery sherd]].}}
{{History|bedrock}}
{{History||Next Major Update<br>(Experimental)|link=Bedrock Edition 1.19.70|snap=beta 1.19.70.23|[[File:Brush JE1 BE1.png|32px]] Added brushes behind the "[[Bedrock Edition 1.20.0|Next Major Update]]" [[experimental]] toggle.
|The crafting recipe is originally three [[string]] and two [[stick]]s.
{{{!}} class{{=}}"collapsible collapsed" data-description{{=}}"Recipe"
! Recipe
{{!}}-
{{!}}{{Crafting Table
|A1 = String
|B1 = String
|C1 = String
|B2 = Stick
|B3 = Stick
|Output = Brush
|type = Tool
|ignoreusage=1}}
{{!}}}
}}
{{History||Next Major Update<br>(Experimental)|link=Bedrock Edition 1.19.80|snap=beta 1.19.80.20|The crafting recipe for brushes has been changed:
{{{!}} class{{=}}"collapsible collapsed" data-description{{=}}"Recipe"
! Recipe
{{!}}-
{{!}}{{Crafting Table
|B1 = Feather
|B2 = Copper Ingot
|B3 = Stick
|Output = Brush
|type = Tool
|ignoreusage=1}}
{{!}}}
}}
{{History||1.20.0|snap=beta 1.20.0.21|Brushes are now available without using the "Next Major Update" experimental toggle.}}
{{History|foot}}
== Issues ==
{{Issue list}}
== References ==
{{Reflist}}
==External Links==
*[https://www.minecraft.net/en-us/article/brush Taking Inventory: Brush] – Minecraft.net on July 6, 2023
{{Items}}
[[Category:Renewable resources]]
[[de:Pinsel]]
[[es:Pincel]]
[[ja:ブラシ]]
[[pt:Pincel]]
[[pl:Pędzel]]
[[uk:Щітка]]
[[zh:刷子]]</li><li>[[Raw Iron|Raw Iron]]<br/>{{Item
| image = Raw Iron.png
| renewable = No
| stackable = Yes (64)
}}
'''Raw iron''' is a raw metal resource obtained from mining [[iron ore]].
== Obtaining ==
=== Mining ===
[[Iron ore]] and [[deepslate iron ore]] mined with a [[stone pickaxe]] or higher drops 1 unit of raw iron. If the pickaxe is enchanted with [[Fortune]], it can drop an extra unit per level of Fortune, allowing for a maximum of 4 with Fortune III. If the ore is mined using a pickaxe enchanted with [[Silk Touch]], it drops the ore block instead.
=== Crafting ===
{{Crafting
|showname=1
|Block of Raw Iron
|Output=Raw Iron,9
|type=Material
|foot=1
}}
== Usage ==
The primary usage of raw iron is smelting it into [[iron ingot]]s.
=== Crafting ===
{{crafting usage}}
=== Smelting ingredient ===
{{Smelting
|showname=2
|Raw Iron
|Iron Ingot
|0.7
}}
== Data values ==
=== ID ===
{{edition|java}}:
{{ID table
|edition=java
|showitemtags=y
|showforms=y
|generatetranslationkeys=y
|displayname=Raw Iron
|spritetype=item
|nameid=raw_iron
|form=item
|foot=1}}
{{edition|bedrock}}:
{{ID table
|edition=bedrock
|shownumericids=y
|showforms=y
|notshowbeitemforms=y
|generatetranslationkeys=y
|displayname=Raw Iron
|spritetype=item
|nameid=raw_iron
|form=item
|id=505
|foot=1}}
== History ==
{{History|java}}
{{History||1.17|snap=21w14a|[[File:Raw Iron JE1.png|32px]] Added raw iron.}}
{{History|||snap=April 13, 2021|slink={{Tweet|JasperBoerstra|1381991999952277513}}|[[File:Raw Iron JE2.png|32px]] [[JAPPA]] shows a new raw iron texture.}}
{{History|||snap=21w15a|[[File:Raw Iron JE2.png|32px]] The texture of raw iron has been changed.
|Raw iron can now be used to craft [[block of raw iron]].}}
{{History|||snap=April 16, 2021|slink={{Tweet|JasperBoerstra|1383047666037325829}}|[[File:Raw Iron (pre-release).png|32px]] [[JAPPA]] shows a new raw iron texture again.}}
{{History|||snap=21w16a|[[File:Raw Iron JE3.png|32px]] The texture of raw iron has been changed.}}
{{History|Bedrock}}
{{History||1.17.0|snap=beta 1.17.0.50|[[File:Raw Iron JE2.png|32px]] Added raw iron.}}
{{History|||snap=beta 1.17.0.52|Raw iron are now available without enabling [[experimental gameplay]].}}
{{History|||snap=beta 1.17.0.54|[[File:Raw Iron JE3.png|32px]] The texture of raw iron has been changed.}}
{{History|foot}}
== Issues ==
{{Issue list}}
==Gallery==
<gallery>
JE 1.17 Dev Raw Metals.jpg|Jappa shows raw ore textures.
Jappa Raw Ores 1.jpg|Jappa shows raw ore textures.
Jappa Raw Ores 2.png|Jappa shows raw ore textures.
Jappa Raw Ores 3.jpg|Jappa shows raw ore textures.
Jappa Raw Ores 4.jpg|Jappa shows raw ore textures.
Jappa Raw Ores 5.jpg|Jappa shows raw ore textures.
</gallery>
{{Items}}
[[Category:Non-renewable resources]]
[[de:Roheisen]]
[[es:Hierro en bruto]]
[[fr:Fer brut]]
[[it:Ferro grezzo]]
[[ja:鉄の原石]]
[[lzh:砂鐵]]
[[pl:Surowe żelazo]]
[[pt:Ferro bruto]]
[[ru:Необработанное железо]]
[[uk:Необроблене залізо]]
[[zh:粗铁]]</li></ul> | 13w19a | Command blocks are no longer mineable in Survival. | |||
| Command blocks are no longer damaged by explosions, except by blue wither skulls. | |||||
1.7.2{{Extension DPL}}<ul><li>[[Ankle Monitor|Ankle Monitor]]<br/>{{Joke feature}}
{{Item
| title = Ankle Monitor
| image = Ankle Monitor.png
| renewable = No
| stackable = Yes (64)
}}
The '''Ankle monitor''' was a joke foot item.
== Usage ==
Ankle monitors were equipped in the boots slot. In survival mode, when equipped, it could not be taken off. However, players in Creative mode are unaffected.
When equipped, the player would be afflicted with {{EffectLink|Slowness}} I.
During the night, being a certain number of blocks from the world spawn, above a certain minimum,{{checkthecode|how much?}} would prompt the following message in chat: "CURFEW WARNING! You are violating your house arrest! Get back by [distance] meters!"
If in [[the Nether]] or [[the End]], a different set of messages would be cycled through which can be seen in the section below.
=== Nether and End messages ===
* CURFEW WARNING! You are violating your house arrest! Uuuh... where are you anyway?
* CURFEW WARNING! Hello, are you there?
* CURFEW WARNING! I'm sure you have important things to do, but you need to go back!
* CURFEW WARNING! We're lonely back home!
* CURFEW WARNING! By "we" I mean I. I'm lonely.
* CURFEW WARNING! Ok enough games... GET BACK RIGHT NOW!
* CURFEW WARNING! LAST WARNING!
* CURFEW WARNING! LASTEST WARNING (really now)
* CURFEW WARNING! ...
* CURFEW WARNING! So... Where are you?
* CURFEW WARNING! Having a good day?
* CURFEW WARNING! Did you see that monster over there?
* CURFEW WARNING! Give it a whack, if you would be so kind.
* CURFEW WARNING! Teheee...
* CURFEW WARNING! Ok, enough of this!
* CURFEW WARNING! Last straw!
* CURFEW WARNING! Now you die.
* CURFEW WARNING! Boom!
* CURFEW WARNING! Hehe, fun right?
* CURFEW WARNING! Ok, you will not hear anything more from me now!
* CURFEW WARNING! You'll be as lonely as I am.
* CURFEW WARNING! How does that feel?
* CURFEW WARNING! Stop. Please. Stupid.
* CURFEW WARNING! I know, I'll wipe my memory. That way, I can start over!
* CURFEW WARNING! *bzzzzttt*
== Sounds ==
{{Sound table
|sound=Robot1arm1.ogg
|sound2=Robot1arm2.ogg
|sound3=Robot1arm3.ogg
|sound4=Robot1arm4.ogg
|source=dependent
|subtitle=''None''
|description=When a notification is displayed
|id=item.ankle_monitor.warning
|translationkey=''None''
|volume=1.0
|pitch=1.0
|distance=16
|foot=1}}
== Data values ==
=== ID ===
{{ID table
|shownumericids=y
|showforms=y
|generatetranslationkeys=java
|displayname=Ankle Monitor
|spritetype=item
|nameid=ankle_monitor
|id=501
|form=item
|translationkey=item.ankleMonitor.name
|foot=1}}
== History ==
{{History|java}}
{{History||1.RV-Pre1|[[File:Ankle_Monitor_(item).png|32px]] [[File:Ankle Monitor.png|32px]] Added ankle monitors.}}
{{History||1.11|snap=16w39a|The inability to remove ankle monitors was somewhat implemented into the canonical game through the addition of [[Curse of Binding]].<ref>{{ytl|Vm6oplvyyh0|t=3m31s}}</ref>}}
{{History|foot}}
== Issues ==
Ankle monitors are an unsupported [[item]] due to being an [[Wikipedia:April Fools' Day|April Fools']] joke, and therefore such issues relating to them will not be fixed.
== Gallery ==
<gallery>
TechGear.png|A [[player]] wearing the gear featured in this [[wikipedia:April Fools' Day|April Fools']] joke version.
</gallery>
==References==
{{Reflist}}
{{Items}}
{{Jokes}}
[[Category:Non-renewable resources]]
[[Category:Joke items]]
[[es:Ankle monitor]]</li><li>[[Leggings|Leggings]]<br/>{{Update|Include information about armor trims and updated netherite upgrade information.}}
{{Item
| image = <gallery>
Leather Pants.png | Leather
Chainmail Leggings.png | Chainmail
Iron Leggings.png | Iron
Diamond Leggings.png | Diamond
Golden Leggings.png | Golden
Netherite Leggings.png | Netherite
</gallery>
| durability =
* Leather: 75
* Chainmail: 225
* Iron: 225
* Golden: 105
* Diamond: 495
* Netherite: 555
| renewable =
* '''Netherite''': No
* '''All others''': Yes
| stackable = No
}}
'''Leggings''' are a type of [[armor]] that covers the lower body of the player. There are six types of leggings: '''leather pants'''<ref group=fn>Known as '''leather trousers''' in British English variant.{{only|java}}</ref>, '''chainmail leggings''', '''iron leggings''', '''diamond leggings''', '''gold leggings''', and '''netherite leggings'''.
== Obtaining ==
=== Crafting ===
{{crafting
|head=1
|showname=0
|showdescription=1
|name=Leggings
|A1= Leather;Gold Ingot;Iron Ingot;Diamond
|B1= Leather;Gold Ingot;Iron Ingot;Diamond
|C1= Leather;Gold Ingot;Iron Ingot;Diamond
|A2= Leather;Gold Ingot;Iron Ingot;Diamond
|C2= Leather;Gold Ingot;Iron Ingot;Diamond
|A3= Leather;Gold Ingot;Iron Ingot;Diamond
|C3= Leather;Gold Ingot;Iron Ingot;Diamond
|Output= Leather Pants;Golden Leggings;Iron Leggings;Diamond Leggings
|type= Combat
}}
{{crafting
|foot=1
|ignoreusage=1
|name=Leggings
|ingredients=Damaged Matching Leggings
|Damaged Leather Pants; Damaged Golden Leggings; Damaged Chainmail Leggings; Damaged Iron Leggings; Damaged Diamond Leggings; Damaged Netherite Leggings
|Damaged Leather Pants; Damaged Golden Leggings; Damaged Chainmail Leggings; Damaged Iron Leggings; Damaged Diamond Leggings; Damaged Netherite Leggings
|Output= Leather Pants; Golden Leggings; Chainmail Leggings; Iron Leggings; Diamond Leggings; Netherite Leggings
|description= The durability of the two leggings is added together, plus an extra 5% durability. Removes any enchantments.
|type= Combat
}}
=== Upgrading ===
{{Smithing
|Netherite Upgrade
|Diamond Leggings
|Netherite Ingot
|Netherite Leggings
|description=
|tail=1
}}
=== Repairing ===
==== Grinding ====
{{Grinding
|showdescription=1
|ingredients=Damaged Matching Leggings
|Damaged Leather Pants; Damaged Chainmail Leggings; Damaged Iron Leggings; Damaged Golden Leggings; Damaged Diamond Leggings; Damaged Netherite Leggings
|Damaged Leather Pants; Damaged Chainmail Leggings; Damaged Iron Leggings; Damaged Golden Leggings; Damaged Diamond Leggings; Damaged Netherite Leggings
|Leather Pants; Chainmail Leggings; Iron Leggings; Golden Leggings; Diamond Leggings; Netherite Leggings
|description=The durability of the two leggings are added together, plus an extra 5% durability.
}}
==== [[Anvil mechanics#Unit repair|Unit repair]] ====
Leggings may be repaired on an [[anvil]] by combining them with their corresponding crafting material (leather, gold ingots, iron ingots, diamonds, or netherite ingots), with each repair material restoring 25% of the leggings' maximum durability, rounded down. Any enchantments are retained. Chainmail leggings may be repaired in this way with iron ingots. Leggings may also be repaired by crafting them together with another pair of leggings of the same material, although enchantments are lost.
=== Mob loot ===
If a [[zombie]], [[piglin]], [[zombie pigman]] or [[skeleton]] is wearing armor, there is an 8.5% chance (9.5% with Looting I, 10.5% with Looting II and 11.5% with Looting III) for the mob to drop leggings upon death. The leggings are usually badly damaged and may be enchanted.
[[Vindicator]]s and [[pillager]]s spawn in [[raid]]s have a chance to drop iron leggings, which are usually badly damaged, and may be enchanted.
=== Chest loot ===
{{IN|BE}}, a sealed room in [[woodland mansion]]s can appear that has a chest sometimes containing an [[Efficiency]] I leather pants.<ref>{{bug|MCPE-109048}}</ref>
{{LootChestItem|leather-pants,random-enchanted-leather-pants,chainmail-leggings,iron-leggings,level-enchanted-iron-leggings,golden-leggings,random-enchanted-golden-leggings,diamond-leggings,damaged-diamond-leggings,level-enchanted-diamond-leggings,damaged-random-enchanted-diamond-leggings,damaged-random-enchanted-diamond-leggings-2}}
=== Trading ===
{{IN|java}}, novice-level armorer villagers have a 40% chance to sell iron leggings for 7 emeralds. Apprentice-level armorer villagers have a 50% chance to sell chainmail leggings for 3 emeralds. Expert-level armorer villagers always sell enchanted diamond leggings for 18-35 emeralds. Novice-level leatherworker villagers have a {{frac|2|3}} chance to sell randomly dyed<ref group="note">The leather armor has a random color created by two dyes (possibly the same dye twice).</ref> leather pants for 3 emeralds.
Armorer villagers may give the players with the [[Hero of the Village]] effect chainmail leggings. {{only|java}}
{{IN|bedrock}}, novice-level armorer villagers have a 25% chance of selling iron leggings for 7 emeralds. Apprentice-level armorers have a {{frac|1|3}} chance to sell chainmail leggings for 3 emeralds. Expert-level armorers have a 50% chance to sell enchanted diamond leggings for 14 emeralds. Novice-level leatherworker villagers have 50% chance to sell leather pants for 3 emeralds.
{{notelist|columns=1}}
== Usage ==
Leggings can be placed in the 3rd armor slot of a player's [[inventory]] for activation.
=== Defense points ===
Defense points are each signified by half of a shirt of mail in the armor bar above the health bar. Each defense point reduces any damage dealt to the player that is absorbed by armor by 4%, increasing additively with the number of defense points. Different materials and combinations of armor provide different levels of defense.
The following table shows the number of defense points added by leggings.
{| class="wikitable" data-description="Defense points"
|-
!scope="col" | Material
!scope="col" | Defense points
|-
!scope="row" | Leather
| {{armor|2}}
|-
!scope="row" | Golden
| {{armor|3}}
|-
!scope="row" | Chain
| {{armor|4}}
|-
!scope="row" | Iron
| {{armor|5}}
|-
!scope="row" | Diamond
| rowspan="2" | {{armor|6}}
|-
!scope="row" | Netherite
|}
=== Knockback resistance ===
Netherite leggings provide 10% knockback resistance.
=== Durability ===
The following table shows the amount of damage each piece of armor can absorb before being destroyed.
Any "hit" from a damage source that can be blocked by armor removes one point of durability from each piece of armor worn for every {{hp|4}} of incoming damage (rounded down, but never below 1). Damage taken but not protected by that armor (such as [[Damage#Fall damage|falling]] or [[Damage#Drowning|drowning]]) does not damage the armor, even if it is enchanted to protect against that type of damage. The following chart displays how many hits leggings can endure.
Netherite armor is not damaged by [[lava]] or [[fire]] when worn.
{| class="wikitable" data-description="Durability"
|-
! Material
!Durability
|-
!scope="row" | Leather
| 75
|-
!scope="row" | Golden
| 105
|-
!scope="row" | Chain/Iron
| 225
|-
!scope="row" | Diamond
| 495
|-
!scope="row" | Netherite
| 555
|}
=== Enchantments ===
Leggings can receive the following [[enchantment]]s:
{| class="wikitable"
|-
! Enchantment !! Max Level !! Notes
|-
| [[Fire Protection]] || IV || <ref group=note name=exclusive>Fire Protection, Blast Protection, Projectile Protection and Protection are mutually exclusive</ref>
|-
| [[Projectile Protection]] || IV || <ref group=note name="exclusive"/>
|-
| [[Blast Protection]] || IV || <ref group=note name="exclusive"/>
|-
| [[Protection]] || IV || <ref group=note name="exclusive"/>
|-
| [[Unbreaking]] || III ||
|-
| [[Thorns]] || III || <ref group="note" name="anvil">Only from using an [[anvil]] and [[enchanted book]]s.</ref>
|-
| [[Mending]] || I || <ref group=note name="anvil2">Only from chest loot, fishing, or an anvil and enchanted books.</ref>
|-
| [[Curse of Binding]] || I || <ref group="note" name="anvil2"/>
|-
| [[Curse of Vanishing]] || I || <ref group="note" name="anvil2"/>
|-
| [[Swift Sneak]] || III || <ref group=note name="anvil"/>
|}
{{notelist}}
=== Smelting usage ===
{{Smelting|showname=1|Iron Leggings;Chainmail Leggings;Golden Leggings|Iron Nugget;Iron Nugget;Gold Nugget|0,1}}
=== Piglins ===
{{EntityLink|Piglin|Piglins}} are attracted to ''golden'' leggings and pick them up, examining them for 6 to 8 seconds. Piglins can wear other leggings but are not attracted to them. They prefer stronger leggings over weaker leggings, with one exception: They always prefer golden leggings over all other leggings, throwing out stronger leggings in favor of gold leggings. Enchanted leggings are preferred over unenchanted leggings.
== Sounds ==
{{el|je}}:
{{Sound table
|sound=Equip leather1.ogg
|sound2=Equip leather2.ogg
|sound3=Equip leather3.ogg
|sound4=Equip leather4.ogg
|sound5=Equip leather5.ogg
|sound6=Equip leather6.ogg
|subtitle=Leather armor rustles
|source=player
|description=When leather leggings are equipped
|id=item.armor.equip_leather
|translationkey=subtitles.item.armor.equip_leather
|volume=1.0
|pitch=1.0
|distance=16}}
{{Sound table
|sound=Equip chain1.ogg
|sound2=Equip chain2.ogg
|sound3=Equip chain3.ogg
|sound4=Equip chain4.ogg
|sound5=Equip chain5.ogg
|sound6=Equip chain6.ogg
|subtitle=Chain armor jingles
|source=player
|description=When chainmail leggings are equipped
|id=item.armor.equip_chain
|translationkey=subtitles.item.armor.equip_chain
|volume=1.0
|pitch=1.0
|distance=16}}
{{Sound table
|sound=Equip iron1.ogg
|sound2=Equip iron2.ogg
|sound3=Equip iron3.ogg
|sound4=Equip iron4.ogg
|sound5=Equip iron5.ogg
|sound6=Equip iron6.ogg
|subtitle=Iron armor clanks
|source=player
|description=When iron leggings are equipped
|id=item.armor.equip_iron
|translationkey=subtitles.item.armor.equip_iron
|volume=1.0
|pitch=1.0
|distance=16}}
{{Sound table
|sound=Equip gold1.ogg
|sound2=Equip gold2.ogg
|sound3=Equip gold3.ogg
|sound4=Equip gold4.ogg
|sound5=Equip gold5.ogg
|sound6=Equip gold6.ogg
|subtitle=Gold armor clinks
|source=player
|description=When gold leggings are equipped
|id=item.armor.equip_gold
|translationkey=subtitles.item.armor.equip_gold
|volume=1.0
|pitch=1.0
|distance=16}}
{{Sound table
|sound=Equip diamond1.ogg
|sound2=Equip diamond2.ogg
|sound3=Equip diamond3.ogg
|sound4=Equip diamond4.ogg
|sound5=Equip diamond5.ogg
|sound6=Equip diamond6.ogg
|subtitle=Diamond armor clangs
|source=player
|description=When diamond leggings are equipped
|id=item.armor.equip_diamond
|translationkey=subtitles.item.armor.equip_diamond
|volume=1.0
|pitch=1.0
|distance=16}}
{{Sound table
|sound=Equip netherite1.ogg
|sound2=Equip netherite2.ogg
|sound3=Equip netherite3.ogg
|sound4=Equip netherite4.ogg
|subtitle=Netherite armor clanks
|source=player
|description=When netherite leggings are equipped
|id=item.armor.equip_netherite
|translationkey=subtitles.item.armor.equip_netherite
|volume=0.8
|pitch=1.0/0.9
|distance=16}}
{{Sound table
|sound=Random break.ogg
|subtitle=Item breaks
|source=dependent
|description=When a pair of leggings' durability is exhausted
|id=entity.item.break
|translationkey=subtitles.entity.item.break
|volume=0.8
|pitch=0.8-1.2
|distance=16
|foot=1}}
{{el|be}}:
{{Sound table
|type=bedrock
|sound=Equip leather1.ogg
|sound2=Equip leather2.ogg
|sound3=Equip leather3.ogg
|sound4=Equip leather4.ogg
|sound5=Equip leather5.ogg
|sound6=Equip leather6.ogg
|source=player
|description=When leather leggings are equipped
|id=armor.equip_leather
|volume=1.0
|pitch=1.0}}
{{Sound table
|sound=Equip chain1.ogg
|sound2=Equip chain2.ogg
|sound3=Equip chain3.ogg
|sound4=Equip chain4.ogg
|sound5=Equip chain5.ogg
|sound6=Equip chain6.ogg
|source=player
|description=When chain leggings are equipped
|id=armor.equip_chain
|volume=1.0
|pitch=1.0}}
{{Sound table
|sound=Equip iron1.ogg
|sound2=Equip iron2.ogg
|sound3=Equip iron3.ogg
|sound4=Equip iron4.ogg
|sound5=Equip iron5.ogg
|sound6=Equip iron6.ogg
|source=player
|description=When iron leggings are equipped
|id=armor.equip_iron
|volume=1.0
|pitch=1.0}}
{{Sound table
|sound=Equip gold1.ogg
|sound2=Equip gold2.ogg
|sound3=Equip gold3.ogg
|sound4=Equip gold4.ogg
|sound5=Equip gold5.ogg
|sound6=Equip gold6.ogg
|source=player
|description=When gold leggings are equipped
|id=armor.equip_gold
|volume=1.0
|pitch=1.0}}
{{Sound table
|sound=Equip diamond1.ogg
|sound2=Equip diamond2.ogg
|sound3=Equip diamond3.ogg
|sound4=Equip diamond4.ogg
|sound5=Equip diamond5.ogg
|sound6=Equip diamond6.ogg
|source=player
|description=When diamond leggings are equipped
|id=armor.equip_diamond
|volume=1.0
|pitch=1.0}}
{{Sound table
|sound=Equip netherite1.ogg
|sound2=Equip netherite2.ogg
|sound3=Equip netherite3.ogg
|sound4=Equip netherite4.ogg
|source=player
|description=When netherite leggings are equipped.
|id=armor.equip_netherite
|volume=1.0
|pitch=1.0}}
{{Sound table
|rowspan=2
|sound=Water Splash Old.ogg
|source=block
|description=When leather leggings are dyed using a cauldron
|id=cauldron.dyearmor
|volume=0.1
|pitch=1.0}}
{{Sound table
|source=block
|description=When leather leggings' dye is removed using a cauldron
|id=cauldron.cleanarmor
|volume=0.1
|pitch=1.0}}
{{Sound table
|sound=Random break.ogg
|source=player
|description=When a pair of leggings' durability is exhausted
|id=random.break
|volume=1.0
|pitch=0.9
|foot=1}}
== Data values ==
=== ID ===
{{edition|java}}:
{{ID table
|edition=java
|showitemtags=y
|showforms=y
|generatetranslationkeys=y
|displayname=Leather Pants
|spritetype=item
|nameid=leather_leggings
|itemtags=freeze_immune_wearables
|form=item}}
{{ID table
|displayname=Chainmail Leggings
|spritetype=item
|nameid=chainmail_leggings
|form=item}}
{{ID table
|displayname=Iron Leggings
|spritetype=item
|nameid=iron_leggings
|form=item}}
{{ID table
|displayname=Diamond Leggings
|spritetype=item
|nameid=diamond_leggings
|form=item}}
{{ID table
|displayname=Golden Leggings
|spritetype=item
|nameid=golden_leggings
|form=item}}
{{ID table
|displayname=Netherite Leggings
|spritetype=item
|nameid=netherite_leggings
|form=item
|foot=1}}
{{edition|bedrock}}:
{{ID table
|edition=bedrock
|shownumericids=y
|showforms=y
|notshowbeitemforms=y
|generatetranslationkeys=y
|displayname=Leather Pants
|spritetype=item
|nameid=leather_leggings
|id=337
|form=item}}
{{ID table
|displayname=Chainmail Leggings
|spritetype=item
|nameid=chainmail_leggings
|id=341
|form=item}}
{{ID table
|displayname=Iron Leggings
|spritetype=item
|nameid=iron_leggings
|id=345
|form=item}}
{{ID table
|displayname=Diamond Leggings
|spritetype=item
|nameid=diamond_leggings
|id=349
|form=item}}
{{ID table
|displayname=Golden Leggings
|spritetype=item
|nameid=golden_leggings
|id=353
|form=item}}
{{ID table
|displayname=Netherite Leggings
|spritetype=item
|nameid=netherite_leggings
|id=611
|form=item
|foot=1}}
=== Item data ===
When leather pants are dyed, it has the following NBT:
<div class="treeview">
* {{nbt|compound|tag}}: Parent tag.
** {{nbt|compound|display}}: Display properties.
*** {{nbt|int|color}}: The color of the leather armor. The tooltip displays "Dyed" if advanced tooltips are disabled, otherwise it displays the hexadecimal color value. Color codes are calculated from the red, green, and blue components using this formula:<br>'''<span style="color:red">Red</span>[[wikipedia:Logical shift|<<]]16 + <span style="color:green">Green</span><<8 + <span style="color:blue">Blue</span>'''<ref>For positive values larger than 0x00FFFFFF, the top byte is ignored. All negative values produce white.</ref>
</div>
== Achievements ==
{{load achievements|Iron Man;Tie Dye Outfit;Cover me in debris;Oooh, shiny!}}
== Advancements ==
{{load advancements|Suit Up;Cover me With Diamonds;Oh Shiny;Cover Me in Debris}}
== History ==
{{Cleanup|Split history into just leggings history}}
{{Needs render|type=old|Add of armor models from February 12, 2010 ("Added armor models" / "Armor models are displayed on the player in the inventory").}}
{{History|java indev}}
{{History||0.31|snap=20091231-2|[[File:Studded Leggings (item) JE1.png|32px]] [[History of textures/Unused textures#Studded armor|Studded leggings]] are now able to be seen in the [[inventory]]. This was taken directly from one of [[Notch|Notch's]] game's ''[[Legend of the Chambered 2]]''.}}
{{History||February 9, 2010|link=wordofnotch:380486636|[[File:Notch revealed armor.png|32px]] [[Notch]] revealed new models for armor, which included leggings.}}
{{History||20100212-1|Added leggings models.{{more info|No armor sets were added until later, what does this mean?}}
|[[File:Indev 20100212 armor.png|50px]] Leggings models are now displayed on the [[player]] in the [[inventory]].{{more info|No armor sets were added until later, what does this mean?}}}}
{{History||20100218|[[File:Leather Pants JE1.png|32px]] [[File:Leather Pants (item) JE1 BE1.png|32px]] Added cloth leggings, which have been given the textures from one of [[Notch]]'s previous games, ''[[Legend of the Chambered]]''.
|[[File:Chainmail Leggings JE1 BE1.png|32px]] [[File:Chainmail Leggings (item) JE1 BE1.png|32px]] Added chain leggings.
|[[File:Iron Leggings JE1 BE1.png|32px]] [[File:Iron Leggings (item) JE1 BE1.png|32px]] Added iron leggings.
|[[File:Golden Leggings JE1 BE1.png|32px]] [[File:Golden Leggings (item) JE1 BE1.png|32px]] Added gold leggings.
|[[File:Diamond Leggings JE1 BE1.png|32px]] [[File:Diamond Leggings (item) JE1 BE1.png|32px]] Added diamond leggings.
|Leggings can be [[crafting|crafted]] and worn.
|Leggings now function, giving {{Armor|6}}. Leggings have limited [[item durability|durability]], with lower tier leggings less durable than higher tier leggings.}}
{{History|java alpha}}
{{History||v1.0.8|"Wool leggings" have been renamed to "leather leggings".{{verify|Were they "pants" or "leggings" at the time? If not, when did the name change?}}
|Leather pants are now [[crafting|crafted]] with [[leather]] instead of [[wool]].}}
{{History|java}}
{{History||1.0.0|snap=Beta 1.9 Prerelease|The armor protection behavior has been changed. Previous to this update, the total armor protection is based in this equation: (((''total equipped armor damage reduction'' − 1) × (''all equipped armor max damage'' − ''total equipped armor damage'')) ÷ (''total equipped armor max damage'' + 1)).}}
{{History|||snap=October 3, 2011|slink={{tweet|notch|120859830339637249}}|The first images of a [[player]] wearing enchanted armor, including leggings, are revealed.}}
{{History|||snap=Beta 1.9 Prerelease 3|Iron leggings can be found in the new [[stronghold]] altar [[chest]]s.}}
{{History|||snap=Beta 1.9 Prerelease 4|Leggings can be [[enchanting|enchanted]].}}
{{History||1.1|snap=12w01a|Iron leggings can be found in the new blacksmith [[chest]]s in [[village]]s.}}
{{History||1.3.1|snap=12w15a|{{key|Shift}}+clicking can be used to equip leggings.}}
{{History|||snap=12w21a|Chain leggings can be obtained legitimately in [[survival]] mode through [[trading]].
|Blacksmith [[villager]]s now [[trading|sell]] chain leggings for 9–10 emeralds.
|Blacksmith villagers now sell diamond leggings for 11–13 emeralds.
|Blacksmith villagers now sell iron leggings for 8–9 emeralds.
|Butchers now sell leather pants for 2–3 emeralds.}}
{{History||1.4.2|snap=12w32a|[[Mob]] armor has been reintroduced. A partial or full set of any armor is now sometimes worn by [[zombie]]s, [[skeleton]]s and [[zombie pigman|zombie pigmen]], with the likelihood increasing with difficulty.}}
{{History|||snap=August 17, 2012|slink={{tweet|Dinnerbone|236445090929844225}}|[[Jeb]] and [[Dinnerbone]] tweeted pictures of [[dye]]able leather armor, including leggings.}}
{{History|||snap=12w34a|Leather pants can be dyed by [[crafting]] leather pants with [[dye]]s. Dyes can be removed by {{control|use|text=using}} dyed leather pants on a [[cauldron]] with [[water]].
|[[File:Leather Pants JE2.png|32px]] [[File:Leather Pants (item) JE2.png|32px]] Default leather pants are now slightly darker.}}
{{History|||snap=12w36a|[[Dye]]d leather pants are now more saturated and have a slight tint of tan in respect to the default armor color.
|[[Wither skeleton]]s can now spawn wearing leggings.}}
{{History|||snap=12w37a|[[File:Leather Pants (item) JE3 BE2.png|32px]]{{info needed|needs updating.}}[[Category:Needs updating]] Leather leggings now have non-dyed parts. This has been implemented so that [[player]]s can distinguish between other types of armor and similar-colored leather armor.
|Leather pants now have knee pads, which has changed the texture from [[File:Leather Pants JE2.png|32px]] to [[File:Leather Pants JE3 BE1.png|32px]].}}
{{History||1.5|snap=13w04a|Leggings in the [[player]]'s hand can be equipped by right-clicking.
|[[Dispenser]]s can now equip nearby players with leggings.}}
{{History||1.8|snap=14w02a|Armorer [[villager]]s now [[trading|sell]] chain leggings for 9–11 emeralds.
|Armorer villagers no longer sell diamond leggings.
|Armorer villagers no longer sell iron leggings.
|Leatherworkers now sell leather pants for 2–4 emeralds.}}
{{History|||snap=14w05a|Leggings no longer turn red when [[mob]]s and [[player]]s are hurt.}}
{{History|||snap=14w06a|Leggings are now visible on [[giant]]s.}}
{{History|||snap=14w25a|Chain leggings [[Java Edition removed features#Chain armor|can no longer be crafted anymore]] due to the [[item]] form of [[fire]] being [[Java Edition removed features#Obtainable until 1.8|removed]].}}
{{History||1.9|snap=15w31a|Enchanted iron and diamond leggings can be found in [[end city]] ship [[chest]]s.
|[[Mob]]s now wear armor from the bottom to the top, rather than from the top to the bottom. This means that a mob with three armor pieces, for example, spawn with all armor except a helmet.}}
{{History|||snap=15w34b|Leggings' [[item durability|durability]] now affects armor value.}}
{{History|||snap=15w36a|Armor value and armor [[enchanting|enchantment]] calculations have been changed. For the original values, see [[Armor/Before 1.9|here]].}}
{{History|||snap=15w36d|Leggings' durability affecting value has been removed.
|Leggings now have an attribute controlling the defense points.}}
{{History|||snap=15w50a|Added {{cd|equip}} [[sound]]s for leggings.}}
{{History|||snap=16w02a|Armor value and armor enchantment calculations have been changed again.}}
{{History|||snap=16w05a|Armor value calculations have been changed, once again.}}
{{History||1.11.1|snap=16w50a|Golden, chain, and iron leggings can be [[smelting|smelted]] down into one of their respective [[nugget]]s. Chain leggings smelt into iron nuggets.}}
{{History||1.13|snap=17w47a|Prior to [[1.13/Flattening|''The Flattening'']], these [[item]]s' numeral IDs were 300 (Leather), 304 (Chainmail), 308 (Iron), 312 (Diamond), and 316 (Golden).}}
{{History|||snap=18w11a|Enchanted leather pants can now generate in the chests of [[shipwreck]]s.}}
{{History|||snap=18w20a|Chain leggings have been renamed to "chainmail leggings".}}
{{History||1.14|snap=18w43a|[[File:Leather Pants JE4 BE2.png|32px]] [[File:Leather Pants (item) JE4 BE3.png|32px]] The textures of leather leggings have been changed.
|[[File:Chainmail Leggings JE2 BE2.png|32px]] [[File:Chainmail Leggings (item) JE2 BE2.png|32px]] The textures of chainmail leggings have been changed.
|[[File:Iron Leggings JE2 BE2.png|32px]] [[File:Iron Leggings (item) JE2 BE2.png|32px]] The textures of iron leggings have been changed.
|[[File:Golden Leggings JE2 BE2.png|32px]] [[File:Golden Leggings (item) JE2 BE2.png|32px]] The textures of gold leggings have been changed.
|[[File:Diamond Leggings JE2 BE2.png|32px]] [[File:Diamond Leggings (item) JE2 BE2.png|32px]] The textures of diamond leggings have been changed.}}
{{History|||snap=18w48a|Leather pants can be found in [[chest]]s in [[village]] tanneries.}}
{{History|||snap=19w08a|[[File:Golden Leggings (item) JE3 BE3.png|32px]] The texture of gold leggings [[item]]s have been changed.}}
{{History|||snap=19w11a|Armorer villagers now sell iron and enchanted diamond leggings, making diamond leggings effectively [[renewable resource|renewable]] again.
|Leather pants sold by leatherworker villagers are now randomly [[dye]]d.}}
{{History|||snap=19w13a|Armorer villagers now give chainmail leggings to players under the [[Hero of the Village]] effect.}}
{{History||1.16|snap=20w06a|[[File:Netherite Leggings JE1.png|32px]] [[File:Netherite Leggings (item) JE1.png|32px]] Added netherite leggings.
|Netherite leggings can be [[crafting|crafted]] using one diamond leggings and one [[netherite ingot]].}}
{{History|||snap=20w09a|[[File:Diamond Leggings (item) JE3 BE3.png|32px]] The textures of diamond leggings [[item]]s have been changed.}}
{{History|||snap=20w10a|[[File:Netherite Leggings JE2.png|32px]] [[File:Netherite Leggings (item) JE2 BE1.png|32px]] The texture of netherite leggings have been changed.
|Netherite leggings can no longer be [[crafting|crafted]].
|Netherite leggings are now obtained by combining one diamond leggings and one [[netherite ingot]] in a [[smithing table]].}}
{{History|||snap=20w16a|Netherite leggings now generate randomly enchanted in [[bastion remnant]] chests.
|Golden leggings now generate randomly enchanted in [[ruined portal]] chests.}}
{{History|||snap=20w17a|Diamonds leggings now generate in place of netherite leggings in bastion remnant [[chest]]s.}}
{{History||1.16.4|snap=Pre-release 1|[[File:Netherite Leggings JE3 BE2.png|32px]] The texture of netherite leggings has been changed.}}
{{History||1.18.2|snap=22w03a|Netherite leggings knockback resistance is no longer random.}}
{{History||1.19|snap=22w12a|Added the [[Swift Sneak]] enchantment, which can be applied only to leggings.}}
{{History|||snap=22w13a|Enchanted iron and diamond leggings may be found in [[ancient city]] [[chest]]s.}}
{{History||1.20<br>(Experimental)|link=1.19.4|snap=23w04a|Non-leather leggings can now be trimmed using a [[smithing table]].
|There are 10 types of material that determine the color of the trim:
*Iron
*Copper
*Gold
*Lapis
*Emerald
*Diamond
*Netherite
*Redstone
*Amethyst
*Quartz
|Upgrading diamond leggings to netherite leggings now requires the netherite upgrade [[smithing template]].}}
{{History|||snap=23w05a|Leather pants can now be trimmed using a smithing table.|Leggings can now have trims of the same material it is made out of.}}
{{History|||snap=23w06a|Swapped {{cd|iron}} and {{cd|iron_darker}} palette, then made {{cd|iron_darker}} darker overall.}}
{{History||1.19.4|snap=23w05a|Leggings can now be swapped by {{ctrl|using}} them in the hotbar.<ref>{{bug|MC-216270|||Fixed}}</ref>}}
{{History||?|Leggings can now be swapped in [[armor stand]]s by {{ctrl|using}} them in the armor stand's slot.}}
{{History||1.20|snap=23w12a|The pattern textures of dune and sentry armor trims are changed.|
Those previous patterns were left with different names: dune was renamed sentry and sentry was renamed shaper.}}
{{History|pocket alpha}}
{{History||v0.6.0|[[File:Leather Pants JE1 BE1.png|32px]] [[File:Leather Pants (item) JE1 BE1.png|32px]] Added the leather pants.
|[[File:Chainmail Leggings JE1 BE1.png|32px]] [[File:Chainmail Leggings (item) JE1 BE1.png|32px]] Added the chain leggings.
|[[File:Iron Leggings JE1 BE1.png|32px]] [[File:Iron Leggings (item) JE1 BE1.png|32px]] Added the iron leggings.
|[[File:Golden Leggings JE1 BE1.png|32px]] [[File:Golden Leggings (item) JE1 BE1.png|32px]] Added the golden leggings.
|[[File:Diamond Leggings JE1 BE1.png|32px]] [[File:Diamond Leggings (item) JE1 BE1.png|32px]] Added the diamond leggings.}}
{{History||v0.8.0|snap=build 2|[[File:Leather Pants (item) JE3 BE2.png|32px]] The leather pants sprites have been changed to that of the [[Java Edition|PC]] version, but its armor [[model]] remains that of older versions.}}
{{History||v0.9.0|snap=build 1|Iron leggings now naturally generates in [[village]] [[chest]]s and a [[stronghold]] altar chest.}}
{{History||v0.11.0|snap=build 11|Armor now protects against [[damage]] from [[mob]]s only.}}
{{History||v0.12.1|snap=build 1|Leggings can be worn by mobs.
|Chainmail leggings can be obtained in [[survival]] mode from a mob wearing it.}}
{{History||?|Leggings no longer turn red when [[mob]]s and [[player]]s are hurt.}}
{{History||v0.14.0|snap=build 1|[[File:Leather Pants JE3 BE2.png|32px]] Leather armor can be dyed and the model has been updated.}}
{{History||v0.15.0|snap=build 1|Leggings can be obtained from [[stray]]s and [[husk]]s that naturally spawn with armor.}}
{{History||v0.15.10|[[Cape]]s no longer clip through armor.}}
{{History|pocket}}
{{History||1.0.0|snap=alpha 0.17.0.1|[[Enchanting|Enchanted]] iron leggings and enchanted diamond leggings can be found inside [[chest]]s within [[end city]].}}
{{History||1.0.4|snap=alpha 1.0.4.0|Chainmail leggings are now [[trading|sold]] by armorer smith [[villager]]s via [[trading]].}}
{{History||1.1.0|snap=alpha 1.1.0.0|Golden, chain, and iron leggings can be [[smelting|smelted]] down into one of their respective [[nugget]]s.}}
{{History|bedrock}}
{{History||1.4.0|snap=beta 1.2.14.2|Chainmail leggings now generate in [[buried treasure]] chests.
|Enchanted leather leggings can be found inside [[shipwreck]] supply room [[chest]]s.}}
{{History||1.10.0|snap=beta 1.10.0.3|Iron leggings now can be found in plains [[village]] weaponsmith [[chest]]s.
|Leather pants can be found inside plains village tannery chests.
|[[File:Leather Pants JE4 BE2.png|32px]] [[File:Leather Pants (item) JE4 BE3.png|32px]] The textures of leather pants have been changed.
|[[File:Chainmail Leggings JE2 BE2.png|32px]] [[File:Chainmail Leggings (item) JE2 BE2.png|32px]] The textures of chainmail leggings have been changed.
|[[File:Iron Leggings JE2 BE2.png|32px]] [[File:Iron Leggings (item) JE2 BE2.png|32px]] The textures of iron leggings have been changed.
|[[File:Golden Leggings JE2 BE2.png|32px]] [[File:Golden Leggings (item) JE2 BE2.png|32px]] The textures of golden leggings have been changed.
|[[File:Diamond Leggings JE2 BE2.png|32px]] [[File:Diamond Leggings (item) JE2 BE2.png|32px]] The textures of diamond leggings have been changed.}}
{{History||1.11.0|snap=beta 1.11.0.1|Iron leggings now can be found in [[savanna]], [[taiga]], [[desert]], [[snowy taiga]], and [[snowy tundra]] [[village]] weaponsmith [[chest]]s.
|Leather leggings can be found inside savanna, taiga, desert, snowy taiga, and snowy tundra village tannery chests.}}
{{History|||snap=beta 1.11.0.4|[[Pillager]]s and [[vindicator]]s that spawn in [[raid]]s can now drop iron leggings.
|Leather pants are now [[trading|sold]] by leather worker [[villager]]s.
|Iron leggings and diamond leggings are now sold by armorer villagers.}}
{{History||1.11.0|snap=beta 1.11.0.5|[[File:Golden Leggings (item) JE3 BE3.png|32px]] The textures of golden leggings [[item]]s have been changed.}}
{{History||1.12.0|snap=beta 1.12.0.2|[[File:Armor Stand with Leather Armor MCPE-44669.png|32px]] Leather armor no longer show as being [[dye]]d properly when worn by [[armor stand]]s.}}
{{History||1.13.0|snap=beta 1.13.0.1|Leather armor now appears dyed properly when worn by armor stands.}}
{{History||1.16.0|snap=beta 1.16.0.51|[[File:Netherite Leggings BE1.png|32px]] [[File:Netherite Leggings (item) JE2 BE1.png|32px]] Added netherite leggings.
|Netherite leggings can be [[crafting|crafted]] using one diamond leggings and one [[netherite ingot]].
|[[File:Diamond Leggings (item) JE3 BE3.png|32px]] The texture of diamond leggings has been changed.
|Golden leggings can be obtained from [[piglin]]s wearing [[armor]].}}
{{History||1.16.0|snap=beta 1.16.0.57|Netherite leggings can no longer be [[crafting|crafted]].
|Netherite leggings are now obtained by combining one diamond leggings and one [[netherite ingot]] in a [[smithing table]].
|Golden leggings can be found in [[ruined portal]] chests.
|Golden and netherite leggings can be found in [[bastion remnant]] chests.}}
{{History|||snap=beta 1.16.0.63|Diamonds leggings now generate in place of netherite leggings in bastion remnant chests.}}
{{History||1.16.200|snap=beta 1.16.200.52|[[File:Netherite Leggings JE3 BE2.png|32px]] The texture of netherite leggings has been changed.}}
{{History||1.19.0|snap=beta 1.19.0.24|Added the [[Swift Sneak]] enchantment, which is applicable only to leggings.}}
{{History|||snap=beta 1.19.0.26|Enchanted iron and diamond leggings may be found in [[ancient city]] [[chest]]s.}}
{{History|console}}
{{History||xbox=TU1|xbone=CU1|ps=1.0|wiiu=Patch 1|switch=1.0.1|[[File:Leather Pants JE3 BE1.png|32px]] [[File:Leather Pants (item) JE1 BE1.png|32px]] Added the leather leggings.
|[[File:Iron Leggings JE1 BE1.png|32px]] [[File:Iron Leggings (item) JE1 BE1.png|32px]] Added the iron leggings.
|[[File:Golden Leggings JE1 BE1.png|32px]] [[File:Golden Leggings (item) JE1 BE1.png|32px]] Added the golden leggings.
|[[File:Diamond Leggings JE1 BE1.png|32px]] [[File:Diamond Leggings (item) JE1 BE1.png|32px]] Added the diamond set.}}
{{History||xbox=TU5|[[File:Chainmail Leggings JE1 BE1.png|32px]] [[File:Chainmail Leggings (item) JE1 BE1.png|32px]] Added the chain leggings.
|Added a quick equip for armor to the [[inventory]] interface.}}
{{History||xbox=TU12|ps=1.03|[[File:Leather Pants (item) JE3 BE2.png|32px]] The textures for leather armor [[item]]s have been changed.}}
{{History||xbox=TU14|ps=1.05|Leather armor can be [[dye]]d.
|[[Item repair]] can now repair armor.}}
{{History||xbox=TU25|xbone=CU13|ps=1.16|Armor now have the quick equip functionality.}}
{{History||xbox=TU53|xbone=CU43|ps=1.49|wiiu=Patch 23|switch=1.0.3|Golden, chain, and iron armor can be [[smelting|smelted]] down into one of their respective [[nugget]]s.}}
{{History|PS4}}
{{History||1.90|[[File:Leather Cap JE4 BE2.png|32px]] [[File:Leather Tunic JE4 BE2.png|32px]] [[File:Leather Pants JE4 BE2.png|32px]] [[File:Leather Boots JE3 BE2.png|32px]]<br>[[File:Leather Cap (item) JE4 BE3.png|32px]] [[File:Leather Tunic (item) JE4 BE3.png|32px]] [[File:Leather Pants (item) JE4 BE3.png|32px]] [[File:Leather Boots (item) JE4 BE3.png|32px]] The textures of leather armor have been changed.
|[[File:Chainmail Helmet JE3 BE2.png|32px]] [[File:Chainmail Chestplate JE3 BE2.png|32px]] [[File:Chainmail Leggings JE2 BE2.png|32px]] [[File:Chainmail Boots JE2 BE2.png|32px]]<br>[[File:Chainmail Helmet (item) JE2 BE2.png|32px]] [[File:Chainmail Chestplate (item) JE2 BE2.png|32px]] [[File:Chainmail Leggings (item) JE2 BE2.png|32px]] [[File:Chainmail Boots (item) JE2 BE2.png|32px]] The textures of chainmail armor have been changed.
|[[File:Iron Helmet JE2 BE2.png|32px]] [[File:Iron Chestplate JE2 BE2.png|32px]] [[File:Iron Leggings JE2 BE2.png|32px]] [[File:Iron Boots JE2 BE2.png|32px]]<br>[[File:Iron Helmet (item) JE2 BE2.png|32px]] [[File:Iron Chestplate (item) JE2 BE2.png|32px]] [[File:Iron Leggings (item) JE2 BE2.png|32px]] [[File:Iron Boots (item) JE2 BE2.png|32px]] The textures of iron armor have been changed.
|[[File:Golden Helmet JE2 BE2.png|32px]] [[File:Golden Chestplate JE2 BE2.png|32px]] [[File:Golden Leggings JE2 BE2.png|32px]] [[File:Golden Boots JE2 BE2.png|32px]]<br>[[File:Golden Helmet (item) JE3 BE3.png|32px]] [[File:Golden Chestplate (item) JE3 BE3.png|32px]] [[File:Golden Leggings (item) JE3 BE3.png|32px]] [[File:Golden Boots (item) JE3 BE3.png|32px]] The textures of gold armor have been changed.
|[[File:Diamond Helmet JE2 BE2.png|32px]] [[File:Diamond Chestplate JE3 BE2.png|32px]] [[File:Diamond Leggings JE2 BE2.png|32px]] [[File:Diamond Boots JE2 BE2.png|32px]]<br>[[File:Diamond Helmet (item) JE2 BE2.png|32px]] [[File:Diamond Chestplate (item) JE2 BE2.png|32px]] [[File:Diamond Leggings (item) JE2 BE2.png|32px]] [[File:Diamond Boots (item) JE2 BE2.png|32px]] The textures of diamond armor have been changed.}}
{{History|new 3ds}}
{{History||0.1.0|[[File:Leather Cap JE3 BE1.png|32px]] [[File:Leather Tunic JE3 BE1.png|32px]] [[File:Leather Pants JE3 BE1.png|32px]] [[File:Leather Boots JE2 BE1.png|32px]]<br>[[File:Leather Cap (item) JE3 BE2.png|32px]] [[File:Leather Tunic (item) JE3 BE2.png|32px]] [[File:Leather Pants (item) JE3 BE2.png|32px]] [[File:Leather Boots (item) JE3 BE2.png|32px]] Added the leather set.
|[[File:Chainmail Helmet JE2 BE1.png|32px]] [[File:Chainmail Chestplate JE2 BE1.png|32px]] [[File:Chainmail Leggings JE1 BE1.png|32px]] [[File:Chainmail Boots JE1 BE1.png|32px]]<br>[[File:Chainmail Helmet (item) JE1 BE1.png|32px]] [[File:Chainmail Chestplate (item) JE1 BE1.png|32px]] [[File:Chainmail Leggings (item) JE1 BE1.png|32px]] [[File:Chainmail Boots (item) JE1 BE1.png|32px]] Added the chain set.
|[[File:Iron Helmet JE1 BE1.png|32px]] [[File:Iron Chestplate JE1 BE1.png|32px]] [[File:Iron Leggings JE1 BE1.png|32px]] [[File:Iron Boots JE1 BE1.png|32px]]<br>[[File:Iron Helmet (item) JE1 BE1.png|32px]] [[File:Iron Chestplate (item) JE1 BE1.png|32px]] [[File:Iron Leggings (item) JE1 BE1.png|32px]] [[File:Iron Boots (item) JE1 BE1.png|32px]] Added the iron set.
|[[File:Golden Helmet JE1 BE1.png|32px]] [[File:Golden Chestplate JE1 BE1.png|32px]] [[File:Golden Leggings JE1 BE1.png|32px]] [[File:Golden Boots JE1 BE1.png|32px]]<br>[[File:Golden Helmet (item) JE1 BE1.png|32px]] [[File:Golden Chestplate (item) JE1 BE1.png|32px]] [[File:Golden Leggings (item) JE1 BE1.png|32px]] [[File:Golden Boots (item) JE1 BE1.png|32px]] Added the golden set.
|[[File:Diamond Helmet JE1 BE1.png|32px]] [[File:Diamond Chestplate JE1 BE1.png|32px]] [[File:Diamond Leggings JE1 BE1.png|32px]] [[File:Diamond Boots JE1 BE1.png|32px]]<br>[[File:Diamond Helmet (item) JE1 BE1.png|32px]] [[File:Diamond Chestplate (item) JE1 BE1.png|32px]] [[File:Diamond Leggings (item) JE1 BE1.png|32px]] [[File:Diamond Boots (item) JE1 BE1.png|32px]] Added the diamond set.}}
{{History|foot}}
== Issues ==
{{issue list}}
== Gallery ==
=== Enchanted Leggings ===
<gallery>
File:Enchanted Leather Pants (item).gif
File:Enchanted Chainmail Leggings (item).gif
File:Enchanted Iron Leggings (item).gif
File:Enchanted Golden Leggings (item).gif
File:Enchanted Diamond Leggings (item).gif
File:Enchanted Netherite Leggings (item).gif
</gallery>
<gallery>
File:Enchanted Leather Leggings.gif
File:Enchanted Chainmail Leggings.gif
File:Enchanted Iron Leggings.gif
File:Enchanted Golden Leggings.gif
File:Enchanted Diamond Leggings.gif
File:Enchanted Netherite Leggings.gif
</gallery>
== Notes ==
{{fnlist}}
== References ==
{{reflist}}
== External Links ==
*[https://www.minecraft.net/en-us/article/taking-inventory-leggings Taking Inventory:Leggings] – Minecraft.net on February 15, 2019
{{Items}}
[[Category:Armor]]
[[fr:Armure#Jambières]]
[[ja:レギンス]]
[[ko:각반]]
[[pl:Nogawice]]
[[pt:Calças]]
[[zh:护腿]]</li></ul> | 13w37a | A bar that shows the previous output of command blocks has been added. | |||
| The character limit when inserting a command in a command block has been increased from 256 to 16,369. Using a third-party editor allows the player to reach 32,767 characters. | |||||
1.8{{Extension DPL}}<ul><li>[[:Category:Tools|Category:Tools]]<br/>[[Category:Items]]
[[fr:Catégorie:Outil]]
[[it:Categoria:Attrezzi]]</li><li>[[Reality Vision|Reality Vision]]<br/>{{Joke feature}}
{{Item
| title = Reality Vision
| image = Reality Vision.png
| renewable = No
| stackable = Yes (64)
}}
The '''Reality vision''' was a joke [[helmet]].
== Usage ==
Reality vision was equipped via the [[helmet]] slot. When equipped, it showed a [[wikipedia:Mini-map|minimap]] in the bottom-center of the screen (which moved when the [[player]]'s camera moves). The minimap showed all [[chunk]]s that were currently rendered. The player's location was represented by a green [[beacon]] beam marker on the map.
It displayed a vision overlay (similar to the [[pumpkin]] overlay). The overlay would change to a new overlay if the player went into third person (unlike the pumpkin overlay), which made the screen appear like an old [[wikipedia:Television|television]] screen. The overlay was called <code>cantseeshit<!-- Do not change this; this is that word that is actually used-->captain.png</code> in the assets folder. It activated a [[Shaders|shader]] when equipped (<code>scan_pincushion</code>).
== Sounds ==
{{Sound table
|sound=Equipvr.ogg
|subtitle=''None''
|source=player
|description=When equipped
|id=item.reality_vision.use
|translationkey=''None''
|volume=1.0
|pitch=1.0
|distance=16
|foot=1}}
== Data values ==
=== ID ===
{{ID table
|edition=java
|shownumericids=y
|showforms=y
|generatetranslationkeys=y
|displayname=Reality Vision
|spritetype=item
|nameid=reality_vision
|id=500
|form=item
|translationkey=item.realityVision.name
|foot=1}}
== History ==
{{History|java}}
{{History||1.RV-Pre1|[[File:Reality_Vision_(item).png|32px]] [[File:Reality Vision.png|32px]] Added reality vision.}}
{{History|foot}}
== Issues ==
Reality Vision is an unsupported item due to being an [[Wikipedia:April Fools' Day|April Fools']] joke, and therefore such issues relating to them will not be fixed.
== Trivia ==
* [[Sign]]s display the text "OBEY" while equipped, a reference to the movie [[wikipedia:They Live|''They Live'']].
== Gallery ==
<gallery>
Sign2.png|The [[sign]] texture found in the game files.
OBEY.png|OBEY seen in a sign.
OBEY sign in 1.RV-Pre1..png|OBEY seen in a sign, but seen from a better perspective.
TechGear.png|A [[player]] wearing reality vision, featured in this [[wikipedia:April Fools' Day|April Fools']] joke version.
</gallery>
{{Items}}
{{Jokes}}
[[Category:Non-renewable resources]]
[[Category:Joke items]]
[[pt:Visão da realidade]]
[[es:Reality Vision]]</li></ul> | 14w07a | Dispensers now place command blocks, instead of shooting them out. | |||
| 14w20a | The in-game character limit of 16,369 has been removed, allowing access to the full 32,767 characters. | ||||
| 14w27a | Added CommandStats NBT tag to command blocks. | ||||
1.8.6{{Extension DPL}}<ul><li>[[Written Book|Written Book]]<br/>{{Item
| title = Written Book
| image = Written Book.gif
| renewable = Yes
| stackable = Yes (16)
}}
A '''written book''' is an [[item]] created after a [[book and quill]] is signed.
== Obtaining ==
=== Signing a book and quill ===
Written books can be obtained by signing a [[book and quill]]. After it has been signed, it cannot be edited again. The label does not say "Written Book", but whatever the [[player]] titles it. The title appears on the top line of the label, and "by <''player''>" (the player's username) on the bottom. {{IN|bedrock}}, this is customizable without [[commands]].
=== Copying ===
{{crafting
|name=Written Book
|showdescription=1
|;;;Book and Quill;Book and Quill;Book and Quill;Book and Quill;Book and Quill
|;;;;Book and Quill;Book and Quill;Book and Quill;Book and Quill
|;;;;;Book and Quill;Book and Quill;Book and Quill
|Book and Quill
|Written Book
|;;;;;;Book and Quill;Book and Quill
|;Book and Quill;Book and Quill;Book and Quill;Book and Quill;Book and Quill;Book and Quill;Book and Quill
|;;Book and Quill;Book and Quill;Book and Quill;Book and Quill;Book and Quill;Book and Quill
|;;;;;;;Book and Quill
|Output= Written Book; Written Book,2; Written Book,3; Written Book,4; Written Book,5; Written Book,6; Written Book,7; Written Book,8
|description=The input written book is not consumed.<br>The new copies are "Copy of Original" or "Copy of Copy", depending on whether the input written book is "Original" or "Copy of Original".<br>Copies of copies cannot be copied.<br>Copied books of the same generation ("Original", "Copy of Original", "Copy of Copy", or "Tattered") stack.
|type=Miscellaneous
}}
== Usage ==
Written books can be opened by right-clicking (or holding down on the screen {{in|bedrock}}), and display a GUI allowing the [[player]] to read it or turn the page.
The contents of a book are an extra set of data attached to the item. This means that when a book is destroyed, its contents are lost with it.
=== Lecterns ===
One can place a [[written book]] on an empty [[lectern]].
The lectern then emits a redstone signal depending on the displayed page in the book. On the last page, the lectern emits a signal strength of 15.
=== Chiseled bookshelf ===
{{control|Use|text=Using}} the [[chiseled bookshelf]] while having a written book in the main hand will put the book inside the chiseled bookshelf.
== Sounds ==
{{edition|java}}:
{{Sound table
|sound=Page turn1.ogg
|sound2=Page turn2.ogg
|sound3=Page turn3.ogg
|subtitle=Page rustles
|source=master
|description=When the page of a book is turned
|id=item.book.page_turn
|translationkey=subtitles.item.book.page_turn
|volume=2.0
|pitch=1.0
|distance=16}}
{{Sound table
|sound=Page turn1.ogg
|sound2=Page turn2.ogg
|sound3=Page turn3.ogg
|subtitle=Page rustles
|source=block
|description=When the page of a book is turned on a lectern
|id=item.book.page_turn
|translationkey=subtitles.item.book.page_turn
|volume=2.0
|pitch=0.9-1.0
|distance=16}}
{{Sound table
|sound=Book thump1.ogg
|sound2=Book thump2.ogg
|subtitle=Book thumps
|source=block
|description=When a book is placed on a lectern
|id=item.book.put
|translationkey=subtitles.item.book.put
|volume=1.0
|pitch=1.0
|distance=16}}
{{Sound table
|sound=Chiseled bookshelf insert1.ogg
|sound2=Chiseled bookshelf insert2.ogg
|sound3=Chiseled bookshelf insert3.ogg
|sound4=Chiseled bookshelf insert4.ogg
|subtitle=Book placed
|source=block
|description=When a written book is placed in a chiseled bookshelf
|id=block.chiseled_bookshelf.insert
|translationkey=subtitles.chiseled_bookshelf.insert
|volume=0.8
|pitch=''varies'' <ref group=sound>Can be 1.0, 0.85, or 1.1 for each sound</ref>
|distance=16}}
{{Sound table
|sound=Chiseled bookshelf pickup1.ogg
|sound2=Chiseled bookshelf pickup2.ogg
|sound3=Chiseled bookshelf pickup3.ogg
|subtitle=Book taken
|source=block
|description=When a written book is removed from a chiseled bookshelf
|id=block.chiseled_bookshelf.pickup
|translationkey=subtitles.chiseled_bookshelf.take
|volume=0.8
|pitch=''varies'' <ref group=sound>Can be 1.0, 0.8, or 1.1 for each sound</ref>
|distance=16
|foot=1}}
{{edition|bedrock}}:
{{Sound table
|type=bedrock
|sound=Page turn1.ogg
|sound2=Page turn2.ogg
|sound3=Page turn3.ogg
|source=sound
|description=When the page of a book is turned
|id=item.book.page_turn
|volume=2.0
|pitch=1.0}}
{{Sound table
|sound=Book thump1.ogg
|sound2=Book thump2.ogg
|source=block
|description=When a book is placed on a lectern
|id=item.book.put
|volume=4.8
|pitch=1.0}}
{{Sound table
|type=bedrock
|sound=Chiseled bookshelf insert1.ogg
|sound2=Chiseled bookshelf insert2.ogg
|sound3=Chiseled bookshelf insert3.ogg
|sound4=Chiseled bookshelf insert4.ogg
|source=block
|description=When a written book is placed in a chiseled bookshelf
|id=insert.chiseled_bookshelf
|volume=0.8
|pitch=''varies'' <ref group=sound>Can be 1.0, 0.85, or 1.1 for each sound</ref>}}
{{Sound table
|sound=Chiseled bookshelf pickup1.ogg
|sound2=Chiseled bookshelf pickup2.ogg
|sound3=Chiseled bookshelf pickup3.ogg
|source=block
|description=When a written book is removed from a chiseled bookshelf
|id=pickup.chiseled_bookshelf
|volume=0.8
|pitch=''varies'' <ref group=sound>Can be 1.0, 0.8, or 1.1 for each sound</ref>
|foot=1}}
== Data values ==
=== ID ===
{{JE}}:
{{ID table
|edition=java
|showitemtags=y
|showforms=y
|generatetranslationkeys=y
|displayname=Written Book
|spritetype=item
|nameid=written_book
|itemtags=bookshelf_books, lectern_books
|form=item
|foot=1}}
{{BE}}:
{{ID table
|edition=bedrock
|showitemtags=y
|shownumericids=y
|showforms=y
|notshowbeitemforms=y
|generatetranslationkeys=y
|displayname=Written Book
|spritetype=item
|nameid=written_book
|id=511
|itemtags=minecraft:bookshelf_books, minecraft:lectern_books
|form=item
|foot=1}}
=== Item data ===
{{el|java}}:
{{main|Player.dat format}}
<div class="treeview">
* {{nbt|compound|tag}}: The item's '''tag''' tag.
{{:Player.dat_format/Written Books}}
</div>
{{el|bedrock}}:
: See [[Bedrock Edition level format/Item format]].
== History ==
{{History|java}}
{{History||1.3.1|snap=12w17a|[[File:Written Book JE1 BE1.png|32px]] Added written books.}}
{{History|||snap=12w21a|Written books can now be [[trading|sold]] to librarian [[villager]]s, at 1 written book for 1 [[emerald]].}}
{{History||1.7.2|snap=13w36a|Written books can now be cloned the same way [[map]]s can, but by using [[book and quill|books and quills]] instead of Empty Maps. Multiple copies of the same written book can be cloned by putting more book and quills in the crafting grid.
|Written books can now be stacked (up to 16 per stack).}}
{{History||1.8|snap=14w02a|[[Trading]] has been changed: librarian [[villager]]s now [[trading|buy]] 2 written books for 1 [[emerald]].}}
{{History|||snap=14w05a|Copying written books now mark them as "Copy of Original" or "Copy of Copy". The copying status of a book is denoted in a separate line in the tooltip, beneath the author's name. Copies of copies cannot be copied.}}
{{History||1.9|snap=15w33c|A written book titled "Work in Progress" now generates within a [[hopper]] as a part of the [[end ship]] in the [[end cities]]. It reads: "We will have something else here soon..." and is signed by [[Searge]].}}
{{History|||snap=15w41a|End ships no longer contain a written book.}}
{{History||1.13|snap=17w47a|Prior to [[1.13/Flattening|''The Flattening'']], this [[item]]'s numeral ID was 387.}}
{{History||1.14|snap=18w43a|[[File:Written Book JE2 BE2.png|32px]] The texture of written books has been changed.}}
{{History|||snap=19w02a|Written books can now be held on [[lectern]]s.}}
{{History|||snap=19w11a|Librarian [[villager]]s no longer [[trading|buy]] written books.}}
{{History||1.20<br>(Experimental)|link=1.19.3|snap=22w42a|Written books can now interact with [[chiseled bookshelves]].}}
{{History|bedrock}}
{{History||1.2.0|snap=beta 1.2.0.2|[[File:Written Book JE1 BE1.png|32px]] Added written books.}}
{{History||1.10.0|snap=beta 1.10.0.3|[[File:Written Book JE2 BE2.png|32px]] The texture of written books has been changed.
|Written books can now be held on [[lectern]]s.}}
{{History|console}}
{{History||xbox=TU25|xbone=CU14|ps=1.17|wiiu=Patch 1|[[File:Written Book JE1 BE1.png|32px]] Added written books.}}
{{History|PS4}}
{{History||1.90|[[File:Written Book JE2 BE2.png|32px]] The texture of written books has been changed.}}
{{History|foot}}
== Issues ==
{{issue list}}
== Trivia ==
*When written books are obtained with [[commands]] (without the correct [[Player.dat format#Written Books|data tag]]), the label shows "Written Book" and has the text "*Invalid book tag*" when opened. The book is signed and cannot be edited without commands.
*Commands that were added to a written book using serialized JSON objects are executed through the chat system. This means that any command added to a written book can't be longer than 256 characters, which is the maximum chat line limit.
*During the 2020 April Fools Update [[Java Edition 20w14∞]], throwing a written book into a lit [[Nether Portal (block)|nether portal]] would create a portal to one of the 2,147,483,645 new dimensions.
== Gallery ==
<gallery>
Written Book tooltip.png|A signed book.
Test by Dinnerbone.png|Copying a signed book.
BookandQuillOperators12w17a.png|Different types of characters can be used to simulate a different font.
JSON Book.png|First image of a book using JSON text.
No NBT written book GUI.png|A no NBT written book using commands.
Book Background (JE).png|Java Edition book background texture.
Book Background (BE).png|Bedrock Edition book background texture.
Book Arrowleft (JE).png|Java Edition left arrow texture.
Book Arrowright (JE).png|Java Edition right arrow texture.
Book Arrowleft (BE).png|Bedrock Edition left arrow texture.
Book Arrowright (BE).png|Bedrock Edition Right arrow texture.
</gallery>
== See also ==
*[[Book]]
*[[Bookshelf]]
*[[Book and Quill]]
{{Items}}
[[Category:Renewable resources]]
[[cs:Napsaná kniha]]
[[es:Libro escrito]]
[[fr:Livre édité]]
[[hu:Megírt könyv]]
[[it:Libro]]
[[ja:記入済みの本]]
[[ko:글이 쓰인 책]]
[[nl:Geschreven boek]]
[[pl:Zapisana książka]]
[[pt:Livro escrito]]
[[ru:Написанная книга]]
[[uk:Написана книга]]
[[zh:成书]]</li><li>[[Flower Pot|Flower Pot]]<br/>{{more images|The potted cherry sapling texture has been change in 1.19.4-pre2.}}
{{For|other uses|Pot}}
{{Block
| image = Flower Pot.png
| image2 = Potted Poppy.png
| extratext = View [[#Gallery|all renders]]
| transparent = Yes
| light = No
| tool = any
| renewable = Yes
| stackable = Yes (64)
| flammable = No
| lavasusceptible = No
}}
A '''flower pot''' is a decorative [[block]] that can contain flowers, bamboo, saplings, cacti, mushrooms, fungi, and other reasonably small plants.
== Obtaining ==
=== Natural generation ===
Flower pots naturally generate in [[witch hut]]s where they contain a red [[mushroom]], the basement of [[igloo]]s where they contain a [[cactus]], and in [[woodland mansion]]s, where they contain birch [[sapling]]s, dark oak saplings, dandelions, poppies, blue orchids, alliums, azure bluets, red and white tulips, and oxeye daisies.
Flower pots containing a dandelion can be found in some [[plains]] and [[savanna]] [[village]] houses. Flower pots containing a cactus or a dead bush can be found in some [[desert]] village houses. Flower pots containing a spruce sapling can be found in [[taiga]] village mason houses. Flower pots containing a poppy can be found in taiga village churches.
=== Breaking ===
Flower pots can be mined instantly using any [[tool]] or without a tool.
A flower pot drops itself as an [[item]] (any [[plant]] or [[mushroom]] in it separately) when pushed by a [[piston]] or washed away with [[water]].
[[Lava]] can flow into the space of a flower pot, destroying it.
=== Chest loot ===
{{LootChestItem|flower-pot}}
=== Crafting ===
{{Crafting
|A2= Brick
|C2= Brick
|B3= Brick
|Output= Flower Pot
|type= Decoration block
}}
== Usage ==
A flower pot can be used to hold [[mushroom]]s, [[Fungus|fungi]], and various [[plant]]s. Plants that can be {{control|placed}} in a pot include any one block high [[flower]]s, [[sapling]]s, [[fern]]s, [[dead bush]]es, [[cacti]], [[bamboo]], [[azalea]]s, [[mangrove propagule]], and [[roots]].
Plants can be removed by using the interact button.
{{IN|je}}, flower pots can be placed on any block, or over [[air]].<ref>{{bug|MC-127036|||WAI}}</ref>
{{IN|be}}, they must be placed on top of a full-[[block]] top surface, or the top of a [[fence]], stone [[wall]], or [[hopper]]. They cannot be placed on [[slab]]s and [[stairs]] unless those blocks are upside-down. Pots may also be placed on an upward facing trapdoor. If the trapdoor is opened, the pot will break.
Flower pots are {{frac|3|8}} of a block high and can be stepped on. It is not possible to walk from the top of a flower pot onto a full sized block without jumping. It is possible to jump from a flower pot onto a fence.
The plant or fungus can be removed from the flower pot by pressing the {{control|use}} control. This places the item directly back into the player's inventory.<ref>{{bug|MC-169496|||WAI}}</ref>
They can be used to display cacti and wither roses without inheriting their damaging properties.<ref>{{bug|MC-2241|||WAI}}</ref><ref>{{bug|MC-138024|||WAI}}</ref>
Potted [[Fungus|warped fungus]] can be used to repel [[hoglin]]s.
== Sounds ==
{{Sound table/Block/Normal}}
== Data values ==
=== ID ===
{{edition|java}}:
{{ID table
|edition=java
|showblocktags=y
|showforms=y
|generatetranslationkeys=y
|displayname=Flower Pot
|spritetype=block
|nameid=flower_pot
|blocktags=flower_pots
|translationkey=block.minecraft.flower_pot,item.minecraft.flower_pot}}
{{ID table
|displayname=Potted Dandelion
|spritetype=block
|nameid=potted_dandelion
|blocktags=flower_pots
|form=block}}
{{ID table
|displayname=Potted Poppy
|spritetype=block
|nameid=potted_poppy
|blocktags=flower_pots
|form=block}}
{{ID table
|displayname=Potted Blue Orchid
|spritetype=block
|nameid=potted_blue_orchid
|blocktags=flower_pots
|form=block}}
{{ID table
|displayname=Potted Allium
|spritetype=block
|nameid=potted_allium
|blocktags=flower_pots
|form=block}}
{{ID table
|displayname=Potted Azure Bluet
|spritetype=block
|nameid=potted_azure_bluet
|blocktags=flower_pots
|form=block}}
{{ID table
|displayname=Potted Red Tulip
|spritetype=block
|nameid=potted_red_tulip
|blocktags=flower_pots
|form=block}}
{{ID table
|displayname=Potted Orange Tulip
|spritetype=block
|nameid=potted_orange_tulip
|blocktags=flower_pots
|form=block}}
{{ID table
|displayname=Potted White Tulip
|spritetype=block
|nameid=potted_white_tulip
|blocktags=flower_pots
|form=block}}
{{ID table
|displayname=Potted Pink Tulip
|spritetype=block
|nameid=potted_pink_tulip
|blocktags=flower_pots
|form=block}}
{{ID table
|displayname=Potted Oxeye Daisy
|spritetype=block
|nameid=potted_oxeye_daisy
|blocktags=flower_pots
|form=block}}
{{ID table
|displayname=Potted Cornflower
|spritetype=block
|nameid=potted_cornflower
|blocktags=flower_pots
|form=block}}
{{ID table
|displayname=Potted Lily of the Valley
|spritetype=block
|nameid=potted_lily_of_the_valley
|blocktags=flower_pots
|form=block}}
{{ID table
|displayname=Potted Wither Rose
|spritetype=block
|nameid=potted_wither_rose
|blocktags=flower_pots
|form=block}}
{{ID table
|displayname=Potted Oak Sapling
|spritetype=block
|nameid=potted_oak_sapling
|blocktags=flower_pots
|form=block}}
{{ID table
|displayname=Potted Spruce Sapling
|spritetype=block
|nameid=potted_spruce_sapling
|blocktags=flower_pots
|form=block}}
{{ID table
|displayname=Potted Birch Sapling
|spritetype=block
|nameid=potted_birch_sapling
|blocktags=flower_pots
|form=block}}
{{ID table
|displayname=Potted Jungle Sapling
|spritetype=block
|nameid=potted_jungle_sapling
|blocktags=flower_pots
|form=block}}
{{ID table
|displayname=Potted Acacia Sapling
|spritetype=block
|nameid=potted_acacia_sapling
|blocktags=flower_pots
|form=block}}
{{ID table
|displayname=Potted Dark Oak Sapling
|spritetype=block
|nameid=potted_dark_oak_sapling
|blocktags=flower_pots
|form=block}}
{{ID table
|displayname=Potted Red Mushroom
|spritetype=block
|nameid=potted_red_mushroom
|blocktags=flower_pots
|form=block}}
{{ID table
|displayname=Potted Brown Mushroom
|spritetype=block
|nameid=potted_brown_mushroom
|blocktags=flower_pots
|form=block}}
{{ID table
|displayname=Potted Fern
|spritetype=block
|nameid=potted_fern
|blocktags=flower_pots
|form=block}}
{{ID table
|displayname=Potted Dead Bush
|spritetype=block
|nameid=potted_dead_bush
|blocktags=flower_pots
|form=block}}
{{ID table
|displayname=Potted Cactus
|spritetype=block
|nameid=potted_cactus
|blocktags=flower_pots
|form=block}}
{{ID table
|displayname=Potted Bamboo
|spritetype=block
|nameid=potted_bamboo
|blocktags=flower_pots
|form=block}}
{{ID table
|displayname=Potted Azalea
|spritetype=block
|nameid=potted_azalea_bush
|blocktags=flower_pots
|spritename=potted azalea bush
|form=block}}
{{ID table
|displayname=Potted Flowering Azalea
|spritetype=block
|nameid=potted_flowering_azalea_bush
|blocktags=flower_pots
|spritename=potted flowering azalea bush
|form=block}}
{{ID table
|displayname=Potted Crimson Fungus
|spritetype=block
|nameid=potted_crimson_fungus
|blocktags=flower_pots
|form=block}}
{{ID table
|displayname=Potted Warped Fungus
|spritetype=block
|nameid=potted_warped_fungus
|blocktags=flower_pots, hoglin_repellents
|form=block}}
{{ID table
|displayname=Potted Crimson Roots
|spritetype=block
|nameid=potted_crimson_roots
|blocktags=flower_pots
|form=block}}
{{ID table
|displayname=Potted Warped Roots
|spritetype=block
|nameid=potted_warped_roots
|blocktags=flower_pots
|form=block}}
{{ID table
|displayname=Potted Mangrove Propagule
|spritetype=block
|nameid=potted_mangrove_propagule
|blocktags=flower_pots
|form=block
|foot=1}}
{{edition|bedrock}}:
{{ID table
|edition=bedrock
|firstcolumnname=Flower Pot
|shownumericids=y
|showforms=y
|generatetranslationkeys=y
|displayname=Block
|spritename=flower-pot
|spritetype=block
|nameid=flower_pot
|id=140
|form=block
|itemform=item.flower_pot
|translationkey=-}}
{{ID table
|displayname=Item
|spritename=flower-pot
|spritetype=item
|nameid=flower_pot
|id=514
|form=item
|foot=1}}
=== Block states ===
{{see also|Block states}}
{{IN|be}}, flower pots use the following block states:
{{/BS}}
=== Block data ===
{{IN|bedrock}}, flower pot has a block entity associated with it that holds additional data about the block.
See [[Bedrock Edition level format/Block entity format]].
== Achievements ==
{{load achievements|Pot Planter}}
== History ==
{{History||August 16, 2012|link={{tweet|Dinnerbone|236062188555624448}}|[[Dinnerbone]] tweeted the first image of flower pots.}}
{{History|java}}
{{History||1.4.2|snap=12w34a|[[File:Flower Pot JE1.png|32px]] [[File:Potted Dandelion JE1.png|32px]] [[File:Potted Rose JE1.png|32px]] [[File:Potted Red Mushroom JE1.png|32px]] [[File:Potted Brown Mushroom JE1.png|32px]] [[File:Potted Oak Sapling JE1.png|32px]] [[File:Potted Birch Sapling JE1.png|32px]] [[File:Potted Spruce Sapling JE1.png|32px]] [[File:Potted Jungle Sapling JE1.png|32px]] [[File:Potted Cactus JE1.png|32px]] [[File:Potted Fern JE1.png|32px]] [[File:Potted Dead Bush JE1.png|32px]]<br>[[File:Flower Pot (item) JE1 BE1.png|32px]] Added flower pots.
|At this point, plants inside of pots rendered much like they do outside of flower pots, not being subject to directional shading.}}
{{History|||snap=12w40a|A potted [[red mushroom]] can now be found on one window of a [[witch hut]]. This changed to an empty pot in a far later unknown version,{{info needed}} but returned again afterward.{{info needed}}}}
{{History||1.7.2|snap=13w36a|[[File:Potted Allium JE1.png|32px]] [[File:Potted Azure Bluet JE1.png|32px]] [[File:Potted Oxeye Daisy JE1.png|32px]] [[File:Potted Blue Orchid JE1.png|32px]] [[File:Potted Red Tulip JE1.png|32px]] [[File:Potted Orange Tulip JE1.png|32px]] [[File:Potted White Tulip JE1.png|32px]] [[File:Potted Pink Tulip JE1.png|32px]] Allium, azure bluet, oxeye daisies, blue orchids, red tulips, orange tulips, white tulips and pink tulips can now be placed in flower pots.
|[[File:Potted Poppy JE1.png|32px]] As the rose has been replaced with the poppy, the potted rose is also now replaced with the potted poppy as a result.
|Flower pots can no longer use data values because more than 15 plants can be potted, it now has a [[block entity]] instead.
|[[File:Potted Green Shrub.png|32px]] [[File:Potted Cobweb JE1.png|32px]] Due to the tile entity handling, it is now possible to place any [[block]] inside of a flower pot via NBT editors. However, at this point, with the ones possible in vanilla [[survival]] aside, only [[grass]], [[shrub|green shrub]]s, and [[cobweb]]s actually render.
|[[File:Potted Grass JE1.png|32px]] Potted grass now exists can be placed in flower pots using [[commands]].
|[[File:Potted Grass (no tint) JE1.png|32px]] [[File:Potted Fern (no tint) JE1.png|32px]] Potted shrubs, grass, and ferns must now have block data value 11 to display biome colors, otherwise rendering as default/gray.}}
{{History|||snap=13w37a|Added {{cmd|setblock}}, allowing for the aforementioned potted plants to be obtained without map editing.}}
{{History|||snap=13w43a|[[File:Potted Acacia Sapling JE1.png|32px]] [[File:Potted Dark Oak Sapling JE1.png|32px]] Acacia sapling and dark oak saplings can now be placed in flower pots.}}
{{History||1.8|snap=14w06a|Many more blocks (almost all full cubes) placed into a flower pot by modifying the block entity now render, if in somewhat buggy fashion, as the texture is in a cross shape. {{LoadPage|Flower Pot/1.8 development gallery/14w06a|Click show to display all of the applicable blocks.|b}}
|[[File:Potted Cactus JE2.png|32px]] Potted cacti now appear as a cross formed of their bottom texture inside of a pot.<ref>{{bug|MC-47469}}</ref>}}
{{History|||snap=14w06b|Further blocks now render in flower pots than did in the previous snapshot. {{LoadPage|Flower Pot/1.8 development gallery/14w06b|Click show to display all of the applicable blocks.|b}}
|[[File:Potted Cactus JE3.png|32px]] The accidental potted cactus model change has been reverted.}}
{{History|||snap=14w07a|[[File:Potted Iron Trapdoor.png|32px]] The newly added [[iron trapdoor]] also renders in flower pots when created with commands.}}
{{History|||snap=14w17a|[[File:Flower Pot JE2.png|32px]] [[File:Potted Dandelion JE2.png|32px]] [[File:Potted Allium JE2.png|32px]] [[File:Potted Azure Bluet JE2.png|32px]] [[File:Potted Oxeye Daisy JE2.png|32px]] [[File:Potted Blue Orchid JE2.png|32px]] [[File:Potted Poppy JE2.png|32px]] [[File:Potted Red Tulip JE2.png|32px]] [[File:Potted Orange Tulip JE2.png|32px]] [[File:Potted White Tulip JE2.png|32px]] [[File:Potted Pink Tulip JE2.png|32px]] [[File:Potted Red Mushroom JE2.png|32px]] [[File:Potted Brown Mushroom JE2.png|32px]] [[File:Potted Oak Sapling JE2.png|32px]] [[File:Potted Birch Sapling JE2.png|32px]] [[File:Potted Spruce Sapling JE2.png|32px]] [[File:Potted Jungle Sapling JE2.png|32px]] [[File:Potted Acacia Sapling JE2.png|32px]] [[File:Potted Dark Oak Sapling JE2.png|32px]] [[File:Potted Cactus JE4.png|32px]] [[File:Potted Fern JE2.png|32px]] [[File:Potted Dead Bush JE2.png|32px]] The flower pot model and rendering has changed. The insides are now subject to directional shading, rather than being fully lit, much like the changes made to [[hopper]]s and [[cauldron]]s in 14w10a. In addition, the outer face (as well as the cuboids comprising the cactus in potted cactus) are no longer subject to ambient occlusion. The potted cactus also now uses the side texture on the top face, rather than the top texture.
|Invalid blocks no longer render inside flower pots. This also includes cobweb and grass.}}
{{History|||snap=14w25a|[[File:Potted Dandelion JE3.png|32px]] [[File:Potted Allium JE3.png|32px]] [[File:Potted Azure Bluet JE3.png|32px]] [[File:Potted Oxeye Daisy JE3.png|32px]] [[File:Potted Blue Orchid JE3.png|32px]] [[File:Potted Poppy JE3.png|32px]] [[File:Potted Red Tulip JE3.png|32px]] [[File:Potted Orange Tulip JE3.png|32px]] [[File:Potted White Tulip JE3.png|32px]] [[File:Potted Pink Tulip JE3.png|32px]] [[File:Potted Red Mushroom JE3.png|32px]] [[File:Potted Brown Mushroom JE3.png|32px]] [[File:Potted Oak Sapling JE3.png|32px]] [[File:Potted Birch Sapling JE3.png|32px]] [[File:Potted Spruce Sapling JE3.png|32px]] [[File:Potted Jungle Sapling JE3.png|32px]] [[File:Potted Acacia Sapling JE3.png|32px]] [[File:Potted Dark Oak Sapling JE3.png|32px]] [[File:Potted Fern JE3.png|32px]] [[File:Potted Dead Bush JE3.png|32px]] Potted cross shaped objects are now affected by directional shading.<ref>{{bug|MC-129826}}</ref>}}
{{History||1.9|snap=15w43a|A potted cactus can now be found on a table in [[igloo]] basements.}}
{{History||1.11|snap=16w32a|The block entity ID of flower pots has been changed from <code>FlowerPot</code> to <code>flower_pot</code>.}}
{{History|||snap=16w39a|Potted plants can now be removed from flower pots by pressing {{control|use}}.
|Flower pots now generate in [[woodland mansion]]s.}}
{{History||1.13|snap=17w47a|The different block states for the <code>flower_pot</code> ID have been split up into their own IDs.
|Flower pots are no longer block entities.
|Prior to [[1.13/Flattening|''The Flattening'']], this block's numeral ID was 140, and the item's was 390.}}
{{History||1.14|snap=18w43a|[[File:Flower Pot JE3.png|32px]] [[File:Potted Dandelion JE4.png|32px]] [[File:Potted Poppy JE4.png|32px]] [[File:Potted Allium JE4.png|32px]] [[File:Potted Azure Bluet JE4.png|32px]] [[File:Potted Oxeye Daisy JE4.png|32px]] [[File:Potted Blue Orchid JE4.png|32px]] [[File:Potted Red Tulip JE4.png|32px]] [[File:Potted Orange Tulip JE4.png|32px]] [[File:Potted White Tulip JE4.png|32px]] [[File:Potted Pink Tulip JE4.png|32px]] [[File:Potted Red Mushroom JE4.png|32px]] [[File:Potted Brown Mushroom JE4.png|32px]] [[File:Potted Oak Sapling JE4.png|32px]] [[File:Potted Birch Sapling JE4.png|32px]] [[File:Potted Spruce Sapling JE4.png|32px]] [[File:Potted Jungle Sapling JE4.png|32px]] [[File:Potted Acacia Sapling JE4.png|32px]] [[File:Potted Dark Oak Sapling JE4.png|32px]] [[File:Potted Cactus JE5.png|32px]] [[File:Potted Fern JE4.png|32px]] [[File:Potted Dead Bush JE4.png|32px]] <br>[[File:Flower Pot (item) JE2 BE2.png|32px]] The textures of flower pots and their contained plants have been changed.
|[[File:Potted Cornflower JE1 BE1.png|32px]] [[File:Potted Lily of the Valley JE1 BE1.png|32px]] [[File:Potted Wither Rose JE1 BE1.png|32px]] [[File:Potted Bamboo JE1 BE1.png|32px]] Cornflower, lily of the valley, wither rose and [[bamboo]] can now be placed in flower pots.}}
{{History|||snap=18w44a|[[File:Potted Cactus JE6.png|32px]] The texture of potted cacti has been changed.}}
{{History|||snap=18w47b|[[File:Potted Poppy JE5.png|32px]] The texture of potted poppies has been changed.}}
{{History|||snap=18w49a|Flower pots can now be found in [[chest]]s in [[village]] mason houses.}}
{{History|||snap=19w11a|Flower pots have become [[renewable resource|renewable]], as mason [[villager]]s now [[trading|sell]] [[brick]]s.}}
{{History||1.16|snap=20w06a|The model of flower pots has been fixed and has been given an underside, which has changed the model from [[File:Flower Pot UNKVER2 (facing NWU).png|32px]] to [[File:Flower Pot UNKVER3 (facing NWU).png|32px]].}}
{{History|||snap=20w09a|[[File:Potted Crimson Fungus JE1 BE1.png|32px]] [[File:Potted Warped Fungus JE1 BE1.png|32px]] [[File:Potted Crimson Roots JE1 BE1.png|32px]] [[File:Potted Warped Roots JE1 BE1.png|32px]] Crimson and warped [[fungi]] and crimson and warped [[roots]] can now be placed in flower pots.
|The model for potted plants has been fixed, so the bottom face now renders,<ref>{{bug|MC-170842}}</ref> which has changed the model from [[File:Potted Dandelion UNKVER1 (facing NWU).png|32px]] [[File:Potted Poppy UNKVER1 (facing NWU).png|32px]] [[File:Potted Allium UNKVER1 (facing NWU).png|32px]] [[File:Potted Azure Bluet UNKVER1 (facing NWU).png|32px]] [[File:Potted Oxeye Daisy UNKVER1 (facing NWU).png|32px]] [[File:Potted Blue Orchid UNKVER1 (facing NWU).png|32px]] [[File:Potted Red Tulip UNKVER1 (facing NWU).png|32px]] [[File:Potted Orange Tulip UNKVER1 (facing NWU).png|32px]] [[File:Potted White Tulip UNKVER1 (facing NWU).png|32px]] [[File:Potted Pink Tulip UNKVER1 (facing NWU).png|32px]] [[File:Potted Red Mushroom UNKVER1 (facing NWU).png|32px]] [[File:Potted Brown Mushroom UNKVER1 (facing NWU).png|32px]] [[File:Potted Oak Sapling UNKVER1 (facing NWU).png|32px]] [[File:Potted Birch Sapling UNKVER1 (facing NWU).png|32px]] [[File:Potted Spruce Sapling UNKVER1 (facing NWU).png|32px]] [[File:Potted Jungle Sapling UNKVER1 (facing NWU).png|32px]] [[File:Potted Acacia Sapling UNKVER1 (facing NWU).png|32px]] [[File:Potted Dark Oak Sapling UNKVER1 (facing NWU).png|32px]] [[File:Potted Cactus UNKVER1 (facing NWU).png|32px]] [[File:Potted Fern UNKVER1 (facing NWU).png|32px]] [[File:Potted Dead Bush UNKVER1 (facing NWU).png|32px]] [[File:Potted Cornflower UNKVER1 (facing NWU).png|32px]] [[File:Potted Lily of the Valley UNKVER1 (facing NWU).png|32px]] [[File:Potted Wither Rose UNKVER1 (facing NWU).png|32px]] [[File:Potted Bamboo UNKVER1 (facing NWU).png|32px]] to [[File:Potted Dandelion UNKVER2 (facing NWU).png|32px]] [[File:Potted Poppy UNKVER2 (facing NWU).png|32px]] [[File:Potted Allium UNKVER2 (facing NWU).png|32px]] [[File:Potted Azure Bluet UNKVER2 (facing NWU).png|32px]] [[File:Potted Oxeye Daisy UNKVER2 (facing NWU).png|32px]] [[File:Potted Blue Orchid UNKVER2 (facing NWU).png|32px]] [[File:Potted Red Tulip UNKVER2 (facing NWU).png|32px]] [[File:Potted Orange Tulip UNKVER2 (facing NWU).png|32px]] [[File:Potted White Tulip UNKVER2 (facing NWU).png|32px]] [[File:Potted Pink Tulip UNKVER2 (facing NWU).png|32px]] [[File:Potted Red Mushroom UNKVER2 (facing NWU).png|32px]] [[File:Potted Brown Mushroom UNKVER2 (facing NWU).png|32px]] [[File:Potted Oak Sapling UNKVER2 (facing NWU).png|32px]] [[File:Potted Birch Sapling UNKVER2 (facing NWU).png|32px]] [[File:Potted Spruce Sapling UNKVER2 (facing NWU).png|32px]] [[File:Potted Jungle Sapling UNKVER2 (facing NWU).png|32px]] [[File:Potted Acacia Sapling UNKVER2 (facing NWU).png|32px]] [[File:Potted Dark Oak Sapling UNKVER2 (facing NWU).png|32px]] [[File:Potted Cactus UNKVER2 (facing NWU).png|32px]] [[File:Potted Fern UNKVER2 (facing NWU).png|32px]] [[File:Potted Dead Bush UNKVER2 (facing NWU).png|32px]] [[File:Potted Cornflower UNKVER2 (facing NWU).png|32px]] [[File:Potted Lily of the Valley UNKVER2 (facing NWU).png|32px]] [[File:Potted Wither Rose UNKVER2 (facing NWU).png|32px]] [[File:Potted Bamboo UNKVER2 (facing NWU).png|32px]].}}
{{History|||snap=20w11a|[[File:Potted Bamboo UNKVER3 (facing NWU).png|32px]] An unneeded face has been removed from potted bamboo to solve a z-fighting issue.<ref>{{bug|MC-173156}}</ref>}}
{{History|||snap=Pre-release 3|[[File:Potted Cactus JE7.png|32px]] [[File:Potted Cactus UNKVER3 (facing NWU).png|32px]] The model of the potted cacti has been changed. The top face now uses the top texture of cactus, rather than the side texture and the bottom face has been changed to the top texture of the flower pot.}}
{{History||1.16.2|snap=20w28a|[[File:Potted Cactus UNKVER4 (facing NWU).png|32px]] The model of the potted cactus no longer has a hole in the bottom, although the texture is stretched.}}
{{History||1.17|snap=Pre-release 1|[[File:Potted Azalea JE1 BE1.png|32px]] [[File:Potted Flowering Azalea JE1 BE1.png|32px]][[Azalea]] and flowering azalea can now be placed in flower pots.
|[[File:Potted Flowering Azalea (plant texture) JE1.png|32px]] Potted flowering azalea has own unused plant texture but uses normal variant for consistency with flowering azalea: [[File:Potted Flowering Azalea (bottom) JE1 BE1.png|32px]] [[File:Flowering Azalea (bottom) JE2 BE2.png|32px]]}}
{{History||1.19|snap=22w11a|[[File:Potted Mangrove Propagule JE1.png|32px]] [[Mangrove propagule]]s can now be placed in flower pots.}}
{{History|||snap=22w18a|[[File:Potted Mangrove Propagule JE2.png|32px]] The western element of the flower pot in potted mangrove propagules has been deleted.<ref name="mc-251355">{{bug|MC-251355}}</ref>}}
{{History|||snap=Pre-release 1|[[File:Potted Mangrove Propagule JE1.png|32px]] The aforementioned western element has been restored.<ref name="mc-251355"/>}}
{{History||1.20<br>(Experimental)|link=1.19.4|snap=23w07a|[[File:Potted Torchflower JE1.png|32px]] [[File:Potted Cherry Sapling JE1.png|32px]] [[Torchflower]]s and [[cherry sapling]]s can now be placed in flower pots.}}
{{History|||snap=1.19.4-pre2|Changed the texture of potted cherry saplings.}}
{{History||1.20|snap=23w12a|Potted torchflower and cherry sapling are now available without using the "Update 1.20" experimental datapack.|Flower pot can now be found in [[suspicious gravel]] and [[suspicious sand]] in [[trail ruins]].}}
{{History|||snap=23w13a|[[File:Potted Flowering Azalea JE2.png|32px]] Flowering azalea now uses own plant texture, changing appearance from [[File:Potted Flowering Azalea (bottom) JE1 BE1.png|32px]] to [[File:Potted Flowering Azalea (bottom) JE2.png|32px]] and breaking consistency with flowering azalea.<ref>{{bug|MC-230916}}</ref>}}
{{History|||snap=23w16a|Flower pot no longer generates in [[suspicious sand]] in [[trail ruins]].|Due to the split of the archaeological loot tables for the suspicious gravel within the [[trail ruins]]; flower pot now is in the common loot.}}
{{History|pocket alpha}}
{{History||v0.12.1|snap=build 1|[[File:Flower Pot JE1.png|32px]] [[File:Potted Dandelion JE1.png|32px]] [[File:Potted Red Mushroom JE1.png|32px]] [[File:Potted Brown Mushroom JE1.png|32px]] [[File:Potted Oak Sapling JE1.png|32px]] [[File:Potted Birch Sapling JE1.png|32px]] [[File:Potted Spruce Sapling JE1.png|32px]] [[File:Potted Jungle Sapling JE1.png|32px]] [[File:Potted Cactus JE1.png|32px]] [[File:Potted Fern JE1.png|32px]] [[File:Potted Allium JE1.png|32px]] [[File:Potted Azure Bluet JE1.png|32px]] [[File:Potted Oxeye Daisy JE1.png|32px]] [[File:Potted Blue Orchid JE1.png|32px]] [[File:Potted Poppy JE1.png|32px]] [[File:Potted Red Tulip JE1.png|32px]] [[File:Potted Orange Tulip JE1.png|32px]] [[File:Potted White Tulip JE1.png|32px]] [[File:Potted Pink Tulip JE1.png|32px]] [[File:Potted Acacia Sapling JE1.png|32px]] [[File:Potted Dark Oak Sapling JE1.png|32px]]{{verify|Are these models the ones used in this version?}}<br>[[File:Flower Pot (item) JE1 BE1.png|32px]] Added flower pots.}}
{{History||v0.14.0|snap=build 1|Flower pots now generate in [[witch hut]]s.}}
{{History|pocket}}
{{History||1.0.0|snap=alpha 0.17.0.1|Flower pots now generate in [[igloo]] basements.}}
{{History||1.1.0|snap=alpha 1.1.0.0|Flower pots now generate naturally in [[woodland mansion]]s.}}
{{History|bedrock}}
{{History||1.8.0|snap=beta 1.8.0.8|[[File:Potted Bamboo JE1 BE1.png|32px]]{{verify|Is this how they really look in BE?}} [[Bamboo]] can now be placed in flower pots.}}
{{History||1.9.0|snap=beta 1.9.0.0|[[File:Potted Cornflower BE.jpg|32px]] [[File:Potted Lily of the Valley BE.jpg|32px]] Cornflower and lily of the valley can now be placed in flower pots.}}
{{History||1.10.0|snap=beta 1.10.0.3|[[File:Flower Pot BE.jpg|32px]] [[File:Potted Dandelion BE.jpg|32px]] [[File:Potted Poppy BE.jpg|32px]] [[File:Potted Allium BE.jpg|32px]] [[File:Potted Azure Bluet BE.jpg|32px]] [[File:Potted Oxeye Daisy BE.jpg|32px]] [[File:Potted Blue Orchid BE.jpg|32px]] [[File:Potted Red Tulip BE.jpg|32px]] [[File:Potted Orange Tulip BE.jpg|32px]] [[File:Potted White Tulip BE.jpg|32px]] [[File:Potted Pink Tulip BE.jpg|32px]] [[File:Potted Red Mushroom BE.jpg|32px]] [[File:Potted Brown Mushroom BE.jpg|32px]] [[File:Potted Oak Sapling BE.jpg|32px]] [[File:Potted Birch Sapling BE.jpg|32px]] [[File:Potted Spruce Sapling BE.jpg|32px]] [[File:Potted Jungle Sapling BE.jpg|32px]] [[File:Potted Acacia Sapling BE.jpg|32px]] [[File:Potted Dark Oak Sapling BE.jpg|32px]] [[File:Potted Cactus BE.png|32px]] [[File:Potted Fern BE.jpg|32px]]<br>[[File:Flower Pot (item) JE2 BE2.png|32px]] The textures of flower pots have been changed.
|Flower pots now generate in the new [[village]]s.}}
{{History||1.11.0|snap=beta 1.11.0.1|Flower pots can now be found in [[village]] mason [[chest]]s.}}
{{History||1.13.0|snap=beta 1.13.0.9|[[File:Potted Wither Rose JE1 BE1.png|32px]] [[Wither rose]]s can now be placed in flower pots.}}
{{History||1.16.0|snap=beta 1.15.0.51|Potted plants can now be removed from flower pots by pressing {{control|use}}.}}
{{History|||snap=beta 1.16.0.51|[[File:Potted Crimson Fungus JE1 BE1.png|32px]] [[File:Potted Warped Fungus JE1 BE1.png|32px]] [[File:Potted Crimson Roots JE1 BE1.png|32px]] [[File:Potted Warped Roots JE1 BE1.png|32px]] Crimson and warped [[fungi]] and crimson and warped [[roots]] can now be placed in flower pots.}}
{{History||1.17.10|snap=beta 1.17.10.21|[[File:Potted Azalea JE1 BE1.png|32px]] [[File:Potted Flowering Azalea JE1 BE1.png|32px]] [[Azalea]] and flowering azalea can now be placed in flower pots.}}
{{History|console}}
{{History||xbox=TU14|xbone=CU1|ps=1.04|wiiu=Patch 1|switch=1.0.1|[[File:Flower Pot JE1.png|32px]] [[File:Potted Dandelion JE1.png|32px]] [[File:Potted Red Mushroom JE1.png|32px]] [[File:Potted Brown Mushroom JE1.png|32px]] [[File:Potted Oak Sapling JE1.png|32px]] [[File:Potted Birch Sapling JE1.png|32px]] [[File:Potted Spruce Sapling JE1.png|32px]] [[File:Potted Jungle Sapling JE1.png|32px]] [[File:Potted Cactus JE1.png|32px]] [[File:Potted Fern JE1.png|32px]] [[File:Potted Allium JE1.png|32px]] [[File:Potted Azure Bluet JE1.png|32px]] [[File:Potted Oxeye Daisy JE1.png|32px]] [[File:Potted Blue Orchid JE1.png|32px]] [[File:Potted Poppy JE1.png|32px]] [[File:Potted Red Tulip JE1.png|32px]] [[File:Potted Orange Tulip JE1.png|32px]] [[File:Potted White Tulip JE1.png|32px]] [[File:Potted Pink Tulip JE1.png|32px]] [[File:Potted Acacia Sapling JE1.png|32px]] [[File:Potted Dark Oak Sapling JE1.png|32px]] [[File:Potted Dead Bush JE3.png|32px]]{{verify|Are these models the ones used in this version?}}<br>[[File:Flower Pot (item) JE1 BE1.png|32px]] Added flower pots.}}
{{History||xbox=none|xbone=none|ps=1.90|wiiu=none|switch=none|[[File:Flower Pot BE.png|32px]] [[File:Potted Dandelion BE.png|32px]] [[File:Potted Poppy BE.png|32px]] [[File:Potted Allium BE.png|32px]] [[File:Potted Azure Bluet BE.png|32px]] [[File:Potted Oxeye Daisy BE.png|32px]] [[File:Potted Blue Orchid BE.png|32px]] [[File:Potted Red Tulip BE.png|32px]] [[File:Potted Orange Tulip BE.png|32px]] [[File:Potted White Tulip BE.png|32px]] [[File:Potted Pink Tulip BE.png|32px]] [[File:Potted Red Mushroom BE.png|32px]] [[File:Potted Brown Mushroom BE.png|32px]] [[File:Potted Oak Sapling BE.png|32px]] [[File:Potted Birch Sapling BE.png|32px]] [[File:Potted Spruce Sapling BE.png|32px]] [[File:Potted Jungle Sapling BE.png|32px]] [[File:Potted Acacia Sapling BE.png|32px]] [[File:Potted Dark Oak Sapling BE.png|32px]] [[File:Potted Cactus BE.png|32px]] [[File:Potted Fern BE.png|32px]]<br>[[File:Flower Pot (item) JE2 BE2.png|32px]] The textures of flower pots have been changed.}}
{{History|new 3ds}}
{{History||0.1.0|[[File:Flower Pot JE1.png|32px]] [[File:Potted Dandelion JE1.png|32px]] [[File:Potted Red Mushroom JE1.png|32px]] [[File:Potted Brown Mushroom JE1.png|32px]] [[File:Potted Oak Sapling JE1.png|32px]] [[File:Potted Birch Sapling JE1.png|32px]] [[File:Potted Spruce Sapling JE1.png|32px]] [[File:Potted Jungle Sapling JE1.png|32px]] [[File:Potted Cactus JE1.png|32px]] [[File:Potted Fern JE1.png|32px]] [[File:Potted Allium JE1.png|32px]] [[File:Potted Azure Bluet JE1.png|32px]] [[File:Potted Oxeye Daisy JE1.png|32px]] [[File:Potted Blue Orchid JE1.png|32px]] [[File:Potted Poppy JE1.png|32px]] [[File:Potted Red Tulip JE1.png|32px]] [[File:Potted Orange Tulip JE1.png|32px]] [[File:Potted White Tulip JE1.png|32px]] [[File:Potted Pink Tulip JE1.png|32px]] [[File:Potted Acacia Sapling JE1.png|32px]] [[File:Potted Dark Oak Sapling JE1.png|32px]]{{verify|Are these models the ones used in this version?}}<br>[[File:Flower Pot (item) JE1 BE1.png|32px]] Added flower pots.}}
{{History|foot}}
<gallery>
Suggestion for itemframes.png|Original Reddit image suggesting item frames and flower pots.
FlowerPot.png|The first image of flower pots, released by [[Dinnerbone]].
Pots 1-100.png|An [[Java Edition 14w06a|14w06a]] example of some of the blocks that can be placed inside of flower pots, and their rendering.
Pots 1-100b.png|The same arrangement as prior in [[Java Edition 14w06b|14w06b]].
</gallery>
=== Flower pot "item" ===
{{:Technical blocks/Flower Pot}}
== Gallery ==
=== Renders ===
; Flowers
<gallery>
Potted Dandelion.png |
Potted Poppy.png |
Potted Blue Orchid.png |
Potted Allium.png |
Potted Azure Bluet.png |
Potted Red Tulip.png |
Potted Orange Tulip.png |
Potted White Tulip.png |
Potted Pink Tulip.png |
Potted Oxeye Daisy.png |
Potted Cornflower.png |
Potted Lily of the Valley.png |
Potted Wither Rose.png |
Potted Torchflower.png
</gallery>
; Saplings
<gallery>
Potted Oak Sapling.png |
Potted Spruce Sapling.png |
Potted Birch Sapling.png |
Potted Jungle Sapling.png |
Potted Acacia Sapling.png |
Potted Dark Oak Sapling.png |
Potted Azalea.png |
Potted Flowering Azalea.png |
Potted Mangrove Propagule.png |
Potted Cherry Sapling.png
</gallery>
; Mushrooms
<gallery>
Potted Red Mushroom.png |
Potted Brown Mushroom.png |
Potted Crimson Fungus.png |
Potted Warped Fungus.png |
</gallery>
; Roots and bushes
<gallery>
Potted Crimson Roots.png |
Potted Warped Roots.png |
Potted Fern.png |
Potted Dead Bush.png |
Potted Cactus.png |
Potted Cactus BE.png |
Potted Bamboo.png
</gallery>
=== Other ===
<gallery>
FiveFlowerPots.png | Five flower pots in a player-created village.
</gallery>
== Issues ==
{{issue list}}
== Trivia ==
* The flower pot is based on a suggestion from Reddit, like [[ender chest]]s and [[item frame]]s.<ref>{{tweet|dinnerbone|235747041286975488|My next task is going to be flower pots.|August 15, 2012}}</ref>
* Flower pots break [[falling block]]s.
* If a plant that has been [[Name Tag|named]] is put in a flower pot, the plant loses its name.
* The inside of the flower pot in ''Java Edition'' uses the center 4x4 pixels of the dirt texture while Bedrock Edition uses the center 6x6.
==References==
{{Reflist}}
{{Blocks|Utility}}
{{items}}
[[Category:Manufactured blocks]]
[[Category:Storage]]
[[Category:Generated structure blocks]]
[[Category:Non-solid blocks]]
[[Category:Utility blocks]]
[[cs:Květináč]]
[[de:Blumentopf]]
[[es:Maceta]]
[[fr:Pot de fleurs]]
[[hu:Virágcserép]]
[[it:Vaso da fiori]]
[[ja:植木鉢]]
[[ko:화분]]
[[nl:Bloempot]]
[[pl:Doniczka]]
[[pt:Vaso]]
[[ru:Цветочный горшок]]
[[zh:花盆]]
[[uk:Квітковий горщик]]</li></ul> | Dispensers no longer place command blocks.[1] | ||||
1.9{{Extension DPL}}<ul><li>[[Dye|Dye]]<br/>{{Item
| title = Dyes
| image = White Dye.png
| extratext = View [[#Gallery|all renders]]
| renewable = Yes
| stackable = Yes (64)
}}
'''Dyes''' are a set of sixteen items used to change the color of [[wool]], [[carpet]]s, [[terracotta]], [[concrete powder]], [[glass]], [[shulker box]]es, [[bed]]s, [[candle]]s, the patterns on [[banner]]s, [[firework star]]s, certain mobs, and text on [[sign]]s and [[hanging sign]]s. {{IN|bedrock}} they can also be used to dye water in a [[cauldron]] (which is thereafter used to dye leather [[armor]]); {{in|java}} leather armor can be dyed directly. {{IN|education}} dyes can also be used to dye [[balloon]]s and [[glow stick]]s.
{{IN|bedrock|education}}, [[bone meal]], [[ink sac]]s, [[lapis lazuli]], and [[cocoa bean]]s can generally substitute for [[white dye]], [[black dye]], [[blue dye]], and [[brown dye]], respectively, in crafting recipes and for use in dyeing items or mobs. However, they have other important uses that aren't related to color, and are therefore not considered true dyes. They are mentioned in this article only in regard to their use as dyeing agents; see their individual articles for complete information about them.
[[File:Dye Recipes.png|400px|thumb|A guide for creating all the dyes]]
== Obtaining ==
<!--[[File:Dye Chart.png|350px|thumb|A guide to crafting all the dyes.{{until|java 1.14}}]]-->
Dyes can be produced by crafting them from plants (mainly flowers), by crafting dyes of different colors together, by smelting plants, or by trading with a [[wandering trader]].
{{loadPage|Crafting/Dye|Crafting|h3}}
=== Smelting ===
{{smelting|head=1|Sea Pickle|Lime Dye|0,2}}
{{smelting|foot=1|Cactus|Green Dye|1||b=Lapis Lazuli|c=Any fuel|d=1}}
=== Trading ===
[[Wandering trader]]s can sell 3 dyes for an [[emerald]]. {{IN|bedrock}}, they can also sell 3 lapis lazuli, bone meal, cocoa beans, or ink sacs for one emerald.
Apprentice-level cleric [[villager]]s sell one lapis lazuli per emerald.
=== Chest loot ===
{{#invoke:LootChest|base3|blue-dye,green-dye,orange-dye,light-blue-dye,yellow-dye,white-dye}}
=== Other ===
Ink sacs can also be created using 1 iron, 1 sulfur, and 4 oxygen in the [[compound creator]]. {{only|bedrock|education}}
== Usage ==
Similar to their use in crafting, [[bone meal]], [[ink sac]]s, [[lapis lazuli]], and [[cocoa beans]] can be substituted for the corresponding dye in any of the following usages unless otherwise specified.{{only|bedrock}} <!--- sections are ordered by craftable dyeable blocks, dyeable items, version exclusive sections, and non-crafting miscellaneous uses--->
=== Dyeing wool and mobs ===
Players can dye wool by placing [[wool]] and any dye in a crafting grid.
{{Crafting
|nocat=1
|Any Wool
|Matching Dye
|Output=Any Wool
}}
Dyes can be {{control|use|text=used}} on sheep to change the color of the wool. Shearing a colored sheep drops the corresponding color of the wool, and the sheep retains the color when the wool regenerates. [[Breeding]] colored sheep produces a lamb colored as one of the parent sheep, or a color resulting from the combination of both parents' color. The color combining follows the same rules that dyes use – red and yellow sheep produce an orange lamb, but a blue and yellow sheep cannot create a green lamb. The unlimited reproduction of colored sheep makes dyeing and shearing sheep infinitely more efficient than just dyeing wool directly.
Dye can also be used on a tamed [[wolf]] or [[cat]] to change the color of its collar from the default red to the color of the dye.
=== Dyeing carpets ===
Carpets can be dyed.
{{Crafting
|Any Carpet
|Matching Dye
|Output= Matching Carpet
|type= Building block
}}
=== Dyeing terracotta ===
[[Terracotta]] can be dyed by placing 8 blocks around a dye on a crafting table.
{{Crafting
|nocat=1
|A1=Terracotta |B1=Terracotta |C1=Terracotta
|A2=Terracotta |B2=Matching Dye |C2=Terracotta
|A3=Terracotta |B3=Terracotta |C3=Terracotta
|Output=Matching Dyed Terracotta,8
}}
=== Creating concrete powder ===
Dyes can also be used to craft [[concrete powder]], which can then be set into their respective [[concrete]] blocks (they cannot be dyed directly).
{{Crafting
|nocat=1
|Sand |Gravel |Sand
|Gravel |Matching Dye |Gravel
|Sand |Gravel |Sand
|Output=Matching Concrete Powder,8
}}
=== Staining glass ===
[[Stained glass]] can be stained by placing 8 blocks of glass around a dye on a [[crafting table]]. Just like regular glass, stained glass can be crafted into stained glass panes. The recipe for this is the same as with regular glass.
{{Crafting
|nocat=1
|A1=Glass |B1=Glass |C1=Glass
|A2=Glass |B2=Matching Dye |C2=Glass
|A3=Glass |B3=Glass |C3=Glass
|Output=Matching Stained Glass,8
|head=1
}}
{{Crafting
|nocat=1
|A1= Glass Pane
|B1= Glass Pane
|C1= Glass Pane
|A2= Glass Pane
|B2= Matching Dye
|C2= Glass Pane
|A3= Glass Pane
|B3= Glass Pane
|C3= Glass Pane
|Output= Matching Stained Glass Pane,8
|type= Decoration block
|foot=1
}}
=== Dyeing shulker boxes ===
[[Shulker box]]es are generated in a light shade of purple (like the [[purpur block]]), but can be dyed any color. They can also be re-dyed as often as desired.
{{Crafting
|ignoreusage=1
|showname=1
|Any Shulker Box
|Matching Dye
|Output=Matching Shulker Box
}}
=== Dyeing beds ===
Players can dye beds by placing a [[bed]] and any color dye in a crafting grid.
{{Crafting
|nocat=1
|Any Bed
|Matching Dye
|Output=Matching Bed
}}
=== Dyeing candles ===
Players can dye [[candles]] by placing an undyed candle and any color dye in a crafting grid.
{{Crafting
|ignoreusage=1
|Candle
|Matching Dye
|Output=Matching Dyed Candle
}}
=== Banner patterns ===
{{main|Banner#Patterns}}
Dyes are used in most banner patterns to determine the pattern and color displayed.
=== Dyeing armor ===
[[File:DyeGraph2.png|200px|thumb|A graph showing all combinations of two dyes on a [[tunic]].]]
Leather [[armor]] can be dyed by:
* Crafting dyes with a piece of leather armor or leather [[horse armor]].{{Only|java}}
* Dousing the leather armor or leather [[horse armor]] in a [[cauldron]] to which dyes have been added.{{Only|bedrock}}
There are 5,713,438<ref>https://anrar4.github.io/DyeLeatherArmor/</ref> (34.1% of sRGB) colors leather armor can be, as it is possible to put more than one dye on the crafting bench alongside the leather armor. Armor can be dyed multiple times with previous colors affecting the final outcome. Colored armor can be reverted to their original color using a [[cauldron]] with undyed water.
The game has a specific formula for calculating the color of dyed armor: each color, in the RGB color model, has a red value, green value, and blue value. For each dye in the crafting grid, and the armor itself (if it is already dyed), the red, green, and blue values are added to running totals. In addition, a running total of the highest value (be it red, green, or blue) is also kept. After this, each total is divided by the number of colors used. This effectively produces the average red, green, blue, and maximum values. The maximum value of the average RGB values is also calculated. Finally, each average RGB value is multiplied by the average maximum value and divided by the maximum of the average RGB values. The modified average RGB values are then used as the final color. This procedure can be summed up with the following equations:
for each color (all "total" variables start at 0 before counting):
totalRed = totalRed + redValue
totalGreen = totalGreen + greenValue
totalBlue = totalBlue + blueValue
totalMaximum = totalMaximum + max(redValue, greenValue, blueValue)
numberOfColors = numberOfColors + 1
averageRed = totalRed / numberOfColors
averageGreen = totalGreen / numberOfColors
averageBlue = totalBlue / numberOfColors
averageMaximum = totalMaximum / numberOfColors
maximumOfAverage = max(averageRed, averageGreen, averageBlue)
gainFactor = averageMaximum / maximumOfAverage
resultRed = averageRed * gainFactor
resultGreen = averageGreen * gainFactor
resultBlue = averageBlue * gainFactor
Due to the way this formula works, the resulting color can never be darker than the average of the input colors and is often lighter and more saturated. Of course, the resulting color can never be lighter or more saturated than the lightest or most saturated input color. In addition, this formula never creates an RGB value higher than 255 (which would be invalid in the 8-bit RGB color model).
If leather armor is renamed on an [[anvil]], it retains its name when dyed or undyed.
;Mixing Samples
: {{ItemSprite|Yellow Dye}} + {{ItemSprite|Yellow Dye}} = {{Tint|leather-chestplate| #{{CalcDye| yellow=2 }} | code=1}}
: {{ItemSprite|Red Dye}} + {{ItemSprite|Blue Dye}} + {{ItemSprite|White Dye}} = {{Tint|leather-chestplate| #{{CalcDye| red=1 | blue=1 | white=1}} | code=1}}
: {{ItemSprite|Green Dye}} + {{ItemSprite|Red Dye}} + {{ItemSprite|Pink Dye}} = {{Tint|leather-chestplate| #{{CalcDye| green=1 | red=1 | pink=1}} | code=1}}
=== Dyeing firework stars ===
A [[firework star]] can have a single color or a combination of up to eight colors when crafted with dyes. Adding one or more dyes to a crafted firework star adds a "fade to color" effect to it, overwriting any existing fade colors.
{{Crafting
|head=1
|ignoreusage=1
|ingredients=[[Gunpowder]] +<br>Any Dye (1–8) +<br>Extra ingredient (optional)
|Gunpowder
|Matching Dye
|Diamond;Glowstone Dust;Head;Gold Nugget;Feather;Fire Charge;
|Output=Matching Firework Star
}}
{{Crafting
|ignoreusage=1
|Matching Firework Star
|Any Dye
|Output=Matching Firework Star
|foot=1
}}
=== Creating balloons ===
Dye can be used to craft balloons.{{only|education}}
{{Crafting
|nocat=1
|A1= Latex
|B1= Matching Dye
|C1= Latex
|A2= Latex
|B2= Helium
|C2= Latex
|A3= Latex
|B3= Lead
|C3= Latex
|Output= Matching Balloon
}}
=== Creating glow sticks ===
Dye can also be used to craft glow sticks.{{only|education}}
{{Crafting
|nocat=1
|A1= Polyethylene
|B1= Hydrogen Peroxide
|C1= Polyethylene
|A2= Polyethylene
|B2= Matching Dye
|C2= Polyethylene
|A3= Polyethylene
|B3= Luminol
|C3= Polyethylene
|Output= Matching Glow Stick
}}
=== Dyeing water inside cauldrons ===
Water can be dyed in a cauldron by holding any dye in the hand and pressing {{Ctrl|use}} on a cauldron filled with water.{{only|bedrock}}
=== Signs ===
Dye can be {{control|used}} on a [[sign]] or a [[hanging sign]] to change the text color. {{IN|bedrock}}, [[ink sac]]s cannot be used for this purpose; black dye must be used to change the text to black.
=== Trading ===
Apprentice, journeyman and expert-level shepherd [[villager]]s buy any of the 12 dyes for an [[emerald]].
== Color values ==
The "color codes" are used to determine the color imparted on sheep, wolf and cat collars, firework stars, [[beacon]] beams, and dyed leather armor. The hex value is shown in the extended tooltips of dyed leather armor; however, to set the color using an NBT data tag in a [[command]], the decimal value must be used instead. The color values for firework stars are slightly different from the ones listed below, and use [[Item colors#Firework stars|these values]] instead.
{| class="wikitable" style="margin:2px; border: 1px solid silver; text-align: left;" data-description="Data values"
! rowspan=2 | Description
! colspan=2 style="text-align:center" | Color Code
|-
! Dec
! <abbr title="Hexadecimal color code">Hex</abbr>
|-
| style="text-align:center" | White || 16383998 || {{color|#F9FFFE}}
|-
| style="text-align:center" | Light gray || 10329495 || {{color|#9D9D97}}
|-
| style="text-align:center" | Gray || 4673362 || {{color|#474F52}}
|-
| style="text-align:center" | Black || 1908001|| {{color|#1D1D21}}
|-
| style="text-align:center" | Brown || 8606770 || {{color|#835432}}
|-
| style="text-align:center" | Red || 11546150 || {{color|#B02E26}}
|-
| style="text-align:center" | Orange || 16351261 || {{color|#F9801D}}
|-
| style="text-align:center" | Yellow || 16701501 || {{color|#FED83D}}
|-
| style="text-align:center" | Lime || 8439583 || {{color|#80C71F}}
|-
| style="text-align:center" | Green || 6192150 || {{color|#5E7C16}}
|-
| style="text-align:center" | Cyan || 1481884|| {{color|#169C9C}}
|-
| style="text-align:center" | Light blue || 3847130 || {{color|#3AB3DA}}
|-
| style="text-align:center" | Blue || 3949738 || {{color|#3C44AA}}
|-
| style="text-align:center" | Purple || 8991416 || {{color|#8932B8}}
|-
| style="text-align:center" | Magenta || 13061821 || {{color|#C74EBD}}
|-
| style="text-align:center" | Pink || 15961002 || {{color|#F38BAA}}
|}
== Sounds ==
{{edition|java}}:
{{Sound table
|rowspan=2
|sound=Dye.ogg
|subtitle=Dye stains
|source=block
|description=When dye is used on a [[sign]]
|id=item.dye.use
|translationkey=subtitles.item.dye.use
|volume=1.0
|pitch=1.0/0.9/0.95/1.1
|distance=16}}
{{Sound table
|subtitle=Dye stains
|source=player
|description=When dye is used on a [[sheep]]
|id=item.dye.use
|translationkey=subtitles.item.dye.use
|volume=1.0
|pitch=1.0/0.9/0.95/1.1
|distance=16
|foot=1}}
{{edition|bedrock}}:
{{Sound table
|type=bedrock
|sound=Dye.ogg
|source=sound
|description=When dye is used on a sign
|id=sign.dye.use
|volume=1.0
|pitch=1.0}}
{{Sound table
|rowspan=3
|sound=Water Splash Old.ogg
|source=block
|description=When dye is added to a cauldron
|id=cauldron.adddye
|volume=0.1
|pitch=1.0}}
{{Sound table
|source=block
|description=When armor is dyed using a cauldron
|id=cauldron.dyearmor
|volume=0.1
|pitch=1.0}}
{{Sound table
|source=block
|description=When dye is removed from armor using a cauldron
|id=cauldron.cleanarmor
|volume=0.1
|pitch=1.0
|foot=1}}
== Achievements ==
{{load achievements|Rainbow Collection;Tie dye outfit}}
== Video ==
{{Video note|These videos are outdated, as it does not include details of the [[Java Edition 1.7.2|1.7.2]] update's changes to the dyeing system/production chain.}}
<div style="text-align:center">
<span style="display:inline-block">{{yt|8YD7oauNZHE}}</span>
<span style="display:inline-block">{{yt|7tETaRt7STM}}</span>
</div>
== History ==
{{History|java beta}}
{{History||January 3, 2011|link=https://web.archive.org/web/0/http://notch.tumblr.com/post/2582321901/2011-here-we-go|Notch mentions adding a "paint" feature if he can figure out how.}}
{{History||January 10, 2011<ref group="n">Supposed time when fragment was filmed. Based on modified date of client.jar/gui/trap.png in [[Beta 1.2]].</ref>|link=https://www.youtube.com/watch?v=cBF2ugTzXqQ&t=181s|[[File:Red Dye (pre-release).png|32px]] Shown rose red in development as part of [[Minecraft: The Story of Mojang]].}}
{{History||1.2|[[File:Ink Sac JE1 BE1.png|32px]] [[File:Red Dye JE1 BE1.png|32px]] [[File:Green Dye JE1 BE1.png|32px]] [[File:Cocoa Beans JE1 BE1.png|32px]] [[File:Lapis Lazuli JE1 BE1.png|32px]] [[File:Purple Dye JE1 BE1.png|32px]] [[File:Cyan Dye JE1 BE1.png|32px]] [[File:Light Gray Dye JE1 BE1.png|32px]] [[File:Gray Dye JE1 BE1.png|32px]] [[File:Pink Dye JE1 BE1.png|32px]] [[File:Lime Dye JE1 BE1.png|32px]] [[File:Yellow Dye JE1 BE1.png|32px]] [[File:Light Blue Dye JE1 BE1.png|32px]] [[File:Magenta Dye JE1 BE1.png|32px]] [[File:Orange Dye JE1 BE1.png|32px]] [[File:Bone Meal JE1 BE1.png|32px]] Added dyes.
|[[File:Black Dye (Recreated).png|32px]] [[File:Red Dye (pre-release).png|32px]] [[File:Green Dye (Recreated).png|32px]] [[File:Brown Dye (Recreated).png|32px]] [[File:Blue Dye (Recreated).png|32px]] [[File:Purple Dye (Recreated).png|32px]] [[File:Cyan Dye (Recreated).png|32px]] [[File:Light Gray Dye (Recreated).png|32px]] [[File:Gray Dye (Recreated).png|32px]] [[File:Pink Dye (Recreated).png|32px]] [[File:Lime Dye (Recreated).png|32px]] [[File:Yellow Dye (Recreated).png|32px]] [[File:Light Blue Dye (Recreated).png|32px]] [[File:Magenta Dye (Recreated).png|32px]] [[File:Orange Dye (Recreated).png|32px]] [[File:White Dye (Recreated).png|32px]] Leftovers of old textures can be seen in [[items.png]] with 100% opacity. The white dye texture was reused for [[Sugar]].
| The colors were as follows:{{verify|Did the color codes remain the same between Beta 1.2 and Java 1.11.2?}}
{{:Color/Java Edition dye colors before 17w06a}}
}}
{{History|java}}
{{History||1.1|snap=11w49a|[[Sheep]] can now regrow their [[wool]] by eating [[grass block|grass]]. Dyed sheep regrow wool in their new color.}}
{{History||1.3.1|snap=12w19a|[[File:Cocoa Beans JE2.png|32px]] The texture of [[cocoa beans]] has been changed.}}
{{History|||snap=1.3|[[File:bone meal changes.gif|32px]] The textures of [[bone meal]], [[cactus green]], cocoa beans and [[rose red]] have been changed. The textures have been lowered one pixel.}}
{{History||1.4.2|snap=12w34a|Added the ability to dye leather [[armor]] and [[wolf]] collars.}}
{{History||1.4.4|snap=1.4.3|Color codes have been changed. The colors of red, brown, blue, purple, cyan, pink, light blue, magenta and orange were adjusted a little vividly.}}
{{History||1.6.1|snap=13w19a|[[Stained clay]] can now be crafted using dyes.}}
{{history||1.7.2|snap=13w36a|With the addition of new [[flower]]s, many secondary and tertiary dyes are now primary dyes.}}
{{History|||snap=13w41a|[[Stained glass]] can now be crafted using dyes.}}
{{History||1.8|snap=14w02a|As cleric [[villager]]s now sell lapis lazuli, all dyes have become fully renewable.}}
{{History|||snap=14w30a|Added [[banner]]s, which can be dyed.}}
{{History||1.9|snap=15w34a|Added [[shield]]s, which can be dyed indirectly by applying a matching [[banner]].}}
{{History||1.11|snap=16w39b|Dyes are now used to change the color of [[shulker box]]es.}}
{{History||1.12|snap=17w06a|Dyes are now used to craft [[concrete powder]].
|Color codes have been changed. All colors are adjusted more vividly. The changes were as follows:
{{:Color/Java Edition dye color changes in 17w06a}}
|Light blue dye, stained glass, and stained glass panes, did not change colors in this update. This means that they still use old colors.<ref name="unchanged dyes">{{Bug|MC-214643}}<br>{{Bug|MC-214641}}</ref>
}}
{{History|||snap=17w15a|Dyes can now apply color to white [[bed]]s.}}
{{History||1.13|snap=17w47a|The different data values for the <code>dye</code> ID have been split up into their own IDs.}}
{{History||1.14|snap=18w43a|[[Bone meal]], [[ink sac]]s, [[cocoa beans]] and [[lapis lazuli]] are no longer considered dyes.
|[[File:White Dye JE1 BE1.png|32px]] [[File:Black Dye JE1 BE1.png|32px]] [[File:Brown Dye JE1 BE1.png|32px]] [[File:Blue Dye JE1 BE1.png|32px]] Added [[white dye|white]], [[black dye|black]], [[brown dye|brown]] and [[blue dye]]s.
|"Rose Red", "Dandelion Yellow" and "Cactus Green" have been renamed to "Red Dye", "Yellow Dye" and "Green Dye", respectively.
|[[Glass pane]]s and [[carpet]]s can now be dyed.
|[[File:Light Gray Dye JE2 BE2.png|32px]] [[File:Gray Dye JE2 BE2.png|32px]] [[File:Red Dye JE2 BE2.png|32px]] [[File:Orange Dye JE2 BE2.png|32px]] [[File:Yellow Dye JE2 BE2.png|32px]] [[File:Lime Dye JE2 BE2.png|32px]] [[File:Green Dye JE2 BE2.png|32px]] [[File:Cyan Dye.png|32px]] [[File:Light Blue Dye JE2 BE2.png|32px]] [[File:Purple Dye JE2 BE2.png|32px]] [[File:Magenta Dye JE2 BE2.png|32px]] [[File:Pink Dye JE2 BE2.png|32px]] The textures of light gray, gray, red, orange, yellow, lime, green, cyan, light blue, purple, magenta, and pink dyes, have been changed. The color texture for light blue dye was not changed to reflect the updated colors from 1.12.<ref name="unchanged dyes"></ref>}}
{{History|||snap=18w44a|The color of the text on [[sign]]s can now be changed with dye.}}
{{History|||snap=18w49a|Yellow dyes can now be found in [[chest]]s in [[village]] mason houses.}}
{{History|||snap=18w50a|Green dyes can now be found in [[chest]]s in [[desert]] [[village]] houses.}}
{{History|||snap=19w05a|Added the [[wandering trader]], which can sell any type of dye.}}
{{History|||snap=19w11a|All 16 types of dyes can now be [[trading|bought]] by shepherd villagers.}}
{{History||1.16.2|snap=Pre-release 2|Reversed the order of dyes to match other colored items in the [[Creative inventory]].<ref name="reverse dye">{{Bug|MC-136553}}</ref>
|Regrouped dyes in the Creative inventory such that white, blue, brown, and black dyes are within and not [[cocoa beans]], [[ink sacs]], [[lapis lazuli]], and [[bone meal]].<ref name="regroup dye">{{Bug|MC-177684}}</ref>}}
{{History||1.17|snap=20w45a|Added [[candle]]s, which can be dyed.}}
{{History|||snap=21w03a|Added a sound for applying dyes.}}
{{History|||snap=21w19a|Candles can no longer be dyed.}}
{{History|||snap=Pre-release 1|Candles can now once again be dyed.}}
{{History||1.20<br>(Experimental)|link=1.19.3|snap=22w42a|The color of the text on [[hanging sign]]s can now be changed with dye.}}
{{History||1.20<br>(Experimental)|link=1.19.4|snap=23w07a|[[Torchflower]]s can now be crafted into orange dye.|[[Pink petals]] can now be crafted into pink dye.}}
{{History||1.20|snap=23w12a|[[Pitcher plant]]s can now be crafted into cyan dye.|Blue, light blue, orange, white, and yellow dye can now be found in [[suspicious gravel]] and [[suspicious sand]] in [[trail ruins]].}}
{{History|||snap=23w14a|Pitcher plants can now craft two [[cyan dye]] instead of one.}}
{{History|||snap=23w16a|Blue, light blue, orange, white, and yellow dye no longer generates in [[suspicious sand]] in [[trail ruins]].|Due to the split of the archaeological loot tables for the suspicious gravel within the [[trail ruins]]; blue, light blue, orange, white, and yellow dye now are in the common loot.}}
{{History|pocket alpha}}
{{History||v0.3.0|[[File:Bone Meal JE1 BE1.png|32px]] [[File:Light Gray Dye JE1 BE1.png|32px]] [[File:Gray Dye JE1 BE1.png|32px]] [[File:Ink Sac JE1 BE1.png|32px]] [[File:Cocoa Beans JE1 BE1.png|32px]] [[File:Red Dye JE1 BE1.png|32px]] [[File:Orange Dye JE1 BE1.png|32px]] [[File:Yellow Dye JE1 BE1.png|32px]] [[File:Lime Dye JE1 BE1.png|32px]] [[File:Green Dye JE1 BE1.png|32px]] [[File:Cyan Dye JE1 BE1.png|32px]] [[File:Light Blue Dye JE1 BE1.png|32px]] [[File:Lapis Lazuli JE1 BE1.png|32px]] [[File:Purple Dye JE1 BE1.png|32px]] [[File:Magenta Dye JE1 BE1.png|32px]] [[File:Pink Dye JE1 BE1.png|32px]] Added dyes. Only [[dandelion yellow]] and [[lapis lazuli]] are currently obtainable and have functionality.}}
{{History||v0.3.2|[[Cactus green]] is now obtainable by smelting [[cacti]].}}
{{History||v0.3.3|[[Bone meal]] is now obtainable via [[crafting]].}}
{{History||v0.4.0|[[Cyan dye]], [[light blue dye]], [[lime dye]], [[magenta dye]], [[orange dye]], [[pink dye]], and [[purple dye]] are now obtainable via crafting.
|[[Rose red]] is now obtainable by smelting red [[mushroom]]s.
|All available dyes, excluding bone meal, can now be used to craft their respective [[wool]] color.}}
{{History||v0.8.0|snap=build 1|[[File:Cocoa Beans JE3 BE2.png|32px]] The texture of cocoa beans has been changed.}}
{{History|||snap=build 3|[[Ink sac]]s, [[cocoa bean]]s, [[gray dye]], and [[light gray dye]] are now available in the [[creative]] [[inventory]].
|Rose red can now be obtained from [[beetroot]]s.}}
{{History||v0.9.0|snap=build 1|Cocoa beans can now be obtained from [[cocoa pod]]s.
|The [[rose]] has been removed and replaced with a new poppy [[flower]] that can be crafted into rose red.}}
{{History|||snap=build 3|All new [[flower]]s can now be [[crafting|crafted]] into dyes. Because of this, many secondary and tertiary dyes are now primary dyes.
|[[Gray dye]] and [[light gray dye]] can now be obtained in [[survival]].}}
{{History|||snap=build 11|[[Terracotta|Stained clay]] can now be crafted using dyes.}}
{{History||v0.11.0|snap=build 1|[[Ink sac]]s can now be obtained from [[squid]].
|Added the ability to dye [[wolf]] collars.}}
{{History||v0.12.1|snap=build 1|Red [[mushroom]]s can no longer be smelted to obtain [[rose red]].}}
{{History||v0.14.0|snap=build 1|[[Cauldron]]s now used for leather dyeing, by applying a dye to a [[water]]-filled cauldron.}}
{{History||v0.16.0|snap=build 1|[[Cocoa bean]]s can no longer be crafted.}}
{{History|pocket}}
{{History||1.0.0|snap=alpha 0.17.0.1|Added a ''Dye'' button for [[sheep]].
|Added [[shulker]]s, which can be dyed.
|Added [[stained glass]]. Stain glass cannot be [[crafting|crafted]], but purple glass generates in [[end city|end cities]].}}
{{History||1.1.0|snap=alpha 1.1.0.0|Dyes can now apply color to a white [[bed]]s.
|Dyes are now used to craft [[concrete powder]].
|The color palette has been changed.}}
{{History|bedrock}}
{{History||1.2.0|snap=beta 1.2.0.2|Dyes can now be used for [[banner]] crafting.
|Dyes can now be used to craft [[firework star]]s.
|[[Stained glass]] is now [[crafting|craftable]], using dyes.}}
{{History||1.4.0|snap=beta 1.2.20.1|[[Lime dye]] can now be obtained from smelting [[sea pickle]]s.
|Dyes can now used to craft [[glow stick]]s and [[balloon]]s.}}
{{History||1.8.0|snap=beta 1.8.0.8|Dyes can now be used to dye [[cat]] collars.}}
{{History|||snap=beta 1.8.0.10|[[File:White Dye JE1 BE1.png|32px]] [[File:Black Dye JE1 BE1.png|32px]] [[File:Brown Dye JE1 BE1.png|32px]] [[File:Blue Dye JE1 BE1.png|32px]] Added [[white dye|white]], [[brown dye|brown]], [[black dye|black]] and [[blue dye]]s, which can be crafted from [[lapis lazuli]], [[bone meal]], [[cocoa beans]] and [[ink sac]]s. This, however, the later four still use as dyes.<ref>{{Bug|MCPE-42473}}</ref>
|"Rose Red", "Dandelion Yellow" and "Cactus Green" have been renamed to "Red Dye", "Yellow Dye" and "Green Dye", respectively.}}
{{History||1.9.0|snap=beta 1.9.0.0|Blue and white dye can now be obtained from [[cornflower]]s and [[lily of the valley]]s.}}
{{History||1.10.0|snap=beta 1.10.0.3|[[Glass pane]]s and [[carpet]]s can now be dyed.
|Only a single dye is now required to apply a banner pattern in a [[loom]].
|Various dyes except black dye, white dye, brown dye and blue dye are now [[trading|sold]] by [[wandering trader]]s.
|[[File:Bone Meal JE2 BE2.png|32px]] [[File:Light Gray Dye JE2 BE2.png|32px]] [[File:Gray Dye JE2 BE2.png|32px]] [[File:Ink Sac JE2 BE2.png|32px]] [[File:Cocoa Beans JE4 BE3.png|32px]] [[File:Red Dye JE3 BE3.png|32px]] [[File:Orange Dye JE2 BE2.png|32px]] [[File:Yellow Dye JE2 BE2.png|32px]] [[File:Lime Dye JE2 BE2.png|32px]] [[File:Green Dye JE2 BE2.png|32px]] [[File:Cyan Dye.png|32px]] [[File:Light Blue Dye JE2 BE2.png|32px]] [[File:Lapis Lazuli JE2 BE2.png|32px]] [[File:Purple Dye JE2 BE2.png|32px]] [[File:Magenta Dye JE2 BE2.png|32px]] [[File:Pink Dye JE2 BE2.png|32px]] The textures of bone meal, light gray, gray, ink sac, cocoa beans, red, orange, yellow, lime, green, cyan, light blue, lapis lazuli, purple, magenta, and pink dyes have been changed.}}
{{History||1.11.0|snap=beta 1.11.0.4|Dye can now be [[trading|sold]] to shepherd [[villager]]s.}}
{{History||1.16.210|snap=beta 1.16.210.59|The color of the text on [[sign]]s can now be changed with dye.}}
{{History|||snap=beta 1.16.210.60|The ability to dye the color of the text on [[sign]]s was temporarily removed.}}
{{History||1.16.220|snap=beta 1.16.220.50|The color of the text on [[sign]]s can now be changed with dye again.}}
{{History||1.17.10|snap=beta 1.17.10.22|Added [[candles]], which can be dyed.}}
{{History|console}}
{{History||xbox=TU1|xbone=CU1|ps=1.0|wiiu=Patch 1|switch=1.0.1|[[File:Bone Meal JE1 BE1.png|32px]] [[File:Light Gray Dye JE1 BE1.png|32px]] [[File:Gray Dye JE1 BE1.png|32px]] [[File:Ink Sac JE1 BE1.png|32px]] [[File:Cocoa Beans JE1 BE1.png|32px]] [[File:Red Dye JE1 BE1.png|32px]] [[File:Orange Dye JE1 BE1.png|32px]] [[File:Yellow Dye JE1 BE1.png|32px]] [[File:Lime Dye JE1 BE1.png|32px]] [[File:Green Dye JE1 BE1.png|32px]] [[File:Cyan Dye JE1 BE1.png|32px]] [[File:Light Blue Dye JE1 BE1.png|32px]] [[File:Lapis Lazuli JE1 BE1.png|32px]] [[File:Purple Dye JE1 BE1.png|32px]] [[File:Magenta Dye JE1 BE1.png|32px]] [[File:Pink Dye JE1 BE1.png|32px]] Added dyes.}}
{{History||xbox=TU9|[[File:Cocoa Beans JE3 BE2.png|32px]] The texture of cocoa beans has been changed.}}
{{History||xbox=none|xbone=none|ps=1.83|wiiu=none|switch=none|[[File:White Dye JE1 BE1.png|32px]] [[File:Black Dye JE1 BE1.png|32px]] [[File:Brown Dye JE1 BE1.png|32px]] [[File:Blue Dye JE1 BE1.png|32px]] Added [[white dye|white]], [[black dye|black]], [[brown dye|brown]], and [[blue dye|blue]] dyes, which can crafted from [[bone meal]], [[ink sac]], [[cocoa beans]], and [[lapis lazuli]].
|"Rose Red", "Dandelion Yellow" and "Cactus Green" have been renamed to "Red Dye", "Yellow Dye" and "Green Dye", respectively.}}
{{History||ps=1.90|[[File:Bone Meal JE2 BE2.png|32px]] [[File:Light Gray Dye JE2 BE2.png|32px]] [[File:Gray Dye JE2 BE2.png|32px]] [[File:Ink Sac JE2 BE2.png|32px]] [[File:Cocoa Beans JE4 BE3.png|32px]] [[File:Red Dye JE2 BE2.png|32px]] [[File:Orange Dye JE2 BE2.png|32px]] [[File:Yellow Dye JE2 BE2.png|32px]] [[File:Lime Dye JE2 BE2.png|32px]] [[File:Green Dye JE2 BE2.png|32px]] [[File:Cyan Dye.png|32px]] [[File:Light Blue Dye JE2 BE2.png|32px]] [[File:Lapis Lazuli JE2 BE2.png|32px]] [[File:Purple Dye JE2 BE2.png|32px]] [[File:Magenta Dye JE2 BE2.png|32px]] [[File:Pink Dye JE2 BE2.png|32px]] The textures of bone meal, light gray, gray, ink sac, cocoa beans, red, orange, yellow, lime, green, cyan, light blue, lapis lazuli, purple, magenta, and pink dyes have been changed.}}
{{History|3ds}}
{{History||0.1.0|[[File:Bone Meal JE1 BE1.png|32px]] [[File:Light Gray Dye JE1 BE1.png|32px]] [[File:Gray Dye JE1 BE1.png|32px]] [[File:Ink Sac JE1 BE1.png|32px]] [[File:Cocoa Beans JE3 BE2.png|32px]] [[File:Red Dye JE1 BE1.png|32px]] [[File:Orange Dye JE1 BE1.png|32px]] [[File:Yellow Dye JE1 BE1.png|32px]] [[File:Lime Dye JE1 BE1.png|32px]] [[File:Green Dye JE1 BE1.png|32px]] [[File:Cyan Dye JE1 BE1.png|32px]] [[File:Light Blue Dye JE1 BE1.png|32px]] [[File:Lapis Lazuli JE1 BE1.png|32px]] [[File:Purple Dye JE1 BE1.png|32px]] [[File:Magenta Dye JE1 BE1.png|32px]] [[File:Pink Dye JE1 BE1.png|32px]] Added dyes from [[Pocket Edition v0.15.4 alpha]].}}
{{History|foot}}
<gallery>
Pre-release dyes.png|Pre-release dye textures hidden within [[Items.png]].
</gallery>
;Notes
{{reflist|group=n}}
== Gallery ==
<gallery>
White Dye.png|White Dye
Light Gray Dye.png|Light Gray Dye
Gray Dye.png|Gray Dye
Black Dye.png|Black Dye
Brown Dye.png|Brown Dye
Red Dye.png|Red Dye
Orange Dye.png|Orange Dye
Yellow Dye.png|Yellow Dye
Lime Dye.png|Lime Dye
Green Dye.png|Green Dye
Cyan Dye.png|Cyan Dye
Light Blue Dye.png|Light Blue Dye
Blue Dye.png|Blue Dye
Purple Dye.png|Purple Dye
Magenta Dye.png|Magenta Dye
Pink Dye.png|Pink Dye
</gallery>
==Issues==
{{issue list}}
== Trivia ==
* Players can obtain each one of every color with 1 cocoa bean, 2 yellow dye, 2 ink sac, 3 green dye, 4 lapis lazuli, 4 red dye, and 6 bone meal (2 bones).
* The dyed sheep breeding behavior mirrors [[wikipedia:Lamarckism|Lamarck's theory]], in which the organisms evolve inheriting the external changes and adaptations of the previous generation, transmitting them to their offspring.
* In ''Bedrock Edition'', tertiary colors, along with their regular crafting recipes, can be crafted with primary colors. E.g.: Magenta can be crafted with one rose red and two bone meals.
* The colors of the dyes match the chat colors in [[color codes]] except for brown (dye only), light aqua, and gold (color codes only).
* The texture for light blue dye still uses the color from prior to the 1.12 World of Color update.<ref name="unchanged dyes"></ref>
== References ==
{{reflist}}
== External Links ==
* Tools for calculating leather dye combination: [https://minecraft.tools/en/armor.php minecraft.tools] (webapp); [https://github.com/pudquick/pyMCdyes/ pyMCDyes] (open-source Python script, outdated); [https://anrar4.github.io/DyeLeatherArmor/ DyeLeatherArmor]: a tool for calculating an exact crafting recipe for any sRGB color
{{Items}}
[[Category:Dyes]]
[[Category:Renewable resources]]
[[cs:Barvivo]]
[[de:Farbstoff]]
[[es:Tinte]]
[[fr:Teinture]]
[[hu:Színezés]]
[[it:Colorante]]
[[ja:染料]]
[[ko:염료]]
[[nl:Kleurstof]]
[[pl:Barwniki]]
[[pt:Corante]]
[[ru:Красители]]
[[th:สีย้อม]]
[[uk:Барвники]]
[[zh:染料]]</li><li>[[Snowball|Snowball]]<br/>{{about|the throwable item|the enchantment in ''Minecraft Dungeons''|MCD:Snowball}}
{{ItemEntity
|image=Snowball.png
|renewable=Yes
|stackable=Yes (16)<br>
Yes (64){{upcoming|java Combat Tests}}
|size=Height: 0.25 Blocks<br>Width: 0.25 Blocks
}}
'''Snowballs''' are throwable combat items that hit but do not damage most [[Mob|mobs]] on impact.
== Obtaining ==
{{see also|Tutorials/Snow farming}}
=== Mining ===
A [[shovel]] without the [[Silk Touch]] enchantment can get 4 snowballs by breaking a [[snow block]], and 1–8 snowballs by breaking or blasting [[snow layer]]s – one per layer. The [[Fortune]] enchantment does not affect these amounts.
{{IN|bedrock}}, snowballs are dropped from snow layers even when mined with a Silk Touch shovel.<ref>{{bug|MCPE-59729||Snow layers don't drop themselves when mined with a silk touch enchanted shovel}}</ref>
==== Explosions ====
Creeper and TNT [[explosion]]s leave snowballs in the resulting debris field if near snow.
==== Ravagers ====
{{IN|BE}}, Ravagers destroy snow layers, dropping snowballs.
==== Pistons ====
{{IN|BE}}, a block or piston head pushed into the position of snow layers destroys the snow layers, dropping snowballs. 1-3 layers drops 1 snowball, 4-5 layers drops 2 snowballs, 6-7 layers drops 3 snowballs and 8 layers drops 4 snowballs.
=== Mob loot ===
[[Snow golem]]s drop 0–15 snowballs upon death, unaffected by [[Looting]].
=== Chest loot ===
{{LootChestItem|snowball}}
== Usage ==
=== Crafting ingredient ===
{{crafting usage}}
=== Combat ===
[[File:Throwing a snowball on a pig.gif|300px|thumbnail|right|Throwing a snowball on a pig animation.]]
Snowballs can be thrown by {{control|using}} them. There is no charging time or cooldown for firing them,{{Until|java Combat Tests}} meaning they can be thrown as fast as the player can click.
Like other projectiles, snowballs are affected by gravity: their range is the same as those of [[egg]]s and [[ender pearl]]s, less than that of [[arrow]]s fired from [[bow]]s, and more than that of [[splash potion]]s. In [[Bedrock Edition]], players will receive damage and will be knockbacked.
Snowballs deal {{hp|3}} each to [[blaze]]s but they deal no damage to other mobs. Mobs still receive knockback and act the same as if they were being damaged (for example, [[zombified piglin]]s who are hit by snowballs become aggressive). Players {{in|BE}} receive knockback, while players {{in|JE}} are unaffected.<ref>{{bug|MC-3179|||WAI}}</ref>{{Until|java Combat Tests}}
When fighting the [[ender dragon]], [[end crystal]]s are able to be destroyed by snowballs being thrown at them.
Snowball, like other projectiles, can be used to distract the [[warden]]. A warden walks towards the location where the snowball lands to inspect it, giving the player time to escape. However, if snowballs are fired too frequently (at least twice in 5 seconds), the warden walks straight to the player instead.
In the new versions they can hit players but just only in bedrock
=== Dispenser ===
Snowballs can be fired from [[dispenser]]s.
== Sounds ==
{{Edition|Java}}:<br>
Thrown snowballs use the Friendly Creatures sound category for entity-dependent sound events.
{{Sound table
|rowspan=3
|sound=Bow shoot.ogg
|subtitle=Snowball flies
|source=neutral
|description=When a player throws a snowball
|id=entity.snowball.throw
|translationkey=subtitles.entity.snowball.throw
|volume=0.5
|pitch={{frac|1|3}}-0.5
|distance=16}}
{{Sound table
|subtitle=Snowball flies
|source=neutral
|description=When a snow golem shoots a snowball
|id=entity.snow_golem.shoot
|translationkey=subtitles.entity.snowball.throw
|volume=1.0
|pitch={{frac|1|3}}-0.5
|distance=16}}
{{Sound table
|subtitle=Dispensed item
|source=block
|description=When a dispenser shoots a snowball
|id=block.dispenser.launch
|translationkey=subtitles.block.dispenser.dispense
|volume=1.0
|pitch=1.2
|distance=16
|foot=1}}
{{Edition|Bedrock}}:
{{Sound table
|type=bedrock
|rowspan=3
|sound=Bow shoot.ogg
|source=player
|description=When a player throws a snowball
|id=random.bow
|volume=0.5
|pitch=0.33-0.5}}
{{Sound table
|source=neutral
|description=When a snow golem shoots a snowball
|id=mob.snowgolem.shoot
|volume=1.0
|pitch=0.8-1.2}}
{{Sound table
|source=player
|description=When a dispenser shoots a snowball
|id=random.bow
|volume=1.0
|pitch=0.83-1.25
|foot=1}}
== Data values ==
=== ID ===
{{edition|java}}:
{{ID table
|edition=java
|firstcolumnname=Item
|showforms=y
|generatetranslationkeys=y
|displayname=Snowball
|spritetype=item
|nameid=snowball
|form=item
|foot=1}}
{{ID table
|edition=java
|firstcolumnname=Entity
|showentitytags=y
|generatetranslationkeys=y
|displayname=Snowball
|spritetype=entity
|nameid=snowball
|entitytags=impact_projectiles
|foot=1}}
{{edition|bedrock}}:
{{ID table
|edition=bedrock
|firstcolumnname=Item
|shownumericids=y
|showforms=y
|notshowbeitemforms=y
|generatetranslationkeys=y
|displayname=Snowball
|spritetype=item
|nameid=snowball
|id=374
|form=item
|foot=1}}
{{ID table
|edition=bedrock
|firstcolumnname=Entity
|shownumericids=y
|generatetranslationkeys=y
|displayname=Snowball
|spritetype=entity
|nameid=snowball
|id=81
|foot=1}}
=== Entity Data ===
Snowballs have entity data that define various properties of the entity.
{{el|java}}:
{{main|Entity format}}
{{/ED}}
{{el|bedrock}}:
: See [[Bedrock Edition level format/Entity format]].
== Advancements ==
{{Load advancements|Bullseye}}
== Video ==
<div style="text-align:center">{{yt|2E-c9P8kyfg}}</div>
==History==
{{History|java alpha}}
{{History||v1.0.5|[[File:Snowball JE1 BE1.png|32px]] Added snowballs.
|Snowballs are used to craft [[snow block]]s.
|Snowballs could stack up to 64.}}
{{History||v1.0.5_01|Snowballs now stack to 8.
|Added a new snowball [[sound]] effect.
|Harvesting snowballs now requires a [[shovel]].}}
{{History||v1.0.6|Snowballs now stack up to 16.
|Thrown snowballs no longer disappear.}}
{{History||v1.1.1|It is no longer possible to obtain more than four snowballs from a solid [[snow block]] (the [[player]] was previously able to obtain 4-6 snowballs per snow block allowing an infinite number of snowballs to be made).}}
{{History||v1.2.0|snap=preview|[[Fireball]]s use the same texture as the snowball.}}
{{History|java beta}}
{{History||1.2|Snowballs can now be fired by [[dispenser]]s.}}
{{History|java}}
{{History||1.0.0|snap=Beta 1.9 Prerelease|[[Fireball]]s no longer use the snowball texture.}}
{{History|||snap=RC1|Snowball throwing sound was changed.}}
{{History||1.9|snap=15w32a|Snowballs no longer damage the [[ender dragon]].}}
{{History|||snap=15w36b|Snowballs now produce particles when thrown at an entity.}}
{{History|||snap=15w49a|Snowballs, as well as all projectiles, now take the thrower's motion into account when fired.}}
{{History||1.11|snap=16w32a|The entity ID has been changed from <code>Snowball</code> to <code>snowball</code>.}}
{{History||1.13|snap=17w47a|Prior to [[1.13/Flattening|''The Flattening'']], this [[item]]'s numeral ID was 332.}}
{{History||1.14|snap=18w43a|[[File:Snowball JE2 BE2.png|32px]] The texture of snowballs has been changed.}}
{{History|||snap=18w49a|Snowballs can now be found in [[chest]]s in [[snowy tundra]] [[village]] houses.}}
{{History|||snap=19w08a|[[File:Snowball JE3 BE3.png|32px]] The texture of snowballs has been changed, once again.}}
{{History||1.16.2|snap=Pre-Release 1|Snowballs are now affected by [[bubble column]]s.}}
{{History||1.19|snap=Deep Dark Experimental Snapshot 1|Snowballs now generate in [[ancient city]] chests.}}
{{History|upcoming java}}
{{History||Combat Tests|snap=Combat Test 4|Snowballs now stack to 64, once again.
|Snowballs now have 4-tick cooldown and are not rendered for the first 2 ticks to prevent screen flickering.}}
{{History|pocket alpha}}
{{History||v0.2.0|[[File:Snowball JE1 BE1.png|32px]] Added snowballs. They are currently unobtainable and serve no purpose.}}
{{History||v0.3.0|Snowballs now drop as an item when mining [[snow block]]s and [[snow layer]]s.
|Snowballs can be used to craft [[snow block]]s.}}
{{History||v0.4.0|Snowballs can now be thrown.}}
{{History||v0.11.0|snap=build 14|Snowballs are now available in the [[creative]] inventory.}}
{{History||v0.12.0|Snowballs now deal [[damage]] to [[blaze]]s.}}
{{History||v0.12.1|snap=build 1|Added [[snow golem]]s, which [[drops|drop]] snowballs.}}
{{History|bedrock}}
{{History||1.2.0|Snowballs now deal knockback to [[player]]s.}}
{{History||1.10.0|snap=beta 1.10.0.3|[[File:Snowball JE2 BE2.png|32px]] The texture of snowballs has been changed.}}
{{History||1.11.0|snap=beta 1.11.0.1|Snowballs can now be found in some [[snowy tundra]] [[village]] house [[chest]]s.}}
{{History|||snap=beta 1.11.0.5|[[File:Snowball JE3 BE3.png|32px]] The texture of snowballs has been changed, once again.}}
{{History|console}}
{{History||xbox=TU1|xbone=CU1|ps=1.0|switch=1.0.1|wiiu=Patch 1|[[File:Snowball JE1 BE1.png|32px]] Added snowballs.}}
{{History||xbox=none|xbone=none|ps=1.90|switch=none|wiiu=none|[[File:Snowball JE3 BE3.png|32px]] The texture of snowballs has been changed.}}
{{History|3DS}}
{{History||0.1.0|[[File:Snowball JE1 BE1.png|32px]] Added snowballs.}}
{{History|foot}}
== Issues ==
{{issue list}}
== Trivia ==
* A thrown snowball faces the player in the first-person view, while it appears horizontally rotated in third-person view. This is the case for all throwable items ([[ender pearl]]s, [[egg]]s, snowballs, and all throwable [[potion]]s).
== References ==
{{reflist}}
== External Links ==
*[https://www.minecraft.net/en-us/article/taking-inventory--snowball Taking Inventory: Snowball] – Minecraft.net on August 3, 2019
{{Items}}
{{entities}}
[[Category:Combat]]
[[cs:Sněhová koule]]
[[de:Schneeball]]
[[es:Bola de nieve]]
[[fr:Boule de neige]]
[[hu:Hógolyó]]
[[ja:雪玉]]
[[ko:눈덩이]]
[[nl:Sneeuwbal]]
[[pl:Śnieżka]]
[[pt:Bola de neve]]
[[ru:Снежок]]
[[th:บอลหิมะ]]
[[uk:Сніжок]]
[[zh:雪球]]</li></ul> | 15w33a | The character limit for command blocks is now 32,500 instead of 32,767. | |||
| 15w34a | |||||
| Added block facing for command blocks. | |||||
| 15w34b | Added Conditional mode within command blocks. | ||||
| Added tab completion support within command blocks. | |||||
| 15w35a | |||||
| Added Always active and needs redstone options for command blocks. | |||||
Added auto NBT tag to control redstone options within command blocks. | |||||
| 15w36a | Players are now unable to use commands, such as /give, within command blocks.
| ||||
| Players, who are unable to use commands, can no longer place command blocks. | |||||
| 15w36d | Each command block type now appears with different colors on maps. | ||||
| 16w02a | Running /help in a command block now randomly uses one of various different humorous phrases as the previous output. | ||||
| 16w04a | Running "Searge" as the command in the command block without a preceding "/" now sets the previous output to "#itzlipofutzli". | ||||
1.11{{Extension DPL}}<ul><li>[[Longer String|Longer String]]<br/>{{stub}}
{{Joke feature}}
{{exclusive|java}}
{{item
| image = Longer String.png
| rarity=Common
| renewable=Yes
| stackable=Yes (64)
}}
'''Longer string''' is a joke item from [[Java Edition 23w13a_or_b]].
==Obtaining==
===Crafting===
{{Crafting
|A1= String |B1= String
|Output= Longer String
|shapeless= 1
|ignoreusage=1
}}
==Data values==
===ID===
{{edition|java}}:{{ID table
|edition=java
|showforms=y
|generatetranslationkeys=y
|displayname=Longer String
|spritetype=item
|nameid=string2
|form=item|foot=1}}
==History==
{{History|java}}
{{History||23w13a_or_b|[[File:Longer String.png|32px]] Added longer string.}}
{{History|foot}}
{{items}}
{{Jokes}}
[[Category:Joke items]]
[[ja:Longer String]]
[[pt:Linha mais comprida]]</li><li>[[Redstone Comparator|Redstone Comparator]]<br/>{{Block
| image =
| image2 =
| transparent = Yes
| light = No
| tool = any
| renewable = Yes
| stackable = Yes (64)
| flammable = No
| lavasusceptible = No
| group = Redstone Comparator
| group2 = Subtracting
| group3 = Powered
| group4 = Powered+Subtracting
| 1-1 = Redstone Comparator.png
| 2-1 = Subtracting Redstone Comparator.png
| 3-1 = Powered Redstone Comparator.png
| 4-1 = Powered Subtracting Redstone Comparator.png
}}
{{Many images}}
A '''redstone comparator''' is a [[block]] that can produce an [[Redstone Dust|output signal]] from its front by reading [[chest]]s, [[lectern]]s, [[beehive]]s and similar blocks, or repeat a signal without changing its strength. It can also be set to either stop outputting a signal when its side input recieves a stronger one (front torch off), or subtract its side input's signal strength from its output (front torch on).
== Obtaining ==
=== Natural generation ===
Redstone comparators generate in [[Ancient City|ancient cities]].
=== Breaking ===
A redstone comparator can be broken instantly with any [[tool]], or by hand, and drops itself as an item.
{{Breaking row|Redstone Comparator|horizontal=y}}
A redstone comparator is removed and dropped as an item if:
* its attachment block is moved, removed, or destroyed;
* [[water]] flows into its space;{{only|java}}
* a [[piston]] tries to push it or moves a block into its space.
If [[lava]] flows into a redstone comparator's space, the redstone comparator is destroyed without dropping as an item.
=== Crafting ===
{{Crafting
|B1=Redstone Torch
|A2=Redstone Torch
|B2=Nether Quartz
|C2=Redstone Torch
|A3=Stone
|B3=Stone
|C3=Stone
|Output= Redstone Comparator
|type=Redstone
}}
== Usage ==
A redstone comparator can be placed on the top of any [[opaque]] block with a solid full-height top surface (including upside-down [[slab]]s and upside-down [[stairs]]). {{IN|be}}, a comparator can also be placed on [[wall]]s and fences. For more information about placement on transparent blocks, see [[Opacity/Placement]].
The redstone comparator has a front and a back — the arrow on the top of the comparator points to the front. When placed, the comparator faces away from the player. The comparator has two miniature redstone torches at the back and one at the front. The back torches turn on when the comparator's output is greater than zero (the arrow on top also turns red). The front torch has two states that can be toggled by {{control|using}} the comparator:
* Down and unpowered (indicating the comparator is in "comparison mode")
* Up and powered (indicating the comparator is in "subtraction mode")
The redstone comparator can take a signal strength input from its rear as well as from both sides. Side inputs are accepted only from [[redstone dust]], [[block of redstone]], [[redstone repeater]]s, other comparators, and [[observer]]s in specific scenarios. The redstone comparator's front is its output.
It takes 1 [[redstone tick]] (2 game ticks, or 0.1 seconds barring lag) for signals to move through a redstone comparator, either from the rear or from the sides. This applies to changing signal strengths as well as simply to turning on and off.
Redstone comparators check their power state before their scheduled ticks update. This results in redstone comparators not usually responding to 1-tick fluctuations of power or signal strength — for example, a [[clock circuit|1-clock]] input is treated as always off from the side, and always on from the rear. This happens because the signal changes back to its original state before the redstone comparator checks its input states. However, certain setups such as powering any input with two separate observer pulses at the same time will cause a redstone comparator to respond to 2 gametick pulses.
The redstone comparator has four functions: maintain signal strength, compare signal strength, subtract signal strength, and measure certain block states (primarily the fullness of containers).
=== Maintain signal strength ===
A redstone comparator with no powered sides outputs the same signal strength as its rear input.
=== Compare signal strength ===
[[File:Comparators Explained.png|Comparators in comparison mode.|thumb]]
A redstone comparator in comparison mode (front torch down and unpowered) compares its rear input to its two side inputs. If either side input is greater than the rear input, the comparator output turns off. If neither side input is greater than the rear input, the comparator outputs the same signal strength as its rear input.
The formula for calculating the output signal strength is as follows:
<code>output = rear × [[Wikipedia:Iverson bracket|[]]'''''left''''' ≤ '''''rear''''' AND '''''right''''' ≤ '''''rear'''''[[Wikipedia:Iverson bracket|<nowiki>]]]</code>
{{-}}
=== Subtract signal strength ===
[[File:Redstone comparator.png|thumb|The greatest of the side inputs A and C is subtracted from the rear input B, outputting 1. If either A or C were greater than B, it would output 0.]]
A redstone comparator in subtraction mode (front torch up and powered) subtracts the signal strength of the higher side input from the signal strength of the rear input.
<code>output = max('''''rear''''' − max('''''left''', '''right'''''), 0)</code>
For example: if the signal strength is 6 at the left input, 7 at the right input and 4 at the rear, the output signal has a strength of ''max(4 − max(6, 7), 0) = max(4−7, 0) = max(−3, 0) = 0''.
If the signal strength is 9 at the rear, 2 at the right input and 5 at the left input, the output signal has a strength of ''max(9 − max(2, 5), 0) = max(9−5, 0) = 4''.
=== Measure block state ===
{{Schematic | caption = A redstone comparator can measure the fullness of a chest, as well as other block states, even through an opaque block.
|rd-ew!|rc-w!|ch|SB|rc-e!|rd-ew!
}}
A redstone comparator treats certain blocks behind it as power sources and outputs a signal strength proportional to the block's state. The comparator may be separated from the measured block by an opaque block. However, {{in|je}}, if the opaque block is powered to signal strength 15, then the comparator outputs 15 no matter the fullness of the container.<ref>{{bug|MC-64394}} (resolved as "Works As Intended")</ref>
[[Category:Java Edition specific information]]
{{-}}
==== Fullness of containers ====
{| class="wikitable floatright" style="margin-left: 0.5em; margin-right: 0; text-align: center;"
|+ Minimum Items for Container Signal Strength
|-
!Containers
!{{BlockSprite|Furnace|link=Furnace}}<br>{{BlockSprite|Blast Furnace|link=Blast Furnace}}<br>{{BlockSprite|Smoker|link=Smoker}}
!{{BlockSprite|Hopper|link=Hopper}}<br>{{EntitySprite|Minecart with Hopper|link=Minecart with Hopper}}<br>{{BlockSprite|Brewing Stand|link=Brewing Stand}}
!{{BlockSprite|Dispenser|link=Dispenser}}<br>{{BlockSprite|Dropper|link=Dropper}}
!{{BlockSprite|Chest|link=Chest}}<br>{{EntitySprite|Minecart with Chest|link=Minecart with Chest}}<br>{{BlockSprite|Shulker Box|link=Shulker Box}}<br>{{BlockSprite|Barrel|link=Barrel}}
![[Double Chest|{{Schematic|size=16|ch-s|-|ch-n}}
]]
!{{BlockSprite|Jukebox|link=Jukebox}}
|-
!Total Slots
!3!!5!!9!!27!!54!!1
|-
!Power Level
! colspan="5" |Number of Items
!Music Disc
|-
|0||0||0||0||0||0||No disc
|-
|1||1||1||1||1||1||"13"
|-
|2||14||23||42||1s 60||3s 55||"cat"
|-
|3||28||46||1s 19||3s 55||7s 46||"blocks"
|-
|4||42||1s 5||1s 60||5s 51||11s 37||"chirp"
|-
|5||55||1s 28||2s 37||7s 46||15s 28||"far"
|-
|6||1s 5||1s 51||3s 14||9s 42||19s 19||"mall"
|-
|7||1s 19||2s 10||3s 55||11s 37||23s 10||"mellohi"
|-
|8||1s 32||2s 32||4s 32||13s 32||27s||"stal"
|-
|9||1s 46||2s 55||5s 10||15s 28||30s 55||"strad"
|-
|10||1s 60||3s 14||5s 51||17s 23||34s 46||"ward"
|-
|11||2s 10||3s 37||6s 28||19s 19||38s 37||"11"
|-
|12||2s 23||3s 60||7s 5||21s 14||42s 28||"wait"
|-
|13||2s 37||4s 19||7s 46||23s 10||46s 19||"Pigstep"
|-
|14||2s 51||4s 42||8s 23||25s 5||50s 10||"Otherside"<br>"Relic"
|-
|15||3s||5s||9s||27s||54s||"5"
|}
A redstone comparator can output a signal indicating how full a container is. (0 for empty, 15 for full, etc.) The table on the right is described more in detail, later in this section.
Containers that can be measured by a comparator include:
* {{BlockLink|Furnace}}
* {{BlockLink|Blast Furnace}}
* {{BlockLink|Smoker}}
* {{BlockLink|Brewing Stand}}
* {{BlockLink|Hopper}}
* {{ItemLink|Minecart with Hopper}} on top of a [[detector rail]]
* {{BlockLink|Dispenser}}
* {{BlockLink|Dropper}}
* {{BlockLink|Chest}}
* {{BlockLink|Trapped Chest}}
* {{ItemLink|Minecart with Chest}} on top of a [[detector rail]]
* {{BlockLink|Barrel}}
* {{SchematicSprite|size=16|ch-e}}{{SchematicSprite|size=16|ch-w}} Large chest
* {{SchematicSprite|size=16|ch-e}}{{SchematicSprite|size=16|ch-w}} Large trapped chest
* {{BlockLink|Shulker Box}} (any color)
Generally speaking, the comparator output signal strength represents the average fullness of the slots, based on how many of that item form a full stack (64, 16, or 1 for non-stackable items).
The ''Minimum Items for Container Signal Strength'' table (right) shows the minimum '''''full-stack-equivalent (FSE)''''' to produce different signal strengths from common containers. A '''''full-stack-equivalent''''' quantifies how many normal 64-stackable items are needed to output a corresponding signal strength. The 's' is a constant 64, with the additional amount needed following after.
One may also consider the terms: '''c''umulative-weight''''' or '''''weighted-sum''''' instead of '''''full-stack-equivalent'''''.
Items that stack to a max of 16 ([[snowball]]s, [[sign]]s, [[ender pearl]]s, etc.), contribute +4 to the ''full-stack-equivalent'' for each unity (count of 1 item). Similarly, items that stack to 1 ([[minecart]], [[boat]], etc.) contribute +64, and items that stack to 64 contribute +1.
Example 1: 3 ender pearls will contribute a 3 x 4 = 12 ''full-stack-equivalent''.
Example 2: 16 ender pearls and 60 redstone dust contributes a 16x4 + 60x1 = 124 ''full-stack-equivalent''.
Example 3: 1 minecart and 60 redstone dust contributes a 1x64 + 60x1 = 124 ''full-stack-equivalent''.
Example 4: To produce a signal strength of 10 from a hopper, one requires a ''full-stack-equivalent'' of at least 3s + 14 = 206 but strictly less than than 3s + 37 = 229. This can be done with 3 minecarts, and 14 dirt.
When a comparator measures a large chest or large trapped chest, it measures the entire large chest (54 slots), not just the half directly behind the comparator. A chest or trapped chest that cannot be opened (either because it has an opaque block, [[ocelot]], or [[cat]] above it) always produces an output of 0 no matter how many items are in the container — shulker boxes can always be measured, even if they cannot open.
;Calculating signal strength from items
:When a container is empty, the output is off.
:When it is not empty, the output signal strength is calculated as follows:
:<code>'''''signal strength''''' = floor(1 + (('''''sum of all slots' fullnesses''''') / ('''''number of slots in container''''')) × 14)</code>
:<code>fullness of a slot = '''''number of items in slot''''' / '''''max stack size for this type of item'''''</code>
:''Example:'' 300 blocks in a dispenser (which has 9 slots), where each block stacks to a maximum of 64 has a 300 ''full-stack-equivalent.'' This produces an output with a signal strength of 8:
<blockquote>
1 + ((300 items / 64 items per slot) / 9 slots) × 14 = 8.292, floored is 8
</blockquote>
;Calculating items from signal strength
:It can be useful in redstone circuits to use containers with comparators to create signals of a specific strength. The number of items required in a container to produce a signal of desired strength is calculated as follows:
:<code>items required = max('''''desired signal strength''''', roundup(('''''total slots in container''''' × 64 / 14) × (desired signal strength − 1)))</code>
:''Example:'' To use a furnace (which has 3 slots) to create a strength 9 signal, players need 110 items:
<blockquote>
max(9, (3×64/14) × (9−1)) = 109.714, rounded up is 110
</blockquote>
{{-}}
==== Miscellaneous ====
[[File:Comparator storage.png|Comparators used to measure containers.|thumb]]
Some non-container blocks can also be measured by a redstone comparator:
;{{BlockLink|Beehive}} and {{BlockLink|Bee nest}}
: A hive or nest outputs a signal strength equal to the amount of honey in the hive/nest.
;{{BlockLink|Cake}}
: A cake outputs a signal strength relative to the amount of cake remaining. Each slice is worth 2 signal strength, with 7 total slices, for an output of 14 for a full cake.
[[File:Cauldron Redstone Strength Values.png|Cauldron signal strength|thumb]]
;{{BlockLink|Cauldron}}
: A cauldron outputs different signal strengths depending on how much water or powdered snow is inside. From completely empty to completely full, the output values are 0, 1, 2, and 3. If lava or powder snow is inside, the strength is always 3.
[[File:Composter Redstone Strength Values.png|Composter signal strength|thumb]]
;{{BlockLink|Composter}}
: A composter outputs different signal strengths depending on the level inside. From completely empty to completely full, the output values are 0, 1, 2, 3, 4, 5, 6, 7 and 8.
;{{Anchor|CommandBlock}}{{BlockLink|Command Block}}
: A command block stores the "success count" of the last command executed, which represents the number of times the most recently used command of this command block succeeded. A "success" is defined by the [[command]]'s success conditions: if a red error message is returned in the chat, the command was not successful.
: Most commands can succeed once per execution, but certain commands (such as those that accept players as arguments) can succeed multiple times, and the comparator outputs the number of times it succeeded (maximum 15 when sent to redstone dust, but in the code it is able to go up to the 32-bit integer limit, and can be used in contraptions with no redstone dust with those values).
: A command block continues to store the success count of the last command executed until it executes its command again, thus the comparator continues to output the same signal strength even after the command block is no longer being activated (it doesn't turn off when the signal to the command block turns off).
;{{BlockLink|End Portal Frame}}
: An end portal frame outputs a full signal of 15 if it contains an [[eye of ender]] and zero otherwise.
[[File:Item frame and comparator.png|A comparator can measure the presence and rotation of an item frame's contents.|thumb]]
;{{EntityLink|Item Frame}}
: A comparator can measure the state of an [[item frame]]'s contents. An item frame comparator outputs 0 if the item frame is empty, or 1 to 8 for any item depending on its rotation: 1 at initial placement, plus 1 for each 45° of rotation for a maximum of 8.
: For an item frame that holds a map, a unit of rotation is 90° instead of 45°, but a comparator still outputs power levels 1 to 8. It takes two full rotations to cycle through all comparator outputs, and each orientation of the map corresponds to two output levels that differ by 4.
: The comparator must be placed behind the block the item frame is attached to, facing away from the item frame. The block must be a full block, and the item frame cannot be submerged in water. Having a sign in the same block as the item frame will prevent the frame from sending a signal as well.{{only|java}}
;{{BlockLink|Jukebox}}
: A jukebox outputs a signal strength indicating which music disc is currently playing. See the ''Minimum Items for Container Signal Strength'' table above.
;{{BlockLink|Lectern}}
: A lectern outputs a signal strength that depends on what page the player is currently on. The calculation used is:
:<code>'''''signal strength''''' = floor(1 + (('''''current page''''' - 1) / ('''''number of pages in book''''' - 1)) × 14)</code>
:This results in page 1 having a signal strength of 1, and the last page having a signal strength of 15. The exception is a single page book, which will output a signal strength of 15.
:For example, a book with 15 pages will output a signal equal to the current page number. A book with 5 pages will output signal strengths of 1, 4, 8, 11 and 15 for the different pages. A book with 100 pages will have the signal strength increase to the next level on pages 1, 9, 16, 23, 30, 37, 44, 51, 58, 65, 72, 79, 86, 93 and 100.
:
;{{BlockLink|Respawn Anchor}}
: A respawn anchor outputs a signal strength of 0, 3, 7, 11, or 15, depending on the "charged" value.
;{{BlockLink|Sculk Sensor}}
: A sculk sensor outputs a signal strength depending on the type of vibration that is detected.
;{{BlockLink|Chiseled Bookshelf}}
: A chisled bookshelf outputs a signal strength between 1 and 6 indicating the last slot interacted with. When no slot has been interacted with yet, it outputs 0.
{{-}}
== Sounds ==
=== Generic ===
{{Edition|Java}}:
{{Sound table/Block/Stone/JE}}
{{Edition|Bedrock}}:
{{Sound table/Block/Wood/BE}}
=== Unique ===
{{edition|java}}:
{{Sound table
|rowspan=2
|sound=Click.ogg
|subtitle=Comparator clicks
|source=block
|description=When a comparator is set to subtraction mode
|id=block.comparator.click
|translationkey=subtitles.block.comparator.click
|volume=0.3
|pitch=0.55
|distance=16}}
{{Sound table
|subtitle=Comparator clicks
|source=block
|description=When a comparator is set to comparison mode
|id=block.comparator.click
|translationkey=subtitles.block.comparator.click
|volume=0.3
|pitch=0.5
|distance=16
|foot=1}}
{{edition|bedrock}}:
{{Sound table
|type=bedrock
|rowspan=2
|sound=Click.ogg
|source=block
|description=When a comparator is set to subtraction mode
|id=block.click
|volume=0.2
|pitch=0.55}}
{{Sound table
|source=block
|description=When a comparator is set to comparison mode
|id=block.click
|volume=0.2
|pitch=0.5
|foot=1}}
== Data values ==
=== ID ===
{{edition|java}}:
{{ID table
|edition=java
|showforms=y
|generatetranslationkeys=y
|displayname=Redstone Comparator
|spritetype=block
|nameid=comparator
|foot=1}}
{{ID table
|displayname=Block entity
|spritename=redstone-comparator
|spritetype=block
|nameid=comparator
|foot=1}}
{{edition|bedrock}}:
{{ID table
|edition=bedrock
|firstcolumnname=Redstone Comparator
|shownumericids=y
|showforms=y
|generatetranslationkeys=y
|displayname=Unpowered block
|spritename=unpowered-comparator
|spritetype=block
|nameid=unpowered_comparator
|id=149
|form=block
|translationkey=-}}
{{ID table
|displayname=Powered block
|spritename=powered-comparator
|spritetype=block
|nameid=powered_comparator
|id=150
|form=block
|translationkey=-}}
{{ID table
|displayname=Item
|spritename=redstone-comparator
|spritetype=item
|nameid=comparator
|id=522
|form=item
|foot=1}}
{{ID table
|notnamespaced=y
|displayname=Block entity
|spritename=redstone-comparator
|spritetype=block
|nameid=Comparator
|foot=1}}
=== Block states ===
{{see also|Block states}}
{{/BS}}
=== Block data ===
A redstone comparator has a block entity associated with it that holds additional data about the block.
{{el|je}}:
{{see also|Block entity format}}
{{/BE}}
{{el|be}}:
: See [[Bedrock Edition level format/Block entity format]].
== Advancements ==
{{Load advancements|the power of books}}
== Video ==
<div style="text-align:center">{{yt|J7Z20Zzz3yU}}</div>
== History ==
{{info needed section|If {{bug|MC-50242}} also affected comparators?}}
''For a more in-depth breakdown of changes to repeater textures and models, including a set of renders for each state combination, see [[/Asset history]]''
{{History|java}}
{{History||November 24, 2012|link=https://youtube.com/watch?v=YG9RNyRhIow&t=6m56s|[[Jeb]] stated that there may be a "capacitor" in [[Minecraft]]. }}
{{History||December 27, 2012|link={{tweet|Dinnerbone|284388625595125760}}|[[Dinnerbone]] released [https://web.archive.org/web/20190710120115/https://imgur.com/a/FBKed pictures] of the first version of the "comparator", stating it was a replacement for the "capacitor" idea that has variable, alternate inputs.}}
{{History||January 2, 2013|link={{tweet|Dinnerbone|286428595423965184}}|Dinnerbone released one more [http://dinnerbone.com/media/uploads/2013-01/screenshots/2013-01-02_12.06.47.png picture] of the comparator. The picture itself showing a digital-to-analog converter, using the comparator as the main [[block]].}}
{{History||1.5|snap=13w01a|[[File:Redstone Comparator (S) JE1.png|32px]] [[File:Powered Redstone Comparator (S) JE1.png|32px]] [[File:Subtracting Redstone Comparator (S) JE1.png|32px]] [[File:Powered Subtracting Redstone Comparator (S) JE1.png|32px]] [[File:Redstone Comparator (item) JE1 BE1.png|32px]] Added redstone comparators.
|Redstone comparators have 0 delay.
At this point, block ID 149 was used for unpowered comparators, and block ID 150 for powered comparators.}}
{{History|||snap=13w01b|A delay of 1 game tick ({{frac|1|2}} redstone tick) has now been added to redstone comparators to fix bugs.
|The ability to measure containers to redstone comparators has now been added.}}
{{History|||snap=13w02a|[[File:Redstone Comparator (S) JE2.png|32px]] [[File:Powered Redstone Comparator (S) JE2.png|32px]] [[File:Subtracting Redstone Comparator (S) JE2.png|32px]] [[File:Powered Subtracting Redstone Comparator (S) JE2.png|32px]] The appearance of redstone comparators has now been changed - the top texture has changed to show [[quartz]] in the middle and the sides now use the [[smooth stone]] texture rather than the smooth stone slab side texture.
|The algorithm for measuring containers has now been changed so that redstone comparators output a signal with as few as 1 [[item]] in the container.}}
{{History|||snap=13w02b|Redstone comparators now treat large [[chest]]s as a single container.}}
{{History|||snap=13w03a|Redstone comparators now output success count of [[command block]]s.
|Redstone comparators now measure container [[minecart]]s on [[detector rail]]s.}}
{{History|||snap=13w04a|Redstone comparators now measure [[jukebox]]es.}}
{{History|||snap=13w05a|Redstone comparators no longer cause constant [[block]] updates. The delay has now been made consistent, and side input no longer causes a pulse output.
|Block 150 (later <code>powered_comparator</code>) is no longer used; powered state is now represented by the 8s bit on block 149 (later <code>unpowered_comparator</code>).}}
{{History|||snap=13w05b|Redstone comparator delay has now been changed from 1 game tick (1/2 [[redstone]] tick) to 2 game ticks (1 redstone tick).}}
{{History|||snap=13w09c|The redstone signal strength from a redstone comparator next to a [[brewing stand]] with 3 [[water bottle]]s in it is now the same as one with 3 water bottles and 1 ingredient in it.}}
{{History||1.6.1|snap=13w18a|Redstone comparators now measure [[cauldron]]s and [[end portal frame]]s.}}
{{History||1.8|snap=14w04a|Redstone comparators now measure [[item frame]]s.}}
{{History|||snap=14w10a|The torches under redstone comparators have now been shortened, which has changed the underside appearance from [[File:Redstone Comparator UNKVER1 (facing NWU).png|32px]] [[File:Powered Redstone Comparator UNKVER1 (facing NWU).png|32px]] [[File:Subtracting Redstone Comparator UNKVER1 (facing NWU).png|32px]] [[File:Powered Subtracting Redstone Comparator UNKVER1 (facing NWU).png|32px]] to [[File:Redstone Comparator UNKVER2 (facing NWU).png|32px]].}}
{{History|||snap=14w25a|[[File:Redstone Comparator (S) JE3.png|32px]] [[File:Powered Redstone Comparator (S) JE3.png|32px]] [[File:Subtracting Redstone Comparator (S) JE3.png|32px]] [[File:Powered Subtracting Redstone Comparator (S) JE3.png|32px]] The torches on comparators are now subject to ambient occlusion.
|Comparators set to subtract mode appear to be powered as well regardless of incoming power. The subtracting-only model still exists and can be achieved through {{cmd|setblock}}.}}
{{History|||snap=14w25b|[[File:Subtracting Redstone Comparator (S) JE4.png|32px]] [[File:Powered Subtracting Redstone Comparator (S) JE4.png|32px]] The powered front torch when in subtraction mode is now lower.
|Comparators set to subtract by hand now appear normally again.}}
{{History|||snap=14w28a|Redstone comparators now measure [[cake]]s.}}
{{History||1.9|snap=15w42a|With the addition of the [[blaze powder]] fuel slot, [[brewing stand]]s now have 5 slots instead of 4. Their original comparative power values from redstone comparators are listed below:
{{{!}} class{{=}}"wikitable collapsible collapsed" data-description{{=}}"Original values"
! Original values
{{!}}-
{{!}}
*0: 0
*1: 1
*2: 19
*3: 37
*4: 55
*5: 1s 10
*6: 1s 28
*7: 1s 46
*8: 2s
*9: 2s 19
*10: 2s 37
*11: 2s 55
*12: 3s 10
*13: 3s 28
*14: 3s 46
*15: 4s
{{!}}}
}}
{{History|||snap=15w47a|Redstone comparators' side inputs now take power from [[redstone block]]s.}}
{{History||1.13|snap=17w47a|All 3 IDs for the redstone comparator have now been merged into one ID: <code>comparator</code>.
|Redstone comparators now render their underside, which has changed their undersides from [[File:Redstone Comparator UNKVER2 (facing NWU).png|32px]] to [[File:Redstone Comparator UNKVER3 (facing NWU).png|32px]].
|Prior to [[1.13/Flattening|''The Flattening'']], these blocks' numeral IDs were 149 and 150, and the [[item]]'s 404.
|As a result, the formerly unused comparator ID is now technically used again, due to both unpowered and powered versions being merged into a single comparator block ID.}}
{{History||1.14|snap=18w43a|[[File:Redstone Comparator (S) JE4.png|32px]] [[File:Powered Redstone Comparator (S) JE4.png|32px]] [[File:Subtracting Redstone Comparator (S) JE5.png|32px]] [[File:Powered Subtracting Redstone Comparator (S) JE5.png|32px]] [[File:Redstone Comparator (item) JE2 BE2.png|32px]] The textures of redstone comparators have now been changed.}}
{{History|||snap=19w02a|Redstone comparators now measure [[lectern]]s.}}
{{History|||snap=19w03a|Redstone comparators now measure [[composter]]s.}}
{{History|||snap=19w12b|Redstone comparators can now be placed on [[glass]], [[ice]], [[glowstone]] and [[sea lantern]]s.}}
{{History||1.15|snap=19w34a|Redstone comparators now measure how much honey is inside [[beehive|bee hive]]s and [[bee nest]]s.}}
{{History||1.16|snap=20w06a|The way to calculate the input signals of redstone comparators has now been changed.}}
{{History|||snap=20w11a|The changes to the way of calculating the input signals of redstone comparators from [[Java Edition 20w06a|20w06a]] have now been reverted.}}
{{History|||snap=20w16a|Redstone comparators now measure [[Pigstep music disc]]s in [[jukebox]]es.}}
{{History||1.17|snap=20w45a|Redstone comparators now measure [[lava cauldron]]s.}}
{{History|||snap=20w46a|Redstone comparators now measure [[Cauldron#Holding powder snow|powder snow cauldron]]s.}}
{{History||1.18|snap=21w41a|[[File:Powered Redstone Comparator (S) JE5.png|32px]] [[File:Powered Subtracting Redstone Comparator (S) JE6.png|32px]] The texture of powered redstone comparator have now been changed.}}
{{History||1.19|snap=22w13a|Redstone comparators now generate as part of [[ancient cities]].}}
{{History||1.20<br>(Experimental)|link=1.19.3|snap=22w42a|Redstone comparators now measure [[chiseled bookshelves]].}}
{{History||1.20.2|snap=23w33a|Redstone comparators now use stone sounds instead of wood sounds.<ref>{{bug|MC-182820|||Fixed}}</ref>}}
{{History|pocket alpha}}
{{History||v0.14.0|snap=build 1|[[File:Redstone Comparator (S) JE2 BE1.png|32px]] [[File:Powered Redstone Comparator (S) JE2 BE1.png|32px]] [[File:Subtracting Redstone Comparator (S) JE2 BE1.png|32px]] [[File:Powered Subtracting Redstone Comparator (S) JE2 BE1.png|32px]]{{verify|Was this the model used?}} [[File:Redstone Comparator (item) JE1 BE1.png|32px]] Added redstone comparators.}}
{{History|pocket}}
{{History||1.0.0|snap=alpha 0.17.0.1|Redstone comparators now measure [[end portal frame]]s.}}
{{History||1.0.5|snap=alpha 1.0.5.0|Redstone comparators now output success count of [[command block]]s.}}
{{History||1.1.0|snap=alpha 1.1.0.0|Redstone comparators now measure [[shulker box]]es.}}
{{History|bedrock}}
{{History||1.2.0|snap=beta 1.2.0.2|Redstone comparators now measure [[jukebox]]es.
|Redstone comparators now render their underside, which has changed their undersides from [[File:Redstone Comparator UNKVER1 (facing NWU).png|32px]] to [[File:Redstone Comparator UNKVER3 (facing NWU).png|32px]]}}
{{History||1.10.0|snap=beta 1.10.0.3|[[File:Redstone Comparator (S) BE.png|32px]] [[File:Powered Redstone Comparator (S) BE.png|32px]] [[File:Subtracting Redstone Comparator (S) BE.png|32px]] [[File:Powered Subtracting Redstone Comparator (S) BE.png|32px]] [[File:Redstone Comparator (item) JE2 BE2.png|32px]] The textures of redstone comparators have now been changed.}}
{{History||1.11.0|snap=beta 1.11.0.1|Redstone comparators now measure [[smoker]]s, [[blast furnace]]s, [[lectern]]s and [[composter]]s.}}
{{History||1.18.10|snap=beta 1.18.10.20|[[File:Powered Redstone Comparator (S) JE5.png|32px]] [[File:Powered Subtracting Redstone Comparator (S) JE6.png|32px]] The texture of powered redstone comparator have now been changed.}}
{{History||1.20.30|snap=beta 1.20.30.20|Redstone comparators now use the <code>minecraft:cardinal_direction</code> [[block state]] instead of <code>direction</code>.}}
{{History|console}}
{{History||xbox=TU19|xbone=CU7|ps=1.12|wiiu=Patch 1|switch=1.0.1|[[File:Redstone Comparator (S) JE2 BE1.png|32px]] [[File:Powered Redstone Comparator (S) JE2 BE1.png|32px]] [[File:Subtracting Redstone Comparator (S) JE2 BE1.png|32px]] [[File:Powered Subtracting Redstone Comparator (S) JE2 BE1.png|32px]]{{verify|Was this the model used?}} [[File:Redstone Comparator (item) JE1 BE1.png|32px]] Added redstone comparators.}}
{{History||xbox=TU31|xbone=CU19|ps=1.22|wiiu=Patch 3|switch=1.0.1|Redstone comparators can now measure [[item frame]]s.}}
{{History||xbox=none|xbone=none|ps=1.90|wiiu=none|switch=none|[[File:Redstone Comparator (S) BE.png|32px]] [[File:Powered Redstone Comparator (S) BE.png|32px]] [[File:Subtracting Redstone Comparator (S) BE.png|32px]] [[File:Powered Subtracting Redstone Comparator (S) BE.png|32px]]{{verify|Was this the model used?}} [[File:Redstone Comparator (item) JE2 BE2.png|32px]] The textures of redstone comparators have now been changed.}}
{{History|3ds}}
{{History||0.1.0|[[File:Redstone Comparator (S) JE2 BE1.png|32px]] [[File:Powered Redstone Comparator (S) JE2 BE1.png|32px]] [[File:Subtracting Redstone Comparator (S) JE2 BE1.png|32px]] [[File:Powered Subtracting Redstone Comparator (S) JE2 BE1.png|32px]]{{verify|Was this the model used?}} [[File:Redstone Comparator (item) JE2 BE2.png|32px]] Added redstone comparators.}}
{{History|foot}}
=== Redstone comparator "items" ===
{{:Technical blocks/Redstone Comparator}}
== Issues ==
{{issue list}}
== Trivia ==
* Comparators do not emit redstone particles when powered, unlike redstone torches and repeaters.<ref>{{bug|MC-51692|||WAI}}</ref>
== Gallery ==
<gallery>
Dinnerbone Comparator 1.png|Dinnerbone showing how comparators work.
Dinnerbone Comparator 2.png|Dinnerbone showing how comparators work.
Dinnerbone Comparator 3.png|Dinnerbone showing how comparators work.
Dinnerbone Comparators 1.png|A contraption incorporating comparators.
Dinnerbone Comparators 2.png|Comparators in action.
Dinnerbone Comparators 3.png|Output specific signals.
Dinnerbone Comparator Thing.png|Another comparator in use.
Item Frame Comparator.png|Rotating the torch in the item frame adjusts the comparator's output.
</gallery>
== References ==
{{reflist}}
{{Redstone}}
{{Blocks|Utility}}
{{Items}}
[[Category:Mechanics]]
[[Category:Block entities]]
[[Category:Redstone mechanics]]
[[Category:Mechanisms]]
[[Category:Manufactured blocks]]
[[Category:Non-solid blocks]]
[[de:Redstone-Komparator]]
[[es:Comparador de redstone]]
[[fr:Comparateur de redstone]]
[[hu:Redstone-komparátor]]
[[ja:レッドストーンコンパレーター]]
[[ko:레드스톤 비교기]]
[[nl:Redstonevergelijker]]
[[pl:Komparator]]
[[pt:Comparador de redstone]]
[[ru:Компаратор]]
[[uk:Редстоуновий компаратор]]
[[zh:红石比较器]]</li></ul></nowiki> | 16w32a | The block entity ID has been changed from Control to command_block. | |||
1.12{{Extension DPL}}<ul><li>[[Fishing Rod|Fishing Rod]]<br/>{{Dungeons hatnote|type=artifact}}
{{Item
| image = Fishing Rod.png
| image2 = Cast Fishing Rod.png
| rarity = Common
| renewable = Yes
| durability =
Depends on the Edition:
Java: 64
Bedrock: 384
| stackable = No
}}
A '''fishing rod''' is a [[tool]] that casts a bobber used to [[Fishing|fish]] in [[water]] or to hook and pull [[Mob|mobs]], [[Item (entity)|items]] and some [[Entity|entities]] towards the user.
== Obtaining ==
=== Crafting ===
{{Crafting
|head=1
|showname=0
|showdescription=1
|C1= Stick
|B2= Stick
|C2= String
|A3= Stick
|C3= String
|Output= Fishing Rod
|type= Tool
}}
{{crafting
|foot=1
|ignoreusage=1
|Damaged Fishing Rod
|Damaged Fishing Rod
|Output= Fishing Rod
|description= The durability of the two fishing rods is added together, plus an extra 5% durability.
|type= Tool
}}
=== Fishing ===
Enchanted fishing rods can be obtained as "treasure" [[item]]s from [[fishing]], and unenchanted ones as "junk" items.
=== Trading ===
Journeyman-level [[fisherman]] [[villager]]s sell enchanted fishing rods for 6 [[emerald]]s.
The [[enchantment]]s are the same as the ones obtained from an [[enchantment table]] at levels 5–19.
=== Chest loot ===
{{LootChestItem|enchanted-fishing-rod}}
{{notelist}}
=== Carrot/warped fungus on a stick ===
If a [[carrot on a stick]] or a [[warped fungus on a stick]] is used to the point of zero durability, it becomes a fishing rod again.
=== Mob loot ===
{{IN|java}}, the [[drowned]] mob has a 3.75% chance of spawning with a fishing rod equipped.
{{IN|bedrock}}, naturally-spawned drowned has 0.85% chance to spawn with fishing rod, while converted drowned has 1% chance to spawn with it.
If killed, they have an 8.5% chance of dropping this fishing rod. That chance increases by 1% for each level of Looting applied to a weapon (up to 11.5% chance). The dropped item is damaged and never enchanted.
== Usage ==
=== Fishing ===
{{main|Fishing}}
Fishing rods can be cast into water. After a short period of time, a stream of bubble particles approaches the fishing rod. If the rod is reeled in once the particles "bite" the bobber, the player obtains a fish, junk, or possibly a treasure item. If the fishing rod was in the player's hand and is no longer, the fishing bobber [[Entity|entity]] despawns, unless the fishing rod to the off-hand or it's been swapped with another fishing rod{{Cn|Cn=Research on the way fishing rods behave when you swap rod or have two equipped (one in the main and one in the off hand) needs to be done}}.
=== Crafting ingredient ===
{{crafting usage|Fishing Rod, Damaged Fishing Rod}}
=== Hooking mobs and other entities ===
{{see also|Fishing#Fishing rod durability}}
The fishing rod can be used to hook [[mobs]], [[Item (entity)|items]]{{only|java}} and some [[entities]], and even [[player]]s. The fishing rod can then be reeled in, dragging the hooked object toward the player without dealing damage. Reeling in a [[mob]] or entity costs 5 points of durability, and reeling in an item costs 3 points. Reeling a mob pulls it toward the player with a speed of {{frac|1|10}} the distance between mob and player.
Besides mobs and items, entities that can be reeled in include:
* {{ItemLink|id=oak boat|Boat}}s
* {{ItemLink|id=oak boat with chest|Boat with Chest}}s
* {{ItemSprite|Minecart}} [[Minecart]]s of any type
* {{ItemLink|Armor Stand}}s
* {{EntityLink|Shulker Bullet}}s
* {{EntityLink|Fireball}}s
* {{EntityLink|Small fireball}}s
* {{EntitySprite|TNT}} Primed [[TNT]]
* Any [[falling block]] such as {{EntityLink|Sand}}, {{EntityLink|Gravel}}, {{EntityLink|Dragon Egg}}s, {{EntityLink|Concrete Powder}}s, {{EntityLink|Scaffolding}}, [[Snow]] on [[Bedrock Edition]] or {{EntityLink|Anvil}}s
Some entities can be hooked, but cannot be reeled in:
* {{EntitySprite|Horse}} Mobs riding/being ridden by other mobs (in Bedrock Edition, the hooked mob dismounts)
* {{EntityLink|Painting}}s
* {{EntityLink|Item Frame}}s
* {{EntityLink|id=leash-knot|Lead}} knots
* {{EntityLink|End Crystal}}s
* {{EntityLink|Shulker}}s
Attempting to reel in said entities still costs durability to the rod.
The rest of the entities cannot be hooked at all:
* {{EntitySprite|egg}} Thrown [[egg]]s
* {{EntitySprite|snowball}} Thrown [[snowball]]s
* {{EntitySprite|ender-pearl}} Thrown [[ender pearl]]s
* {{EntitySprite|eye-of-ender}} Thrown [[eyes of ender]]
* {{ItemSprite|splash-potion}} Thrown [[potion]]s
* {{ItemSprite|bottle-o'-enchanting|附魔之瓶}} Thrown [[bottles o' enchanting]]
* {{EntitySprite|dragon-fireball}} [[Dragon fireball]]s
* {{EntitySprite|Wither Skull}} [[Wither#Wither Skull|Wither skull]]s
* {{ItemSprite|firework-rocket}} [[Firework rocket]]s in flight
* {{EntitySprite|arrow}} [[Arrow]]s in flight
* {{EffectSprite|particle-speed}} [[Lingering Potion#Area effect cloud|Area effect cloud]]
* {{EntityLink|id=experience-orb|Experience|XP orbs}}
Using it on a [[villager]] lowers the player's popularity and causes any naturally-spawned [[iron golem]]s nearby to attack.
=== Fuel ===
A fishing rod can be used as fuel in [[furnace]]s, smelting 1.5 items per fishing rod.
=== Other usage ===
The hook can also be used to activate wooden [[pressure plate]]s or [[weighted pressure plate]]s.
=== Enchantments ===
A fishing rod can receive the following enchantments:
{| class="wikitable col-2-center"
|+
!Name
!Max Level
![[Enchanting|Method]]
|-
|[[Lure]]<ref group="note">Lure levels above V don't work.</ref>
|III
|{{Inventory slot|Enchanting Table}}{{Inventory slot|Anvil}}
|-
|[[Luck of the Sea]]
|III
|{{Inventory slot|Enchanting Table}}{{Inventory slot|Anvil}}
|-
|[[Unbreaking]]
|III
|{{Inventory slot|Enchanting Table}}{{Inventory slot|Anvil}}
|-
|[[Mending]]
|I
|{{Inventory slot|Anvil}}
|-
|[[Curse of Vanishing]]
|I
|{{Inventory slot|Anvil}}
|}
{{Notelist|note}}
A fishing rod with the [[Mending]] enchantment has infinite durability if used for fishing only. The rod incrementally repairs itself using the experience gained each time a player reels in a fish, even if starting from nearly 0% durability. Players wearing damaged [[Mending]] armor have a lower average rate of repair, because the mending mechanic can ignore damage to the rod while repairing armor instead. [[Unbreaking]] III can nearly guarantee that the rod does not break, unless it's already at low durability.
== Fishing Bobber ==
{{Entity
| title = Fishing Bobber
| image2 = Fishing Bobber BE.png
| imagesize = 100px
| image = Fishing Bobber JE1.png
| networkid = '''[[JE]]:''' 90
}}
{{see also|Entity format}}
'''Fishing bobbers''' have entity data associated with them that contain various properties of the entity. They also appear to despawn after a while.
=== Data values ===
==== ID ====
{{edition|java}}:
{{ID table
|generatetranslationkeys=java
|displayname=Fishing Bobber
|spritetype=entity
|nameid=fishing_bobber
|foot=1}}
{{edition|bedrock}}:
{{ID table
|shownumericids=y
|generatetranslationkeys=bedrock
|displayname=Fishing Bobber
|spritetype=entity
|nameid=fishing_hook
|id=77
|foot=1}}
==== Entity data ====
{{el|java}}:
{{main|Entity format}}
{{/ED}}
{{el|bedrock}}:
: See [[Bedrock Edition level format/Entity format]].
== Sounds ==
{{Edition|Java}}:<br>
Fishing bobbers use the Friendly Creatures sound category for entity-dependent sound events.<ref group="sound" name="oddcats" />
{{Sound table
|sound=Fishing rod cast.ogg
|subtitle=Bobber thrown
|source=Friendly Creatures <ref group="sound" name="oddcats">{{bug|MC-139041||The sounds of fishing bobbers aren't controlled by the "Players" sound slider}}</ref>
|overridesource=1
|description=When a fishing rod is cast
|id=entity.fishing_bobber.throw
|translationkey=subtitles.entity.fishing_bobber.throw
|volume=0.5
|pitch={{frac|1|3}}-0.5
|distance=16}}
{{Sound table
|sound=Fishing rod reel in1.ogg
|sound2=Fishing rod reel in2.ogg
|subtitle=Bobber retrieved
|source=Friendly Creatures <ref group="sound" name="oddcats"/>
|overridesource=1
|description=When a fishing rod is reeled in
|id=entity.fishing_bobber.retrieve
|translationkey=subtitles.entity.fishing_bobber.retrieve
|volume=1.0
|pitch=0.8-1.2
|distance=16}}
{{Sound table
|sound=Water Splash Old.ogg
|subtitle=Fishing Bobber splashes
|description=When a fishing bobber is bitten by something
|source=Friendly Creatures <ref group="sound" name="oddcats"/>
|overridesource=1
|id=entity.fishing_bobber.splash
|translationkey=subtitles.entity.fishing_bobber.splash
|volume=0.25
|pitch=0.6-1.4
|distance=16}}
{{Sound table
|sound=Random break.ogg
|subtitle=Item breaks
|source=player
|description=When a fishing rod's durability is exhausted
|id=entity.item.break
|translationkey=subtitles.entity.item.break
|volume=0.8
|pitch=0.8-1.2
|distance=16
|foot=1}}
{{Edition|Bedrock}}:
{{Sound table
|type=bedrock
|sound=Bow shoot.ogg
|source=player
|description=When a fishing rod is cast
|id=random.bow
|volume=0.5
|pitch=0.33-0.5}}
<!--There is no reel in sound on Bedrock Edition, it seems.-->
{{Sound table
|sound=Water Splash Old.ogg
|source=player
|description=When a fishing bobber is bitten by something
|id=random.splash
|volume=1.0
|pitch=0.6-1.4}}
{{Sound table
|sound=Random break.ogg
|source=player
|description=When a fishing rod's durability is exhausted
|id=random.break
|volume=1.0
|pitch=0.9
|foot=1}}
== Data values ==
=== ID ===
{{edition|java}}:
{{ID table
|edition=java
|showforms=y
|generatetranslationkeys=y
|displayname=Fishing Rod
|spritetype=item
|nameid=fishing_rod
|form=item
|foot=1}}
{{edition|bedrock}}:
{{ID table
|edition=bedrock
|shownumericids=y
|showforms=y
|notshowbeitemforms=y
|generatetranslationkeys=y
|displayname=Fishing Rod
|spritetype=item
|nameid=fishing_rod
|id=392
|form=item
|foot=1}}
== Achievements==
{{load achievements|Cow Tipper}}<!--This is due to the fact that leather can be obtained via fishing, which grants the achievement.-->
== Advancements ==
{{load advancements|Fishy Business}}
== History ==
{{more sounds|section=24|type=old|Old throwing sound (pre-Sound Update), which was used for fishing rods}}
{{History|java alpha}}
{{History||v1.1.1|[[File:Fishing Rod JE1 BE1.png|32px]] Added fishing rods.
|Fishing rods currently have no function.
|Fishing rods are stackable.}}
{{History||v1.2.0|snap=<nowiki>?|slink=:Category:Information needed requiring unarchived version|Fishing rods have been updated to be able to [[fishing|catch fish]] from any body of [[water]].
|[[File:Stick JE1 BE1.png|32px]] Cast fishing rods use the [[stick]] texture in first and third person, and do not appear cast in the hotbar.}}
{{History||v1.2.2|Fishing rods now work in [[multiplayer]]. Previously, fishing rods could be used in multiplayer, but would produce fake client-side fish that could not be picked up.
|Fishing rods in multiplayer repeat the cast sound when reeling in, do not render the line, and do not switch textures when cast.}}
{{History|java beta}}
{{History||1.6|snap=Test Build 3|Fishing rods are now no longer stackable, stacking rods would allow the player to change the damage values of any rods stacked to the first rod. This could be exploited to have fishing rods that lasted forever.
|[[File:Cast Fishing Rod JE2 BE1.png|32px]] In first person, cast fishing rods now use a texture without the line to show that it is no longer on the rod. The stick texture is still used in third person, however.}}
{{History||Sound Update|The fishing rod cast [[sound]] has been changed.}}
{{History|java}}
{{History||1.3.1|snap=12w17a|Fishing rods now have infinite [[durability]] in [[Creative]] mode.}}
{{History|||snap=12w18a|Fishing rods in multiplayer no longer repeat the cast sound when reeling in, now properly render the line, and now switch textures when cast.}}
{{History||1.4.2|snap=12w36a|Added [[carrot on a stick]], which can be [[crafting|crafted]] using a fishing rod and a [[carrot]].}}
{{History|||snap=12w37a|Fishing now give the [[player]] [[experience]] with each [[fish]] caught.}}
{{History||1.4.6|snap=12w49a|Fishing rods can now be [[enchanting|enchanted]] with [[Unbreaking]] using [[enchanted book]]s.}}
{{History||1.7.2|snap=13w36a|Fishing rods now have 2 new [[enchanting|enchantments]]: [[Lure]] and [[Luck of the Sea]].
|Fishing rods can now be [[enchanted]] in an [[enchantment table]].
|Enchanted fishing rods can now be obtained as a "treasure" item from [[fishing]], and unenchanted ones as a "junk" item.}}
{{History||1.8|snap=14w02a|Fisherman [[villager]]s now [[trading|sell]] enchanted fishing rods for 7–8 [[emerald]]s.}}
{{History|||snap=14w33b|Cast fishing rods now use the cast texture in third person, rather than the stick texture.}}
{{History||1.9|snap=15w31a|Cast fishing rods now look cast in the [[hotbar]] and [[inventory]].}}
{{History|||snap=15w32a|Fishing rods no longer [[damage]] the [[ender dragon]].}}
{{History|||snap=15w36a|Fishing rods now properly hook [[entity|entities]].
|Reeling in while hooked to a non-item entity now costs 5 [[durability]] (was 3) to the fishing rod.}}
{{History||1.10|snap=16w21a|Fishing rods now hook [[item (entity)|item]]s, which costs 3 durability.}}
{{History||1.11|snap=16w33a|Fishing rods can now be used to fuel [[furnace]]s.}}
{{History||1.12|snap=17w13a|The [[sound]] of the bobbers of fishing rods being thrown has been changed.}}
{{History|||snap=17w16a|Added sounds for reeling in fishing bobbers.}}
{{History||1.13|snap=17w47a|Prior to [[1.13/Flattening|''The Flattening'']], this [[item]]'s numeral ID was 346.}}
{{History|||snap=17w50a|[[Crafting]] a [[carrot on a stick]] no longer requires the fishing rod to be at full [[durability]].<ref>[https://bugs.mojang.com/browse/MC-123196 MC-123196 resolved as "Works as Intended"]</ref>}}
{{History|||snap=18w02a|The bobber of fishing rods now has its own [[entity]] ID: <code>fishing_bobber</code>, although summoning the bobber alone is still not possible.}}
{{History|||snap=18w09a|[[Enchanting|Enchanted]] fishing rods now generate in the [[chest]]s of [[underwater ruins]].}}
{{History|||snap=18w11a|Added [[drowned]], which have a chance to spawn [[drops|drop]] fishing rods upon [[death]].}}
{{History|||snap=18w14a|Catching a [[fish]] with the fishing rod now grants the "Fishy Business" [[advancement]].}}
{{History|||snap=?|Fishing rods no longer display as unknown when called by a target selector.}}
{{History||1.14|snap=18w43a|[[File:Fishing Rod JE2 BE2.png|32px]] [[File:Cast Fishing Rod JE3 BE2.png|32px]] The textures of fishing rods have been changed.}}
{{History||1.16|snap=20w13a|Fishing rod is now used to craft [[warped fungus on a stick]].}}
{{History|||snap=20w14a|The bobber of fishing rods is now considered a projectile and can ignite (if on [[fire]]) [[TNT]], activate [[target]]s and ring [[bell]]s.}}
{{History|upcoming java}}
{{History||Villager Trade Rebalance<br>(Experimental)|link=Java Edition 1.20.2|snap=23w31a|Enchantments exclusive to fishing rods are no longer obtainable from villager [[trading]].}}
{{History|pocket alpha}}
{{History||v0.11.0|snap=build 1|[[File:Fishing Rod JE1 BE1.png|32px]] [[File:Cast Fishing Rod JE2 BE1.png|32px]] Added fishing rods.}}
{{History|||snap=build 8|If an [[entity]] is mounted on another entity, reeling it in with a fishing rod now pulls it off its ride.}}
{{History|||snap=build 11|Fishing rods are now functional in [[third person view]].}}
{{History||v0.12.1|snap=build 12|Fishing rods now make a less repetitive [[sound]].
|Fishing rods now grant [[experience]] when successful.
|Fishing rods can now be [[enchanting|enchanted]].
|Enchanted fishing rods can now be found as "treasure" from [[fishing]].}}
{{History||v0.15.0|snap=build 1|Fishing rods are now used to craft [[carrot on a stick]].}}
{{History|pocket}}
{{History||1.0.4|snap=alpha 1.0.4.0|Fisherman [[villager]]s now [[trading|sell]] enchanted fishing rods.}}
{{History||1.1.0|snap=alpha 1.1.0.0|The [[entity]] ID of fishing rods has been changed from <code>fishinghook</code> to <code>fishing_hook</code>.}}
{{History|bedrock}}
{{History||1.4.0|snap=beta 1.2.13.8|Added [[drowned]], which can spawn with and [[drops|drop]] fishing rods.}}
{{History|||snap=beta 1.2.20.1|Fishing rods and [[enchanting|enchanted]] fishing rods can now be found in [[underwater ruins]].}}
{{History||1.10.0|snap=beta 1.10.0.3|[[File:Fishing Rod JE2 BE2.png|32px]] [[File:Cast Fishing Rod JE3 BE2.png|32px]] The textures of fishing rods have been changed.}}
{{History||1.11.0|snap=beta 1.11.0.4|Fisherman [[villager]]s now [[trading|sell]] enchanted fishing rods for 6 [[emerald]]s as part of their third tier [[trading|trade]].}}
{{History|console}}
{{History||xbox=TU1|xbone=CU1|ps=1.0|wiiu=Patch 1|switch=1.0.1|[[File:Fishing Rod JE1 BE1.png|32px]] Added fishing rods.
|As a result of Legacy Console Edition using an internal server, fishing rods repeat the cast sound when reeling in, do not render the line, and do not switch textures when cast.}}
{{History||xbox=TU7|[[File:Cast Fishing Rod JE2 BE1.png|32px]] [[File:Stick JE1 BE1.png|32px]] Fishing rods no longer repeat the cast sound when reeling in, now properly render the line, and now switch textures when cast.
|The cast fishing rod texture appears in first person, while the stick texture is used instead in third person.}}
{{History||xbox=TU27|xbone=CU15|ps=1.18|Cast fishing rods now use the cast texture in third person, rather than the stick texture.}}
{{History||xbox=TU46|xbone=CU36|ps=1.38|wiiu=Patch 15|switch=none|Fishing rods now hook [[item (entity)|item]]s, which costs 3 durability.}}
{{History||xbox=TU53|xbone=CU43|ps=1.49|wiiu=Patch 23|switch=1.0.3|The [[sound]] of the bobbers of fishing rods being thrown has been changed.|Added sounds for reeling in fishing bobbers.}}
{{History||xbox=TU69|xbone=none|ps=1.76|wiiu=Patch 38|switch=none|[[Enchanting|Enchanted]] fishing rods now generate in the [[chest]]s of [[underwater ruins]].
|Added [[drowned]], which have a chance to spawn [[drops|drop]] fishing rods upon [[death]].}}
{{History||xbox=none|xbone=none|ps=1.90|wiiu=none|switch=none|[[File:Fishing Rod JE2 BE2.png|32px]] [[File:Cast Fishing Rod JE3 BE2.png|32px]] The textures of fishing rods have been changed.}}
{{History|new 3ds}}
{{History||0.1.0|[[File:Fishing Rod JE1 BE1.png|32px]] [[File:Cast Fishing Rod JE2 BE1.png|32px]] Added fishing rods.}}
{{History|foot}}
== Issues ==
{{issue list}}
== Trivia ==
*The maximum distance the [[player]] can get between the bobber and themselves is 33 blocks.
*[[Skeleton]]s can be pulled into their own [[arrow]]s.
*When casting the rod into a [[portal]], the bobber may stick to it like a normal [[block]], go through and travel in [[the Nether]], or stop on the next block behind the portal.
*If the player stands directly in front of a column and casts the line onto a block above the player, the line falls downward.
*If the bobber hits a [[painting]], the painting breaks.
*The player can get into [[bed]] after casting a line, and the line remains in the water until the player wakes up and reels it in.
== Gallery ==
<gallery>
13w36a banner.png|[[13w36a]] snapshot banner.
Bobber and bubbles.png|Trail of bubbles indicating that a [[fish]] is about to bite.
Bobber2D.png|Two-dimensional bobber {{in|je}}.
Bobber3D.png|Three-dimensional bobber {{in|be}}.
Enderman Fishing.png|Bobbers can be attached to [[mobs]], like this [[enderman]].
Drowned with Fishing rod.png|A [[drowned]] holding a fishing rod.
Firebobber.png|A bobber cast in fire.
Fishingbobber.png|Fishing in 2010.
Fishing Rod Hooking Teaser.png|Image from [[dinnerbone]] teasing the addition of fishing rods hooking entities.
File:Sunny Fishing.jpg|[[Sunny]] reeling back a fishing rod.
File:Croc Ad 1.jpg|[[Noor]] catching a [[salmon]].<ref> https://www.youtube.com/shorts/e1AJo7jU5MI</ref>
Enchanted Fishing Rod.gif|An enchanted fishing rod.
Fishing Rod SDGP.png|Fishing rod in the [[Super Duper Graphics Pack]].
</gallery>
== References ==
{{Reflist}}
{{Items}}
{{entities}}
[[Category:Renewable resources]]
[[cs:Rybářský prut]]
[[de:Angel]]
[[es:Caña de pescar]]
[[fr:Canne à pêche]]
[[hu:Horgászbot]]
[[it:Canna da pesca]]
[[ja:釣竿]]
[[ko:낚싯대]]
[[nl:Vishengel]]
[[pl:Wędka]]
[[pt:Vara de pesca]]
[[ru:Удочка]]
[[uk:Вудка]]
[[zh:钓鱼竿]]</li><li>[[Snowball|Snowball]]<br/>{{about|the throwable item|the enchantment in ''Minecraft Dungeons''|MCD:Snowball}}
{{ItemEntity
|image=Snowball.png
|renewable=Yes
|stackable=Yes (16)<br>
Yes (64){{upcoming|java Combat Tests}}
|size=Height: 0.25 Blocks<br>Width: 0.25 Blocks
}}
'''Snowballs''' are throwable combat items that hit but do not damage most [[Mob|mobs]] on impact.
== Obtaining ==
{{see also|Tutorials/Snow farming}}
=== Mining ===
A [[shovel]] without the [[Silk Touch]] enchantment can get 4 snowballs by breaking a [[snow block]], and 1–8 snowballs by breaking or blasting [[snow layer]]s – one per layer. The [[Fortune]] enchantment does not affect these amounts.
{{IN|bedrock}}, snowballs are dropped from snow layers even when mined with a Silk Touch shovel.<ref>{{bug|MCPE-59729||Snow layers don't drop themselves when mined with a silk touch enchanted shovel}}</ref>
==== Explosions ====
Creeper and TNT [[explosion]]s leave snowballs in the resulting debris field if near snow.
==== Ravagers ====
{{IN|BE}}, Ravagers destroy snow layers, dropping snowballs.
==== Pistons ====
{{IN|BE}}, a block or piston head pushed into the position of snow layers destroys the snow layers, dropping snowballs. 1-3 layers drops 1 snowball, 4-5 layers drops 2 snowballs, 6-7 layers drops 3 snowballs and 8 layers drops 4 snowballs.
=== Mob loot ===
[[Snow golem]]s drop 0–15 snowballs upon death, unaffected by [[Looting]].
=== Chest loot ===
{{LootChestItem|snowball}}
== Usage ==
=== Crafting ingredient ===
{{crafting usage}}
=== Combat ===
[[File:Throwing a snowball on a pig.gif|300px|thumbnail|right|Throwing a snowball on a pig animation.]]
Snowballs can be thrown by {{control|using}} them. There is no charging time or cooldown for firing them,{{Until|java Combat Tests}} meaning they can be thrown as fast as the player can click.
Like other projectiles, snowballs are affected by gravity: their range is the same as those of [[egg]]s and [[ender pearl]]s, less than that of [[arrow]]s fired from [[bow]]s, and more than that of [[splash potion]]s. In [[Bedrock Edition]], players will receive damage and will be knockbacked.
Snowballs deal {{hp|3}} each to [[blaze]]s but they deal no damage to other mobs. Mobs still receive knockback and act the same as if they were being damaged (for example, [[zombified piglin]]s who are hit by snowballs become aggressive). Players {{in|BE}} receive knockback, while players {{in|JE}} are unaffected.<ref>{{bug|MC-3179|||WAI}}</ref>{{Until|java Combat Tests}}
When fighting the [[ender dragon]], [[end crystal]]s are able to be destroyed by snowballs being thrown at them.
Snowball, like other projectiles, can be used to distract the [[warden]]. A warden walks towards the location where the snowball lands to inspect it, giving the player time to escape. However, if snowballs are fired too frequently (at least twice in 5 seconds), the warden walks straight to the player instead.
In the new versions they can hit players but just only in bedrock
=== Dispenser ===
Snowballs can be fired from [[dispenser]]s.
== Sounds ==
{{Edition|Java}}:<br>
Thrown snowballs use the Friendly Creatures sound category for entity-dependent sound events.
{{Sound table
|rowspan=3
|sound=Bow shoot.ogg
|subtitle=Snowball flies
|source=neutral
|description=When a player throws a snowball
|id=entity.snowball.throw
|translationkey=subtitles.entity.snowball.throw
|volume=0.5
|pitch={{frac|1|3}}-0.5
|distance=16}}
{{Sound table
|subtitle=Snowball flies
|source=neutral
|description=When a snow golem shoots a snowball
|id=entity.snow_golem.shoot
|translationkey=subtitles.entity.snowball.throw
|volume=1.0
|pitch={{frac|1|3}}-0.5
|distance=16}}
{{Sound table
|subtitle=Dispensed item
|source=block
|description=When a dispenser shoots a snowball
|id=block.dispenser.launch
|translationkey=subtitles.block.dispenser.dispense
|volume=1.0
|pitch=1.2
|distance=16
|foot=1}}
{{Edition|Bedrock}}:
{{Sound table
|type=bedrock
|rowspan=3
|sound=Bow shoot.ogg
|source=player
|description=When a player throws a snowball
|id=random.bow
|volume=0.5
|pitch=0.33-0.5}}
{{Sound table
|source=neutral
|description=When a snow golem shoots a snowball
|id=mob.snowgolem.shoot
|volume=1.0
|pitch=0.8-1.2}}
{{Sound table
|source=player
|description=When a dispenser shoots a snowball
|id=random.bow
|volume=1.0
|pitch=0.83-1.25
|foot=1}}
== Data values ==
=== ID ===
{{edition|java}}:
{{ID table
|edition=java
|firstcolumnname=Item
|showforms=y
|generatetranslationkeys=y
|displayname=Snowball
|spritetype=item
|nameid=snowball
|form=item
|foot=1}}
{{ID table
|edition=java
|firstcolumnname=Entity
|showentitytags=y
|generatetranslationkeys=y
|displayname=Snowball
|spritetype=entity
|nameid=snowball
|entitytags=impact_projectiles
|foot=1}}
{{edition|bedrock}}:
{{ID table
|edition=bedrock
|firstcolumnname=Item
|shownumericids=y
|showforms=y
|notshowbeitemforms=y
|generatetranslationkeys=y
|displayname=Snowball
|spritetype=item
|nameid=snowball
|id=374
|form=item
|foot=1}}
{{ID table
|edition=bedrock
|firstcolumnname=Entity
|shownumericids=y
|generatetranslationkeys=y
|displayname=Snowball
|spritetype=entity
|nameid=snowball
|id=81
|foot=1}}
=== Entity Data ===
Snowballs have entity data that define various properties of the entity.
{{el|java}}:
{{main|Entity format}}
{{/ED}}
{{el|bedrock}}:
: See [[Bedrock Edition level format/Entity format]].
== Advancements ==
{{Load advancements|Bullseye}}
== Video ==
<div style="text-align:center">{{yt|2E-c9P8kyfg}}</div>
==History==
{{History|java alpha}}
{{History||v1.0.5|[[File:Snowball JE1 BE1.png|32px]] Added snowballs.
|Snowballs are used to craft [[snow block]]s.
|Snowballs could stack up to 64.}}
{{History||v1.0.5_01|Snowballs now stack to 8.
|Added a new snowball [[sound]] effect.
|Harvesting snowballs now requires a [[shovel]].}}
{{History||v1.0.6|Snowballs now stack up to 16.
|Thrown snowballs no longer disappear.}}
{{History||v1.1.1|It is no longer possible to obtain more than four snowballs from a solid [[snow block]] (the [[player]] was previously able to obtain 4-6 snowballs per snow block allowing an infinite number of snowballs to be made).}}
{{History||v1.2.0|snap=preview|[[Fireball]]s use the same texture as the snowball.}}
{{History|java beta}}
{{History||1.2|Snowballs can now be fired by [[dispenser]]s.}}
{{History|java}}
{{History||1.0.0|snap=Beta 1.9 Prerelease|[[Fireball]]s no longer use the snowball texture.}}
{{History|||snap=RC1|Snowball throwing sound was changed.}}
{{History||1.9|snap=15w32a|Snowballs no longer damage the [[ender dragon]].}}
{{History|||snap=15w36b|Snowballs now produce particles when thrown at an entity.}}
{{History|||snap=15w49a|Snowballs, as well as all projectiles, now take the thrower's motion into account when fired.}}
{{History||1.11|snap=16w32a|The entity ID has been changed from <code>Snowball</code> to <code>snowball</code>.}}
{{History||1.13|snap=17w47a|Prior to [[1.13/Flattening|''The Flattening'']], this [[item]]'s numeral ID was 332.}}
{{History||1.14|snap=18w43a|[[File:Snowball JE2 BE2.png|32px]] The texture of snowballs has been changed.}}
{{History|||snap=18w49a|Snowballs can now be found in [[chest]]s in [[snowy tundra]] [[village]] houses.}}
{{History|||snap=19w08a|[[File:Snowball JE3 BE3.png|32px]] The texture of snowballs has been changed, once again.}}
{{History||1.16.2|snap=Pre-Release 1|Snowballs are now affected by [[bubble column]]s.}}
{{History||1.19|snap=Deep Dark Experimental Snapshot 1|Snowballs now generate in [[ancient city]] chests.}}
{{History|upcoming java}}
{{History||Combat Tests|snap=Combat Test 4|Snowballs now stack to 64, once again.
|Snowballs now have 4-tick cooldown and are not rendered for the first 2 ticks to prevent screen flickering.}}
{{History|pocket alpha}}
{{History||v0.2.0|[[File:Snowball JE1 BE1.png|32px]] Added snowballs. They are currently unobtainable and serve no purpose.}}
{{History||v0.3.0|Snowballs now drop as an item when mining [[snow block]]s and [[snow layer]]s.
|Snowballs can be used to craft [[snow block]]s.}}
{{History||v0.4.0|Snowballs can now be thrown.}}
{{History||v0.11.0|snap=build 14|Snowballs are now available in the [[creative]] inventory.}}
{{History||v0.12.0|Snowballs now deal [[damage]] to [[blaze]]s.}}
{{History||v0.12.1|snap=build 1|Added [[snow golem]]s, which [[drops|drop]] snowballs.}}
{{History|bedrock}}
{{History||1.2.0|Snowballs now deal knockback to [[player]]s.}}
{{History||1.10.0|snap=beta 1.10.0.3|[[File:Snowball JE2 BE2.png|32px]] The texture of snowballs has been changed.}}
{{History||1.11.0|snap=beta 1.11.0.1|Snowballs can now be found in some [[snowy tundra]] [[village]] house [[chest]]s.}}
{{History|||snap=beta 1.11.0.5|[[File:Snowball JE3 BE3.png|32px]] The texture of snowballs has been changed, once again.}}
{{History|console}}
{{History||xbox=TU1|xbone=CU1|ps=1.0|switch=1.0.1|wiiu=Patch 1|[[File:Snowball JE1 BE1.png|32px]] Added snowballs.}}
{{History||xbox=none|xbone=none|ps=1.90|switch=none|wiiu=none|[[File:Snowball JE3 BE3.png|32px]] The texture of snowballs has been changed.}}
{{History|3DS}}
{{History||0.1.0|[[File:Snowball JE1 BE1.png|32px]] Added snowballs.}}
{{History|foot}}
== Issues ==
{{issue list}}
== Trivia ==
* A thrown snowball faces the player in the first-person view, while it appears horizontally rotated in third-person view. This is the case for all throwable items ([[ender pearl]]s, [[egg]]s, snowballs, and all throwable [[potion]]s).
== References ==
{{reflist}}
== External Links ==
*[https://www.minecraft.net/en-us/article/taking-inventory--snowball Taking Inventory: Snowball] – Minecraft.net on August 3, 2019
{{Items}}
{{entities}}
[[Category:Combat]]
[[cs:Sněhová koule]]
[[de:Schneeball]]
[[es:Bola de nieve]]
[[fr:Boule de neige]]
[[hu:Hógolyó]]
[[ja:雪玉]]
[[ko:눈덩이]]
[[nl:Sneeuwbal]]
[[pl:Śnieżka]]
[[pt:Bola de neve]]
[[ru:Снежок]]
[[th:บอลหิมะ]]
[[uk:Сніжок]]
[[zh:雪球]]</li></ul></nowiki> | 17w16a | Chains of command blocks no longer schedule their commands to be run in the next tick. Instead, they now execute all in the same tick they are read. This allows later blocks in a chain to be modified via earlier blocks, allowing techniques like branching and looping, all in the same tick. | |||
| 17w16b | Added the game rule maxCommandChainLength to control the max length of a command block chain. | ||||
| 17w17a | Added UpdateLastExecution and LastExecution NBT tags, which control the tracking of which tick a chain command block was last executed in. | ||||
| pre6 | Tab-completing command names in command blocks no longer add a / prefix. | ||||
1.13{{Extension DPL}}<ul><li>[[:Category:Minecraft Dungeons items|Category:Minecraft Dungeons items]]<br/>All items that are in ''[[Minecraft Dungeons]]''.
{{Minecraft Dungeons items}}
[[Category:Minecraft Dungeons]]
[[Category:Items]]
[[ja:カテゴリ:アイテム (Minecraft Dungeons)]]
[[pl:Kategoria:Przedmioty w Minecraft Dungeons]]
[[pt:Categoria:Itens do Minecraft Dungeons]]</li><li>[[Melon Seeds|Melon Seeds]]<br/>{{Block
|image = <gallery>
Melon Stem Age 0.png | Age 0
Melon Stem Age 1.png | Age 1
Melon Stem Age 2.png | Age 2
Melon Stem Age 3.png | Age 3
Melon Stem Age 4.png | Age 4
Melon Stem Age 5.png | Age 5
Melon Stem Age 6.png | Age 6
Melon Stem Age 7.png | Age 7
</gallery>
| image2 = <gallery>
Attached Melon Stem (N).png | North
Attached Melon Stem (E).png | East
Attached Melon Stem (S).png | South
Attached Melon Stem (W).png | West
</gallery>
| transparent = Yes
| light = No
| tool = none
| renewable = Yes
| stackable = Yes (64)
| flammable = No
| lavasusceptible = No
}}'''Melon seeds''' are items obtained from [[Melon Slice|melon slices]] that can be used to grow melon stems.
'''Melon stems''' are plants grown on [[farmland]] that, over time, grow [[melon]]s on dirt, mud and moss blocks adjacent to them.
== Obtaining ==
=== Breaking ===
When broken, a melon stem drops 0–3 melon seeds. The chance for melon seeds to drop increases with the stem's age.
{| class="wikitable"
! rowspan="3" |[[Resource location]]
! rowspan="3" | Source
! colspan="4" | Default
|-
| colspan="1" rowspan="2" style="text-align:center" | Nothing || colspan="3" style="text-align:center" |{{ItemLink|Melon Seeds|Melon seeds}}
|-
| style="text-align:center" | 1 || style="text-align:center" | 2 || style="text-align:center" | 3
|-
| rowspan="8" |<code>blocks/melon_stem</code>
|{{BlockLink|Melon Stem|Melon stem}} <code>age = 0</code>
| style="text-align:center" |81.3%|| style="text-align:center" |17.42%|| style="text-align:center" |1.24%|| style="text-align:center" |0.03%
|-
|{{BlockLink|Melon Stem|Melon stem}} <code>age = 1</code>
| style="text-align:center" |65.1%|| style="text-align:center" |30.04%|| style="text-align:center" |4.62%|| style="text-align:center" |0.24%
|-
|{{BlockLink|Melon Stem|Melon stem}} <code>age = 2</code>
| style="text-align:center" |51.2%|| style="text-align:center" |38.4%|| style="text-align:center" |9.6%|| style="text-align:center" |0.8%
|-
|{{BlockLink|Melon Stem|Melon stem}} <code>age = 3</code>
| style="text-align:center" |39.44%|| style="text-align:center" |43.02%|| style="text-align:center" |15.64%|| style="text-align:center" |1.9%
|-
|{{BlockLink|Melon Stem|Melon stem}} <code>age = 4</code>
| style="text-align:center" |29.13%|| style="text-align:center" |44.44%|| style="text-align:center" |22.22%|| style="text-align:center" |3.7%
|-
|{{BlockLink|Melon Stem|Melon stem}} <code>age = 5</code>
| style="text-align:center" |21.6%|| style="text-align:center" |43.2%|| style="text-align:center" |28.8%|| style="text-align:center" |6.4%
|-
|{{BlockLink|Melon Stem|Melon stem}} <code>age = 6</code>
| style="text-align:center" |15.17%|| style="text-align:center" |39.82%|| style="text-align:center" |34.84%|| style="text-align:center" |10.16%
|-
|{{BlockLink|Melon Stem|Melon stem}} <code>age = 7</code>
| style="text-align:center" |10.16%|| style="text-align:center" |34.84%|| style="text-align:center" |39.82%|| style="text-align:center" |15.17%
|-
| rowspan="1" |<code>blocks/attached_melon_stem</code>
|{{BlockLink|Attached Melon Stem|Attached Melon stem}}
| style="text-align:center" |10.16%|| style="text-align:center" |34.84%|| style="text-align:center" |39.82%|| style="text-align:center" |15.17%
|}
=== Natural generation ===
Melon stems generate naturally in stem farm inside [[woodland mansion]]s.
Melon stems generate in 20% of the farm plots in [[savanna]] [[village]]s, and 10% of the farm plots in [[desert]] villages.
=== Chest loot ===
{{LootChestItem|melon-seeds}}
=== Crafting ===
{{Crafting
|Melon Slice
|Output= Melon Seeds
|type= Material
}}
=== Trading ===
[[Wandering trader]]s sell melon seeds for 1 [[emerald]].
== Usage ==
=== Farming ===
{{see also|Tutorials/Pumpkin and melon farming}}
Melon seeds can be planted only on [[farmland]], as stems. Over time, a stem grows through several stages<sup>[''[[Talk:Pumpkin Seeds|needs testing]]'']</sup> and, at its final growth stage, will produce [[melon]]s on any adjacent [[dirt]], [[Coarse Dirt|coarse dirt]], [[Rooted Dirt|rooted dirt]], [[Grass Block|grass block]], [[farmland]], [[podzol]], [[mycelium]], [[Moss Block|moss block]], [[mud]] or [[Muddy Mangrove Roots|muddy mangrove roots]]. If a melon is already occupying a spot adjacent to a stem it does not grow more melons until the melons is removed. A single stem can grow an unlimited number of melons. Melon stems need a minimum light level of 10 in the block above the stem to grow and give melons. Melon seeds are affected by [[bone meal]] only with respect to stem growth; bone meal does not help produce the actual melons.
=== Breeding ===
Like other seeds, melon seeds can be used to [[breed]] [[chicken]]s, lead chickens around, and make baby chickens grow up faster by 10% of the remaining time.
=== Taming ===
Like other seeds, melon seeds can be used to tame [[parrot]]s.
=== Composting ===
Placing melon seeds into a [[composter]] has a 30% chance of raising the compost level by 1.
== Melon Stem ==
A '''melon stem''' is the block that is planted on [[farmland]] when melon seeds are used on it. It starts underground, and rises up as the plant grows. The stem is colored green when young, and then yellow once fully grown.
The stem curves once a melon has grown from it. A fully-grown single stem connects to any [[melon]] in an adjacent square, thus there are 5 possible appearances to a stem. If there are multiple melons it can connect to, it favors the east, then west, north, and south. When the melon is removed, the stem returns to its straight shape.
== Sounds ==
{{Sound table/Block/Hard crop}}
== Data values ==
=== ID ===
{{edition|java}}:
{{ID table
|edition=java
|showblocktags=y
|showforms=y
|generatetranslationkeys=y
|displayname=Melon Stem
|spritetype=block
|nameid=melon_stem
|blocktags=bee_growables, crops
|form=block}}
{{ID table
|displayname=Attached Melon Stem
|spritetype=block
|nameid=attached_melon_stem
|form=block}}
{{ID table
|displayname=Melon Seeds
|spritetype=item
|nameid=melon_seeds
|form=item
|foot=1}}
{{edition|bedrock}}:
{{ID table
|edition=bedrock
|shownumericids=y
|showforms=y
|generatetranslationkeys=y
|displayname=Melon Stem
|spritetype=block
|nameid=melon_stem
|id=105
|form=block
|translationkey=-}}
{{ID table
|displayname=Melon Seeds
|spritetype=item
|nameid=melon_seeds
|id=293
|form=item
|foot=1}}
=== Block states ===
{{see also|Block states}}
{{/BS}}
== Advancements ==
{{load advancements|A Seedy Place}}
== History ==
{{info needed section|check if stems floated above farmland upon initial implementation}}
{{History|java beta}}
{{History||1.8|snap=Pre-release|[[File:Melon Seeds JE1 BE1.png|32px]] Added melon seeds.
|[[File:Melon Stem Age 0 JE1.png|32px]] [[File:Stem Age 1 JE1.png|32px]] [[File:Melon Stem Age 2 JE1.png|32px]] [[File:Melon Stem Age 3 JE1.png|32px]] [[File:Melon Stem Age 4 JE1.png|32px]] [[File:Melon Stem Age 5 JE1.png|32px]] [[File:Melon Stem Age 6 JE1.png|32px]] [[File:Melon Stem Age 7 JE1.png|32px]] Added the melon stem, with seven stages of growth.
|Melon seeds can found in the new [[mineshaft]] [[chest]]s.
|[[File:Attached Melon Stem (N) JE1.png|32px]] [[File:Attached Melon Stem (E) JE1.png|32px]] [[File:Attached Melon Stem (S) JE1.png|32px]] [[File:Attached Melon Stem (W) JE1.png|32px]] Melon stems have four slightly visually distinct appearances for each facing direction - the bent part of the stem rotates, but the other two planes do not.
|[[File:Melon Stem Age 8 JE1.png|32px]] [[File:Melon Stem Age 9 JE1.png|32px]] [[File:Melon Stem Age 10 JE1.png|32px]] [[File:Melon Stem Age 11 JE1.png|32px]] [[File:Melon Stem Age 12 JE1.png|32px]] [[File:Melon Stem Age 13 JE1.png|32px]] [[File:Melon Stem Age 14 JE1.png|32px]] [[File:Melon Stem Age 15 JE1.png|32px]] Melon stem data values 8–15 now show a glitched formation, with a floating stem with an attached stem cross eventually emerging below.
|[[File:Attached Stem Age 8 JE1.png|32px]] [[File:Attached Stem Age 9 JE1.png|32px]] [[File:Attached Stem Age 10 JE1.png|32px]] [[File:Attached Stem Age 11 JE1.png|32px]] [[File:Attached Stem Age 12 JE1.png|32px]] [[File:Attached Stem Age 13 JE1.png|32px]] [[File:Attached Stem Age 14 JE1.png|32px]] [[File:Attached Stem Age 15 JE1.png|32px]] Melon stem blocks with data values higher than 7 can now attach to adjacent fruits, which results in buggy stem textures with [[vines]] in the mix due to vines being below attached stems in [[terrain.png]].}}
{{History|||snap=Pre-release 2 ;)|Melon stems can now be grown faster using [[bone meal]].}}
{{History|java}}
{{History||1.3.1|snap=1.3|The texture of melon stems has been moved one pixel to the left in [[terrain.png]].
|[[File:Melon Stem Age 0 JE2.png|32px]] [[File:Melon Stem Age 1 JE2.png|32px]] [[File:Melon Stem Age 2 JE2.png|32px]] [[File:Melon Stem Age 3 JE2.png|32px]] [[File:Melon Stem Age 4 JE2.png|32px]] [[File:Melon Stem Age 5 JE2.png|32px]] [[File:Melon Stem Age 6 JE2.png|32px]] [[File:Melon Stem Age 7 JE2.png|32px]] Stems now appear slightly different.
|[[File:Melon Stem Age 8 JE2.png|32px]] [[File:Melon Stem Age 9 JE2.png|32px]] [[File:Melon Stem Age 10 JE2.png|32px]] [[File:Melon Stem Age 11 JE2.png|32px]] [[File:Melon Stem Age 12 JE2.png|32px]] [[File:Melon Stem Age 13 JE2.png|32px]] [[File:Melon Stem Age 14 JE2.png|32px]] [[File:Melon Stem Age 15 JE2.png|32px]] Overgrown stems now appear slightly different.
|[[File:Attached Melon Stem (N) JE2.png|32px]] [[File:Attached Melon Stem (E) JE2.png|32px]] [[File:Attached Melon Stem (S) JE2.png|32px]] [[File:Attached Melon Stem (W) JE2.png|32px]] Attached melon stems now appear slightly different.
|[[File:Attached Stem Age 8 JE2.png|32px]] [[File:Attached Stem Age 9 JE2.png|32px]] [[File:Attached Stem Age 10 JE2.png|32px]] [[File:Attached Stem Age 11 JE2.png|32px]] [[File:Attached Stem Age 12 JE2.png|32px]] [[File:Attached Stem Age 13 JE2.png|32px]] [[File:Attached Stem Age 14 JE2.png|32px]] [[File:Attached Stem Age 15 JE2.png|32px]] Overgrown attached melon stems now appear slightly different.}}
{{History||1.4.2|snap=12w36a|[[Chicken]]s now use [[wheat seeds]], melon seeds, and [[pumpkin seeds]], instead of [[wheat]] to breed.}}
{{History||1.5|snap=13w02a|[[File:Melon Stem Age 0 JE3.png|32px]] [[File:Melon Stem Age 1 JE3.png|32px]] [[File:Melon Stem Age 2 JE3.png|32px]] [[File:Melon Stem Age 3 JE3.png|32px]] [[File:Melon Stem Age 4 JE3.png|32px]] [[File:Melon Stem Age 5 JE3.png|32px]] [[File:Melon Stem Age 6 JE3.png|32px]] Melon stems now use a squished version of their texture for immature stems, depending on age.
|[[File:Melon Stem Age 8 JE3.png|32px]] [[File:Melon Stem Age 9 JE3.png|32px]] [[File:Melon Stem Age 10 JE3.png|32px]] [[File:Melon Stem Age 11 JE3.png|32px]] [[File:Melon Stem Age 12 JE3.png|32px]] [[File:Melon Stem Age 13 JE3.png|32px]] [[File:Melon Stem Age 14 JE3.png|32px]] [[File:Melon Stem Age 15 JE3.png|32px]] This also affects melon stems of ages 8–15, which are likewise stretched to accommodate its predicted size.
|[[File:Attached Stem Age 8 JE3.png|32px]] [[File:Attached Stem Age 9 JE3.png|32px]] [[File:Attached Stem Age 10 JE3.png|32px]] [[File:Attached Stem Age 11 JE3.png|32px]] [[File:Attached Stem Age 12 JE3.png|32px]] [[File:Attached Stem Age 13 JE3.png|32px]] [[File:Attached Stem Age 14 JE3.png|32px]] [[File:Attached Stem Age 15 JE3.png|32px]] Melon stems of extreme ages, which are attached to adjacent fruits, now show a stretched and tinted stem appearance.}}
{{History|||snap=13w03a|[[File:Melon Stem Age 0 JE4.png|32px]] [[File:Melon Stem Age 1 JE4.png|32px]] [[File:Melon Stem Age 2 JE4.png|32px]] [[File:Melon Stem Age 3 JE4.png|32px]] [[File:Melon Stem Age 4 JE4.png|32px]] [[File:Melon Stem Age 5 JE4.png|32px]] [[File:Melon Stem Age 6 JE4.png|32px]] [[File:Melon Stem Age 7 JE4.png|32px]] Melon stems are no longer squished or stretched to account for age.<ref>{{bug|MC-7111}}</ref>
|[[File:Melon Stem Age 8 JE4.png|32px]] [[File:Melon Stem Age 9 JE4.png|32px]] [[File:Melon Stem Age 10 JE4.png|32px]] [[File:Melon Stem Age 11 JE4.png|32px]] [[File:Melon Stem Age 12 JE4.png|32px]] [[File:Melon Stem Age 13 JE4.png|32px]] [[File:Melon Stem Age 14 JE4.png|32px]] [[File:Melon Stem Age 15 JE4.png|32px]] Melon stems with age values 8 through 15 now show a tinted [[trapdoor]] texture.
|From this version up until 14w08a, overgrown melon stems start to draw from the texture below them on the [[texture atlas]], in much the same way they previously did with terrain.png. However, as texture atlases are unstable and textures tend to change positions as new blocks and textures are added, overgrown stems change the texture they draw from every time new textures are added, which includes when textures added by [[mods]].}}
{{History|||snap=13w09a|[[File:Melon Stem Age 8 JE5.png|32px]] [[File:Melon Stem Age 9 JE5.png|32px]] [[File:Melon Stem Age 10 JE5.png|32px]] [[File:Melon Stem Age 11 JE5.png|32px]] [[File:Melon Stem Age 12 JE5.png|32px]] [[File:Melon Stem Age 13 JE5.png|32px]] [[File:Melon Stem Age 14 JE5.png|32px]] [[File:Melon Stem Age 15 JE5.png|32px]] Melon stems with age values 8–15 now show a tinted [[birch wood]] texture.}}
{{History||1.6.1|snap=13w24a|Melon and pumpkin stems have now been assigned separate textures.
|[[File:Melon Stem Age 8 JE6.png|32px]] [[File:Melon Stem Age 9 JE6.png|32px]] [[File:Melon Stem Age 10 JE6.png|32px]] [[File:Melon Stem Age 11 JE6.png|32px]] [[File:Melon Stem Age 12 JE6.png|32px]] [[File:Melon Stem Age 13 JE6.png|32px]] [[File:Melon Stem Age 14 JE6.png|32px]] [[File:Melon Stem Age 15 JE6.png|32px]] Melon stems with age values 8–15 now show a tinted [[note block]] texture.}}
{{History||1.7.2|snap=13w37a|Added the {{cmd|setblock}} [[commands|command]], allowing for invalid stem ages to be placed in the world without using external editors. This also allows them to be obtained in earlier versions via backdating.}}
{{History|||snap=13w41a|[[File:Melon Stem Age 8 JE7.png|32px]] [[File:Melon Stem Age 9 JE7.png|32px]] [[File:Melon Stem Age 10 JE7.png|32px]] [[File:Melon Stem Age 11 JE7.png|32px]] [[File:Melon Stem Age 12 JE7.png|32px]] [[File:Melon Stem Age 13 JE7.png|32px]] [[File:Melon Stem Age 14 JE7.png|32px]] [[File:Melon Stem Age 15 JE7.png|32px]] Melon stems with age values 8–15 now show a tinted [[netherrack]] texture.}}
{{History||1.8|snap=14w10a|[[File:Melon Stem Age 8 JE8.png|32px]] [[File:Melon Stem Age 9 JE8.png|32px]] [[File:Melon Stem Age 10 JE8.png|32px]] [[File:Melon Stem Age 11 JE8.png|32px]] Melon stems with data values 8–11 now display a tinted attached stem, with 8 facing west, 9 facing east, 10 facing north and 11 facing south.
|Invalid melon stems with data values 12-15 now crash the game.}}
{{History|||snap=14w25a|[[File:Melon Stem Age 0 JE5.png|32px]] [[File:Melon Stem Age 1 JE5.png|32px]] [[File:Melon Stem Age 2 JE5.png|32px]] [[File:Melon Stem Age 3 JE5.png|32px]] [[File:Melon Stem Age 4 JE5.png|32px]] [[File:Melon Stem Age 5 JE5.png|32px]] [[File:Melon Stem Age 6 JE5.png|32px]] [[File:Melon Stem Age 7 JE5.png|32px]] Melon stems now render as a single diagonal plane, or, in the case of attached stems, a diagonal and orthogonal plane.
|[[File:Attached Melon Stem (N) JE3.png|32px]] [[File:Attached Melon Stem (E) JE3.png|32px]] [[File:Attached Melon Stem (S) JE3.png|32px]] [[File:Attached Melon Stem (W) JE3.png|32px]] The attached melon stem [[model]] now fully rotates to the direction the stem points. Prior to this update, the base of the melon stem would stay the same while the long attaching section would differ, resulting in four possible attached stem appearances.
|Invalid overgrown melon stems have effectively been removed from the game, as attempting to place an out of range stem via {{cmd|setblock}} creates a stem of age 0 and loading a world with such stems existing causes a game crash.}}
{{History|||snap=14w26a|[[File:Melon Stem Age 0 JE6.png|32px]] [[File:Melon Stem Age 1 JE6.png|32px]] [[File:Melon Stem Age 2 JE6.png|32px]] [[File:Melon Stem Age 3 JE6.png|32px]] [[File:Melon Stem Age 4 JE6.png|32px]] [[File:Melon Stem Age 5 JE6.png|32px]] [[File:Melon Stem Age 6 JE6.png|32px]] [[File:Melon Stem Age 7 JE6.png|32px]] [[File:Attached Melon Stem (N) JE4.png|32px]] [[File:Attached Melon Stem (E) JE4.png|32px]] [[File:Attached Melon Stem (S) JE4.png|32px]] [[File:Attached Melon Stem (W) JE4.png|32px]] Melon stems now correctly render as crosses again.<ref>{{bug|MC-58136}}</ref>}}
{{History|||snap=14w27a|[[File:Attached Stem Age 0 14w27a.png|32px]] [[File:Attached Stem Age 1 14w27a.png|32px]] [[File:Attached Stem Age 2 14w27a.png|32px]] [[File:Attached Stem Age 3 14w27a.png|32px]] [[File:Attached Stem Age 4 14w27a.png|32px]] [[File:Attached Stem Age 5 14w27a.png|32px]] [[File:Attached Stem Age 6 14w27a.png|32px]] Due to a bug, all melon stems appear attached regardless of age or any actual attachment.<ref>{{bug|MC-60208}}</ref>}}
{{History|||snap=14w28a|All melon stems appearing attached regardless of age or any actual attachment has been fixed. However, melon stems still appear attached to adjacent fruits regardless of age due to a similar bug.<ref>{{bug|MC-61716}}</ref>}}
{{History|||snap=14w34d|Melon seeds can no longer be used for [[breeding]] [[chicken]]s.}}
{{History||1.9|snap=15w31a|Chickens can now use melon seeds to breed again.}}
{{History|||snap=15w44a|Melon seeds have been added to [[dungeon]] [[chest]]s.
|The average yield of melon seeds from [[mineshaft]] chests has been decreased.}}
{{History|||snap=15w45a|Melon stems must now be fully grown again to attach.}}
{{History||1.11|snap=16w39a|Melon seeds can now be found inside chests in the new [[woodland mansion]]s.
|Melon crops now generate inside woodland mansions.}}
{{History||1.12|snap=17w18b|Placing a melon seeds in farmland now gives the player the "A Seedy Place" [[advancement]].{{verify}}}}
{{History||1.13|snap=17w47a|The different block states for the <code>melon_stem</code> ID have been split up into their own IDs.
|Prior to [[1.13/Flattening|''The Flattening'']], this [[block]]'s numeral ID was 105, and the [[item]]'s 362.}}
{{History|||snap=17w48a|Attached melon stems no longer [[drops|drop]] seeds.}}
{{History||1.14|snap=18w43a|[[File:Attached Melon Stem (N) JE5.png|32px]] [[File:Attached Melon Stem (E) JE5.png|32px]] [[File:Attached Melon Stem (S) JE5.png|32px]] [[File:Attached Melon Stem (W) JE5.png|32px]] The texture of attached melon stems has been changed.}}
{{History|||snap=18w49a|Melon stems now generate in the updated [[savanna]] [[village]]s.}}
{{History|||snap=18w50a|Melon stems now generate in the updated [[desert]] [[village]]s.}}
{{History|||snap=19w03a|Placing melon seeds into the new [[composter]] has a 10% chance of raising the compost level by 1.}}
{{History|||snap=19w05a|Melon seeds now have a 30% chance of increasing the compost level in a composter by 1.
|Added [[Wandering Trader|wandering trader]]s, which sell melon seeds.}}
{{History||1.15|snap=19w34a|[[Bee]]s can now pollinate melon stems.}}
{{History|||snap=19w39a|Attached melon stems now [[drops|drop]] seeds again.<ref>{{bug|MC-136360}}</ref>}}
{{History||1.18|snap=Pre-release 5|[[File:Melon Seeds JE2.png|32px]] The texture of melon seeds has been changed.}}
{{History|pocket alpha}}
{{History||v0.5.0|Added melon seeds.
|[[File:Melon Stem Age 0 JE1.png|32px]] [[File:Stem Age 1 JE1.png|32px]] [[File:Melon Stem Age 2 JE1.png|32px]] [[File:Melon Stem Age 3 JE1.png|32px]] [[File:Melon Stem Age 4 JE1.png|32px]] [[File:Melon Stem Age 5 JE1.png|32px]] [[File:Melon Stem Age 6 JE1.png|32px]] [[File:Melon Stem Age 7 JE1.png|32px]] [[File:Attached Melon Stem (N) JE1.png|32px]] [[File:Attached Melon Stem (E) JE1.png|32px]] [[File:Attached Melon Stem (S) JE1.png|32px]] [[File:Attached Melon Stem (W) JE1.png|32px]]{{verify|Are these models correct?}} Added melon stems.}}
{{History||v0.6.0|[[File:Melon Seeds JE1 BE1.png|32px]] Melon seeds no longer use the pumpkin seeds texture.}}
{{History||v0.9.0|snap=?|Melon seeds can now be found in [[mineshaft]] chests.}}
{{History||v0.12.1|snap=build 1|Melon seeds are no longer available from the [[Nether reactor]].}}
{{History||v0.14.0|snap=build 1|Melon seeds can now be found in [[minecart with chest|minecarts with chests]] in [[mineshaft]]s.}}
{{History|pocket}}
{{History||1.0.0|snap=alpha 0.17.0.1|Melon seeds now generate inside [[dungeon]] [[chest]]s.}}
{{History||1.1.0|snap=alpha 1.1.0.0|Melon crops now generate inside [[woodland mansion]]s.
|Melon seeds can now be found in woodland mansion chests.}}
{{History|bedrock}}
{{History||1.2.0|snap=beta 1.2.0.2|Melon seeds can now be found inside [[bonus chest]]s.
|Melon seeds are now used to tame [[parrot]]s.}}
{{History||1.10.0|snap=beta 1.10.0.3|[[File:Attached Melon Stem (W) JE5.png|32px]]{{info needed|More accurate image}} The texture of attached melon stems has been changed.
|Melon stems now generate in [[savanna]] and [[desert]] [[village]] farms.
|Added [[wandering trader]]s, who [[trading|sell]] melon seeds.}}
{{History||1.11.0|snap=beta 1.11.0.1|Melon seeds can now be used to fill up [[composter]]s.}}
{{History||1.14.0|snap=beta 1.14.0.1|[[Bee]]s can now pollinate melon stems.}}
{{History|console}}
{{History||xbox=TU5|xbone=CU1|ps=1.0|wiiu=Patch 1|[[File:Melon Seeds JE1 BE1.png|32px]] Added melon seeds.
|[[File:Melon Stem Age 0 JE1.png|32px]] [[File:Stem Age 1 JE1.png|32px]] [[File:Melon Stem Age 2 JE1.png|32px]] [[File:Melon Stem Age 3 JE1.png|32px]] [[File:Melon Stem Age 4 JE1.png|32px]] [[File:Melon Stem Age 5 JE1.png|32px]] [[File:Melon Stem Age 6 JE1.png|32px]] [[File:Melon Stem Age 7 JE1.png|32px]] [[File:Attached Melon Stem (N) JE1.png|32px]] [[File:Attached Melon Stem (E) JE1.png|32px]] [[File:Attached Melon Stem (S) JE1.png|32px]] [[File:Attached Melon Stem (W) JE1.png|32px]]{{verify|Are these models correct?}} Added melon stems.}}
{{History||xbox=none|xbone=none|ps=1.90|wiiu=none|switch=none|[[File:Attached Melon Stem (W) JE5.png|32px]]{{info needed|More accurate image}} The texture of attached melon stems has been changed.}}
{{History|New 3DS}}
{{History||0.1.0|[[File:Melon Stem Age 0 JE1.png|32px]] [[File:Stem Age 1 JE1.png|32px]] [[File:Melon Stem Age 2 JE1.png|32px]] [[File:Melon Stem Age 3 JE1.png|32px]] [[File:Melon Stem Age 4 JE1.png|32px]] [[File:Melon Stem Age 5 JE1.png|32px]] [[File:Melon Stem Age 6 JE1.png|32px]] [[File:Melon Stem Age 7 JE1.png|32px]] [[File:Attached Melon Stem (N) JE1.png|32px]] [[File:Attached Melon Stem (E) JE1.png|32px]] [[File:Attached Melon Stem (S) JE1.png|32px]] [[File:Attached Melon Stem (W) JE1.png|32px]]{{verify|Are these models correct?}} Added melon stems.}}
{{History|foot}}
<gallery>
Melon Stem with data value 15.png|The final version of the melon stem with age 15, as seen in-game.
Melonstems.png|Melon stems of ages 1–15 on a modded version of 1.7.2, hence the melon stems using the melon top texture.
Stems of 13w02a.png|All 16 stem sizes in 13w02a, with accompanying data values.
</gallery>
=== Melon stem "item" ===
{{:Technical blocks/Melon Stem}}
== Issues ==
{{issue list}}
== Gallery ==
<gallery>
Stem All Ages.png|All stages of growth.
AllSeeds.png|All the [[seeds]] that exist in the game.
</gallery>
== See also ==
* [[Melon]]
* [[Pumpkin Seeds]]
==References==
{{Reflist}}
{{Blocks|vegetation}}
{{Items}}
[[Category:Plants]]
[[Category:Food]]
[[Category:Non-solid blocks]]
[[Category:Generated structure blocks]]
[[cs:Semínka melounu]]
[[de:Melone]]
[[es:Semillas de sandía]]
[[fr:Graines de pastèque]]
[[hu:Dinnyemagok]]
[[it:Anguria]]
[[ja:スイカの種]]
[[ko:수박씨]]
[[nl:Meloenzaden]]
[[pl:Nasiona arbuza]]
[[pt:Sementes de melancia]]
[[ru:Семена арбуза]]
[[th:เมล็ดแตงโม]]
[[zh:西瓜种子]]</li></ul> | 17w47a | Prior to The Flattening, the numeral IDs for the command block, repeating command block, and chain command block were 137, 210, and 211, respectively. | |||
| pre1 | The player can now tab-complete in command blocks again. | ||||
1.14{{Extension DPL}}<ul><li>[[Obsidian Boat|Obsidian Boat]]<br/>{{for|other uses|Obsidian (disambiguation)}} {{for|other kinds of boats|Boat (disambiguation)}}
{{Joke feature}}
{{ItemEntity
|title=Obsidian Boat
|image=Obsidian Boat.png
|image2=Obsidian Boat (item).png
|stackable=No
|renewable=Yes
}}
The '''obsidian boat''' was a joke [[boat]] variant released in an April Fools' joke version.
== Obtaining ==
=== Crafting ===
{{crafting
|A2 = Obsidian |C2 = Obsidian
|A3 = Obsidian |B3 = Obsidian |C3 = Obsidian
|Output= Obsidian Boat
|ignoreusage=1
}}
== Usage ==
Obsidian boats sank in [[water]] instead of floating. They also sank in lava like other boats but did not get destroyed in it.
== Sounds ==
Obsidian boats used the Friendly Creatures sound category for entity-dependent sound events, although did not have any sounds of their own.
== Data values ==
=== ID ===
{{ID table
|shownumericids=y
|showforms=y
|generatetranslationkeys=java
|displayname=Obsidian Boat
|spritetype=item
|nameid=obsidian_boat
|id=432
|form=item
|translationkey=item.obsidian_boat.name
|foot=1}}
{{ID table
|shownumericids=y
|generatetranslationkeys=java
|displayname=Obsidian Boat
|spritetype=entity
|nameid=boat
|id=41
|translationkey=entity.Boat.name
|foot=1}}
=== Entity data ===
{{/ED}}
== History ==
{{History|java}}
{{History||1.10|snap=15w14a|link=Java Edition 15w14a|[[File:Obsidian_Boat_(item).png|32px]] [[File:Obsidian Boat.png|32px]] Added the obsidian boat.}}
{{History|foot}}
== Issues ==
Obsidian boat is a joke feature and as such issues relating to them cannot be fixed.
{{Items}}
{{Entities}}
{{Jokes}}
[[Category:Joke items]]
[[Category:Joke entities]]
[[it:Barca di ossidiana]]
[[ja:黒曜石のボート]]
[[pt:Bote de obsidiana]]
[[uk:Обсидіановий човен]]
[[zh:15w14a]]</li><li>[[Redstone Dust|Redstone Dust]]<br/>{{Redirect|Redstone|the ore|Redstone Ore|the powered mineral block|Block of Redstone|other uses|Redstone (disambiguation)}}
{{Block
| group = Inactive (connected)
| 1-1= Inactive Redstone Wire (NESW).png
| 1-2 = Inactive Redstone Wire (NESW) BE.png
| group2 = Inactive (unconnected)
| 2-1 = Inactive Redstone Wire (unconnected).png
| 2-2 = Inactive Redstone Wire (unconnected).png
| group3 = Active (connected)
| 3-1 = Active Redstone Wire (NESW).png
| 3-2 = Active Redstone Wire (NESW) BE.png
| group4 = Active (unconnected)
| 4-1 = Active Redstone Wire (unconnected).png
| 4-2 = Active Redstone Wire (unconnected).png
| image = Redstone Dust JE2 BE2.png
| extratext = [[#Gallery|View all renders]]
| transparent = Yes
| light = No
| tool = all
| renewable = Yes
| stackable = Yes (64)
| flammable = No
| lavasusceptible = No
}}
'''Redstone dust''' is a mineral that can transmit [[Redstone circuit#Power|redstone power]] as a wire when placed as a [[block]]. It is also used in [[crafting]] and [[brewing]].
== Obtaining ==
=== Mining ===
{{see also|Redstone Ore#Natural generation}}
[[Redstone ore]] mined using an iron [[pickaxe]] or higher drops 4 or 5 redstone dust (or more with [[Fortune]], averaging at 6 redstone dust with Fortune III). If mined with [[Silk Touch]], the block drops itself instead of redstone dust.
=== Natural generation ===
15 lengths of redstone dust are naturally generated as part of the trap in each [[jungle pyramid]]. 5 lengths of redstone dust can be found in one type of jail cell room in a [[woodland mansion]]. In [[Ancient City|ancient cities]], multiple pieces of redstone dust can be found integrated into circuitry.
=== Breaking ===
Redstone dust can be broken instantly using any tool, or without a tool, and drops itself as an item.
Redstone dust is removed and drops as an item if:
* its attachment block is moved, removed, or destroyed
* [[water]] or [[lava]] flows into its space
* a [[piston]] tries to push it or moves a block into its space
=== Mob loot ===
[[Witch]]es have a chance of dropping 0–2 redstone dust upon death. This is increased by 1 per level of [[Looting]], for a maximum of 0–5 redstone dust.
=== Chest loot ===
{{LootChestItem|redstone}}
=== Crafting ===
Redstone dust can be crafted from [[blocks of redstone]].
{{Crafting
|Block of Redstone
|Output=Redstone Dust,9
|type=Redstone
}}
=== Smelting ===
{{Smelting
|showname=1
|Redstone Ore; Deepslate Redstone Ore
|Redstone Dust
|0.7
}}
=== Trading ===
{{IN|java}}, novice-level cleric [[villager]]s sell two redstone dust for one [[emerald]].
{{IN|bedrock}}, novice-level cleric villagers sell four redstone dust for one emerald.
=== Villager gifts ===
{{see also|Tutorials/Raid farming}}
{{IN|Java}}, when the player has the [[Hero of the Village]] status effect, clerics might throw that player a redstone dust as a gift.
== Usage ==
Redstone dust is used for [[#Brewing ingredient|brewing]], [[#Crafting ingredient|crafting]], and in redstone circuits by placing it on the ground to create [[#Redstone component|redstone wire]]. It can also be used to power redstone components.
=== Brewing ingredient ===
{{Brewing
|head=1
|Redstone Dust
|Mundane Potion
|base=Water Bottle
}}
{{Brewing
|foot=1
|name=Increased Duration
|Redstone Dust
|showbase=1
|base=Potion of Fire Resistance; Potion of Invisibility; Potion of Night Vision; Potion of Poison; Potion of Regeneration; Potion of Slowness; Potion of Strength; Potion of Swiftness; Potion of Water Breathing; Potion of Weakness; Potion of Leaping; Potion of Slow Falling
}}
=== Crafting ingredient ===
{{crafting usage|Redstone Dust}}
=== {{anchor|Redstone dust}} Redstone component ===
When placed in the world, redstone dust becomes a block of "redstone wire"{{Info needed|other blco? BE?}}, which can transmit [[Redstone circuit#Power|redstone power]].
=== Smithing ingredient ===
{{Smithing
|head=1
|ingredients=Any Armor Trim +<br/>Any Armor Piece + <br/>Redstone Dust
|Any Armor Trim Smithing Template
|Netherite Chestplate
|Redstone
|Redstone Trim Netherite Chestplate
|showdescription=1
|description = All armor types can be used in this recipe,<br/>a netherite chestplate is shown as an example.<br/>
|tail=1
}}
;Trim color palette
The following color palette is shown on the designs on trimmed armor:
*{{TrimPalette|redstone dust}}
=== Placement ===
[[File:Redstone wire as circuit component.png|Examples of redstone wire configuration. ''Top Left:'' Redstone wire connects diagonally vertically through non-opaque blocks. ''Top Right:'' Redstone wire does ''not'' connect diagonally vertically through opaque blocks. ''Center:'' Redstone wire gets darker as its power level drops, to a maximum of 15 blocks from a power source.|thumb]]
[[File:Redstone on Glowstone, Stairs, Slabs.png|Examples of redstone wire placements.|thumb]]
Redstone dust can be placed on [[opaque]] blocks as well as [[glowstone]], upside-down [[slab]]s, [[glass]], upside-down [[stairs]], and [[hopper]]s. It can also be placed on some transparent blocks; see [[Opacity/Placement]] for more information. It cannot be placed suspended in midair, even with commands, which is not unintentional.<ref>{{bug|MC-182709}}</ref>
Redstone wire configures itself to point toward adjacent redstone [[Redstone components#Power components|power components]] and [[Redstone components#Transmission components|transmission component]] connection points. Redstone wire also configures itself to point toward adjacent redstone wire one block higher or lower – unless there is a solid opaque block above the lower redstone wire.
If there is only one such adjacent redstone component, redstone wire configures itself into a {{BlockSprite|redstone-dust}} line pointing both at the neighbor and away from it. If there are two or more such adjacent components, redstone wire connects them in the form of {{BlockSprite|redstone-dust}}, {{BlockSprite|redstone-dust-upleft}}, {{BlockSprite|redstone-dust-t-up}}, or {{BlockSprite|redstone-dust-cross}} as needed.
When there are no adjacent components, a single redstone wire configures itself into a {{BlockSprite|redstone-dust-cross}} plus sign, which can provide power in all four directions. By right-clicking it can be changed into a {{BlockSprite|redstone-dust-dot}} dot, which does not provide power to any of the four directions.
{{IN|bedrock}}, redstone wire automatically configures itself to point toward adjacent blocks or [[Redstone components#Mechanism components|mechanism components]]. {{IN|java}}, it does not. If such a configuration is desired, the other neighbors of the redstone wire must be arranged to create it, i.e the redstone dust must be placed in a way that it would be pointed at the block’s location even if it were not there.
When redstone wire is reconfigured after placement, it does not update other redstone components around it of the change unless that reconfiguration also includes a change in power level or another component provides an update. This can create situations where a mechanism component remains activated when it shouldn't, or vice versa, until it receives an update from something else – a "feature" of redstone wire that can be used to make a [[BUD|block update detector]].
{{-}}
=== Behavior ===
{{Schematic|caption=
{{IN|be}}, the signal can go down from glass blocks.
|||rd-$ew!|RL-!||||rd-$ew!|RL-!|-
|rt-$!|rd-$ew!|SB|||rt-$!|rd-$ew!|glass||-
|ts-$|SB|rd-$ew|RL||ts-$|SB|rd-$ew!|RL-!
}}{{Schematic|caption =
However, the signal can never go down from slabs.
|||rd-$ew!|RL-!||||rd-$ew!|RL-!|-
|rt-$!|rd-$ew!|SB|||rt-$!|rd-$ew!|glass||-
|ts-$|ts-$|rd-$ew|RL||ts-$|ts-$|rd-$ew|RL
}}
Redstone wire can transmit power, which can be used to operate [[Redstone components#Mechanism components|mechanism components]] ([[door]]s, [[piston]]s, [[redstone lamp]]s, etc.).
Redstone wire can be "powered" by a number of methods:
* from an adjacent [[Redstone components#Power components|power component]] or a strongly-powered block
* from the output of a redstone repeater or redstone comparator
* from adjacent redstone wire. The powering dust can be a level higher or lower, but with restrictions:
** Redstone dust can be powered by redstone dust that is one level lower, or on an [[opaque]] block one level higher. A transparent block cannot{{only|java}} pass power downward.
** The block "between" the two dust blocks must be air or transparent. A solid block there "cuts" the connection between the higher and lower dust.
The "power level" of redstone dust can vary from 0 to 15. Most power components power-up adjacent redstone dust to power level 15, but a few ([[daylight sensor]]s, [[trapped chest]]s, and [[weighted pressure plate]]s) may create a lower power level. Redstone repeaters output power level 15 (when turned on), but [[redstone comparator]]s may output a lower power level.
{{Schematic | caption =
Redstone wire can transmit power up to 15 blocks.
|rt-$!|rd-$ew!+15|rd-$ew!+14|rd-$ew!+13|rd-$ew!+12|rd-$ew!+11|rd-$ew!+10|rd-$ew!+9
|rd-$ew!+8|rd-$ew!+7|rd-$ew!+6|rd-$ew!+5|rd-$ew!+4|rd-$ew!+3|rd-$ew!+2|rd-$ew!+1|rd-$ew+0
}}
Power level drops by 1 for every block of redstone wire it crosses. Thus, redstone wire can transmit power for no more than 15 blocks. To go further, the power level must be re-strengthened – typically with a redstone repeater.
Powered redstone wire on top of, or pointing at, an opaque block provides ''weak'' power to the block. A weakly-powered block cannot power other adjacent redstone wire, but can still power redstone repeaters and comparators, and activate adjacent mechanism components. Transparent blocks cannot be powered.
When redstone wire is unpowered, it appears dark red. When powered, it becomes bright red at power level 15, fading to darker shades with decreasing power. Powered redstone wire also produces "dust" [[particles]] of the same color.
While redstone wire always provides power to the directions it points into, it can still point into directions in which it cannot give power. If redstone wire comes in the form of a cross, the player can right-click to toggle it between a cross and dot. A redstone dot does not power anything adjacent to it, but powers the block under it.
== Sounds ==
{{Sound table/Block/Normal}}
== Data values ==
=== ID ===
{{edition|java}}:
{{ID table
|edition=java
|firstcolumnname=Redstone Dust
|showforms=y
|generatetranslationkeys=y
|displayname=Block
|spritename=redstone-dust
|spritetype=block
|nameid=redstone_wire
|form=block}}
{{ID table
|displayname=Item
|spritename=redstone-dust
|spritetype=item
|nameid=redstone
|form=item
|foot=1}}
{{edition|bedrock}}:
{{ID table
|edition=bedrock
|firstcolumnname=Redstone Dust
|shownumericids=y
|showforms=y
|generatetranslationkeys=y
|displayname=Block
|spritename=redstone-dust
|spritetype=block
|nameid=redstone_wire
|id=55
|form=block}}
{{ID table
|displayname=Item
|spritename=redstone-dust
|spritetype=item
|nameid=redstone
|id=373
|form=item
|foot=1}}
=== Block states ===
{{see also|Block states}}
{{/BS}}
{{LoadPage|Redstone Dust/Asset history|List of block state combinations|h4}}
== Achievements ==
{{load achievements|Dispense With This}}
== Video ==
{{Video note|These videos do not show all uses for redstone in crafting and all methods of obtaining. This video is also outdated, as of 1.13 Java Edition, redstone is now called Redstone Dust.}}
<div style="text-align:center">
<span style="display:inline-block">{{yt|zldqknGFWb4}}</span>
<span style="display:inline-block">{{yt|_IApwvCLJW8}}</span>
</div>
== History ==
{{History||May 21, 2009|link=https://web.archive.org/web/0/http://notch.tumblr.com/post/110762705/my-list-on-tile-types-so-far|[[Notch]] shows interest in adding wire-type [[block]]s.}}
{{History|java alpha}}
{{History||v1.0.1|[[File:Redstone Dust JE1 BE1.png|32px]] Added redstone dust as an [[item]].
|[[File:Inactive Redstone Wire (NS) JE1.png|32px]] [[File:Inactive Redstone Wire (EW) JE1.png|32px]] [[File:Inactive Redstone Wire (NE) JE1.png|32px]] [[File:Inactive Redstone Wire (ES) JE1.png|32px]] [[File:Inactive Redstone Wire (SW) JE1.png|32px]] [[File:Inactive Redstone Wire (NW) JE1.png|32px]] [[File:Inactive Redstone Wire (NEW) JE1.png|32px]] [[File:Inactive Redstone Wire (NES) JE1.png|32px]] [[File:Inactive Redstone Wire (ESW) JE1.png|32px]] [[File:Inactive Redstone Wire (NSW) JE1.png|32px]] [[File:Inactive Redstone Wire (NESW) JE1.png|32px]]<br>[[File:Active Redstone Wire (NS) JE1.png|32px]] [[File:Active Redstone Wire (EW) JE1.png|32px]] [[File:Active Redstone Wire (NE) JE1.png|32px]] [[File:Active Redstone Wire (ES) JE1.png|32px]] [[File:Active Redstone Wire (SW) JE1.png|32px]] [[File:Active Redstone Wire (NW) JE1.png|32px]] [[File:Active Redstone Wire (NEW) JE1.png|32px]] [[File:Active Redstone Wire (NES) JE1.png|32px]] [[File:Active Redstone Wire (ESW) JE1.png|32px]] [[File:Active Redstone Wire (NSW) JE1.png|32px]] [[File:Active Redstone Wire (NESW) JE1.png|32px]] Added redstone dust as a placed [[block]].
|Redstone dust as a placed block has two power appearances; either completely on, or completely off.
|Redstone dust is used to craft [[redstone torch]]es.
|At this time, redstone has not been given an official name.}}
{{History||v1.0.2_01|Redstone dust now doesn't connect through solid [[block]]s diagonally down.{{needs testing|may have been changed in v1.0.2|type=untestable}}
|Walking on redstone dust no longer [[breaking|breaks]] it.{{needs testing|may have been changed in v1.0.2|type=untestable}}
|Active redstone dust now gives off [[particles]].{{needs testing|may have been changed in v1.0.2|type=untestable}}}}
{{History||v1.1.0|Redstone is now used to craft [[compass]]es.}}
{{History||v1.2.0|snap=<nowiki>?|slink=:Category:Information needed requiring unarchived version|Redstone is now used to craft [[clock]]s.}}
{{History|java beta}}
{{History||1.0|With the addition of inventory tooltips, the [[item]] form of redstone dust has been named "Redstone", and the usually unobtainable block form has been named "Redstone Dust".}}
{{History||1.2|Redstone is now used to craft [[dispenser]]s and [[note block]]s.}}
{{History||1.3|[[File:Inactive Redstone Wire (NS) JE2.png|32px]] [[File:Inactive Redstone Wire (EW) JE2.png|32px]] [[File:Inactive Redstone Wire (NE) JE2.png|32px]] [[File:Inactive Redstone Wire (ES) JE2.png|32px]] [[File:Inactive Redstone Wire (SW) JE2.png|32px]] [[File:Inactive Redstone Wire (NW) JE2.png|32px]] [[File:Inactive Redstone Wire (NEW) JE2.png|32px]] [[File:Inactive Redstone Wire (NES) JE2.png|32px]] [[File:Inactive Redstone Wire (ESW) JE2.png|32px]] [[File:Inactive Redstone Wire (NSW) JE2.png|32px]] [[File:Inactive Redstone Wire (NESW) JE2.png|32px]]<br>[[File:Active Redstone Wire (NS) JE2.png|32px]] [[File:Active Redstone Wire (EW) JE2.png|32px]] [[File:Active Redstone Wire (NE) JE2.png|32px]] [[File:Active Redstone Wire (ES) JE2.png|32px]] [[File:Active Redstone Wire (SW) JE2.png|32px]] [[File:Active Redstone Wire (NW) JE2.png|32px]] [[File:Active Redstone Wire (NEW) JE2.png|32px]] [[File:Active Redstone Wire (NES) JE2.png|32px]] [[File:Active Redstone Wire (ESW) JE2.png|32px]] [[File:Active Redstone Wire (NSW) JE2.png|32px]] [[File:Active Redstone Wire (NESW) JE2.png|32px]] Redstone wire gets darker the farther away it is from a source of power, using a dedicated [[tint]] system. Previously, it was fully on until it reached its limit.
|Its particles now appear gray due to not being tinted.
|Redstone is now used to craft [[redstone repeater]]s.}}
{{History||1.5|[[File:Inactive Redstone Wire (NS) JE3.png|32px]] [[File:Inactive Redstone Wire (EW) JE3.png|32px]] [[File:Inactive Redstone Wire (NE) JE3.png|32px]] [[File:Inactive Redstone Wire (ES) JE3.png|32px]] [[File:Inactive Redstone Wire (SW) JE3.png|32px]] [[File:Inactive Redstone Wire (NW) JE3.png|32px]] [[File:Inactive Redstone Wire (NEW) JE3.png|32px]] [[File:Inactive Redstone Wire (NES) JE3.png|32px]] [[File:Inactive Redstone Wire (ESW) JE3.png|32px]] [[File:Inactive Redstone Wire (NSW) JE3.png|32px]] [[File:Inactive Redstone Wire (NESW) JE3.png|32px]]<br>[[File:Active Redstone Wire (NS) JE3.png|32px]] [[File:Active Redstone Wire (EW) JE3.png|32px]] [[File:Active Redstone Wire (NE) JE3.png|32px]] [[File:Active Redstone Wire (ES) JE3.png|32px]] [[File:Active Redstone Wire (SW) JE3.png|32px]] [[File:Active Redstone Wire (NW) JE3.png|32px]] [[File:Active Redstone Wire (NEW) JE3.png|32px]] [[File:Active Redstone Wire (NES) JE3.png|32px]] [[File:Active Redstone Wire (ESW) JE3.png|32px]] [[File:Active Redstone Wire (NSW) JE3.png|32px]] [[File:Active Redstone Wire (NESW) JE3.png|32px]] Fully off redstone wire is no longer black.
|Redstone dust can now be placed on [[snow]].
|Redstone is now used to craft [[powered rail]]s and [[detector rail]]s.}}
{{History||1.6.6|Redstone dust now checks if the block below has a solid top face or [[glowstone]], allowing it to be placed on it.}}
{{History||1.7|Redstone dust now connects to a [[redstone repeater|repeater]] without the dust being explicitly pointed at it.
|Redstone can now be used to craft [[piston]]s.}}
{{History||1.8|snap=Pre-release|Redstone can now be found in the new [[stronghold]] storeroom [[chest]]s, and in the new [[mineshaft]] chests.}}
{{History|java}}
{{History||1.0.0|snap=Beta 1.9 Prerelease 3|Redstone can now be [[brewing|brewed]] in a [[water bottle]] to create a [[mundane potion]].
|Redstone can now be found in the new [[stronghold]] altar [[chest]]s.
|Redstone now extends the [[potion]]s of [[Fire Resistance]], [[Slowness]], [[Swiftness]], [[Poison]], [[Weakness]] and [[Strength]].}}
{{History|||snap=Beta 1.9 Prerelease 4|Redstone now extends the new potion of [[Regeneration]].}}
{{History|||snap=RC1|[[File:Inactive Redstone Wire (unconnected) JE1.png|32px]] <br>[[File:Active Redstone Wire (unconnected) JE1.png|32px]] Redstone dust placement on one [[block]] has been changed from a "+" to a "•" shape.}}
{{History||?|Redstone wire block particles are now correctly colored.}}
{{History||1.1|snap=11w49a|Fixed redstone update bug.{{more info}}}}
{{History||1.2.1|snap=12w06a|Redstone can now be placed on [[glowstone]].}}
{{History|||snap=12w07a|Redstone is now used to craft [[redstone lamp]]s.}}
{{History||1.3.1|snap=12w21a|Redstone can now be [[trading|bought]] from priest [[villager]]s, at 2–4 redstone for 1 [[emerald]], making them [[renewable]].}}
{{History|||snap=12w22a|Redstone dust now generates in [[jungle temple]]s.}}
{{History|||snap=12w25a|Redstone dust can now be placed on top of upside-down [[slabs]] and [[stairs]].}}
{{History||1.4.2|snap=12w34a|Redstone now extends the new [[potion]]s of [[Night Vision]] and [[Invisibility]].}}
{{History|||snap=12w38a|[[Witch]]es have been added, which sometimes [[drops|drop]] redstone when killed.}}
{{History||1.5|snap=13w01a|Redstone can now be used to craft [[blocks of redstone]] and [[dropper]]s.}}
{{History||1.7.2|snap=13w36a|Redstone now extends the new [[potion]] of [[Water Breathing]].}}
{{History||1.8|snap=14w02a|[[Trading]] has been changed: cleric [[villager]]s now [[trading|sell]] 1–4 redstone for 1 [[emerald]].}}
{{History|||snap=14w25a|Redstone dust no longer changes to [[obsidian]] next to water when [[lava]] flows into it.}}
{{History|||snap=14w27a|Redstone now extends the new [[potion]] of [[Leaping]].}}
{{History||1.9|snap=15w31a|[[File:Inactive Redstone Wire (unconnected) JE2.png|32px]] [[File:Inactive Redstone Wire (NS) JE4.png|32px]] [[File:Inactive Redstone Wire (EW) JE4.png|32px]] [[File:Inactive Redstone Wire (NE) JE4.png|32px]] [[File:Inactive Redstone Wire (ES) JE4.png|32px]] [[File:Inactive Redstone Wire (SW) JE4.png|32px]] [[File:Inactive Redstone Wire (NW) JE4.png|32px]] [[File:Inactive Redstone Wire (NEW) JE4.png|32px]] [[File:Inactive Redstone Wire (NES) JE4.png|32px]] [[File:Inactive Redstone Wire (ESW) JE4.png|32px]] [[File:Inactive Redstone Wire (NSW) JE4.png|32px]] [[File:Inactive Redstone Wire (NESW) JE4.png|32px]]<br>[[File:Active Redstone Wire (unconnected) JE2.png|32px]] [[File:Active Redstone Wire (NS) JE4.png|32px]] [[File:Active Redstone Wire (EW) JE4.png|32px]] [[File:Active Redstone Wire (NE) JE4.png|32px]] [[File:Active Redstone Wire (ES) JE4.png|32px]] [[File:Active Redstone Wire (SW) JE4.png|32px]] [[File:Active Redstone Wire (NW) JE4.png|32px]] [[File:Active Redstone Wire (NEW) JE4.png|32px]] [[File:Active Redstone Wire (NES) JE4.png|32px]] [[File:Active Redstone Wire (ESW) JE4.png|32px]] [[File:Active Redstone Wire (NSW) JE4.png|32px]] [[File:Active Redstone Wire (NESW) JE4.png|32px]] Some slight changes have been made to redstone wire's appearance - the dot now extends outward with two more pixels, and the south-facing section of bends, T shapes and crosses now has one fewer pixel. It also appears straighter and more continuous in straight wire form.
|Redstone can no longer be added to extended [[potion]]s or tier-II potions.}}
{{History|||snap=15w44a|The average yield of redstone from [[dungeon]] [[chest]]s has been cut by more than half.
|The average yield of redstone in [[mineshaft]] chests has been increased.}}
{{History|||snap=15w46a|The hitbox of redstone now covers only part of the surface of the [[block]] below, based on the orientation of the redstone.}}
{{History||1.11|snap=16w39a|Redstone dust can now be found in chests in [[woodland mansion]]s.
|Redstone can now used to craft [[observer]]s.}}
{{History||1.13|snap=17w47a|The [[item]] form of "Redstone" has been renamed to "Redstone Wire".
|Prior to [[1.13/Flattening|''The Flattening'']], this [[block]]'s numeral ID was 55, and the [[item]]'s 331.}}
{{History|||snap=17w48a|"Redstone" has been renamed to "Redstone Dust".}}
{{History|||snap=18w07a|Redstone now extends the new [[potion of the Turtle Master]].}}
{{History||1.14|snap=18w43a|[[File:Redstone Dust JE2 BE2.png|32px]] The texture of redstone dust has been changed.}}
{{History|||snap=18w50a|Redstone dust can now be found in chests in [[village]] temples.}}
{{History|||snap=19w12b|Redstone dust can now be placed on [[glass]], [[ice]] and [[sea lantern]]s.}}
{{History|||snap=19w13a|Cleric villagers now give redstone dust to players under the [[Hero of the Village]] effect.}}
{{History||1.16|snap=20w06a|Redstone dust now has a bottom texture.}}
{{History|||snap=20w09a|Redstone can now be used to craft [[target]]s.}}
{{History|||snap=20w18a|Redstone dust placement on one [[block]] has been changed from a "•" back to a "+" shape.
|Redstone dust's hitbox is now no longer strictly a cuboid, and more closely matches the shape of the wiring.<ref>{{bug|MC-137336}}</ref>
|Upward going redstone dust now has a hitbox on the side of the [[block]] too, rather than only on the floor.<ref>{{bug|MC-153508}}</ref>
|Unconnected redstone dust now has all direction block states set to "side".
|The direction block states of redstone dust are now properly set to "side" at the end of a redstone wire on both ends, rather than only the one with other redstone besides it.
|[[File:Inactive Redstone Wire (N).png|32px]] [[File:Inactive Redstone Wire (E).png|32px]] [[File:Inactive Redstone Wire (S).png|32px]] [[File:Inactive Redstone Wire (W).png|32px]]<br>[[File:Active Redstone Wire (N).png|32px]] [[File:Active Redstone Wire (E).png|32px]] [[File:Active Redstone Wire (S).png|32px]] [[File:Active Redstone Wire (W).png|32px]] While not accessible in normal gameplay, redstone dust that points into one side, but not the opposite, now visually reaches halfway across the [[block]].}}
{{History|||snap=20w19a|Redstone dust now visually connects when going up [[soul sand]], 8-layer [[snow]] stacks and the back side of upside-down [[stairs]].
|[[Particles]] are now generated across the length of the redstone wire rather than the center of the [[block]].}}
{{History|||snap=20w21a|Redstone dust placement on one [[block]] is now toggleable between a "+" and a "•" shape, by {{control|interacting}} with it.}}
{{History||1.17|snap=21w08a|Redstone dust can now drop and be smelted from [[deepslate redstone ore]].}}
{{History||1.19|snap=22w13a|Redstone wire now generates in [[Ancient City|ancient cities]].}}
{{History||1.20<br>(Experimental)|link=1.19.4|snap=23w04a|Redstone dust can now be used as an armor trim material.}}
{{History|pocket alpha}}
{{History||v0.8.0|snap=build 1|[[File:Redstone Dust JE1 BE1.png|32px]] Added redstone as an [[item]].
|Redstone is now [[drops|dropped]] when [[breaking|mined]] from [[redstone ore]].
|Redstone can be used to craft [[compass]]es and [[clock]]s.}}
{{History|||snap=build 2|Redstone can now be used to craft [[powered rail]]s.}}
{{History||v0.11.0|snap=build 1|Redstone is now used to craft [[redstone block]]s.}}
{{History||v0.12.1|snap=build 1|Redstone has been added to the [[Creative]] [[inventory]], but it still cannot be placed. }}
{{History||v0.13.0|snap=build 1|Redstone can now be placed.
|Redstone is now used to craft [[redstone lamp]]s, [[note block]]s, [[detector rail]]s and [[redstone torch]]es.}}
{{History||v0.14.0|snap=build 1|Redstone is now used to craft [[dispenser]]s and [[dropper]]s.}}
{{History||v0.15.0|snap=build 1|Redstone is now used to craft [[piston]]s and [[observer]]s.}}
{{History|pocket}}
{{History||1.0.4|snap=alpha 1.0.4.0|Cleric [[villager]]s now [[trading|sell]] 1–4 redstone for an [[emerald]].}}
{{History||1.1.0|snap=alpha 1.1.0.0|Redstone can now be found in [[woodland mansion]]s.}}
{{History|bedrock}}
{{History||?|[[File:Inactive Redstone Wire (NE) BE.png|32px]] [[File:Inactive Redstone Wire (ES) BE.png|32px]] [[File:Inactive Redstone Wire (SW) BE.png|32px]] [[File:Inactive Redstone Wire (NW) BE.png|32px]] [[File:Inactive Redstone Wire (NEW) BE.png|32px]] [[File:Inactive Redstone Wire (NES) BE.png|32px]] [[File:Inactive Redstone Wire (ESW) BE.png|32px]] [[File:Inactive Redstone Wire (NSW) BE.png|32px]] [[File:Inactive Redstone Wire (NESW) BE.png|32px]]<br>[[File:Active Redstone Wire (NE) BE.png|32px]] [[File:Active Redstone Wire (ES) BE.png|32px]] [[File:Active Redstone Wire (SW) BE.png|32px]] [[File:Active Redstone Wire (NW) BE.png|32px]] [[File:Active Redstone Wire (NEW) BE.png|32px]] [[File:Active Redstone Wire (NES) BE.png|32px]] [[File:Active Redstone Wire (ESW) BE.png|32px]] [[File:Active Redstone Wire (NSW) BE.png|32px]] [[File:Active Redstone Wire (NESW) BE.png|32px]]<br>Placed redstone now assumes its current appearance with a more solid center. Its linear state appearences are unknown.}}
{{History||1.10.0|snap=beta 1.10.0.3|[[File:Redstone Dust JE2 BE2.png|32px]] The texture of redstone has been changed.}}
{{History||1.11.0|snap=beta 1.11.0.1|Redstone can now be found in [[desert]] [[village]] temple [[chest]]s.}}
{{History|||snap=beta 1.11.0.4|Cleric [[villager]]s now [[trading|sell]] 4 redstone as part of their first tier [[trading|trade]].}}
{{History||1.16.210|snap=beta 1.16.210.57|"Redstone" has been renamed to "Redstone Dust".}}
{{History||1.17.0|snap=beta 1.16.230.52|Redstone dust can now drop and be smelted from [[deepslate redstone ore]].}}
{{History||1.19.0|snap=beta 1.19.0.26|Redstone wire now generates in [[Ancient City|ancient cities]].}}
{{History||1.19.80|snap=beta 1.19.80.21|Redstone dust can now be used as an armor trim material.}}
{{History|console}}
{{History||xbox=TU1|xbone=CU1|ps=1.0|wiiu=Patch 1|switch=1.0.1|[[File:Redstone Dust JE1 BE1.png|32px]] Added redstone.}}
{{History||xbox=TU3|Redstone now connects to a [[redstone repeater|repeater]] without the dust being explicitly pointed at it.}}
{{History||xbox=none|xbone=none|ps=1.90|wiiu=none|switch=none|[[File:Redstone Dust JE2 BE2.png|32px]] The texture of redstone has been changed.}}
{{History||ps=1.95|Redstone can now be placed on [[glass]].}}
{{History|new 3ds}}
{{History||0.1.0|[[File:Redstone Dust JE1 BE1.png|32px]] Added redstone dust.}}
{{History|foot}}
=== Redstone wire "item" ===
{{:Technical blocks/Redstone Wire}}
== Gallery ==
=== Renders ===
; Java Edition
<gallery>
Inactive Redstone Wire (NESW).png |
Inactive Redstone Wire (unconnected).png |
Inactive Redstone Wire (NS).png |
Inactive Redstone Wire (EW).png |
Inactive Redstone Wire (NE).png |
Inactive Redstone Wire (ES).png |
Inactive Redstone Wire (SW).png |
Inactive Redstone Wire (NW).png |
Inactive Redstone Wire (NEW).png |
Inactive Redstone Wire (NES).png |
Inactive Redstone Wire (ESW).png |
Inactive Redstone Wire (NSW).png
</gallery>
<gallery>
Active Redstone Wire (NESW).png |
Active Redstone Wire (unconnected).png |
Active Redstone Wire (NS).png |
Active Redstone Wire (EW).png |
Active Redstone Wire (NE).png |
Active Redstone Wire (ES).png |
Active Redstone Wire (SW).png |
Active Redstone Wire (NW).png |
Active Redstone Wire (NEW).png |
Active Redstone Wire (NES).png |
Active Redstone Wire (ESW).png |
Active Redstone Wire (NSW).png
</gallery>
; Bedrock Edition
<gallery>
Inactive Redstone Wire (NESW) BE.png |
Inactive Redstone Wire (NESW) BE.png |
Inactive Redstone Wire (NS).png |
Inactive Redstone Wire (EW).png |
Inactive Redstone Wire (NE) BE.png |
Inactive Redstone Wire (ES) BE.png |
Inactive Redstone Wire (SW) BE.png |
Inactive Redstone Wire (NW) BE.png |
Inactive Redstone Wire (NEW) BE.png |
Inactive Redstone Wire (NES) BE.png |
Inactive Redstone Wire (ESW) BE.png |
Inactive Redstone Wire (NSW) BE.png
</gallery>
<gallery>
Active Redstone Wire (NESW) BE.png |
Active Redstone Wire (NESW) BE.png |
Active Redstone Wire (NS).png |
Active Redstone Wire (EW).png |
Active Redstone Wire (NE) BE.png |
Active Redstone Wire (ES) BE.png |
Active Redstone Wire (SW) BE.png |
Active Redstone Wire (NW) BE.png |
Active Redstone Wire (NEW) BE.png |
Active Redstone Wire (NES) BE.png |
Active Redstone Wire (ESW) BE.png |
Active Redstone Wire (NSW) BE.png
</gallery>
=== Screenshots ===
<gallery>
Slab Stair Redstone.png|First image of redstone dust on top of slabs and stairs.
File:Olivia Tinkering.jpeg|[[Olivia]] using a scarce amount of redstone dust.
File:23w32a.jpg|[[Sunny]] using a very long strip of redstone dust.
</gallery>
=== In other media ===
<gallery>
Powered By Redstone JINX.jpg|Official T-shirt artwork "Powered By Redstone" made by [https://www.jinx.com JINX].
File:Redstone Behind Chiseled Bookshelf Pixel Art.png|Pixel art of redstone dust.
</gallery>
== Issues ==
{{issue list|redstone|redstone dust|redstone wire}}
== Trivia ==
* Five updates for [[wikipedia:Windows 10 version history|Windows 10]] released from 2016 to 2018 were codenamed "Redstone", referencing ''Minecraft''.<ref>{{link|url=https://www.theverge.com/2015/4/7/8364355/microsoft-redstone-windows-updates|title=Microsoft plans ‘Redstone’ updates for Windows 10 in 2016|author=Tom Warren|website=The Verge|date=April 7, 2015}}</ref>
* The block has 1,296 possible block state combinations, the highest of all blocks as of 1.15.2, beating [[fire]]'s 512 and [[note block]]'s 800.
* According to {{el|ee}}, redstone dust contains radioactive [[element]]s.
== References ==
{{Reflist}}
{{Redstone}}
{{Blocks|Utility}}
{{Items}}
[[Category:Redstone mechanics]]
[[Category:Mechanisms]]
[[Category:Mechanics]]
[[Category:Generated structure blocks]]
[[Category:Non-solid blocks]]
[[Category:Brewing recipe]]
[[cs:Rudit]]
[[de:Redstone]]
[[el:Σκόνη Κοκκινόπετρας]]
[[es:Polvo de redstone]]
[[fr:Poudre de redstone]]
[[hu:Redstone]]
[[it:Polvere di redstone]]
[[ja:レッドストーンダスト]]
[[ko:레드스톤 가루]]
[[nl:Redstonestof]]
[[pl:Redstone]]
[[pt:Pó de redstone]]
[[ru:Красная пыль]]
[[th:ผงเรดสโตน]]
[[tr:Kızıltaş]]
[[uk:Редстоун]]
[[zh:红石粉]]</li></ul></nowiki> | 18w43a | ||||
| 18w47b | |||||
1.19.3{{Extension DPL}}<ul><li>[[:Category:Planned items|Category:Planned items]]<br/>All pages relating to items that have been officially announced, but are not yet in the game.
__EXPECTUNUSEDCATEGORY__
[[Category:Items]]
[[Category:Planned]]
[[pt:Itens planejados]]</li><li>[[Glow Berries|Glow Berries]]<br/>{{Block
|image=<gallery>
Cave Vines (head).png|Without Berries
Cave Vines (berries).png|With Berries
</gallery>
|image2 = Glow Berries JE1 BE1.png
|extratext=[[#Gallery|View all renders]]
|rarity=Common
|renewable=Yes
|stackable=Yes (64)
|tool=Any
|light=Yes
|transparent=Yes
|heals={{hunger|2}}
|flammable=Yes
|lavasusceptible=No
}}
'''Glow berries''' are a [[food]] [[item]] obtained from cave vines and can be used to plant them.
'''Cave vines''' are a climbable, [[Bone Meal|bonemealable]] plant that hangs off ceilings and grows glow berries. Cave vines with glow berries produce [[light]] and drop glow berries when broken or harvested. Cave vines with no glow berries will not drop anything.
== Obtaining ==
=== Natural generation ===
Cave vines can be found in [[lush caves]], hanging from cave ceilings.
=== Chest loot ===
{{LootChestItem|glow-berries}}
=== Post-generation ===
Glow berries can be collected from a cave vine by {{control|using}} or {{control|breaking}} the vine. This yields one glow berry when the vine is bearing them and nothing when it is not. A cave vine also breaks if [[water]] runs over its location or if a [[piston]] extends or pushes a block into its location.
{{IN|bedrock}}, using a tool with [[Silk Touch]] on cave vines always yields a glow berry, even if the vine appears empty.
[[Fortune]] has no effect on the number of glow berries dropped.
== Usage ==
=== Placement ===
Glow berries can be placed on and grown from the bottom of most blocks. They have no specific lighting requirements. When placed, they can be of any length.
=== Growth ===
Placing glow berries on the bottom of a block creates a cave vine that grows downward one block at a time as long as [[air]] is beneath it and its maximum height (2 to 26 blocks) has not been reached. Each newly-grown cave vine block has a 1 in 9 chance of bearing glow berries. Only this tip can ever naturally grow them.{{only|JE}}{{More info|exact growth rate and chance to bear glow berries}}
{{control|Using}} [[bone meal]] on a cave vine produces glow berries if the vine was not bearing any.
{{IN|Java}}, cave vines stop growing if [[shears]] are {{control|used}} on the tip.
{{IN|bedrock}}, if placing glow berries in the Nether, cave vines are able to grow and produces glow berries.
=== Food ===
To eat glow berries, press and hold {{control|use}} while it is selected in the hotbar. Eating one restores {{hunger|2}} [[hunger]] and 0.4 hunger [[Hunger#Mechanics|saturation]] points, like [[sweet berries]].
=== Light ===
When bearing glow berries, cave vines give off a [[light]] level of 14.
=== Composting ===
Placing glow berries into a [[composter]] by {{control|using}} them on it has a 30% chance of raising the compost level by 1.
=== Breeding ===
Glow berries can be fed to [[fox]]es to [[breeding|breed]] them. Foxes are similar to cats when being fed as a wild animal; a sudden movement by the player may cause the fox to flee even if the player holds glow berries. The resulting baby fox trusts the [[player]] and does not flee.
Glow berries can be {{control|used}} on baby foxes to reduce the time until they grow by 10%.
==Sounds==
===Glow berries===
{{Sound table/Entity/Food}}
===Cave vines===
====Generic====
{{Sound table/Block/Cave vines}}
==== Unique ====
{{edition|java}}:
{{Sound table
|sound=Berries pick1.ogg
|sound2=Berries pick2.ogg
|subtitle=Berries pop
|source=block
|description=When glow berries are picked
|id=block.cave_vines.pick_berries
|translationkey=subtitles.item.berries.pick
|volume=1.0
|pitch=0.8-1.2
|distance=16}}
{{Sound table
|sound=Shear.ogg
|subtitle=Plant cropped
|source=block
|description=When the tip of cave vines are cropped with [[Shears#Cropping growing plants|shears]]
|id=block.growing_plant.crop
|translationkey=subtitles.block.growing_plant.crop
|volume=1.0
|pitch=1.0
|distance=16
|foot=1}}
{{edition|bedrock}}:
{{Sound table
|type=bedrock
|sound=Berries pick1.ogg
|sound2=Berries pick2.ogg
|source=block
|description=When glow berries are picked
|id=pick_berries.cave_vines
|volume=1.0
|pitch=0.8-1.2
|foot=1}}
==Data values==
===ID===
{{edition|java}}:
{{ID table
|edition=java
|showblocktags=y
|showitemtags=y
|showforms=y
|generatetranslationkeys=y
|displayname=Cave Vines
|spritetype=block
|nameid=cave_vines
|blocktags=cave_vines,lush_plants_replaceable
|form=block
}}
{{ID table
|displayname=Cave Vines Plant
|spritetype=block
|nameid=cave_vines_plant
|blocktags=cave_vines,lush_plants_replaceable
|form=block
}}
{{ID table
|displayname=Glow Berries
|spritetype=item
|nameid=glow_berries
|itemtags=fox_food
|form=item
|foot=1}}
{{el|be}}:
{{ID table
|edition=bedrock
|shownumericids=y
|showforms=y
|generatetranslationkeys=y
|displayname=Cave Vines
|nameid=cave_vines
|spritetype=block
|id=577}}
{{ID table
|displayname=Cave Vines Body With Berries
|nameid=cave_vines_body_with_berries
|spritename=lit-cave-vines-plant
|spritetype=block
|id=630}}
{{ID table
|displayname=Cave Vines Head With Berries
|spritename=lit-cave-vines
|nameid=cave_vines_head_with_berries
|spritetype=block
|id=631}}
{{ID table
|displayname=Glow Berries
|spritetype=item
|nameid=glow_berries
|form=item
|id=638
|foot=1}}
=== Block states===
{{See also|Block states}}
{{/BS}}
==Advancements==
{{load advancements|Husbandry;A Balanced Diet}}
==History==
{{History||October 3, 2020|link={{ytl|DWZIfsaIgtE|t=1781}}|[[File:Cave Vines Plant JE1 BE1.png|32px]] [[File:Cave Vines Plant (berries) JE1 BE1.png|32px]] [[File:Cave Vines (head) JE1 BE1.png|32px]] [[File:Cave Vines (berries) JE1 BE1.png|32px]] Cave vines (named as glow berries) are shown as part of lush caves at [[Minecraft Live 2020]].}}
{{History|java}}
{{History||1.17|snap=21w05a|[[File:Glow Berries JE1 BE1.png|32px]] Added glow berries.
|[[File:Cave Vines Plant JE1 BE1.png|32px]] [[File:Cave Vines Plant (berries) JE1 BE1.png|32px]] [[File:Cave Vines (head) JE1 BE1.png|32px]] [[File:Cave Vines (berries) JE1 BE1.png|32px]] Added cave vines.}}
{{History|||snap=21w11a|Renamed from "cave vines head" and "cave vines body" to "cave vines" and "cave vines plant", respectively.
|The IDs have also changed.
|Cave vines now always give 14 light, regardless of the type of part.
|Now slow down the player.
|Can now be climbed.}}
{{History|||snap=21w13a|Glow berries now generate as loot in [[mineshaft]] [[Minecart with Chest|chest minecarts]].}}
{{History||1.18|snap=Experimental Snapshot 1|With the implementation of cave biomes including lush caves, caves vines can now generate in normal worlds.}}
{{History|||snap=21w37a|Cave vines stop growing if [[shears]] are used on the tip.}}
{{History|||snap=21w41a|[[File:Cave Vines Plant JE2.png|32px]] [[File:Cave Vines Plant (berries) JE2.png|32px]] Changed cave vines plant texture.}}
{{History||1.19|snap=22w13a|Glow Berries may now be found in [[ancient city]] [[chest]]s.}}
{{History|bedrock}}
{{History||Caves & Cliffs (experimental)|link=Bedrock Edition 1.17.0|snap=beta 1.16.220.52|[[File:Glow Berries JE1 BE1.png|32px]] Added glow berries.
|[[File:Cave Vines Plant JE1 BE1.png|32px]] [[File:Cave Vines Plant (berries) JE1 BE1.png|32px]] [[File:Cave Vines (head) JE1 BE1.png|32px]] [[File:Cave Vines (berries) JE1 BE1.png|32px]] Added cave vines.}}
{{History||1.17.0|snap=beta 1.16.230.54|Glow Berries now generate as loot in [[mineshaft]] [[Minecart with Chest|chest minecarts]].}}
{{History|||snap=beta 1.17.0.52|Glow Berries are now available without enabling [[experimental gameplay]].}}
{{History||1.17.20|snap=beta 1.17.20.20|Cave Vines can now be pollinated by [[bee]]s.}}
{{History||1.18.10|snap=beta 1.18.10.20|[[File:Cave Vines Plant JE2.png|32px]] [[File:Cave Vines Plant (berries) JE2.png|32px]] Changed cave vines plant texture.}}
{{History||1.19.20|snap=beta 1.19.20.20|Cave vines can now be destroyed by [[ravagers]].}}
{{History|foot}}
<gallery>
Lush_caves_overview_concept_art.jpg|Concept art for the lush caves and vegetation including Glow Berries.
JE_1.17_Development_Lush_Caves.jpg|A view of the lush caves with glow berries from Minecraft Live 2020.
Lushcaves_minecon.png|Lush cave in MINECON.
Cavesworkinprogress.jpg|A view of the lush caves with glow berries, tweeted by LadyAgnes.
Livestream_lush_cave.jpg|Another view of the lush caves with glow berries, in an interview with LadyAgnes.
Glow Berry Fox.jpg|A fox under a glow berry vine.
</gallery>
===Cave vines "item"===
{{:Technical blocks/Cave Vines}}
==Issues==
{{Issue list}}
==Trivia==
*They are the first item to be usable as both a food and a light source.
==Gallery==
<gallery>
Cave Vines (plant).png
Cave Vines (berries, plant).png
Cave Vines (head).png
Cave Vines (berries).png
Cave_Vines_Age2_(Possibility_pattern_1)_JE1.png|A possible pattern of the cave vines at Age 2.
Cave_Vines_Age2_(Possibility_pattern_2)_JE1.png|And another pattern.
</gallery>
{{Blocks|vegetation}}
{{Items}}
[[Category:Food]]
[[Category:Plants]]
[[Category:Natural blocks]]
[[Category:Non-solid blocks]]
[[Category:Light sources]]
[[Category:Flammable blocks]]
[[Category:Climbable blocks]]
[[de:Leuchtbeeren]]
[[es:Bayas luminosas]]
[[fr:Baies lumineuses]]
[[it:Bacche luminose]]
[[ja:グロウベリー]]
[[pt:Bagas brilhantes]]
[[ru:Светящиеся ягоды]]
[[zh:发光浆果]]</li></ul> | 22w44a | Command blocks are now available in the creative inventory, but only if cheats are enabled. | |||
| 22w45a | Moved command blocks behind the Operator Utilities tab in the creative inventory. The tab is only available if cheats are enabled and the "Operator Items Tab" option in the controls menu is turned on. | ||||
| Upcoming Java Edition | |||||
1.20.2{{Extension DPL}}<ul><li>[[Fermented Spider Eye|Fermented Spider Eye]]<br/>{{Item
| image = Fermented Spider Eye.png
| renewable = Yes
| stackable = Yes (64)
}}
A '''fermented spider eye''' is a [[brewing]] ingredient.
== Obtaining ==
=== Crafting ===
{{Crafting
|Brown Mushroom
|Sugar
|Spider Eye
|Output= Fermented Spider Eye
|type= Brewing
}}
== Usage ==
They can be used to brew [[potion]]s with negative effects, as well as the [[Potion of Invisibility]].
=== Brewing ingredient ===
{{brewing
|showname=1
|head=1
|Fermented Spider Eye
|Potion of Weakness
|base=Water Bottle
}}
{{brewing
|Fermented Spider Eye
|Potion of Harming
|base=Potion of Poison;Potion of Healing
}}
{{brewing
|Fermented Spider Eye
|Potion of Slowness
|base=Potion of Swiftness;Potion of Leaping
}}
{{brewing
|foot=1
|Fermented Spider Eye
|Potion of Invisibility
|base=Potion of Night Vision
}}
== Data values ==
=== ID ===
{{edition|java}}:
{{ID table
|edition=java
|showforms=y
|generatetranslationkeys=y
|displayname=Fermented Spider Eye
|spritetype=item
|nameid=fermented_spider_eye
|form=item
|foot=1}}
{{edition|bedrock}}:
{{ID table
|edition=bedrock
|shownumericids=y
|showforms=y
|notshowbeitemforms=y
|generatetranslationkeys=y
|displayname=Fermented Spider Eye
|spritetype=item
|nameid=fermented_spider_eye
|id=428
|form=item
|foot=1}}
== Video ==
<div style="text-align:center">{{yt|ln8ZQn5MtFI}}</div>
== History ==
{{History|java}}
{{History||1.0.0|snap=Beta 1.9 Prerelease 2|[[File:Fermented Spider Eye JE1 BE1.png|32px]] Added fermented spider eyes.}}
{{History|||snap=Beta 1.9 Prerelease 3|Fermented spider eyes can now be [[brewing|brewed]] in a [[water bottle]] to create a [[potion of Weakness]].
|Fermented spider eyes now corrupt potions of [[Swiftness]] and [[Fire Resistance]] into potions of [[Slowness]], for both normal and extended types.
|Fermented spider eyes now corrupts potions of [[Healing]] and [[Poison]] into potions of [[Harming]], as well as Healing II and extended Poison into extended Harming.}}
{{History||1.4.2|snap=12w34a|Fermented spider eyes now change potions of [[Night Vision]] into the new potions of [[Invisibility]], for both normal and extended types.}}
{{History||1.7.2|snap=13w36a|Fermented spider eyes now corrupt the new [[potion of Water Breathing]] into a potion of Harming.}}
{{History||1.8|snap=14w27a|Fermented spider eyes now corrupt the new [[potion of Leaping]] into a potion of Slowness.}}
{{History||1.9|snap=15w31a|[[Potions of Weakness]] can no longer be made using a [[thick potion]], [[mundane potion]], [[awkward potion]], [[potion of Regeneration]], or [[potion of Strength]].
|[[Potions of Slowness]] can no longer be made using a [[potion of Fire Resistance]].
|[[Potions of Harming]] can no longer be made using a [[potion of Water Breathing]].}}
{{History||1.13|snap=17w47a|Prior to [[1.13/Flattening|''The Flattening'']], this [[item]]'s numeral ID was 376.}}
{{History||1.14|snap=18w50a|[[File:Fermented Spider Eye JE2 BE2.png|32px]] The texture of fermented spider eyes has been changed.}}
{{History|upcoming java}}
{{History||Villager Trade Rebalance<br>(Experimental)|link=Java Edition 1.20.2|snap=23w31a|[[Wandering trader]]s now have a chance to [[trading|buy]] a fermented spider eye from the player.}}
{{History|pocket alpha}}
{{History||v0.12.1|snap=build 1|[[File:Fermented Spider Eye JE1 BE1.png|32px]] Added fermented spider eyes.}}
{{History|bedrock}}
{{History||1.10.0|snap=beta 1.10.0.3|[[File:Fermented Spider Eye JE2 BE2.png|32px]] The texture of fermented spider eyes has been changed.}}
{{History|console}}
{{History||xbox=TU7|xbone=CU1|ps=1.0|wiiu=Patch 1|switch=1.0.1|[[File:Fermented Spider Eye JE1 BE1.png|32px]] Added fermented spider eyes.}}
{{History||xbox=none|xbone=none|ps=1.90|wiiu=none|switch=none|[[File:Fermented Spider Eye JE2 BE2.png|32px]] The texture of fermented spider eyes has been changed.}}
{{History|New 3DS}}
{{History||0.1.0|[[File:Fermented Spider Eye JE1 BE1.png|32px]] Added fermented spider eyes.}}
{{History|foot}}
== Issues ==
{{issue list}}
{{items}}
[[Category:Renewable resources]]
[[cs:Zkvašené pavoučí oko]]
[[de:Fermentiertes Spinnenauge]]
[[es:Ojo de araña fermentado]]
[[fr:Œil d'araignée fermenté]]
[[it:Occhio di ragno fermentato]]
[[ja:発酵したクモの目]]
[[ko:발효된 거미 눈]]
[[nl:Gefermenteerd spinnenoog]]
[[pl:Sfermentowane oko pająka]]
[[pt:Olho de aranha fermentado]]
[[ru:Приготовленный паучий глаз]]
[[th:ตาแมงมุมดอง]]
[[uk:Оброблене павуче око]]
[[zh:发酵蛛眼]]</li><li>[[Fish|Fish]]<br/>{{About|the type of mob|the action|Fishing}}
'''Fish''' are aquatic creatures that are found in [[river]] and [[ocean]] biomes.
== Mobs ==
There are four categories of fish mobs in ''Minecraft'':
*{{EntityLink|Cod}}
*{{EntityLink|Salmon}}
*{{EntityLink|Pufferfish}}
*{{EntityLink|Tropical Fish}} - many color and pattern varieties
In addition, there are other fish-like mobs that have different characteristics from fish: {{EntityLink|Axolotl}}, {{EntityLink|Guardian}}, and {{EntityLink|Elder Guardian}}.
==Obtaining and transporting==
A live fish can be captured by using a [[water bucket]] on a fish, to obtain a [[bucket of fish]], which is the only way to obtain the live mob in item form. Using the bucket of fish on a water source block transfers the fish from the bucket to the body of water. A water bucket may also be used on [[axolotl]]s in this manner.
==Items==
Fish exist in several different item forms. Upon death, fish drop their item form equivalent (cooked if on fire), with a chance to drop a [[bone]]{{only|bedrock}} or [[bone meal]].{{only|java}}
;Non-living
*{{ItemLink|Raw Cod}}
*{{ItemLink|Cooked Cod}}
*{{ItemLink|Raw Salmon}}
*{{ItemLink|Cooked Salmon}}
*{{ItemLink|Pufferfish|link=Pufferfish (item)}}
*{{ItemLink|Tropical Fish|link=Tropical Fish (item)}}
;Living
*{{ItemLink|Bucket of Cod}}
*{{ItemLink|Bucket of Salmon}}
*{{ItemLink|Bucket of Pufferfish}}
*{{ItemLink|Bucket of Tropical Fish}}
== Spawning ==
Various fish can be found in different [[ocean]] [[biomes]], but only [[salmon]] appear in rivers. Fish can also spawn in player-created bodies of water, as long as they are within a river or ocean biome.
{| class="wikitable sortable" style="text-align:left" data-description="Fish biomes"
!'''Fish'''
! style="text-align:left" |{{BiomeLink|Warm Ocean}}
! style="text-align:left" |{{BiomeLink|Lukewarm Ocean}}<br>{{BiomeLink|Deep Lukewarm Ocean}}
! style="text-align:left" |{{BiomeLink|Ocean}}<br>{{BiomeLink|Deep Ocean}}
! style="text-align:left" |{{BiomeLink|Cold Ocean}}<br>{{BiomeLink|Deep Cold Ocean}}
! style="text-align:left" |{{BiomeLink|Frozen Ocean}}<br>{{BiomeLink|Deep Frozen Ocean}}
! style="text-align:left" |{{BiomeLink|River}}<br>{{BiomeLink|Frozen River}}
|-
! rowspan=2 style="text-align:left" |{{EntityLink|Cod}}
| rowspan=2 {{tc|no}}
| rowspan=2 {{tc|yes}}
| rowspan=2 {{tc|yes}}
| rowspan=2 {{tc|yes}}
| {{tc|no|No{{only|je|short=1}}}}
| rowspan=2 {{tc|no}}
|-
| {{tc|yes|Yes{{only|be|short=1}}}}
|-
! rowspan=2 style="text-align:left" |{{EntityLink|Salmon}}
| rowspan=2 {{tc|no}}
| {{tc|no|No{{only|je|short=1}}}}
| {{tc|no|No{{only|je|short=1}}}}
| rowspan=2 {{tc|yes}}
| rowspan=2 {{tc|yes}}
| rowspan=2 {{tc|yes}}
|-
| {{tc|yes|Yes{{only|be|short=1}}}}
| {{tc|yes|Yes{{only|be|short=1}}}}
|-
! rowspan=2 style="text-align:left" |{{EntityLink|Pufferfish}}
| rowspan=2 {{tc|yes}}
| {{tc|yes|Yes{{only|je|short=1}}}}
| rowspan=2 {{tc|no}}
| rowspan=2 {{tc|no}}
| rowspan=2 {{tc|no}}
| rowspan=2 {{tc|no}}
|-
| {{tc|no|No{{only|be|short=1}}}}
|-
! style="text-align:left" |{{EntityLink|Tropical Fish}}<ref group="note">Also spawns in {{BiomeLink|Lush Caves}} at any Y-level.</ref>
| {{tc|yes}}
| {{tc|yes}}
| {{tc|no}}
| {{tc|no}}
| {{tc|no}}
| {{tc|no}}
|-
! style="text-align:left" |{{EntityLink|Squid}}
| {{tc|yes}}
| {{tc|yes}}
| {{tc|yes}}
| {{tc|yes}}
| {{tc|yes}}
| {{tc|yes}}
|-
! rowspan=2 style="text-align:left" |{{EntityLink|Dolphin}}
| rowspan=2 {{tc|yes}}
| rowspan=2 {{tc|yes}}
| rowspan=2 {{tc|yes}}
| {{tc|no|No{{only|je|short=1}}}}
| rowspan=2 {{tc|no}}
| rowspan=2 {{tc|no}}
|-
| {{tc|yes|Yes{{only|be|short=1}}}}
|}
{{notelist}}
In ''Java Edition'', fish can spawn inside a water block at Y-level 50 to 63 (from 13 blocks below sea level up to inside the block one above it), that also has water above and below it. The spawn block and the block below can be any kind of water, such as a source block, falling water, bubble column, kelp, or even a waterlogged block (as long as the fish can be placed at the bottom center of the spawn block without colliding with anything solid). The block above must be pure water, such as a source block, falling water, or flowing water of any depth. Particularly, the block above cannot also be a bubble column, so fish no longer spawn inside bubble elevators.<ref>{{cite bug|MC|244683|Tropical fish spawn in bubble columns (fixed in 22w07a)}}</ref>
''Bedrock Edition'' does permit fish to spawn in bubble columns.<ref>{{cite bug|MCPE|73967|Squids, Dolphins, and fish not spawning in bubble columns (fixed in 1.16.20)}}</ref>
Fish can spawn between 24 and 64 block spherical range away from the player.{{only|java}}
=== Despawning ===
As of [[1.16]], fish can despawn at range of 40 blocks or more from the player, and will instantly despawn more than 64 blocks away, except when spawned using a [[bucket of fish]].
{{Items}}
{{Entities}}
[[cs:Ryba]]
[[de:Fisch (Begriffsklärung)]]
[[es:Pez]]
[[fr:Poisson]]
[[it:Pesce]]
[[ja:魚]]
[[ko:물고기]]
[[nl:Vis]]
[[pl:Ryba (ujednoznacznienie)]]
[[pt:Peixe]]
[[ru:Рыба]]
[[th:ปลา (แก้ความกำกวม)]]
[[uk:Риба]]
[[zh:鱼]]</li></ul> | 23w31a | The text in command blocks now scrolls when selected using ⇧ Shift and arrow keys.[2] | |||
| Pocket Edition | |||||
1.0.5{{Extension DPL}}<ul><li>[[Glass Bottle|Glass Bottle]]<br/>{{about|the empty bottle||Bottle}}
{{Item
| image = Glass Bottle.png
| renewable = Yes
| stackable = Yes (64)
}}
A '''glass bottle''' is an [[item]] that can hold [[water]], [[potion]]s, [[Honey Bottle|honey]], or [[dragon's breath]].
== Obtaining ==
Glass bottles can be obtained by crafting, drinking from bottles, [[fishing]], or from [[witch]] drops.
=== Crafting ===
{{Crafting
|A2= Glass
|C2= Glass
|B3= Glass
|Output= Glass Bottle,3
|type= Brewing
}}
=== Drinking ===
Drinking a [[potion]] or [[Honey Bottle|honey bottle]] returns the empty glass bottle. Throwing a splash potion or a lingering potion does not return a glass bottle, but brewing a lingering potion gives back a glass bottle.
=== Mob loot ===
[[Witch]]es have a chance of dropping 0–6 glass bottles upon death. This is increased by 3 per level of [[Looting]], for a maximum of 0–15 glass bottles.
=== Mud ===
{{control|Using}} a [[water bottle]], [[splash water bottle]] or [[lingering water bottle]] on [[dirt]], [[coarse dirt]] or [[rooted dirt]] will transforming it into a [[mud]] block, at the same time leaving the player with an empty glass bottle.
=== Cauldrons ===
{{control|Using}} a water bottle (or, {{in|bedrock}}, a potion, splash potion, or lingering potion) on a [[cauldron]] that is not yet full adds that liquid to the cauldron, leaving the player with an empty glass bottle.
== Usage ==
Glass bottles can be filled to make [[water bottle]]s, which can then be used to [[brew]] items with a [[brewing stand]]. Glass bottles are also used to hold the resulting [[potion]].
=== Collecting liquids ===
==== Water ====
A bottle may be filled with water by holding it in the hand and {{control|using}} it on a [[water]] source block or a [[cauldron]] that has water in it. It can also be filled using a waterlogged block.{{only|java}}<ref>{{bug|MCPE-83420}}</ref>
Also, a bottle may be filled by powering a [[dispenser]] containing a bottle and pointed at a water source block. This does not work with cauldrons.<ref>{{bug|MC-165196|||Invalid}}</ref>
If filled via a water source, the water is unaffected. If filled via a cauldron, {{frac|1|3}} of the water in the cauldron is removed. Therefore, using a cauldron to fill water bottles is inefficient, except in [[the Nether]] where it is normally the only way to fill bottles.
==== Potion ====
{{IN|bedrock}}, a bottle may be filled with potion by {{control|using}} it on a [[cauldron]] containing potion. When the bottle is filled, {{frac|1|3}} of the cauldron's potion is removed.
==== Honey ====
If a [[beehive|bee nest]] or [[beehive]] is full, the player can {{control|use}} a glass bottle on the block, or may power a [[dispenser]] that contains a bottle and is pointed at the block, which empties the block and creates a [[honey bottle]]. Honey bottles can also be emptied by using them in crafting recipes (such as [[sugar]] or [[honey block]]). However, a lingering potion use on tipped arrow recipe does not give the bottle back.
==== Dragon's breath ====
{{control|Using}} a glass bottle in clouds emitted when the [[ender dragon]] breathes or shoots a [[dragon fireball]] fills the bottle with [[dragon's breath]].
When put 2 or more dragon's breath in the brewing stand, after the brewing process, a glass bottle will drop as an [[Item (entity)|entity]]. However, if put only 1 dragon's breath in the brewing stand, after the brewing process, the glass bottle is consumed and cannot be retrieved.<ref>{{bug|MC-259583}}</ref>
=== Trading ===
Expert-level cleric [[villager]]s have a 50% chance to buy 9 glass bottles for one [[emerald]] as part of their trade.{{only|bedrock}}
Expert-level cleric villagers have a {{frac|2|3}} chance to buy 9 glass bottles for one emerald.{{only|java}}
=== Crafting ingredients ===
{{Crafting usage|Glass Bottle}}
== Sounds ==
{{edition|java}}:
{{Sound table
|rowspan=2
|sound=Bottle fill water1.ogg
|sound2=Bottle fill water2.ogg
|sound3=Bottle fill water3.ogg
|sound4=Bottle fill water4.ogg
|subtitle=Bottle fills
|source=block
|description=When a bottle is filled with a liquid from a cauldron, or honey from a bee nest or beehive
|id=item.bottle.fill
|translationkey=subtitles.item.bottle.fill
|volume=1.0
|pitch=1.0
|distance=16}}
{{Sound table
|subtitle=Bottle fills
|source=neutral
|description=When a bottle is filled with water from a water source
|id=item.bottle.fill
|translationkey=subtitles.item.bottle.fill
|volume=1.0
|pitch=1.0
|distance=16}}
{{Sound table
|sound=Bottle empty1.ogg
|sound2=Bottle empty2.ogg
|subtitle=Bottle empties
|source=block
|description=When a water bottle is emptied
|id=item.bottle.empty
|translationkey=subtitles.item.bottle.empty
|volume=1.0
|pitch=1.0
|distance=16}}
{{Sound table
|sound=Bottle fill dragon breath1.ogg
|sound2=Bottle fill dragon breath2.ogg
|subtitle=Bottle fills
|source=neutral
|description=When a bottle is filled with dragon's breath
|id=item.bottle.fill_dragonbreath
|translationkey=subtitles.item.bottle.fill
|volume=1.0
|pitch=1.0
|distance=16
|foot=1}}
{{edition|java}}:
{{Sound table
|type=bedrock
|rowspan=4
|sound=Water Splash Old.ogg
|source=block
|description=When water from a bottle is placed in a cauldron<wbr><ref group=sound name=potionsplash>{{Bug|MCPE-174867}}</ref>
|id=cauldron.fillwater
|volume=0.1
|pitch=1.0}}
{{Sound table
|source=block
|description=When water from a bottle is taken from a cauldron<wbr><ref group=sound name=potionsplash/>
|id=cauldron.takewater
|volume=0.1
|pitch=1.0}}
{{Sound table
|source=block
|description=When a bottle is filled with a potion from a cauldron<wbr><ref group=sound name=potionsplash/>
|id=cauldron.fillpotion
|volume=0.1
|pitch=1.0}}
{{Sound table
|source=block
|description=When a potion bottle is emptied into a cauldron<wbr><ref group=sound name=potionsplash/>
|id=cauldron.takepotion
|volume=0.1
|pitch=1.0}}
{{Sound table
|sound=Bottle empty1.ogg
|sound2=Bottle empty2.ogg
|source=sound<!--bottle-->
|description=When a bottle is emptied<wbr>{{Upcoming|BE 1.20.40}}
|id=bottle.empty
|volume=1.0
|pitch=1.0}}
{{Sound table
|sound=Bottle fill water1.ogg
|sound2=Bottle fill water2.ogg
|sound3=Bottle fill water3.ogg
|sound4=Bottle fill water4.ogg
|source=sound<!--bottle-->
|description=When a bottle is filled<wbr>{{Upcoming|BE 1.20.40}}
|id=bottle.fill
|volume=1.0
|pitch=1.0}}
{{Sound table
|sound=Fill water bucket1.ogg
|sound2=Fill water bucket2.ogg
|sound3=Fill water bucket3.ogg
|source=block
|description=When a bottle is filled with honey from a bee nest or beehive<wbr><ref group=sound>{{Bug|MCPE-53881}}</ref>
|id=bucket.fill_water
|volume=1.0
|pitch=1.0}}
{{Sound table
|sound=Bottle fill dragon breath1.ogg
|sound2=Bottle fill dragon breath2.ogg
|source=sound
|description=When a bottle is filled with dragon's breath
|id=bottle.dragonbreath
|volume=0.7<wbr>{{Until|BE 1.20.40}}<br>1.0<wbr>{{Upcoming|BE 1.20.40}}
|pitch=1.0
|foot=1}}
== Data values ==
=== ID ===
{{edition|java}}:
{{ID table
|edition=java
|showforms=y
|generatetranslationkeys=y
|displayname=Glass Bottle
|spritetype=item
|nameid=glass_bottle
|form=item
|foot=1}}
{{edition|bedrock}}:
{{ID table
|edition=bedrock
|shownumericids=y
|showforms=y
|notshowbeitemforms=y
|generatetranslationkeys=y
|displayname=Glass Bottle
|spritetype=item
|id=427
|nameid=glass_bottle
|form=item
|foot=1}}
== Achievements ==
{{Load achievements|You Need a Mint;Local Brewery;Bee Our guest}}
== Advancements ==
{{load advancements|Local Brewery;You Need a Mint;Bee Our Guest}}
== History ==
{{History|java}}
{{History||1.0.0|snap=Beta 1.9 Prerelease 2|[[File:Glass Bottle JE1 BE1.png|32px]] Added glass bottles.}}
{{History|||snap=Beta 1.9 Prerelease 3|[[File:Water Bottle JE1 BE1.png|32px]] Glass bottles have been given their sole function of picking up [[water]] for the [[brewing]] of [[potion]]s.}}
{{History||1.4.2|snap=12w38b|[[Witch]]es now have a chance of [[drops|dropping]] glass bottles upon [[death]].}}
{{history||1.9|snap=15w33a|[[File:Dragon's Breath JE1 BE1.png|32px]] Glass bottles can now be used to obtain [[dragon's breath]].}}
{{history|||snap=15w43a|A glass bottle can be found in the [[brewing stand]] in an [[igloo]] basement.}}
{{history|||snap=15w43c|The glass bottle has been removed from igloo basements.}}
{{History|||snap=15w50a|Added [[sound]]s: <code>item.bottle.fill</code> and <code>item.bottle.fill_dragonbreath</code>.}}
{{History||1.13|snap=17w47a|Prior to [[1.13/Flattening|''The Flattening'']], this [[item]]'s numeral ID was 374.}}
{{History||1.14|snap=18w43a|[[File:Glass Bottle JE2 BE2.png|32px]] [[File:Water Bottle JE2 BE2.png|32px]] [[File:Dragon's Breath JE2 BE2.png|32px]] The textures of glass bottles, [[water bottle]]s and [[dragon's breath]] have been changed.}}
{{History|||snap=19w11a|Cleric [[villager]]s now [[trading|buy]] glass bottles.}}
{{History||1.15|snap=19w34a|[[File:Honey Bottle JE1.png|32px]] Glass bottles can now be used to collect [[Honey Bottle|honey]].
|[[Dispenser]]s may now use glass bottles to collect [[water]] and honey.}}
{{History|||snap=19w46a|Using glass bottles to collect honey now unlocks the [[Bee Our Guest]] advancement.}}
{{History||1.19|snap=22w11a|Converting [[dirt]], [[coarse dirt]] or [[rooted dirt]] into [[mud]] using a [[water bottle]], [[splash water bottle]] or [[lingering water bottle]] now leaves the player with an empty glass bottle.}}
{{History|pocket alpha}}
{{History||v0.12.1|snap=build 1|[[File:Glass Bottle JE1 BE1.png|32px]] Added glass bottles.}}
{{History||v0.14.0|snap=build 1|Glass bottles can now be used to empty [[cauldron]]s filled with [[water]] or [[potion]]s.
|Glass bottles can now be dropped by [[witch]]es.
|Potions and [[splash potion]]s can now be used to fill cauldrons, which turns them into glass bottles.}}
{{History|pocket}}
{{History||1.0.0|snap=alpha 0.17.0.1|[[File:Dragon's Breath JE1 BE1.png|32px]] Glass bottles can now be used to obtain [[dragon's breath]].
|[[Lingering potion]]s can now be used to fill [[cauldron]]s, which turns them into glass bottles.}}
{{History|bedrock}}
{{History||1.10.0|snap=beta 1.10.0.3|[[File:Glass Bottle JE2 BE2.png|32px]] The texture of glass bottles has been changed.}}
{{History||1.11.0|snap=beta 1.11.0.4|Glass bottles can now be [[trading|sold]] to cleric [[villager]]s.}}
{{History||1.14.0|snap=beta 1.14.0.1|[[File:Honey Bottle BE1.png|32px]] Glass bottles can now be used to collect [[Honey Bottle|honey]].
|[[Dispenser]]s may now use glass bottles to collect [[water]] and honey.}}
{{History|console}}
{{History||xbox=TU7|xbone=CU1|ps=1.0|wiiu=Patch 1|[[File:Glass Bottle JE1 BE1.png|32px]] Added glass bottles.}}
{{History|PS4}}
{{History||1.90|[[File:Glass Bottle JE2 BE2.png|32px]] The texture of glass bottles has been changed.}}
{{History|new 3ds}}
{{History||0.1.0|[[File:Glass Bottle JE1 BE1.png|32px]] Added glass bottles.}}
{{History||1.7.10|[[File:Dragon's Breath JE1 BE1.png|32px]] Glass bottles can now be used to obtain [[dragon's breath]].}}
{{history|foot}}
== Issues ==
{{issue list}}
==References==
{{Reflist}}
{{Items}}
[[cs:Lahvička]]
[[de:Glasflasche]]
[[es:Frasco de cristal]]
[[fr:Fiole]]
[[hu:Üvegpalack]]
[[it:Ampolla]]
[[ja:ガラス瓶]]
[[ko:유리병]]
[[nl:Glazen fles]]
[[pl:Szklana butelka]]
[[pt:Frasco]]
[[ru:Колба]]
[[zh:玻璃瓶]]
[[Category:Renewable resources]]</li><li>[[Bamboo|Bamboo]]<br/>{{for|the plant feature|Bamboo (feature)}}
{{Distinguish|text = [[Sugar Cane]], which was colloquially known as Bamboo}}
{{Block
| image = <gallery>
Leafless Bamboo.png|Leafless
Small Leaves Bamboo.png|Small
Big Leaves Bamboo.png|Big
Leafless Old Bamboo.png|Leafless Old
Small Leaves Old Bamboo.png|Small Old
Big Leaves Old Bamboo.png|Big Old
</gallery>
| image2 = Bamboo Shoot.png<!--different infobox for this later down the line, like with pistons?-->
| image3 = Bamboo (item) JE1 BE1.png
| transparent = Yes
| light = No
| tool = Sword
| tool2 = Axe
| renewable = Yes
| stackable = Yes (64)
| flammable = '''Bamboo''': Yes (60)<br>'''Shoot''': No
| lavasusceptible = Yes
}}
'''Bamboo''' is a versatile, fast-growing, [[Bone Meal|bonemealable]] [[plant]] found primarily in [[jungle]]s, which is used for [[crafting]] (particularly [[scaffolding]] and [[Block of Bamboo|bamboo wood]]), [[smelting]] and [[breeding]] [[Panda|pandas]].
A '''bamboo shoot''' is the initial non-solid sapling form of planted bamboo.
== Obtaining ==
Bamboo shoots cannot be obtained through vanilla means. {{IN|bedrock}}, they can be obtained through [[add-on]]s or inventory editing. {{IN|java}}, they are completely unobtainable.
=== Breaking ===
Bamboo can be mined with any [[tool]], but a [[sword]] breaks the block [[instant mining|instantly]], even with [[Mining Fatigue]]. Flowing [[water]] also breaks bamboo shoots, but not mature bamboo stalks.
{{breaking row|Bamboo|Sword|sword=1|horizontal=1}}
{{notelist}}
=== Natural generation ===
Bamboo generates in widely scattered single shoots within [[jungle]] [[biome]]s. Bamboo generates much more densely in the [[bamboo jungle|bamboo variant]]s of jungles, covering large areas of the landscape. Bamboo does ''not'' generate in [[sparse jungle]]s.<ref>{{bug|MC-156638|||WAI}}</ref>
=== Mob loot ===
{{IN|java}}, a [[panda]] drops 1 bamboo when killed. [[Looting]] does not affect the drop rate.<ref>{{bug|MC-160006}}</ref>
{{IN|bedrock}}, a panda drops 0-2 bamboo when killed. Looting increases the drop by 1 per level.
=== Fishing ===
Bamboo can be found while [[fishing]] in [[jungle]] [[biome]]s as a junk [[item]].
=== Chest loot ===
{{LootChestItem|bamboo}}
== Usage ==
When broken, any bamboo [[block]] placed or grown above it is also broken. A bamboo block drops itself as an [[item]] if a [[piston]] pushes it or moves a block into its space. When bamboo is first placed as a shoot it's not solid and can be destroyed by water flowing into it. After growing at least one block taller it becomes solid and can't be destroyed by water. To transform a bamboo shoot into a solid bamboo block place another bamboo on top of it.
Unlike most plants, bamboo cannot be [[Composter#Composting|composted]].<ref>{{bug|MC-142452|||WAI}}</ref>
=== Farming ===
Bamboo can be planted on [[moss block]]s{{only|java|short=1}}, [[grass block]]s, [[dirt]], [[coarse dirt]], [[rooted dirt]], [[gravel]], [[mycelium]], [[podzol]], [[sand]], [[red sand]], [[suspicious sand]], [[suspicious gravel]], [[mud]], bamboo shoot, or on itself. At default random tick speed (3), each plant grows on average every {{convert|4096|ticks|seconds}}. When [[bone meal]] is {{control|used}} on it, it grows by 1–2 [[blocks]]. Bamboo can grow up to 12–16 blocks tall. The top of a bamboo plant requires a [[light]] level of 9 or above to grow.
Because bamboo breaks in almost the same way as [[sugar cane]]s, [[Tutorials/Sugar cane farming|a sugar cane farm]] can be easily adapted to this use. While water is not needed with such a farm, some spacing is recommended if the harvest is done manually as mature stalks are solid.
=== Pandas ===
Bamboo [[item]]s are eaten by [[panda]]s and can be used to speed up the growth of baby pandas. Bamboo can also be used to breed pandas when at least 8 [[block]]s of bamboo are within 5 blocks of the pandas, making the panda the only animal in the game to have extra breeding requirements. At this point, the [[player]] can feed them bamboo and they [[breeding|mate]] to have a baby.
=== Fuel ===
Bamboo can be used as fuel for [[smelting]]. Each bamboo item smelts 0.25 [[item]]s. Crafting two bamboo into a [[stick]] and using that as fuel is equivalent, smelting 0.5 items.
Bamboo can be crafted into other items to increase its fuel efficiency.
* By crafting 9 bamboo into 2 [[bamboo planks]], 3 items can be smelted instead of 2.25, a 33.3% increase in efficiency.
** {{IN|bedrock}}, the fuel efficiency can be further doubled by crafting the bamboo planks into twice the amount of [[slab]]s.<ref>{{bug|MCPE-94368||Wooden slabs last for the same amount of time as planks in a furnace}}</ref>
* {{IN|java}}, by crafting 14 bamboo into 3 [[ladder]]s, 4.5 items can be smelted instead of 3.5, a 28.6% increase in efficiency.
=== Flower pots ===
Bamboo can be placed in a [[flower pot]], where it retains the design it has in its item form.
=== Crafting ingredient ===
{{crafting usage}}
== Appearance ==
[[File:Bamboo stages.png|thumb|The different stages of bamboo growth.]]
The appearance of bamboo changes as it grows. When first placed, it takes the form of a small shoot, which has no [[hitbox]]. When it grows one [[block]] taller it grows to 2 pixels in length and width and the top block has leaves coming off it. At 3 blocks, the top 2 blocks have leaves and at 4 blocks the bamboo expands to 3×3 pixels. At 5 blocks tall, the top 3 blocks have leaves on them. As the bamboo grows, the leaves move up and stay at the top 3 blocks. Destroying a block of bamboo does not change the appearance of the blocks below it. Bamboo is oriented at a random position in the block that it is in.
== Sounds ==
=== Bamboo ===
{{Sound table/Block/Bamboo}}
=== Bamboo Shoot ===
{{Sound table/Block/Bamboo shoot}}
== Data values ==
=== ID ===
{{edition|java}}:
{{ID table
|edition=java
|showblocktags=y
|showforms=y
|generatetranslationkeys=y
|displayname=Bamboo
|spritetype=block
|nameid=bamboo
|blocktags=bamboo_plantable_on}}
{{ID table
|displayname=Bamboo Shoot
|spritetype=block
|nameid=bamboo_sapling
|blocktags=bamboo_plantable_on
|form=block
|foot=1}}
{{edition|bedrock}}:
{{ID table
|edition=bedrock
|shownumericids=y
|showforms=y
|generatetranslationkeys=y
|displayname=Bamboo
|spritetype=block
|nameid=bamboo
|id=418}}
{{ID table
|displayname=Bamboo Sapling
|spritetype=block
|nameid=bamboo_sapling
|id=419
|form=block
|translationkey=-
|foot=1}}
=== Block states ===
{{see also|Block states}}
{{/BS}}
== Achievements ==
{{load achievements|Zoologist}}
== History ==
{{History||September 29, 2018|link={{tweet|minecraft|1046096508570009602}}|Bamboo is announced at [[MINECON Earth 2018]].}}
{{History|java}}
{{History||1.14|snap=18w43a|[[File:Leafless Bamboo JE1 BE2.png|32px]] [[File:Small Leaves Bamboo JE1 BE2.png|32px]] [[File:Big Leaves Bamboo JE1 BE2.png|32px]] [[File:Leafless Old Bamboo JE1 BE2.png|32px]] [[File:Small Leaves Old Bamboo JE1 BE2.png|32px]] [[File:Big Leaves Old Bamboo JE1 BE2.png|32px]] [[File:Bamboo Shoot JE1 BE1.png|32px]] Added bamboo.
|[[File:Bamboo (item) JE1 BE1.png|32px]] Bamboo as an [[item]] can be [[drops|dropped]] by bamboo and planted to grow bamboo.
|Added [[bamboo jungle]]s, where bamboo naturally generates.}}
{{History||1.16|snap=20w06a|"Bamboo Sapling" has been renamed to "Bamboo Shoot".}}
{{History|||snap=20w13a|Bamboo has been moved from the Miscellaneous tab to the Decoration Blocks tab in the [[Creative inventory]].<ref name="misc decoration">https://bugs.mojang.com/browse/MC-174434</ref>}}
{{History||1.17|snap=21w13a|Bamboo can now be planted on rooted dirt.}}
{{History|||snap=21w16a|Bamboo can now be planted on moss blocks.}}
{{History||1.18|snap=21w39a|Bamboo no longer generates underground.<ref>{{bug|MC-145376}}</ref><ref>{{bug|MC-214894}}</ref>}}
{{History||1.19|snap=22w15a|Bamboo can now be planted on mud.}}
{{History||1.20<br>(Experimental)|link=1.19.3|snap=22w42a|Bamboo can now be used to craft [[bamboo planks]].}}
{{History|||snap=22w45a|Bamboo can no longer be used to craft bamboo planks.|Bamboo can now be used to craft a [[block of bamboo]].}}
{{History||1.20<br>(Experimental)|link=1.19.4|snap=23w07a|Bamboo can now be planted on [[suspicious sand]].}}
{{History||1.20|snap=23w14a|Bamboo can now be planted on [[suspicious gravel]].}}
{{History|bedrock}}
{{History||1.8.0|snap=beta 1.8.0.8|[[File:Leafless Bamboo BE1.png|32px]] [[File:Small Leaves Bamboo BE1.png|32px]] [[File:Big Leaves Bamboo BE1.png|32px]] [[File:Leafless Old Bamboo BE1.png|32px]] [[File:Small Leaves Old Bamboo BE1.png|32px]] [[File:Big Leaves Old Bamboo BE1.png|32px]] [[File:Bamboo Shoot JE1 BE1.png|32px]] Added bamboo.
|[[File:Bamboo (item) JE1 BE1.png|32px]] Bamboo as an [[item]] can be [[drops|dropped]] by bamboo and planted to grow bamboo.}}
{{History||1.9.0|snap=beta 1.9.0.0|Bamboo can now generate in [[jungle]] [[biome]]s in single shoots.
|Added [[bamboo jungle]]s, where bamboo naturally generates.}}
{{History||1.12.0|snap=beta 1.12.0.3|[[File:Leafless Bamboo JE1 BE2.png|32px]] [[File:Small Leaves Bamboo JE1 BE2.png|32px]] [[File:Big Leaves Bamboo JE1 BE2.png|32px]] [[File:Leafless Old Bamboo JE1 BE2.png|32px]] [[File:Small Leaves Old Bamboo JE1 BE2.png|32px]] [[File:Big Leaves Old Bamboo JE1 BE2.png|32px]] The bamboo texture brightness has been updated to match {{el|je}}.<ref>{{bug|MCPE-42635}}</ref>}}
{{History||1.17.30|snap=beta 1.17.20.20|Swords now break bamboo instantly to match ''Java Edition''.<ref>{{bug|MCPE-64013}}</ref>}}
{{History||1.20.0|link=Bedrock Edition 1.20.0|snap=beta 1.19.50.21|Bamboo can now be used to craft [[bamboo planks]].}}
{{History|||snap=beta 1.19.60.20|Bamboo can no longer be used to craft bamboo planks.|Bamboo can now be used to craft a [[block of bamboo]].}}
{{History|console}}
{{History||xbox=none|xbone=none|ps=1.83|wiiu=none|switch=none|[[File:Leafless Bamboo JE1 BE2.png|32px]] [[File:Small Leaves Bamboo JE1 BE2.png|32px]] [[File:Big Leaves Bamboo JE1 BE2.png|32px]] [[File:Leafless Old Bamboo JE1 BE2.png|32px]] [[File:Small Leaves Old Bamboo JE1 BE2.png|32px]] [[File:Big Leaves Old Bamboo JE1 BE2.png|32px]] [[File:Bamboo Shoot JE1 BE1.png|32px]] Added bamboo.
|[[File:Bamboo (item) JE1 BE1.png|32px]] Bamboo as an [[item]] can be [[drops|dropped]] by bamboo and planted to grow bamboo.}}
{{History|foot}}
=== Bamboo shoot "item" ===
{{:Technical blocks/Bamboo Shoot}}
== Issues ==
{{Issue list}}
== Trivia ==
* Because bamboo grows quickly (on average 1 growth per 200 seconds), just 500 plants in an automatic farm produce more [[item]]s than a [[hopper]] can collect (2.5 items per second). A single hopper can move only enough items to keep 6.25 [[furnace]]s running.
* Bamboo is the fastest-growing plant in ''[[Minecraft]]'', which reflects its status as the fastest-growing plant known in real life.
* While bamboo cannot be composted in ''Minecraft'', it can be composted in real life.
== Gallery ==
<gallery>
File:PandaMinecon.png|The first image featuring bamboo, from [[MINECON Earth 2018]].
File:PandasEatingMinecon.jpg|A group of [[Panda|pandas]] eating bamboo, shown at [[MINECON Earth 2018]].
File:Growing bamboo BE.png|Planted bamboo growing.
File:Bamboo in tree.png|A bamboo shoot growing through a [[tree]].
File:Bamboo Jungle.png|Bamboo seen in a [[jungle]] [[biome]] variant.
File:Bamboo Jungle in Amplified world.png|Bamboo Jungle in an [[Amplified]] world in 1.19-rc2.
File:Naturalbamboo.png|Multiple naturally generated bamboo stems growing by a river.
File:Tall Bamboo.png|Grown Bamboo with three parts
File:Zuri Chopping Bamboo Pixel Art.png|[[Zuri]] chopping down bamboo for a baby panda.
File:Bamboo Wallpaper.png|Smartphone wallpaper of the aforementioned artwork, showing more of the treetops and bamboo.
File:Panda Packaging.jpg|Packing for the ''Diamond Level Panda'', modeled after bamboo.
</gallery>
==References==
{{Reflist}}
{{Blocks|vegetation}}
{{Items}}
[[Category:Plants]]
[[Category:Food]]
[[Category:Natural blocks]]
[[Category:Non-solid blocks]]
[[Category:Flammable blocks]]
[[cs:Bambus]]
[[de:Bambus]]
[[es:Bambú]]
[[fr:Bambou]]
[[it:Bambù]]
[[ja:竹]]
[[ko:대나무]]
[[pl:Bambus]]
[[pt:Bambu]]
[[ru:Бамбук]]
[[th:ไม้ไผ่]]
[[zh:竹子]]</li></ul> | alpha 1.0.5.0 | ||||
| Bedrock Edition | |||||
1.8.0{{Extension DPL}}<ul><li>[[Clock|Clock]]<br/>{{about|the item|the redstone circuit|Redstone circuits/Clock}}
{{Item
| image = Clock.gif
| renewable = Yes
| stackable = Yes (64)
}}
'''Clocks''' are [[Daylight cycle|time]]-telling devices that display the current in-game position of the sun and the moon. Clocks only function properly in the [[Overworld]].
== Obtaining ==
=== Crafting ===
{{Crafting
|B1= Gold Ingot
|A2= Gold Ingot
|B2= Redstone Dust
|C2= Gold Ingot
|B3= Gold Ingot
|Output= Clock
|type= Tool
}}
=== Natural generation ===
{{LootChestItem|clock}}
=== Trading ===
Expert-level [[Trading#Librarian|librarian villagers]] have a {{frac|1|3}} (roughly 33.3%) chance to sell a single clock for 4 [[emerald]]s as part of their trades.{{only|bedrock}}
Expert-level librarian villagers have a {{frac|1|2}} (50%) chance to sell a clock for 5 emeralds.{{only|java}}
== Usage ==
[[File:WatchCycle.gif|thumb|Clock animation]]
The clock dial consists of two halves, a day side and a night side. The dial spins clockwise slowly to indicate the time of day, corresponding to the sun or moon's actual position in the sky. The player is able to [[bed|sleep]] a few seconds after the clock shows exactly dusk.
The dial always shows the current in-game time when in the [[Overworld]], regardless of where it appears. This includes a player's hand, an inventory slot, a [[Crafting table|crafting grid]], an [[item frame]], or even as a dropped [[Item (entity)|item]]. For a clock to be mounted on a wall, an [[item frame]] is required.
Because there is no day/night cycle in [[the Nether]] or [[the End]], clocks do not work properly in these dimensions. Instead, the dial rotates rapidly and randomly {{in|JE}} or clockwise {{in|BE}}, making them useless.
=== Piglins ===
{{EntityLink|Piglin|Piglins}} are attracted to clocks and run toward any clock on the ground, and inspect it for 6 to 8 seconds before putting it in their inventory.
== Data values ==
=== ID ===
{{edition|java}}:
{{ID table
|edition=java
|showforms=y
|generatetranslationkeys=y
|displayname=Clock
|spritetype=item
|nameid=clock
|form=item
|foot=1}}
{{edition|bedrock}}:
{{ID table
|edition=bedrock
|shownumericids=y
|showforms=y
|notshowbeitemforms=y
|generatetranslationkeys=y
|displayname=Clock
|spritetype=item
|nameid=clock
|id=393
|form=item
|foot=1}}
== Achievements ==
{{load achievements|Oooh, shiny!}}
== Advancements ==
{{load advancements|Oh Shiny}}
== Video ==
''Note: This video doesn't state that clocks can be found in [[shipwreck]]s or [[ruined portal]]s because the video was released in an earlier [[Java Edition version history|version]].''
<div style="text-align:center">{{yt|Q3bsT84oVz4}}</div>
== History ==
{{History|java alpha}}
{{History||v1.2.0|snap=<nowiki>?|slink=:Category:Information needed requiring unarchived version|[[File:Clock JE1.gif|32px]] Added clocks.
|They have 228 visually distinct frames due to how the texture is generated – see the section below.}}
{{History|java}}
{{History||1.3.1|snap=12w21a|Librarian [[villager]]s now [[trading|sell]] clocks for 10-11 [[emerald]]s, making them [[renewable]].}}
{{History||1.5|snap=13w02a|[[File:Clock JE2 BE2.gif|32px]] Clocks now use the new animation feature included in [[texture pack]]s. As a result, they are considerably less precise, having only 64 frames.}}
{{History||1.8|snap=14w02a|Librarian [[villager]]s now [[trading|sell]] clocks for 10-12 [[emerald]]s.}}
{{History||1.9|snap=15w31a|Clocks are now broken up into individual textures, instead of having every individual frame on one vertical strip like with animated textures.}}
{{History||1.13|snap=17w47a|Prior to [[1.13/Flattening|''The Flattening'']], this [[item]]'s numeral ID was 347.}}
{{History|||snap=18w14a|Clocks can now be found in [[shipwreck]] map rooms.}}
{{History||1.16|snap=20w09a|Clocks can now be used to distract [[piglin]]s.<ref>{{bug|MC-172363}}</ref>}}
{{History|||snap=20w16a|Clocks now generate in [[ruined portal]] chests.}}
{{History|||snap=20w19a|Clocks no longer work in the [[recipe book]].<ref>{{bug|MC-116293}}</ref>}}
{{History|||snap=20w22a|Clocks no longer work in the villager trading GUI.<ref>{{bug|MC-182888}}</ref>}}
{{History||1.17|snap=20w48a|[[File:Clock JE3.gif|32px]] The texture of clocks has been changed to match the new gold ingot texture from the texture update.}}
{{History|pocket alpha}}
{{History||v0.2.0|[[File:Clock BE1.png|32px]] Added clocks.
|Clocks currently have no function or legitimate method of obtaining them.}}
{{History||v0.8.0|snap=build 1|Clocks are now functional and [[crafting|craftable]]. They have been added into the Creative inventory.
|[[File:Clock JE2 BE2.gif|32px]] The texture of clocks has been changed. They use an predefined texture file with 64 different frames.}}
{{History|pocket}}
{{History||1.0.4|snap=alpha 1.0.4.0|Librarian [[villager]]s now [[trading|sell]] clocks for 10-12 [[emerald]]s.}}
{{History|bedrock}}
{{History||1.4.0|snap=beta 1.2.20.1|Clocks can now be found inside map room [[chest]]s in [[shipwreck]]s.}}
{{History||1.11.0|snap=beta 1.11.0.4|[[Trading]] has been changed, librarian [[villager]]s now have {{frac|1|3}} chance to [[trading|sell]] a clock for 4 [[emerald]]s as part of their [[trading|trades]].}}
{{History||1.16.0|snap=beta 1.16.0.57|Clocks now generate in [[ruined portal]] chests.}}
{{History||1.17.0|snap=beta 1.17.0.54|[[File:Clock JE3.gif|32px]] The texture of clocks has been changed to match the new gold ingot texture from the texture update.}}
{{History|console}}
{{History||xbox=TU1|xbone=CU1|ps=1.0|wiiu=Patch 1|switch=1.0.1|[[File:Clock JE2 BE2.gif|32px]] Added clocks.}}
{{History||xbox=TU69|xbone=none|ps=1.76|wiiu=Patch 38|switch=none|Clocks can now be found in [[shipwreck]] map rooms.}}
{{History|New Nintendo 3DS Edition}}
{{History||0.1.0|[[File:Clock JE2 BE2.gif|32px]] Added clocks.}}
{{History|foot}}
=== Texture generation prior to Java Edition 13w02a ===
{{:Procedural animated texture generation/Clocks}}
== Issues ==
{{issue list}}
== Trivia ==
* {{IN|java}}, a clock can be viewed under the item [[statistics]] page as long as one obtained a clock at some point.
* {{IN|java}}, the default resource pack for the clock contains 64 individual frames, each frame lasting about 18.75 seconds in real time (375 ticks) (1350 seconds (22 minutes, 30 seconds) in Minecraft time).
* When the time of day changes suddenly, such as after sleeping or when {{cmd|time}} is used, the clock dial spins rapidly to catch up.
* Although clocks do not function in the Nether or the End, the actual daylight cycle does continue.
== Gallery ==
<gallery>
File:Clockonawall.png|A clock in an [[item frame]] on a wall in a [[player]]'s base, showing the night is near.
File:Player Holding Clock.png|Early-game player holding a clock.
File:Clock In Item Frame.png|A clock placed in an item frame.
</gallery>
== References ==
{{Reflist}}
{{Items}}
[[Category:Tools]]
[[Category:Renewable resources]]
[[cs:Hodiny]]
[[de:Uhr]]
[[es:Reloj]]
[[fr:Montre]]
[[hu:Óra]]
[[it:Orologio]]
[[ja:時計]]
[[ko:시계]]
[[nl:Klok]]
[[pl:Zegar]]
[[pt:Relógio]]
[[ru:Часы]]
[[th:นาฬิกา]]
[[uk:Годинник]]
[[zh:时钟]]</li><li>[[:Category:Minecraft Dungeons items|Category:Minecraft Dungeons items]]<br/>All items that are in ''[[Minecraft Dungeons]]''.
{{Minecraft Dungeons items}}
[[Category:Minecraft Dungeons]]
[[Category:Items]]
[[ja:カテゴリ:アイテム (Minecraft Dungeons)]]
[[pl:Kategoria:Przedmioty w Minecraft Dungeons]]
[[pt:Categoria:Itens do Minecraft Dungeons]]</li></ul></nowiki> | beta 1.8.0.8 | Command blocks now have a default name of ! instead of @. | |||
1.10.0{{Extension DPL}}<ul><li>[[Obsidian Boat|Obsidian Boat]]<br/>{{for|other uses|Obsidian (disambiguation)}} {{for|other kinds of boats|Boat (disambiguation)}}
{{Joke feature}}
{{ItemEntity
|title=Obsidian Boat
|image=Obsidian Boat.png
|image2=Obsidian Boat (item).png
|stackable=No
|renewable=Yes
}}
The '''obsidian boat''' was a joke [[boat]] variant released in an April Fools' joke version.
== Obtaining ==
=== Crafting ===
{{crafting
|A2 = Obsidian |C2 = Obsidian
|A3 = Obsidian |B3 = Obsidian |C3 = Obsidian
|Output= Obsidian Boat
|ignoreusage=1
}}
== Usage ==
Obsidian boats sank in [[water]] instead of floating. They also sank in lava like other boats but did not get destroyed in it.
== Sounds ==
Obsidian boats used the Friendly Creatures sound category for entity-dependent sound events, although did not have any sounds of their own.
== Data values ==
=== ID ===
{{ID table
|shownumericids=y
|showforms=y
|generatetranslationkeys=java
|displayname=Obsidian Boat
|spritetype=item
|nameid=obsidian_boat
|id=432
|form=item
|translationkey=item.obsidian_boat.name
|foot=1}}
{{ID table
|shownumericids=y
|generatetranslationkeys=java
|displayname=Obsidian Boat
|spritetype=entity
|nameid=boat
|id=41
|translationkey=entity.Boat.name
|foot=1}}
=== Entity data ===
{{/ED}}
== History ==
{{History|java}}
{{History||1.10|snap=15w14a|link=Java Edition 15w14a|[[File:Obsidian_Boat_(item).png|32px]] [[File:Obsidian Boat.png|32px]] Added the obsidian boat.}}
{{History|foot}}
== Issues ==
Obsidian boat is a joke feature and as such issues relating to them cannot be fixed.
{{Items}}
{{Entities}}
{{Jokes}}
[[Category:Joke items]]
[[Category:Joke entities]]
[[it:Barca di ossidiana]]
[[ja:黒曜石のボート]]
[[pt:Bote de obsidiana]]
[[uk:Обсидіановий човен]]
[[zh:15w14a]]</li><li>[[Map|Map]]<br/>{{about|the craftable map|maps showing the locations of certain structures|Explorer Map|other uses|Map (disambiguation)}}
{{distinguish|World}}
{{Item
| image = Map Zoom 4.png
| renewable = Yes
| stackable = Yes (64)
}}
A '''map''' is an [[item]] used to view explored [[Chunk|terrain]] and mark landmarks.
==Obtaining==
===Crafting===
{{crafting
|head=1
|showname=0
|showdescription=1
|A1= Paper
|B1= Paper
|C1= Paper
|A2= Paper
|B2= Compass
|C2= Paper
|A3= Paper
|B3= Paper
|C3= Paper
|Output= Empty Map
|type= Miscellaneous
|description=This variation is called an "empty locator map" {{in|bedrock}}, or an "empty map" {{in|java}}.
When the player first creates a map, it is blank. It needs to be activated by holding it and pressing ''{{Control|use item}}''. after which it records terrain and location markers as the player travels within (or close to) the area it maps.
}}
{{crafting
|A1= Paper
|B1= Paper
|C1= Paper
|A2= Paper
|B2= Paper
|C2= Paper
|A3= Paper
|B3= Paper
|C3= Paper
|Output= Empty Map
|type= Miscellaneous
|description={{only|bedrock}}
This variation is called an "empty map". It does not show location markers. It is intended for cloning and zooming locator maps without having to consume an additional [[compass]] (thereby saving [[iron ingot]]s and [[redstone dust]]), but it can also be {{Control|use|text=activated}} and later converted to a locator map by combining it with a compass on an [[anvil]], [[crafting table]], or [[cartography table]].
|foot=1
}}
=== Natural generation ===
==== Chest loot ====
{{LootChestItem|empty-map,map
}}
=== Cartography table ===
A map can also be created using a single paper on a [[cartography table]] to create an empty map, or a paper with a compass for an empty locator map.{{only|bedrock}}
=== Starting map ===
{{exclusive|bedrock|section=1}}
When creating a new world {{in|bedrock}}, the player can enable the "Starting Map" option to spawn with an empty locator map in the hotbar. The map's zoom scale is 1:8. The map is updated only while the player holds it.
=== Trading ===
Novice-level cartographer [[Villager|villagers]] sell a single empty map for 7 [[Emerald|emeralds]] as their trades.
{{IN|java}}, cartographer villagers may give players with the [[Hero of the Village]] effect an empty map.
== Usage ==
{{See also|Tutorials/Mapping}}
=== Mapping ===
Crafting a map creates an empty map. The map is drawn for the first time when it is held and used (with ''{{control|use item}}''). This map can then be adjusted to different zoom levels. After conversion to a drawn map item, it starts to draw a top-down view of the player's surroundings, with North pointing to the top of the map. A pointed oval pointer indicates the player's position on the map, and moves in real-time as the player moves across the terrain shown on the map. The map does ''not'' center on the player when created, rather, the world is broken up into large invisible grid squares, and the map displays the area of whichever grid square it is in when it is first used. For example, if a player uses a new map in a certain grid square, and then moves a distance away and uses another fresh map but is still within the same grid square, both maps appear identical. To make a map that is not identical to the first one, the player would have to move outside of the edges of the first map (because then they would be in a new grid square). This way, no two maps of the same size can ever partially overlap and every map can display only a fixed area.
To record the world on a map, that specific map must be held in the player's hands while the player moves around the world. The world is recorded as-is during exploration, meaning that if the world is modified, a player must revisit the area while holding the map to update the map's view. Maps can also be [[Map#Cloning|cloned]]. If a player holds a map whose one or more clones are on display in item frames, updates are made on all clone-connected maps.
Other players are displayed on the map only if they have a map in their inventory cloned from the one being looked at. When placing a map into an [[item frame]], the map displays with a green pointer shown at the location of the item frame. This is to help the player see where they are in relation to the area that the map is showing. If the player leaves a map in an item frame and views a clone of it, the green pointer remains in the spot of the framed copy. This can be used to set up waypoints. Unexplored areas are transparent, making the item frame visible.
When the player leaves the area shown on a specific map, the player pointer transforms into a white dot that moves on that map. The marker shrinks to a smaller white dot if the player is far from the map's center: the area is 320 by 320 blocks per scale factor. The dot moves along the edge of the map to show the relative location of the player. However {{in|bedrock}}, the pointer remains as an arrow but shrinks until the player is near the area shown on the map.
While maps in [[the Nether]] work, they show only the red-and-gray pattern, regardless of the blocks placed. The only useful function is finding where the player is in relation to placed framed maps, which show as green pointers. Additionally, the player pointer rapidly spins and is not a good indicator of direction. Placing a [[banner]] in [[the Nether]] still shows it on the map as usual. Having a smaller map image while riding a [[strider]] in the Nether can help one to see one's footing while traveling over [[lava]].
{{IN|java}}, when using a map from another dimension, the map shows the player's position and direction when they were last in the dimension of the map. {{IN|bedrock}}, however, the player can use maps from one dimension while in another dimension. For locator maps, the place marker changes color depending on the dimension that the player is currently in (white for the Overworld, red for [[the Nether]], and magenta for [[the End]]). An Overworld map in the Nether shows the player's corresponding location and direction in the Overworld.<ref name=multiverse>{{ytl|EpP1diZdEdI}}</ref> Similarly, a Nether Map in the Overworld shows the player's corresponding location in the Overworld, but the place marker spins, just like a Nether map in the Nether. An Overworld map in the End shows the world spawn.<ref name=multiverse/> A Nether map cannot be used in the End — the map appears, but the place marker is not shown anywhere — and similarly, an End map cannot be used in the Overworld or the Nether.
A player can make a large piece of pixel art (128×128) facing upward, center a map on it, and place that map in an [[item frame]] to create a custom picture. Locking is recommended. See [[Map item format#Map Pixel Art]] for details on the techniques.
Maps display as a mini-map when held in the off-hand, or if the off-hand slot is occupied; the map is full-sized only when held in the dominant hand with both hands free.
A map always positions itself facing towards North when placed horizontally within an item frame regardless of how the map is placed.
=== Map content ===
{{Main|Map item format}}
Maps consist of square pixels arranged like pixels in a 128×128 square pattern, with each pixel representing a square portion of land. {{IN|java}}, the [[Map item format#Color table|color of a map pixel]] generally matches the color of the most common [[opaque]] block in the corresponding area, as seen from the sky. 'Minority blocks' in the target area have no effect on the color of the pixel, thus small features tend to be undetectable on zoomed-out maps.
{{IN|bedrock}}, the [[Map item format#Color table|color of a map pixel]] instead matches the single top-most opaque block in a grid sized by the map magnification pixel size (see the table in the "Player marker and pointer" section below). For example, a 3/4 magnification map has a pixel size of 8x8 blocks; this means the map will read only the top-most opaque blocks at the 0,0 coordinate, the 8,0 coordinate, the 0,8 coordinate, etcetera, ignoring all other blocks in the area. This means that {{in|bedrock}}, map pixel art requires only one block per pixel regardless of map magnification.
{{IN|bedrock}}, grass, foliage and water colors that are biome-dependent are represented accurately on a map.
{| class="wikitable"
|-
! style="width: 300px;" | {{el|je}}
! style="width: 300px;" | {{el|be}}
|-
| style="text-align: center;" | [[File:Map Zoom 4.png|alt=All banners marked on a map, alongside a named banner.|216px]]
| style="text-align: center;" | [[File:Map item BE.png|216px]]
|-
| Biome colors on ''Java Edition''.
| Biome colors on ''Bedrock Edition''.
|-
|}
Maps also show ground up to about 15 blocks below the surface of the water in oceans as slightly lighter blue, to show where the ground rises. This is not true with land above water. Higher elevations in the world mean lighter colors on the map. The map records the surface even as the player moves below the surface.
A standard map represents 128x128 blocks (1 block per pixel, 8x8 [[chunks]]) but maps can be zoomed-out to represent up to 2048x2048 blocks (16 square blocks per pixel, 128x128 [[chunks]]).
Some relevant distances: 64 blocks (4 chunks) is the update radius from a player in the Overworld and the End. However, it is half this (32 blocks) in the Nether. Also, 1024 blocks is the minimum Overworld distance from a [[nether portal]], at which players can build another portal and expect to reach a new location in the Nether. This is the distance across a 1:8 map, and also from a 1:16 map's center to its edge.
=== Player marker and pointer ===
{{IN|java}}, every map contains a marker that marks the position of the player, and points in the same direction as the player. When a player moves out of a map, a big white dot appears and moves relative to the player's position. The pointer either disappears when the player moves away a certain distance from the border of the map or, in case of [[explorer map]]s, the big white dot changes to a smaller white dot. The distance required for the small white dot to appear(explorer maps) or for the big dot to vanish (normal maps) changes with the scaling of the map.
* '''Level 0/4 :''' 128×128 blocks (each map pixel represents 1 block)
* '''Level 1/4 :''' 256×256 blocks (2×2 blocks per map pixel)
* '''Level 2/4 :''' 512×512 blocks (4×4 blocks per map pixel)
* '''Level 3/4 :''' 1024×1024 blocks (8×8 blocks per map pixel)
* '''Level 4/4 :''' 2048×2048 blocks (16×16 blocks per map pixel)
{{IN|bedrock}}, a map can be crafted with or without this marker, and a map without a position marker can add one later by adding a compass to the map. When a map is crafted without a compass, it's simply called an "empty map", but when crafted with a compass, it's called an "empty locator map". The marker also turns red if the player enters the Nether with an Overworld map and shows the player's Overworld location relative to the Nether location. A map created in the End has a purple marker showing the player's location. If an Overworld map is used in the End, a magenta dot appears on the player's spawn point.{{/BE|position}}
{{crafting
|name=Map<br>(with marker)
|ingredients=[[Map]] or Empty Map +<br>[[Compass]]
|showdescription=1
|Map (no markers);Empty Map
|Compass
|Output= Locator Map;Empty Locator Map
|type= Miscellaneous
|description={{el|be}} only.
Maps crafted from only paper do not show the location marker; to add it, a compass must be added to the map.
|foot=1
}}
{{IN|bedrock}}, a cartography table can also be used to add a pointer to create a locator map or empty locator map. This can be done by adding a compass to paper, or to an empty map or map.
=== Zooming out ===
[[File:Cartography table UI zoom.png|thumb|300px|{{IN|java}}, cartography table's UI, showing the map is being zoomed out.]]
A [[cartography table]] can also be used to zoom out, taking only one piece of paper per zoom level.
A blank map can not be zoomed out. A map has to have something already marked on it for the zooming to be possible.
{{Crafting
|A1= Paper |B1= Paper |C1= Paper
|A2= Paper |B2= Map;Locator Map |C2= Paper
|A3= Paper |B3= Paper |C3= Paper
|Output= Map;Locator Map
|showdescription=1
|description=Locator Map {{el|be}} only.
}}
{{/BE|zoom}}
==== Zoom details ====
The zooming function starts from when the map is created (zoom level 0) up to its fourth zoom step (zoom level 4).
{| class="wikitable" style="text-align: center" data-description="Zoom levels"
! colspan="2" |
! Zoom step 0
! Zoom step 1
! Zoom step 2
! Zoom step 3
! Zoom step 4
|-
! colspan="2" |
| [[File:Map Zoom 0.png|116px|Zoom step 0, 1:1]]
| [[File:Map Zoom 1.png|116px|Zoom step 1, 1:2]]
| [[File:Map Zoom 2.png|116px|Zoom step 2, 1:4]]
| [[File:Map Zoom 3.png|116px|Zoom step 3, 1:8]]
| [[File:Map Zoom 4.png|116px|Zoom step 4, 1:16]]
|-
! colspan="2" | Zoom level
| 0/4
| 1/4
| 2/4
| 3/4
| 4/4
|-
! colspan="2" | 1 map pixel represents
| 1 block
| 2×2 blocks
| 4×4 blocks
| 8×8 blocks
| 16×16 blocks<br>(1×1 chunk)
|-
! colspan="2" | Scaling ratio
| 1:1
| 1:2
| 1:4
| 1:8
| 1:16
|-
! rowspan="2" colspan="2" | Map covers an area of
| 128×128 blocks
| 256×256 blocks
| 512×512 blocks
| 1024×1024 blocks
| 2048×2048 blocks
|-
| 8×8 chunks
| 16×16 chunks
| 32×32 chunks
| 64×64 chunks
| 128×128 chunks
|-
! colspan="2" | Smallest discernible features
| Blocks
| Trees, Paths
| Lakes, Buildings
| Mountains, Rivers
| Biomes, Mountain Ranges
|-
! colspan="2" | Use cases
| Pixel art, Base plans
| Base surroundings
| Structure mapping
| Landscape mapping
| Biome mapping
|-
! rowspan="2" | Total paper needed to zoom out from Level 0
! in anvil{{only|bedrock|short=1}} or crafting table
| -
| {{ItemSprite|Paper}} 8
| {{ItemSprite|Paper}} 16
| {{ItemSprite|Paper}} 24
| {{ItemSprite|Paper}} 32
|-
! in cartography table
| -
| {{ItemSprite|Paper}} 1
| {{ItemSprite|Paper}} 2
| {{ItemSprite|Paper}} 3
| {{ItemSprite|Paper}} 4
|}
Maps are always aligned to a grid at all zoom levels. That means zooming out any different map in a specific area covered by that map always has the same center. As such, maps are aligned by map width (1024 blocks for a level 3 maps) minus 64. A level 3 map generated at spawn covers X and Z coordinates from -64 to 959. All maps generated in this area zoom out to the same coordinates, guaranteeing that they are always 'aligned' on a map wall. For a zoomed-out map to cover a new area, it must start with a base (level 0) map that is in that area.
At zoom level 0, a map created on the point (0,0) has (0,0) at the center of the map. At higher zoom levels of the same map, the coordinate (0,0) is in the top left square of the map.
{{IN|java}}, zoom level can be seen on a map by turning on Advanced Tooltips (a [[Debug screen#More debug keys|debug screen]] option that can be toggled by using the key combination {{key|F3+H}}). The tooltip of the map then shows the zoom level, scaling factors, and map ID.
=== Cloning ===
[[File:Cartography table UI clone.png|thumb|300px|{{IN|Java}}, cartography table's UI, showing the map is being cloned.]]
A mix of empty maps and empty locator maps may be used. Whether the cloned maps show position markers is dependent only on the input map.
A [[cartography table]] can also be used to clone a map.
The parts of the world that have already been explored and mapped are copied, and newly explored areas appear on both instances. If one of the maps is later zoomed out, then the maps lose their connection to each other and function as completely separate maps that have to be individually filled by exploring.
In Creative mode, a map in an item frame may be cloned by using {{control|pick block}} on it, as long as that map is not also in the player's inventory.
It doesn't matter if the map to be cloned is at a higher zoom level (made of more paper) than the blank map. Upon copying the map, both resulting maps have the same magnification as the starting map.
{{/BE|clone}}
=== Crafting ingredient ===
{{crafting usage|Map, Empty Map}}
=== Marking points ===
{{IN|java}} the player has the ability to mark spots on a map. To do this, {{control|use}} a map on a placed-down [[banner]], and the spot of the banner gets marked on the map. The mark takes the color of whatever the base color is for the banner, and if the banner has a name, the mark shows that name. Banner marks on a map are always oriented with their top facing north, regardless of the banner's actual orientation. If the banner is destroyed, the mark of the banner remains at first, but if the player gets closer to where the banner previously was, it disappears as the area is updated on the map.
If a map is mounted on an item frame and is within the area it depicts, the mounted map displays its current location with a green indicator rotated to match its orientation.
[[File:Map Marker Bedrock on Item frame.png|thumb|181x181px|{{IN|bedrock}} this is what a map lying on an item frame looks like, while showing markers.]]
{{IN|bedrock}} the player can place copies of locator maps in [[item frame]]s in order to create a land mark. The marker is a green dot that resembles the shape of the player's marker, but in green color. The position the marker points at depends on the direction the item frame is facing. It is worth noting that the markers work only on copies of the same map. Other maps of the same area do not show the existing markers that the player(s) had placed.
If a player has a cloned map in their inventory, their pointer appears white when viewed on the same map held by another player. Hence, if all players have the same cloned map in their inventory, all markers would appear white when the clone map is viewed.
{| class="wikitable"
|-
! style="width: 300px;" | {{el|je}}
! style="width: 300px;" | {{el|be}}
|-
| style="text-align: center;" | [[File:Banner marked map.png|alt=All banners marked on a map, alongside a named banner.|216px]]
| style="text-align: center;" | [[File:Tracking map with markers bedrock.png|216px]]
|-
| How every banner appears {{IN|java}} on a map, including named banners.
| {{IN|bedrock}} this is how a locator map shows map markers while held by a player.
|-
|}
===Locking===
[[File:Cartography table UI lock.png|thumb|300px|{{IN|Java}}, cartography table's UI, showing the map is being locked.]]
Maps can be locked when using a [[glass pane]] in a [[cartography table]]. This creates a new map containing the same data and locks it. All copies of this new map are also locked. A locked map never changes, even when the depicted terrain changes. {{IN|Be}}, locked maps have a unique texture.
{| class="wikitable" style="text-align: center;"
|-
! Condition
! style="width: 200px;" | Newly created map
! style="width: 200px;" | Map after terrain alteration
|-
! Unlocked map
| [[File:Map Zoom 0.png|174px]] || [[File:Unlocked Map.png|174px]]
|-
! Locked map
| [[File:Map Zoom 0.png|174px]] || [[File:Map Zoom 0.png|174px]]
|-
|}
{{-}}
== Sounds ==
{{Edition|Java}}:
{{Sound table
|rowspan=2
|sound=Drawmap1.ogg
|sound2=Drawmap2.ogg
|sound3=Drawmap3.ogg
|subtitle=Map drawn
|source=player
|description=When a map is drawn
|id=ui.cartography_table.take_result
|translationkey=subtitles.ui.cartography_table.take_result
|volume=1.0
|pitch=1.0
|distance=16}}
{{Sound table
|subtitle=Map drawn
|source=block
|description=When a map is edited using a cartography table
|id=ui.cartography_table.take_result
|translationkey=subtitles.ui.cartography_table.take_result
|volume=1.0
|pitch=1.0
|distance=16
|foot=1}}
{{Edition|Bedrock}}:
{{Sound table
|type=bedrock
|rowspan=2
|sound=Drawmap1.ogg
|sound2=Drawmap2.ogg
|sound3=Drawmap3.ogg
|source=block
|description=When a map is drawn<wbr>{{Upcoming|BE 1.20.20.20}}
|id=ui.cartography_table.take_result|idnote={{Verify|Could be block.cartography_table.use}}
|volume=0.8
|pitch=1.0}}
{{Sound table
|type=bedrock
|source=block
|description=When a map is edited using a cartography table
|id=ui.cartography_table.take_result
|volume=0.8
|pitch=1.0
|foot=1}}
== Data values ==
=== ID ===
{{edition|java}}:
{{ID table
|edition=java
|showforms=y
|generatetranslationkeys=y
|displayname=Empty Map
|spritetype=item
|nameid=map
|form=item}}
{{ID table
|displayname=Map
|spritetype=item
|nameid=filled_map
|form=item
|translationkey=item.minecraft.filled_map, filled_map.buried_treasure, filled_map.explorer_jungle{{upcoming|java 1.20.2}}, filled_map.explorer_swamp{{upcoming|java 1.20.2}}, filled_map.mansion, filled_map.monument, filled_map.unknown, filled_map.village_desert{{upcoming|java 1.20.2}}, filled_map.village_plains{{upcoming|java 1.20.2}}, filled_map.village_savanna{{upcoming|java 1.20.2}}, filled_map.village_snowy{{upcoming|java 1.20.2}}, filled_map.village_taiga{{upcoming|java 1.20.2}}
|foot=1}}
{{edition|bedrock}}:
{{ID table
|edition=bedrock
|showaliasids=y
|shownumericids=y
|showforms=y
|notshowbeitemforms=y
|generatetranslationkeys=y
|displayname=Empty Map
|spritetype=item
|nameid=empty_map
|aliasid=emptymap
|id=515
|form=item
|translationkey=item.emptyMap.name, item.emptyLocatorMap.name}}
{{ID table
|displayname=Map
|spritetype=item
|spritename=map-be
|nameid=filled_map
|aliasid=map
|id=420
|form=item
|translationkey=item.map.name, item.map.exploration.mansion.name, item.map.exploration.monument.name, item.map.exploration.treasure.name
|foot=1}}
=== Metadata ===
{{see also|Bedrock Edition data values}}
{{IN|bedrock}}, maps use the following data values:
{{/DV}}
=== Item data ===
{{el|java}}:
{{main|Player.dat format}}
<div class="treeview">
* {{nbt|compound|tag}}: The item's '''tag''' tag.
{{:Player.dat_format/Maps}}
</div>
{{el|bedrock}}:
: See [[Bedrock Edition level format/Item format]].
=== Map icons ===
{{see also|Player.dat format|Map item format|map_icons.png}}
Map icons are 8×8 in ''Java Edition'', but 16×16 in Bedrock Edition. As such, there are minor misalignment issues in ''Java Edition''.<ref>{{bug|MC-214649|||WF}}</ref>
[[File:Map icons.png|thumb|128px|Map icons texture {{in|Java}}]]
[[File:Map icons BE.png|thumb|128px|Map icons texture {{in|Bedrock}}]]
{| class="wikitable"
|-
! Java ID !! Bedrock ID !! Text ID !! Appearance !! Purpose !! Shown in item frames?
|-
| 0 || ||<code>player</code> || [[File:Player (texture) JE1 BE1.png|16px]] [[File:Player (texture) BE2.png|16px]] White marker || Players (on map) || No
|-
| 1 || 1 ||<code>frame</code> || [[File:Green Marker (texture) JE1 BE1.png|16px]] [[File:Green Marker (texture) BE2.png|16px]] Green marker || The current map in an item frame || Yes
|-
| 2 || ||<code>red_marker</code> || [[File:Red Marker (texture) JE1 BE1.png|16px]] [[File:Red Marker (texture) BE2.png|16px]] Red marker || Position converted to Overworld when opening Overworld map in the Nether{{Only|bedrock}} || No
|-
| 3 || ||<code>blue_marker</code> || [[File:Blue Marker (texture) JE1 BE1.png|16px]] [[File:Blue Marker (texture) BE2.png|16px]] Blue marker || Other players || No
|-
| 4 || ||<code>target_x</code> || [[File:Target X (texture) JE1 BE1.png|16px]] White X || Unused || Yes
|-
| 5 ||5
|<code>target_point</code> || [[File:Target Point (texture) JE1 BE1.png|16px]] [[File:Target Point (texture) BE2.png|16px]] Red triangle || Unused || Yes
|-
| 6 || 6 ||<code>player_off_map</code> || [[File:Player Off Map (texture) JE1 BE1.png|16px]] Large white dot || Players off map, nearby{{only|java}} || No
|-
| 7 || 13 ||<code>player_off_limits</code> || [[File:Player Off Limits (texture) JE1.png|16px]] [[File:Player Off Limits (texture) BE.png|16px]] Small white dot || Players off map, far away{{only|java}} || No
|-
| 8 ||14
|<code>mansion</code> || [[File:Mansion (texture) JE1.png|16px]] [[File:Mansion (Texture) BE2.png|frameless|16x16px]] Woodland mansion || Woodland mansion || Yes
|-
| 9 || 15 ||<code>monument</code> || [[File:Monument (texture) JE1.png|16px]] [[File:Monument Texture BE2.png|frameless|16x16px]] Ocean monument || Ocean monument || Yes
|-
| 10 - 25 || ||<code>{{tooltip|banner_*|banner_white, banner_orange, banner_magenta, banner_light_blue, banner_yellow, banner_lime, banner_pink, banner_gray, banner_light_gray, banner_cyan, banner_purple, banner_blue, banner_brown, banner_green, banner_red, banner_black}}</code> || [[File:Banner White (texture) JE1.png|16px]] [[File:Banner Light Gray (texture) JE1.png|16px]] [[File:Banner Gray (texture) JE1.png|16px]] [[File:Banner Black (texture) JE1.png|16px]] [[File:Banner Brown (texture) JE1.png|16px]] [[File:Banner Red (texture) JE1.png|16px]] [[File:Banner Orange (texture) JE1.png|16px]] [[File:Banner Yellow (texture) JE1.png|16px]] [[File:Banner Lime (texture) JE1.png|16px]] [[File:Banner Green (texture) JE1.png|16px]] [[File:Banner Cyan (texture) JE1.png|16px]] [[File:Banner Light Blue (texture) JE1.png|16px]] [[File:Banner Blue (texture) JE1.png|16px]] [[File:Banner Magenta (texture) JE1.png|16px]] [[File:Banner Purple (texture) JE1.png|16px]] [[File:Banner Pink (texture) JE1.png|16px]]<br>Banners in all 16 wool colors{{only|java}}|| Banner markers || Yes
|-
| 26 ||4
|<code>red_x</code> || [[File:Red X (texture) JE1.png|16px]] [[File:Target X (texture) BE2.png|16px]] Red X || Buried treasure || Yes
|-
| || 8 || || [[File:Magenta Marker (texture) BE1.png|16px]] Magenta marker
| Position converted to Overworld when opening Overworld map in the End{{Only|bedrock}} || No
|-
| || 9 || || [[File:Orange Marker (texture) BE1.png|16px]] Orange marker{{more info}}
|Other players
|Yes
|-
| || 10 || || [[File:Yellow Marker (texture) BE1.png|16px]] Yellow marker
| Other players || No
|-
| || 11 || || [[File:Cyan Marker (texture) BE1.png|16px]] Cyan marker
| Other players || No
|-
| -
|12
| || [[File:Green Point (texture) BE1.png|16px]] Green Triangle
| Other structure such as stronghold, fortress, end city, etc. when used as explorer map destination{{Only|bedrock}} || Yes
|}
It should be noted that even if the player used a NBT editor to add an additional icon on the map, ''Minecraft'' shows only the first one listed when the player loads up their world.
== Achievements ==
{{load achievements|Map Room}}
== History ==
{{see also|section=24|map_icons.png|Java Edition history of textures#Map icons}}
{{more images|section=24|{{bug|MC-72962}}}}
{{History||April 27, 2011|link=https://web.archive.org/web/0/http://notch.tumblr.com/post/4988431144/the-maps|[[Notch]] unveiled screenshots of the map.}}
{{History||April 28, 2011|link={{tweet|notch|63500114005721088}}|[[Notch]] said that he would try to make maps place-able on [[wall]]s.}}
{{History|java beta}}
{{History||1.6|snap=Test Build 3|[[File:Map (item) JE1 BE1.png|32px]] Added maps.}}
{{History||1.6.6|The ability to auto-craft maps using shift-click has been disabled.}}
{{History||1.8|snap=Pre-release|Maps can now be found in library chests in the brand-new [[stronghold]]s.
|Auto crafting maps has been restored. Map cloning, therefore, is unavailable for a period of time.}}
{{History||1.8.1|Maps now work both while walking and flying.}}
{{History|java}}
{{History||1.0.0|snap=Beta 1.9 Prerelease 5|Prior to this update, the [[sun]] in ''[[Minecraft]]'' rose in the North, which threw off many [[player]]s and led to a common misconception that ''Minecraft'' maps/[[world]]s were oriented with East at the top. The sun now rises in the east and sets in the west, making navigation much more intuitive.
|Before the change in sun position, it was commonly said that ''Minecraft'' maps/worlds are oriented with East at the top; sunrise, by definition, occurs at the East, which means it is certainly true that the maps were oriented "East" since the Sun rose from the top (North). However, [[Jeb]] asserted (and [[Notch]] agreed) that the sun rose in the north.<ref>{{Tweet|jeb|87815841160237056}}</ref><ref>{{Tweet|notch|88155424880201728}}</ref> Most mods and map-making tools, however, used the terms East and North consistent with their actual definitions (e.g. a [[Programs and editors/Cartograph|Cartograph]]-generated map with North at the top is rotated 90 degrees from the in-game map).}}
{{History||1.4.2|snap=12w34a|[[File:Empty Map JE1 BE1.png|32px]] [[Crafting]] a map now creates an empty map. The map is drawn for the first time when it is held and right clicked, and is centered near the location of the [[player]] when clicked (not as before where it was centered on the location it was crafted.)
|Previously, in order to map a new area, the map had to be ''crafted'' in that area (rather than carrying a previously-crafted map to the new area). The point where a map is crafted becomes its permanent center, and could never be changed.
|The pointer no longer disappears when leaving the map, but transforms into a white dot, indicating on what side of the map the player is located.
|Maps now align to a grid, making it easier to create adjacent maps.
|Maps can now be zoomed out (but not zoomed in).
|Maps can now be cloned and scaled.}}
{{History||1.4.2|snap=12w34b|Maps now have a ''zoom level'', which was fixed at 1:8 prior to snapshot [[Java Edition 12w34a|12w34a]],<ref name="mapinfo">https://web.archive.org/web/0/http://notch.tumblr.com/post/4988431144/the-maps</ref> but now starts at 1:1 and can be increased up to 1:16 by re-crafting an existing map.
|Maps are no longer numbered on the top-left corner and is labeled through the tooltip.}}
{{History|||snap=12w36a|New maps are now crafted at a scale factor of 1:1. A zoomed in map can be zoomed out by re-crafting it with another 8 sheets of [[paper]] on a [[crafting table]]. Each time this is done, the scale increases - 1:1, 1:2, 1:4, 1:8, 1:16 with a map scale of 1:16 being the current maximum.}}
{{History||1.7.2|snap=13w38a|The map size has been increased when placed on a [[wall]] using the [[item frame]].
|More colors have been added to maps for different [[block]]s.<ref name="infodump2">https://web.archive.org/web/0/https://www.mojang.com/2013/10/minecraft-1-7-the-update-that-changed-the-world</ref>}}
{{History||1.8|snap=14w31a|Zoomed maps now conform to an expanded grid based on their zoom level. Previously, careful considerations would need to be taken to creating a wall of adjoining maps.}}
{{History||1.8.1|snap=pre1|Some colors have been changed on maps to more accurately represent their respective [[block]].}}
{{History||1.9|snap=15w31a|Maps now display as a mini-map when held in the off-hand, or if the off-hand slot is occupied; the (old) large version is visible only when held in the dominant hand with the secondary hand free.}}
{{History|||snap=15w34a|New maps can now be [[crafting|crafted]] at a scale factor of 1:4.
|A crafting recipe has been added for zooming in maps.}}
{{History|||snap=15w43a|The average yield of empty maps from [[stronghold]] library [[chest]]s has been doubled.}}
{{History|||snap=15w45a|New maps are once again [[crafting|crafted]] at a scale factor of 1:1, as they had been before snapshot [[15w34a]].
|The [[crafting]] recipe, that was introduced in 15w34a, for zooming in maps has been removed.}}
{{History|||snap=15w49a|Map making now uses armor equipping sounds.}}
{{History||1.11|snap=16w39a|Maps now work in [[the End]].
|Empty maps are now [[trading|sold]] by cartographer [[villager]]s as their tier 3 [[trading|trade]].
|Added [[explorer map]]s, sold by cartographers as their tier 4 trades.}}
{{History||1.12|snap=17w17a|Maps now have separate colors for colored [[terracotta]] blocks from other colored blocks.}}
{{History||1.13|snap=17w47a|Prior to [[1.13/Flattening|''The Flattening'']], these [[item]]s' numeral IDs were 358 and 395.
|Maps now use additional NBT to specify which map they contain. Prior to this version, they used the [[damage]] value instead.
|Map IDs are no longer limited to 32,768.}}
{{History|||snap=17w50a|Maps can now be placed on floor and ceiling [[item frame]]s.}}
{{History|||snap=18w10a|Spots on maps can now be marked using [[banner]]s.}}
{{History|||snap=18w11a|Empty maps can now generate in [[shipwreck]] [[chest]]s.}}
{{History|||snap=pre7|Maps have been changed slightly, in regard to which [[block]]s are shown and which blocks are not.}}
{{History||1.14|snap=18w43a|[[File:Empty Map JE2 BE2.png|32px]] [[File:Map (item) JE2 BE2.png|32px]] The textures of maps have been changed.}}
{{History|||snap=18w48a|Empty maps can now be found in chests in [[village]] cartographer houses.}}
{{History|||snap=19w02a|Maps can now be cloned and zoomed out (extended) by using a [[cartography table]].
|Maps can now be locked by using a [[glass pane]] with a cartography table.
|The recipes for cloning and zooming out maps have been removed.}}
{{History|||snap=19w06a|Map making is now silent again.}}
{{History|||snap=19w13a|Cartographer villagers now give empty maps to players under the [[Hero of the Village]] effect.}}
{{History||1.16|snap=20w21a|Map making sounds are now the same as when using a cartography table.}}
{{History|pocket alpha}}
{{History||v0.14.0|snap=build 1|[[File:Empty Map JE1 BE1.png|32px]] [[File:Map (item) JE1 BE1.png|32px]] Added maps.
|Maps are crafted using nine [[paper]], one for every slot of the [[crafting]] grid.
|Maps must be combined with a [[compass]] using an [[anvil]] in order to show the [[player]]'s position.
|Maps can be zoomed using an anvil.}}
{{History|||snap=build 3|New maps are now [[crafting|crafted]] at full zoom.
|Empty maps now have a "Create Map" button to initialize them.}}
{{History|||snap=build 7|New maps are now crafted at a scale factor of 1:1.}}
{{History||v0.15.0|snap=unknown|Maps can now be crafted either with 8 pieces of [[paper]] and a [[compass]] ''or'' 9 pieces of paper, to get a map with or without a position marker.}}
{{History||v0.16.0|snap=build 1|Different colors have been added to maps for different [[biome]]s.}}
{{History|pocket}}
{{History||1.0.0|snap=?|[[Windows 10 Edition]] can now use the [[anvil]] as well as the [[crafting table]] to clone, zoom and apply markers, just as [[Pocket Edition]] in general could.
|Maps can now be found inside [[stronghold]] library [[chest]]s.}}
{{History||1.1.0|snap=alpha 1.1.0.0|Empty maps with direction markers built-in are now called "locator maps".}}
{{History|||snap=alpha 1.1.0.3|"Locator maps" are now called "empty locator maps".
|Empty maps are now [[trading|sold]] by cartographer [[villager]]s for 7-11 [[emerald]]s as their tier 3 [[trading|trade]].}}
{{History|bedrock}}
{{History||1.4.0|snap=beta 1.2.14.2|Maps can now be found inside map room [[chest]]s in [[shipwreck]]s.}}
{{History||?|The texture of the filled map overlay has been changed.}}
{{History||?|Maps now function in dimensions other than the dimension in which they were created.}}
{{History||1.10.0|snap=beta 1.10.0.3|Maps can now be found in cartographer house [[chest]]s in [[village]]s.
|[[File:Empty Map JE2 BE2.png|32px]] The texture of empty maps has been changed.}}
{{History||1.11.0|snap=beta 1.11.0.1|Empty maps can now be created from 1 [[paper]] in [[cartography table]]s.
|Maps can now be zoomed, cloned, renamed, and have pointers added in cartography tables.}}
{{History|||snap=beta 1.11.0.4|Cartographer [[villager]]s now [[trading|sell]] empty map for an [[emerald]] as their first tier [[trading|trades]].
|Empty locator maps can now be [[trading|bought]] from cartographer villagers.}}
{{History||1.13.0|snap=beta 1.13.0.1|[[File:Map (item) BE3.png|32px]] [[File:Locked Map (item) BE2.png|32px]] Filled maps and locked maps now have unique inventory icons.}}
{{History||1.16.0|snap=beta 1.16.0.57|Trading has been changed, novice-level cartographer now sell an empty map for 7 emeralds. Cartographer villager no longer sell empty locator map.}}
{{History||1.16.100|snap=beta 1.16.100.56|The ID of maps have been changed from <code>emptymap</code> to <code>empty_map</code> and <code>map</code> to <code>filled_map</code>.}}
{{History|console}}
{{History||xbox=TU1|xbone=CU1|ps=1.00|wiiu=Patch 1|switch=1.0.1|[[File:Map (item) JE1 BE1.png|32px]] Added maps.
|The [[player]] spawns with a free map.
|Maps are available only as zoom step 3 maps centered at coordinates 0,0. Biome colors do not appear on maps.}}
{{History||xbox=none|xbone=CU1|ps=1.0|wiiu=none|Larger sized worlds on Xbox One, Playstation 4, and Nintendo Switch have zoom step 3 maps aligned to a grid with maps centered at 0, 1024, or 2048 on the X or Z coordinates.}}
{{History||xbox=TU21|xbone=CU9|ps=1.14|wiiu=Patch 1|[[File:Empty Map JE1 BE1.png|32px]] [[Crafting]] a map now produces an empty map.}}
{{History||xbox=TU46|xbone=CU36|ps=1.38|wiiu=Patch 15|The outer end islands appear on different maps; even on Xbox 360, Playstation 3, Vita, and Wii U editions.}}
{{History||xbox=none|xbone=none|ps=1.90|wiiu=none|switch=none|[[File:Empty Map JE2 BE2.png|32px]] [[File:Map (item) JE2 BE2.png|32px]] The textures of maps have been changed.}}
{{History||ps=1.91|Maps can now be created and used in [[cartography table]]s.}}
{{History|foot}}
== Issues ==
{{issue list}}
== Trivia ==
* Use of the {{key|F1}} key can allow the player to hold a map without blocking their view at all.
* In ''Java Edition'', a map created using {{cmd|give}} can be any map by using the Map parameter to specify the map number desired. E.g. {{cmd|give [player] minecraft:filled_map{map:5<nowiki>}}} gives the specified player map_5. If no data value is supplied it defaults to map_0. If map_0 has not ever been crafted, it is centered on x=0, z=0.
* The maps are stored separately as their own data (<code>.dat</code>) file as <code>map_x.dat</code> with (x) being the map number, see [[map item format]] for more info. By manipulating this number, players can organize their maps to suit them, or if they accidentally create a map in the same location, they can delete their extra map so as to save the number they make.
* Certain programs can be used to make customized maps with images or text on them instead of actual maps, many people use these in adventure maps to show pictures or to tell a story.
* Since all copies of a map are links to the same file, copying an unfinished map keeps it synchronized with the copy as the player fills it in. Thus, a copy stored in a chest can act as a remote backup.
* A map that is in an item frame does not update itself until a player picks it up, lets it reload, and places it back again. However, if a player holds a clone of the map, both maps update.
* Filled maps are the only items that make 90 degree rotations in item frames, and also the only items that can expand the item frame into full block wide.
* On [[Legacy Console Edition]], the player always spawns with a map in their inventory after creating a world. This was later added to Bedrock Edition as an optional feature in the world creation menu.
* Maps on Legacy Console Edition always show the player's current coordinates, as a substitute for the optional [[Coordinates|coordinate display]] in other editions.
* A map cannot be created on [[New Nintendo 3DS Edition]]. Instead, the map is always displayed on the bottom screen along with the coordinates. Biome colors do not appear on maps.
== Gallery ==
<gallery>
MapItem1.png|A fully zoomed map.
MapRotation.png|Having a map in hand does not stop the ability to see ahead.
MapItem3.png|A world being recorded onto a map.
Mcmap4.png|Nearly fully explored map.
Zoomed Map.png|A map edited to the scale of 1.
Sky Map.png|A map mapping the [[Sky Dimension]].
MapOfVillage.png|A village and how it is represented on a map.
Pumpkin map.png|A map containing a custom image made by placing a large number of blocks.
Complete Map.png|A completely explored map.
MapZooms.png|A diagram showing how maps zoomed out before [[Java Edition 1.8]]. Notice how the larger maps have borders made of half and quarter small maps.
Map18zooms.png|From 1.8, zoomed maps are aligned to this grid exactly.
Large Biome Map.png|A map of a [[Large Biomes]] world.
Map0140-0160.png|A comparison of maps between versions in Pocket Edition Alpha [[Pocket Edition Alpha 0.14.0|0.14.0]] and [[Pocket Edition Alpha 0.16.0|0.16.0]].
Mycelium Map.png|A map view of a mushroom biome, showing that mycelium appears purple on a map.
MiniMap.png|Maps held in the off-hand or in either hand while [[dual wielding]] appear as mini-maps.
Partly filled treasure map.png|Partly filled treasure map with an odd area at the bottom left. Normally a partly filled map would look striped (as in the top left), but this map seems to be bugged and is possibly showing caves, or something, in the bottom left.
Partly filled ocean explorer map.png|Partly filled ocean explorer map. Updating the game from an older version (in this case the area was first generated before 1.18) and buying a map after updating (in this case in 1.19.4) can result in the map displaying rivers and terrain where there is really a frozen sea.
Map Stained Glass 1.png|Stained glasses' appearances on maps before and after 1.13.
Map Stained Glass 2.png|Stained glasses' appearances on maps before and after 1.13.
Map Various Blocks 1.png|Various blocks' appearances on maps before and after 1.13.
Map Various Blocks 2.png|Various blocks' appearances on maps before and after 1.13.
Better Together Map.jpg|Holding a map in the offhand in ''Bedrock Edition''.
Better Together Map Icon.jpg|Holding a map in both hands in ''Bedrock Edition''.
File:MapFailedtoFill.png|A map that has not yet filled. A rare bug in Java.
</gallery>
=== The Nether ===
<gallery>
Nethermap.png|A map in [[the Nether]].
Maponnether.png|A map in the Nether; the arrow turns around itself, like in [[compass]].
</gallery>
=== The End ===
<gallery>
Jeb End Map.png|The first image of a map in [[the End]].
Endmap.png|A map in the End.
</gallery>
=== Maps in item frames ===
<gallery>
FramedMap.png|A map displayed on an item frame, as it looked before [[Java Edition 1.7.2]].
Structure Map Collection.png|Multiple maps in item frames. Notice a [[village]], two [[desert temple]]s and a lava lake.
Minecraft maps 3by3.png|A collection of 9 connected full maps.
Full Map.png|A combination of 25 maps pasted together as one map.
Map wall BE.png|A map wall on ''Bedrock Edition'', showing large areas of biome colors for each biome.
Map's in item frames.png|Maps can be placed into [[item frame]]s so they can be viewed together.
Comparing Maps.png|The comparison between 3 zooms of maps.
SuperflatMap.png|A map in a [[Superflat]] world, with some [[village]]s.
MapWallWithMarkers.png|A 3x3 map wall with banner markers.
HEYYEYAAEYAAAEYAEYAA.png|He-Man map art.
Map Player Icons 1.png|First image of player icons on maps.
Map Player Icons 2.png|Second image of player icons on maps.
</gallery>
== See also ==
* [[Explorer Map]]
* [[Clock]]
* [[Tutorials/Navigation|Navigation]]
== References ==
{{Reflist}}
{{Items}}
[[cs:Mapa]]
[[de:Karte]]
[[es:Mapa]]
[[fr:Carte (objet)]]
[[hu:Térkép (tárgy)]]
[[ja:地図]]
[[ko:지도]]
[[nl:Kaart]]
[[pl:Mapa]]
[[pt:Mapa]]
[[ru:Карта]]
[[tr:Harita]]
[[th:แผนที่]]
[[uk:Мапа]]
[[zh:地图]]
[[Category:Renewable resources]]</li></ul></nowiki> | beta 1.10.0.3 | ||||
1.12.0{{Extension DPL}}<ul><li>[[Elytra|Elytra]]<br/>{{Item
| image = Elytra.png
| rarity = Uncommon
| renewable = No
| durability = 432
| stackable = No
}}
'''Elytra''' ({{Audio|ElytraPronunciation.mp3|/ˈɛl ɪ trə/|link2=''ᴇʟ-i-trə''}}<ref>“Elytron.” ''Merriam-Webster.com Dictionary'', Merriam-Webster, https://www.merriam-webster.com/dictionary/elytron. Accessed 22 May. 2022.</ref>)<!--"Elytra" is the plural of "elytron," a single half of a beetle's protective wing covers. Verbs should agree accordingly (e.g. "Elytra allow flight"). https://www.merriam-webster.com/dictionary/elytron--> are rare wings found in [[end ship]]s that are a source of flight in [[Survival]] mode.
== Obtaining ==
=== Natural generation ===
Elytra are found only in [[end city|end cities]] in [[item frame|item frames]] in the treasure room of the [[end ship]]. A [[shulker]] guards the elytra and the ship's two loot chests.
=== Repairing ===
Elytra can be enchanted with [[Mending]] so that they get [[Item repair|repaired]] as the player collects [[experience]] orbs while wearing/holding them.
Elytra can also be repaired in the player crafting grid, by combining two damaged pairs of elytra together.
{{crafting
|showname=0
|showdescription=1
|ignoreusage=1
|Damaged Elytra
|Damaged Elytra
|Output= Elytra
|description= The durability of the two pairs is added together, plus an extra 5% durability, but removes any enchantments.
|type= Transportation
}}
Similarly, two damaged elytra pairs can be combined on a [[grindstone]].
{{Grinding
|showdescription=1
|ingredients=2x Damaged [[Elytra]]
|Damaged Elytra
|Damaged Elytra
|Elytra
|description=The durability of the two pairs is added together, plus an extra 5% durability, but removes any enchantments.
}}
Elytra can also be repaired at an anvil using [[phantom membrane]]s, which has the advantage that it preserves [[enchantments]] on elytra. Each phantom membrane restores 108 durability points, exactly 25% of the elytra's total durability.
{| class="wikitable" data-description="Repairing elytra"
! scope="col" style="width:64px;" | Name
! Ingredients
! [[Anvil]] usage
|-
! scope="row" style="text-align: center;" | '''Elytra'''
| [[Elytra]] +<br>[[Phantom Membrane]]
| style="width: 260px; padding: 1px;" | {{Anvil| title = Elytra|Input1=Damaged Elytra|Input2=Phantom Membrane, 2|Output=Elytra}}
|-
|}
Each repair on the anvil, however, also increases the [[Anvil mechanics|prior work]] penalty for the Elytra, making every subsequent repair increasingly expensive and eventually reaching an upper limit where repairs are no longer allowed because they are "too expensive" (even if the player has many xp levels to spare). However, the prior work penalty can be reset to 0 for an enchanted elytra pair when it is disenchanted on a grindstone. Unenchanted elytra cannot be used on the grindstone alone.
== Usage ==
[[File:Steve in elytra.png|75px]] [[File:Alex in elytra.png|75px]]
Elytra are equipped in the [[chestplate]] slot, either by placing the item directly in the slot, by pressing {{ctrl|use item}} while [[hotbar|held in hand]], or by firing a point-blank [[dispenser]] at a target. They are gray in color by default, but they adopt the design of any [[cape]] the player is wearing. They maintain their in-world texture design even when they're [[#Repair|broken]] or [[enchanted]].
=== Flying ===
To fly, the player must press the {{ctrl|jump}} key while falling, and the elytra spread apart like a beetle's elytra. The player can aim their view around to turn or adjust their pitch. Losing altitude increases speed, and gaining altitude decreases speed. [[Firework rocket]]s can be used to increase speed. Additionally, speed is quickly lost from sharp changes in direction.
Directly hitting any surface while gliding too fast causes damage to the player and their armor proportional to flight speed (although this may be calculated from another factor). When a player dies in this way, they receive the [[death messages|death message]] "'''<player> experienced kinetic energy'''". The player does not take [[fall damage]] from colliding at a shallow angle or a low enough speed. The critical, damaging angle is about 50° with the collision surface, and the calculation for damage seems to be as if the player had fallen from their maximum potential glide height to the height of the struck surface.
A safe and simple cruise with the highest travel distance can be achieved by aiming directly at the horizon while at the glide's altitude limit. The player's speed is slow enough to allow them time to do other things during a long flight, like sort out their inventory.
In [[Creative]] mode or when the "mayfly" [[ability]] has been given, the player can alternatively hold the {{ctrl|jump}} key to fly up,{{only|bedrock}} or double press the jump key to move around freely.
Flight can be stopped by pressing the [[jump]] key.{{only|bedrock}}
==== Speed and altitude ====
Elytra have a minimum speed of about 7.2 m/s (obtained by gliding at the altitude cap with a strong upward pitch of 30°). If the diver drops to 0 speed, they quickly get accelerated back up to at least this minimum. The diver can increase speed by choosing to descend faster, but afterward, they do not regain nearly as much altitude. In the real world, drag increases with speed, and drag, in turn, slows the aircraft; Minecraft mimics this. To glide from cliff to cliff, a player's best bet is to aim slightly above the horizon.
Sharp turns are a fast way to lose speed. Quicker turns cause greater losses, while gentle movements have small effects. Making a hairpin turn can actually be used for making high-speed landings safe as well as for precise landings on small targets like rooftops. The player aims to glide just above the target, then as they're right over it they immediately reverse directions, then they make readjustments as necessary.
The lowest rate of altitude loss is about 1.5 m/sec, obtained by gliding at the altitude cap with a slight upward pitch (12° or 15°).
To get the best possible glide ratio (and thus the furthest distance out of their altitude), the diver pilot should aim directly at the horizon. This ratio is about 9.47 to 1.
[[Slow Falling]] potions greatly decrease the player's vertical (fall) speed, which also greatly decreases their ''horizontal'' speed (clearly, it depends on the vertical fall rate, as one might expect from flight modeling). The net result is that the player flies extremely slowly - but their Elytra still takes durability damage at the usual rate (1 durability per second without Unbreaking, etc.). Due to this combination, Elytra plus Slow Falling is largely a novelty that most players won't use. The [[Feather Falling]] enchantment does not affect Elytra speed and does not reduce fall damage from hitting things with elytra.
It is possible to calculate the glide range by dividing the altitude by tan of the glide angle (altitude/tan(glide angle)). For example, if the player glides from an altitude of 64 blocks above ground with a glide angle of 15 degrees, they can glide for 237 blocks (assume that they are on superflat), since floor(64 / tan(15)) is 237.
==== Stalling ====
Trying for too high a pitch reduces the player's lift. At a pitch of 30° above the horizon, the player has the lowest possible airspeed of 7.2 m/sec. Above that, the player might be considered to be in a stall. Increasing the pitch gets closer to a free-fall, and stalled flight at 60° is enough to cause fall damage. Stalling at 90° is a true free-fall.
Recovering from a stall is done by readjusting to any safe pitch as quickly as the player likes. This can be just changing to look at the horizon.
==== Powered flight ====
{{fakeImage|{{invSprite|Firework Rocket}}|Firework rockets are used for speed boosts while gliding.}}
[[Firework rocket]]s can be used for propulsion during flight by placing it in either hand and {{ctrl|using}}. Using a firework rocket while gliding quickly maximizes the player's speed for a time similar to the rocket's flight duration.
If the rocket is equipped with [[firework star]]s, it explodes at the end of its flight, inflicting damage based on the number of stars.
It is possible to gain altitude during powered flight. This makes it possible to glide for extreme distances and had been used extensively by [[far lands]]/[[World Border]] challenges.
=== Durability and Repair ===
{{fakeImage|{{invSprite|Broken Elytra}}|A broken pair of elytra.}}
[[Durability]] decreases by one point each second when gliding. A pair of elytra has 432 durability, allowing 7 minutes and 12 seconds of gliding time without enchantments, providing more than 10,000 blocks of transport distance. It is possible to apply the [[Unbreaking]] enchantment using an [[anvil]] and an [[enchanted book]], which affects the elytra, in the same way it does to [[tool]]s. Unbreaking III increases elytra's flight time to about four seconds per durability point, a total of 28 minutes and 44 seconds.
When the durability reaches 1, elytra stop working until they are repaired, adopting a tattered texture in the inventory. The damage ends at durability 1, so they can never fully break. A pair may be repaired by either using the [[Mending]] enchantment, combining two pairs in a [[grindstone]], or combining it in an anvil with [[phantom membrane]]s. In an anvil, each piece of membrane repairs elytra by 108 durability points, requiring 4 pieces to fully repair them.
Each repair on the anvil will also increase the [[Anvil mechanics|prior work]] penalty for the Elytra, making every subsequent repair increasingly expensive, with an upper limit where repairs are no longer allowed because they are "too expensive". However, the prior work penalty can be reset to 0 for an enchanted elytra pair when it is disenchanted on a grindstone (by adding nothing to it). Unenchanted elytra cannot be used on the grindstone alone.
=== Enchantments ===
Elytra can receive the following [[enchantments]] by combining in an anvil:
{| class="wikitable sortable"
|-
! Enchantment
! Max Level
![[Enchanting|Method]]
|-
| [[Unbreaking]]
| III
|{{Inventory slot|Anvil}}
|-
| [[Mending]]
| I
|{{Inventory slot|Anvil}}
|-
| [[Curse of Vanishing]]
| I
|{{Inventory slot|Anvil}}
|-
| [[Curse of Binding]]
| I
|{{Inventory slot|Anvil}}
|}
{{notelist|columns=1}}
== Sounds ==
{{edition|java}}:
{{Sound table
|sound=Equip leather1.ogg
|sound2=Equip leather2.ogg
|sound3=Equip leather3.ogg
|sound4=Equip leather4.ogg
|sound5=Equip leather5.ogg
|sound6=Equip leather6.ogg
|subtitle=Elytra rustles
|source=player
|description=When a pair of elytra is equipped
|id=item.armor.equip_elytra
|translationkey=subtitles.item.armor.equip_elytra
|volume=1.0
|pitch=1.0
|distance=16}}
{{Sound table
|sound=Elytra loop.ogg
|subtitle=MC-177084
|source=player
|description=While flying with a pair of elytra
|id=item.elytra.flying
|translationkey=-
|volume=0.0-1.0 <ref group=sound>Is a quarter of the player's velocity. If flying for less than 1 second, it is 0.0; otherwise, if flying for less than 2 seconds, it is between 0.0 and a quarter of the player's velocity (scaling up with time until 2 seconds)</ref>
|pitch=1.0 <ref group=sound>If the volume is greater than 0.8, 0.8-volume is added to the pitch</ref>
|distance=16}}
{{Sound table
|sound=Random break.ogg
|subtitle=Item breaks
|source=dependent
|description=When a pair of elytra's durability is exhausted
|id=entity.item.break
|translationkey=subtitles.entity.item.break
|volume=0.8
|pitch=0.8-1.2
|distance=16
|foot=1}}
{{edition|bedrock}}:
{{Sound table
|type=bedrock
|sound=Equip leather1.ogg
|sound2=Equip leather2.ogg
|sound3=Equip leather3.ogg
|sound4=Equip leather4.ogg
|sound5=Equip leather5.ogg
|sound6=Equip leather6.ogg
|source=player
|description=When a pair of elytra is equipped
|id=armor.equip_leather
|volume=1.0
|pitch=1.0}}
{{Sound table
|sound=Elytra loop.ogg
|source=player
|description=While flying with a pair of elytra
|id=elytra.loop
|volume=''Depends'' {{checkthecode}}
|pitch=1.0}}
{{Sound table
|sound=Random break.ogg
|source=player
|description=When a pair of elytra's durability is exhausted
|id=random.break
|volume=1.0
|pitch=0.9
|foot=1}}
== Data values ==
=== ID ===
{{edition|java}}:
{{ID table
|edition=java
|showforms=y
|generatetranslationkeys=y
|displayname=Elytra
|spritetype=item
|nameid=elytra
|form=item
|foot=1}}
{{edition|bedrock}}:
{{ID table
|edition=bedrock
|shownumericids=y
|showforms=y
|notshowbeitemforms=y
|generatetranslationkeys=y
|displayname=Elytra
|spritetype=item
|nameid=elytra
|id=564
|form=item
|foot=1}}
== Achievements ==
{{Load achievements|Super Sonic}}
== Advancements ==
{{load advancements|Sky's the Limit}}
== History ==
{{History|java}}
{{History||1.9|snap=October 5, 2015|slink=https://twitter.com/_tomcc/status/651042141397979136|[[Tommaso Checchi]] tweets that [[Jeb]] is working on a secret feature for Minecraft Java Edition, saying "it's like [[W:c:Mario:Super Mario 64|Mario 64]]."}}
{{History|||snap=October 6, 2015|slink=https://twitter.com/jeb_/status/651416814791081984|[[Jeb]] tweets a [https://web.archive.org/web/20230820173231/https://gfycat.com/serpentinehighlevelamurminnow-minecraftsuggestions-ethoslab animated GIF] revealing a [[player]] gliding around an [[end city]]. Elytra have a dragon-wing texture.}}
{{History|||snap=October 6, 2015|slink=https://twitter.com/jeb_/status/651419480187346944|Jeb tweets an [https://web.archive.org/web/20230219045525/https://i.imgur.com/LBgZCyW.png image] of folded wings, which replace the cape the player is wearing.}}
{{History|||snap=October 6, 2015|slink=https://twitter.com/jeb_/status/651423700777074688|Jeb tweets another [https://web.archive.org/web/20230820083025/https://gfycat.com/leadingindolentgangesdolphin animated GIF] of his character with Mojang-themed elytra, gliding along a [[river]] through a [[taiga]] forest.}}
{{History|||snap=15w41a|[[File:Elytra JE1 BE1.png|32px]] <br>[[File:Elytra (item) JE1 BE1.png|32px]] [[File:Broken Elytra (item) JE1 BE1.png|32px]] Added elytra.
|Elytra are currently repaired with [[leather]] when using [[anvil]].}}
{{History|||snap=15w42a|Elytra now spread slightly when the [[player]] crouches.
|The player can now take [[damage]] from gliding into walls, and crashing into a wall now has its own [[Health#Death messages|death message]].
|When flying with elytra, players are only 0.6 blocks tall. They, therefore, can now fit through 1-block gaps while gliding.
|The [[player]] can no longer go higher than the starting point of the glide.}}
{{History|||snap=15w43a|The player's point of view now shifts while gliding.}}
{{History|||snap=16w06a|Elytra now recognize the [[player]]'s [[cape]] and adopt a different elytron design for every official cape (see [[#Gallery|Gallery]]). In addition, Jeb is working on a feature to allow players to change the elytron design like regular player skins.}}
{{History|||snap=16w07a|Elytra are now activated by jumping mid-air. The player no longer glides automatically when falling.
|The cape option in the [[options|options menu]] now also disables custom elytra textures.
|Added the [[game rule]] {{cd|disableElytraMovementCheck}}.}}
{{History||1.9.1|snap=pre1|[[Sound]]s while gliding with elytra have been added.}}
{{History||1.11|snap=16w32a|Elytra can now be placed on [[armor stand]]s, just like any other [[chestplate]].}}
{{History|||snap=16w38a|Elytra are now visible on [[zombie]]s, [[skeleton]]s, and armor stands.}}
{{History|||snap=16w41a|Elytra now have their own [[sound]] when equipped.}}
{{History||1.11.1|snap=16w50a|Elytra can now be propelled through the [[air]] by using [[firework rocket]]s.}}
{{History||1.13|snap=17w47a|Prior to [[1.13/Flattening|''The Flattening'']], this [[item]]'s numeral ID was 443.}}
{{History|||snap=18w14a|Elytra now require [[phantom membrane]] to be repaired, instead of [[leather]].}}
{{History||1.14|snap=18w43a|[[File:Elytra JE2 BE2.png|32px]] <br>[[File:Elytra (item) JE2 BE2.png|32px]] [[File:Broken Elytra (item) JE2 BE2.png|32px]] The textures of the elytra have been changed.}}
{{History||1.15|snap=19w39a|The deployment animation of elytra causes [[player]] blinks when the deployment events has overlapped.}}
{{History|||snap=19w42a|The deployment and folding animations of elytra have been improved and become smoother.
|Elytra can now start to glide immediately after a jump, not only during falls.}}
{{History||1.18|snap=experimental snapshot 7|Elytra no longer use up durability when gliding regularly. Durability is now only consumed when a [[firework rocket]] is used.
|Speed boosts from firework rockets are slightly weaker.
|Now break when the item reaches 0 durability.}}
{{History|||snap=21w37a|The elytra changes in experimental snapshot 7 have been reverted.}}
{{History||1.19|snap=Pre-release 1|Equipping elytra through the inventory now plays a sound.<ref>{{bug|MC-94060||Equipping armor/elytra through inventory or dispenser doesn't play sounds|Fixed}}</ref>}}
{{History||1.19.4|snap=23w05a|Equipping elytra while held with an item already in the chestplate slot now swaps the two items.}}
{{History|pocket}}
{{History||1.0.0|snap=alpha 0.17.0.1|[[File:Elytra JE1 BE1.png|32px]] <br>[[File:Elytra (item) JE1 BE1.png|32px]] [[File:Broken Elytra (item) JE1 BE1.png|32px]] Added elytra. In-game, they are known as ''elytra wings''.}}
{{History|bedrock}}
{{History||1.2.0|snap=beta 1.2.0.2|Elytra can now be propelled through the [[air]] by using [[firework rocket]]s.}}
{{History||1.2.3|snap=beta 1.2.3.3|''Elytra Wings'' have been renamed to ''Elytra''.}}
{{History||1.6.0|snap=beta 1.6.0.5|Elytra can now be repaired in an [[anvil]] using [[phantom membrane]], instead of [[leather]].}}
{{History||1.10.0|snap=beta 1.10.0.3|[[File:Elytra JE2 BE2.png|32px]] <br>[[File:Elytra (item) JE2 BE2.png|32px]] [[File:Broken Elytra (item) JE2 BE2.png|32px]] The textures of elytra have been changed.}}
{{History|console}}
{{History||xbox=TU46|xbone=CU36|ps=1.38|wiiu=Patch 15|switch=1.0.1|[[File:Elytra JE1 BE1.png|32px]] <br>[[File:Elytra (item) JE1 BE1.png|32px]] [[File:Broken Elytra (item) JE1 BE1.png|32px]] Added elytra.}}
{{History||xbox=TU53|xbone=CU43|ps=1.49|wiiu=Patch 23|switch=1.0.3|Elytra can now be propelled through the [[air]] by using [[firework rocket]]s.}}
{{History||xbox=TU69|xbone=none|ps=1.76|wiiu=Patch 38|switch=none|Elytra are now repaired on the [[anvil]] using [[phantom membrane]] instead of [[leather]].}}
{{History||xbox=none|xbone=none|ps=1.90|wiiu=none|switch=none|[[File:Elytra JE2 BE2.png|32px]] <br>[[File:Elytra (item) JE2 BE2.png|32px]] [[File:Broken Elytra (item) JE2 BE2.png|32px]] The textures of elytra have been changed.}}
{{History|new 3ds}}
{{History||1.7.10|[[File:Elytra JE1 BE1.png|32px]] <br>[[File:Elytra (item) JE1 BE1.png|32px]] [[File:Broken Elytra (item) JE1 BE1.png|32px]] Added elytra.}}
{{History|foot}}
== Issues ==
{{issue list}}
== Trivia ==
* The singular form of elytra is an {{w|elytron}}.
* In reality, elytra are not used for flight. They are the tough forewings of beetles and earwigs that cover the wings they actually use for flight. However, like ''Minecraft'' elytra, beetles can use them for gliding.
* A flying player has a shorter hitbox than usual: A 0.6 block cube centered on the player's feet.
* It is possible to glide while on a [[ladder]], by pressing {{key|shift}} followed by {{key|space}}, causing the player to fall with a speed determined by the player's visual angle. This means that the player can descend fast on a ladder, but if the speed is too fast when hitting the ground, they can take fatal fall damage. Using a [[firework rocket]] can also speed up the player's descent.
* {{IN|java}} if the player glides into deep [[water]] with elytra equipped, the animation does not stop, giving it the appearance of a [[swimming]] animation.<ref name="MC-97190">{{bug|MC-97190||While gliding into water or lava, player continues gliding|WAI}}</ref> The animation stops once the player touches the ground. Additionally, [[firework rocket]]s can be used with elytra underwater with a short boost duration.
* Elytra do not deactivate when the player flies into [[lava]].<ref name="MC-97190"/>
* Elytra can be equipped onto some [[mob]]s using [[command]]s. This has no effect unless the mob has the {{cd|FallFlying}} tag set to {{cd|1b}}. Mobs glide forward, unable to control the movement before landing, at which time they regain their AI.
** Exceptions to this are [[squid]]s as the squid's AI causes it to attempt swimming in midair, making it fall straight down because it conflicts with the elytra mechanics.
**Because [[chicken]]s fall slowly, they can move more distance.
** [[Enderman|Endermen]], tamed [[wolf|wolves]] and tamed [[cat]]s that are not sitting cannot teleport until they hit the ground.
** Because mobs do not regain control until they hit the ground, [[vex]]es fall until they die or despawn as they cannot touch the ground.
** Mobs capable of flying, such as [[parrot]]s or vexes can steer in air, though they cannot travel up or down. Dolphins also have this ability.
* [[4J Studios]] created an elytron-centered tutorial map for console edition when elytra were first introduced to this platform, this map is themed as "ruins of an ancient civilization of ''[[Minecraft]]'' worshipers" and showcases the new amplified terrain generation. This map can be seen behind the scenes.<ref>{{Mcnet|learning-fly|Learning To Fly}}</ref> On 28 March 2017, 4J Studios added an elytron-themed [[Mini Games]] for console edition called "Glide;" it consists of Time Attack and Score Attack mode.<ref>{{Mcnet|glide-mini-game-consoles-tomorrow|Glide Mini Game on Consoles Tomorrow|March 23, 2017}}</ref><ref>{{Mcnet|mini-game-masters-glide-console|Mini Game Masters Glide onto Console|March 28, 2017}}</ref>
* A player who jumps with both elytra and the [[Slow Falling]] effect travels slightly upward, which is a cheap but time-consuming alternative to [[fireworks]] and [[Riptide]]-enchanted [[trident]]s.
* On May 5, 2019, [[Mojang]] tweeted '[[The End]] never yields enough adequate resources, sadly,' along with a sad emoji.<ref>{{tweet|Minecraft|1125053038757068802|The End never yields enough adequate resources, sadly. 😔}}</ref> The first letter of each word spells 'T E n y e a r s' (Ten Years). Attached was a picture of [[player|Steve and Alex]] wearing both a [[chestplate]] and elytra. The next day, they tweeted, "Have you noticed something ''suspic10us'' here lately?"<ref>{{tweet|Minecraft|1125415169495064576|Have you noticed something suspic10us here lately?}}</ref>
* Mojang has considered the suggestion of combining elytra with a chestplate, but eventually decided against it, stating that elytra taking up armor is an intentional decision of game balancing.<ref>
{{cite
|url=https://feedback.minecraft.net/hc/en-us/articles/360005029872-Previously-Considered-Suggestions
| title = Part of the tradeoff of having an Elytra is it takes up half your armor.
|website=Minecraft Feedback
|date=July 12, 2018}}
</ref>
== Gallery ==
<gallery>
ElytraFlight.gif|The first image of elytra, tweeted by [[Jeb]]. Click to play.
FoldedWings.png|Folded elytra, which resembles the [[cape]] the user is wearing.
Minecon2015Alternative.png|The minecon 2015 cape elytra.
Dinnerbone Elytra.png|[[Dinnerbone]] flying upside down.
ElytraEnd.png|Elytra in an [[end ship]].
PlayerElytraBack.png|A [[player]] wearing elytra.
PlayerElytraFront.png|A player using elytra.
Broken Elytra.png|Elytra with only 1 [[item durability|durability]].
UpcomingElytras.jpg|Elytra designs fitting to the official capes, posted by Jeb on {{w|Reddit}}.
FlyBlock.png|A player gliding while blocking with a [[shield]].
Suspic10us.jpg|An image of players using elytra.
Steve Gliding with Elytra.png|Steve gliding with elytra.
Alex Gliding with Elytra.png|Alex gliding with elytra.
Enchanted Elytra (item).gif|A pair of enchanted elytra.
</gallery>
=== Console exclusive ===
<gallery>
Glide Score Cavern 2.png|Screenshot of Glide mini-games.
Glide Time Cavern 2.png|Another screenshot of Glide mini-games.
GLIDE Official.jpg|''Glide'' launch poster.
Elytra Tutorial Map.jpg|Official elytra themed tutorial map.
</gallery>(These maps can be found for a price on the Microsoft Store)
=== Designs when wearing capes ===
<blockquote>Designs that are not listed here have default elytron texture or don't have any.</blockquote><gallery>
File:Mojang employees Elytra.png|Old [[Mojang]] cape
File:Mojang employees 2015 Elytra.png|New Mojang cape
File:Mojang Studios employees 2021 Elytra.png|Mojang Studios cape
File:Crowdin Translator Elytra.png|[[Crowdin]] Translator cape
File:DannyBstyle's Elytra.png|dannyBstyle's cape
File:JulianClark's Elyrtra.png|JulianClark's cape
File:Millionth Customer Elytra.png|Millionth Customer cape
File:MINECON 2011 Attendees Elytra.png|[[MINECON 2011]] Attendees cape
File:MINECON 2012 Attendees Elytra.png|[[MINECON 2012]] Attendees cape
File:MINECON 2013 Attendees Elytra.png|[[MINECON 2013]] Attendees cape
File:MINECON 2015 Attendees Elytra.png|[[MINECON 2015]] Attendees cape
File:MINECON 2016 Attendees Elytra.png|[[MINECON 2016]] Attendees cape
File:MINECON LIVE 2019 Founder's Elytra.png|[[MINECON Live 2019]] Founder's cape
File:Mojira Moderator Elytra.png|[[bug tracker|Mojira]] Moderator cape
File:MrMessiah's Elytra.png|MrMessiah's cape
File:Prismarine Elytra.png|[[Prismarine]] cape
File:Realms Mapmaker Elytra.png|[[Realms]] mapmaker's cape
File:Cobalt Elytra.png|[[Cobalt (game)|Cobalt]] cape
File:Scrolls Elytra.png|[[Scrolls]] cape
File:Turtle Elytra.png|[[Turtle]] cape
File:PancapeElyR.png|Pancape cape
File:MSCapeElyR.png|Migrator cape
File:Gr8 Escape's elytra.png|Gr8_Escape's cape
File:Valentine Elytra.png|Valentine cape
File:Vanilla Cape Elytra JE.png|Vanilla cape{{only|java}}
File:Vanilla cape elytra BE.png|Vanilla cape{{only|bedrock}}
</gallery>
== References ==
{{reflist}}
== External Links ==
*[https://www.minecraft.net/en-us/article/taking-inventory--elytra Taking Inventory: Elytra] – Minecraft.net on December 14, 2019
{{Items}}
[[de:Elytren]]
[[es:Élitros]]
[[fr:Élytres]]
[[ja:エリトラ]]
[[ko:겉날개]]
[[nl:Dekschild]]
[[pl:Elytry]]
[[pt:Élitros]]
[[ru:Элитры]]
[[tr:Elitra]]
[[zh:鞘翅]]
[[Category:Non-renewable resources]]</li><li>[[Brewing Stand|Brewing Stand]]<br/>{{Block
| image = <gallery>
Brewing Stand (empty) JE10.png | Empty
Brewing Stand (right) JE10.png | Right
Brewing Stand (left) JE10.png | Left
Brewing Stand (full) JE10.png | Full
</gallery>
| transparent = Yes
| light = Yes (1)
| tool = Wooden Pickaxe
| renewable = Yes
| stackable = Yes (64)
| flammable = No
| lavasusceptible = No
}}
A '''brewing stand''' is a [[block]] used for [[brewing]] [[potion]]s using [[Glass Bottle|bottles]] and suitable ingredients. It also serves as a [[cleric]]'s [[job site block]].
== Obtaining ==
=== Breaking ===
A brewing stand can be obtained using any [[pickaxe]]. If mined without a pickaxe, it drops nothing {{in|JE}}, while it drops itself {{in|BE}}.
{{breaking row|horizontal=1|Brewing Stand|Pickaxe|Wood|foot=1}}
=== Natural generation ===
Brewing stands generate in [[end ship]]s. They have two [[potion of Healing|Instant Health II potions]] in their holders.
A brewing stand also generates in the basement of [[igloo]]s with a [[splash potion of Weakness]] in it.
Brewing stands can generate without potions in [[village]] churches.
=== Crafting ===
{{Crafting
|head=1
|showdescription=1
|B1= Blaze Rod
|A2= Any stone-tier block |B2= Any stone-tier block |C2= Any stone-tier block
|Output= Brewing Stand
|type= Brewing
|description=Can use cobblestone and its other variants interchangeably.
|foot=1
}}
== Usage ==
[[File:Brewing Stand GUI.png|thumb|right|176px|Brewing stand GUI {{in|java}}]]
By default, the interface of a brewing stand is labeled "Brewing Stand", but this name can be customized by naming it in an [[anvil]] before placing it.
Brewing stands cannot be pushed by [[piston]]s {{in|java}}.
=== Brewing ===
{{main|Brewing}}
The main purpose of brewing stands is to allow for the [[brewing]] of [[potion]]s. Its interface can be opened by pressing {{control|use}} on them.
Brewing stands need [[blaze powder]] as fuel. Each piece brews 20 batches of potions, with each stage of brewing counting separately. Unlike [[furnace]]s, there is no time limit; fuel is consumed only when there are [[Glass Bottle|bottles]] and an ingredient to brew into it.
Brewing stands interact with [[hopper]]s as follows:
* They accept brewing ingredients from hoppers pointing down into the top.
* Any valid potion recipe can be preloaded for "hands-free" brewing of a complex recipe, with the [[Nether Wart|nether wart]] falling through into the stand for the first step.
* Bottles and fuel are accepted from hoppers pointing into the side.
* Finished products can be pulled out by hoppers below, but each stage of brewing counts as a batch of "finished" potions.
{{IN|education}}, elements can be combined in the brewing stand to make the [[medicine]] potions: antidote, elixir, eye drops, and tonic.
=== Changing profession ===
If a village has a brewing stand that has not been claimed by a villager, any villager who hasn't already picked a [[job site]] block in the village has a chance to change their profession into cleric.
=== Light source ===
Brewing stands emit a light level of 1.
== Sounds ==
=== Generic ===
{{Sound table/Block/Stone}}
=== Unique ===
{{edition|java}}:
{{Sound table
|rowspan=2
|sound=Brewing Stand brew1.ogg
|sound2=Brewing Stand brew2.ogg
|subtitle=Brewing Stand bubbles
|source=block
|description=When a potion finishes brewing
|id=block.brewing_stand.brew
|translationkey=subtitles.block.brewing_stand.brew
|volume=1.0
|pitch=1.0
|distance=16}}
{{Sound table
|subtitle=Cleric works
|source=neutral
|description=Randomly while a cleric is working
|id=entity.villager.work_cleric
|translationkey=subtitles.entity.villager.work_cleric
|volume=1.0
|pitch=0.8-1.2
|distance=16}}
{{Sound table
|sound=Door close.ogg
|sound2=Door open.ogg
|subtitle=Chest locked<ref group=sound name=lock>{{Bug|MC-98316||Wrong subtitles caused by missing distinction}}</ref>
|source=block
|description=When a player attempts to open a brewing stand locked using the {{nbt|string|Lock}} tag
|id=block.chest.locked|idnote=<ref group=sound name=lock/>
|translationkey=subtitles.block.chest.locked|translationkeynote=<ref group=sound name=lock/>
|volume=1.0
|pitch=1.0
|distance=16
|foot=1}}
{{Edition|Bedrock}}:
{{Sound table
|type=bedrock
|rowspan=2
|sound=Brewing Stand brew1.ogg
|sound2=Brewing Stand brew2.ogg
|source=block
|description=When a potion finishes brewing
|id=random.potion.brewed
|volume=1.0
|pitch=1.0}}
{{Sound table
|source=block
|description=Randomly while a cleric is working
|id=random.potion.brewed
|volume=1.0
|pitch=1.0
|foot=1}}
== Data values ==
=== ID ===
{{edition|java}}:
{{ID table
|edition=java
|showforms=y
|generatetranslationkeys=y
|displayname=Brewing Stand
|spritetype=block
|nameid=brewing_stand
|translationkey=block.minecraft.brewing_stand, item.minecraft.brewing_stand
|foot=1}}
{{ID table
|displayname=Block entity
|spritename=brewing-stand
|spritetype=block
|nameid=brewing_stand
|foot=1}}
{{edition|bedrock}}:
{{ID table
|edition=bedrock
|firstcolumnname=Brewing Stand
|shownumericids=y
|showforms=y
|generatetranslationkeys=y
|displayname=Block
|spritename=brewing-stand
|spritetype=block
|nameid=brewing_stand
|id=117
|form=block
|itemform=item.brewing_stand
|translationkey=-}}
{{ID table
|displayname=Item
|spritename=brewing-stand
|spritetype=item
|nameid=brewing_stand
|id=431
|form=item
|foot=1}}
{{ID table
|notnamespaced=y
|displayname=Block entity
|spritename=brewing-stand
|spritetype=block
|nameid=BrewingStand
|foot=1}}
=== Block states ===
{{see also|Block states}}
{{/BS}}
=== Block data ===
A brewing stand has a block entity associated with it that holds additional data about the block.
{{el|java}}:
{{see also|Block entity format}}
{{/BE}}
{{el|bedrock}}:
: See [[Bedrock Edition level format/Block entity format]].
== Achievements ==
{{load achievements|Local Brewery}}
== Advancements ==
{{Load advancements|Local Brewery}}
== History ==
{{History|java}}
{{History||1.0.0|snap=Beta 1.9 Prerelease 2|[[Cauldron]]s are implemented to be used to brew [[potion]]s, but are not available in-game yet.}}
{{History|||snap=September 30, 2011|slink={{tweet|jeb|119762786619359232}}|[[File:Brewing Stand (pre-release).png|32px]] [[Jens Bergensten|Jeb]] reveals that brewing is done through a brewing stand instead of a [[cauldron]].}}
{{History|||snap=Beta 1.9 Prerelease 3|[[File:Brewing Stand (empty) JE1 BE1.png|32px]] [[File:Brewing Stand (right) JE1.png|32px]] [[File:Brewing Stand (left) JE1.png|32px]] [[File:Brewing Stand (full) JE1.png|32px]] [[File:Brewing Stand (item) JE1 BE1.png|32px]] Added brewing stands.
|Brewing [[potion]]s with brewing stands currently take 30 seconds.
|When the first brewing stand was shown by Jeb, it had an additional 2D sub-stand for [[Glass Bottle|bottles]], but the stands for bottles are now designed in 3D.<ref>{{tweet|jeb|119763532312096769|I'm fully aware the potions are very thin (diet?), but it looks cute. (Always work in progress, of course)|September 30, 2011}}</ref>}}
{{History||1.1|snap=12w01a|Brewing time for brewing stands has been reduced to 20 seconds.}}
{{History||1.3.1|snap=12w15a|{{key|Shift}} + clicking can now be used to put items in brewing stands.}}
{{History||1.8|snap=14w11a|[[File:Brewing Stand (empty) JE2.png|32px]] [[File:Brewing Stand (right) JE2.png|32px]] [[File:Brewing Stand (left) JE2.png|32px]] [[File:Brewing Stand (full) JE2.png|32px]] The [[model]] of brewing stands has been changed. Stands with no bottles appear glitched from some angles, the left and right slots appear identical when filled in (although both distinct appearences still exist as metadata), and the arm angles have changed due to the 22.5º rotation limit.
|Brewing stands' targeting [[hitbox]] is now a full cube - previously it was a cuboid around the base plates.}}
{{History|||snap=14w11b|[[File:Brewing Stand (empty) JE3.png|32px]] [[File:Brewing Stand (right) JE3.png|32px]] [[File:Brewing Stand (left) JE3.png|32px]] [[File:Brewing Stand (full) JE3.png|32px]] Empty brewing stands' model have been fixed, although the other changes still remain.}}
{{History|||snap=14w25a|[[File:Brewing Stand (empty) JE4.png|32px]] [[File:Brewing Stand (right) JE4.png|32px]] [[File:Brewing Stand (left) JE4.png|32px]] [[File:Brewing Stand (full) JE4.png|32px]] Brewing stand models have changed such that bottles in the left and right slots now indeed appear different. However, the leftmost one appears stretched. Arms are also now affected by directional shading.<ref>{{bug|MC-68302|||WAI}}</ref>}}
{{History||1.9|snap=15w31a|Brewing stands now generate in [[End City|end cities]].}}
{{History|||snap=15w33a|Brewing stands can now brew [[Lingering Potion|lingering potion]]s.}}
{{History|||snap=15w33c|A bug where the [[player]] couldn't put in a [[splash potion]] to make a lingering potion has been fixed.}}
{{History|||snap=15w42a|Brewing stands now require [[Blaze Powder|blaze powder]] to operate.}}
{{History|||snap=15w43a|Brewing stands now generate in the basement of [[igloo]]s.
|Each blaze powder now fuels 20 brewing stand operations rather than 30.}}
{{History|||snap=15w44a|[[File:Brewing Stand (empty) JE5.png|32px]] [[File:Brewing Stand (right) JE5.png|32px]] [[File:Brewing Stand (left) JE5.png|32px]] [[File:Brewing Stand (full) JE5.png|32px]] Brewing stand models no longer have a stretched bottle.}}
{{History|||snap=15w47b|[[Sound]]s have been added for brewing stands.}}
{{History||1.11|snap=16w32a|The block entity ID has been changed from <code>Cauldron</code> to <code>brewing_stand</code>.}}
{{History||1.13|snap=17w47a|Prior to [[Java Edition 1.13/Flattening|''The Flattening'']], this [[block]]'s numeral ID was 117, and the [[item]]'s 379.}}
{{History||1.14|snap=18w43a|[[File:Brewing Stand (empty) JE6 BE2.png|32px]] <!-- [[File:Brewing Stand (left) JE6 BE2.png|32px]] [[File:Brewing Stand (right) JE6 BE2.png|32px]] -->[[File:Brewing Stand (Full) JE6 BE2.png|32px]] [[File:Brewing Stand (item) JE2.png|32px]] The textures of brewing stands have been changed.}}
{{History|||snap=18w44a|[[File:Brewing Stand (item) JE3 BE2.png|32px]] The texture of the brewing stand [[item]] has been changed.}}
{{History|||snap=18w48a|Brewing stands now generate in the updated [[plains]] [[village]]s.}}
{{History|||snap=18w49a|Brewing stands now generate in the updated [[savanna]] villages and the new [[Snowy Tundra|snowy]] villages.}}
{{History|||snap=18w50a|Brewing stands now generate in the updated [[desert]] and [[taiga]] villages.}}
{{History|||snap=19w03c|The three plates, but not the rod, of a brewing stand now use correct cullface arguments.}}
{{History|||snap=19w11a|Brewing stands now serve as cleric [[villager]]s' job site block.}}
{{History||1.16.2|snap=20w28a|Brewing stands can now be [[crafting|crafted]] with [[blackstone]].}}
{{History||1.17|snap=21w07a|Brewing stands can now be crafted with [[deepslate|grimstone]] (now deepslate).}}
{{History||1.17|snap=21w08a|Brewing stands can no longer be crafted with deepslate.
|Brewing stands can now be crafted with [[Cobbled Deepslate|cobbled deepslate]].}}
{{History|||snap=21w11a|<!--[[File:Brewing Stand (empty) JE7.png|32px]] [[File:Brewing Stand (right) JE7.png|32px]] [[File:Brewing Stand (left) JE7.png|32px]] [[File:Brewing Stand (Full) JE7.png|32px]] Changed [[lighting]].-->Tweaked the brewing stand GUI texture.}}
{{History||1.18|snap=21w39a|[[File:Brewing Stand (empty) JE8.png|32px]] [[File:Brewing Stand (right) JE8.png|32px]] [[File:Brewing Stand (left) JE8.png|32px]] [[File:Brewing Stand (full) JE8.png|32px]] The default [[brightness]] has been changed from "Moody" to 50.}}
{{History||1.19|snap=22w11a|[[File:Brewing Stand (empty) JE9.png|32px]] [[File:Brewing Stand (right) JE9.png|32px]] [[File:Brewing Stand (left) JE9.png|32px]] [[File:Brewing Stand (full) JE9.png|32px]] Changed texture and model.}}
{{History|||snap=22w17a|[[File:Brewing Stand (empty) JE10.png|32px]] [[File:Brewing Stand (right) JE10.png|32px]] [[File:Brewing Stand (left) JE10.png|32px]] [[File:Brewing Stand (full) JE10.png|32px]] Changed base texture and model.}}
{{History|pocket alpha}}
{{History||v0.12.1|snap=build 1|[[File:Brewing Stand (empty) JE1 BE1.png|32px]] [[File:Brewing Stand (item) JE1 BE1.png|32px]] Added brewing stands.}}
{{History|pocket}}
{{History||1.0.0|snap=alpha 0.17.0.1|Brewing stands now generate in [[igloo]] basements.
|Brewing stands now generate in [[end ship]]s.}}
{{History|bedrock}}
{{History||1.2.0|snap=beta 1.2.0.2|Brewing stands now require [[blaze powder]] to operate.}}
{{History||1.10.0|snap=beta 1.10.0.3|[[File:Brewing Stand (empty) JE6 BE2.png|32px]] [[File:Brewing Stand (item) JE3 BE2.png|32px]] The textures of brewing stands have been changed.|A brewing stand can now generate in [[village]] temples.}}
{{History||1.16.100|snap=beta 1.16.100.52|Brewing stands can now be [[craft]]ed with [[blackstone]].}}
{{History||1.17.0|snap=beta 1.17.0.50|Brewing stands can now be [[craft]]ed with [[cobbled deepslate]].}}
{{History||1.19.0|snap=beta 1.19.0.20|[[File:Brewing Stand (empty) JE10.png|32px]] [[File:Brewing Stand (right) JE10.png|32px]] [[File:Brewing Stand (left) JE10.png|32px]] [[File:Brewing Stand (full) JE10.png|32px]] Slightly changed its texture, to make their arms connect to their bases.}}
{{History|console}}
{{History||xbox=TU7|xbone=CU1|ps=1.0|wiiu=Patch 1|switch=1.0.1|[[File:Brewing Stand (empty) JE1 BE1.png|32px]] [[File:Brewing Stand (item) JE1 BE1.png|32px]] Added brewing stands.}}
{{History||xbox=TU43|xbone=CU33|ps=1.36|wiiu=Patch 13|Brewing stands now appear in [[igloo]]s. The lack of a fuel requirement means that potions can now be made without going to the Nether.}}
{{History||xbox=TU46|xbone=CU36|ps=1.38|wiiu=Patch 15|Brewing stands now require [[blaze powder]] to operate.}}
{{History||xbox=none|xbone=none|ps=1.90|wiiu=none|switch=none|[[File:Brewing Stand.png|32px]] [[File:Brewing Stand (item) JE3 BE2.png|32px]] The textures of brewing stands have been changed.}}
{{History|new 3ds}}
{{History||0.1.0|[[File:Brewing Stand (empty) JE1 BE1.png|32px]] [[File:Brewing Stand (item) JE1 BE1.png|32px]] Added brewing stands.}}
{{History|foot}}
<gallery>
File:Brewingstand Potion.png|The first picture of a brewing stand. A [[giant mushroom]] is also seen in this picture.
</gallery>
=== Brewing stand "item" ===
{{:Technical blocks/Brewing Stand}}
== Issues ==
{{issue list}}
== Trivia ==
* Even when the brewing stand is not in use, there is still smoke coming out of the top of it.
* In ''[[Java Edition]]'', when a brewing stand is broken, particles from a bottle appear, even if no bottle is in the stand.
* No matter what potion (including water bottles) is in the stand it always looks like a full red bottle.
* Brewing stands always face east, no matter what direction they are placed.
* According to [[Michael Stoyke|Searge]], for thematic reasons, a brewing stand was added to the basement of the [[igloo]]. Because of this, blaze powder was required for fuel to preserve game progression. In this way, the player is prevented from using it before going to the Nether.<ref>https://minecraft.net/en-us/article/meet-blaze</ref>
== Gallery ==
<gallery>
File:Brewing stand in action.png|A brewing stand in action.
File:Igloobasement.png|A brewing stand in an igloo basement.
File:1.8 and below brewing stand.png|The GUI of the brewing stand in 1.8.x and below.
</gallery>
== See also ==
*[[Glass Bottle]]
*[[Splash Potion]]
== References ==
{{reflist}}
== External links ==
*[https://www.minecraft.net/en-us/article/taking-inventory--brewing-stand Taking Inventory: Brewing Stand] – Minecraft.net on October 11, 2019
{{Blocks|Utility}}
{{items}}
[[Category:Job blocks]]
[[Category:Utility blocks]]
[[Category:Manufactured blocks]]
[[Category:Generated structure blocks]]
[[Category:Storage]]
[[Category:Block entities]]
[[Category:Light sources]]
[[de:Braustand]]
[[es:Soporte para pociones]]
[[fr:Alambic]]
[[hu:Főzőállvány]]
[[it:Alambicco]]
[[ja:醸造台]]
[[nl:Brouwstandaard]]
[[pl:Statyw alchemiczny]]
[[pt:Suporte de poções]]
[[ru:Варочная стойка]]
[[uk:Варильна стійка]]
[[zh:酿造台]]</li></ul> | beta 1.12.0.2 | Tab-complete has been added to command blocks. | |||
| Added a delay option to command blocks, which allows a delay to be added to a redstone tick delay field. | |||||
| Legacy Console Edition | |||||
| TU19 | CU7 | 1.12 | Patch 1 | ||
| Command blocks do not have any functionality and can be obtained only with mods. | |||||
| ? | ? | ? | ? | ? | Added chain and repeating command blocks. These are completely unobtainable without inventory editing with an external editor, but can be modded into the game. They do not have any functionality. |
Issues[]
Issues relating to "Command Block" are maintained on the bug tracker. Report issues there.
Gallery[]

The command block GUI in Bedrock Edition pre 1.12.0

The first image released by jeb_ of the command block.

The second image released by jeb_ showing the block giving glass to the player.

Command blocks creating more command blocks.
A command block summoning block breaking particles.
Command blocks in a terracotta cube.
The new command block texture as revealed by Searge on twitter.
Teaser image from Searge showing new command blocks.
The sides of each command block type.
Each command block type placed in a wall.
A bunch of eggs being summoned with a command block.
Each of the command block types in each mode of operation.
Searge holding a command block in front of a command block.
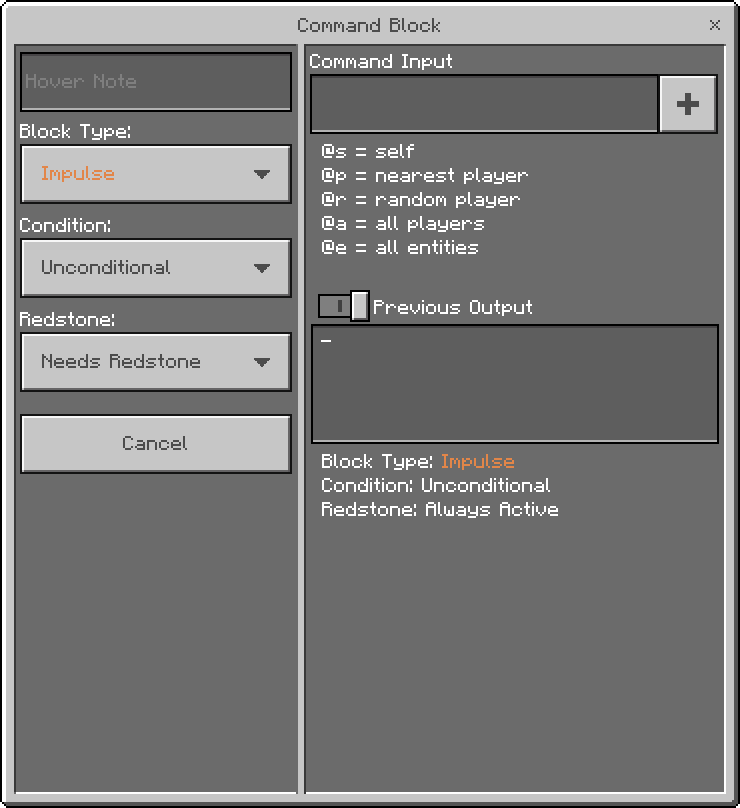
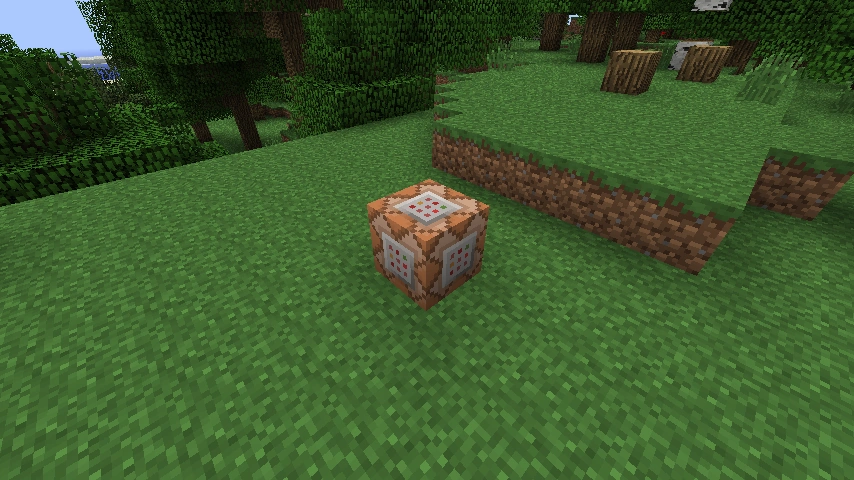
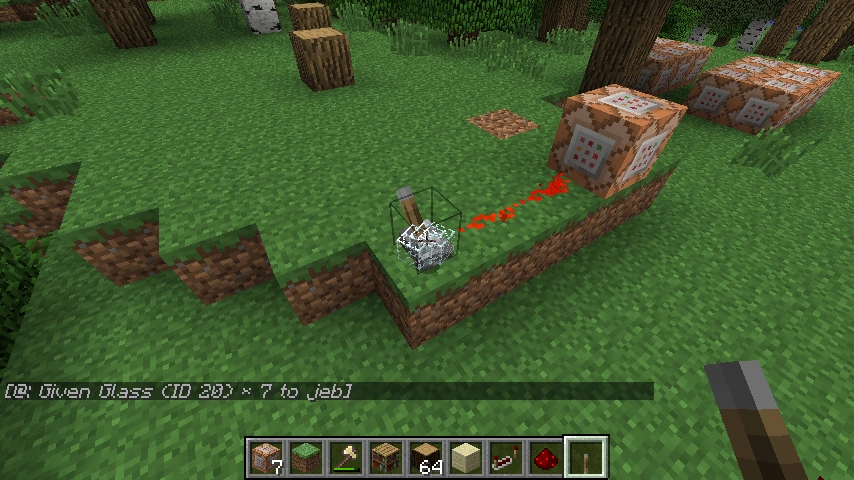
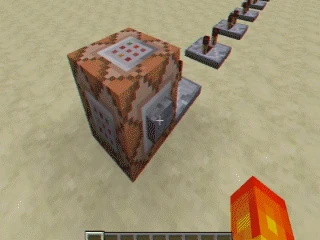
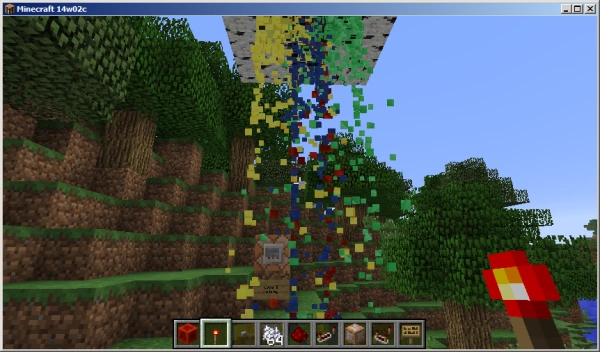

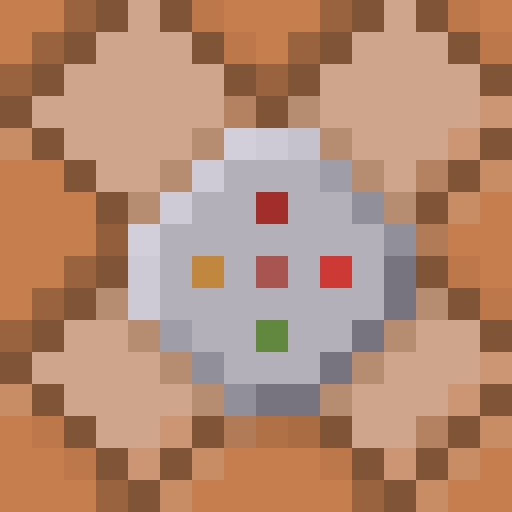
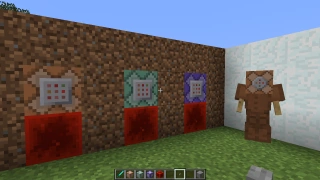
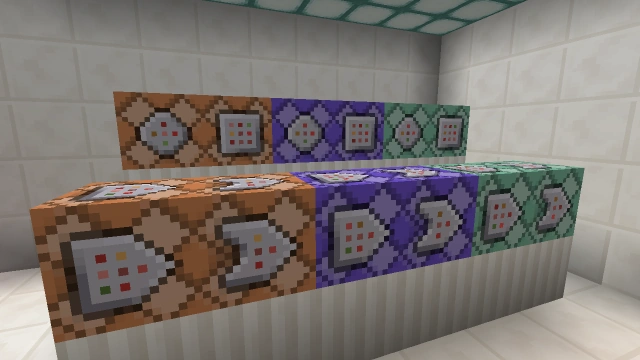
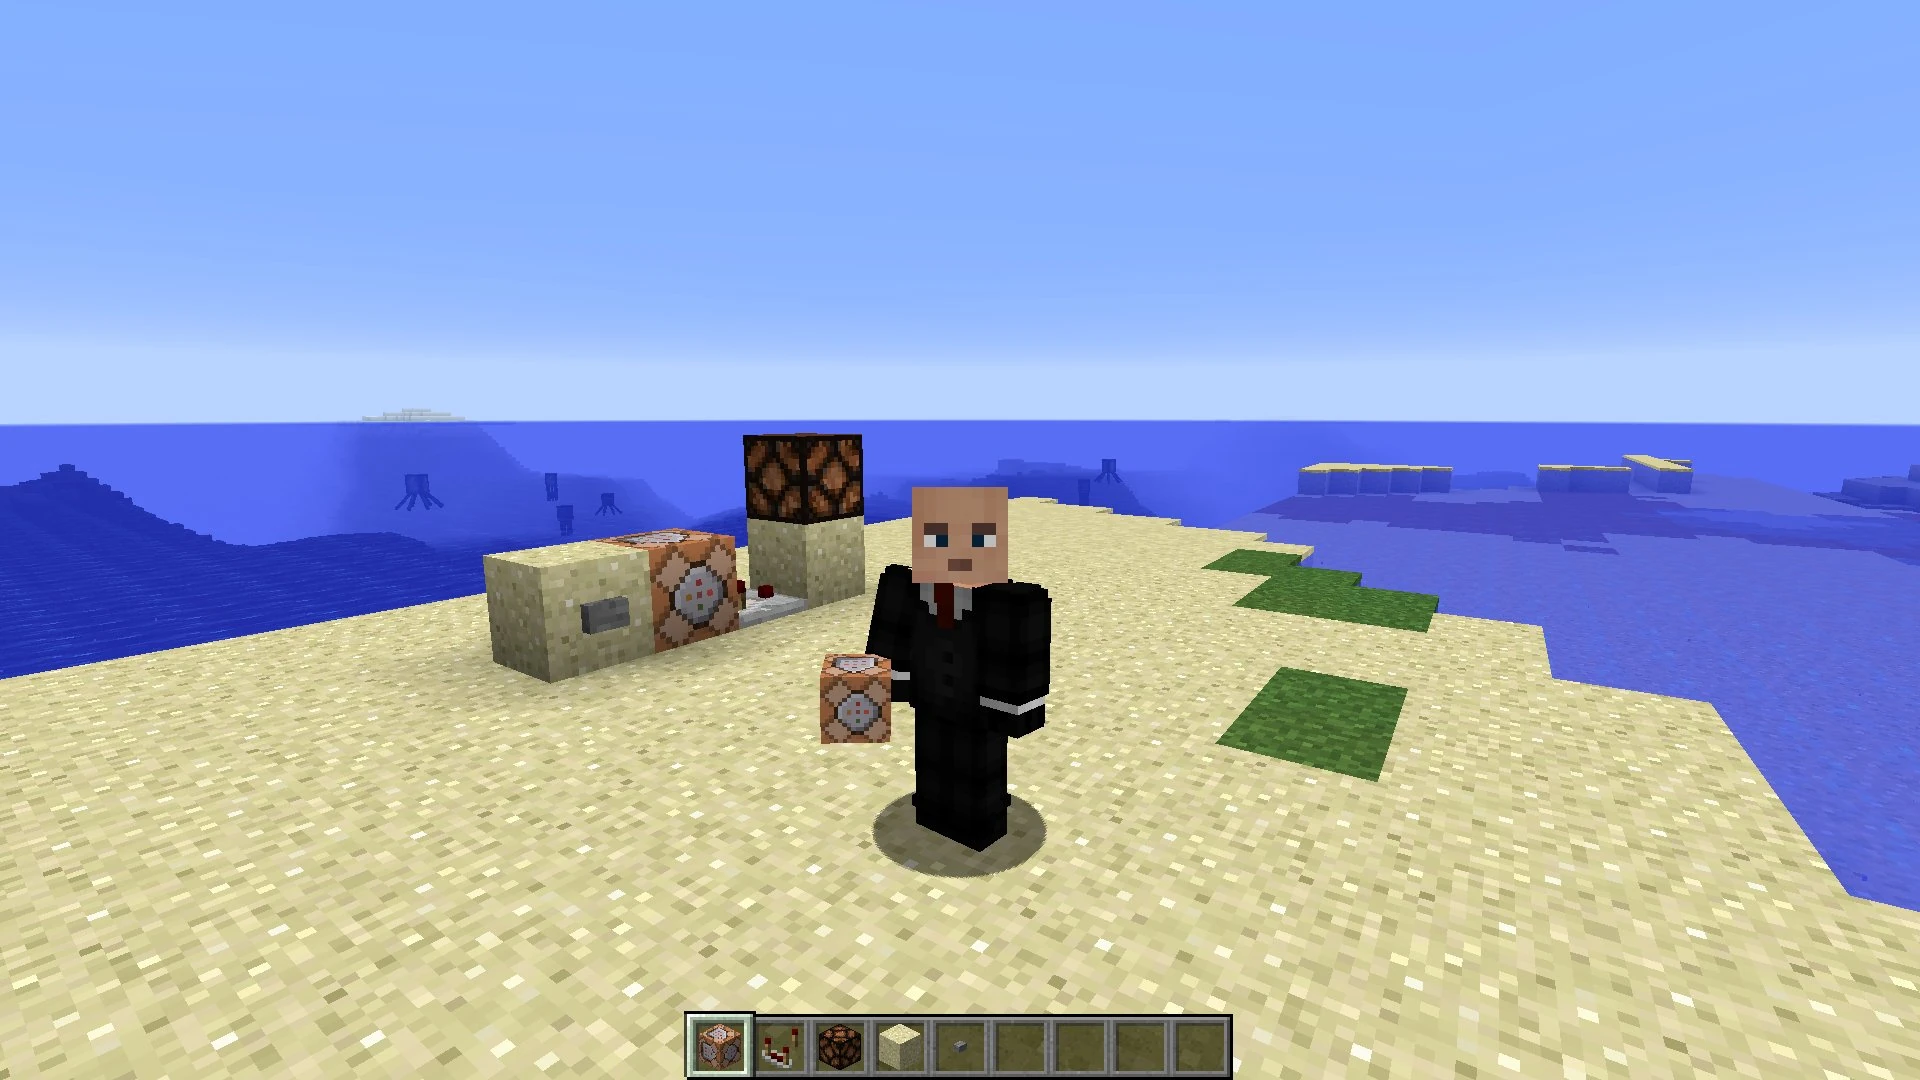
References[]
External Links[]
- Block of the Week: Command Block – Minecraft.net on April 27, 2018