(Revert to revision 1880974 dated 2021-03-15 09:27:48 by NexaForX using popups) |
(→Unbrewable potions: Witch huts no longer generate with decay.) |
||
| (45 intermediate revisions by 28 users not shown) | |||
| Line 1: | Line 1: | ||
[[File:Minecraft brewing en.png|thumb|400px|right|Potion brewing chart (most efficient recipes, excludes splash potions). Recipes may differ {{in|bedrock}}.]] |
[[File:Minecraft brewing en.png|thumb|400px|right|Potion brewing chart (most efficient recipes, excludes splash potions). Recipes may differ {{in|bedrock}}.]] |
||
| − | '''Brewing''' is the process of creating [[potion]]s, [[splash potion]]s, and [[lingering potion]]s by adding various ingredients to [[water bottle]]s in a [[brewing stand]]. |
+ | '''Brewing''' is the process of creating [[potion]]s, [[Splash Potion|splash potion]]s, and [[Lingering Potion|lingering potion]]s by adding various ingredients to [[Potion#Base potions|water bottle]]s in a [[Brewing Stand|brewing stand]]. |
== Brewing potions == |
== Brewing potions == |
||
| Line 9: | Line 9: | ||
|} |
|} |
||
| − | By placing at least one or more water bottles in the lower three slots of the brewing interface, an ingredient in the upper slot, and blaze powder in the fuel slot, a player can distill the ingredients into each bottle and brew potions that may be consumed to grant an effect to the player. |
+ | By placing at least one or more water bottles in the lower three slots of the brewing interface, an ingredient in the upper slot, and blaze powder in the fuel slot, a player can distill the ingredients into each bottle and brew potions that may be consumed to grant an [[effect]] to the player. The three potions being brewed do not necessarily have to be the same. |
| + | Every potion starts with a [[Potion#Base potions|water bottle]], and proceeds with one or more steps of brewing. The usual steps are: |
||
| − | Every potion starts with a [[water bottle]], made by filling a [[glass bottle]] at a water source or filled [[cauldron]]. The next step is to add a base ingredient to create a base potion, usually [[nether wart]] is used to create an awkward potion, and adding [[blaze powder]] to the fuel slot. By brewing an effect ingredient into the awkward potion, in the same manner, the player can create a potion with a working effect. A modifier ingredient ([[glowstone dust]], [[redstone dust]], or [[fermented spider eye]]) may be added to make the effect more intense or last longer or change the effect entirely. [[Gunpowder]] can be added to a potion at any stage to convert it to a [[splash potion]], which can be thrown (or fired using a [[dispenser]]) to affect all players and mobs in a radius. [[Dragon's breath]] can be added to a splash potion to convert it to a [[lingering potion]], which can be used to create a cloud that grants an effect as long as it remains. Each brewing step takes 20 seconds. |
||
| + | * Add a base ingredient to create a base potion, usually [[Nether Wart|nether wart]] is used to create an awkward potion. |
||
| ⚫ | |||
| + | * Add an effect ingredient into the awkward potion to create a potion with a working effect. |
||
| + | * In any order, several optional steps can be added (depending on the basic effect, not all of these may be valid): |
||
| + | ** A enhancer ingredient may be added: [[Glowstone Dust|glowstone dust]] to make the effect more intense, or [[Redstone Dust|redstone dust]] to make it last longer. |
||
| + | ** a [[Fermented Spider Eye|fermented spider eye]] may be added to "corrupt" the effect, generally reversing it. |
||
| + | ** [[Gunpowder]] can be added to convert it to a [[Splash Potion|splash potion]], which can be thrown (or fired using a [[dispenser]]) to affect all players and [[mob]]s in a radius. |
||
| + | * After a splash potion is brewed, [[Dragon's Breath|Dragon's breath]] may be added to upgrade it to a [[Lingering Potion|lingering potion]], which can be used to create an lasting [[Lingering Potion#Area Effect Cloud|area effect cloud]], or to craft [[Arrow#Tipped arrows|tipped arrows]]. |
||
| + | |||
| + | The exception to the above sequence is the potion of weakness, where a fermented spider eye is brewed directly into water. The resulting potion can be extended with redstone and/or converted to a splash or lingering potion as above. |
||
| + | |||
| ⚫ | Each brewing step takes 20 seconds. Each piece of blaze powder used provides fuel for 20 "steps" of brewing. Fuel is consumed when a brewing operation starts and it is not recovered if the operation is halted prematurely by removing the ingredient or potion bottles. The same amount of fuel is consumed whether one, two, or three bottles are being brewed. |
||
| + | |||
| + | The brewing stand can be fed by hoppers: Ingredients can be fed to the top of the stand, bottles and fuel can be fed to the side of the stand, and "finished" potions can be taken from the bottom. |
||
| + | |||
| + | * All ingredients for a single batch of any recipe can be loaded in order from a hopper for a hands-free brewing of a multi-step potion. (With the nether wart falling through to begin brewing.) |
||
| + | * Since each step produces a "finished" potion (which can be taken by a bottom hopper, mass-production of potions is non-trivial. However, it can be managed if several brewing stands are chained together from bottom to side, each with fuel and stacks of the successive ingredients. The first step can be fed by a chest of water bottles. |
||
| + | |||
| ⚫ | Brewing continues as long as at least one of the three bottom spaces is filled, and additional [[Potion#Base potions|bottles of water]] or [[potion]]s can be added. However, if the ingredient is removed, or the bottom three slots are emptied at any time during the process, the process stops and nothing is brewed. |
||
== Brewing equipment == |
== Brewing equipment == |
||
| Line 24: | Line 41: | ||
! scope="row" | {{anchor|Brewing Stand}}[[Brewing Stand]] |
! scope="row" | {{anchor|Brewing Stand}}[[Brewing Stand]] |
||
| {{Inventory slot|Brewing Stand}} |
| {{Inventory slot|Brewing Stand}} |
||
| − | | Used to add ingredients into water bottles |
+ | | Used to add ingredients into water bottles. |
|- |
|- |
||
! scope="row" | {{anchor|Cauldron}}[[Cauldron]] |
! scope="row" | {{anchor|Cauldron}}[[Cauldron]] |
||
| − | | {{ |
+ | | {{Inventory slot|Cauldron}} |
| − | | Each cauldron can hold a [[bucket]] of water (after placement), fill 3 glass bottles, or {{in|bedrock}}, hold 3 bottles' worth of a single potion (after placement), and can hold water in the Nether without evaporating |
+ | | Each cauldron can hold a [[bucket]] of water (after placement), fill 3 glass bottles, or {{in|bedrock}}, hold 3 bottles' worth of a single potion (after placement), and can hold water in the Nether without evaporating. |
|- |
|- |
||
! scope="row" | {{anchor|Water}}[[Water]] |
! scope="row" | {{anchor|Water}}[[Water]] |
||
| Line 36: | Line 53: | ||
! scope="row" | {{anchor|Blaze Powder}}[[Blaze Powder]] |
! scope="row" | {{anchor|Blaze Powder}}[[Blaze Powder]] |
||
| {{Inventory slot|Blaze Powder}} |
| {{Inventory slot|Blaze Powder}} |
||
| − | | Needed to fuel the brewing stand |
+ | | Needed to fuel the brewing stand. |
|- |
|- |
||
! scope="row" | {{anchor|Glass Bottle}}[[Glass Bottle]] |
! scope="row" | {{anchor|Glass Bottle}}[[Glass Bottle]] |
||
| {{Inventory slot|Glass Bottle}} |
| {{Inventory slot|Glass Bottle}} |
||
| − | | Container for all kinds of potions |
+ | | Container for all kinds of potions. |
|- |
|- |
||
| − | ! scope="row" | {{anchor|Water Bottle}}[[Water Bottle]] |
+ | ! scope="row" | {{anchor|Water Bottle}}[[Potion#Base potions|Water Bottle]] |
| − | | {{Inventory slot|Water Bottle}} |
+ | | {{Inventory slot|link=Potion#Base potions|Water Bottle}} |
| − | | The starting base for all potions, made by filling a [[glass bottle]] from a [[cauldron]] or a [[water]] source block |
+ | | The starting base for all potions, made by filling a [[Glass Bottle|glass bottle]] from a [[cauldron]] or a [[water]] source block. |
|} |
|} |
||
== Ingredients == |
== Ingredients == |
||
=== Base ingredients and modifiers === |
=== Base ingredients and modifiers === |
||
| − | Base ingredients are ingredients that can be added directly to a [[water bottle]] and are the starting point of all potions. [[Nether wart]] is the most fundamental of the base ingredients, as it is required to make the vast majority of potions. |
+ | Base ingredients are ingredients that can be added directly to a [[Potion#Base potions|water bottle]] and are the starting point of all potions. [[Nether Wart|Nether wart]] is the most fundamental of the base ingredients, as it is required to make the vast majority of potions. |
| − | Modifiers are ingredients used to alter the properties of a potion or to change a potion effect into a different one. The [[fermented spider eye]] is unique in that it is the only modifier that can convert a [[water bottle]] directly into an effective potion. |
+ | Modifiers are ingredients used to alter the properties of a potion or to change a potion effect into a different one. The [[Fermented Spider Eye|fermented spider eye]] is unique in that it is the only modifier that can convert a [[Potion#Base potions|water bottle]] directly into an effective potion. |
{| class="wikitable" style="text-align: center;" data-description="Bases and modifiers" |
{| class="wikitable" style="text-align: center;" data-description="Bases and modifiers" |
||
| Line 61: | Line 78: | ||
|- |
|- |
||
! scope="row" | {{anchor|Nether Wart}}[[Nether Wart]] |
! scope="row" | {{anchor|Nether Wart}}[[Nether Wart]] |
||
| − | | {{ |
+ | | {{Inventory slot|Nether Wart}} |
| − | | [[Awkward Potion]] |
+ | | [[Potion#Base potions|Awkward Potion]] |
| − | | Allows the creation of more complex potions |
+ | | Allows the creation of more complex potions. |
|- |
|- |
||
! scope="row" | {{anchor|Redstone Dust}}[[Redstone Dust]] |
! scope="row" | {{anchor|Redstone Dust}}[[Redstone Dust]] |
||
| − | | {{ |
+ | | {{Inventory slot|Redstone Dust}} |
| − | | [[Mundane Potion]] |
+ | | [[Potion#Base potions|Mundane Potion]] |
| − | | Extends the duration of a potion |
+ | | Extends the duration of a potion. |
|- |
|- |
||
! scope="row" | {{anchor|Glowstone Dust}}[[Glowstone Dust]] |
! scope="row" | {{anchor|Glowstone Dust}}[[Glowstone Dust]] |
||
| − | | {{ |
+ | | {{Inventory slot|Glowstone Dust}} |
| − | | [[Thick Potion]] |
+ | | [[Potion#Base potions|Thick Potion]] |
| − | | Enhances the level of a potion |
+ | | Enhances the level of a potion. |
|- |
|- |
||
! scope="row" | {{anchor|Fermented Spider Eye}}[[Fermented Spider Eye]] |
! scope="row" | {{anchor|Fermented Spider Eye}}[[Fermented Spider Eye]] |
||
| − | | {{ |
+ | | {{Inventory slot|Fermented Spider Eye}} |
| − | | [[Potion of Weakness]] |
+ | | [[Potion#Potion of Weakness|Potion of Weakness]] |
| − | | Corrupts the potion effect (changes effect) |
+ | | Corrupts the potion effect. (changes effect) |
|- |
|- |
||
! scope="row" | {{anchor|Gunpowder}}[[Gunpowder]] |
! scope="row" | {{anchor|Gunpowder}}[[Gunpowder]] |
||
| − | | {{ |
+ | | {{Inventory slot|Gunpowder}} |
| − | | [[Splash Water Bottle]] |
+ | | [[Splash Potion#Splash water bottles|Splash Water Bottle]] |
| − | | Turns a potion into a splash potion |
+ | | Turns a potion into a splash potion. |
|- |
|- |
||
! scope="row" | {{anchor|Dragon's Breath}}[[Dragon's Breath]] |
! scope="row" | {{anchor|Dragon's Breath}}[[Dragon's Breath]] |
||
| − | | {{ |
+ | | {{Inventory slot|Dragon's Breath}} |
| − | | [[Lingering Water Bottle]] <br> <small>(from Splash Water Bottle)</small> |
+ | | [[Lingering Potion#Lingering water bottle|Lingering Water Bottle]] <br> <small>(from Splash Water Bottle)</small> |
| − | | Turns a splash potion into a lingering potion |
+ | | Turns a splash potion into a lingering potion. |
|} |
|} |
||
| + | |||
| + | '''Enhancement''': Generally, upgrading a potion involves a trade-off between duration and potency. A potion with an enhanced effect has shorter duration, and a potion with extended duration cannot have an enhanced effect. However: |
||
| ⚫ | |||
| ⚫ | |||
| + | |||
'''Corrupting effect''': A fermented spider eye changes a potion's base effect, often reversing it or producing a negative potion. |
'''Corrupting effect''': A fermented spider eye changes a potion's base effect, often reversing it or producing a negative potion. |
||
* A corrupted potion usually does the opposite of the original potion. |
* A corrupted potion usually does the opposite of the original potion. |
||
* Corrupting an enhanced or extended potion into an effect that supports the modifier results in a potion with the same modifier applied. |
* Corrupting an enhanced or extended potion into an effect that supports the modifier results in a potion with the same modifier applied. |
||
| − | * Corrupting an enhanced potion of Poison/Healing results in a basic potion of Harming. Enhanced potions of Leaping or Swiftness cannot be corrupted. |
+ | * Corrupting an enhanced potion of [[Poison]]/[[Instant Health|Healing]] results in a basic potion of [[Instant Damage|Harming]]. Enhanced potions of [[Jump Boost|Leaping]] or [[Speed|Swiftness]] cannot be corrupted. |
| − | * A potion of Invisibility is considered a "corrupted" version of a potion of Night Vision. |
+ | * A potion of [[Invisibility]] is considered a "corrupted" version of a potion of [[Night Vision]]. |
| ⚫ | |||
'''Splash''' and '''lingering''' potions: Any potion can be turned into a splash potion, and subsequently, a lingering potion. Splash and lingering potions can be used best for affecting other entities. |
'''Splash''' and '''lingering''' potions: Any potion can be turned into a splash potion, and subsequently, a lingering potion. Splash and lingering potions can be used best for affecting other entities. |
||
* Splash potions and lingering potions can be modified in the same manner as their normal counterparts. For instance, a splash water bottle can be brewed with any of the base ingredients; the result remains a splash potion. |
* Splash potions and lingering potions can be modified in the same manner as their normal counterparts. For instance, a splash water bottle can be brewed with any of the base ingredients; the result remains a splash potion. |
||
| + | * Some extended/enhanced splash and lingering potions cannot be brewed from their extended/enhanced potion/splash potion counterparts, respectively (e.g. [[Regeneration]] + → Splash Potion of Regeneration +).{{only|be}} |
||
* {{IN|bedrock}}, splash potions' effects have only three-fourths of the duration of the drinkable form. For example, a drinkable potion effect of 8:00 is reduced to 6:00 as a splash potion. {{IN|java}}, splash and drinkable forms have the same duration. |
* {{IN|bedrock}}, splash potions' effects have only three-fourths of the duration of the drinkable form. For example, a drinkable potion effect of 8:00 is reduced to 6:00 as a splash potion. {{IN|java}}, splash and drinkable forms have the same duration. |
||
* Lingering potions have only one-fourth of the duration of the drinkable form. For instance, a drinkable potion effect of 8:00 is reduced to 2:00 as a lingering potion. |
* Lingering potions have only one-fourth of the duration of the drinkable form. For instance, a drinkable potion effect of 8:00 is reduced to 2:00 as a lingering potion. |
||
| Line 105: | Line 129: | ||
{| class="wikitable" style="text-align: center;" data-description="Effect ingredients" |
{| class="wikitable" style="text-align: center;" data-description="Effect ingredients" |
||
| + | |+Effect ingredients |
||
|- |
|- |
||
! Name |
! Name |
||
! Icon |
! Icon |
||
| − | ! Effect |
+ | ! Effect |
! Effect when corrupted |
! Effect when corrupted |
||
|- |
|- |
||
| − | ! |
+ | !{{anchor|Sugar}}[[Sugar]] |
| − | | |
+ | |{{Slot|Sugar}} |
| − | | |
+ | |[[Speed]] |
| rowspan="2" |[[Slowness]] |
| rowspan="2" |[[Slowness]] |
||
|- |
|- |
||
| − | ! |
+ | !{{anchor|Rabbit's Foot}}[[Rabbit's Foot]] |
| − | | |
+ | |{{Slot|Rabbit's Foot}} |
| − | | |
+ | |[[Jump Boost]] |
|- |
|- |
||
| − | ! |
+ | !{{anchor|Glistering Melon Slice}}[[Glistering Melon Slice]] |
| − | | |
+ | |{{Slot|Glistering Melon Slice}} |
| − | | |
+ | |[[Instant Health]] |
| rowspan="2" |[[Instant Damage]] |
| rowspan="2" |[[Instant Damage]] |
||
|- |
|- |
||
| − | ! |
+ | !{{anchor|Spider Eye}}[[Spider Eye]] |
| − | | |
+ | |{{Slot|Spider Eye}} |
| − | | |
+ | |[[Poison]] |
|- |
|- |
||
| − | ! |
+ | !{{anchor|Pufferfish}}[[Pufferfish (item)|Pufferfish]] |
| − | | |
+ | |{{Slot|Pufferfish}} |
| − | | |
+ | |[[Water Breathing]] |
| rowspan="2" |None |
| rowspan="2" |None |
||
|- |
|- |
||
| − | ! |
+ | !{{anchor|Magma Cream}}[[Magma Cream]] |
| − | | |
+ | |{{Slot|Magma Cream}} |
| − | | |
+ | |[[Fire Resistance]] |
|- |
|- |
||
| − | ! |
+ | !{{anchor|Golden Carrot}}[[Golden Carrot]] |
| − | | |
+ | |{{Slot|Golden Carrot}} |
| − | | |
+ | |[[Night Vision]] |
| − | | |
+ | |[[Invisibility]] |
|- |
|- |
||
| − | ! |
+ | !{{anchor|Blaze Powder}}[[Blaze Powder]] |
| − | | |
+ | |{{Slot|Blaze Powder}} |
| − | | |
+ | |[[Strength]] |
| − | | rowspan |
+ | | rowspan="2" |None |
|- |
|- |
||
| − | ! |
+ | !{{anchor|Ghast Tear}}[[Ghast Tear]] |
| − | | |
+ | |{{Slot|Ghast Tear}} |
| − | | |
+ | |[[Regeneration]] |
|- |
|- |
||
| − | ! |
+ | !{{anchor|Turtle Shell}}[[Turtle Shell]] |
| − | | |
+ | |{{Slot|Turtle Shell}} |
| − | | |
+ | |[[Slowness]], [[Resistance]] |
| rowspan="2" |None |
| rowspan="2" |None |
||
|- |
|- |
||
| − | ! |
+ | !{{anchor|Phantom Membrane}}[[Phantom Membrane]] |
| − | | |
+ | |{{Slot|Phantom Membrane}} |
| − | | |
+ | |[[Slow Falling]] |
|} |
|} |
||
| Line 167: | Line 192: | ||
{| class="wikitable" style="text-align: center;" data-description="Base potions" |
{| class="wikitable" style="text-align: center;" data-description="Base potions" |
||
| + | |+Base potions |
||
! Potion |
! Potion |
||
! Reagent, base |
! Reagent, base |
||
! Precursor to |
! Precursor to |
||
|- |
|- |
||
| − | ! |
+ | !{{Inventory slot|link=Potion#Base potions|Awkward Potion}}<br>Awkward Potion |
| − | | |
+ | |{{Brewing Stand |
|Input= Nether Wart |
|Input= Nether Wart |
||
|Output2= Water Bottle |
|Output2= Water Bottle |
||
| + | <!-- I have no idea how to add a non-redirect link for water bottle in output2, so I have to leave it this way --> |
||
}} |
}} |
||
| Effect potions |
| Effect potions |
||
|- |
|- |
||
| − | ! |
+ | !{{Inventory slot|link=Potion#Base potions|Mundane Potion}}<br>Mundane Potion |
| − | | |
+ | |{{Brewing Stand |
|Input= Redstone Dust; Sugar; Rabbit's Foot; Glistering Melon Slice; Spider Eye; Magma Cream; Blaze Powder; Ghast Tear |
|Input= Redstone Dust; Sugar; Rabbit's Foot; Glistering Melon Slice; Spider Eye; Magma Cream; Blaze Powder; Ghast Tear |
||
<!-- I realize this is stupidly long, but it is already mentioned previously in the article, and the result is a junk potion anyway, so it doesn't really matter --> |
<!-- I realize this is stupidly long, but it is already mentioned previously in the article, and the result is a junk potion anyway, so it doesn't really matter --> |
||
| Line 186: | Line 213: | ||
| None |
| None |
||
|- |
|- |
||
| − | ! |
+ | !{{Inventory slot|link=Potion#Base potions|Thick Potion}}<br>Thick Potion |
| − | | |
+ | |{{Brewing Stand |
|Input= Glowstone Dust |
|Input= Glowstone Dust |
||
|Output2= Water Bottle |
|Output2= Water Bottle |
||
| Line 195: | Line 222: | ||
=== Effect potions === |
=== Effect potions === |
||
| − | Effect potions are primarily created by adding an effect ingredient to an awkward potion, which is created by adding a nether wart to a water bottle. Certain effects require a potion to be corrupted by a fermented spider eye. The potion of weakness can additionally be created by simply adding a fermented spider eye to a water bottle. |
+ | Effect potions are primarily created by adding an effect ingredient to an awkward potion, which is created by adding a nether wart to a water bottle. Certain effects require a potion to be corrupted by a fermented spider eye. The potion of [[weakness]] can additionally be created by simply adding a fermented spider eye to a water bottle — and it is the only potion that can be brewed without [[Nether Wart|nether wart]]. |
| + | |||
| ⚫ | |||
==== Positive effects ==== |
==== Positive effects ==== |
||
| Line 205: | Line 234: | ||
! Effects |
! Effects |
||
|- |
|- |
||
| − | ! {{Slot|Potion of Healing[&9Instant Health]}}<br>Potion of Healing |
+ | ! {{Slot|link=Potion#Potion of Healing|Potion of Healing[&9Instant Health]}}<br>Potion of Healing |
| − | | {{ |
+ | | {{Brewing Stand |
|Input= Glistering Melon Slice |
|Input= Glistering Melon Slice |
||
|Output2= Awkward Potion |
|Output2= Awkward Potion |
||
}} |
}} |
||
| — |
| — |
||
| − | | {{Slot|Potion of Healing[&9Instant Health II]}}<br>Potion of Healing |
+ | | {{Slot|link=Potion#Potion of Healing|Potion of Healing[&9Instant Health II]}}<br>Potion of Healing |
| [[Instant Health]]: Restores health by {{hp|4|9px}}. |
| [[Instant Health]]: Restores health by {{hp|4|9px}}. |
||
'''Enhanced:'''<br>[[Instant Health]] II: Restores health by {{hp|8|9px}}. |
'''Enhanced:'''<br>[[Instant Health]] II: Restores health by {{hp|8|9px}}. |
||
|- |
|- |
||
| − | ! {{Slot|Potion of Fire Resistance[&9Fire Resistance (<nowiki>3:00</nowiki>)]}}<br>Potion of Fire Resistance<br>({{EffectSprite|fire-resistance}} 3:00) |
+ | ! {{Slot|link=Potion#Potion of Fire Resistance|Potion of Fire Resistance[&9Fire Resistance (<nowiki>3:00</nowiki>)]}}<br>Potion of Fire Resistance<br>({{EffectSprite|fire-resistance}} 3:00) |
| − | | {{ |
+ | | {{Brewing Stand |
|Input= Magma Cream |
|Input= Magma Cream |
||
|Output2= Awkward Potion |
|Output2= Awkward Potion |
||
}} |
}} |
||
| − | | {{Slot|Potion of Fire Resistance[&9Fire Resistance (<nowiki>8:00</nowiki>)]}}<br>Potion of Fire Resistance<br>({{EffectSprite|fire-resistance}} 8:00) |
+ | | {{Slot|link=Potion#Potion of Fire Resistance|Potion of Fire Resistance[&9Fire Resistance (<nowiki>8:00</nowiki>)]}}<br>Potion of Fire Resistance<br>({{EffectSprite|fire-resistance}} 8:00) |
| — |
| — |
||
| [[Fire Resistance]]: Gives immunity to damage from fire, lava, magma blocks, campfires, and [[blaze]]s' ranged attacks. |
| [[Fire Resistance]]: Gives immunity to damage from fire, lava, magma blocks, campfires, and [[blaze]]s' ranged attacks. |
||
|- |
|- |
||
| − | ! {{Slot|Potion of Regeneration[&9Regeneration (<nowiki>0:45</nowiki>)]}}<br>Potion of Regeneration<br>({{EffectSprite|regeneration}} 0:45) |
+ | ! {{Slot|link=Potion#Potion of Regeneration|Potion of Regeneration[&9Regeneration (<nowiki>0:45</nowiki>)]}}<br>Potion of Regeneration<br>({{EffectSprite|regeneration}} 0:45) |
| − | | {{ |
+ | | {{Brewing Stand |
|Input= Ghast Tear |
|Input= Ghast Tear |
||
|Output2= Awkward Potion |
|Output2= Awkward Potion |
||
}} |
}} |
||
| − | | {{Slot|Potion of Regeneration[&9Regeneration (<nowiki>1:30</nowiki>)]}}<br>Potion of Regeneration<br>({{EffectSprite|regeneration}} 1:30) |
+ | | {{Slot|link=Potion#Potion of Regeneration|Potion of Regeneration[&9Regeneration (<nowiki>1:30</nowiki>)]}}<br>Potion of Regeneration<br>({{EffectSprite|regeneration}} 1:30) |
| − | | {{Slot|Potion of Regeneration[&9Regeneration II (<nowiki>0:22</nowiki>)]}}<br>Potion of Regeneration<br>({{EffectSprite|regeneration}} 0:22) |
+ | | {{Slot|link=Potion#Potion of Regeneration|Potion of Regeneration[&9Regeneration II (<nowiki>0:22</nowiki>)]}}<br>Potion of Regeneration<br>({{EffectSprite|regeneration}} 0:22) |
| [[Regeneration]]: Restores health by {{healthbar|1|9px}} every 2.5 seconds. |
| [[Regeneration]]: Restores health by {{healthbar|1|9px}} every 2.5 seconds. |
||
'''Enhanced:'''<br>[[Regeneration]] II: Restores health by {{healthbar|1|9px}} every 1.2 seconds. |
'''Enhanced:'''<br>[[Regeneration]] II: Restores health by {{healthbar|1|9px}} every 1.2 seconds. |
||
|- |
|- |
||
| − | ! {{Slot|Potion of Strength[&9Strength (<nowiki>3:00</nowiki>)]}}<br>Potion of Strength<br>({{EffectSprite|strength}} 3:00) |
+ | ! {{Slot|link=Potion#Potion of Strength|Potion of Strength[&9Strength (<nowiki>3:00</nowiki>)]}}<br>Potion of Strength<br>({{EffectSprite|strength}} 3:00) |
| − | | {{ |
+ | | {{Brewing Stand |
|Input= Blaze Powder |
|Input= Blaze Powder |
||
|Output2= Awkward Potion |
|Output2= Awkward Potion |
||
}} |
}} |
||
| − | | {{Slot|Potion of Strength[&9Strength (<nowiki>8:00</nowiki>)]}}<br>Potion of Strength<br>({{EffectSprite|strength}} 8:00) |
+ | | {{Slot|link=Potion#Potion of Strength|Potion of Strength[&9Strength (<nowiki>8:00</nowiki>)]}}<br>Potion of Strength<br>({{EffectSprite|strength}} 8:00) |
| − | | {{Slot|Potion of Strength[&9Strength II (<nowiki>1:30</nowiki>)]}}<br>Potion of Strength<br>({{EffectSprite|strength}} 1:30) |
+ | | {{Slot|link=Potion#Potion of Strength|Potion of Strength[&9Strength II (<nowiki>1:30</nowiki>)]}}<br>Potion of Strength<br>({{EffectSprite|strength}} 1:30) |
| [[Strength]]: Increases player's melee attack damage by {{hp|3}}. |
| [[Strength]]: Increases player's melee attack damage by {{hp|3}}. |
||
'''Enhanced:'''<br>[[Strength]] II: Increases player's melee attack damage by {{hp|6}}. |
'''Enhanced:'''<br>[[Strength]] II: Increases player's melee attack damage by {{hp|6}}. |
||
|- |
|- |
||
| − | ! {{Slot|Potion of Swiftness[&9Speed (<nowiki>3:00</nowiki>)]}}<br>Potion of Swiftness<br>({{EffectSprite|speed}} 3:00) |
+ | ! {{Slot|link=Potion#Potion of Swiftness|Potion of Swiftness[&9Speed (<nowiki>3:00</nowiki>)]}}<br>Potion of Swiftness<br>({{EffectSprite|speed}} 3:00) |
| − | | {{ |
+ | | {{Brewing Stand |
|Input= Sugar |
|Input= Sugar |
||
|Output2= Awkward Potion |
|Output2= Awkward Potion |
||
}} |
}} |
||
| − | | {{Slot|Potion of Swiftness[&9Speed (<nowiki>8:00</nowiki>)]}}<br>Potion of Swiftness<br>({{EffectSprite|speed}} 8:00) |
+ | | {{Slot|link=Potion#Potion of Swiftness|Potion of Swiftness[&9Speed (<nowiki>8:00</nowiki>)]}}<br>Potion of Swiftness<br>({{EffectSprite|speed}} 8:00) |
| − | | {{Slot|Potion of Swiftness[&9Speed II (<nowiki>1:30</nowiki>)]}}<br>Potion of Swiftness<br>({{EffectSprite|speed}} 1:30) |
+ | | {{Slot|link=Potion#Potion of Swiftness|Potion of Swiftness[&9Speed II (<nowiki>1:30</nowiki>)]}}<br>Potion of Swiftness<br>({{EffectSprite|speed}} 1:30) |
| − | | [[ |
+ | | [[Speed]]: Increases movement speed, sprinting speed, and jumping length by 20%. |
| − | '''Enhanced:'''<br>[[ |
+ | '''Enhanced:'''<br>[[Speed]] II: Increases movement speed, sprinting speed, and jumping length by 40%. |
|- |
|- |
||
| − | ! {{Slot|Potion of Night Vision[&9Night Vision (<nowiki>3:00</nowiki>)]}}<br>Potion of Night Vision<br>({{EffectSprite|night-vision}} 3:00) |
+ | ! {{Slot|link=Potion#Potion of Night Vision|Potion of Night Vision[&9Night Vision (<nowiki>3:00</nowiki>)]}}<br>Potion of Night Vision<br>({{EffectSprite|night-vision}} 3:00) |
| − | | {{ |
+ | | {{Brewing Stand |
|Input= Golden Carrot |
|Input= Golden Carrot |
||
|Output2= Awkward Potion |
|Output2= Awkward Potion |
||
}} |
}} |
||
| − | | {{Slot|Potion of Night Vision[&9Night Vision (<nowiki>8:00</nowiki>)]}}<br>Potion of Night Vision<br>({{EffectSprite|night-vision}} 8:00) |
+ | | {{Slot|link=Potion#Potion of Night Vision|Potion of Night Vision[&9Night Vision (<nowiki>8:00</nowiki>)]}}<br>Potion of Night Vision<br>({{EffectSprite|night-vision}} 8:00) |
| — |
| — |
||
| [[Night Vision]]: Makes everything appear to be at the maximum light level, including underwater areas. |
| [[Night Vision]]: Makes everything appear to be at the maximum light level, including underwater areas. |
||
|- |
|- |
||
| − | ! {{Slot|Potion of Invisibility[&9Invisibility (<nowiki>3:00</nowiki>)]}}<br>Potion of Invisibility<br>({{EffectSprite|invisibility}} 3:00) |
+ | ! {{Slot|link=Potion#Potion of Invisibility|Potion of Invisibility[&9Invisibility (<nowiki>3:00</nowiki>)]}}<br>Potion of Invisibility<br>({{EffectSprite|invisibility}} 3:00) |
| − | | {{ |
+ | | {{Brewing Stand |
|Input= Fermented Spider Eye |
|Input= Fermented Spider Eye |
||
|Output2= Potion of Night Vision[&9Night Vision] |
|Output2= Potion of Night Vision[&9Night Vision] |
||
}} |
}} |
||
| − | | {{Slot|Potion of Invisibility[&9Invisibility (<nowiki>8:00</nowiki>)]}}<br>Potion of Invisibility<br>({{EffectSprite|invisibility}} 8:00) |
+ | | {{Slot|link=Potion#Potion of Invisibility|Potion of Invisibility[&9Invisibility (<nowiki>8:00</nowiki>)]}}<br>Potion of Invisibility<br>({{EffectSprite|invisibility}} 8:00) |
| — |
| — |
||
| [[Invisibility]]: Renders the player invisible. Equipped and wielded items are still visible. |
| [[Invisibility]]: Renders the player invisible. Equipped and wielded items are still visible. |
||
|- |
|- |
||
| − | ! {{Slot|Potion of Water Breathing[&9Water Breathing (<nowiki>3:00</nowiki>)]}}<br>Potion of Water Breathing<br>({{EffectSprite|water-breathing}} 3:00) |
+ | ! {{Slot|link=Potion#Potion of Water Breathing|Potion of Water Breathing[&9Water Breathing (<nowiki>3:00</nowiki>)]}}<br>Potion of Water Breathing<br>({{EffectSprite|water-breathing}} 3:00) |
| − | | {{ |
+ | | {{Brewing Stand |
|Input= Pufferfish |
|Input= Pufferfish |
||
|Output2= Awkward Potion |
|Output2= Awkward Potion |
||
}} |
}} |
||
| − | | {{Slot|Potion of Water Breathing[&9Water Breathing (<nowiki>8:00</nowiki>)]}}<br>Potion of Water Breathing<br>({{EffectSprite|water-breathing}} 8:00) |
+ | | {{Slot|link=Potion#Potion of Water Breathing|Potion of Water Breathing[&9Water Breathing (<nowiki>8:00</nowiki>)]}}<br>Potion of Water Breathing<br>({{EffectSprite|water-breathing}} 8:00) |
| — |
| — |
||
| [[Water Breathing]]: Prevents the oxygen bar from depleting when underwater. |
| [[Water Breathing]]: Prevents the oxygen bar from depleting when underwater. |
||
|- |
|- |
||
| − | ! {{Slot|Potion of Leaping[&9Jump Boost (<nowiki>3:00</nowiki>)]}}<br>Potion of Leaping<br>({{EffectSprite|jump-boost}} 3:00) |
+ | ! {{Slot|link=Potion#Potion of Leaping|Potion of Leaping[&9Jump Boost (<nowiki>3:00</nowiki>)]}}<br>Potion of Leaping<br>({{EffectSprite|jump-boost}} 3:00) |
| − | | {{ |
+ | | {{Brewing Stand |
|Input= Rabbit's Foot |
|Input= Rabbit's Foot |
||
|Output2= Awkward Potion |
|Output2= Awkward Potion |
||
}} |
}} |
||
| − | | {{Slot|Potion of Leaping[&9Jump Boost (<nowiki>8:00</nowiki>)]}}<br>Potion of Leaping<br>({{EffectSprite|jump-boost}} 8:00) |
+ | | {{Slot|link=Potion#Potion of Leaping|Potion of Leaping[&9Jump Boost (<nowiki>8:00</nowiki>)]}}<br>Potion of Leaping<br>({{EffectSprite|jump-boost}} 8:00) |
| − | | {{Slot|Potion of Leaping[&9Jump Boost II (<nowiki>1:30</nowiki>)]}}<br>Potion of Leaping<br>({{EffectSprite|jump-boost}} 1:30) |
+ | | {{Slot|link=Potion#Potion of Leaping|Potion of Leaping[&9Jump Boost II (<nowiki>1:30</nowiki>)]}}<br>Potion of Leaping<br>({{EffectSprite|jump-boost}} 1:30) |
| [[Jump Boost]]: Increases jump height by {{fraction|1|2}} block. |
| [[Jump Boost]]: Increases jump height by {{fraction|1|2}} block. |
||
'''Enhanced:'''<br>[[Jump Boost]] II: Increases jump height by {{fraction|1|1|4}} blocks. |
'''Enhanced:'''<br>[[Jump Boost]] II: Increases jump height by {{fraction|1|1|4}} blocks. |
||
|- |
|- |
||
| − | ! {{Slot|Potion of Slow Falling[&9Slow Falling (<nowiki>1:30</nowiki>)]}}<br>Potion of Slow Falling<br>({{EffectSprite|slow-falling}} 1:30) |
+ | ! {{Slot|link=Potion#Potion of Slow Falling|Potion of Slow Falling[&9Slow Falling (<nowiki>1:30</nowiki>)]}}<br>Potion of Slow Falling<br>({{EffectSprite|slow-falling}} 1:30) |
| − | | {{ |
+ | | {{Brewing Stand |
|Input= Phantom Membrane |
|Input= Phantom Membrane |
||
|Output2= Awkward Potion |
|Output2= Awkward Potion |
||
}} |
}} |
||
| − | | {{Slot|Potion of Slow Falling[&9Slow Falling (<nowiki>4:00</nowiki>)]}}<br>Potion of Slow Falling<br>({{EffectSprite|slow-falling}} 4:00) |
+ | | {{Slot|link=Potion#Potion of Slow Falling|Potion of Slow Falling[&9Slow Falling (<nowiki>4:00</nowiki>)]}}<br>Potion of Slow Falling<br>({{EffectSprite|slow-falling}} 4:00) |
| — |
| — |
||
| [[Status effect#Slow Falling|Slow Falling]]: Causes the player to fall at a slower rate and not take any damage when hitting the ground. |
| [[Status effect#Slow Falling|Slow Falling]]: Causes the player to fall at a slower rate and not take any damage when hitting the ground. |
||
| Line 309: | Line 338: | ||
! Effects |
! Effects |
||
|- |
|- |
||
| − | ! {{Slot|Potion of Poison[&cPoison (<nowiki>0:45</nowiki>)]}}<br>Potion of Poison<br>({{EffectSprite|poison}} 0:45) |
+ | ! {{Slot|link=Potion#Potion of Poison|Potion of Poison[&cPoison (<nowiki>0:45</nowiki>)]}}<br>Potion of Poison<br>({{EffectSprite|poison}} 0:45) |
| − | | {{ |
+ | | {{Brewing Stand |
|Input= Spider Eye |
|Input= Spider Eye |
||
|Output2= Awkward Potion |
|Output2= Awkward Potion |
||
}} |
}} |
||
| − | | {{Slot|Potion of Poison[&cPoison (<nowiki>1:30</nowiki>)]}}<br>Potion of Poison<br>({{EffectSprite|poison}} 1:30) |
+ | | {{Slot|link=Potion#Potion of Poison|Potion of Poison[&cPoison (<nowiki>1:30</nowiki>)]}}<br>Potion of Poison<br>({{EffectSprite|poison}} 1:30) |
| − | | {{Slot|Potion of Poison[&cPoison II (<nowiki>0:21</nowiki>)]}}<br>Potion of Poison<br>({{EffectSprite|poison}} 0:21) |
+ | | {{Slot|link=Potion#Potion of Poison|Potion of Poison[&cPoison II (<nowiki>0:21</nowiki>)]}}<br>Potion of Poison<br>({{EffectSprite|poison}} 0:21) |
| [[Poison]]: Depletes health by {{hp|1|9px}} every 1.25 seconds. |
| [[Poison]]: Depletes health by {{hp|1|9px}} every 1.25 seconds. |
||
'''Enhanced:'''<br>[[Poison]] II: Depletes health by {{hp|1|9px}} every 0.4 seconds. |
'''Enhanced:'''<br>[[Poison]] II: Depletes health by {{hp|1|9px}} every 0.4 seconds. |
||
|- |
|- |
||
| − | ! {{Slot|Potion of Weakness[&cWeakness (<nowiki>1:30</nowiki>)]}}<br>Potion of Weakness<br>({{EffectSprite|weakness}} 1:30) |
+ | ! {{Slot|link=Potion#Potion of Weakness|Potion of Weakness[&cWeakness (<nowiki>1:30</nowiki>)]}}<br>Potion of Weakness<br>({{EffectSprite|weakness}} 1:30) |
| − | | {{ |
+ | | {{Brewing Stand |
|Input= Fermented Spider Eye |
|Input= Fermented Spider Eye |
||
|Output2= Water Bottle |
|Output2= Water Bottle |
||
}} |
}} |
||
| − | | {{Slot|Potion of Weakness[&cWeakness (<nowiki>4:00</nowiki>)]}}<br>Potion of Weakness<br>({{EffectSprite|weakness}} 4:00) |
+ | | {{Slot|link=Potion#Potion of Weakness|Potion of Weakness[&cWeakness (<nowiki>4:00</nowiki>)]}}<br>Potion of Weakness<br>({{EffectSprite|weakness}} 4:00) |
| — |
| — |
||
| [[Weakness]]: Reduces player's melee attack damage by {{hp|4}}. |
| [[Weakness]]: Reduces player's melee attack damage by {{hp|4}}. |
||
|- |
|- |
||
| − | ! {{Slot|Potion of Harming[&cInstant Damage]}}<br>Potion of Harming |
+ | ! {{Slot|link=Potion#Potion of Harming|Potion of Harming[&cInstant Damage]}}<br>Potion of Harming |
| − | | {{ |
+ | | {{Brewing Stand |
|Input= Fermented Spider Eye |
|Input= Fermented Spider Eye |
||
|Output1= Potion of Healing[&9Instant Health] |
|Output1= Potion of Healing[&9Instant Health] |
||
| Line 335: | Line 364: | ||
}} |
}} |
||
| — |
| — |
||
| − | | {{Slot|Potion of Harming[&cInstant Damage II]}}<br>Potion of Harming |
+ | | {{Slot|link=Potion#Potion of Harming|Potion of Harming[&cInstant Damage II]}}<br>Potion of Harming |
| [[Instant Damage]]: Inflicts {{hp|6|9px}} damage. |
| [[Instant Damage]]: Inflicts {{hp|6|9px}} damage. |
||
'''Enhanced:'''<br>[[Instant Damage]] II: Inflicts {{hp|12|9px}} damage. |
'''Enhanced:'''<br>[[Instant Damage]] II: Inflicts {{hp|12|9px}} damage. |
||
|- |
|- |
||
| − | ! {{Slot|Potion of Slowness[&cSlowness (<nowiki>1:30</nowiki>)]}}<br>Potion of Slowness<br>({{EffectSprite|slowness}} 1:30) |
+ | ! {{Slot|link=Potion#Potion of Slowness|Potion of Slowness[&cSlowness (<nowiki>1:30</nowiki>)]}}<br>Potion of Slowness<br>({{EffectSprite|slowness}} 1:30) |
| − | | {{ |
+ | | {{Brewing Stand |
|Input= Fermented Spider Eye |
|Input= Fermented Spider Eye |
||
|Output1= Potion of Swiftness[&9Speed] |
|Output1= Potion of Swiftness[&9Speed] |
||
|Output3= Potion of Leaping[&9Jump Boost] |
|Output3= Potion of Leaping[&9Jump Boost] |
||
}} |
}} |
||
| − | | {{Slot|Potion of Slowness[&cSlowness (<nowiki>4:00</nowiki>)]}}<br>Potion of Slowness<br>({{EffectSprite|slowness}} 4:00) |
+ | | {{Slot|link=Potion#Potion of Slowness|Potion of Slowness[&cSlowness (<nowiki>4:00</nowiki>)]}}<br>Potion of Slowness<br>({{EffectSprite|slowness}} 4:00) |
| − | | {{Slot|Potion of Slowness[&cSlowness IV (<nowiki>0:20</nowiki>)]}}<br>Potion of Slowness<br>({{EffectSprite|slowness}} 0:20) |
+ | | {{Slot|link=Potion#Potion of Slowness|Potion of Slowness[&cSlowness IV (<nowiki>0:20</nowiki>)]}}<br>Potion of Slowness<br>({{EffectSprite|slowness}} 0:20) |
| [[Slowness]]: Slows the player to 85% speed. |
| [[Slowness]]: Slows the player to 85% speed. |
||
'''Enhanced:'''<br>[[Slowness]] IV: Slows the player to 40% speed. |
'''Enhanced:'''<br>[[Slowness]] IV: Slows the player to 40% speed. |
||
| Line 359: | Line 388: | ||
! Effects |
! Effects |
||
|- |
|- |
||
| − | ! {{Slot|Potion of the Turtle Master[&cSlowness IV (<nowiki>0:20</nowiki>)/&9Resistance III (<nowiki>0:20</nowiki>)]}}<br>Potion of the Turtle Master<br>({{EffectSprite|slowness}}{{EffectSprite|resistance}}0:20) |
+ | ! {{Slot|link=Potion#Potion of the Turtle Master|Potion of the Turtle Master[&cSlowness IV (<nowiki>0:20</nowiki>)/&9Resistance III (<nowiki>0:20</nowiki>)]}}<br>Potion of the Turtle Master<br>({{EffectSprite|slowness}}{{EffectSprite|resistance}}0:20) |
| − | | {{ |
+ | | {{Brewing Stand |
|Input= Turtle Shell |
|Input= Turtle Shell |
||
|Output2= Awkward Potion |
|Output2= Awkward Potion |
||
}} |
}} |
||
| − | | {{Slot|Potion of the Turtle Master[&cSlowness IV (<nowiki>0:40</nowiki>)/&9Resistance III (<nowiki>0:40</nowiki>)]}}<br>Potion of the Turtle Master<br>({{EffectSprite|slowness}}{{EffectSprite|resistance}}0:40) |
+ | | {{Slot|link=Potion#Potion of the Turtle Master|Potion of the Turtle Master[&cSlowness IV (<nowiki>0:40</nowiki>)/&9Resistance III (<nowiki>0:40</nowiki>)]}}<br>Potion of the Turtle Master<br>({{EffectSprite|slowness}}{{EffectSprite|resistance}}0:40) |
| − | | {{Slot|Potion of the Turtle Master[&cSlowness VI (<nowiki>0:20</nowiki>)/&9Resistance IV (<nowiki>0:20</nowiki>)]}}<br>Potion of the Turtle Master<br>({{EffectSprite|slowness}}{{EffectSprite|resistance}}0:20) |
+ | | {{Slot|link=Potion#Potion of the Turtle Master|Potion of the Turtle Master[&cSlowness VI (<nowiki>0:20</nowiki>)/&9Resistance IV (<nowiki>0:20</nowiki>)]}}<br>Potion of the Turtle Master<br>({{EffectSprite|slowness}}{{EffectSprite|resistance}}0:20) |
| − | | [[Slowness]] IV, [[ |
+ | | [[Slowness]] IV, [[Resistance]] III: Slows the player by 60% speed and reduces incoming damage by 60%. |
| − | '''Enhanced:'''<br>[[Slowness]] VI, [[ |
+ | '''Enhanced:'''<br>[[Slowness]] VI, [[Resistance]] IV: Slows the player by 90% speed and reduces incoming damage by 80%. |
|} |
|} |
||
=== Cures === |
=== Cures === |
||
| + | {{education feature|section = 1}} |
||
| − | Cures are brewed from awkward potions using different [[ |
+ | Cures are brewed from awkward potions using different [[element]]s.{{only|bedrock|education}} Drinking these removes the specified bad effect. They cannot be modified into splash, lingering, extended, or enhanced versions. |
{| class="wikitable" style="text-align: center;" data-description="Remedies" |
{| class="wikitable" style="text-align: center;" data-description="Remedies" |
||
| Line 378: | Line 408: | ||
! Effect |
! Effect |
||
|- |
|- |
||
| − | ! {{ |
+ | ! {{Inventory slot|link=medicine|Antidote}}<br>Antidote |
| − | | {{ |
+ | | {{Brewing Stand |
|Input= Silver |
|Input= Silver |
||
|Output2= Awkward Potion |
|Output2= Awkward Potion |
||
| Line 385: | Line 415: | ||
| Cures [[Poison]] |
| Cures [[Poison]] |
||
|- |
|- |
||
| − | ! {{ |
+ | ! {{Inventory slot|link=medicine|Elixir}}<br>Elixir |
| − | | {{ |
+ | | {{Brewing Stand |
|Input= Cobalt |
|Input= Cobalt |
||
|Output2= Awkward Potion |
|Output2= Awkward Potion |
||
| Line 392: | Line 422: | ||
| Cures [[Weakness]] |
| Cures [[Weakness]] |
||
|- |
|- |
||
| − | ! {{ |
+ | ! {{Inventory slot|link=medicine|Eye Drops}}<br>Eye Drops |
| − | | {{ |
+ | | {{Brewing Stand |
|Input= Calcium |
|Input= Calcium |
||
|Output2= Awkward Potion |
|Output2= Awkward Potion |
||
| Line 399: | Line 429: | ||
| Cures [[Blindness]] |
| Cures [[Blindness]] |
||
|- |
|- |
||
| − | ! {{ |
+ | ! {{Inventory slot|link=medicine|Tonic}}<br>Tonic |
| − | | {{ |
+ | | {{Brewing Stand |
|Input= Bismuth |
|Input= Bismuth |
||
|Output2= Awkward Potion |
|Output2= Awkward Potion |
||
| Line 408: | Line 438: | ||
=== Unbrewable potions === |
=== Unbrewable potions === |
||
| − | The potion of Luck{{only|java}} and the potion of Decay{{only|bedrock}} cannot be brewed, and can be obtained only through commands or the [[creative inventory |
+ | The potion of Luck{{only|java}} and the potion of Decay{{only|bedrock}} cannot be brewed, and can be obtained only through commands or the [[Inventory#Creative inventory|creative inventory]]. |
== Video == |
== Video == |
||
| Line 416: | Line 446: | ||
{{History|java}} |
{{History|java}} |
||
{{History||?|The brewing system was originally meant to be procedural, meaning that the recipes were meant to be different each time one generated a ''Minecraft'' world.<ref>[https://minecraft.net/en-us/article/meet-magma-cube "The Mundane Potion is a remnant of an abandoned procedural brewing system—meaning that the recipes were meant to be different each time you generated a Minecraft world. But this didn't turn out to be much fun for the player and the system was abandoned, leaving the Mundane Potion without a purpose. "It's sort of like an appendix," says Jens"] – [[Tom Stone]], February 21, 2017</ref>}} |
{{History||?|The brewing system was originally meant to be procedural, meaning that the recipes were meant to be different each time one generated a ''Minecraft'' world.<ref>[https://minecraft.net/en-us/article/meet-magma-cube "The Mundane Potion is a remnant of an abandoned procedural brewing system—meaning that the recipes were meant to be different each time you generated a Minecraft world. But this didn't turn out to be much fun for the player and the system was abandoned, leaving the Mundane Potion without a purpose. "It's sort of like an appendix," says Jens"] – [[Tom Stone]], February 21, 2017</ref>}} |
||
| − | {{History||1.0.0|snap=Beta 1.9 Prerelease 2|Initially, the [[cauldron]] was where potions were brewed, though cauldrons were not assigned a block ID, rendering potions unobtainable except through [http://www.minecraftforum.net/topic/673742-19-pre2-cauldron-block/ modding the cauldron] so that it would be obtainable. When the cauldron was obtained, potions could be brewed by adding water to the cauldron followed by certain ingredients. Correctly combined ingredients would confer purely beneficial |
+ | {{History||1.0.0|snap=Beta 1.9 Prerelease 2|Initially, the [[cauldron]] was where potions were brewed, though cauldrons were not assigned a block ID, rendering potions unobtainable except through [http://www.minecraftforum.net/topic/673742-19-pre2-cauldron-block/ modding the cauldron] so that it would be obtainable. When the cauldron was obtained, potions could be brewed by adding water to the cauldron followed by certain ingredients. Correctly combined ingredients would confer purely beneficial potion effects, and incorrect combinations added negative effects. The system was complicated, lacked a GUI, and formed many duplicate potions (i.e. two potions that were the same could be made in several different ways), so Notch and Jeb came up with a new brewing method using a [[Brewing Stand|brewing stand]].<ref>[[jebtweet:119710836469149697]]</ref>}} |
{{History|||snap=Beta 1.9 Prerelease 3|A brewing GUI was added and most duplicate potions were removed (the total possible potions went down from 150 combinations to only 25 different potions in 31 combinations). Some status effects available in earlier 1.9 pre-releases as potions became inaccessible (e.g. Nausea, Blindness, and Invisibility).}} |
{{History|||snap=Beta 1.9 Prerelease 3|A brewing GUI was added and most duplicate potions were removed (the total possible potions went down from 150 combinations to only 25 different potions in 31 combinations). Some status effects available in earlier 1.9 pre-releases as potions became inaccessible (e.g. Nausea, Blindness, and Invisibility).}} |
||
| − | {{History|||snap=Beta 1.9 Prerelease 4|Throwable [[splash potion]]s introduced, brewed by placing [[gunpowder]] and any potion together in a brewing stand. |
+ | {{History|||snap=Beta 1.9 Prerelease 4|Throwable [[Splash Potion|splash potion]]s introduced, brewed by placing [[gunpowder]] and any potion together in a brewing stand. |
| − | |[[Glistering melon]] was added to be the ingredient for the potion of Healing; the [[ghast tear]], which previously served this purpose, is now used for the potion of Regeneration instead. |
+ | |[[Glistering Melon Slice|Glistering melon]] was added to be the ingredient for the potion of Healing; the [[Ghast Tear|ghast tear]], which previously served this purpose, is now used for the potion of Regeneration instead. |
| − | |Converted certain ingredients into base-secondary ingredients (the [[spider eye]], |
+ | |Converted certain ingredients into base-secondary ingredients (the [[Spider Eye|spider eye]], glistering melon and [[Blaze Powder|blaze powder]] made mundane potion when brewed into a water bottle in addition to their previous functions), bringing the potion total to 28 different potions in 35 combinations.}} |
{{History||1.1|snap=12w01a|The time to brew potions was decreased to 20 seconds.}}<!--From what?--> |
{{History||1.1|snap=12w01a|The time to brew potions was decreased to 20 seconds.}}<!--From what?--> |
||
{{History||1.4.2|snap=12w34a|Brewing recipes for potions of Night Vision and Invisibility added.}} |
{{History||1.4.2|snap=12w34a|Brewing recipes for potions of Night Vision and Invisibility added.}} |
||
| Line 427: | Line 457: | ||
{{History||1.8|snap=14w27a|Potion of Leaping added.}} |
{{History||1.8|snap=14w27a|Potion of Leaping added.}} |
||
{{History||1.8.1|snap=pre1|The potion of Leaping can now be extended using redstone.}} |
{{History||1.8.1|snap=pre1|The potion of Leaping can now be extended using redstone.}} |
||
| − | {{History||1.9|snap=15w31a|[[Glowstone Dust|Glowstone]] and [[redstone]] can no longer be added to already extended or enhanced potions. |
+ | {{History||1.9|snap=15w31a|[[Glowstone Dust|Glowstone]] and [[Redstone Dust|redstone]] can no longer be added to already extended or enhanced potions. |
| − | |[[Fermented spider eye]]s can no longer be added to enhanced potions of Speed or Leaping, but can still be added to extended potions of Poison. |
+ | |[[Fermented Spider Eye|Fermented spider eye]]s can no longer be added to enhanced potions of Speed or Leaping, but can still be added to extended potions of Poison. |
|Potions of Weakness can no longer be made using a thick potion, mundane potion, awkward potion, potion of Regeneration, or potion of Strength. |
|Potions of Weakness can no longer be made using a thick potion, mundane potion, awkward potion, potion of Regeneration, or potion of Strength. |
||
|Potions of Slowness can no longer be made using a potion of Fire Resistance. |
|Potions of Slowness can no longer be made using a potion of Fire Resistance. |
||
| Line 434: | Line 464: | ||
|Removed reverted potions and "extended" mundane potion, as well as unused potion IDs. See {{slink|Java Edition removed features|Potions}} for more information. |
|Removed reverted potions and "extended" mundane potion, as well as unused potion IDs. See {{slink|Java Edition removed features|Potions}} for more information. |
||
|Splash potions can now be created from all potions, including water bottles.}} |
|Splash potions can now be created from all potions, including water bottles.}} |
||
| − | {{History|||snap=15w33a|Added [[lingering potion]]s.}} |
+ | {{History|||snap=15w33a|Added [[Lingering Potion|lingering potion]]s.}} |
{{History|||snap=15w42a|Blaze powder is now required as fuel for brewing.}} |
{{History|||snap=15w42a|Blaze powder is now required as fuel for brewing.}} |
||
{{History|||snap=15w43a|Blaze powder as fuel reduced from 30 points to 20.}} |
{{History|||snap=15w43a|Blaze powder as fuel reduced from 30 points to 20.}} |
||
| Line 455: | Line 485: | ||
{{History||xbox=TU46|xbone=CU36|ps=1.38|wiiu=Patch 15|Lingering potions added.|Blaze powder is now required as fuel for brewing.}} |
{{History||xbox=TU46|xbone=CU36|ps=1.38|wiiu=Patch 15|Lingering potions added.|Blaze powder is now required as fuel for brewing.}} |
||
{{History|foot}} |
{{History|foot}} |
||
| − | |||
| − | === Potion type history === |
||
| − | [[File:Brewing Potions.png|thumb|right|150px|Potions brewing in cauldrons (1.9 pre2).]] |
||
| − | {{checkthecode|What about glowing, levitation, bad luck, conduit power, dolphin's grace and bad omen potions?}} |
||
| − | |||
| − | Based on information found in ''minecraft.jar/lang/en_US.lang'', the current potion types are listed below: |
||
| − | |||
| − | * Potion of Swiftness (Speed) |
||
| − | * Potion of Slowness |
||
| − | * Potion of Strength |
||
| − | * Potion of Weakness |
||
| − | * Potion of Healing (Instant Health for players, Instant Damage for undead) |
||
| − | * Potion of Harming (Instant Damage for players, Instant Health for undead) |
||
| − | * Potion of Regeneration |
||
| − | * Potion of Fire Resistance |
||
| − | * Potion of Water Breathing |
||
| − | * Potion of Poison |
||
| − | * Potion of Night Vision |
||
| − | * Potion of Invisibility |
||
| − | * Potion of Leaping (Jump Boost) |
||
| − | * Potion of Slow Falling |
||
| − | * Potion of Turtle Master (both Resistance and Slowness) |
||
| − | |||
| − | Due to changes in the brewing system, the following potions are currently not accessible: |
||
| − | |||
| − | * Potion of Haste |
||
| − | * Potion of Dullness (Mining Fatigue) |
||
| − | * Potion of Nausea |
||
| − | * Potion of Confusion (Blindness) |
||
| − | * Potion of Hunger |
||
| − | * Potion of Decay (Wither) |
||
| − | * Potion of Resistance |
||
| − | |||
| − | Some potions also do not have a real name in ''Minecraft'', and are currently not accessible: |
||
| − | |||
| − | * Potion of potion.healthBoost.postFix (Health Boost) |
||
| − | * Potion of potion.absorption.postFix (Absorption) |
||
| − | * Potion of potion.saturation.postFix (Saturation) |
||
== Trivia == |
== Trivia == |
||
| ⚫ | |||
| ⚫ | * Although [[Jens Bergensten|Jeb]] said that in [[Java Edition Beta 1.9 Prerelease 3]] there would be 161 possible different potion combinations with 2,653 in the future, in the actual third pre-release only 22 different potions could be made without the use of external programs. Of those, 19 potions had one of 8 different effects. |
||
| ⚫ | |||
| − | * The three potions do not necessarily have to be the same. |
||
| ⚫ | |||
| ⚫ | |||
| ⚫ | * Although [[Jeb]] said that in [[Java Edition |
||
| ⚫ | |||
* By modifying the [[item]] NBT using an editor or [[commands]], it is possible to get a potion that cannot be upgraded into a splash potion. |
* By modifying the [[item]] NBT using an editor or [[commands]], it is possible to get a potion that cannot be upgraded into a splash potion. |
||
| + | * Unlike [[crafting]], [[smelting]] and [[Stonecutter#Cutting|stonecutting]], there is no in-game [[recipe book]] for brewing, making the process much less intuitive. |
||
| − | * The potion of Weakness is the only potion with an effect that can be brewed without needing to have a [[nether wart]]. |
||
| − | * Brewing recipes are one of the few types of crafting that cannot be included in [[data packs]]. |
||
== Gallery == |
== Gallery == |
||
<gallery> |
<gallery> |
||
| − | File: |
+ | File:Brewing stand.png|Texture file for the 1.9 brewing user interface |
</gallery> |
</gallery> |
||
| Line 540: | Line 525: | ||
[[ru:Зельеварение]] |
[[ru:Зельеварение]] |
||
[[th:การปรุงยา]] |
[[th:การปรุงยา]] |
||
| − | [[tr: |
+ | [[tr:İksircilik]] |
[[uk:Зіллєваріння]] |
[[uk:Зіллєваріння]] |
||
[[zh:药水酿造]] |
[[zh:药水酿造]] |
||
Revision as of 02:51, 10 July 2021
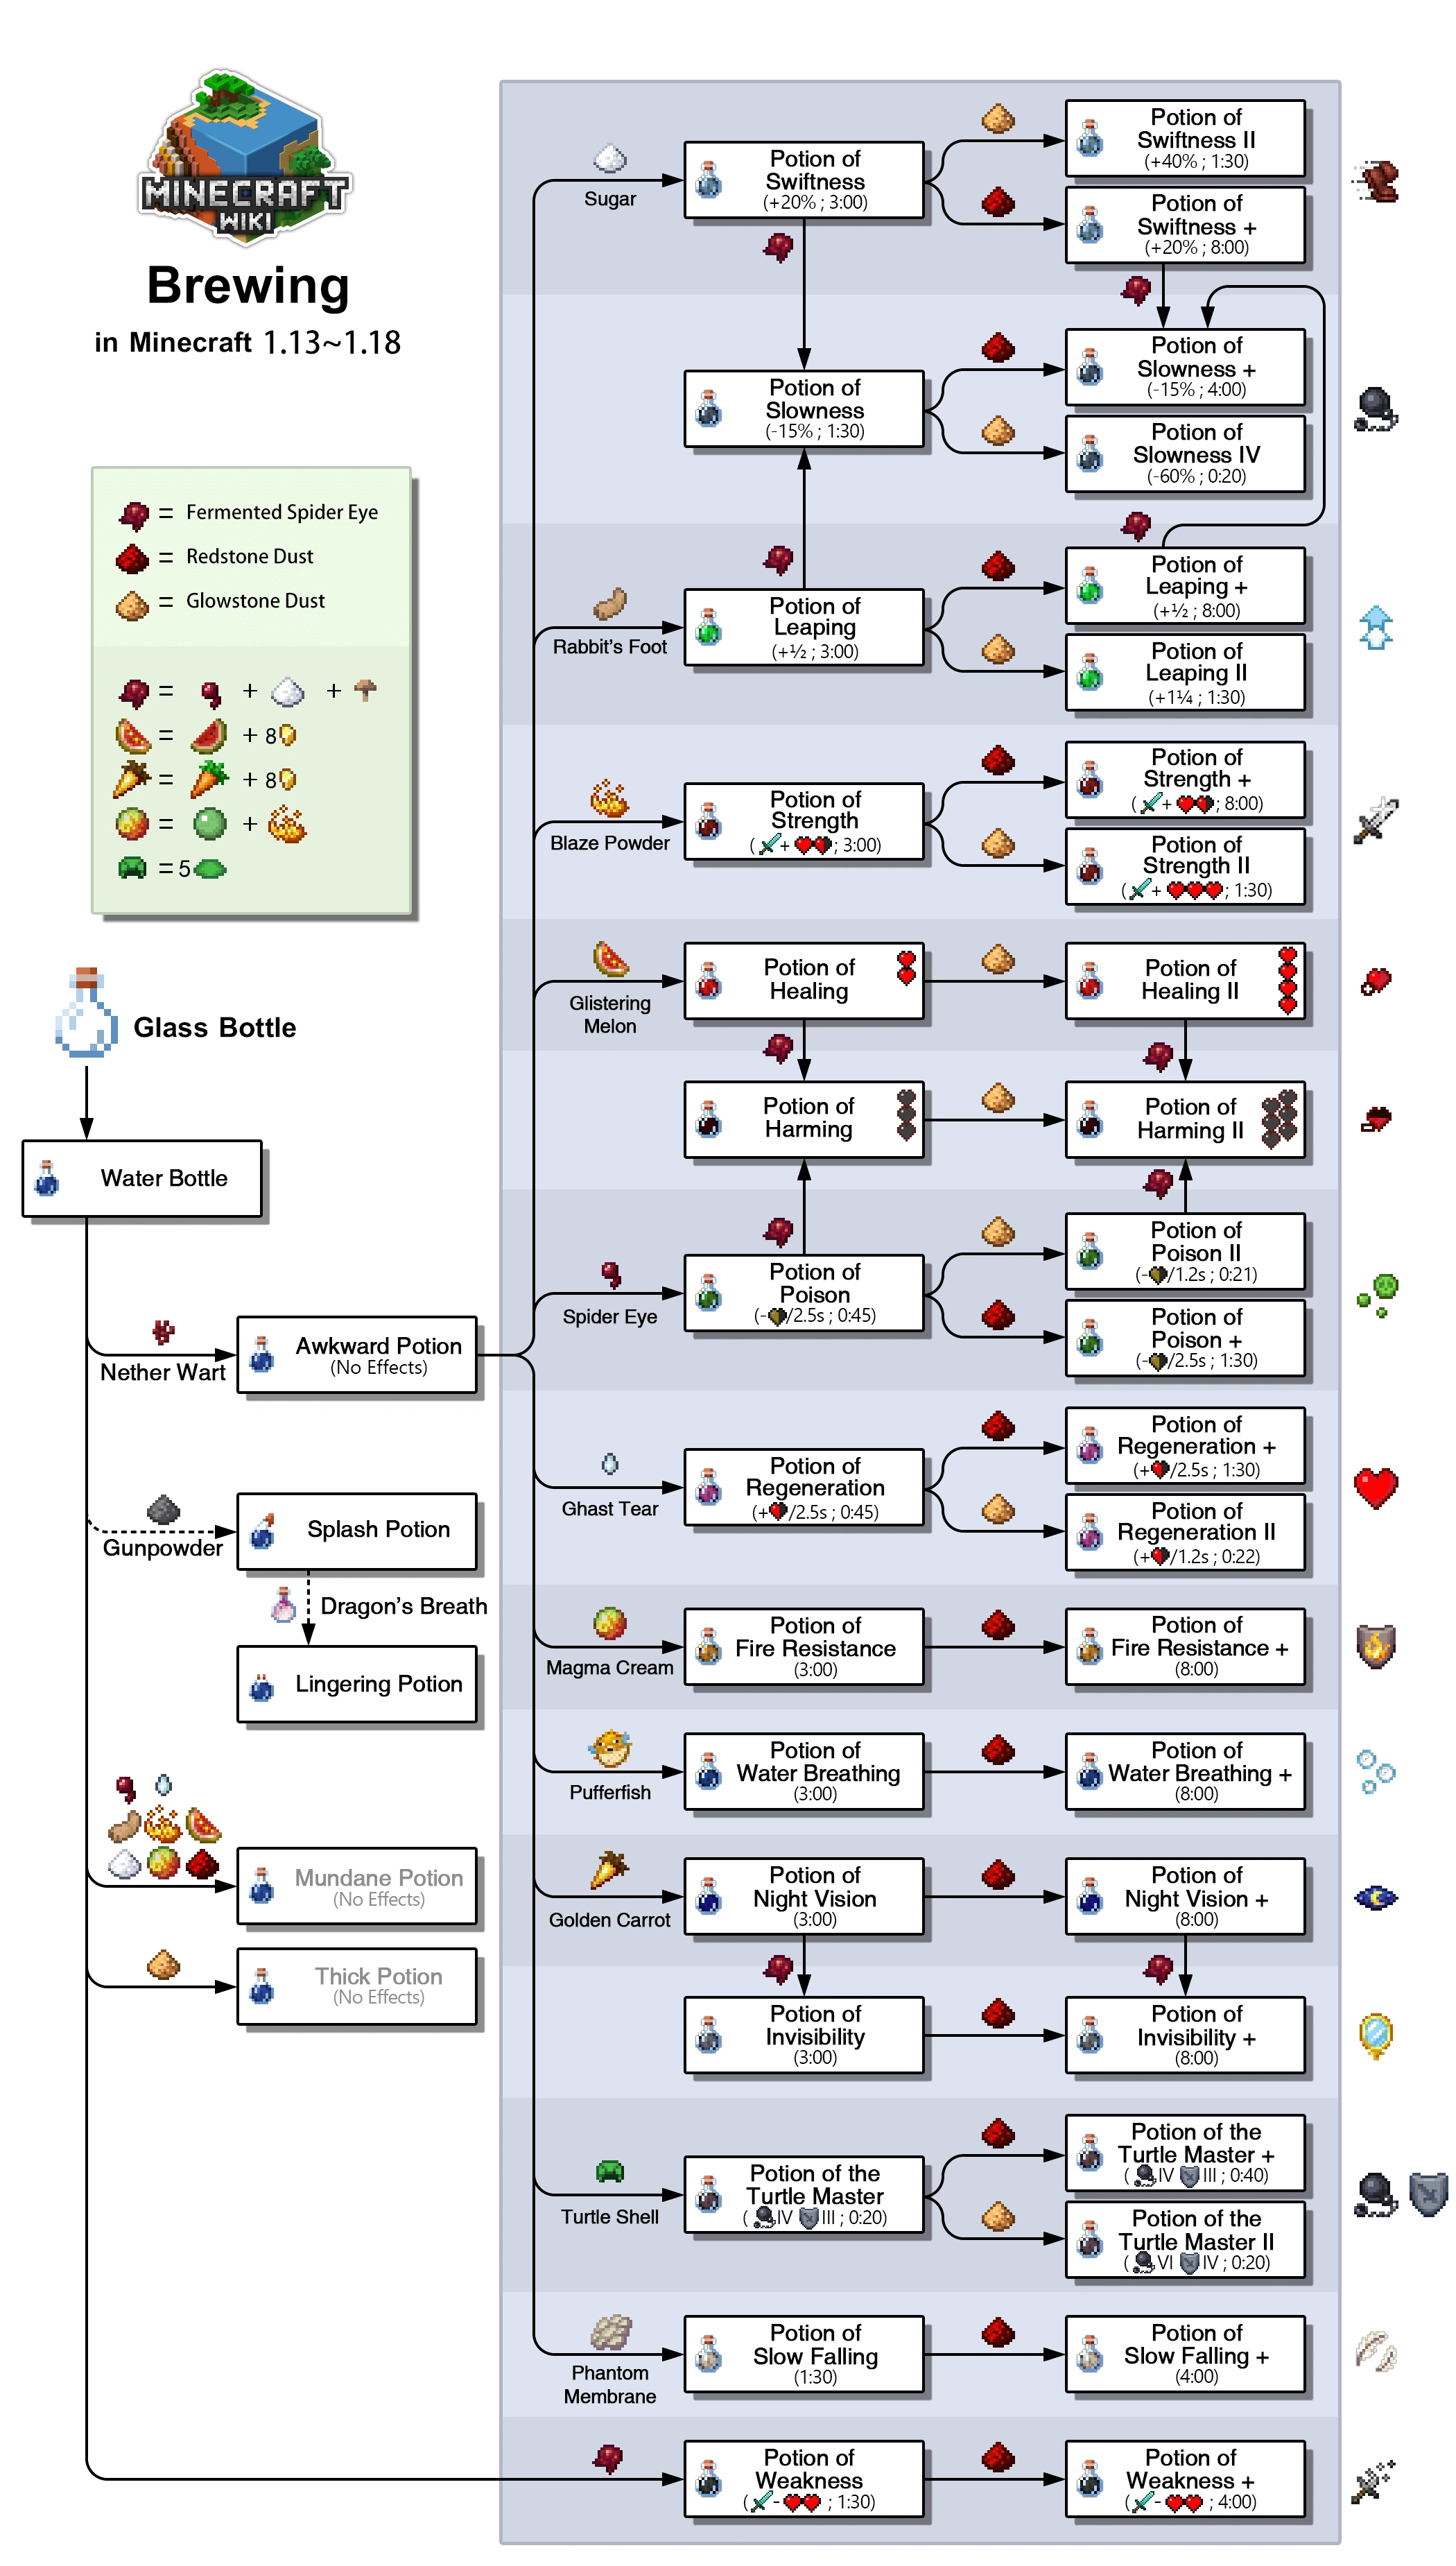
Potion brewing chart (most efficient recipes, excludes splash potions). Recipes may differ in Bedrock Edition.
Brewing is the process of creating potions, splash potions, and lingering potions by adding various ingredients to water bottles in a brewing stand.
Brewing potions
| Brewing GUI |
|---|
By placing at least one or more water bottles in the lower three slots of the brewing interface, an ingredient in the upper slot, and blaze powder in the fuel slot, a player can distill the ingredients into each bottle and brew potions that may be consumed to grant an effect to the player. The three potions being brewed do not necessarily have to be the same.
Every potion starts with a water bottle, and proceeds with one or more steps of brewing. The usual steps are:
- Add a base ingredient to create a base potion, usually nether wart is used to create an awkward potion.
- Add an effect ingredient into the awkward potion to create a potion with a working effect.
- In any order, several optional steps can be added (depending on the basic effect, not all of these may be valid):
- A enhancer ingredient may be added: glowstone dust to make the effect more intense, or redstone dust to make it last longer.
- a fermented spider eye may be added to "corrupt" the effect, generally reversing it.
- Gunpowder can be added to convert it to a splash potion, which can be thrown (or fired using a dispenser) to affect all players and mobs in a radius.
- After a splash potion is brewed, Dragon's breath may be added to upgrade it to a lingering potion, which can be used to create an lasting area effect cloud, or to craft tipped arrows.
The exception to the above sequence is the potion of weakness, where a fermented spider eye is brewed directly into water. The resulting potion can be extended with redstone and/or converted to a splash or lingering potion as above.
Each brewing step takes 20 seconds. Each piece of blaze powder used provides fuel for 20 "steps" of brewing. Fuel is consumed when a brewing operation starts and it is not recovered if the operation is halted prematurely by removing the ingredient or potion bottles. The same amount of fuel is consumed whether one, two, or three bottles are being brewed.
The brewing stand can be fed by hoppers: Ingredients can be fed to the top of the stand, bottles and fuel can be fed to the side of the stand, and "finished" potions can be taken from the bottom.
- All ingredients for a single batch of any recipe can be loaded in order from a hopper for a hands-free brewing of a multi-step potion. (With the nether wart falling through to begin brewing.)
- Since each step produces a "finished" potion (which can be taken by a bottom hopper, mass-production of potions is non-trivial. However, it can be managed if several brewing stands are chained together from bottom to side, each with fuel and stacks of the successive ingredients. The first step can be fed by a chest of water bottles.
Brewing continues as long as at least one of the three bottom spaces is filled, and additional bottles of water or potions can be added. However, if the ingredient is removed, or the bottom three slots are emptied at any time during the process, the process stops and nothing is brewed.
Brewing equipment
| Name | Icon | Use |
|---|---|---|
| Brewing Stand | Used to add ingredients into water bottles. | |
| Cauldron | Each cauldron can hold a bucket of water (after placement), fill 3 glass bottles, or in Bedrock Edition, hold 3 bottles' worth of a single potion (after placement), and can hold water in the Nether without evaporating. | |
| Water | Alternatively, instead of a cauldron, a water source block can be used to fill an unlimited number of glass bottles. | |
| Blaze Powder | Needed to fuel the brewing stand. | |
| Glass Bottle | Container for all kinds of potions. | |
| Water Bottle | The starting base for all potions, made by filling a glass bottle from a cauldron or a water source block. |
Ingredients
Base ingredients and modifiers
Base ingredients are ingredients that can be added directly to a water bottle and are the starting point of all potions. Nether wart is the most fundamental of the base ingredients, as it is required to make the vast majority of potions.
Modifiers are ingredients used to alter the properties of a potion or to change a potion effect into a different one. The fermented spider eye is unique in that it is the only modifier that can convert a water bottle directly into an effective potion.
| Name | Icon | Result of adding to water bottle | Modifier effect |
|---|---|---|---|
| Nether Wart | Awkward Potion | Allows the creation of more complex potions. | |
| Redstone Dust | Mundane Potion | Extends the duration of a potion. | |
| Glowstone Dust | Thick Potion | Enhances the level of a potion. | |
| Fermented Spider Eye | Potion of Weakness | Corrupts the potion effect. (changes effect) | |
| Gunpowder | Splash Water Bottle | Turns a potion into a splash potion. | |
| Dragon's Breath | Lingering Water Bottle (from Splash Water Bottle) |
Turns a splash potion into a lingering potion. |
Enhancement: Generally, upgrading a potion involves a trade-off between duration and potency. A potion with an enhanced effect has shorter duration, and a potion with extended duration cannot have an enhanced effect. However:
- Upgrading the effect of a potion that has no time parameter (e.g. Instant Health) with glowstone involves no trade-off.
- Upgrading the time of a potion that has no level II effect (e.g. Fire Resistance) with redstone involves no trade-off.
Corrupting effect: A fermented spider eye changes a potion's base effect, often reversing it or producing a negative potion.
- A corrupted potion usually does the opposite of the original potion.
- Corrupting an enhanced or extended potion into an effect that supports the modifier results in a potion with the same modifier applied.
- Corrupting an enhanced potion of Poison/Healing results in a basic potion of Harming. Enhanced potions of Leaping or Swiftness cannot be corrupted.
- A potion of Invisibility is considered a "corrupted" version of a potion of Night Vision.

Splash potion brewed using gunpowder.
Splash and lingering potions: Any potion can be turned into a splash potion, and subsequently, a lingering potion. Splash and lingering potions can be used best for affecting other entities.
- Splash potions and lingering potions can be modified in the same manner as their normal counterparts. For instance, a splash water bottle can be brewed with any of the base ingredients; the result remains a splash potion.
- Some extended/enhanced splash and lingering potions cannot be brewed from their extended/enhanced potion/splash potion counterparts, respectively (e.g. Regeneration + → Splash Potion of Regeneration +).[Bedrock Edition only]
- In Bedrock Edition, splash potions' effects have only three-fourths of the duration of the drinkable form. For example, a drinkable potion effect of 8:00 is reduced to 6:00 as a splash potion. In Java Edition, splash and drinkable forms have the same duration.
- Lingering potions have only one-fourth of the duration of the drinkable form. For instance, a drinkable potion effect of 8:00 is reduced to 2:00 as a lingering potion.
Effect ingredients
Effect ingredients imbue an awkward potion with a particular effect but do not alter potion duration or intensity. When added directly to a water bottle, most of these ingredients produce a mundane potion. The exceptions to this are golden carrot, pufferfish, turtle shell, and phantom membrane, which cannot be added directly to a water bottle.
| Name | Icon | Effect | Effect when corrupted |
|---|---|---|---|
| Sugar | Speed | Slowness | |
| Rabbit's Foot | Jump Boost | ||
| Glistering Melon Slice | Instant Health | Instant Damage | |
| Spider Eye | Poison | ||
| Pufferfish | Water Breathing | None | |
| Magma Cream | Fire Resistance | ||
| Golden Carrot | Night Vision | Invisibility | |
| Blaze Powder | Strength | None | |
| Ghast Tear | Regeneration | ||
| Turtle Shell | Slowness, Resistance | None | |
| Phantom Membrane | Slow Falling |
Brewing recipes
Base potions
Base potions are potions without effects, brewed by adding a single base ingredient to a water bottle. Of these, only the awkward potion can be imbued with an effect ingredient to produce a potion effect.
| Potion | Reagent, base | Precursor to |
|---|---|---|
Awkward Potion |
Effect potions | |
Mundane Potion |
None | |
Thick Potion |
None |
Effect potions
Effect potions are primarily created by adding an effect ingredient to an awkward potion, which is created by adding a nether wart to a water bottle. Certain effects require a potion to be corrupted by a fermented spider eye. The potion of weakness can additionally be created by simply adding a fermented spider eye to a water bottle — and it is the only potion that can be brewed without nether wart.
Undead mobs react differently to effects than other mobs. They take damage from potions of Healing, gain health from potions of Harming, and are unaffected by potions of Poison and Regeneration.
Positive effects
| Potion | Reagent, base | Extended | Enhanced | Effects |
|---|---|---|---|---|
Potion of Healing |
— | Potion of Healing |
Instant Health: Restores health by 4 Enhanced: | |
Potion of Fire Resistance ( 3:00) |
Potion of Fire Resistance ( 8:00) |
— | Fire Resistance: Gives immunity to damage from fire, lava, magma blocks, campfires, and blazes' ranged attacks. | |
Potion of Regeneration ( 0:45) |
Potion of Regeneration ( 1:30) |
Potion of Regeneration ( 0:22) |
Regeneration: Restores health by Enhanced: | |
Potion of Strength ( 3:00) |
Potion of Strength ( 8:00) |
Potion of Strength ( 1:30) |
Strength: Increases player's melee attack damage by 3 Enhanced: | |
Potion of Swiftness ( 3:00) |
Potion of Swiftness ( 8:00) |
Potion of Swiftness ( 1:30) |
Speed: Increases movement speed, sprinting speed, and jumping length by 20%.
Enhanced: | |
Potion of Night Vision ( 3:00) |
Potion of Night Vision ( 8:00) |
— | Night Vision: Makes everything appear to be at the maximum light level, including underwater areas. | |
Potion of Invisibility ( 3:00) |
Potion of Invisibility ( 8:00) |
— | Invisibility: Renders the player invisible. Equipped and wielded items are still visible. | |
Potion of Water Breathing ( 3:00) |
Potion of Water Breathing ( 8:00) |
— | Water Breathing: Prevents the oxygen bar from depleting when underwater. | |
Potion of Leaping ( 3:00) |
Potion of Leaping ( 8:00) |
Potion of Leaping ( 1:30) |
Jump Boost: Increases jump height by 1⁄2 block.
Enhanced: | |
Potion of Slow Falling ( 1:30) |
Potion of Slow Falling ( 4:00) |
— | Slow Falling: Causes the player to fall at a slower rate and not take any damage when hitting the ground. |
Negative effects
| Potion | Reagent, base(s) | Extended | Enhanced | Effects |
|---|---|---|---|---|
Potion of Poison ( 0:45) |
Potion of Poison ( 1:30) |
Potion of Poison ( 0:21) |
Poison: Depletes health by 1 Enhanced: | |
Potion of Weakness ( 1:30) |
Potion of Weakness ( 4:00) |
— | Weakness: Reduces player's melee attack damage by 4 | |
Potion of Harming |
— | Potion of Harming |
Instant Damage: Inflicts 6 Enhanced: | |
Potion of Slowness ( 1:30) |
Potion of Slowness ( 4:00) |
Potion of Slowness ( 0:20) |
Slowness: Slows the player to 85% speed.
Enhanced: |
Mixed effects
| Potion | Reagent, base | Extended | Enhanced | Effects |
|---|---|---|---|---|
Potion of the Turtle Master (0:20) |
Potion of the Turtle Master (0:40) |
Potion of the Turtle Master (0:20) |
Slowness IV, Resistance III: Slows the player by 60% speed and reduces incoming damage by 60%.
Enhanced: |
Cures
Cures are brewed from awkward potions using different elements.[Bedrock Edition and Minecraft Education only] Drinking these removes the specified bad effect. They cannot be modified into splash, lingering, extended, or enhanced versions.
| Potion | Reagent, base | Effect |
|---|---|---|
Antidote |
Cures Poison | |
Elixir |
Cures Weakness | |
Eye Drops |
Cures Blindness | |
Tonic |
Cures Nausea |
Unbrewable potions
The potion of Luck[Java Edition only] and the potion of Decay[Bedrock Edition only] cannot be brewed, and can be obtained only through commands or the creative inventory.
Video
History
| Java Edition | |||||
|---|---|---|---|---|---|
| ? | The brewing system was originally meant to be procedural, meaning that the recipes were meant to be different each time one generated a Minecraft world.[1] | ||||
1.0.0{{Extension DPL}}<ul><li>[[Pumpkin Pie|Pumpkin Pie]]<br/>{{redirect|Pie|the other craftable dessert|Cake|the terrain features|Pile}}
{{Item
| title = Pumpkin Pie
| image = Pumpkin Pie.png
| renewable = Yes
| heals = {{hunger|8}}
| stackable = Yes (64)
}}
'''Pumpkin pie''' is a [[food]] item that can be eaten by the [[player]].
== Obtaining ==
{{see also
| Tutorials/Pumpkin and melon farming |title1= Pumpkin and melon farming
| Tutorials/Sugar Cane farming |title2= Sugar cane farming
| Tutorials/Egg farming |title3= Egg farming
}}
=== Crafting ===
{{Crafting
|Pumpkin
|Sugar
|Egg
|Output= Pumpkin Pie
|type=Foodstuff
}}
=== Trading ===
Apprentice-level farmer [[villager]]s have a 50%{{only|bedrock}} or {{frac|2|3}}{{only|java}} chance to sell 4 pumpkin pies for an emerald as part of their trades.
{{in|java}}, farmer villagers throw pumpkin pies at players under the [[Hero of the Village]] effect.
=== Natural generation ===
{{LootChestItem|pumpkin-pie}}
== Usage ==
=== Food ===
{{see also|Tutorials/Hunger management|title1=Hunger management}}
To eat pumpkin pie, press and hold {{control|use}} while it is selected in the hotbar. Eating one restores {{hunger|8}} [[hunger]] and 4.8 [[:en:Hunger#Mechanics|saturation]].
=== Composting ===
Placing pumpkin pie into a [[composter]] raises the compost level by 1.
==Sounds==
{{Sound table/Entity/Food}}
== Advancements ==
{{load advancements|Husbandry;A Balanced Diet}}
== Data values ==
=== ID ===
{{edition|java}}:
{{ID table
|edition=java
|showforms=y
|generatetranslationkeys=y
|displayname=Pumpkin Pie
|spritetype=item
|nameid=pumpkin_pie
|form=item
|foot=1}}
{{edition|bedrock}}:
{{ID table
|edition=bedrock
|shownumericids=y
|showforms=y
|notshowbeitemforms=y
|generatetranslationkeys=y
|displayname=Pumpkin Pie
|spritetype=item
|nameid=pumpkin_pie
|id=284
|form=item
|foot=1}}
== Video ==
<div style="text-align:center">{{yt|IjeeTE117HM}}</div>
== History ==
{{History|java}}
{{History||September 11, 2012|link=http://twitter.com/jeb_/status/245503714167750656|The first screenshot of pumpkin pie was posted on [[Jens Bergensten|Jeb's]] Twitter.<ref>{{Tweet|jeb|245503714167750656}}</ref><ref>{{Tweet|jeb|245506498099298305}}</ref>}}
{{History||1.4.2|snap=12w37a|[[File:Pumpkin Pie JE1 BE1.png|32px]] Added pumpkin pies.}}
{{History||1.8|snap=14w02a|Pumpkin pie can now be [[trading|bought]] from farmer [[villager]]s, at 2–3 pumpkin pies for 1 [[emerald]].}}
{{History||1.13|snap=17w47a|Prior to [[1.13/Flattening|''The Flattening'']], this [[item]]'s numeral ID was 400.}}
{{History||1.14|snap=18w43a|[[File:Pumpkin Pie JE2 BE2.png|32px]] The texture of pumpkin pie has been changed.}}
{{History|||snap=18w50a|Pumpkin pies now generate in chests in taiga [[village]] houses.}}
{{History|||snap=19w03a|Placing pumpkin pie into the new [[composter]] raises the compost level by 1.}}
{{History|||snap=19w13a|Farmer villagers now give pumpkin pies to players under the [[Hero of the Village]] effect.}}
{{History|pocket alpha}}
{{History||v0.8.0|snap=build 1|[[File:Pumpkin Pie JE1 BE1.png|32px]] Added pumpkin pie.}}
{{History||v0.12.1|snap=build 1|Pumpkin pie now restores [[hunger]] instead of [[health]].}}
{{History|bedrock}}
{{History||1.10.0|snap=beta 1.10.0.3|[[File:Pumpkin Pie JE2 BE2.png|32px]] The texture of pumpkin pie has been changed.}}
{{History||1.11.0|snap=beta 1.11.0.1|Pumpkin pie can now be found in [[taiga]] and [[snowy taiga]] [[village]] house [[chest]]s.
|Pumpkin pie can now be used to fill up [[composter]]s.}}
{{History|||snap=beta 1.11.0.4|Farmer [[villager]]s now have a 50% chance to [[trading|sell]] 4 pumpkin pies for an [[emerald]].}}
{{History|console}}
{{History||xbox=TU14|xbone=CU1|ps=1.04|wiiu=Patch 1|switch=1.0.1|[[File:Pumpkin Pie JE1 BE1.png|32px]] Added pumpkin pie.}}
{{History||xbox=none|xbone=none|ps=1.90|wiiu=none|switch=none|[[File:Pumpkin Pie JE2 BE2.png|32px]] The texture of pumpkin pie has been changed.}}
{{History|New 3DS}}
{{History||0.1.0|[[File:Pumpkin Pie JE1 BE1.png|32px]] Added pumpkin pie.}}
{{History|foot}}
== Issues ==
{{issue list}}
== Gallery ==
<gallery>
File:Twitter Pumpkin Pie.png|The first screenshot of pumpkin pies, posted on Jeb's twitter.
</gallery>
== References ==
{{reflist}}
{{Items}}
[[cs:Dýňový koláč]]
[[de:Kürbiskuchen]]
[[es:Tarta de calabaza]]
[[fr:Tarte à la citrouille]]
[[it:Torta di zucca]]
[[ja:パンプキンパイ]]
[[ko:호박 파이]]
[[lzh:南瓜餅]]
[[nl:Pompoentaart]]
[[pl:Placek dyniowy]]
[[pt:Torta de abóbora]]
[[ru:Тыквенный пирог]]
[[zh:南瓜派]]
[[Category:Food]]
[[Category:Renewable resources]]</li><li>[[Emerald|Emerald]]<br/>{{About|the item|the currency in ''Minecraft Dungeons''|MCD:Emerald|the skin|MCD:Emerald (skin)|the ore|Emerald Ore|the mineral block|Block of Emerald}}
{{Item
| image = Emerald.png
| renewable = Yes
| stackable = Yes (64)
| rarity = Common}}
'''Emeralds''' are rare minerals that are used primarily as the currency for [[trading]] with [[villager]]s and [[wandering trader]]s. Naturally-occurring emeralds are rarer than [[diamond]]s.
== Obtaining ==
=== Trading (how emerald is renewable) ===
{{main|Trading}}
Emeralds can be obtained by trading with [[villager]]s, since they are the currency that villagers use for trading. Villagers either buy or sell specific goods for emeralds. Some villagers trade stuff that is renewable with emerald.
=== Mining ===
[[Emerald ore]] drops one emerald when mined using an iron or better [[pickaxe]]. If the pickaxe is enchanted with [[Fortune]], it may drop an extra emerald per level of Fortune, up to a maximum of 4 emeralds with Fortune III. If the ore is mined using a pickaxe enchanted with [[Silk Touch]], it drops itself in ore form instead of an emerald.
=== Crafting ===
{{Crafting
|Block of Emerald
|Output= Emerald,9
|type= Material
}}
=== Smelting ===
{{Smelting
|Emerald Ore; Deepslate Emerald Ore
|Emerald
|1
}}
=== Natural generation ===
{{see also|Emerald Ore#Natural generation}}
Emeralds can generate in [[chest]]s in some [[village]] houses or other generated [[Generated structures|structures]].
{{needs update|inaccurate=1|section=1}}
{{LootChestItem|emerald}}
=== Drops ===
[[Vindicator]]s and [[evoker]]s drop 0–1 emeralds upon death. [[Looting]] increases the maximum emerald drop by one per level, for a maximum of 4 emeralds with Looting III.
[[Fox]]es that are holding emeralds also have a chance of 100% to drop the emerald they are holding upon death. Alternatively, the player can drop a food item to entice the fox to drop the emerald without killing it.
{{IN|bedrock}}, vindicators and [[pillager]]s spawned from [[raids]] can drop 0–1 emeralds. Depending on difficulty, vindicators and pillagers spawned from raids also have a chance of dropping additional emeralds. There is a 65% chance of dropping on easy and normal, and an 80% chance of dropping on hard. If this additional drop condition is met, different emerald counts can drop with different chances. There is a {{frac|10|39}} chance to drop an additional 0–1 emeralds, a {{frac|5|39}} chance to drop an additional 2–3, and a {{frac|2|39}} chance to drop an additional 4–5.
{{IN|bedrock}}, with Looting III, it is possible for a vindicator in a raid to drop up to 16 emeralds upon death (vindicator drops + raid drops + an additional drop<!-- emerald from 2/39 chance-->).
== Usage ==
=== Trading ===
{{main|Trading}}
Emeralds are primarily used as currency for [[trading]] with villagers and wandering traders. Trading is typically a faster way to obtain emeralds than by mining, as an emerald ore is rarer than a diamond ore.
=== Crafting ingredient ===
{{crafting usage}}
===Beacons===
Emeralds can be used to select powers from a [[beacon]]. The player must select one of the available powers and then insert an emerald into the item slot.
An emerald can be substituted for an [[iron ingot]], a [[gold ingot]], a [[diamond]] or a [[netherite ingot]] in a beacon.
=== Smithing ingredient ===
{{Smithing
|head=1
|ingredients=Any Armor Trim +<br/>Any Armor Piece + <br/>Emerald
|Any Armor Trim Smithing Template
|Netherite Chestplate
|Emerald
|Emerald Trim Netherite Chestplate
|showdescription=1
|description = All armor types can be used in this recipe,<br/>a netherite chestplate is shown as an example.
|tail=1
}}
;Trim color palette
The following color palette is shown on the designs on trimmed armor:
*{{TrimPalette|emerald}}
== Achievements ==
{{load achievements|The Haggler;Buy Low;Master Trader}}
== Advancements ==
{{load advancements|What a Deal!}}
== Data values ==
=== ID ===
{{edition|java}}:
{{ID table
|edition=java
|showitemtags=y
|showforms=y
|generatetranslationkeys=y
|displayname=Emerald
|spritetype=item
|nameid=emerald
|itemtags=beacon_payment_items
|form=item
|foot=1}}
{{edition|bedrock}}:
{{ID table
|edition=bedrock
|shownumericids=y
|showforms=y
|notshowbeitemforms=y
|generatetranslationkeys=y
|displayname=Emerald
|spritetype=item
|nameid=emerald
|id=512
|form=item
|foot=1}}
== History ==
{{History|java indev}}
{{History||0.31|snap=20100129|Added [[diamond]]s, referred to as emeralds in the code.}}
{{History|java}}
{{History||May 21, 2012|link={{tweet|jeb_|204619936616808451}}|[[File:Ruby pJE20120521.png|32px]] [[Jens Bergensten|Jeb]] released a screenshot of himself testing the [[trading]] system. At this time, what would become emeralds were [[History_of_textures/Unused_textures#Ruby|rubies]].<ref>http://www.minecraftforum.net/topic/1621716-15-new-blocksitems/#entry19977082</ref>}}
{{History||1.3.1|snap=12w21a|[[File:Emerald JE1 BE1.png|32px]] Added emeralds and [[emerald ore]].
|Emeralds can be [[trading|traded]] with [[villager]]s in exchange for different [[item]]s.
|Added [[desert temple]]s, with a hidden [[chest]] room and loot containing emeralds.
|[[File:Ruby JE1 BE1.png|32px]] The texture of [[History_of_textures/Unused_textures#Ruby|rubies]] can be found in the (at this time unused) file {{cd|items.png}}.<ref name="en_US 12w21">Snapshot 12w21a/b ''lang/en_US.lang'': '''item.ruby.name=Ruby'''</ref>}}
{{History|||snap=12w22a|[[Block of emerald]] has now been added, which is [[crafting|crafted]] from nine emeralds and can be placed as a decorative [[block]].
|Added [[jungle temple]]s, which contain loot [[chest]]s with emeralds.}}
{{History||1.4.2|snap=12w32a|As [[zombie villager]]s can now spawn and be cured, emeralds can now still be obtained in [[trading|trades]] even if [[generated structures]] are disabled.}}
{{history||1.9|snap=15w31a|Emeralds now generate in [[end city]] ship [[chest]]s.}}
{{history|||snap=15w43a|Emeralds now generate in [[igloo]] basement chests.}}
{{history|||snap=15w44a|The average yield of emeralds in [[desert temple]] chests has now been increased.}}
{{History||1.11|snap=16w39a|Added [[vindicator]]s and [[evoker]]s, which drop emeralds if killed by a player.}}
{{History||1.13|snap=17w47a|Prior to [[1.13/Flattening|''The Flattening'']], this [[item]]'s numeral ID was 388.}}
{{History|||snap=18w09a|Emeralds can now generate in the loot [[chest]]s of [[underwater ruins]].}}
{{History|||snap=18w10a|Emeralds can now generate in [[buried treasure]] chests.}}
{{History|||snap=18w11a|Emeralds can now generate in the chests of [[shipwreck]]s.}}
{{History||1.14|snap=18w43a|[[File:Emerald JE2 BE2.png|32px]] The texture of emeralds has now been changed.
|Added [[pillager]]s, which can [[drops|drop]] emeralds.}}
{{History|||snap=18w46a|Pillagers no longer drop emeralds.}}
{{History|||snap=18w48a|Emeralds now generate in chests in [[village]] tanneries, fisher cottages and plains village houses.}}
{{History|||snap=18w49a|Emeralds now generate in chests in [[village]] shepherd houses, mason houses, butcher shops, and savanna and snowy village houses.}}
{{History|||snap=18w50a|Emeralds now generate in chests in [[village]] fletcher houses, temples, and desert and taiga village houses.}}
{{History|||snap=19w07a|Added [[fox]]es, which sometimes spawn with emeralds in their mouths.}}
{{History|||snap=19w08a|[[File:Emerald JE3 BE3.png|32px]] The texture of emeralds has now been changed, once again and it looks smaller.}}
{{History||1.17|snap=21w13a|The unused [[History_of_textures/Unused_textures#Ruby|rubies]] texture was removed.}}
{{History||1.20<br>(Experimental)|link=1.19.4|snap=23w04a|Emeralds can now be used as an armor trim material.}}
{{History|||snap=23w07a|Emeralds now drop when brushing [[suspicious sand]] in [[desert pyramid]]s or [[desert well]]s.}}
{{History||1.20|snap=23w12a|The probability for the emerald to generate in the [[suspicious sand]] in [[desert temple]] and in [[desert well]] has been changed from 1/7 to 1/8.|Emerald can now be found in [[suspicious gravel]] and [[suspicious sand]] in cold and warm [[ocean ruins]] and in [[trail ruins]].}}
{{History|||snap=23w16a|Emerald no longer generates in [[suspicious sand]] in [[trail ruins]].|Due to the split of the archaeological loot tables for the suspicious gravel within the [[trail ruins]]; emerald now is in the common loot.}}
{{History|pocket alpha}}
{{History||v0.9.0|snap=build 1|[[File:Emerald JE1 BE1.png|32px]] Added emeralds.}}
{{History|||snap=build 5|Emeralds can now be used to craft [[blocks of emerald]].}}
{{History||v0.13.0|snap=build 1|Emeralds can now be found inside [[desert temple]] [[chest]]s.}}
{{History||v0.15.0|snap=build 1|Added [[jungle temple]]s, which contain loot chests with emeralds.}}
{{History||v0.16.0|snap=build 1|Emeralds can now be used to power [[beacon]]s.}}
{{History|pocket}}
{{History||1.0.0|snap=alpha 0.17.0.1|Emeralds can now be found in [[end city]] ship [[chest]]s.
|Emeralds can now be found in [[igloo]] basement chests.}}
{{History||1.0.4|snap=alpha 1.0.4.0|Emeralds are now used as "currency" for [[villager]] [[trading]].}}
{{History||1.1.0|snap=alpha 1.1.0.0|Added [[evoker]]s and [[vindicator]]s, which [[drops|drop]] emeralds when killed.}}
{{History|bedrock}}
{{History||1.4.0|snap=beta 1.2.14.2|Emeralds can now be found in some [[shipwreck]] [[chest]]s.}}
{{History|||snap=beta 1.2.20.1|Emeralds can now be found inside [[underwater ruins]] chests.}}
{{History||1.10.0|snap=beta 1.10.0.3|Emeralds can now be used to [[trading|buy]] items from [[wandering trader]]s.
|Emeralds can now be found in [[plains]] [[village]] house and tannery [[chest]]s.
|[[File:Emerald JE2 BE2.png|32px]] The texture of emeralds has now been changed.}}
{{History||1.11.0|snap=beta 1.11.0.1|Emeralds can now be found in [[village]] [[chest]]s other than [[plains]].}}
{{History|||snap=beta 1.11.0.4|[[Vindicator]]s and [[pillager]]s that spawn from [[raid]]s can now [[drops|drop]] bonus emeralds.}}
{{History|||snap=beta 1.11.0.5|[[File:Emerald JE3 BE3.png|32px]] The texture of emeralds has now been changed, once again.}}
{{History||1.13.0|snap=beta 1.13.0.1|Added [[fox]]es, which can [[drops|drop]] emeralds.}}
{{History||Next Major Update<br>(Experimental)|link=Bedrock Edition 1.19.70|snap=beta 1.19.70.23|Emeralds now drop when brushing [[suspicious sand]] in [[desert pyramid]]s or [[desert well]]s.}}
{{History|||snap=beta 1.19.80.21|Emeralds can now be used as an armor trim material.}}
{{History|console}}
{{History||xbox=TU14|xbone=CU1|ps=1.04|wiiu=Patch 1|switch=1.0.1|[[File:Emerald JE1 BE1.png|32px]] Added emeralds.}}
{{History|Ps4}}
{{History||1.90|[[File:Emerald JE2 BE2.png|32px]] The texture of emeralds has now been changed.}}
{{History|new3DS}}
{{History||0.1.0|[[File:Emerald JE1 BE1.png|32px]] Added emeralds.}}
{{History|foot}}
== Issues ==
{{issue list}}
== Gallery ==
<gallery>
Villager trading preview.png|The first image of the trading system released by [[Jeb]]. What would become emeralds can be seen in the [[inventory]] space.
Emerald Ore 12w21a.png|A wall of [[emerald ore]] utilizing a previous texture in snapshot [[12w21a]].
Room of Emeralds.png|All forms of emeralds in one photo: emerald (in the form of [[emerald block|block]], [[emerald ore|ore]] and the emerald itself).
</gallery>
==Trivia==
*The [[History_of_textures/Unused_textures#Ruby|ruby]] was going to be the [[villager]] currency but was changed to emeralds before the update's release.
== References ==
{{Reflist}}
{{Items}}
[[Category:Renewable resources]]
[[cs:Smaragd]]
[[de:Smaragd]]
[[es:Esmeralda]]
[[fr:Émeraude]]
[[hu:Smaragd]]
[[it:Smeraldo]]
[[ja:エメラルド]]
[[ko:에메랄드]]
[[nl:Smaragd]]
[[pl:Szmaragd]]
[[pt:Esmeralda]]
[[ru:Изумруд]]
[[th:มรกต]]
[[tr:Zümrüt]]
[[uk:Смарагд]]
[[zh:绿宝石]]</li></ul> | Beta 1.9 Prerelease 2 | Initially, the cauldron was where potions were brewed, though cauldrons were not assigned a block ID, rendering potions unobtainable except through modding the cauldron so that it would be obtainable. When the cauldron was obtained, potions could be brewed by adding water to the cauldron followed by certain ingredients. Correctly combined ingredients would confer purely beneficial potion effects, and incorrect combinations added negative effects. The system was complicated, lacked a GUI, and formed many duplicate potions (i.e. two potions that were the same could be made in several different ways), so Notch and Jeb came up with a new brewing method using a brewing stand.[2] | |||
| Beta 1.9 Prerelease 3 | A brewing GUI was added and most duplicate potions were removed (the total possible potions went down from 150 combinations to only 25 different potions in 31 combinations). Some status effects available in earlier 1.9 pre-releases as potions became inaccessible (e.g. Nausea, Blindness, and Invisibility). | ||||
| Beta 1.9 Prerelease 4 | Throwable splash potions introduced, brewed by placing gunpowder and any potion together in a brewing stand. | ||||
| Glistering melon was added to be the ingredient for the potion of Healing; the ghast tear, which previously served this purpose, is now used for the potion of Regeneration instead. | |||||
| Converted certain ingredients into base-secondary ingredients (the spider eye, glistering melon and blaze powder made mundane potion when brewed into a water bottle in addition to their previous functions), bringing the potion total to 28 different potions in 35 combinations. | |||||
1.1{{Extension DPL}}<ul><li>[[Red Dye|Red Dye]]<br/>{{Item
| title = Red Dye
| renewable = Yes
| stackable = Yes (64)
}}
'''Red dye''' is a [[Dye#Primary|primary color dye]] created primarily from flowers.
== Obtaining ==
=== Crafting ===
{{Crafting
|head=1
|showname=0
|Poppy; Red Tulip; Beetroot
|Output=Red Dye
|type=Material
}}
{{Crafting
|Rose Bush
|Output=Red Dye,2
|type=Material
|foot=1
}}
=== Trading ===
[[Wandering trader]]s sell 3 red dye for an [[emerald]].
== Usage ==
{{dye usage}}
=== Crafting ingredient ===
{{crafting usage|ignore=Banner|continue=1}}
{{banner crafting usage}}
=== Loom ingredient ===
{{Banner loom usage|Red Dye}}
=== Trading ===
Journeyman-level shepherd villagers have a {{frac|1|6}} chance to buy 12 red dye for an emerald.
== Data values ==
=== ID ===
{{edition|java}}:
{{ID table
|edition=java
|showforms=y
|generatetranslationkeys=y
|displayname=Red Dye
|spritetype=item
|nameid=red_dye
|form=item
|foot=1}}
{{edition|bedrock}}:
{{ID table
|edition=bedrock
|showaliasids=y
|shownumericids=y
|showforms=y
|notshowbeitemforms=y
|generatetranslationkeys=y
|displayname=Red Dye
|spritetype=item
|nameid=red_dye
|aliasid=dye / 1
|id=396
|form=item
|translationkey=item.dye.red.name
|foot=1}}
== Video ==
<div style="text-align:center">{{yt|tqTbsbt2irk}}</div>
== History ==
{{History|java beta}}
{{History||January 10, 2011<ref group="n">Supposed time when fragment was filmed. Based on modified date of client.jar/gui/trap.png in [[Beta 1.2]].</ref>|link=https://www.youtube.com/watch?v=cBF2ugTzXqQ&t=181s|[[File:Red Dye (pre-release).png|32px]] Shown rose red in development as part of [[Minecraft: The Story of Mojang]].}}
{{History||1.2|[[File:Red Dye JE1 BE1.png|32px]] Added rose red.}}
{{History||1.6.6|Roses can now be generated using [[Bone Meal|bone meal]], making rose red [[renewable resource|renewable]].}}
{{History|java}}
{{History||1.3.1|snap=1.3|[[File:Red Dye JE2 BE2.png|32px]] The texture of rose red has now been changed.}}
{{History||1.4.2|snap=12w34a|Added the ability to [[Armor#Dyeing|dye]] leather [[armor]] and [[wolf]] collars.}}
{{History||1.4.6|snap=12w49a|Rose red can now be crafted with [[gunpowder]] to create a [[firework star]].}}
{{History||1.6.1|snap=13w19a|Rose red can now be used to craft stained clay.}}
{{History||1.7.2|snap=13w36a|Rose red is now crafted using a poppy instead of a rose, as the latter is removed.
|Rose red can now be crafted using red tulips and rose bushes.}}
{{History|||snap=13w37a|Each poppy now yields only 1 rose red, instead of 2.}}
{{History|||snap=13w41a|Rose red can now be used to craft stained glass.}}
{{History||1.8|snap=14w30a|Added [[banner]]s, which can be dyed.}}
{{History||1.9|snap=15w31a|Rose red can now be crafted using [[beetroot]].}}
{{History||1.11|snap=16w39a|Added the ability to dye [[shulker box]]es.}}
{{History||1.12|snap=17w06a|Rose red can now be used to craft red [[concrete powder]].}}
{{History|||snap=17w15a|Added the ability to dye [[bed]]s.}}
{{History||1.13|snap=17w47a|The different data values for the <code>dye</code> ID have now been split up into their own IDs.
|Prior to [[1.13/Flattening|''The Flattening'']], this [[item]]'s numeral ID was 351.}}
{{History||1.14|snap=18w43a|"Rose Red" has now been renamed to "Red Dye".
|[[File:Red Dye JE3 BE3.png|32px]] The texture of red dye has now been changed.}}
{{History|||snap=18w44a|Red dye can now change the text color on [[sign]]s to red.}}
{{History|||snap=19w05a|Added the [[wandering trader]], which sells red dye.}}
{{History|||snap=19w11a|Red dye can now be [[trading|bought]] by shepherd villagers.}}
{{History||1.17|snap=20w45a|Red dye can now be used to craft [[red candle]]s.}}
{{History|||snap=21w19a|Red dye can no longer be used to craft red candles.}}
{{History|||snap=Pre-release 1|Red dye can once again be used to craft red candles.}}
{{History||1.20<br>(Experimental)|link=1.19.3|snap=22w42a|Red dye can now change the text color on [[hanging sign]]s to red.}}
{{History|pocket alpha}}
{{History||v0.3.0|[[File:Red Dye JE1 BE1.png|32px]] Added rose red. It is currently unobtainable and serves no purpose.}}
{{History||v0.4.0|Rose red is now obtainable by smelting red [[mushroom]]s.
|Rose red can now be used to craft other dyes and red wool.}}
{{History||v0.8.0|snap=build 1|[[File:Red Dye JE2 BE2.png|32px]] The texture of red dye has been changed.
|Rose red is now used to craft [[cocoa beans]].}}
{{History||v0.9.0|snap=build 3|Rose red can now be obtained by putting a poppy, red tulip or rose bush [[flower]]s in the crafting grid.}}
{{History||v0.15.0|snap=build 1|Red mushrooms can no longer be smelted to obtain rose red.}}
{{History||v0.16.0|snap=build 1|Rose red is no longer used to craft cocoa beans.}}
{{History|bedrock}}
{{History||1.8.0|snap=beta 1.8.0.10|"Rose Red" has now been renamed to "Red Dye".}}
{{History||1.10.0|snap=beta 1.10.0.3|Red dye can now be [[trading|bought]] from [[wandering trader]]s.
|[[File:Red Dye JE3 BE3.png|32px]] The texture of red dye has now been changed.}}
{{History||1.11.0|snap=beta 1.11.0.4|Red dye can now be [[trading|sold]] to shepherd [[villager]]s.}}
{{History||1.16.100|snap=beta 1.16.100.56|The ID of red dye has been changed from <code>dye/1</code> to <code>red_dye</code>.}}
{{History|console}}
{{History||xbox=TU1|xbone=CU1|ps=1.00|switch=1.0.1|wiiu=Patch 1|[[File:Red Dye JE1 BE1.png|32px]] Added rose red.}}
{{History||xbox=none|xbone=none|ps=1.83|switch=none|wiiu=none|"Rose Red" has now been renamed to "Red Dye".}}
{{History||ps=1.90|[[File:Red Dye JE3 BE3.png|32px]] The texture of red dye has now been changed.}}
{{History|new 3ds}}
{{History||0.1.0|[[File:Red Dye JE1 BE1.png|32px]] Added rose red.}}
{{History|foot}}
;Notes
{{reflist|group=n}}
== Issues ==
{{issue list}}
{{Items}}
[[cs:Šípková červeň]]
[[de:Roter Farbstoff]]
[[es:Tinte rojo]]
[[fr:Teinture rouge]]
[[hu:Rózsavörös]]
[[ja:赤色の染料]]
[[ko:장밋빛 빨강 염료]]
[[nl:Rozenrood]]
[[pl:Czerwony barwnik]]
[[pt:Corante vermelho]]
[[ru:Красный краситель]]
[[zh:红色染料]]
[[Category:Items]]
[[Category:Dyes]]
[[Category:Renewable resources]]</li><li>[[Cooked Porkchop|Cooked Porkchop]]<br/>{{Item
| title = Cooked Porkchop
| image = Cooked Porkchop.png
| renewable = Yes
| heals = {{hunger|8}}
| stackable = Yes (64)
}}
'''Cooked porkchop''' is a [[food]] [[item]] that can be eaten by the [[player]].
== Obtaining ==
{{see also|Tutorials/Animal farming|title1=Animal farming}}
Cooked porkchops can be obtained by cooking [[raw porkchop]]s or by [[trading]] with butchers, and is a [[drops|drop]] from [[pig]]s and [[hoglin]]s that die while on [[fire]].
=== Mob loot ===
==== Pigs ====
Adult [[pig]]s drop 1–3 cooked porkchop if killed while on fire. The maximum amount is increased by 1 per level of [[Looting]], for a maximum of 1-6 with Looting III.
==== Hoglins ====
Adult [[hoglin]]s drop 2–4 cooked porkchop if killed while on fire. The maximum amount is increased by 1 per level of Looting, for a maximum of 7 with Looting III.
=== Cooking ===
[[Raw porkchop]] can be cooked in a [[furnace]], [[smoker]], or [[campfire]]. Each piece of cooked porkchop removed from a furnace output slot gives 0.35 [[experience]] (22.4 experience per stack).
{{Smelting
|Raw Porkchop
|Cooked Porkchop
|0,35
}}
=== Trading ===
{{IN|java}}, apprentice-level butcher [[villager]]s have a {{frac|2|3}} chance of selling 5 cooked porkchop for 1 [[emerald]].
Butcher villagers may give players with the [[Hero of the Village]] effect a cooked porkchop.{{only|java}}
{{IN|bedrock}}, apprentice-level butcher villagers have a 25% chance to sell 5 cooked porkchop for 1 emerald.
=== Chest loot ===
{{LootChestItem|cooked-porkchop}}
== Usage ==
=== Food ===
{{see also|Tutorials/Hunger management|title1=Hunger management}}
To eat cooked porkchop, press and hold {{control|use}} while it is selected in the hotbar. Eating one restores {{hunger|8}} [[hunger]] and 12.8 [[Hunger#Mechanics|saturation]].
=== Wolves ===
Cooked porkchops can be used to [[breeding|breed]] and heal tamed [[wolf|wolves]], lead them around, and make baby tamed wolves grow up faster by 10% of the remaining time.
=== Piglins ===
[[Piglin]]s pick up any cooked porkchops in their [[item (entity)|item]] form. However, they do not eat it.
==Sounds==
{{Sound table/Entity/Food}}
== Data values ==
=== ID ===
{{edition|java}}:
{{ID table
|edition=java
|showitemtags=y
|showforms=y
|generatetranslationkeys=y
|displayname=Cooked Porkchop
|spritetype=item
|nameid=cooked_porkchop
|itemtags=piglin_food
|form=item
|foot=1}}
{{edition|bedrock}}:
{{ID table
|edition=bedrock
|shownumericids=y
|showforms=y
|notshowbeitemforms=y
|generatetranslationkeys=y
|displayname=Cooked Porkchop
|spritetype=item
|nameid=cooked_porkchop
|id=263
|form=item
|foot=1}}
== Achievements ==
{{load achievements|Pork Chop}}
== Advancements ==
{{load advancements|Husbandry;A Balanced Diet}}
== History ==
{{History|java indev}}
{{History||20100219|[[File:Cooked Porkchop JE1.png|32px]] Added cooked porkchops.
|Cooked porkchops restore {{hp|8}} and do not stack in the [[inventory]].
|Created by cooking [[raw porkchops]] in the inventory.}}
{{History|java alpha}}
{{History||v1.2.0|snap=preview|[[Zombie pigmen]] now [[drops|drop]] 0-2 cooked porkchops upon [[death]].}}
{{History|java beta}}
{{History||1.5|[[Pig]]s now [[drops|drop]] cooked porkchops when killed with [[fire]].}}
{{History||1.8|snap=Pre-release|[[File:Cooked Porkchop JE2 BE1.png|32px]] The texture of cooked porkchops has been changed to avoid confusion with [[steak]].
|Cooked porkchops are now stackable to 64 and restore [[hunger]] instead of [[health]].
|Cooked porkchops now restore {{hunger|8}} to the food bar.
|Cooked porkchops are no longer dropped by [[zombie pigmen]] upon their [[death]].}}
{{History|java}}
{{History||1.2.1|snap=12w03a|Cooked porkchop can now be used to breed wolves.}}
{{History||1.3.1|snap=12w21a|Butcher [[villager]]s now [[trading|sell]] 6–7 cooked porkchops for 1 [[emerald]].}}
{{History||1.4.2|snap=12w37a|[[File:Cooked Porkchop JE3 BE2.png|32px]] The texture of cooked porkchops has been changed, so that it no longer has a dark outline.}}
{{History||1.8|snap=14w02a|Butcher [[villager]]s now [[trading|sell]] 5–7 cooked porkchops for 1 [[emerald]].}}
{{History||1.13|snap=17w47a|Prior to [[1.13/Flattening|''The Flattening'']], this [[item]]'s numeral ID was 320.}}
{{History||1.14|snap=18w43a|[[File:Cooked Porkchop JE4 BE3.png|32px]] The texture of cooked porkchops has been changed.}}
{{History|||snap=19w13a|Butcher villagers now give cooked porkchops to players under the [[Hero of the Village]] effect.}}
{{History||1.16|snap=20w07a|[[Hoglin]]s now drop cooked porkchops if killed while on fire.}}
{{History|||snap=20w16a|Cooked porkchops can now be found in hoglin stable chests in [[bastion remnant]]s.}}
{{History||1.16.2|snap=20w30a|Cooked porkchops can now be found in generic bastion remnant chests as well.}}
{{History|pocket alpha}}
{{History||v0.4.0|[[File:Cooked Porkchop JE2 BE1.png|32px]] Added cooked porkchops.}}
{{History||v0.5.0|Cooked porkchops now restore {{hp|8}} instead of {{hp|4}}.}}
{{History||v0.8.0|snap=build 1|[[File:Cooked Porkchop JE3 BE2.png|32px]] The texture of cooked porkchops has been changed, so that it no longer has a dark outline.}}
{{History||v0.12.1|snap=build 1|Cooked porkchops now restore [[hunger]] instead of [[health]].}}
{{History|pocket}}
{{History||1.0.4|snap=alpha 1.0.4.0|Butcher [[villager]]s now [[trading|sell]] 5–7 cooked porkchops for 1 [[emerald]].}}
{{History|bedrock}}
{{History||1.10.0|snap=beta 1.10.0.3|[[File:Cooked Porkchop JE4 BE3.png|32px]] The texture of cooked porkchops has been changed.}}
{{History||1.11.0|snap=beta 1.11.0.4|[[Trading]] has been changed, butcher [[villager]]s now have a 25% chance to [[trading|sell]] 4 cooked porkchops as part of their second-tier [[trading|trade]].}}
{{History||1.16.0|snap=beta 1.16.0.57|Trading has been changed, apprentice butcher [[villager]]s now have a 25% chance to [[trading|sell]] 5 cooked porkchops instead of 3.}}
{{History|console}}
{{History||xbox=TU1|xbone=CU1|ps=1.0|wiiu=Patch 1|[[File:Cooked Porkchop JE1.png|32px]] Added cooked porkchops.}}
{{History||xbox=TU3|[[File:Cooked Porkchop JE2 BE1.png|32px]] The texture of cooked porkchops has been changed to be consistent with [[Java Edition]].}}
{{History||xbox=TU5|Cooked porkchops are now stackable to 64.
|Cooked porkchops now fill [[hunger]] instead of [[health]].}}
{{History||xbox=TU12|[[File:Cooked Porkchop JE3 BE2.png|32px]] The texture of cooked porkchops has been changed, so that it no longer has a dark outline.}}
{{History|PS4}}
{{History||1.90|[[File:Cooked Porkchop JE4 BE3.png|32px]] The texture of cooked porkchops has been changed.}}
{{History|new3DS}}
{{History||0.1.0|[[File:Cooked Porkchop JE3 BE2.png|32px]] Added cooked porkchops.}}
{{History|foot}}
== Issues ==
{{issue list}}
== External Links ==
*[https://www.minecraft.net/en-us/article/taking-inventory--porkchop Taking Inventory: Porkchop] – Minecraft.net on February 13, 2020
{{Items}}
[[Category:Food]]
[[Category:Renewable resources]]
[[cs:Pečená kotleta]]
[[de:Gebratenes Schweinefleisch]]
[[es:Chuleta de cerdo cocinada]]
[[fr:Côtelette de porc cuite]]
[[hu:Sült sertésszelet]]
[[ja:焼き豚]]
[[nl:Gebraden varkensvlees]]
[[pl:Pieczony schab]]
[[pt:Costeleta de porco assada]]
[[ru:Жареная свинина]]
[[uk:Смажена свинина]]
[[zh:熟猪排]]</li></ul> | 12w01a | The time to brew potions was decreased to 20 seconds. | |||
1.4.2{{Extension DPL}}<ul><li>[[Bleach|Bleach]]<br/>{{education feature}}
{{exclusive|bedrock|education}}
{{Item
| image = Bleach.png
| renewable = No
| stackable = Yes (64)
}}
'''Bleach''' is an [[item]] used to [[dye]] things white. It is a [[compound]], as it is made using a [[lab table]].
== Obtaining ==
=== Lab Table ===
Bleach is not obtainable in the [[creative inventory]] or {{cmd|give}}. The only way to obtain it is using a [[lab table]].
{| class="wikitable"
! Result
! Materials Needed
|-
!rowspan=2|{{slot|Bleach}}<br>[[Bleach]]
|{{slot|Water (compound)|link=Compound}}{{slot|Water (compound)|link=Compound}}{{slot|Water (compound)|link=Compound}}{{slot|Sodium Hypochlorite|link=Compound}}{{slot|Sodium Hypochlorite|link=Compound}}{{slot|Sodium Hypochlorite|link=Compound}}
|-
|<center>[[Water (compound)|Water]] x3, [[Compound|Sodium Hypochlorite]] x3</center>
|}
== Usage ==
=== Crafting ingredient ===
{{crafting usage}}
== Sounds ==
{{Sound table
|type=bedrock
|sound=Fire.ogg
|source=sound
|description=When bleach is created by a lab table
|id=lt.reaction.fire
|volume=6.0
|pitch=0.7/0.9
|foot=1}}
== Data values ==
=== ID ===
{{ID table
|edition=bedrock
|shownumericids=y
|showforms=y
|notshowbeitemforms=y
|generatetranslationkeys=y
|displayname=Bleach
|spritetype=item
|nameid=bleach
|id=596
|form=item
|foot=1}}
== History ==
{{History|bedrock}}
{{History||1.4.0|snap=beta 1.2.20.1|[[File:Bleach BE1.png|32px]] Added bleach.}}
{{History|education}}
{{History||1.0.27|[[File:Bleach BE1.png|32px]] Added bleach.}}
{{History|foot}}
== Trivia ==
*[[File:Bleach (compound).png|32px]] There is an [[History of textures/Unused textures#Unused compounds|unused bleach texture]] in the compounds folder of the chemistry resource pack, which is slightly different from the one used in the game.
== Issues ==
{{issue list}}
{{Items}}
{{Education Edition}}
[[Category:Dyes]]
[[Category:Non-renewable resources]]
[[Category:Education Edition items]]
[[de:Bleichmittel]]
[[es:Lejía]]
[[ja:漂白剤]]
[[ko:표백제]]
[[pl:Wybielacz]]
[[pt:Alvejante]]
[[zh:漂白剂]]
[[lzh:素精]]</li><li>[[Bowl|Bowl]]<br/>{{Item
| image = Bowl.png
| renewable = Yes
| stackable = Yes (64)
}}
'''Bowls''' are containers that can hold certain [[food]]s.
== Obtaining ==
=== Crafting ===
{{Crafting
|A2= Any Planks
|C2= Any Planks
|B3= Any Planks
|Output= Bowl,4
|type= Material
}}
=== Fishing ===
Bowls can be obtained as a "junk" item while [[fishing]].
=== Eating ===
A bowl containing food becomes an empty bowl when the food is eaten.
=== Mob loot ===
When a [[turtle]] is killed by a [[Thunderstorm#Lightning|lightning bolt]], it drops 1 bowl.<ref name=BowlReport>{{Cite bug|MC|125562|Turtles drop bowls when killed by lightning|date=February 16, 2018}}</ref><ref>{{Cite bug|MCPE|57038| Turtles killed by lightning drop Bowls.|date=November 17, 2019}}</ref>
== Usage ==
=== Crafting ingredient ===
{{crafting usage}}
=== Mooshrooms ===
{{control|use|text=Using}} a bowl on a [[mooshroom]] turns the bowl into [[mushroom stew]] or [[suspicious stew]]. The stew can then be consumed immediately and the process repeated, making this an excellent way to quickly restore depleted [[hunger]] and [[saturation]] with almost no cost or effort.
=== Fuel ===
Bowls can be used as a fuel in [[furnace]]s, smelting 0.5 items per bowl {{in|je}}, and 1 item per bowl {{in|be}}.
== Data values ==
=== ID ===
{{edition|java}}:
{{ID table
|edition=java
|showforms=y
|generatetranslationkeys=y
|displayname=Bowl
|spritetype=item
|nameid=bowl
|form=item
|foot=1}}
{{edition|bedrock}}:
{{ID table
|edition=bedrock
|shownumericids=y
|showforms=y
|notshowbeitemforms=y
|generatetranslationkeys=y
|displayname=Bowl
|spritetype=item
|nameid=bowl
|id=321
|form=item
|foot=1}}
== History ==
{{History|java indev}}
{{History||0.31|snap=20100130|[[File:Bowl JE1 BE1.png|32px]] Added bowls.
|Bowls are used to craft [[mushroom soup]].}}
{{History|java}}
{{History||1.0.0|snap=Beta 1.9 Prerelease|Added [[mooshroom]]s, which can be {{control|use|text=milked}} with a bowl.}}
{{History||1.2.4|snap=release|[[Spruce planks]], [[birch planks]], and [[jungle planks]] can now be used to craft bowls.}}
{{History||1.7.2|snap=13w36a|Bowls can now be obtained as one of the "junk" [[item]]s by [[fishing]].}}
{{History|||snap=1.7.1|[[Acacia planks]] and [[dark oak planks]] can now be used to craft bowls.}}
{{History||1.8|snap=14w27a|Bowls are now used to craft [[rabbit stew]].}}
{{History||1.9|snap=15w31a|Bowls are now used to craft [[beetroot soup]].}}
{{History||1.11|snap=16w33a|Bowls can now be used to fuel [[furnace]]s.}}
{{History||1.13|snap=17w47a|Prior to [[1.13/Flattening|''The Flattening'']], this [[item]]'s numeral ID was 281.}}
{{History|||snap=18w07a|[[Turtles]] drop 0 to 1 bowls if killed by [[lightning]].<ref name=BowlReport/>}}
{{History||1.14|snap=18w43a|[[File:Bowl JE2 BE2.png|32px]] The texture of bowls has now been changed.
|Bowls are now used to craft [[suspicious stew]].}}
{{History||1.16|snap=20w06a|[[Crimson planks]] and [[warped planks]] can now be used to craft bowls.}}
{{History||1.19|snap=22w11a|[[Mangrove planks]] can now be used to craft bowls.}}
{{History|pocket alpha}}
{{History||v0.2.0|[[File:Bowl JE1 BE1.png|32px]] Added bowls. They are currently unobtainable and serve no purpose.}}
{{History||v0.3.0|Bowls are now [[craft]]able. They still serve no purpose.}}
{{History||v0.4.0|Bowls are now used to craft [[mushroom stew]].}}
{{History||v0.5.0|Bowls now appear in the [[nether reactor]].}}
{{History||v0.8.0|snap=build 2|Bowls are now used to craft [[beetroot soup]].}}
{{History|||snap=build 7|Bowls can now be used as fuel in a [[furnace]].}}
{{History||v0.9.0|snap=build 1|Added bowls to [[creative]] mode.
|[[Mooshroom]]s can now be "milked" to obtain [[mushroom stew]].}}
{{History||v0.12.1|snap=build 1|Bowls are no longer available from the [[nether reactor]].}}
{{History||v0.13.0|snap=build 1|Bowls are now used to craft [[rabbit stew]].}}
{{History|bedrock}}
{{History||1.10.0|snap=beta 1.10.0.3|[[File:Bowl JE2 BE2.png|32px]] The texture of bowls has now been changed.}}
{{History||1.13.0|snap=beta 1.13.0.9|Bowls can now be used to craft [[suspicious stew]].}}
{{History|console}}
{{History||xbox=TU1|xbone=CU1|ps=1.0|wiiu=Patch 1|switch=1.0.1|[[File:Bowl JE1 BE1.png|32px]] Added bowls.}}
{{History||xbox=TU9|Bowls now stack to 64.}}
{{History||xbox=none|xbone=none|ps=1.90|wiiu=none|switch=none|[[File:Bowl JE2 BE2.png|32px]] The texture of bowls has now been changed.}}
{{History|new 3ds}}
{{History||0.1.0|[[File:Bowl JE1 BE1.png|32px]] Added bowls.}}
{{History|foot}}
== Issues ==
{{issue list}}
== Trivia ==
* {{in|be}}, bowls are actually more fuel efficient than [[stick]]s. If 6 wood planks are crafted into 8 bowls, 8 items can be [[smelt]]ed; but if those are crafted into 12 sticks, only 6 items can be smelted. This can be useful when the player only has access to Nether wood types, which cannot be used as fuel.
== See also ==
* [[Mushrooms]]
== References ==
{{reflist}}
== External Links ==
* {{Mcnet|taking-inventory--bowl|Taking Inventory: Bowl|April 25, 2019}}
{{Items}}
[[Category:Renewable resources]]
[[cs:Miska]]
[[de:Schüssel]]
[[es:Cuenco]]
[[fr:Bol]]
[[hu:Tál]]
[[it:Ciotola]]
[[ja:ボウル]]
[[ko:그릇]]
[[nl:Kom]]
[[pl:Miska]]
[[pt:Tigela]]
[[ru:Миска]]
[[th:ชาม]]
[[uk:Миска]]
[[zh:碗]]</li></ul> | 12w34a | Brewing recipes for potions of Night Vision and Invisibility added. | |||
1.5{{Extension DPL}}<ul><li>[[Diamond|Diamond]]<br/>{{For}}
{{redirect|Diamonds|the achievement|Achievements#DIAMONDS!|the advancement|Advancements#Diamonds!}}
{{Item
| image = Diamond.png
| renewable = No
| stackable = Yes (64)
| rarity = Common}}
A '''diamond''' is a mineral that can only be obtained from [[Diamond Ore|diamond ore]], [[chest loot|loot chests]] and [[Suspicious Block|suspicious blocks]]. It is required to craft diamond [[tool]]s and [[armor]] (and therefore obtain [[obsidian]] to access the [[The Nether|Nether]]), [[enchanting table]]s, [[jukebox]]es and duplicate [[smithing template]]s.
== Obtaining ==
{{see also|Tutorials/Diamonds}}
=== Mining ===
{{see also|Diamond Ore#Natural generation}}
[[Diamond ore]] can be mined using an iron [[pickaxe]] or stronger. An ore drops a single diamond. If mined by any other tool, it drops nothing. If the pickaxe is enchanted with [[Fortune]], it can drop an extra diamond per level of Fortune, allowing for a maximum of 4 diamonds with Fortune III. If the ore is mined using a pickaxe enchanted with [[Silk Touch]], it drops an ore block rather than a diamond. The ore is found at level 15 or lower, most commonly between -50 and -64; levels -58 and -59 are the preferred levels to mine at since they don't contain [[bedrock]], as it starts spawning at -60.
=== Chest loot ===
{{LootChestItem|diamond}}
=== Suspicious sand ===
When brushing [[suspicious sand]] in [[desert pyramid]]s, they have a {{frac|1|7}} chance to drop a diamond.
=== Crafting ===
{{Crafting
|Block of Diamond
|Output= Diamond,9
|type= Material
}}
=== Smelting ===
{{Smelting
|showname=1
|Diamond Ore; Deepslate Diamond Ore
|Diamond
|1
}}
== Usage ==
Diamonds are mainly used to craft high-tier armor and equipment, which in turn are also used in making [[netherite]] armor and equipment.
=== Crafting ingredient ===
{{crafting usage}}
=== Trading ===
{{IN|bedrock}}, expert-level armorer, toolsmith, and weaponsmith villagers buy one diamond for an emerald as part of their trades.
{{IN|java}}, journeyman-level armorer villagers have a 40% chance of offering to buy one diamond for one emerald. Expert-level toolsmith villagers have {{frac|2|3}} chance of offering to buy one diamond for one emerald. Expert-level weaponsmith villagers always offer to buy one diamond for one emerald.
=== Repairing ===
Diamonds are the repair items for the diamond [[tier]] and [[armor material]], and thus can be used to [[item repair|repair]] the following items in an [[anvil]] or [[grindstone]]:
* {{ItemLink|Diamond Helmet}}
* {{ItemLink|Diamond Chestplate}}
* {{ItemLink|Diamond Leggings}}
* {{ItemLink|Diamond Boots}}
* {{ItemLink|Diamond Sword}}
* {{ItemLink|Diamond Pickaxe}}
* {{ItemLink|Diamond Axe}}
* {{ItemLink|Diamond Shovel}}
* {{ItemLink|Diamond Hoe}}
=== Beacons ===
Diamonds can be used to select powers from a [[beacon]]. The player must select one of the available powers then insert a diamond into the item slot.
A diamond can be substituted for an [[iron ingot]], a [[gold ingot]], an [[emerald]] or a [[netherite ingot]].
=== Smithing ingredient ===
{{Smithing
|head=1
|ingredients=Any Armor Trim +<br/>Any Armor Piece + <br/>Diamond
|Any Armor Trim Smithing Template
|Netherite Chestplate
|Diamond
|Diamond Trim Netherite Chestplate
|showdescription=1
|description = All armor types can be used in this recipe,<br/>a netherite chestplate is shown as an example.<br/>
|tail=1
}}
;Trim color palette
The following color palettes are shown on the designs on trimmed armor:
*{{TrimPalette|diamond}}
*{{TrimPalette|diamond|darker=1}} (a darker color palette is used when a diamond armor piece is trimmed using a diamond).
== Data values ==
=== ID ===
{{edition|java}}:
{{ID table
|edition=java
|showitemtags=y
|showforms=y
|generatetranslationkeys=y
|displayname=Diamond
|spritetype=item
|nameid=diamond
|itemtags=beacon_payment_items
|form=item
|foot=1}}
{{edition|bedrock}}:
{{ID table
|edition=bedrock
|shownumericids=y
|showforms=y
|notshowbeitemforms=y
|generatetranslationkeys=y
|displayname=Diamond
|spritetype=item
|nameid=diamond
|id=304
|form=item
|foot=1}}
== Achievements ==
{{load achievements|DIAMONDS!;Diamonds to you!;Enchanter}}
== Advancements ==
{{load advancements|Diamonds!}}
== History ==
{{History|java indev}}
{{History||0.31|snap=20100128|[[File:Diamond JE1 BE1.png|32px]] Added diamonds. Initially, they were referred to as "emeralds".
|A stack of 100 diamonds can be found inside the [[Indev house]] [[chest]]s.}}
{{History|||snap=20100129|Diamond can be used to craft [[diamond block]]s and diamond [[sword]]s, [[shovel]]s, [[pickaxe]]s and [[axe]]s.
|Diamonds can no longer be found inside the Indev House due to all items having been removed from its chests.
|Diamond can be obtained by smelting diamond blocks.}}
{{History|||snap=20100130|[[Emerald]]s from the previous version are now officially known as "diamonds", though this has no actual effect as item names are not yet displayed in-game.
|[[Diamond block]]s now require 9 diamonds (3×3) instead of 4 (2×2) to be [[crafting|crafted]], making them much more expensive.}}
{{History||20100206|Diamonds are now used to craft diamond [[hoe]]s.}}
{{History||20100212-1|Diamonds are now used to craft diamond [[helmet]]s, [[chestplate]]s, [[leggings]] and [[boots]].}}
{{History|java alpha}}
{{History||v1.0.14|Diamonds are now used to craft [[jukebox]]es.}}
{{History|java beta}}
{{History||1.8|snap=Pre-release|Diamonds are now found in [[mineshaft]] [[chest]]s.}}
{{History|java}}
{{History||1.0.0|snap=Beta 1.9 Prerelease 2|[[Diamond ore]] can now be [[smelting|smelted]] into diamonds.}}
{{History|||snap=Beta 1.9 Prerelease 3|Diamonds are now used to craft [[enchantment table]]s.
|Diamonds are now found in [[stronghold]] altar [[chest]]s.}}
{{History||1.1|snap=12w01a|Diamonds are now found in [[village]] [[villager|blacksmith]] [[chest]]s.}}
{{History||1.3.1|snap=12w21a|Diamonds can now be [[trading|traded]] to blacksmith [[villager]]s in quantities of 3–5 for 1 [[emerald]].
|Added [[desert temple]]s, with a hidden [[chest]] room and loot containing diamonds.}}
{{History|||snap=12w21b|Diamonds have been changed in the game code from "emerald" to "diamond", due to actual [[emerald]]s being added. Diamond's original name during [[Indev]], as stated above, was emerald in the code, and was kept this way until this snapshot.}}
{{History|||snap=12w22a|Added [[jungle temple]]s, which contain loot [[chest]]s with diamonds.}}
{{History|||snap=1.3|[[File:Diamond JE2 BE2.png|32px]] The texture of diamonds has been changed.}}
{{History||1.4.6|snap=12w49a|Diamonds can now be used to [[crafting|craft]] a [[firework star]] with a trail.}}
{{History||1.6.1|snap=13w16a|Diamond is now used to craft diamond [[horse armor]].}}
{{History|||snap=13w18a|Diamond is no longer used to craft diamond [[horse armor]].|Diamonds are now found in [[nether fortress]] [[chest]]s.}}
{{History||1.8|snap=14w02a|Diamonds can now be [[traded]] to any black apron [[villager]] in quantities of 3–4 for 1 [[emerald]], as their tier III trade.}}
{{History||1.9|snap=15w31a|Diamonds now generate in [[end city]] [[chest]]s.}}
{{History|||snap=15w43a|The average yield of diamonds have been slightly decreased in [[nether fortress]] chests.}}
{{History|||snap=15w44a|The average yield of diamonds in [[desert temple]] and [[mineshaft]] chests have been decreased.}}
{{History||1.13|snap=17w47a|Prior to [[1.13/Flattening|''The Flattening'']], this [[item]]'s numeral ID was 264.}}
{{History|||snap=18w10a|Diamonds now generate in [[buried treasure]] [[chest]]s.}}
{{History|||snap=18w11a|Diamonds now generate in [[shipwreck]] treasure chests.}}
{{History||1.14|snap=18w43a|[[File:Diamond JE3 BE3.png|32px]] The texture of diamonds has been changed.}}
{{History|||snap=18w50a|Diamonds can now be found in [[chest]]s in [[village]] toolsmith houses.}}
{{History||1.16|snap=20w16a|Diamonds now generate in bastion remnants chests.}}
{{History||1.16.2|snap=20w30a|The chance of finding diamonds in bastion remnant chests is increased from 8.6% to 15.8%.}}
{{History||1.17|snap=21w08a|Diamonds can now drop and be smelted from [[deepslate diamond ore]].}}
{{History||1.20<br>(Experimental)|link=1.19.4|snap=23w04a|Diamonds can now be used to craft [[smithing template]]s.
|Diamonds can now be used as an armor trim material.}}
{{History|||snap=23w07a|Diamonds now drop when brushing [[suspicious sand]] in [[desert pyramid]]s.}}
{{History||1.20|snap=23w12a|The probability for the diamond to generate in the [[suspicious sand]] in [[desert temple]] has been changed from 1/7 to 1/8.}}
{{History|pocket alpha}}
{{History||v0.2.0|[[File:Diamond JE1 BE1.png|32px]] Added diamonds. They are currently unobtainable and serve no purpose.}}
{{History||v0.3.2|Diamonds can be collected and used to craft [[blocks of diamond]] and diamond [[axe]]s, [[pickaxe]]s, [[sword]]s and [[shovel]]s.}}
{{History||v0.4.0|Diamonds are now used to [[crafting|craft]] diamond [[hoe]]s.}}
{{History||v0.5.0|Diamonds are now used to craft [[nether reactor core]]s.}}
{{History||v0.6.0|Diamonds are now used to craft diamond [[armor]].}}
{{History||v0.8.0|snap=build 1|[[File:Diamond JE2 BE2.png|32px]] The texture of diamonds has been changed.}}
{{History||v0.12.1|snap=build 1|Diamonds are now used to craft [[enchanting table]]s.
|Diamonds are no longer used to craft [[nether reactor core]]s and are now instead dropped by it.
|Diamonds now generate in [[nether fortress]] [[chest]]s.}}
{{History||v0.13.0|snap=build 1|Diamonds now have a chance to generate in [[desert temple]] chests.}}
{{History||v0.14.0|snap=build 1|Diamonds are now found in [[minecart with chest]]s in [[mineshaft]]s.}}
{{History||v0.15.0|snap=build 1|Diamonds can now be found in [[jungle temple]] [[chest]]s.}}
{{History|pocket}}
{{History||1.0.0|snap=alpha 0.17.0.1|Diamonds can now be found in altar [[chest]]s in [[stronghold]]s, [[dungeon]] chests and [[end city]] chests.}}
{{History|||snap=alpha 1.0.0.0|Diamonds can now be found in [[villager|blacksmith]] [[chest]]s in [[village]]s.}}
{{History||1.0.4|snap=alpha 1.0.4.0|3-4 diamonds can now be traded to blacksmith [[villager]]s for an [[emerald]] as part of their third tier trades.}}
{{History|bedrock}}
{{History||1.2.0|snap=beta 1.2.0.2|Diamonds can now be used to [[crafting|craft]] a [[firework star]] with a trail.
|Diamonds can now be used to craft [[jukebox]]es.}}
{{History||1.4.0|snap=beta 1.2.14.2|Diamonds can now be found inside [[buried treasure]] [[chest]]s and [[shipwreck]]s.}}
{{History||1.10.0|snap=beta 1.10.0.3|Diamonds can now be found in [[plains]] [[village]] weaponsmith chests.
|[[File:Diamond JE3 BE3.png|32px]] The texture of diamonds has been changed.}}
{{History||1.11.0|snap=beta 1.11.0.1|Diamonds can now be found in village toolsmith chests and in [[savanna]], [[desert]], [[taiga]], and [[snowy taiga]] village weaponsmith chests.}}
{{History|||snap=beta 1.11.0.4|Armorer, toolsmith, and weaponsmith [[villager]]s now [[trading|buy]] one diamond for an [[emerald]] as part of their fourth tier [[trading|trades]].}}
{{History||1.16.0|snap=beta 1.16.0.57|Diamonds can now be found in [[bastion remnant]] chests.}}
{{History||1.17.0|snap=beta 1.16.230.52|Diamonds can now drop and be smelted from [[deepslate diamond ore]].}}
{{History||1.20.0<br>(Experimental)|link=Bedrock Edition 1.19.70|snap=beta 1.19.70.23|Diamonds now drop when brushing [[suspicious sand]] in [[desert pyramid]]s.}}
{{History||1.20.0<br>(Experimental)|link=Bedrock Edition 1.19.80|snap=beta 1.19.80.21|Diamonds can now be used to craft [[smithing template]]s.
|Diamonds can now be used as an armor trim material.}}
{{History|console}}
{{History||xbox=TU1|xbone=CU1|ps=1.0|wiiu=Patch 1|switch=1.0.1|[[File:Diamond JE1 BE1.png|32px]] Added diamonds.}}
{{History||xbox=TU5|Diamonds are now found in the new [[mineshaft]] [[chest]]s.}}
{{History||xbox=TU7|Diamonds are now used to craft [[enchantment table]]s.}}
{{History||xbox=TU9|Diamonds are now found in [[village]] [[villager|blacksmith]] [[chest]]s.}}
{{History||xbox=TU14|ps=1.04|Diamonds can now be [[trading|traded]] to blacksmith [[villager]]s in quantities of 3–5 for 1 [[emerald]].
|Added [[desert temple]]s, with a hidden [[chest]] room and loot containing diamonds.|Added [[jungle temple]]s, which contain loot [[chest]]s with diamonds.|[[File:Diamond JE2 BE2.png|32px]] The texture of diamonds has been changed.}}
{{History||xbox=TU19|xbone=CU7|ps=1.12|Diamonds can now be used to [[crafting|craft]] a [[firework star]] with a trail|Diamonds are now found in the new [[nether fortress]] [[chest]]s.}}
{{History||xbox=TU31|xbone=CU19|ps=1.22|wiiu=Patch 3|Diamonds can now be [[traded]] to any black apron [[villager]] in quantities of 3–4 for 1 [[emerald]], as their tier III trade.}}
{{History||xbox=TU46|xbone=CU36|ps=1.36|wiiu=Patch 15|Diamonds now generate in [[end city]] [[chest]]s.}}
{{History||xbox=TU69|xbone=none|ps=1.76|wiiu=Patch 38|switch=none|Diamonds now generate in [[buried treasure]] [[chest]]s.|Diamonds now generate in [[shipwreck]] treasure chests.}}
{{History||xbox=none|ps=1.90|wiiu=none|[[File:Diamond JE3 BE3.png|32px]] The texture of diamonds has been changed.}}
{{History|new3DS}}
{{History||0.1.0|[[File:Diamond JE2 BE2.png|32px]] Added diamonds.}}
{{History|foot}}
==Issues==
{{issue list}}
==Trivia==
*Unlike in ''Minecraft'', newly mined [[Wikipedia:Diamond|diamond]]s in real life are rough, cloudy stones. The largest, purest ones are polished into crystal-clear gemstones, while the rest are used in industry for cutting and grinding.
*Although diamonds themselves are not renewable, all tools, weapons, and armor made from diamonds can be acquired through [[trading]], and are therefore renewable. Other items crafted from diamonds are not renewable.
*In the April fools version [[Java Edition 2.0]], [[Diamond Chicken|diamond chickens]] can lay diamonds. This does not exist in newer versions, as this was a joke.
*The item forms of diamonds and [[Turtle Egg|turtle eggs]] have the same shape.
==Gallery==
<gallery>
File:DiamondOre.png|Naturally occurring diamonds.
File:MultipleOreBlobs.png|Multiple ore blobs.
File:Lava Diamond.png|Diamond ore near Lava.
File:Diamond ore blob.png|Another Diamond ore blob near Lava.
File:10 ore diamond blob.png|10 ore diamond blob.
File:Trading a diamond for an emerald.png|A blacksmith offering an [[emerald]] for a diamond.
File:Diamond Pendant Necklace JINX.jpg|Official diamond pendant made by [https://www.jinx.com JINX].
File:All Mine JINX.jpg|Official t-shirt artwork "All Mine" which features a diamond. Made by JINX
File:4 ways of viewing 12 diamonds in stone form.png|4 ways of viewing 12 diamonds in stone form
</gallery>
== External Links ==
*[https://www.minecraft.net/en-us/article/taking-inventory--diamond Taking Inventory: Diamond] – Minecraft.net on February 20, 2019
{{items}}
[[cs:Diamant]]
[[de:Diamant]]
[[el:Διαμάντι]]
[[es:Diamante]]
[[fr:Diamant]]
[[hu:Gyémánt]]
[[it:Diamante]]
[[ja:ダイヤモンド]]
[[ko:다이아몬드]]
[[nl:Diamant]]
[[pl:Diament]]
[[pt:Diamante]]
[[ru:Алмаз]]
[[th:เพชร]]
[[tr:Elmas]]
[[uk:Діамант]]
[[zh:钻石]]
[[Category:Non-renewable resources]]</li><li>[[Banner|Banner]]<br/>{{for|the image|Banner (image)}}
{{Block
| image = <gallery>
White Banner.gif | Banner
White Wall Banner.png | Wall Banner
</gallery>
| rarity = Common
| transparent = Yes
| light = No
| tool = axe
| renewable = Yes
| stackable = Yes (16)
| flammable = No
| lavasusceptible = Yes
}}
'''Banners''' are tall decorative [[blocks]], featuring a field that is highly customizable using [[dye]]s and [[banner pattern]]s.
== Obtaining ==
=== Breaking ===
Banners can be broken with or without a [[tool]], but an [[axe]] is fastest.
{{breaking row|horizontal=1|Banners|Axe}}
A banner also breaks and drops itself as an [[Item (entity)|item]] if the block the banner is attached to is moved, removed, or destroyed.
=== Natural generation ===
{| class="wikitable collapsible"
! Name !! Location !! Appearance !! Design
|-
! Magenta Banner
| Outside of [[end cities]].
| style="text-align: center" | [[File:End City Banner.png|32px]]
| Magenta Banner
* Black Inverted Chevron
* Black Chevron
|-
! Gray Banner
| In banner room in [[woodland mansion]]s.
| style="text-align: center" | [[File:Gray Banner.png|32px]]
| Gray Banner
|-
! Light Gray Banner
| In master bedroom in [[woodland mansion]]s.
| style="text-align: center" | [[File:Master Bedroom Banner.png|32px]]
| Light Gray Banner
* White Flower Charge
|- id="Ominous Banner"
! Ominous Banner{{only|java|short=1}}
Illager Banner{{only|bedrock|education|short=1}}
| Carried by [[raid captain]]s.<br> Located in [[pillager outpost]]s.
{{IN|java}}, the ominous banner cannot be crafted or copied because the design uses 8 patterns.
{{IN|bedrock}}, the illager banner is a separate type that cannot be placed in a loom.
| style="text-align: center" | [[File:Ominous Banner.png|32px]]<br/>[[File:Ominous Banner BE.png|32px]]
| White Banner{{only|java|short=1}}
* Cyan Lozenge
* Light Gray Base
* Gray Pale
* Light Gray Bordure
* Black Fess
* Light Gray Per Fess
* Light Gray Roundel
* Black Bordure
Separate type entirely{{only|bedrock|short=1}}
|-
! Brown Banner
| Outside of some houses, meeting points, and pillar fountains in savanna [[village]]s.
| style="text-align: center" | [[File:Brown Banner.png|32px]]
| Brown Banner
|-
! Black Banner
| In altar room in [[woodland mansions]].
| style="text-align: center" | [[File:Black Banner.png|32px]]
| Black Banner
|}
=== Crafting ===
Banners can be crafted from six [[wool]] and a [[stick]] in a pattern resembling a [[sign]].
{{Crafting
|head=1
|showdescription=1
|A1=Matching Wool |B1=Matching Wool |C1=Matching Wool
|A2=Matching Wool |B2=Matching Wool |C2=Matching Wool
|B3=Stick
|Output=Matching Banner
|Olink=Banner
|type=Decoration block
|description=Once the banner is crafted, its base color cannot be changed.{{only|java}}
}}
{{Crafting
|showdescription=1
|Any Banner
|Bleach
|Output=White Banner
|type=Decoration block
|description=Bleach can be used to remove the color of a banner, resulting in a white banner. This includes removing patterns from a white banner.{{only|bedrock|education}}
|foot=1
}}
=== Trading ===
Expert-level cartographer [[villager]]s always offer to [[trading|sell]] 1 or 2 blank banners of a random color for 3 [[emeralds]]. Expert-level shepherd villagers have a {{frac|2|7}} chance of offering the same trade.{{only|java}}
{{IN|bedrock}}, expert-level cartographer and shepherd villagers both offer to sell one of 16 blank banners for 3 emeralds as part of their trades.
=== Mob loot ===
[[Illager]]s that spawn carrying an ominous banner{{only|java|short=1}} / illager banner{{only|bedrock|education|short=1}} always drop it upon death.
== Usage ==
[[File:Standing banner with block.png|thumb|upright|Overlapping block on a banner.]]
[[File:Wall banner with block.png|thumb|upright|Overlapping on a wall mounted banner.]]
There are 16 colored blank banners, and numerous patterns each available in each of the 16 colors. A banner can feature up to 6 different patterns. The top layer of a banner (or the last pattern added) can be washed off by {{control|using}} it on a [[cauldron]] containing water.
Banners, much like signs, can be placed both on the ground facing in any direction, or on a wall. They gently sway as if affected by a breeze, regardless of dimension or location.
Banners have no collision mask as they are completely non-solid, so [[entities]] can move through them.
Other blocks (including other banners) can be placed on any edge of a banner's hitbox, which is only one block high despite the banner appearing as two blocks tall. This makes it possible to overlap another solid block on the top half of a banner for floor banners, or the bottom half of wall banners.
When a banner is placed on the side of a block, its position is set by the top block, and it is possible to place it so it appears half buried.
Banners can also be placed in [[item frame]]s, where they simply appear as their item model.
[[Water]] and [[lava]] flow around banners. {{IN|bedrock}}, banners can be [[waterlogged]].
<gallery>
File:Wall banner with water below.png| Water can be placed below wall banners
File:Water flowing around banner.png| Water flows around a banner on the ground
</gallery>
Lava can create [[fire]] in air blocks next to banners as if the banners were flammable, but the banners do not burn (and cannot be burned by other methods). Banners also cannot be moved by [[piston]]s.
If a banner is renamed on an [[anvil]], it retains its name when a pattern is added, but not when a pattern is removed.
=== Helmet ===
{{exclusive|java|section=13}}
While a banner cannot be equipped in the [[Helmet|head slot]] in [[Survival]] mode, equipping it using commands causes it to appear on top of the player. This is how [[raid captain]]s wear banners{{only|java|short=1}}.
=== Chestplate ===
{{exclusive|bedrock|section=13}}
While a banner cannot be equipped in the [[chestplate]] slot in Survival mode, equipping it using NBT editors causes it to appear on top of the player. This is how [[raid captain]]s wear banners{{only|bedrock|education|short=1}}.
<gallery>
Steve wearing White Banner.png|
Alex wearing White Banner.png|
Pillager with Ominous Banner.png|
Vindicator with Ominous Banner.png|
Evoker with Ominous Banner.png|Illusioner with Ominous Banner.png|
</gallery>
=== Crafting ingredient ===
[[Shield]]s can have patterns applied to them using banners. The shield pattern has a smaller resolution than the banner pattern, causing them to look different or offset. Banners that have more than six patterns, such as Ominous Banners or banners obtained through inventory editors, will be reduced to six patterns on the shield.
{{Crafting
|showdescription=1
|Shield
|Matching Banner; Ominous Banner
|Output=Matching Shield; Ominous Shield
|B2link=Banner
|type=Combat
|description=Applies the banner pattern to the shield. The banner is consumed.<br>The shield must have no pre-existing patterns.<br>Does not change existing durability or enchantments on the shield.
}}
=== Copying ===
Banners can be copied with a blank banner to make multiple identical banners. Banners with more than 6 patterns applied using commands cannot be copied in this manner.
{{Crafting
|showdescription=1
|Matching Banner
|Matching Banner
|Output=Matching Banner
|A2link=Banner
|B2link=Banner
|Olink=Banner
|type=Decoration block
|ignoreusage=1
|description=Copies pattern; both banners must have the same base color, and the one having a pattern copied onto it must have no preexisting pattern.
}}
=== Map marker ===
[[File:Banner marked map.png|alt=All banners marked on a map, alongside a named banner.|thumb|right|How every banner appears {{IN|java}} on a map, including named banners.]]
{{exclusive|java|section=13}}
{{IN|java}}, {{control|using}} on a standing banner with a [[map]] selected places a marker of the banner's position on the selected map, and {{control|using}} on the banner again removes the marker. Note that wall banners cannot serve as map markers. The marker has the same color as the banner's base without decorations. The marker is removed if the banner is destroyed unless the map is locked using a [[cartography table]]. If the banner is renamed, the name appears below the marker.
=== Patterns ===
{{see also|Banner/Patterns|title1=List of patterned banners}}
[[File:Spawned-in Banner.png|thumb|100px|Example of a banner with more than 6 patterns, a result of using the {{cmd|give}} command.]]
A banner may have up to six layers of patterns, which are overlaid with the last-crafted on top. A banner can have up to 16 layers of patterns with the use of commands. The total number of unique banners is approximately 2.3x10^16 (or 23 quadrillion).
Any color banner can be used; the pattern overlays the color. {{IN|java}}, a [[loom]] is used to make patterns. However, {{in|bedrock}}, the patterns can be made in a [[loom]] or a [[crafting table]].
A banner can have more than six layers of patterns through the commands <code>/[[Commands/give|give]]</code>, <code>/[[Commands/setblock|setblock]]</code> or <code>/[[Commands/fill|fill]]</code>. This only works in ''Java Edition'', as Bedrock Edition doesn't have any NBT commands. Here is an example of a mining banner with seven different patterns. There is specific codes for the [[Banner#Item data:~:text=white-,Item,-In Java Edition|colors]] and [[Banner/Patterns|patterns]] that you have to input.
<code><nowiki>/give @p white_banner{display:{Name:"\"Mining Industries Banner\""},BlockEntityTag:{Patterns:[{Pattern:"cr",Color:15},{Pattern:"bs",Color:15},{Pattern:"sc",Color:12},{Pattern:"ms",Color:0},{Pattern:"hh",Color:15},{Pattern:"bo",Color:15},{Pattern:"tts",Color:8}]}} 1</code>
{{LoadPage|Template:Banner pattern loom recipes|Loom recipes|h4}}
{{LoadPage|Banner/Banner pattern crafting recipes|Crafting recipes|h4|transcluded=1}}
=== Renaming ===
{{IN|java}}, a banner can be given a custom name that remains as the banner is placed and retrieved. The player can use an [[anvil]] to rename the banner item, or may change the <code>CustomName</code> tag using the {{cmd|data}} command on the banner block.
=== Fuel ===
Banners can be used as a fuel in [[furnace]]s, smelting 1.5 items per banner.
=== Note Blocks ===
Banners can be placed under [[note block]]s to produce "bass" sounds.
== Sounds ==
=== Generic ===
{{Sound table/Block/Wood}}
=== Unique ===
{{edition|java}}: ''None''
{{edition|bedrock}}:
{{Sound table
|type=bedrock
|sound=Water Splash Old.ogg
|source=block
|description=When all patterns are removed from a banner using a cauldron
|id=cauldron.cleanbanner
|volume=0.1
|pitch=1.0
|foot=1}}
== Data values ==
=== ID ===
{{edition|java}}:
{{ID table
|edition=java
|showblocktags=y
|showitemtags=y
|showforms=y
|generatetranslationkeys=y
|displayname=White Banner
|spritetype=block
|nameid=white_banner
|blocktags=banners, wall_post_override
|itemtags=banners
|translationkey=block.minecraft.white_banner,block.minecraft.ominous_banner
}}
{{ID table
|displayname=Orange Banner
|spritetype=block
|nameid=orange_banner
|blocktags=banners, wall_post_override
|itemtags=banners}}
{{ID table
|displayname=Magenta Banner
|spritetype=block
|nameid=magenta_banner
|blocktags=banners, wall_post_override
|itemtags=banners}}
{{ID table
|displayname=Light Blue Banner
|spritetype=block
|nameid=light_blue_banner
|blocktags=banners, wall_post_override
|itemtags=banners}}
{{ID table
|displayname=Yellow Banner
|spritetype=block
|nameid=yellow_banner
|blocktags=banners, wall_post_override
|itemtags=banners}}
{{ID table
|displayname=Lime Banner
|spritetype=block
|nameid=lime_banner
|blocktags=banners, wall_post_override
|itemtags=banners}}
{{ID table
|displayname=Pink Banner
|spritetype=block
|nameid=pink_banner
|blocktags=banners, wall_post_override
|itemtags=banners}}
{{ID table
|displayname=Gray Banner
|spritetype=block
|nameid=gray_banner
|blocktags=banners, wall_post_override
|itemtags=banners}}
{{ID table
|displayname=Light Gray Banner
|spritetype=block
|nameid=light_gray_banner
|blocktags=banners, wall_post_override
|itemtags=banners}}
{{ID table
|displayname=Cyan Banner
|spritetype=block
|nameid=cyan_banner
|blocktags=banners, wall_post_override
|itemtags=banners}}
{{ID table
|displayname=Purple Banner
|spritetype=block
|nameid=purple_banner
|blocktags=banners, wall_post_override
|itemtags=banners}}
{{ID table
|displayname=Blue Banner
|spritetype=block
|nameid=blue_banner
|blocktags=banners, wall_post_override
|itemtags=banners}}
{{ID table
|displayname=Brown Banner
|spritetype=block
|nameid=brown_banner
|blocktags=banners, wall_post_override
|itemtags=banners}}
{{ID table
|displayname=Green Banner
|spritetype=block
|nameid=green_banner
|blocktags=banners, wall_post_override
|itemtags=banners}}
{{ID table
|displayname=Red Banner
|spritetype=block
|nameid=red_banner
|blocktags=banners, wall_post_override
|itemtags=banners}}
{{ID table
|displayname=Black Banner
|spritetype=block
|nameid=black_banner
|blocktags=banners, wall_post_override
|itemtags=banners}}
{{ID table
|displayname=White Wall Banner
|spritetype=block
|nameid=white_wall_banner
|blocktags=banners, wall_post_override
|form=block
|translationkey=block.minecraft.white_banner,block.minecraft.ominous_banner}}
{{ID table
|displayname=Orange Wall Banner
|spritetype=block
|nameid=orange_wall_banner
|blocktags=banners, wall_post_override
|form=block
|translationkey=block.minecraft.orange_banner}}
{{ID table
|displayname=Magenta Wall Banner
|spritetype=block
|nameid=magenta_wall_banner
|blocktags=banners, wall_post_override
|form=block
|translationkey=block.minecraft.magenta_banner}}
{{ID table
|displayname=Light Blue Wall Banner
|spritetype=block
|nameid=light_blue_wall_banner
|blocktags=banners, wall_post_override
|form=block
|translationkey=block.minecraft.light_blue_banner}}
{{ID table
|displayname=Yellow Wall Banner
|spritetype=block
|nameid=yellow_wall_banner
|blocktags=banners, wall_post_override
|form=block
|translationkey=block.minecraft.yellow_banner}}
{{ID table
|displayname=Lime Wall Banner
|spritetype=block
|nameid=lime_wall_banner
|blocktags=banners, wall_post_override
|form=block
|translationkey=block.minecraft.lime_banner}}
{{ID table
|displayname=Pink Wall Banner
|spritetype=block
|nameid=pink_wall_banner
|blocktags=banners, wall_post_override
|form=block
|translationkey=block.minecraft.pink_banner}}
{{ID table
|displayname=Gray Wall Banner
|spritetype=block
|nameid=gray_wall_banner
|blocktags=banners, wall_post_override
|form=block
|translationkey=block.minecraft.gray_banner}}
{{ID table
|displayname=Light Gray Wall Banner
|spritetype=block
|nameid=light_gray_wall_banner
|blocktags=banners, wall_post_override
|form=block
|translationkey=block.minecraft.light_gray_banner}}
{{ID table
|displayname=Cyan Wall Banner
|spritetype=block
|nameid=cyan_wall_banner
|blocktags=banners, wall_post_override
|form=block
|translationkey=block.minecraft.cyan_banner}}
{{ID table
|displayname=Purple Wall Banner
|spritetype=block
|nameid=purple_wall_banner
|blocktags=banners, wall_post_override
|form=block
|translationkey=block.minecraft.purple_banner}}
{{ID table
|displayname=Blue Wall Banner
|spritetype=block
|nameid=blue_wall_banner
|blocktags=banners, wall_post_override
|form=block
|translationkey=block.minecraft.blue_banner}}
{{ID table
|displayname=Brown Wall Banner
|spritetype=block
|nameid=brown_wall_banner
|blocktags=banners, wall_post_override
|form=block
|translationkey=block.minecraft.brown_banner}}
{{ID table
|displayname=Green Wall Banner
|spritetype=block
|nameid=green_wall_banner
|blocktags=banners, wall_post_override
|form=block
|translationkey=block.minecraft.green_banner}}
{{ID table
|displayname=Red Wall Banner
|spritetype=block
|nameid=red_wall_banner
|blocktags=banners, wall_post_override
|form=block
|translationkey=block.minecraft.red_banner}}
{{ID table
|displayname=Black Wall Banner
|spritetype=block
|nameid=black_wall_banner
|blocktags=banners, wall_post_override
|form=block
|translationkey=block.minecraft.black_banner
|foot=1}}
{{ID table
|displayname=Block entity
|spritename=Banners
|spritetype=block
|nameid=banner
|foot=1}}
{{edition|bedrock}}:
{{ID table
|edition=bedrock
|firstcolumnname=Banner
|shownumericids=y
|showforms=y
|generatetranslationkeys=y
|displayname=Standing
|spritename=Banners
|spritetype=block
|nameid=standing_banner
|translationkey=tile.standing_banner.black.name, tile.standing_banner.red.name, tile.standing_banner.green.name, tile.standing_banner.brown.name, tile.standing_banner.blue.name, tile.standing_banner.purple.name, tile.standing_banner.cyan.name, tile.standing_banner.silver.name, tile.standing_banner.gray.name, tile.standing_banner.pink.name, tile.standing_banner.lime.name, tile.standing_banner.yellow.name, tile.standing_banner.lightBlue.name, tile.standing_banner.magenta.name, tile.standing_banner.orange.name, tile.standing_banner.white.name
|id=176
|form=block}}
{{ID table
|displayname=Wall
|spritename=Banners
|spritetype=block
|nameid=wall_banner
|id=177
|form=block
|translationkey=-}}
{{ID table
|displayname=Item
|spritename=Banners
|spritetype=item
|nameid=banner
|translationkey=item.banner.black.name, item.banner.red.name, item.banner.green.name, item.banner.brown.name, item.banner.blue.name, item.banner.purple.name, item.banner.cyan.name, item.banner.silver.name, item.banner.gray.name, item.banner.pink.name, item.banner.lime.name, item.banner.yellow.name, item.banner.lightBlue.name, item.banner.magenta.name, item.banner.orange.name, item.banner.white.name
|id=567
|form=item
|foot=1}}
{{ID table
|notnamespaced=y
|displayname=Block entity
|spritename=Banners
|spritetype=block
|nameid=Banner
|foot=1}}
=== Metadata ===
==== Item ====
{{IN|Bedrock}}, banner items use the following data values:
{| class="wikitable"
! DV !! Banner color
|-
|| 0 || black
|-
|| 1 || red
|-
|| 2 || green
|-
|| 3 || brown
|-
|| 4 || blue
|-
|| 5 || purple
|-
|| 6 || cyan
|-
|| 7 || light gray
|-
|| 8 || gray
|-
|| 9 || pink
|-
|| 10 || lime
|-
|| 11 || yellow
|-
|| 12 || light blue
|-
|| 13 || magenta
|-
|| 14 || orange
|-
|| 15 || white
|}
=== Item ===
{{IN|Java}}, banner items use the following data values:
{| class="wikitable"
! DV !! Banner color
|-
|| 15 || black
|-
|| 14 || red
|-
|| 13 || green
|-
|| 12 || brown
|-
|| 11 || blue
|-
|| 10 || purple
|-
|| 9 || cyan
|-
|| 8 || light gray
|-
|| 7 || gray
|-
|| 6 || pink
|-
|| 5 || lime
|-
|| 4 || yellow
|-
|| 3 || light blue
|-
|| 2 || magenta
|-
|| 1 || orange
|-
|| 0 || white
|}
=== Block states ===
{{see also|Block states}}
{{/BS}}
=== Block data ===
A banner has a block entity associated with it that holds additional data about the block.
{{el|bedrock}}:
: See [[Bedrock Edition level format/Block entity format]].
{{el|java}}:
{{see also|Block entity format}}
{{/BE}}
=== Item data ===
{{el|java}}:
{{main|Player.dat format}}
Banners, as items, use an NBT tag <code>BlockEntityTag</code> to indicate the patterns and details when it is placed.
<div class="treeview" style="margin-top: 0;">
* {{nbt|compound|Item}}: The item
** {{nbt|compound|tag}}: Additional information about the item. This tag is optional for most items.
*** {{nbt|compound|BlockEntityTag}}: The details of the shulker box.
**** All block data, except tags common to all block entities.
</div>
{{el|bedrock}}:
: See [[Bedrock Edition level format/Item format]].
== Achievements ==
{{load achievements|Fruit on the Loom}}
== Advancements ==
{{load advancements|Voluntary Exile}}
== History ==
{{info needed section|The Nether Update}}
{{History|java}}
{{History||1.8|snap=July 21, 2014|slink=https://twitter.com/jeb_/status/491238882789572608|[[Jeb]] posted a picture of banners, and stated that he is working on them.}}
{{History|||snap=14w30a|[[File:White Banner Revision 1.png|22px]][[File:Light Gray Banner Revision 1.png|22px]][[File:Gray Banner Revision 1.png|22px]][[File:Black Banner Revision 1.png|22px]][[File:Brown Banner Revision 1.png|22px]][[File:Red Banner Revision 1.png|22px]][[File:Orange Banner Revision 1.png|22px]][[File:Yellow Banner Revision 1.png|22px]][[File:Lime Banner Revision 1.png|22px]][[File:Green Banner Revision 1.png|22px]][[File:Cyan Banner Revision 1.png|22px]][[File:Light Blue Banner Revision 1.png|22px]][[File:Blue Banner Revision 1.png|22px]][[File:Purple Banner Revision 1.png|22px]][[File:Magenta Banner Revision 1.png|22px]][[File:Pink Banner Revision 1.png|22px]] Added banners.}}
{{History|||snap=14w30c|Added four additional patterns: Cross (+), Border, Curly Border and Thing (Mojang logo).}}
{{History|||snap=14w31a|Added two additional patterns: Inverted Halves and Base Gradient.
|The banner pattern terminology has been changed based on vexillology advice [[Jeb]] received from [http://www.reddit.com/r/Minecraft/comments/2bkxej/i_made_a_huge_mistake_banners/ his Reddit post].
|Banners can now be used as a [[fuel]] in [[furnace]]s.}}
{{History||1.8.8|snap=pre|The number of layers attainable by using [[commands]] is now limited to 16 per banner.}}
{{History||1.9|snap=15w31a|[[File:End City Banner.png|17px]] Magenta banners with a black chevron and inverted chevron are now naturally generated on the outside walls of [[end city|end cities]].}}
{{History|||snap=15w33c|Banners can be used to apply patterns to [[shield]]s.}}
{{History||1.11|snap=16w33a|Banners now require a [[dye]] when applying a pattern that uses a non-dye [[item]], such as a [[mob head|creeper head]] or [[golden apple|enchanted golden apple]]. Previously, the lack of a dye would have applied the black variant of the pattern.}}
{{History|||snap=16w39a|Black and gray banners, and light gray banners with a white flower charge are now naturally generated in rooms of [[woodland mansion]]s.}}
{{History||1.12|snap=January 24, 2017|slink={{tweet|jeb_|823817090511601664}}|[[Jeb]] tweets a screenshot of the changes to the banner color palette.}}
{{History|||snap=17w06a|[[File:White Banner.png|17px]] [[File:Light Gray Banner.png|17px]] [[File:Gray Banner.png|17px]] [[File:Black Banner.png|17px]] [[File:Brown Banner.png|17px]] [[File:Red Banner.png|17px]] [[File:Orange Banner.png|17px]] [[File:Yellow Banner.png|17px]] [[File:Lime Banner.png|17px]] [[File:Green Banner.png|17px]] [[File:Cyan Banner.png|17px]] [[File:Light Blue Banner.png|17px]] [[File:Blue Banner.png|17px]] [[File:Purple Banner.png|17px]] [[File:Magenta Banner.png|17px]] [[File:Pink Banner.png|17px]] Changed banners' [[tint]]s.}}
{{History|||snap=pre6|"Chief fess" and "base fess" banners are now just "chief" and "base" banners.}}
{{History||1.13|snap=17w47a|The colors for the <code>banner</code>, <code>wall_banner</code> and <code>standing_banner</code> ID have been split up into their own IDs.
|Prior to [[1.13/Flattening|''The Flattening'']], these [[block]]s' numeral IDs were 176 and 177, and the [[item]]'s 425.}}
{{History|||snap=18w10a|{{control|Using}} a [[map]] on a banner now mark the spot of the banner on the map.}}
{{History||1.14|snap=18w43a|[[Loom]]s have been added to help the [[player]] edit banners more easily.
|All recipes for banner patterns have been removed.}}
{{History|||snap=18w45a|[[File:Ominous Banner Revision 1.png|17px]] Added [[illager patrol]]s, where the leader of an illager patrol carries an [[illager]] banner.}}
{{History|||snap=18w46a|[[File:Ominous Banner.png|17px]] The pattern of [[illager]] banner now has a black border.}}
{{History|||snap=19w11a|Cartographer and shepherd [[villager]]s now [[trading|sell]] banners.}}
{{History|||snap=Pre-Release 2|"Illager Banners" have been renamed to "Ominous Banners".}}
{{History||1.17|snap=20w46a|The unused "base" pattern has been renamed to the "field" pattern and given proper translation strings (its ID is still "base").}}
{{History||1.19.3|snap=22w43a|The ominous banner is now available in the Creative inventory.}}
{{History|bedrock}}
{{History||1.2.0|snap=beta 1.2.0.2|[[File:White Banner.png|17px]] [[File:Light Gray Banner.png|17px]] [[File:Gray Banner.png|17px]] [[File:Black Banner.png|17px]] [[File:Brown Banner.png|17px]] [[File:Red Banner.png|17px]] [[File:Orange Banner.png|17px]] [[File:Yellow Banner.png|17px]] [[File:Lime Banner.png|17px]] [[File:Green Banner.png|17px]] [[File:Cyan Banner.png|17px]] [[File:Light Blue Banner.png|17px]] [[File:Blue Banner.png|17px]] [[File:Purple Banner.png|17px]] [[File:Magenta Banner.png|17px]] [[File:Pink Banner.png|17px]] Added banners.
|[[File:End City Banner.png|17px]] Magenta banners with a black chevron and inverted chevron are now naturally generated on the outside walls of [[end city|end cities]].
|Black and gray banners, and light gray banners with a white flower charge are now naturally generated in rooms of [[woodland mansion]]s.}}
{{History||1.4.0|snap=beta 1.2.20.1|The white banner can now be crafted from a colored banner and [[bleach]], which also removes all patterns, if used on a white banner.}}
{{History||1.10.0|snap=beta 1.10.0.3|[[Loom]]s have been added to help the [[player]] edit banners more easily.
|Brown banners now generate in new [[savanna]] [[village]]s.
|Black banners now generate in [[pillager outpost]] watchtowers.}}
{{History||1.11.0|snap=beta 1.11.0.1|Gray banners now generate in pillager outpost watchtowers, instead of black banners.
|[[File:Ominous Banner BE.png|17px]] Added [[illager captain]]s, which drop an [[illager]] banner upon [[death]].}}
{{History|||snap=beta 1.11.0.3|Illager banners now generate in [[pillager outpost]] watchtowers, instead of gray banners.}}
{{History|||snap=beta 1.11.0.4|Banners can now be [[trading|bought]] from cartographer and shepherd [[villager]]s.}}
{{History||1.20.0|snap=beta 1.20.0.20|Banners can now be used to customise [[shield]]s.}}
{{History|console}}
{{History||xbox=TU43|xbone=CU33|ps=1.36|wiiu=Patch 13|switch=1.0.1|[[File:White Banner Revision 1.png|22px]][[File:Light Gray Banner Revision 1.png|22px]][[File:Gray Banner Revision 1.png|22px]][[File:Black Banner Revision 1.png|22px]][[File:Brown Banner Revision 1.png|22px]][[File:Red Banner Revision 1.png|22px]][[File:Orange Banner Revision 1.png|22px]][[File:Yellow Banner Revision 1.png|22px]][[File:Lime Banner Revision 1.png|22px]][[File:Green Banner Revision 1.png|22px]][[File:Cyan Banner Revision 1.png|22px]][[File:Light Blue Banner Revision 1.png|22px]][[File:Blue Banner Revision 1.png|22px]][[File:Purple Banner Revision 1.png|22px]][[File:Magenta Banner Revision 1.png|22px]][[File:Pink Banner Revision 1.png|22px]] Added banners.}}
{{History||xbox=TU46|xbone=CU36|ps=1.38|wiiu=Patch 15|switch=1.0.1|[[File:End City Banner.png|17px]] Magenta banners with a black chevron and inverted chevron are now naturally generated on the outside walls of [[end city|end cities]].}}
{{History||xbox=TU53|xbone=CU43|ps=1.49|wiiu=Patch 23|switch=1.0.3|[[File:White Banner.png|17px]] [[File:Light Gray Banner.png|17px]] [[File:Gray Banner.png|17px]] [[File:Black Banner.png|17px]] [[File:Brown Banner.png|17px]] [[File:Red Banner.png|17px]] [[File:Orange Banner.png|17px]] [[File:Yellow Banner.png|17px]] [[File:Lime Banner.png|17px]] [[File:Green Banner.png|17px]] [[File:Cyan Banner.png|17px]] [[File:Light Blue Banner.png|17px]] [[File:Blue Banner.png|17px]] [[File:Purple Banner.png|17px]] [[File:Magenta Banner.png|17px]] [[File:Pink Banner.png|17px]] Changed banners' [[tint]]s.}}
{{History||xbox=none|xbone=none|ps=1.90|wiiu=none|switch=none|[[Loom]]s have been added to help the [[player]] edit banners more easily.}}
{{History||ps=1.91|[[File:Ominous Banner BE.png|17px]] Added [[illager]] banners, which generate with [[pillager outpost]]s and are [[drops|dropped]] by [[illager captain]]s upon [[death]].}}
{{History|foot}}
== Issues ==
{{issue list}}
== Trivia ==
* With 16 blank banners, 38 patterns of 16 colors each (608 uniquely-colored patterns), and 0 to 6 patterns per banner, the number of uniquely crafted banners is 16 × (608<sup>0</sup> + 608<sup>1</sup> + 608<sup>2</sup> + 608<sup>3</sup> + 608<sup>4</sup> + 608<sup>5</sup> + 608<sup>6</sup>) ≈ 809 quadrillion - 809 with 15 zeros (809,573,616,779,945,488). The number of visually distinct banners is smaller, because one or more patterns may completely cover other patterns, or the entire banner, or be duplicated due to the symmetric set of patterns (e.g. field or (yellow) + per pale azure (blue) = field azure + per pale or inverted).
** Not 38 patterns are available on BE, but 40 patterns of 16 colors each (640 uniquely-colored patterns), so the number is even greater. 16 × (640<sup>0</sup> + 640<sup>1</sup> + 640<sup>2</sup> + 640<sup>3</sup> + 640<sup>4</sup> + 640<sup>5</sup> + 640<sup>6</sup>) ≈ 1 quintillion - 1 with 18 zeros (1,101,232,303,249,827,856). This increases the number by almost 1.4 times, or almost 292 quadrillion, despite the addition of only 2 patterns.
* If a banner has over 6 patterns, only the six bottom-most patterns are displayed when hovered over in the [[inventory]].
* The Mojang logo is called "Thing" in-game, which could be considered an alternate translation for [[wiktionary:mojäng|mojäng]]. If [[wikipedia:Google Translate|Google Translate]] is used, it translates to "thingys" or "contraption".
** In the Swedish translation of the game, this pattern is, in fact, called ''mojäng''.
* [[List of block textures#Banner Textures|Banner textures]] are located in \assets\minecraft\textures\entity\banner.
** There are 40 monochrome textures, each containing all 6 sides of the banner.
** The texture of the back side is the mirrored texture of the front side.
** Compared to the texture files, textures' colors are inverted in-game due to them acting as masks for the re-colored base texture, base.png. That means white is visible, while black is transparent.
* Banners that have the purple NBT+ line in the bottom (obtained by holding Ctrl and middle-clicking the banner, which also copies the NBT [[tag]] of anything that the player points their crosshair to) actually have no difference with the base banner obtained by middle click.
*The Illager Banner in Bedrock Edition is available as a separate item but is just a second variant of the white banner.
**Standard variant of white banner is set to type 0.
**Illager variant is set to type 1.
== Gallery ==
<gallery>
Banners Jeb.png|The first image of banners, as tweeted by Jens Bergensten.
Iceland and Norway Flags.png|Another banner image from Jeb.
Searge Banners.png|Several banners made by Searge.
The Bountiful Update.png|Banners in the official 1.8 poster.
BannersBeforeAndAfter.png|An image, tweeted by Jeb, showcasing the changes he made to the banner color palette in the 1.12 update.
Gradients Overlay.png|The result of using gradient different numbers of times, each time increasing the level of gradient by 1.
All positions and rotations of a banner.png|All positions and rotations of a banner
Item Frame with Banner.png|A banner with the [[Mojang]] logo in an [[item frame]].
EndCityBanners.png|Banners floating outside of an [[End city]] tower.
Woodland mansion 1x2 d1.png|Banners hanging above the doorway of a [[woodland mansion]] master bedroom.
Replaceitembanner.png|Banner put in the helmet slot by using the command {{cmd|replaceitem}}{{Only|BE}} or {{cmd|item replace}}{{Only|JE}}.
Better Together Banners.jpg|Banners in ''Bedrock Edition''.
Better Together Banner Crafting 1.jpg|A banner in the hand.
Better Together Banner Crafting 2.jpg|A banner in the inventory.
Better Together Banner Crafting 3.jpg|A banner in the crafting grid.
Better Together Banner Crafting 4.jpg|A banner being given a pattern.
</gallery>
=== Renders ===
<gallery>
Ominous Banner.gif
White Banner.gif
Light Gray Banner.gif
Gray Banner.gif
Black Banner.gif
Brown Banner.gif
Red Banner.gif
Orange Banner.gif
Yellow Banner.gif
Lime Banner.gif
Green Banner.gif
Cyan Banner.gif
Light Blue Banner.gif
Blue Banner.gif
Purple Banner.gif
Magenta Banner.gif
Pink Banner.gif
Ominous Wall Banner.png|
White Wall Banner.png|
Light Gray Wall Banner.png|
Gray Wall Banner.png|
Black Wall Banner.png|
Brown Wall Banner.png|
Red Wall Banner.png|
Orange Wall Banner.png|
Yellow Wall Banner.png|
Lime Wall Banner.png|
Green Wall Banner.png|
Cyan Wall Banner.png|
Light Blue Wall Banner.png|
Blue Wall Banner.png|
Purple Wall Banner.png|
Magenta Wall Banner.png|
Pink Wall Banner.png
</gallery>
<gallery>
File:Ominous Banner.gif|Ominous banner pattern in Java Edition.
File:Ominous Banner BE.gif|Illager banner pattern in Bedrock Edition.
File:Ominous Banner Revision 1.gif|Old Ominous banner pattern.
File:Ominous Banner washing.gif|Washing with cauldron shows how to apply the ominous banner pattern.
</gallery>
=== [[Lego Minecraft]] Banners ===
<gallery>
File:Lego Red Creeper Banner Collage.jpg|Lego banners from 21127 and 21131
File:Lego Melon Banner.png|Lego banner from 21138
File:Lego Fish Banner.png|Lego banner from 21142
File:Lego Beetroot Banner.png|Lego banner from 21144
File:Lego Wheat Banner.png|Another lego banner from 21144
File:Lego Carrot Banner.png|A third lego banner from 21144
File:Lego Crossbones Banner.png|Lego banner from 21152
File:Lego Green Creeper Banner Collage.jpg|Lego banners from 21155
File:Lego Ominous Banner.png|Lego ominous banner from 21160
</gallery>
== References ==
{{reflist}}
{{Blocks|Utility}}
{{Items}}
[[Category:Generated structure blocks]]
[[Category:Manufactured blocks]]
[[Category:Block entities]]
[[Category:Non-solid blocks]]
[[cs:Prapor]]
[[de:Banner]]
[[es:Estandarte]]
[[fr:Bannière]]
[[ja:旗]]
[[ko:현수막]]
[[nl:Banier]]
[[pl:Sztandar]]
[[pt:Estandarte]]
[[ru:Флаг]]
[[uk:Стяг]]
[[zh:旗帜]]</li></ul></nowiki> | 13w01a | Hoppers added, which can move items in and out of brewing stands. | |||
1.7.2{{Extension DPL}}<ul><li>[[Map|Map]]<br/>{{about|the craftable map|maps showing the locations of certain structures|Explorer Map|other uses|Map (disambiguation)}}
{{distinguish|World}}
{{Item
| image = Map Zoom 4.png
| renewable = Yes
| stackable = Yes (64)
}}
A '''map''' is an [[item]] used to view explored [[Chunk|terrain]] and mark landmarks.
==Obtaining==
===Crafting===
{{crafting
|head=1
|showname=0
|showdescription=1
|A1= Paper
|B1= Paper
|C1= Paper
|A2= Paper
|B2= Compass
|C2= Paper
|A3= Paper
|B3= Paper
|C3= Paper
|Output= Empty Map
|type= Miscellaneous
|description=This variation is called an "empty locator map" {{in|bedrock}}, or an "empty map" {{in|java}}.
When the player first creates a map, it is blank. It needs to be activated by holding it and pressing ''{{Control|use item}}''. after which it records terrain and location markers as the player travels within (or close to) the area it maps.
}}
{{crafting
|A1= Paper
|B1= Paper
|C1= Paper
|A2= Paper
|B2= Paper
|C2= Paper
|A3= Paper
|B3= Paper
|C3= Paper
|Output= Empty Map
|type= Miscellaneous
|description={{only|bedrock}}
This variation is called an "empty map". It does not show location markers. It is intended for cloning and zooming locator maps without having to consume an additional [[compass]] (thereby saving [[iron ingot]]s and [[redstone dust]]), but it can also be {{Control|use|text=activated}} and later converted to a locator map by combining it with a compass on an [[anvil]], [[crafting table]], or [[cartography table]].
|foot=1
}}
=== Natural generation ===
==== Chest loot ====
{{LootChestItem|empty-map,map
}}
=== Cartography table ===
A map can also be created using a single paper on a [[cartography table]] to create an empty map, or a paper with a compass for an empty locator map.{{only|bedrock}}
=== Starting map ===
{{exclusive|bedrock|section=1}}
When creating a new world {{in|bedrock}}, the player can enable the "Starting Map" option to spawn with an empty locator map in the hotbar. The map's zoom scale is 1:8. The map is updated only while the player holds it.
=== Trading ===
Novice-level cartographer [[Villager|villagers]] sell a single empty map for 7 [[Emerald|emeralds]] as their trades.
{{IN|java}}, cartographer villagers may give players with the [[Hero of the Village]] effect an empty map.
== Usage ==
{{See also|Tutorials/Mapping}}
=== Mapping ===
Crafting a map creates an empty map. The map is drawn for the first time when it is held and used (with ''{{control|use item}}''). This map can then be adjusted to different zoom levels. After conversion to a drawn map item, it starts to draw a top-down view of the player's surroundings, with North pointing to the top of the map. A pointed oval pointer indicates the player's position on the map, and moves in real-time as the player moves across the terrain shown on the map. The map does ''not'' center on the player when created, rather, the world is broken up into large invisible grid squares, and the map displays the area of whichever grid square it is in when it is first used. For example, if a player uses a new map in a certain grid square, and then moves a distance away and uses another fresh map but is still within the same grid square, both maps appear identical. To make a map that is not identical to the first one, the player would have to move outside of the edges of the first map (because then they would be in a new grid square). This way, no two maps of the same size can ever partially overlap and every map can display only a fixed area.
To record the world on a map, that specific map must be held in the player's hands while the player moves around the world. The world is recorded as-is during exploration, meaning that if the world is modified, a player must revisit the area while holding the map to update the map's view. Maps can also be [[Map#Cloning|cloned]]. If a player holds a map whose one or more clones are on display in item frames, updates are made on all clone-connected maps.
Other players are displayed on the map only if they have a map in their inventory cloned from the one being looked at. When placing a map into an [[item frame]], the map displays with a green pointer shown at the location of the item frame. This is to help the player see where they are in relation to the area that the map is showing. If the player leaves a map in an item frame and views a clone of it, the green pointer remains in the spot of the framed copy. This can be used to set up waypoints. Unexplored areas are transparent, making the item frame visible.
When the player leaves the area shown on a specific map, the player pointer transforms into a white dot that moves on that map. The marker shrinks to a smaller white dot if the player is far from the map's center: the area is 320 by 320 blocks per scale factor. The dot moves along the edge of the map to show the relative location of the player. However {{in|bedrock}}, the pointer remains as an arrow but shrinks until the player is near the area shown on the map.
While maps in [[the Nether]] work, they show only the red-and-gray pattern, regardless of the blocks placed. The only useful function is finding where the player is in relation to placed framed maps, which show as green pointers. Additionally, the player pointer rapidly spins and is not a good indicator of direction. Placing a [[banner]] in [[the Nether]] still shows it on the map as usual. Having a smaller map image while riding a [[strider]] in the Nether can help one to see one's footing while traveling over [[lava]].
{{IN|java}}, when using a map from another dimension, the map shows the player's position and direction when they were last in the dimension of the map. {{IN|bedrock}}, however, the player can use maps from one dimension while in another dimension. For locator maps, the place marker changes color depending on the dimension that the player is currently in (white for the Overworld, red for [[the Nether]], and magenta for [[the End]]). An Overworld map in the Nether shows the player's corresponding location and direction in the Overworld.<ref name=multiverse>{{ytl|EpP1diZdEdI}}</ref> Similarly, a Nether Map in the Overworld shows the player's corresponding location in the Overworld, but the place marker spins, just like a Nether map in the Nether. An Overworld map in the End shows the world spawn.<ref name=multiverse/> A Nether map cannot be used in the End — the map appears, but the place marker is not shown anywhere — and similarly, an End map cannot be used in the Overworld or the Nether.
A player can make a large piece of pixel art (128×128) facing upward, center a map on it, and place that map in an [[item frame]] to create a custom picture. Locking is recommended. See [[Map item format#Map Pixel Art]] for details on the techniques.
Maps display as a mini-map when held in the off-hand, or if the off-hand slot is occupied; the map is full-sized only when held in the dominant hand with both hands free.
A map always positions itself facing towards North when placed horizontally within an item frame regardless of how the map is placed.
=== Map content ===
{{Main|Map item format}}
Maps consist of square pixels arranged like pixels in a 128×128 square pattern, with each pixel representing a square portion of land. {{IN|java}}, the [[Map item format#Color table|color of a map pixel]] generally matches the color of the most common [[opaque]] block in the corresponding area, as seen from the sky. 'Minority blocks' in the target area have no effect on the color of the pixel, thus small features tend to be undetectable on zoomed-out maps.
{{IN|bedrock}}, the [[Map item format#Color table|color of a map pixel]] instead matches the single top-most opaque block in a grid sized by the map magnification pixel size (see the table in the "Player marker and pointer" section below). For example, a 3/4 magnification map has a pixel size of 8x8 blocks; this means the map will read only the top-most opaque blocks at the 0,0 coordinate, the 8,0 coordinate, the 0,8 coordinate, etcetera, ignoring all other blocks in the area. This means that {{in|bedrock}}, map pixel art requires only one block per pixel regardless of map magnification.
{{IN|bedrock}}, grass, foliage and water colors that are biome-dependent are represented accurately on a map.
{| class="wikitable"
|-
! style="width: 300px;" | {{el|je}}
! style="width: 300px;" | {{el|be}}
|-
| style="text-align: center;" | [[File:Map Zoom 4.png|alt=All banners marked on a map, alongside a named banner.|216px]]
| style="text-align: center;" | [[File:Map item BE.png|216px]]
|-
| Biome colors on ''Java Edition''.
| Biome colors on ''Bedrock Edition''.
|-
|}
Maps also show ground up to about 15 blocks below the surface of the water in oceans as slightly lighter blue, to show where the ground rises. This is not true with land above water. Higher elevations in the world mean lighter colors on the map. The map records the surface even as the player moves below the surface.
A standard map represents 128x128 blocks (1 block per pixel, 8x8 [[chunks]]) but maps can be zoomed-out to represent up to 2048x2048 blocks (16 square blocks per pixel, 128x128 [[chunks]]).
Some relevant distances: 64 blocks (4 chunks) is the update radius from a player in the Overworld and the End. However, it is half this (32 blocks) in the Nether. Also, 1024 blocks is the minimum Overworld distance from a [[nether portal]], at which players can build another portal and expect to reach a new location in the Nether. This is the distance across a 1:8 map, and also from a 1:16 map's center to its edge.
=== Player marker and pointer ===
{{IN|java}}, every map contains a marker that marks the position of the player, and points in the same direction as the player. When a player moves out of a map, a big white dot appears and moves relative to the player's position. The pointer either disappears when the player moves away a certain distance from the border of the map or, in case of [[explorer map]]s, the big white dot changes to a smaller white dot. The distance required for the small white dot to appear(explorer maps) or for the big dot to vanish (normal maps) changes with the scaling of the map.
* '''Level 0/4 :''' 128×128 blocks (each map pixel represents 1 block)
* '''Level 1/4 :''' 256×256 blocks (2×2 blocks per map pixel)
* '''Level 2/4 :''' 512×512 blocks (4×4 blocks per map pixel)
* '''Level 3/4 :''' 1024×1024 blocks (8×8 blocks per map pixel)
* '''Level 4/4 :''' 2048×2048 blocks (16×16 blocks per map pixel)
{{IN|bedrock}}, a map can be crafted with or without this marker, and a map without a position marker can add one later by adding a compass to the map. When a map is crafted without a compass, it's simply called an "empty map", but when crafted with a compass, it's called an "empty locator map". The marker also turns red if the player enters the Nether with an Overworld map and shows the player's Overworld location relative to the Nether location. A map created in the End has a purple marker showing the player's location. If an Overworld map is used in the End, a magenta dot appears on the player's spawn point.{{/BE|position}}
{{crafting
|name=Map<br>(with marker)
|ingredients=[[Map]] or Empty Map +<br>[[Compass]]
|showdescription=1
|Map (no markers);Empty Map
|Compass
|Output= Locator Map;Empty Locator Map
|type= Miscellaneous
|description={{el|be}} only.
Maps crafted from only paper do not show the location marker; to add it, a compass must be added to the map.
|foot=1
}}
{{IN|bedrock}}, a cartography table can also be used to add a pointer to create a locator map or empty locator map. This can be done by adding a compass to paper, or to an empty map or map.
=== Zooming out ===
[[File:Cartography table UI zoom.png|thumb|300px|{{IN|java}}, cartography table's UI, showing the map is being zoomed out.]]
A [[cartography table]] can also be used to zoom out, taking only one piece of paper per zoom level.
A blank map can not be zoomed out. A map has to have something already marked on it for the zooming to be possible.
{{Crafting
|A1= Paper |B1= Paper |C1= Paper
|A2= Paper |B2= Map;Locator Map |C2= Paper
|A3= Paper |B3= Paper |C3= Paper
|Output= Map;Locator Map
|showdescription=1
|description=Locator Map {{el|be}} only.
}}
{{/BE|zoom}}
==== Zoom details ====
The zooming function starts from when the map is created (zoom level 0) up to its fourth zoom step (zoom level 4).
{| class="wikitable" style="text-align: center" data-description="Zoom levels"
! colspan="2" |
! Zoom step 0
! Zoom step 1
! Zoom step 2
! Zoom step 3
! Zoom step 4
|-
! colspan="2" |
| [[File:Map Zoom 0.png|116px|Zoom step 0, 1:1]]
| [[File:Map Zoom 1.png|116px|Zoom step 1, 1:2]]
| [[File:Map Zoom 2.png|116px|Zoom step 2, 1:4]]
| [[File:Map Zoom 3.png|116px|Zoom step 3, 1:8]]
| [[File:Map Zoom 4.png|116px|Zoom step 4, 1:16]]
|-
! colspan="2" | Zoom level
| 0/4
| 1/4
| 2/4
| 3/4
| 4/4
|-
! colspan="2" | 1 map pixel represents
| 1 block
| 2×2 blocks
| 4×4 blocks
| 8×8 blocks
| 16×16 blocks<br>(1×1 chunk)
|-
! colspan="2" | Scaling ratio
| 1:1
| 1:2
| 1:4
| 1:8
| 1:16
|-
! rowspan="2" colspan="2" | Map covers an area of
| 128×128 blocks
| 256×256 blocks
| 512×512 blocks
| 1024×1024 blocks
| 2048×2048 blocks
|-
| 8×8 chunks
| 16×16 chunks
| 32×32 chunks
| 64×64 chunks
| 128×128 chunks
|-
! colspan="2" | Smallest discernible features
| Blocks
| Trees, Paths
| Lakes, Buildings
| Mountains, Rivers
| Biomes, Mountain Ranges
|-
! colspan="2" | Use cases
| Pixel art, Base plans
| Base surroundings
| Structure mapping
| Landscape mapping
| Biome mapping
|-
! rowspan="2" | Total paper needed to zoom out from Level 0
! in anvil{{only|bedrock|short=1}} or crafting table
| -
| {{ItemSprite|Paper}} 8
| {{ItemSprite|Paper}} 16
| {{ItemSprite|Paper}} 24
| {{ItemSprite|Paper}} 32
|-
! in cartography table
| -
| {{ItemSprite|Paper}} 1
| {{ItemSprite|Paper}} 2
| {{ItemSprite|Paper}} 3
| {{ItemSprite|Paper}} 4
|}
Maps are always aligned to a grid at all zoom levels. That means zooming out any different map in a specific area covered by that map always has the same center. As such, maps are aligned by map width (1024 blocks for a level 3 maps) minus 64. A level 3 map generated at spawn covers X and Z coordinates from -64 to 959. All maps generated in this area zoom out to the same coordinates, guaranteeing that they are always 'aligned' on a map wall. For a zoomed-out map to cover a new area, it must start with a base (level 0) map that is in that area.
At zoom level 0, a map created on the point (0,0) has (0,0) at the center of the map. At higher zoom levels of the same map, the coordinate (0,0) is in the top left square of the map.
{{IN|java}}, zoom level can be seen on a map by turning on Advanced Tooltips (a [[Debug screen#More debug keys|debug screen]] option that can be toggled by using the key combination {{key|F3+H}}). The tooltip of the map then shows the zoom level, scaling factors, and map ID.
=== Cloning ===
[[File:Cartography table UI clone.png|thumb|300px|{{IN|Java}}, cartography table's UI, showing the map is being cloned.]]
A mix of empty maps and empty locator maps may be used. Whether the cloned maps show position markers is dependent only on the input map.
A [[cartography table]] can also be used to clone a map.
The parts of the world that have already been explored and mapped are copied, and newly explored areas appear on both instances. If one of the maps is later zoomed out, then the maps lose their connection to each other and function as completely separate maps that have to be individually filled by exploring.
In Creative mode, a map in an item frame may be cloned by using {{control|pick block}} on it, as long as that map is not also in the player's inventory.
It doesn't matter if the map to be cloned is at a higher zoom level (made of more paper) than the blank map. Upon copying the map, both resulting maps have the same magnification as the starting map.
{{/BE|clone}}
=== Crafting ingredient ===
{{crafting usage|Map, Empty Map}}
=== Marking points ===
{{IN|java}} the player has the ability to mark spots on a map. To do this, {{control|use}} a map on a placed-down [[banner]], and the spot of the banner gets marked on the map. The mark takes the color of whatever the base color is for the banner, and if the banner has a name, the mark shows that name. Banner marks on a map are always oriented with their top facing north, regardless of the banner's actual orientation. If the banner is destroyed, the mark of the banner remains at first, but if the player gets closer to where the banner previously was, it disappears as the area is updated on the map.
If a map is mounted on an item frame and is within the area it depicts, the mounted map displays its current location with a green indicator rotated to match its orientation.
[[File:Map Marker Bedrock on Item frame.png|thumb|181x181px|{{IN|bedrock}} this is what a map lying on an item frame looks like, while showing markers.]]
{{IN|bedrock}} the player can place copies of locator maps in [[item frame]]s in order to create a land mark. The marker is a green dot that resembles the shape of the player's marker, but in green color. The position the marker points at depends on the direction the item frame is facing. It is worth noting that the markers work only on copies of the same map. Other maps of the same area do not show the existing markers that the player(s) had placed.
If a player has a cloned map in their inventory, their pointer appears white when viewed on the same map held by another player. Hence, if all players have the same cloned map in their inventory, all markers would appear white when the clone map is viewed.
{| class="wikitable"
|-
! style="width: 300px;" | {{el|je}}
! style="width: 300px;" | {{el|be}}
|-
| style="text-align: center;" | [[File:Banner marked map.png|alt=All banners marked on a map, alongside a named banner.|216px]]
| style="text-align: center;" | [[File:Tracking map with markers bedrock.png|216px]]
|-
| How every banner appears {{IN|java}} on a map, including named banners.
| {{IN|bedrock}} this is how a locator map shows map markers while held by a player.
|-
|}
===Locking===
[[File:Cartography table UI lock.png|thumb|300px|{{IN|Java}}, cartography table's UI, showing the map is being locked.]]
Maps can be locked when using a [[glass pane]] in a [[cartography table]]. This creates a new map containing the same data and locks it. All copies of this new map are also locked. A locked map never changes, even when the depicted terrain changes. {{IN|Be}}, locked maps have a unique texture.
{| class="wikitable" style="text-align: center;"
|-
! Condition
! style="width: 200px;" | Newly created map
! style="width: 200px;" | Map after terrain alteration
|-
! Unlocked map
| [[File:Map Zoom 0.png|174px]] || [[File:Unlocked Map.png|174px]]
|-
! Locked map
| [[File:Map Zoom 0.png|174px]] || [[File:Map Zoom 0.png|174px]]
|-
|}
{{-}}
== Sounds ==
{{Edition|Java}}:
{{Sound table
|rowspan=2
|sound=Drawmap1.ogg
|sound2=Drawmap2.ogg
|sound3=Drawmap3.ogg
|subtitle=Map drawn
|source=player
|description=When a map is drawn
|id=ui.cartography_table.take_result
|translationkey=subtitles.ui.cartography_table.take_result
|volume=1.0
|pitch=1.0
|distance=16}}
{{Sound table
|subtitle=Map drawn
|source=block
|description=When a map is edited using a cartography table
|id=ui.cartography_table.take_result
|translationkey=subtitles.ui.cartography_table.take_result
|volume=1.0
|pitch=1.0
|distance=16
|foot=1}}
{{Edition|Bedrock}}:
{{Sound table
|type=bedrock
|rowspan=2
|sound=Drawmap1.ogg
|sound2=Drawmap2.ogg
|sound3=Drawmap3.ogg
|source=block
|description=When a map is drawn<wbr>{{Upcoming|BE 1.20.20.20}}
|id=ui.cartography_table.take_result|idnote={{Verify|Could be block.cartography_table.use}}
|volume=0.8
|pitch=1.0}}
{{Sound table
|type=bedrock
|source=block
|description=When a map is edited using a cartography table
|id=ui.cartography_table.take_result
|volume=0.8
|pitch=1.0
|foot=1}}
== Data values ==
=== ID ===
{{edition|java}}:
{{ID table
|edition=java
|showforms=y
|generatetranslationkeys=y
|displayname=Empty Map
|spritetype=item
|nameid=map
|form=item}}
{{ID table
|displayname=Map
|spritetype=item
|nameid=filled_map
|form=item
|translationkey=item.minecraft.filled_map, filled_map.buried_treasure, filled_map.explorer_jungle{{upcoming|java 1.20.2}}, filled_map.explorer_swamp{{upcoming|java 1.20.2}}, filled_map.mansion, filled_map.monument, filled_map.unknown, filled_map.village_desert{{upcoming|java 1.20.2}}, filled_map.village_plains{{upcoming|java 1.20.2}}, filled_map.village_savanna{{upcoming|java 1.20.2}}, filled_map.village_snowy{{upcoming|java 1.20.2}}, filled_map.village_taiga{{upcoming|java 1.20.2}}
|foot=1}}
{{edition|bedrock}}:
{{ID table
|edition=bedrock
|showaliasids=y
|shownumericids=y
|showforms=y
|notshowbeitemforms=y
|generatetranslationkeys=y
|displayname=Empty Map
|spritetype=item
|nameid=empty_map
|aliasid=emptymap
|id=515
|form=item
|translationkey=item.emptyMap.name, item.emptyLocatorMap.name}}
{{ID table
|displayname=Map
|spritetype=item
|spritename=map-be
|nameid=filled_map
|aliasid=map
|id=420
|form=item
|translationkey=item.map.name, item.map.exploration.mansion.name, item.map.exploration.monument.name, item.map.exploration.treasure.name
|foot=1}}
=== Metadata ===
{{see also|Bedrock Edition data values}}
{{IN|bedrock}}, maps use the following data values:
{{/DV}}
=== Item data ===
{{el|java}}:
{{main|Player.dat format}}
<div class="treeview">
* {{nbt|compound|tag}}: The item's '''tag''' tag.
{{:Player.dat_format/Maps}}
</div>
{{el|bedrock}}:
: See [[Bedrock Edition level format/Item format]].
=== Map icons ===
{{see also|Player.dat format|Map item format|map_icons.png}}
Map icons are 8×8 in ''Java Edition'', but 16×16 in Bedrock Edition. As such, there are minor misalignment issues in ''Java Edition''.<ref>{{bug|MC-214649|||WF}}</ref>
[[File:Map icons.png|thumb|128px|Map icons texture {{in|Java}}]]
[[File:Map icons BE.png|thumb|128px|Map icons texture {{in|Bedrock}}]]
{| class="wikitable"
|-
! Java ID !! Bedrock ID !! Text ID !! Appearance !! Purpose !! Shown in item frames?
|-
| 0 || ||<code>player</code> || [[File:Player (texture) JE1 BE1.png|16px]] [[File:Player (texture) BE2.png|16px]] White marker || Players (on map) || No
|-
| 1 || 1 ||<code>frame</code> || [[File:Green Marker (texture) JE1 BE1.png|16px]] [[File:Green Marker (texture) BE2.png|16px]] Green marker || The current map in an item frame || Yes
|-
| 2 || ||<code>red_marker</code> || [[File:Red Marker (texture) JE1 BE1.png|16px]] [[File:Red Marker (texture) BE2.png|16px]] Red marker || Position converted to Overworld when opening Overworld map in the Nether{{Only|bedrock}} || No
|-
| 3 || ||<code>blue_marker</code> || [[File:Blue Marker (texture) JE1 BE1.png|16px]] [[File:Blue Marker (texture) BE2.png|16px]] Blue marker || Other players || No
|-
| 4 || ||<code>target_x</code> || [[File:Target X (texture) JE1 BE1.png|16px]] White X || Unused || Yes
|-
| 5 ||5
|<code>target_point</code> || [[File:Target Point (texture) JE1 BE1.png|16px]] [[File:Target Point (texture) BE2.png|16px]] Red triangle || Unused || Yes
|-
| 6 || 6 ||<code>player_off_map</code> || [[File:Player Off Map (texture) JE1 BE1.png|16px]] Large white dot || Players off map, nearby{{only|java}} || No
|-
| 7 || 13 ||<code>player_off_limits</code> || [[File:Player Off Limits (texture) JE1.png|16px]] [[File:Player Off Limits (texture) BE.png|16px]] Small white dot || Players off map, far away{{only|java}} || No
|-
| 8 ||14
|<code>mansion</code> || [[File:Mansion (texture) JE1.png|16px]] [[File:Mansion (Texture) BE2.png|frameless|16x16px]] Woodland mansion || Woodland mansion || Yes
|-
| 9 || 15 ||<code>monument</code> || [[File:Monument (texture) JE1.png|16px]] [[File:Monument Texture BE2.png|frameless|16x16px]] Ocean monument || Ocean monument || Yes
|-
| 10 - 25 || ||<code>{{tooltip|banner_*|banner_white, banner_orange, banner_magenta, banner_light_blue, banner_yellow, banner_lime, banner_pink, banner_gray, banner_light_gray, banner_cyan, banner_purple, banner_blue, banner_brown, banner_green, banner_red, banner_black}}</code> || [[File:Banner White (texture) JE1.png|16px]] [[File:Banner Light Gray (texture) JE1.png|16px]] [[File:Banner Gray (texture) JE1.png|16px]] [[File:Banner Black (texture) JE1.png|16px]] [[File:Banner Brown (texture) JE1.png|16px]] [[File:Banner Red (texture) JE1.png|16px]] [[File:Banner Orange (texture) JE1.png|16px]] [[File:Banner Yellow (texture) JE1.png|16px]] [[File:Banner Lime (texture) JE1.png|16px]] [[File:Banner Green (texture) JE1.png|16px]] [[File:Banner Cyan (texture) JE1.png|16px]] [[File:Banner Light Blue (texture) JE1.png|16px]] [[File:Banner Blue (texture) JE1.png|16px]] [[File:Banner Magenta (texture) JE1.png|16px]] [[File:Banner Purple (texture) JE1.png|16px]] [[File:Banner Pink (texture) JE1.png|16px]]<br>Banners in all 16 wool colors{{only|java}}|| Banner markers || Yes
|-
| 26 ||4
|<code>red_x</code> || [[File:Red X (texture) JE1.png|16px]] [[File:Target X (texture) BE2.png|16px]] Red X || Buried treasure || Yes
|-
| || 8 || || [[File:Magenta Marker (texture) BE1.png|16px]] Magenta marker
| Position converted to Overworld when opening Overworld map in the End{{Only|bedrock}} || No
|-
| || 9 || || [[File:Orange Marker (texture) BE1.png|16px]] Orange marker{{more info}}
|Other players
|Yes
|-
| || 10 || || [[File:Yellow Marker (texture) BE1.png|16px]] Yellow marker
| Other players || No
|-
| || 11 || || [[File:Cyan Marker (texture) BE1.png|16px]] Cyan marker
| Other players || No
|-
| -
|12
| || [[File:Green Point (texture) BE1.png|16px]] Green Triangle
| Other structure such as stronghold, fortress, end city, etc. when used as explorer map destination{{Only|bedrock}} || Yes
|}
It should be noted that even if the player used a NBT editor to add an additional icon on the map, ''Minecraft'' shows only the first one listed when the player loads up their world.
== Achievements ==
{{load achievements|Map Room}}
== History ==
{{see also|section=24|map_icons.png|Java Edition history of textures#Map icons}}
{{more images|section=24|{{bug|MC-72962}}}}
{{History||April 27, 2011|link=https://web.archive.org/web/0/http://notch.tumblr.com/post/4988431144/the-maps|[[Notch]] unveiled screenshots of the map.}}
{{History||April 28, 2011|link={{tweet|notch|63500114005721088}}|[[Notch]] said that he would try to make maps place-able on [[wall]]s.}}
{{History|java beta}}
{{History||1.6|snap=Test Build 3|[[File:Map (item) JE1 BE1.png|32px]] Added maps.}}
{{History||1.6.6|The ability to auto-craft maps using shift-click has been disabled.}}
{{History||1.8|snap=Pre-release|Maps can now be found in library chests in the brand-new [[stronghold]]s.
|Auto crafting maps has been restored. Map cloning, therefore, is unavailable for a period of time.}}
{{History||1.8.1|Maps now work both while walking and flying.}}
{{History|java}}
{{History||1.0.0|snap=Beta 1.9 Prerelease 5|Prior to this update, the [[sun]] in ''[[Minecraft]]'' rose in the North, which threw off many [[player]]s and led to a common misconception that ''Minecraft'' maps/[[world]]s were oriented with East at the top. The sun now rises in the east and sets in the west, making navigation much more intuitive.
|Before the change in sun position, it was commonly said that ''Minecraft'' maps/worlds are oriented with East at the top; sunrise, by definition, occurs at the East, which means it is certainly true that the maps were oriented "East" since the Sun rose from the top (North). However, [[Jeb]] asserted (and [[Notch]] agreed) that the sun rose in the north.<ref>{{Tweet|jeb|87815841160237056}}</ref><ref>{{Tweet|notch|88155424880201728}}</ref> Most mods and map-making tools, however, used the terms East and North consistent with their actual definitions (e.g. a [[Programs and editors/Cartograph|Cartograph]]-generated map with North at the top is rotated 90 degrees from the in-game map).}}
{{History||1.4.2|snap=12w34a|[[File:Empty Map JE1 BE1.png|32px]] [[Crafting]] a map now creates an empty map. The map is drawn for the first time when it is held and right clicked, and is centered near the location of the [[player]] when clicked (not as before where it was centered on the location it was crafted.)
|Previously, in order to map a new area, the map had to be ''crafted'' in that area (rather than carrying a previously-crafted map to the new area). The point where a map is crafted becomes its permanent center, and could never be changed.
|The pointer no longer disappears when leaving the map, but transforms into a white dot, indicating on what side of the map the player is located.
|Maps now align to a grid, making it easier to create adjacent maps.
|Maps can now be zoomed out (but not zoomed in).
|Maps can now be cloned and scaled.}}
{{History||1.4.2|snap=12w34b|Maps now have a ''zoom level'', which was fixed at 1:8 prior to snapshot [[Java Edition 12w34a|12w34a]],<ref name="mapinfo">https://web.archive.org/web/0/http://notch.tumblr.com/post/4988431144/the-maps</ref> but now starts at 1:1 and can be increased up to 1:16 by re-crafting an existing map.
|Maps are no longer numbered on the top-left corner and is labeled through the tooltip.}}
{{History|||snap=12w36a|New maps are now crafted at a scale factor of 1:1. A zoomed in map can be zoomed out by re-crafting it with another 8 sheets of [[paper]] on a [[crafting table]]. Each time this is done, the scale increases - 1:1, 1:2, 1:4, 1:8, 1:16 with a map scale of 1:16 being the current maximum.}}
{{History||1.7.2|snap=13w38a|The map size has been increased when placed on a [[wall]] using the [[item frame]].
|More colors have been added to maps for different [[block]]s.<ref name="infodump2">https://web.archive.org/web/0/https://www.mojang.com/2013/10/minecraft-1-7-the-update-that-changed-the-world</ref>}}
{{History||1.8|snap=14w31a|Zoomed maps now conform to an expanded grid based on their zoom level. Previously, careful considerations would need to be taken to creating a wall of adjoining maps.}}
{{History||1.8.1|snap=pre1|Some colors have been changed on maps to more accurately represent their respective [[block]].}}
{{History||1.9|snap=15w31a|Maps now display as a mini-map when held in the off-hand, or if the off-hand slot is occupied; the (old) large version is visible only when held in the dominant hand with the secondary hand free.}}
{{History|||snap=15w34a|New maps can now be [[crafting|crafted]] at a scale factor of 1:4.
|A crafting recipe has been added for zooming in maps.}}
{{History|||snap=15w43a|The average yield of empty maps from [[stronghold]] library [[chest]]s has been doubled.}}
{{History|||snap=15w45a|New maps are once again [[crafting|crafted]] at a scale factor of 1:1, as they had been before snapshot [[15w34a]].
|The [[crafting]] recipe, that was introduced in 15w34a, for zooming in maps has been removed.}}
{{History|||snap=15w49a|Map making now uses armor equipping sounds.}}
{{History||1.11|snap=16w39a|Maps now work in [[the End]].
|Empty maps are now [[trading|sold]] by cartographer [[villager]]s as their tier 3 [[trading|trade]].
|Added [[explorer map]]s, sold by cartographers as their tier 4 trades.}}
{{History||1.12|snap=17w17a|Maps now have separate colors for colored [[terracotta]] blocks from other colored blocks.}}
{{History||1.13|snap=17w47a|Prior to [[1.13/Flattening|''The Flattening'']], these [[item]]s' numeral IDs were 358 and 395.
|Maps now use additional NBT to specify which map they contain. Prior to this version, they used the [[damage]] value instead.
|Map IDs are no longer limited to 32,768.}}
{{History|||snap=17w50a|Maps can now be placed on floor and ceiling [[item frame]]s.}}
{{History|||snap=18w10a|Spots on maps can now be marked using [[banner]]s.}}
{{History|||snap=18w11a|Empty maps can now generate in [[shipwreck]] [[chest]]s.}}
{{History|||snap=pre7|Maps have been changed slightly, in regard to which [[block]]s are shown and which blocks are not.}}
{{History||1.14|snap=18w43a|[[File:Empty Map JE2 BE2.png|32px]] [[File:Map (item) JE2 BE2.png|32px]] The textures of maps have been changed.}}
{{History|||snap=18w48a|Empty maps can now be found in chests in [[village]] cartographer houses.}}
{{History|||snap=19w02a|Maps can now be cloned and zoomed out (extended) by using a [[cartography table]].
|Maps can now be locked by using a [[glass pane]] with a cartography table.
|The recipes for cloning and zooming out maps have been removed.}}
{{History|||snap=19w06a|Map making is now silent again.}}
{{History|||snap=19w13a|Cartographer villagers now give empty maps to players under the [[Hero of the Village]] effect.}}
{{History||1.16|snap=20w21a|Map making sounds are now the same as when using a cartography table.}}
{{History|pocket alpha}}
{{History||v0.14.0|snap=build 1|[[File:Empty Map JE1 BE1.png|32px]] [[File:Map (item) JE1 BE1.png|32px]] Added maps.
|Maps are crafted using nine [[paper]], one for every slot of the [[crafting]] grid.
|Maps must be combined with a [[compass]] using an [[anvil]] in order to show the [[player]]'s position.
|Maps can be zoomed using an anvil.}}
{{History|||snap=build 3|New maps are now [[crafting|crafted]] at full zoom.
|Empty maps now have a "Create Map" button to initialize them.}}
{{History|||snap=build 7|New maps are now crafted at a scale factor of 1:1.}}
{{History||v0.15.0|snap=unknown|Maps can now be crafted either with 8 pieces of [[paper]] and a [[compass]] ''or'' 9 pieces of paper, to get a map with or without a position marker.}}
{{History||v0.16.0|snap=build 1|Different colors have been added to maps for different [[biome]]s.}}
{{History|pocket}}
{{History||1.0.0|snap=?|[[Windows 10 Edition]] can now use the [[anvil]] as well as the [[crafting table]] to clone, zoom and apply markers, just as [[Pocket Edition]] in general could.
|Maps can now be found inside [[stronghold]] library [[chest]]s.}}
{{History||1.1.0|snap=alpha 1.1.0.0|Empty maps with direction markers built-in are now called "locator maps".}}
{{History|||snap=alpha 1.1.0.3|"Locator maps" are now called "empty locator maps".
|Empty maps are now [[trading|sold]] by cartographer [[villager]]s for 7-11 [[emerald]]s as their tier 3 [[trading|trade]].}}
{{History|bedrock}}
{{History||1.4.0|snap=beta 1.2.14.2|Maps can now be found inside map room [[chest]]s in [[shipwreck]]s.}}
{{History||?|The texture of the filled map overlay has been changed.}}
{{History||?|Maps now function in dimensions other than the dimension in which they were created.}}
{{History||1.10.0|snap=beta 1.10.0.3|Maps can now be found in cartographer house [[chest]]s in [[village]]s.
|[[File:Empty Map JE2 BE2.png|32px]] The texture of empty maps has been changed.}}
{{History||1.11.0|snap=beta 1.11.0.1|Empty maps can now be created from 1 [[paper]] in [[cartography table]]s.
|Maps can now be zoomed, cloned, renamed, and have pointers added in cartography tables.}}
{{History|||snap=beta 1.11.0.4|Cartographer [[villager]]s now [[trading|sell]] empty map for an [[emerald]] as their first tier [[trading|trades]].
|Empty locator maps can now be [[trading|bought]] from cartographer villagers.}}
{{History||1.13.0|snap=beta 1.13.0.1|[[File:Map (item) BE3.png|32px]] [[File:Locked Map (item) BE2.png|32px]] Filled maps and locked maps now have unique inventory icons.}}
{{History||1.16.0|snap=beta 1.16.0.57|Trading has been changed, novice-level cartographer now sell an empty map for 7 emeralds. Cartographer villager no longer sell empty locator map.}}
{{History||1.16.100|snap=beta 1.16.100.56|The ID of maps have been changed from <code>emptymap</code> to <code>empty_map</code> and <code>map</code> to <code>filled_map</code>.}}
{{History|console}}
{{History||xbox=TU1|xbone=CU1|ps=1.00|wiiu=Patch 1|switch=1.0.1|[[File:Map (item) JE1 BE1.png|32px]] Added maps.
|The [[player]] spawns with a free map.
|Maps are available only as zoom step 3 maps centered at coordinates 0,0. Biome colors do not appear on maps.}}
{{History||xbox=none|xbone=CU1|ps=1.0|wiiu=none|Larger sized worlds on Xbox One, Playstation 4, and Nintendo Switch have zoom step 3 maps aligned to a grid with maps centered at 0, 1024, or 2048 on the X or Z coordinates.}}
{{History||xbox=TU21|xbone=CU9|ps=1.14|wiiu=Patch 1|[[File:Empty Map JE1 BE1.png|32px]] [[Crafting]] a map now produces an empty map.}}
{{History||xbox=TU46|xbone=CU36|ps=1.38|wiiu=Patch 15|The outer end islands appear on different maps; even on Xbox 360, Playstation 3, Vita, and Wii U editions.}}
{{History||xbox=none|xbone=none|ps=1.90|wiiu=none|switch=none|[[File:Empty Map JE2 BE2.png|32px]] [[File:Map (item) JE2 BE2.png|32px]] The textures of maps have been changed.}}
{{History||ps=1.91|Maps can now be created and used in [[cartography table]]s.}}
{{History|foot}}
== Issues ==
{{issue list}}
== Trivia ==
* Use of the {{key|F1}} key can allow the player to hold a map without blocking their view at all.
* In ''Java Edition'', a map created using {{cmd|give}} can be any map by using the Map parameter to specify the map number desired. E.g. {{cmd|give [player] minecraft:filled_map{map:5<nowiki>}}} gives the specified player map_5. If no data value is supplied it defaults to map_0. If map_0 has not ever been crafted, it is centered on x=0, z=0.
* The maps are stored separately as their own data (<code>.dat</code>) file as <code>map_x.dat</code> with (x) being the map number, see [[map item format]] for more info. By manipulating this number, players can organize their maps to suit them, or if they accidentally create a map in the same location, they can delete their extra map so as to save the number they make.
* Certain programs can be used to make customized maps with images or text on them instead of actual maps, many people use these in adventure maps to show pictures or to tell a story.
* Since all copies of a map are links to the same file, copying an unfinished map keeps it synchronized with the copy as the player fills it in. Thus, a copy stored in a chest can act as a remote backup.
* A map that is in an item frame does not update itself until a player picks it up, lets it reload, and places it back again. However, if a player holds a clone of the map, both maps update.
* Filled maps are the only items that make 90 degree rotations in item frames, and also the only items that can expand the item frame into full block wide.
* On [[Legacy Console Edition]], the player always spawns with a map in their inventory after creating a world. This was later added to Bedrock Edition as an optional feature in the world creation menu.
* Maps on Legacy Console Edition always show the player's current coordinates, as a substitute for the optional [[Coordinates|coordinate display]] in other editions.
* A map cannot be created on [[New Nintendo 3DS Edition]]. Instead, the map is always displayed on the bottom screen along with the coordinates. Biome colors do not appear on maps.
== Gallery ==
<gallery>
MapItem1.png|A fully zoomed map.
MapRotation.png|Having a map in hand does not stop the ability to see ahead.
MapItem3.png|A world being recorded onto a map.
Mcmap4.png|Nearly fully explored map.
Zoomed Map.png|A map edited to the scale of 1.
Sky Map.png|A map mapping the [[Sky Dimension]].
MapOfVillage.png|A village and how it is represented on a map.
Pumpkin map.png|A map containing a custom image made by placing a large number of blocks.
Complete Map.png|A completely explored map.
MapZooms.png|A diagram showing how maps zoomed out before [[Java Edition 1.8]]. Notice how the larger maps have borders made of half and quarter small maps.
Map18zooms.png|From 1.8, zoomed maps are aligned to this grid exactly.
Large Biome Map.png|A map of a [[Large Biomes]] world.
Map0140-0160.png|A comparison of maps between versions in Pocket Edition Alpha [[Pocket Edition Alpha 0.14.0|0.14.0]] and [[Pocket Edition Alpha 0.16.0|0.16.0]].
Mycelium Map.png|A map view of a mushroom biome, showing that mycelium appears purple on a map.
MiniMap.png|Maps held in the off-hand or in either hand while [[dual wielding]] appear as mini-maps.
Partly filled treasure map.png|Partly filled treasure map with an odd area at the bottom left. Normally a partly filled map would look striped (as in the top left), but this map seems to be bugged and is possibly showing caves, or something, in the bottom left.
Partly filled ocean explorer map.png|Partly filled ocean explorer map. Updating the game from an older version (in this case the area was first generated before 1.18) and buying a map after updating (in this case in 1.19.4) can result in the map displaying rivers and terrain where there is really a frozen sea.
Map Stained Glass 1.png|Stained glasses' appearances on maps before and after 1.13.
Map Stained Glass 2.png|Stained glasses' appearances on maps before and after 1.13.
Map Various Blocks 1.png|Various blocks' appearances on maps before and after 1.13.
Map Various Blocks 2.png|Various blocks' appearances on maps before and after 1.13.
Better Together Map.jpg|Holding a map in the offhand in ''Bedrock Edition''.
Better Together Map Icon.jpg|Holding a map in both hands in ''Bedrock Edition''.
File:MapFailedtoFill.png|A map that has not yet filled. A rare bug in Java.
</gallery>
=== The Nether ===
<gallery>
Nethermap.png|A map in [[the Nether]].
Maponnether.png|A map in the Nether; the arrow turns around itself, like in [[compass]].
</gallery>
=== The End ===
<gallery>
Jeb End Map.png|The first image of a map in [[the End]].
Endmap.png|A map in the End.
</gallery>
=== Maps in item frames ===
<gallery>
FramedMap.png|A map displayed on an item frame, as it looked before [[Java Edition 1.7.2]].
Structure Map Collection.png|Multiple maps in item frames. Notice a [[village]], two [[desert temple]]s and a lava lake.
Minecraft maps 3by3.png|A collection of 9 connected full maps.
Full Map.png|A combination of 25 maps pasted together as one map.
Map wall BE.png|A map wall on ''Bedrock Edition'', showing large areas of biome colors for each biome.
Map's in item frames.png|Maps can be placed into [[item frame]]s so they can be viewed together.
Comparing Maps.png|The comparison between 3 zooms of maps.
SuperflatMap.png|A map in a [[Superflat]] world, with some [[village]]s.
MapWallWithMarkers.png|A 3x3 map wall with banner markers.
HEYYEYAAEYAAAEYAEYAA.png|He-Man map art.
Map Player Icons 1.png|First image of player icons on maps.
Map Player Icons 2.png|Second image of player icons on maps.
</gallery>
== See also ==
* [[Explorer Map]]
* [[Clock]]
* [[Tutorials/Navigation|Navigation]]
== References ==
{{Reflist}}
{{Items}}
[[cs:Mapa]]
[[de:Karte]]
[[es:Mapa]]
[[fr:Carte (objet)]]
[[hu:Térkép (tárgy)]]
[[ja:地図]]
[[ko:지도]]
[[nl:Kaart]]
[[pl:Mapa]]
[[pt:Mapa]]
[[ru:Карта]]
[[tr:Harita]]
[[th:แผนที่]]
[[uk:Мапа]]
[[zh:地图]]
[[Category:Renewable resources]]</li><li>[[Sign|Sign]]<br/>{{Block
| image = <gallery>
Oak Sign.png|Sign
Oak Wall Sign.png|Wall Sign
Oak Hanging Sign.png|Hanging Sign
Oak Wall Hanging Sign.png|Wall Hanging Sign
</gallery>
| image2 = <gallery>
Oak Sign JE3.png|Sign
Oak Hanging Sign (item) JE1 BE1.png|Hanging Sign
</gallery>
| extratext = [[#Gallery|View all renders]]
| transparent = Yes
| light = No
| tool = axe
| renewable = Yes
| stackable = Yes (16)
| flammable = No
| lavasusceptible = No
}}
A '''sign''' is a non-solid [[block]] that displays text and can be placed on the top or side of other blocks. A '''hanging sign''' is a decorative block that also displays text, and can be placed underneath blocks or with a solid self-supporting bracket. The text of both types of signs can be customized with [[dye]]s and [[glow ink sac]]s.
== Obtaining ==
=== Breaking ===
Signs can be broken with any tool or without a tool, but an [[axe]] is fastest.
{{breaking row|horizontal=1|Sign|sprite=oak-sign|Axe|foot=1|item=1}}
A sign or a hanging sign also breaks and drops itself as an [[item]] if the block the sign is attached to is moved, removed or destroyed. However, a wall hanging sign will stay here if the block the hanging sign is attached to is removed.<ref>{{bug|MC-256501|||WAI}}</ref>
If a sign is broken while being edited, the player continues to edit the sign<ref>{{bug|MC-117815}}</ref>, although {{in|bedrock}} breaking the sign stops the editing operation.
=== Natural generation ===
An oak sign can be found in [[igloo]] basements. Spruce signs can be found in taiga [[village]] houses, as part of a chair.
=== Chest loot ===
{{LootChestItem|oak-sign,oak-hanging-sign,spruce-sign,spruce-hanging-sign}}
=== Crafting ===
[[The player]] can place six stripped [[log]] [[block]]s at the bottom half of the crafting table and place two [[chain]]s on the top-left and top-right slots to create hanging signs. This crafting recipe will create six hanging signs. Hanging signs can only be crafted with stripped logs or [[stem]]s; non-stripped wood cannot be used to craft hanging signs.
{{Crafting
|head=1
|showdescription=1
|nolink=1
|A1= Matching Planks
|B1= Matching Planks
|C1= Matching Planks
|A2= Matching Planks
|B2= Matching Planks
|C2= Matching Planks
|B3= Stick
|Output=Matching Sign,3
|type=Decoration block
}}
{{Crafting
|name= Hanging Sign
|A1= Chain
|C1= Chain
|A2= Matching Stripped Log or Stem; Block of Stripped Bamboo
|B2= Matching Stripped Log or Stem; Block of Stripped Bamboo
|C2= Matching Stripped Log or Stem; Block of Stripped Bamboo
|A3= Matching Stripped Log or Stem; Block of Stripped Bamboo
|B3= Matching Stripped Log or Stem; Block of Stripped Bamboo
|C3= Matching Stripped Log or Stem; Block of Stripped Bamboo
|Output= Matching Hanging Sign,6; Bamboo Hanging Sign,6
|type=Decoration block
|foot=1
}}
== Usage ==
Signs can be used to display text; they can be used to label storage, display information to other players or note areas of interest. Signs are also not destroyed by [[water]] or [[lava]] and therefore may be used to control the flow of these fluids.
=== Placement ===
==== Signs ====
Signs may be placed on the top or side of other [[block]]s (including semi-solid and non-solid blocks such as [[fence]]s, [[Trapdoor|trapdoors]] and other signs). To place a sign, {{control|use}} a sign [[item]] while pointing at the block the sign should be attached to, enter the desired text (or none), and click the "Done" button or press "escape" on a keyboard (or press × {{in|bedrock}}, {{xbtn|b}} on an Xbox controller, {{psbtn|o}} on a PlayStation controller, or {{nsbutton|B}} on a Nintendo Switch controller. Closing the virtual keyboard on a mobile device also exits the typing menu). To place a sign on a block that can be interacted with by the {{control|use}} control (for example, [[chest]]s, [[note block]]s, etc.), {{control|sneak}} while placing the sign.
Signs on the top of a block stand on a short post and face toward the player who placed it, in any of 16 different directions. Signs placed on the side of a block simply float there, even if the block doesn't make contact with the sign.
Even if placed on a vertical surface, a sign may not co-exist in the same block of air as any other item, despite not necessarily visibly obstructing eachother.
For more information about the blocks signs can be placed on, see [[Opacity/Placement]].
==== Hanging signs ====
Hanging signs can be placed in three different ways:
* Placing a hanging sign on the side of a block will result in it being placed with a self-supporting bracket, which allows it to float without any supporting block. This version can be placed in four different directions.
* Placing a hanging sign on the bottom of a block will result in the sign hanging below the block.
** If the block is wide enough, the chains holding the sign will be parallel. This version can be placed in four different directions.
** If the block is too narrow, the chains will meet together in a upwards arrow shape. This version is also placed if the player is {{control|sneaking}} when placing a hanging sign below a wide-enough block. This version can be placed in sixteen different directions.
=== Text ===
[[File:Oak Sign GUI.png|thumb|240px|Oak Sign editing.]]
Placing a sign opens an editor interface resembling a magnified view of the sign. Up to four lines of text can then be entered using a keyboard (hardware or on-screen). The editor supports limited editing, including moving the cursor and inserting and deleting characters. {{IN|bedrock}}, [[formatting codes]] can also be used to apply decorative effects such as color, bold, italic and underline to various bits of the text. Depending on the edition and platform in use, copy and paste operations may be supported and the editor may also support keyboard entry of Alt-codes for displaying Unicode characters.
Text can be added to the back side of a sign by interacting with the that side of the sign after placing it and editing the front.
Signs can be waxed by {{Control|use|text=using}} a [[honeycomb]] on it. Once waxed, a sign cannot be unwaxed or edited.
After placing and affixing text on a sign, a player can change the text color by {{control|using}} a [[dye]] on it. When colored with dye, the text color may differ from any color specified by formatting codes.{{Info needed|How does this work? Does the dye affect all the text? One line? One word? Does dye override all formatting codes, including font effects?}}
[[File:Glow Ink Sign with Orange Dye JE2.png|thumb|216px|Oak sign with glow ink and orange dye applied in {{JE}}.]]
A player can {{control|use}} a [[glow ink sac]] on a sign to make its text glow. The glowing text is not affected by lighting. The player can use a regular black [[ink sac]] on the sign to remove the glowing effect.
{| class="wikitable mw-collapsible mw-collapsed"
|+ class="nowrap" | Glow ink colors
!Name !! Main Color !! Edge Color
|-
! Black
| {{color|#000000}}
| {{color|#EDE8CA}}
|-
! Red
| {{color|#FC0000}}
| {{color|#650000}}
|-
! Green
| {{color|#00FC00}}
| {{color|#006500}}
|-
! Brown
| {{color|#894413}}
| {{color|#361B07}}
|-
! Blue
| {{color|#0000FC}}
| {{color|#000065}}
|-
! Purple
| {{color|#9E20ED}}
| {{color|#3F0C5F}}
|-
! Cyan
| {{color|#00D6D6}}
| {{color|#006565}}
|-
! Light Gray
| {{color|#D0D0D0}}
| {{color|#535353}}
|-
! Gray
| {{color|#7E7E7E}}
| {{color|#323232}}
|-
! Pink
| {{color|#FC68B2}}
| {{color|#652947}}
|-
! Lime
| {{color|#8DFC00}}
| {{color|#4B6500}}
|-
! Yellow
| {{color|#FCFC00}}
| {{color|#656500}}
|-
! Light Blue
| {{color|#98BECB}}
| {{color|#3C4B51}}
|-
! Magenta
| {{color|#FC00FC}}
| {{color|#650065}}
|-
! Orange
| {{color|#FC671F}}
| {{color|#65280C}}
|-
! White
| {{color|#FCFCFC}}
| {{color|#656565}}
|}
In [[Creative]] mode, the combination {{key|Ctrl}} + {{control|pick block}} on Windows/Linux, or {{key|cmd}} + {{control|pick block}} on macOS, can be used to copy an already-placed sign, including its text (with decorations), into the player's inventory.
A dyed sign facing east or west will have its text appear more saturated and bright than a sign facing north or south. However, it is actually the sign that is dimmer, because ''Minecraft'''s lighting engine uses side lighting to make the world appear less flat, but the text on signs is not affected by this.
{{IN|bedrock}}, inappropriate words or phrases in a sign's text are displayed as asterisks.
{{IN|java}}, signs can be created with [[Commands#Raw JSON Text|JSON text]], which allows complex formatting (colors, bold, italic, etc.), hover and click events, localized translation (for ''Minecraft'' technical terms, like "Redstone Repeater", otherwise translations must be provided in language files in resource packs), and the incorporation of scoreboard values into text. Use the {{cmd|data merge block}} command to create or alter JSON signs.
: Example: {{cmd|long=1|data merge block ~ ~1 ~ {front_text:{ color:"green", messages:[ '{"selector":"@p", "bold":false, "italic":false, "underlined":false, "strikethrough":false, "obfuscated":false}' , '{"text":"Second Line"}']}}}}
Signs can post the success count of JSON text hover and click events to [[scoreboard]] objectives. The objectives to be used can be specified by running the {{cmd|execute store}} command or by modifying the sign's NBT data directly with the {{cmd|data merge block}} command.
=== Interaction ===
Signs act as though they have a {{control|use}} action, so the [[player]] is unable to place [[block]]s or use [[item]]s while the cursor is pointed at them without {{control|sneaking}}.
Signs are destroyed and drop as an item when pushed by a [[piston]].{{Only|bedrock}}
Signs are non-solid and have no collision, so [[item]]s and [[mob]]s can move through sign blocks. Other [[block]]s (including other signs) can be placed on any edge of a sign.
[[Water]] and [[lava]] flow around signs. Lava can create [[fire]] in [[air]] blocks next to signs as if the signs were flammable, but the signs do not burn (and cannot be burned by other methods either, except {{in|be}}).
=== Fuel ===
Wooden signs can be used as a fuel in [[furnace]]s, smelting an [[item]] per sign.
=== Note Blocks ===
Signs can be placed under [[note block]]s to produce a "bass" sounds.
== Sounds ==
=== Generic ===
==== Normal wood ====
; Sign
{{Sound table/Block/Wood|forcecollapsed=1}}
; Hanging sign
{{Sound table/Block/Hanging sign|forcecollapsed=1}}
==== Cherry wood ====
; Sign
{{Sound table/Block/Cherry wood|forcecollapsed=1}}
; Hanging sign
{{Sound table/Block/Cherry wood hanging sign|forcecollapsed=1}}
==== Bamboo wood ====
; Sign
{{Sound table/Block/Bamboo wood|forcecollapsed=1}}
; Hanging sign
{{edition|java}}:
{{Sound table/Block/Bamboo wood hanging sign/JE|forcecollapsed=1}}
{{edition|bedrock}}:
{{Sound table/Block/Bamboo wood hanging sign/BE|forcecollapsed=1}}
==== Nether wood ====
; Sign
{{Sound table/Block/Nether wood|forcecollapsed=1}}
; Hanging sign
{{edition|java}}:
{{Sound table/Block/Nether wood hanging sign/JE|forcecollapsed=1}}
{{edition|bedrock}}:
{{Sound table/Block/Nether wood hanging sign/BE|forcecollapsed=1}}
=== Unique ===
{{edition|java}}:
{{Sound table|forcecollapsed=1
|rowspan=2
|sound=Ink sac1.ogg
|sound2=Ink sac2.ogg
|sound3=Ink sac3.ogg
|subtitle=Glow Ink Sac splotches
|source=block
|description=When a [[glow ink sac]] is used on a sign
|id=item.glow_ink_sac.use
|translationkey=subtitles.item.glow_ink_sac.use
|volume=1.0
|pitch=''varies'' <ref group=sound>Can be 1.0, 0.95, or 1.05 for each sound</ref>
|distance=16}}
{{Sound table
|subtitle=Ink Sac splotches
|source=block
|description=When an [[ink sac]] is used on a sign
|id=item.ink_sac.use
|translationkey=subtitles.item.ink_sac.use
|volume=1.0
|pitch=''varies'' <ref group=sound>Can be 0.85, 0.88, or 0.9 for each sound</ref>
|distance=16}}
{{Sound table
|sound=Dye.ogg
|subtitle=Dye stains
|source=block
|description=When [[dye]] is used on a sign
|id=item.dye.use
|translationkey=subtitles.item.dye.use
|volume=1.0
|pitch=''varies'' <ref group=sound>Can be 1.0, 0.9, 0.95, or 1.1</ref>
|distance=16}}
{{Sound table
|sound=Wax on1.ogg
|sound2=Wax on2.ogg
|sound3=Wax on3.ogg
|subtitle=Wax on
|source=block
|description=When a sign is waxed
|id=item.honeycomb.wax_on
|translationkey=subtitles.item.honeycomb.wax_on
|volume=1.0
|pitch=1.0/0.9/1.1
|distance=16}}
{{Sound table
|sound=Sign waxed interact fail1.ogg
|sound2=Sign waxed interact fail2.ogg
|sound3=Sign waxed interact fail3.ogg
|subtitle=Sign wobbles
|source=block
|description=When a player attempts to edit a waxed sign
|id=block.sign.waxed_interact_fail
|translationkey=subtitles.block.sign.waxed_interact_fail
|volume=1.0
|pitch=''varies''<ref group=sound>{{cd|fail1}} can be 1.0 or 0.9; {{cd|fail2}} and {{cd|fail3}} can be 0.8 or 0.9</ref>
|distance=16
|foot=1}}
{{edition|bedrock}}:
{{Sound table|forcecollapsed=1
|type=bedrock
|sound=Ink sac1.ogg
|sound2=Ink sac2.ogg
|sound3=Ink sac3.ogg
|source=sound
|description=When a glow ink sac or an ink sac is used on a sign
|id=sign.ink_sac.use
|volume=1.0
|pitch=1.0}}
{{Sound table
|type=bedrock
|sound=Dye.ogg
|source=sound
|description=When dye is used on a sign
|id=sign.dye.use
|volume=1.0
|pitch=1.0}}
{{Sound table
|sound=Wax on1.ogg
|sound2=Wax on2.ogg
|sound3=Wax on3.ogg
|source=neutral
|description=When a honeycomb waxes a sign
|id=copper.wax.on
|volume=1.0
|pitch=0.8-1.2}}
{{Sound table
|sound=Sign waxed interact fail1.ogg
|sound2=Sign waxed interact fail2.ogg
|sound3=Sign waxed interact fail3.ogg
|source=block
|description=When a player attempts to edit a waxed sign
|id=block.sign.waxed_interact_fail
|volume=1.0
|pitch=''varies'' <ref group=sound>Can be 1.0 or 0.9 for <code>waxed_interact_fail1</code>; can be 0.8 or 0.9 for <code>waxed_interact_fail2</code> and <code>waxed_interact_fail3</code></ref>
|foot=1}}
== Data values ==
=== ID ===
{{edition|java}}:
{{ID table
|edition=java
|showblocktags=y
|showitemtags=y
|showforms=y
|generatetranslationkeys=y
|displayname=Oak Sign
|spritetype=block
|nameid=oak_sign
|blocktags=signs, standing_signs, wall_post_override
|itemtags=signs}}
{{ID table
|displayname=Spruce Sign
|spritetype=block
|nameid=spruce_sign
|blocktags=signs, standing_signs, wall_post_override
|itemtags=signs}}
{{ID table
|displayname=Birch Sign
|spritetype=block
|nameid=birch_sign
|blocktags=signs, standing_signs, wall_post_override
|itemtags=signs}}
{{ID table
|displayname=Jungle Sign
|spritetype=block
|nameid=jungle_sign
|blocktags=signs, standing_signs, wall_post_override
|itemtags=signs}}
{{ID table
|displayname=Acacia Sign
|spritetype=block
|nameid=acacia_sign
|blocktags=signs, standing_signs, wall_post_override
|itemtags=signs}}
{{ID table
|displayname=Dark Oak Sign
|spritetype=block
|nameid=dark_oak_sign
|blocktags=signs, standing_signs, wall_post_override
|itemtags=signs}}
{{ID table
|displayname=Mangrove Sign
|spritetype=block
|nameid=mangrove_sign
|blocktags=signs, standing_signs, wall_post_override
|itemtags=signs}}
{{ID table
|displayname=Cherry Sign
|spritename=Cherry Sign
|spritetype=block
|nameid=cherry_sign
|blocktags=signs, standing_signs, wall_post_override
|itemtags=signs}}
{{ID table
|displayname=Bamboo Sign
|spritename=Bamboo Sign
|spritetype=block
|nameid=bamboo_sign
|blocktags=signs, standing_signs, wall_post_override
|itemtags=signs}}
{{ID table
|displayname=Crimson Sign
|spritetype=block
|nameid=crimson_sign
|blocktags= signs, standing_signs, wall_post_override
|itemtags=non_flammable_wood, signs}}
{{ID table
|displayname=Warped Sign
|spritetype=block
|nameid=warped_sign
|blocktags=signs, standing_signs, wall_post_override
|itemtags=non_flammable_wood, signs}}
{{ID table
|displayname=Oak Wall Sign
|spritetype=block
|nameid=oak_wall_sign
|blocktags=signs, wall_signs
|form=block}}
{{ID table
|displayname=Spruce Wall Sign
|spritetype=block
|nameid=spruce_wall_sign
|blocktags=signs, wall_signs
|form=block}}
{{ID table
|displayname=Birch Wall Sign
|spritetype=block
|nameid=birch_wall_sign
|blocktags=signs, wall_signs
|form=block}}
{{ID table
|displayname=Jungle Wall Sign
|spritetype=block
|nameid=jungle_wall_sign
|blocktags=signs, wall_signs
|form=block}}
{{ID table
|displayname=Acacia Wall Sign
|spritetype=block
|nameid=acacia_wall_sign
|blocktags=signs, wall_signs
|form=block}}
{{ID table
|displayname=Dark Oak Wall Sign
|spritetype=block
|nameid=dark_oak_wall_sign
|blocktags=signs, wall_signs
|form=block}}
{{ID table
|displayname=Mangrove Wall Sign
|spritetype=block
|nameid=mangrove_wall_sign
|blocktags=signs, wall_signs
|form=block}}
{{ID table
|displayname=Cherry Wall Sign
|spritename=Cherry Wall Sign
|spritetype=block
|nameid=cherry_wall_sign
|blocktags=signs, wall_signs
|form=block}}
{{ID table
|displayname=Bamboo Wall Sign
|spritename=Bamboo Wall Sign
|spritetype=block
|nameid=bamboo_wall_sign
|blocktags=signs, wall_signs
|form=block}}
{{ID table
|displayname=Crimson Wall Sign
|spritetype=block
|nameid=crimson_wall_sign
|blocktags=signs, wall_signs
|form=block}}
{{ID table
|displayname=Warped Wall Sign
|spritetype=block
|nameid=warped_wall_sign
|blocktags=signs, wall_signs
|form=block}}
{{ID table
|displayname=Oak Hanging Sign
|spritename=Oak Hanging Sign
|spritetype=block
|nameid=oak_hanging_sign
|blocktags=all_hanging_signs, ceiling_hanging_signs
|itemtags=hanging_signs}}
{{ID table
|displayname=Spruce Hanging Sign
|spritename=Spruce Hanging Sign
|spritetype=block
|nameid=spruce_hanging_sign
|blocktags=all_hanging_signs, ceiling_hanging_signs
|itemtags=hanging_signs}}
{{ID table
|displayname=Birch Hanging Sign
|spritename=Birch Hanging Sign
|spritetype=block
|nameid=birch_hanging_sign
|blocktags=all_hanging_signs, ceiling_hanging_signs
|itemtags=hanging_signs}}
{{ID table
|displayname=Jungle Hanging Sign
|spritename=Jungle Hanging Sign
|spritetype=block
|nameid=jungle_hanging_sign
|blocktags=all_hanging_signs, ceiling_hanging_signs
|itemtags=hanging_signs}}
{{ID table
|displayname=Acacia Hanging Sign
|spritename=Acacia Hanging Sign
|spritetype=block
|nameid=acacia_hanging_sign
|blocktags=all_hanging_signs, ceiling_hanging_signs
|itemtags=hanging_signs}}
{{ID table
|displayname=Dark Oak Hanging Sign
|spritename=Dark Oak Hanging Sign
|spritetype=block
|nameid=dark_oak_hanging_sign
|blocktags=all_hanging_signs, ceiling_hanging_signs
|itemtags=hanging_signs}}
{{ID table
|displayname=Mangrove Hanging Sign
|spritename=Mangrove Hanging Sign
|spritetype=block
|nameid=mangrove_hanging_sign
|blocktags=all_hanging_signs, ceiling_hanging_signs
|itemtags=hanging_signs}}
{{ID table
|displayname=Cherry Hanging Sign
|spritename=Cherry Hanging Sign
|spritetype=block
|nameid=cherry_hanging_sign
|blocktags=all_hanging_signs, ceiling_hanging_signs
|itemtags=hanging_signs}}
{{ID table
|displayname=Bamboo Hanging Sign
|spritename=Bamboo Hanging Sign
|spritetype=block
|nameid=bamboo_hanging_sign
|blocktags=all_hanging_signs, ceiling_hanging_signs
|itemtags=hanging_signs}}
{{ID table
|displayname=Crimson Hanging Sign
|spritename=Crimson Hanging Sign
|spritetype=block
|nameid=crimson_hanging_sign
|blocktags=all_hanging_signs, ceiling_hanging_signs
|itemtags=hanging_signs, non_flammable_wood}}
{{ID table
|displayname=Warped Hanging Sign
|spritename=Warped Hanging Sign
|spritetype=block
|nameid=warped_hanging_sign
|blocktags=all_hanging_signs, ceiling_hanging_signs
|itemtags=hanging_signs, non_flammable_wood}}
{{ID table
|displayname=Oak Wall Hanging Sign
|spritename=Oak Wall Hanging Sign
|spritetype=block
|nameid=oak_wall_hanging_sign
|blocktags=all_hanging_signs, wall_hanging_signs
|form=block}}
{{ID table
|displayname=Spruce Wall Hanging Sign
|spritename=Spruce Wall Hanging Sign
|spritetype=block
|nameid=spruce_wall_hanging_sign
|blocktags=all_hanging_signs, wall_hanging_signs
|form=block}}
{{ID table
|displayname=Birch Wall Hanging Sign
|spritename=Birch Wall Hanging Sign
|spritetype=block
|nameid=birch_wall_hanging_sign
|blocktags=all_hanging_signs, wall_hanging_signs
|form=block}}
{{ID table
|displayname=Jungle Wall Hanging Sign
|spritename=Jungle Wall Hanging Sign
|spritetype=block
|nameid=jungle_wall_hanging_sign
|blocktags=all_hanging_signs, wall_hanging_signs
|form=block}}
{{ID table
|displayname=Acacia Wall Hanging Sign
|spritename=Acacia Wall Hanging Sign
|spritetype=block
|nameid=acacia_wall_hanging_sign
|blocktags=all_hanging_signs, wall_hanging_signs
|form=block}}
{{ID table
|displayname=Dark Oak Wall Hanging Sign
|spritename=Dark Oak Wall Hanging Sign
|spritetype=block
|nameid=dark_oak_wall_hanging_sign
|blocktags=all_hanging_signs, wall_hanging_signs
|form=block}}
{{ID table
|displayname=Mangrove Wall Hanging Sign
|spritename=Mangrove Wall Hanging Sign
|spritetype=block
|nameid=mangrove_wall_hanging_sign
|blocktags=all_hanging_signs, wall_hanging_signs
|form=block}}
{{ID table
|displayname=Cherry Wall Hanging Sign
|spritename=Cherry Wall Hanging Sign
|spritetype=block
|nameid=cherry_wall_hanging_sign
|blocktags=all_hanging_signs, wall_hanging_signs
|form=block}}
{{ID table
|displayname=Bamboo Wall Hanging Sign
|spritename=Bamboo Wall Hanging Sign
|spritetype=block
|nameid=bamboo_wall_hanging_sign
|blocktags=all_hanging_signs, wall_hanging_signs
|form=block}}
{{ID table
|displayname=Crimson Wall Hanging Sign
|spritename=Crimson Wall Hanging Sign
|spritetype=block
|nameid=crimson_wall_hanging_sign
|blocktags=all_hanging_signs, wall_hanging_signs
|form=block}}
{{ID table
|displayname=Warped Wall Hanging Sign
|spritename=Warped Wall Hanging Sign
|spritetype=block
|nameid=warped_wall_hanging_sign
|blocktags=all_hanging_signs, wall_hanging_signs
|form=block
|foot=1}}
{{ID table
|displayname=Block entity
|spritename=signs
|spritetype=block
|nameid=sign}}
{{ID table
|displayname=Block entity
|spritename=hanging-signs
|spritetype=block
|nameid=hanging_sign
|foot=1}}
{{edition|bedrock}}:
{{ID table
|edition=bedrock
|firstcolumnname=Sign
|shownumericids=y
|showforms=y
|showaliasids=y
|showitemtags=y
|generatetranslationkeys=y
|displayname=Oak standing
|spritename=oak-sign
|spritetype=block
|nameid=standing_sign
|id=63
|form=block}}
{{ID table
|displayname=Spruce standing
|spritename=spruce-sign
|spritetype=block
|nameid=spruce_standing_sign
|id=436
|form=block}}
{{ID table
|displayname=Birch standing
|spritename=birch-sign
|spritetype=block
|nameid=birch_standing_sign
|id=441
|form=block}}
{{ID table
|displayname=Jungle standing
|spritename=jungle-sign
|spritetype=block
|nameid=jungle_standing_sign
|id=443
|form=block}}
{{ID table
|displayname=Acacia standing
|spritename=acacia-sign
|spritetype=block
|nameid=acacia_standing_sign
|id=445
|form=block}}
{{ID table
|displayname=Dark Oak standing
|spritename=dark-oak-sign
|spritetype=block
|nameid=darkoak_standing_sign
|id=447
|form=block}}
{{ID table
|displayname=Mangrove standing
|spritename=mangrove-sign
|spritetype=block
|nameid=mangrove_standing_sign
|id=-494
|form=block
|translationkey=-}}
{{ID table
|displayname=Cherry standing
|spritename=cherry-sign
|spritetype=block
|nameid=cherry_standing_sign
|id=-542
|form=block
|translationkey=-}}
{{ID table
|displayname=Bamboo standing
|spritename=bamboo-sign
|spritetype=block
|nameid=bamboo_standing_sign
|id=-518
|form=block
|translationkey=-}}
{{ID table
|displayname=Crimson standing
|spritename=crimson-sign
|spritetype=block
|nameid=crimson_standing_sign
|id=505
|form=block}}
{{ID table
|displayname=Warped standing
|spritename=warped-sign
|spritetype=block
|nameid=warped_standing_sign
|id=506
|form=block}}
{{ID table
|displayname=Oak wall
|spritename=oak-wall-sign
|spritetype=block
|nameid=wall_sign
|id=68
|form=block
|translationkey=-}}
{{ID table
|displayname=Spruce wall
|spritename=spruce-wall-sign
|spritetype=block
|nameid=spruce_wall_sign
|id=437
|form=block
|translationkey=-}}
{{ID table
|displayname=Birch wall
|spritename=birch-wall-sign
|spritetype=block
|nameid=birch_wall_sign
|id=442
|form=block
|translationkey=-}}
{{ID table
|displayname=Jungle wall
|spritename=jungle-wall-sign
|spritetype=block
|nameid=jungle_wall_sign
|id=444
|form=block
|translationkey=-}}
{{ID table
|displayname=Acacia wall
|spritename=acacia-wall-sign
|spritetype=block
|nameid=acacia_wall_sign
|id=446
|form=block
|translationkey=-}}
{{ID table
|displayname=Dark Oak wall
|spritename=dark-oak-wall-sign
|spritetype=block
|nameid=darkoak_wall_sign
|id=448
|form=block
|translationkey=-}}
{{ID table
|displayname=Mangrove wall
|spritename=mangrove-wall-sign
|spritetype=block
|nameid=mangrove_wall_sign
|id=-495
|form=block
|translationkey=-}}
{{ID table
|displayname=Cherry wall
|spritename=cherry-wall-sign
|spritetype=block
|nameid=cherry_wall_sign
|id=-544
|form=block
|translationkey=-}}
{{ID table
|displayname=Bamboo wall
|spritename=bamboo-wall-sign
|spritetype=block
|nameid=bamboo_wall_sign
|id=-519
|form=block
|translationkey=-}}
{{ID table
|displayname=Crimson wall
|spritename=crimson-wall-sign
|spritetype=block
|nameid=crimson_wall_sign
|id=507
|form=block}}
{{ID table
|displayname=Warped wall
|spritename=warped-wall-sign
|spritetype=block
|nameid=warped_wall_sign
|id=508
|form=block}}
{{ID table
|displayname=Oak item
|spritename=oak-sign
|spritetype=item
|nameid=oak_sign
|aliasid=sign
|id=360
|form=item
|itemtags=minecraft:sign
|translationkey=item.sign.name}}
{{ID table
|displayname=Spruce item
|spritename=spruce-sign
|spritetype=item
|nameid=spruce_sign
|id=576
|form=item
|itemtags=minecraft:sign}}
{{ID table
|displayname=Birch item
|spritename=birch-sign
|spritetype=item
|nameid=birch_sign
|id=577
|form=item
|itemtags=minecraft:sign}}
{{ID table
|displayname=Jungle item
|spritename=jungle-sign
|spritetype=item
|nameid=jungle_sign
|id=578
|form=item
|itemtags=minecraft:sign}}
{{ID table
|displayname=Acacia item
|spritename=acacia-sign
|spritetype=item
|nameid=acacia_sign
|id=579
|form=item
|itemtags=minecraft:sign}}
{{ID table
|displayname=Dark Oak item
|spritename=dark-oak-sign
|spritetype=item
|nameid=dark_oak_sign
|aliasid=darkoak_sign
|id=587
|form=item
|itemtags=minecraft:sign
|translationkey=item.darkoak_sign.name}}
{{ID table
|displayname=Mangrove item
|spritename=mangrove-sign
|spritetype=item
|nameid=mangrove_sign
|id=642
|form=item
|itemtags=minecraft:sign}}
{{ID table
|displayname=Cherry item
|spritename=cherry-sign
|spritetype=item
|nameid=cherry_sign
|id=659
|form=item
|itemtags=minecraft:sign}}
{{ID table
|displayname=Bamboo item
|spritename=bamboo-sign
|spritetype=item
|nameid=bamboo_sign
|id=660
|form=item
|itemtags=minecraft:sign}}
{{ID table
|displayname=Crimson item
|spritename=crimson-sign
|spritetype=item
|nameid=crimson_sign
|id=614
|form=item
|itemtags=minecraft:sign}}
{{ID table
|displayname=Warped item
|spritename=warped-sign
|spritetype=item
|nameid=warped_sign
|id=615
|form=item
|itemtags=minecraft:sign}}
{{ID table
|displayname=Oak Hanging Sign
|spritename=Oak Wall Hanging Sign
|spritetype=block
|nameid=oak_hanging_sign
|id=-500
|itemtags=minecraft:hanging_sign
|translationkey=item.oak_hanging_sign.name}}
{{ID table
|displayname=Spruce Hanging Sign
|spritename=Spruce Wall Hanging Sign
|spritetype=block
|nameid=spruce_hanging_sign
|id=-501
|itemtags=minecraft:hanging_sign
|translationkey=item.spruce_hanging_sign.name}}
{{ID table
|displayname=Birch Hanging Sign
|spritename=Birch Wall Hanging Sign
|spritetype=block
|nameid=birch_hanging_sign
|id=-502
|itemtags=minecraft:hanging_sign
|translationkey=item.birch_hanging_sign.name}}
{{ID table
|displayname=Jungle Hanging Sign
|spritename=Jungle Wall Hanging Sign
|spritetype=block
|nameid=jungle_hanging_sign
|id=-503
|itemtags=minecraft:hanging_sign
|translationkey=item.jungle_hanging_sign.name}}
{{ID table
|displayname=Acacia Hanging Sign
|spritename=Acacia Wall Hanging Sign
|spritetype=block
|nameid=acacia_hanging_sign
|id=-504
|itemtags=minecraft:hanging_sign
|translationkey=item.acacia_hanging_sign.name}}
{{ID table
|displayname=Dark Oak Hanging Sign
|spritename=Dark Oak Wall Hanging Sign
|spritetype=block
|nameid=dark_oak_hanging_sign
|id=-505
|itemtags=minecraft:hanging_sign
|translationkey=item.dark_oak_hanging_sign.name}}
{{ID table
|displayname=Mangrove Hanging Sign
|spritename=Mangrove Wall Hanging Sign
|spritetype=block
|nameid=mangrove_hanging_sign
|id=-508
|itemtags=minecraft:hanging_sign
|translationkey=item.mangrove_hanging_sign.name}}
{{ID table
|displayname=Cherry Hanging Sign
|spritename=Cherry Wall Hanging Sign
|spritetype=block
|nameid=cherry_hanging_sign
|id=-534
|itemtags=minecraft:hanging_sign
|translationkey=item.cherry_hanging_sign.name}}
{{ID table
|displayname=Bamboo Hanging Sign
|spritename=Bamboo Wall Hanging Sign
|spritetype=block
|nameid=bamboo_hanging_sign
|id=-522
|itemtags=minecraft:hanging_sign
|translationkey=item.bamboo_hanging_sign.name}}
{{ID table
|displayname=Crimson Hanging Sign
|spritename=Crimson Wall Hanging Sign
|spritetype=block
|nameid=crimson_hanging_sign
|id=-506
|itemtags=minecraft:hanging_sign
|translationkey=item.crimson_hanging_sign.name}}
{{ID table
|displayname=Warped Hanging Sign
|spritename=Warped Wall Hanging Sign
|spritetype=block
|nameid=warped_hanging_sign
|id=-507
|itemtags=minecraft:hanging_sign
|translationkey=item.warped_hanging_sign.name
|foot=1}}
{{ID table
|notnamespaced=y
|displayname=Block entity
|spritename=signs
|spritetype=block
|nameid=Sign}}
{{ID table
|displayname=Block entity
|spritename=hanging-signs
|spritetype=block
|nameid=HangingSign
|foot=1}}
=== Block states ===
{{see also|Block states}}
{{/BS}}
=== Block data ===
A sign has a block entity associated with it that holds additional data about the block.
{{el|java}}:
{{see also|Block entity format}}
{{/BE}}
{{el|bedrock}}:
:See [[Bedrock Edition level format/Block entity format]].
== Achievements ==
{{load achievements|It's a Sign}}
== Advancements ==
{{load advancements|Glow and Behold}}
== History ==
{{main|/History}}
{{History|java classic}}
{{History||0.24_SURVIVAL_TEST|[[File:Sign Entity.png|32px]] Signs are currently being tested as [[entity|entities]]. They always display "This is a test of the signs. Each line can be 15 chars!" and can only be spawned by pressing {{key|B}}.<ref>{{ytl|bdT76iFEnLk}}</ref>}}
{{History||0.26 SURVIVAL TEST|Removed signs.}}
{{History|java infdev}}
{{History||20100607|[[File:Oak Sign (0) JE1.png|32px]] Signs have been re-implemented as [[block]]s, although still rendering as entities.
|Signs now have a [[crafting]] recipe and the text can now be edited. Editing a sign pauses the game in [[singleplayer]].
|Signs are currently huge and drop [[planks]] when destroyed.
|Signs do not have a particle texture defined. As such, they [[Placeholder texture#Default texture|default to using the grass block texture instead]].}}
{{History||20100608|Signs are now broken faster.
|Signs now [[drops|drop]] themselves when [[breaking|destroyed]], instead of planks.
|Signs now use planks particles.}}
{{History|java alpha}}
{{History||v1.0.1|[[File:Oak Wall Sign (S) JE1 BE1.png|32px]] Added wall signs.
|[[File:Oak Sign (0) JE2.png|32px]] Signs are now smaller.}}
{{History||v1.0.5|Signs no longer require a free [[block]] above it to place.}}
{{History|java beta}}
{{History||April 27, 2011|link=https://notch.tumblr.com/post/4988431144|Hand-drawn signs are mentioned.}}
{{History|java}}
{{History||1.0.0|snap=Beta 1.9 Prerelease 6|Signs are now broken faster using an [[axe]].}}
{{History||1.3.1|snap=12w18a|Editing a sign no longer pauses the game in [[singleplayer]].}}
{{History|||snap=12w27a|Signs are now stackable up to 16.
|The same [[crafting]] recipe now produces 3 signs instead of 1.}}
{{History||June 9, 2014|link=https://twitter.com/SeargeDP/status/476047216541700096|[[Searge]] tweeted a picture of a sign showing a username and a [[scoreboard]] score.}}
{{History||1.8|snap=14w25a|Added support for JSON text to signs.
|Sign character limit now depends on character width.}}
{{History|||snap=14w29a|Signs now display the cracking animation.}}
{{History||1.9|snap=15w43a|A sign now generates within [[igloo]] basements.}}
{{History||1.11|snap=16w33a|Signs can now be used as [[fuel]] in [[furnace]]s.}}
{{History||1.13|snap=17w47a|The standing sign ID has been changed from <code>standing_sign</code> to <code>sign</code>.
|Prior to [[1.13/Flattening|''The Flattening'']], these [[block]]s' numeral IDs were 63 and 68, and the [[item]]'s 323.}}
{{History|||snap=18w10d|[[Water]] can now be placed on the same block as signs.}}
{{History||1.14|snap=18w43a|"Sign" has been renamed to "Oak Sign".
|[[File:Oak Sign JE2 BE2.png|32px]] The texture of oak sign [[item]]s has been changed.
|[[File:Spruce Standing Sign JE1 BE1.png|32px]] [[File:Birch Standing Sign JE1 BE1.png|32px]] [[File:Jungle Standing Sign JE1 BE1.png|32px]] [[File:Acacia Standing Sign JE1 BE1.png|32px]] [[File:Dark Oak Standing Sign JE1 BE1.png|32px]] [[File:Spruce Sign JE1 BE1.png|32px]] [[File:Birch Sign JE1 BE1.png|32px]] [[File:Jungle Sign JE1 BE1.png|32px]] [[File:Acacia Sign JE1 BE1.png|32px]] [[File:Dark Oak Sign JE1 BE1.png|32px]] Added spruce, birch, jungle, acacia and dark oak signs.
|The sign's text has been changed from black to white.
|A sign's recipe now requires the same type of [[wood]] instead of a random assortment.}}
{{History|||snap=18w44a|Signs can now be {{control|used}} while holding a [[dye]] to change the text color.
|Default text color for signs has been changed back to black.}}
{{History|||snap=18w45a|A new movable cursor for free text editing to signs has been added.
|Selection and copy/paste support have been added to signs.}}
{{History|||snap=18w50a|Spruce signs now generate in some [[taiga]] [[village]] houses.
|Spruce sign items can now be found in [[chest]]s in taiga village houses.}}
{{History|||snap=19w12a|Signs can now be [[dye]]d only in [[Creative mode]].}}
{{History|||snap=19w12b|Signs can now be dyed in [[Survival mode]] again.}}
{{History||1.16|snap=20w06a|[[File:Crimson Standing Sign JE1 BE1.png|32px]] [[File:Warped Standing Sign JE1 BE1.png|32px]] [[File:Crimson Sign JE1 BE1.png|32px]] [[File:Warped Sign JE1 BE1.png|32px]] Added crimson and warped signs.}}
{{History|||snap=20w09a|Crimson and warped signs can now be [[crafting|crafted]].}}
{{History||1.17|snap=21w03a|Signs can now be tinted with [[Glow Ink Sac|glow ink sac]]s to make the text glow.
|Works with both undyed and dyed signs.
|Signs now have a sound for being dyed.}}
{{History|||snap=21w11a|[[File:Oak Standing Sign (S) JE2.png|32px]][[File:Spruce Standing Sign (S) JE2 BE2.png|32px]] [[File:Birch Standing Sign (S) JE2 BE2.png|32px]] [[File:Jungle Standing Sign (S) JE2 BE2.png|32px]] [[File:Acacia Standing Sign (S) JE2 BE2.png|32px]] [[File:Dark Oak Standing Sign (S) JE2 BE2.png|32px]] [[File:Oak Wall Sign (S) JE2.png|32px]] [[File:Spruce Wall Sign (S) JE2 BE2.png|32px]] [[File:Birch Wall Sign (S) JE2 BE2.png|32px]] [[File:Jungle Wall Sign (S) JE2 BE2.png|32px]] [[File:Acacia Wall Sign (S) JE2 BE2.png|32px]] [[File:Dark Oak Wall Sign (S) JE2 BE2.png|32px]] The textures of signs have been changed to reflect the changes made to planks in the [[Texture Update]].}}
{{History|||snap=Pre-release 1|Glowing text on signs now has an outer glow, making text more visible in the dark.}}
{{History||1.18|snap=21w41a|[[File:Oak Sign JE3.png|32px]] [[File:Spruce Sign JE2.png|32px]] [[File:Birch Sign JE2.png|32px]] [[File:Jungle Sign JE2.png|32px]] [[File:Acacia Sign JE2.png|32px]] [[File:Dark Oak Sign JE2.png|32px]] [[File:Crimson Sign JE2.png|32px]] [[File:Warped Sign JE2.png|32px]] Changed all signs textures as items.}}
{{History||1.19|snap=22w11a|[[File:Mangrove Sign JE1 BE1.png|32px]][[File:Mangrove Wall Sign JE1 BE1.png|32px]][[File:Mangrove Sign (item) JE1 BE1.png|32px]] Added mangrove signs.}}
{{History|||snap=22w14a|Due to the addition of the [[mangrove tree]] and [[mangrove swamp]], mangrove signs are now obtainable in survival and renewable.}}
{{History||October 15, 2022|link={{ytl|https://youtu.be/iM9KtHaDcUg?t=5437}}|Hanging signs were announced and shown on [[Minecraft Live 2022]].|Hanging signs were conceptualized by [[Agnes Larsson]] with input from her daughter.<ref>{{ytl|vJCMpPyaN8Q|Minecraft 1.20: New Blocks and Their Functions! @ 0:29|Minecraft|February 24, 2023|t=29s}}</ref>}}
{{History||1.20<br>(Experimental)|link=1.19.3|snap=22w42a|[[File:Bamboo Sign (0) JE1 BE1.png|32px]] [[File:Bamboo Wall Sign (S) JE1 BE1.png|32px]] [[File:Bamboo Sign (item) JE1 BE1.png|32px]] Added bamboo signs behind the [[Java Edition 1.20|Update 1.20 experimental datapack]].
|[[File:Oak Hanging Sign JE1 BE1.png|32px]] [[File:Spruce Hanging Sign JE1 BE1.png|32px]] [[File:Birch Hanging Sign JE1 BE1.png|32px]] [[File:Jungle Hanging Sign JE1 BE1.png|32px]] [[File:Acacia Hanging Sign JE1 BE1.png|32px]] [[File:Dark Oak Hanging Sign JE1 BE1.png|32px]] [[File:Mangrove Hanging Sign JE1 BE1.png|32px]] [[File:Bamboo Hanging Sign JE1 BE1.png|32px]] [[File:Crimson Hanging Sign JE1 BE1.png|32px]] [[File:Warped Hanging Sign JE1 BE1.png|32px]]<br>[[File:Oak Wall Hanging Sign JE1 BE1.png|32px]] [[File:Spruce Wall Hanging Sign JE1 BE1.png|32px]] [[File:Birch Wall Hanging Sign JE1 BE1.png|32px]] [[File:Jungle Wall Hanging Sign JE1 BE1.png|32px]] [[File:Acacia Wall Hanging Sign JE1 BE1.png|32px]] [[File:Dark Oak Wall Hanging Sign JE1 BE1.png|32px]] [[File:Mangrove Wall Hanging Sign JE1 BE1.png|32px]] [[File:Bamboo Wall Hanging Sign (S) JE1 BE1.png|32px]] [[File:Crimson Wall Hanging Sign JE1 BE1.png|32px]] [[File:Warped Wall Hanging Sign JE1 BE1.png|32px]]<br>[[File:Oak Hanging Sign (item) JE1 BE1.png|32px]] [[File:Spruce Hanging Sign (item) JE1 BE1.png|32px]] [[File:Birch Hanging Sign (item) JE1 BE1.png|32px]] [[File:Jungle Hanging Sign (item) JE1 BE1.png|32px]] [[File:Acacia Hanging Sign (item) JE1 BE1.png|32px]] [[File:Dark Oak Hanging Sign (item) JE1 BE1.png|32px]] [[File:Mangrove Hanging Sign (item) JE1 BE1.png|32px]] [[File:Bamboo Hanging Sign (item) JE1 BE1.png|32px]] [[File:Crimson Hanging Sign (item) JE1 BE1.png|32px]] [[File:Warped Hanging Sign (item) JE1 BE1.png|32px]]<br>Added hanging signs behind the [[Java Edition 1.20|Update 1.20 experimental datapack]].|Added unique sounds for Nether and bamboo wood signs.}}
{{History|||snap=22w45a|[[File:Jungle Wall Hanging Sign JE2 BE2.png|32px]] The texture of jungle hanging wall signs have been changed.|Added unique sounds for Nether and bamboo wood hanging signs.|Bamboo hanging signs now can be crafted using [[block of stripped bamboo]] instead of bamboo planks.|Crafting bamboo hanging signs now outputs 6 hanging signs instead of 2.}}
{{History||1.20<br>(Experimental)|link=1.19.4|snap=23w07a|[[File:Cherry Sign (0) JE1.png|32px]] [[File:Cherry Wall Sign (S) JE1.png|32px]] [[File:Cherry Sign (item) JE1.png|32px]] [[File:Cherry Hanging Sign JE1.png|32px]] [[File:Cherry Wall Hanging Sign JE1.png|32px]] [[File:Cherry Hanging Sign (item) JE1.png|32px]] Added cherry signs and hanging signs behind the [[Java Edition 1.20|Update 1.20 experimental datapack]]. There used to be a glitch where right clicking on a sign would play the “use” animation. This was fixed in the snapshots for 1.20, where signs are editable.}}
{{History|||snap=1.19.4 Pre-release 4|[[File:Cherry Sign (0) JE2 BE2.png|32px]] Updated the texture of cherry signs.}}
{{History||1.20|snap=23w12a|Bamboo sign, cherry sign and all of the hanging signs are now available without using the "Update 1.20" experimental datapack.|Signs and hanging signs can now be edited after being placed.|Signs and hanging signs now support text on both sides.|Signs and hanging signs can now be waxed with [[honeycomb]] to prevent editing.|Oak and spruce hanging sign can now be found in [[suspicious gravel]] and [[suspicious sand]] in [[trail ruins]].}}
{{History|||snap=23w14a|Signs and hanging signs with click commands can now be interacted with even if the sign is not waxed.|Signs and hanging signs can no longer be edited by players in [[Adventure]] mode.|Signs and hanging signs with non-text chat components can no longer be edited, even if the sign is not waxed.|Signs and hanging signs now save text even if the edit screen is closed by the player being moved far away.}}
{{History|||snap=23w16a|Oak and spruce hanging sign no longer generates in [[suspicious sand]] in [[trail ruins]].|Due to the split of the archaeological loot tables for the suspicious gravel within the [[trail ruins]]; oak and spruce hanging sign now are in the common loot.}}
{{History||1.20.2|snap=23w31a|Changed sounds for Nether wood hanging signs.<ref>{{Bug|MC-262295||Warped and Crimson hanging signs uses their respective plank sounds, despite their stripped stems having unique sounds|Fixed}}</ref>}}
{{History|pocket alpha}}
{{History||v0.5.0|[[File:Oak Standing Sign.png|32px]] [[File:Oak Sign JE1 BE1.png|32px]] Signs have been added, though they can be obtained only through [[inventory]] editors. |The [[player]] currently cannot write on signs.}}
{{History||v0.6.0|Signs can now be legitimately obtained in [[Survival]] and [[Creative]] mode.|The player can now write on signs.}}
{{History||v0.10.0|snap=build 1|Signs now have a selection overlay.}}
{{History|pocket}}
{{History||1.0.0|snap=alpha 0.17.0.1|Signs can now be found in [[igloo]] basements.}}
{{History|bedrock}}
{{History||1.9.0|snap=beta 1.9.0.0|"Sign" has been renamed to "Oak Sign".
|[[File:Spruce Standing Sign (S) JE2 BE2.png|32px]] [[File:Birch Standing Sign (S) JE2 BE2.png|32px]] [[File:Jungle Standing Sign (S) JE2 BE2.png|32px]] [[File:Acacia Standing Sign (S) JE2 BE2.png|32px]] [[File:Dark Oak Standing Sign (S) JE2 BE2.png|32px]] [[File:Spruce Sign JE1 BE1.png|32px]] [[File:Birch Sign JE1 BE1.png|32px]] [[File:Jungle Sign JE1 BE1.png|32px]] [[File:Acacia Sign JE1 BE1.png|32px]] [[File:Dark Oak Sign JE1 BE1.png|32px]] Added spruce, birch, jungle, acacia and dark oak signs.|The sign's text has been changed from black to white.|A sign's recipe now requires the same type of [[wood]] instead of a random assortment.}}
{{History|||snap=beta 1.9.0.2|The default sign text color has been changed back to black.|Sign variants are now grouped in their own [[inventory]] category.}}
{{History||1.10.0|snap=beta 1.10.0.3|[[File:Oak Sign JE2 BE2.png|32px]] The texture of oak sign [[item]]s has been changed.|Spruce signs now generate in new [[taiga]] and [[snowy taiga]] [[village]] houses.}}
{{History||1.11.0|snap=beta 1.11.0.1|Signs can now be used as a [[fuel]] in [[furnace]]s.|Oak signs can now be found inside taiga and snowy taiga village house [[chest]]s.}}
{{History||1.16.0|snap=beta 1.16.0.51|[[File:Crimson Standing Sign JE1 BE1.png|32px]] [[File:Warped Standing Sign JE1 BE1.png|32px]] [[File:Crimson Sign JE1 BE1.png|32px]] [[File:Warped Sign JE1 BE1.png|32px]] Added crimson and warped signs.|[[File:Spruce Standing Sign (S) JE2 BE2.png|32px]] [[File:Birch Standing Sign (S) JE2 BE2.png|32px]] [[File:Jungle Standing Sign (S) JE2 BE2.png|32px]] [[File:Acacia Standing Sign (S) JE2 BE2.png|32px]] [[File:Dark Oak Standing Sign (S) JE2 BE2.png|32px]] [[File:Spruce Wall Sign (S) JE2 BE2.png|32px]] [[File:Birch Wall Sign (S) JE2 BE2.png|32px]] [[File:Jungle Wall Sign (S) JE2 BE2.png|32px]] [[File:Acacia Wall Sign (S) JE2 BE2.png|32px]] [[File:Dark Oak Wall Sign (S) JE2 BE2.png|32px]] The texture of all signs except oak sign have been changed.}}
{{History||1.16.20|snap=beta 1.16.20.50|Crimson and warped signs now uses regular plank [[sound]]s instead of their stem variant sounds.}}
{{History||1.16.210|snap=beta 1.16.210.59|Signs can now be {{control|used}} while holding a [[dye]] to change the text color.|Signs can now be tinted with [[Glow Ink Sac|glow ink sac]]s to make the text glow.
|Works with both default and dyed signs.}}
{{History|||snap=beta 1.16.210.60|Color on dyed signs disappears and the text turns back to black.|Signs with applied glowing effect as well as color stops glowing and color is removed.}}
{{History||1.16.220|snap=beta 1.16.220.50|Signs can now be {{control|used}} while holding a [[dye]] to change the text color again.|Signs can now be tinted with [[Glow Ink Sac|glow ink sac]]s to make the text glow again.}}
{{History|||snap=beta 1.16.220.52|Now has sounds for being dyed.}}
{{History|||snap=release|A glowing effect can no longer be applied to signs due to glow ink sacs becoming inaccessible in the full release.}}
{{History||1.17.0|snap=beta 1.17.0.50|[[File:Oak Sign BE3.png|32px]] [[File:Spruce Sign BE2.png|32px]] [[File:Birch Sign BE2.png|32px]] [[File:Jungle Sign BE2.png|32px]] [[File:Acacia Sign BE2.png|32px]] [[File:Dark Oak Sign BE2.png|32px]] Textures of sign items was updated.
|[[File:Oak Standing Sign (S) JE2 BE2.png|32px]] [[File:Oak Wall Sign (S) JE2 BE2.png|32px]] The textures of oak signs have been changed to reflect the changes made to planks in the [[Texture Update]].}}
{{History||1.17.10|snap=beta 1.17.10.21|Glowing text on signs now has an outer glow, making text more visible in the dark.}}
{{History||1.18.10|snap=beta 1.18.10.20|[[File:Oak Sign JE3.png|32px]] [[File:Spruce Sign JE2.png|32px]] [[File:Birch Sign JE2.png|32px]] [[File:Jungle Sign JE2.png|32px]] [[File:Acacia Sign JE2.png|32px]] [[File:Dark Oak Sign JE2.png|32px]] [[File:Crimson Sign JE2.png|32px]] [[File:Warped Sign JE2.png|32px]] Changed all signs textures as items.}}
{{History||1.19.0|snap=beta 1.19.0.20|[[File:Mangrove Sign JE1 BE1.png|32px]][[File:Mangrove Wall Sign JE1 BE1.png|32px]][[File:Mangrove Sign (item) JE1 BE1.png|32px]] Added mangrove signs.}}
{{History||Next Major Update<br>(Experimental)|link=Bedrock Edition 1.20|snap=beta 1.19.50.21|[[File:Bamboo Sign (0) JE1 BE1.png|32px]] [[File:Bamboo Wall Sign (S) JE1 BE1.png|32px]] [[File:Bamboo Sign (item) JE1 BE1.png|32px]] Added bamboo signs behind the "[[Bedrock Edition 1.20|Next Major Update]]" [[experimental]] toggle.|[[File:Oak Hanging Sign JE1 BE1.png|32px]] [[File:Spruce Hanging Sign JE1 BE1.png|32px]] [[File:Birch Hanging Sign JE1 BE1.png|32px]] [[File:Jungle Hanging Sign JE1 BE1.png|32px]] [[File:Acacia Hanging Sign JE1 BE1.png|32px]] [[File:Dark Oak Hanging Sign JE1 BE1.png|32px]] [[File:Mangrove Hanging Sign JE1 BE1.png|32px]] [[File:Bamboo Hanging Sign JE1 BE1.png|32px]] [[File:Crimson Hanging Sign JE1 BE1.png|32px]] [[File:Warped Hanging Sign JE1 BE1.png|32px]]<br>[[File:Oak Wall Hanging Sign JE1 BE1.png|32px]] [[File:Spruce Wall Hanging Sign JE1 BE1.png|32px]] [[File:Birch Wall Hanging Sign JE1 BE1.png|32px]] [[File:Jungle Wall Hanging Sign JE1 BE1.png|32px]] [[File:Acacia Wall Hanging Sign JE1 BE1.png|32px]] [[File:Dark Oak Wall Hanging Sign JE1 BE1.png|32px]] [[File:Mangrove Wall Hanging Sign JE1 BE1.png|32px]] [[File:Bamboo Wall Hanging Sign (S) JE1 BE1.png|32px]] [[File:Crimson Wall Hanging Sign JE1 BE1.png|32px]] [[File:Warped Wall Hanging Sign JE1 BE1.png|32px]]<br>[[File:Oak Hanging Sign (item) JE1 BE1.png|32px]] [[File:Spruce Hanging Sign (item) JE1 BE1.png|32px]] [[File:Birch Hanging Sign (item) JE1 BE1.png|32px]] [[File:Jungle Hanging Sign (item) JE1 BE1.png|32px]] [[File:Acacia Hanging Sign (item) JE1 BE1.png|32px]] [[File:Dark Oak Hanging Sign (item) JE1 BE1.png|32px]] [[File:Mangrove Hanging Sign (item) JE1 BE1.png|32px]] [[File:Bamboo Hanging Sign (item) JE1 BE1.png|32px]] [[File:Crimson Hanging Sign (item) JE1 BE1.png|32px]] [[File:Warped Hanging Sign (item) JE1 BE1.png|32px]]<br>Added hanging signs behind the "[[Bedrock Edition 1.20.0|Next Major Update]]" [[experimental]] toggle.|Added unique sounds for Nether and bamboo wood signs.}}
{{History|||snap=beta 1.19.60.20|[[File:Jungle Wall Hanging Sign JE2 BE2.png|32px]] The texture of jungle hanging wall signs have been changed.|Bamboo hanging signs now can be crafted using [[block of stripped bamboo]] instead of bamboo planks.|Crafting bamboo hanging signs now outputs 6 hanging signs instead of 2.}}
{{History||Next Major Update<br>(Experimental)|link=Bedrock Edition 1.19.80|snap=beta 1.19.80.20|[[File:Cherry Sign (0).png|32px]] [[File:Cherry Wall Sign (S) JE1.png|32px]] [[File:Cherry Sign (item) JE1.png|32px]] [[File:Cherry Hanging Sign JE1.png|32px]] [[File:Cherry Wall Hanging Sign JE1.png|32px]] [[File:Cherry Hanging Sign (item) JE1.png|32px]] Added cherry signs and hanging signs behind the "[[Bedrock Edition 1.20.0|Next Major Update]]" [[experimental]] toggle.}}
{{History|||snap=beta 1.19.80.21|[[File:Cherry Sign (0) JE2 BE2.png|32px]] Updated the texture of cherry signs.}}
{{History|||snap=beta 1.19.80.22|Signs and hanging signs can now be edited after being placed.|Signs and hanging signs now support text on both sides.|Signs and hanging signs can now be waxed with [[honeycomb]] to prevent editing.}}
{{History|||snap=beta 1.20.0.20|Crimson, warped, and bamboo hanging signs now have custom sounds to match their wood type.<ref name=badnewsounds>{{Bug|MCPE-164246}}</ref>}}
{{History||1.20.0|snap=beta 1.20.0.21|Bamboo sign, cherry sign and all of the hanging signs are now available without using the "Next Major Update" experimental toggle.}}
{{History|console}}
{{History||xbox=TU1|xbone=CU1|ps=1.0|wiiu=Patch 1|switch=1.0.1|[[File:Oak Standing Sign.png|32px]] [[File:Oak Sign JE1 BE1.png|32px]] Added signs.}}
{{History||xbox=TU9|Signs are now stackable up to 16.
|The same [[crafting]] recipe for signs now produces 3 signs instead of 1.}}
{{History||xbox=none|xbone=none|ps=1.88|wiiu=none|switch=none|[[File:Spruce Standing Sign (S) JE2 BE2.png|32px]] [[File:Birch Standing Sign (S) JE2 BE2.png|32px]] [[File:Jungle Standing Sign (S) JE2 BE2.png|32px]] [[File:Acacia Standing Sign (S) JE2 BE2.png|32px]] [[File:Dark Oak Standing Sign (S) JE2 BE2.png|32px]] [[File:Spruce Sign JE1 BE1.png|32px]] [[File:Birch Sign JE1 BE1.png|32px]] [[File:Jungle Sign JE1 BE1.png|32px]] [[File:Acacia Sign JE1 BE1.png|32px]] [[File:Dark Oak Sign JE1 BE1.png|32px]] Added spruce, birch, jungle, acacia and dark oak signs.}}
{{History||xbox=none|xbone=none|ps=1.90|wiiu=none|switch=none|[[File:Oak Sign JE2 BE2.png|32px]] The texture of oak sign [[item]]s has been changed.}}
{{History|new 3ds}}
{{History||0.1.0|[[File:Oak Standing Sign (S) JE2 BE2.png|32px]] [[File:Oak Sign JE1 BE1.png|32px]] Added signs.}}
{{History|foot}}
== Trivia ==
* The first concept art of hanging signs came from [[Agnes Larsson]]'s daughter.<ref>{{Ytl|vJCMpPyaN8Q|Minecraft 1.20: New Blocks and Their Functions!|Minecraft|t=30s}}</ref>
== Gallery ==
=== Screenshots ===
<gallery>
Signs classic.png|Test of signs in early [[Java Edition Classic]].
Sigh test.jpg|Another early sign image.
Signs PreRelease.png|First image of sign blocks during [[Java Edition Infdev|Infdev]].
Pocket Edition v0.6.0 alpha Development sign.png|First image of signs on [[Pocket Edition]].
Pocket Edition v0.6.0 alpha Development sign editing.png|First image of editing text on [[PE]] iOS.
Pocket Edition v0.6.0 alpha Development sign editing 2.png|First image of editing text on [[PE]] Android.
Pocket Edition v0.6.0 alpha Development sky.png
Door Sign.png|A sign placed on a door.
Breaking News.png|A sign being broken.
Sign Text Dark.jpg|A dark oak sign with black text.
Sign Text Light.jpg|A dark oak sign with white text.
Sign Blockdata.gif|A sign using blockdata to dynamically change.
JSON Sign.png|First image of a sign using JSON text.
Width Based Character Limit.png|First image of a sign using width based character limits.
Glow Ink Sign with Pink Dye.png|Oak sign with glow ink in the dark in [[Java Edition 21w03a]].
Lit vs unlit signs.png|Difference in visibility of a lime text, from left to right, in a lit birch sign, unlit birch sign, lit dark oak sign, and unlit dark oak sign.
Glowing Text Comparison.png|The comparison between glow text and non-glow text.
Example Of Signs Being Weird.png|alt=Shading differences|Signs being different shades depending on orientation.
Glow text.gif|All sixteen colors of glow text.
Glow Ink Signs.jpg|Signs with glowing ink in several colors.
Lots of Glowing Signs.jpg|More signs with glowing ink.
Sign Platforms.jpg|[[Ari]] standing on top of a hanged sign.
Eric Shop.jpg|[[Sunny]] looking at a double sided hanging sign.
Hanging Sign Bedrock.png|Hanging sign with small text.
Hanging Sign Java.png|Hanging sign with large text.
New Hanging Sign Text Length 1.jpg|Text on hanging sign.
New Hanging Sign Text Length 2.jpg|Text on hanging sign.
</gallery>
=== Concept Art ===
<gallery>
Hanging_Sign_Concept_Art.png|Hanging sign concept art.
Hanging_Sign_Concept_Art2.png|Ditto.
Hanging_Sign_Concept_Art3.png|Hanging sign dimensions concept art.
Hanging_Sign_Concept_Art4.png|Hanging sign crafting recipe, block states concept art.
</gallery>
=== Renders ===
{{hidden begin}}
<div style="clear: both"></div>
<gallery>
Oak Sign.png|Oak Sign
Spruce Sign.png|Spruce Sign
Birch Sign.png|Birch Sign
Jungle Sign.png|Jungle Sign
Acacia Sign.png|Acacia Sign
Dark Oak Sign.png|Dark Oak Sign
Mangrove Sign.png|Mangrove Sign
Cherry Sign.png|Cherry Sign
Bamboo Sign.png|Bamboo Sign
Crimson Sign.png|Crimson Sign
Warped Sign.png|Warped Sign
Oak Wall Sign.png|Oak Wall Sign
Spruce Wall Sign.png|Spruce Wall Sign
Birch Wall Sign.png|Birch Wall Sign
Jungle Wall Sign.png|Jungle Wall Sign
Acacia Wall Sign.png|Acacia Wall Sign
Dark Oak Wall Sign.png|Dark Oak Wall Sign
Mangrove Wall Sign.png|Mangrove Wall Sign
Cherry Wall Sign.png|Cherry Wall Sign
Bamboo Wall Sign.png|Bamboo Wall Sign
Crimson Wall Sign.png|Crimson Wall Sign
Warped Wall Sign.png|Warped Wall Sign
Oak Hanging Sign.png|Oak Hanging Sign
Spruce Hanging Sign.png|Spruce Hanging Sign
Birch Hanging Sign.png|Birch Hanging Sign
Jungle Hanging Sign.png|Jungle Hanging Sign
Acacia Hanging Sign.png|Acacia Hanging Sign
Dark Oak Hanging Sign.png|Dark Oak Hanging Sign
Mangrove Hanging Sign.png|Mangrove Hanging Sign
Cherry Hanging Sign.png|Cherry Hanging Sign
Bamboo Hanging Sign.png|Bamboo Hanging Sign
Crimson Hanging Sign.png|Crimson Hanging Sign
Warped Hanging Sign.png|Warped Hanging Sign
Oak Wall Hanging Sign.png|Oak Wall Hanging Sign
Spruce Wall Hanging Sign.png|Spruce Wall Hanging Sign
Birch Wall Hanging Sign.png|Birch Wall Hanging Sign
Jungle Wall Hanging Sign.png|Jungle Wall Hanging Sign
Acacia Wall Hanging Sign.png|Acacia Wall Hanging Sign
Dark Oak Wall Hanging Sign.png|Dark Oak Wall Hanging Sign
Mangrove Wall Hanging Sign.png|Mangrove Wall Hanging Sign
Cherry Wall Hanging Sign.png|Cherry Wall Hanging Sign
Bamboo Wall Hanging Sign.png|Bamboo Wall Hanging Sign
Crimson Wall Hanging Sign.png|Crimson Wall Hanging Sign
Warped Wall Hanging Sign.png|Warped Wall Hanging Sign
</gallery>
<gallery>
Oak Sign JE3.png
Spruce Sign JE2.png
Birch Sign JE2.png
Jungle Sign JE2.png
Acacia Sign JE2.png
Dark Oak Sign JE2.png
Mangrove Sign (item) JE1 BE1.png
Cherry Sign (item) JE1.png
Bamboo Sign (item) JE1 BE1.png
Crimson Sign JE2.png
Warped Sign JE2.png
Oak Hanging Sign (item) JE1 BE1.png
Spruce Hanging Sign (item) JE1 BE1.png
Birch Hanging Sign (item) JE1 BE1.png
Jungle Hanging Sign (item) JE1 BE1.png
Acacia Hanging Sign (item) JE1 BE1.png
Dark Oak Hanging Sign (item) JE1 BE1.png
Mangrove Hanging Sign (item) JE1 BE1.png
Cherry Hanging Sign (item) JE1.png
Bamboo Hanging Sign (item) JE1 BE1.png
Crimson Hanging Sign (item) JE1 BE1.png
Warped Hanging Sign (item) JE1 BE1.png
</gallery>
{{hidden end}}
{{-}}
== Issues ==
{{issue list}}
== See also ==
* [[Chalkboard]]
== References ==
{{Reflist}}
== External Links ==
*[https://www.minecraft.net/en-us/article/taking-inventory--sign Taking Inventory: Sign] – Minecraft.net on January 9, 2020
{{Blocks|utility}}
{{Items}}
[[Category:Utility blocks]]
[[Category:Manufactured blocks]]
[[Category:Generated structure blocks]]
[[Category:Block entities]]
[[Category:Non-solid blocks]]
[[cs:Cedule]]
[[de:Schild (Schrift)]]
[[es:Cartel]]
[[fr:Pancarte]]
[[hu:Tábla]]
[[it:Cartello]]
[[ja:看板]]
[[ko:표지판]]
[[nl:Bord]]
[[pl:Tabliczka]]
[[pt:Placa]]
[[ru:Табличка]]
[[th:ป้าย]]
[[uk:Табличка]]
[[zh:告示牌]]</li></ul></nowiki> | 13w36a | Potion of Water Breathing added. | |||
1.8{{Extension DPL}}<ul><li>[[White Dye|White Dye]]<br/>{{Item
| image = White Dye.png
| renewable = Yes
| stackable = Yes (64)
}}
'''White dye''' is a [[Dye#Primary|primary color dye]] similar to [[bone meal]].
== Obtaining ==
=== Crafting ===
{{Crafting
|showname=0
|Bone Meal
|Output=White Dye
|type=Material
|head=1
}}
{{Crafting
|Lily of the Valley
|Output=White Dye
|type=Material
|foot=1
}}
=== Loot chest ===
{{#invoke:LootChest|base3|white-dye}}
== Usage ==
{{dye usage}}
=== Crafting ingredient ===
{{crafting usage|ignore=Banner|continue=1}}
{{banner crafting usage}}
=== Loom ingredient ===
{{Banner loom usage|White Dye}}
=== Trading ===
Apprentice-level shepherd villagers have a 20% chance to buy 12 white dye for an emerald.
== Data values ==
=== ID ===
{{edition|java}}:
{{ID table
|edition=java
|showforms=y
|generatetranslationkeys=y
|displayname=White Dye
|spritetype=item
|nameid=white_dye
|form=item
|foot=1}}
{{edition|bedrock}}:
{{ID table
|edition=bedrock
|showaliasids=y
|shownumericids=y
|showforms=y
|notshowbeitemforms=y
|generatetranslationkeys=y
|displayname=White Dye
|spritetype=item
|nameid=white_dye
|aliasid=dye / 19
|id=410
|form=item
|translationkey=item.dye.white_new.name
|foot=1}}
== History ==
{{History|java}}
{{History||1.14|snap=18w43a|[[File:White Dye JE1 BE1.png|32px]] Added white dye.}}
{{History|||snap=18w44a|White dye can now change the text color on [[sign]]s to white.}}
{{History|||snap=19w05a|Added the [[wandering trader]], which sells white dye.}}
{{History|||snap=19w11a|White dye can now be [[trading|bought]] by shepherd villagers.}}
{{History||1.17|snap=20w45a|White dye can now be used to craft [[white candle]]s.}}
{{History|||snap=21w19a|White dyes can no longer be used to craft white candles.}}
{{History|||snap=Pre-release 1|White dye can once again be used to craft white candles.}}
{{History||1.20<br>(Experimental)|link=1.19.3|snap=22w42a|White dye can now change the text color on [[hanging sign]]s to white.}}
{{History||1.20|snap=23w12a|White dye can now be found in [[suspicious gravel]] and [[suspicious sand]] in [[trail ruins]].}}
{{History|||snap=23w16a|White dye no longer generates in [[suspicious sand]] in [[trail ruins]].|Due to the split of the archaeological loot tables for suspicious gravel within the [[trail ruins]]; white dye is now common loot.}}
{{History|bedrock}}
{{History||1.8.0|snap=beta 1.8.0.10|[[File:White Dye JE1 BE1.png|32px]] Added white dye.}}
{{History||1.9.0|snap=beta 1.9.0.0|Added [[flower|lilies of the valley]], which can be used to [[crafting|craft]] white dye.}}
{{History||1.11.0|snap=beta 1.11.0.4|White dye can now be [[trading|sold]] to shepherd [[villager]]s.}}
{{History||1.16.100|snap=beta 1.16.100.56|The ID of white dye has been changed from <code>dye/19</code> to <code>white_dye</code>.}}
{{History|ps4}}
{{History||1.83|[[File:White Dye JE1 BE1.png|32px]] Added white dye.}}
{{History|foot}}
== Issues ==
{{issue list}}
{{Items}}
[[Category:Items]]
[[Category:Dyes]]
[[Category:Renewable resources]]
[[de:Weißer Farbstoff]]
[[es:Tinte blanco]]
[[fr:Teinture blanche]]
[[ja:白色の染料]]
[[ko:하얀색 염료]]
[[pl:Biały barwnik]]
[[pt:Corante branco]]
[[zh:白色染料]]</li><li>[[Trial Key|Trial Key]]<br/>{{Item|
|image=Trial Key .webp
|renewable=Yes
|stackable=Yes (64)
}}
{{Stub}}
{{in dev|java|bedrock|1.21|1.21.0}}
A '''Trial Key''' is an item found in [[Trial Chambers]].
Its functionality remained a mystery for a pretty good time, but on the Minecraft Monthly of January 2024, it has been revealed to open vaults, which once opened will drop an item. It's still unknown what will the loot be, but was seen dispensing the following:
Enchanted iron helmet, enchanted iron leggings, enchanted crossbow, enchanted diamond chestplate, iron, gold and diamond horse armour, enchanted golden apple, saddle, enchanted diamond axe, enchanted iron pickaxe and enchanted iron Shovel.
The trial key can currently be obtained from trial spawners (50%), or from pots and chests (8%).
[[Category:Items]]
[[ja:Trial Key]]
[[lzh:煉管]]</li></ul> | 14w27a | Potion of Leaping added. | |||
1.8.1{{Extension DPL}}<ul><li>[[Fermented Spider Eye|Fermented Spider Eye]]<br/>{{Item
| image = Fermented Spider Eye.png
| renewable = Yes
| stackable = Yes (64)
}}
A '''fermented spider eye''' is a [[brewing]] ingredient.
== Obtaining ==
=== Crafting ===
{{Crafting
|Brown Mushroom
|Sugar
|Spider Eye
|Output= Fermented Spider Eye
|type= Brewing
}}
== Usage ==
They can be used to brew [[potion]]s with negative effects, as well as the [[Potion of Invisibility]].
=== Brewing ingredient ===
{{brewing
|showname=1
|head=1
|Fermented Spider Eye
|Potion of Weakness
|base=Water Bottle
}}
{{brewing
|Fermented Spider Eye
|Potion of Harming
|base=Potion of Poison;Potion of Healing
}}
{{brewing
|Fermented Spider Eye
|Potion of Slowness
|base=Potion of Swiftness;Potion of Leaping
}}
{{brewing
|foot=1
|Fermented Spider Eye
|Potion of Invisibility
|base=Potion of Night Vision
}}
== Data values ==
=== ID ===
{{edition|java}}:
{{ID table
|edition=java
|showforms=y
|generatetranslationkeys=y
|displayname=Fermented Spider Eye
|spritetype=item
|nameid=fermented_spider_eye
|form=item
|foot=1}}
{{edition|bedrock}}:
{{ID table
|edition=bedrock
|shownumericids=y
|showforms=y
|notshowbeitemforms=y
|generatetranslationkeys=y
|displayname=Fermented Spider Eye
|spritetype=item
|nameid=fermented_spider_eye
|id=428
|form=item
|foot=1}}
== Video ==
<div style="text-align:center">{{yt|ln8ZQn5MtFI}}</div>
== History ==
{{History|java}}
{{History||1.0.0|snap=Beta 1.9 Prerelease 2|[[File:Fermented Spider Eye JE1 BE1.png|32px]] Added fermented spider eyes.}}
{{History|||snap=Beta 1.9 Prerelease 3|Fermented spider eyes can now be [[brewing|brewed]] in a [[water bottle]] to create a [[potion of Weakness]].
|Fermented spider eyes now corrupt potions of [[Swiftness]] and [[Fire Resistance]] into potions of [[Slowness]], for both normal and extended types.
|Fermented spider eyes now corrupts potions of [[Healing]] and [[Poison]] into potions of [[Harming]], as well as Healing II and extended Poison into extended Harming.}}
{{History||1.4.2|snap=12w34a|Fermented spider eyes now change potions of [[Night Vision]] into the new potions of [[Invisibility]], for both normal and extended types.}}
{{History||1.7.2|snap=13w36a|Fermented spider eyes now corrupt the new [[potion of Water Breathing]] into a potion of Harming.}}
{{History||1.8|snap=14w27a|Fermented spider eyes now corrupt the new [[potion of Leaping]] into a potion of Slowness.}}
{{History||1.9|snap=15w31a|[[Potions of Weakness]] can no longer be made using a [[thick potion]], [[mundane potion]], [[awkward potion]], [[potion of Regeneration]], or [[potion of Strength]].
|[[Potions of Slowness]] can no longer be made using a [[potion of Fire Resistance]].
|[[Potions of Harming]] can no longer be made using a [[potion of Water Breathing]].}}
{{History||1.13|snap=17w47a|Prior to [[1.13/Flattening|''The Flattening'']], this [[item]]'s numeral ID was 376.}}
{{History||1.14|snap=18w50a|[[File:Fermented Spider Eye JE2 BE2.png|32px]] The texture of fermented spider eyes has been changed.}}
{{History|upcoming java}}
{{History||Villager Trade Rebalance<br>(Experimental)|link=Java Edition 1.20.2|snap=23w31a|[[Wandering trader]]s now have a chance to [[trading|buy]] a fermented spider eye from the player.}}
{{History|pocket alpha}}
{{History||v0.12.1|snap=build 1|[[File:Fermented Spider Eye JE1 BE1.png|32px]] Added fermented spider eyes.}}
{{History|bedrock}}
{{History||1.10.0|snap=beta 1.10.0.3|[[File:Fermented Spider Eye JE2 BE2.png|32px]] The texture of fermented spider eyes has been changed.}}
{{History|console}}
{{History||xbox=TU7|xbone=CU1|ps=1.0|wiiu=Patch 1|switch=1.0.1|[[File:Fermented Spider Eye JE1 BE1.png|32px]] Added fermented spider eyes.}}
{{History||xbox=none|xbone=none|ps=1.90|wiiu=none|switch=none|[[File:Fermented Spider Eye JE2 BE2.png|32px]] The texture of fermented spider eyes has been changed.}}
{{History|New 3DS}}
{{History||0.1.0|[[File:Fermented Spider Eye JE1 BE1.png|32px]] Added fermented spider eyes.}}
{{History|foot}}
== Issues ==
{{issue list}}
{{items}}
[[Category:Renewable resources]]
[[cs:Zkvašené pavoučí oko]]
[[de:Fermentiertes Spinnenauge]]
[[es:Ojo de araña fermentado]]
[[fr:Œil d'araignée fermenté]]
[[it:Occhio di ragno fermentato]]
[[ja:発酵したクモの目]]
[[ko:발효된 거미 눈]]
[[nl:Gefermenteerd spinnenoog]]
[[pl:Sfermentowane oko pająka]]
[[pt:Olho de aranha fermentado]]
[[ru:Приготовленный паучий глаз]]
[[th:ตาแมงมุมดอง]]
[[uk:Оброблене павуче око]]
[[zh:发酵蛛眼]]</li><li>[[Lava Bucket|Lava Bucket]]<br/>{{Item
| title = Lava Bucket
| image = Lava Bucket.png
| renewable = Yes
| stackable = No
}}
A '''lava bucket''' is a [[bucket]] filled with [[lava]].
== Obtaining ==
=== Interacting ===
To fill an empty [[bucket]] with lava, {{control|use}} it on a [[lava]] source block or lava in a [[cauldron]]. The block is consumed in the process. Flowing lava does not fill a bucket.
If there is a lava source above the [[pointed dripstone]] stalactite, there is a {{frac|15|256}} (~5.9%) chance for it to completely fill an empty cauldron within 10 blocks under the tip with lava after a [[random tick]]. This lava can then be scooped with a bucket, making it a renewable resource.
==Usage==
A lava bucket can be used to place down lava sources with the {{key|Use Item}} button. Doing so gives the player the bucket back. Lava buckets can be used to replace some transparent, non-full blocks such as [[tall grass]] and [[water]], both flowing and sources.
{{IN|java}}, lava buckets can be used to break [[Nether Portal (block)|Nether portal blocks]] by placing the lava on the side of a block next to the portal block.
=== Smelting ===
A lava bucket can be used as an efficient [[fuel]]. It has the longest burning value of 1000 seconds, compared to 800 seconds for a [[coal block]] (a lava bucket smelts 100 items, and a coal block smelts 80). After smelting starts, the lava bucket turns into an empty bucket.
=== Trading ===
{{IN|bedrock}}, journeyman-level armorer villagers buy a lava bucket for one [[emerald]] as part of their trades.
{{IN|java}}, journeyman-level armorer villagers have a 40% chance of offering to buy a lava bucket for one emerald.
=== Cauldrons ===
A lava bucket can be used to fill a [[cauldron]] with lava. The lava damages any entity standing inside the cauldron, unless the entity is immune to fire damage.<!-- ex: nether mobs--> Flowing water or waterlogging does not affect the lava in the cauldron.
== Sounds ==
{{el|je}}:
{{Sound table
|sound=Fill lava bucket1.ogg
|sound2=Fill lava bucket2.ogg
|sound3=Fill lava bucket3.ogg
|subtitle=Bucket fills
|source=player
|description=When a bucket is filled with lava
|id=item.bucket.fill_lava
|translationkey=subtitles.item.bucket.fill
|volume=1.0
|pitch=1.0
|distance=16}}
{{Sound table
|sound=Empty lava bucket1.ogg
|sound2=Empty lava bucket2.ogg
|sound3=Empty lava bucket3.ogg
|subtitle=Bucket empties
|source=block
|description=When a lava bucket is emptied
|id=item.bucket.empty_lava
|translationkey=subtitles.item.bucket.empty
|volume=1.0
|pitch=1.0
|distance=16
|foot=1}}
{{el|be}}:
{{Sound table
|type=bedrock
|sound=Fill lava bucket1.ogg
|sound2=Fill lava bucket2.ogg
|sound3=Fill lava bucket3.ogg
|source=block
|description=When a bucket is filled with lava
|id=bucket.fill_lava
|volume=1.0
|pitch=1.0}}
{{Sound table
|sound=Empty lava bucket1.ogg
|sound2=Empty lava bucket2.ogg
|sound3=Empty lava bucket3.ogg
|source=block
|description=When a lava bucket is emptied
|id=bucket.empty_lava
|volume=1.0
|pitch=1.0
|foot=1}}
==Data values==
=== ID ===
{{edition|java}}:
{{ID table
|edition=java
|showforms=y
|generatetranslationkeys=y
|displayname=Lava Bucket
|spritetype=item
|nameid=lava_bucket
|form=item
|foot=1}}
{{edition|bedrock}}:
{{ID table
|edition=bedrock
|showaliasids=y
|shownumericids=y
|showforms=y
|notshowbeitemforms=y
|generatetranslationkeys=y
|displayname=Lava Bucket
|spritetype=item
|nameid=lava_bucket
|aliasid=bucket / 10
|id=363
|form=item
|translationkey=item.bucketLava.name
|foot=1}}
== Achievements ==
{{load achievements|Super Fuel}}
== Advancements ==
{{Load advancements|Hot Stuff}}
==History==
{{History|java infdev}}
{{History||20100615|[[File:Lava Bucket JE1 BE1.png|32px]] Added lava buckets.}}
{{History|java alpha}}
{{History||v1.1.0|Buckets of lava can now be used to fuel a [[furnace]] for 100 [[smelting|smelts]], consuming the [[lava]] and the [[bucket]]. This is the highest number of smelts of any single [[item]] in the game.}}
{{History||v1.2.6|{{control|use|text=Using}} a lava bucket on [[block]]s with GUIs ([[chest]]s, furnaces, etc.) no longer places the lava.}}
{{History|java}}
{{History||1.2.1|snap=1.2|Changed name from "Lava bucket" to "Lava Bucket".}}
{{History||1.3|snap=12w22a|[[Smelting]] in a [[furnace]] with a lava bucket now leaves an empty [[bucket]] for the [[player]] to retrieve.}}
{{History||1.8|snap=14w25a|A lava bucket is now shown as the icon when [[lava]] is used as a layer in [[Superflat]].}}
{{History||1.9|snap=15w50a|Added sounds for filling and pouring lava buckets.}}
{{History||1.13|snap=17w47a|Prior to the ''[[Flattening]]'' this item's numerical ID was 327.}}
{{History||1.14|snap=18w43a|[[File:Lava Bucket JE2 BE2.png|32px]] The texture of lava buckets has been changed.}}
{{History|||snap=19w11a|Armorer villagers can now [[trading|buy]] lava buckets.}}
{{History||1.17|snap=20w45a|Lava buckets can now be used to fill a [[cauldron]] with lava.}}
{{History|||snap=21w13a|The lava bucket is now fully renewable, as [[pointed dripstone]] can now be obtained in Survival mode without custom generation.}}
{{History|pocket alpha}}
{{History||v0.7.0|[[File:Lava Bucket JE1 BE1.png|32px]] Added lava buckets.}}
{{History||v0.7.4|Lava buckets can now be used as [[fuel]] in a [[furnace]].
|Lava buckets no longer stack to 64.}}
{{History|bedrock}}
{{History||1.4.0|snap=beta 1.2.14.2|Moved all bucket items, including lava buckets, from the Equipment tab to the Items tab in the [[Creative inventory]].{{verify|type=update}}{{info needed}}<!---please check snapshots, only 1 major release version was checked each--->}}
{{History||1.9.0|snap=beta 1.9.0.2|Lava bucket can now be used to fill a [[cauldron]].}}
{{History||1.10.0|snap=beta 1.10.0.3|[[File:Lava Bucket JE2 BE2.png|32px]] The texture of lava buckets has been changed.}}
{{History||1.11.0|snap=beta 1.11.0.4|Lava buckets can now be [[trading|sold]] to armorer [[villager]]s.}}
{{History||1.16.100|snap=beta 1.16.100.56|The ID of lava buckets has been changed from <code>bucket/10</code> to <code>lava_bucket</code>.}}
{{History||1.17.0|snap=beta 1.16.230.54|The lava bucket is now fully renewable, as [[pointed dripstone]] can now be obtained in Survival mode without custom generation.}}
{{History|console}}
{{History||xbox=TU1|xbone=CU1|ps=1.0|wiiu=Patch 1|switch=1.0.1|[[File:Lava Bucket JE1 BE1.png|32px]] Added lava buckets.}}
{{History||xbox=TU9|[[Dispenser]]s have now been given the ability to shoot out the [[liquids]] inside lava buckets. They can also suck up the liquids if activated again, but do not fill up the [[bucket]]s with the liquid dropped due to a bug.}}
{{History||xbox=none|xbone=none|ps=1.90|wiiu=none|switch=none|[[File:Lava Bucket JE2 BE2.png|32px]] The texture of lava buckets has been changed.}}
{{History|New Nintendo 3DS Edition}}
{{History||0.1.0|[[File:Lava Bucket JE1 BE1.png|32px]] Added lava buckets.}}
{{History|foot}}
== Issues ==
{{Issue list}}
==Trivia==
* One lava bucket has the highest number of [[smelting|smelts]] in the game at 100 items per bucket.
** This makes it 12.5 times more efficient than [[coal]] and [[charcoal]].
* A lava bucket is used as Steve's Down-Smash attack in the crossover fighting game Super Smash Bros. Ultimate.
{{Items}}
[[Category:Renewable resources]]
[[Category:Tools]]
[[de:Lavaeimer]]
[[ja:溶岩入りバケツ]]
[[pt:Balde de lava]]
[[th:ถังลาวา]]
[[uk:Відро лави]]
[[zh:熔岩桶]]</li></ul> | pre1 | The potion of Leaping can now be extended using redstone. | |||
1.9{{Extension DPL}}<ul><li>[[Dried Kelp|Dried Kelp]]<br/>{{about|the item|the block|Dried Kelp Block}}
{{Item
| title = Dried Kelp
| image = Dried Kelp.png
| renewable = Yes
| heals = {{hunger|1}}
| stackable = Yes (64)
}}
'''Dried kelp''' is a [[food]] item that can be quickly eaten by the [[player]]. It can also be crafted into [[Dried Kelp Block|dried kelp blocks]].
== Obtaining ==
=== Cooking ===
[[Kelp]] can be cooked in a [[furnace]], [[smoker]], or [[campfire]]. Each piece of dried kelp removed from a furnace output slot gives 0.1 [[experience]] (6.4 experience per stack).
{{Smelting
|Kelp
|Dried Kelp
|0,1
}}
=== Crafting ===
{{Crafting
|Dried Kelp Block
|Output= Dried Kelp,9
|type= Foodstuff
}}
== Usage ==
=== Food ===
[[File:Eating dried kelp.png|thumb|A player eating dried kelp.]]
To eat dried kelp, press and hold {{control|use}} while it is selected in the hotbar. Eating one restores {{hunger|1}} [[hunger]] and 0.6{{only|je|short=1}} / 0.2{{only|be|short=1}} hunger [[Hunger#Mechanics|saturation]].
A player can consume dried kelp about twice as fast as any other food item in the game.
=== Crafting ingredient ===
{{Crafting usage}}
=== Composting ===
Dried kelp placed into a [[composter]] has a 30% chance of raising the compost level by 1.
==Sounds==
{{Sound table/Entity/Food}}
== Achievements ==
{{load achievements|Castaway}}
== Advancements ==
{{load advancements|Husbandry;A Balanced Diet}}
== Data values ==
=== ID ===
{{edition|java}}:
{{ID table
|edition=java
|showforms=y
|generatetranslationkeys=y
|displayname=Dried Kelp
|spritetype=item
|nameid=dried_kelp
|form=item
|foot=1}}
{{edition|bedrock}}:
{{ID table
|edition=bedrock
|shownumericids=y
|showforms=y
|notshowbeitemforms=y
|generatetranslationkeys=y
|displayname=Dried Kelp
|spritetype=item
|nameid=dried_kelp
|id=270
|form=item
|foot=1}}
== History ==
{{History|java}}
{{History||1.13|snap=18w07a|[[File:Dried Kelp JE1.png|32px]] Added dried kelp.}}
{{History|||snap=18w08b|Dried kelp can now be used to craft [[dried kelp block]]s.}}
{{History||1.14|snap=19w03a|Placing dried kelp into the new [[composter]] has a 10% chance of raising the compost level by 1.}}
{{History|||snap=19w05a|Dried kelp now has a 30% chance of increasing the compost level in a composter.}}
{{History|bedrock}}
{{History||1.4.0|snap=beta 1.2.14.2|[[File:Dried Kelp BE1.png|32px]] Added dried kelp.}}
{{H||1.11.0|snap=beta 1.11.0.1|Dried kelp can now be used to fill up [[composter]]s.}}
{{History||1.17.10|snap=beta 1.17.10.20|[[FIle:Dried Kelp JE1.png|32px]] The texture of dried kelp has been changed to match ''Java Edition''.}}
{{History|console}}
{{History||xbox=TU69|ps=1.76|wiiu=Patch 38|[[File:Dried Kelp BE1.png|32px]] Added dried kelp.}}
{{History|foot}}
== Issues ==
{{issue list}}
{{Items}}
[[Category:Food]]
[[Category:Renewable resources]]
[[de:Getrockneter Seetang]]
[[es:Algas secas]]
[[fr:Algue séchée]]
[[ja:乾燥した昆布]]
[[ko:말린 켈프]]
[[lzh:乾海帶]]
[[nl:Gedroogde kelp]]
[[pl:Suszone wodorosty]]
[[pt:Algas secas]]
[[ru:Сушёная ламинария]]
[[th:สาหร่ายทะเลแห้ง]]
[[zh:干海带]]</li><li>[[Axe|Axe]]<br/>{{For}}
{{Item
| image = <gallery>
Wooden Axe.png | Wooden
Stone Axe.png | Stone
Iron Axe.png | Iron
Golden Axe.png | Golden
Diamond Axe.png | Diamond
Netherite Axe.png | Netherite
</gallery>
| rarity = Common
| renewable =
* '''Netherite''': No
* '''Others''': Yes
| durability =
'''Bedrock Edition'''
* Golden: 33
* Wooden: 60
* Stone: 132
* Iron: 251
* Diamond: 1562
* Netherite: 2032
'''Java Edition'''
* Golden: 32
* Wooden: 59
* Stone: 131
* Iron: 250
* Diamond: 1561
* Netherite: 2031
| stackable = No
}}
An '''axe''' is a [[tool]] used to hasten the [[breaking]] of [[wood]]-based or other tough organic [[block]]s, strip or scrape certain blocks, or as a melee [[weapon]] that can disable [[Shield|shields]] it hits.
==Obtaining==
===Crafting===
{{Crafting
|head=1
|showname=0
|showdescription=1
|name=[[Axe]]
|A1={Any Planks}; Iron Ingot; Gold Ingot; Diamond
|B1={Any Planks}; Iron Ingot; Gold Ingot; Diamond
|A2={Any Planks}; Iron Ingot; Gold Ingot; Diamond
|B2=Stick
|B3=Stick
|Output= Wooden Axe; Iron Axe; Golden Axe; Diamond Axe
|type= Tool
}}
{{Crafting
|name=[[Stone Axe]]
|A1=Any stone-tier block |B1=Any stone-tier block
|A2=Any stone-tier block |B2=Stick
|B3=Stick
|Output=Stone Axe
|type=Tool
|description=Can use cobblestone and its other variants interchangeably.
}}
{{Crafting
|foot=1
|ignoreusage=1
|name=[[Axe]]
|ingredients=Damaged Matching [[Axe]]
|Damaged Wooden Axe; Damaged Stone Axe; Damaged Iron Axe; Damaged Golden Axe; Damaged Diamond Axe; Damaged Netherite Axe
|Damaged Wooden Axe; Damaged Stone Axe; Damaged Iron Axe; Damaged Golden Axe; Damaged Diamond Axe; Damaged Netherite Axe
|Output=Wooden Axe; Stone Axe; Iron Axe; Golden Axe; Diamond Axe; Netherite Axe
|description= The durability of the two axes is added together, plus an extra 5% durability.
|type= Tool
}}
=== Upgrading ===
{{Smithing
|head=1
|Netherite Upgrade
|Diamond Axe
|Netherite Ingot
|Netherite Axe
|tail=1
}}
===Repairing===
====Grinding====
{{Grinding
|showdescription=1
|ingredients= 2× Damaged [[Wooden Axe]] or 2× Damaged [[Stone Axe]] or 2× Damaged [[Iron Axe]] or 2× Damaged [[Golden Axe]] or 2× Damaged [[Diamond Axe]] or 2× Damaged [[Netherite Axe]]
|Damaged Wooden Axe; Damaged Stone Axe; Damaged Iron Axe; Damaged Golden Axe; Damaged Diamond Axe; Damaged Netherite Axe
|Damaged Wooden Axe; Damaged Stone Axe; Damaged Iron Axe; Damaged Golden Axe; Damaged Diamond Axe; Damaged Netherite Axe
|Wooden Axe; Stone Axe; Iron Axe; Golden Axe; Diamond Axe; Netherite Axe
|description=The durability of the two axes is added together, plus an extra 5% of max durability.
}}
====[[Anvil mechanics#Unit repair|Unit repair]]====
An axe can be repaired in an [[anvil]] by adding units of the [[tiers|tier]]'s repair material, with each repair material restoring 25% of the axe's maximum durability, rounded down.
===Mob loot===
==== Equipment ====
{{Main|Drops#Equipped items}}
A [[vindicator]] spawns with an iron axe and has an 8.5% chance (9.5% with Looting I, 10.5% with Looting II, and 11.5% with Looting III) of dropping it upon death by the player. It is usually heavily damaged and is sometimes enchanted.
A [[piglin brute]] spawns with a golden axe and has an 8.5% chance (9.5% with Looting I, 10.5% with Looting II, and 11.5% with Looting III) of dropping it upon death by the player. Also, {{in|java}}, [[Zombified Piglin|zombified piglins]] can drop their golden axe (with the same chance as piglin brute drop) if they have been zombified from a [[Piglin Brute|piglin brute.]]
====Raids====
{{IN|be}}, [[Vindicator]] and [[pillager]]s that spawn in raids have a 4.1% chance (5.12% on hard) to drop a badly-damaged iron axe, which is sometimes enchanted with a random enchantment. A vindicator can drop 2 iron axes, one from natural equipment and one from raid drops.
===Trading===
Novice-level [[Trading#Toolsmith|Toolsmith]] [[villager]]s have a 25% chance to sell a stone axe for one [[emerald]], journeyman-level Toolsmith villagers have a 25% chance to sell an enchanted iron axe for eight emeralds, and expert-level Toolsmith villagers have a 50% chance to sell an enchanted diamond axe for 13 emeralds.{{only|bedrock}}
Novice-level [[Trading#Toolsmith 2|Toolsmith]] villagers have a 40% chance to sell a stone axe for one emerald, journeyman-level Toolsmith villagers have a 40% chance to sell an enchanted iron axe for 7-22 emeralds, and expert-level Toolsmith villagers have a 66.67% chance to sell an enchanted diamond axe for 18-35 emeralds.{{only|java}}
Novice-level [[Trading#Weaponsmith|Weaponsmith]] [[villager]]s sell an iron axe for 3 emeralds as one of their trades, and master-level Weaponsmith villagers sell an enchanted diamond axe for 12 emeralds.{{only|bedrock}}
Novice-level [[Trading#Weaponsmith 2|Weaponsmith]] villagers have a 66.67% chance to sell an iron axe for 3 emeralds. Master-level Weaponsmith villagers always offer to sell an enchanted diamond axe for 18-35 emeralds.{{only|java}}
The enchantments are the same as the ones obtained from an [[enchantment table]] at levels 5–19.
=== Villager gifts ===
[[Trading#Toolsmith 2|Toolsmith]] [[villagers]] occasionally throw stone axes at players with the [[Hero of the Village]] status effect.{{only|java}}
[[Trading#Weaponsmith 2|Weaponsmith]] [[villagers]] occasionally throw either stone, gold, or iron axes at players with the [[Hero of the Village]] status effect.{{only|java}}
===Structure loot===
{{IN|JE}}, a sealed room in [[woodland mansion]]s can appear that has a chest always containing an [[Efficiency]] I iron axe.
{{LootChestItem|wooden-axe,stone-axe,random-enchanted-golden-axe,damaged-random-enchanted-netherite-axe,iron-axe}}
==Usage==
===Chopping===
An axe is used to break [[logs]], blocks derived from wood and some other blocks faster than by using other tools. An axe uses 1 durability to break 1 block. For blocks that break instantly, it uses 0 durability.
====Durability====
Each tier of axe has a different durability:
{| class="wikitable sortable"
! Material
! [[Durability]]
|-
| {{itemLink|Wooden Axe|Wood|link=Axe}}
| 59
|-
| {{itemLink|Stone Axe|Stone|link=Axe}}
| 131
|-
| {{itemLink|Iron Axe|Iron|link=Axe}}
| 250
|-
| {{itemLink|Diamond Axe|Diamond|link=Axe}}
| 1561
|-
| {{itemLink|Golden Axe|Golden|link=Axe}}
| 32
|-
| {{itemLink|Netherite Axe|Netherite|link=Axe}}
| 2031
|}
====Speed====
The following table summarizes the speed at which axes of different qualities perform.
{{breaking row|Wooden Trapdoors|link=Trapdoor|sort=1|simple=1}}
{{breaking row|Wooden Doors|item=1|link=Door|sprite=oak-door}}
{{breaking row|Barrel}}
{{breaking row|Cartography Table}}
{{breaking row|Chest}}
{{breaking row|Trapped Chest}}
{{breaking row|Crafting Table}}
{{breaking row|Fletching Table}}
{{breaking row|Lectern}}
{{breaking row|Loom}}
{{breaking row|Smithing Table}}
{{breaking row|Bamboo Mosaic}}
{{breaking row|Block of Bamboo}}
{{breaking row|Campfire}}
{{breaking row|Fences}}
{{breaking row|Fence Gates}}
{{breaking row|Jukebox}}
{{breaking row|Logs}}
{{breaking row|Planks}}
{{breaking row|Wooden Slabs|link=Slabs|sprite=all-wooden-slabs}}
{{breaking row|Wooden Stairs|link=Stairs|sprite=all-wooden-stairs}}
{{breaking row|Bookshelf}}
{{breaking row|Chiseled Bookshelf}}
{{breaking row|Banners}}
{{breaking row|Jack o'Lantern}}
{{breaking row|Melon}}
{{breaking row|Pumpkin}}
{{breaking row|Sign|sprite=oak-sign}}
{{breaking row|Hanging Sign|sprite=hanging-oak-sign}}
{{breaking row|Note Block}}
{{breaking row|Mangrove Roots}}
{{breaking row|Wooden Pressure Plate|sprite=oak-pressure-plate}}
{{breaking row|Beehive}}
{{breaking row|Ladder}}
{{breaking row|Bee Nest|drop=0}}
{{breaking row|Composter}}
{{breaking row|Bamboo}}
{{breaking row|sprite=red-bed|Bed}}
{{breaking row|Cocoa}}
{{breaking row|Daylight Detector}}
{{breaking row|Mushroom Block|sprite=mushroom-blocks}}
{{breaking row|Vines|drop=0|foot=1}}
=== Stripping ===
{{control|Using}} an axe on a [[log]], [[wood]] block, [[block of bamboo]]\, or [[block of copper]] causes it to become a [[stripped log]], [[stripped wood]] block, [[block of stripped bamboo]], or removes one layer of oxidization or wax, respectively. This consumes one point of durability from the axe.
===Weapon===
An axe loses 2 points of durability when used as a weapon.
==== Bedrock Edition ====
{{IN|bedrock}}, axes always attack instantly and deal {{hp|1}} less damage than a [[sword]] of the same quality but it lowers the durability of armor and shields faster than any other tool in-game.
{| class="wikitable" style="text-align:center" data-description="Bedrock damage"
! Material !! Damage
|-
| {{ItemSprite|Wooden Axe}} Wooden || rowspan="2" |{{hp|4}}
|-
| {{ItemSprite|Golden Axe}} Golden
|-
| {{ItemSprite|Stone Axe}} Stone ||{{hp|5}}
|-
| {{ItemSprite|Iron Axe}} Iron ||{{hp|6}}
|-
| {{ItemSprite|Diamond Axe}} Diamond ||{{hp|7}}
|-
| {{ItemSprite|Netherite Axe}} Netherite ||{{hp|8}}
|}
====Java Edition====
Attacking a [[shield]] user with an axe should have a chance to disable the use of the shield for 5 seconds, but currently this always disables a shield.<ref>{{bug|MC-197537}}</ref> The base chance is 25%, plus 5 percentage points per level of [[Efficiency]] on the axe, plus 75 percentage points if attacking while sprinting. [[Vindicator]]s, [[piglin brute]]s, or other [[mob]]s with commands always disable the player's shield. Damage done when using an axe as a weapon is more than that of a [[sword]] of the same tier, though they take longer than a sword to [[Damage#Attack cooldown|recover]], resulting in lower <abbr title="Damage/Second">DPS</abbr> (with the exception of [[gold]]en axes). The damage dealt and cooldown time depends on the type:
{| class="wikitable" style="text-align:center" data-description="Attack damage"
! Material
! {{ItemSprite|Wooden Axe|text=Wooden}}
! {{ItemSprite|Golden Axe|text=Gold}}
! {{ItemSprite|Stone Axe|text=Stone}}
! {{ItemSprite|Iron Axe|text=Iron}}
! {{ItemSprite|Diamond Axe|text=Diamond}}
! {{ItemSprite|Netherite Axe|text=Netherite}}
|-
! Attack Damage
| {{hp|7}}
| {{hp|7}}
| {{hp|9}}
| {{hp|9}}
| {{hp|9}}
| {{hp|10}}
|-
! Attack Speed
| 0.8
| 1.0
| 0.8
| 0.9
| 1.0
| 1.0
|-
! Recovery time
| {{convert|1.25|sec|tick|sep=}}
| {{convert|1|sec|tick|sep=}}
| {{convert|1.25|sec|tick|sep=}}
| {{convert|1.11|sec|tick|sep=}}
| {{convert|1|sec|tick|sep=}}
| {{convert|1|sec|tick|sep=}}
|-
! <abbr title="Damage/Second">DPS</abbr>
| 5.6
| 7.0
| 7.2
| 8.1
| 9.0
| 10.0
|-
! Lifetime damage inflicted<ref group="note">The formula to find the total lifetime damage is <code>ceil(''durability'' ÷ 2) × ''damage per hit''</code>. The durability is halved then ceiled because axes take double durability when used as a weapon, and the last 1 durability can also deal damage. The formula also ignores enchantments and critical hits, and assumes each attack is performed at maximum charge.</ref>
| {{hp|210}}
| {{hp|112}}
| {{hp|594}}
| {{hp|1125}}
| {{hp|7029}}
| {{hp|10160}}
|}
{{notelist}}
=== Enchantments ===
An axe can receive the following enchantments:
{| class="wikitable col-2-center col-3-right"
|+
!Name
!Max Level
![[Enchanting|Method]]
|-
|[[Fortune]]<ref group=note name=exc>Silk Touch and Fortune are mutually exclusive.</ref>
|III
|{{Inventory slot|Enchanting Table}}{{Inventory slot|Anvil}}
|-
|[[Silk Touch]]<ref group=note name=exc/>
|I
|{{Inventory slot|Enchanting Table}}{{Inventory slot|Anvil}}
|-
|[[Efficiency]]
|V
|{{Inventory slot|Enchanting Table}}{{Inventory slot|Anvil}}
|-
|[[Unbreaking]]
|III
|{{Inventory slot|Enchanting Table}}{{Inventory slot|Anvil}}
|-
|[[Sharpness]]<ref group="note" name="exc2">Sharpness, Smite, Bane of Arthropods, and Cleaving{{upcoming|java Combat Tests}} are mutually exclusive.</ref>
|V
|{{Inventory slot|Anvil}}
|-
|[[Smite]]<ref group="note" name=exc2/>
|V
|{{Inventory slot|Anvil}}
|-
|[[Bane of Arthropods]]<ref group="note" name=exc2/>
|V
|{{Inventory slot|Anvil}}
|-
|[[Fire Aspect]]{{upcoming|java Combat Tests}}<ref group="note" name="sword">Fire Aspect, Looting, Knockback, and Sweeping Edge currently exist, but they can be used only for [[sword]]s.</ref>
|II
|{{Inventory slot|Anvil}}
|-
|[[Looting]]{{upcoming|java Combat Tests}}<ref group="note" name="sword" />
|III
|{{Inventory slot|Anvil}}
|-
|[[Knockback]]{{upcoming|java Combat Tests}}<ref group="note" name="sword" />
|II
|{{Inventory slot|Anvil}}
|-
|[[Cleaving]]{{upcoming|java Combat Tests}}<ref group="note" name="exc2" />
|III
|{{Inventory slot|Enchanting Table}}{{Inventory slot|Anvil}}
|-
|[[Sweeping Edge]]{{upcoming|java Combat Tests}}<ref group="note" name="sword" />
|III
|{{Inventory slot|Enchanting Table}}{{Inventory slot|Anvil}}
|-
|[[Mending]]
|I
|{{Inventory slot|Anvil}}
|-
|[[Curse of Vanishing]]
|I
|{{Inventory slot|Anvil}}
|}
{{notelist}}
=== Fuel===
Wooden axes can be used as a fuel in [[furnace]]s, smelting 1 item per axe.
===Smelting ingredient===
{{Smelting|showname=1|Iron Axe;Golden Axe|Iron Nugget;Gold Nugget|0,1}}
===Piglins===
{{EntityLink|Piglin|Piglins}} are attracted to golden axes and run toward any golden axes on the ground, and inspect it for 6 to 8 seconds before putting it in their inventory.
== Sounds ==
{{el|je}}:
{{Sound table
|sound=Axe strip1.ogg
|sound2=Axe strip2.ogg
|sound3=Axe strip3.ogg
|sound4=Axe strip4.ogg
|subtitle=Axe strips
|source=block
|description=When an axe strips a log or wood block
|id=item.axe.strip
|translationkey=subtitles.item.axe.strip
|volume=0.9
|pitch=1.0/0.85
|distance=16}}
{{Sound table
|sound=wax_off1.ogg
|sound2=wax_off2.ogg
|sound3=wax_off3.ogg
|subtitle=Wax off
|source=block
|description=When an axe unwaxes a [[block of copper]]
|id=item.axe.wax_off
|translationkey=subtitles.item.axe.wax_off
|volume=1.0
|pitch=0.9/1.1/1.0
|distance=16}}
{{Sound table
|sound=scrape1.ogg
|sound2=scrape2.ogg
|sound3=scrape3.ogg
|subtitle=Axe scrapes
|source=block
|description=When an axe deoxidizes a block of copper
|id=item.axe.scrape
|translationkey=subtitles.item.axe.scrape
|volume=1.0
|pitch=1.0/0.9/1.1
|distance=16}}
{{Sound table
|sound=Random break.ogg
|subtitle=Item breaks
|source=player
|description=When an axe's durability is exhausted
|id=entity.item.break
|translationkey=subtitles.entity.item.break
|volume=0.8
|pitch=0.8-1.2
|distance=16
|foot=1}}
{{el|be}}:
{{Sound table
|type=bedrock
|sound=Wood hit1.ogg
|sound2=Wood hit2.ogg
|sound3=Wood hit3.ogg
|sound4=Wood hit4.ogg
|sound5=Wood hit5.ogg
|sound6=Wood hit6.ogg
|source=block
|description=When an axe strips a log or wood block <ref group=sound name=stripsoundbug>{{Bug|MCPE-106552}}</ref>
|id=use.wood
|volume=1.0
|pitch=0.8}}
{{Sound table
|sound=Stem step1.ogg
|sound2=Stem step2.ogg
|sound3=Stem step3.ogg
|sound4=Stem step4.ogg
|sound5=Stem step5.ogg
|sound6=Stem step6.ogg
|source=block
|description=When an axe strips a stem or hyphae block <ref group=sound name=stripsoundbug/>
|id=use.stem
|volume=1.0
|pitch=0.8}}
{{Sound table
|sound=Bamboo wood step1.ogg
|sound2=Bamboo wood step2.ogg
|sound3=Bamboo wood step3.ogg
|sound4=Bamboo wood step4.ogg
|sound5=Bamboo wood step5.ogg
|sound6=Bamboo wood step6.ogg
|source=player
|description=When an axe strips a [[block of bamboo]] <ref group=sound name=stripsoundbug/>
|id=step.bamboo_wood
|volume=1.0
|pitch=0.8}}
{{Sound table
|sound=Cherry wood step1.ogg
|sound2=Cherry wood step2.ogg
|sound3=Cherry wood step3.ogg
|sound4=Cherry wood step4.ogg
|sound5=Cherry wood step5.ogg
|sound6=Cherry wood step6.ogg
|source=player
|description=When an axe strips a cherry log or cherry wood block <ref group=sound name=stripsoundbug/>
|id=step.cherry_wood
|volume=1.0
|pitch=0.8}}
{{Sound table
|sound=wax_off1.ogg
|sound2=wax_off2.ogg
|sound3=wax_off3.ogg
|source=neutral
|description=When an axe unwaxes or deoxidizes a block of copper {{More info|Is use.copper used as well?}}
|id=copper.wax.off
|volume=1.0
|pitch=0.8-1.2}}
{{Sound table
|sound=Random break.ogg
|source=player
|description=When an axe's durability is exhausted
|id=random.break
|volume=1.0
|pitch=0.9
|foot=1}}
==Data values==
===ID===
{{edition|java}}:
{{ID table
|edition=java
|showforms=y
|generatetranslationkeys=y
|displayname=Wooden Axe
|spritetype=item
|nameid=wooden_axe
|form=item}}
{{ID table
|displayname=Stone Axe
|spritetype=item
|nameid=stone_axe
|form=item}}
{{ID table
|displayname=Iron Axe
|spritetype=item
|nameid=iron_axe
|form=item}}
{{ID table
|displayname=Diamond Axe
|spritetype=item
|nameid=diamond_axe
|form=item}}
{{ID table
|displayname=Golden Axe
|spritetype=item
|nameid=golden_axe
|form=item}}
{{ID table
|displayname=Netherite Axe
|spritetype=item
|nameid=netherite_axe
|form=item
|foot=1}}
{{edition|bedrock}}:
{{ID table
|edition=bedrock
|shownumericids=y
|showforms=y
|notshowbeitemforms=y
|generatetranslationkeys=y
|displayname=Wooden Axe
|spritetype=item
|nameid=wooden_axe
|id=311
|form=item}}
{{ID table
|displayname=Stone Axe
|spritetype=item
|nameid=stone_axe
|id=315
|form=item}}
{{ID table
|displayname=Iron Axe
|spritetype=item
|nameid=iron_axe
|id=298
|form=item}}
{{ID table
|displayname=Diamond Axe
|spritetype=item
|nameid=diamond_axe
|id=319
|form=item}}
{{ID table
|displayname=Golden Axe
|spritetype=item
|nameid=golden_axe
|id=325
|form=item}}
{{ID table
|displayname=Netherite Axe
|spritetype=item
|nameid=netherite_axe
|id=607
|form=item
|foot=1}}
==Achievements==
{{load achievements|MOAR Tools ;Oooh, shiny!}}
==Advancements ==
{{load advancements|Oh Shiny;Wax off}}
==History==
{{History|java indev}}
{{History||0.31|snap=20100110|[[File:Iron Axe JE1.png|32px]] Added iron axes.
|An axe is used to gather [[log|wood]] 400% faster than by hand.
|When starting in a new world, the [[player]] is given one of each [[tools|tool]].}}
{{History|||snap=20100122|[[File:Iron Axe JE2.png|32px]] The texture of axes has been changed. Half of the axe head has been removed.}}
{{History|||snap=20100124|[[File:Iron Axe JE3.png|32px]] The texture of axes has been changed again. The other axe head is now used instead.
|A complete toolset is no longer given to the [[player]] on starting a new world. Instead, there are multiple [[chest]]s in the later called "[[Indev House]]" containing a stack of most accessible [[blocks]]/[[items]] including [[tools]].}}
{{History|||snap=20100128|[[File:Wooden Axe JE1 BE1.png|32px]] [[File:Stone Axe JE1 BE1.png|32px]] [[File:Diamond Axe JE1 BE1.png|32px]] [[Tools]] now have tiers. Wooden, stone, and diamond axes have been added.
|[[File:Iron Axe JE4 BE1.png|32px]] The texture of iron axes has been changed.
|An axe held by the player is now rendered to appear more 3D.
|They cannot be crafted yet, but have been added to the item chest in the Indev house.}}
{{History|||snap=20100129|Wooden, stone, iron, and diamond axes can now be [[craft]]ed.}}
{{History|||snap=20100130|[[File:Golden Axe JE1.png|32px]] Axes can now be made out of gold.}}
{{History|||snap=20100201-1|[[Tools]] now take [[damage]] when being used. Better tools now last longer.}}
{{History||20100206|[[File:Golden Axe JE2 BE1.png|32px]] The texture of golden axes has been changed.}}
{{History|java beta}}
{{History||1.2|Gold [[tools]], including axes, now remove [[block]]s faster than diamond tools.}}
{{History|java}}
{{History||1.2.4|snap=release|[[Spruce planks]], [[birch planks]], and [[jungle planks]] can now be used to craft wooden axes.}}
{{History||1.3.1|snap=12w16a|Wooden and stone axes are now found in the new [[bonus chest]]s.}}
{{History|||snap=12w18a|Wooden axes can now be used as [[fuel]] in a [[furnace]].}}
{{History|||snap=12w21a|Blacksmith [[villager]]s now [[trading|sell]] 1 diamond axe for 9–11 [[emerald]]s, and 1 iron axe for 6–7 emeralds.}}
{{History||1.6.1|snap=13w21a|Instead of replacing the barehanded [[damage]] ({{hp|1}}), axes now add their damage onto the barehanded damage, which results in all axes doing {{hp|1}} more damage than before.}}
{{History||1.7.2|snap=1.7.1|[[Acacia planks]] and [[dark oak planks]] can now be used to craft wooden axes.}}
{{History||1.8|snap=14w02a|Weapon smith villagers now sell 1 [[enchanting|enchanted]] diamond axe for 9–12 emeralds, and 1 iron axe for 6–8 emeralds. Unenchanted diamond axes are no longer sold.}}
{{History||1.9|snap=15w34a|Axes now use the attack speed combat mechanic meter. The time it takes for the meter to fill up for an axe is 1.2 seconds.}}
{{History|||snap=15w34b|Axes now have an attack speed of 0.8, taking about 1.25 seconds to fill the attack meter.}}
{{History|||snap=15w34c|Axes do {{hp|4}} more [[damage]] than previously.
|Axes now have an attack speed of 0.85.
|Axes can now temporarily disable [[shield]] use.}}
{{History|||snap=15w35a|The [[damage]] of axes has been reduced by {{hp|1}}.
|The speed of axes has been increased to 0.9.}}
{{History|||snap=15w37a|Stone and diamond axes now both do {{hp|9}} damage, instead of the previous {{hp|8}} and {{hp|10}} respectively.
|Axes now have attack speed based on the tier, with wooden and stone having a speed of 0.8, iron having a speed of 0.9, and diamond and gold having a speed of 1.}}
{{History|||snap=15w43a|Stone axes may now be found in [[igloo]] basement chests.}}
{{History|||snap=15w44a|The average yield of stone and wooden axes from [[bonus chest]]s has been decreased.}}
{{History||1.11.1|snap=16w50a|Golden and iron axes now [[smelting|smelt]] down into one of their respective [[nugget]]s.}}
{{History||1.13|snap=17w47a|Prior to [[1.13/Flattening|''The Flattening'']], these [[item]]s' numeral IDs were 271, 275, 258, 279 and 286.}}
{{History||1.13|snap=18w07a|{{control|Using}} an axe on a block of [[wood]] or [[log]] now turns it into a stripped block of wood or log.}}
{{History|||snap=18w09a|Stone axes now can generate in the [[chest]]s of [[underwater ruins]].}}
{{History|||snap=pre2|{{control|Using}} an axe on a bark now turns it into a stripped bark.}}
{{History||1.14|snap=18w43a|[[File:Wooden Axe JE2 BE2.png|32px]] [[File:Stone Axe JE2 BE2.png|32px]] [[File:Iron Axe JE5 BE2.png|32px]] [[File:Golden Axe JE3 BE2.png|32px]] [[File:Diamond Axe JE2 BE2.png|32px]] The textures of all axes have been changed.}}
{{History|||snap=19w11a|Toolsmith villagers now sell stone axes, as well as enchanted iron and diamond axes.}}
{{History|||snap=19w13a|Toolsmith villagers now give stone axes to players under the [[Hero of the Village]] effect.
|Weaponsmith villagers now give stone, golden and iron axes to players under the [[Hero of the Village]] effect.}}
{{History||1.16|snap=20w06a|[[File:Netherite Axe JE1.png|32px]] Added netherite axes.
|Netherite axes are obtained by combining one diamond axe and one netherite ingot in a crafting table.
|[[Crimson planks]] and [[warped planks]] can now be used to craft wooden axes.}}
{{History|||snap=20w09a|[[File:Diamond Axe JE3 BE3.png|32px]] The texture of diamond axes has been changed.}}
{{History|||snap=20w10a|[[File:Netherite Axe JE2.png|32px]] The texture of netherite axes has been changed.
|Netherite axes can no longer be crafted.
|Netherite axes are now obtained by combining one diamond axe and one netherite ingot in a smithing table.}}
{{History|||snap=20w15a|Stone axes can now be crafted using [[blackstone]].}}
{{History|||snap=20w16a|Golden axes now generate randomly enchanted in [[ruined portal]] chests.}}
{{History||1.16.2|snap=20w30a|Enchanted golden axes can now be found in [[bastion remnant]] chests.}}
{{History||1.17|snap=21w08a|Stone axes can now be crafted using [[cobbled deepslate]].}}
{{History|||snap=21w11a|Axes can now be used to scrape wax and oxidation off [[copper block]]s.}}
{{History||1.19|snap=22w11a|[[Mangrove planks]] can now be used to craft wooden axes.}}
{{History||1.20 (Experimental)|link=1.19.3|snap=22w42a|Added [[block of bamboo]], which when used with an axe gives a block of stripped bamboo.}}
{{History||1.20<br>(Experimental)|link=1.19.4|snap=23w04a|Upgrading diamond axes to netherite axes now requires the netherite upgrade [[smithing template]].}}
{{History||1.20|snap=23w12a|Iron axes can now be found in [[suspicious gravel]] and [[suspicious sand]] in cold and warm [[ocean ruins]].}}
{{History|upcoming java}}
{{History||Combat Tests|snap=1.14.3 - Combat Test|The attack speed for all axes has been increased to 2.
|All axes now deal {{hp|1}} more [[damage]] than their sword counterparts.}}
{{History|||snap=Combat Test 3|The [[Cleaving|Chopping]] enchantment has been added for axes, which adds 1 damage and 0.5 seconds (10 [[game tick]]s) of [[shield]] stunning per level and is mutually exclusive with [[Sharpness]].
|Axes now always disable shields for {{convert|1.6|seconds|ticks}}, instead of having a 25% to disable them for 5 seconds (100 game ticks).
|Axes now take 1 damage when attacking instead of 2.
|The [[Sweeping Edge]] enchantment can now be applied to axes.}}
{{History|||snap=Combat Test 4|[[Knockback]], [[Looting]], and [[Fire Aspect]] enchantments can now be applied to axes.}}
{{History|pocket alpha}}
{{History||v0.2.0|[[File:Stone Axe JE1 BE1.png|32px]] Added stone axes.}}
{{History||v0.3.0|[[File:Wooden Axe JE1 BE1.png|32px]] Added wooden axes.
|Survival players no longer start with an infinite durability stone axe in the inventory.}}
{{History||v0.3.2|[[File:Iron Axe JE4 BE1.png|32px]] [[File:Golden Axe JE2 BE1.png|32px]] [[File:Diamond Axe JE1 BE1.png|32px]] Added iron, golden and diamond axes.}}
{{History||v0.4.0|Removed stone axes from the creative inventory.}}
{{History||v0.11.0|snap=build 11|All axes are now available in the [[creative]] [[inventory]].}}
{{History|||snap=build 12|All axes have been removed from creative.}}
{{History|||snap=build 13|All axes have been re-added to creative mode.}}
{{History||v0.12.1|snap=build 1|Instead of replacing the barehanded [[damage]] ({{hp|1}}), axes now add their damage onto the barehanded damage, which results in all axes doing {{hp|1}} more damage than before.}}
{{History|pocket}}
{{History||1.0.0|snap=alpha 0.17.0.1|Stone axes now can be found inside [[igloo]] basement [[chest]]s.}}
{{History||1.0.4|snap=alpha 1.0.4.0|Weaponsmith [[villager]]s now [[trading|sell]] iron axes for 6-8 [[emerald]]s as part of their first tier [[trading|trades]] and [[enchanting|enchanted]] diamond axes for 9-12 emeralds as part of their third tier trades.}}
{{History||1.1.0|snap=alpha 1.1.0.0|Iron and golden axes are now [[smelting|smeltable]].
|Iron axes with the [[Efficiency]] I enchantment can now be found inside [[chest]]s in [[woodland mansion]]s.
|Added [[vindicator]]s, who rarely [[drops|drop]] iron axes.}}
{{History|bedrock}}
{{History||1.2.0|snap=beta 1.2.0.2|Wooden and stone axes can now be found in [[bonus chest]]s.}}
{{History||1.4.0|snap=beta 1.2.13.8|Using an axe on a [[log]] now turns it into a stripped log.}}
{{History|||snap=beta 1.2.20.1|Stone axes can now be found inside [[underwater ruins]] chests.}}
{{History||1.10.0|snap=beta 1.10.0.3|[[File:Wooden Axe JE2 BE2.png|32px]] [[File:Stone Axe JE2 BE2.png|32px]] [[File:Iron Axe JE5 BE2.png|32px]] [[File:Golden Axe JE3 BE2.png|32px]] [[File:Diamond Axe JE2 BE2.png|32px]] The textures of all axes have been changed.}}
{{History||1.11.0|snap=beta 1.11.0.4|[[Vindicator]]s and [[pillager]]s that spawn in [[raid]]s can now [[drops|drop]] an iron axe.
|[[Trading]] has been changed, weaponsmith [[villager]]s now [[trading|sell]] iron axes for 3 [[emerald]]s and [[enchanting|enchanted]] diamond axes for 12 emeralds as part of their fourth tier [[trading|trades]].
|Stone axes, enchanted iron axes, and diamond axes can now be [[trading|bought]] from toolsmith villagers.}}
{{History||1.16.0|snap=beta 1.16.0.51|[[File:Netherite Axe BE1.png|32px]] Added netherite axes.|Netherite axes are obtained by combining one diamond axe and one netherite ingot in a crafting table.
|[[File:Diamond Axe JE3 BE3.png|32px]] The texture of diamond axes has been changed.}}
{{History|||snap=beta 1.16.0.57|Netherite axes can no longer be crafted.
|Netherite axes are now obtained by combining one diamond axe and one netherite ingot in a smithing table.
|Stone axes can now be crafted using blackstone.
|Golden axes now generate randomly enchanted in [[ruined portal]] chests.
|Netherite axes now generate randomly enchanted in [[bastion remnant]] chests.}}
{{History||1.16.20|snap=beta 1.16.20.50|Added [[piglin brute]]s, who rarely drop golden axes.}}
{{History||1.16.100|snap=beta 1.16.100.54|Piglin brutes no longer spawn with enchanted axes.}}
{{History|||snap=beta 1.16.100.55|Zombified piglins that are converted from piglin brutes now keep their golden axes.}}
{{History||1.16.220|snap=beta 1.16.220.52|Axes can now be used to scrape wax off copper blocks.}}
{{History||1.18.30|snap=beta 1.18.30.26|Axes can now temporarily disable [[shield]] use. This is not mentioned in the official changelog.<ref>{{tweet|kingbdogz|1504505321884196872|We missed a change in recent changelogs for the Bedrock beta that you may like - we have now made a parity fix that makes shields get disabled for 5 seconds when attacked by an Axe-wielding mob or player. We will make sure to list this properly in the next beta :)|March 17, 2022}}</ref>
}}
{{History|console}}
{{History||xbox=TU1|xbone=CU1|ps=1.00|wiiu=Patch 1|switch=1.0.1|[[File:Wooden Axe JE1 BE1.png|32px]] [[File:Stone Axe JE1 BE1.png|32px]] [[File:Iron Axe JE4 BE1.png|32px]] [[File:Golden Axe JE2 BE1.png|32px]] [[File:Diamond Axe JE1 BE1.png|32px]] Added axes (all five types).}}
{{History||xbox=TU53|xbone=CU43|ps=1.49|wiiu=Patch 23|switch=1.0.3|Iron and golden axes are now [[smelting|smeltable]].}}
{{History||xbox=none|xbone=none|ps=1.90|wiiu=none|switch=none|[[File:Wooden Axe JE2 BE2.png|32px]] [[File:Stone Axe JE2 BE2.png|32px]] [[File:Iron Axe JE5 BE2.png|32px]] [[File:Golden Axe JE3 BE2.png|32px]] [[File:Diamond Axe JE2 BE2.png|32px]] The textures of all axes have been changed.}}
{{History|New Nintendo 3DS Edition}}
{{History||0.1.0|[[File:Wooden Axe JE1 BE1.png|32px]] [[File:Stone Axe JE1 BE1.png|32px]] [[File:Iron Axe JE4 BE1.png|32px]] [[File:Golden Axe JE2 BE1.png|32px]] [[File:Diamond Axe JE1 BE1.png|32px]] Added axes.}}
{{History|foot}}
==Issues==
{{issue list}}
==Trivia==
*Before [[Java Edition 1.13]], in the language files, axes were referred to as Hatchets.<ref name="1.8 lang">''1.8/assets/minecraft/lang/en_US.lang'', line 915: '''item.hatchetIron.name= Iron Axe'''</ref>
*Weaponsmith villagers gifting stone, iron and golden axes is a reference to the story ''[[wikipedia:The Honest Woodcutter|The Honest Woodcutter]]'', where a woodcutter dropped his axe into a river, and is successively provided a silver and a golden axe by the river god.{{cn}}
== Gallery ==
<gallery>
Stone Axe SDGP.png|Stone axe in the [[Super Duper Graphics Pack]].
</gallery>
=== Enchanted axes ===
<gallery>
Enchanted Wooden Axe.gif
Enchanted Stone Axe.gif
Enchanted Iron Axe.gif
Enchanted Golden Axe.gif
Enchanted Diamond Axe.gif
Enchanted Netherite Axe.gif
</gallery>
==See also==
*{{ItemLink|Pickaxe}}
==References==
{{Reflist}}
== External Links ==
*[https://www.minecraft.net/en-us/article/taking-inventory--axe Taking Inventory: Axe] – Minecraft.net on February 6, 2020
{{items}}
[[Category:Combat]]
[[cs:Sekera]]
[[de:Axt]]
[[es:Hacha]]
[[fr:Hache]]
[[hu:Balta]]
[[ja:斧]]
[[ko:도끼]]
[[nl:Bijl]]
[[pl:Siekiera]]
[[pt:Machado]]
[[ru:Топор]]
[[th:ขวาน]]
[[uk:Сокира]]
[[zh:斧]]</li></ul> | 15w31a | Glowstone and redstone can no longer be added to already extended or enhanced potions. | |||
| Fermented spider eyes can no longer be added to enhanced potions of Speed or Leaping, but can still be added to extended potions of Poison. | |||||
| Potions of Weakness can no longer be made using a thick potion, mundane potion, awkward potion, potion of Regeneration, or potion of Strength. | |||||
| Potions of Slowness can no longer be made using a potion of Fire Resistance. | |||||
| Potions of Harming can no longer be made using a potion of Water Breathing. | |||||
| Removed reverted potions and "extended" mundane potion, as well as unused potion IDs. See Java Edition removed features § Potions for more information. | |||||
| Splash potions can now be created from all potions, including water bottles. | |||||
| 15w33a | Added lingering potions. | ||||
| 15w42a | Blaze powder is now required as fuel for brewing. | ||||
| 15w43a | Blaze powder as fuel reduced from 30 points to 20. | ||||
1.13{{Extension DPL}}<ul><li>[[Cyan Dye|Cyan Dye]]<br/>{{Item
| image = Cyan Dye.png
| renewable = Yes
| stackable = Yes (64)
}}
'''Cyan dye''' is a [[Dyeing#Secondary|secondary dye color]].
== Obtaining ==
=== Crafting ===
{{Crafting
|head=1
|showdescription=1
|showname=0
|Blue Dye
|Green Dye
|Output=Cyan Dye,2
|type=Material
}}
{{Crafting
|Lapis Lazuli
|Green Dye
|Output=Cyan Dye,2
|description={{only|bedrock|education}}
|type=Material
}}
{{Crafting
|Pitcher Plant
|Output=Cyan Dye,2
|description=
|type=Material
|foot=1
}}
=== Trading ===
[[Wandering trader]]s sell 3 cyan dye for an [[emerald]].
== Usage ==
{{dye usage}}
=== Crafting ingredient ===
{{crafting usage|ignore=Banner|continue=1}}
{{banner crafting usage}}
=== Loom ingredient ===
{{Banner loom usage|Cyan Dye}}
=== Trading ===
{{IN|bedrock}}, journeyman-level shepherd villagers have 20% chance to buy 12 cyan dye for an emerald.
{{More info|java=1|Java UI does not use a specific trade slot, which results in a different chance to offer this trade.}}
== Data values ==
=== ID ===
{{edition|java}}:
{{ID table
|edition=java
|showforms=y
|generatetranslationkeys=y
|displayname=Cyan Dye
|spritetype=item
|nameid=cyan_dye
|form=item
|foot=1}}
{{edition|bedrock}}:
{{ID table
|edition=bedrock
|showaliasids=y
|shownumericids=y
|showforms=y
|notshowbeitemforms=y
|generatetranslationkeys=y
|displayname=Cyan Dye
|spritetype=item
|nameid=cyan_dye
|aliasid=dye / 6
|id=401
|form=item
|translationkey=item.dye.cyan.name
|foot=1}}
== History ==
{{History|java beta}}
{{History||1.2|[[File:Cyan Dye JE1 BE1.png|32px]] Added cyan dye.}}
{{History|java}}
{{History||1.4.2|snap=12w34a|Added the ability to [[Armor#Dyeing|dye]] leather [[armor]] and [[wolf]] collars.}}
{{History||1.4.6|snap=12w49a|Cyan dye can now be [[crafting|crafted]] with [[gunpowder]] to create a [[firework star]].}}
{{History||1.6.1|snap=13w19a|[[Stained clay]] can now be crafted.}}
{{history||1.7.2|snap=13w36a|With the addition of new [[flower]]s, many secondary and tertiary dyes are now primary [[dye]]s.}}
{{History|||snap=13w41a|[[Stained glass]] can now be crafted.}}
{{History||1.8|snap=14w02a|Due to [[lapis lazuli]] being [[renewable resource|renewable]], cyan dye is also renewable.}}
{{History|||snap=14w30a|Added [[banner]]s, which can be dyed.}}
{{History||1.13|snap=17w47a|The different data values for the <code>dye</code> ID have now been split up into their own IDs.
|Prior to [[1.13/Flattening|''The Flattening'']], this [[item]]'s numeral ID was 351.}}
{{History||1.14|snap=18w43a|Cyan dye is now [[crafting|crafted]] using [[blue dye]], instead of [[lapis lazuli]].
|[[File:Cyan Dye.png|32px]] The texture of cyan dye has now been changed.}}
{{History|||snap=18w44a|Cyan dye can now change the text color on [[sign]]s to cyan.}}
{{History|||snap=19w05a|Added the [[wandering trader]], which sell cyan dyes.}}
{{History|||snap=19w11a|Cyan dye can now be [[trading|bought]] by shepherd villagers.}}
{{History||1.17|snap=20w45a|Cyan dye can now be used to craft [[cyan candle]]s.}}
{{History|||snap=21w19a|Cyan dye can no longer be used to craft cyan candles.}}
{{History|||snap=Pre-release 1|Cyan dye can once again be used to craft cyan candles.}}
{{History||1.20<br>(Experimental)|link=1.19.3|snap=22w42a|Cyan dye can now change the text color on [[hanging sign]]s to cyan.}}
{{History||1.20|snap=23w12a|Added [[pitcher plant]]s, which can be crafted into cyan dye.}}
{{History|||snap=23w14a|[[Pitcher plant]]s now craft into 2 cyan dye instead of 1.}}
{{History|pocket alpha}}
{{History||v0.3.0|[[File:Cyan Dye JE1 BE1.png|32px]] Added cyan dye. It is currently unobtainable and serves no purpose.}}
{{History||v0.4.0|Cyan dye is now craftable with [[lapis lazuli]] and [[cactus green]].
|Cyan dye can now be used to craft cyan wool.}}
{{History||v0.6.0|Cyan dye can now be used to dye [[sheep]].}}
{{History||v0.9.0|snap=build 11|Cyan dye can now be used to craft colored [[terracotta]].}}
{{History||v0.11.0|snap=build 1|Cyan dye can now be used to dye tamed [[wolf]] collars.}}
{{History||v0.14.0|snap=build 1|Cyan dye can now be used to dye water in [[cauldron]]s.}}
{{History|pocket}}
{{History||1.0.0|snap=alpha 0.17.0.1|Cyan dye can now be used to dye [[shulker]]s.}}
{{History||1.1.0|snap=alpha 1.1.0.0|Cyan dye can now be used to craft [[concrete powder]], colored [[bed]]s and dyed [[shulker box]]es.}}
{{History|bedrock}}
{{History||1.2.0|snap=beta 1.2.0.2|Cyan dye can now be used to craft [[firework star]]s, [[stained glass]] and patterns on [[banner]]s.}}
{{History||1.4.0|snap=beta 1.2.20.1|Cyan dye can now be used to craft [[balloon|ballons]] and [[glow stick|glow sticks]].}}
{{History||1.8.0|snap=beta 1.8.0.8|Cyan dye can now be used to dye tamed [[cat]] collars.}}
{{History||1.10.0|snap=beta 1.10.0.3|Cyan dye are now [[trading|sold]] by [[wandering trader]]s.
|Cyan dye can now be used to dye white [[carpet|carpets]] and undyed [[glass pane]]s.
|[[File:Cyan Dye.png|32px]] The texture of cyan dye has now been changed.}}
{{History||1.11.0|snap=beta 1.11.0.4|Cyan dye can be [[trading|sold]] to shepherd [[villager]]s.}}
{{History||1.16.100|snap=beta 1.16.100.56|The ID of cyan dye has been changed from <code>dye/6</code> to <code>cyan_dye</code>.}}
{{History|console}}
{{History||xbox=TU1|xbone=CU1|ps=1.00|switch=1.0.1|wiiu=Patch 1|[[File:Cyan Dye JE1 BE1.png|32px]] Added cyan dye.}}
{{History|PS4}}
{{History||1.90|[[File:Cyan Dye.png|32px]] The texture of cyan dye has now been changed.}}
{{History|new 3ds}}
{{History||0.1.0|[[File:Cyan Dye JE1 BE1.png|32px]] Added cyan dye.}}
{{History|foot}}
== Issues ==
{{issue list}}
{{Items}}
[[Category:Items]]
[[Category:Dyes]]
[[Category:Renewable resources]]
[[cs:Azurové barvivo]]
[[de:Türkiser Farbstoff]]
[[es:Tinte cian]]
[[fr:Teinture cyan]]
[[hu:Ciánkék festék]]
[[ja:青緑色の染料]]
[[ko:청록색 염료]]
[[nl:Turquoise kleurstof]]
[[pl:Błękitny barwnik]]
[[pt:Corante ciano]]
[[ru:Бирюзовый краситель]]
[[zh:青色染料]]</li><li>[[Trident|Trident]]<br/>{{For|the Hidden Depths DLC weapon in ''Minecraft Dungeons''|MCD:Trident}}
{{ItemEntity
|durability= 250
|renewable= Yes
|stackable= No
|size=Height: 0.25 Blocks<br>Width: 0.25 Blocks
|title=Trident|image= <gallery>
Trident (item).png | Item
Trident.png | Entity
</gallery>}}
A '''trident''' is a [[weapon]] used in both melee and ranged combat and is a rare drop from [[drowned]].
==Obtaining==
Tridents are not craftable. A trident can be obtained only when dropped by a [[drowned]], Converted drowned are never equipped with tridents.
===Mob loot===
==== '''''Java Edition''''' ====
6.25% (or 1 in 16) of [[Drowned]] in Java Edition spawn with a trident of random durability as their natural weapon. They have an 8.5% chance to drop their trident when killed by a player. The chance is increased by 1% for each level of [[Looting]] up to a max of 11.5% with Looting III. This means the overall chance of obtaining a trident from any given drowned is 0.53125% (about 1 in 188) or 0.71875% (about 1 in 140) with looting III.
{{IN|Java}}, a trident held by a drowned has a chance to be enchanted, but the trident's enchantments have no effects for drowned.<ref>{{bug|MC-127321}}</ref>
==== '''''Bedrock Edition''''' ====
Only 15% (or 3 in 20) of [[Drowned]] in Bedrock Edition spawn with tridents. Of these, they have a 25% chance to drop their trident when killed by a player. This chance is increased by 4% for each level of looting up to a max of 37% with looting III. This means the overall chance of obtaining a trident from any given drowned is 3.75% (or 3 in 80) or 5.55% with looting III.
===Thrown tridents===
Tridents thrown onto the ground by a player can be picked up; however, tridents thrown by [[drowned]] cannot be picked up, similar to arrows shot by [[skeleton]]s, [[stray]]s, and [[pillager]]s. Only the owner of a trident thrown in Creative mode or enchanted with Loyalty can pick it up; other players in Creative and players in Survival mode including its own owner can't pick up the trident thrown in Creative.
===Trading===
Drowned who are holding tridents will sometimes drop their trident at full durability if given a nautilus shell when they aren't attacking anything.{{only|BE}}
==Usage==
===Drowned===
{{main|Drowned}}
15% of drowned {{in|bedrock}}, and 6.25% {{in|java}}, spawn with a trident as its natural weapon. It throws the trident at its opponent every 1.5 seconds, dealing {{hp|9}} [[damage]] in normal difficulty. A drowned can throw unlimited tridents, and these tridents cannot be picked up by the [[player]].
A [[villager]] can be turned into a [[zombie villager]] if it is killed by a trident thrown by a drowned: the chance of conversion is 0% on Easy [[difficulty]], 50% on Normal, and 100% on Hard and [[Hardcore]].
{{IN|bedrock}}, a drowned can use the trident's melee attack if its target is within three blocks. The melee attack deals {{hp|9}} damage.
===Melee attack===
Pressing {{control|attack}} while holding a trident deals damage to both [[mob]]s and players. Tridents deal {{hp|9}} melee damage. A successful hit consumes durability of the trident.
===Ranged attack===
[[File:Steve aiming with Trident.png|150px]] [[File:Alex aiming with Trident.png|150px]]
Pressing and holding {{control|use}} while holding a trident charges it. When released at half charge or more, the trident is thrown and deals damage to any [[entity]] it hits. Note that it doesn't have to be full charge for the complete damage and length. It flies on a ballistic trajectory similar to that of an [[arrow]], but at 80% strength. If the trident hits a block, it sticks to the block. If it hits an entity, it bounces off the entity and lands nearby. It is also blocked by [[shield]]s and can be retrieved once it lands in the ground. Thrown tridents can trigger wooden [[button]]s, wooden [[pressure plate]]s, and [[target]] blocks. A trident can be thrown at a [[chorus flower]] or [[pointed dripstone]] to break it, which causes the block to be dropped as its respective item.
{{IN|bedrock}} and [[Java Edition Combat Test 4]], tridents can be shot by [[dispenser]]s regardless of enchantment.
Tridents [[Enchanting#Summary_of_enchantments_by_item|enchanted]] with [[Loyalty]] return to the thrower after hitting an entity{{only|java}}/hitting and bouncing off an entity then hitting a block{{only|bedrock}}<ref>{{bug|MCPE-51726}}</ref> or just a block. A Loyalty-enchanted trident fired from a [[dispenser]] just sticks to the block it strikes. Higher levels of enchantment result in shorter recovery times. {{IN|java}}, throwing a trident enchanted with Loyalty into the [[void]] destroys it,<ref>{{bug|MC-125755|||WAI}}</ref> while {{in|bedrock}} it automatically returns to the player. Tridents (if enchanted with Loyalty), can take [[fire]] damage but still return to the player if thrown in [[lava]]. This is especially helpful in [[the Nether]] should the [[player]] be using a trident instead of a [[bow]]. If a trident enchanted with Loyalty attempts to return to a player with no available inventory space, the trident floats near the player until inventory space becomes available.
Thrown tridents take 1 durability damage, regardless of whether it hit an entity or not. Tridents with 1 durability remaining cannot be thrown.
Tridents enchanted with [[Riptide]] launch the player a certain distance when thrown, with the distance increasing for higher enchantment levels. They can be thrown only if the player is standing in [[water]], or if it is raining on the block they are standing on. If the player charges it but walks into a nearby dry area, the charge is canceled. If the player throws a Riptide trident and collides with a mob, the mob takes melee damage (including critical damage if the player is falling). {{IN|java}} tridents enchanted with Riptide take one durability damage upon throwing, and lose an additional 1 durability if it collides with an entity on both editions. Each level of Riptide increases the distance traveled by six blocks. The enchantment at level one launches the player nine blocks, fifteen blocks at level two, and twenty-one blocks at level three.
Tridents enchanted with [[Channeling]] summon a lightning bolt if there is a thunderstorm, although only upon hitting a mob or player standing in the rain as well as a [[Lightning Rod|lightning rod]] placed in the rain.
Unlike other projectiles, the trident does not slow down when thrown through water or lava.
{{IN|java}}, the [[Impaling]] enchantment affects ''all water mobs''. {{IN|bedrock}}, it deals extra damage to [[player]]s and mobs in water or rain.
Unlike arrows, thrown tridents do not despawn.{{only|bedrock}} Tridents despawn after 60 seconds if they are not picked up.{{only|java}}<ref>{{bug|MC-125817}}</ref>
;Magical damage
Using [[Riptide]], nearby players or mobs are dealt [[Harming|splash damage]] within an 8.25×8.25×4.25 cubical area. It stacks with the [[Impaling]] enchantment and [[Strength]] effect. Critical hits do not increase splash damage, but affect the target.
{{IN|bedrock}}, thrown tridents can damage the [[ender dragon]] while resting on the bedrock fountain. {{IN|java}}, they act just like arrows — deflected, but burn as if they had [[Flame]].
=== Damage===
Thrown tridents and splashes deal {{hp|8}} damage. The damage remains the same regardless of the trident's speed. It has a faster charging speed than a [[bow]] or [[crossbow]] (barring the [[Quick Charge]] enchantment.)
====Java Edition====
{{IN|java}}, tridents have an attack speed of 1.1 and take ~0.91 seconds to [[Damage#Attack cooldown|recover]].
{| class="wikitable" style="text-align:center" data-description="Sword attack damage by type"
!Attack
!{{ItemSprite|Trident|text=Melee}}
!{{ItemSprite|Trident|text=Melee (critical)}}
!{{ItemSprite|Trident|text=Range}}
|-
!Attack damage
|{{hp|9}}
|{{hp|13.5}}
|{{hp|8}}
|-
!Damage/Second (DPS)<ref group="note">This does not take travel time into account</ref>
|9.9
|14.3
| ?
|-
!Lifetime damage inflicted<ref group="note">The formula to find the total lifetime damage is ''Durability × Damage per hit = Lifetime damage minimum'' (e.g., 250 × 9 = 2250). It ignores enchantments and critical hits, and assumes the trident is at maximum charge</ref>
|{{hp|2250}}
|{{hp|3375}}
|{{hp|2000}}
|-
!Durability
| colspan="3" |250
|}
{{notelist}}
====Bedrock Edition====
{{IN|bedrock}}, tridents have no attack cooldown and do the following damage:
{| class="wikitable" style="text-align:center" data-description="Sword attack damage by type"
!Attack
!{{ItemSprite|Trident|text=Melee}}
!{{ItemSprite|Trident|text=Range}}
|-
!Attack damage
|{{hp|9}}
|{{hp|8}}
|-
! ''Lifetime damage inflicted''<ref group="note">The formula to find the total lifetime damage is ''Durability × Damage per hit = Lifetime damage minimum''. It excludes enchantments and critical hits.</ref>
|{{hp|2259}}
|{{hp|2008}}
|-
!Durability
| colspan="2" |251
|}
{{notelist}}
===Elytra===
A trident with the [[Riptide]] enchantment can be used to propel a player with a pair of [[elytra]], but only in [[rain]]y weather, during snowy weather in certain biomes<ref>{{bug|MC-128169}}</ref> or while the [[player]] is in a body of water. A Riptide trident can boost the player to speeds as high as 125 blocks per second,<ref>{{bug|MC-147173||Using riptide tridents while elytra flying can boost the player to excessive speeds}}</ref> much faster than the 33.5 blocks-per-second speed achievable using [[firework rocket]]s.
===Impaling damage ===
{{IN|java}}, the [[Impaling]] enchantment deals extra damage to all water mobs. {{IN|bedrock}} and in [[Java Edition Combat Test 3]], it deals extra damage to all players and mobs in water or rain.
{| class="wikitable" style="text-align:center" data-description="Trident Damage by Impaling Level" |
|+ Trident Damage by Impaling level
|-
!Level
!Increase
!Melee
!Ranged
|-
|I
| adds {{hp|2.5}}
|{{hp|11.5}}
|{{hp|10.5}}
|-
|II
|adds {{hp|5}}
|{{hp|14}}
|{{hp|13}}
|-
|III
| adds {{hp|7.5}}
|{{hp|16.5}}
|{{hp|15.5}}
|-
|IV
|adds {{hp|10}}
|{{hp|19}}
|{{hp|18}}
|-
|V
|adds {{hp|12.5}}
|{{hp|21.5}}
|{{hp|20.5}}
|}
{{-}}
===Enchantments===
Tridents have a base enchantability of 1 and can receive the following [[enchantment]]s:
{| class="wikitable col-2-center col-3-right"
|+
!Name
!Max Level
![[Enchanting|Method]]
|-
|[[Loyalty]]<ref group="note" name="note1">Loyalty and Channeling are mutually exclusive from Riptide, but not from each other.</ref>
|III
|{{Inventory slot|Enchanting Table}}{{Inventory slot|Anvil}}
|-
|[[Channeling]]<ref group="note" name="note1" />
|I
|{{Inventory slot|Enchanting Table}}{{Inventory slot|Anvil}}
|-
|[[Riptide]]<ref group="note" name="note1" />
|III
|{{Inventory slot|Enchanting Table}}{{Inventory slot|Anvil}}
|-
|[[Impaling]]
|V
|{{Inventory slot|Enchanting Table}}{{Inventory slot|Anvil}}
|-
|[[Unbreaking]]
|III
|{{Inventory slot|Enchanting Table}}{{Inventory slot|Anvil}}
|-
|[[Mending]]
|I
|{{Inventory slot|Anvil}}
|-
|[[Curse of Vanishing]]
|I
|{{Inventory slot|Anvil}}
|}
; Notes
<references group="note" />
===Repairing ===
Tridents have the same [[durability]] as an [[sword|iron sword]]. Whenever a trident deals damage, its durability decreases by 1.
Tridents can be repaired by:
*combining two damaged tridents in a [[grindstone]], or on a [[crafting table]] or the 2×2 inventory grid, which removes any enchantments except for [[Curse of Vanishing]] and [[Curse of Binding]]
*combining a damaged trident with another trident on an [[anvil]], which preserves enchantments.
*applying the [[Mending]] enchantment.
==Sounds==
{{Edition|Java}}:<br>
Thrown tridents use the Friendly Creatures sound category for entity-dependent sound events.
{{Sound table
|sound=Trident pierce1.ogg
|sound2=Trident pierce2.ogg
|sound3=Trident pierce3.ogg
|subtitle=Trident stabs
|source=neutral
|description=When a trident hits a mob
|id=item.trident.hit
|translationkey=subtitles.item.trident.hit
|volume=1.0
|pitch=1.0
|distance=16}}
{{Sound table
|sound=Trident ground impact1.ogg
|sound2=Trident ground impact2.ogg
|sound3=Trident ground impact3.ogg
|sound4=Trident ground impact4.ogg
|subtitle=Trident vibrates
|source=neutral
|description=When a trident hits the ground
|id=item.trident.hit_ground
|translationkey=subtitles.item.trident.hit_ground
|volume=0.9
|pitch={{frac|12|11}}-{{frac|4|3}}
|distance=16}}
{{Sound table
|sound=Trident throw1.ogg
|sound2=Trident throw2.ogg
|subtitle=Trident clangs
|source=player
|description=When a player throws a trident
|id=item.trident.throw
|translationkey=subtitles.item.trident.throw
|volume=1.0
|pitch=1.0
|distance=16}}
{{Sound table
|rowspan=2
|sound=Trident thunder1.ogg
|sound2=Trident thunder2.ogg
|subtitle=Trident thunder cracks
|source=neutral
|description=When a Channeling trident hits a mob
|id=item.trident.thunder
|translationkey=subtitles.item.trident.thunder
|volume=5.0
|pitch=1.0
|distance=16}}
{{Sound table
|subtitle=Trident thunder cracks
|source=weather
|description=When a trident with Channeling strikes a lightning rod
|id=item.trident.thunder
|translationkey=subtitles.item.trident.thunder
|volume=5.0
|pitch=1.0
|distance=16}}
{{Sound table
|sound=Riptide I.ogg
|subtitle=Trident zooms
|source=player
|description=When a Riptide I trident is used
|id=item.trident.riptide_1
|translationkey=subtitles.item.trident.riptide
|volume=1.0
|pitch=1.0
|distance=16}}
{{Sound table
|sound=Riptide II.ogg
|subtitle=Trident zooms
|source=player
|description=When a Riptide II trident is used
|id=item.trident.riptide_2
|translationkey=subtitles.item.trident.riptide
|volume=1.0
|pitch=1.0
|distance=16}}
{{Sound table
|sound=Riptide III.ogg
|subtitle=Trident zooms
|source=player
|description=When a Riptide III or higher trident is used
|id=item.trident.riptide_3
|translationkey=subtitles.item.trident.riptide
|volume=1.0
|pitch=1.0
|distance=16}}
{{Sound table
|sound=Trident return1.ogg
|sound2=Trident return2.ogg
|sound3=Trident return3.ogg
|subtitle=Trident returns
|source=neutral
|description=When a trident starts returning <ref group=sound>The first sound is only played {{frac|1|9}} of the time, while the others are played {{frac|4|9}} of the time</ref>
|id=item.trident.return
|translationkey=subtitles.item.trident.return
|volume=8.0
|pitch=''varies'' <ref group=sound>1.0 for <code>return1</code>, 1.0/0.8/1.2/1.2 for <code>return2</code>, and 1.0/0.8/0.8/1.2 for <code>return3</code></ref>
|distance=16}}
{{Sound table
|sound=Trident throw1.ogg
|sound2=Trident throw2.ogg
|subtitle=Drowned throws Trident
|source=hostile
|description=When a drowned shoots a trident
|id=entity.drowned.shoot
|translationkey=subtitles.entity.drowned.shoot
|volume=1.0
|pitch={{frac|5|6}}-1.25
|distance=16}}
{{Sound table
|sound=Random break.ogg
|subtitle=Item breaks
|source=player
|description=When a trident's durability is exhausted
|id=entity.item.break
|translationkey=subtitles.entity.item.break
|volume=0.8
|pitch=0.8-1.2
|distance=16
|foot=1}}
{{Edition|Bedrock}}:
{{Sound table
|type=bedrock
|sound=Trident pierce1.ogg
|sound2=Trident pierce2.ogg
|sound3=Trident pierce3.ogg
|source=player
|description=When a trident hits a mob
|id=item.trident.hit
|volume=1.0
|pitch=1.0}}
{{Sound table
|sound=Trident ground impact1.ogg
|sound2=Trident ground impact2.ogg
|sound3=Trident ground impact3.ogg
|sound4=Trident ground impact4.ogg
|source=player
|description=When a trident hits the ground
|id=item.trident.hit_ground
|volume=0.9
|pitch=1.0}}
{{Sound table
|sound=Trident throw1.ogg
|sound2=Trident throw2.ogg
|source=player
|description=When a player throws a trident
|id=item.trident.throw
|volume=1.0
|pitch=1.0}}
{{Sound table
|sound=Trident thunder1.ogg
|sound2=Trident thunder2.ogg
|source=player
|description=When a trident with Channeling strikes a mob<ref group="sound">{{Bug|MCPE-43402}}</ref><wbr><ref group=sound>{{bug|MCPE-173931||Tridents don't make channeling sounds when striking a lightning rod}}</ref><wbr>{{Upcoming|BE 1.20.30}}
|id=item.trident.thunder
|volume=1.0<wbr>{{Until|BE 1.20.30}}<br>1000.0<wbr>{{Upcoming|BE 1.20.30}}
|pitch=1.0}}
{{Sound table
|sound=Riptide I.ogg
|source=player
|description=When a Riptide I trident is used
|id=item.trident.riptide_1
|volume=1.0
|pitch=1.0}}
{{Sound table
|sound=Riptide II.ogg
|source=player
|description=When a Riptide II trident is used
|id=item.trident.riptide_2
|volume=1.0
|pitch=1.0}}
{{Sound table
|sound=Riptide III.ogg
|source=player
|description=When a Riptide III trident is used
|id=item.trident.riptide_3
|volume=1.0
|pitch=1.0}}
{{Sound table
|sound=Trident return1.ogg
|sound2=Trident return2.ogg
|sound3=Trident return3.ogg
|source=player
|description=When a trident starts returning <ref group=sound>The first sound is only played {{frac|1|9}} of the time, while the others are played {{frac|4|9}} of the time</ref>
|id=item.trident.return
|volume=8.0
|pitch=''varies'' <ref group=sound>1.0 for <code>return1</code>, 1.0/0.8/1.2/1.2 for <code>return2</code>, and 1.0/0.8/0.8/1.2 for <code>return3</code></ref>}}
{{Sound table
|sound=Trident throw1.ogg
|sound2=Trident throw2.ogg
|source=hostile
|description=When a drowned shoots a trident<ref group="sound">{{Bug|MCPE-53297}}</ref><wbr>{{Upcoming|BE 1.20.30}}
|id=mob.drowned.shoot
|volume=1.0
|pitch=0.8-1.2
|foot=1}}
==Data values==
===ID===
{{edition|java}}:
{{ID table
|edition=java
|showforms=y
|generatetranslationkeys=y
|displayname=Trident
|spritetype=item
|nameid=trident
|form=item
|foot=1}}
{{ID table
|edition=java
|showentitytags=y
|generatetranslationkeys=y
|displayname=Trident
|spritetype=entity
|nameid=trident
|entitytags=impact_projectiles
|foot=1}}
{{edition|bedrock}}:
{{ID table
|edition=bedrock
|shownumericids=y
|showforms=y
|notshowbeitemforms=y
|generatetranslationkeys=y
|displayname=Trident
|spritetype=item
|nameid=trident
|id=546
|form=item
|foot=1}}
{{ID table
|edition=bedrock
|shownumericids=y
|generatetranslationkeys=y
|displayname=Trident
|spritetype=entity
|nameid=thrown_trident
|id=73
|foot=1}}
===Entity data ===
Tridents have entity data associated with them that contain various properties of the entity.
{{el|java}}:
{{main|Entity format}}
{{/ED}}
{{el|bedrock}}:
:See [[Bedrock Edition level format/Entity format]].
==Achievements==
{{load achievements|Do a Barrel Roll!;Bullseye}}
==Advancements==
{{load advancements|A Throwaway Joke;Very Very Frightening;Not Today;Sniper Duel;Bullseye}}
==History==
{{History|java}}
{{History||November 18, 2017|link={{YouTubeLink|mAapz_nIC_Y}}|A trident was shown killing a [[zombie]] in a clip presented at [[MineCon Earth]].}}
{{History||1.13|snap=18w07a|[[File:Trident.png|60px]] {{InvSprite|Trident Revision 1}} Added tridents, which are currently unobtainable in [[Survival]].}}
{{History|||snap=18w10a|[[File:Trident (item).png|32px]] Tridents now have a new texture in the [[inventory]].}}
{{History|||snap=18w11a|Added [[drowned]] mobs, which can spawn with a trident, allowing tridents to now become obtainable in [[Survival]].}}
{{History|||snap=18w14a|If the [[player]] is not in [[water]] and it is not [[rain]]ing, the player can no longer throw tridents [[enchantment|enchanted]] with [[Riptide]], but they can still deal melee [[damage]].}}
{{History|||snap=18w20a|Like with swords, tridents no longer can break blocks when held in [[Creative]] mode.<ref>{{bug|MC-126300}}</ref>}}
{{History||1.14|snap=18w43a|Thrown tridents can now break [[chorus flower]]s.}}
{{History||1.15|snap=19w39a|[[File:Enchanted Trident.png|60px]] [[File:Enchanted Trident (item).gif|32px]] Tridents that are [[enchanting|enchanted]] now have a glint.
|Trident items use a 3D model again. When dropped, it rotates off center<ref>{{bug|MC-161886}}</ref> (like with beds at the time and shields currently).}}
{{History|||snap=19w42a|Trident items now use the 2D sprite again.<ref>{{bug|MC-161872}}</ref>}}
{{History||1.17|snap=20w48a|Thrown tridents can now break [[pointed dripstone]].}}
{{History|upcoming java}}
{{History||Villager Trade Rebalance<br>(Experimental)|link=Java Edition 1.20.2|snap=23w31a|Trident-exclusive enchantments are no longer obtainable from villager [[trading]].}}
{{History||Combat Tests|snap=1.14.3 - Combat Test|The attack speed of tridents has been increased to 2.
|The base [[damage]] of tridents has been decreased from {{hp|9}} to {{hp|7}}.
|The attack reach of tridents has been increased to 4 [[block]]s.}}
{{History|||snap=Combat Test 2|The damage of tridents has been increased to {{hp|8}}.}}
{{History|||snap=Combat Test 4|Tridents can now be shot from [[dispenser]]s.
|Tridents with [[Loyalty]] that fall into the [[void]] now return to their owner upon breaking in the void.
|Tridents with [[Impaling]] now deal [[enchanting|enchantment]] damage to all [[mob]]s that are in [[water]] or [[rain]].}}
{{History|||snap=Combat Test 5|The damage of tridents has been decreased to {{hp|7}} again.}}
{{History|bedrock}}
{{History||1.4.0|snap=beta 1.2.13.8|[[File:Trident.png|60px]] [[File:Trident (item).png|32px]] Added tridents.
|Tridents are currently a part of [[Experimental Gameplay]].}}
{{History|||snap=beta 1.2.14.2|Tridents have been fully implemented.}}
{{History|||snap=beta 1.2.20.1|A new animation has been added for tridents with [[Riptide]] when they are thrown.}}
{{History||1.5.0|snap=beta 1.5.0.0|Tridents can now be [[enchantment|enchanted]] with [[Mending]] and [[Unbreaking]].}}
{{History|||snap=beta 1.5.0.7|Tridents no longer break [[block]]s in [[Creative]] mode.}}
{{History||1.10.0|snap=beta 1.10.0.3|Thrown tridents can now break [[chorus flower]]s.}}
{{History||1.16.0|snap=beta 1.15.0.51|Drowned can no longer have a trident when converted.|Drowned that are not holding a trident are no longer able to drop one.}}
{{History||1.16.220|snap=beta 1.16.220.50|Tridents are now able to break pointed dripstone.}}
{{History|||snap=beta 1.16.220.51|Drowned now hold their tridents correctly when targeting a player.}}
{{History|console}}
{{History||xbox=TU69|ps=1.76|wiiu=Patch 38|[[File:Trident.png|60px]] [[File:Trident (item).png|32px]] Added tridents.}}
{{History|education}}
{{History||1.4.0|[[File:Trident.png|60px]] [[File:Trident (item).png|32px]] Added tridents.}}
{{History|foot}}
==Issues==
{{issue list}}
==Trivia==
* If a player throws a Loyalty-enchanted trident and the player's inventory subsequently fills, the trident hovers around or through the player's skin until an inventory slot opens, which it fills immediately. Multiple tridents can be 'queued' to re-enter the player's inventory in this manner.
*{{IN|java}} in Creative mode, sword enchantments can be applied to tridents. This includes Sharpness, Fire Aspect, and Looting. Sharpness, Smite, and Bane of Arthropods increases their damage against their specific mobs, as well.{{more info needed|Does the damage also increase when the trident is thrown?}}
*Thrown tridents pass through [[Nether Portal (block)|nether portal block]]s without being transported to [[the Nether]] or the [[Overworld]].
*Using a trident enchanted with Riptide while riding an entity cancels the charge and does nothing.
==Gallery==
<gallery>
TridentMineconEarth.jpg|Tridents are shown in a clip of Minecon Earth 2017.
Returning trident.jpg|A trident [[enchantment|enchanted]] with [[Loyalty]] returning to the [[player]].
Riptide Trident.png|A player "flying" high in the [[air]] after throwing a trident enchanted with [[Riptide]] III vertically upward.
Trident in ground.png|A trident stuck in [[sand]].
Two-hand drowned.png|A drowned holding a trident and a [[nautilus shell]].
Enchanted Trident (item).gif|An enchanted trident.
Alex with Trident.png|An official T-Shirt design of [[Alex]] with a trident.
Acid Drowned.png|"Acid Drowned," an officially licensed T-Shirt featuring a [[drowned]] with a trident.
ArgoMajor Trident.jpg|First image of a trident in ''Bedrock Edition''.
</gallery>
==References==
{{reflist}}
==External Links==
*[https://www.minecraft.net/en-us/article/taking-inventory--trident Taking Inventory: Trident] – Minecraft.net on January 30, 2020
{{Items}}
{{Entities}}
[[Category:Combat]]
[[de:Dreizack]]
[[es:Tridente]]
[[fr:Trident]]
[[ja:トライデント]]
[[ko:삼지창]]
[[pl:Trójząb]]
[[pt:Tridente]]
[[ru:Трезубец]]
[[th:ตรีศูล]]
[[zh:三叉戟]]</li></ul> | 18w07a | Potion of the Turtle Master added. | |||
| 18w14a | Potion of Slow Falling added. | ||||
| Pocket Edition Alpha | |||||
v0.12.1{{Extension DPL}}<ul><li>[[Portfolio|Portfolio]]<br/>{{exclusive|education}}
{{Item
| image = Portfolio.png
| renewable = No
| stackable = Yes (64)
}}
A '''portfolio''' is an [[item]] that can save [[photo]]s taken with a [[camera]].<ref>https://education.minecraft.net/support/knowledge-base/using-cameras-portfolios/</ref>
== Obtaining ==
Portfolios can be obtained in the [[creative inventory]] or through the {{cmd|give}} command.
== Usage ==
[[File:Portfolio Interface.png|thumb|upright=1.5|The portfolio interface]]
Once a photo has been taken using the [[camera]], it appears in the portfolio. Once equipped, right-clicking brings up a two-page book of photos the [[player]] has taken, in chronological order. Captions can be added below each picture. Pressing the "Export Portfolio" button creates a .zip file with all photos as JPGs in a specified folder. The portfolio is also used to load custom items in [[Minecraft China]].
== Data values ==
=== ID ===
{{ID table
|edition=bedrock
|shownumericids=y
|showforms=y
|notshowbeitemforms=y
|generatetranslationkeys=y
|displayname=Portfolio
|spritetype=item
|nameid=portfolio
|id=456
|form=item
|foot=1}}
== History ==
{{History|pocket alpha}}
{{History||v0.16.0|snap=build 1|[[File:Portfolio BE1.png|32px]] Added portfolios.}}
{{History|||snap=build 2|Portfolios have been removed.}}
{{History|bedrock}}
{{History||1.16.100|Data-driven portfolios, allowing for add-ons to create custom portfolios. Normal Portfolios are still unobtainable.}}
{{History|education}}
{{History||1.0|[[File:Portfolio BE1.png|32px]] Added portfolios.}}
{{History|foot}}
== References ==
{{Reflist}}
{{Items}}
{{Education Edition}}
[[Category:Non-renewable resources]]
[[Category:Education Edition items]]
[[Category:Storage]]
[[de:Fotoalbum]]
[[es:Portafolio]]
[[ja:ポートフォリオ]]
[[ko:포트폴리오]]
[[pl:Portfolio]]
[[pt:Portfólio]]
[[ru:Портфолио]]
[[uk:Портфоліо]]
[[zh:公文包]]</li><li>[[Phantom Membrane|Phantom Membrane]]<br/>{{Item
| title = Phantom Membrane
| image = Phantom Membrane.png
| renewable = Yes
| stackable = Yes (64)
}}
'''Phantom membranes''' are items obtained from killing [[phantom]]s. They are used to repair [[elytra]] and brew [[Potion of Slow Falling|potions of Slow Falling]].
== Obtaining ==
=== Mob loot ===
[[Phantom]]s drop 0–1 phantom membrane when killed by a [[player]] or tamed [[wolf]]. [[Looting]] increases the maximum drops by 1 per level, for a maximum of 4 with Looting III.
=== Cat gifts ===
{{main|Cat#Gifts}}
Tamed [[cat]]s have a 70% chance to bring the player a gift when they wake up from a [[bed]], and the gift has a 3.22% chance to be a phantom membrane.
== Usage ==
=== Repairing ===
Phantom membranes can be used in an [[anvil]] to repair [[elytra]], restoring 108 durability points (25% of the pair's total durability) per membrane while preserving their [[enchantments]].
{| class="wikitable" data-description="Repairing elytra"
! scope="col" style="width:64px;" | Name
! Ingredients
! [[Anvil]] usage
|-
! scope="row" style="text-align: center;" | '''Elytra'''
| [[Elytra]] +<br>[[Phantom Membrane]]
| style="width: 260px; padding: 1px;" | {{Anvil| title = Elytra|Input1=Damaged Elytra|Input2=Phantom Membrane, 2|Output=Elytra}}
|-
|}
=== Brewing ingredient ===
Phantom membranes are used to [[brewing|brew]] [[Potion of Slow Falling|slow falling potions]] from an [[awkward potion]].
{{Brewing
|Phantom Membrane
|Potion of Slow Falling
|showname=3
}}
== Data values ==
=== ID ===
{{edition|java}}:
{{ID table
|edition=java
|showforms=y
|generatetranslationkeys=y
|displayname=Phantom Membrane
|spritetype=item
|nameid=phantom_membrane
|form=item
|foot=1}}
{{edition|bedrock}}:
{{ID table
|edition=bedrock
|shownumericids=y
|showforms=y
|notshowbeitemforms=y
|generatetranslationkeys=y
|displayname=Phantom Membrane
|spritetype=item
|nameid=phantom_membrane
|id=574
|form=item
|foot=1}}
== History ==
{{History|java}}
{{History||1.13|snap=18w14a|[[File:Phantom Membrane JE1 BE1.png|32px]] Added phantom membranes.}}
{{History||1.14|snap=18w44a|Tamed [[cat]]s now have a chance to give the [[player]] phantom membranes as [[Cat#Gifts|gifts]].}}
{{History|||snap=19w08a|[[File:Phantom Membrane JE2 BE2.png|32px]] The texture of phantom membranes has now been changed.}}
{{History|bedrock}}
{{History||1.6.0|snap=beta 1.6.0.5|[[File:Phantom Membrane JE1 BE1.png|32px]] Added phantom membranes.}}
{{History||1.8.0|snap=beta 1.8.0.8|Tamed [[cat]]s now have a chance to give the [[player]] phantom membranes as gifts.}}
{{History||1.10.0|snap=beta 1.10.0.3|[[File:Phantom Membrane JE2 BE2.png|32px]] The texture of phantom membranes has now been changed.}}
{{History|console}}
{{History||xbox=TU69|ps=1.76|wiiu=Patch 38|[[File:Phantom Membrane JE1 BE1.png|32px]] Added phantom membranes.}}
{{History||xbox=none|xbone=none|ps=1.90|wiiu=none|switch=none|[[File:Phantom Membrane JE2 BE2.png|32px]] The texture of phantom membranes has now been changed.}}
{{History|foot}}
== Issues ==
{{issue list}}
== References ==
{{reflist}}
== External Links ==
*[https://www.minecraft.net/en-us/article/taking-inventory--phantom-membrane Taking Inventory: Phantom Membrane] – Minecraft.net on August 2, 2019
{{items}}
[[de:Phantomhaut]]
[[fr:Membrane de Phantom]]
[[ja:ファントムの皮膜]]
[[ko:팬텀 막]]
[[pl:Błona fantoma]]
[[pt:Membrana de phantom]]
[[ru:Мембрана фантома]]
[[th:เนื้อเยื่อแฟนท่อม]]
[[uk:Перетинка фантома]]
[[zh:幻翼膜]]
[[Category:Renewable resources]]
[[Category:Brewing recipe]]</li></ul> | build 1 | Added potions and brewing. | |||
| Pocket Edition | |||||
1.0.0{{Extension DPL}}<ul><li>[[Carrot on a Stick|Carrot on a Stick]]<br/>{{Item
| image = Carrot on a Stick.png
| rarity = Common
| renewable = Yes
| durability = 25
| stackable = No
}}
A '''carrot on a stick''' is an item that can be used to control saddled [[pig]]s.
== Obtaining ==
=== Crafting ===
It is possible to craft a carrot on a stick without a [[crafting table]].
{{Crafting
|head=1
|showname=0
|showdescription=1
|B2=Fishing Rod; Damaged Fishing Rod
|C3=Carrot
|Output= Carrot on a Stick
|type= Transportation
|description= The fishing rod must be diagonally above the carrot to craft the carrot on a stick.
}}
{{crafting
|foot=1
|ignoreusage=1
|Damaged Carrot on a Stick
|Damaged Carrot on a Stick
|Output= Carrot on a Stick
|description= The durability of the two carrots on sticks is added together, plus an extra 5% durability.
|type= Transportation
}}
== Usage ==
=== Riding a pig ===
To use a carrot on a stick, the player must first [[saddle]] a [[pig]], and ride it while holding the carrot on a stick. The pig then moves in the direction of the carrot. Also, if the player holds a carrot on a stick, all nearby pigs (but not [[rabbit]]s<ref>{{bug|MC-207993}}</ref>) follow the player, but they can't breed using carrot on a stick.
To make the pig run faster, the player can press {{control|use}} while holding the carrot on a stick. This is called "boosting". Each boost costs 7 durability. If the carrot on a stick's durability is depleted, it turns back into a fishing rod.
The speed of a mounted pig is 2.42 m/s. Boosting a pig causes its speed to slowly ramp up until it reaches 2.15 times its normal speed, 5.20 m/s. Then speed slowly declines until the pig reaches normal speed again. The boost lasts between 140 and 980 game [[tick]]s (7 seconds and 49 seconds respectively), chosen randomly. No matter how many ticks the boost lasts, the average speed of pig during a full boost cycle is roughly 4.19 m/s. These boosted speeds are applied only while holding the carrot on a stick. These speeds are affected by the [[speed]] effect.
=== Enchantments ===
A carrot on a stick can receive the following enchantments, but only through an [[anvil]]:
{|class="wikitable col-2-center col-3-right"
|+
!Name
!Max Level
![[Enchanting|Method]]
|-
|[[Unbreaking]]
|III
|{{Inventory slot|Anvil}}
|-
|[[Mending]]
|I
|{{Inventory slot|Anvil}}
|-
|[[Curse of Vanishing]]
|I
|{{Inventory slot|Anvil}}
|}
== Sounds ==
{{Edition|Java}}:
{{Sound table
|sound=Random break.ogg
|subtitle=Item breaks
|source=player
|description=When a carrot on a stick's durability is exhausted
|id=entity.item.break
|translationkey=subtitles.entity.item.break
|volume=0.8
|pitch=0.8-1.2
|distance=16
|foot=1}}
{{Edition|Bedrock}}:
{{Sound table
|type=bedrock
|sound=Random break.ogg
|source=player
|description=When a carrot on a stick's durability is exhausted
|id=random.break
|volume=1.0
|pitch=0.9
|foot=1}}
== Data values ==
=== ID ===
{{edition|java}}:
{{ID table
|edition=java
|showforms=y
|generatetranslationkeys=y
|displayname=Carrot on a Stick
|spritetype=item
|nameid=carrot_on_a_stick
|form=item
|foot=1}}
{{edition|bedrock}}:
{{ID table
|edition=bedrock
|showaliasids=y
|shownumericids=y
|showforms=y
|notshowbeitemforms=y
|generatetranslationkeys=y
|displayname=Carrot on a Stick
|spritetype=item
|nameid=carrot_on_a_stick
|aliasid=carrotonastick
|id=517
|form=item
|translationkey=item.carrotOnAStick.name
|foot=1}}
== Video ==
<div style="text-align:center">{{yt|V7IVYX5Bs48}}</div>
== History ==
{{History|java}}
{{History||August 28, 2012|link={{tweet|Dinner|240428477856231424}}|Dinnerbone released images of saddled pigs being controlled with carrots.<ref>{{tweet|dinner|240428477856231424}}</ref> They start slow but end up traveling up to 5 blocks per second.<ref>{{tweet|dinner|240429280469856256}}</ref> [[Wheat]] was considered as a "fuel" along with carrots,<ref>{{tweet|dinner|240188453789257728}}</ref> and Dinnerbone eventually decided upon [[carrot]]s.<ref>{{tweet|dinner|240355810650247168}}</ref>}}
{{History||1.4.2|snap=12w36a|[[File:Carrot on a Stick JE1 BE1.png|32px]] Added carrot on a stick.
|The [[player]] does not get back a [[fishing rod]] once the carrot on a stick is used up.}}
{{History|||snap=12w37a|Carrots on sticks now have a [[item durability|durability meter]], and can be used to give [[saddle]]d [[pig]]s a burst of speed when right-clicked. The carrot on a stick no longer needs to be held when pigs have the burst of speed.}}
{{History|||snap=12w38a|Using up a carrot on a stick now returns a [[fishing rod]].}}
{{History||1.4.6|snap=12w50a|A carrot on a stick can now be [[enchanting|enchanted]] with [[Unbreaking]] via an [[enchanted book]] and an [[anvil]].}}
{{History||1.8.2|snap=pre7|Crafting a carrot on a stick now removes all enchantments on the original fishing rod.}}
{{History||1.9|snap=16w05b|[[Item durability|Durability]] is no longer reduced merely by riding a [[pig]], but only by using the speed boost.{{testingame}}}}
{{History||1.13|snap=17w47a|[[Crafting]] a carrot on a stick no longer requires the [[fishing rod]] to be at full durability.<ref>[https://bugs.mojang.com/browse/MC-123196 MC-123196 resolved as "Works as Intended"]</ref>
|Prior to [[1.13/Flattening|''The Flattening'']], this [[item]]'s numeral ID was 398.}}
{{History||1.14|snap=18w43a|[[File:Carrot on a Stick.png|32px]] The texture of carrot on a stick has been changed.}}
{{History||1.16|snap=20w06a|Carrot on a stick can now be used up.<ref>[https://bugs.mojang.com/browse/MC-112630 MC-112630]</ref>}}
{{History|pocket alpha}}
{{History||v0.15.0|snap=build 1|[[File:Carrot on a Stick JE1 BE1.png|32px]] Added carrot on a stick.}}
{{History|bedrock}}
{{History||1.10.0|snap=beta 1.10.0.3|[[File:Carrot on a Stick.png|32px]] The texture of carrot on a stick has been changed.}}
{{History||1.16.100|snap=beta 1.16.100.56|The ID of carrot on a stick has been changed from <code>carrotonastick</code> to <code>carrot_on_a_stick</code>.}}
{{History|console}}
{{History||xbox=TU14|xbone=CU1|ps=1.04|wiiu=Patch 1|switch=1.0.1|[[File:Carrot on a Stick JE1 BE1.png|32px]] Added carrot on a stick.}}
{{History||xbox=none|xbone=none|ps=1.90|wiiu=none|switch=none|[[File:Carrot on a Stick.png|32px]] The texture of carrot on a stick has been changed.}}
{{History|3ds}}
{{History||0.1.0|[[File:Carrot on a Stick JE1 BE1.png|32px]] Added carrot on a stick.}}
{{History|foot}}
== Issues ==
{{issue list}}
== Gallery ==
<gallery>
PigControl.png|First image of carrot on a stick released by Dinnerbone.
pigstairs.png|Pigs can climb [[stairs]] and [[slabs]].
Jebpig.png|[[Jeb]] riding a pig.<ref>http://www.mojang.com/2012/09/minecraft-snapshot-12w37a/</ref>
Enchanted Carrot on a Stick.gif|An enchanted carrot on a stick.
Grum Carrot on a Stick 1.png|Image from [[Grum]] of a carrot on a stick's texture changing with its durability.
Grum Carrot on a Stick 2.png|Another image showing the same.
Grum Carrot on a Stick 3.png|Another image.
</gallery>
== See also ==
* [[Warped Fungus on a Stick]]
== References ==
{{reflist}}
{{Items}}
[[Category:Renewable resources]]
[[cs:Mrkev na prutu]]
[[de:Karottenrute]]
[[es:Caña con zanahoria]]
[[fr:Carotte sur un bâton]]
[[hu:Répa horgászboton]]
[[it:Bastone e carota]]
[[ja:ニンジン付きの棒]]
[[ko:당근 낚싯대]]
[[nl:Wortel aan een stok]]
[[pl:Marchewka na patyku]]
[[pt:Vara com cenoura]]
[[ru:Удочка с морковью]]
[[th:แคร์รอตติดเบ็ด]]
[[uk:Морква на паличці]]
[[zh:胡萝卜钓竿]]</li><li>[[Cocoa Beans|Cocoa Beans]]<br/>{{Block
|image=<gallery>
Cocoa Age 0.png|Age 0 JE
Cocoa Age 1.png|Age 1 JE
Cocoa Age 2.png|Age 2 JE
</gallery>
|image2=<gallery>
Cocoa Age 0 BE.png|Age 0 BE
Cocoa Age 1 BE.png|Age 1 BE
Cocoa Age 2 BE.png|Age 2 BE
</gallery>
|transparent=Yes
|light=No
|tool=axe
|renewable=Yes
|stackable=Yes (64)
|flammable=No
|lavasusceptible=No
}} '''Cocoa beans''' are items obtained from cocoa pods and are used to plant them, as well as to craft [[dye|brown dye]] and [[cookie|cookies]].
'''Cocoa pods''' are [[Bone Meal|bonemealable]] [[plant]]s placed on [[Log|jungle log]] sides that grow cocoa beans, and can be found naturally in [[Jungle|jungles]].
==Obtaining==
In ''Java Edition'', cocoa beans are only obtained through the natural generation of cocoa pods, while in ''Bedrock Edition'', they can also be gotten in bonus chests, from [[fishing]] inside the jungle, bamboo jungle and sparse jungle biomes and during a [[trading]] with a wandering trader.
Cocoa beans come from cocoa pods, which are found on the trunks of normal-sized naturally-generated [[jungle tree]]s in [[jungle]], [[bamboo jungle]]s and [[sparse jungle]] temperate [[biome]]s.
Cocoa pods can be mined with any item, but [[axe]]s are the quickest. Fully grown cocoa pods drop 3 cocoa beans. Using a tool enchanted with Fortune does not increase the amount of cocoa beans dropped.
{{breaking row|horizontal=1|Cocoa|Axe|sword=1|link=none}}
The block itself can be obtained by inventory editing or [[add-on]]s {{in|bedrock}}.
From one to two cocoa beans can be found in 40% of bonus [[chest]]s {{in|bedrock}}.
{{LootChestItem|cocoa-beans}}
Cocoa beans can be obtained from [[fishing]] in a jungle {{in|bedrock}}.
[[Wandering trader]]s may sell 3 cocoa beans for an [[emerald]] during a [[trading]] {{in|bedrock}}.
==Usage==
===Farming===
{{main|Tutorials/Cocoa bean farming}}
Placing cocoa beans on the side of a jungle [[log]] plants a new cocoa pod. The log does not need to be attached to a tree. A cocoa pod can be placed on jungle logs, jungle [[wood]], stripped jungle logs and stripped jungle wood.
[[File:Cocoaplant farm.png|thumb|left|A somewhat efficient cocoa pod farm, minimizing space and wood use.]]
Cocoa has three stages of growth. During its first stage, the pod is small and green. In the second stage, the plant is bigger and colored tan. In its last stage, the pod is even larger and orange. The cocoa block has a 20% chance to grow a stage when receiving a [[Tick#Random tick|random tick]], giving it an average time of 5 minutes and 41 seconds per stage. When destroyed in the first two stages, the pod yields only one cocoa bean. When destroyed in the third stage, it gives 3 cocoa beans. [[Bone meal]] can be used to force the cocoa pod forward by one growth stage. Cocoa pods burst and drop their beans when struck by flowing water, pushed by a piston or if their [[log]] or wood are removed by any means.
===Composting===
Placing cocoa beans into a [[composter]] has a 65% chance of raising the compost level by 1. {{IN|bedrock}}, cocoa beans are accepted as a direct substitute of brown dye in many recipes.
===Crafting ingredient===
{{crafting usage}}
{{Dye usage}}
{{IN|bedrock}}, cocoa beans can be also used in banner patterns:
{{banner crafting usage}}
{{Banner loom usage|Cocoa Beans}}
==Sounds==
{{Sound table/Block/Wood}}
==Data values==
===ID===
{{edition|java}}:
{{ID table
|edition=java
|showforms=y
|generatetranslationkeys=y
|displayname=Cocoa
|spritetype=block
|nameid=cocoa
|form=block}}
{{ID table
|displayname=Cocoa Beans
|spritetype=item
|nameid=cocoa_beans
|form=item
|foot=1}}
{{edition|bedrock}}:
{{ID table
|edition=bedrock
|showforms=y
|showaliasids=y
|shownumericids=y
|generatetranslationkeys=y
|displayname=Cocoa
|spritetype=block
|nameid=cocoa
|id=127
|form=block}}
{{ID table
|displayname=Cocoa Beans
|spritetype=item
|nameid=cocoa_beans
|aliasid=dye / 3
|id=412
|form=item
|translationkey=item.dye.brown.name
|foot=1}}
===Block states===
{{see also|Block states}}
{{/BS}}
==History==
''For a more in-depth breakdown of changes to textures and models, including a set of renders for each state combination, see [[/Asset history]]''
{{History|java beta}}
{{History||1.2|[[File:Cocoa Beans JE1 BE1.png|32px]] Added cocoa beans.
|Cocoa beans are currently obtainable only through an inventory editor.}}
{{History||1.2_02|Prior to this, Cocoa Beans were misspelled as 'Coco Beans'.}}
{{History||1.4|Cocoa beans have been formally brought into the game as a reward found in [[dungeon]] chests.<ref>{{tweet|notch|53161729990987776}}</ref> (53% chance) Also, brown [[sheep]] now naturally spawn, making brown [[wool]] obtainable without hacking the game.
|Cocoa beans can now be used to craft [[cookie]]s.}}
{{History|java}}
{{History||May 8, 2012|link={{tweet|jeb|199867730927697920}}|[[Jeb]] revealed cocoa with a screenshot.}}
{{History||1.3.1|snap=12w18a|For only this snapshot, cocoa beans have been given a small (0.5%) chance of dropping from destroyed [[jungle tree]] [[leaves]] in a similar fashion to [[apple]]s from oak leaves, which makes cocoa beans [[renewable resource|renewable]] for the first time.}}
{{History|||snap=12w19a|[[File:Cocoa Age 0 (S) JE1.png|32px]] [[File:Cocoa Age 1 (S) JE1.png|32px]] [[File:Cocoa Age 2 (S) JE1.png|32px]] Added cocoa. The top textures of cocoa always keep a completely constant rotation, regardless of what direction they face. They also not shaded.
|[[File:Cocoa Beans JE2.png|32px]] The texture of cocoa beans has been changed.
|Cocoa has replaced jungle [[leaves]] as the main method of finding cocoa beans.
|[[File:Cocoa Age 3 (S) JE1.png|32px]] Cocoa with values 12–15 is inaccessible normally, and use the texture of the [[dragon egg]]. This is due to the dragon egg texture being to the left of the ripe cocoa texture in <samp>[[terrain.png]]</samp>, as cocoa textures are arranged with the oldest on the left and the youngest on the right, resulting in the unusually ripe cocoa reading the dragon egg texture.}}
{{History|||snap=1.3|[[File:Cocoa Beans JE3 BE2.png|32px]] The texture of cocoa beans has been changed.}}
{{History||1.4.2|snap=12w34a|Cocoa beans have been given the ability to [[Armor#Dyeing|dye]] leather [[armor]] and [[wolf]] collars.}}
{{History||1.4.6|snap=12w49a|Cocoa beans can now be [[crafting|crafted]] with [[gunpowder]] to create a [[firework star]].}}
{{History||1.5|snap=13w02a|Due to textures being stored in individual files, cocoa beans with data 12–15 no longer have a texture to use, and now crash the game if a [[chunk]] containing one is loaded.}}
{{History|||snap=13w03a|Cocoa with data values 12–15 now only crash the game if one is directly in the field of view.}}
{{History|||snap=13w04a|[[Bone meal]] now grows cocoa by only one stage.}}
{{History|||snap=13w10a|[[File:Cocoa Age 3 (S) JE2.png|32px]] Cocoa with data 12–15 now use the age 2 texture, resulting in a broken appearance, preventing previously mentioned crashes.}}
{{History||1.6.1|snap=13w18a|Cocoa beans have been removed from [[dungeon]] [[chest]]s.}}
{{History|||snap=13w19a|Brown [[Terracotta|stained clay]] can now be [[crafting|crafted]] using cocoa beans.}}
{{History||1.7.2|snap=13w41a|Brown [[stained glass]] can now be crafted using cocoa beans.}}
{{History||1.8|snap=14w07a|[[File:Cocoa Age 0 (S) JE2.png|32px]] [[File:Cocoa Age 1 (S) JE2.png|32px]] [[File:Cocoa Age 2 (S) JE2.png|32px]] [[File:Missing Model JE1.png|32px]] The top textures of cocoa now rotate with the blocks themselves (cocoa facing north remaining visually unaffected), and cocoa of age 3 has [[Missing model|no model]].}}
{{History|||snap=14w10a|[[File:Cocoa Age 0 (S) JE3.png|32px]] [[File:Cocoa Age 1 (S) JE3.png|32px]] [[File:Cocoa Age 2 (S) JE3.png|32px]] [[File:Missing Model JE2.png|32px]] The large section of cocoa is shaded, and the missing model (which age 3 cocoa uses) has changed.}}
{{History|||snap=14w25a|[[File:Cocoa Age 0 (S) JE4.png|32px]] [[File:Cocoa Age 1 (S) JE4.png|32px]] [[File:Cocoa Age 2 (S) JE4.png|32px]] The connecting region of cocoa is now shaded.}}
{{History|||snap=14w26a|Cocoa with data 12–15 has been effectively removed from the game, as such blocks now convert to a proper value with {{cmd|setblock}}. Loading worlds with existing out of range cocoa crash the game.}}
{{History|||snap=14w30a|Cocoa beans can now be used to dye [[banner]]s.}}
{{History||1.13|snap=17w47a|The different data values for the <code>dye</code> ID have been split up into their own IDs.
|Prior to [[1.13/Flattening|''The Flattening'']], this block's and item's numeral ID were respectively 127 and 351.}}
{{History||1.14|snap=18w43a|Cocoa beans can now be used to craft [[brown dye]].
|Cocoa beans can no longer be used as a [[dye]].
|All of the dye-related functions and crafting recipes of cocoa beans (except cookies) have been transferred to brown dye.
|"Cocoa Beans" item has been renamed to "Cocoa".
|[[File:Cocoa Beans JE4 BE3.png|32px]] The texture of cocoa has been changed.
|[[File:Cocoa Age 0 (S) JE5.png|32px]] [[File:Cocoa Age 1 (S) JE5.png|32px]] [[File:Cocoa Age 2 (S) JE5.png|32px]] The textures of cocoa have been changed.
|[[File:Cocoa Age 0 (texture) JE2 BE2.png|32px]] [[File:Cocoa Age 1 (texture) JE2 BE2.png|32px]] Textures for cocoa age 0 and 1 has palette left, visible only on particles.
|Cocoa now has a placement [[sound]].}}
{{History|||snap=19w03a|Placing cocoa into the new [[composter]] has a 50% chance of raising the compost level by 1.}}
{{History|||snap=19w05a|Cocoa now has a 65% chance of increasing the compost level in a composter by 1.}}
{{History|||snap=19w11b|"Cocoa" item has been renamed back to "Cocoa Beans".{{verify|was this not just one bug that affected other crops as well? if so cite the ticket and add to all other affected pages}}}}
{{History||1.18|snap=Pre-release 5|[[File:Cocoa Age 0 (texture) JE3 BE3.png|32px]] [[File:Cocoa Age 1 (texture) JE3 BE3.png|32px]] Textures for cocoa age 0 and 1 were changed. This visually changes only particles.}}
{{History||1.19|snap=22w11a|[[File:Cocoa Age 2 (S) JE6.png|32px]] The texture and model of cocoa age 2 have been changed.}}
{{History|pocket alpha}}
{{History||v0.3.0|[[File:Cocoa Beans JE1 BE1.png|32px]] Added cocoa beans. They are currently unobtainable and serve no purpose.}}
{{History||v0.8.0|snap=build 1|[[File:Cocoa Beans JE3 BE2.png|32px]] The texture of cocoa beans has been changed.
|Cocoa beans can be [[crafted]] from an [[orange dye]] and an [[ink sac]], or from [[dandelion yellow]], [[rose red]], and an ink sac, despite there being no way of obtaining ink sacs at the time.}}
{{History|||snap=build 3|Cocoa beans are now available in [[creative]].}}
{{History||v0.9.0|snap=build 1|[[File:Cocoa Age 0 (S) JE1.png|32px]] [[File:Cocoa Age 1 (S) JE1.png|32px]] [[File:Cocoa Age 2 (S) JE1.png|32px]] {{info needed|How did 12-16 appear?}} Added cocoa.
|Cocoa provides an additional way of obtaining cocoa beans.
|Cocoa beans are now used to craft [[cookie]]s.}}
{{History||v0.11.0|snap=build 14|Cocoa now grows over time.<ref>{{bug|MCPE-7887}}</ref>}}
{{History||?|[[File:Cocoa Age 0 (S) BE4.png|32px]] [[File:Cocoa Age 1 (S) BE4.png|32px]] [[File:Cocoa Age 2 (S) BE2.png|32px]] Cocoa no longer has a stem connecting it to the log.}}
{{History||v0.15.0|snap=Realms build 4|[[File:Cocoa Age 0 (S) JE1.png|32px]] [[File:Cocoa Age 1 (S) JE1.png|32px]] [[File:Cocoa Age 2 (S) JE1.png|32px]] Cocoa stems now render again.<ref>{{bug|MCPE-13579}}</ref>}}
{{History||v0.16.0|snap=build 1|Cocoa beans can no longer be crafted from [[orange dye]] and an ink sac.
|Cocoa beans can no longer be crafted from rose red, dandelion yellow and ink sacs.}}
{{History|pocket}}
{{History||1.0.0|snap=alpha 0.17.0.1|Cocoa beans can now be used to dye [[shulker]]s.}}
{{History||1.1.0|snap=alpha 1.1.0.0|Cocoa beans can now be used to dye [[shulker box]]es and [[bed]]s.
|Cocoa beans can now be used to craft [[concrete powder]].}}
{{History|bedrock}}
{{History||1.2.0|snap=beta 1.2.0.2|Cocoa beans can now be used to dye [[banner]]s, [[firework star]]s, and [[glass]].
|Cocoa beans can now be found in [[bonus chest]]s.}}
{{History||1.4.0|snap=beta 1.2.20.1|Cocoa beans can now be used to craft brown [[balloon]]s and [[glow stick]]s.}}
{{History||1.8.0|snap=beta 1.8.0.10|Cocoa beans can now be used to craft [[brown dye]].}}
{{History||1.10.0|snap=beta 1.10.0.3|Cocoa beans are now [[trading|sold]] by [[wandering trader]]s.
|[[File:Cocoa Beans JE4 BE3.png|32px]] The texture of cocoa beans has been changed.
|[[File:Cocoa Age 0 (S) BE4.png|32px]] [[File:Cocoa Age 1 (S) BE4.png|32px]] [[File:Cocoa Age 2 (S) BE4.png|32px]] The textures of cocoa have been changed.}}
{{History||1.11.0|snap=beta 1.11.0.1|Cocoa beans can now be used to fill up [[composter]]s.}}
{{History||1.16.100|snap=beta 1.16.100.56|The ID of cocoa beans has been changed from <code>dye/3</code> to <code>cocoa_beans</code>.}}
{{History||1.18.10|snap=beta 1.18.10.22|[[File:Cocoa Age 0 (texture) JE3 BE3.png|32px]] [[File:Cocoa Age 1 (texture) JE3 BE3.png|32px]] Textures for cocoa age 0 and 1 were changed. This visually changes only particles.}}
{{History|console}}
{{History||xbox=TU1|xbone=CU1|ps=1.0|wiiu=Patch 1|switch=1.0.1|[[File:Cocoa Beans JE1 BE1.png|32px]] Added cocoa beans.}}
{{History||xbox=TU9|[[File:Cocoa Beans JE3 BE2.png|32px]] The texture of cocoa beans has been changed.}}
{{History||xbox=TU12|[[File:Cocoa Age 0 (S) JE3.png|32px]] [[File:Cocoa Age 1 (S) JE3.png|32px]] [[File:Cocoa Age 2 (S) JE3.png|32px]]{{verify|Were these the models used?}} Added cocoa.}}
{{History||xbox=none|xbone=none|ps=1.90|wiiu=none|switch=none|[[File:Cocoa Beans JE4 BE3.png|32px]] The texture of cocoa beans has been changed once again.
|[[File:Cocoa Age 0 (S) JE5.png|32px]] [[File:Cocoa Age 1 (S) JE5.png|32px]] [[File:Cocoa Age 2 (S) JE5.png|32px]]{{verify|Were these the models used?}} The textures of cocoa have been changed.}}
{{History|new 3ds}}
{{History||0.1.0|[[File:Cocoa Beans JE3 BE2.png|32px]] Added cocoa beans.
|[[File:Cocoa Age 0 (S) JE3.png|32px]] [[File:Cocoa Age 1 (S) JE3.png|32px]] [[File:Cocoa Age 2 (S) JE3.png|32px]]{{verify|Were these the models used?}} Added cocoa.}}
{{History|foot}}
=== Cocoa "item" ===
{{:Technical blocks/Cocoa}}
== Issues ==
{{issue list|Cocoa Beans|Cocoa Pod}}
== Trivia ==
*Cocoa pods have a different hitbox for each size; however, the top is always 0.25 blocks below the top of the [[log]] it is on.
*If a cocoa pod grows while the player is standing next to it, the player is forced into the appropriate form of [[suffocation prevention]] depending on available space.
*{{IN|be}}, the pixels on top of the fully grown pod are 8/7 the size of those on the side.<ref>{{bug|MC-109055||Fixed}}</ref><ref>{{bug|MCPE-152862}}</ref>
== Gallery ==
<gallery>
CocoaReveal.png|The first screenshot of cocoa pods tweeted by [[Jens Bergensten]], which revealed the plants.
CocoaPlant.png|A screenshot tweeted by Jens Bergensten, showing the pod.
Cocoa Plants in a Jungle Biome (12w19a).png|Naturally generated cocoa pods.
CPlantsJWood.png|A cocoa pod farm.
Cocoa2.jpg|A cocoa farm.
Cocoa beans phases.png|Three growing phases of the cocoa pod.
AreaOptimizedBeanPods.gif|A log and pod layout for optimizing an example area of 14×14 (including walls).
File:CocoaBean15.png|Cocoa beans with values greater than 12 appeared this way
</gallery>
==Literature==
===References===
{{reflist}}
===External Links===
*[https://www.minecraft.net/en-us/article/taking-inventory--cocoa-beans Taking Inventory: Cocoa Beans] – Minecraft.net on December 5, 2019
{{Items}}
{{Blocks|vegetation}}
[[Category:Dyes]]
[[Category:Food]]
[[Category:Plants]]
[[Category:Renewable resources]]
[[Category:Non-solid blocks]]
[[Category:Natural blocks]]
[[cs:Kakaové boby]]
[[de:Kakaobohnen]]
[[es:Semillas de cacao]]
[[fr:Fèves de cacao]]
[[hu:Kakaóbab]]
[[ja:カカオ豆]]
[[ko:코코아 콩]]
[[nl:Cacaobonen]]
[[pl:Ziarna kakaowe]]
[[pt:Sementes de cacau]]
[[ru:Какао-бобы]]
[[uk:Какао-боби]]
[[zh:可可豆]]</li></ul> | alpha 0.17.0.1 | Added lingering potions. | |||
| Bedrock Edition | |||||
1.2.0{{Extension DPL}}<ul><li>[[Bottle o' Enchanting|Bottle o' Enchanting]]<br/>{{ItemEntity
|image=Bottle o' Enchanting.gif
|imagesize=160px
|invimage=Bottle o' Enchanting
|stackable=Yes (64)
|renewable=Yes
|size=Height: 0.25 Blocks<br>Width: 0.25 Blocks
|rarity=Uncommon
|networkid='''[[JE]]''': 75
}}
A '''bottle o' enchanting''' is a throwable item that releases [[experience]] orbs on impact.
== Obtaining ==
=== Trading ===
Master-level cleric [[villager]]s sell bottles o' enchanting for 3 emeralds as part of their trade.
=== Natural generation ===
{{LootChestItem|bottle-o'-enchanting}}
== Usage ==
A bottle o' enchanting can be thrown by pressing {{control|use}}. On impact, it drops [[experience]] orbs worth {{xp|3|11}} (average 7.0) and sends out blue particles.
== Sounds ==
{{Edition|Java}}:<br>
Bottles o' enchanting use the Friendly Creatures sound category for entity-dependent sound events.
{{Sound table
|sound=Glass dig1.ogg
|sound2=Glass dig2.ogg
|sound3=Glass dig3.ogg
|subtitle=Bottle smashes
|source=neutral
|description=When a bottle o' enchanting impacts something
|id=entity.splash_potion.break
|translationkey=subtitles.entity.potion.splash
|volume=1.0
|pitch=0.9-1.0
|distance=16}}
{{Sound table
|rowspan=2
|sound=Bow shoot.ogg
|subtitle=Bottle thrown
|source=neutral
|description=When a bottle o' enchanting is thrown by a player
|id=entity.experience_bottle.throw
|translationkey=subtitles.entity.potion.throw
|volume=0.5
|pitch={{frac|1|3}}-0.5
|distance=16}}
{{Sound table
|subtitle=Dispensed item
|source=block
|description=When a bottle o' enchanting is dispensed from a [[dispenser]]
|id=block.dispenser.launch
|translationkey=subtitles.block.dispenser.dispense
|volume=1.0
|pitch=1.2
|distance=16
|foot=1}}
{{Edition|Bedrock}}:
{{Sound table
|type=bedrock
|sound=Glass dig1.ogg
|sound2=Glass dig2.ogg
|sound3=Glass dig3.ogg
|source=block
|description=When a splash potion impacts something
|id=random.glass
|volume=1.0
|pitch=1.0}}
{{Sound table
|rowspan=2
|sound=Bow shoot.ogg
|source=player
|description=When a splash potion is thrown by a player
|id=random.bow
|volume=0.5
|pitch=0.33-0.5}}
{{Sound table
|source=player
|description=When a splash potion is dispensed from a dispenser
|id=random.bow
|volume=1.0
|pitch=0.83-1.25
|foot=1}}
== Data values ==
=== ID ===
{{edition|java}}:
{{ID table
|edition=java
|firstcolumnname=Item
|showforms=y
|generatetranslationkeys=y
|displayname=Bottle o' Enchanting
|spritetype=item
|nameid=experience_bottle
|form=item
|foot=1}}
{{ID table
|edition=java
|firstcolumnname=Entity
|generatetranslationkeys=y
|displayname=Thrown Bottle o' Enchanting
|spritetype=entity
|spritename=Bottle o' Enchanting
|nameid=experience_bottle
|foot=1}}
{{edition|bedrock}}:
{{ID table
|edition=bedrock
|firstcolumnname=Item
|shownumericids=y
|showforms=y
|notshowbeitemforms=y
|generatetranslationkeys=y
|displayname=Bottle o' Enchanting
|spritetype=item
|nameid=experience_bottle
|id=508
|form=item
|foot=1}}
{{ID table
|edition=bedrock
|firstcolumnname=Entity
|shownumericids=y
|generatetranslationkeys=y
|displayname=Bottle o' Enchanting
|spritetype=entity
|nameid=xp_bottle
|id=68
|foot=1}}
=== Entity data ===
{{see also|Chunk format}}
Thrown bottles o' enchanting have entity data that define various properties of the entity.
{{/ED}}
== History ==
<!--When were dispensers made able to fire these? Or was this always a thing?-->
{{History|java}}
{{History||1.2.1|snap=12w04a|[[File:Bottle o' Enchanting JE1 BE1.png|32px]] Added bottles o' enchanting.
|Bottles o' enchanting can currently be obtained only in [[creative]] mode.}}
{{History||1.3.1|snap=12w21a|With the implementation of the [[trading]] system, the [[player]] can now trade with priest [[villager]]s to obtain 2–4 bottles o' enchanting for 1 [[emerald]].}}
{{History||1.8|snap=14w02a|With the trading revamp, villagers no longer [[trading|sell]] bottles o' enchanting, making them again unobtainable in regular [[survival]].}}
{{History|||snap=14w31a|Cleric [[villager]]s now sell bottles o' enchanting for 3–11 [[emerald]]s each, making them [[renewable resource|renewable]] again.}}
{{History||1.9|snap=15w49a|Bottles o' enchanting, like all projectiles, now take thrower's motion into account.}}
{{History||1.11|snap=16w32a|The entity ID has now been changed from <code>ThrownExpBottle</code> to <code>xp_bottle</code>.}}
{{History||1.13|snap=17w47a|Prior to [[1.13/Flattening|''The Flattening'']], this [[item]]'s numeral ID was 384.}}
{{History|||snap=18w11a|Bottles o' enchanting can now generate in [[shipwreck]] chests.}}
{{History|||snap=pre5|The entity ID has now been changed to <code>experience_bottle</code>.}}
{{History||1.14|snap=18w43a|[[File:Bottle o' Enchanting JE2 BE2.png|32px]] The texture of bottles o' enchanting has now been changed.}}
{{History|||snap=18w47a|Bottles o' enchanting can now generate in [[pillager outpost]] chests.}}
{{History||1.19|snap=22w13a|Bottles o' enchanting may now be found in [[ancient city]] [[chest]]s.}}
{{History|pocket alpha}}
{{History||v0.12.1|snap=build 1|[[File:Bottle o' Enchanting JE1 BE1.png|32px]] Added bottles o' enchanting.
|Due to the lack of [[trading]], bottles o' enchanting are currently available only in [[creative]] mode, similar to [[Java Edition 12w04a|12w04a]] when it was first released.}}
{{History|pocket}}
{{History||1.0.4|snap=alpha 1.0.4.0|With [[villager]] [[trading]] added, it is now possible to obtain bottles o' enchanting legitimately.}}
{{History||1.1.0|snap=alpha 1.1.0.0|The entity ID has now been changed from <code>potion.experience</code> to <code>xp_bottle</code>.}}
{{History|bedrock}}
{{History||1.4.0|snap=beta 1.2.14.2|Bottles o' enchanting can now be found inside [[shipwreck]] and [[buried treasure]] [[chest]]s.}}
{{History||1.10.0|snap=beta 1.10.0.3|Bottles o' enchanting can now be found in [[pillager outpost]] chests.
|[[File:Bottle o' Enchanting JE2 BE2.png|32px]] The texture of bottles o' enchanting has now been changed.}}
{{History||1.11.0|snap=beta 1.11.0.4|[[Trading]] has now been changed and bottles o' enchanting are now [[trading|sold]] by cleric [[villager]]s for 3 [[emerald]]s.}}
{{History|console}}
{{History||xbox=TU7|xbone=CU1|ps=1.0|wiiu=Patch 1|[[File:Bottle o' Enchanting JE1 BE1.png|32px]] Added bottles o' enchanting.
|Bottle o' enchanting can be found in the Miscellaneous tab in the [[Creative inventory]].}}
{{History||xbox=TU12|Moved bottle o' enchanting to the Brewing tab in the Creative inventory.}}
{{History|PS4}}
{{History||1.90|[[File:Bottle o' Enchanting JE2 BE2.png|32px]] The texture of bottles o' enchanting has now been changed.}}
{{History|3ds}}
{{History||0.1.0|[[File:Bottle o' Enchanting JE1 BE1.png|32px]] Added bottles o' enchanting.
|Bottles o' enchanting are not available within the [[Creative inventory]].}}
{{History||?|Added bottles o' enchanting to the Creative inventory.{{info needed|Which update did this occur?}}}}
{{History|foot}}
== Issues ==
{{issue list|Bottle o' Enchanting|Experience Bottle}}
== Gallery ==
<gallery>
Bottle O' Enchanting Splash.gif|Bottle o' enchanting splash animation on impact.
Bottle O' Enchanting villager.png|Players may trade with villagers to obtain bottles o' enchanting in survival mode.
</gallery>
{{Items}}
{{Entities}}
[[cs:Lektvar očarování]]
[[de:Erfahrungsfläschchen]]
[[es:Frasco con experiencia]]
[[fr:Fiole d'expérience]]
[[ja:エンチャントの瓶]]
[[ko:경험치 병]]
[[pl:Zaklęta butelka]]
[[pt:Frasco de experiência]]
[[ru:Зелье опыта]]
[[th:ขวดแห่งเวทมนตร์]]
[[zh:附魔之瓶]]</li><li>[[Pottery Sherd|Pottery Sherd]]<br/>{{Item
| image=Angler Pottery Sherd.png
| extratext = View [[#Items|all items]]
| renewable = No
| stackable = Yes (64)
}}
<!-- IT IS SHERD, NOT SHARD! DO NOT CHANGE TO SHARD, AS IT IS NAMED SHERD IN-GAME! -->
'''Pottery sherds'''<ref group="note">The word "[[wiktionary:sherd#English|sherd]]" or "[[wiktionary:potsherd#English|potsherd]]" is used by archaeologists to refer to fragments of pottery or other ceramics in order to differentiate them from "shards" of glass, metal, minerals and other materials.
</ref> are a set of twenty [[item]]s used to craft [[decorated pot]]s with ornamental designs. They can be obtained only by [[brush]]ing [[suspicious block]]s, with the variants of sherd obtainable being dependent on the structure.
== Obtaining ==
=== Breaking ===
When a [[decorated pot]] is broken with a [[pickaxe]], [[axe]], [[shovel]], [[hoe]] or [[sword]] that is ''not'' enchanted with [[Silk Touch]], it drops all of the pottery sherds and [[brick]]s used to craft it.
=== Suspicious block loot ===
Pottery sherds can be found as [[suspicious block]] loot in [[trail ruins]], [[ocean ruins]], [[desert pyramids]] and [[desert well]]s, and can be extracted from these blocks using a [[brush]].
{{#invoke:LootChest|base3|angler-pottery-sherd,archer-pottery-sherd,arms-up-pottery-sherd,blade-pottery-sherd,brewer-pottery-sherd,burn-pottery-sherd,danger-pottery-sherd,explorer-pottery-sherd,friend-pottery-sherd,heart-pottery-sherd,heartbreak-pottery-sherd,howl-pottery-sherd,miner-pottery-sherd,mourner-pottery-sherd,plenty-pottery-sherd,prize-pottery-sherd,sheaf-pottery-sherd,shelter-pottery-sherd,skull-pottery-sherd,snort-pottery-sherd}}
== Usage ==
=== Crafting ingredient ===
{{Crafting
|ingredients=Any Pottery Sherd or [[Brick]]
|B1= Any Pottery Sherd
|A2= Any Pottery Sherd |C2= Any Pottery Sherd
|B3= Any Pottery Sherd
|Output= Decorated Pot
|type= Decoration block
}}
== Data values ==
=== ID ===
{{edition|java}}:
{{ID table
|edition=java
|showforms=y
|generatetranslationkeys=y
|displayname=Angler Pottery Sherd
|spritetype=item
|nameid=angler_pottery_sherd
|form=item}}
{{ID table
|displayname=Archer Pottery Sherd
|spritetype=item
|nameid=archer_pottery_sherd
|form=item}}
{{ID table
|displayname=Arms Up Pottery Sherd
|spritetype=item
|nameid=arms_up_pottery_sherd
|form=item}}
{{ID table
|displayname=Blade Pottery Sherd
|spritetype=item
|nameid=blade_pottery_sherd
|form=item}}
{{ID table
|displayname=Brewer Pottery Sherd
|spritetype=item
|nameid=brewer_pottery_sherd
|form=item}}
{{ID table
|displayname=Burn Pottery Sherd
|spritetype=item
|nameid=burn_pottery_sherd
|form=item}}
{{ID table
|displayname=Danger Pottery Sherd
|spritetype=item
|nameid=danger_pottery_sherd
|form=item}}
{{ID table
|displayname=Explorer Pottery Sherd
|spritetype=item
|nameid=explorer_pottery_sherd
|form=item}}
{{ID table
|displayname=Friend Pottery Sherd
|spritetype=item
|nameid=friend_pottery_sherd
|form=item}}
{{ID table
|displayname=Heart Pottery Sherd
|spritetype=item
|nameid=heart_pottery_sherd
|form=item}}
{{ID table
|displayname=Heartbreak Pottery Sherd
|spritetype=item
|nameid=heartbreak_pottery_sherd
|form=item}}
{{ID table
|displayname=Howl Pottery Sherd
|spritetype=item
|nameid=howl_pottery_sherd
|form=item}}
{{ID table
|displayname=Miner Pottery Sherd
|spritetype=item
|nameid=miner_pottery_sherd
|form=item}}
{{ID table
|displayname=Mourner Pottery Sherd
|spritetype=item
|nameid=mourner_pottery_sherd
|form=item}}
{{ID table
|displayname=Plenty Pottery Sherd
|spritetype=item
|nameid=plenty_pottery_sherd
|form=item}}
{{ID table
|displayname=Prize Pottery Sherd
|spritetype=item
|nameid=prize_pottery_sherd
|form=item}}
{{ID table
|displayname=Sheaf Pottery Sherd
|spritetype=item
|nameid=sheaf_pottery_sherd
|form=item}}
{{ID table
|displayname=Shelter Pottery Sherd
|spritetype=item
|nameid=shelter_pottery_sherd
|form=item}}
{{ID table
|displayname=Skull Pottery Sherd
|spritetype=item
|nameid=skull_pottery_sherd
|form=item}}
{{ID table
|displayname=Snort Pottery Sherd
|spritetype=item
|nameid=snort_pottery_sherd
|form=item
|foot=1}}
{{edition|bedrock}}:
{{ID table
|edition=bedrock
|shownumericids=y
|showforms=y
|notshowbeitemforms=y
|generatetranslationkeys=y
|displayname=Angler Pottery Sherd
|spritetype=item
|nameid=angler_pottery_sherd
|id=664
|form=item}}
{{ID table
|displayname=Archer Pottery Sherd
|spritetype=item
|nameid=archer_pottery_sherd
|id=665
|form=item}}
{{ID table
|displayname=Arms Up Pottery Sherd
|spritetype=item
|nameid=arms_up_pottery_sherd
|id=666
|form=item}}
{{ID table
|displayname=Blade Pottery Sherd
|spritetype=item
|nameid=blade_pottery_sherd
|id=667
|form=item}}
{{ID table
|displayname=Brewer Pottery Sherd
|spritetype=item
|nameid=brewer_pottery_sherd
|id=668
|form=item}}
{{ID table
|displayname=Burn Pottery Sherd
|spritetype=item
|nameid=burn_pottery_sherd
|id=669
|form=item}}
{{ID table
|displayname=Danger Pottery Sherd
|spritetype=item
|nameid=danger_pottery_sherd
|id=670
|form=item}}
{{ID table
|displayname=Explorer Pottery Sherd
|spritetype=item
|nameid=explorer_pottery_sherd
|id=671
|form=item}}
{{ID table
|displayname=Friend Pottery Sherd
|spritetype=item
|nameid=friend_pottery_sherd
|id=672
|form=item}}
{{ID table
|displayname=Heart Pottery Sherd
|spritetype=item
|nameid=heart_pottery_sherd
|id=673
|form=item}}
{{ID table
|displayname=Heartbreak Pottery Sherd
|spritetype=item
|nameid=heartbreak_pottery_sherd
|id=674
|form=item}}
{{ID table
|displayname=Howl Pottery Sherd
|spritetype=item
|nameid=howl_pottery_sherd
|id=675
|form=item}}
{{ID table
|displayname=Miner Pottery Sherd
|spritetype=item
|nameid=miner_pottery_sherd
|id=676
|form=item}}
{{ID table
|displayname=Mourner Pottery Sherd
|spritetype=item
|nameid=mourner_pottery_sherd
|id=677
|form=item}}
{{ID table
|displayname=Plenty Pottery Sherd
|spritetype=item
|nameid=plenty_pottery_sherd
|id=678
|form=item}}
{{ID table
|displayname=Prize Pottery Sherd
|spritetype=item
|nameid=prize_pottery_sherd
|id=679
|form=item}}
{{ID table
|displayname=Sheaf Pottery Sherd
|spritetype=item
|nameid=sheaf_pottery_sherd
|id=680
|form=item}}
{{ID table
|displayname=Shelter Pottery Sherd
|spritetype=item
|nameid=shelter_pottery_sherd
|id=681
|form=item}}
{{ID table
|displayname=Skull Pottery Sherd
|spritetype=item
|nameid=skull_pottery_sherd
|id=682
|form=item}}
{{ID table
|displayname=Snort Pottery Sherd
|spritetype=item
|nameid=snort_pottery_sherd
|id=683
|form=item
|foot=1}}
== Achievements ==
{{Load achievements|Careful restoration}}
== Advancements ==
{{Load advancements|Respecting the Remnants;Careful Restoration}}
== History ==
{{History||October 3, 2020|[[File:Blue Ceramic Shard.png|32px]][[File:Orange Ceramic Shard.png|32px]][[File:Ceramic Shard 1.png|32px]][[File:Ceramic Shard 2.png|32px]][[File:Ceramic Shard 3.png|32px]][[File:Ceramic Shard 4.png|32px]] Ceramic shards were announced at [[Minecraft Live 2020]].|link=https://youtu.be/DBvZ2Iqmm3M?t=2216}}
{{History||February 10, 2023|[[Sofia Dankis]] posted an article about upcoming archaeology features, including pottery shards.|link=https://www.minecraft.net/en-us/article/archeology-coming-minecraft-120}}
{{History|java}}
{{History||1.20<br>(Experimental)|link=1.19.4|snap=23w07a|[[File:Archer Pottery Sherd JE1.png|32px]] [[File:Arms Up Pottery Sherd JE1 BE2.png|32px]] [[File:Prize Pottery Sherd JE1 BE2.png|32px]] [[File:Skull Pottery Sherd JE1 BE2.png|32px]] Added pottery shards behind the [[Java Edition 1.20|Update 1.20 experimental datapack]].}}
{{History|||snap=1.19.4 Pre-release 3|[[File:Archer Pottery Sherd JE2 BE2.png|32px]] Changed the texture of archer pottery shard.}}
{{History||1.20|snap=23w12a|Pottery shards are now out of the 1.20 experimental data pack.|[[File:Angler Pottery Sherd JE1 BE1.png|32px]] [[File:Blade Pottery Sherd JE1 BE1.png|32px]] [[File:Brewer Pottery Sherd JE1 BE1.png|32px]] [[File:Burn Pottery Sherd JE1 BE1.png|32px]] [[File:Danger Pottery Sherd JE1 BE1.png|32px]] [[File:Explorer Pottery Sherd JE1 BE1.png|32px]] [[File:Friend Pottery Sherd JE1 BE1.png|32px]] [[File:Heart Pottery Sherd JE1 BE1.png|32px]] [[File:Heartbreak Pottery Sherd JE1 BE1.png|32px]] [[File:Howl Pottery Sherd JE1 BE1.png|32px]] [[File:Miner Pottery Sherd JE1 BE1.png|32px]] [[File:Mourner Pottery Sherd JE1 BE1.png|32px]] [[File:Plenty Pottery Sherd JE1 BE1.png|32px]] [[File:Sheaf Pottery Sherd JE1 BE1.png|32px]] [[File:Shelter Pottery Sherd JE1 BE1.png|32px]] [[File:Snort Pottery Sherd JE1 BE1.png|32px]] Added another sixteen pottery shards.
|The probability for the archer, prize, and skull pottery shards to generate in the [[suspicious sand]] in [[desert temple]] and in [[desert well]] has been changed from 1/7 to 1/8, for the arms up pottery sherd to generate in the suspicious sand in [[desert well]] has been changed from 3/7 to 1/4.}}
{{History|||snap=23w16a|Renamed "Pottery Shard" to "Pottery Sherd".|Burn, danger, friend, heart, heartbreak, howl and sheaf pottery sherds no longer generates in [[suspicious sand]] in [[trail ruins]].|Due to the split of the archaeological loot tables for the suspicious gravel within the [[trail ruins]]; burn, danger, friend, heart, heartbreak, howl and sheaf pottery sherds now are in the rare loot.}}
{{History|||snap=23w17a|The probability of the burn, danger, friend, heart, heartbreak, howl, and sheaf pottery sherds to generate in [[suspicious gravel]] in [[trail ruins]] has been changed from 1/11 to 1/12.{{verify}}|The player now gets the [[advancement]] "Respecting the remnants" when they brush a [[suspicious sand]] or a [[suspicious gravel]] to obtain a pottery sherd, "Careful restoration" when they craft a decorated pot using 4 pottery sherds.}}
{{History|bedrock}}
{{History||Next Major Update<br>(Experimental)|link=Bedrock Edition 1.19.70|snap=beta 1.19.70.23|[[File:Archer Pottery Sherd BE1.png|32px]] [[File:Arms Up Pottery Sherd BE1.png|32px]] [[File:Prize Pottery Sherd BE1.png|32px]] [[File:Skull Pottery Sherd BE1.png|32px]] Added pottery shards behind the "[[Bedrock Edition 1.20.0|Next Major Update]]" [[experimental]] toggle.}}
{{History|||snap=beta 1.19.80.20|[[File:Archer Pottery Sherd JE2 BE2.png|32px]] Changed the texture of archer pottery shard.}}
{{h|||snap=beta 1.19.80.22|[[File:Angler Pottery Sherd JE1 BE1.png|32px]] [[File:Blade Pottery Sherd JE1 BE1.png|32px]] [[File:Brewer Pottery Sherd JE1 BE1.png|32px]] [[File:Burn Pottery Sherd JE1 BE1.png|32px]] [[File:Danger Pottery Sherd JE1 BE1.png|32px]] [[File:Explorer Pottery Sherd JE1 BE1.png|32px]] [[File:Friend Pottery Sherd JE1 BE1.png|32px]] [[File:Heart Pottery Sherd JE1 BE1.png|32px]] [[File:Heartbreak Pottery Sherd JE1 BE1.png|32px]] [[File:Howl Pottery Sherd JE1 BE1.png|32px]] [[File:Miner Pottery Sherd JE1 BE1.png|32px]] [[File:Mourner Pottery Sherd JE1 BE1.png|32px]] [[File:Plenty Pottery Sherd JE1 BE1.png|32px]] [[File:Sheaf Pottery Sherd JE1 BE1.png|32px]] [[File:Shelter Pottery Sherd JE1 BE1.png|32px]] [[File:Snort Pottery Sherd JE1 BE1.png|32px]] Added another sixteen pottery shards.
|[[File:Arms Up Pottery Sherd JE1 BE2.png|32px]] [[File:Prize Pottery Sherd JE1 BE2.png|32px]] [[File:Skull Pottery Sherd JE1 BE2.png|32px]] Changed the texture of arms up, prize and skull pottery shards.<ref>{{bug|MCPE-167202}}</ref>}}
{{History||Next Major Update<br>(Experimental)|link=Bedrock Edition 1.20.0|snap=beta 1.20.0.20|Miner pottery shard can generate in desert pyramids.}}
{{History||1.20.0|snap=beta 1.20.0.21|Pottery shards are now available without using the "Next Major Update" experimental toggle.}}
{{History|||snap=beta 1.20.0.22|Renamed "Pottery Shard" to "Pottery Sherd".}}
{{History|foot}}
== Issues ==
{{issue list}}
== Trivia ==
* Many pottery sherds are based on another in-game mob or item:
** The angler pottery sherd depicts a [[fishing rod]].
** The archer pottery sherd depicts a [[bow]] and [[arrow]].
** The blade pottery sherd depicts a [[sword]].
** The brewer pottery sherd depicts a [[potion]].
** The burn pottery sherd depicts [[fire]].
** The danger pottery sherd depicts a [[creeper]].
** The explorer pottery sherd depicts a [[map]].
** The friend pottery sherd depicts the unibrow and nose of a [[villager]] or [[iron golem]].
** The howl pottery sherd depicts a [[wolf]].
** The miner pottery sherd depicts a [[pickaxe]].
** The mourner pottery sherd depicts an early design for the [[warden]].
** The plenty pottery sherd depicts a [[chest]].
** The sheaf pottery sherd depicts [[wheat]].
** The skull pottery sherd depicts a [[skeleton]].
** The snort pottery sherd depicts a [[sniffer]].
**The prize pottery sherd depicts a diamond cut [[diamond]]
***It could depict a [[MCE:Ruby|ruby]] from ''Minecraft Earth'', as well.
**The arms up pottery sherd depicts a [[character]] with their arms up.
**The heart and heartbreak pottery sherds depict a [[Health|heart]] and broken heart respectively.
**The shelter pottery sherd depicts a [[tree]].
==Gallery==
=== Items ===
<gallery>
Angler Pottery Sherd.png|Angler Pottery Sherd
Archer Pottery Sherd.png|Archer Pottery Sherd
Arms Up Pottery Sherd.png|Arms Up Pottery Sherd
Blade Pottery Sherd.png|Blade Pottery Sherd
Brewer Pottery Sherd.png|Brewer Pottery Sherd
Burn Pottery Sherd.png|Burn Pottery Sherd
Danger Pottery Sherd.png|Danger Pottery Sherd
Explorer Pottery Sherd.png|Explorer Pottery Sherd
Friend Pottery Sherd.png|Friend Pottery Sherd
Heart Pottery Sherd.png|Heart Pottery Sherd
Heartbreak Pottery Sherd.png|Heartbreak Pottery Sherd
Howl Pottery Sherd.png|Howl Pottery Sherd
Miner Pottery Sherd.png|Miner Pottery Sherd
Mourner Pottery Sherd.png|Mourner Pottery Sherd
Plenty Pottery Sherd.png|Plenty Pottery Sherd
Prize Pottery Sherd.png|Prize Pottery Sherd
Sheaf Pottery Sherd.png|Sheaf Pottery Sherd
Shelter Pottery Sherd.png|Shelter Pottery Sherd
Skull Pottery Sherd.png|Skull Pottery Sherd
Snort Pottery Sherd.png|Snort Pottery Sherd
</gallery>
=== Development images ===
<gallery>
JE 1.17 Development Archeology.jpg|Blue ceramic shard.
JE 1.17 Development Archeology 2.jpg|Ceramic shards.
</gallery>
=== Official artwork ===
<gallery>
Pottery Sherd Pixel Art.png|Pixel artwork of [[Ari]] holding a skull pottery sherd.
File:T&T Thumbnail.jpg|Ari holding up a different sherd.
</gallery>
== References ==
<references />
== Notes ==
<references group="note"/>
{{Items}}
[[Category:Non-renewable resources]]
[[de:Töpferscherbe]]
[[es:Fragmento de cerámica]]
[[fr:Tesson de poterie]]
[[ja:壺の欠片]]
[[pt:Óstraco]]
[[zh:陶片]]</li></ul> | beta 1.2.0.2 | Blaze powder is now required as fuel for brewing. | |||
1.4.0{{Extension DPL}}<ul><li>[[Raw Rabbit|Raw Rabbit]]<br/>{{for|the cooked version|Cooked Rabbit}}
{{Item
| title = Raw Rabbit
| image = Raw Rabbit.png
| heals = {{hunger|3}}
| renewable = Yes
| stackable = Yes (64)
}}
'''Raw rabbit''' is a food item that can be eaten by the [[player]], or cooked in a [[furnace]] or a [[campfire]] to make [[cooked rabbit]].
== Obtaining ==
=== Mob loot ===
{{IN|Bedrock}}, adult [[rabbit]]s drop 0-1 raw rabbit when killed. The maximum amount is increased by 1 per level of [[Looting]], for a maximum of 0-4 with [[Looting]] III. If killed while on [[fire]], they drop [[cooked rabbit]] instead.
{{IN|Java}}, adult [[rabbit]]s drop 1 raw rabbit when killed. The maximum amount is increased by 1 per level of [[Looting]], for a maximum of 1-4 with [[Looting]] III. If killed while on [[fire]], they drop [[cooked rabbit]] instead.
== Usage ==
To eat raw rabbit, press and hold {{control|use}} while it is selected in the hotbar. Eating one restores {{hunger|3}} [[hunger]] and 1.8 [[Hunger#Mechanics|saturation]].
=== Smelting ingredient ===
{{Smelting
|showname=1
|Raw Rabbit
|Cooked Rabbit
|0.35
}}
=== Wolves ===
Raw rabbit can be used to [[breed]] and heal tamed [[wolves]], lead them around, and make baby tamed [[Wolf|wolves]] grow up faster by 10% of the remaining time.
=== Trading ===
Novice-level Butcher [[villager|villagers]] have a {{frac|1|3}} chance to buy 4 raw rabbit for an [[emerald]] as their trades.{{only|bedrock}}
Novice-level Butcher villagers have 40% chance of offering to buy 4 raw rabbit for an emerald.{{only|java}}
==Sounds==
{{Sound table/Entity/Food}}
== Data values ==
=== ID ===
{{edition|java}}:
{{ID table
|edition=java
|showforms=y
|generatetranslationkeys=y
|displayname=Raw Rabbit
|spritetype=item
|nameid=rabbit
|form=item
|foot=1}}
{{edition|bedrock}}:
{{ID table
|edition=bedrock
|shownumericids=y
|showforms=y
|notshowbeitemforms=y
|generatetranslationkeys=y
|displayname=Raw Rabbit
|spritetype=item
|nameid=rabbit
|id=288
|form=item
|foot=1}}
== Achievements ==
{{load achievements|Rabbit Season}}
== Advancements ==
{{load advancements|Husbandry;A Balanced Diet}}
== History ==
{{History|java}}
{{History||1.8|snap=June 30, 2014|slink=https://twitter.com/TheMogMiner/status/483636993780232192|[[Ryan Holtz]] tweeted images of raw rabbits and some other new [[item]]s.}}
{{History|||snap=14w27a|[[File:Raw Rabbit JE1.png|32px]] Added raw rabbit.}}
{{History|||snap=14w33b|[[File:Raw Rabbit JE2 BE1.png|32px]] The texture of raw rabbit has been changed. The new texture was created by [[wikipedia:Reddit|Reddit]] user [http://www.reddit.com/u/zeldahuman zeldahuman].<ref>{{reddit|2bjzes/a_reminder_of_the_blocks_and_items_added_in_18_so|cj69zie|context=3}}</ref><ref>{{reddit|2c5f35/minecraft_snapshot_14w31a_has_been_released|cjct7gb}}</ref>}}
{{History||1.13|snap=17w47a|Prior to [[1.13/Flattening|''The Flattening'']], this [[item]]'s numeral ID was 411.}}
{{History||1.14|snap=18w43a|[[File:Raw Rabbit JE3 BE2.png|32px]] The texture of raw rabbit has been changed.}}
{{History|||snap=19w11a|Butcher [[villager]]s now [[trading|buy]] raw rabbit.}}
{{History||1.19.3|snap=22w42a|Rabbits now always drop at least 1 raw rabbit when killed.<ref>{{bug|MC-96449|||Fixed}}</ref>}}
{{History|pocket alpha}}
{{History||v0.13.0|snap=build 1|[[File:Raw Rabbit JE2 BE1.png|32px]] Added raw rabbit.}}
{{History|bedrock}}
{{History||1.10.0|snap=beta 1.10.0.3|[[File:Raw Rabbit JE3 BE2.png|32px]] The texture of raw rabbit has been changed.}}
{{History||1.11.0|snap=beta 1.11.0.4|Raw rabbit can now be [[trading|sold]] to butcher [[villager]]s.}}
{{History|console}}
{{History||xbox=TU31|xbone=CU19|ps=1.22|wiiu=Patch 3|[[File:Raw Rabbit JE2 BE1.png|32px]] Added raw rabbit.}}
{{History|PS4}}
{{History||1.90|[[File:Raw Rabbit JE3 BE2.png|32px]] The texture of raw rabbit has been changed.}}
{{History|new 3ds}}
{{History||0.1.0|[[File:Raw Rabbit JE2 BE1.png|32px]] Added raw rabbit.}}
{{History|foot}}
== Issues ==
{{issue list}}
== Gallery ==
<gallery>
File:Rabbit Items 2 Ryan Holtz.png|First image of the item by [[Ryan Holtz]].
</gallery>
== References ==
{{reflist}}
{{items}}
[[de:Rohes Kaninchen]]
[[es:Conejo crudo]]
[[it:Coniglio crudo]]
[[fr:Lapin cru]]
[[ja:生の兎肉]]
[[ko:익히지 않은 토끼고기]]
[[nl:Rauw konijnenvlees]]
[[pl:Surowy królik]]
[[pt:Coelho cru]]
[[ru:Сырая крольчатина]]
[[zh:生兔肉]]
[[Category:Food]]
[[Category:Renewable resources]]</li><li>[[Lava Bucket|Lava Bucket]]<br/>{{Item
| title = Lava Bucket
| image = Lava Bucket.png
| renewable = Yes
| stackable = No
}}
A '''lava bucket''' is a [[bucket]] filled with [[lava]].
== Obtaining ==
=== Interacting ===
To fill an empty [[bucket]] with lava, {{control|use}} it on a [[lava]] source block or lava in a [[cauldron]]. The block is consumed in the process. Flowing lava does not fill a bucket.
If there is a lava source above the [[pointed dripstone]] stalactite, there is a {{frac|15|256}} (~5.9%) chance for it to completely fill an empty cauldron within 10 blocks under the tip with lava after a [[random tick]]. This lava can then be scooped with a bucket, making it a renewable resource.
==Usage==
A lava bucket can be used to place down lava sources with the {{key|Use Item}} button. Doing so gives the player the bucket back. Lava buckets can be used to replace some transparent, non-full blocks such as [[tall grass]] and [[water]], both flowing and sources.
{{IN|java}}, lava buckets can be used to break [[Nether Portal (block)|Nether portal blocks]] by placing the lava on the side of a block next to the portal block.
=== Smelting ===
A lava bucket can be used as an efficient [[fuel]]. It has the longest burning value of 1000 seconds, compared to 800 seconds for a [[coal block]] (a lava bucket smelts 100 items, and a coal block smelts 80). After smelting starts, the lava bucket turns into an empty bucket.
=== Trading ===
{{IN|bedrock}}, journeyman-level armorer villagers buy a lava bucket for one [[emerald]] as part of their trades.
{{IN|java}}, journeyman-level armorer villagers have a 40% chance of offering to buy a lava bucket for one emerald.
=== Cauldrons ===
A lava bucket can be used to fill a [[cauldron]] with lava. The lava damages any entity standing inside the cauldron, unless the entity is immune to fire damage.<!-- ex: nether mobs--> Flowing water or waterlogging does not affect the lava in the cauldron.
== Sounds ==
{{el|je}}:
{{Sound table
|sound=Fill lava bucket1.ogg
|sound2=Fill lava bucket2.ogg
|sound3=Fill lava bucket3.ogg
|subtitle=Bucket fills
|source=player
|description=When a bucket is filled with lava
|id=item.bucket.fill_lava
|translationkey=subtitles.item.bucket.fill
|volume=1.0
|pitch=1.0
|distance=16}}
{{Sound table
|sound=Empty lava bucket1.ogg
|sound2=Empty lava bucket2.ogg
|sound3=Empty lava bucket3.ogg
|subtitle=Bucket empties
|source=block
|description=When a lava bucket is emptied
|id=item.bucket.empty_lava
|translationkey=subtitles.item.bucket.empty
|volume=1.0
|pitch=1.0
|distance=16
|foot=1}}
{{el|be}}:
{{Sound table
|type=bedrock
|sound=Fill lava bucket1.ogg
|sound2=Fill lava bucket2.ogg
|sound3=Fill lava bucket3.ogg
|source=block
|description=When a bucket is filled with lava
|id=bucket.fill_lava
|volume=1.0
|pitch=1.0}}
{{Sound table
|sound=Empty lava bucket1.ogg
|sound2=Empty lava bucket2.ogg
|sound3=Empty lava bucket3.ogg
|source=block
|description=When a lava bucket is emptied
|id=bucket.empty_lava
|volume=1.0
|pitch=1.0
|foot=1}}
==Data values==
=== ID ===
{{edition|java}}:
{{ID table
|edition=java
|showforms=y
|generatetranslationkeys=y
|displayname=Lava Bucket
|spritetype=item
|nameid=lava_bucket
|form=item
|foot=1}}
{{edition|bedrock}}:
{{ID table
|edition=bedrock
|showaliasids=y
|shownumericids=y
|showforms=y
|notshowbeitemforms=y
|generatetranslationkeys=y
|displayname=Lava Bucket
|spritetype=item
|nameid=lava_bucket
|aliasid=bucket / 10
|id=363
|form=item
|translationkey=item.bucketLava.name
|foot=1}}
== Achievements ==
{{load achievements|Super Fuel}}
== Advancements ==
{{Load advancements|Hot Stuff}}
==History==
{{History|java infdev}}
{{History||20100615|[[File:Lava Bucket JE1 BE1.png|32px]] Added lava buckets.}}
{{History|java alpha}}
{{History||v1.1.0|Buckets of lava can now be used to fuel a [[furnace]] for 100 [[smelting|smelts]], consuming the [[lava]] and the [[bucket]]. This is the highest number of smelts of any single [[item]] in the game.}}
{{History||v1.2.6|{{control|use|text=Using}} a lava bucket on [[block]]s with GUIs ([[chest]]s, furnaces, etc.) no longer places the lava.}}
{{History|java}}
{{History||1.2.1|snap=1.2|Changed name from "Lava bucket" to "Lava Bucket".}}
{{History||1.3|snap=12w22a|[[Smelting]] in a [[furnace]] with a lava bucket now leaves an empty [[bucket]] for the [[player]] to retrieve.}}
{{History||1.8|snap=14w25a|A lava bucket is now shown as the icon when [[lava]] is used as a layer in [[Superflat]].}}
{{History||1.9|snap=15w50a|Added sounds for filling and pouring lava buckets.}}
{{History||1.13|snap=17w47a|Prior to the ''[[Flattening]]'' this item's numerical ID was 327.}}
{{History||1.14|snap=18w43a|[[File:Lava Bucket JE2 BE2.png|32px]] The texture of lava buckets has been changed.}}
{{History|||snap=19w11a|Armorer villagers can now [[trading|buy]] lava buckets.}}
{{History||1.17|snap=20w45a|Lava buckets can now be used to fill a [[cauldron]] with lava.}}
{{History|||snap=21w13a|The lava bucket is now fully renewable, as [[pointed dripstone]] can now be obtained in Survival mode without custom generation.}}
{{History|pocket alpha}}
{{History||v0.7.0|[[File:Lava Bucket JE1 BE1.png|32px]] Added lava buckets.}}
{{History||v0.7.4|Lava buckets can now be used as [[fuel]] in a [[furnace]].
|Lava buckets no longer stack to 64.}}
{{History|bedrock}}
{{History||1.4.0|snap=beta 1.2.14.2|Moved all bucket items, including lava buckets, from the Equipment tab to the Items tab in the [[Creative inventory]].{{verify|type=update}}{{info needed}}<!---please check snapshots, only 1 major release version was checked each--->}}
{{History||1.9.0|snap=beta 1.9.0.2|Lava bucket can now be used to fill a [[cauldron]].}}
{{History||1.10.0|snap=beta 1.10.0.3|[[File:Lava Bucket JE2 BE2.png|32px]] The texture of lava buckets has been changed.}}
{{History||1.11.0|snap=beta 1.11.0.4|Lava buckets can now be [[trading|sold]] to armorer [[villager]]s.}}
{{History||1.16.100|snap=beta 1.16.100.56|The ID of lava buckets has been changed from <code>bucket/10</code> to <code>lava_bucket</code>.}}
{{History||1.17.0|snap=beta 1.16.230.54|The lava bucket is now fully renewable, as [[pointed dripstone]] can now be obtained in Survival mode without custom generation.}}
{{History|console}}
{{History||xbox=TU1|xbone=CU1|ps=1.0|wiiu=Patch 1|switch=1.0.1|[[File:Lava Bucket JE1 BE1.png|32px]] Added lava buckets.}}
{{History||xbox=TU9|[[Dispenser]]s have now been given the ability to shoot out the [[liquids]] inside lava buckets. They can also suck up the liquids if activated again, but do not fill up the [[bucket]]s with the liquid dropped due to a bug.}}
{{History||xbox=none|xbone=none|ps=1.90|wiiu=none|switch=none|[[File:Lava Bucket JE2 BE2.png|32px]] The texture of lava buckets has been changed.}}
{{History|New Nintendo 3DS Edition}}
{{History||0.1.0|[[File:Lava Bucket JE1 BE1.png|32px]] Added lava buckets.}}
{{History|foot}}
== Issues ==
{{Issue list}}
==Trivia==
* One lava bucket has the highest number of [[smelting|smelts]] in the game at 100 items per bucket.
** This makes it 12.5 times more efficient than [[coal]] and [[charcoal]].
* A lava bucket is used as Steve's Down-Smash attack in the crossover fighting game Super Smash Bros. Ultimate.
{{Items}}
[[Category:Renewable resources]]
[[Category:Tools]]
[[de:Lavaeimer]]
[[ja:溶岩入りバケツ]]
[[pt:Balde de lava]]
[[th:ถังลาวา]]
[[uk:Відро лави]]
[[zh:熔岩桶]]</li></ul> | beta 1.2.20.1 | Added four new potions known as cures: antidote, elixir, eye drops, and tonic. | |||
1.5.0{{Extension DPL}}<ul><li>[[Medicine|Medicine]]<br/>{{Redirect|Elixir", "Antidote", "Eye Drops", and "Tonic|s=1|the brewable items|Potion}}
{{Education feature}}
{{Exclusive|bedrock|education}}
{{Item
| image = <gallery>
Antidote.png | Antidote
Elixir.png | Elixir
Eye Drops.png | Eye Drops
Tonic.png | Tonic
</gallery>
| renewable = Yes
| stackable = No
}}
A '''medicine''' is a type of [[potion]] that cures the specified [[effect]] instead of applying it.
== Obtaining ==
=== Brewing ===
Cures are brewed from awkward potions using different [[element]]s.{{only|bedrock|education}} These drinks remove the specified effect when drank, and cannot be modified into splash, lingering, extended or enhanced versions.
{| class="wikitable" style="text-align: center;" data-description="Remedies"
! Potion
! Reagent, base
! Effect
! Notes
|-
! {{Inventory slot|Antidote}}<br>Antidote
| {{Brewing Stand
|Input= Silver
|Output2= Awkward Potion
}}
| Cures [[Poison]]
| Silver detects poison {{w|Silver#Symbolic role|in folklore}}, and possesses anti-microbial properties.
|-
! {{Inventory slot|Elixir}}<br>Elixir
| {{Brewing Stand
|Input= Cobalt
|Output2= Awkward Potion
}}
| Cures [[Weakness]]
|
|-
! {{Inventory slot|Eye Drops}}<br>Eye Drops
| {{Brewing Stand
|Input= Calcium
|Output2= Awkward Potion
}}
| Cures [[Blindness]]
|
|-
! {{Inventory slot|Tonic}}<br>Tonic
| {{Brewing Stand
|Input= Bismuth
|Output2= Awkward Potion
}}
| Cures [[Nausea]]
| In real life, {{w|bismuth subsalicylate}} is used as a nausea treatment.
|}
== Usage ==
Each type of medicine has an associated effect that it can cure (see {{slink||Brewing}} for details). Players can drink the medicine only if they have the corresponding effect. Drinking the medicine eliminates the effect. Although medicine does not resemble [[potion]]s, the player still gets the [[glass bottle]] back.
== Sounds ==
{{Sound table
|type=bedrock
|sound=Drink.ogg
|source=player
|description=When a player drinks medicine
|id=random.drink
|foot=1}}
== Data values ==
=== ID ===
{{ID table
|edition=bedrock
|shownumericids=y
|showforms=y
|generatetranslationkeys=y
|displayname=Medicine
|spritetype=item
|nameid=medicine
|id=599
|form=item
|notshowbeitemforms=y
|translationkey=item.medicine.poison.name,item.medicine.weakness.name,item.medicine.blindness.name,item.medicine.nausea.name
|foot=1}}
== History ==
{{History|bedrock}}
{{History||1.4.0|snap=beta 1.2.20.1|[[File:Antidote BE1.png|32px]] [[File:Elixir BE1.png|32px]] [[File:Eye Drops BE1.png|32px]] [[File:Tonic BE1.png|32px]] Added medicines.}}
{{History|education}}
{{History||1.0.27|[[File:Antidote BE1.png|32px]] [[File:Elixir BE1.png|32px]] [[File:Eye Drops BE1.png|32px]] [[File:Tonic BE1.png|32px]] Added medicines.}}
{{History|foot}}
== Issues ==
{{issue list|Cures|Medicine}}
== See also ==
* [[Potion]]
* [[Splash Potion]]
* [[Lingering Potion]]
{{Items}}
{{Education Edition}}
[[Category:Non-renewable resources]]
[[Category:Education Edition items]]
[[de:Medizin]]
[[it:Medicinale]]
[[ja:治療薬]]
[[lzh:藥]]
[[pl:Leki]]
[[pt:Remédio]]
[[zh:药物]]</li><li>[[Horse Saddle|Horse Saddle]]<br/>{{About|the removed item|the current item|Saddle}}
{{outdated feature|edition=java}}
{{Item
| title = Horse Saddle
| image = Horse Saddle.png
| renewable = Yes
| stackable = Yes (32)
}}
'''Horse saddles''' were [[item]]s which allowed the player to ride [[horse]]s.
== Obtaining ==
=== Crafting ===
{{crafting |ignoreusage=1
|A1=Leather |B1=Leather |C1=Leather
|A2=Leather |B2=Iron Ingot |C2=Leather
|A3=Iron Ingot |C3=Iron Ingot
|Output=Horse Saddle
}}
== Usage ==
Horse saddles worked just like regular [[saddle]]s, but for [[horse]]s instead of [[pig]]s. Taming a horse was required before putting a horse saddle on it. Unlike any other items, horse saddles could be stacked up to 32.
== Sounds ==
''None''<ref>{{ytl|2a6BQeW6is4|t=330}}; sounds for horses were not added until [[13w22a]]</ref>
== Data values ==
=== ID ===
{{ID table
|nonameid=y
|shownumericids=y
|showforms=y
|generatetranslationkeys=java
|displayname=Horse Saddle
|spritetype=item
|id=416
|form=item
|translationkey=item.horsesaddle.name
|foot=y}}
== History ==
{{History|java}}
{{History||1.6.1|snap=13w16a|[[File:Horse Saddle JE1.png|32px]] Added horse saddles.}}
{{History|||snap=13w18a|Horse saddles have been removed.
|[[Horse]]s and [[zombie horse]]s can now be ridden using regular [[saddle]]s.}}
{{History|foot}}
== Issues ==
Horse saddles have been removed from the game, and as such are no longer supported.
{{Items}}
{{Removed Features}}
[[es:Montura de caballo]]
[[fr:Selle de cheval]]
[[it:Sella di cavallo]]
[[ja:ウマの鞍]]
[[ko:말 안장]]
[[pt:Sela para cavalo]]
[[zh:马鞍]]</li></ul> | beta 1.5.0.4 | Potion of the Turtle Master added. | |||
1.6.0{{Extension DPL}}<ul><li>[[Slimeball|Slimeball]]<br/>{{about|the item|the mob|Slime|the block constructed with slimeballs|Slime Block|other uses|Slime (disambiguation)}}
{{Item
| image = Slimeball.png
| renewable = Yes
| stackable = Yes (64)
}}
A '''slimeball''' is a [[crafting]] ingredient commonly dropped by [[slime]]s, and can be sneezed out by [[panda]]s.
== Obtaining ==
=== Mob loot ===
==== Slimes ====
{{see also|Tutorials/Slime farming}}
If a [[slime]]'s size is 1, it drops 0–2 slimeballs when killed. The maximum number of slimeballs is increased by 1 per level of [[Looting]], for a maximum of 5 slimeballs with Looting III.
==== Pandas ====
Baby [[panda]]s have a {{frac|1|700}} chance of [[drop]]ping one slimeball when sneezing.
=== Crafting ===
{{Crafting
|Slime Block
|Output= Slimeball,9
|type= Miscellaneous
}}
=== Trading ===
[[Wandering trader]]s sometimes offer to sell a slimeball for 4 [[emerald]]s.
== Usage ==
=== Crafting ingredient ===
{{crafting usage}}
=== Breeding ===
Slimeballs can be used to breed [[frog]]s and reduce the remaining growth duration of [[tadpole]]s by 10%. Both also follow a player holding a slimeball.
==Video==
{{Video note|This video is outdated, as slimeballs can now also be used to craft [[lead]]s and [[slime block]]s, breed [[frog]]s, and can now be obtained from baby [[panda]]s and [[wandering trader]]s.}}
{{yt|J6oR3fdbbjY}}
== Data values ==
===ID===
{{edition|java}}:
{{ID table
|edition=java
|showforms=y
|generatetranslationkeys=y
|displayname=Slimeball
|spritetype=item
|nameid=slime_ball
|form=item
|foot=1}}
{{edition|bedrock}}:
{{ID table
|edition=bedrock
|shownumericids=y
|showforms=y
|notshowbeitemforms=y
|generatetranslationkeys=y
|displayname=Slimeball
|spritetype=item
|nameid=slime_ball
|id=388
|form=item
|foot=1}}
==History==
{{History|java alpha}}
{{History||v1.0.11|[[File:Slimeball JE1 BE1.png|32px]] Added slimeballs, which are dropped from [[slime]]s. At the moment, they serve no purpose.}}
{{History|java beta}}
{{History||1.7|Slimeballs are now used to craft [[sticky piston]]s.}}
{{History|java}}
{{History||1.0.0|snap=Beta 1.9 Prerelease 2|Slimeballs are used to craft [[magma cream]].}}
{{History||1.6.1|snap=13w18a|[[Lead]]s, which were originally implemented in the [[13w16a]] snapshot, now have a [[crafting]] recipe that includes slimeballs.}}
{{History||1.8|snap=14w02a|Nine slimeballs are now used to [[crafting|craft]] a [[slime block]]. Slime blocks also act as storage [[block]]s, being able to craft back into 9 slimeballs.}}
{{History||1.13|snap=17w47a|Prior to [[1.13/Flattening|''The Flattening'']], this [[item]]'s numeral ID was 341.}}
{{History||1.14|snap=18w43a|[[File:Slimeball JE2 BE2.png|32px]] The texture of slimeballs has been changed.
|Slimeballs can now be obtained when a [[panda|baby panda]] sneezes.}}
{{History|||snap=19w05a|Slimeballs can now be bought from [[wandering trader]]s.}}
{{History||1.19|snap=22w11a|Slimeballs can now be used to breed [[frog]]s.}}
{{History|pocket alpha}}
{{History||v0.9.0|snap=build 1|[[File:Slimeball JE1 BE1.png|32px]] Added slimeballs. They are currently unobtainable and serve no purpose.}}
{{History||v0.12.1|snap=build 1|Added slimeballs to the [[creative]] [[inventory]].
|Slimeballs can now be obtained by killing [[slime]]s.
|Slimeballs are now used to craft [[magma cream]].}}
{{History||v0.14.0|snap=build 1|Slimeballs are now used to craft [[slime block]]s.}}
{{History||v0.15.0|snap=build 1|Slimeballs are now used to craft [[sticky piston]]s and [[lead]]s.}}
{{History|bedrock}}
{{History||1.8.0|snap=beta 1.8.0.8|Slimeballs can now be obtained when a [[panda|baby panda]] sneezes.}}
{{History||1.10.0|snap=beta 1.10.0.3|[[File:Slimeball JE2 BE2.png|32px]] The texture of slimeballs has been changed.
|Slimeballs can now be obtained via [[trading]] with [[wandering trader]]s.}}
{{History|console}}
{{History||xbox=TU1|xbone=CU1|ps=1.0|wiiu=Patch 1|switch=1.0.1|[[File:Slimeball JE1 BE1.png|32px]] Added slimeballs.}}
{{History||xbox=TU3|Slimeballs are now used to craft [[sticky piston]]s.}}
{{History||xbox=TU5|Slimeballs are found in the Miscellaneous tab in the [[Creative inventory]].}}
{{History||xbox=TU9|Moved slimeballs to the Materials tab in the Creative inventory.}}
{{History||xbox=none|xbone=none|ps=1.83|wiiu=none|switch=none|Slimeballs can now be obtained when a [[panda|baby panda]] sneezes.}}
{{History||xbox=none|xbone=none|ps=1.90|wiiu=none|switch=none|[[File:Slimeball JE2 BE2.png|32px]] The texture of slimeballs has been changed.}}
{{History|New 3DS}}
{{History||0.1.0|[[File:Slimeball JE1 BE1.png|32px]] Added slimeballs.}}
{{History|foot}}
==Issues ==
{{issue list}}
== External Links ==
*[https://www.minecraft.net/en-us/article/taking-inventory--slimeball Taking Inventory: Slimeball] – Minecraft.net on June 24, 2021
{{Items}}
[[Category:Renewable resources]]
[[cs:Sliz]]
[[de:Schleimball]]
[[es:Bola de slime]]
[[fr:Boule de Slime]]
[[hu:Nyálkagolyó]]
[[it:Palla di slime]]
[[ja:スライムボール]]
[[ko:슬라임볼]]
[[nl:Slijmbal]]
[[pl:Kula szlamu]]
[[pt:Bola de slime]]
[[ru:Слизь]]
[[th:ลูกเมือก]]
[[uk:Слизова кулька]]
[[zh:黏液球]]</li><li>[[Food|Food]]<br/>{{For|food in ''Minecraft Dungeons''|MCD:Food}}
[[File:Eating Steve.png|thumb|right|150px]]
[[File:Eating Alex.png|thumb|right|150px]]
'''Food''' refers to any consumable [[item]]s that, when eaten, restore [[hunger]] points and hunger saturation points, and sometimes cause [[status effect]]s. They are essential to survival, as going without them eventually causes the player to starve, causing damage until reaching {{hp|10}} in Easy [[difficulty]], and {{hp|1}} on Normal. [[Hunger#Effects of hunger|Starvation]] damage kills the player in Hard and [[Hardcore]] Mode.
Food is eaten by holding {{control|use}} while having the food item selected in the hot bar or in the off-hand.
[[Cake]] cannot be eaten this way, and must instead be placed on a surface before being eaten.
With the exception of [[chorus fruit]], [[golden apple]]s, [[honey bottle]]s, [[milk]], and [[suspicious stew]]{{only|Java}}, food cannot be eaten when the hunger bar is completely full. In [[Creative]] Mode, any food can be consumed at any time.
All food items and ingredients can be stacked in the inventory slots, except for [[milk]], [[rabbit stew]], [[mushroom stew]], [[beetroot soup]], [[suspicious stew]], and [[cake]].{{only|Java}}
This page covers food items for players; blocks and items that can be eaten by other [[mob]]s are not included here.
== Hunger and saturation ==
{{main|Hunger#Mechanics}}
{{seealso|Tutorials/Hunger_management}}
[[File:Raw_and_Cooked_Chicken_Comparison.png|thumb|Raw (left) and cooked (right) [[chicken]]. Eating raw chicken can give the [[player]] [[food poisoning]].]]
[[Player]]s have two different food statistics, one of which is visible: The hunger level is visible, and the saturation level is not.
[[Saturation]] is the first statistic to decrease when a player performs energy-intensive actions, and it must be completely depleted before the visible hunger meter begins decreasing. Although the current saturation level is generally hidden, the player can tell that their saturation level is completely depleted if the visible hunger meter begins displaying a jittering effect.
Eating a food item replenishes a fixed number of hunger points and saturation points, based on the item. Some foods have a better ratio of saturation to hunger points replenished than others. Overeating the hunger bar does not overflow to saturation.
A player's current saturation level can never exceed their current hunger level. A player at a hunger level of 5, for example, can be at a maximum of 5 saturation. Food always restores hunger (raising the saturation limit) ''before'' supplying saturation. The most efficient use of food is to eat low-saturation food to fill the hunger bar, followed by high-saturation food to fill saturation. While a few hunger points may be wasted when eating nourishing food when nearly full, eating nourishing foods on a low hunger bar wastes even more points of saturation. Maximizing saturation increases the length of time (and/or the amount of damage healed) before the player needs to eat again.
=== Usage ===
Most foods can be eaten by holding down the right-click button with a food item in hand. It takes 1.61 seconds to eat most foods; dried kelp takes 0.865 seconds to eat. Additionally, a player can hold food in their [[offhand]] {{in|Java}}.
While eating, food [[particles]] form from the player's mouth correlated with their respective food item, and produces a munching noise. Eating also slows the user significantly.
Unlike other foods, [[cake]] has to be eaten by placing it, then right-clicking on its block form. Eating cake is instant and it has 7 edible slices, each giving {{hunger|2}} hunger and 0.4 hunger [[saturation]].
=== Nourishment value ===
Nourishment is defined as the ratio of saturation to hunger points restored. Foods with higher nourishment values should be eaten when the hunger bar is more full.
The "nourishment" table below can help by categorizing foods by their saturation-to-hunger restoration ratios. See the more detailed [[#Foods|Foods]] table for the exact hunger and saturation statistics of each food.
<!-- do not change the locations of the food in this table without providing an explanation in the edit summary -->
{| class="wikitable" data-description="Nourishment value"
|-
!Nourishment
! Value
!Food
|- style="text-align: left;"
!Great
| 2.4
| {{Slot|Enchanted Golden Apple}}{{Slot|Golden Apple}}{{Slot|Golden Carrot}}
|- style="text-align: left;"
!Good
| 1.6
| {{Slot|Cooked Mutton}}{{Slot|Cooked Porkchop}}{{Slot|Cooked Salmon}}{{Slot|Steak}}
|- style="text-align: left;"
!Normal
| 1.2
| {{Slot|Baked Potato}}{{Slot|Beetroot}}{{Slot|Beetroot Soup}}{{Slot|Bread}}{{Slot|Carrot}}{{Slot|Cooked Chicken}}{{Slot|Cooked Cod}}{{Slot|Cooked Rabbit}}{{Slot|Mushroom Stew}}{{Slot|Rabbit Stew}}{{Slot|Suspicious Stew}}
|- style="text-align: left;"
! Low
| 0.6
| {{Slot|Apple}}{{Slot|Chorus Fruit}}{{Slot|Dried Kelp}}<ref group="note" name="Java">{{only|java}}</ref>{{Slot|Melon Slice}}{{Slot|Poisonous Potato}}{{Slot|Potato}}{{Slot|Pumpkin Pie}}{{Slot|Raw Beef}}{{Slot|Raw Chicken}}{{Slot|Raw Mutton}}{{Slot|Raw Porkchop}}{{Slot|Raw Rabbit}}{{Slot|Sweet Berries}}<ref group="note" name="Bedrock">{{only|bedrock}}</ref>
|- style="text-align: left;"
!Poor
| 0.2
| {{Slot|Cake}}{{Slot|Cookie}}{{Slot|Dried Kelp}}<ref group="note" name="Bedrock"/>{{Slot|Glow Berries}}{{Slot|Honey Bottle}}{{Slot|Pufferfish|link=Pufferfish (item)}}{{Slot|Raw Cod}}{{Slot|Raw Salmon}}{{Slot|Rotten Flesh}}{{Slot|Spider Eye}}{{Slot|Sweet Berries}}<ref group="note" name="Java"/>{{Slot|Tropical Fish|link=Tropical Fish (item)}}
|}
== Foods ==
{{/table}}
=== Ingredients ===
The following items cannot be eaten on their own. Instead, they are used to craft consumable food items.
<!--
Please leave spaces between each row in the table - this has no effect on the appearance of the table, but it makes it a lot easier on future wiki editors!
-->
{| class="sortable wikitable list-style-none" data-description="Ingredients"
|-
! Name
! Icon
! Used to make
! Source(s)
! Notes
|- id="Bowl"
! scope="row" | [[Bowl]]
| {{Slot|Bowl}}
| {{itemLink|Mushroom Stew}}
* {{itemLink|Beetroot Soup}}
* {{itemLink|Rabbit Stew}}
* {{itemLink|Suspicious Stew}}
|
* [[Crafting]] from [[planks]]
* [[Fishing Rod#Usage|Fishing]]
* [[Turtle]] killed by [[lightning]]
* Eating food made with them
|
|- id="Cocoa Bean"
! scope="row" | [[Cocoa Beans]]
| {{Slot|Cocoa Beans}}
| {{itemLink|Cookie}}s
|
* Breaking [[cocoa plant]]s
* Bought from [[wandering trader]]
|
|- id="Egg"
! scope="row" | [[Egg]]
| {{Slot|Egg}}
|
* {{itemLink|Cake}}
* {{itemLink|Pumpkin Pie}}
|
* Laid by [[chicken]]s
* Found in village fletcher chests
|
|- id="Milk"
! scope="row" | [[Milk Bucket]]
| {{Slot|Milk Bucket}}
| {{itemLink|Cake}}
|
* Milking a [[cow]], [[mooshroom]]s, or [[goat]]s
* Killing a [[Wandering trader]] drinking it
| Can also be consumed to clear [[status effect]]s
|- id="Mushroom"
! scope="row" | [[Brown Mushroom]] and [[Red Mushroom]]
| {{Slot|Brown Mushroom;Red Mushroom}}
| {{itemLink|Mushroom Stew}}
* {{itemLink|Rabbit Stew}}
* {{itemLink|Suspicious Stew}}
| {{anchor|Brown Mushroom|Red Mushroom}}
* Dark/shady areas
* Swamp [[biome]]s
* [[Mushroom fields]]
* Breaking [[Huge Mushroom|huge brown or red mushrooms]]
* [[The Nether]]
* Using [[shears]] on a [[mooshroom|brown mooshroom or red mushroom]]
* Bought from [[wandering trader]]
|
|- id="Flower"
! scope="row" | [[Flower]]
| {{Slot|Any Flower}}
|{{itemLink|Suspicious Stew}}
|
* Breaking [[Flower]]
* Using [[Bone Meal]] on a [[Grass Block]]
* Bought from [[wandering trader]]
* Killing [[Iron Golem]] (poppy)
|
|- id="Pumpkin"
! scope="row" | [[Pumpkin]]
| {{Slot|Pumpkin}}
| {{itemLink|Pumpkin Pie}}
|
* Harvesting mature [[pumpkin]]s grown from [[pumpkin seeds]]
* Naturally occurring [[pumpkin]]s
* Taiga and Snowy Taiga [[Village]]s
* Bought from [[wandering trader]]
|
|- id="Sugar"
! scope="row" | [[Sugar]]
| {{Slot|Sugar}}
|
* {{itemLink|Cake}}
* {{itemLink|Pumpkin Pie}}
|
* Crafting [[sugar cane]]
* Dropped by [[witch]]es
* Creating from its base [[element]]s {{only|bedrock|education}}
* Redeemed from [[honey bottle]] on a crafting table
|
|- id="Wheat"
! scope="row" | [[Wheat]]
| {{Slot|Wheat}}
|
* {{itemLink|Bread}}
* {{itemLink|Cake}}
* {{itemLink|Cookie}}s
|
* Harvesting mature [[wheat]]
* Found in [[Dungeon#Loot|dungeon]], [[Woodland Mansion#Loot|woodland mansion]], [[Shipwreck#Loot|shipwreck]], [[Igloo#Loot|igloo]], [[Village#Loot|village]], [[Ocean Ruins#Loot|ocean ruins]], and [[Pillager Outpost#Loot|pillager outpost]] chest
* Crafting [[hay bale]]s
|
|- id="Gold Nugget"
! scope="row" | [[Gold Nugget]]
| {{Slot|Gold Nugget}}
| {{itemLink|Golden Carrot}}
|
* Crafting [[gold ingot]]s
* Dropped by [[zombified piglin]]s
* Found in [[Shipwreck#Loot|shipwreck]], [[Igloo#Loot|igloo]], [[Village#Loot|village]], and [[Ocean Ruins#Loot|ocean ruins]] chest
* Smelting golden armor or tools
* Mining [[nether gold ore]] without [[Silk Touch]]
|
|- id="Gold Ingot"
! scope="row" | [[Gold Ingot]]
| {{Slot|Gold Ingot}}
| {{itemLink|Golden Apple}}
|
* Crafting [[gold block]]s or [[gold nugget]]s
* Rarely dropped by [[zombified piglin]]s and by [[Drowned]]
* Smelting [[gold ore]] or [[nether gold ore]]
* Found in [[Shipwreck#Loot|shipwreck]], [[Jungle Pyramid#Structure:Loot|jungle pyramid]], [[Dungeon#Loot|dungeon]], [[Woodland Mansion#Loot|woodland mansion]], [[Nether Fortress#Loot|nether fortress]], [[End city#Loot|end city]], [[Mineshaft#Loot|mineshaft]], [[Village#Structure:Loot|village]], [[Stronghold#Loot|stronghold]], [[Buried Treasure#Loot|buried treasure]] and [[Desert pyramid#Structure:Loot|desert pyramid]] chest
|
|- id="Honey Block"
! scope="row" | [[Honey Block]]
| {{Slot|Honey Block}}
| {{itemLink|Honey Bottle}}
|
* Crafting [[honey bottle]]s
|
|}
== Sounds ==
{{Sound table/Entity/Food}}
== Achievements ==
{{load achievements|Pork Chop;Iron Belly;Rabbit Season;Overpowered;Castaway;Delicious Fish;The Lie;Bake Bread;Time For Stew}}
== Advancements ==
{{load advancements|Husbandry;A Balanced Diet;A Furious Cocktail;How Did We Get Here;Fishy Business}}
== History ==
{{History|java classic}}
{{History||June 14, 2009|link=https://notch.tumblr.com/post/123343045/my-vision-for-survival|[[Notch]] discussed how food would work in [[survival]] mode: "Monsters will hurt you and take away from your health. The only way to regain health is to eat food. You get food from either hunting or from farming."}}
{{History||0.24_SURVIVAL_TEST|[[Mushroom]]s are now edible, making them the first food to be added in the game. At this point, food restores [[health]] instead of [[hunger]], and are eaten instantly without sound or animation. Pigs drop them upon death.}}
{{History|java indev}}
{{History||0.31|snap=20091231-2|Added [[apple]]s, which are currently non-functional.}}
{{History|||snap=20100110|Apples are now edible, and restore {{hp|4}} each.}}
{{History|||snap=?|Mushrooms are no longer edible.}}
{{History|||snap=20100130|Added [[mushroom stew]], which restores {{hp|8}} health.}}
{{History||20100206|Added [[wheat]] and [[bread]].
|Mushroom stew now restores {{hp|10}} health.}}
{{History||20100219|[[Pig]]s now drop [[raw porkchop]]s, which can be [[smelt]]ed to become [[cooked porkchop]]s.}}
{{History|java infdev}}
{{History||20100227-1|Added [[golden apple]]s. At this point, they were crafted with [[block of gold]], and restored {{hp|20}}.}}
{{History|java alpha}}
{{History||v1.0.8|Added [[milk]], which was at this point unobtainable and the player could not use it in any way.}}
{{History||v1.0.11|Milk can now be obtained in the game, by milking a [[cow]] with an empty [[bucket]].}}
{{History||v1.0.14|With the addition of [[chicken]]s, [[egg]]s are now in the game, but have no use. Chickens do not drop raw chicken at this point in time.}}
{{History||v1.2.0|snap=<nowiki>?|slink=:Category:Information needed requiring unarchived version|Added [[pumpkin]]s, but not pumpkin seeds.
|Added [[raw fish]] and [[cooked fish]], obtainable through [[fishing]].}}
{{History||v1.2.3|Eating food now functions correctly in multiplayer.}}
{{History|java beta}}
{{History||1.2|Added [[sugar]] and [[cake]].}}
{{History||1.4|[[Cocoa beans]] now appear naturally in the game; since Beta 1.2, they were available only through inventory editors.
|Added [[cookie]]s.}}
{{History||1.5|Pigs now drop cooked porkchops if killed while on fire.}}
{{History||1.8|snap=Pre-release|Added [[melon]]s, [[melon seeds]], and [[pumpkin seeds]].
|Added [[raw chicken]] as a drop from chickens, which can be smelted into [[cooked chicken]].
|Added [[raw beef]] as a drop from cows, which can be smelted into [[steak]].
|Added [[rotten flesh]] as a new drop from [[zombie]]s.
|Added an eating animation, instead of food simply disappearing from the player's hand as if a block had been placed.
|Added [[hunger bar]]; now food restores hunger instead of health.
|Food now stacks in the inventory, with the exception of cake, mushroom stew, and milk.
|[[Huge mushroom]]s were added as a new source for [[mushroom]]s.
|With the addition of the hunger bar, golden apples now restore {{Hunger|10}} and give 30 seconds of [[regeneration]], but do not heal health directly anymore.}}
{{History|java}}
{{History||1.0.0|snap=Beta 1.9 Prerelease 2|Mushrooms can now be obtained from the mushroom island [[biome]], via the huge mushrooms, random scattered mushrooms, or the new [[mooshroom]]s.
|[[Milk]] can be used to nullify the effects of [[potion]]s.
|[[Spider]]s now drop [[Spider Eye|eyes]].}}
{{History||1.1|snap=release|Golden apples are now made with [[gold nugget]]s instead of blocks of gold, restore {{Hunger|4}} and give 4 seconds of regeneration.}}
{{History||1.3.1|snap=12w21a|Added enchanted golden apples, which functioned like golden apples prior to 1.1 and had the same crafting recipe, but also gave resistance and fire resistance for 5 minutes each.
|[[Cocoa Beans]] are now a crop, making all food items a renewable resource.}}
{{History||1.4.2|snap=12w34a|[[Potato]]es and [[carrot]]s can be obtainable from zombies (rare drop) or harvested.
|Potatoes can be cooked to make [[baked potato]]es
|Harvesting potatoes may give 0–2 [[poisonous potato]]es.
|Carrots can be crafted into [[golden carrot]]s.
|Added [[pumpkin pie]], making [[pumpkin]]s a food ingredient.}}
{{History||1.7.2|snap=13w36a|Added [[tropical fish (item)|clownfish]], [[Raw Salmon|raw]] and [[cooked salmon]], and [[pufferfish (item)|pufferfish]].}}
{{History||1.8|snap=14w02a|Baked potatoes now restore {{Hunger|5}} hunger points instead of 6, with a corresponding reduction in saturation restored.
|Carrots now restore {{Hunger|3}} hunger points instead of 4, with a corresponding reduction in saturation restored.}}
{{History|||snap=14w27a|Added [[Raw Mutton|raw]] and [[cooked mutton]], [[Raw Rabbit|raw]] and [[cooked rabbit]], and [[rabbit stew]].}}
{{History||1.9|snap=15w31a|Added [[chorus fruit]], [[beetroot]] and [[beetroot soup]].
|Enchanted golden apples are no longer craftable, making them no longer renewable.}}
{{History||1.13|snap=18w07a|Added [[dried kelp]], which is edible.}}
{{History||1.14|snap=18w43a|Added [[suspicious stew]].}}
{{History|||snap=18w49a|Added [[sweet berries]].}}
{{History||1.15|snap=19w34a|Added [[honey bottle]]s.}}
{{History|||snap=19w35a|[[Honey bottle]]s now remove [[poison]] effects when consumed.}}
{{History|||snap=19w46a|All foods can now be consumed in Creative mode, including cake.}}
{{History||1.17|snap=21w05a|Added [[glow berries]].}}
{{History|pocket alpha}}
{{History||v0.4.0|Added the first food items: [[apple]]s, [[bread]], [[mushroom stew]], [[raw beef]], [[steak]], [[raw chicken]], [[cooked chicken]], [[raw porkchop]]s, and [[cooked porkchop]].}}
{{History||v0.5.0|Added [[melon]]s, [[melon slice]]s, and [[melon seeds]].}}
{{History||v0.7.0|Added [[milk]] and [[cake]].}}
{{History||v0.8.0|snap=build 1|Added [[pumpkin pie]], [[carrot]]s, [[potato]]es, and [[baked potato]]es.}}
{{History|||snap=build 2|Added [[beetroot]]s and [[beetroot soup]].}}
{{History||v0.9.0|snap=build 1|[[Potato]]es and [[carrot]]s can be obtainable from zombies (rare drop) or harvested.
|Added [[cookie]]s.}}
{{History||v0.11.0|snap=build 1|Added [[rotten flesh]] as a new drop from [[zombie]]s, at this time, it inflicts poison.
|Added [[Raw Fish|raw]] and [[cooked fish]], [[clownfish]], [[Raw Salmon|raw]] and [[cooked salmon]], and [[pufferfish]].}}
{{History|||snap=build 4|[[Milk]] can be used to nullify the effects of [[potion]]s.}}
{{History||v0.12.1|snap=build 1|Eating food now restores hunger.
|[[Spider]]s now drop [[Spider Eye|eyes]].
|Added poisonous potatoes, golden apples, enchanted golden apples and golden carrots.}}
{{History||v0.13.0|snap=build 1|Hunger restored by food now matches Minecraft PC.
|Added raw rabbit, cooked rabbit, and [[rabbit stew]].}}
{{History||v0.15.0|snap=build 1|Added raw mutton and cooked mutton.}}
{{History|pocket}}
{{History||1.0.0|snap=alpha 0.17.0.1|Added chorus fruit.}}
{{History|bedrock}}
{{History||1.4.0|snap=beta 1.2.14.2|Added [[dried kelp]], which is edible.}}
{{History||1.7.0|snap=beta 1.7.0.2|Food can now be eaten in creative mode and on peaceful difficulty.}}
{{History||1.10.0|snap=beta 1.10.0.3|Added [[sweet berries]].}}
{{History||1.13.0|snap=beta 1.13.0.9|Added [[suspicious stew]].}}
{{History||1.14.0|snap=beta 1.14.0.1|Added [[honey bottle]].}}
{{History||1.17.0|snap=beta 1.16.220.52|Added [[glow berries]].}}
{{History|foot}}
{{items}}
[[Category:Food]]
[[cs:Potraviny]]
[[de:Hunger]]
[[es:Comida]]
[[fr:Nourriture]]
[[hu:Étel]]
[[it:Cibo]]
[[ja:食料]]
[[ko:식료품]]
[[nl:Voedsel]]
[[pl:Jedzenie]]
[[pt:Alimento]]
[[ru:Еда]]
[[th:อาหาร]]
[[uk:Їжа]]
[[zh:食物]]</li></ul></nowiki> | beta 1.6.0.5 | Potion of Slow Falling added. | |||
| Legacy Console Edition | |||||
| TU7 | CU1 | 1.0 | Patch 1 | 1.0.1 | Added potions and brewing. |
| TU14 | 1.04 | Potions of Night Vision and Invisibility added. | |||
| TU46 | CU36 | 1.38 | Patch 15 | Lingering potions added. | |
| Blaze powder is now required as fuel for brewing. | |||||
Trivia
- Although Jeb said that in Java Edition Beta 1.9 Prerelease 3 there would be 161 possible different potion combinations with 2,653 in the future, in the actual third pre-release only 22 different potions could be made without the use of external programs. Of those, 19 potions had one of 8 different effects.
- By modifying the item NBT using an editor or commands, it is possible to get a potion that cannot be upgraded into a splash potion.
- Unlike crafting, smelting and stonecutting, there is no in-game recipe book for brewing, making the process much less intuitive.
Gallery
Texture file for the 1.9 brewing user interface
See also
References
- ↑ "The Mundane Potion is a remnant of an abandoned procedural brewing system—meaning that the recipes were meant to be different each time you generated a Minecraft world. But this didn't turn out to be much fun for the player and the system was abandoned, leaving the Mundane Potion without a purpose. "It's sort of like an appendix," says Jens" – Tom Stone, February 21, 2017
- ↑ jebtweet:119710836469149697