Gavinmdavis (talk | contribs) (→ID) |
(cleanup) Tag: Undo |
||
| (75 intermediate revisions by 46 users not shown) | |||
| Line 1: | Line 1: | ||
| − | {{About|the mineral block|the ore|Iron Ore|the item|Iron Ingot|the nugget|Iron Nugget}} |
+ | {{About|the mineral block|the ore|Iron Ore|the item|Iron Ingot|the nugget|Iron Nugget|the raw variant|Block of Raw Iron}} |
{{Block |
{{Block |
||
|image=Block of Iron.png |
|image=Block of Iron.png |
||
| Line 14: | Line 14: | ||
== Obtaining == |
== Obtaining == |
||
| − | |||
=== Breaking === |
=== Breaking === |
||
| ⚫ | |||
| − | |||
| ⚫ | |||
{{breaking row|horizontal=1|Block of Iron|Pickaxe|Stone}} |
{{breaking row|horizontal=1|Block of Iron|Pickaxe|Stone}} |
||
=== Chest loot === |
=== Chest loot === |
||
| − | |||
{{LootChestItem|block-of-iron}} |
{{LootChestItem|block-of-iron}} |
||
=== Crafting === |
=== Crafting === |
||
| − | |||
{{Crafting |
{{Crafting |
||
|Iron Ingot |
|Iron Ingot |
||
| Line 41: | Line 37: | ||
== Usage == |
== Usage == |
||
| − | |||
Blocks of iron can be used to store [[iron ingot]]s in a compact fashion. |
Blocks of iron can be used to store [[iron ingot]]s in a compact fashion. |
||
=== Beacons === |
=== Beacons === |
||
| ⚫ | Blocks of iron can be used to "power" a [[beacon]]. The beacon can be powered by a 3×3 square of iron blocks underneath it, and can optionally also include a 5×5, 7×7 and 9×9 layer in the shape of a pyramid under the original layer to increase the effects from the beacon. The layers do not have to be entirely blocks of iron, as they may also contain [[block of gold|blocks of gold]], [[block of diamond|blocks of diamond]], [[block of netherite|blocks of netherite]] or [[block of emerald|blocks of emerald]]. |
||
| − | |||
| ⚫ | Blocks of iron can be used to "power" a [[beacon]]. The beacon can be powered by a 3×3 square of iron blocks underneath it, and can optionally also include a 5×5, 7×7 and 9×9 layer in the shape of a pyramid under the original layer to increase the effects from the beacon. The layers do not have to be entirely |
||
=== Spawning iron golems === |
=== Spawning iron golems === |
||
| − | |||
{{FakeImage|{{BlockGrid|scale=2|p=Carved Pumpkin|i=Block of Iron| p |iii| i }}|Iron golem build configuration.}} |
{{FakeImage|{{BlockGrid|scale=2|p=Carved Pumpkin|i=Block of Iron| p |iii| i }}|Iron golem build configuration.}} |
||
Blocks of iron and [[pumpkin]]s{{Only|bedrock}}, [[carved pumpkin]]s or [[jack o'lantern]]s are used to build [[iron golem]]s. The pumpkin, carved pumpkin or jack o'lantern must be placed last, and the golem spawns immediately after placing it. |
Blocks of iron and [[pumpkin]]s{{Only|bedrock}}, [[carved pumpkin]]s or [[jack o'lantern]]s are used to build [[iron golem]]s. The pumpkin, carved pumpkin or jack o'lantern must be placed last, and the golem spawns immediately after placing it. |
||
=== Crafting ingredient === |
=== Crafting ingredient === |
||
| − | |||
{{crafting usage}} |
{{crafting usage}} |
||
| Line 67: | Line 59: | ||
{{edition|java}}: |
{{edition|java}}: |
||
{{ID table |
{{ID table |
||
| + | |edition=java |
||
|showblocktags=y |
|showblocktags=y |
||
|showforms=y |
|showforms=y |
||
| − | |generatetranslationkeys= |
+ | |generatetranslationkeys=y |
|displayname=Block of Iron |
|displayname=Block of Iron |
||
|spritetype=block |
|spritetype=block |
||
| Line 78: | Line 71: | ||
{{edition|bedrock}}: |
{{edition|bedrock}}: |
||
{{ID table |
{{ID table |
||
| + | |edition=bedrock |
||
|shownumericids=y |
|shownumericids=y |
||
|showforms=y |
|showforms=y |
||
| − | |generatetranslationkeys= |
+ | |generatetranslationkeys=y |
|displayname=Block of Iron |
|displayname=Block of Iron |
||
|spritetype=block |
|spritetype=block |
||
| Line 94: | Line 88: | ||
== History == |
== History == |
||
| − | {{moreImages|The very first texture of iron block as shown [[:file:Classic 0.28.png|in this image]].|section=1}} |
||
{{History|java classic}} |
{{History|java classic}} |
||
| − | {{History||May 21, 2009|link=http://notch.tumblr.com/post/110762705/my-list-on-tile-types-so-far|[[Notch]] shows interest in adding a "metal [[block]]".}} |
+ | {{History||May 21, 2009|link=https://web.archive.org/web/0/http://notch.tumblr.com/post/110762705/my-list-on-tile-types-so-far|[[Notch]] shows interest in adding a "metal [[block]]".}} |
| − | {{History||October 24, 2009|link=https://notch.tumblr.com/post/221308991/the-new-block-types-and-new-graphics-for-the-gold|Notch teased a block of iron.}} |
+ | {{History||October 24, 2009|link=https://web.archive.org/web/0/https://notch.tumblr.com/post/221308991/the-new-block-types-and-new-graphics-for-the-gold|Notch teased a block of iron.}} |
{{History||0.26 SURVIVAL TEST|[[File:Block of Iron JE1.png|30px]] Added blocks of iron.}} |
{{History||0.26 SURVIVAL TEST|[[File:Block of Iron JE1.png|30px]] Added blocks of iron.}} |
||
{{History|java indev}} |
{{History|java indev}} |
||
| − | {{History||0.31|snap= |
+ | {{History||0.31|snap=20100128|[[Iron ore]] no longer [[drops]] iron blocks.}} |
{{History|||snap=20100129|slink=Indev 0.31 (January 29, 2010)|Blocks of iron can now be [[crafting|crafted]] from 4 [[iron ingot]]s.}} |
{{History|||snap=20100129|slink=Indev 0.31 (January 29, 2010)|Blocks of iron can now be [[crafting|crafted]] from 4 [[iron ingot]]s.}} |
||
| − | {{History|||snap=20100130|Blocks of iron are now more expensive, requiring 9 [[iron ingot]]s ( |
+ | {{History|||snap=20100130|Blocks of iron are now more expensive, requiring 9 [[iron ingot]]s (3×3) instead of 4 (2×2).}} |
| + | {{History||?|snap=?|Iron blocks can be uncrafted into 9 ingots.}} |
||
{{History|java alpha}} |
{{History|java alpha}} |
||
| − | {{History||v1.2.0|snap=<nowiki>?</nowiki>|slink=:Category:Information needed requiring unarchived version|[[File:Block of Iron JE2 BE1.png|30px]] The texture of blocks of iron has |
+ | {{History||v1.2.0|snap=<nowiki>?</nowiki>|slink=:Category:Information needed requiring unarchived version|[[File:Block of Iron JE2 BE1.png|30px]] The texture of blocks of iron has been changed.}} |
{{History|java beta}} |
{{History|java beta}} |
||
| − | {{History||1.2|The side and bottom textures of blocks of iron have |
+ | {{History||1.2|The side and bottom textures of blocks of iron have been removed from [[terrain.png]].}} |
{{History|java}} |
{{History|java}} |
||
| − | {{History||1.0.0|snap=Beta 1.9 Prerelease 5|[[File:Block of Iron JE3 BE2.png|30px]] The texture of blocks of iron has |
+ | {{History||1.0.0|snap=Beta 1.9 Prerelease 5|[[File:Block of Iron JE3 BE2.png|30px]] The texture of blocks of iron has been changed.}} |
| − | {{History||1.2.1|snap= |
+ | {{History||1.2.1|snap=12w06a|Blocks of iron are now [[renewable]], due to zombies occassionally dropping iron ingots.}} |
| + | {{History|||snap=12w08a|Blocks of iron can be used to make [[iron golem]]s.}} |
||
{{History||1.4.2|snap=12w32a|Blocks of iron can be used to activate a [[beacon]].}} |
{{History||1.4.2|snap=12w32a|Blocks of iron can be used to activate a [[beacon]].}} |
||
{{History|||snap=12w41a|Blocks of iron are now used to craft [[anvil]]s.}} |
{{History|||snap=12w41a|Blocks of iron are now used to craft [[anvil]]s.}} |
||
| Line 117: | Line 112: | ||
{{History|||snap=15w41a|End ships no longer generate with iron blocks.}} |
{{History|||snap=15w41a|End ships no longer generate with iron blocks.}} |
||
{{History||July 18, 2017|link=https://twitter.com/jeb_/status/887230844112424960|[[File:Block of Iron JE4 BE3.png|32px]] [[Jeb]] tweets an image of new textures for iron blocks, [[obsidian]], and birch [[log]]s.}} |
{{History||July 18, 2017|link=https://twitter.com/jeb_/status/887230844112424960|[[File:Block of Iron JE4 BE3.png|32px]] [[Jeb]] tweets an image of new textures for iron blocks, [[obsidian]], and birch [[log]]s.}} |
||
| − | {{History||1. |
+ | {{History||1.14|snap=18w43a|[[File:Block of Iron JE4 BE3.png|32px]] The texture of blocks of iron has been changed.}} |
| − | {{History||1.14|snap=18w43a|[[File:Block of Iron JE4 BE3.png|32px]] The texture of blocks of iron has now been changed.}} |
||
{{History|||snap=19w09a|Blocks of iron can now be used to play the xylophone, if they are under [[note block]]s.}} |
{{History|||snap=19w09a|Blocks of iron can now be used to play the xylophone, if they are under [[note block]]s.}} |
||
| + | {{History||1.16.2|snap=20w30a|Blocks of iron can now be found in [[bastion remnant]] chests.}} |
||
{{History|pocket alpha}} |
{{History|pocket alpha}} |
||
{{History||Pre-release|[[File:Block of Iron JE1.png|30px]] Added blocks of iron.}} |
{{History||Pre-release|[[File:Block of Iron JE1.png|30px]] Added blocks of iron.}} |
||
| − | {{History||v0.1.0|[[File:Block of Iron JE2 BE1.png|30px]] The texture of blocks of iron has |
+ | {{History||v0.1.0|[[File:Block of Iron JE2 BE1.png|30px]] The texture of blocks of iron has been changed.}} |
| − | {{History||v0.2.0|[[File:Block of Iron JE3 BE2.png|30px]] The texture of blocks of iron has |
+ | {{History||v0.2.0|[[File:Block of Iron JE3 BE2.png|30px]] The texture of blocks of iron has been changed, once again.}} |
{{History||v0.12.1|snap=build 1|Blocks of iron are now used to craft [[anvil]]s. |
{{History||v0.12.1|snap=build 1|Blocks of iron are now used to craft [[anvil]]s. |
||
|Blocks of iron can now be used to create [[iron golem]]s.}} |
|Blocks of iron can now be used to create [[iron golem]]s.}} |
||
{{History||v0.16.0|snap=build 4|Blocks of iron can now be used to activate [[beacon]]s.}} |
{{History||v0.16.0|snap=build 4|Blocks of iron can now be used to activate [[beacon]]s.}} |
||
{{History|bedrock}} |
{{History|bedrock}} |
||
| − | {{History||1.10.0|snap=beta 1.10.0.3|[[File:Block of Iron JE4 BE3.png|32px]] The texture of blocks of iron has |
+ | {{History||1.10.0|snap=beta 1.10.0.3|[[File:Block of Iron JE4 BE3.png|32px]] The texture of blocks of iron has been changed.}} |
{{History||1.13.0|snap=beta 1.13.0.9|Blocks of iron can now be used to play the xylophone, if they are under [[note block]]s.}} |
{{History||1.13.0|snap=beta 1.13.0.9|Blocks of iron can now be used to play the xylophone, if they are under [[note block]]s.}} |
||
{{History|console}} |
{{History|console}} |
||
{{History||xbox=TU1|xbone=CU1|ps=1.00|wiiu=Patch 1|switch=1.0.1|[[File:Block of Iron JE2 BE1.png|30px]] Added blocks of iron.}} |
{{History||xbox=TU1|xbone=CU1|ps=1.00|wiiu=Patch 1|switch=1.0.1|[[File:Block of Iron JE2 BE1.png|30px]] Added blocks of iron.}} |
||
| − | {{History||xbox=TU3|xbone=CU1|ps=1.00|wiiu=Patch 1|switch=1.0.1|[[File:Block of Iron JE3 BE2.png|30px]] The texture of blocks of iron has |
+ | {{History||xbox=TU3|xbone=CU1|ps=1.00|wiiu=Patch 1|switch=1.0.1|[[File:Block of Iron JE3 BE2.png|30px]] The texture of blocks of iron has been changed.}} |
{{History||xbox=TU14|xbone=CU1|ps=1.05|wiiu=Patch 1|switch=1.0.1|Blocks of iron are now used to craft [[anvil]]s.}} |
{{History||xbox=TU14|xbone=CU1|ps=1.05|wiiu=Patch 1|switch=1.0.1|Blocks of iron are now used to craft [[anvil]]s.}} |
||
{{History||xbox=TU19|xbone=CU7|ps=1.12|Blocks of iron can now be used to construct [[beacon]] pyramids.}} |
{{History||xbox=TU19|xbone=CU7|ps=1.12|Blocks of iron can now be used to construct [[beacon]] pyramids.}} |
||
| − | {{History||xbox=none|xbone=none|ps=1.90|wiiu=none|switch=none|[[File:Block of Iron JE4 BE3.png|32px]] The texture of blocks of iron has |
+ | {{History||xbox=none|xbone=none|ps=1.90|wiiu=none|switch=none|[[File:Block of Iron JE4 BE3.png|32px]] The texture of blocks of iron has been changed.}} |
{{History|New 3DS}} |
{{History|New 3DS}} |
||
| Line 144: | Line 139: | ||
<gallery> |
<gallery> |
||
| − | + | 1.13 teased obsidian, iron and birch textures.png| The first image of new textures for iron blocks, [[obsidian]], and [[birch log]]s compared to the old ones. |
|
</gallery> |
</gallery> |
||
| − | == |
+ | === Data history === |
| + | {{History|java}} |
||
| + | {{History||1.13|snap=17w47a|Prior to [[1.13/Flattening|''The Flattening'']], this block's numeral ID was 42.}} |
||
| + | {{History|foot}} |
||
| ⚫ | |||
{{issue list}} |
{{issue list}} |
||
| ⚫ | |||
| ⚫ | |||
| − | * Despite being [[wikipedia:Reactivity series|considerably more reactive]] than [[Block of Copper|copper]], neither iron nor its products will rust over time |
||
| − | |||
| − | |||
| ⚫ | |||
[[Category:Ore]] |
[[Category:Ore]] |
||
Latest revision as of 00:16, 13 November 2023
A block of iron is a precious metal block equivalent to nine iron ingots.
Obtaining
Breaking
Blocks of iron can be mined only with a stone pickaxe or better. If a block of iron is mined without the use of a pickaxe, it drops nothing.
| Block | Block of Iron | |
|---|---|---|
| Hardness | 5 | |
| Tool | ||
| Breaking time[A] | ||
| Default | 25 | |
| Wooden | 12.5 | |
| Stone | 1.9 | |
| Iron | 1.25 | |
| Diamond | 0.95 | |
| Netherite | 0.85 | |
| Golden | 2.1 | |
- ↑ Times are for unenchanted tools as wielded by players with no status effects, measured in seconds. For more information, see Breaking § Speed.
Chest loot
| Item | Structure | Container | Quantity | Chance |
|---|---|---|---|---|
| Java Edition | ||||
| Block of Iron | Bastion remnant | Generic chest | 1 | 19% |
| Treasure chest | 2–5 | 33.7% | ||
| Bedrock Edition | ||||
| Block of Iron | Bastion remnant | Generic chest | 1 | 19% |
| Treasure chest | 2–5 | 33.7% | ||
Crafting
| Ingredients | Crafting recipe |
|---|---|
| Iron Ingot |
Usage
Blocks of iron can be used to store iron ingots in a compact fashion.
Beacons
Blocks of iron can be used to "power" a beacon. The beacon can be powered by a 3×3 square of iron blocks underneath it, and can optionally also include a 5×5, 7×7 and 9×9 layer in the shape of a pyramid under the original layer to increase the effects from the beacon. The layers do not have to be entirely blocks of iron, as they may also contain blocks of gold, blocks of diamond, blocks of netherite or blocks of emerald.
Spawning iron golems
Blocks of iron and pumpkins[Bedrock Edition only], carved pumpkins or jack o'lanterns are used to build iron golems. The pumpkin, carved pumpkin or jack o'lantern must be placed last, and the golem spawns immediately after placing it.
Crafting ingredient
| Name | Ingredients | Crafting recipe |
|---|---|---|
| Anvil | Block of Iron + Iron Ingot |
|
| Iron Ingot | Block of Iron |
Note blocks
Blocks of iron can be placed under note blocks to produce iron xylophone sounds.
Sounds
| Sound | Subtitles | Source | Description | Resource location | Translation key | Volume | Pitch | Attenuation distance |
|---|---|---|---|---|---|---|---|---|
| Block broken | Blocks | Once the block has broken | block | subtitles | 1.0 | 1.2 | 16 | |
| Block placed | Blocks | When the block is placed | block | subtitles | 1.0 | 1.2 | 16 | |
| Block breaking | Blocks | While the block is in the process of being broken | block | subtitles | 0.25 | 0.75 | 16 | |
| None[sound 1] | Entity-Dependent | Falling on the block with fall damage | block | None[sound 1] | 0.5 | 1.25 | 16 | |
| Footsteps | Entity-Dependent | Walking on the block | block | subtitles | 0.15 | 1.5 | 16 |
| Sound | Source | Description | Resource location | Volume | Pitch |
|---|---|---|---|---|---|
| Blocks | Once the block has broken | dig | 1.0 | 1.1-1.2 | |
| Blocks | When the block is placed | use | 1.0 | 1.2-1.25 | |
| Blocks | While the block is in the process of being broken | hit | 0.3 | 0.75 | |
| Players | Falling on the block with fall damage | fall | 0.4 | 1.0 | |
| Players | Walking on the block | step | 0.35 | 1.0 | |
| Players | Jumping from the block | jump | 0.12 | 1.0 | |
| Players | Falling on the block without fall damage | land | 0.22 | 1.0 |
Data values
ID
| Name | Identifier | Form | Block tags | Translation key |
|---|---|---|---|---|
| Block of Iron | iron_block | Block & Item | beacon_base_blocks mineable/pickaxe needs_stone_tool | block.minecraft.iron_block |
| Name | Identifier | Numeric ID | Form | Item ID[i 1] | Translation key |
|---|---|---|---|---|---|
| Block of Iron | iron_block | 42 | Block & Giveable Item[i 2] | Identical[i 3] | tile.iron_block.name |
Achievements
| Icon | Achievement | In-game description | Actual requirements (if different) | Gamerscore earned | Trophy type (PS4) | |
|---|---|---|---|---|---|---|
| PS4 | Other | |||||
| Body Guard | Create an Iron Golem | — | 20G | Bronze | ||
Advancements
| Icon | Advancement | In-game description | Parent | Actual requirements (if different) | Resource location |
|---|---|---|---|---|---|
 | Hired Help | Summon an Iron Golem to help defend a village | What a Deal! | Summon an iron golem. | adventure/summon_iron_golem
|
History
| Java Edition Classic | |||||
|---|---|---|---|---|---|
| May 21, 2009 | Notch shows interest in adding a "metal block". | ||||
| October 24, 2009 | Notch teased a block of iron. | ||||
0.26 SURVIVAL TEST{{Extension DPL}}<ul><li>[[Raw Beef|Raw Beef]]<br/>{{Item
| title = Raw Beef
| image = Raw Beef.png
| heals = {{hunger|3}}
| renewable = Yes
| stackable = Yes (64)
}}
'''Raw beef''' is a [[food]] item that can be eaten by the [[player]] or cooked in a [[furnace]], [[smoker]], or [[campfire]] to make [[steak]].
== Obtaining ==
=== Mob loot ===
When adult [[cow]]s and [[mooshroom]]s are killed, they drop 1-3 raw beef. The maximum amount is increased by 1 per level of [[Looting]], for a maximum of 1-6 with Looting III. If killed while on fire, they drop [[steak]] instead.
=== Chest loot ===
{{LootChestItem|raw-beef}}
== Usage ==
=== Food ===
To eat raw beef, press and hold {{control|use}} while it is selected in the hotbar. Eating one restores {{hunger|3}} hunger and 1.8 hunger [[Hunger#Mechanics|saturation]].
=== Smelting ingredient ===
{{Smelting
|showname=1
|Raw Beef
|Steak
|0.35
}}
=== Wolves ===
Raw beef can be used to [[breed]] and heal tamed [[wolves]], lead them around, and make baby tamed wolves grow up faster by 10% of the remaining time.
=== Trading ===
Journeyman-level Butcher villagers have a 50% chance to buy 10 raw beef for an emerald.{{only|bedrock}}
Journeyman-level Butcher villagers always offer buy 10 raw beef for an emerald.{{only|java}}
==Sounds==
{{Sound table/Entity/Food}}
== Advancements ==
{{load advancements|Husbandry;A Balanced Diet}}
== Data values ==
=== ID ===
{{edition|java}}:
{{ID table
|edition=java
|showforms=y
|generatetranslationkeys=y
|displayname=Raw Beef
|spritetype=item
|nameid=beef
|form=item
|foot=1}}
{{edition|bedrock}}:
{{ID table
|edition=bedrock
|shownumericids=y
|showforms=y
|notshowbeitemforms=y
|generatetranslationkeys=y
|displayname=Raw Beef
|spritetype=item
|nameid=beef
|id=273
|form=item
|foot=1}}
== History ==
{{History|java beta}}
{{History||1.8|snap=Pre-release|[[File:Raw Beef JE1 BE1.png|32px]] Added raw beef.|Raw beef is one of the new [[food]] items, [[drops|dropped]] by [[cow]]s in addition to their [[leather]].}}
{{History|java}}
{{History||1.2.1|snap=12w03a|Raw beef can now be used to breed wolves.}}
{{History||1.3.1|snap=12w21a|Raw beef can now be [[trading|sold]] to butcher [[villager]]s, at 14–17 raw beef for 1 [[emerald]].}}
{{History|||snap=1.3|[[File:Raw Beef JE2.png|32px]] The texture of raw beef has been changed.}}
{{History||1.4.2|snap=12w37a|[[File:Raw Beef JE3 BE2.png|32px]] The texture of raw beef has been changed, so that it no longer has a dark outline.}}
{{History||1.8|snap=14w02a|[[Villager]]s no longer [[trading|trade]] for raw beef.}}
{{History||1.13|snap=17w47a|Prior to [[1.13/Flattening|''The Flattening'']], this [[item]]'s numeral ID was 363.}}
{{History||1.14|snap=18w43a|[[File:Raw Beef JE4 BE3.png|32px]] The texture of raw beef has been changed.}}
{{History|||snap=18w49a|Raw beef can now be found in [[chest]]s in [[village]] butcher shops.}}
{{History|||snap=19w11a|Butcher [[villager]]s now [[trading|buy]] raw beef.}}
{{History|pocket alpha}}
{{History||v0.4.0|[[File:Raw Beef JE1 BE1.png|32px]] Added raw beef.}}
{{History||v0.5.0|Raw beef now restores {{hp|3}} instead of {{hp|1}}.}}
{{History||v0.8.0|snap=build 1|[[File:Raw Beef JE3 BE2.png|32px]] The texture of raw beef has been changed, so that it no longer has a dark outline.}}
{{History||v0.9.0|snap=build 1|Raw beef has been added to [[Creative]] mode.}}
{{History||v0.12.1|snap=build 1|Raw beef now restores [[hunger]] instead of [[health]].}}
{{History|bedrock}}
{{History||1.10.0|snap=beta 1.10.0.3|[[File:Raw Beef JE4 BE3.png|32px]] The texture of raw beef has been changed.}}
{{History||1.11.0|snap=beta 1.11.0.1|Raw beef can now be found in [[village]] butcher [[chest]]s.}}
{{History|||snap=beta 1.11.0.4|Raw beef can now be [[trading|sold]] to butcher [[villager]]s.}}
{{History|console}}
{{History||xbox=TU5|xbone=CU1|ps=1.0|wiiu=Patch 1|[[File:Raw Beef JE1 BE1.png|32px]] Added raw beef.}}
{{History||xbox=TU12|[[File:Raw Beef JE3 BE2.png|32px]] The texture of raw beef has been changed, so that it no longer has a dark outline.}}
{{History||xbox=none|xbone=none|ps=1.90|wiiu=none|switch=none|[[File:Raw Beef JE4 BE3.png|32px]] The texture of raw beef has been changed.}}
{{History|New 3DS}}
{{History||0.1.0|[[File:Raw Beef JE3 BE2.png|32px]] Added raw beef.}}
{{History|foot}}
== Issues ==
{{issue list}}
== Gallery ==
<gallery>
File:Jeb steak.png|Raw Beef and [[Steak]] in a preview screenshot.
</gallery>
{{Items}}
[[de:Rohes Rindfleisch]]
[[es:Filete crudo]]
[[fr:Bœuf cru]]
[[hu:Nyers marhahús]]
[[ja:生の牛肉]]
[[ko:익히지 않은 소고기]]
[[nl:Rauwe biefstuk]]
[[pl:Surowa wołowina]]
[[pt:Bife cru]]
[[ru:Сырая говядина]]
[[uk:Сира яловичина]]
[[zh:生牛肉]]
[[Category:Food]]
[[Category:Renewable resources]]</li><li>[[:Category:Combat|Category:Combat]]<br/>[[Category:Items]]
[[fr:Catégorie:Combat]]
[[zh:Category:武器]]</li></ul> | |||||
| Java Edition Indev | |||||
0.31{{Extension DPL}}<ul><li>[[Key|Key]]<br/>{{About|the joke item|the golem|Key Golem|in-game control keys|Controls}}
{{Exclusive|Java}}
{{Joke feature}}
{{Item
| image = <gallery>
Red Key.gif | Red
Yellow Key.gif | Yellow
Blue Key.gif | Blue
</gallery>
| renewable =
* Blue: No
* Red, Yellow: Yes
| stackable = No
}}
'''Keys''' were a joke item from [[Java Edition 3D Shareware v1.34]].
There are three different keys: '''red''', '''yellow''', and '''blue'''.
== Obtaining ==
=== Mobs ===
The red key was dropped by the [[wither]], the yellow key was dropped by [[ravager]]s, and the blue key was dropped by the [[elder guardian]].
=== Cheat codes ===
These keys were also obtainable by using the cheat code "IDKFA" when typing in chat.
=== Natural generation ===
{{LootChestItem|red-key,yellow-key,blue-key}}
== Data values ==
=== ID ===
{{ID table
|showforms=y
|generatetranslationkeys=java
|displayname=Red Key
|spritetype=item
|nameid=red_key
|form=item}}
{{ID table
|displayname=Yellow Key
|spritetype=item
|nameid=yellow_key
|form=item}}
{{ID table
|displayname=Blue Key
|spritetype=item
|nameid=blue_key
|form=item
|foot=1}}
== History ==
{{History|java}}
{{History||3D Shareware v1.34|[[File:Red Key.gif|32px]] [[File:Yellow Key.gif|32px]] [[File:Blue Key.gif|32px]] Added red, yellow, and blue keys.}}
{{History|foot}}
== Trivia ==
*[[File:Green Key.png|32px]] A key with a similar appearance is present in ''The Europa Arcology Incident'', a game made by [[Notch]] in 2009.
{{Items}}
{{Jokes}}
[[Category:Joke items]]
[[pt:Chave]]</li><li>[[Cauldron|Cauldron]]<br/>{{For|the boss in ''Minecraft Dungeons''|MCD:Corrupted Cauldron}}
{{Block
| extratext = View [[#Renders|all renders]]
| transparent = Yes
| light = Depends on contained liquid
| tool = wooden pickaxe
| renewable = Yes
| stackable = Yes (64)
| flammable = No
| lavasusceptible = No
}}
A '''cauldron''' is a [[block]] that can contain [[water]], [[lava]] or [[powder snow]] and, in certain situations, collect it from the environment. {{IN|bedrock}}, it can also hold [[potion]]s or dyed water. It also serves as a [[leatherworker]]'s [[job site block]].
== Obtaining ==
=== Breaking ===
A cauldron can be obtained using any [[pickaxe]]. If mined without a pickaxe, it drops nothing. Regardless of the tool, when a cauldron is destroyed, its contents are lost.
{{breaking row|horizontal=1|Cauldron|Pickaxe|Wood}}
=== Natural generation ===
[[File:Natural Cauldron Table.png|A naturally occurring cauldron inside of a [[witch hut]].|thumb]]
A single empty cauldron is generated in each [[swamp hut]]. {{IN|be}}, the cauldrons generated there are {{frac|1|3}} to {{frac|2|3}} full of a random [[potion]].
A cauldron {{frac|2|3}} full of water is generated in each [[igloo]] basement.
[[File:MansionJailInner.png|thumb|Cauldron in [[woodland mansion]] jail.]]
Cauldrons can be found in a few rooms inside of [[woodland mansion]]s.
Two filled cauldrons can be found inside savanna, taiga, snowy taiga, and snowy tundra [[village]] tannery houses.
A single filled cauldron can be found in plains village and desert village tannery houses.
{{IN|java}}, three filled cauldrons can be found in plains village tannery houses.
Cauldrons can also spawn in [[trail ruins]].
=== Crafting ===
A cauldron can be crafted from [[iron ingot]]s.
{{Crafting
|A1= Iron Ingot
|C1= Iron Ingot
|A2= Iron Ingot
|C2= Iron Ingot
|A3= Iron Ingot
|B3= Iron Ingot
|C3= Iron Ingot
|Output= Cauldron
|type= Brewing
}}
== Usage ==
=== Storage for substances ===
Cauldrons can hold a variety of substances. Fluids they cannot hold include [[milk]], [[Honey Bottle|honey]] and any food items that exist in [[bowl]]s; namely [[mushroom stew]], [[beetroot soup]], [[rabbit stew]] and [[suspicious stew]]. {{IN|java}}, cauldrons containing fluids are considered by the game to be separate blocks from each other and from empty cauldrons, which does not affect gameplay but does affect the commands needed to place them.
==== Holding water ====
A cauldron can be filled with [[water]] by {{control|using}} a [[water bucket]] on the cauldron. Once completely filled, a cauldron can be used to fill a water bucket by {{control|using}} an empty [[bucket]] on the cauldron; this empties the cauldron. Despite containing water, using a [[fish bucket]] on a cauldron does not fill it with water, but places water against it, meaning it does nothing to the cauldron.<ref>{{bug|MC-129109|||WAI}}</ref>
A cauldron can also be filled by dumping a water bucket on the block above the cauldron. Once the water block is removed, the cauldron is filled to the full level with water.{{only|be}}
It can contain three levels of water. One level of water can be added to a cauldron by {{control|using}} a [[water bottle]] on it. One level of water can be removed from a cauldron, filling a water bottle, by {{control|using}} a [[glass bottle]] on it.
A cauldron slowly fills with [[water]] when [[rain]]ed upon, if starting empty or with some water. This happens randomly, at 5% of the rate in which snow accumulates on the ground during [[snowfall]].
Water can be stored in a cauldron even in [[the Nether]]. Water in a cauldron does not freeze in cold biomes.
Water in a cauldron does ''not'' absorb [[explosion]] damage; make [[sound]]s and [[particle]]s; absorb fall damage;<ref>{{bug|MC-176867|||WF}}</ref><ref>{{bug|MCPE-104572|||WF}}</ref> allow [[Riptide]] [[trident]]s to activate;<ref>{{bug|MC-145311|||WF}}</ref><ref>{{bug|MCPE-93111}}</ref> or damage [[endermen]], [[strider]]s, or [[blaze]]s.<ref>{{bug|MC-106813|||WF}}</ref> Cauldrons do ''not'' deal drowning damage to mobs inside of them<ref>{{bug|MC-152680}}</ref> and [[fish]] act as if there is no water inside it.<ref>{{bug|MC-126819|||WF}}</ref> The player ''cannot'' float or [[swim]] in it, as the water is about level with the player's waist. Jumping in a cauldron does ''not'' produce any bubble or water particles.
A cauldron placed below a down-facing [[pointed dripstone]] that has water placed a block above it slowly fills with water. The same works with [[lava]], allowing for infinite lava generation.
Attempting to add lava or potion to water empties the cauldron.{{only|be}}
The water in a cauldron cannot be sucked up by a [[sponge]], whether the sponge is touching the cauldron or not.
===== Applying dye to cauldron water =====
{{exclusive|bedrock|section=yes}}
{{IN|bedrock}}, leather armor is dyed through a cauldron, so a cauldron can hold dyed [[water]]. {{control|Using}} a dye on a cauldron filled with water colors the water, consuming the dye. Different dyes may be added to produce mixed colors. {{control|Using}} [[leather armor]] or [[leather horse armor]] on the cauldron dyes that item the color of the water, reducing the water in the cauldron by one level for each item dyed.
Attempting to add water, lava or potion to dyed water empties the cauldron.
==== Holding lava ====
[[File:Lava Cauldron.png|150px|thumb|Cauldron filled with lava]]
Cauldrons can be used to hold lava. {{IN|be|ee}}, when a cauldron is already filled with water, it empties the cauldron and makes an extinguishing sound. A cauldron filled with lava emits a light level of 15, similar to lava, and burns any [[entity]] inside of it; {{in|be|ee|short=1}}, this includes mobs that do not take damage from lava like [[zombified piglin]]s.
Lava inside a cauldron does not interact with water outside of the cauldron. The lava disappears upon putting water in the cauldron.
A [[redstone comparator]] with a lava cauldron behind it outputs redstone signal strength of 3.<ref name=JavaLava>{{bug|MC-204393}}</ref><ref>{{bug|MCPE-104824}}</ref>
A cauldron placed below a down-facing [[pointed dripstone]] that has lava placed a block above it slowly fills with lava.
If a cauldron is filled by lava, using glass bottles on the cauldron does nothing.
==== Holding powder snow ====
[[Powder snow]] is currently the only solid material that can be stored in a cauldron. A cauldron slowly fills with powder snow during [[snowfall]], if starting empty or with any layer of powder snow already inside. Up to three layers can be filled. When the cauldron is full, {{ctrl|interacting}} using a [[bucket]], creates a [[powder snow bucket]] and empties the cauldron. Entities standing in the cauldron do not take freeze damage, and entities wearing [[leather boots]] still fall through the powder snow.
A [[redstone comparator]] with a powder snow cauldron behind it outputs a redstone signal strength proportional to the fill level, up to 3.
Contrary to a cauldron filled with water, a powder snow cauldron that is not full cannot be filled up with a powder snow bucket, as {{control|using}} the bucket on the cauldron instead places powder snow against it.
==== Filling cauldrons with potions ====
{{exclusive|bedrock|education|section=yes}}
{{IN|bedrock}}, a cauldron can hold normal [[potion]]s, [[splash potion]]s and [[lingering potion]]s. {{control|Using}} a potion on a cauldron empties the potion and increases the level of the potion in the cauldron by one level. A glass bottle can then be {{control|used}} on a cauldron with a potion in it, filling the bottle with that potion. This reduces the potion in the cauldron by one level.
{{control|Using}} an [[arrow]] on a cauldron that contains a potion transforms the arrow into a [[tipped arrow]] with that potion [[effect]], and reduce the potion in the cauldron by one level. Tipping multiple arrows at once can be more efficient, and it may use more than one level at once. 1 level of potion tips up to 16 arrows, 2 levels up to 32, and a full cauldron can tip a full stack of arrows, resulting in 21.33 tipped arrows per potion.
Attempting to put [[water]], [[lava]] or a different potion into a cauldron with a potion causes an explosion sound, and the cauldron is emptied.
An entity that stands in a cauldron filled to any level with any potion does not receive the effect of the potion.
Using an empty bucket on a cauldron filled with any potion does nothing, as the bucket remains empty and the potion in the cauldron does not empty.
=== Removing dye from items ===
A cauldron with [[water]] can wash the dye off of leather [[armor]] and [[shulker box]]es, and can remove the top-most pattern layer of a [[banner]], by pressing {{control|use}} on the cauldron with the leather armor, shulker box, or banner in hand. Each wash reduces the water in the cauldron by one level. The water does not become dyed while removing dye from objects.
=== Changing profession ===
If a [[village]] has a cauldron that has not been claimed by a [[villager]], any villager that does not already have a profession or [[job site]] block may change their profession to [[leatherworker]].
=== Extinguishing fire ===
A cauldron with [[water]] or [[powder snow]] extinguishes [[entities]] on [[fire]] that fall into it and the entity emits black particles. This includes [[mob]]s, [[player]]s, [[item]]s (if they land in the cauldron before burning up), and flaming [[arrow]]s{{only|je|short=1}}. Flaming arrows stuck into the side are also extinguished. Entities must reach the water or powder snow in it. Each entity extinguished causes the substance in the cauldron to decrease by one level. If the cauldron is filled with powder snow, it then becomes a water cauldron.
=== Redstone component ===
[[File:Cauldron transmission over piston.png|An example of a cauldron used in a [[redstone]] circuit.|thumb]]
{{see also|Redstone circuit}}
A cauldron can act as a power source for a [[redstone comparator]]. With a cauldron behind it (either directly, or separated by an unpowered solid block), a comparator outputs a signal strength proportional to how full the cauldron is: 0 for empty, 1 for one-third full, 2 for two-thirds full, and 3 for completely full or filled with lava. However, if there is a block between the cauldron and the comparator, the comparator does not immediately update.
== Sounds ==
=== Generic ===
{{Sound table/Block/Normal}}
=== Unique ===
{{edition|java}}:
{{Sound table
|sound=Pointed Dripstone drip water cauldron1.ogg
|sound2=Pointed Dripstone drip water cauldron2.ogg
|sound3=Pointed Dripstone drip water cauldron3.ogg
|sound4=Pointed Dripstone drip water cauldron4.ogg
|sound5=Pointed Dripstone drip water cauldron5.ogg
|sound6=Pointed Dripstone drip water cauldron6.ogg
|sound7=Pointed Dripstone drip water cauldron7.ogg
|sound8=Pointed Dripstone drip water cauldron8.ogg
|subtitle=Water drips
|source=block
|description=When dripping water from a pointed dripstone falls into a cauldron
|id=block.pointed_dripstone.drip_water_into_cauldron
|translationkey=subtitles.block.pointed_dripstone.drip_water_into_cauldron
|volume=2.0
|pitch=0.9-1.0
|distance=16}}
{{Sound table
|sound=Pointed Dripstone drip lava cauldron1.ogg
|sound2=Pointed Dripstone drip lava cauldron2.ogg
|sound3=Pointed Dripstone drip lava cauldron3.ogg
|sound4=Pointed Dripstone drip lava cauldron4.ogg
|subtitle=Lava drips
|source=block
|description=When dripping lava from a pointed dripstone falls into a cauldron
|id=block.pointed_dripstone.drip_lava_into_cauldron
|translationkey=subtitles.block.pointed_dripstone.drip_lava_into_cauldron
|volume=2.0
|pitch=0.9-1.0
|distance=16}}
{{Sound table
|sound=Empty water bucket1.ogg
|sound2=Empty water bucket1.ogg
|sound3=Empty water bucket2.ogg
|sound4=Empty water bucket3.ogg
|subtitle=Bucket empties
|source=block
|description=When water from a bucket is placed in a cauldron <ref group=sound><code>empty1</code> plays twice as often as the other sounds</ref>
|id=item.bucket.empty
|translationkey=subtitles.item.bucket.empty
|volume=1.0
|pitch=1.0 <ref group=sound>Except for the second copy of <code>empty1</code>, which is 0.9</ref>
|distance=16}}
{{Sound table
|sound=Fill water bucket1.ogg
|sound2=Fill water bucket2.ogg
|sound3=Fill water bucket3.ogg
|subtitle=Bucket fills
|source=block
|description=When water from a bucket is removed from a cauldron
|id=item.bucket.fill
|translationkey=subtitles.item.bucket.fill
|volume=1.0
|pitch=1.0
|distance=16}}
{{Sound table
|sound=Empty lava bucket1.ogg
|sound2=Empty lava bucket2.ogg
|sound3=Empty lava bucket3.ogg
|subtitle=Bucket empties
|source=block
|description=When lava is placed in a cauldron
|id=item.bucket.empty_lava
|translationkey=subtitles.item.bucket.empty
|volume=1.0
|pitch=1.0
|distance=16}}
{{Sound table
|sound=Fill lava bucket1.ogg
|sound2=Fill lava bucket2.ogg
|sound3=Fill lava bucket3.ogg
|subtitle=Bucket fills
|source=block
|description=When lava is removed from a cauldron
|id=item.bucket.fill_lava
|translationkey=subtitles.item.bucket.fill
|volume=1.0
|pitch=1.0
|distance=16}}
{{Sound table
|sound=Empty powder snow bucket1.ogg
|sound2=Empty powder snow bucket2.ogg
|subtitle=Bucket empties
|source=block
|description=When powder snow is placed in a cauldron
|id=item.bucket.empty_powder_snow
|translationkey=subtitles.item.bucket.empty
|volume=1.0
|pitch=''varies'' <ref group=sound>Can be 1.0, 0.95, or 1.1 for each sound</ref>
|distance=16}}
{{Sound table
|sound=Fill powder snow bucket1.ogg
|sound2=Fill powder snow bucket2.ogg
|subtitle=Bucket fills
|source=block
|description=When powder snow is removed from a cauldron
|id=item.bucket.fill_powder_snow
|translationkey=subtitles.item.bucket.fill
|volume=1.0
|pitch=''varies'' <ref group=sound>Can be 1.0, 0.9, or 1.1 for each sound</ref>
|distance=16}}
{{Sound table
|sound=Bottle empty1.ogg
|sound2=Bottle empty2.ogg
|subtitle=Bottle empties
|source=block
|description=When water from a bottle is placed in a cauldron
|id=item.bottle.empty
|translationkey=subtitles.item.bottle.empty
|volume=1.0
|pitch=1.0
|distance=16}}
{{Sound table
|sound=Bottle fill_water1.ogg
|sound2=Bottle fill_water2.ogg
|sound3=Bottle fill_water3.ogg
|sound4=Bottle fill_water4.ogg
|subtitle=Bottle fills
|source=block
|description=When water from a bottle is removed from a cauldron
|id=item.bottle.fill
|translationkey=subtitles.item.bottle.fill
|volume=1.0
|pitch=1.0
|distance=16}}
{{Sound table
|sound=Empty water bucket1.ogg
|sound2=Empty water bucket2.ogg
|sound3=Empty water bucket3.ogg
|subtitle=Leatherworker works
|source=neutral
|description=Randomly while a leatherworker is working
|id=entity.villager.work_leatherworker
|translationkey=subtitles.entity.villager.work_leatherworker
|volume=0.9
|pitch=0.8-1.2
|distance=16
|foot=1}}
{{edition|bedrock}}:
{{Sound table
|type=bedrock
|sound=Pointed Dripstone drip water cauldron1.ogg
|sound2=Pointed Dripstone drip water cauldron2.ogg
|sound3=Pointed Dripstone drip water cauldron3.ogg
|sound4=Pointed Dripstone drip water cauldron4.ogg
|sound5=Pointed Dripstone drip water cauldron5.ogg
|sound6=Pointed Dripstone drip water cauldron6.ogg
|sound7=Pointed Dripstone drip water cauldron7.ogg
|sound8=Pointed Dripstone drip water cauldron8.ogg
|source=block
|description=When dripping water from a pointed dripstone falls into a cauldron
|id=cauldron_drip.water<br>.pointed_dripstone
|volume=2.0
|pitch=0.9-1.0}}
{{Sound table
|sound=Pointed Dripstone drip lava cauldron1.ogg
|sound2=Pointed Dripstone drip lava cauldron2.ogg
|sound3=Pointed Dripstone drip lava cauldron3.ogg
|sound4=Pointed Dripstone drip lava cauldron4.ogg
|source=block
|description=When dripping lava from a pointed dripstone falls into a cauldron
|id=cauldron_drip.lava<br>.pointed_dripstone
|volume=2.0
|pitch=0.9-1.0}}
{{Sound table
|sound=Fizz.ogg
|source=block
|description=When a different liquid is put in a cauldron with a potion
|id=random.fizz
|volume=1.0
|pitch=0.6-0.8<wbr>{{Checkthecode}}[[Category:Pages with inaccurate sound pitch value]]}}
{{Sound table
|rowspan=8
|sound=Water Splash Old.ogg
|source=block
|description=When dye is added to a cauldron
|id=cauldron.adddye
|volume=0.1
|pitch=1.0}}
{{Sound table
|source=block
|description=When armor is dyed using a cauldron
|id=cauldron.dyearmor
|volume=0.1
|pitch=1.0}}
{{Sound table
|source=block
|description=When dye is removed from armor using a cauldron
|id=cauldron.cleanarmor
|volume=0.1
|pitch=1.0}}
{{Sound table
|source=block
|description=When all patterns are removed from a banner using a cauldron
|id=cauldron.cleanbanner
|volume=0.1
|pitch=1.0}}
{{Sound table
|source=block
|description=When a potion is placed in a cauldron<wbr><ref group=sound name=potionsplash>{{Bug|MCPE-174867}}</ref>
|id=cauldron.fillpotion
|volume=0.1
|pitch=1.0}}
{{Sound table
|source=block
|description=When a potion is taken from a cauldron<wbr><ref group=sound name=potionsplash/>
|id=cauldron.takepotion
|volume=0.1
|pitch=1.0}}
{{Sound table
|source=block
|description=When water from a bucket or bottle is placed in a cauldron<wbr><ref group=sound name=bucketsplash>{{Bug|MCPE-135919}}</ref>
|id=cauldron.fillwater
|volume=0.1
|pitch=1.0}}
{{Sound table
|source=block
|description=When water from a bucket or bottle is removed from a cauldron <ref group=sound name=bucketsplash/>
|id=cauldron.takewater
|volume=0.1
|pitch=1.0}}
{{Sound table
|sound=Empty lava bucket1.ogg
|sound2=Empty lava bucket2.ogg
|sound3=Empty lava bucket3.ogg
|source=block
|description=When lava is placed in a cauldron
|id=bucket.empty_lava
|volume=1.0
|pitch=1.0}}
{{Sound table
|sound=Fill lava bucket1.ogg
|sound2=Fill lava bucket2.ogg
|sound3=Fill lava bucket3.ogg
|source=block
|description=When lava is removed from a cauldron
|id=bucket.fill_lava
|volume=1.0
|pitch=1.0}}
{{Sound table
|sound=Empty powder snow bucket1.ogg
|sound2=Empty powder snow bucket2.ogg
|source=block
|description=When powder snow is placed in a cauldron
|id=bucket.empty_powder_snow
|volume=1.0
|pitch=1.0}}
{{Sound table
|sound=Fill powder snow bucket1.ogg
|sound2=Fill powder snow bucket2.ogg
|source=player
|description=When powder snow is removed from a cauldron
|id=bucket.fill_powder_snow
|volume=1.0
|pitch=1.0}}
{{Sound table
|sound=Empty water bucket1.ogg
|sound2=Empty water bucket2.ogg
|sound3=Empty water bucket3.ogg
|source=block
|description=Randomly while a leatherworker is working
|id=bucket.fill_water
|volume=1.0
|pitch=1.0
|foot=1}}
== Data values ==
=== ID ===
{{edition|java}}:
{{ID table
|edition=java
|showblocktags=y
|showforms=y
|generatetranslationkeys=y
|displayname=Cauldron
|spritetype=block
|nameid=cauldron
|blocktags=cauldrons
|translationkey=block.minecraft.cauldron,item.minecraft.cauldron}}
{{ID table
|displayname=Lava Cauldron
|spritename=cauldron
|spritetype=block
|nameid=lava_cauldron
|blocktags=cauldrons
|form=block}}
{{ID table
|displayname=Powder Snow Cauldron
|spritename=cauldron
|spritetype=block
|nameid=powder_snow_cauldron
|blocktags=cauldrons
|form=block}}
{{ID table
|displayname=Water Cauldron
|spritename=cauldron
|spritetype=block
|nameid=water_cauldron
|blocktags=cauldrons
|form=block
|foot=1}}
{{edition|bedrock}}:
{{ID table
|edition=bedrock
|firstcolumnname=Type
|shownumericids=y
|showforms=y
|generatetranslationkeys=y
|displayname=Normal block
|spritename=cauldron
|spritetype=block
|nameid=cauldron
|id=118
|form=block
|itemform=item.cauldron}}
{{ID table
|displayname=Brighting block
|spritename=cauldron
|spritetype=block
|nameid=lava_cauldron
|id=465
|form=block
|translationkey=-}}
{{ID table
|displayname=Item
|spritename=cauldron
|spritetype=item
|nameid=cauldron
|id=432
|form=item
|foot=1}}
{{ID table
|notnamespaced=y
|displayname=Block entity
|spritename=cauldron
|spritetype=block
|nameid=Cauldron
|foot=1}}
=== Block states ===
{{see also|Block states}}
{{/BS}}
=== Block data ===
{{IN|be}}, a cauldron has a block entity associated with it that holds additional data about the block.
See [[Bedrock Edition level format/Block entity format]].
== Achievements ==
{{load achievements|Tie Dye Outfit}}
== History ==
{{History|java}}
{{History||1.0.0|snap=Beta 1.9 Prerelease 2|[[File:Cauldron JE1.png|32px]] Cauldrons are present in the code, but are not assigned to a [[block]] ID (and thus are unobtainable without [http://www.minecraftforum.net/topic/673742-19-pre2-cauldron-block/ mods] (archived link: [https://web.archive.org/web/20141222205821/https://dl.dropboxusercontent.com/u/19728555/cauldron.zip])).}}
{{History|||snap=Beta 1.9 Prerelease 3|[[File:Cauldron (item) JE1 BE1.png|32px]] Cauldrons have been given a [[block]] ID, an [[item]] ID, and a [[crafting]] recipe.}}
{{History||1.2.1|snap=12w06a|Cauldrons have now become [[renewable]], due to [[zombie]]s sometimes dropping iron ingots.}}
{{History||1.4.2|snap=12w40a|Empty cauldrons can now be found in [[witch hut]]s.}}
{{History||1.5|snap=13w02a|[[File:Cauldron JE2.png|32px]] The walls inside of the cauldron now use the bottom texture, and the cauldron now has no bottom.<ref name="whatdoyouputinacauldrontomakeitlighter">{{bug|MC-6772}}</ref>}}
{{History|||snap=13w02b|[[File:Cauldron JE1.png|32px]] Fixed the model error from 13w02a.}}
{{History||1.8|snap=14w03a|[[File:Cauldron JE4.png|32px]] Cauldrons now appear completely opaque.<ref>{{bug|MC-44990}}</ref>}}
{{History|||snap=14w03b|[[File:Cauldron JE1.png|32px]] Cauldrons now render as normal again.}}
{{History|||snap=14w06a|Cauldrons now have extra planes inside the feet. These planes are now rendered solid, so the [[player]] cannot see through the [[water]].{{info needed|what exactly does this mean?}}}}
{{History|||snap=14w10a|[[File:Cauldron JE6.png|32px]] The cauldron's feet now have planes on all sides.}}
{{History||1.11|snap=16w39a|Cauldrons now generate naturally in jail cells in [[woodland mansion]]s.}}
{{History||July 19, 2017|link=https://twitter.com/jeb_/status/887599625045250048|[[Jeb]] tweets image of a new jungle [[planks]], cauldron and [[dandelion]] textures.}}
{{History||1.13|snap=17w47a|Prior to [[1.13/Flattening|''The Flattening'']], this [[block]]'s numeral ID was 118, and the [[item]]'s was 380.}}
{{History||1.14|snap=18w43a|[[File:Cauldron JE7.png|32px]]<br/>[[File:Cauldron (item) JE2 BE2.png|32px]] The textures of cauldrons have been changed.}}
{{History|||snap=18w48a|Cauldrons now generate in the updated [[plains]] [[village]]s.}}
{{History|||snap=18w49a|Cauldrons now generate in the updated [[savanna]] villages and the new [[snowy tundra]] villages.}}
{{History|||snap=18w50a|Cauldrons now generate in the updated [[desert]] and [[taiga]] villages.}}
{{History|||snap=19w03a|The numerous missing cullface arguments for the cauldron have been fixed.}}
{{History|||snap=19w11a|Cauldrons now serve as leatherworker [[villager]]s' job site block.}}
{{History|||snap=19w13a|The cauldron's hitbox has been fixed.<ref>{{bug|MC-129205}}</ref>}}
{{History||1.17|snap=20w45a|Normal and water cauldrons have been split into different blocks, making filled cauldrons no longer work as a workstation for villagers.<ref name="technicalunemployment">{{bug|MC-204430}}</ref>
|This also means that any [[structure]]s before this snapshot that have cauldron(s) fill with water now no longer generate(s) cauldron. Instead, water cauldron(s) will generate.}}
{{History|||snap=20w48a|Cauldrons can now collect water and lava dripped by [[pointed dripstone]].}}
{{History|||snap=21w11a|[[Lava bucket]]s and [[powder snow bucket]]s can now be emptied into any filled cauldron.}}
{{History|||snap=21w13a|Filled cauldrons work again as a workstation for villagers.}}
{{History||1.20|snap=23w12a|Cauldrons now generate in [[trail ruins]].}}
{{History|pocket alpha}}
{{History||v0.14.0|snap=build 1|[[File:Cauldron BE1.png|32px]]<br/>[[File:Cauldron (item) JE1 BE1.png|32px]] Added cauldrons.
|Cauldrons are generated naturally in [[witch hut]]s.}}
{{History||v0.15.0|snap=build 1|Cauldrons can now be moved by [[piston]]s.}}
{{History|pocket}}
{{History||1.1.0|snap=alpha 1.1.0.0|Cauldrons now generate naturally in [[woodland mansion]]s, their fullness status is unknown.}}
{{History|bedrock}}
{{History||1.10.0|snap=beta 1.10.0.3|[[File:Cauldron BE2.png|32px]] The textures of cauldrons have been changed.
|Cauldrons now generate in tannery houses in [[village]]s.}}
{{History||?|[[File:Cauldron JE7.png|32px]] The textures of cauldrons have been changed.}}
{{History|console}}
{{History||xbox=TU7|xbone=CU1|ps=1.0|wiiu=Patch 1|switch=1.0.1|[[File:Cauldron JE1.png|32px]]{{verify|Was this the actually used model?}}[[File:Cauldron (item) JE1 BE1.png|32px]] Added cauldrons.}}
{{History||xbox=TU60|xbone=CU51|ps=1.64|wiiu=Patch 30|switch=1.0.11|[[Water]] in a cauldron can now be [[dye]]d.
|[[Armor]] can be dyed in a cauldron filled with dyed water.
|Cauldrons can no longer be pushed by [[piston]]s.}}
{{History||xbox=none|xbone=none|ps=1.90|wiiu=none|switch=none|[[File:Cauldron JE7.png|32px]]{{verify|Was this the actually used model?}}<br/>[[File:Cauldron (item) JE2 BE2.png|32px]] The textures of cauldrons have been changed.}}
{{History|new 3ds}}
{{History||0.1.0|[[File:Cauldron BE1.png|32px]]<br/>[[File:Cauldron (item) JE1 BE1.png|32px]] Added cauldrons.}}
{{History|foot}}
=== Water cauldron ===
{{History|java}}
{{History||1.0.0|snap=Beta 1.9 Prerelease 2|[[File:Water Cauldron (level 1) JE1.png|32px]] [[File:Water Cauldron (level 2) JE1.png|32px]] [[File:Water Cauldron JE1.png|32px]] If made to work with a mod, cauldrons can be filled with a [[water bucket]].
|Cauldron water transparency appears inconsistent depending on hardware.}}
{{History||1.3.1|snap=12w22a|Cauldrons can now be filled with [[water]], if placed outside during [[rain]] or a [[thunderstorm]].}}
{{History||1.4.2|snap=12w34a|Holding a piece of [[Dyeing|dyed]] leather [[armor]] and right-clicking a [[water]]-filled cauldron now washes away all [[dye]]s applied to the leather armor.}}
{{History||1.5|snap=13w02a|[[File:Water Cauldron (level 1) JE2.png|32px]] [[File:Water Cauldron (level 2) JE2.png|32px]] [[File:Water Cauldron JE2.png|32px]] The walls inside of the cauldron now use the bottom texture, and the cauldron now has no bottom.<ref name="whatdoyouputinacauldrontomakeitlighter"/>}}
{{History|||snap=13w02b|[[File:Water Cauldron (level 1) JE1.png|32px]] [[File:Water Cauldron (level 2) JE1.png|32px]] [[File:Water Cauldron JE1.png|32px]] Fixed the model error from 13w02a.}}
{{History||1.6.1|snap=13w18a|When used with a [[redstone comparator]], cauldrons now output a signal varying in strength according to the amount of water inside.}}
{{History||1.7.2|snap=13w43a|Cauldrons now extinguish burning [[entity|entities]].}}
{{History||1.8|snap=14w10a|[[File:Water Cauldron (level 1) JE4.png|32px]] [[File:Water Cauldron (level 2) JE4.png|32px]] [[File:Water Cauldron JE4.png|32px]] The cauldron's feet now have planes on all sides.}}
{{History|||snap=14w30a|Right-clicking a non-empty cauldron with a [[banner]] now removes the top-most pattern layer.}}
{{History||1.9|snap=15w43a|A cauldron now generates within [[igloo]] basements, {{frac|2|3}} full.}}
{{History|||snap=15w44a|A full cauldron can now be emptied with a [[bucket]], filling the bucket with [[water]].}}
{{History||1.11|snap=16w32a|When a cauldron washes a dyed item (leather [[armor]] or [[banner]]), it reduces its water level by 1.}}
{{History|||snap=16w33a|A [[water bottle]] is now able to add 1 [[water]] level to a cauldron.}}
{{History||1.13|snap=18w10d|[[Shulker box]]es can now be undyed in a cauldron.}}
{{History|||snap=18w15a|[[File:Water Cauldron (level 1) JE5.png|32px]] [[File:Water Cauldron (level 2) JE5.png|32px]] [[File:Water Cauldron JE5.png|32px]] [[Water]] in cauldrons is now white colored.<ref>{{bug|MC-128253}}</ref>}}
{{History|||snap=18w20b|[[File:Water Cauldron (level 1) JE6.png|32px]] [[File:Water Cauldron (level 2) JE6.png|32px]] [[File:Water Cauldron JE6.png|32px]] Cauldron water is now colored again, depending on the biome.
|[[File:Swamp Water Cauldron JE1.png|32px]] [[File:Warm Ocean Water Cauldron JE1.png|32px]] [[File:Lukewarm Ocean Water Cauldron JE1.png|32px]] [[File:Cold Ocean Water Cauldron JE1.png|32px]] [[File:Frozen Ocean Water Cauldron JE1.png|32px]] This currently affects ocean temperature variants and swamps.
|[[File:Swamp Hills Water Cauldron JE1.png|32px]] Swampland M water has a yellowish color while in a cauldron.<ref>{{bug|MC-128558}}</ref>}}
{{History|||snap=pre3|[[File:Swamp Water Cauldron JE1.png|32px]] Swampland M water now has the same [[water]] color in cauldrons as regular [[swamp]]s.}}
{{History||1.14|snap=18w43a|[[File:Water Cauldron (level 1) JE7.png|32px]] [[File:Water Cauldron (level 2) JE7.png|32px]] [[File:Water Cauldron JE7.png|32px]]<br>[[File:Swamp Water Cauldron JE2.png|32px]] [[File:Warm Ocean Water Cauldron JE2.png|32px]] [[File:Lukewarm Ocean Water Cauldron JE2.png|32px]] [[File:Cold Ocean Water Cauldron JE2.png|32px]] [[File:Frozen Ocean Water Cauldron JE2.png|32px]] The textures of cauldrons have been changed.}}
{{History|||snap=19w03a|The numerous missing cullface arguments for the water cauldron have been fixed.}}
{{History||1.17|snap=20w45a|Normal and water cauldrons have been split into different blocks, making filled cauldrons no longer work as a workstation for villagers.<ref name="technicalunemployment"/>
|This also means that any [[structure]]s before this snapshot that have cauldron(s) fill with water now no longer generate(s) cauldron. Instead, water cauldron(s) will generate.}}
{{History|||snap=21w13a|Filled cauldrons work again as a workstation for villagers.}}
{{History|pocket alpha}}
{{History||v0.14.0|snap=build 1|[[File:Water Cauldron (level 1) BE1.png|32px]] [[File:Water Cauldron (level 2) BE1.png|32px]] [[File:Water Cauldron BE1.png|32px]] Added water cauldrons.
|[[Water]] color in cauldrons can be changed by adding [[dye]]s. [[Item]]s dipped in the water are dyed that color.}}
{{History||v0.15.0|snap=build 1|Cauldrons are now used to dye leather [[horse armor]].
|Water cauldrons can now be moved by [[piston]]s.}}
{{History|pocket}}
{{History||1.0.0|snap=alpha 0.17.0.1|Cauldrons now generate naturally in [[igloo]] basements.
|Cauldrons now extinguish burning [[entity|entities]].}}
{{History|bedrock}}
{{History||1.10.0|snap=beta 1.10.0.3|[[File:Water Cauldron (level 1) BE2.png|32px]] [[File:Water Cauldron (level 2) BE2.png|32px]] [[File:Water Cauldron BE2.png|32px]] The textures of cauldrons have been changed.}}
{{History||1.20.0|snap=beta 1.20.0.20|[[File:Water Cauldron (level 1) MCPE-170427.png|32px]] [[File:Water Cauldron (level 2) MCPE-170427.png|32px]] [[File:Water Cauldron MCPE-170427.png|32px]] [[Water]] in cauldrons now looks like lava.<ref>{{bug|MCPE-170427}}</ref>}}
{{History||1.20.10|snap=beta 1.20.10.20|[[File:Water Cauldron (level 1) BE2.png|32px]] [[File:Water Cauldron (level 2) BE2.png|32px]] [[File:Water Cauldron BE2.png|32px]] Cauldron water now uses the correct texture.}}
{{History|console}}
{{History||xbox=TU7|xbone=CU1|ps=1.0|wiiu=Patch 1|switch=1.0.1|[[File:Water Cauldron (level 1) JE1.png|32px]] [[File:Water Cauldron (level 2) JE1.png|32px]] [[File:Water Cauldron JE1.png|32px]]{{verify|Were these the models used?}} Added water cauldrons.}}
{{History||xbox=TU12|[[Water]] is no longer removed from a [[water bucket]] when filling a cauldron in [[creative]] mode.}}
{{History||xbox=TU14|ps=1.04|Cauldrons fill with water if placed outside during [[rain]] or a [[thunderstorm]].}}
{{History||xbox=TU31|xbone=CU19|ps=1.22|wiiu=Patch 3|Cauldrons with [[water]] in them extinguish burning [[entity|entities]], taking away one water level each time.}}
{{History|new 3ds}}
{{History||0.1.0|[[File:Water Cauldron (level 1) BE1.png|32px]] [[File:Water Cauldron (level 2) BE1.png|32px]] [[File:Water Cauldron BE1.png|32px]]{{verify|Were these the models used?}} Added cauldrons.
|Water color in cauldrons can be changed by adding [[dye]]s.
|Cauldrons can be used to [[dye]] leather [[armor]].}}
{{History|foot}}
=== Lava cauldron ===
{{History|Java}}
{{History||1.17|snap=20w45a|[[File:Lava Cauldron JE1.png|32px]] Cauldrons can now be filled with [[lava]].}}
{{History|||snap=21w20a|Lava cauldrons now emits redstone signal strength of 3.<ref name=JavaLava/>}}
{{History|bedrock}}
{{History||1.9.0|snap=beta 1.9.0.2|[[File:Lava Cauldron BE1.png|32px]] Cauldrons can now be filled with lava.}}
{{History||1.10.0|snap=beta 1.10.0.3|[[File:Lava Cauldron BE2.png|32px]] The texture of cauldrons filled with lava has been changed.}}
{{History|console}}
{{History||xbox=none|xbone=none|ps=1.88|wiiu=none|switch=none|[[File:Lava Cauldron LCE1.png|32px]] Cauldrons can now be filled with lava.}}
{{History||xbox=none|xbone=none|ps=1.90|wiiu=none|switch=none|[[File:Lava Cauldron LCE2.png|32px]] The texture of cauldrons filled with lava has been changed.}}
{{History|foot}}
=== Powder Snow Cauldron ===
{{History|java}}
{{History||1.17|snap=20w46a|[[File:Powder Snow Cauldron (level 1) JE1.png|32px]] [[File:Powder Snow Cauldron (level 2) JE1.png|32px]] [[File:Powder Snow Cauldron JE1.png|32px]] Cauldrons can now be filled with powder snow.}}
{{History||1.17.1|snap=Pre-release 1|Powder snow now fills twice as fast in a cauldron.}}
{{History|bedrock}}
{{History||1.17.0|snap=beta 1.17.0.52|[[File:Powder Snow Cauldron (level 1) JE1.png|32px]] [[File:Powder Snow Cauldron (level 2) JE1.png|32px]] [[File:Powder Snow Cauldron JE1.png|32px]] Cauldrons can now be filled with powder snow.}}
{{History|foot}}
=== Potion cauldron ===
{{cleanup|Many potion cauldrons here are listed as being added in versions where said potion did not exist yet - please rearrange and add new history entries accordingly}}
{{History|java}}
{{History||1.0.0|snap=Beta 1.9 Prerelease 2|[[File:Arrran Cauldron 1.png|32px]] [[File:Arrran Cauldron 2.png|32px]] [[File:Arrran Cauldron 3.png|32px]] [[File:Arrran Cauldron 4.png|32px]] <br/>[[File:Cauldron (item) JE1 BE1.png|32px]] Cauldrons are intended to be used for the creation of [[potion]]s.
|Cauldrons can be made to work with a mod, through which the following has been revealed:
* Applying a [[potion]] ingredient to a water cauldron cause it to change to a differently-colored [[lava]] texture, and adding any further potion ingredients to the filled cauldron cause the [[liquid]] to change color.
* Scooping out a potion with ingredients applied cause the potion to have an effect related to the ingredient, e.g. a potion brewed with a [[magma cream]] have [[Fire Resistance]] as an effect.}}
{{History|||snap=Beta 1.9 Prerelease 3|The system was deemed too complex and not user-friendly,<ref>{{Tweet|jeb|119466949708222465|Potions are delayed because *add to cauldron, pick up, look at tooltip, pour back into cauldron, repeat* was extremely tedious|September 29, 2011}}</ref> so the cauldron's ability to brew potions has been replaced with the [[brewing stand]].<ref>{{Tweet|jeb|119710836469149697|A quick discussion with @notch led me in on a new way of doing the potion brewing. Cauldron is out...|September 30, 2011}}</ref><ref>{{Tweet|jeb|119762786619359232|Look back at me! Your Cauldron is now a Brewing Stand. Anything's possible when working with interaction design.|September 30, 2011}}</ref> That brewing system is finalized and doesn't change in the rest of the pre-releases.}}
{{History|pocket alpha}}
{{History||v0.14.0|snap=build 1|[[File:Invisibility Potion Cauldron BE1.png|32px]] [[File:Jump Boost Potion Cauldron BE1.png|32px]] [[File:Fire Resistance Potion Cauldron BE1.png|32px]] [[File:Speed Potion Cauldron BE1.png|32px]] [[File:Slowness Potion Cauldron BE1.png|32px]] [[File:Water Breathing Potion Cauldron BE1.png|32px]] [[File:Instant Health Potion Cauldron BE1.png|32px]] [[File:Instant Damage Potion Cauldron BE1.png|32px]] [[File:Poison Potion Cauldron BE1.png|32px]] [[File:Regeneration Potion Cauldron BE1.png|32px]] [[File:Strength Potion Cauldron BE1.png|32px]] [[File:Weakness Potion Cauldron BE1.png|32px]] [[File:Wither Potion Cauldron BE1.png|32px]] [[File:Turtle Master Potion Cauldron BE1.png|32px]] [[File:Slow Falling Potion Cauldron BE1.png|32px]] Cauldrons can store [[potion]]s, and [[explosion|explode]] if potions are mixed.}}
{{History||v0.15.0|snap=build 1|Cauldrons are now used to make [[tipped arrow]]s.}}
{{History|bedrock}}
{{History||1.10.0|snap=beta 1.10.0.3|[[File:Invisibility Potion Cauldron BE2.png|32px]] [[File:Jump Boost Potion Cauldron BE2.png|32px]] [[File:Fire Resistance Potion Cauldron BE2.png|32px]] [[File:Speed Potion Cauldron BE2.png|32px]] [[File:Slowness Potion Cauldron BE2.png|32px]] [[File:Water Breathing Potion Cauldron BE2.png|32px]] [[File:Instant Health Potion Cauldron BE2.png|32px]] [[File:Instant Damage Potion Cauldron BE2.png|32px]] [[File:Poison Potion Cauldron BE2.png|32px]] [[File:Regeneration Potion Cauldron BE2.png|32px]] [[File:Strength Potion Cauldron BE2.png|32px]] [[File:Weakness Potion Cauldron BE2.png|32px]] [[File:Wither Potion Cauldron BE2.png|32px]] [[File:Turtle Master Potion Cauldron BE2.png|32px]] [[File:Slow Falling Potion Cauldron BE2.png|32px]] The textures of cauldrons filled with [[potion]]s have been changed.}}
{{History|console}}
{{History||xbox=TU60|xbone=CU51|ps=1.64|wiiu=Patch 30|switch=1.0.11|[[File:Invisibility Potion Cauldron BE1.png|32px]] [[File:Jump Boost Potion Cauldron BE1.png|32px]] [[File:Fire Resistance Potion Cauldron BE1.png|32px]] [[File:Speed Potion Cauldron BE1.png|32px]] [[File:Slowness Potion Cauldron BE1.png|32px]] [[File:Water Breathing Potion Cauldron BE1.png|32px]] [[File:Instant Health Potion Cauldron BE1.png|32px]] [[File:Instant Damage Potion Cauldron BE1.png|32px]] [[File:Poison Potion Cauldron BE1.png|32px]] [[File:Regeneration Potion Cauldron BE1.png|32px]] [[File:Strength Potion Cauldron BE1.png|32px]] [[File:Weakness Potion Cauldron BE1.png|32px]] [[File:Wither Potion Cauldron BE1.png|32px]] [[File:Turtle Master Potion Cauldron BE1.png|32px]] [[File:Slow Falling Potion Cauldron BE1.png|32px]]{{verify|Were these the models used?}} Cauldrons can now be filled with [[potion]]s and make an explosion [[sound]] if they are mixed.
|[[Effect]]s can now be applied to [[arrow]]s by using them on a potion-filled cauldron.}}
{{History||xbox=none|xbone=none|ps=1.90|wiiu=none|switch=none|[[File:Invisibility Potion Cauldron BE2.png|32px]] [[File:Jump Boost Potion Cauldron BE2.png|32px]] [[File:Fire Resistance Potion Cauldron BE2.png|32px]] [[File:Speed Potion Cauldron BE2.png|32px]] [[File:Slowness Potion Cauldron BE2.png|32px]] [[File:Water Breathing Potion Cauldron BE2.png|32px]] [[File:Instant Health Potion Cauldron BE2.png|32px]] [[File:Instant Damage Potion Cauldron BE2.png|32px]] [[File:Poison Potion Cauldron BE2.png|32px]] [[File:Regeneration Potion Cauldron BE2.png|32px]] [[File:Strength Potion Cauldron BE2.png|32px]] [[File:Weakness Potion Cauldron BE2.png|32px]] [[File:Wither Potion Cauldron BE2.png|32px]] [[File:Turtle Master Potion Cauldron BE2.png|32px]] [[File:Slow Falling Potion Cauldron BE2.png|32px]]{{verify|Were these the models used?}} The textures of cauldrons filled with [[potion]]s have been changed.}}
{{History|new 3ds}}
{{History||0.1.0|[[File:Invisibility Potion Cauldron BE1.png|32px]] [[File:Jump Boost Potion Cauldron BE1.png|32px]] [[File:Fire Resistance Potion Cauldron BE1.png|32px]] [[File:Speed Potion Cauldron BE1.png|32px]] [[File:Slowness Potion Cauldron BE1.png|32px]] [[File:Water Breathing Potion Cauldron BE1.png|32px]] [[File:Instant Health Potion Cauldron BE1.png|32px]] [[File:Instant Damage Potion Cauldron BE1.png|32px]] [[File:Poison Potion Cauldron BE1.png|32px]] [[File:Regeneration Potion Cauldron BE1.png|32px]] [[File:Strength Potion Cauldron BE1.png|32px]] [[File:Weakness Potion Cauldron BE1.png|32px]] [[File:Wither Potion Cauldron BE1.png|32px]] [[File:Turtle Master Potion Cauldron BE1.png|32px]] [[File:Slow Falling Potion Cauldron BE1.png|32px]]{{verify|Were these the models used?}} Cauldrons can store [[potion]]s.
|Cauldrons make an explosion [[sound]] if potions are mixed, and the potions disappear.
|Potions inside cauldrons have a bubbling effect.}}
{{History|foot}}
===Cauldron "item"===
{{:Technical blocks/Cauldron}}
==Issues==
{{issue list}}
==Trivia==
*[[Arrow]]s "stick" to the [[water]] in a cauldron.
*The inside of a cauldron is 0.25 ({{frac|1|4}}) blocks tall.
*A cauldron holding water is the only way to have water in [[the Nether]] without the use of [[commands]].
==Renders==
; Normal water
<gallery>
Water Cauldron (level 1).png | Level 1
Water Cauldron (level 2).png | Level 2
Water Cauldron.png | Level 3 - full
Water Cauldron (level 1) BE.png | Level 1 (Bedrock Edition)
Water Cauldron (level 2) BE.png | Level 2 (Bedrock Edition)
Water Cauldron BE.png | Level 3 - full (Bedrock Edition)
</gallery>
;Dyed water {{Only|BE}}
<gallery>
Cauldron (filled with white water).png|White Water Cauldron
Cauldron (filled with light gray water).png|Light Gray Water Cauldron
Cauldron (filled with gray water).png|Gray Water Cauldron
Cauldron (filled with black water).png|Black Water Cauldron
Cauldron (filled with brown water).png|Brown Water Cauldron
Cauldron (filled with red water).png|Red Water Cauldron
Cauldron (filled with orange water).png|Orange Water Cauldron
Cauldron (filled with yellow water).png|Yellow Water Cauldron
Cauldron (filled with lime water).png|Lime Water Cauldron
Cauldron (filled with green water).png|Green Water Cauldron
Cauldron (filled with cyan water).png|Cyan Water Cauldron
Cauldron (filled with light blue water).png|Light Blue Water Cauldron
Cauldron (filled with blue water).png|Blue Water Cauldron
Cauldron (filled with purple water).png|Purple Water Cauldron
Cauldron (filled with magenta water).png|Magenta Water Cauldron
Cauldron (filled with pink water).png|Pink Water Cauldron
</gallery>
;Cauldrons filled with potions {{Only|BE}}
<gallery>
Night Vision Potion Cauldron.png|Night Vision Potion Cauldron
Invisibility Potion Cauldron.png|Invisibility Potion Cauldron
Jump Boost Potion Cauldron.png|Leaping Potion Cauldron
Fire Resistance Potion Cauldron.png|Fire Resistance Potion Cauldron
Speed Potion Cauldron.png|Swiftness Potion Cauldron
Slowness Potion Cauldron.png|Slowness Potion Cauldro
Turtle Master Potion Cauldron.png|Turtle Master Potion Cauldron
Water Breathing Potion Cauldron.png|Water Breathing Potion Cauldron
Instant Health Potion Cauldron.png|Healing Potion Cauldron
Instant Damage Potion Cauldron.png|Harming Potion Cauldron
Poison Potion Cauldron.png|Poison Potion Cauldron
Regeneration Potion Cauldron.png|Regeneration Potion Cauldron
Strength Potion Cauldron.png|Strength Potion Cauldron
Weakness Potion Cauldron.png|Weakness Potion Cauldron
Slow Falling Potion Cauldron.png|Slow Falling Potion Cauldron
Wither Potion Cauldron.png|Decay Potion Cauldron
</gallery>
;Powder Snow
<gallery>
Powder Snow Cauldron (level 1).png | Level 1
Powder Snow Cauldron (level 2).png | Level 2
Powder Snow Cauldron.png | Level 3 - full
</gallery>
== Gallery==
<gallery>
The three stages of water height in cauldrons.png| All cauldron states in [[Java Edition]].
Cauldrons potion.png|All [[potion]]s in cauldrons.{{only|be|short=1}}
Cauldrons DyeWater.png|All cauldron [[water]] colors possible with one dye.{{only|be|short=1}}
Brewing Potions.png|How potions were brewed in [[Java Edition Beta 1.9 Prerelease 2|Beta 1.9 Pre-Release 2]] if enabled through a mod.
Dyed Water Cauldrons.jpg|Cauldrons filled with dyed water.
Potion Cauldron.jpg|A cauldron filled with potions.
Arrow Tipping 1.jpg|Using a cauldron to make [[tipped arrow]]s.
Arrow Tipping 2.jpg|Using a cauldron to make [[tipped arrow]]s.
Arrow Tipping 3.jpg|Using a cauldron to make [[tipped arrow]]s.
Snow Cauldron.jpg|A cauldron full of snow.
</gallery>
==References==
{{reflist|2}}
{{Blocks|Utility}}
{{items}}
[[Category:Natural blocks]]
[[Category:Job blocks]]
[[Category:Utility blocks]]
[[Category:Storage]]
[[Category:Manufactured blocks]]
[[Category:Generated structure blocks]]
[[Category:Light sources]]
[[cs:Kotel]]
[[de:Kessel]]
[[es:Caldero]]
[[fr:Chaudron]]
[[hu:Üst]]
[[it:Calderone]]
[[ja:大釜]]
[[ko:가마솥]]
[[nl:Ketel]]
[[pl:Kocioł]]
[[pt:Caldeirão]]
[[ru:Котёл]]
[[th:หม้อปรุงยา]]
[[uk:Казан]]
[[zh:炼药锅]]</li></ul> | 20100128 | Iron ore no longer drops iron blocks. | |||
| 20100129 | Blocks of iron can now be crafted from 4 iron ingots. | ||||
| 20100130 | Blocks of iron are now more expensive, requiring 9 iron ingots (3×3) instead of 4 (2×2). | ||||
| ? | ? | Iron blocks can be uncrafted into 9 ingots. | |||
| Java Edition Alpha | |||||
v1.2.0{{Extension DPL}}<ul><li>[[Fermented Spider Eye|Fermented Spider Eye]]<br/>{{Item
| image = Fermented Spider Eye.png
| renewable = Yes
| stackable = Yes (64)
}}
A '''fermented spider eye''' is a [[brewing]] ingredient.
== Obtaining ==
=== Crafting ===
{{Crafting
|Brown Mushroom
|Sugar
|Spider Eye
|Output= Fermented Spider Eye
|type= Brewing
}}
== Usage ==
They can be used to brew [[potion]]s with negative effects, as well as the [[Potion of Invisibility]].
=== Brewing ingredient ===
{{brewing
|showname=1
|head=1
|Fermented Spider Eye
|Potion of Weakness
|base=Water Bottle
}}
{{brewing
|Fermented Spider Eye
|Potion of Harming
|base=Potion of Poison;Potion of Healing
}}
{{brewing
|Fermented Spider Eye
|Potion of Slowness
|base=Potion of Swiftness;Potion of Leaping
}}
{{brewing
|foot=1
|Fermented Spider Eye
|Potion of Invisibility
|base=Potion of Night Vision
}}
== Data values ==
=== ID ===
{{edition|java}}:
{{ID table
|edition=java
|showforms=y
|generatetranslationkeys=y
|displayname=Fermented Spider Eye
|spritetype=item
|nameid=fermented_spider_eye
|form=item
|foot=1}}
{{edition|bedrock}}:
{{ID table
|edition=bedrock
|shownumericids=y
|showforms=y
|notshowbeitemforms=y
|generatetranslationkeys=y
|displayname=Fermented Spider Eye
|spritetype=item
|nameid=fermented_spider_eye
|id=428
|form=item
|foot=1}}
== Video ==
<div style="text-align:center">{{yt|ln8ZQn5MtFI}}</div>
== History ==
{{History|java}}
{{History||1.0.0|snap=Beta 1.9 Prerelease 2|[[File:Fermented Spider Eye JE1 BE1.png|32px]] Added fermented spider eyes.}}
{{History|||snap=Beta 1.9 Prerelease 3|Fermented spider eyes can now be [[brewing|brewed]] in a [[water bottle]] to create a [[potion of Weakness]].
|Fermented spider eyes now corrupt potions of [[Swiftness]] and [[Fire Resistance]] into potions of [[Slowness]], for both normal and extended types.
|Fermented spider eyes now corrupts potions of [[Healing]] and [[Poison]] into potions of [[Harming]], as well as Healing II and extended Poison into extended Harming.}}
{{History||1.4.2|snap=12w34a|Fermented spider eyes now change potions of [[Night Vision]] into the new potions of [[Invisibility]], for both normal and extended types.}}
{{History||1.7.2|snap=13w36a|Fermented spider eyes now corrupt the new [[potion of Water Breathing]] into a potion of Harming.}}
{{History||1.8|snap=14w27a|Fermented spider eyes now corrupt the new [[potion of Leaping]] into a potion of Slowness.}}
{{History||1.9|snap=15w31a|[[Potions of Weakness]] can no longer be made using a [[thick potion]], [[mundane potion]], [[awkward potion]], [[potion of Regeneration]], or [[potion of Strength]].
|[[Potions of Slowness]] can no longer be made using a [[potion of Fire Resistance]].
|[[Potions of Harming]] can no longer be made using a [[potion of Water Breathing]].}}
{{History||1.13|snap=17w47a|Prior to [[1.13/Flattening|''The Flattening'']], this [[item]]'s numeral ID was 376.}}
{{History||1.14|snap=18w50a|[[File:Fermented Spider Eye JE2 BE2.png|32px]] The texture of fermented spider eyes has been changed.}}
{{History|upcoming java}}
{{History||Villager Trade Rebalance<br>(Experimental)|link=Java Edition 1.20.2|snap=23w31a|[[Wandering trader]]s now have a chance to [[trading|buy]] a fermented spider eye from the player.}}
{{History|pocket alpha}}
{{History||v0.12.1|snap=build 1|[[File:Fermented Spider Eye JE1 BE1.png|32px]] Added fermented spider eyes.}}
{{History|bedrock}}
{{History||1.10.0|snap=beta 1.10.0.3|[[File:Fermented Spider Eye JE2 BE2.png|32px]] The texture of fermented spider eyes has been changed.}}
{{History|console}}
{{History||xbox=TU7|xbone=CU1|ps=1.0|wiiu=Patch 1|switch=1.0.1|[[File:Fermented Spider Eye JE1 BE1.png|32px]] Added fermented spider eyes.}}
{{History||xbox=none|xbone=none|ps=1.90|wiiu=none|switch=none|[[File:Fermented Spider Eye JE2 BE2.png|32px]] The texture of fermented spider eyes has been changed.}}
{{History|New 3DS}}
{{History||0.1.0|[[File:Fermented Spider Eye JE1 BE1.png|32px]] Added fermented spider eyes.}}
{{History|foot}}
== Issues ==
{{issue list}}
{{items}}
[[Category:Renewable resources]]
[[cs:Zkvašené pavoučí oko]]
[[de:Fermentiertes Spinnenauge]]
[[es:Ojo de araña fermentado]]
[[fr:Œil d'araignée fermenté]]
[[it:Occhio di ragno fermentato]]
[[ja:発酵したクモの目]]
[[ko:발효된 거미 눈]]
[[nl:Gefermenteerd spinnenoog]]
[[pl:Sfermentowane oko pająka]]
[[pt:Olho de aranha fermentado]]
[[ru:Приготовленный паучий глаз]]
[[th:ตาแมงมุมดอง]]
[[uk:Оброблене павуче око]]
[[zh:发酵蛛眼]]</li><li>[[Rabbit's Foot|Rabbit's Foot]]<br/>{{Item
| image = Rabbit's Foot.png
|type=
| renewable = Yes
| stackable = Yes (64)
}}
A '''rabbit's foot''' is a [[brewing]] item obtained from [[rabbit]]s.
== Obtaining ==
=== Mob loot ===
Each [[rabbit]] has a 10% chance to drop a rabbit's foot when killed by the [[player]]. This chance can be increased by 3% per level using a sword enchanted with [[Looting]].
A [[fox]] sometimes spawns with a rabbit's foot in its mouth, which always drops upon death. Alternatively, the player can drop a [[food]] item, which causes the fox to drop the rabbit's foot.
=== Cat gifts ===
{{main|Cat#Gifts}}
A tamed [[cat]] has a 70% chance of giving the player a gift when the player wakes up from a [[bed]], and the gift has a 16.13% chance to be a rabbit's foot.
== Usage ==
=== Brewing ingredient ===
{{Brewing
|head=1
|Rabbit's Foot
|Mundane Potion
|base=Water Bottle
}}
{{brewing
|foot=1
|showname=1
|Rabbit's Foot
|Potion of Leaping
}}
=== Trading ===
Journeyman-level cleric [[villager]]s buy rabbit's feet for an [[emerald]] as part of their trade: {{in|java}} they buy 2, and {{in|bedrock}} they buy 4.
== Video ==
<div style="text-align:center">{{yt|Ba3QN3uCniU}}</div>
== Data values ==
=== ID ===
{{edition|java}}:
{{ID table
|edition=java
|showforms=y
|generatetranslationkeys=y
|displayname=Rabbit's Foot
|spritetype=item
|nameid=rabbit_foot
|form=item
|foot=1}}
{{edition|bedrock}}:
{{ID table
|edition=bedrock
|shownumericids=y
|showforms=y
|notshowbeitemforms=y
|generatetranslationkeys=y
|displayname=Rabbit's Foot
|spritetype=item
|nameid=rabbit_foot
|id=528
|form=item
|foot=1}}
== History ==
{{History|java}}
{{History||1.8|snap=June 30, 2014|slink=https://twitter.com/TheMogMiner/status/483636993780232192|[[Ryan Holtz]] tweeted images of a rabbit's foot with some other new [[item]]s.}}
{{History|||snap=14w27a|[[File:Rabbit's Foot JE1.png|32px]] Added rabbit's foot.
|Added the [[potion of Leaping]]; it is [[brewing|brewed]] by adding a rabbit's foot to an [[awkward potion]]. The rabbit's foot also creates the [[mundane potion]] when brewed into a [[water bottle]].}}
{{History|||snap=14w33b|[[File:Rabbit's Foot JE2 BE1.png|32px]] The texture of the rabbit's foot has been changed. The new texture was created by [[wikipedia:Reddit|Reddit]] user [http://www.reddit.com/u/zeldahuman zeldahuman].<ref>{{reddit|2bjzes/a_reminder_of_the_blocks_and_items_added_in_18_so|cj69zie|context=3}}</ref><ref>{{reddit|2c5f35/minecraft_snapshot_14w31a_has_been_released|cjct7gb}}</ref>}}
{{History||1.8.1|snap=pre1|Potions of Leaping, which use rabbit's foot, can now be extended using [[redstone]].}}
{{History||1.9|snap=15w46a|The drop rate of rabbit's foot has been quadrupled.{{more info|Before/After rates}}}}
{{History||1.13|snap=17w47a|Prior to [[1.13/Flattening|''The Flattening'']], this [[item]]'s numeral ID was 414.}}
{{History||1.14|snap=18w43a|[[File:Rabbit's Foot JE3 BE2.png|32px]] The texture of rabbit's foot has been changed.}}
{{History|||snap=18w44a|[[Cat]]s now offer rabbit's feet as [[Cat#Gifts|gifts]].}}
{{History|||snap=19w07a|Added [[fox]]es, which sometimes spawn with rabbit's feet in their mouths.}}
{{History|||snap=19w11a|Cleric [[villager]]s now [[trading|buy]] rabbit's feet.}}
{{History|pocket alpha}}
{{History||v0.12.1|snap=build 1|[[File:Rabbit's Foot JE2 BE1.png|32px]] Added rabbit's foot to the [[Creative]] mode [[inventory]].}}
{{History||v0.13.0|snap=build 1|Rabbit's foot can now be obtained as a rare [[drops|drop]] upon killing [[rabbit]]s.
|Rabbit's foot can now be [[brewing|brewed]] to make [[potions of Leaping]].}}
{{History|bedrock}}
{{History||1.8.0|snap=beta 1.8.0.8|Tamed [[cat]]s can now give the [[player]] rabbit's foot as a gift.}}
{{History||1.10.0|snap=beta 1.10.0.3|[[File:Rabbit's Foot JE3 BE2.png|32px]] The texture of rabbit's foot has been changed.}}
{{History||1.11.0|snap=beta 1.11.0.4|Rabbit's foot can now be [[trading|sold]] to cleric [[villager]]s.}}
{{History||1.13.0|snap=beta 1.13.0.1|Added [[fox]]es, which can [[drops|drop]] rabbit's foot.}}
{{History|console}}
{{History||xbox=TU31|xbone=CU19|ps=1.22|wiiu=Patch 3|switch=1.0.1|[[File:Rabbit's Foot JE2 BE1.png|32px]] Added rabbit's foot.}}
{{History||xbox=none|xbone=none|ps=1.90|wiiu=none|switch=none|[[File:Rabbit's Foot JE3 BE2.png|32px]] The texture of rabbit's foot has been changed.}}
{{History|New 3DS}}
{{History||0.1.0|[[File:Rabbit's Foot JE2 BE1.png|32px]] Added rabbit's foot.}}
{{History|foot}}
== Issues ==
{{issue list}}
== Trivia ==
* The superstition that [[wikipedia:Rabbit's_foot|a rabbit's foot is a lucky charm]] applies equally to Minecraft as it does in the real world: it does not actually increase luck.
== Gallery ==
<gallery>
Rabbit Items 4 Ryan Holtz.png|First image of the item by [[Ryan Holtz]].
Rabbit Items 5 Ryan Holtz.png|Ryan Holtz brewing the item into a potion.
Rabbit Items 6 Ryan Holtz.png|Ryan Holtz enhancing the potion.
</gallery>
== References ==
{{reflist}}
== External Links ==
*[https://www.minecraft.net/en-us/article/taking-inventory--rabbit-s-foot Taking Inventory: Rabbit's Foot] – Minecraft.net on May 3, 2019
{{items}}
[[de:Hasenpfote]]
[[es:Pata de conejo]]
[[fr:Patte de lapin]]
[[it:Zampa di coniglio]]
[[ja:ウサギの足]]
[[ko:토끼발]]
[[nl:Konijnenpootje]]
[[pl:Królicza łapka]]
[[pt:Pé de coelho]]
[[ru:Кроличья лапка]]
[[uk:Кроляча лапка]]
[[zh:兔子脚]]
[[Category:Renewable resources]]
[[Category:Brewing recipe]]</li></ul> | ? | ||||
| Java Edition Beta | |||||
1.2{{Extension DPL}}<ul><li>[[Milk Bucket|Milk Bucket]]<br/>{{Item
| title=Milk Bucket
| image = Milk Bucket.png
| renewable = Yes
| effects = Clears all
| stackable = No
}}
A '''milk bucket'''{{fn|Known as '''Milk Bucket''' {{in|java}} and '''Milk''' {{in|bedrock}}.}} is a [[drink]] obtained from {{Control|use|text=using}} a [[bucket]] on [[cow]]s, [[mooshroom]]s and [[goat]]s that can be consumed to clear all [[Effect|effects]].
== Obtaining ==
=== Harvesting ===
Milk buckets can be obtained from [[cow]]s, [[mooshroom]]s, and [[goat]]s by pressing {{control|use}} while looking at them with an empty [[bucket]].
=== Mob loot ===
A milk bucket has a chance of dropping from a [[wandering trader]], if the trader is killed while holding it.{{only|java}}
== Usage ==
Holding {{control|use}} with a milk bucket starts the drinking sound and animation. {{IN|java}}, the animation is shown only in first-person camera mode.
When consumed, milk immediately removes all status [[effect]]s from the [[player]]. [[Fire]] is not a status effect; therefore, drinking milk doesn't extinguish a burning player.
The benefits of area status effects granted by [[beacon]]s and [[Conduit Power|conduit power]] are restored almost immediately in Bedrock Edition and after a few seconds in ''Java Edition''.
=== Crafting ingredient ===
{{crafting usage|Milk Bucket}}
== Sounds ==
{{el|je}}:
{{Sound table
|sound=Drink.ogg
|subtitle=Sipping
|source=player
|description=While a player is drinking milk
|id=entity.generic.drink
|translationkey=subtitles.entity.generic.drink
|volume=0.5
|pitch=0.9-1.0
|distance=16}}
{{Sound table
|sound=Cow milk1.ogg
|sound2=Cow milk2.ogg
|sound3=Cow milk3.ogg
|source=player
|subtitle=Cow gets milked
|description=When a cow is milked
|id=entity.cow.milk
|translationkey=subtitles.entity.cow.milk
|volume=1.0
|pitch=1.0
|distance=16}}
{{Sound table
|sound=Mooshroom milk1.ogg
|sound2=Mooshroom milk2.ogg
|sound3=Mooshroom milk3.ogg
|subtitle=Goat gets milked
|description=When a regular goat is milked
|source=neutral
|id=entity.goat.milk
|translationkey=subtitles.entity.goat.milk
|volume=1.0
|pitch=1.0
|distance=16}}
{{Sound table
|sound=Goat screaming milk1.ogg
|sound2=Goat screaming milk2.ogg
|sound3=Goat screaming milk3.ogg
|sound4=Goat screaming milk4.ogg
|sound5=Goat screaming milk5.ogg
|subtitle=Goat gets milked
|description=When a screaming goat is milked
|source=neutral
|id=entity.goat.screaming.milk
|translationkey=subtitles.entity.goat.milk
|volume=1.0
|pitch=1.0
|distance=16}}
{{Sound table
|sound=Wandering trader drink milk1.ogg
|sound2=Wandering trader drink milk2.ogg
|sound3=Wandering trader drink milk3.ogg
|sound4=Wandering trader drink milk4.ogg
|sound5=Wandering trader drink milk5.ogg
|subtitle=Wandering Trader drinks milk
|source=neutral
|description=While a wandering trader is drinking milk to become visible during daytime
|id=entity.wandering_trader.drink_milk
|translationkey=subtitles.entity.wandering_trader.drink_milk
|volume=0.5
|pitch=0.9-1.0
|distance=16
|foot=1}}
{{el|be}}:
{{Sound table
|type=bedrock
|sound=Drink.ogg
|source=player
|description=While a player is drinking milk
|id=random.drink
|volume=0.35
|pitch=0.9-1.1}}
{{Sound table
|sound=Cow milk1.ogg
|sound2=Cow milk2.ogg
|sound3=Cow milk3.ogg
|source=neutral
|description=When a cow is milked
|id=mob.cow.milk
|volume=1.0
|pitch=1.0}}
{{Sound table
|sound=Mooshroom milk1.ogg
|sound2=Mooshroom milk2.ogg
|sound3=Mooshroom milk3.ogg
|description=When a regular goat is milked
|source=neutral
|id=mob.mooshroom.suspicious_milk
|volume=1.0
|pitch=1.0/0.9/1.1}}
{{Sound table
|sound=Goat screaming milk1.ogg
|sound2=Goat screaming milk2.ogg
|sound3=Goat screaming milk3.ogg
|sound4=Goat screaming milk4.ogg
|sound5=Goat screaming milk5.ogg
|description=When a screaming goat is milked
|source=neutral
|id=mob.goat.milk.screamer
|volume=1.0
|pitch=1.0}}
{{Sound table
|sound=Wandering trader drink milk1.ogg
|sound2=Wandering trader drink milk2.ogg
|sound3=Wandering trader drink milk3.ogg
|sound4=Wandering trader drink milk4.ogg
|sound5=Wandering trader drink milk5.ogg
|source=neutral
|description=While a wandering trader is drinking milk to become visible during daytime
|id=mob.wanderingtrader.drink_milk
|volume=1.0
|pitch=0.8-1.2
|foot=1}}
== Data values ==
=== ID ===
{{edition|java}}:
{{ID table
|edition=java
|showforms=y
|generatetranslationkeys=y
|displayname=Milk Bucket
|spritetype=item
|nameid=milk_bucket
|form=item
|foot=1}}
{{edition|bedrock}}:
{{ID table
|edition=bedrock
|showaliasids=y
|shownumericids=y
|showforms=y
|notshowbeitemforms=y
|generatetranslationkeys=y
|displayname=Milk
|spritetype=item
|nameid=milk_bucket
|aliasid=bucket / 1
|id=361
|form=item
|translationkey=item.milk.name
|foot=1}}
== Achievements ==
{{load achievements|The Lie}}
== Advancements ==
{{Load advancements|Husbandry}}
== Video ==
<div style="text-align:center">{{yt|eyxea_d0b3s}}</div>
== History ==
{{History|java alpha}}
{{History||v1.0.8|[[File:Milk Bucket JE1 BE1.png|32px]] Milk has been introduced, but it has no purpose and is obtainable only through inventory editing.}}
{{History||v1.0.11|Milk can now be obtained by {{control|use|text=milking}} a [[cow]] with a [[bucket]]. However, it is not yet drinkable.}}
{{History||v1.0.17|Milk buckets can now be emptied.}}
{{History|java beta}}
{{History||1.2|Milk has been incorporated into the [[crafting]] recipe of [[cake]].}}
{{History||1.2_01|[[Squid]] can now be milked by right-clicking on their mouth if part of their body was exposed to [[air]] or if they were not touching another [[block]]. An easy way to accomplish this is to pull a squid with a [[fishing rod]] away from other blocks and then milk it.}}
{{History||1.3_01|Squid milking has been removed.}}
{{History|java}}
{{History||1.0.0|snap=Beta 1.9 Prerelease|Milk can now be obtained by milking [[mooshroom]]s.}}
{{History|||snap=Beta 1.9 Prerelease 2|Milk has been made drinkable.
|According to a tweet by [[Jeb]] on September 30th 2011, milk was made a cure for all status effects.<ref>{{tweet|jeb_|119842906528944129|@Nexusdog_UK I haven't! In beta 1.9 pre2 milk works like a clear-everything drink|September 30, 2011}}</ref>
|Milk is no longer emptiable.}}
{{History||1.13|snap=17w47a|Prior to [[1.13/Flattening|''The Flattening'']], this [[item]]'s numeral ID was 335.}}
{{History|||snap=18w20a|"Milk" has been renamed to "Milk Bucket".}}
{{History||1.14|snap=18w43a|[[File:Milk Bucket JE2 BE2.png|32px]] The texture of milk buckets has been changed.}}
{{History||1.14|snap=19w06a|[[Wandering trader]]s now drink from milk buckets at dawn, and have a change to drop them.}}
{{History||1.17|snap=21w13a|Milk can now be obtained by milking [[goat]]s.}}
{{History|upcoming java}}
{{History||Villager Trade Rebalance<br>(Experimental)|link=Java Edition 1.20.2|snap=23w31a|Wander traders now have a chance to [[trading|buy]] a milk bucket from the player.}}
{{History|pocket alpha}}
{{History||v0.7.0|[[File:Milk Bucket JE1 BE1.png|32px]] Added milk buckets.
|Milk buckets are not yet drinkable.}}
{{History||v0.11.0|snap=build 4|Drinking milk now removes [[status effects]].
|Added milk buckets to the Creative inventory.{{verify|type=update}}{{info needed}}<!---same update?--->}}
{{History|bedrock}}
{{History||1.4.0|snap=beta 1.2.14.2|Moved all bucket items, including milk, from the Equipment tab to the Items tab in the [[Creative inventory]].{{verify|type=update}}{{info needed}}<!---please check snapshots, only 1 major release version was checked each--->}}
{{History||1.10.0|snap=beta 1.10.0.3|[[File:Milk Bucket JE2 BE2.png|32px]] The texture of milk buckets has been changed.}}
{{History||1.16.100|snap=beta 1.16.100.56|The ID of milk has been changed from <code>bucket/1</code> to <code>milk_bucket</code>.}}
{{History||1.16.200|snap=beta 1.16.200.52|Milk can now be obtained by milking [[goat]]s.}}
{{History|console}}
{{History||xbox=TU1|xbone=CU1|ps=1.0|wiiu=Patch 1|switch=1.0.1|[[File:Milk Bucket JE1 BE1.png|32px]] Added milk buckets.}}
{{History|Ps4}}
{{History||1.90|[[File:Milk Bucket JE2 BE2.png|32px]] The texture of milk buckets has been changed.}}
{{History|New 3DS}}
{{History||0.1.0|[[File:Milk Bucket JE1 BE1.png|32px]] Added milk buckets.}}
{{History|foot}}
== Issues ==
{{issue list}}
== See also ==
*[[Water Bucket]]
*[[Lava]]
*[[Food]]
*[[Cake]]
*[[Honey Bottle]] (alternative to remove poison effect)
*[[Medicine]]
== Notes ==
{{fnlist}}
== References ==
{{reflist}}
== External Links ==
*[https://www.minecraft.net/en-us/article/taking-inventory--milk-bucket Taking Inventory: Milk Bucket] – Minecraft.net on October 8, 2019
{{Items}}
[[Category:Food]]
[[Category:Renewable resources]]
[[Category:Tools]]
[[cs:Mléko]]
[[de:Milcheimer]]
[[es:Cubo con leche]]
[[fr:Seau de lait]]
[[hu:Tej]]
[[it:Secchio di latte]]
[[ja:ミルク入りバケツ]]
[[ko:우유 양동이]]
[[nl:Emmer melk]]
[[pl:Wiadro mleka]]
[[pt:Balde de leite]]
[[ru:Ведро с молоком]]
[[th:ถังนม]]
[[uk:Відро молока]]
[[zh:奶桶]]</li><li>[[Tag (item)|Tag (item)]]<br/>{{About|the April Fools item|the standard item used to rename mobs|Name Tag}}
{{wip}}
{{joke feature}}
{{exclusive|java}}
{{Item
| title = Tag
| image = Tag.png
| renewable = Yes
| stackable = Yes (64)
}}
Tags and Bits are items exclusive to the [[Java Edition 23w13a or b|23w13a_or_b]] [[Easter eggs#April Fools|April Fools' joke]] snapshot from 2023. They are used to craft in-game representations of [[NBT format|NBT tags]].
==Obtaining==
A [[stonecutter]] can be used to cut a [[Name Tag|name tag]] into either 16 "Name" or 16 "Tag" items. These can be cut into 16 Bit items each.
{{Stonecutting
|head=1
|showdescription=1
|Name Tag
|Name, 16; Tag, 16
|description=The resulting "Name" items must be named in an [[anvil]].
}}
{{Stonecutting
|showdescription=
|Name; Tag
|Bit, 16
|foot=1
}}
To be able to proceed from here the <code>nbt_crafting</code> vote must be approved. Bits can be used in a crafting table to craft Left Curly, Right Curly, Left Square, and Right Square. In appears like these are the only tag items that can be crafted from Bits.
A [[Crafting Table|crafting table]] can be used to convert a "Tag" item into a "Byte Tag." The amount of [[stick]]s added to the crafting recipe specifies the value of the Byte, as a [[wikipedia:Signed number representations#Two's complement|signed 8-bit value]]. For example, a "Tag" and a full stack of sticks make a Byte with the value <code>64b</code>, while 255 sticks result in <code>-1b</code>. Only one of the sticks is consumed. Two Bytes can be crafted into a "Short Tag" (equivalent to 16 bit), two Shorts into an "Int Tag" (equivalent to 32 bit), and two Ints into a "Long Tag" (equivalent to 64 bit). Many other combinations that form either 16, 32, or 64 bit are possible. For example, two Shorts and an Int make a Long. When combining values, their digits are stuck together in the given order, e.g. <code>1b</code> and <code>0b</code> make <code>256s</code> (equivalent to 0100<sub>16</sub> in [[wikipedia:Hexadecimal|hexadecimal]]). Undoing any of these crafting actions in e.g. a stonecutter is not possible.
"Float" and "Double Tags" can be crafted by adding one or two [[boat]]s to any numeric tag. A "String Tag" is crafted with a "Tag" and a piece of [[string]].
{{Crafting
|head=1
|showdescription=1
|A1= Bit; ; Bit; Bit |B1= ; Bit; Bit; Bit
|A2= ; Bit; Bit; |B2= Bit; ; ; Bit
|A3= Bit; ; Bit; Bit |B3= ; Bit; Bit; Bit
|Output= Right Curly; Left Curly; Left Square; Right Square
|ignoreusage=1
}}
{{Crafting
|Tag
|String
|Output= String Tag
|description=String tags must be named in an [[anvil]] to set their value.
|ignoreusage=1
}}
{{Crafting
|Tag; Tag; Tag
|; Stick; Stick, 64
|; ; Stick, 63
|Output= Byte Tag; Byte Tag; Byte Tag
|description=Only 1 stick is consumed. 128 and more sticks make [[wikipedia:Signed number representations#Two's complement|two's complements]]:
128 sticks = <code>-128b</code><br>
129 sticks = <code>-127b</code><br>
⋮<br>
254 sticks = <code>-2b</code><br>
255 sticks = <code>-1b</code>
|ignoreusage=1
}}
{{Crafting
|Byte Tag; Byte Tag; Byte Tag
|Byte Tag; Byte Tag; Byte Tag
| ; Byte Tag; Byte Tag
| ; Byte Tag; Byte Tag
| ; ; Byte Tag
| ; ; Byte Tag
| ; ; Byte Tag
| ; ; Byte Tag
|Output= Short Tag; Int Tag; Long Tag
|description=Shorts and Ints can be combined the same way, even mixed.
Digits are appended, e.g. two <code>1b</code> tags make <code>257b</code> (0101<sub>16</sub> in [[wikipedia:Hexadecimal|hexadecimal]]).
|ignoreusage=1
}}
{{Crafting
|Byte Tag; Short Tag; Int Tag; Long Tag
|Any Boat; Any Boat; Any Boat; Any Boat
|Output= Float Tag; Float Tag; Float Tag; Float Tag
|ignoreusage=1
}}
{{Crafting
|Byte Tag; Short Tag; Int Tag; Long Tag
|Any Boat; Any Boat; Any Boat; Any Boat
|Any Boat; Any Boat; Any Boat; Any Boat
|Output= Double Tag; Double Tag; Double Tag; Double Tag
|ignoreusage=1
}}
{{Crafting
|Left Curly; Left Curly
|Name; Name
|Byte Tag; Byte Tag
|Right Curly; Name |; Byte Tag | |; Name |; Byte Tag |; Right Curly
|Output= Compound Tag; Compound Tag
|description=Instead of Bytes any other tag can be used, including other compound tags.
|ignoreusage=1
}}
{{Crafting
|Left Square; Left Square
|Byte Tag; Byte Tag
|Right Square; Byte Tag |; Byte Tag |; Byte Tag |; Byte Tag |; Byte Tag |; Byte Tag |; Right Square
|Output= List Tag; List Tag
|description=Instead of Bytes any other tag can be used, including other list tags.
|ignoreusage=1
}}
{{Crafting
|Compound Tag; List Tag
|Compound Tag; List Tag
|Output= Compound Tag; List Tag
|description=Up to 9 can be combined.
When compound tags contain identical names, only the latest of the corresponding values is used.
|ignoreusage=1
|foot=1
}}
"Name" and "String Tags" must be named in an [[anvil]] before they can be used. Unnamed Names and Strings always produce a "Sssyntax Error". None of the other tag items can be named.
All these items can be combined in a crafting table to form a short sequence of JSON code, as long as the resulting syntax is valid. For example:
*A pair of Curlies that enclose a named "Name" item and some value, e.g. a Byte, create a "Compound Tag" with the content <code>{Example:0b}</code>.
**Because of the limited size of the crafting table only 3 name-value pairs can be put between Curlies at a time. Compound Tags of any length can be created by concatenating two or more Compound Tags.
**An empty pair of Curlies produces an empty Compound Tag with the content <code>{}</code>.
*A pair of Square brackets that enclose any number of values, e.g. 7 Bytes, create a "List Tag" with the content <code>[0b,0b,0b,0b,0b,0b,0b]</code>.
**Because of the limited size of the crafting table only 7 values can be put between Square brackets at a time. List Tags of any length can be created by concatenating two or more List Tags.
**An empty pair of Square brackets produces an empty List with the content <code>[]</code>.
**"Name" items cannot be used in a List.
The resulting Compound and List Tags can be used as values in other Compound and List Tags, as deeply nested as you want.
==Usage==
Tags appear to have no further functionality. They cannot be eaten or placed in the world, except in an item frame, as each other item can. However, Compound Tags with values like <code>{Enchantments:[{id:"minecraft:sharpness",lvl:127b}]}</code> will show the [[Enchanting|enchantment]] glint and actually act accordingly when used.<ref>https://www.reddit.com/r/Minecraft/comments/129xdyl/i_figure_out_how_the_nbtcrafting_in_the_vote/</ref> This appears to work with many weapon and tool [[Enchanting#Summary of enchantments by item|enchantments]].
In theory, an extremely lucky <code>replace_recipe_output</code> vote can change the crafting recipe for compound tags to output something else. When cheats are enabled you can test this with a command like <code>/vote rule minecraft:replace_recipe_output approve {key:"minecraft:compound_tag",value:"minecraft:netherite_sword"}</code>. However, as long as this vote is approved no other compound tag can be crafted. Use <code>/vote rule minecraft:replace_recipe_output repeal *</code> to undo all recipe replacements.
In combination with the <code>midas_touch</code> vote tag items can be converted into [[Gold Ingot|gold ingots]]. These retain their NBT data. When the world is loaded in another version of the game tag items disappear, but gold ingots persist.
==Trivia==
*This implies that a [[Name Tag|name tag]] is 128 bit.
*Compound and list tags are special in so far that the value they show in their [[tooltip]] is not merely a property of the item, but their ''actual'' [[NBT format|NBT data]]. This is also the reason why naming them is disabled as that would mess up the NBT data.
*The snapshot also contains an [[History of textures/Unused textures|unused texture]] for an {{ItemLink|End Tag}}.
==History==
{{History|java}}
{{History||23w13a_or_b|[[File:Tag.png|32px]] Added tags.}}
{{History|foot}}
==Gallery==
<gallery>
Tag.png|Tag
Bit.png|Bit
Byte Tag.png|Byte Tag
Double Tag.png|Double Tag
End Tag.png|End Tag
Float Tag.png|Float Tag
Int Tag.png|Int Tag
Left Curly.png|Left Curly
Left Square.png|Left Sqaure
List Tag.png|List Tag
Long Tag.png|Long Tag
Name (23w13a or b).png|Name
Right Curly.png|Right Curly
Right Square.png|Right Square
Short Tag.png|Short Tag
Sssyntax Error.png|Sssyntax Error
String Tag.png|String Tag
</gallery>
== References ==
{{reflist}}
{{items}}
{{jokes}}
[[pt:Tag (item)]]
[[Category:Joke items]]</li></ul> | The side and bottom textures of blocks of iron have been removed from terrain.png. | ||||
| Java Edition | |||||
1.0.0{{Extension DPL}}<ul><li>[[Minecart with Hopper|Minecart with Hopper]]<br/>{{ItemEntity
|image=Minecart with Hopper.png
|renewable=Yes
|stackable=No
|size=Height: 0.7 Blocks<br>Width: 0.98 Blocks
|networkid='''[[JE]]''': 10
|drops=1 {{ItemLink|Minecart with Hopper}}<br>plus contents
|health={{hp|6}}
}}
A '''minecart with hopper''' is a [[minecart]] with a [[hopper]] inside. Unlike a normal hopper, it pulls items from containers much more quickly, cannot push items into containers, can collect [[Item (entity)|item entities]] through a single layer of [[solid block]]s and is locked and unlocked via [[Activator Rail|activator rails]].
== Obtaining ==
=== Crafting ===
{{Crafting
|Output= Minecart with Hopper
|type= Transportation
|Hopper|Minecart}}
Minecarts with hoppers can be retrieved by attacking them. By doing so it drop as an [[item (entity)|item]] and any other contents of the hopper are dropped as well.
== Usage ==
[[File:Minecart with Hopper GUI.png|thumb|176px|The GUI of a minecart with hopper.]]
Minecarts with hoppers are placed similarly to other [[minecart]]s.
A minecart with hopper pulls in items lying nearby (within a range slightly larger than the cart itself), or inside a container directly above the minecart, at a rate of 1 item every [[game tick]] (20 items per second), eight times as fast as a normal hopper. It also picks up items that are lying on a block directly above the track. It does not push items into containers, but a hopper underneath the track can remove items from a minecart with hopper on the track. Ordinary hoppers can also drop items into a minecart with hopper like other containers, at the normal speed of 2.5 items per second. In Bedrock Edition, a minecart with hopper on curved rail pulls in items in a hopper lying in front of its moving direction and 1 block above if hopper's output funnel is pointed downward and no block is below that hopper.<ref>{{bug|MCPE-94293}}</ref>
The hopper can be disabled by passing over a powered [[activator rail]], and can be reenabled by an inactive activator rail.
An empty minecart with hopper can travel more than 85 blocks without stopping (as opposed to a normal cart going less than 12 blocks) from a dead stop using a 2 powered track starter even with another cart in front of them. However, the distance traveled by a minecart with hopper depends on the hopper's load. Using a 1 powered rail starter track, a minecart with an empty hopper travels 64 blocks until it stops (as opposed to an empty normal minecart going 8 blocks). The distance traveled diminishes non-linearly with increased hopper load; a minecart with a full hopper can travel only 16 blocks in this setup.
{{See also|Tutorials/Storage minecarts}}
== Sounds ==
{{Edition|Java}}:<br>
Minecarts with hoppers use the Friendly Creatures sound category for entity-dependent sound events.<ref group=sound name=rollsource>{{bug|MC-42132}}</ref>
{{Sound table
|sound=Minecart rolling.ogg
|subtitle=Minecart rolls
|source=Friendly Creatures <ref group=sound name=rollsource/>
|overridesource=1
|description=While a minecart with hopper is moving
|id=entity.minecart.riding
|translationkey=subtitles.entity.minecart.riding
|volume=0.0-0.35 <ref group=sound>Relates linearly with horizontal velocity (max 0.5)</ref>
|pitch=0.0-1.0 <ref group=sound>Will increase by 0.0025 per tick if the minecart's horizontal velocity is more than 0.01</ref>
|distance=16
|foot=1}}
{{Edition|Bedrock}}:
{{Sound table
|type=bedrock
|sound=Minecart rolling.ogg
|source=neutral
|description=While a minecart with hopper is moving
|id=minecart.base
|foot=1}}
== Data values ==
=== ID ===
{{edition|java}}:
{{ID table
|edition=java
|firstcolumnname=Item
|showforms=y
|generatetranslationkeys=y
|displayname=Minecart with Hopper
|spritetype=item
|nameid=hopper_minecart
|form=item
|foot=1}}
{{ID table
|edition=java
|firstcolumnname=Entity
|generatetranslationkeys=y
|displayname=Minecart with Hopper
|spritetype=entity
|nameid=hopper_minecart
|foot=1}}
{{edition|bedrock}}:
{{ID table
|edition=bedrock
|firstcolumnname=Item
|shownumericids=y
|showforms=y
|notshowbeitemforms=y
|generatetranslationkeys=y
|displayname=Minecart with Hopper
|spritetype=item
|nameid=hopper_minecart
|id=526
|form=item
|foot=1}}
{{ID table
|edition=bedrock
|firstcolumnname=Entity
|shownumericids=y
|generatetranslationkeys=y
|displayname=Minecart with Hopper
|spritetype=entity
|nameid=hopper_minecart
|id=96
|foot=1}}
=== Entity data ===
Minecarts with hoppers have entity data associated with them that contain various properties of the entity.
{{el|java}}:
{{main|Entity format}}
{{/ED}}
{{el|bedrock}}:
: See [[Bedrock Edition level format/Entity format]].
== Video ==
<div style="text-align:center">{{yt|I5etC7LeCac}}</div>
== History ==
{{History|java}}
{{History||1.5|snap=13w03a|[[File:Minecart with Hopper JE1 BE1.png|32px]] [[File:Minecart with Hopper (item) JE1 BE1.png|32px]] Added minecart with hopper.}}
{{History||1.9|snap=15w43a|Loot tables are added; minecarts with hopper now can use loot tables.}}
{{History||1.9.1|snap=pre2|The title of the [[inventory]] is changed from 'Hopper minecart' to 'Minecart with Hopper'.}}
{{History||1.11|snap=16w32a|The entity ID of the minecart with hopper has now been changed from <code>MinecartHopper</code> to <code>hopper_minecart</code>.}}
{{History||1.13|snap=17w47a|Prior to [[1.13/Flattening|''The Flattening'']], this [[item]]'s numeral ID was 408.}}
{{History||1.14|snap=18w43a|[[File:Minecart with Hopper JE2 BE2.png|32px]] [[File:Minecart with Hopper (item) JE2 BE2.png|32px]] The textures of the minecart with hopper have now been changed.}}
{{History||1.15|snap=19w38a|[[File:Minecart with Hopper 19w38a.png|32px]] The hopper now appears dark, same as suffocating mobs.}}
{{History|||snap=19w39a|The hopper now renders correctly.}}
{{History||1.16.2|snap=Pre-release 1|Opening or destroying a minecart with hopper now angers nearby [[piglin]]s.}}
{{History||1.19|snap=22w13a|The crafting recipe for a minecart with hopper is now shapeless.|Breaking a minecart with hopper will now drop the item instead of the minecart and hopper separately, though the contents of the hopper are still dropped.<ref>{{bug|MC-249493|||Fixed}}</ref>}}
{{History||1.19.4|snap=23w06a|Minecart with hopper now no longer aggravates [[piglin]]s when opened.}}
{{History|pocket alpha}}
{{History||v0.14.0|snap=build 1|[[File:Minecart with Hopper JE1 BE1.png|32px]] [[File:Minecart with Hopper (item) JE1 BE1.png|32px]] Added minecart with hopper.}}
{{History|pocket}}
{{History||1.1.0|snap=alpha 1.1.0.0|The entity ID of the minecart with hopper has now been changed from <code>minecarthopper</code> to <code>hopper_minecart</code>.}}
{{History|bedrock}}
{{History||1.10.0|snap=beta 1.10.0.3|[[File:Minecart with Hopper JE2 BE2.png|32px]] [[File:Minecart with Hopper (item) JE2 BE2.png|32px]] The textures of the minecart with hopper have now been changed.}}
{{History||1.19.0|snap=beta 1.19.0.30|Breaking a minecart with hopper will now drop the item instead of the minecart and hopper separately, though the contents of the hopper are still dropped.}}
{{History|console}}
{{History||xbox=TU19|xbone=CU7|ps=1.12|wiiu=Patch 1|switch=1.0.1|[[File:Minecart with Hopper JE1 BE1.png|32px]] [[File:Minecart with Hopper (item) JE1 BE1.png|32px]] Added minecart with hopper.}}
{{History||xbox=none|xbone=none|ps=1.90|wiiu=none|switch=none|[[File:Minecart with Hopper JE2 BE2.png|32px]] [[File:Minecart with Hopper (item) JE2 BE2.png|32px]] The textures of the minecart with hopper have now been changed.}}
{{History|new 3ds}}
{{History||0.1.0|[[File:Minecart with Hopper JE1 BE1.png|32px]] [[File:Minecart with Hopper (item) JE1 BE1.png|32px]] Added minecart with hopper.
|Minecarts with hopper emit smoke [[particles]] when destroyed.}}
{{History|foot}}
== Issues ==
{{issue list}}
== Gallery ==
<gallery>
File:First hopper Minecart Image.png|The first image of hopper carts released by Dinnerbone.<ref>{{Tweet|Dinnerbone|291215700213772289|Well you guys got that quick. The letters in the hotbar were for <nowiki>[imgur link]|January 15, 2013}}</ref>
File:13w03a Banner.png|The 13w03a banner showing a minecart with hopper and a [[dropper]].
</gallery>
== References ==
{{reflist}}
{{items}}
{{entities}}
[[Category:Mechanics]]
[[Category:Storage]]
[[cs:Vozík s násypkou]]
[[de:Trichterlore]]
[[es:Vagoneta con tolva]]
[[fr:Wagonnet à entonnoir]]
[[hu:Tölcsér csille]]
[[it:Carrello da miniera]]
[[ja:ホッパー付きのトロッコ]]
[[ko:호퍼가 실린 광산 수레]]
[[nl:Mijnkar met trechter]]
[[pl:Wagonik z lejem]]
[[pt:Carrinho de mina com funil]]
[[ru:Вагонетка с воронкой]]
[[uk:Вагонетка з лійкою]]
[[zh:漏斗矿车]]</li><li>[[Painting|Painting]]<br/>{{ItemEntity
|title=Painting
|image=Painting JE2 BE2.png
|extratext=View [[#Renders|all renders]]
|renewable=Yes
|stackable=Yes (64)
|drops=1 {{ItemLink|Painting}}
}}
'''Paintings''' are decorative [[entity|entities]] that hang on walls.
== Obtaining ==
=== Crafting ===
{{Crafting
|A1= Stick |B1= Stick |C1= Stick
|A2= Stick |B2= Any Wool |C2= Stick
|A3= Stick |B3= Stick |C3= Stick
|Output= Painting
|type= Decoration block
}}
Paintings can be crafted with any color of [[wool]]. The color of the wool used does not influence the picture chosen when the painting is placed.
Once placed, it displays a random painting.
=== Breaking ===
To remove a painting from a wall, the player can {{control|attack}} it, break one of its supporting blocks, cover one square of it with a block, hit it with an arrow, egg, ender pearl, snowball, or fire charge, or subject it to an explosion. The painting then drops as an item. Arrows that hit paintings disappear.
=== Trading ===
Master-level shepherd [[villager]]s sell 3 paintings for 2 [[emerald]]s.
== Usage ==
=== Placement ===
Paintings can be placed on the sides of [[solid block]]s, [[sign]]s, [[banner]]s, or [[sculk vein]]s. A small gap is visible between the painting and attachment surface. There are several different sizes of paintings (see below). When placed, a painting checks for the largest amount of space it has. It then chooses a random painting of that size. The player can add blocks around the painting to ensure it is the size wanted. When the supporting blocks are removed, the painting breaks after 20 game [[tick]]s (1 second) if no supporting blocks are replaced during that interval.
=== Properties ===
Being an entity, paintings can simultaneously exist in the same space as blocks such as water or torches. Specifically, they can share the space with any block whose collision box does not intersect its hitbox.
Players and mobs are able to walk through paintings, as long as the blocks supporting the painting allow it. Secret doorways can be created this way. [[Light]] propagates through paintings as well.
If a player is concealed behind a painting, the player's name is also concealed from other players.{{verify|Is this true in Bedrock?}}
Paintings are non-flammable.
== Canvases ==
{{Stub|Needing the new painting renders}}
There are 31 paintings in the game. These are mostly based on paintings by [[Kristoffer Zetterstrand]], who also created the ''Minecraft'' versions.
{| class="wikitable stikitable" style="text-align: center" data-description="Paintings"
! style="min-width:150px" |Canvas
! style="min-width:3em;max-width:4em" |Size
! style="min-width:3em" |Original
! style="min-width:3em" |Name
! style="min-width:3em;max-width:4.5em" |[[Resource location]]
! style="min-width:10em" |Description
! Java Edition version added
|-
! [[File:Alban (texture).png|64px]]
| rowspan="7" | 1×1 blocks<br>16×16 pixels || [https://zetterstrand.com/work/pictures/archive/alban.jpeg "Albanian"] || Albanian || <code>alban</code> || A man wearing a fez next to a house and a bush. As the name of the painting suggests, it may be a landscape in [[Wikipedia:Albania|Albania]]. || rowspan="9" | [[Indev 20100223]]
|-
! [[File:Aztec (texture).png|64px]]
|[https://zetterstrand.com/eventz/wp-content/uploads/2aztbig.jpg "de_aztec"]|| de_aztec || <code>aztec</code> || [[Wikipedia:Noclip mode|Free-look]] perspective of the map [[w:c:counterstrike:Aztec|de_aztec]] from the video game ''[[Wikipedia:Counter-Strike (video game)|Counter-Strike]]''.
|-
! [[File:Aztec2 (texture).png|64px]]
|[https://zetterstrand.com/eventz/wp-content/uploads/11aztec_for_print.jpg "de_aztec"]|| de_aztec || <code>aztec2</code> || [[Wikipedia:Noclip mode|Free-look]] perspective of the map [[w:c:counterstrike:Aztec|de_aztec]] from the video game ''[[Wikipedia:Counter-Strike (video game)|Counter-Strike]]''.
|-
! [[File:Bomb (texture).png|64px]]
|[https://zetterstrand.com/eventz/wp-content/uploads/12bomb.jpg "Target successfully bombed"]|| Target Successfully Bombed || <code>bomb</code> || The map [[w:c:counterstrike:Dust II|de_dust2]] from the video game ''[[Wikipedia:Counter-Strike (video game)|Counter-Strike]]'', named “target successfully bombed" in reference to the game.
|-
! [[File:Kebab (texture).png|64px]]
|[https://zetterstrand.com/work/pictures/archive/kebab2.jpg "Kebab med tre pepperoni"] || Kebab med tre pepperoni || <code>kebab</code> || A kebab with three green chili peppers.
|-
! [[File:Plant (texture).png|64px]]
|[https://zetterstrand.com/work/pictures/archive/paradistrad.jpeg "Paradisträd"] || Paradisträd || <code>plant</code> || Still life of two plants in pots. "Paradisträd" is Swedish for "[[Wikipedia:Crassula ovata|money tree]]", which is a common name for the depicted species in Scandinavia.
|-
! [[File:Wasteland (texture).png|64px]]
|[https://zetterstrand.com/eventz/wp-content/uploads/Wasteland_1920.jpg "Wasteland"]|| Wasteland || <code>wasteland</code> || A view of some wastelands; a small animal (presumably a rabbit) is sitting on the window ledge.
|-
! [[File:Courbet (texture).png|128px]]
| rowspan="5" | 2×1 blocks<br>32×16 pixels ||[https://zetterstrand.com/eventz/wp-content/uploads/bonjourmonsieurcourbet_BIG.jpg "Bonjour monsieur Courbet"]|| Bonjour Monsieur Courbet || <code>courbet</code> || Two hikers with pointy beards seemingly greeting each other. Based on Gustave Courbet's painting ''[[Wikipedia:La rencontre|The Meeting or "Bonjour, Monsieur Courbet"]]''.
|-
! [[File:Pool (texture).png|128px]]
|[https://zetterstrand.com/eventz/wp-content/uploads/thepool_1920.jpg "The pool"]|| The Pool || <code>pool</code> || Some men and women skinny-dipping in a pool over a cube of sorts. Also there is an old man resting in the lower-right edge.
|-
! [[File:Sea (texture).png|128px]]
| rowspan=2 |[https://zetterstrand.com/eventz/wp-content/uploads/SeaSide_1920.jpg "Seaside"]
| Seaside
| <code>sea</code>
| Mountains and a lake, with a small photo of a mountain and a bright-colored plant on the window ledge. || [[Indev 20100223]] / [[Alpha v1.1.1]]
|-
! [[File:Creebet (texture).png|128px]]
| Creebet || <code>creebet</code> || Mountains and a lake, with a small photo of a mountain and a creeper looking at the viewer through a window. || [[Alpha v1.1.1]]
|-
! [[File:Sunset (texture).png|128px]]
|[https://zetterstrand.com/eventz/wp-content/uploads/sunset_dense.jpg "sunset_dense"]|| sunset_dense || <code>sunset</code> || A view of mountains at sunset. || [[Indev 20100223]]
|-
! [[File:Graham (texture).png|64px]]
| rowspan="2" | 1×2 blocks<br>16×32 pixels ||[https://zetterstrand.com/eventz/wp-content/uploads/graham.jpg "Graham"]|| Graham || <code>graham</code> || King Graham, the player character in the video game series ''[[Wikipedia:King's Quest|King's Quest]]''. The original is based on ''[[Wikipedia:File:Sánchez_Cotán_(Bodegón_con_membrillo,_repollo,_melón_y_pepino).jpg|Still Life with Quince, Cabbage, Melon, and Cucumber]]'' by Juan Sánchez Cotán.|| [[Alpha v1.1.1]]
|-
! [[File:Wanderer (texture).png|64px]]
|[https://zetterstrand.com/eventz/wp-content/uploads/wanderer_1920.jpg "Wanderer"]|| Wanderer || <code>wanderer</code> || A version of Caspar David Friedrich's famous painting ''[[Wikipedia:Wanderer above the Sea of Fog|Wanderer above the Sea of Fog]]''. || rowspan="4" | [[Indev 20100223]]
|-
! [[File:Bust (texture).png|128px]]
| rowspan="6" | 2×2 blocks<br>32×32 pixels ||[https://zetterstrand.com/eventz/wp-content/uploads/bust_1915.jpg "Bust"]|| Bust || <code>bust</code> || A bust of [[Wikipedia:Marcus Aurelius|Marcus Aurelius]] surrounded by fire.
|-
! [[File:Match (texture).png|128px]]
|[https://zetterstrand.com/eventz/wp-content/uploads/Match_rgb_1918.jpg "Match"]|| Match || <code>match</code> || A hand holding a match, causing fire on a white cubic gas fireplace.
|-
! [[File:Skull and Roses (texture).png|128px]]
|[https://zetterstrand.com/eventz/wp-content/uploads/moonlight-installation_1920.jpg "Moonlight Installation"]|| Skull and Roses || <code>skull_and_roses</code> || A skeleton at night with red flowers in the foreground. The original painting was different, depicting a woman sitting in a couch, while the skull is in the middle of a body of glacial water of sorts.
|-
! [[File:Stage (texture).png|128px]]
|[https://zetterstrand.com/eventz/wp-content/uploads/The-stage-is-set-1.jpg "The stage is set"]
| The Stage Is Set
| <code>stage</code>
| Scenery from ''[[Wikipedia:Space Quest I|Space Quest I]]'', with the character Graham from the video game series ''[[Wikipedia:King's Quest|King's Quest]]'' appearing twice. || [[Indev 20100223]] / [[Alpha v1.1.1]]
|-
! [[File:Void (texture).png|128px]]
|[https://zetterstrand.com/eventz/wp-content/uploads/the-void_1920.jpg "The Void"]|| The void || <code>void</code> || An angel praying into a void with fire below. || [[Indev 20100223]]
|-
! [[File:Wither (painting texture).png|128px]]
| – || Wither || <code>wither</code> || The creation of a [[wither]].
This is the only painting not based on a real painting. Made by Jens Bergensten.<ref>{{Citation|url=https://www.youtube.com/watch?v=kK5Y4k-vVXc|title=Who Made Minecraft’s LAST Painting?!|author=AntVenom|website=YouTube|date=29 October 2022}}</ref><ref>https://www.reddit.com/r/Minecraft/comments/1tzav2/comment/cedagcy/</ref>
|| [[Java Edition 1.4.2]] ([[12w36a]])
|-
! [[File:Fighters (texture).png|128px]]
| 4×2 blocks<br>64×32 pixels ||[https://zetterstrand.com/eventz/wp-content/uploads/fighters.jpg "Fighters"]|| Fighters || <code>fighters</code> || Two men poised to fight. Paper versions of fighters from the game ''[[Wikipedia:International Karate +|International Karate +]]''. || [[Indev 20100223]]
|-
! [[File:Donkey Kong (texture).png|128px]]
| rowspan="2" | 4×3 blocks<br>64×48 pixels ||[https://zetterstrand.com/eventz/wp-content/uploads/kong.jpg "Kong"]|| Kong || <code>donkey_kong</code> || A paper-looking screenshot of the level [https://www.mariowiki.com/100m 100m] from the arcade game ''[[Wikipedia:Donkey Kong (arcade game)|Donkey Kong]]''. || rowspan="2" | [[Alpha v1.1.1]]
|-
! [[File:Skeleton (painting texture).png|128px]]
|[https://zetterstrand.com/eventz/wp-content/uploads/mortal_coil.jpg "Mortal Coil"]|| Mortal Coil || <code>skeleton</code> || [[w:c:grim-fandango:Bruno Martinez|Bruno Martinez]] from the adventure game ''[[Wikipedia:Grim Fandango|Grim Fandango]]''.
|-
! [[File:Burning Skull (texture).png|128px]]
| rowspan="3" | 4×4 blocks<br>64×64 pixels ||[https://zetterstrand.com/eventz/wp-content/uploads/skull_on_fire_framed_c_1910.jpg "Skull on Fire"]|| Skull On Fire || <code>burning_skull</code> || A Skull on fire; in the background there is a moon in a clear night sky.<br>This painting is based on a Minecraft screenshot,<ref>{{Citation|url=https://web.archive.org/web/20220928041338/https://imgur.com/HVhrbnH|website=Imgur|date=22 August 2020|title=https://web.archive.org/web/20220928041338/https://imgur.com/HVhrbnH}}</ref> with the grass block and a 3D skull added on top.<ref>{{Citation|url=https://web.archive.org/web/20200906184721/https://imgur.com/AwqQFS6|title=https://web.archive.org/web/20200906184721/https://imgur.com/AwqQFS6|website=Imgur|date=23 August 2020}}</ref>
(See the [[:en:Painting#Trivia|trivia]] section for more info.)
| [[Java Edition Beta 1.2 01|Beta 1.2_01]] / [[Java Edition Beta 1.3|Beta 1.3]]
|-
! [[File:Pigscene (texture).png|128px]]
|[https://zetterstrand.com/eventz/wp-content/uploads/rgb_1914.jpg "RGB"]|| Pigscene || <code>pigscene</code> <!-- yes, without an underscore --> || A girl pointing to a pig on a canvas. In the original version, the canvas showed red, green and blue blocks, representing the three colors of the [[Wikipedia:RGB color model|RGB color model]] that is typically used by computer displays. It is based on the painting ''[[Wikipedia:File:Jacob van Oost (I) - The Artist's Studio - WGA16654.jpg|The Artist's Studio]]'' by Jacob van Oost.|| [[Alpha v1.1.1]]
|-
! [[File:Pointer (texture).png|128px]]
|[https://zetterstrand.com/eventz/wp-content/uploads/pointer_1920.jpg "Pointer"]|| Pointer || <code>pointer</code> || The main character of the game ''[[Wikipedia:International Karate +|International Karate +]]'' in a fighting stance touching a large hand. It could also be interpreted as a play on Michelangelo's famous painting ''[[Wikipedia:The Creation of Adam|The Creation of Adam]]''. || [[Indev 20100223]]
|-
! TBA ||
Pack || <code>pack</code> || Reference to the pack.png fi || [[Java Edition 1.21]]le
|}
=== Unused paintings ===
In [[Pocket Edition v0.5.0 alpha|v0.5.0 alpha]], with the addition of paintings to Pocket Edition, four unused 32×32 paintings were present in <samp>[[kz.png]]</samp> which remained unused. See {{slink|Bedrock Edition unused features|Paintings}} for more information. They were also added to Java Edition in snapshot [[Java Edition 22w16a|22w16a]]. They cannot be placed by default, but can be summoned by [[commands]] (such as {{cmd|/summon painting ~ ~ ~ {variant:"water"} }}) or through a [[datapack]].
According to [[Helen Zbihlyj]],<ref>https://old.reddit.com/r/Minecraft/comments/u8hpnx/thoughts_on_the_new_paintings/i5olue6/?context=3 ([https://web.archive.org/web/20220422115723/https://old.reddit.com/r/Minecraft/comments/u8hpnx/thoughts_on_the_new_paintings/i5olue6/?context=3 archived])</ref> these paintings were originally added "as part of a Pocket Edition promo map" (no footage found) which was planned to be a part of [[Pocket Edition]] promotion at [[MINECON 2012]] [[MINECON 2013|or 2013]] and have never been used in game. The artist of these paintings remains unknown.
{| class="wikitable stikitable" style="text-align: center" data-description="Paintings"
! style="min-width:100px" |Canvas
! style="min-width:3em;max-width:4em" |Size
! style="min-width:6em" |Name
! style="min-width:10em" |[[Resource location]]
! style="min-width:10em" |Description
! style="min-width:5em;max-width:10em" |Bedrock Edition version added
! style="min-width:5em;max-width:8em" |Java Edition version added
|-
! [[File:Earth (texture) BE2.png|128px]]
| rowspan="4" | 2×2 blocks<br>32×32 pixels || Earth || <code>earth</code> || One of the four {{Wikipedia|Classical element|classical elements}}: Earth. || rowspan="4" | [[Pocket Edition v0.5.0 alpha|v0.5.0 alpha]] || rowspan="4" | [[Java Edition 22w16a|22w16a]]
|-
! [[File:Fire (texture) BE2.png|128px]]
| Fire || <code>fire</code> || One of the four classical elements: Fire.
|-
! [[File:Water (texture) BE2.png|128px]]
| Water || <code>water</code> || One of the four classical elements: Water.
|-
! [[File:Wind (texture) BE2.png|128px]]
| Wind || <code>wind</code> || One of the four classical elements: Air.
|}
==Sounds==
{{Edition|Java}}:
{{Sound table
|sound=Painting break1.ogg
|sound2=Painting break2.ogg
|sound3=Painting break3.ogg
|subtitle=Painting breaks<ref>{{Cite bug|MC|194948|Painting, item frame and lead breaking subtitles inconsistent with block breaking subtitle|date=July 14, 2020}}</ref>
|source=neutral
|description=When a painting is broken or pops off
|id=entity.painting.break
|translationkey=subtitles.entity.painting.break
|volume=1.0
|pitch=1.0
|distance=16}}
{{Sound table
|sound=Painting place1.ogg
|sound2=Painting place2.ogg
|sound3=Painting place3.ogg
|sound4=Painting place4.ogg
|subtitle=Painting placed
|source=neutral
|description=When a painting is placed
|id=entity.painting.place
|translationkey=subtitles.entity.painting.place
|volume=1.0
|pitch=1.0
|distance=16
|foot=1}}
{{Edition|Bedrock}}:
{{Sound table
|type=bedrock
|sound=Item Frame break1.ogg
|sound2=Item Frame break2.ogg
|sound3=Item Frame break3.ogg
|source=block
|description=When a painting is broken or pops off
|id=block.itemframe.break
|volume=1.0
|pitch=1.0}}
{{Sound table
|sound=Item Frame add item1.ogg
|sound2=Item Frame add item2.ogg
|soumd3=Item Frame add item3.ogg
|sound4=Item Frame add item4.ogg
|source=block
|description=When a painting is placed
|id=block.itemframe.add_item
|volume=1.0
|pitch=1.0
|foot=1}}
== Data values ==
=== ID ===
{{edition|java}}:
{{ID table
|edition=java
|firstcolumnname=Item
|showforms=y
|generatetranslationkeys=y
|displayname=Painting
|spritetype=item
|nameid=painting
|form=item
|foot=1}}
{{ID table
|edition=java
|firstcolumnname=Entity
|generatetranslationkeys=y
|displayname=Painting
|spritetype=entity
|nameid=painting
|foot=1}}
{{edition|bedrock}}:
{{ID table
|edition=bedrock
|firstcolumnname=Item
|shownumericids=y
|showforms=y
|notshowbeitemforms=y
|generatetranslationkeys=y
|displayname=Painting
|spritetype=item
|nameid=painting
|id=357
|form=item
|foot=1}}
{{ID table
|edition=bedrock
|firstcolumnname=Entity
|shownumericids=y
|generatetranslationkeys=y
|displayname=Painting
|spritetype=entity
|nameid=painting
|id=83
|foot=1}}
=== Entity data ===
Paintings have entity data that defines various properties of the entity.
{{el|java}}:
{{main|Entity format}}
{{/ED}}
{{el|bedrock}}:
: See [[Bedrock Edition level format/Entity format]].
== Video ==
<div style="text-align:center">{{yt|M3vWDirTMek}}</div>
== History ==
{{History|java indev}}
{{History||20100223|[[File:Painting JE1 BE1.png|32px]] Added paintings.
|There are currently 19 canvases, which can be viewed at [[Java Edition history of textures/Paintings]].
|The [[crafting]] recipe of paintings uses eight [[planks]].
{{{!}} class{{=}}"collapsible collapsed"
! Recipe
{{!}}-
{{!}}
{{Crafting Table
|A1=Oak Planks
|B1=Oak Planks
|C1=Oak Planks
|A2=Oak Planks
|B2=Light Gray Wool
|C2=Oak Planks
|A3=Oak Planks
|B3=Oak Planks
|C3=Oak Planks
|Output=Painting
}}
{{!}}}
|Painting textures are currently stored on a [[texture atlas]] called <samp>[[kz.png]]</samp>.}}
{{History|java infdev}}
{{History||20100227-1|The [[crafting]] recipe has of paintings has been changed, so that it now uses [[stick]]s, rather than [[planks]].
{{{!}} class{{=}}"collapsible collapsed"
! Recipe
{{!}}-
{{!}}
{{Crafting Table
|A1=Stick
|B1=Stick
|C1=Stick
|A2=Stick
|B2=Light Gray Wool
|C2=Stick
|A3=Stick
|B3=Stick
|C3=Stick
|Output=Painting
}}
{{!}}}
}}
{{History|java alpha}}
{{History||v1.1.1|Added five more painting canvases, for a total of 24.
|The textures of two paintings have been changed.}}
{{History|java beta}}
{{History||1.2_01|Added a new painting, although it uses an untextured part of <samp>kz.png</samp> due to the painting texture not yet being implemented.}}
{{History||1.3|The texture of the new painting, has been added to the part of <samp>kz.png</samp> displayed by the new painting.}}
{{History||April 27, 2011|link=https://web.archive.org/web/20201111211000/https://notch.tumblr.com/post/4988431144/the-maps|Custom paintings are mentioned by [[Notch]].}}
{{History||1.7.3|Paintings pushed by [[piston]]s now pop off.}}
{{History|java}}
{{History||1.4.2|snap=12w36a|Added new painting canvas 'Wither'.
|Paintings can now be placed overlapping one another.}}
{{History||1.8|snap=14w10a|Paintings can no longer be placed directly inside of each other.}}
{{History||1.9|snap=15w49a|Paintings can no longer be destroyed by [[lightning]].}}
{{History|||snap=15w50a|Added [[sound]]s for placing and breaking paintings: <code>entity.painting.place</code> and <code>entity.painting.break</code>.}}
{{History||1.11|snap=16w32a|The [[entity]] ID for paintings has been changed from <code>Painting</code> to <code>painting</code>.}}
{{History||1.12|snap=17w06a|Paintings now have a more intuitive placement system. When placed, a painting always uses the maximum possible amount of available space.}}
{{History||1.13|snap=17w47a|Prior to [[1.13/Flattening|''The Flattening'']], this [[item]]'s numeral ID was 321.}}
{{History|||snap=18w02a|Paintings now use a [[resource location]] for their motive.}}
{{History||1.14|snap=18w43a|[[File:Painting JE2 BE2.png|32px]] The [[item]] texture of paintings has been changed.}}
{{History|||snap=19w07a|Paintings are now stored as individual image files instead of parts of a single large image file, and now support animations.}}
{{History|||snap=19w11a|Shepherd [[villager]]s now [[trading|sell]] paintings.}}
{{History||1.17|snap=21w11a|The painting back texture has been updated to be in line with the texture update.}}
{{History||1.19|snap=22w16a|Added the four unused paintings from Bedrock Edition: "Earth", "Wind", "Fire", and "Water".|These paintings can only be added through a [[data pack]], or with the {{cmd|summon}} command.}}
{{History||1.19.4|snap=23w06a|Added [[painting]] variants to "Functional Blocks" tab.|Paintings with pre-defined variant will now display author, title and size in description when hovered over.|The "Operator Utilities" tab now contains the four paintings that are not available in Survival mode.}}
{{History||1.21|snap=TBA|Added 5 new paintings, one 1x1, one 2x1, one 2x2, one 3x2 and one 4x4}}
}
{{History|pocket alpha}}
{{History||v0.5.0|[[File:Painting JE1 BE1.png|32px]] Added paintings.
|There are currently 25 canvases, which can be viewed at [[Bedrock Edition history of textures/Paintings]].}}
{{History||v0.8.0|snap=build 3|A new painting rendering has been added.{{info needed|What exactly changed?}}}}
{{History||v0.12.1|snap=build 1|Paintings are no longer available from the [[nether reactor]].}}
{{History||v0.15.0|snap=build 1|Paintings now have [[sound]]s when placed and broken.}}
{{History|pocket}}
{{History||1.0.7|Added new painting canvas 'Wither'.}}
{{History|bedrock}}
{{History||1.10.0|snap=beta 1.10.0.3|[[File:Painting JE2 BE2.png|32px]] The [[item]] texture of paintings has been changed.}}
{{History||1.11.0|snap=beta 1.11.0.4|Paintings can now be [[trading|bought]] from shepherd [[villager]]s.}}
{{History||1.17.0|snap=beta 1.17.0.50|The painting back texture has been updated to be in line with the texture update.}}
{{History|console}}
{{History||xbox=TU1|xbone=CU1|ps=1.0|wiiu=Patch 1|switch=1.0.1|[[File:Painting JE1 BE1.png|32px]] Added paintings.
|There are currently 25 canvases, which can be viewed at [[Legacy Console Edition history of textures/Paintings]].}}
{{History||xbox=TU11|The limit for paintings in a world has been increased.
|A message is now displayed when the maximum paintings are reached.}}
{{History||xbox=TU14|ps=1.04|Added new painting canvas 'Wither'.}}
{{History||xbox=TU43|xbone=CU33|ps=1.36|wiiu=Patch 13|Added [[sound]]s for paintings.}}
{{History||xbox=none|xbone=none|ps=1.90|wiiu=none|switch=none|[[File:Painting JE2 BE2.png|32px]] The [[item]] texture of paintings has been changed.}}
{{History|3ds}}
{{History||0.1.0|[[File:Painting JE1 BE1.png|32px]] Added paintings.
|There are currently 25 canvases, which can be viewed at [[New Nintendo 3DS Edition history of textures/Paintings]].}}
{{History|foot}}
== Issues ==
{{issue list}}
== Trivia ==
* On April 26, 2011, Notch stated that the automapping code can be used to share custom paintings and books in the future.<ref>{{tweet|notch|62970142207913984|The auto mapping code can be used to share custom paintings and books in the future. There's a hard cap on 65536 of each/world, though|April 26, 2011}}</ref>
* The texture on the back of a painting is the same as the wooden planks texture, but with a yellowish color similar to that of [[chests]] (but slightly darker).
* The "Skull on Fire" painting contains a Minecraft world in the background, which is based on a screenshot taken by the artist in [[Java Edition Alpha v1.1.2 01|Alpha 1.1.2_01]] (or earlier) on October 12, 2010, at 13:22:49 (UTC+2).<ref>{{cite|url=https://web.archive.org/web/20220928041338/https://imgur.com/HVhrbnH|title=The original (never publicly shared before) screenshot that Kristoffer Zetterstrand took and based his painting on.|website=Imgur}}</ref>
**The seeds for this world are -1044887956651363087 and -6984854390176336655 (both are the same), standing at X=-249.65, Y=91, Z=-29.04.<ref>https://pastebin.com/fzAY9ES4</ref><ref>https://www.reddit.com/r/Minecraft/comments/iqg3ey/the_original_screenshot_seed_of_the_minecraft/</ref>
* The "Skull on Fire" painting's texture was added in [[Java Edition Beta 1.3|Beta 1.3]]. However, the code for paintings to randomly display the part of the [[Kz.png]] texture that was to be occupied by the Burning Skull painting was added earlier, in [[Java Edition Beta 1.2_01|Beta 1.2_01]]. As there was nothing on this part of the texture except for a purple background grid, this is what would be displayed if the painting was randomly chosen, until the Burning Skull painting texture was actually added.
* The original "Skull on Fire" painting was given to the winner of an official texture pack competition by Mojang.<ref>https://web.archive.org/web/20110110003612/http://www.webhallen.com:80/minecraft/</ref>
== Gallery ==
<gallery>
File:Notch Painting Screenshot.png|The first image of paintings released by [[Notch]].
File:Skull on Fire world.jpg|The original screenshot behind the "Skull on Fire" painting.
File:Burning Skull Render.jpg|A render of the "Skull on Fire" painting that [[Kristoffer Zetterstrand]] used as a reference image.
File:Skull on Fire IRL.jpg|The original "Skull on Fire" painting being painted.
File:Burning Skull JE1.png|The "Skull on Fire" painting as it appeared between versions [[Java Edition Beta 1.2_01|Beta 1.2_01]] and [[Java Edition Beta 1.2_02|Beta 1.2_02]], prior to its texture being added in [[Java Edition Beta 1.3|Beta 1.3]].
</gallery>
=== Renders ===
<gallery>
Alban.png | Albanian
Aztec.png | de_aztec
Aztec2.png | de_aztec
Bomb.png | Target Successfully Bombed
Kebab.png | Kebab med tre pepperoni
Plant.png | Paradisträd
Wasteland.png | Wasteland
Courbet.png | Bonjour Monsieur Courbet
Creebet.png | Creebet
Pool.png | The Pool
Sea.png | Seaside
Sunset.png | sunset_dense
Graham.png | Graham
Wanderer.png | Wanderer
Bust.png | Bust
Match.png | Match
Skull and Roses.png | Skull and Roses
Stage.png | The Stage Is Set
Void.png | The void
Wither (painting).png | Wither
Fighters.png | Fighters
Donkey Kong.png | Kong
Skeleton (painting).png | Mortal Coil
Burning Skull.png | Skull On Fire
Pigscene.png | Pigscene
Pointer.png | Pointer
Earth BE2.png | Earth
Fire BE2.png | Fire
Water BE2.png | Water
Wind BE2.png | Wind
</gallery>
== See also ==
* [[Item Frame]]
* [[Bedrock Edition unused features#Paintings|Unused paintings]]
* [[Kz.png]]
* [[Kristoffer Zetterstrand]]
== References ==
{{reflist}}
== External links ==
*[https://www.minecraft.net/en-us/article/taking-inventory-painting Taking Inventory: Painting] – Minecraft.net on January 18, 2019
{{items}}
{{entities}}
[[cs:Obraz]]
[[de:Gemälde]]
[[es:Cuadro]]
[[fr:Tableau]]
[[hu:Festmény]]
[[it:Quadro]]
[[ja:絵画]]
[[ko:그림]]
[[nl:Schilderij]]
[[pl:Obraz]]
[[pt:Quadro]]
[[ru:Картина]]
[[th:ภาพวาด]]
[[uk:Картина]]
[[zh:画]]</li></ul></nowiki> | Beta 1.9 Prerelease 5 | ||||
1.2.1{{Extension DPL}}<ul><li>[[Saddle|Saddle]]<br/>{{about|normal saddles|the removed horse saddle|Horse Saddle}}
{{item
| image = <gallery>
Saddle (Pig).png | Pig
Saddle (Horse).png | Horse
Saddle (Strider).png | Strider
</gallery>
| invimage = Saddle
| renewable = Yes
| stackable = No
}}
A '''saddle''' is an [[item]] required to ride [[Pig|pigs]] and [[Strider|striders]] or control ridden [[camel]]s, [[Horse|horses]], [[Donkey|donkeys]] and [[Mule|mules]].
== Obtaining ==
=== Chest loot ===
{{LootChestItem|saddle}}
=== Fishing ===
Saddles can be obtained as a "treasure" item from [[fishing]] with a base chance (without fishing rod enchantments) of 0.8%.
=== Trading ===
Master-level [[Trading#Leatherworker|leatherworker]] [[villager]]s have a 50% chance to sell a saddle for 6 [[Emerald|emeralds]] as their trade.{{only|bedrock}} This trade is always offered in ''Java Edition''.
=== Mob loot ===
Any mob that the player equips with a saddle drops the saddle upon death.
A [[strider]] may spawn being ridden by a [[zombified piglin]], which causes it to spawn wearing a saddle. This saddle always drops when the strider is killed.
A [[ravager]] always spawns with a saddle and always drops the saddle upon death. Looting does not affect the drop.
== Usage ==
[[File:SaddledHorse.png|thumb|right|A [[horse]] equipped with a saddle.]]
While [[camel]]s, [[horse]]s, [[donkey]]s, [[mule]]s and [[Skeleton Horse|skeleton horse]]s{{Only|Java}} can always be ridden, a saddle is required to control them. These mobs (only after being tamed, in the case of equine mobs) can be equipped with a saddle by placing it in their inventory, which can be opened by pressing {{control|use}} while holding a saddle or {{control|sneaking}}. The saddle can be unequipped by removing it from {{SlotSprite|Saddle}} the specific inventory slot.
Saddles are required to ride [[Pig|pigs]] and [[Strider|striders]], but even with a saddle their movement cannot be controlled like other mobs. A [[Carrot on a Stick|carrot on a stick]] (for pigs) or a [[Warped Fungus on a Stick|warped fungus on a stick]] (for striders) is required to direct these mobs. {{control|Using}} a saddle on one of these mobs equips them with the saddle, and, since they have no inventory, there is no way to retrieve the saddle without killing the mob.
Animals can also be equipped with saddles by a [[dispenser]].
Although [[ravager]]s are equipped with saddles and sometimes ridden by other mobs, the [[player]] is unable to ride ravagers.
== Sounds ==
{{edition|java}}:
{{Sound table
|rowspan=4
|sound=Saddle equip.ogg
|source=neutral
|subtitle=Saddle equips
|description=When a saddle is equipped to a camel
|id=entity.camel.saddle
|translationkey=subtitles.entity.horse.saddle
|volume=0.5
|pitch=0.8
|distance=16}}
{{Sound table
|subtitle=MC-184399
|source=neutral
|description=When a saddle is equipped to a strider
|id=entity.strider.saddle
|translationkey=-
|volume=0.5
|pitch=1.0
|distance=16}}
{{Sound table
|subtitle=Saddle equips
|source=neutral
|description=When a saddle is equipped to a horse, donkey, mule, skeleton horse, or zombie horse
|id=entity.horse.saddle
|translationkey=subtitles.entity.horse.saddle
|volume=0.5
|pitch=1.0
|distance=16}}
{{Sound table
|subtitle=Saddle equips
|source=neutral
|description=When a saddle is equipped to a pig
|id=entity.pig.saddle
|translationkey=subtitles.entity.pig.saddle
|volume=0.5
|pitch=1.0
|distance=16
|foot=1}}
{{edition|bedrock}}:
{{Sound table
|type=bedrock
|rowspan=3
|sound=Saddle equip.ogg
|source=neutral
|description=When a saddle is equipped to a camel
|id=mob.horse.leather
|volume=1.0
|pitch=1.0}}
{{Sound table
|source=neutral
|description=When a saddle is equipped to a horse, mule, skeleton horse, or zombie horse
|id=mob.horse.leather
|volume=0.6
|pitch=1.0}}
{{Sound table
|source=neutral
|description=When a saddle is equipped to a donkey
|id=mob.horse.leather
|volume=0.5
|pitch=1.0
|foot=1}}
== Data values ==
=== ID ===
{{edition|java}}:
{{ID table
|edition=java
|showforms=y
|generatetranslationkeys=y
|displayname=Saddle
|spritetype=item
|nameid=saddle
|form=item
|foot=1}}
{{edition|bedrock}}:
{{ID table
|edition=bedrock
|shownumericids=y
|showforms=y
|notshowbeitemforms=y
|generatetranslationkeys=y
|displayname=Saddle
|spritetype=item
|nameid=saddle
|id=371
|form=item
|foot=1}}
== Achievements ==
{{load achievements|When Pigs Fly}}
== Advancements ==
{{load advancements|This Boat Has Legs}}
== History ==
{{needs render|type=old|isolated saddles in 1.13 dev|section=11}}
{{History|java infdev}}
{{History||20100625-2|[[File:Saddle (Pig) JE1 BE1.png|32px]] [[File:Saddle JE1 BE1.png|32px]] Added saddles.
|Saddles do not [[drops|drop]] from saddled [[pig]]s.
|Saddles can be found in the new [[dungeon]] [[chest]]s.}}
{{History|java}}
{{History||1.2.4|snap=release|When baby animals were introduced, baby [[pig]]s could be ridden just like adult pigs. After this version, baby pigs can no longer be saddled.}}
{{History||1.3.1|snap=12w21a|Saddles can now be [[trading|bought]] from butcher [[villager]]s for 6–7 [[emerald]]s each, and thus have become [[renewable resource|renewable]].}}
{{History||1.4.2|snap=12w36a|Saddles now [[drops|drop]] from killing saddled [[pig]]s.
|Added [[Carrot on a Stick|carrot on a stick]] to direct saddled pigs, effectively controlling them.}}
{{History|||snap=12w37a|Pigs can now jump when being ridden.}}
{{History||1.6.1|snap=13w18a|Regular saddles can now be used to ride [[horse]]s, while previously they required [[Horse Saddle|horse saddle]]s.
|Added saddles to the loot tables of [[mineshaft]] minecarts, [[stronghold]] altar chests, [[village]] blacksmith chests, as well as [[Desert pyramid|desert]] and [[jungle pyramid]]s.
|Added chests to [[Nether Fortress|nether fortresses]], where saddles can be found.}}
{{History||1.7.2|snap=13w36a|Saddles can now be [[fishing|fished]] with [[Fishing Rod|fishing rod]]s and are described as treasure.}}
{{History||1.8|snap=14w02a|[[Trading]] has been changed: leatherworker [[villager]]s now [[trading|sell]] saddles for 8–10 [[emerald]]s each, and butchers no longer [[trading|trade]] saddles.}}
{{History||1.9|snap=15w31a|Saddles can now be found in [[End City|end city]] [[chest]]s.}}
{{History|||snap=15w43a|The average yield of saddles in [[Nether Fortress|nether fortress]] chests has been slightly decreased.}}
{{History|||snap=15w44a|Saddles have been removed from [[mineshaft]] chests.
|The average yield of saddles in [[dungeon]] chests has been decreased.
|The average yield of saddles in [[desert pyramid|desert temple]] chests has been increased.}}
{{History||1.13|snap=17w45a|[[File:White Horse (Saddle) 17w45a.png|50px]] The models of the horse's saddle has been changed.}}
{{History|||snap=17w46a|[[File:White Horse (Saddle) 17w46a.png|50px]] The models of the horse's saddle has been changed once again.}}
{{History|||snap=17w47a|Prior to [[Java Edition 1.13/Flattening|''The Flattening'']], this [[item]]'s numeral ID was 329.}}
{{History|||snap=18w03a|[[File:White Horse (Saddle) 18w03a.png|50px]] The models of the horse's saddle has been changed once again.}}
{{History|||snap=pre2|[[File:White Horse (Saddle) 1.13pre2.png|50px]] The models of the horse's saddle has been changed once again. The reins bit has now been rendered. Also, the lines of the reins are no longer rendered except when riding.}}
{{History||1.14|snap=18w43a|Added [[ravager|illager beast]]s, which [[drops|drop]] saddles.
|[[File:Saddle (Pig) JE2 BE2.png|32px]] [[File:Saddle (Horse) JE2 BE2.png|32px]] <br>[[File:Saddle JE2 BE2.png|32px]] The textures of saddles have been changed.}}
{{History|||snap=18w48a|Saddles can now be found in [[chest]]s in [[village]] tanneries.}}
{{History|||snap=18w49a|Saddles can now be found in chests in [[savanna]] village houses.}}
{{History||1.16|snap=20w13a|[[File:Saddle (Strider) JE1 BE1.png|32px]] Added [[strider]]s, which can be ridden with saddles.}}
{{History|||snap=20w15a|Saddles placed in a [[dispenser]] can now saddle pigs, striders, and tamed horses, donkeys and mules.}}
{{History|||snap=20w16a|Saddles now generate in [[Bastion Remnant|bastion remnant]] chests.}}
{{History|||snap=20w17a|[[File:Saddle (Strider) JE2.png|32px]] The texture of the strider saddles has been changed. The front and back orientation of the saddle has been corrected.<ref>{{bug|MC-176116}}</ref>}}
{{History||1.19|snap=22w13a|Saddles may now be found in [[ancient city]] [[chest]]s.}}
{{History||1.20<br>(Experimental)|link=1.19.3|snap=22w42a|Saddles can be used to ride [[camel]]s with the use of a built-in experimental data pack.}}
{{History|pocket alpha}}
{{History||v0.7.0|[[File:Saddle JE1 BE1.png|32px]] Added saddles. They are currently unobtainable and have no practical usage since they cannot be equipped on any mobs.}}
{{History||v0.9.0|snap=build 1|Saddles can now be obtained from [[village]] blacksmith [[chest]]s.}}
{{History||v0.11.0|snap=build 1|Saddles can now be [[fishing|fished]] with [[fishing rod]]s and are described as treasure.}}
{{History||v0.12.1|snap=build 1|Saddles can now be found in [[nether fortress]]es.}}
{{History||v0.13.0|snap=build 1|Saddles can now be found in [[desert temple]]s.}}
{{History||v0.15.0|snap=build 1|[[File:Saddle (Pig) JE1 BE1.png|32px]] [[File:Saddle (Horse) JE1 BE1.png|32px]] Saddles can now be used for riding [[horse]]s and [[pig]]s.|Saddles can now be found inside [[jungle temple]]s.}}
{{History||snap=?||Added saddles to the [[Creative inventory]].{{info needed}}}}
{{History|pocket}}
{{History||1.0.0|snap=alpha 0.17.0.1|Saddles can now be found in [[end cities]].}}
{{History||1.0.4|snap=alpha 1.0.4.0|Saddles are now [[trading|sold]] by leatherworker [[villager]]s for 8-10 [[emerald]]s as their only third tiers [[trading|trades]].}}
{{History|bedrock}}
{{History||1.10.0|snap=beta 1.10.0.3|Saddles can now be found in [[plains]] [[village]] tannery and weaponsmith [[chest]]s.
|Added [[ravager]]s, which [[drops|drop]] a saddle upon death.
|[[File:Saddle (Pig) JE2 BE2.png|32px]] [[File:Saddle (Horse) JE2 BE2.png|32px]] <br>[[File:Saddle JE2 BE2.png|32px]] The textures of saddles have been changed.}}
{{History||1.11.0|snap=beta 1.11.0.1|Saddles can now be found in [[savanna]], [[snowy taiga]], [[taiga]] and [[snowy tundra]] village tannery [[chest]]s.
|Saddles can now be found in savanna, taiga, snowy taiga, and [[desert]] village weaponsmith chests.
|Saddles can now be found in savanna [[village]] house chests.}}
{{History|||snap=beta 1.11.0.4|[[Trading]] has been changed. Leatherworker [[villager]]s now have 50% chance to [[trading|sell]] saddles for 10 [[emerald]]s as part of their last tier [[trading|trade]].}}
{{History||1.12.0|snap=beta 1.12.0.3|The trading price of saddles has been lowered to 6 emeralds.}}
{{History||1.16.0|snap=beta 1.16.0.57|[[File:Saddle (Strider) JE1 BE1.png|32px]] Added [[strider]]s, which can be ridden with saddles.|Saddles now generate in [[Bastion Remnant|bastion remnant]] chests.}}
{{History||1.20.0<br>(Experimental)|link=Bedrock Edition 1.19.50|snap=beta 1.19.50.21|Saddles can now be used to ride [[camel]]s with the use of the "[[Bedrock Edition 1.20|Next Major Update]]" [[experimental]] toggle.}}
{{History|console}}
{{History||xbox=TU1|xbone=CU1|ps=1.0|wiiu=Patch 1|switch=1.0.1|[[File:Saddle (Pig) JE1 BE1.png|32px]] <br>[[File:Saddle JE1 BE1.png|32px]] Added saddles.}}
{{History||xbox=none|xbone=none|ps=1.90|wiiu=none|switch=none|[[File:Saddle (Pig) JE2 BE2.png|32px]] [[File:Saddle (Horse) JE2 BE2.png|32px]] <br>[[File:Saddle JE2 BE2.png|32px]] The textures of saddles have been changed.}}
{{History|3ds}}
{{History||0.1.0|[[File:Saddle (Pig) JE1 BE1.png|32px]] <br>[[File:Saddle JE1 BE1.png|32px]] Added saddles.}}
{{History|foot}}
== Issues ==
{{issue list}}
== Trivia ==
* A saddle is considered "armor" by the game, but the value of protection to the animal is zero.
* A saddle on a pig can still be seen if the pig is afflicted with [[Invisibility]].
* When riding a saddled mob, the hunger bar is replaced by hearts (representing the mounted mob's health) resembling the look of the saddle.
== Gallery ==
<gallery>
File:Pig saddle.png|A [[player]] riding a [[pig]] (before [[Java Edition Beta 1.8|Beta 1.8]]).
File:Horse saddle.png|A player riding a [[horse]].
File:13w21a-new-HorseUI-inventory.png|The horse interface implemented in [[Java Edition 13w21a|13w21a]] that allows for the removal of saddles, but only on horses, [[donkey]]s or [[mule]]s.
File:Saddled Mule (picture).png|Mule equipped with both a saddle and a [[chest]].
File:GodSpawner.png|A saddle found in a monster room chest, which coincidentally contains an [[enchanted golden apple]].
</gallery>
== See also ==
* [[Transportation]]
== References ==
{{reflist}}
{{items}}
[[cs:Sedlo]]
[[de:Sattel]]
[[es:Montura]]
[[fr:Selle]]
[[hu:Nyereg]]
[[it:Sella]]
[[ja:鞍]]
[[ko:안장]]
[[nl:Zadel]]
[[pl:Siodło]]
[[pt:Sela]]
[[ru:Седло]]
[[zh:鞍]]
[[Category:Renewable resources]]
[[uk:Сідло]]</li><li>[[Redstone Comparator|Redstone Comparator]]<br/>{{Block
| image =
| image2 =
| transparent = Yes
| light = No
| tool = any
| renewable = Yes
| stackable = Yes (64)
| flammable = No
| lavasusceptible = No
| group = Redstone Comparator
| group2 = Subtracting
| group3 = Powered
| group4 = Powered+Subtracting
| 1-1 = Redstone Comparator.png
| 2-1 = Subtracting Redstone Comparator.png
| 3-1 = Powered Redstone Comparator.png
| 4-1 = Powered Subtracting Redstone Comparator.png
}}
{{Many images}}
A '''redstone comparator''' is a [[block]] that can produce an [[Redstone Dust|output signal]] from its front by reading [[chest]]s, [[lectern]]s, [[beehive]]s and similar blocks, or repeat a signal without changing its strength. It can also be set to either stop outputting a signal when its side input recieves a stronger one (front torch off), or subtract its side input's signal strength from its output (front torch on).
== Obtaining ==
=== Natural generation ===
Redstone comparators generate in [[Ancient City|ancient cities]].
=== Breaking ===
A redstone comparator can be broken instantly with any [[tool]], or by hand, and drops itself as an item.
{{Breaking row|Redstone Comparator|horizontal=y}}
A redstone comparator is removed and dropped as an item if:
* its attachment block is moved, removed, or destroyed;
* [[water]] flows into its space;{{only|java}}
* a [[piston]] tries to push it or moves a block into its space.
If [[lava]] flows into a redstone comparator's space, the redstone comparator is destroyed without dropping as an item.
=== Crafting ===
{{Crafting
|B1=Redstone Torch
|A2=Redstone Torch
|B2=Nether Quartz
|C2=Redstone Torch
|A3=Stone
|B3=Stone
|C3=Stone
|Output= Redstone Comparator
|type=Redstone
}}
== Usage ==
A redstone comparator can be placed on the top of any [[opaque]] block with a solid full-height top surface (including upside-down [[slab]]s and upside-down [[stairs]]). {{IN|be}}, a comparator can also be placed on [[wall]]s and fences. For more information about placement on transparent blocks, see [[Opacity/Placement]].
The redstone comparator has a front and a back — the arrow on the top of the comparator points to the front. When placed, the comparator faces away from the player. The comparator has two miniature redstone torches at the back and one at the front. The back torches turn on when the comparator's output is greater than zero (the arrow on top also turns red). The front torch has two states that can be toggled by {{control|using}} the comparator:
* Down and unpowered (indicating the comparator is in "comparison mode")
* Up and powered (indicating the comparator is in "subtraction mode")
The redstone comparator can take a signal strength input from its rear as well as from both sides. Side inputs are accepted only from [[redstone dust]], [[block of redstone]], [[redstone repeater]]s, other comparators, and [[observer]]s in specific scenarios. The redstone comparator's front is its output.
It takes 1 [[redstone tick]] (2 game ticks, or 0.1 seconds barring lag) for signals to move through a redstone comparator, either from the rear or from the sides. This applies to changing signal strengths as well as simply to turning on and off.
Redstone comparators check their power state before their scheduled ticks update. This results in redstone comparators not usually responding to 1-tick fluctuations of power or signal strength — for example, a [[clock circuit|1-clock]] input is treated as always off from the side, and always on from the rear. This happens because the signal changes back to its original state before the redstone comparator checks its input states. However, certain setups such as powering any input with two separate observer pulses at the same time will cause a redstone comparator to respond to 2 gametick pulses.
The redstone comparator has four functions: maintain signal strength, compare signal strength, subtract signal strength, and measure certain block states (primarily the fullness of containers).
=== Maintain signal strength ===
A redstone comparator with no powered sides outputs the same signal strength as its rear input.
=== Compare signal strength ===
[[File:Comparators Explained.png|Comparators in comparison mode.|thumb]]
A redstone comparator in comparison mode (front torch down and unpowered) compares its rear input to its two side inputs. If either side input is greater than the rear input, the comparator output turns off. If neither side input is greater than the rear input, the comparator outputs the same signal strength as its rear input.
The formula for calculating the output signal strength is as follows:
<code>output = rear × [[Wikipedia:Iverson bracket|[]]'''''left''''' ≤ '''''rear''''' AND '''''right''''' ≤ '''''rear'''''[[Wikipedia:Iverson bracket|<nowiki>]]]</code>
{{-}}
=== Subtract signal strength ===
[[File:Redstone comparator.png|thumb|The greatest of the side inputs A and C is subtracted from the rear input B, outputting 1. If either A or C were greater than B, it would output 0.]]
A redstone comparator in subtraction mode (front torch up and powered) subtracts the signal strength of the higher side input from the signal strength of the rear input.
<code>output = max('''''rear''''' − max('''''left''', '''right'''''), 0)</code>
For example: if the signal strength is 6 at the left input, 7 at the right input and 4 at the rear, the output signal has a strength of ''max(4 − max(6, 7), 0) = max(4−7, 0) = max(−3, 0) = 0''.
If the signal strength is 9 at the rear, 2 at the right input and 5 at the left input, the output signal has a strength of ''max(9 − max(2, 5), 0) = max(9−5, 0) = 4''.
=== Measure block state ===
{{Schematic | caption = A redstone comparator can measure the fullness of a chest, as well as other block states, even through an opaque block.
|rd-ew!|rc-w!|ch|SB|rc-e!|rd-ew!
}}
A redstone comparator treats certain blocks behind it as power sources and outputs a signal strength proportional to the block's state. The comparator may be separated from the measured block by an opaque block. However, {{in|je}}, if the opaque block is powered to signal strength 15, then the comparator outputs 15 no matter the fullness of the container.<ref>{{bug|MC-64394}} (resolved as "Works As Intended")</ref>
[[Category:Java Edition specific information]]
{{-}}
==== Fullness of containers ====
{| class="wikitable floatright" style="margin-left: 0.5em; margin-right: 0; text-align: center;"
|+ Minimum Items for Container Signal Strength
|-
!Containers
!{{BlockSprite|Furnace|link=Furnace}}<br>{{BlockSprite|Blast Furnace|link=Blast Furnace}}<br>{{BlockSprite|Smoker|link=Smoker}}
!{{BlockSprite|Hopper|link=Hopper}}<br>{{EntitySprite|Minecart with Hopper|link=Minecart with Hopper}}<br>{{BlockSprite|Brewing Stand|link=Brewing Stand}}
!{{BlockSprite|Dispenser|link=Dispenser}}<br>{{BlockSprite|Dropper|link=Dropper}}
!{{BlockSprite|Chest|link=Chest}}<br>{{EntitySprite|Minecart with Chest|link=Minecart with Chest}}<br>{{BlockSprite|Shulker Box|link=Shulker Box}}<br>{{BlockSprite|Barrel|link=Barrel}}
![[Double Chest|{{Schematic|size=16|ch-s|-|ch-n}}
]]
!{{BlockSprite|Jukebox|link=Jukebox}}
|-
!Total Slots
!3!!5!!9!!27!!54!!1
|-
!Power Level
! colspan="5" |Number of Items
!Music Disc
|-
|0||0||0||0||0||0||No disc
|-
|1||1||1||1||1||1||"13"
|-
|2||14||23||42||1s 60||3s 55||"cat"
|-
|3||28||46||1s 19||3s 55||7s 46||"blocks"
|-
|4||42||1s 5||1s 60||5s 51||11s 37||"chirp"
|-
|5||55||1s 28||2s 37||7s 46||15s 28||"far"
|-
|6||1s 5||1s 51||3s 14||9s 42||19s 19||"mall"
|-
|7||1s 19||2s 10||3s 55||11s 37||23s 10||"mellohi"
|-
|8||1s 32||2s 32||4s 32||13s 32||27s||"stal"
|-
|9||1s 46||2s 55||5s 10||15s 28||30s 55||"strad"
|-
|10||1s 60||3s 14||5s 51||17s 23||34s 46||"ward"
|-
|11||2s 10||3s 37||6s 28||19s 19||38s 37||"11"
|-
|12||2s 23||3s 60||7s 5||21s 14||42s 28||"wait"
|-
|13||2s 37||4s 19||7s 46||23s 10||46s 19||"Pigstep"
|-
|14||2s 51||4s 42||8s 23||25s 5||50s 10||"Otherside"<br>"Relic"
|-
|15||3s||5s||9s||27s||54s||"5"
|}
A redstone comparator can output a signal indicating how full a container is. (0 for empty, 15 for full, etc.) The table on the right is described more in detail, later in this section.
Containers that can be measured by a comparator include:
* {{BlockLink|Furnace}}
* {{BlockLink|Blast Furnace}}
* {{BlockLink|Smoker}}
* {{BlockLink|Brewing Stand}}
* {{BlockLink|Hopper}}
* {{ItemLink|Minecart with Hopper}} on top of a [[detector rail]]
* {{BlockLink|Dispenser}}
* {{BlockLink|Dropper}}
* {{BlockLink|Chest}}
* {{BlockLink|Trapped Chest}}
* {{ItemLink|Minecart with Chest}} on top of a [[detector rail]]
* {{BlockLink|Barrel}}
* {{SchematicSprite|size=16|ch-e}}{{SchematicSprite|size=16|ch-w}} Large chest
* {{SchematicSprite|size=16|ch-e}}{{SchematicSprite|size=16|ch-w}} Large trapped chest
* {{BlockLink|Shulker Box}} (any color)
Generally speaking, the comparator output signal strength represents the average fullness of the slots, based on how many of that item form a full stack (64, 16, or 1 for non-stackable items).
The ''Minimum Items for Container Signal Strength'' table (right) shows the minimum '''''full-stack-equivalent (FSE)''''' to produce different signal strengths from common containers. A '''''full-stack-equivalent''''' quantifies how many normal 64-stackable items are needed to output a corresponding signal strength. The 's' is a constant 64, with the additional amount needed following after.
One may also consider the terms: '''c''umulative-weight''''' or '''''weighted-sum''''' instead of '''''full-stack-equivalent'''''.
Items that stack to a max of 16 ([[snowball]]s, [[sign]]s, [[ender pearl]]s, etc.), contribute +4 to the ''full-stack-equivalent'' for each unity (count of 1 item). Similarly, items that stack to 1 ([[minecart]], [[boat]], etc.) contribute +64, and items that stack to 64 contribute +1.
Example 1: 3 ender pearls will contribute a 3 x 4 = 12 ''full-stack-equivalent''.
Example 2: 16 ender pearls and 60 redstone dust contributes a 16x4 + 60x1 = 124 ''full-stack-equivalent''.
Example 3: 1 minecart and 60 redstone dust contributes a 1x64 + 60x1 = 124 ''full-stack-equivalent''.
Example 4: To produce a signal strength of 10 from a hopper, one requires a ''full-stack-equivalent'' of at least 3s + 14 = 206 but strictly less than than 3s + 37 = 229. This can be done with 3 minecarts, and 14 dirt.
When a comparator measures a large chest or large trapped chest, it measures the entire large chest (54 slots), not just the half directly behind the comparator. A chest or trapped chest that cannot be opened (either because it has an opaque block, [[ocelot]], or [[cat]] above it) always produces an output of 0 no matter how many items are in the container — shulker boxes can always be measured, even if they cannot open.
;Calculating signal strength from items
:When a container is empty, the output is off.
:When it is not empty, the output signal strength is calculated as follows:
:<code>'''''signal strength''''' = floor(1 + (('''''sum of all slots' fullnesses''''') / ('''''number of slots in container''''')) × 14)</code>
:<code>fullness of a slot = '''''number of items in slot''''' / '''''max stack size for this type of item'''''</code>
:''Example:'' 300 blocks in a dispenser (which has 9 slots), where each block stacks to a maximum of 64 has a 300 ''full-stack-equivalent.'' This produces an output with a signal strength of 8:
<blockquote>
1 + ((300 items / 64 items per slot) / 9 slots) × 14 = 8.292, floored is 8
</blockquote>
;Calculating items from signal strength
:It can be useful in redstone circuits to use containers with comparators to create signals of a specific strength. The number of items required in a container to produce a signal of desired strength is calculated as follows:
:<code>items required = max('''''desired signal strength''''', roundup(('''''total slots in container''''' × 64 / 14) × (desired signal strength − 1)))</code>
:''Example:'' To use a furnace (which has 3 slots) to create a strength 9 signal, players need 110 items:
<blockquote>
max(9, (3×64/14) × (9−1)) = 109.714, rounded up is 110
</blockquote>
{{-}}
==== Miscellaneous ====
[[File:Comparator storage.png|Comparators used to measure containers.|thumb]]
Some non-container blocks can also be measured by a redstone comparator:
;{{BlockLink|Beehive}} and {{BlockLink|Bee nest}}
: A hive or nest outputs a signal strength equal to the amount of honey in the hive/nest.
;{{BlockLink|Cake}}
: A cake outputs a signal strength relative to the amount of cake remaining. Each slice is worth 2 signal strength, with 7 total slices, for an output of 14 for a full cake.
[[File:Cauldron Redstone Strength Values.png|Cauldron signal strength|thumb]]
;{{BlockLink|Cauldron}}
: A cauldron outputs different signal strengths depending on how much water or powdered snow is inside. From completely empty to completely full, the output values are 0, 1, 2, and 3. If lava or powder snow is inside, the strength is always 3.
[[File:Composter Redstone Strength Values.png|Composter signal strength|thumb]]
;{{BlockLink|Composter}}
: A composter outputs different signal strengths depending on the level inside. From completely empty to completely full, the output values are 0, 1, 2, 3, 4, 5, 6, 7 and 8.
;{{Anchor|CommandBlock}}{{BlockLink|Command Block}}
: A command block stores the "success count" of the last command executed, which represents the number of times the most recently used command of this command block succeeded. A "success" is defined by the [[command]]'s success conditions: if a red error message is returned in the chat, the command was not successful.
: Most commands can succeed once per execution, but certain commands (such as those that accept players as arguments) can succeed multiple times, and the comparator outputs the number of times it succeeded (maximum 15 when sent to redstone dust, but in the code it is able to go up to the 32-bit integer limit, and can be used in contraptions with no redstone dust with those values).
: A command block continues to store the success count of the last command executed until it executes its command again, thus the comparator continues to output the same signal strength even after the command block is no longer being activated (it doesn't turn off when the signal to the command block turns off).
;{{BlockLink|End Portal Frame}}
: An end portal frame outputs a full signal of 15 if it contains an [[eye of ender]] and zero otherwise.
[[File:Item frame and comparator.png|A comparator can measure the presence and rotation of an item frame's contents.|thumb]]
;{{EntityLink|Item Frame}}
: A comparator can measure the state of an [[item frame]]'s contents. An item frame comparator outputs 0 if the item frame is empty, or 1 to 8 for any item depending on its rotation: 1 at initial placement, plus 1 for each 45° of rotation for a maximum of 8.
: For an item frame that holds a map, a unit of rotation is 90° instead of 45°, but a comparator still outputs power levels 1 to 8. It takes two full rotations to cycle through all comparator outputs, and each orientation of the map corresponds to two output levels that differ by 4.
: The comparator must be placed behind the block the item frame is attached to, facing away from the item frame. The block must be a full block, and the item frame cannot be submerged in water. Having a sign in the same block as the item frame will prevent the frame from sending a signal as well.{{only|java}}
;{{BlockLink|Jukebox}}
: A jukebox outputs a signal strength indicating which music disc is currently playing. See the ''Minimum Items for Container Signal Strength'' table above.
;{{BlockLink|Lectern}}
: A lectern outputs a signal strength that depends on what page the player is currently on. The calculation used is:
:<code>'''''signal strength''''' = floor(1 + (('''''current page''''' - 1) / ('''''number of pages in book''''' - 1)) × 14)</code>
:This results in page 1 having a signal strength of 1, and the last page having a signal strength of 15. The exception is a single page book, which will output a signal strength of 15.
:For example, a book with 15 pages will output a signal equal to the current page number. A book with 5 pages will output signal strengths of 1, 4, 8, 11 and 15 for the different pages. A book with 100 pages will have the signal strength increase to the next level on pages 1, 9, 16, 23, 30, 37, 44, 51, 58, 65, 72, 79, 86, 93 and 100.
:
;{{BlockLink|Respawn Anchor}}
: A respawn anchor outputs a signal strength of 0, 3, 7, 11, or 15, depending on the "charged" value.
;{{BlockLink|Sculk Sensor}}
: A sculk sensor outputs a signal strength depending on the type of vibration that is detected.
;{{BlockLink|Chiseled Bookshelf}}
: A chisled bookshelf outputs a signal strength between 1 and 6 indicating the last slot interacted with. When no slot has been interacted with yet, it outputs 0.
{{-}}
== Sounds ==
=== Generic ===
{{Edition|Java}}:
{{Sound table/Block/Stone/JE}}
{{Edition|Bedrock}}:
{{Sound table/Block/Wood/BE}}
=== Unique ===
{{edition|java}}:
{{Sound table
|rowspan=2
|sound=Click.ogg
|subtitle=Comparator clicks
|source=block
|description=When a comparator is set to subtraction mode
|id=block.comparator.click
|translationkey=subtitles.block.comparator.click
|volume=0.3
|pitch=0.55
|distance=16}}
{{Sound table
|subtitle=Comparator clicks
|source=block
|description=When a comparator is set to comparison mode
|id=block.comparator.click
|translationkey=subtitles.block.comparator.click
|volume=0.3
|pitch=0.5
|distance=16
|foot=1}}
{{edition|bedrock}}:
{{Sound table
|type=bedrock
|rowspan=2
|sound=Click.ogg
|source=block
|description=When a comparator is set to subtraction mode
|id=block.click
|volume=0.2
|pitch=0.55}}
{{Sound table
|source=block
|description=When a comparator is set to comparison mode
|id=block.click
|volume=0.2
|pitch=0.5
|foot=1}}
== Data values ==
=== ID ===
{{edition|java}}:
{{ID table
|edition=java
|showforms=y
|generatetranslationkeys=y
|displayname=Redstone Comparator
|spritetype=block
|nameid=comparator
|foot=1}}
{{ID table
|displayname=Block entity
|spritename=redstone-comparator
|spritetype=block
|nameid=comparator
|foot=1}}
{{edition|bedrock}}:
{{ID table
|edition=bedrock
|firstcolumnname=Redstone Comparator
|shownumericids=y
|showforms=y
|generatetranslationkeys=y
|displayname=Unpowered block
|spritename=unpowered-comparator
|spritetype=block
|nameid=unpowered_comparator
|id=149
|form=block
|translationkey=-}}
{{ID table
|displayname=Powered block
|spritename=powered-comparator
|spritetype=block
|nameid=powered_comparator
|id=150
|form=block
|translationkey=-}}
{{ID table
|displayname=Item
|spritename=redstone-comparator
|spritetype=item
|nameid=comparator
|id=522
|form=item
|foot=1}}
{{ID table
|notnamespaced=y
|displayname=Block entity
|spritename=redstone-comparator
|spritetype=block
|nameid=Comparator
|foot=1}}
=== Block states ===
{{see also|Block states}}
{{/BS}}
=== Block data ===
A redstone comparator has a block entity associated with it that holds additional data about the block.
{{el|je}}:
{{see also|Block entity format}}
{{/BE}}
{{el|be}}:
: See [[Bedrock Edition level format/Block entity format]].
== Advancements ==
{{Load advancements|the power of books}}
== Video ==
<div style="text-align:center">{{yt|J7Z20Zzz3yU}}</div>
== History ==
{{info needed section|If {{bug|MC-50242}} also affected comparators?}}
''For a more in-depth breakdown of changes to repeater textures and models, including a set of renders for each state combination, see [[/Asset history]]''
{{History|java}}
{{History||November 24, 2012|link=https://youtube.com/watch?v=YG9RNyRhIow&t=6m56s|[[Jeb]] stated that there may be a "capacitor" in [[Minecraft]]. }}
{{History||December 27, 2012|link={{tweet|Dinnerbone|284388625595125760}}|[[Dinnerbone]] released [https://web.archive.org/web/20190710120115/https://imgur.com/a/FBKed pictures] of the first version of the "comparator", stating it was a replacement for the "capacitor" idea that has variable, alternate inputs.}}
{{History||January 2, 2013|link={{tweet|Dinnerbone|286428595423965184}}|Dinnerbone released one more [http://dinnerbone.com/media/uploads/2013-01/screenshots/2013-01-02_12.06.47.png picture] of the comparator. The picture itself showing a digital-to-analog converter, using the comparator as the main [[block]].}}
{{History||1.5|snap=13w01a|[[File:Redstone Comparator (S) JE1.png|32px]] [[File:Powered Redstone Comparator (S) JE1.png|32px]] [[File:Subtracting Redstone Comparator (S) JE1.png|32px]] [[File:Powered Subtracting Redstone Comparator (S) JE1.png|32px]] [[File:Redstone Comparator (item) JE1 BE1.png|32px]] Added redstone comparators.
|Redstone comparators have 0 delay.
At this point, block ID 149 was used for unpowered comparators, and block ID 150 for powered comparators.}}
{{History|||snap=13w01b|A delay of 1 game tick ({{frac|1|2}} redstone tick) has now been added to redstone comparators to fix bugs.
|The ability to measure containers to redstone comparators has now been added.}}
{{History|||snap=13w02a|[[File:Redstone Comparator (S) JE2.png|32px]] [[File:Powered Redstone Comparator (S) JE2.png|32px]] [[File:Subtracting Redstone Comparator (S) JE2.png|32px]] [[File:Powered Subtracting Redstone Comparator (S) JE2.png|32px]] The appearance of redstone comparators has now been changed - the top texture has changed to show [[quartz]] in the middle and the sides now use the [[smooth stone]] texture rather than the smooth stone slab side texture.
|The algorithm for measuring containers has now been changed so that redstone comparators output a signal with as few as 1 [[item]] in the container.}}
{{History|||snap=13w02b|Redstone comparators now treat large [[chest]]s as a single container.}}
{{History|||snap=13w03a|Redstone comparators now output success count of [[command block]]s.
|Redstone comparators now measure container [[minecart]]s on [[detector rail]]s.}}
{{History|||snap=13w04a|Redstone comparators now measure [[jukebox]]es.}}
{{History|||snap=13w05a|Redstone comparators no longer cause constant [[block]] updates. The delay has now been made consistent, and side input no longer causes a pulse output.
|Block 150 (later <code>powered_comparator</code>) is no longer used; powered state is now represented by the 8s bit on block 149 (later <code>unpowered_comparator</code>).}}
{{History|||snap=13w05b|Redstone comparator delay has now been changed from 1 game tick (1/2 [[redstone]] tick) to 2 game ticks (1 redstone tick).}}
{{History|||snap=13w09c|The redstone signal strength from a redstone comparator next to a [[brewing stand]] with 3 [[water bottle]]s in it is now the same as one with 3 water bottles and 1 ingredient in it.}}
{{History||1.6.1|snap=13w18a|Redstone comparators now measure [[cauldron]]s and [[end portal frame]]s.}}
{{History||1.8|snap=14w04a|Redstone comparators now measure [[item frame]]s.}}
{{History|||snap=14w10a|The torches under redstone comparators have now been shortened, which has changed the underside appearance from [[File:Redstone Comparator UNKVER1 (facing NWU).png|32px]] [[File:Powered Redstone Comparator UNKVER1 (facing NWU).png|32px]] [[File:Subtracting Redstone Comparator UNKVER1 (facing NWU).png|32px]] [[File:Powered Subtracting Redstone Comparator UNKVER1 (facing NWU).png|32px]] to [[File:Redstone Comparator UNKVER2 (facing NWU).png|32px]].}}
{{History|||snap=14w25a|[[File:Redstone Comparator (S) JE3.png|32px]] [[File:Powered Redstone Comparator (S) JE3.png|32px]] [[File:Subtracting Redstone Comparator (S) JE3.png|32px]] [[File:Powered Subtracting Redstone Comparator (S) JE3.png|32px]] The torches on comparators are now subject to ambient occlusion.
|Comparators set to subtract mode appear to be powered as well regardless of incoming power. The subtracting-only model still exists and can be achieved through {{cmd|setblock}}.}}
{{History|||snap=14w25b|[[File:Subtracting Redstone Comparator (S) JE4.png|32px]] [[File:Powered Subtracting Redstone Comparator (S) JE4.png|32px]] The powered front torch when in subtraction mode is now lower.
|Comparators set to subtract by hand now appear normally again.}}
{{History|||snap=14w28a|Redstone comparators now measure [[cake]]s.}}
{{History||1.9|snap=15w42a|With the addition of the [[blaze powder]] fuel slot, [[brewing stand]]s now have 5 slots instead of 4. Their original comparative power values from redstone comparators are listed below:
{{{!}} class{{=}}"wikitable collapsible collapsed" data-description{{=}}"Original values"
! Original values
{{!}}-
{{!}}
*0: 0
*1: 1
*2: 19
*3: 37
*4: 55
*5: 1s 10
*6: 1s 28
*7: 1s 46
*8: 2s
*9: 2s 19
*10: 2s 37
*11: 2s 55
*12: 3s 10
*13: 3s 28
*14: 3s 46
*15: 4s
{{!}}}
}}
{{History|||snap=15w47a|Redstone comparators' side inputs now take power from [[redstone block]]s.}}
{{History||1.13|snap=17w47a|All 3 IDs for the redstone comparator have now been merged into one ID: <code>comparator</code>.
|Redstone comparators now render their underside, which has changed their undersides from [[File:Redstone Comparator UNKVER2 (facing NWU).png|32px]] to [[File:Redstone Comparator UNKVER3 (facing NWU).png|32px]].
|Prior to [[1.13/Flattening|''The Flattening'']], these blocks' numeral IDs were 149 and 150, and the [[item]]'s 404.
|As a result, the formerly unused comparator ID is now technically used again, due to both unpowered and powered versions being merged into a single comparator block ID.}}
{{History||1.14|snap=18w43a|[[File:Redstone Comparator (S) JE4.png|32px]] [[File:Powered Redstone Comparator (S) JE4.png|32px]] [[File:Subtracting Redstone Comparator (S) JE5.png|32px]] [[File:Powered Subtracting Redstone Comparator (S) JE5.png|32px]] [[File:Redstone Comparator (item) JE2 BE2.png|32px]] The textures of redstone comparators have now been changed.}}
{{History|||snap=19w02a|Redstone comparators now measure [[lectern]]s.}}
{{History|||snap=19w03a|Redstone comparators now measure [[composter]]s.}}
{{History|||snap=19w12b|Redstone comparators can now be placed on [[glass]], [[ice]], [[glowstone]] and [[sea lantern]]s.}}
{{History||1.15|snap=19w34a|Redstone comparators now measure how much honey is inside [[beehive|bee hive]]s and [[bee nest]]s.}}
{{History||1.16|snap=20w06a|The way to calculate the input signals of redstone comparators has now been changed.}}
{{History|||snap=20w11a|The changes to the way of calculating the input signals of redstone comparators from [[Java Edition 20w06a|20w06a]] have now been reverted.}}
{{History|||snap=20w16a|Redstone comparators now measure [[Pigstep music disc]]s in [[jukebox]]es.}}
{{History||1.17|snap=20w45a|Redstone comparators now measure [[lava cauldron]]s.}}
{{History|||snap=20w46a|Redstone comparators now measure [[Cauldron#Holding powder snow|powder snow cauldron]]s.}}
{{History||1.18|snap=21w41a|[[File:Powered Redstone Comparator (S) JE5.png|32px]] [[File:Powered Subtracting Redstone Comparator (S) JE6.png|32px]] The texture of powered redstone comparator have now been changed.}}
{{History||1.19|snap=22w13a|Redstone comparators now generate as part of [[ancient cities]].}}
{{History||1.20<br>(Experimental)|link=1.19.3|snap=22w42a|Redstone comparators now measure [[chiseled bookshelves]].}}
{{History||1.20.2|snap=23w33a|Redstone comparators now use stone sounds instead of wood sounds.<ref>{{bug|MC-182820|||Fixed}}</ref>}}
{{History|pocket alpha}}
{{History||v0.14.0|snap=build 1|[[File:Redstone Comparator (S) JE2 BE1.png|32px]] [[File:Powered Redstone Comparator (S) JE2 BE1.png|32px]] [[File:Subtracting Redstone Comparator (S) JE2 BE1.png|32px]] [[File:Powered Subtracting Redstone Comparator (S) JE2 BE1.png|32px]]{{verify|Was this the model used?}} [[File:Redstone Comparator (item) JE1 BE1.png|32px]] Added redstone comparators.}}
{{History|pocket}}
{{History||1.0.0|snap=alpha 0.17.0.1|Redstone comparators now measure [[end portal frame]]s.}}
{{History||1.0.5|snap=alpha 1.0.5.0|Redstone comparators now output success count of [[command block]]s.}}
{{History||1.1.0|snap=alpha 1.1.0.0|Redstone comparators now measure [[shulker box]]es.}}
{{History|bedrock}}
{{History||1.2.0|snap=beta 1.2.0.2|Redstone comparators now measure [[jukebox]]es.
|Redstone comparators now render their underside, which has changed their undersides from [[File:Redstone Comparator UNKVER1 (facing NWU).png|32px]] to [[File:Redstone Comparator UNKVER3 (facing NWU).png|32px]]}}
{{History||1.10.0|snap=beta 1.10.0.3|[[File:Redstone Comparator (S) BE.png|32px]] [[File:Powered Redstone Comparator (S) BE.png|32px]] [[File:Subtracting Redstone Comparator (S) BE.png|32px]] [[File:Powered Subtracting Redstone Comparator (S) BE.png|32px]] [[File:Redstone Comparator (item) JE2 BE2.png|32px]] The textures of redstone comparators have now been changed.}}
{{History||1.11.0|snap=beta 1.11.0.1|Redstone comparators now measure [[smoker]]s, [[blast furnace]]s, [[lectern]]s and [[composter]]s.}}
{{History||1.18.10|snap=beta 1.18.10.20|[[File:Powered Redstone Comparator (S) JE5.png|32px]] [[File:Powered Subtracting Redstone Comparator (S) JE6.png|32px]] The texture of powered redstone comparator have now been changed.}}
{{History||1.20.30|snap=beta 1.20.30.20|Redstone comparators now use the <code>minecraft:cardinal_direction</code> [[block state]] instead of <code>direction</code>.}}
{{History|console}}
{{History||xbox=TU19|xbone=CU7|ps=1.12|wiiu=Patch 1|switch=1.0.1|[[File:Redstone Comparator (S) JE2 BE1.png|32px]] [[File:Powered Redstone Comparator (S) JE2 BE1.png|32px]] [[File:Subtracting Redstone Comparator (S) JE2 BE1.png|32px]] [[File:Powered Subtracting Redstone Comparator (S) JE2 BE1.png|32px]]{{verify|Was this the model used?}} [[File:Redstone Comparator (item) JE1 BE1.png|32px]] Added redstone comparators.}}
{{History||xbox=TU31|xbone=CU19|ps=1.22|wiiu=Patch 3|switch=1.0.1|Redstone comparators can now measure [[item frame]]s.}}
{{History||xbox=none|xbone=none|ps=1.90|wiiu=none|switch=none|[[File:Redstone Comparator (S) BE.png|32px]] [[File:Powered Redstone Comparator (S) BE.png|32px]] [[File:Subtracting Redstone Comparator (S) BE.png|32px]] [[File:Powered Subtracting Redstone Comparator (S) BE.png|32px]]{{verify|Was this the model used?}} [[File:Redstone Comparator (item) JE2 BE2.png|32px]] The textures of redstone comparators have now been changed.}}
{{History|3ds}}
{{History||0.1.0|[[File:Redstone Comparator (S) JE2 BE1.png|32px]] [[File:Powered Redstone Comparator (S) JE2 BE1.png|32px]] [[File:Subtracting Redstone Comparator (S) JE2 BE1.png|32px]] [[File:Powered Subtracting Redstone Comparator (S) JE2 BE1.png|32px]]{{verify|Was this the model used?}} [[File:Redstone Comparator (item) JE2 BE2.png|32px]] Added redstone comparators.}}
{{History|foot}}
=== Redstone comparator "items" ===
{{:Technical blocks/Redstone Comparator}}
== Issues ==
{{issue list}}
== Trivia ==
* Comparators do not emit redstone particles when powered, unlike redstone torches and repeaters.<ref>{{bug|MC-51692|||WAI}}</ref>
== Gallery ==
<gallery>
Dinnerbone Comparator 1.png|Dinnerbone showing how comparators work.
Dinnerbone Comparator 2.png|Dinnerbone showing how comparators work.
Dinnerbone Comparator 3.png|Dinnerbone showing how comparators work.
Dinnerbone Comparators 1.png|A contraption incorporating comparators.
Dinnerbone Comparators 2.png|Comparators in action.
Dinnerbone Comparators 3.png|Output specific signals.
Dinnerbone Comparator Thing.png|Another comparator in use.
Item Frame Comparator.png|Rotating the torch in the item frame adjusts the comparator's output.
</gallery>
== References ==
{{reflist}}
{{Redstone}}
{{Blocks|Utility}}
{{Items}}
[[Category:Mechanics]]
[[Category:Block entities]]
[[Category:Redstone mechanics]]
[[Category:Mechanisms]]
[[Category:Manufactured blocks]]
[[Category:Non-solid blocks]]
[[de:Redstone-Komparator]]
[[es:Comparador de redstone]]
[[fr:Comparateur de redstone]]
[[hu:Redstone-komparátor]]
[[ja:レッドストーンコンパレーター]]
[[ko:레드스톤 비교기]]
[[nl:Redstonevergelijker]]
[[pl:Komparator]]
[[pt:Comparador de redstone]]
[[ru:Компаратор]]
[[uk:Редстоуновий компаратор]]
[[zh:红石比较器]]</li></ul></nowiki> | 12w06a | Blocks of iron are now renewable, due to zombies occassionally dropping iron ingots. | |||
| 12w08a | Blocks of iron can be used to make iron golems. | ||||
1.4.2{{Extension DPL}}<ul><li>[[Minecart with Command Block|Minecart with Command Block]]<br/>{{ItemEntity
|renewable=No
|stackable=No
|size=Height: 0.7 Blocks<br>Width: 0.98 Blocks
|image=Minecart with Command Block.gif
|image2=Minecart with Command Block BE.gif
|invimage1=Minecart with Command Block
|networkid=10
|drops={{drop|Item|Minecart|1}}
|health={{hp|6}}
|rarity=Epic
}}
A '''minecart with command block''' is an impulse{{only|java|short=y}} or repeating{{only|bedrock|education|short=y}} [[command block]] inside a [[minecart]].
== Obtaining ==
The minecart with command block is obtainable only using the [[command]] {{cmd|give @s command_block_minecart}}, as it does not appear in the creative inventory{{only|BE}} and has no [[crafting]] recipe. It can also be summoned using the command {{cmd|summon command_block_minecart}}. It can be broken like any other minecart, but only the minecart is retained, while the command block is lost.
== Usage ==
{{main|Command Block}}
The minecart with command block combines the functionalities of both minecarts and command blocks. Although the minecart visually contains an impulse command block, it functions more similarly to a repeating command block, and runs its command once every four game [[tick]]s when on an active [[activator rail]]. When it passes over a [[detector rail]] with a [[comparator]] connected next to it, it outputs the command block's result.
== Sounds ==
{{Edition|Java}}:<br>
Minecarts with command blocks use the Friendly Creatures sound category for entity-dependent sound events.<ref group="sound" name="rollsource">{{bug|MC-42132}}</ref>
{{Sound table
|sound=Minecart rolling.ogg
|subtitle=Minecart rolls
|source=Friendly Creatures <ref group=sound name=rollsource/>
|overridesource=1
|description=While a minecart with command block is moving
|id=entity.minecart.riding
|translationkey=subtitles.entity.minecart.riding
|volume=0.0-0.35 <ref group=sound>Relates linearly with horizontal velocity (max 0.5)</ref>
|pitch=0.0-1.0 <ref group=sound>Will increase by 0.0025 per tick if the minecart's horizontal velocity is more than 0.01</ref>
|distance=16
|foot=1}}
{{Edition|Bedrock}}:
{{Sound table
|type=bedrock
|sound=Minecart rolling.ogg
|source=neutral
|description=While a minecart with command block is moving
|id=minecart.base
|foot=1}}
== Data values ==
=== ID ===
{{edition|java}}:
{{ID table
|edition=java
|firstcolumnname=Item
|showforms=y
|generatetranslationkeys=y
|displayname=Minecart with Command Block
|spritetype=item
|nameid=command_block_minecart
|form=item
|foot=1}}
{{ID table
|edition=java
|firstcolumnname=Entity
|generatetranslationkeys=y
|displayname=Minecart with Command Block
|spritetype=entity
|nameid=command_block_minecart
|foot=1}}
{{edition|bedrock}}:
{{ID table
|edition=bedrock
|firstcolumnname=Item
|shownumericids=y
|showforms=y
|notshowbeitemforms=y
|generatetranslationkeys=y
|displayname=Minecart with Command Block
|spritetype=item
|nameid=command_block_minecart
|id=563
|form=item
|foot=1}}
{{ID table
|edition=bedrock
|firstcolumnname=Entity
|shownumericids=y
|generatetranslationkeys=y
|displayname=Minecart with Command Block
|spritename=minecart-with-repeating-command-block
|spritetype=entity
|nameid=command_block_minecart
|id=100
|foot=1}}
=== Entity data ===
Minecarts with command blocks have entity data associated with them that contain various properties of the entity.
{{el|java}}:
{{main|Entity format}}
{{/ED}}
{{el|bedrock}}:
: See [[Bedrock Edition level format/Entity format]].
== History ==
{{History|java}}
{{History||1.7.2|snap=13w39a|[[File:Minecart with Command Block JE1.png|32px]] [[File:Minecart with Command Block (item) JE1 BE2.png|32px]] Added minecart with command block.}}
{{History||1.9|snap=15w34a|[[File:Minecart with Command Block JE2.png|32px]] The texture of the [[command block]] in the [[minecart]] has been removed due to the new texture and types for the command block.}}
{{History|||snap=15w35a|[[File:Minecart with Command Block JE3.png|32px]] The texture of the command block has been changed.}}
{{History||1.11|snap=16w32a|The [[entity]] ID has been changed from <code>MinecartCommandBlock</code> to <code>commandblock_minecart</code>.}}
{{History||1.13|snap=17w47a|Prior to [[1.13/Flattening|''The Flattening'']], this [[item]]'s numeral ID was 422.}}
{{History|||snap=pre5|The entity ID has been changed to <code>command_block_minecart</code>.}}
{{History||1.14|snap=18w43a|[[File:Minecart with Command Block JE4.png|32px]] [[File:Minecart with Command Block (item) JE2 BE3.png|32px]] The textures of the minecart with command block has been changed.}}
{{History||1.17|snap=21w20a|Minecart with command block [[Rarity|rarity color]] was changed from common to epic.}}
{{History||1.19.3|snap=22w44a|Minecart with command block is now available in the creative inventory, but only if cheats are enabled.}}
{{History|||snap=22w45a|Moved the minecart with command block behind the Operator Utilities tab in the creative inventory. The tab is only available if cheats are enabled and the "Operator Items Tab" option in the controls menu is turned on.}}
{{History|pocket}}
{{History||1.0.5|snap=alpha 1.0.5.0|[[File:Minecart with Command Block BE1.png|32px]] [[File:Minecart with Command Block (item) BE1.png|32px]] Added minecart with command block. The [[minecart]] has a [[repeating command block]] in it, instead of an impulse command block.}}
{{History||1.1.0|snap=alpha 1.1.0.0|The entity ID has been changed from <code>minecartcommandblock</code> to <code>command_block_minecart</code>.}}
{{History|bedrock}}
{{History||1.10.0|snap=beta 1.10.0.3|[[File:Minecart with Command Block BE2.png|32px]] [[File:Minecart with Command Block (item) JE2 BE3.png|32px]] The texture of the minecart with command block has been changed. Also the item texture has been changed to match {{el|je}}'s.<ref>{{bug|MCPE-42990}}</ref>}}
{{History|console}}
{{History||xbox=?|xbone=?|ps=?|wiiu=?|switch=?|Added minecart with command blocks. This only exists as an item, as placing it will result in a normal minecart being placed. The command block in the minecart cannot be modified via NBT editing and it has an unused tooltip stating "Used to execute commands on the move!".}}
{{History|foot}}
== Issues ==
{{issue list}}
== Gallery ==
<gallery>
File:Minecart with command block 13w39b.png|A minecart with command block in [[1.16.4]].
File:A minecart command block testing the block in the red bucket with air.png|A minecart command block testing the block in the red area with [[air]].
</gallery>
==References==
{{Reflist}}
{{Items}}
{{Entities}}
[[de:Befehlsblocklore]]
[[fr:Wagonnet à bloc de commande]]
[[it:Carrello da miniera]]
[[ja:コマンドブロック付きのトロッコ]]
[[nl:Mijnkar met opdrachtblok]]
[[pl:Wagonik z blokiem poleceń]]
[[pt:Carrinho de mina com bloco de comando]]
[[ru:Вагонетка с командным блоком]]
[[uk:Вагонетка з командним блоком]]
[[zh:命令方块矿车]]</li><li>[[Raw Copper|Raw Copper]]<br/>{{Item
| image = Raw Copper.png
| renewable = No
| stackable = Yes (64)
}}
'''Raw copper''' is a raw metal resource obtained from mining [[copper ore]].
== Obtaining ==
=== Mining ===
Copper ore and deepslate copper ore mined with a [[stone pickaxe]] or better drops 2–5 units of raw copper. If the pickaxe is enchanted with [[Fortune]], it can drop extra raw copper, allowing for a maximum of 20 units per ore block with Fortune III, or an average of 7.7 units of raw copper per ore block. If the ore is mined using a pickaxe enchanted with [[Silk Touch]], it drops the ore block instead.
=== Crafting ===
{{Crafting
|showname=1
|Block of Raw Copper
|Output=Raw Copper,9
|type=Material
|foot=1
}}
== Usage ==
The primary usage of raw copper is [[smelting]] it into [[copper ingot]]s.
=== Crafting ===
{{crafting usage}}
=== Smelting ingredient ===
{{Smelting
|showname=2
|Raw Copper
|Copper Ingot
|0.7
}}
== Data values ==
=== ID ===
{{edition|java}}:
{{ID table
|edition=java
|showitemtags=y
|showforms=y
|generatetranslationkeys=y
|displayname=Raw Copper
|spritetype=item
|nameid=raw_copper
|form=item
|foot=1}}
{{edition|bedrock}}:
{{ID table
|edition=bedrock
|shownumericids=y
|showforms=y
|notshowbeitemforms=y
|generatetranslationkeys=y
|displayname=Raw Copper
|spritetype=item
|nameid=raw_copper
|form=item
|id=507
|foot=1}}
== History ==
{{History|java}}
{{History||1.17|snap=21w14a|[[File:Raw Copper JE1.png|32px]] Added raw copper.}}
{{History|||snap=April 13, 2021|slink={{Tweet|JasperBoerstra|1381991999952277513}}|[[File:Raw Copper JE2.png|32px]] [[JAPPA]] shows a new raw copper texture.}}
{{History|||snap=21w15a|[[File:Raw Copper JE2.png|32px]] The texture of raw copper has been changed.
|Raw copper can now be used to craft [[block of raw copper]].}}
{{History|||snap=April 16, 2021|slink={{Tweet|JasperBoerstra|1383047666037325829}}|[[File:Raw Copper (pre-release).png|32px]] [[JAPPA]] shows a new raw copper texture again.}}
{{History|||snap=21w16a|[[File:Raw Copper JE3.png|32px]] The texture of raw copper has been changed.}}
{{History|||snap=21w17a|[[Copper ore]] now drops 2-3 raw copper when mined instead of a single unit.}}
{{History||1.18|snap=21w40a|[[Copper ore]] now drops 2-5 raw copper when mined.}}
{{History|bedrock}}
{{History||1.17.0|snap=beta 1.17.0.50|[[File:Raw Copper JE2.png|32px]] Added raw copper.}}
{{History|||snap=beta 1.17.0.52|Raw copper are now available without enabling [[experimental gameplay]].}}
{{History|||snap=beta 1.17.0.54|[[File:Raw Copper JE3.png|32px]] The texture of raw copper has been changed.}}
{{History|foot}}
== Issues ==
{{Issue list}}
==Gallery==
<gallery>
JE 1.17 Dev Raw Metals.jpg|Jappa shows raw ore textures.
Jappa Raw Ores 1.jpg|Jappa shows raw ore textures.
Jappa Raw Ores 2.png|Jappa shows raw ore textures.
Jappa Raw Ores 3.jpg|Jappa shows raw ore textures.
Jappa Raw Ores 4.jpg|Jappa shows raw ore textures.
Jappa Raw Ores 5.jpg|Jappa shows raw ore textures.
</gallery>
{{Items}}
[[Category:Non-renewable resources]]
[[de:Rohkupfer]]
[[es:Cobre en bruto]]
[[fr:Cuivre brut]]
[[it:Rame grezzo]]
[[ja:銅の原石]]
[[pl:Surowa miedź]]
[[pt:Cobre bruto]]
[[ru:Необработанная медь]]
[[tr:Ham Bakır]]
[[uk:Необроблена мідь]]
[[zh:粗铜]]</li></ul> | 12w32a | Blocks of iron can be used to activate a beacon. | |||
| 12w41a | Blocks of iron are now used to craft anvils. | ||||
| 12w42a | A new crafting recipe for anvils call for 3 blocks of iron instead of the original 6. | ||||
1.9{{Extension DPL}}<ul><li>[[Brown Dye|Brown Dye]]<br/>{{Item
| image = Brown Dye.png
| renewable = Yes
| stackable = Yes (64)
}}
'''Brown dye''' is a [[Dye#Primary|primary color dye]] derived from [[cocoa beans]].
== Obtaining ==
=== Crafting ===
{{Crafting
|Cocoa Beans
|Output=Brown Dye
|type=Material
|head=
}}
== Usage ==
{{dye usage}}
=== Crafting ingredient ===
{{crafting usage|ignore=Banner|continue=1}}
{{banner crafting usage}}
=== Loom ingredient ===
{{Banner loom usage|Brown Dye}}
=== Trading ===
Apprentice-level Shepherd villagers have a 20% chance to buy 12 brown dye for an emerald.{{only|bedrock}}
Expert-level Shepherd villagers have a {{frac|2|7}} chance to buy 12 brown dye for an emerald.{{only|java}}
== Data values ==
=== ID ===
{{edition|java}}:
{{ID table
|edition=java
|showforms=y
|generatetranslationkeys=y
|displayname=Brown Dye
|spritetype=item
|nameid=brown_dye
|form=item
|foot=1}}
{{edition|bedrock}}:
{{ID table
|edition=bedrock
|showaliasids=y
|shownumericids=y
|showforms=y
|notshowbeitemforms=y
|generatetranslationkeys=y
|displayname=Brown Dye
|spritetype=item
|nameid=brown_dye
|aliasid=dye / 17
|id=398
|form=item
|translationkey=item.dye.brown_new.name
|foot=1}}
== History ==
{{expand section|Item textures and more from a development video on twitter by bartek.}}
{{History|java}}
{{History||1.14|snap=18w43a|[[File:Brown Dye JE1 BE1.png|32px]] Added brown dye.}}
{{History|||snap=18w44a|Brown dye now can change the text color on [[sign]]s to brown.}}
{{History|||snap=19w05a|Added the [[wandering trader]], which sell brown dyes.}}
{{History|||snap=19w11a|Brown dye can now be [[trading|bought]] by shepherd villagers.}}
{{History||1.17|snap=20w45a|Brown dye can now used to craft newly added [[brown candle]]s.}}
{{History|||snap=21w19a|Brown dye can no longer used to craft brown candles.}}
{{History|||snap=Pre-release 1|Brown dye can once again used to craft brown candles.}}
{{History||1.20<br>(Experimental)|link=1.19.3|snap=22w42a|Brown dye now can change the text color on [[hanging sign]]s to brown.}}
{{History|bedrock}}
{{History||1.8.0|snap=beta 1.8.0.10|[[File:Brown Dye JE1 BE1.png|32px]] Added brown dye.}}
{{History||1.11.0|snap=beta 1.11.0.4|Brown dye can now be [[trading|sold]] to shepherd [[villager]]s.}}
{{History||1.16.100|snap=beta 1.16.100.56|The ID of brown dye has been changed from <code>dye/17</code> to <code>brown_dye</code>.}}
{{History|ps4}}
{{History||1.83|[[File:Brown Dye JE1 BE1.png|32px]] Added brown dye.}}
{{History|foot}}
== Issues ==
{{issue list}}
{{Items}}
[[Category:Dyes]]
[[Category:Renewable resources]]
[[de:Brauner Farbstoff]]
[[es:Tinte marrón]]
[[fr:Teinture marron]]
[[ja:茶色の染料]]
[[ko:갈색 염료]]
[[pl:Brązowy barwnik]]
[[pt:Corante marrom]]
[[th:สีย้อมสีน้ำตาล]]
[[zh:棕色染料]]</li><li>[[:Category:Storage|Category:Storage]]<br/>Blocks and items used to '''store''' other blocks or items.
[[Category:Blocks]][[Category:Items]]
[[ja:カテゴリ:ストレージ]]
[[zh:Category:储物]]</li></ul> | 15w31a | 9 iron blocks generate in the end ships. | |||
| 15w33c | End ships generate with only 8 iron blocks now. | ||||
| 15w41a | End ships no longer generate with iron blocks. | ||||
| July 18, 2017 | |||||
1.14{{Extension DPL}}<ul><li>[[Reality Vision|Reality Vision]]<br/>{{Joke feature}}
{{Item
| title = Reality Vision
| image = Reality Vision.png
| renewable = No
| stackable = Yes (64)
}}
The '''Reality vision''' was a joke [[helmet]].
== Usage ==
Reality vision was equipped via the [[helmet]] slot. When equipped, it showed a [[wikipedia:Mini-map|minimap]] in the bottom-center of the screen (which moved when the [[player]]'s camera moves). The minimap showed all [[chunk]]s that were currently rendered. The player's location was represented by a green [[beacon]] beam marker on the map.
It displayed a vision overlay (similar to the [[pumpkin]] overlay). The overlay would change to a new overlay if the player went into third person (unlike the pumpkin overlay), which made the screen appear like an old [[wikipedia:Television|television]] screen. The overlay was called <code>cantseeshit<!-- Do not change this; this is that word that is actually used-->captain.png</code> in the assets folder. It activated a [[Shaders|shader]] when equipped (<code>scan_pincushion</code>).
== Sounds ==
{{Sound table
|sound=Equipvr.ogg
|subtitle=''None''
|source=player
|description=When equipped
|id=item.reality_vision.use
|translationkey=''None''
|volume=1.0
|pitch=1.0
|distance=16
|foot=1}}
== Data values ==
=== ID ===
{{ID table
|edition=java
|shownumericids=y
|showforms=y
|generatetranslationkeys=y
|displayname=Reality Vision
|spritetype=item
|nameid=reality_vision
|id=500
|form=item
|translationkey=item.realityVision.name
|foot=1}}
== History ==
{{History|java}}
{{History||1.RV-Pre1|[[File:Reality_Vision_(item).png|32px]] [[File:Reality Vision.png|32px]] Added reality vision.}}
{{History|foot}}
== Issues ==
Reality Vision is an unsupported item due to being an [[Wikipedia:April Fools' Day|April Fools']] joke, and therefore such issues relating to them will not be fixed.
== Trivia ==
* [[Sign]]s display the text "OBEY" while equipped, a reference to the movie [[wikipedia:They Live|''They Live'']].
== Gallery ==
<gallery>
Sign2.png|The [[sign]] texture found in the game files.
OBEY.png|OBEY seen in a sign.
OBEY sign in 1.RV-Pre1..png|OBEY seen in a sign, but seen from a better perspective.
TechGear.png|A [[player]] wearing reality vision, featured in this [[wikipedia:April Fools' Day|April Fools']] joke version.
</gallery>
{{Items}}
{{Jokes}}
[[Category:Non-renewable resources]]
[[Category:Joke items]]
[[pt:Visão da realidade]]
[[es:Reality Vision]]</li><li>[[Lead|Lead]]<br/>{{About|the item used for leashing and leading mobs|the element|Element#Lead}}
{{Item
| image = Lead.png
| stackable = Yes (64)
| renewable = Yes
}}
'''Leads''' are [[tool]]s used to leash and lead passive and neutral [[animal]]s, [[golem]]s and some [[monster]]s.
== Obtaining ==
=== Chest loot ===
{{LootChestItem|lead}}
=== Crafting ===
{{Crafting
|A1= String
|B1= String
|A2= String
|B2= Slimeball
|C3= String
|Output= Lead,2
|type= Tool
}}
=== Mob loot ===
[[Wandering Trader|Wandering trader]]s always spawn with 2 [[llama|trader llama]]s, each held with a lead. When a trader llama is detached, either by killing it or the wandering trader, dragging them far apart, or putting the llama in a [[boat]] or a [[minecart]], the lead drops at the llama's position.
== Usage ==
=== Crafting ingredient ===
{{crafting usage}}
=== Leashing mobs ===
[[File:SuspendedPigs.png|190px|thumb|One block tall mobs, such as pigs, suspend at 7 blocks above the ground.]]
[[File:SuspendedCows.png|190px|thumb|Two block tall mobs, such as cows, also suspend at 7 blocks above the ground.]]
{{control|Using}} a lead on a [[mob]] ties the lead to the mob, allowing it to be moved by the player. Multiple mobs can be held by leads at once, but each mob held requires its own lead.
It is possible to leash the following mobs and other entities:
{{columns-list|colwidth=20em|
* {{EntityLink|Allay}}
* {{EntityLink|Axolotl}}
* {{EntityLink|Bee}}
* {{EntityLink|Boat}}{{only|bedrock}}
* {{EntityLink|Camel}}
* {{EntityLink|Cat}}
* {{EntityLink|Chicken}}
* {{EntityLink|Chicken Jockey}} (only the mount)
* {{EntityLink|Cow}}
* {{EntityLink|Dolphin}}
* {{EntityLink|Donkey}}
* {{EntityLink|Fox}}
* {{EntityLink|Frog}}
* {{EntityLink|Glow Squid}}
* {{EntityLink|Goat}}
* {{EntityLink|Hoglin}}
* {{EntityLink|Horse}}
* {{EntityLink|Iron Golem}}
* {{EntityLink|Llama}}
* {{EntityLink|Mooshroom}}
* {{EntityLink|Mule}}
* {{EntityLink|Ocelot}}
* {{EntityLink|Parrot}}
* {{EntityLink|Pig}}
* {{EntityLink|Polar Bear}}
* {{EntityLink|Rabbit}}
* {{EntityLink|Sheep}}
* {{EntityLink|Skeleton Horse}}
* {{EntityLink|Skeleton Horseman}} (only the mount)
* {{EntityLink|Sniffer}}
* {{EntityLink|Snow Golem}}
* {{EntityLink|Squid}}
* {{EntityLink|Strider}}
* {{EntityLink|Trader Llama}}
* {{EntityLink|Wolf}}
* {{EntityLink|Zoglin}}
* {{EntityLink|Zombie Horse}}}}
Additionally, [[villager]]s, [[wandering trader]]s, and [[monster]]s other than the ones listed above, can be leashed using a map editor or [[NBT]] editor.
With a mob on a lead held by the player, {{control|using}} the lead on any type of [[fence]] (or [[wall]]{{only|bedrock|short=1}}) attaches the lead to it with a visible knot, tying the mob to it. To attach it to a wall on Bedrock Edition, the player must hold a lead in the main hand.<ref>{{bug|MCPE-108078}}</ref> Multiple leads may be attached to one fence post. A mob tied to a fence tends to stay within 5 blocks of the fence post.
A lead is broken by pressing the {{control|use item}} control on the mob again, hitting the knot, or removing the attached fence post. Leads also break when hit by projectiles. Whenever a lead is removed or broken, it drops as an [[item (entity)|item]] at the location of the mob. However, it does not drop when unleashed in Creative mode.{{only|java}}<ref>{{bug|MCPE-79639}}</ref> A lead does not break if the attached animal dies.
A lead can stretch a maximum of 10 blocks. If the mob is able to move towards the player or fence post, it does so. If not, or if the mob is moving very quickly away from the player, the lead breaks.
When the player or the knot is more than 7 blocks above the ground, the mob being leashed becomes suspended.
Most mobs that can be leashed can still be leashed even if attacking the player leashing them, and any attached leads do not break.
[[Wolf|Wolves]] cannot be leashed after becoming angry. Despite this, if they become angry while already leashed, the lead does not break, but it cannot be reattached when broken through other methods while the wolf is still angry.
A lead attached to a hoglin breaks if it becomes a [[zoglin]].
A lead does not prevent mobs from despawning if they normally would despawn.
When moving downwards and accelerating towards the ground, leashed mobs accumulate fall damage and take it if they hit the ground while still accelerating. When moving up or decelerating (such as when the lead is stretched to its limit), the fall distance is set to one block and the mob therefore does not take any fall damage if it touches the ground.
If the player walks into and back out of a [[nether portal]] while holding a lead connected to a mob, the lead remains attached to the mob. However, if a mob attached to a lead walks into a nether portal, the lead breaks and drops as an item in the other dimension.
A lead can be used to remove a mob from a boat without needing to break the boat, if the mob can normally be leashed.
If a chunk unloads while containing a leashed mob (either by the player walking too far away, or traveling to another dimension via a portal), the lead breaks and drops as an item, leaving the mob free to wander around.
== Sounds ==
{{Edition|Java}}:
{{Sound table
|sound=Lead Knot break1.ogg
|sound2=Lead Knot break2.ogg
|sound3=Lead Knot break3.ogg
|subtitle=Leash Knot breaks
|source=neutral
|description=When a leash knot is destroyed
|id=entity.leash_knot.break
|translationkey=subtitles.entity.leashknot.break
|volume=1.0
|pitch=1.0
|distance=16}}
{{Sound table
|sound=Lead Knot place1.ogg
|sound2=Lead Knot place2.ogg
|sound3=Lead Knot place3.ogg
|subtitle=Leash Knot tied
|source=neutral
|description=When a leash knot is placed on a fence
|id=entity.leash_knot.place
|translationkey=subtitles.entity.leashknot.place
|volume=1.0
|pitch=1.0
|distance=16
|foot=1}}
{{Edition|Bedrock}}:
{{Sound table
|type=bedrock
|sound=Lead Knot break1.ogg
|sound2=Lead Knot break2.ogg
|sound3=Lead Knot break3.ogg
|source=neutral
|description=When a leash knot is broken by {{ctrl|interacting}} with it
|id=leashknot.break
|volume=1.0
|pitch=1.0}}
{{Sound table
|sound=Lead Knot place1.ogg
|sound2=Lead Knot place2.ogg
|sound3=Lead Knot place3.ogg
|source=neutral
|description=When a leash knot is placed on a fence or wall
|id=leashknot.place
|volume=1.0
|pitch=1.0
|foot=1}}
== Leash Knot ==
'''Leash knot''' is an entity created when the [[player]] right-clicks the fence while having a mob leashed.
{{Entity| title = Leash Knot| image = Knot.png|imagesize= 100px|networkid='''[[JE]]''': 77}}
=== Data values ===
==== ID ====
{{edition|java}}:
{{ID table
|edition=java
|generatetranslationkeys=y
|displayname=Leash Knot
|spritetype=entity
|nameid=leash_knot
|foot=1}}
{{edition|bedrock}}:
{{ID table
|edition=bedrock
|shownumericids=y
|notshowbeitemforms=y
|generatetranslationkeys=y
|displayname=Leash Knot
|spritetype=entity
|nameid=leash_knot
|id=88
|foot=1}}
==== Entity data ====
Leash knots have entity data that define various properties of the entity.
{{el|java}}:
{{main|Entity format}}
{{/ED}}
{{el|bedrock}}:
: See [[Bedrock Edition level format/Entity format]].
== Data values ==
=== ID ===
{{edition|java}}:
{{ID table
|edition=java
|showforms=y
|generatetranslationkeys=y
|displayname=Lead
|spritetype=item
|nameid=lead
|form=item
|foot=1}}
{{edition|bedrock}}:
{{ID table
|edition=bedrock
|shownumericids=y
|showforms=y
|notshowbeitemforms=y
|generatetranslationkeys=y
|displayname=Lead
|spritetype=item
|nameid=lead
|id=547
|form=item
|foot=1}}
== Achievements ==
{{load achievements|So I Got That Going for Me}}
== Advancements ==
{{load advancements|When the Squad Hops into Town}}
== History ==
{{missing information|The history of a lot of mobs be leashed}}
{{History|java}}
{{History||1.6.1|snap=13w16a|[[File:Lead JE1 BE1.png|32px]] Added leads.
|Leads do not currently have a tooltip and are called “leashes” in [http://www.mojang.com/2013/04/minecraft-snapshot-13w16a-and-new-launcher/ the change notes].}}
{{History|||snap=13w16b|Leads have been given a tooltip.}}
{{History|||snap=13w18a|Leads have been given a [[crafting]] recipe.}}
{{History||1.9|snap=15w50a|Added a [[sound]] for leads: <code>entity.leashknot.place</code>.}}
{{History||1.11|snap=16w32a|The [[entity]] ID of the knot has been changed from <code>LeashKnot</code> to <code>leash_knot</code>.}}
{{History|||snap=16w39a|Leads can now be found in [[woodland mansion]] chests.}}
{{History||1.13|snap=17w47a|Prior to [[1.13/Flattening|''The Flattening'']], this [[item]]'s numeral ID was 420.}}
{{History||1.14|snap=18w43a|[[File:Lead JE2 BE2.png|32px]] The texture of leads has been changed.}}
{{History|||snap=19w05a|Added [[wandering trader]]s, which are naturally equipped with leads.}}
{{History||1.15|snap=?|[[Bee]]s can now be leashed.}}
{{History||1.16|snap=20w09a|[[Skeleton horse]]s and [[zombie horse]]s can now be leashed.<ref>{{bug|MC-166246}}</ref>}}
{{History|||snap=?|[[Hoglin]]s can now be leashed.}}
{{History||1.16.2|snap=20w27a|[[Zoglin]]s can now be leashed.}}
{{History||1.17|snap=21w19a|[[Squid]]s and [[glow squid]]s can now be leashed.<ref>{{bug|MC-136647}}</ref>}}
{{History|||snap=?|[[Axolotl]]s can now be leashed.}}
{{History||1.19|snap=22w13a|Lead may now be found in [[ancient city]] [[chest]]s.}}
{{History|||snap=?|[[Frog]]s can now be leashed.}}
{{History||1.19.3|snap=22w42a|[[Camel]]s can now be leashed.|Mobs no longer accumulate fall damage when dangling on leads.<ref>{{bug|MC-14167||Mobs build up fall damage when dangling on a lead|Fixed}}</ref>}}
{{History||1.20 (Experimental)|link=1.19.4|snap=?|[[Sniffer]]s can now be leashed.}}
{{History||1.20|snap=23w12a|Lead can now be found in [[suspicious gravel]] and [[suspicious sand]] in [[trail ruins]].}}
{{History|||snap=23w16a|Lead no longer generates in [[suspicious sand]] in [[trail ruins]].|Due to the split of the archaeological loot tables for the suspicious gravel within the [[trail ruins]]; lead now is in the common loot.}}
{{History|pocket alpha}}
{{History||v0.15.0|snap=build 1|[[File:Lead JE1 BE1.png|32px]] Added leads.}}
{{History|pocket}}
{{History||1.1.0|snap=alpha 1.1.0.0|Leads now have better "physics".
|The [[entity]] ID of the knot has been changed from <code>leashknot</code> to <code>leash_knot</code>.
|Leads can now be found inside [[woodland mansion]] [[chest]]s.}}
{{History|bedrock}}
{{History||1.4.0|snap=beta 1.2.14.2|Leads can now be found inside [[buried treasure]] [[chest]]s.
|Leads can now be used on [[boat]]s.}}
{{History||1.4.0|snap=beta 1.2.20.1|Leads can now be used to craft [[balloon]]s.}}
{{History||1.10.0|snap=beta 1.10.0.3|[[File:Lead JE2 BE2.png|32px]] The texture of leads has been changed.
|[[Wandering trader]]s now [[drops|drop]] leads after they are detached from trader [[llama]]s.}}
{{History||1.14.0|snap=beta 1.14.0.1|Leads can now be used on [[polar bear]]s, [[ocelot]]s, [[parrot]]s, [[dolphin]]s and old [[villager]]s.}}
{{History||1.19.0|snap=beta 1.19.0.20|Allays can now be leashed.}}
{{History|console}}
{{History||xbox=TU19|xbone=CU7|ps=1.12|wiiu=Patch 1|switch=1.0.1|[[File:Lead JE1 BE1.png|32px]] Added leads.}}
{{History||xbox=TU43|xbone=CU33|ps=1.36|wiiu=Patch 13|[[Sound]]s have been added for leads.}}
{{History|Ps4}}
{{History||1.90|[[File:Lead JE2 BE2.png|32px]] The texture of leads has been changed.}}
{{History|3ds}}
{{History||0.1.0|[[File:Lead JE1 BE1.png|32px]] Added leads.}}
{{History|foot}}
== Issues ==
{{issue list|Lead|Leash}}
== Trivia ==
[[File:Steve wearing Lead.png|100px]] [[File:Alex wearing Lead.png|100px]]
* The lead is named as "leash" in the texture file.
* If a [[player]] goes to sleep while holding a mob on a lead, the lead remains attached.
* {{IN|Java}}, when using the {{cmd|item}} command to put a lead in a player's head slot, the item gets rotated and positioned in such a way that it looks like the player is wearing a monocle.
== Gallery ==
<gallery>
Multiple_Leash.png|Many animals can be tied to one fence post.
HorseLeashedOnAFence.png|A [[horse]] wearing [[golden horse armor]] that is leashed to a fence post.
ThreeTiedSheep.png|Three sheep tied to the same fence.
More accurate lead mobs.png|A shot of all the mobs that could be tied with leads as of 1.6.1, except donkeys and mules.
Yo Yo.png|With the use of the leash, it is possible to suspend animals in the air by tying the leash on high-up fence posts.
YoYo.png|A [[donkey]] with the Grumm/Dinnerbone [[name tag]] [[easter egg]] tied to a fence with a lead to make a yo-yo.
Flying_Sheep.png|Several [[sheep]] hanging in the air in [[Creative]] mode.
Pocket Edition Lead.jpg|First image of a lead in ''Bedrock Edition''.
</gallery>
== References ==
{{Reflist}}
== External Links ==
*[https://www.minecraft.net/en-us/article/taking-inventory-lead Taking Inventory: Lead] – Minecraft.net on April 8, 2022
{{items}}
{{entities}}
[[Category:Tools]]
[[de:Leine]]
[[es:Rienda]]
[[fr:Laisse]]
[[hu:Lasszó]]
[[it:Guinzaglio]]
[[ja:リード]]
[[ko:끈]]
[[nl:Leidtouw]]
[[pl:Smycz]]
[[pt:Laço]]
[[ru:Поводок]]
[[th:เชือกจูง]]
[[zh:拴绳]]
[[Category:Renewable resources]]</li></ul> | 18w43a | ||||
| 19w09a | Blocks of iron can now be used to play the xylophone, if they are under note blocks. | ||||
1.16.2{{Extension DPL}}<ul><li>[[Sparkler|Sparkler]]<br/>{{About|the Education Edition exclusive item|the new melee weapon available from the ''Minecraft Dungeons'' anniversary event|MCD:Sparkler}}
{{Item
| image = <gallery>
Orange Sparkler.png | Orange
Blue Sparkler.png | Blue
Red Sparkler.png | Red
Purple Sparkler.png | Purple
Green Sparkler.png | Green
</gallery>
| image2 = <gallery>
Active Orange Sparkler.png | Active Orange
Active Blue Sparkler.png | Active Blue
Active Red Sparkler.png | Active Red
Active Purple Sparkler.png | Active Purple
Active Green Sparkler.png | Active Green
</gallery>
| renewable = No
| stackable = No
}}
{{education feature}}
{{exclusive|bedrock|education}}
A '''sparkler''' is a [[Chemistry Update|chemistry]]-related [[item]] that emits particles when lit.
Sparklers are available in orange, blue, red, purple, and green colors.
== Obtaining ==
=== Crafting ===
{{Crafting
|showdescription=1
|B1=Chloride |B2=Magnesium |B3=Stick
|Output=Sparkler
|description= Calcium Chloride: Orange<br>Cerium Chloride: Blue<br>Mercuric Chloride: Red<br>Potassium Chloride: Purple<br>Tungsten Chloride: Green<br>{{only|bedrock|education}}
|type=Miscellaneous
}}
== Usage ==
{{ctrl|Using}} a sparkler ignites it, causing its texture to change. When lit, the sparkler emits colored [[particles]]; the [[durability]] meter depletes while the sparkler is burning. Sparklers are one of the few [[item]]s that can be held in the [[off-hand]] {{in|be}}. Unlit sparklers have normal lighting like most items, while lit sparklers appear to glow when held in the player's hand, similarly to [[glow stick]]s.
When the [[player]] uses another item while a sparkler is lit, or holds the sparkler in the off-hand, the sparkler's durability stops depleting.
If the player has a lit sparkler in their [[inventory]] and goes into the [[water]], the sparkler is destroyed immediately. However, it does not get destroyed if dropped in water. It also cannot float.
Despite having durability, sparklers cannot be enchanted with [[Unbreaking]] or [[Mending]].
== Sounds ==
{{Sound table
|type=bedrock
|sound=Fuse.ogg
|source=sound
|description=While a sparkler is active
|id=sparkler.active
|volume=0.25
|pitch=0.8/1.2}}
{{Sound table
|sound=Fizz.ogg
|source=block
|description=While a sparkler is being lit
|id=random.fizz
|volume=1.0
|pitch=2.4/2.6
|foot=1}}
== Data values ==
=== ID ===
{{ID table
|edition=bedrock
|shownumericids=y
|showforms=y
|notshowbeitemforms=y
|generatetranslationkeys=y
|displayname=Sparkler
|spritename=sparklers
|spritetype=item
|nameid=sparkler
|id=600
|form=item
|translationkey=item.sparkler.orange.name,item.sparkler.blue.name,item.sparkler.red.name,item.sparkler.purple.name,item.sparkler.green.name
|foot=1}}
== History ==
{{History|bedrock}}
{{History||1.4.0|snap=beta 1.2.20.1|[[File:Orange Sparkler BE1.png|32px]] [[File:Blue Sparkler BE1.png|32px]] [[File:Red Sparkler BE1.png|32px]] [[File:Purple Sparkler BE1.png|32px]] [[File:Green Sparkler BE1.png|32px]] <br>[[File:Active Orange Sparkler BE1.png|32px]] [[File:Active Blue Sparkler BE1.png|32px]] [[File:Active Red Sparkler BE1.png|32px]] [[File:Active Purple Sparkler BE1.png|32px]] [[File:Active Green Sparkler BE1.png|32px]] Added sparklers.}}
{{History|education}}
{{History||1.0.27|[[File:Orange Sparkler BE1.png|32px]] [[File:Blue Sparkler BE1.png|32px]] [[File:Red Sparkler BE1.png|32px]] [[File:Purple Sparkler BE1.png|32px]] [[File:Green Sparkler BE1.png|32px]] <br>[[File:Active Orange Sparkler BE1.png|32px]] [[File:Active Blue Sparkler BE1.png|32px]] [[File:Active Red Sparkler BE1.png|32px]] [[File:Active Purple Sparkler BE1.png|32px]] [[File:Active Green Sparkler BE1.png|32px]] Added sparklers.}}
{{History|foot}}
== Issues ==
{{issue list}}
== Trivia ==
* The formula for sparkler roughly works in real life. Magnesium itself burns white in air, while the metal salts add [[wikipedia:flame test|color to the flame]].
{{items}}
{{Education Edition}}
[[Category:Non-renewable resources]]
[[Category:Education Edition items]]
[[de:Wunderkerze]]
[[ja:手持ち花火]]
[[ko:스파클러]]
[[pl:Zimne ognie]]
[[pt:Vela-Faísca]]
[[zh:烟花棒]]</li><li>[[Splash Potion|Splash Potion]]<br/>{{about|the throwable potions|the drinkable potions|Potion|the throwable potions that leave a lingering area of effect|Lingering Potion}}
{{Item
| image = <gallery>
Splash Water Bottle.png | Water Bottle
Uncraftable Splash Potion.png | Uncraftable
</gallery>
| extratext = View [[#Gallery|all renders]]
| renewable = '''Uncraftable, Luck{{only|je|short=1}}, Decay{{only|be|short=1}}''': No<br>
'''All others''': Yes
| stackable = No
}}
'''Splash potions''' are a variant of [[potion]]s that can be thrown.
== Obtaining ==
=== Brewing ===
{{main|Brewing}}
{{brewing
|Gunpowder
|Any Splash Potion
|base= Any Potion
}}
Splash potions are brewed by adding gunpowder to a normal potion, including uncraftable potions of luck{{only|java|short=1}} and decay{{only|be|short=1}}.
=== Natural generation ===
One splash potion of weakness can be found in a [[brewing stand]] inside an [[igloo]] basement.
=== Filling bottles ===
Using a glass bottle on a [[cauldron]] that contains splash potion turns it into a bottle of that splash potion, this also removes {{frac|1|3}} of the cauldron's content.{{only|bedrock}}
=== Bartering ===
[[Piglin]]s have a 1.74% chance of [[barter]]ing a splash potion of Fire Resistance when given a [[gold ingot]].
{{anchor|Area of effect}} <!-- compatibility anchor -->
== Usage ==
===Brewing===
{{Brewing
|Dragon's Breath
|Any Lingering Potion
|ingredients=[[Dragon's Breath|Dragon's breath]] + <br>any splash potion
}}
[[Lingering potions]] are brewed by adding dragon's breath to a splash potion.
===Using===
Splash potions are thrown by {{control|using}} them. On impact they explode, applying [[status effect]]s to nearby entities. When thrown by the player, they have a range of 8 blocks if thrown at the best angle. The bottle is lost, unlike drinkable [[potion]]s. Entities within an 8.25×8.25×4.25 cuboid centered on the thrown potion at impact and within 4 blocks euclidean distance of the thrown potion<ref group="n">Specifically its lower-north-west corner; the potion entity like most thrown entities is 0.25×0.25×0.25 blocks.</ref> at impact are affected.
{{IN|Bedrock}}, splash potions' effects have only three-fourths of the duration of the drinkable form. {{IN|Java}}, splash and drinkable forms have the same duration.
If the potion directly collides with an entity, the entity gets the full duration and potency of the effect. Otherwise, the farther away the entity is from the center of the impact, the lesser the imbued effect. For instant effects (i.e. Healing or Harming), the potency of the effect reduces linearly from 100% on a direct hit to 0% at 4 blocks' distance. For other effects, the potency is unchanged, but the duration decreases linearly on the same scale (rounded to the nearest {{frac|1|20}} second), with no effect being applied if the duration would be 1 second or less.
=== Splash water bottles ===
Splash water bottles have no effect on almost all entities, but they extinguish fire in the block hit and the four blocks horizontally surrounding it.
A splash water bottle deals {{hp|1}} damage to [[endermen]], [[strider]]s, [[snow golem]]s, and [[blaze]]s; however, endermen have a chance of teleporting away if hit with one.
Splash water bottles can extinguish a burning entity.
==== Mud ====
Splash water bottles can be {{control|used}} on [[dirt]], [[coarse dirt]], or [[rooted dirt]] to turn it into [[mud]].
=== Filling cauldrons ===
{{IN|bedrock}}, using a splash potion on a cauldron adds one level of that potion to the cauldron. Attempting to add a splash potion to a cauldron with water, dyed water or a non-matching potion empties the cauldron and creates an explosion sound (but no actual explosion).
=== Uncraftable splash potion ===
{{IN|java}}, the uncraftable potion is a splash potion with no effect that is unobtainable in regular gameplay. It is also available in potion and lingering potion forms, as well as for tipped arrows.
It can be obtained in two distinct (though functionally identical) variants, using the following commands: {{cmd|give @s minecraft:splash_potion{Potion:"minecraft:empty"} }} or {{cmd|give @s minecraft:splash_potion }}. It is also obtained any time a potion has invalid or missing potion effect tags, and thus serves as a placeholder.
{| class="wikitable" style="text-align: center;" data-description="Unused potions"
! Icon
! Name
|-
| {{Slot|Uncraftable Splash Potion|link=none}}
! Uncraftable Splash Potion
|}
== Custom effects ==
{{IN|java}}, splash potions can be obtained with any status effect using {{cmd|give}} and the tag <code>CustomPotionEffects</code>, which is an array of effects for the potion. See [[Item format#Potion Effects]] for more information, and [[status effect]] for a list of effects and IDs.
== Sounds ==
{{edition|java}}:<br>
Splash potions use the Friendly Creatures sound category for entity-dependent sound events.
{{Sound table
|sound=Glass dig1.ogg
|sound2=Glass dig2.ogg
|sound3=Glass dig3.ogg
|subtitle=Bottle smashes
|source=neutral
|description=When a splash potion impacts something
|id=entity.splash_potion.break
|translationkey=subtitles.entity.potion.splash
|volume=1.0
|pitch=0.9-1.0
|distance=16}}
{{Sound table
|sound=Bow shoot.ogg
|subtitle=Bottle thrown
|source=player
|description=When a splash potion is thrown by a player
|id=entity.splash_potion.throw
|translationkey=subtitles.entity.potion.throw
|volume=0.5
|pitch={{frac|1|3}}-0.5
|distance=16}}
{{Sound table
|sound=Witch throw1.ogg
|sound2=Witch throw2.ogg
|sound3=Witch throw3.ogg
|subtitle=Witch throws
|description=When a splash potion is thrown by a [[witch]]
|source=hostile
|id=entity.witch.throw
|translationkey=subtitles.entity.witch.throw
|volume=1.0
|pitch=0.8-1.2
|distance=16}}
{{Sound table
|sound=Bow shoot.ogg
|subtitle=Dispensed item
|source=block
|description=When a splash potion is dispensed from a [[dispenser]]
|id=block.dispenser.launch
|translationkey=subtitles.block.dispenser.dispense
|volume=1.0
|pitch=1.2
|distance=16
|foot=1}}
{{edition|bedrock}}:
{{Sound table
|type=bedrock
|sound=Glass dig1.ogg
|sound2=Glass dig2.ogg
|sound3=Glass dig3.ogg
|source=block
|description=When a splash potion impacts something
|id=random.glass
|volume=1.0
|pitch=1.0}}
{{Sound table
|sound=Bow shoot.ogg
|source=player
|description=When a splash potion is thrown by a player
|id=random.bow
|volume=0.5
|pitch=0.33-0.5}}
{{Sound table
|sound=Witch throw1.ogg
|sound2=Witch throw2.ogg
|sound3=Witch throw3.ogg
|source=hostile
|description=When a splash potion is thrown by a witch
|id=mob.witch.throw
|volume=1.0
|pitch=1.0}}
{{Sound table
|sound=Bow shoot.ogg
|source=player
|description=When a splash potion is dispensed from a dispenser
|id=random.bow
|volume=1.0
|pitch=0.83-1.25
|foot=1}}
== Data values ==
=== ID ===
{{edition|java}}:
{{ID table
|edition=java
|showforms=y
|generatetranslationkeys=y
|displayname=Splash Potion
|spritetype=item
|nameid=splash_potion
|form=item
|translationkey=item.minecraft.splash_potion,item.minecraft.splash_potion.effect.empty,item.minecraft.splash_potion.effect.water,item.minecraft.splash_potion.effect.mundane,item.minecraft.splash_potion.effect.thick,item.minecraft.splash_potion.effect.awkward,item.minecraft.splash_potion.effect.night_vision,item.minecraft.splash_potion.effect.invisibility,item.minecraft.splash_potion.effect.leaping,item.minecraft.splash_potion.effect.fire_resistance,item.minecraft.splash_potion.effect.swiftness,item.minecraft.splash_potion.effect.slowness,item.minecraft.splash_potion.effect.water_breathing,item.minecraft.splash_potion.effect.healing,item.minecraft.splash_potion.effect.harming,item.minecraft.splash_potion.effect.poison,item.minecraft.splash_potion.effect.regeneration,item.minecraft.splash_potion.effect.strength,item.minecraft.splash_potion.effect.weakness,item.minecraft.splash_potion.effect.levitation,item.minecraft.splash_potion.effect.luck,item.minecraft.splash_potion.effect.turtle_master,item.minecraft.splash_potion.effect.slow_falling
|foot=1}}
{{edition|bedrock}}:
{{ID table
|edition=bedrock
|shownumericids=y
|showforms=y
|notshowbeitemforms=y
|generatetranslationkeys=y
|displayname=Splash Potion
|spritetype=item
|nameid=splash_potion
|id=561
|form=item
|translationkey=potion.emptyPotion.splash.name,potion.mundane.splash.name,potion.mundane.extended.splash.name,potion.thick.splash.name,potion.awkward.splash.name,potion.nightVision.splash.name,potion.invisibility.splash.name,potion.jump.splash.name,potion.fireResistance.splash.name,potion.moveSpeed.splash.name,potion.moveSlowdown.splash.name,potion.heal.splash.name,potion.harm.splash.name,potion.poison.splash.name,potion.regeneration.splash.name,potion.damageBoost.splash.name,potion.weakness.splash.name,potion.wither.splash.name,potion.turtleMaster.splash.name,potion.slowFalling.splash.name
|foot=1}}
=== Item data ===
<div class="treeview">
* {{nbt|compound|tag}}: The item's '''tag''' tag.
{{:Player.dat_format/Potion}}
</div>
=== Entity ===
{{Entity
| title = Thrown splash potion
| networkid = '''JE:''' 73
}}
==== ID ====
{{edition|java}}:
{{ID table
|generatetranslationkeys=java
|displayname=Splash Potion
|spritetype=entity
|nameid=potion
|foot=1}}
{{edition|bedrock}}:
{{ID table
|shownumericids=y
|generatetranslationkeys=bedrock
|displayname=Splash Potion
|spritetype=entity
|nameid=splash_potion
|id=86
|foot=1}}
==== Entity data ====
{{see also|Chunk format|Potions#Data values|title2=Potion data values}}
Splash potions when thrown have entity data that define various properties of the entity.
{{/ED}}
== Achievements ==
{{load achievements|Stayin' Frosty;Zombie Doctor;Taste of your own Medicine;Free Diver}}
== Advancements ==
{{load advancements|Zombie Doctor;A Furious Cocktail;How Did We Get Here}}
== Video ==
<div style="text-align:center">{{yt|cuN6VdcUfLE}}</div>
== History ==
{{Info needed section|Splash Potion of Weakness; }}
{{History|java}}
{{History||1.0.0|snap=Beta 1.9 Prerelease 4|[[File:Splash Potion of Fire Resistance JE1 BE1.png|32px]] [[File:Splash Potion of Swiftness JE1 BE1.png|32px]] [[File:Splash Potion of Slowness JE1 BE1.png|32px]] [[File:Splash Potion of Healing JE1 BE1.png|32px]] [[File:Splash Potion of Harming JE1 BE1.png|32px]] [[File:Splash Potion of Poison JE1 BE1.png|32px]] [[File:Splash Potion of Regeneration JE1 BE1.png|32px]] [[File:Splash Potion of Strength JE1 BE1.png|32px]] [[File:Splash Potion of Weakness JE1 BE1.png|32px]] Added splash potions.}}
{{History||link=http://www.reddit.com/r/Minecraft/comments/lbrqq/water_balloons/c2rey4s?context=3|Oct 14, 2011|[[Jeb]] had commented that while splash water bottles should logically harm [[endermen]] and [[blaze]]s, its coding would be more difficult to implement than is worthwhile.}}
{{History||1.3.1|snap=12w17a|Splash potions are no longer depleted from the [[player]]'s [[inventory]] when used in [[creative]].}}
{{History|||snap=12w22a|Splash potions have been added to the new creative item selection from [[Java Edition 12w21b|12w21b]]. This includes extended-enhanced potions with both extended duration and enhanced effect for four potion effects.}}
{{History||1.4.2|snap=12w32a|[[File:Splash Potion of Night Vision JE1 BE1.png|32px]] Added splash potions of [[Night Vision]].
|Splash potions of Night Vision are currently not yet [[brewing|brewable]].}}
{{History|||snap=12w34a|[[File:Splash Potion of Invisibility JE1 BE1.png|32px]] Added splash potions of [[Invisibility]].
|Splash potions of Night Vision are now brewable.}}
{{History|||snap=12w38a|[[Witch]]es now use splash potions for attacking.}}
{{History|||snap=12w39b|Custom [[potion]]s can now be created with a world editor.<ref>http://www.youtube.com/watch?v=2D8OcQ1zyzY</ref>}}
{{History||1.5|snap=?|Extended-enhanced potions are no longer available in the Creative inventory for all four potion effects. {{info needed}}{{verify}}<!--only checked v1.4.7 and v1.5.2, but did not check any version in between, please check all-->}}
{{History||1.7.2|snap=13w36a|[[File:Splash Potion of Water Breathing JE1 BE1.png|32px]] Added splash potions of [[Water Breathing]].}}
{{History||1.8|snap=14w27a|[[File:Splash Potion of Leaping JE1 BE1.png|32px]] Added splash potions of [[Leaping]].}}
{{History||1.8.1|snap=pre1|Splash potions of Leaping can now be extended.}}
{{History||1.9|snap=15w31a|[[File:Splash Water Bottle JE1 BE1.png|32px]] [[File:Splash Water Bottle JE1 BE1.png|32px]] [[File:Splash Water Bottle JE1 BE1.png|32px]] [[File:Splash Water Bottle JE1 BE1.png|32px]] Added splash water bottles, mundane, thick, and awkward splash potions.
|Splash potions no longer only have 75% of the durations from their corresponding normal potions.}}
{{History|||snap=15w33a|Splash potions are now used to brew [[lingering potion]]s.}}
{{History|||snap=15w33c|Splash potions can now be placed in [[brewing stand]]s.}}
{{History|||snap=15w34a|Splash water bottles now just extinguish [[fire]], without placing flowing [[water]].}}
{{History|||snap=15w43a|A splash potion of weakness can now be found in the [[brewing stand]] in an [[igloo]] basement.}}
{{History|||snap=15w44b|[[File:Uncraftable Splash Potion JE1.png|32px]] [[File:Splash Potion of Luck JE1.png|32px]] Added uncraftable splash potions and splash potions of [[Luck]].}}
{{History|||snap=15w49a|Splash potions, like all throwable projectiles, now take the thrower's motion into account.}}
{{History||1.11|snap=16w32a|The [[entity]] ID has been changed from <code>ThrownPotion</code> to <code>potion</code>.}}
{{History|||snap=16w35a|Splash water bottles now deal {{hp|1}} [[damage]] to [[endermen]] and [[blaze]]s.}}
{{History||1.13|snap=17w47a|Prior to [[1.13/Flattening|''The Flattening'']], this [[item]]'s numeral ID was 438.}}
{{History|||snap=18w07a|[[File:Splash Potion of the Turtle Master JE1 BE1.png|32px]] Added splash potions of the Turtle Master.}}
{{History|||snap=18w14a|[[File:Splash Potion of Slow Falling JE1 BE1.png|32px]] Added splash potions of [[Slow Falling]].}}
{{History||1.14|snap=18w43a|[[File:Uncraftable Splash Potion JE2.png|32px]] [[File:Splash Water Bottle JE2 BE2.png|32px]] [[File:Splash Potion of Night Vision JE2 BE2.png|32px]] [[File:Splash Potion of Invisibility JE2 BE2.png|32px]] [[File:Splash Potion of Leaping JE2 BE2.png|32px]] [[File:Splash Potion of Fire Resistance JE2 BE2.png|32px]] [[File:Splash Potion of Swiftness JE2 BE2.png|32px]] [[File:Splash Potion of Slowness JE2 BE2.png|32px]] [[File:Splash Potion of the Turtle Master JE2 BE2.png|32px]] [[File:Splash Potion of Water Breathing JE2 BE2.png|32px]] [[File:Splash Potion of Healing JE2 BE2.png|32px]] [[File:Splash Potion of Harming JE2 BE2.png|32px]] [[File:Splash Potion of Poison JE2 BE2.png|32px]] [[File:Splash Potion of Regeneration JE2 BE2.png|32px]] [[File:Splash Potion of Strength JE2 BE2.png|32px]] [[File:Splash Potion of Weakness JE2 BE2.png|32px]] [[File:Splash Potion of Luck JE2.png|32px]] [[File:Splash Potion of Slow Falling JE2 BE2.png|32px]] The textures of splash potions have been changed.}}
{{History||1.16|snap=20w09a|[[Fire resistance]] splash potions can now be obtained through [[bartering]].}}
{{History||1.19|snap=22w11a|Splash water bottles can now be {{control|used}} on [[dirt]], [[coarse dirt]], or [[rooted dirt]] to turn it into [[mud]].}}
{{History||1.19.3|snap=22w43a|Splash water bottles can now extinguish burning entities.<ref>{{bug|MC-189911|||Fixed}}</ref>}}
{{History||1.19.4|snap=Pre-release 1|Splash potions no longer have an enchantment glint.}}
{{History|||snap=Pre-release 3|[[File:Splash Potion of Night Vision JE3.png|32px]] [[File:Splash Potion of Invisibility JE3.png|32px]] [[File:Splash Potion of Leaping JE3.png|32px]] [[File:Splash Potion of Fire Resistance JE3.png|32px]] [[File:Splash Potion of Swiftness JE3.png|32px]] [[File:Splash Potion of Slowness JE3.png|32px]] [[File:Splash Potion of the Turtle Master JE3.png|32px]] [[File:Splash Potion of Water Breathing JE3.png|32px]] [[File:Splash Potion of Harming JE3.png|32px]] [[File:Splash Potion of Poison JE3.png|32px]] [[File:Splash Potion of Strength JE3.png|32px]] Changed colors of the following splash potions: Night Vision, Invisibility, Leaping, Fire Resistance, Swiftness, Slowness, Turtle Master, Water Breathing, Harming, Poison, Strength, Resistance.}}
{{History||1.20|snap=23w12a|Wither [[effect]] particle colors have been adjusted to make them more distinguishable.
|The splash potion of [[Slow Falling]] has had its color tweaked to make it more distinguishable from the splash potion of [[Invisibility]].}}
{{History|pocket alpha}}
{{History||v0.12.1|snap=build 1|[[File:Splash Water Bottle JE1 BE1.png|32px]] [[File:Splash Potion of Night Vision JE1 BE1.png|32px]] [[File:Splash Potion of Invisibility JE1 BE1.png|32px]] [[File:Splash Potion of Leaping JE1 BE1.png|32px]] [[File:Splash Potion of Fire Resistance JE1 BE1.png|32px]] [[File:Splash Potion of Swiftness JE1 BE1.png|32px]] [[File:Splash Potion of Slowness JE1 BE1.png|32px]] [[File:Splash Potion of Water Breathing JE1 BE1.png|32px]] [[File:Splash Potion of Healing JE1 BE1.png|32px]] [[File:Splash Potion of Harming JE1 BE1.png|32px]] [[File:Splash Potion of Poison JE1 BE1.png|32px]] [[File:Splash Potion of Regeneration JE1 BE1.png|32px]] [[File:Splash Potion of Strength JE1 BE1.png|32px]] [[File:Splash Potion of Weakness JE1 BE1.png|32px]] Added splash potions.
|Splash water bottles, mundane, long mundane, thick, and awkward splash potions are all available in the Creative inventory.}}
{{History||v0.13.0|snap=build 1|Splash potions of [[Leaping]] are now obtainable in [[survival]].}}
{{History||v0.14.0|snap=build 1|Splash potions can now be used to fill [[cauldron]]s.
|A cauldron now can be filled by splash potions and can be emptied using a [[glass bottle]], which turn into the corresponding splash potion.
|[[Witch]]es now use splash potions for attacking.}}
{{History||?|Splash water bottles now deal {{hp|1}} [[damage]] to [[endermen]] and [[blaze]]s.
|Splash water bottles now just extinguish [[fire]], without placing flowing [[water]].}}
{{History||v0.16.0|snap=build 4|[[File:Splash Potion of Decay BE1.png|32px]] As a version exclusive, added splash potions of [[Decay]].}}
{{History|pocket}}
{{History||1.0.0|snap=alpha 0.17.0.1|Splash potions can now be used to brew [[lingering potion]]s.
|A splash potion of weakness can now be found in the [[brewing stand]] in an [[igloo]] basement.}}
{{History|bedrock}}
{{History||1.5.0|snap=beta 1.5.0.4|[[File:Splash Potion of the Turtle Master JE1 BE1.png|32px]] Added splash potions of the Turtle Master.}}
{{History||1.6.0|snap=beta 1.6.0.5|[[File:Splash Potion of Slow Falling JE1 BE1.png|32px]] Added splash potions of [[Slow Falling]].}}
{{History||1.10.0|snap=beta 1.10.0.3|[[File:Splash Water Bottle JE2 BE2.png|32px]] [[File:Splash Potion of Night Vision JE2 BE2.png|32px]] [[File:Splash Potion of Invisibility JE2 BE2.png|32px]] [[File:Splash Potion of Leaping JE2 BE2.png|32px]] [[File:Splash Potion of Fire Resistance JE2 BE2.png|32px]] [[File:Splash Potion of Swiftness JE2 BE2.png|32px]] [[File:Splash Potion of Slowness JE2 BE2.png|32px]] [[File:Splash Potion of Water Breathing JE2 BE2.png|32px]] [[File:Splash Potion of Healing JE2 BE2.png|32px]] [[File:Splash Potion of Harming JE2 BE2.png|32px]] [[File:Splash Potion of Poison JE2 BE2.png|32px]] [[File:Splash Potion of Regeneration JE2 BE2.png|32px]] [[File:Splash Potion of Strength JE2 BE2.png|32px]] [[File:Splash Potion of Weakness JE2 BE2.png|32px]] [[File:Splash Potion of Decay BE2.png|32px]] [[File:Splash Potion of the Turtle Master JE2 BE2.png|32px]] [[File:Splash Potion of Slow Falling JE2 BE2.png|32px]] The textures of splash potions have been changed.}}
{{History||1.16.0|snap=beta 1.16.0.57|[[Fire resistance]] splash potions can now be obtained through [[bartering]].}}
{{History||1.19.80|snap=beta 1.19.80.21|Changed potion colors for the following splash potions: Fire Resistance, Harming, Invisibility, Leaping, Night Vision, Poison, Slowness, Strength, Swiftness, Turtle Master, and Water Breathing.
|Removed enchantment glint from splash potions.}}
{{History|console}}
{{History||xbox=TU7|xbone=CU1|ps=1.0|wiiu=Patch 1|switch=1.0.1|[[File:Splash Potion of Fire Resistance JE1 BE1.png|32px]] [[File:Splash Potion of Swiftness JE1 BE1.png|32px]] [[File:Splash Potion of Slowness JE1 BE1.png|32px]] [[File:Splash Potion of Healing JE1 BE1.png|32px]] [[File:Splash Potion of Harming JE1 BE1.png|32px]] [[File:Splash Potion of Poison JE1 BE1.png|32px]] [[File:Splash Potion of Regeneration JE1 BE1.png|32px]] [[File:Splash Potion of Strength JE1 BE1.png|32px]] [[File:Splash Potion of Weakness JE1 BE1.png|32px]] Added splash potions.}}
{{History||xbox=TU14|ps=1.04|[[File:Splash Potion of Night Vision JE1 BE1.png|32px]] [[File:Splash Potion of Invisibility JE1 BE1.png|32px]] Added splash potions of [[Night Vision]] and splash potions of [[Invisibility]].
|Extended-enhanced potions are now listed individually for four potion effects.}}
{{History||xbox=TU31|xbone=CU19|ps=1.22|wiiu=Patch 3|[[File:Splash Potion of Leaping JE1 BE1.png|32px]] [[File:Splash Potion of Water Breathing JE1 BE1.png|32px]] Added splash potions of [[Leaping]] and splash potions of [[Water Breathing]]. These are both available in four variants unlike ''Java'' and ''Bedrock'' where the latter group only added two variants of water breathing and three variants for leaping.}}
{{History||xbox=TU46|xbone=CU36|ps=1.38|wiiu=Patch 15|switch=1.0.1|[[File:Splash Water Bottle JE1 BE1.png|32px]] Added splash [[water bottle]]s.
|[[File:Splash Potion of Luck JE1.png|32px]] Added splash potions of [[Luck]].
|Added [[lingering potion]]s, which can be [[brewing|brewed]] with splash potions to create [[dragon's breath]].
|Added dragon's breath, which can be brewed from lingering potions and splash potions.
|Splash potions no longer only have 75% of the durations from their corresponding normal potions.
|Removed all types of extended-enhanced potions for all five potion effects.}}
{{History||xbox=TU54|xbone=CU44|ps=1.52|wiiu=Patch 24|switch=1.0.4|Splash water bottles now deal {{hp|1}} [[damage]] to [[endermen]] and [[blaze]]s.}}
{{History||xbox=TU57|xbone=CU49|ps=1.56|wiiu=Patch 27|switch=1.0.7|Splash potions once again only have 75% of the duration from their corresponding normal potions.}}
{{History||xbox=TU69|xbone=none|ps=1.76|wiiu=Patch 38|switch=none|[[File:Splash Potion of Decay BE1.png|32px]] [[File:Splash Potion of the Turtle Master JE1 BE1.png|32px]] [[File:Splash Potion of Slow Falling JE1 BE1.png|32px]] Added splash potions of [[Decay]], Turtle Master, and [[Slow Falling]].}}
{{History|New 3DS}}
{{History||0.1.0|[[File:Splash Water Bottle JE1 BE1.png|32px]] [[File:Splash Potion of Night Vision JE1 BE1.png|32px]] [[File:Splash Potion of Invisibility JE1 BE1.png|32px]] [[File:Splash Potion of Leaping JE1 BE1.png|32px]] [[File:Splash Potion of Fire Resistance JE1 BE1.png|32px]] [[File:Splash Potion of Swiftness JE1 BE1.png|32px]] [[File:Splash Potion of Slowness JE1 BE1.png|32px]] [[File:Splash Potion of Water Breathing JE1 BE1.png|32px]] [[File:Splash Potion of Healing JE1 BE1.png|32px]] [[File:Splash Potion of Harming JE1 BE1.png|32px]] [[File:Splash Potion of Poison JE1 BE1.png|32px]] [[File:Splash Potion of Regeneration JE1 BE1.png|32px]] [[File:Splash Potion of Strength JE1 BE1.png|32px]] [[File:Splash Potion of Weakness JE1 BE1.png|32px]] Added splash potions.
|Splash water bottles, mundane, thick, and awkward splash potions are all available in the Creative inventory.}}
{{History||1.3.12|[[File:Splash Potion of Decay BE1.png|32px]] Added splash potions of [[Decay]].}}
{{History|foot}}
==Issues==
{{issue list}}
==Trivia==
*If an enderman is targeted directly by a splash potion, it teleports away before the potion can affect it. However, if an enderman is caught in the splash radius of a potion not aimed at it, it takes damage from the potion.
*If killed by a splash potion of harming, the death message would be: ''<player> was killed by <attacker> using magic''
*A thrown splash potion faces toward the [[player]] in first-person view, while it appears rotated horizontally in third-person view. This is the case for all throwable [[item]]s ([[ender pearl]]s, [[eggs]], [[snowball]]s, and all throwable potions).
==Unused splash potions==
[[Bedrock Edition]] has [[History of textures/Unused textures#Unused potions|unused splash potion textures]] for several [[effect]]s, along with their [[Potion#Unused potions|normal variants]]. These effects are: [[Absorption]], [[Blindness]], [[Haste]], [[Health Boost]], [[Hunger]], [[Mining Fatigue]], [[Nausea]], [[Resistance]], [[Saturation]], and [[Levitation]], as well as the [[Luck]] potion textures also present in [[Java Edition]]. These unused textures were added along with the other potion textures in [[Pocket Edition v0.12.1 alpha]], except for the potion of levitation, which was added in [[Pocket Edition 1.0.0]]. The textures were changed along with the other potion textures during the [[texture update]] in [[Bedrock Edition 1.10.0]]. Strangely, the potion of levitation texture is a duplicate of the splash potion of levitation texture.
<gallery>
Splash Potion of Absorption BE2.png|Splash Potion of Absorption
Splash Potion of Blindness BE2.png|Splash Potion of Blindness
Splash Potion of Haste BE2.png|Splash Potion of Haste
Splash Potion of Health Boost BE2.png|Splash Potion of Health Boost
Splash Potion of Hunger BE2.png|Splash Potion of Hunger
Splash Potion of Mining Fatigue BE2.png|Splash Potion of Mining Fatigue
Splash Potion of Nausea BE2.png|Splash Potion of Nausea
Splash Potion of Resistance BE2.png|Splash Potion of Resistance
Splash Potion of Saturation BE2.png|Splash Potion of Saturation
Potion of Levitation BE2.png|Splash Potion of Levitation
</gallery>
== Gallery ==
<gallery>
Splash Water Bottle.png|Splash water bottle
Splash Potion of Night Vision.png|Night Vision
Splash Potion of Invisibility.png|Invisibility
Splash Potion of Leaping.png|Leaping
Splash Potion of Fire Resistance.png|Fire Resistance
Splash Potion of Swiftness.png|Swiftness
Splash Potion of Slowness.png|Slowness
Splash Potion of the Turtle Master.png|Turtle Master
Splash Potion of Water Breathing.png|Water Breathing
Splash Potion of Healing.png|Healing
Splash Potion of Harming.png|Harming
Splash Potion of Poison.png|Poison
Splash Potion of Regeneration.png|Regeneration
Splash Potion of Strength.png|Strength
Splash Potion of Weakness.png|Weakness
Splash Potion of Slow Falling.png|Slow Falling
Splash Potion of Luck.png|Luck
Splash Potion of Decay.png|Decay
Uncraftable Splash Potion.png|Uncraftable splash potion
</gallery>
=== Other ===
<gallery>
Splash Potion Weakness.png|A splash potion hovered over in a brewing stand
Splash Potion Radius.png|Splash potions' area of effect
</gallery>
== See also==
* {{ItemLink|Glass Bottle}}
* {{ItemLink|Lingering Potion}}
* {{ItemLink|Bottle o' Enchanting}}
== Notes ==
{{notelist|n}}
== References ==
{{reflist}}
== External links ==
* [http://www.minecraftforum.net/topic/673147-all-about-potions-and-brewing-19-reference-guidepics-and-a-mod-download-to-make-them-usable/ Minecraft Forum: All About Potions And Brewing - 1.9 Reference Guide]
* [http://potioncraft.net/ Minecraft Potions - A Visual Guide]
{{Items}}
{{entities}}
[[Category:Combat]]
[[cs:Vrhací lektvar]]
[[de:Wurftrank]]
[[fr:Potion jetable]]
[[ja:スプラッシュポーション]]
[[ko:투척용 물약]]
[[nl:Spattende dranken]]
[[pl:Mikstury miotane]]
[[pt:Poção arremessável]]
[[ru:Взрывающиеся зелья]]
[[zh:喷溅药水]]</li></ul> | 20w30a | Blocks of iron can now be found in bastion remnant chests. | |||
| Pocket Edition Alpha | |||||
Pre-release{{Extension DPL}}<ul><li>[[Armor Stand|Armor Stand]]<br/>{{ItemEntity
| image = Armor Stand.png
| image2 = Armor Stand BE.png
| extratext = View [[#Gallery|all renders]]
| stackable =
* '''[[JE]]:''' Yes (16)
* '''[[BE]]:''' Yes (64)
| renewable = Yes
| flammable = Yes
| size = '''Normal:'''<br>
Width: 0.5 Blocks<br>
Height: 1.975 Blocks<br>
'''Small:'''<br>
Width: 0.25 Blocks<br>
Height: 0.9875 Blocks<br>
| health = {{hp|20}}
}}
An '''armor stand''' is an inanimate [[entity]] that can wear [[armor]]. It can also hold [[Item|items]] and be posed (but these are not possible in [[Survival]] in [[Java Edition]]).
== Obtaining ==
An armor stand can be broken by quickly {{control|attack|text=attacking}} it twice, dropping itself and any armor placed onto it.
=== Crafting ===
{{Crafting
|A1= Stick
|B1= Stick
|C1= Stick
|B2= Stick
|A3= Stick
|B3= Smooth Stone Slab
|C3= Stick
|Output= Armor Stand
|type=Decoration block
}}
=== Natural generation ===
Two armor stands are found in each taiga [[village]] outdoor armory, one equipped with an [[iron helmet]], the other with an [[iron chestplate]].
== Usage ==
[[Player]]s can use armor stands to hold [[armor]], [[mob head]]s, [[carved pumpkin]]s, and [[elytra]]. [[Commands]] can be used to give them other [[item]]s. The stand does not have a GUI, so players interact with it directly. Armor stands are also able to be placed in different orientations, similar to [[banner]]s or [[sign]]s. Armor stands are [[entity|entities]], allowing them to be pushed by [[piston]]s, moved by flowing [[water]], pulled with [[fishing rod]]s, pushed by players (with knockback), and bounced by [[slime block]]s.
{{Control|use|text=Using}} armor on the stand places the armor if done on a bare spot. Conversely, clicking on armor with a bare hand removes the armor and places it in the highlighted hotbar slot. It is not possible to take or place items from the armor stand's hands unless playing on Bedrock Edition.
Armor, mob heads, or carved pumpkins can be automatically placed on armor stands with a [[dispenser]].
Armor stands can be customized further to have arms, pose, disobey gravity, dual wield and other things by summoning them using {{cmd|summon}} with [[Tutorials/Command NBT tags#Armor Stand|NBT tags]].
In maps heavily using [[command blocks]], armor stands can be used to keep [[scoreboard]] objectives that are 'global' to the map, run [[commands]], etc.
{{IN|bedrock}}, the pose of the armor stand can be changed by interacting with the armor stand (or pressing the {{btn|Pose|be=1}} button on mobile devices) while sneaking, or by using a redstone signal. There are 13 possible poses. Armor stands can also hold items by interacting with the armor stand (or pressing the {{btn|Equip|be=1}} button on mobile devices) while holding an item that cannot be worn.
;<nowiki>Below are the poses:
{| class="wikitable collapsible collapsed"
!No.!!Namespace ID!! Redstone power
!
! !! Image
|-
|0
|{{cd|animation.armor_stand.default_pose}}
|0
|
|
|[[File:Armor Stand Default Pose.png|128px]]
|-
|1
|{{cd|animation.armor_stand.no_pose}}
|1
|
|
|[[File:Armor Stand No Pose.png|128px]]
|-
|2
|{{cd|animation.armor_stand.solemn_pose}}
|2
|
|
|[[File:Armor Stand Solemn Pose.png|128px]]
|-
|3
|{{cd|animation.armor_stand.athena_pose}}
|3
|
|
|[[File:Armor Stand Athena Pose.png|128px]]
|-
|4
|{{cd|animation.armor_stand.brandish_pose}}
|4
|
|
|[[File:Armor Stand Brandish Pose.png|128px]]
|-
|5
|{{cd|animation.armor_stand.honor_pose}}
|5
|
|
|[[File:Armor Stand Honor Pose.png|128px]]
|-
|6
|{{cd|animation.armor_stand.entertain_pose}}
|6
|
|
|[[File:Armor Stand Entertain Pose.png|128px]]
|-
|7
|{{cd|animation.armor_stand.salute_pose}}
|7
|
|
|[[File:Armor Stand Salute Pose.png|128px]]
|-
|8
|{{cd|animation.armor_stand.hero_pose}}
|8, 13 or more
|
|
|[[File:Armor Stand Hero Pose.png|128px]]
|-
|9
|{{cd|animation.armor_stand.riposte_pose}}
|9
|
|
|[[File:Armor Stand Riposte Pose.png|128px]]
|-
|10
|{{cd|animation.armor_stand.zombie_pose}}
|10
|
|
|[[File:Armor Stand Zombie Pose.png|128px]]
|-
|11
|{{cd|animation.armor_stand.cancan_a_pose}}
|11
|
|
|[[File:Armor Stand Cancan A Pose.png|128px]]
|-
|12
|{{cd|animation.armor_stand.cancan_b_pose}}
|12
|
|
|[[File:Armor Stand Cancan B Pose.png|128px]]
|}
==Behavior==
Because armor stands are entities, they obey gravity, allowing them to fall and rest on non-full [[block]]s such as [[enchanting table]]s, [[snow layer]]s and [[slab]]s.
Any [[armor]] on the stand drops when the stand is broken. Armor stands can display [[enchanting|enchanted]] and all forms of [[dye]]d armor. The effects of most enchanted armor have no effect when on an armor stand, with three exceptions:
*[[Frost Walker]] creates [[frosted ice]] blocks on [[water]] as usual if an armor stand is pushed with a [[piston]].
*[[Depth Strider]] slows the movement of the armor stand when being pushed with water.
*A [[player]] may take damage from hitting an armor stand that holds armor enchanted with [[Thorns]].
Armor stands are not damaged by [[cacti]] but can be broken by [[arrow]]s. An armor stand destroyed by an explosion or a firework does not drop as an [[item (entity)|item]]. Armor stands in water and [[lava]] at the same time are not consumed by the lava.
{{IN|be}}, armor stands can be affected by [[status effect]]s. They can be 'killed' by [[Harming]] and [[Decay]] [[splash potion|splash]]/[[lingering potion]]s, lava, [[fire]], and [[campfire]]s, and they play the player death sound and fall to their side and disappear, yielding no armor stand item. If an armor stand is equipped with an item or armor, that item or armor is considered as "naturally-spawned equipment" with an 8.5% chance of dropping when the armor stand "dies" from the [[Instant Damage]] or the [[Wither (status effect)|Wither]] status effect. If the dropped item is any form of [[weapon]], [[tool]] or armor, it drops in a badly damaged state because the game considers it as "naturally-spawned equipment".<ref>{{Bug|MCPE-24341}}</ref>
The stand wobbles slightly when being hit by the player.
{{IN|java}}, it is possible to create an armor stand with arms using the {{cmd|summon}} [[command]]. It is also possible to change an armor stand without arms into a stand with arms by using the {{cmd|data}} command. The commands are as follows:
*<code>/data merge entity @e[type=armor_stand,sort=nearest,limit=1] {ShowArms:1}</code>, which changes the nearest armor stand into an armor stand with arms.
*<code>/summon minecraft:armor_stand ~ ~ ~ {ShowArms:1}</code>, which summons a new armor stand with arms shown.
*<code>/summon armor_stand ~ ~ ~ {Rotation:[0.0f]}</code>, which summons a new armor stand that faces a desired direction (dependent on changing "0.0f" to other numbers like "90.0f" or "180.0f", otherwise it faces the same way as a default armor stand).
==Sounds==
{{edition|java}}:<br>
Armor stands use the Friendly Creatures sound category for entity-dependent sound events.
{{Sound table
|sound=Armor Stand hit1.ogg
|sound2=Armor Stand hit2.ogg
|sound3=Armor Stand hit3.ogg
|sound4=Armor Stand hit4.ogg
|subtitle=Block breaking
|source=Friendly Creatures
|description=When an armor stand is damaged
|id=entity.armor_stand.hit
|translationkey=subtitles.block.generic.hit
|volume=1.0
|pitch=1.0
|distance=16}}
{{Sound table
|sound=Armor Stand break1.ogg
|sound2=Armor Stand break2.ogg
|sound3=Armor Stand break3.ogg
|sound4=Armor Stand break4.ogg
|subtitle=Block broken
|source=Friendly Creatures
|description=When an armor stand is destroyed
|id=entity.armor_stand.break
|translationkey=subtitles.block.generic.break
|volume=1.0
|pitch=1.0
|distance=16}}
{{Sound table
|sound=Stone dig1.ogg
|sound2=Stone dig2.ogg
|sound3=Stone dig3.ogg
|sound4=Stone dig4.ogg
|subtitle=Block placed
|source=Blocks
|description=When an armor stand is placed
|id=entity.armor_stand.place
|translationkey=subtitles.block.generic.place
|volume=1.0
|pitch=1.0
|distance=16}}
{{Sound table
|sound=Wood dig1.ogg
|sound2=Wood dig2.ogg
|sound3=Wood dig3.ogg
|sound4=Wood dig4.ogg
|subtitle=Block placed
|source=Friendly Creatures
|description=When an armor stand falls onto a block at a high speed{{Info needed}}
|id=entity.armor_stand.fall
|translationkey=subtitles.entity.armorstand.fall
|volume=1.0
|pitch=1.0
|distance=16
|foot=1}}
{{edition|bedrock}}:
{{Sound table
|type=bedrock
|sound=Armor Stand hit1.ogg
|sound2=Armor Stand hit2.ogg
|sound3=Armor Stand hit3.ogg
|sound4=Armor Stand hit4.ogg
|source=neutral
|description=When an armor stand is damaged
|id=mob.armor_stand.hit
|volume=1.0
|pitch=1.0}}
{{Sound table
|sound=Armor Stand break1.ogg
|sound2=Armor Stand break2.ogg
|sound3=Armor Stand break3.ogg
|sound4=Armor Stand break4.ogg
|source=neutral
|description=When an armor stand is destroyed
|id=mob.armor_stand.break
|volume=1.0
|pitch=1.0}}
{{Sound table
|sound=Stone dig1.ogg
|sound2=Stone dig2.ogg
|sound3=Stone dig3.ogg
|sound4=Stone dig4.ogg
|source=neutral
|description=When an armor stand is placed
|id=mob.armor_stand.place
|volume=1.0
|pitch=1.0}}
{{Sound table
|sound=Wood dig1.ogg
|sound2=Wood dig2.ogg
|sound3=Wood dig3.ogg
|sound4=Wood dig4.ogg
|source=neutral
|description=When an armor stand falls onto a block at a high speed{{Info needed}}
|id=mob.armor_stand.land
|volume=1.0
|pitch=1.0
|foot=1}}
==Data values==
===ID===
{{edition|java}}:
{{ID table
|edition=java
|firstcolumnname=Armor Stand
|showforms=y
|generatetranslationkeys=y
|displayname=Item
|spritename=armor-stand
|spritetype=item
|nameid=armor_stand
|form=item
|foot=1}}
{{ID table
|edition=java
|firstcolumnname=Armor Stand
|generatetranslationkeys=y
|displayname=Entity
|spritename=armor-stand
|spritetype=entity
|nameid=armor_stand
|foot=1}}
{{edition|bedrock}}:
{{ID table
|edition=bedrock
|firstcolumnname=Armor Stand
|shownumericids=y
|showforms=y
|notshowbeitemforms=y
|generatetranslationkeys=y
|displayname=Item
|spritename=armor-stand
|spritetype=item
|nameid=armor_stand
|id=552
|form=item
|foot=1}}
{{ID table
|edition=bedrock
|firstcolumnname=Armor Stand
|shownumericids=y
|generatetranslationkeys=y
|displayname=Entity
|spritename=armor-stand
|spritetype=entity
|nameid=armor_stand
|id=61
|foot=1}}
===Item data===
{{el|java}}:
{{main|Player.dat format}}
<div class="treeview">
* {{nbt|compound|tag}}: The item's '''tag''' tag.
{{:Player.dat_format/Entity Spawners}}
</div>
{{el|bedrock}}:
:{{IN|bedrock}}, armor stands have no additional item tag.
:See [[Bedrock Edition level format/Item format]].
===Entity data===
Armor stands have entity data associated with them that contain various properties of the [[entity]].
{{el|java}}:
{{main|Entity format}}
{{/ED}}
{{el|bedrock}}:
:See [[Bedrock Edition level format/Entity format]].
== Video==
Note: This video is outdated as Zoglins now attack armor stands
<div style="text-align:center">{{yt|tCFkdTfCleQ}}</div>
==History==
{{History|java}}
{{History||1.8|snap=August 5, 2014|slink={{Tweet|SeargeDP|496666952530538498}}|[[File:Armor Stand (pre-release).png|32px]] [[File:Armor Stand (item) (pre-release).png|32px]] [[Searge]] tweeted a image of an armor stand. The appearance was changed before release.}}
{{History|||snap=August 5, 2014|slink={{Tweet|SeargeDP|496673890148823040}}|Showed crafting recipe and name "[Armor Stand]", both were changed before release.}}
{{History|||snap=14w32a|[[File:Armor Stand JE1.png|32px]] Added armor stands.}}
{{History|||snap=14w32b|[[File:Armor Stand (item) JE1 BE1.png|32px]] The item texture has changed.
|Pick-block can now be used on armor stands.
|Armor stands can now no longer be crafted using [[slabs]] other than stone slabs.}}
{{History|||snap=14w32c|Added a <code>NoBasePlate</code> tag for the armor stand.}}
{{History|||snap=14w33a|Breaking [[particles]] have been added for the armor stand.}}
{{History||1.8.1|snap=pre1|Added <code>Marker</code> tag for armor stands.}}
{{History||1.9|snap=15w31a|Armor stands can now dual wield.
|<code>HandItems</code> and <code>ArmorItems</code> tags added for armor stands, which is intended to replace the <code>Equipment</code> tag.}}
{{History|||snap=15w33a|The <code>Equipment</code> tag has been removed from armor stands.}}
{{History|||snap=15w47a|The armor stand now wobbles when hit by the [[player]].}}
{{History|||snap=16w02a|Marker <code>ArmorStand</code>s now outline their equipment only when glowing.}}
{{History||1.11|snap=16w32a|The entity ID of the armor stand has been changed from <code>ArmorStand</code> to <code>armor_stand</code>.}}
{{History||1.13|snap=17w47a|Prior to [[1.13/Flattening|''The Flattening'']], this [[item]]'s numeral ID was 416.}}
{{History||1.14|snap=18w43a|[[File:Armor Stand JE2.png|32px]] The texture of armor stands has been changed to the new [[planks|oak planks]] texture.
|[[File:Armor Stand (item) JE2 BE2.png|32px]] The texture of armor stand [[item]]s has been slightly changed. (Comparison: [[File:Armor Stand (item) Texture Change 1.13 to 18w43a.gif|32px]])}}
{{History|||snap=18w50a|[[File:Armor Stand JE3.png|32px]] The texture of armor stands has been changed again.
|Armor stands now generate in taiga [[village]]s.}}
{{History||1.15|snap=19w42a|Armor stands can now be placed by [[dispenser]]s.}}
{{History||1.16|snap=20w07a|Armor stands no longer fall through fences and walls when placed.<ref>{{bug|MC-65951}}</ref>}}
{{History|||snap=20w14a|[[Zoglin]]s now attack armor stands.}}
{{History||1.17|snap=20w45a|[[File:Armor Stand 20w45a.png|32px]] The model of the armor stand has been changed.}}
{{History|||snap=20w46a|[[File:Armor Stand JE3.png|32px]] The model of the armor stand has been changed back to how it was in 1.16.}}
{{History||1.18|snap=Pre-release 5|[[File:Armor Stand JE4.png|32px]] Changed smooth stone texture on armor stand.}}
{{History||1.19.4|snap=23w03a|Armor stands now preserve custom names when placed and broken.}}
{{History||1.20<br>(Experimental)|link=1.19.4|snap=23w04a|An armor stand now appears in the smithing table GUI; arms are displayed as in Bedrock Edition.
|When an armor stand is placed, its model now changes in effect of the player's facing direction<ref>{{bug|MC-93533}}</ref>.}}
{{History|||snap=23w06a|The model no longer changes when the armory is placed. Also, the head, which tilted slightly to the lower right in the version from 1.8 up to 1.19.3, now faces forward from [[File:Armor Stand JE4.png|32px]] to [[File:Armor Stand JE5.png|32px]].}}
{{History||?|Armor can now be swapped in [[armor stand]]s by {{ctrl|using}} them in the armor stand's slot.}}
{{History|bedrock}}
{{History||1.2.0|snap=beta 1.2.0.2|[[File:Armor Stand BE1.png|32px]] [[File:Armor Stand (item) JE1 BE1.png|32px]] Added armor stands.}}
{{History||1.10.0|snap=beta 1.10.0.3|[[File:Armor Stand BE2.png|32px]] The texture of armor stands has been changed.
|[[File:Armor Stand (item) JE2 BE2.png|32px]] The texture of armor stand [[item]]s has been slightly changed.}}
{{History||1.12.0|snap=beta 1.12.0.2|[[File:Armor Stand with Leather Armor MCPE-44669.png|32px]] Leather [[armor]] no longer shows as being [[dye]]d properly when worn by armor stands.}}
{{History|||snap=beta 1.12.0.3|[[File:Armor Stand wear Chicken.png|x73px]][[File:Armor Stand wear Rabbit.png|x73px]] [[File:Armor Stand wear Salmon.gif|x73px]] [[File:Armor Stand wear Pufferfish.gif|x73px]] [[File:Armor Stand wear Slime.png|x73px]] When armor stands hold a [[raw chicken]], [[raw rabbit]], [[raw salmon]], [[pufferfish]] or a [[slime block]], they now wear these [[mob]] counterparts.<ref>{{bug|mcpe-48629}}</ref>}}
{{History||1.13.0|snap=beta 1.13.0.1|Leather armor now shows as being dyed properly when worn by armor stands.}}
{{History|||snap=beta 1.13.0.4|Armor stands no longer hold certain [[mob]]s if they are holding a [[item]] related to them.
|Armor stands now have a smoother animation when changing poses.}}
{{History||1.16.0|snap=?|Armor stands are now targeted by zoglins.}}
{{History||1.16.210|snap=beta 1.16.210.51|Armor stands are no longer attacked by [[goat]]s.}}
{{History|console}}
{{History||xbox=TU31|xbone=CU19|ps=1.22|wiiu=Patch 3|switch=1.0.1|[[File:Armor Stand JE1.png|32px]] [[File:Armor Stand (item) JE1 BE1.png|32px]] Added armor stands.}}
{{History||xbox=TU43|xbone=CU33|ps=1.36|wiiu=Patch 13|Added [[sound]]s for armor stands.}}
{{History||xbox=TU60|xbone=CU51|ps=1.64|wiiu=Patch 30|switch=1.0.11|[[File:Armor Stand BE1.png|32px]] Armor stands now have arms and the [[player]] can now change the pose of the armor stand.}}
{{History||xbox=none|xbone=none|ps=1.90|wiiu=none|switch=none|[[File:Armor Stand BE2.png|32px]] The texture of armor stands has been changed.
|[[File:Armor Stand (item) JE2 BE2.png|32px]] The texture of armor stand [[item]]s has been slightly changed.}}
{{History|foot}}
<gallery>
Armour stand 1.png|The first image of the armor stand.
JE 1.8 Dev Armor Stand crafting.png|The first image of armor stand crafting recipe.
The Bountiful Update.png|Armor stands in the [[Java Edition 1.8|1.8]] poster.
Dual Wielding Armor Stand.png|A dual wielding armor stand.
Glowing Armor Stands.png|Armor stands with the [[glowing]] effect.
Armor Stand Chess.jpg|Chess with armor stands.
</gallery>
==Issues==
{{issue list}}
==Trivia ==
*Equipping armor stands with certain [[block]]s and [[item]]s can cause rendering glitches. According to [[Searge]] this is due to transparent rendering on entities not yet being supported.<ref>{{bug|MC-67415||"Armor Stands with Slime Block rendering entities behind them"}} resolved as "Won't Fix"</ref><ref>{{bug|MC-67674||"Armor Stand wearing a Skull and Holding Stained Glass causes Graphical issues"}} resolved as "Won't Fix"</ref>
*Bedrock Edition has a version exclusive armor stand [[model]], which includes posable arms.
*Using [[redstone]] to change the stands reverse the poses, starting with the can-can pose first.
*Placing the stand within three powered [[redstone dust]] always changes its pose to the honor pose. [[Redstone Repeater|Repeaters]] also switch the stand to the honor pose if not set four blocks from one.
*Using external tools, armor stand spawners can be placed.
*Secret signatures for [[Jasper Boerstra|JAPPA]], Chi Wong, and [[Michael Stoyke|Searge]] can be found at the bottom of the armor stand texture.
== Gallery ==
===Renders===
;Armor (Java Edition)
<gallery>
Armor Stand Leather.png
Armor Stand Golden.png
Armor Stand Chainmail.png
Armor Stand Iron.png
Armor Stand Diamond.png
Armor Stand Netherite.png
</gallery>
; Armor (Bedrock Edition)
<gallery>
Armor Stand with Leather Armor BE.png
Armor Stand with Golden Armor BE.png
Armor Stand with Chain Armor BE.png
Armor Stand with Iron Armor BE.png
Armor Stand with Diamond Armor BE.png
Armor Stand with Netherite Armor BE.png
</gallery>
;Poses
<gallery>
Armor Stand Pose 0.png|
Armor Stand Pose 1.png|
Armor Stand Pose 2.png|
Armor Stand Pose 3.png|
Armor Stand Pose 4.png|
Armor Stand Pose 5.png|
Armor Stand Pose 6.png|
Armor Stand Pose 7.png|
Armor Stand Pose 8.png|
Armor Stand Pose 9.png|
Armor Stand Pose 10.png|
Armor Stand Pose 11.png|
Armor Stand Pose 12.png|
</gallery>
===Screenshots===
<gallery>
Armor Stand Demo.png|Armor stands in various positions with various [[armor]].
Armor Stand glass and sword.png|Armor stands can wear [[block]]s on their heads. This is accessible with [[command]]s such as {{cmd|item}}.
Bedrock edition armor stand poses.png|All armor stand poses as seen in {{el|be}}.
Netherite to the rescue!.png|An entire set of netherite [[armor]] on an armor stand.
Armor Stand Garage.png|An armor stand in a garage.
</gallery>
==References ==
{{reflist}}
==External Links==
*[https://www.minecraft.net/en-us/article/taking-inventory--armor-stand Taking Inventory: Armor Stand] – Minecraft.net on March 16, 2023
{{Items}}
{{Entities}}
[[Category:Storage]]
[[de:Rüstungsständer]]
[[es:Soporte para armadura]]
[[fr:Porte-armure]]
[[ja:防具立て]]
[[ko:갑옷 거치대]]
[[pl:Stojak na zbroję]]
[[pt:Suporte de armaduras]]
[[ru:Стойка для брони]]
[[th:แท่นวางชุดเกราะ]]
[[uk:Стійка для обладунків]]
[[zh:盔甲架]]</li><li>[[Bundle|Bundle]]<br/>{{Experimental feature|bundle}}
{{planned|BE}}
{{Item
| image = Bundle.png
| image2 = Bundle Filled.png
| rarity = Common
| renewable = No
| stackable = No
}}
A '''bundle''' is an [[item]] that can store up to a stack's worth of mixed [[item]] types within itself in a single [[inventory]] slot. Items that stack to 16 occupy more space within the bundle, and items that do not stack occupy the entire bundle without allowing space for any other items.
== Obtaining ==
=== Crafting ===
{{Crafting
|showdescription=1
|A1=String |B1=Rabbit Hide |C1=String
|A2=Rabbit Hide |C2=Rabbit Hide
|A3=Rabbit Hide |B3=Rabbit Hide |C3=Rabbit Hide
|Output=Bundle
|type=Tool
|description={{OnlyExperimental|bundle}}
}}
== Usage ==
<!--The tooltip does not reflect the current bundle "tooltip"-->
{{FakeImage|style=max-width:250px;
|1={{Slot|Stick,64}}{{Slot|Ender Pearl,16}}{{Slot|Iron Sword}}<br>{{Slot|Stick,1}}{{Slot|Ender Pearl,4}}{{Slot|Iron Sword,64}}<br>{{Slot|Filled Bundle[Stick x32/Ender Pearl x8]| title = Bundle|link=none}}
|2=Item stack sizes (top row) and the number of bundle slots they take up (middle row). Sticks stack to 64, so they take up one bundle slot; ender pearls stack to 16, so they take up four; and swords do not stack, so they take up the whole bundle. So, for instance, a bundle may have 32 sticks and 8 ender pearls inside (bottom), which take up a total of {{Tooltip|(32×1)|32 Sticks}}+{{Tooltip|(8×4)|8 Ender Pearls}}=64 bundle slots.
}}
Bundles are used to store different [[item|item type]]s in the same [[inventory]] slot. This does not, however, increase the total capacity of the slot: each bundle has 64 "bundle slots" and each item placed in the bundle takes up these slots similar to how they take up space in a normal inventory slot: items that stack to 64 take up 1 bundle slot, items that stack to 16 (for example, [[egg]]s) take up 4, and items that do not stack (such as tools/weapons/armor) take up the whole bundle, all 64 slots.
Although bundles themselves cannot be stacked, a bundle can be placed inside another (nested): the inner bundle itself uses 4 slots plus the number of slots already occupied by the items in that bundle.<ref>{{bug|MC-203567||Bundles can be placed inside of bundles|WAI}}</ref>
To place items inside a bundle, either (1) pick up the bundle in the inventory and right-click on the item(s) to be placed inside or (2) pick up the item(s) and right-click on the bundle. When placing bundles inside another bundle, the interface uses the first method: picking up Bundle A and right clicking on Bundle B attempts to store Bundle B inside A.
Bundles can be {{ctrl|used}} inside the inventory to take out the last item put in. In this way, items are accessible LIFO (last in, first out). When {{ctrl|used}} outside the inventory, it dumps all the items out into the world.
Hovering over the bundle shows its contained items in its inventory slots. The number of bundle slots used is displayed as ''<fullness>''/64 in the tooltip. If the bundle is full, then the empty slots are greyed out with an <span class="invslot">{{SlotSprite|Bundle full}}</span>.
[[Shulker box]]es cannot be placed inside of bundles.
[[File:MinecraftBundle.jpg|thumb|Hovering the mouse over a bundle filled with mob loot, nearly full, with 61 items.]]
== Sounds ==
{{Sound table
|sound=Bundle drop contents1.ogg
|sound2=Bundle drop contents2.ogg
|sound3=Bundle drop contents3.ogg
|subtitle=Bundle empties
|source=player
|description=When a bundle's items are thrown onto the ground
|id=item.bundle.drop_contents
|translationkey=subtitles.item.bundle.drop_contents
|volume=0.8
|pitch=''varies'' <ref group=sound>Can be 0.8-1.2 or 0.76-1.14 for each sound</ref>
|distance=16}}
{{Sound table
|sound=Bundle insert1.ogg
|sound2=Bundle insert2.ogg
|sound3=Bundle insert3.ogg
|subtitle=Item packed
|source=player
|description=When items are placed into a bundle
|id=item.bundle.insert
|translationkey=subtitles.item.bundle.insert
|volume=0.8
|pitch=''varies'' <ref group=sound>Can be 0.8-1.2, 0.76-1.14, or 0.84-1.26 for each sound</ref>
|distance=16}}
{{Sound table
|sound=Bundle remove one1.ogg
|sound2=Bundle remove one2.ogg
|sound3=Bundle remove one3.ogg
|subtitle=Item unpacked
|source=player
|description=When items are removed from a bundle
|id=item.bundle.remove_one
|translationkey=subtitles.item.bundle.remove_one
|volume=0.8
|pitch=''varies' <ref group=sound>Can be 0.8-1.2, 0.84-1.26, or 0.88-1.32 for each sound</ref>
|distance=16
|foot=1}}
== Data values ==
=== ID ===
{{JE}}:
{{ID table
|edition=java
|showforms=y
|generatetranslationkeys=y
|displayname=Bundle
|spritetype=item
|nameid=bundle
|form=item
|foot=1}}
=== Item data ===
<div class="treeview" style="margin-top: 0;">
* {{nbt|compound|tag}}: The '''tag''' tag.
{{:Player.dat_format/Bundle}}
</div>
== History ==
{{History||October 3, 2020|link={{ytl|DBvZ2Iqmm3M|t=1846s}}|[[File:Bundle JE1.png|32px]][[File:Bundle Filled JE1.png|32px]] Bundles are revealed at [[Minecraft Live 2020]]. Hovering over them shows all items inside scattered around a large area, and incomplete bundles have the empty texture.}}
{{History||October 16, 2021|link=https://clips.twitch.tv/AffluentEncouragingOryxPeteZaroll-cd8pIapkfD4PRHxO|Ulraf, a game developer on ''Minecraft'', states that bundles will not be included in [[Caves & Cliffs]].}}
{{History||November 17, 2021|link=https://www.minecraft.net/en-us/article/caves---cliffs-update-part-ii-coming|Bundles are announced to be added after [[The Wild Update]].}}
{{History|java}}
{{History||1.17|snap=20w45a|[[File:Bundle JE1.png|32px]][[File:Bundle Filled JE1.png|32px]] Added bundles. Hovering over them shows some of the items contained and their quantities, much like the tooltip of a [[shulker box]]. Incomplete bundles have the full texture.}}
{{History|||snap=20w46a|[[File:Bundle JE2.png|32px]][[File:Bundle Filled JE2.png|32px]] The textures of bundles have been changed.
|Hovering over bundles now shows its contained items in special slots, similar to slots in the [[inventory]]. If the bundle is not full, it also has an empty slot with a plus on it.}}
{{History|||snap=20w48a|Bundles now show fullness as a number when [[advanced tooltips]] are enabled.
|{{ctrl|Using}} a bundle in the inventory now empties one item from the bundle instead of emptying all the contents out to the [[inventory]].
|{{ctrl|Using}} a bundle now throws out its entire content into the world.}}
{{History|||snap=20w49a|Bundle fullness is now always shown.
|Full bundles now show the blue bar instead of hiding it, to distinguish from empty bundles.}}
{{History|||snap=20w51a|Bundles now drop its contents when destroyed as an [[Item (entity)|item entity]].
|Bundle fullness has been changed from <code>Fullness: ''<fullness>'' / 64</code> to <code>''<fullness>''/64</code>
|The slots in the tooltip when hovering over bundles have changed to have a border, and rows of slot have a thicker edge between them.
|When the bundle is not full, it instead shows empty slots instead of one slot with a plus. When it is full, those empty slots become greyed out with an X.}}
{{History|||snap=21w05a|The player now receives a tutorial when first having a bundle in the inventory.}}
{{History|||snap=21w19a|Bundles are now accessible only through commands.}}
{{History||1.18|snap=Experimental Snapshot 1|Bundles are now available in the creative inventory and can be crafted once again.}}
{{History|||snap=21w37a|Bundles are once again accessible only through commands.}}
{{History||1.19.3|snap=22w42a|Bundles have been made available once again, and have been moved behind their own datapack.}}
{{h|bedrock}}
{{h||1.19.50|snap=beta 1.19.50.21|Added bundle GUI textures in the Vanilla Packs.}}
{{History|foot}}
== Issues ==
{{Issue list}}
== Gallery ==
<gallery>
JE 1.17 Development Bundle.png|The original bundle UI
Bundle in Inventory.jpg|A bundle inventory in the inventory
</gallery>
== References ==
{{Reflist}}
{{Items}}
[[Category:Storage]]
[[Category:Tools]]
[[Category:Renewable resources]]
[[de:Bündel]]
[[es:Saco]]
[[fr:Sac]]
[[ja:バンドル]]
[[pl:Sakwa]]
[[pt:Trouxa]]
[[ru:Мешок]]
[[zh:收纳袋]]</li></ul></nowiki> | |||||
v0.1.0{{Extension DPL}}<ul><li>[[Tag (item)|Tag (item)]]<br/>{{About|the April Fools item|the standard item used to rename mobs|Name Tag}}
{{wip}}
{{joke feature}}
{{exclusive|java}}
{{Item
| title = Tag
| image = Tag.png
| renewable = Yes
| stackable = Yes (64)
}}
Tags and Bits are items exclusive to the [[Java Edition 23w13a or b|23w13a_or_b]] [[Easter eggs#April Fools|April Fools' joke]] snapshot from 2023. They are used to craft in-game representations of [[NBT format|NBT tags]].
==Obtaining==
A [[stonecutter]] can be used to cut a [[Name Tag|name tag]] into either 16 "Name" or 16 "Tag" items. These can be cut into 16 Bit items each.
{{Stonecutting
|head=1
|showdescription=1
|Name Tag
|Name, 16; Tag, 16
|description=The resulting "Name" items must be named in an [[anvil]].
}}
{{Stonecutting
|showdescription=
|Name; Tag
|Bit, 16
|foot=1
}}
To be able to proceed from here the <code>nbt_crafting</code> vote must be approved. Bits can be used in a crafting table to craft Left Curly, Right Curly, Left Square, and Right Square. In appears like these are the only tag items that can be crafted from Bits.
A [[Crafting Table|crafting table]] can be used to convert a "Tag" item into a "Byte Tag." The amount of [[stick]]s added to the crafting recipe specifies the value of the Byte, as a [[wikipedia:Signed number representations#Two's complement|signed 8-bit value]]. For example, a "Tag" and a full stack of sticks make a Byte with the value <code>64b</code>, while 255 sticks result in <code>-1b</code>. Only one of the sticks is consumed. Two Bytes can be crafted into a "Short Tag" (equivalent to 16 bit), two Shorts into an "Int Tag" (equivalent to 32 bit), and two Ints into a "Long Tag" (equivalent to 64 bit). Many other combinations that form either 16, 32, or 64 bit are possible. For example, two Shorts and an Int make a Long. When combining values, their digits are stuck together in the given order, e.g. <code>1b</code> and <code>0b</code> make <code>256s</code> (equivalent to 0100<sub>16</sub> in [[wikipedia:Hexadecimal|hexadecimal]]). Undoing any of these crafting actions in e.g. a stonecutter is not possible.
"Float" and "Double Tags" can be crafted by adding one or two [[boat]]s to any numeric tag. A "String Tag" is crafted with a "Tag" and a piece of [[string]].
{{Crafting
|head=1
|showdescription=1
|A1= Bit; ; Bit; Bit |B1= ; Bit; Bit; Bit
|A2= ; Bit; Bit; |B2= Bit; ; ; Bit
|A3= Bit; ; Bit; Bit |B3= ; Bit; Bit; Bit
|Output= Right Curly; Left Curly; Left Square; Right Square
|ignoreusage=1
}}
{{Crafting
|Tag
|String
|Output= String Tag
|description=String tags must be named in an [[anvil]] to set their value.
|ignoreusage=1
}}
{{Crafting
|Tag; Tag; Tag
|; Stick; Stick, 64
|; ; Stick, 63
|Output= Byte Tag; Byte Tag; Byte Tag
|description=Only 1 stick is consumed. 128 and more sticks make [[wikipedia:Signed number representations#Two's complement|two's complements]]:
128 sticks = <code>-128b</code><br>
129 sticks = <code>-127b</code><br>
⋮<br>
254 sticks = <code>-2b</code><br>
255 sticks = <code>-1b</code>
|ignoreusage=1
}}
{{Crafting
|Byte Tag; Byte Tag; Byte Tag
|Byte Tag; Byte Tag; Byte Tag
| ; Byte Tag; Byte Tag
| ; Byte Tag; Byte Tag
| ; ; Byte Tag
| ; ; Byte Tag
| ; ; Byte Tag
| ; ; Byte Tag
|Output= Short Tag; Int Tag; Long Tag
|description=Shorts and Ints can be combined the same way, even mixed.
Digits are appended, e.g. two <code>1b</code> tags make <code>257b</code> (0101<sub>16</sub> in [[wikipedia:Hexadecimal|hexadecimal]]).
|ignoreusage=1
}}
{{Crafting
|Byte Tag; Short Tag; Int Tag; Long Tag
|Any Boat; Any Boat; Any Boat; Any Boat
|Output= Float Tag; Float Tag; Float Tag; Float Tag
|ignoreusage=1
}}
{{Crafting
|Byte Tag; Short Tag; Int Tag; Long Tag
|Any Boat; Any Boat; Any Boat; Any Boat
|Any Boat; Any Boat; Any Boat; Any Boat
|Output= Double Tag; Double Tag; Double Tag; Double Tag
|ignoreusage=1
}}
{{Crafting
|Left Curly; Left Curly
|Name; Name
|Byte Tag; Byte Tag
|Right Curly; Name |; Byte Tag | |; Name |; Byte Tag |; Right Curly
|Output= Compound Tag; Compound Tag
|description=Instead of Bytes any other tag can be used, including other compound tags.
|ignoreusage=1
}}
{{Crafting
|Left Square; Left Square
|Byte Tag; Byte Tag
|Right Square; Byte Tag |; Byte Tag |; Byte Tag |; Byte Tag |; Byte Tag |; Byte Tag |; Right Square
|Output= List Tag; List Tag
|description=Instead of Bytes any other tag can be used, including other list tags.
|ignoreusage=1
}}
{{Crafting
|Compound Tag; List Tag
|Compound Tag; List Tag
|Output= Compound Tag; List Tag
|description=Up to 9 can be combined.
When compound tags contain identical names, only the latest of the corresponding values is used.
|ignoreusage=1
|foot=1
}}
"Name" and "String Tags" must be named in an [[anvil]] before they can be used. Unnamed Names and Strings always produce a "Sssyntax Error". None of the other tag items can be named.
All these items can be combined in a crafting table to form a short sequence of JSON code, as long as the resulting syntax is valid. For example:
*A pair of Curlies that enclose a named "Name" item and some value, e.g. a Byte, create a "Compound Tag" with the content <code>{Example:0b}</code>.
**Because of the limited size of the crafting table only 3 name-value pairs can be put between Curlies at a time. Compound Tags of any length can be created by concatenating two or more Compound Tags.
**An empty pair of Curlies produces an empty Compound Tag with the content <code>{}</code>.
*A pair of Square brackets that enclose any number of values, e.g. 7 Bytes, create a "List Tag" with the content <code>[0b,0b,0b,0b,0b,0b,0b]</code>.
**Because of the limited size of the crafting table only 7 values can be put between Square brackets at a time. List Tags of any length can be created by concatenating two or more List Tags.
**An empty pair of Square brackets produces an empty List with the content <code>[]</code>.
**"Name" items cannot be used in a List.
The resulting Compound and List Tags can be used as values in other Compound and List Tags, as deeply nested as you want.
==Usage==
Tags appear to have no further functionality. They cannot be eaten or placed in the world, except in an item frame, as each other item can. However, Compound Tags with values like <code>{Enchantments:[{id:"minecraft:sharpness",lvl:127b}]}</code> will show the [[Enchanting|enchantment]] glint and actually act accordingly when used.<ref>https://www.reddit.com/r/Minecraft/comments/129xdyl/i_figure_out_how_the_nbtcrafting_in_the_vote/</ref> This appears to work with many weapon and tool [[Enchanting#Summary of enchantments by item|enchantments]].
In theory, an extremely lucky <code>replace_recipe_output</code> vote can change the crafting recipe for compound tags to output something else. When cheats are enabled you can test this with a command like <code>/vote rule minecraft:replace_recipe_output approve {key:"minecraft:compound_tag",value:"minecraft:netherite_sword"}</code>. However, as long as this vote is approved no other compound tag can be crafted. Use <code>/vote rule minecraft:replace_recipe_output repeal *</code> to undo all recipe replacements.
In combination with the <code>midas_touch</code> vote tag items can be converted into [[Gold Ingot|gold ingots]]. These retain their NBT data. When the world is loaded in another version of the game tag items disappear, but gold ingots persist.
==Trivia==
*This implies that a [[Name Tag|name tag]] is 128 bit.
*Compound and list tags are special in so far that the value they show in their [[tooltip]] is not merely a property of the item, but their ''actual'' [[NBT format|NBT data]]. This is also the reason why naming them is disabled as that would mess up the NBT data.
*The snapshot also contains an [[History of textures/Unused textures|unused texture]] for an {{ItemLink|End Tag}}.
==History==
{{History|java}}
{{History||23w13a_or_b|[[File:Tag.png|32px]] Added tags.}}
{{History|foot}}
==Gallery==
<gallery>
Tag.png|Tag
Bit.png|Bit
Byte Tag.png|Byte Tag
Double Tag.png|Double Tag
End Tag.png|End Tag
Float Tag.png|Float Tag
Int Tag.png|Int Tag
Left Curly.png|Left Curly
Left Square.png|Left Sqaure
List Tag.png|List Tag
Long Tag.png|Long Tag
Name (23w13a or b).png|Name
Right Curly.png|Right Curly
Right Square.png|Right Square
Short Tag.png|Short Tag
Sssyntax Error.png|Sssyntax Error
String Tag.png|String Tag
</gallery>
== References ==
{{reflist}}
{{items}}
{{jokes}}
[[pt:Tag (item)]]
[[Category:Joke items]]</li><li>[[Banner|Banner]]<br/>{{for|the image|Banner (image)}}
{{Block
| image = <gallery>
White Banner.gif | Banner
White Wall Banner.png | Wall Banner
</gallery>
| rarity = Common
| transparent = Yes
| light = No
| tool = axe
| renewable = Yes
| stackable = Yes (16)
| flammable = No
| lavasusceptible = Yes
}}
'''Banners''' are tall decorative [[blocks]], featuring a field that is highly customizable using [[dye]]s and [[banner pattern]]s.
== Obtaining ==
=== Breaking ===
Banners can be broken with or without a [[tool]], but an [[axe]] is fastest.
{{breaking row|horizontal=1|Banners|Axe}}
A banner also breaks and drops itself as an [[Item (entity)|item]] if the block the banner is attached to is moved, removed, or destroyed.
=== Natural generation ===
{| class="wikitable collapsible"
! Name !! Location !! Appearance !! Design
|-
! Magenta Banner
| Outside of [[end cities]].
| style="text-align: center" | [[File:End City Banner.png|32px]]
| Magenta Banner
* Black Inverted Chevron
* Black Chevron
|-
! Gray Banner
| In banner room in [[woodland mansion]]s.
| style="text-align: center" | [[File:Gray Banner.png|32px]]
| Gray Banner
|-
! Light Gray Banner
| In master bedroom in [[woodland mansion]]s.
| style="text-align: center" | [[File:Master Bedroom Banner.png|32px]]
| Light Gray Banner
* White Flower Charge
|- id="Ominous Banner"
! Ominous Banner{{only|java|short=1}}
Illager Banner{{only|bedrock|education|short=1}}
| Carried by [[raid captain]]s.<br> Located in [[pillager outpost]]s.
{{IN|java}}, the ominous banner cannot be crafted or copied because the design uses 8 patterns.
{{IN|bedrock}}, the illager banner is a separate type that cannot be placed in a loom.
| style="text-align: center" | [[File:Ominous Banner.png|32px]]<br/>[[File:Ominous Banner BE.png|32px]]
| White Banner{{only|java|short=1}}
* Cyan Lozenge
* Light Gray Base
* Gray Pale
* Light Gray Bordure
* Black Fess
* Light Gray Per Fess
* Light Gray Roundel
* Black Bordure
Separate type entirely{{only|bedrock|short=1}}
|-
! Brown Banner
| Outside of some houses, meeting points, and pillar fountains in savanna [[village]]s.
| style="text-align: center" | [[File:Brown Banner.png|32px]]
| Brown Banner
|-
! Black Banner
| In altar room in [[woodland mansions]].
| style="text-align: center" | [[File:Black Banner.png|32px]]
| Black Banner
|}
=== Crafting ===
Banners can be crafted from six [[wool]] and a [[stick]] in a pattern resembling a [[sign]].
{{Crafting
|head=1
|showdescription=1
|A1=Matching Wool |B1=Matching Wool |C1=Matching Wool
|A2=Matching Wool |B2=Matching Wool |C2=Matching Wool
|B3=Stick
|Output=Matching Banner
|Olink=Banner
|type=Decoration block
|description=Once the banner is crafted, its base color cannot be changed.{{only|java}}
}}
{{Crafting
|showdescription=1
|Any Banner
|Bleach
|Output=White Banner
|type=Decoration block
|description=Bleach can be used to remove the color of a banner, resulting in a white banner. This includes removing patterns from a white banner.{{only|bedrock|education}}
|foot=1
}}
=== Trading ===
Expert-level cartographer [[villager]]s always offer to [[trading|sell]] 1 or 2 blank banners of a random color for 3 [[emeralds]]. Expert-level shepherd villagers have a {{frac|2|7}} chance of offering the same trade.{{only|java}}
{{IN|bedrock}}, expert-level cartographer and shepherd villagers both offer to sell one of 16 blank banners for 3 emeralds as part of their trades.
=== Mob loot ===
[[Illager]]s that spawn carrying an ominous banner{{only|java|short=1}} / illager banner{{only|bedrock|education|short=1}} always drop it upon death.
== Usage ==
[[File:Standing banner with block.png|thumb|upright|Overlapping block on a banner.]]
[[File:Wall banner with block.png|thumb|upright|Overlapping on a wall mounted banner.]]
There are 16 colored blank banners, and numerous patterns each available in each of the 16 colors. A banner can feature up to 6 different patterns. The top layer of a banner (or the last pattern added) can be washed off by {{control|using}} it on a [[cauldron]] containing water.
Banners, much like signs, can be placed both on the ground facing in any direction, or on a wall. They gently sway as if affected by a breeze, regardless of dimension or location.
Banners have no collision mask as they are completely non-solid, so [[entities]] can move through them.
Other blocks (including other banners) can be placed on any edge of a banner's hitbox, which is only one block high despite the banner appearing as two blocks tall. This makes it possible to overlap another solid block on the top half of a banner for floor banners, or the bottom half of wall banners.
When a banner is placed on the side of a block, its position is set by the top block, and it is possible to place it so it appears half buried.
Banners can also be placed in [[item frame]]s, where they simply appear as their item model.
[[Water]] and [[lava]] flow around banners. {{IN|bedrock}}, banners can be [[waterlogged]].
<gallery>
File:Wall banner with water below.png| Water can be placed below wall banners
File:Water flowing around banner.png| Water flows around a banner on the ground
</gallery>
Lava can create [[fire]] in air blocks next to banners as if the banners were flammable, but the banners do not burn (and cannot be burned by other methods). Banners also cannot be moved by [[piston]]s.
If a banner is renamed on an [[anvil]], it retains its name when a pattern is added, but not when a pattern is removed.
=== Helmet ===
{{exclusive|java|section=13}}
While a banner cannot be equipped in the [[Helmet|head slot]] in [[Survival]] mode, equipping it using commands causes it to appear on top of the player. This is how [[raid captain]]s wear banners{{only|java|short=1}}.
=== Chestplate ===
{{exclusive|bedrock|section=13}}
While a banner cannot be equipped in the [[chestplate]] slot in Survival mode, equipping it using NBT editors causes it to appear on top of the player. This is how [[raid captain]]s wear banners{{only|bedrock|education|short=1}}.
<gallery>
Steve wearing White Banner.png|
Alex wearing White Banner.png|
Pillager with Ominous Banner.png|
Vindicator with Ominous Banner.png|
Evoker with Ominous Banner.png|Illusioner with Ominous Banner.png|
</gallery>
=== Crafting ingredient ===
[[Shield]]s can have patterns applied to them using banners. The shield pattern has a smaller resolution than the banner pattern, causing them to look different or offset. Banners that have more than six patterns, such as Ominous Banners or banners obtained through inventory editors, will be reduced to six patterns on the shield.
{{Crafting
|showdescription=1
|Shield
|Matching Banner; Ominous Banner
|Output=Matching Shield; Ominous Shield
|B2link=Banner
|type=Combat
|description=Applies the banner pattern to the shield. The banner is consumed.<br>The shield must have no pre-existing patterns.<br>Does not change existing durability or enchantments on the shield.
}}
=== Copying ===
Banners can be copied with a blank banner to make multiple identical banners. Banners with more than 6 patterns applied using commands cannot be copied in this manner.
{{Crafting
|showdescription=1
|Matching Banner
|Matching Banner
|Output=Matching Banner
|A2link=Banner
|B2link=Banner
|Olink=Banner
|type=Decoration block
|ignoreusage=1
|description=Copies pattern; both banners must have the same base color, and the one having a pattern copied onto it must have no preexisting pattern.
}}
=== Map marker ===
[[File:Banner marked map.png|alt=All banners marked on a map, alongside a named banner.|thumb|right|How every banner appears {{IN|java}} on a map, including named banners.]]
{{exclusive|java|section=13}}
{{IN|java}}, {{control|using}} on a standing banner with a [[map]] selected places a marker of the banner's position on the selected map, and {{control|using}} on the banner again removes the marker. Note that wall banners cannot serve as map markers. The marker has the same color as the banner's base without decorations. The marker is removed if the banner is destroyed unless the map is locked using a [[cartography table]]. If the banner is renamed, the name appears below the marker.
=== Patterns ===
{{see also|Banner/Patterns|title1=List of patterned banners}}
[[File:Spawned-in Banner.png|thumb|100px|Example of a banner with more than 6 patterns, a result of using the {{cmd|give}} command.]]
A banner may have up to six layers of patterns, which are overlaid with the last-crafted on top. A banner can have up to 16 layers of patterns with the use of commands. The total number of unique banners is approximately 2.3x10^16 (or 23 quadrillion).
Any color banner can be used; the pattern overlays the color. {{IN|java}}, a [[loom]] is used to make patterns. However, {{in|bedrock}}, the patterns can be made in a [[loom]] or a [[crafting table]].
A banner can have more than six layers of patterns through the commands <code>/[[Commands/give|give]]</code>, <code>/[[Commands/setblock|setblock]]</code> or <code>/[[Commands/fill|fill]]</code>. This only works in ''Java Edition'', as Bedrock Edition doesn't have any NBT commands. Here is an example of a mining banner with seven different patterns. There is specific codes for the [[Banner#Item data:~:text=white-,Item,-In Java Edition|colors]] and [[Banner/Patterns|patterns]] that you have to input.
<code><nowiki>/give @p white_banner{display:{Name:"\"Mining Industries Banner\""},BlockEntityTag:{Patterns:[{Pattern:"cr",Color:15},{Pattern:"bs",Color:15},{Pattern:"sc",Color:12},{Pattern:"ms",Color:0},{Pattern:"hh",Color:15},{Pattern:"bo",Color:15},{Pattern:"tts",Color:8}]}} 1</code>
{{LoadPage|Template:Banner pattern loom recipes|Loom recipes|h4}}
{{LoadPage|Banner/Banner pattern crafting recipes|Crafting recipes|h4|transcluded=1}}
=== Renaming ===
{{IN|java}}, a banner can be given a custom name that remains as the banner is placed and retrieved. The player can use an [[anvil]] to rename the banner item, or may change the <code>CustomName</code> tag using the {{cmd|data}} command on the banner block.
=== Fuel ===
Banners can be used as a fuel in [[furnace]]s, smelting 1.5 items per banner.
=== Note Blocks ===
Banners can be placed under [[note block]]s to produce "bass" sounds.
== Sounds ==
=== Generic ===
{{Sound table/Block/Wood}}
=== Unique ===
{{edition|java}}: ''None''
{{edition|bedrock}}:
{{Sound table
|type=bedrock
|sound=Water Splash Old.ogg
|source=block
|description=When all patterns are removed from a banner using a cauldron
|id=cauldron.cleanbanner
|volume=0.1
|pitch=1.0
|foot=1}}
== Data values ==
=== ID ===
{{edition|java}}:
{{ID table
|edition=java
|showblocktags=y
|showitemtags=y
|showforms=y
|generatetranslationkeys=y
|displayname=White Banner
|spritetype=block
|nameid=white_banner
|blocktags=banners, wall_post_override
|itemtags=banners
|translationkey=block.minecraft.white_banner,block.minecraft.ominous_banner
}}
{{ID table
|displayname=Orange Banner
|spritetype=block
|nameid=orange_banner
|blocktags=banners, wall_post_override
|itemtags=banners}}
{{ID table
|displayname=Magenta Banner
|spritetype=block
|nameid=magenta_banner
|blocktags=banners, wall_post_override
|itemtags=banners}}
{{ID table
|displayname=Light Blue Banner
|spritetype=block
|nameid=light_blue_banner
|blocktags=banners, wall_post_override
|itemtags=banners}}
{{ID table
|displayname=Yellow Banner
|spritetype=block
|nameid=yellow_banner
|blocktags=banners, wall_post_override
|itemtags=banners}}
{{ID table
|displayname=Lime Banner
|spritetype=block
|nameid=lime_banner
|blocktags=banners, wall_post_override
|itemtags=banners}}
{{ID table
|displayname=Pink Banner
|spritetype=block
|nameid=pink_banner
|blocktags=banners, wall_post_override
|itemtags=banners}}
{{ID table
|displayname=Gray Banner
|spritetype=block
|nameid=gray_banner
|blocktags=banners, wall_post_override
|itemtags=banners}}
{{ID table
|displayname=Light Gray Banner
|spritetype=block
|nameid=light_gray_banner
|blocktags=banners, wall_post_override
|itemtags=banners}}
{{ID table
|displayname=Cyan Banner
|spritetype=block
|nameid=cyan_banner
|blocktags=banners, wall_post_override
|itemtags=banners}}
{{ID table
|displayname=Purple Banner
|spritetype=block
|nameid=purple_banner
|blocktags=banners, wall_post_override
|itemtags=banners}}
{{ID table
|displayname=Blue Banner
|spritetype=block
|nameid=blue_banner
|blocktags=banners, wall_post_override
|itemtags=banners}}
{{ID table
|displayname=Brown Banner
|spritetype=block
|nameid=brown_banner
|blocktags=banners, wall_post_override
|itemtags=banners}}
{{ID table
|displayname=Green Banner
|spritetype=block
|nameid=green_banner
|blocktags=banners, wall_post_override
|itemtags=banners}}
{{ID table
|displayname=Red Banner
|spritetype=block
|nameid=red_banner
|blocktags=banners, wall_post_override
|itemtags=banners}}
{{ID table
|displayname=Black Banner
|spritetype=block
|nameid=black_banner
|blocktags=banners, wall_post_override
|itemtags=banners}}
{{ID table
|displayname=White Wall Banner
|spritetype=block
|nameid=white_wall_banner
|blocktags=banners, wall_post_override
|form=block
|translationkey=block.minecraft.white_banner,block.minecraft.ominous_banner}}
{{ID table
|displayname=Orange Wall Banner
|spritetype=block
|nameid=orange_wall_banner
|blocktags=banners, wall_post_override
|form=block
|translationkey=block.minecraft.orange_banner}}
{{ID table
|displayname=Magenta Wall Banner
|spritetype=block
|nameid=magenta_wall_banner
|blocktags=banners, wall_post_override
|form=block
|translationkey=block.minecraft.magenta_banner}}
{{ID table
|displayname=Light Blue Wall Banner
|spritetype=block
|nameid=light_blue_wall_banner
|blocktags=banners, wall_post_override
|form=block
|translationkey=block.minecraft.light_blue_banner}}
{{ID table
|displayname=Yellow Wall Banner
|spritetype=block
|nameid=yellow_wall_banner
|blocktags=banners, wall_post_override
|form=block
|translationkey=block.minecraft.yellow_banner}}
{{ID table
|displayname=Lime Wall Banner
|spritetype=block
|nameid=lime_wall_banner
|blocktags=banners, wall_post_override
|form=block
|translationkey=block.minecraft.lime_banner}}
{{ID table
|displayname=Pink Wall Banner
|spritetype=block
|nameid=pink_wall_banner
|blocktags=banners, wall_post_override
|form=block
|translationkey=block.minecraft.pink_banner}}
{{ID table
|displayname=Gray Wall Banner
|spritetype=block
|nameid=gray_wall_banner
|blocktags=banners, wall_post_override
|form=block
|translationkey=block.minecraft.gray_banner}}
{{ID table
|displayname=Light Gray Wall Banner
|spritetype=block
|nameid=light_gray_wall_banner
|blocktags=banners, wall_post_override
|form=block
|translationkey=block.minecraft.light_gray_banner}}
{{ID table
|displayname=Cyan Wall Banner
|spritetype=block
|nameid=cyan_wall_banner
|blocktags=banners, wall_post_override
|form=block
|translationkey=block.minecraft.cyan_banner}}
{{ID table
|displayname=Purple Wall Banner
|spritetype=block
|nameid=purple_wall_banner
|blocktags=banners, wall_post_override
|form=block
|translationkey=block.minecraft.purple_banner}}
{{ID table
|displayname=Blue Wall Banner
|spritetype=block
|nameid=blue_wall_banner
|blocktags=banners, wall_post_override
|form=block
|translationkey=block.minecraft.blue_banner}}
{{ID table
|displayname=Brown Wall Banner
|spritetype=block
|nameid=brown_wall_banner
|blocktags=banners, wall_post_override
|form=block
|translationkey=block.minecraft.brown_banner}}
{{ID table
|displayname=Green Wall Banner
|spritetype=block
|nameid=green_wall_banner
|blocktags=banners, wall_post_override
|form=block
|translationkey=block.minecraft.green_banner}}
{{ID table
|displayname=Red Wall Banner
|spritetype=block
|nameid=red_wall_banner
|blocktags=banners, wall_post_override
|form=block
|translationkey=block.minecraft.red_banner}}
{{ID table
|displayname=Black Wall Banner
|spritetype=block
|nameid=black_wall_banner
|blocktags=banners, wall_post_override
|form=block
|translationkey=block.minecraft.black_banner
|foot=1}}
{{ID table
|displayname=Block entity
|spritename=Banners
|spritetype=block
|nameid=banner
|foot=1}}
{{edition|bedrock}}:
{{ID table
|edition=bedrock
|firstcolumnname=Banner
|shownumericids=y
|showforms=y
|generatetranslationkeys=y
|displayname=Standing
|spritename=Banners
|spritetype=block
|nameid=standing_banner
|translationkey=tile.standing_banner.black.name, tile.standing_banner.red.name, tile.standing_banner.green.name, tile.standing_banner.brown.name, tile.standing_banner.blue.name, tile.standing_banner.purple.name, tile.standing_banner.cyan.name, tile.standing_banner.silver.name, tile.standing_banner.gray.name, tile.standing_banner.pink.name, tile.standing_banner.lime.name, tile.standing_banner.yellow.name, tile.standing_banner.lightBlue.name, tile.standing_banner.magenta.name, tile.standing_banner.orange.name, tile.standing_banner.white.name
|id=176
|form=block}}
{{ID table
|displayname=Wall
|spritename=Banners
|spritetype=block
|nameid=wall_banner
|id=177
|form=block
|translationkey=-}}
{{ID table
|displayname=Item
|spritename=Banners
|spritetype=item
|nameid=banner
|translationkey=item.banner.black.name, item.banner.red.name, item.banner.green.name, item.banner.brown.name, item.banner.blue.name, item.banner.purple.name, item.banner.cyan.name, item.banner.silver.name, item.banner.gray.name, item.banner.pink.name, item.banner.lime.name, item.banner.yellow.name, item.banner.lightBlue.name, item.banner.magenta.name, item.banner.orange.name, item.banner.white.name
|id=567
|form=item
|foot=1}}
{{ID table
|notnamespaced=y
|displayname=Block entity
|spritename=Banners
|spritetype=block
|nameid=Banner
|foot=1}}
=== Metadata ===
==== Item ====
{{IN|Bedrock}}, banner items use the following data values:
{| class="wikitable"
! DV !! Banner color
|-
|| 0 || black
|-
|| 1 || red
|-
|| 2 || green
|-
|| 3 || brown
|-
|| 4 || blue
|-
|| 5 || purple
|-
|| 6 || cyan
|-
|| 7 || light gray
|-
|| 8 || gray
|-
|| 9 || pink
|-
|| 10 || lime
|-
|| 11 || yellow
|-
|| 12 || light blue
|-
|| 13 || magenta
|-
|| 14 || orange
|-
|| 15 || white
|}
=== Item ===
{{IN|Java}}, banner items use the following data values:
{| class="wikitable"
! DV !! Banner color
|-
|| 15 || black
|-
|| 14 || red
|-
|| 13 || green
|-
|| 12 || brown
|-
|| 11 || blue
|-
|| 10 || purple
|-
|| 9 || cyan
|-
|| 8 || light gray
|-
|| 7 || gray
|-
|| 6 || pink
|-
|| 5 || lime
|-
|| 4 || yellow
|-
|| 3 || light blue
|-
|| 2 || magenta
|-
|| 1 || orange
|-
|| 0 || white
|}
=== Block states ===
{{see also|Block states}}
{{/BS}}
=== Block data ===
A banner has a block entity associated with it that holds additional data about the block.
{{el|bedrock}}:
: See [[Bedrock Edition level format/Block entity format]].
{{el|java}}:
{{see also|Block entity format}}
{{/BE}}
=== Item data ===
{{el|java}}:
{{main|Player.dat format}}
Banners, as items, use an NBT tag <code>BlockEntityTag</code> to indicate the patterns and details when it is placed.
<div class="treeview" style="margin-top: 0;">
* {{nbt|compound|Item}}: The item
** {{nbt|compound|tag}}: Additional information about the item. This tag is optional for most items.
*** {{nbt|compound|BlockEntityTag}}: The details of the shulker box.
**** All block data, except tags common to all block entities.
</div>
{{el|bedrock}}:
: See [[Bedrock Edition level format/Item format]].
== Achievements ==
{{load achievements|Fruit on the Loom}}
== Advancements ==
{{load advancements|Voluntary Exile}}
== History ==
{{info needed section|The Nether Update}}
{{History|java}}
{{History||1.8|snap=July 21, 2014|slink=https://twitter.com/jeb_/status/491238882789572608|[[Jeb]] posted a picture of banners, and stated that he is working on them.}}
{{History|||snap=14w30a|[[File:White Banner Revision 1.png|22px]][[File:Light Gray Banner Revision 1.png|22px]][[File:Gray Banner Revision 1.png|22px]][[File:Black Banner Revision 1.png|22px]][[File:Brown Banner Revision 1.png|22px]][[File:Red Banner Revision 1.png|22px]][[File:Orange Banner Revision 1.png|22px]][[File:Yellow Banner Revision 1.png|22px]][[File:Lime Banner Revision 1.png|22px]][[File:Green Banner Revision 1.png|22px]][[File:Cyan Banner Revision 1.png|22px]][[File:Light Blue Banner Revision 1.png|22px]][[File:Blue Banner Revision 1.png|22px]][[File:Purple Banner Revision 1.png|22px]][[File:Magenta Banner Revision 1.png|22px]][[File:Pink Banner Revision 1.png|22px]] Added banners.}}
{{History|||snap=14w30c|Added four additional patterns: Cross (+), Border, Curly Border and Thing (Mojang logo).}}
{{History|||snap=14w31a|Added two additional patterns: Inverted Halves and Base Gradient.
|The banner pattern terminology has been changed based on vexillology advice [[Jeb]] received from [http://www.reddit.com/r/Minecraft/comments/2bkxej/i_made_a_huge_mistake_banners/ his Reddit post].
|Banners can now be used as a [[fuel]] in [[furnace]]s.}}
{{History||1.8.8|snap=pre|The number of layers attainable by using [[commands]] is now limited to 16 per banner.}}
{{History||1.9|snap=15w31a|[[File:End City Banner.png|17px]] Magenta banners with a black chevron and inverted chevron are now naturally generated on the outside walls of [[end city|end cities]].}}
{{History|||snap=15w33c|Banners can be used to apply patterns to [[shield]]s.}}
{{History||1.11|snap=16w33a|Banners now require a [[dye]] when applying a pattern that uses a non-dye [[item]], such as a [[mob head|creeper head]] or [[golden apple|enchanted golden apple]]. Previously, the lack of a dye would have applied the black variant of the pattern.}}
{{History|||snap=16w39a|Black and gray banners, and light gray banners with a white flower charge are now naturally generated in rooms of [[woodland mansion]]s.}}
{{History||1.12|snap=January 24, 2017|slink={{tweet|jeb_|823817090511601664}}|[[Jeb]] tweets a screenshot of the changes to the banner color palette.}}
{{History|||snap=17w06a|[[File:White Banner.png|17px]] [[File:Light Gray Banner.png|17px]] [[File:Gray Banner.png|17px]] [[File:Black Banner.png|17px]] [[File:Brown Banner.png|17px]] [[File:Red Banner.png|17px]] [[File:Orange Banner.png|17px]] [[File:Yellow Banner.png|17px]] [[File:Lime Banner.png|17px]] [[File:Green Banner.png|17px]] [[File:Cyan Banner.png|17px]] [[File:Light Blue Banner.png|17px]] [[File:Blue Banner.png|17px]] [[File:Purple Banner.png|17px]] [[File:Magenta Banner.png|17px]] [[File:Pink Banner.png|17px]] Changed banners' [[tint]]s.}}
{{History|||snap=pre6|"Chief fess" and "base fess" banners are now just "chief" and "base" banners.}}
{{History||1.13|snap=17w47a|The colors for the <code>banner</code>, <code>wall_banner</code> and <code>standing_banner</code> ID have been split up into their own IDs.
|Prior to [[1.13/Flattening|''The Flattening'']], these [[block]]s' numeral IDs were 176 and 177, and the [[item]]'s 425.}}
{{History|||snap=18w10a|{{control|Using}} a [[map]] on a banner now mark the spot of the banner on the map.}}
{{History||1.14|snap=18w43a|[[Loom]]s have been added to help the [[player]] edit banners more easily.
|All recipes for banner patterns have been removed.}}
{{History|||snap=18w45a|[[File:Ominous Banner Revision 1.png|17px]] Added [[illager patrol]]s, where the leader of an illager patrol carries an [[illager]] banner.}}
{{History|||snap=18w46a|[[File:Ominous Banner.png|17px]] The pattern of [[illager]] banner now has a black border.}}
{{History|||snap=19w11a|Cartographer and shepherd [[villager]]s now [[trading|sell]] banners.}}
{{History|||snap=Pre-Release 2|"Illager Banners" have been renamed to "Ominous Banners".}}
{{History||1.17|snap=20w46a|The unused "base" pattern has been renamed to the "field" pattern and given proper translation strings (its ID is still "base").}}
{{History||1.19.3|snap=22w43a|The ominous banner is now available in the Creative inventory.}}
{{History|bedrock}}
{{History||1.2.0|snap=beta 1.2.0.2|[[File:White Banner.png|17px]] [[File:Light Gray Banner.png|17px]] [[File:Gray Banner.png|17px]] [[File:Black Banner.png|17px]] [[File:Brown Banner.png|17px]] [[File:Red Banner.png|17px]] [[File:Orange Banner.png|17px]] [[File:Yellow Banner.png|17px]] [[File:Lime Banner.png|17px]] [[File:Green Banner.png|17px]] [[File:Cyan Banner.png|17px]] [[File:Light Blue Banner.png|17px]] [[File:Blue Banner.png|17px]] [[File:Purple Banner.png|17px]] [[File:Magenta Banner.png|17px]] [[File:Pink Banner.png|17px]] Added banners.
|[[File:End City Banner.png|17px]] Magenta banners with a black chevron and inverted chevron are now naturally generated on the outside walls of [[end city|end cities]].
|Black and gray banners, and light gray banners with a white flower charge are now naturally generated in rooms of [[woodland mansion]]s.}}
{{History||1.4.0|snap=beta 1.2.20.1|The white banner can now be crafted from a colored banner and [[bleach]], which also removes all patterns, if used on a white banner.}}
{{History||1.10.0|snap=beta 1.10.0.3|[[Loom]]s have been added to help the [[player]] edit banners more easily.
|Brown banners now generate in new [[savanna]] [[village]]s.
|Black banners now generate in [[pillager outpost]] watchtowers.}}
{{History||1.11.0|snap=beta 1.11.0.1|Gray banners now generate in pillager outpost watchtowers, instead of black banners.
|[[File:Ominous Banner BE.png|17px]] Added [[illager captain]]s, which drop an [[illager]] banner upon [[death]].}}
{{History|||snap=beta 1.11.0.3|Illager banners now generate in [[pillager outpost]] watchtowers, instead of gray banners.}}
{{History|||snap=beta 1.11.0.4|Banners can now be [[trading|bought]] from cartographer and shepherd [[villager]]s.}}
{{History||1.20.0|snap=beta 1.20.0.20|Banners can now be used to customise [[shield]]s.}}
{{History|console}}
{{History||xbox=TU43|xbone=CU33|ps=1.36|wiiu=Patch 13|switch=1.0.1|[[File:White Banner Revision 1.png|22px]][[File:Light Gray Banner Revision 1.png|22px]][[File:Gray Banner Revision 1.png|22px]][[File:Black Banner Revision 1.png|22px]][[File:Brown Banner Revision 1.png|22px]][[File:Red Banner Revision 1.png|22px]][[File:Orange Banner Revision 1.png|22px]][[File:Yellow Banner Revision 1.png|22px]][[File:Lime Banner Revision 1.png|22px]][[File:Green Banner Revision 1.png|22px]][[File:Cyan Banner Revision 1.png|22px]][[File:Light Blue Banner Revision 1.png|22px]][[File:Blue Banner Revision 1.png|22px]][[File:Purple Banner Revision 1.png|22px]][[File:Magenta Banner Revision 1.png|22px]][[File:Pink Banner Revision 1.png|22px]] Added banners.}}
{{History||xbox=TU46|xbone=CU36|ps=1.38|wiiu=Patch 15|switch=1.0.1|[[File:End City Banner.png|17px]] Magenta banners with a black chevron and inverted chevron are now naturally generated on the outside walls of [[end city|end cities]].}}
{{History||xbox=TU53|xbone=CU43|ps=1.49|wiiu=Patch 23|switch=1.0.3|[[File:White Banner.png|17px]] [[File:Light Gray Banner.png|17px]] [[File:Gray Banner.png|17px]] [[File:Black Banner.png|17px]] [[File:Brown Banner.png|17px]] [[File:Red Banner.png|17px]] [[File:Orange Banner.png|17px]] [[File:Yellow Banner.png|17px]] [[File:Lime Banner.png|17px]] [[File:Green Banner.png|17px]] [[File:Cyan Banner.png|17px]] [[File:Light Blue Banner.png|17px]] [[File:Blue Banner.png|17px]] [[File:Purple Banner.png|17px]] [[File:Magenta Banner.png|17px]] [[File:Pink Banner.png|17px]] Changed banners' [[tint]]s.}}
{{History||xbox=none|xbone=none|ps=1.90|wiiu=none|switch=none|[[Loom]]s have been added to help the [[player]] edit banners more easily.}}
{{History||ps=1.91|[[File:Ominous Banner BE.png|17px]] Added [[illager]] banners, which generate with [[pillager outpost]]s and are [[drops|dropped]] by [[illager captain]]s upon [[death]].}}
{{History|foot}}
== Issues ==
{{issue list}}
== Trivia ==
* With 16 blank banners, 38 patterns of 16 colors each (608 uniquely-colored patterns), and 0 to 6 patterns per banner, the number of uniquely crafted banners is 16 × (608<sup>0</sup> + 608<sup>1</sup> + 608<sup>2</sup> + 608<sup>3</sup> + 608<sup>4</sup> + 608<sup>5</sup> + 608<sup>6</sup>) ≈ 809 quadrillion - 809 with 15 zeros (809,573,616,779,945,488). The number of visually distinct banners is smaller, because one or more patterns may completely cover other patterns, or the entire banner, or be duplicated due to the symmetric set of patterns (e.g. field or (yellow) + per pale azure (blue) = field azure + per pale or inverted).
** Not 38 patterns are available on BE, but 40 patterns of 16 colors each (640 uniquely-colored patterns), so the number is even greater. 16 × (640<sup>0</sup> + 640<sup>1</sup> + 640<sup>2</sup> + 640<sup>3</sup> + 640<sup>4</sup> + 640<sup>5</sup> + 640<sup>6</sup>) ≈ 1 quintillion - 1 with 18 zeros (1,101,232,303,249,827,856). This increases the number by almost 1.4 times, or almost 292 quadrillion, despite the addition of only 2 patterns.
* If a banner has over 6 patterns, only the six bottom-most patterns are displayed when hovered over in the [[inventory]].
* The Mojang logo is called "Thing" in-game, which could be considered an alternate translation for [[wiktionary:mojäng|mojäng]]. If [[wikipedia:Google Translate|Google Translate]] is used, it translates to "thingys" or "contraption".
** In the Swedish translation of the game, this pattern is, in fact, called ''mojäng''.
* [[List of block textures#Banner Textures|Banner textures]] are located in \assets\minecraft\textures\entity\banner.
** There are 40 monochrome textures, each containing all 6 sides of the banner.
** The texture of the back side is the mirrored texture of the front side.
** Compared to the texture files, textures' colors are inverted in-game due to them acting as masks for the re-colored base texture, base.png. That means white is visible, while black is transparent.
* Banners that have the purple NBT+ line in the bottom (obtained by holding Ctrl and middle-clicking the banner, which also copies the NBT [[tag]] of anything that the player points their crosshair to) actually have no difference with the base banner obtained by middle click.
*The Illager Banner in Bedrock Edition is available as a separate item but is just a second variant of the white banner.
**Standard variant of white banner is set to type 0.
**Illager variant is set to type 1.
== Gallery ==
<gallery>
Banners Jeb.png|The first image of banners, as tweeted by Jens Bergensten.
Iceland and Norway Flags.png|Another banner image from Jeb.
Searge Banners.png|Several banners made by Searge.
The Bountiful Update.png|Banners in the official 1.8 poster.
BannersBeforeAndAfter.png|An image, tweeted by Jeb, showcasing the changes he made to the banner color palette in the 1.12 update.
Gradients Overlay.png|The result of using gradient different numbers of times, each time increasing the level of gradient by 1.
All positions and rotations of a banner.png|All positions and rotations of a banner
Item Frame with Banner.png|A banner with the [[Mojang]] logo in an [[item frame]].
EndCityBanners.png|Banners floating outside of an [[End city]] tower.
Woodland mansion 1x2 d1.png|Banners hanging above the doorway of a [[woodland mansion]] master bedroom.
Replaceitembanner.png|Banner put in the helmet slot by using the command {{cmd|replaceitem}}{{Only|BE}} or {{cmd|item replace}}{{Only|JE}}.
Better Together Banners.jpg|Banners in ''Bedrock Edition''.
Better Together Banner Crafting 1.jpg|A banner in the hand.
Better Together Banner Crafting 2.jpg|A banner in the inventory.
Better Together Banner Crafting 3.jpg|A banner in the crafting grid.
Better Together Banner Crafting 4.jpg|A banner being given a pattern.
</gallery>
=== Renders ===
<gallery>
Ominous Banner.gif
White Banner.gif
Light Gray Banner.gif
Gray Banner.gif
Black Banner.gif
Brown Banner.gif
Red Banner.gif
Orange Banner.gif
Yellow Banner.gif
Lime Banner.gif
Green Banner.gif
Cyan Banner.gif
Light Blue Banner.gif
Blue Banner.gif
Purple Banner.gif
Magenta Banner.gif
Pink Banner.gif
Ominous Wall Banner.png|
White Wall Banner.png|
Light Gray Wall Banner.png|
Gray Wall Banner.png|
Black Wall Banner.png|
Brown Wall Banner.png|
Red Wall Banner.png|
Orange Wall Banner.png|
Yellow Wall Banner.png|
Lime Wall Banner.png|
Green Wall Banner.png|
Cyan Wall Banner.png|
Light Blue Wall Banner.png|
Blue Wall Banner.png|
Purple Wall Banner.png|
Magenta Wall Banner.png|
Pink Wall Banner.png
</gallery>
<gallery>
File:Ominous Banner.gif|Ominous banner pattern in Java Edition.
File:Ominous Banner BE.gif|Illager banner pattern in Bedrock Edition.
File:Ominous Banner Revision 1.gif|Old Ominous banner pattern.
File:Ominous Banner washing.gif|Washing with cauldron shows how to apply the ominous banner pattern.
</gallery>
=== [[Lego Minecraft]] Banners ===
<gallery>
File:Lego Red Creeper Banner Collage.jpg|Lego banners from 21127 and 21131
File:Lego Melon Banner.png|Lego banner from 21138
File:Lego Fish Banner.png|Lego banner from 21142
File:Lego Beetroot Banner.png|Lego banner from 21144
File:Lego Wheat Banner.png|Another lego banner from 21144
File:Lego Carrot Banner.png|A third lego banner from 21144
File:Lego Crossbones Banner.png|Lego banner from 21152
File:Lego Green Creeper Banner Collage.jpg|Lego banners from 21155
File:Lego Ominous Banner.png|Lego ominous banner from 21160
</gallery>
== References ==
{{reflist}}
{{Blocks|Utility}}
{{Items}}
[[Category:Generated structure blocks]]
[[Category:Manufactured blocks]]
[[Category:Block entities]]
[[Category:Non-solid blocks]]
[[cs:Prapor]]
[[de:Banner]]
[[es:Estandarte]]
[[fr:Bannière]]
[[ja:旗]]
[[ko:현수막]]
[[nl:Banier]]
[[pl:Sztandar]]
[[pt:Estandarte]]
[[ru:Флаг]]
[[uk:Стяг]]
[[zh:旗帜]]</li></ul></nowiki> | |||||
v0.2.0{{Extension DPL}}<ul><li>[[Reality Vision|Reality Vision]]<br/>{{Joke feature}}
{{Item
| title = Reality Vision
| image = Reality Vision.png
| renewable = No
| stackable = Yes (64)
}}
The '''Reality vision''' was a joke [[helmet]].
== Usage ==
Reality vision was equipped via the [[helmet]] slot. When equipped, it showed a [[wikipedia:Mini-map|minimap]] in the bottom-center of the screen (which moved when the [[player]]'s camera moves). The minimap showed all [[chunk]]s that were currently rendered. The player's location was represented by a green [[beacon]] beam marker on the map.
It displayed a vision overlay (similar to the [[pumpkin]] overlay). The overlay would change to a new overlay if the player went into third person (unlike the pumpkin overlay), which made the screen appear like an old [[wikipedia:Television|television]] screen. The overlay was called <code>cantseeshit<!-- Do not change this; this is that word that is actually used-->captain.png</code> in the assets folder. It activated a [[Shaders|shader]] when equipped (<code>scan_pincushion</code>).
== Sounds ==
{{Sound table
|sound=Equipvr.ogg
|subtitle=''None''
|source=player
|description=When equipped
|id=item.reality_vision.use
|translationkey=''None''
|volume=1.0
|pitch=1.0
|distance=16
|foot=1}}
== Data values ==
=== ID ===
{{ID table
|edition=java
|shownumericids=y
|showforms=y
|generatetranslationkeys=y
|displayname=Reality Vision
|spritetype=item
|nameid=reality_vision
|id=500
|form=item
|translationkey=item.realityVision.name
|foot=1}}
== History ==
{{History|java}}
{{History||1.RV-Pre1|[[File:Reality_Vision_(item).png|32px]] [[File:Reality Vision.png|32px]] Added reality vision.}}
{{History|foot}}
== Issues ==
Reality Vision is an unsupported item due to being an [[Wikipedia:April Fools' Day|April Fools']] joke, and therefore such issues relating to them will not be fixed.
== Trivia ==
* [[Sign]]s display the text "OBEY" while equipped, a reference to the movie [[wikipedia:They Live|''They Live'']].
== Gallery ==
<gallery>
Sign2.png|The [[sign]] texture found in the game files.
OBEY.png|OBEY seen in a sign.
OBEY sign in 1.RV-Pre1..png|OBEY seen in a sign, but seen from a better perspective.
TechGear.png|A [[player]] wearing reality vision, featured in this [[wikipedia:April Fools' Day|April Fools']] joke version.
</gallery>
{{Items}}
{{Jokes}}
[[Category:Non-renewable resources]]
[[Category:Joke items]]
[[pt:Visão da realidade]]
[[es:Reality Vision]]</li><li>[[Fishing Rod|Fishing Rod]]<br/>{{Dungeons hatnote|type=artifact}}
{{Item
| image = Fishing Rod.png
| image2 = Cast Fishing Rod.png
| rarity = Common
| renewable = Yes
| durability =
Depends on the Edition:
Java: 64
Bedrock: 384
| stackable = No
}}
A '''fishing rod''' is a [[tool]] that casts a bobber used to [[Fishing|fish]] in [[water]] or to hook and pull [[Mob|mobs]], [[Item (entity)|items]] and some [[Entity|entities]] towards the user.
== Obtaining ==
=== Crafting ===
{{Crafting
|head=1
|showname=0
|showdescription=1
|C1= Stick
|B2= Stick
|C2= String
|A3= Stick
|C3= String
|Output= Fishing Rod
|type= Tool
}}
{{crafting
|foot=1
|ignoreusage=1
|Damaged Fishing Rod
|Damaged Fishing Rod
|Output= Fishing Rod
|description= The durability of the two fishing rods is added together, plus an extra 5% durability.
|type= Tool
}}
=== Fishing ===
Enchanted fishing rods can be obtained as "treasure" [[item]]s from [[fishing]], and unenchanted ones as "junk" items.
=== Trading ===
Journeyman-level [[fisherman]] [[villager]]s sell enchanted fishing rods for 6 [[emerald]]s.
The [[enchantment]]s are the same as the ones obtained from an [[enchantment table]] at levels 5–19.
=== Chest loot ===
{{LootChestItem|enchanted-fishing-rod}}
{{notelist}}
=== Carrot/warped fungus on a stick ===
If a [[carrot on a stick]] or a [[warped fungus on a stick]] is used to the point of zero durability, it becomes a fishing rod again.
=== Mob loot ===
{{IN|java}}, the [[drowned]] mob has a 3.75% chance of spawning with a fishing rod equipped.
{{IN|bedrock}}, naturally-spawned drowned has 0.85% chance to spawn with fishing rod, while converted drowned has 1% chance to spawn with it.
If killed, they have an 8.5% chance of dropping this fishing rod. That chance increases by 1% for each level of Looting applied to a weapon (up to 11.5% chance). The dropped item is damaged and never enchanted.
== Usage ==
=== Fishing ===
{{main|Fishing}}
Fishing rods can be cast into water. After a short period of time, a stream of bubble particles approaches the fishing rod. If the rod is reeled in once the particles "bite" the bobber, the player obtains a fish, junk, or possibly a treasure item. If the fishing rod was in the player's hand and is no longer, the fishing bobber [[Entity|entity]] despawns, unless the fishing rod to the off-hand or it's been swapped with another fishing rod{{Cn|Cn=Research on the way fishing rods behave when you swap rod or have two equipped (one in the main and one in the off hand) needs to be done}}.
=== Crafting ingredient ===
{{crafting usage|Fishing Rod, Damaged Fishing Rod}}
=== Hooking mobs and other entities ===
{{see also|Fishing#Fishing rod durability}}
The fishing rod can be used to hook [[mobs]], [[Item (entity)|items]]{{only|java}} and some [[entities]], and even [[player]]s. The fishing rod can then be reeled in, dragging the hooked object toward the player without dealing damage. Reeling in a [[mob]] or entity costs 5 points of durability, and reeling in an item costs 3 points. Reeling a mob pulls it toward the player with a speed of {{frac|1|10}} the distance between mob and player.
Besides mobs and items, entities that can be reeled in include:
* {{ItemLink|id=oak boat|Boat}}s
* {{ItemLink|id=oak boat with chest|Boat with Chest}}s
* {{ItemSprite|Minecart}} [[Minecart]]s of any type
* {{ItemLink|Armor Stand}}s
* {{EntityLink|Shulker Bullet}}s
* {{EntityLink|Fireball}}s
* {{EntityLink|Small fireball}}s
* {{EntitySprite|TNT}} Primed [[TNT]]
* Any [[falling block]] such as {{EntityLink|Sand}}, {{EntityLink|Gravel}}, {{EntityLink|Dragon Egg}}s, {{EntityLink|Concrete Powder}}s, {{EntityLink|Scaffolding}}, [[Snow]] on [[Bedrock Edition]] or {{EntityLink|Anvil}}s
Some entities can be hooked, but cannot be reeled in:
* {{EntitySprite|Horse}} Mobs riding/being ridden by other mobs (in Bedrock Edition, the hooked mob dismounts)
* {{EntityLink|Painting}}s
* {{EntityLink|Item Frame}}s
* {{EntityLink|id=leash-knot|Lead}} knots
* {{EntityLink|End Crystal}}s
* {{EntityLink|Shulker}}s
Attempting to reel in said entities still costs durability to the rod.
The rest of the entities cannot be hooked at all:
* {{EntitySprite|egg}} Thrown [[egg]]s
* {{EntitySprite|snowball}} Thrown [[snowball]]s
* {{EntitySprite|ender-pearl}} Thrown [[ender pearl]]s
* {{EntitySprite|eye-of-ender}} Thrown [[eyes of ender]]
* {{ItemSprite|splash-potion}} Thrown [[potion]]s
* {{ItemSprite|bottle-o'-enchanting|附魔之瓶}} Thrown [[bottles o' enchanting]]
* {{EntitySprite|dragon-fireball}} [[Dragon fireball]]s
* {{EntitySprite|Wither Skull}} [[Wither#Wither Skull|Wither skull]]s
* {{ItemSprite|firework-rocket}} [[Firework rocket]]s in flight
* {{EntitySprite|arrow}} [[Arrow]]s in flight
* {{EffectSprite|particle-speed}} [[Lingering Potion#Area effect cloud|Area effect cloud]]
* {{EntityLink|id=experience-orb|Experience|XP orbs}}
Using it on a [[villager]] lowers the player's popularity and causes any naturally-spawned [[iron golem]]s nearby to attack.
=== Fuel ===
A fishing rod can be used as fuel in [[furnace]]s, smelting 1.5 items per fishing rod.
=== Other usage ===
The hook can also be used to activate wooden [[pressure plate]]s or [[weighted pressure plate]]s.
=== Enchantments ===
A fishing rod can receive the following enchantments:
{| class="wikitable col-2-center"
|+
!Name
!Max Level
![[Enchanting|Method]]
|-
|[[Lure]]<ref group="note">Lure levels above V don't work.</ref>
|III
|{{Inventory slot|Enchanting Table}}{{Inventory slot|Anvil}}
|-
|[[Luck of the Sea]]
|III
|{{Inventory slot|Enchanting Table}}{{Inventory slot|Anvil}}
|-
|[[Unbreaking]]
|III
|{{Inventory slot|Enchanting Table}}{{Inventory slot|Anvil}}
|-
|[[Mending]]
|I
|{{Inventory slot|Anvil}}
|-
|[[Curse of Vanishing]]
|I
|{{Inventory slot|Anvil}}
|}
{{Notelist|note}}
A fishing rod with the [[Mending]] enchantment has infinite durability if used for fishing only. The rod incrementally repairs itself using the experience gained each time a player reels in a fish, even if starting from nearly 0% durability. Players wearing damaged [[Mending]] armor have a lower average rate of repair, because the mending mechanic can ignore damage to the rod while repairing armor instead. [[Unbreaking]] III can nearly guarantee that the rod does not break, unless it's already at low durability.
== Fishing Bobber ==
{{Entity
| title = Fishing Bobber
| image2 = Fishing Bobber BE.png
| imagesize = 100px
| image = Fishing Bobber JE1.png
| networkid = '''[[JE]]:''' 90
}}
{{see also|Entity format}}
'''Fishing bobbers''' have entity data associated with them that contain various properties of the entity. They also appear to despawn after a while.
=== Data values ===
==== ID ====
{{edition|java}}:
{{ID table
|generatetranslationkeys=java
|displayname=Fishing Bobber
|spritetype=entity
|nameid=fishing_bobber
|foot=1}}
{{edition|bedrock}}:
{{ID table
|shownumericids=y
|generatetranslationkeys=bedrock
|displayname=Fishing Bobber
|spritetype=entity
|nameid=fishing_hook
|id=77
|foot=1}}
==== Entity data ====
{{el|java}}:
{{main|Entity format}}
{{/ED}}
{{el|bedrock}}:
: See [[Bedrock Edition level format/Entity format]].
== Sounds ==
{{Edition|Java}}:<br>
Fishing bobbers use the Friendly Creatures sound category for entity-dependent sound events.<ref group="sound" name="oddcats" />
{{Sound table
|sound=Fishing rod cast.ogg
|subtitle=Bobber thrown
|source=Friendly Creatures <ref group="sound" name="oddcats">{{bug|MC-139041||The sounds of fishing bobbers aren't controlled by the "Players" sound slider}}</ref>
|overridesource=1
|description=When a fishing rod is cast
|id=entity.fishing_bobber.throw
|translationkey=subtitles.entity.fishing_bobber.throw
|volume=0.5
|pitch={{frac|1|3}}-0.5
|distance=16}}
{{Sound table
|sound=Fishing rod reel in1.ogg
|sound2=Fishing rod reel in2.ogg
|subtitle=Bobber retrieved
|source=Friendly Creatures <ref group="sound" name="oddcats"/>
|overridesource=1
|description=When a fishing rod is reeled in
|id=entity.fishing_bobber.retrieve
|translationkey=subtitles.entity.fishing_bobber.retrieve
|volume=1.0
|pitch=0.8-1.2
|distance=16}}
{{Sound table
|sound=Water Splash Old.ogg
|subtitle=Fishing Bobber splashes
|description=When a fishing bobber is bitten by something
|source=Friendly Creatures <ref group="sound" name="oddcats"/>
|overridesource=1
|id=entity.fishing_bobber.splash
|translationkey=subtitles.entity.fishing_bobber.splash
|volume=0.25
|pitch=0.6-1.4
|distance=16}}
{{Sound table
|sound=Random break.ogg
|subtitle=Item breaks
|source=player
|description=When a fishing rod's durability is exhausted
|id=entity.item.break
|translationkey=subtitles.entity.item.break
|volume=0.8
|pitch=0.8-1.2
|distance=16
|foot=1}}
{{Edition|Bedrock}}:
{{Sound table
|type=bedrock
|sound=Bow shoot.ogg
|source=player
|description=When a fishing rod is cast
|id=random.bow
|volume=0.5
|pitch=0.33-0.5}}
<!--There is no reel in sound on Bedrock Edition, it seems.-->
{{Sound table
|sound=Water Splash Old.ogg
|source=player
|description=When a fishing bobber is bitten by something
|id=random.splash
|volume=1.0
|pitch=0.6-1.4}}
{{Sound table
|sound=Random break.ogg
|source=player
|description=When a fishing rod's durability is exhausted
|id=random.break
|volume=1.0
|pitch=0.9
|foot=1}}
== Data values ==
=== ID ===
{{edition|java}}:
{{ID table
|edition=java
|showforms=y
|generatetranslationkeys=y
|displayname=Fishing Rod
|spritetype=item
|nameid=fishing_rod
|form=item
|foot=1}}
{{edition|bedrock}}:
{{ID table
|edition=bedrock
|shownumericids=y
|showforms=y
|notshowbeitemforms=y
|generatetranslationkeys=y
|displayname=Fishing Rod
|spritetype=item
|nameid=fishing_rod
|id=392
|form=item
|foot=1}}
== Achievements==
{{load achievements|Cow Tipper}}<!--This is due to the fact that leather can be obtained via fishing, which grants the achievement.-->
== Advancements ==
{{load advancements|Fishy Business}}
== History ==
{{more sounds|section=24|type=old|Old throwing sound (pre-Sound Update), which was used for fishing rods}}
{{History|java alpha}}
{{History||v1.1.1|[[File:Fishing Rod JE1 BE1.png|32px]] Added fishing rods.
|Fishing rods currently have no function.
|Fishing rods are stackable.}}
{{History||v1.2.0|snap=<nowiki>?|slink=:Category:Information needed requiring unarchived version|Fishing rods have been updated to be able to [[fishing|catch fish]] from any body of [[water]].
|[[File:Stick JE1 BE1.png|32px]] Cast fishing rods use the [[stick]] texture in first and third person, and do not appear cast in the hotbar.}}
{{History||v1.2.2|Fishing rods now work in [[multiplayer]]. Previously, fishing rods could be used in multiplayer, but would produce fake client-side fish that could not be picked up.
|Fishing rods in multiplayer repeat the cast sound when reeling in, do not render the line, and do not switch textures when cast.}}
{{History|java beta}}
{{History||1.6|snap=Test Build 3|Fishing rods are now no longer stackable, stacking rods would allow the player to change the damage values of any rods stacked to the first rod. This could be exploited to have fishing rods that lasted forever.
|[[File:Cast Fishing Rod JE2 BE1.png|32px]] In first person, cast fishing rods now use a texture without the line to show that it is no longer on the rod. The stick texture is still used in third person, however.}}
{{History||Sound Update|The fishing rod cast [[sound]] has been changed.}}
{{History|java}}
{{History||1.3.1|snap=12w17a|Fishing rods now have infinite [[durability]] in [[Creative]] mode.}}
{{History|||snap=12w18a|Fishing rods in multiplayer no longer repeat the cast sound when reeling in, now properly render the line, and now switch textures when cast.}}
{{History||1.4.2|snap=12w36a|Added [[carrot on a stick]], which can be [[crafting|crafted]] using a fishing rod and a [[carrot]].}}
{{History|||snap=12w37a|Fishing now give the [[player]] [[experience]] with each [[fish]] caught.}}
{{History||1.4.6|snap=12w49a|Fishing rods can now be [[enchanting|enchanted]] with [[Unbreaking]] using [[enchanted book]]s.}}
{{History||1.7.2|snap=13w36a|Fishing rods now have 2 new [[enchanting|enchantments]]: [[Lure]] and [[Luck of the Sea]].
|Fishing rods can now be [[enchanted]] in an [[enchantment table]].
|Enchanted fishing rods can now be obtained as a "treasure" item from [[fishing]], and unenchanted ones as a "junk" item.}}
{{History||1.8|snap=14w02a|Fisherman [[villager]]s now [[trading|sell]] enchanted fishing rods for 7–8 [[emerald]]s.}}
{{History|||snap=14w33b|Cast fishing rods now use the cast texture in third person, rather than the stick texture.}}
{{History||1.9|snap=15w31a|Cast fishing rods now look cast in the [[hotbar]] and [[inventory]].}}
{{History|||snap=15w32a|Fishing rods no longer [[damage]] the [[ender dragon]].}}
{{History|||snap=15w36a|Fishing rods now properly hook [[entity|entities]].
|Reeling in while hooked to a non-item entity now costs 5 [[durability]] (was 3) to the fishing rod.}}
{{History||1.10|snap=16w21a|Fishing rods now hook [[item (entity)|item]]s, which costs 3 durability.}}
{{History||1.11|snap=16w33a|Fishing rods can now be used to fuel [[furnace]]s.}}
{{History||1.12|snap=17w13a|The [[sound]] of the bobbers of fishing rods being thrown has been changed.}}
{{History|||snap=17w16a|Added sounds for reeling in fishing bobbers.}}
{{History||1.13|snap=17w47a|Prior to [[1.13/Flattening|''The Flattening'']], this [[item]]'s numeral ID was 346.}}
{{History|||snap=17w50a|[[Crafting]] a [[carrot on a stick]] no longer requires the fishing rod to be at full [[durability]].<ref>[https://bugs.mojang.com/browse/MC-123196 MC-123196 resolved as "Works as Intended"]</ref>}}
{{History|||snap=18w02a|The bobber of fishing rods now has its own [[entity]] ID: <code>fishing_bobber</code>, although summoning the bobber alone is still not possible.}}
{{History|||snap=18w09a|[[Enchanting|Enchanted]] fishing rods now generate in the [[chest]]s of [[underwater ruins]].}}
{{History|||snap=18w11a|Added [[drowned]], which have a chance to spawn [[drops|drop]] fishing rods upon [[death]].}}
{{History|||snap=18w14a|Catching a [[fish]] with the fishing rod now grants the "Fishy Business" [[advancement]].}}
{{History|||snap=?|Fishing rods no longer display as unknown when called by a target selector.}}
{{History||1.14|snap=18w43a|[[File:Fishing Rod JE2 BE2.png|32px]] [[File:Cast Fishing Rod JE3 BE2.png|32px]] The textures of fishing rods have been changed.}}
{{History||1.16|snap=20w13a|Fishing rod is now used to craft [[warped fungus on a stick]].}}
{{History|||snap=20w14a|The bobber of fishing rods is now considered a projectile and can ignite (if on [[fire]]) [[TNT]], activate [[target]]s and ring [[bell]]s.}}
{{History|upcoming java}}
{{History||Villager Trade Rebalance<br>(Experimental)|link=Java Edition 1.20.2|snap=23w31a|Enchantments exclusive to fishing rods are no longer obtainable from villager [[trading]].}}
{{History|pocket alpha}}
{{History||v0.11.0|snap=build 1|[[File:Fishing Rod JE1 BE1.png|32px]] [[File:Cast Fishing Rod JE2 BE1.png|32px]] Added fishing rods.}}
{{History|||snap=build 8|If an [[entity]] is mounted on another entity, reeling it in with a fishing rod now pulls it off its ride.}}
{{History|||snap=build 11|Fishing rods are now functional in [[third person view]].}}
{{History||v0.12.1|snap=build 12|Fishing rods now make a less repetitive [[sound]].
|Fishing rods now grant [[experience]] when successful.
|Fishing rods can now be [[enchanting|enchanted]].
|Enchanted fishing rods can now be found as "treasure" from [[fishing]].}}
{{History||v0.15.0|snap=build 1|Fishing rods are now used to craft [[carrot on a stick]].}}
{{History|pocket}}
{{History||1.0.4|snap=alpha 1.0.4.0|Fisherman [[villager]]s now [[trading|sell]] enchanted fishing rods.}}
{{History||1.1.0|snap=alpha 1.1.0.0|The [[entity]] ID of fishing rods has been changed from <code>fishinghook</code> to <code>fishing_hook</code>.}}
{{History|bedrock}}
{{History||1.4.0|snap=beta 1.2.13.8|Added [[drowned]], which can spawn with and [[drops|drop]] fishing rods.}}
{{History|||snap=beta 1.2.20.1|Fishing rods and [[enchanting|enchanted]] fishing rods can now be found in [[underwater ruins]].}}
{{History||1.10.0|snap=beta 1.10.0.3|[[File:Fishing Rod JE2 BE2.png|32px]] [[File:Cast Fishing Rod JE3 BE2.png|32px]] The textures of fishing rods have been changed.}}
{{History||1.11.0|snap=beta 1.11.0.4|Fisherman [[villager]]s now [[trading|sell]] enchanted fishing rods for 6 [[emerald]]s as part of their third tier [[trading|trade]].}}
{{History|console}}
{{History||xbox=TU1|xbone=CU1|ps=1.0|wiiu=Patch 1|switch=1.0.1|[[File:Fishing Rod JE1 BE1.png|32px]] Added fishing rods.
|As a result of Legacy Console Edition using an internal server, fishing rods repeat the cast sound when reeling in, do not render the line, and do not switch textures when cast.}}
{{History||xbox=TU7|[[File:Cast Fishing Rod JE2 BE1.png|32px]] [[File:Stick JE1 BE1.png|32px]] Fishing rods no longer repeat the cast sound when reeling in, now properly render the line, and now switch textures when cast.
|The cast fishing rod texture appears in first person, while the stick texture is used instead in third person.}}
{{History||xbox=TU27|xbone=CU15|ps=1.18|Cast fishing rods now use the cast texture in third person, rather than the stick texture.}}
{{History||xbox=TU46|xbone=CU36|ps=1.38|wiiu=Patch 15|switch=none|Fishing rods now hook [[item (entity)|item]]s, which costs 3 durability.}}
{{History||xbox=TU53|xbone=CU43|ps=1.49|wiiu=Patch 23|switch=1.0.3|The [[sound]] of the bobbers of fishing rods being thrown has been changed.|Added sounds for reeling in fishing bobbers.}}
{{History||xbox=TU69|xbone=none|ps=1.76|wiiu=Patch 38|switch=none|[[Enchanting|Enchanted]] fishing rods now generate in the [[chest]]s of [[underwater ruins]].
|Added [[drowned]], which have a chance to spawn [[drops|drop]] fishing rods upon [[death]].}}
{{History||xbox=none|xbone=none|ps=1.90|wiiu=none|switch=none|[[File:Fishing Rod JE2 BE2.png|32px]] [[File:Cast Fishing Rod JE3 BE2.png|32px]] The textures of fishing rods have been changed.}}
{{History|new 3ds}}
{{History||0.1.0|[[File:Fishing Rod JE1 BE1.png|32px]] [[File:Cast Fishing Rod JE2 BE1.png|32px]] Added fishing rods.}}
{{History|foot}}
== Issues ==
{{issue list}}
== Trivia ==
*The maximum distance the [[player]] can get between the bobber and themselves is 33 blocks.
*[[Skeleton]]s can be pulled into their own [[arrow]]s.
*When casting the rod into a [[portal]], the bobber may stick to it like a normal [[block]], go through and travel in [[the Nether]], or stop on the next block behind the portal.
*If the player stands directly in front of a column and casts the line onto a block above the player, the line falls downward.
*If the bobber hits a [[painting]], the painting breaks.
*The player can get into [[bed]] after casting a line, and the line remains in the water until the player wakes up and reels it in.
== Gallery ==
<gallery>
13w36a banner.png|[[13w36a]] snapshot banner.
Bobber and bubbles.png|Trail of bubbles indicating that a [[fish]] is about to bite.
Bobber2D.png|Two-dimensional bobber {{in|je}}.
Bobber3D.png|Three-dimensional bobber {{in|be}}.
Enderman Fishing.png|Bobbers can be attached to [[mobs]], like this [[enderman]].
Drowned with Fishing rod.png|A [[drowned]] holding a fishing rod.
Firebobber.png|A bobber cast in fire.
Fishingbobber.png|Fishing in 2010.
Fishing Rod Hooking Teaser.png|Image from [[dinnerbone]] teasing the addition of fishing rods hooking entities.
File:Sunny Fishing.jpg|[[Sunny]] reeling back a fishing rod.
File:Croc Ad 1.jpg|[[Noor]] catching a [[salmon]].<ref> https://www.youtube.com/shorts/e1AJo7jU5MI</ref>
Enchanted Fishing Rod.gif|An enchanted fishing rod.
Fishing Rod SDGP.png|Fishing rod in the [[Super Duper Graphics Pack]].
</gallery>
== References ==
{{Reflist}}
{{Items}}
{{entities}}
[[Category:Renewable resources]]
[[cs:Rybářský prut]]
[[de:Angel]]
[[es:Caña de pescar]]
[[fr:Canne à pêche]]
[[hu:Horgászbot]]
[[it:Canna da pesca]]
[[ja:釣竿]]
[[ko:낚싯대]]
[[nl:Vishengel]]
[[pl:Wędka]]
[[pt:Vara de pesca]]
[[ru:Удочка]]
[[uk:Вудка]]
[[zh:钓鱼竿]]</li></ul></nowiki> | |||||
v0.12.1{{Extension DPL}}<ul><li>[[Minecart with TNT|Minecart with TNT]]<br/>{{ItemEntity
|image=Minecart with TNT.png
|renewable=Yes
|stackable=No
|size=Height: 0.7 Blocks<br>Width: 0.98 Blocks
|networkid='''[[JE]]:''' 10
|drops=
;If not exploded
: 1 {{ItemLink|Minecart with TNT}}
|health={{hp|6}}
}}
A '''minecart with TNT''' is a block of [[TNT]] inside a [[minecart]]. Unlike normal TNT it can detonate instantly under certain conditions and its damage and blast radius is increased by its speed when it detonates.
== Obtaining ==
=== Crafting ===
{{Crafting
|Output= Minecart with TNT
|type= Transportation
|TNT|Minecart}}
Minecarts with TNT can be retrieved by attacking them, and by doing so it drops as an [[item]].
== Usage ==
[[File:TNT minecart and powered activator rail.png|thumb|right|When the TNT minecart passes over the powered activator rail, it explodes after four seconds.]]
[[File:Simple TNT minecart detonator setup.png|thumb|right|Placing two TNT minecarts on the rail and powering it (here, by flicking the lever) creates an instant explosion.]]
[[File:TNT minecart roof trap.png|thumb|right|Destroying the gold block causes the TNT minecart to fall down and instantly explode.]]
A minecart with TNT detonates after a delay on these conditions:
* It moves over a powered [[activator rail]].
* It is destroyed while in motion (except by a player in Creative mode).
* It is destroyed by fire, lava, or an explosion.
*{{IN|java}}, it is hit by a [[fire charge]].
The delay is {{convert|4|seconds|ticks}} for an activator rail, like the TNT block. For other causes there is a random delay between 0 and 1.9 seconds, but more likely to be close to 1.
It detonates instantly on these conditions:
* It hits the ground with a downward velocity of it falling more than three blocks, unless landing on any form of rail.
* It turns on a curved track too fast, with a solid block or entity located beside the track (in the previous movement direction).
* It is hit by a flaming arrow.
* It is pressed into a block or entity and has velocity.
Upon detonation it acts as normal TNT, [[exploding]] and damaging nearby blocks, players, and entities. Upon detonation after activating on activator rail, it does not destroy its rails and the blocks the rail is on, however other nearby carts can.{{only|java}} More than one minecart can be placed on the same rail block, allowing many of them to fit into a single block. They explode when touched, dealing large amounts of damage.
The explosion has a base [[Explosion#Explosion strength|power]] of 4, the same as regular TNT, but the game also adds a random bonus value up to 1.5 times velocity, but no higher than 7.5. This means that with a speed of 5 or higher the power will be a random value between 4 and 11.5. When triggered by an activator rail or by damage, the bonus value is calculated using the horizontal velocity of the minecart. When hit by a flaming arrow the velocity of the arrow is used instead. When triggered by fall damage, the fall distance divided by 10 is used.
Minecarts with TNT bounce off of other minecarts and cannot be linked to [[minecarts with furnace]]s.
== Sounds ==
{{Edition|Java}}:<br>
Minecarts with TNT use the Friendly Creatures sound category for entity-dependent sound events.<ref group=sound name=rollsource>{{bug|MC-42132}}</ref>
{{Sound table
|sound=Minecart rolling.ogg
|subtitle=Minecart rolls
|source=Friendly Creatures <ref group=sound name=rollsource/>
|overridesource=1
|description=While a minecart with TNT is moving
|id=entity.minecart.riding
|translationkey=subtitles.entity.minecart.riding
|volume=0.0-0.35 <ref group=sound>Relates linearly with horizontal velocity (max 0.5)</ref>
|pitch=0.0-1.0 <ref group=sound>Will increase by 0.0025 per tick if the minecart's horizontal velocity is more than 0.01</ref>
|distance=16}}
{{Sound table
|sound=Fuse.ogg
|subtitle=TNT fizzes
|source=block
|description=When a minecart with TNT is primed
|id=entity.tnt.primed
|translationkey=subtitles.entity.tnt.primed
|volume=1.0
|pitch=1.0
|distance=16}}
{{Sound table
|sound=Explosion1.ogg
|sound2=Explosion2.ogg
|sound3=Explosion3.ogg
|sound4=Explosion4.ogg
|subtitle=Explosion
|source=block
|description=When a minecart with TNT explodes
|id=entity.generic.explode
|translationkey=subtitles.entity.generic.explode
|volume=4.0
|pitch=0.56-0.84
|distance=16
|foot=1}}
{{Edition|Bedrock}}:<ref group=sound>{{Bug|MCPE-35778||Minecart with tnt does not have the sound of tnt being ignited when we use flint and steel, fire charge or activator rail}}</ref>
{{Sound table
|type=bedrock
|sound=Minecart rolling.ogg
|source=neutral
|description=While a minecart with TNT is moving
|id=minecart.base}}
{{Sound table
|sound=Explosion1.ogg
|sound2=Explosion2.ogg
|sound3=Explosion3.ogg
|sound4=Explosion4.ogg
|source=block
|description=When a minecart with TNT explodes
|id=random.explode
|volume=4.0
|pitch=1.0
|foot=1}}
== Data values ==
=== ID ===
{{edition|java}}:
{{ID table
|edition=java
|firstcolumnname=Item
|showforms=y
|generatetranslationkeys=y
|displayname=Minecart with TNT
|spritetype=item
|nameid=tnt_minecart
|form=item
|foot=1}}
{{ID table
|edition=java
|firstcolumnname=Entity
|generatetranslationkeys=y
|displayname=Minecart with TNT
|spritetype=entity
|nameid=tnt_minecart
|foot=1}}
{{edition|bedrock}}:
{{ID table
|edition=bedrock
|firstcolumnname=Item
|shownumericids=y
|showforms=y
|notshowbeitemforms=y
|generatetranslationkeys=y
|displayname=Minecart with TNT
|spritetype=item
|nameid=tnt_minecart
|id=525
|form=item
|foot=1}}
{{ID table
|edition=bedrock
|firstcolumnname=Entity
|shownumericids=y
|generatetranslationkeys=y
|displayname=Minecart with TNT
|spritetype=entity
|nameid=tnt_minecart
|id=97
|foot=1}}
=== Entity data ===
Minecarts with TNT have entity data associated with them that contain various properties of the entity.
{{el|java}}:
{{main|Entity format}}
{{/ED}}
{{el|bedrock}}:
: See [[Bedrock Edition level format/Entity format]].
== Video ==
<div style="text-align:center">{{yt|1yNgY913tps}}</div>
== History ==
{{History|java}}
{{History||1.5|snap=13w02a|[[File:Minecart_with_TNT_JE1_BE1.png|32px]] [[File:Minecart_with_TNT_(item)_JE1_BE1.png|32px]] Added minecart with TNT.}}
{{History|||snap=13w03a|Minecart with TNT no longer destroys nearby [[rail]]s and rail supports during [[explosion]].<ref>{{bug|MC-6833}}</ref>}}
{{History||1.8|snap=14w11a|Minecart with TNT explosions no longer stack.<!--reverted in 17a like other changes in 11a?-->}}
{{History|||snap=14w26a|Minecart with TNT can now be detonated using [[arrow]]s on fire.}}
{{History||1.11|snap=16w32a|The [[entity]] ID for minecart with TNT has been changed from <code>MinecartTNT</code> to <code>tnt_minecart</code>.}}
{{History||1.12|snap=1.12-pre6|No longer instantly explode when hit with [[fire charge]]s; instead, they explode as if primed by an [[activator rail]].}}
{{History||1.13|snap=17w47a|Prior to [[1.13/Flattening|''The Flattening'']], this [[item]]'s numeral ID was 407.}}
{{History||1.14|snap=18w43a|[[File:Minecart with TNT JE2 BE2.png|32px]] [[File:Minecart with TNT (item) JE2 BE2.png|32px]] The textures of minecart with TNT have been updated.}}
{{History|||snap=19w11a|Minecart with TNT explosions now have a 100% drop rate.}}
{{History||1.15|snap=19w38a|[[File:Minecart with TNT 19w38a.png|32px]] The TNT now appear dark, same as suffocating mobs.}}
{{History|||snap=19w39a|The TNT texture now colored correctly.}}
{{History||1.15|snap=Pre-release 1|[[File:Minecart with TNT JE3.png|32px]] The [[model]] of minecart with TNT has been changed.<ref>{{bug|MC-165971}}</ref>}}
{{History|||snap=Pre-release 3|[[File:Minecart with TNT JE2 BE2.png|32px]] The model of minecart with TNT has been changed back to the [[Java Edition 18w43a|18w43a]] model.}}
{{History||1.19|snap=22w13a|The crafting recipe for a minecart with TNT is now shapeless.
|Breaking a minecart with TNT will now drop the item instead of the minecart and TNT separately.<ref>{{bug|MC-249493|||Fixed}}</ref>}}
{{History|pocket alpha}}
{{History||v0.14.0|snap=build 1|[[File:Minecart with TNT JE1 BE1.png|32px]] [[File:Minecart with TNT (item) JE1 BE1.png|32px]] Added minecart with TNT.}}
{{History|pocket}}
{{History||1.1.0|snap=alpha 1.1.0.0|The [[entity]] ID has been changed from <code>minecarttnt</code> to <code>tnt_minecart</code>.}}
{{History|bedrock}}
{{History||1.10.0|snap=beta 1.10.0.3|[[File:Minecart with TNT JE2 BE2.png|32px]] [[File:Minecart with TNT (item) JE2 BE2.png|32px]] The textures of minecart with TNT have been updated.}}
{{History||1.19.0|snap=beta 1.19.0.30|Breaking a minecart with TNT will now drop the item instead of the minecart and TNT separately.}}
{{History|console}}
{{History||xbox=TU19|xbone=CU7|ps=1.12|wiiu=Patch 1|switch=1.0.1|[[File:Minecart with TNT JE1 BE1.png|32px]] [[File:Minecart with TNT (item) JE1 BE1.png|32px]] Added minecart with TNT.}}
{{History||xbox=none|xbone=none|ps=1.90|wiiu=none|switch=none|[[File:Minecart with TNT JE2 BE2.png|32px]] [[File:Minecart with TNT (item) JE2 BE2.png|32px]] The textures of minecart with TNT have been updated.}}
{{History|new 3ds}}
{{History||0.1.0|[[File:Minecart with TNT JE1 BE1.png|32px]] [[File:Minecart with TNT (item) JE1 BE1.png|32px]] Added minecart with TNT.
|Minecart with TNT emits smoke [[particle]]s when destroyed.}}
{{History|foot}}
== Issues ==
{{issue list}}
== Trivia ==
* A direct hit from three merged [[minecart]]s with [[TNT]] can reduce a fully [[diamond]] [[armor]]ed player to half a heart.<ref>{{tweet|dinner|289532985340993536|Haha, oops... Nuclear minecarts! (mature language)|January 10, 2013}}</ref> However, if the TNT minecarts explode, they do not destroy any [[rail]]s.
== Gallery ==
<gallery>
File:First TNT Minecart Image.jpg|The first image of minecarts with TNT, released by Dinnerbone.<ref>{{tweet|dinner|288302629803683840|Those blasted pigs have taken the village. We've ran out of options; we must stop them from spreading further!|January 7, 2013}}</ref><ref>{{tweet|dinner|288304442560880643|(Mirror: <nowiki>[imgur link])|January 7, 2013}}</ref> (One can be seen in the lower-left corner.)
File:First TNT Minecart Image ZOOM.jpg|A more zoomed in image.
File:Minecart-with-tnt.png|Minecart with TNT and activator rail for detonation.
File:13w02a Banner.png|The 13w02a banner, with a minecart with TNT and a [[hopper]].
File:Dinnerbone safe boom1.jpg|Dinnerbone showing how minecarts with TNT have controlled explosions.<ref>{{tweet|dinner|291212723755307009|What's the point of properly activating TNT carts if they just blow up your tracks? Let me answer that with an album!|January 15, 2013}}</ref>
File:Dinnerbone safe boom 2.png|Primed minecart with TNT.
File:Dinnerbone safe boom 3.jpg|Explosion from a minecart with TNT. (The "bridge" of rails is left undestroyed by the explosion.)
</gallery>
== References ==
{{reflist}}
{{items}}
{{entities}}
[[Category:Mechanics]]
[[cs:Vozík s TNT]]
[[de:TNT-Lore]]
[[es:Vagoneta con dinamita]]
[[fr:Wagonnet à TNT]]
[[it:Carrello da miniera]]
[[ja:TNT付きのトロッコ]]
[[ko:TNT가 실린 광산 수레]]
[[nl:Mijnkar met TNT]]
[[pl:Wagonik z TNT]]
[[pt:Carrinho de mina com dinamite]]
[[ru:Вагонетка с ТНТ]]
[[uk:Вагонетка з динамітом]]
[[zh:TNT矿车]]</li><li>[[Banner|Banner]]<br/>{{for|the image|Banner (image)}}
{{Block
| image = <gallery>
White Banner.gif | Banner
White Wall Banner.png | Wall Banner
</gallery>
| rarity = Common
| transparent = Yes
| light = No
| tool = axe
| renewable = Yes
| stackable = Yes (16)
| flammable = No
| lavasusceptible = Yes
}}
'''Banners''' are tall decorative [[blocks]], featuring a field that is highly customizable using [[dye]]s and [[banner pattern]]s.
== Obtaining ==
=== Breaking ===
Banners can be broken with or without a [[tool]], but an [[axe]] is fastest.
{{breaking row|horizontal=1|Banners|Axe}}
A banner also breaks and drops itself as an [[Item (entity)|item]] if the block the banner is attached to is moved, removed, or destroyed.
=== Natural generation ===
{| class="wikitable collapsible"
! Name !! Location !! Appearance !! Design
|-
! Magenta Banner
| Outside of [[end cities]].
| style="text-align: center" | [[File:End City Banner.png|32px]]
| Magenta Banner
* Black Inverted Chevron
* Black Chevron
|-
! Gray Banner
| In banner room in [[woodland mansion]]s.
| style="text-align: center" | [[File:Gray Banner.png|32px]]
| Gray Banner
|-
! Light Gray Banner
| In master bedroom in [[woodland mansion]]s.
| style="text-align: center" | [[File:Master Bedroom Banner.png|32px]]
| Light Gray Banner
* White Flower Charge
|- id="Ominous Banner"
! Ominous Banner{{only|java|short=1}}
Illager Banner{{only|bedrock|education|short=1}}
| Carried by [[raid captain]]s.<br> Located in [[pillager outpost]]s.
{{IN|java}}, the ominous banner cannot be crafted or copied because the design uses 8 patterns.
{{IN|bedrock}}, the illager banner is a separate type that cannot be placed in a loom.
| style="text-align: center" | [[File:Ominous Banner.png|32px]]<br/>[[File:Ominous Banner BE.png|32px]]
| White Banner{{only|java|short=1}}
* Cyan Lozenge
* Light Gray Base
* Gray Pale
* Light Gray Bordure
* Black Fess
* Light Gray Per Fess
* Light Gray Roundel
* Black Bordure
Separate type entirely{{only|bedrock|short=1}}
|-
! Brown Banner
| Outside of some houses, meeting points, and pillar fountains in savanna [[village]]s.
| style="text-align: center" | [[File:Brown Banner.png|32px]]
| Brown Banner
|-
! Black Banner
| In altar room in [[woodland mansions]].
| style="text-align: center" | [[File:Black Banner.png|32px]]
| Black Banner
|}
=== Crafting ===
Banners can be crafted from six [[wool]] and a [[stick]] in a pattern resembling a [[sign]].
{{Crafting
|head=1
|showdescription=1
|A1=Matching Wool |B1=Matching Wool |C1=Matching Wool
|A2=Matching Wool |B2=Matching Wool |C2=Matching Wool
|B3=Stick
|Output=Matching Banner
|Olink=Banner
|type=Decoration block
|description=Once the banner is crafted, its base color cannot be changed.{{only|java}}
}}
{{Crafting
|showdescription=1
|Any Banner
|Bleach
|Output=White Banner
|type=Decoration block
|description=Bleach can be used to remove the color of a banner, resulting in a white banner. This includes removing patterns from a white banner.{{only|bedrock|education}}
|foot=1
}}
=== Trading ===
Expert-level cartographer [[villager]]s always offer to [[trading|sell]] 1 or 2 blank banners of a random color for 3 [[emeralds]]. Expert-level shepherd villagers have a {{frac|2|7}} chance of offering the same trade.{{only|java}}
{{IN|bedrock}}, expert-level cartographer and shepherd villagers both offer to sell one of 16 blank banners for 3 emeralds as part of their trades.
=== Mob loot ===
[[Illager]]s that spawn carrying an ominous banner{{only|java|short=1}} / illager banner{{only|bedrock|education|short=1}} always drop it upon death.
== Usage ==
[[File:Standing banner with block.png|thumb|upright|Overlapping block on a banner.]]
[[File:Wall banner with block.png|thumb|upright|Overlapping on a wall mounted banner.]]
There are 16 colored blank banners, and numerous patterns each available in each of the 16 colors. A banner can feature up to 6 different patterns. The top layer of a banner (or the last pattern added) can be washed off by {{control|using}} it on a [[cauldron]] containing water.
Banners, much like signs, can be placed both on the ground facing in any direction, or on a wall. They gently sway as if affected by a breeze, regardless of dimension or location.
Banners have no collision mask as they are completely non-solid, so [[entities]] can move through them.
Other blocks (including other banners) can be placed on any edge of a banner's hitbox, which is only one block high despite the banner appearing as two blocks tall. This makes it possible to overlap another solid block on the top half of a banner for floor banners, or the bottom half of wall banners.
When a banner is placed on the side of a block, its position is set by the top block, and it is possible to place it so it appears half buried.
Banners can also be placed in [[item frame]]s, where they simply appear as their item model.
[[Water]] and [[lava]] flow around banners. {{IN|bedrock}}, banners can be [[waterlogged]].
<gallery>
File:Wall banner with water below.png| Water can be placed below wall banners
File:Water flowing around banner.png| Water flows around a banner on the ground
</gallery>
Lava can create [[fire]] in air blocks next to banners as if the banners were flammable, but the banners do not burn (and cannot be burned by other methods). Banners also cannot be moved by [[piston]]s.
If a banner is renamed on an [[anvil]], it retains its name when a pattern is added, but not when a pattern is removed.
=== Helmet ===
{{exclusive|java|section=13}}
While a banner cannot be equipped in the [[Helmet|head slot]] in [[Survival]] mode, equipping it using commands causes it to appear on top of the player. This is how [[raid captain]]s wear banners{{only|java|short=1}}.
=== Chestplate ===
{{exclusive|bedrock|section=13}}
While a banner cannot be equipped in the [[chestplate]] slot in Survival mode, equipping it using NBT editors causes it to appear on top of the player. This is how [[raid captain]]s wear banners{{only|bedrock|education|short=1}}.
<gallery>
Steve wearing White Banner.png|
Alex wearing White Banner.png|
Pillager with Ominous Banner.png|
Vindicator with Ominous Banner.png|
Evoker with Ominous Banner.png|Illusioner with Ominous Banner.png|
</gallery>
=== Crafting ingredient ===
[[Shield]]s can have patterns applied to them using banners. The shield pattern has a smaller resolution than the banner pattern, causing them to look different or offset. Banners that have more than six patterns, such as Ominous Banners or banners obtained through inventory editors, will be reduced to six patterns on the shield.
{{Crafting
|showdescription=1
|Shield
|Matching Banner; Ominous Banner
|Output=Matching Shield; Ominous Shield
|B2link=Banner
|type=Combat
|description=Applies the banner pattern to the shield. The banner is consumed.<br>The shield must have no pre-existing patterns.<br>Does not change existing durability or enchantments on the shield.
}}
=== Copying ===
Banners can be copied with a blank banner to make multiple identical banners. Banners with more than 6 patterns applied using commands cannot be copied in this manner.
{{Crafting
|showdescription=1
|Matching Banner
|Matching Banner
|Output=Matching Banner
|A2link=Banner
|B2link=Banner
|Olink=Banner
|type=Decoration block
|ignoreusage=1
|description=Copies pattern; both banners must have the same base color, and the one having a pattern copied onto it must have no preexisting pattern.
}}
=== Map marker ===
[[File:Banner marked map.png|alt=All banners marked on a map, alongside a named banner.|thumb|right|How every banner appears {{IN|java}} on a map, including named banners.]]
{{exclusive|java|section=13}}
{{IN|java}}, {{control|using}} on a standing banner with a [[map]] selected places a marker of the banner's position on the selected map, and {{control|using}} on the banner again removes the marker. Note that wall banners cannot serve as map markers. The marker has the same color as the banner's base without decorations. The marker is removed if the banner is destroyed unless the map is locked using a [[cartography table]]. If the banner is renamed, the name appears below the marker.
=== Patterns ===
{{see also|Banner/Patterns|title1=List of patterned banners}}
[[File:Spawned-in Banner.png|thumb|100px|Example of a banner with more than 6 patterns, a result of using the {{cmd|give}} command.]]
A banner may have up to six layers of patterns, which are overlaid with the last-crafted on top. A banner can have up to 16 layers of patterns with the use of commands. The total number of unique banners is approximately 2.3x10^16 (or 23 quadrillion).
Any color banner can be used; the pattern overlays the color. {{IN|java}}, a [[loom]] is used to make patterns. However, {{in|bedrock}}, the patterns can be made in a [[loom]] or a [[crafting table]].
A banner can have more than six layers of patterns through the commands <code>/[[Commands/give|give]]</code>, <code>/[[Commands/setblock|setblock]]</code> or <code>/[[Commands/fill|fill]]</code>. This only works in ''Java Edition'', as Bedrock Edition doesn't have any NBT commands. Here is an example of a mining banner with seven different patterns. There is specific codes for the [[Banner#Item data:~:text=white-,Item,-In Java Edition|colors]] and [[Banner/Patterns|patterns]] that you have to input.
<code>/give @p white_banner{display:{Name:"\"Mining Industries Banner\""},BlockEntityTag:{Patterns:[{Pattern:"cr",Color:15},{Pattern:"bs",Color:15},{Pattern:"sc",Color:12},{Pattern:"ms",Color:0},{Pattern:"hh",Color:15},{Pattern:"bo",Color:15},{Pattern:"tts",Color:8}]}} 1</code>
{{LoadPage|Template:Banner pattern loom recipes|Loom recipes|h4}}
{{LoadPage|Banner/Banner pattern crafting recipes|Crafting recipes|h4|transcluded=1}}
=== Renaming ===
{{IN|java}}, a banner can be given a custom name that remains as the banner is placed and retrieved. The player can use an [[anvil]] to rename the banner item, or may change the <code>CustomName</code> tag using the {{cmd|data}} command on the banner block.
=== Fuel ===
Banners can be used as a fuel in [[furnace]]s, smelting 1.5 items per banner.
=== Note Blocks ===
Banners can be placed under [[note block]]s to produce "bass" sounds.
== Sounds ==
=== Generic ===
{{Sound table/Block/Wood}}
=== Unique ===
{{edition|java}}: ''None''
{{edition|bedrock}}:
{{Sound table
|type=bedrock
|sound=Water Splash Old.ogg
|source=block
|description=When all patterns are removed from a banner using a cauldron
|id=cauldron.cleanbanner
|volume=0.1
|pitch=1.0
|foot=1}}
== Data values ==
=== ID ===
{{edition|java}}:
{{ID table
|edition=java
|showblocktags=y
|showitemtags=y
|showforms=y
|generatetranslationkeys=y
|displayname=White Banner
|spritetype=block
|nameid=white_banner
|blocktags=banners, wall_post_override
|itemtags=banners
|translationkey=block.minecraft.white_banner,block.minecraft.ominous_banner
}}
{{ID table
|displayname=Orange Banner
|spritetype=block
|nameid=orange_banner
|blocktags=banners, wall_post_override
|itemtags=banners}}
{{ID table
|displayname=Magenta Banner
|spritetype=block
|nameid=magenta_banner
|blocktags=banners, wall_post_override
|itemtags=banners}}
{{ID table
|displayname=Light Blue Banner
|spritetype=block
|nameid=light_blue_banner
|blocktags=banners, wall_post_override
|itemtags=banners}}
{{ID table
|displayname=Yellow Banner
|spritetype=block
|nameid=yellow_banner
|blocktags=banners, wall_post_override
|itemtags=banners}}
{{ID table
|displayname=Lime Banner
|spritetype=block
|nameid=lime_banner
|blocktags=banners, wall_post_override
|itemtags=banners}}
{{ID table
|displayname=Pink Banner
|spritetype=block
|nameid=pink_banner
|blocktags=banners, wall_post_override
|itemtags=banners}}
{{ID table
|displayname=Gray Banner
|spritetype=block
|nameid=gray_banner
|blocktags=banners, wall_post_override
|itemtags=banners}}
{{ID table
|displayname=Light Gray Banner
|spritetype=block
|nameid=light_gray_banner
|blocktags=banners, wall_post_override
|itemtags=banners}}
{{ID table
|displayname=Cyan Banner
|spritetype=block
|nameid=cyan_banner
|blocktags=banners, wall_post_override
|itemtags=banners}}
{{ID table
|displayname=Purple Banner
|spritetype=block
|nameid=purple_banner
|blocktags=banners, wall_post_override
|itemtags=banners}}
{{ID table
|displayname=Blue Banner
|spritetype=block
|nameid=blue_banner
|blocktags=banners, wall_post_override
|itemtags=banners}}
{{ID table
|displayname=Brown Banner
|spritetype=block
|nameid=brown_banner
|blocktags=banners, wall_post_override
|itemtags=banners}}
{{ID table
|displayname=Green Banner
|spritetype=block
|nameid=green_banner
|blocktags=banners, wall_post_override
|itemtags=banners}}
{{ID table
|displayname=Red Banner
|spritetype=block
|nameid=red_banner
|blocktags=banners, wall_post_override
|itemtags=banners}}
{{ID table
|displayname=Black Banner
|spritetype=block
|nameid=black_banner
|blocktags=banners, wall_post_override
|itemtags=banners}}
{{ID table
|displayname=White Wall Banner
|spritetype=block
|nameid=white_wall_banner
|blocktags=banners, wall_post_override
|form=block
|translationkey=block.minecraft.white_banner,block.minecraft.ominous_banner}}
{{ID table
|displayname=Orange Wall Banner
|spritetype=block
|nameid=orange_wall_banner
|blocktags=banners, wall_post_override
|form=block
|translationkey=block.minecraft.orange_banner}}
{{ID table
|displayname=Magenta Wall Banner
|spritetype=block
|nameid=magenta_wall_banner
|blocktags=banners, wall_post_override
|form=block
|translationkey=block.minecraft.magenta_banner}}
{{ID table
|displayname=Light Blue Wall Banner
|spritetype=block
|nameid=light_blue_wall_banner
|blocktags=banners, wall_post_override
|form=block
|translationkey=block.minecraft.light_blue_banner}}
{{ID table
|displayname=Yellow Wall Banner
|spritetype=block
|nameid=yellow_wall_banner
|blocktags=banners, wall_post_override
|form=block
|translationkey=block.minecraft.yellow_banner}}
{{ID table
|displayname=Lime Wall Banner
|spritetype=block
|nameid=lime_wall_banner
|blocktags=banners, wall_post_override
|form=block
|translationkey=block.minecraft.lime_banner}}
{{ID table
|displayname=Pink Wall Banner
|spritetype=block
|nameid=pink_wall_banner
|blocktags=banners, wall_post_override
|form=block
|translationkey=block.minecraft.pink_banner}}
{{ID table
|displayname=Gray Wall Banner
|spritetype=block
|nameid=gray_wall_banner
|blocktags=banners, wall_post_override
|form=block
|translationkey=block.minecraft.gray_banner}}
{{ID table
|displayname=Light Gray Wall Banner
|spritetype=block
|nameid=light_gray_wall_banner
|blocktags=banners, wall_post_override
|form=block
|translationkey=block.minecraft.light_gray_banner}}
{{ID table
|displayname=Cyan Wall Banner
|spritetype=block
|nameid=cyan_wall_banner
|blocktags=banners, wall_post_override
|form=block
|translationkey=block.minecraft.cyan_banner}}
{{ID table
|displayname=Purple Wall Banner
|spritetype=block
|nameid=purple_wall_banner
|blocktags=banners, wall_post_override
|form=block
|translationkey=block.minecraft.purple_banner}}
{{ID table
|displayname=Blue Wall Banner
|spritetype=block
|nameid=blue_wall_banner
|blocktags=banners, wall_post_override
|form=block
|translationkey=block.minecraft.blue_banner}}
{{ID table
|displayname=Brown Wall Banner
|spritetype=block
|nameid=brown_wall_banner
|blocktags=banners, wall_post_override
|form=block
|translationkey=block.minecraft.brown_banner}}
{{ID table
|displayname=Green Wall Banner
|spritetype=block
|nameid=green_wall_banner
|blocktags=banners, wall_post_override
|form=block
|translationkey=block.minecraft.green_banner}}
{{ID table
|displayname=Red Wall Banner
|spritetype=block
|nameid=red_wall_banner
|blocktags=banners, wall_post_override
|form=block
|translationkey=block.minecraft.red_banner}}
{{ID table
|displayname=Black Wall Banner
|spritetype=block
|nameid=black_wall_banner
|blocktags=banners, wall_post_override
|form=block
|translationkey=block.minecraft.black_banner
|foot=1}}
{{ID table
|displayname=Block entity
|spritename=Banners
|spritetype=block
|nameid=banner
|foot=1}}
{{edition|bedrock}}:
{{ID table
|edition=bedrock
|firstcolumnname=Banner
|shownumericids=y
|showforms=y
|generatetranslationkeys=y
|displayname=Standing
|spritename=Banners
|spritetype=block
|nameid=standing_banner
|translationkey=tile.standing_banner.black.name, tile.standing_banner.red.name, tile.standing_banner.green.name, tile.standing_banner.brown.name, tile.standing_banner.blue.name, tile.standing_banner.purple.name, tile.standing_banner.cyan.name, tile.standing_banner.silver.name, tile.standing_banner.gray.name, tile.standing_banner.pink.name, tile.standing_banner.lime.name, tile.standing_banner.yellow.name, tile.standing_banner.lightBlue.name, tile.standing_banner.magenta.name, tile.standing_banner.orange.name, tile.standing_banner.white.name
|id=176
|form=block}}
{{ID table
|displayname=Wall
|spritename=Banners
|spritetype=block
|nameid=wall_banner
|id=177
|form=block
|translationkey=-}}
{{ID table
|displayname=Item
|spritename=Banners
|spritetype=item
|nameid=banner
|translationkey=item.banner.black.name, item.banner.red.name, item.banner.green.name, item.banner.brown.name, item.banner.blue.name, item.banner.purple.name, item.banner.cyan.name, item.banner.silver.name, item.banner.gray.name, item.banner.pink.name, item.banner.lime.name, item.banner.yellow.name, item.banner.lightBlue.name, item.banner.magenta.name, item.banner.orange.name, item.banner.white.name
|id=567
|form=item
|foot=1}}
{{ID table
|notnamespaced=y
|displayname=Block entity
|spritename=Banners
|spritetype=block
|nameid=Banner
|foot=1}}
=== Metadata ===
==== Item ====
{{IN|Bedrock}}, banner items use the following data values:
{| class="wikitable"
! DV !! Banner color
|-
|| 0 || black
|-
|| 1 || red
|-
|| 2 || green
|-
|| 3 || brown
|-
|| 4 || blue
|-
|| 5 || purple
|-
|| 6 || cyan
|-
|| 7 || light gray
|-
|| 8 || gray
|-
|| 9 || pink
|-
|| 10 || lime
|-
|| 11 || yellow
|-
|| 12 || light blue
|-
|| 13 || magenta
|-
|| 14 || orange
|-
|| 15 || white
|}
=== Item ===
{{IN|Java}}, banner items use the following data values:
{| class="wikitable"
! DV !! Banner color
|-
|| 15 || black
|-
|| 14 || red
|-
|| 13 || green
|-
|| 12 || brown
|-
|| 11 || blue
|-
|| 10 || purple
|-
|| 9 || cyan
|-
|| 8 || light gray
|-
|| 7 || gray
|-
|| 6 || pink
|-
|| 5 || lime
|-
|| 4 || yellow
|-
|| 3 || light blue
|-
|| 2 || magenta
|-
|| 1 || orange
|-
|| 0 || white
|}
=== Block states ===
{{see also|Block states}}
{{/BS}}
=== Block data ===
A banner has a block entity associated with it that holds additional data about the block.
{{el|bedrock}}:
: See [[Bedrock Edition level format/Block entity format]].
{{el|java}}:
{{see also|Block entity format}}
{{/BE}}
=== Item data ===
{{el|java}}:
{{main|Player.dat format}}
Banners, as items, use an NBT tag <code>BlockEntityTag</code> to indicate the patterns and details when it is placed.
<div class="treeview" style="margin-top: 0;">
* {{nbt|compound|Item}}: The item
** {{nbt|compound|tag}}: Additional information about the item. This tag is optional for most items.
*** {{nbt|compound|BlockEntityTag}}: The details of the shulker box.
**** All block data, except tags common to all block entities.
</div>
{{el|bedrock}}:
: See [[Bedrock Edition level format/Item format]].
== Achievements ==
{{load achievements|Fruit on the Loom}}
== Advancements ==
{{load advancements|Voluntary Exile}}
== History ==
{{info needed section|The Nether Update}}
{{History|java}}
{{History||1.8|snap=July 21, 2014|slink=https://twitter.com/jeb_/status/491238882789572608|[[Jeb]] posted a picture of banners, and stated that he is working on them.}}
{{History|||snap=14w30a|[[File:White Banner Revision 1.png|22px]][[File:Light Gray Banner Revision 1.png|22px]][[File:Gray Banner Revision 1.png|22px]][[File:Black Banner Revision 1.png|22px]][[File:Brown Banner Revision 1.png|22px]][[File:Red Banner Revision 1.png|22px]][[File:Orange Banner Revision 1.png|22px]][[File:Yellow Banner Revision 1.png|22px]][[File:Lime Banner Revision 1.png|22px]][[File:Green Banner Revision 1.png|22px]][[File:Cyan Banner Revision 1.png|22px]][[File:Light Blue Banner Revision 1.png|22px]][[File:Blue Banner Revision 1.png|22px]][[File:Purple Banner Revision 1.png|22px]][[File:Magenta Banner Revision 1.png|22px]][[File:Pink Banner Revision 1.png|22px]] Added banners.}}
{{History|||snap=14w30c|Added four additional patterns: Cross (+), Border, Curly Border and Thing (Mojang logo).}}
{{History|||snap=14w31a|Added two additional patterns: Inverted Halves and Base Gradient.
|The banner pattern terminology has been changed based on vexillology advice [[Jeb]] received from [http://www.reddit.com/r/Minecraft/comments/2bkxej/i_made_a_huge_mistake_banners/ his Reddit post].
|Banners can now be used as a [[fuel]] in [[furnace]]s.}}
{{History||1.8.8|snap=pre|The number of layers attainable by using [[commands]] is now limited to 16 per banner.}}
{{History||1.9|snap=15w31a|[[File:End City Banner.png|17px]] Magenta banners with a black chevron and inverted chevron are now naturally generated on the outside walls of [[end city|end cities]].}}
{{History|||snap=15w33c|Banners can be used to apply patterns to [[shield]]s.}}
{{History||1.11|snap=16w33a|Banners now require a [[dye]] when applying a pattern that uses a non-dye [[item]], such as a [[mob head|creeper head]] or [[golden apple|enchanted golden apple]]. Previously, the lack of a dye would have applied the black variant of the pattern.}}
{{History|||snap=16w39a|Black and gray banners, and light gray banners with a white flower charge are now naturally generated in rooms of [[woodland mansion]]s.}}
{{History||1.12|snap=January 24, 2017|slink={{tweet|jeb_|823817090511601664}}|[[Jeb]] tweets a screenshot of the changes to the banner color palette.}}
{{History|||snap=17w06a|[[File:White Banner.png|17px]] [[File:Light Gray Banner.png|17px]] [[File:Gray Banner.png|17px]] [[File:Black Banner.png|17px]] [[File:Brown Banner.png|17px]] [[File:Red Banner.png|17px]] [[File:Orange Banner.png|17px]] [[File:Yellow Banner.png|17px]] [[File:Lime Banner.png|17px]] [[File:Green Banner.png|17px]] [[File:Cyan Banner.png|17px]] [[File:Light Blue Banner.png|17px]] [[File:Blue Banner.png|17px]] [[File:Purple Banner.png|17px]] [[File:Magenta Banner.png|17px]] [[File:Pink Banner.png|17px]] Changed banners' [[tint]]s.}}
{{History|||snap=pre6|"Chief fess" and "base fess" banners are now just "chief" and "base" banners.}}
{{History||1.13|snap=17w47a|The colors for the <code>banner</code>, <code>wall_banner</code> and <code>standing_banner</code> ID have been split up into their own IDs.
|Prior to [[1.13/Flattening|''The Flattening'']], these [[block]]s' numeral IDs were 176 and 177, and the [[item]]'s 425.}}
{{History|||snap=18w10a|{{control|Using}} a [[map]] on a banner now mark the spot of the banner on the map.}}
{{History||1.14|snap=18w43a|[[Loom]]s have been added to help the [[player]] edit banners more easily.
|All recipes for banner patterns have been removed.}}
{{History|||snap=18w45a|[[File:Ominous Banner Revision 1.png|17px]] Added [[illager patrol]]s, where the leader of an illager patrol carries an [[illager]] banner.}}
{{History|||snap=18w46a|[[File:Ominous Banner.png|17px]] The pattern of [[illager]] banner now has a black border.}}
{{History|||snap=19w11a|Cartographer and shepherd [[villager]]s now [[trading|sell]] banners.}}
{{History|||snap=Pre-Release 2|"Illager Banners" have been renamed to "Ominous Banners".}}
{{History||1.17|snap=20w46a|The unused "base" pattern has been renamed to the "field" pattern and given proper translation strings (its ID is still "base").}}
{{History||1.19.3|snap=22w43a|The ominous banner is now available in the Creative inventory.}}
{{History|bedrock}}
{{History||1.2.0|snap=beta 1.2.0.2|[[File:White Banner.png|17px]] [[File:Light Gray Banner.png|17px]] [[File:Gray Banner.png|17px]] [[File:Black Banner.png|17px]] [[File:Brown Banner.png|17px]] [[File:Red Banner.png|17px]] [[File:Orange Banner.png|17px]] [[File:Yellow Banner.png|17px]] [[File:Lime Banner.png|17px]] [[File:Green Banner.png|17px]] [[File:Cyan Banner.png|17px]] [[File:Light Blue Banner.png|17px]] [[File:Blue Banner.png|17px]] [[File:Purple Banner.png|17px]] [[File:Magenta Banner.png|17px]] [[File:Pink Banner.png|17px]] Added banners.
|[[File:End City Banner.png|17px]] Magenta banners with a black chevron and inverted chevron are now naturally generated on the outside walls of [[end city|end cities]].
|Black and gray banners, and light gray banners with a white flower charge are now naturally generated in rooms of [[woodland mansion]]s.}}
{{History||1.4.0|snap=beta 1.2.20.1|The white banner can now be crafted from a colored banner and [[bleach]], which also removes all patterns, if used on a white banner.}}
{{History||1.10.0|snap=beta 1.10.0.3|[[Loom]]s have been added to help the [[player]] edit banners more easily.
|Brown banners now generate in new [[savanna]] [[village]]s.
|Black banners now generate in [[pillager outpost]] watchtowers.}}
{{History||1.11.0|snap=beta 1.11.0.1|Gray banners now generate in pillager outpost watchtowers, instead of black banners.
|[[File:Ominous Banner BE.png|17px]] Added [[illager captain]]s, which drop an [[illager]] banner upon [[death]].}}
{{History|||snap=beta 1.11.0.3|Illager banners now generate in [[pillager outpost]] watchtowers, instead of gray banners.}}
{{History|||snap=beta 1.11.0.4|Banners can now be [[trading|bought]] from cartographer and shepherd [[villager]]s.}}
{{History||1.20.0|snap=beta 1.20.0.20|Banners can now be used to customise [[shield]]s.}}
{{History|console}}
{{History||xbox=TU43|xbone=CU33|ps=1.36|wiiu=Patch 13|switch=1.0.1|[[File:White Banner Revision 1.png|22px]][[File:Light Gray Banner Revision 1.png|22px]][[File:Gray Banner Revision 1.png|22px]][[File:Black Banner Revision 1.png|22px]][[File:Brown Banner Revision 1.png|22px]][[File:Red Banner Revision 1.png|22px]][[File:Orange Banner Revision 1.png|22px]][[File:Yellow Banner Revision 1.png|22px]][[File:Lime Banner Revision 1.png|22px]][[File:Green Banner Revision 1.png|22px]][[File:Cyan Banner Revision 1.png|22px]][[File:Light Blue Banner Revision 1.png|22px]][[File:Blue Banner Revision 1.png|22px]][[File:Purple Banner Revision 1.png|22px]][[File:Magenta Banner Revision 1.png|22px]][[File:Pink Banner Revision 1.png|22px]] Added banners.}}
{{History||xbox=TU46|xbone=CU36|ps=1.38|wiiu=Patch 15|switch=1.0.1|[[File:End City Banner.png|17px]] Magenta banners with a black chevron and inverted chevron are now naturally generated on the outside walls of [[end city|end cities]].}}
{{History||xbox=TU53|xbone=CU43|ps=1.49|wiiu=Patch 23|switch=1.0.3|[[File:White Banner.png|17px]] [[File:Light Gray Banner.png|17px]] [[File:Gray Banner.png|17px]] [[File:Black Banner.png|17px]] [[File:Brown Banner.png|17px]] [[File:Red Banner.png|17px]] [[File:Orange Banner.png|17px]] [[File:Yellow Banner.png|17px]] [[File:Lime Banner.png|17px]] [[File:Green Banner.png|17px]] [[File:Cyan Banner.png|17px]] [[File:Light Blue Banner.png|17px]] [[File:Blue Banner.png|17px]] [[File:Purple Banner.png|17px]] [[File:Magenta Banner.png|17px]] [[File:Pink Banner.png|17px]] Changed banners' [[tint]]s.}}
{{History||xbox=none|xbone=none|ps=1.90|wiiu=none|switch=none|[[Loom]]s have been added to help the [[player]] edit banners more easily.}}
{{History||ps=1.91|[[File:Ominous Banner BE.png|17px]] Added [[illager]] banners, which generate with [[pillager outpost]]s and are [[drops|dropped]] by [[illager captain]]s upon [[death]].}}
{{History|foot}}
== Issues ==
{{issue list}}
== Trivia ==
* With 16 blank banners, 38 patterns of 16 colors each (608 uniquely-colored patterns), and 0 to 6 patterns per banner, the number of uniquely crafted banners is 16 × (608<sup>0</sup> + 608<sup>1</sup> + 608<sup>2</sup> + 608<sup>3</sup> + 608<sup>4</sup> + 608<sup>5</sup> + 608<sup>6</sup>) ≈ 809 quadrillion - 809 with 15 zeros (809,573,616,779,945,488). The number of visually distinct banners is smaller, because one or more patterns may completely cover other patterns, or the entire banner, or be duplicated due to the symmetric set of patterns (e.g. field or (yellow) + per pale azure (blue) = field azure + per pale or inverted).
** Not 38 patterns are available on BE, but 40 patterns of 16 colors each (640 uniquely-colored patterns), so the number is even greater. 16 × (640<sup>0</sup> + 640<sup>1</sup> + 640<sup>2</sup> + 640<sup>3</sup> + 640<sup>4</sup> + 640<sup>5</sup> + 640<sup>6</sup>) ≈ 1 quintillion - 1 with 18 zeros (1,101,232,303,249,827,856). This increases the number by almost 1.4 times, or almost 292 quadrillion, despite the addition of only 2 patterns.
* If a banner has over 6 patterns, only the six bottom-most patterns are displayed when hovered over in the [[inventory]].
* The Mojang logo is called "Thing" in-game, which could be considered an alternate translation for [[wiktionary:mojäng|mojäng]]. If [[wikipedia:Google Translate|Google Translate]] is used, it translates to "thingys" or "contraption".
** In the Swedish translation of the game, this pattern is, in fact, called ''mojäng''.
* [[List of block textures#Banner Textures|Banner textures]] are located in \assets\minecraft\textures\entity\banner.
** There are 40 monochrome textures, each containing all 6 sides of the banner.
** The texture of the back side is the mirrored texture of the front side.
** Compared to the texture files, textures' colors are inverted in-game due to them acting as masks for the re-colored base texture, base.png. That means white is visible, while black is transparent.
* Banners that have the purple NBT+ line in the bottom (obtained by holding Ctrl and middle-clicking the banner, which also copies the NBT [[tag]] of anything that the player points their crosshair to) actually have no difference with the base banner obtained by middle click.
*The Illager Banner in Bedrock Edition is available as a separate item but is just a second variant of the white banner.
**Standard variant of white banner is set to type 0.
**Illager variant is set to type 1.
== Gallery ==
<gallery>
Banners Jeb.png|The first image of banners, as tweeted by Jens Bergensten.
Iceland and Norway Flags.png|Another banner image from Jeb.
Searge Banners.png|Several banners made by Searge.
The Bountiful Update.png|Banners in the official 1.8 poster.
BannersBeforeAndAfter.png|An image, tweeted by Jeb, showcasing the changes he made to the banner color palette in the 1.12 update.
Gradients Overlay.png|The result of using gradient different numbers of times, each time increasing the level of gradient by 1.
All positions and rotations of a banner.png|All positions and rotations of a banner
Item Frame with Banner.png|A banner with the [[Mojang]] logo in an [[item frame]].
EndCityBanners.png|Banners floating outside of an [[End city]] tower.
Woodland mansion 1x2 d1.png|Banners hanging above the doorway of a [[woodland mansion]] master bedroom.
Replaceitembanner.png|Banner put in the helmet slot by using the command {{cmd|replaceitem}}{{Only|BE}} or {{cmd|item replace}}{{Only|JE}}.
Better Together Banners.jpg|Banners in ''Bedrock Edition''.
Better Together Banner Crafting 1.jpg|A banner in the hand.
Better Together Banner Crafting 2.jpg|A banner in the inventory.
Better Together Banner Crafting 3.jpg|A banner in the crafting grid.
Better Together Banner Crafting 4.jpg|A banner being given a pattern.
</gallery>
=== Renders ===
<gallery>
Ominous Banner.gif
White Banner.gif
Light Gray Banner.gif
Gray Banner.gif
Black Banner.gif
Brown Banner.gif
Red Banner.gif
Orange Banner.gif
Yellow Banner.gif
Lime Banner.gif
Green Banner.gif
Cyan Banner.gif
Light Blue Banner.gif
Blue Banner.gif
Purple Banner.gif
Magenta Banner.gif
Pink Banner.gif
Ominous Wall Banner.png|
White Wall Banner.png|
Light Gray Wall Banner.png|
Gray Wall Banner.png|
Black Wall Banner.png|
Brown Wall Banner.png|
Red Wall Banner.png|
Orange Wall Banner.png|
Yellow Wall Banner.png|
Lime Wall Banner.png|
Green Wall Banner.png|
Cyan Wall Banner.png|
Light Blue Wall Banner.png|
Blue Wall Banner.png|
Purple Wall Banner.png|
Magenta Wall Banner.png|
Pink Wall Banner.png
</gallery>
<gallery>
File:Ominous Banner.gif|Ominous banner pattern in Java Edition.
File:Ominous Banner BE.gif|Illager banner pattern in Bedrock Edition.
File:Ominous Banner Revision 1.gif|Old Ominous banner pattern.
File:Ominous Banner washing.gif|Washing with cauldron shows how to apply the ominous banner pattern.
</gallery>
=== [[Lego Minecraft]] Banners ===
<gallery>
File:Lego Red Creeper Banner Collage.jpg|Lego banners from 21127 and 21131
File:Lego Melon Banner.png|Lego banner from 21138
File:Lego Fish Banner.png|Lego banner from 21142
File:Lego Beetroot Banner.png|Lego banner from 21144
File:Lego Wheat Banner.png|Another lego banner from 21144
File:Lego Carrot Banner.png|A third lego banner from 21144
File:Lego Crossbones Banner.png|Lego banner from 21152
File:Lego Green Creeper Banner Collage.jpg|Lego banners from 21155
File:Lego Ominous Banner.png|Lego ominous banner from 21160
</gallery>
== References ==
{{reflist}}
{{Blocks|Utility}}
{{Items}}
[[Category:Generated structure blocks]]
[[Category:Manufactured blocks]]
[[Category:Block entities]]
[[Category:Non-solid blocks]]
[[cs:Prapor]]
[[de:Banner]]
[[es:Estandarte]]
[[fr:Bannière]]
[[ja:旗]]
[[ko:현수막]]
[[nl:Banier]]
[[pl:Sztandar]]
[[pt:Estandarte]]
[[ru:Флаг]]
[[uk:Стяг]]
[[zh:旗帜]]</li></ul></nowiki> | build 1 | Blocks of iron are now used to craft anvils. | |||
| Blocks of iron can now be used to create iron golems. | |||||
v0.16.0{{Extension DPL}}<ul><li>[[Potato|Potato]]<br/>{{about|the raw potato|the cooked potato|Baked Potato|the potato that can inflict poison|Poisonous Potato}}
{{Item
| group = Age 0-1
| 1-1 = Potatoes Age 0-1.png
| 1-2 = Potatoes Age 0-1 BE.png
| group2 = Age 2-3
| 2-1 = Potatoes Age 4-6.png
| 2-2 = Potatoes Age 2-3 BE.png
| group3 = Age 4-6
| 3-1 = Potatoes Age 4-6.png
| 3-2 = Potatoes Age 4-6 BE.png
| group4 = Age 7
| 4-1 = Potatoes Age 7.png
| 4-2 = Potatoes Age 7 BE.png
| image = Potato JE3 BE2.png
| renewable = Yes
| heals = {{hunger|1}}
| stackable = Yes (64)
}}
A '''potato''' is a [[food]] [[item]] obtained from potato crops that can be used to plant them, consumed raw or [[cook]]ed to make [[baked potato]]es.
'''Potato crops''' are planted in [[farmland]] and used to grow potatoes and, rarely, [[Poisonous Potato|poisonous potatoes]].
== Obtaining ==
=== Natural generation ===
[[Village]] farm plots have a chance of being planted with potatoes. The exact chance depends on the style of the village:
{| class="wikitable"
! Village style !! Chance
|-
| {{EnvSprite|snowy-village}} Snowy || 70%
|-
| {{EnvSprite|plains-village}} Plains || 15%
|-
| {{EnvSprite|taiga-village}} Taiga || 10%
|}
Fully grown potato crops drop 2 to 5 potatoes ({{frac|3|5|7}} per crop harvested on average) and have a 2% chance of dropping an additional [[poisonous potato]]. Potato yield can be increased using a tool enchanted with [[Fortune]], with Fortune III harvesting an average of {{frac|5|3|7}} potatoes. [[Bone meal]] can be used to mature the potato to its last stage of growth.
The first two potatoes always drop, and then three more attempts are made to drop a potato with a success rate of 57.14286% to yield the extra 0–3 drops. Each level of Fortune enchantment increases the number of attempts by one.
=== Mob loot ===
[[Zombie]]s, [[husk]]s, and [[zombie villager]]s have a 2.5% ({{frac|1|40}}) chance of dropping either an [[iron ingot]], [[carrot]], or potato when killed by a player or tamed wolf. This is increased by 1% ({{frac|1|100}}) per level of looting. This gives potatoes the following chances of dropping:
* {{frac|1|120}} (about 0.83%)
* {{frac|7|600}} (about 1.17%) with Looting I
* {{frac|9|600}} (1.50%) with Looting II
* {{frac|11|600}} (about 1.83%) with Looting III
If a zombie, husk, or zombie villager is killed with fire, it drops a baked potato instead.
=== Chest loot ===
{{LootChestItem|potato}}
== Usage ==
=== Farming ===
{{main|Tutorials/Crop farming}}
When farmed, potatoes require 8 [[Block tick|stages]] to grow. However, there are four ''visible'' stages due to having only four distinct textures: every two stages have the same texture, except that growth stage 7 keeps the same appearance as stages 5–6, so that only stage 8 has the final, mature appearance. Planted potatoes require a light level of 9 or greater to continue growing. If the light level is 7 or below, the crops instantly un-plant themselves ("pop off"). It is not possible to plant potatoes if the light level is too low.
Crops grow faster if the farmland they are planted in is [[Farmland#Hydration|hydrated]]. Using [[bone meal]] on crops also increases the speed of growth by randomly increasing their growth stage by 2 to 5.
Crops break if pushed by a [[piston]] or if their supporting farmland breaks or turns to dirt (i.e. by being trampled), dropping their usual drops.
=== Food ===
To eat a potato, press and hold {{control|use}} while it is selected in the [[hotbar]]. Eating a potato restores {{hunger|1}} hunger and 0.6 [[Hunger#Mechanics|saturation]].
=== Breeding ===
[[Pig]]s follow and can be [[bred]] by a player holding a potato.
[[Villager]]s can pick up potato items to become willing, which allow them to breed. Villagers require 12 potatoes to become willing.
=== Smelting ingredient ===
{{Smelting
|showname=1
|Potato
|Baked Potato
|0.35
}}
=== Trading ===
Novice-level farmer villagers have a 25%{{only|bedrock}} or 40%{{only|java}} chance to buy 26 potatoes for an [[emerald]] as part of their trade.
=== Composting ===
Placing a potato into a [[composter]] has a 65% chance of raising the compost level by 1. This is less efficient than composting with [[Baked Potato|baked potatoes]], which has a higher success chance of 85%.
== Sounds ==
=== Block ===
{{Sound table/Block/Crop}}
=== Item ===
{{Sound table/Entity/Food}}
== Data values ==
=== ID ===
{{edition|java}}:
{{ID table
|edition=java
|showblocktags=y
|showforms=y
|generatetranslationkeys=y
|displayname=Potatoes
|spritetype=block
|nameid=potatoes
|blocktags=bee_growables, crops
|form=block}}
{{ID table
|displayname=Potato
|spritetype=item
|nameid=potato
|form=item
|foot=1}}
{{edition|bedrock}}:
{{ID table
|edition=bedrock
|shownumericids=y
|showforms=y
|generatetranslationkeys=y
|displayname=Potatoes
|spritetype=block
|nameid=potatoes
|id=142
|form=block}}
{{ID table
|displayname=Potato
|spritetype=item
|nameid=potato
|id=280
|form=item
|foot=1}}
=== Block states ===
{{see also|Block states}}
{{/BS}}
== Advancements ==
{{load advancements|Husbandry;A Balanced Diet}}
== History ==
{{History|java}}
{{History||1.4.2|snap=12w34a|[[File:Potato JE1 BE1.png|32px]] Added potatoes.
|[[File:Potatoes Age 0-1 JE1.png|32px]] [[File:Potatoes Age 2-3 JE1.png|32px]] [[File:Potatoes Age 4-6 JE1.png|32px]] [[File:Potatoes Age 7 JE1.png|32px]] Added potato crops.}}
{{History|||snap=12w36a|Potatoes can now be found in [[village]]s.}}
{{History||1.5|snap=13w09b|The [[Fortune]] enchantment now works when harvesting potatoes.<ref>{{bug|MC-1680}}</ref>}}
{{History||1.8|snap=14w02a|Potatoes can now be [[trading|sold]] to farmer [[villager]]s, at 15–19 potatoes for 1 [[emerald]].}}
{{History|||snap=14w04a|Farmer villagers now harvest fully grown potatoes.
|Villagers can now be made willing using 12 potatoes.}}
{{History|||snap=14w06a|[[File:Potatoes Age 0-1 JE2.png|32px]] [[File:Potatoes Age 2-3 JE2.png|32px]] [[File:Potatoes Age 4-6 JE2.png|32px]] [[File:Potatoes Age 7 JE2.png|32px]] Potato crops are now a pixel higher - previously they were offset one pixel down as to match farmland's sunken model. This is likely an accidental result of model conversion.}}
{{History|||snap=14w10a|[[File:Missing Model JE2.png|32px]] [[File:Missing Model JE2.png|32px]] [[File:Missing Model JE2.png|32px]] [[File:Missing Model JE2.png|32px]]<br>[[File:Missing Model (anisotropic filtering) JE2.png|32px]] [[File:Missing Model (anisotropic filtering) JE2.png|32px]] [[File:Missing Model (anisotropic filtering) JE2.png|32px]] [[File:Missing Model (anisotropic filtering) JE2.png|32px]]<br>Potato crops of all stages [[Missing model|no longer have a model]].}}
{{History|||snap=14w10b|[[File:Potatoes Age 0-1 JE4.png|32px]] [[File:Potatoes Age 2-3 JE4.png|32px]] [[File:Potatoes Age 4-6 JE4.png|32px]] [[File:Potatoes Age 7 JE4.png|32px]] Potato crops now have models again.<ref>{{bug|MC-50232}}</ref> In addition, they are now offset downwards by one pixel once more.<ref>{{bug|MC-50155}}</ref>}}
{{History|||snap=14w25a|[[File:Potatoes Age 0-1 JE5.png|32px]] [[File:Potatoes Age 2-3 JE5.png|32px]] [[File:Potatoes Age 4-6 JE5.png|32px]] [[File:Potatoes Age 7 JE5.png|32px]] Potato crops are now darker and subject to directional shading.}}
{{History|||snap=14w27a|[[File:Potatoes Age 0-1 JE6.png|32px]] [[File:Potatoes Age 2-3 JE6.png|32px]] [[File:Potatoes Age 4-6 JE6.png|32px]] [[File:Potatoes Age 7 JE6.png|32px]] Potato crops are no longer subject to directional shading.}}
{{History||1.9|snap=15w31a|Potatoes can now be used to lead and breed [[pig]]s.}}
{{History|||snap=15w38a|The [[drop]] chances of potatoes has now been slightly improved from average {{frac|2|3|5}} per potato crop harvested to {{frac|2|5|7}}.}}
{{History||1.13|snap=17w47a|Prior to [[1.13/Flattening|''The Flattening'']], this block's numeral ID was 142, and the item's 392.}}
{{History|||snap=18w11a|Potatoes now have a chance of generating in [[shipwreck]] [[chest]]s.}}
{{History||1.14|snap=18w43a|[[File:Potato JE2.png|32px]] The texture of potatoes has been changed.
|[[File:Potatoes Age 0-1 JE7.png|32px]] [[File:Potatoes Age 2-3 JE7.png|32px]] [[File:Potatoes Age 4-6 JE7.png|32px]] [[File:Potatoes Age 7 JE7.png|32px]] The textures of potato crops have been changed.}}
{{History|||snap=18w47a|Potatoes now generate in [[pillager outpost]] chests.}}
{{History|||snap=18w48a|Potatoes can now be found in chests in [[plains]] village houses.}}
{{History|||snap=18w49a|Potatoes can now be found in chests in [[snowy tundra|snowy]] village houses.}}
{{History|||snap=18w50a|Potatoes can now be found in chests in [[taiga]] village houses.
|[[File:Potato JE3 BE2.png|32px]] The texture of potatoes has been changed, once again.}}
{{History|||snap=19w03a|Added placement and new breaking [[sound]]s to potatoes.
|Placing a potato into the new [[composter]] has a 50% chance of raising the compost level by 1.}}
{{History|||snap=19w05a|Potatoes now have a 65% chance of increasing the compost level in a composter by 1.}}
{{History||1.15|snap=19w34a|[[Bee]]s can now pollinate potato crops.}}
{{History||1.17|snap=21w13a|[[File:Potatoes Age 0-1 JE8.png|32px]] [[File:Potatoes Age 2-3 JE8.png|32px]] [[File:Potatoes Age 4-6 JE8.png|32px]] [[File:Potatoes Age 7 JE8.png|32px]] The "crop" template model has changed such that pixels appear in the same physical positions on opposite sides of texture planes, changing the potato crop's appearance in the process.<ref>{{bug|MC-199242}}</ref>}}
{{History|pocket alpha}}
{{History||v0.8.0|snap=build 1|[[File:Potato JE1 BE1.png|32px]] Added potatoes.
|[[File:Potatoes Age 0-1 JE6 BE1.png|32px]] [[File:Potatoes Age 2-3 JE6 BE1.png|32px]] [[File:Potatoes Age 4-6 JE6 BE1.png|32px]] [[File:Potatoes Age 7 JE6 BE1.png|32px]]{{verify|Correct models?}} Added potato crops.
|Potatoes are a rare [[drops|drop]] from killing [[zombie]]s.}}
{{History|||snap=build 3|Potatoes now have a chance to drop when tilling [[grass block]]s.}}
{{History|||snap=build 4|Potatoes are no longer dropped from tilling grass blocks.}}
{{History||v0.9.0|snap=build 1|Potato crops now naturally spawn in [[village]]s.
|Potatoes can now be used to lead and breed [[pig]]s.}}
{{History||v0.12.1|snap=build 1|Potatoes now restore [[hunger]] instead of [[health]].
|Farmer (profession) [[villager]]s now plant and harvest potatoes.}}
{{History||v0.16.2|Potatoes can now be found in the [[chest]] inside large houses in [[ice plains]] and [[cold taiga]] [[village]]s.}}
{{History|bedrock}}
{{History||1.10.0|snap=beta 1.10.0.3|Potatoes can now be found in [[pillager outpost]]s and [[plains]] [[village]] houses.
|[[File:Potato JE3 BE2.png|32px]] The texture of potatoes has been changed.
|[[File:Potatoes Age 0-1 JE7.png|32px]] [[File:Potatoes Age 2-3 JE7.png|32px]] [[File:Potatoes Age 4-6 JE7.png|32px]] [[File:Potatoes Age 7 JE7.png|32px]]{{verify|Correct models?}} The textures of potato crops have been changed.}}
{{History||1.11.0|snap=beta 1.11.0.1|Potatoes can now be used to fill up [[composter]]s.
|Potatoes can now be found in [[taiga]], [[snowy taiga]] and [[snowy tundra]] village house [[chest]]s.}}
{{History|||snap=beta 1.11.0.4|[[Trading]] has now been changed, farmer [[villager]]s now have a 25% chance to [[trading|buy]] 26 potatoes for an [[emerald]].}}
{{History||1.14.0|snap=beta 1.14.0.1|[[Bee]]s can now pollinate potato crops.}}
{{History||?|[[File:Potatoes Age 0-1 BE.png|32px]] [[File:Potatoes Age 2-3 BE.png|32px]] [[File:Potatoes Age 4-6 BE.png|32px]] [[File:Potatoes Age 7 BE.png|32px]] Potato crop planes use a mapping that results in very unnatural mirroring when viewed from certain angles, such as northwest.<ref>{{bug|MCPE-146936}}</ref>}}
{{History|console}}
{{History||xbox=TU14|xbone=CU1|ps=1.04|wiiu=Patch 1|switch=1.0.1|[[File:Potato JE1 BE1.png|32px]] Added potatoes.
|[[File:Potatoes Age 0-1 JE6 BE1.png|32px]] [[File:Potatoes Age 2-3 JE6 BE1.png|32px]] [[File:Potatoes Age 4-6 JE6 BE1.png|32px]] [[File:Potatoes Age 7 JE6 BE1.png|32px]]{{verify|Correct models?}} Added potato crops.}}
{{History||xbox=none|xbone=none|ps=1.90|wiiu=none|switch=none|[[File:Potato JE3 BE2.png|32px]] The texture of potatoes has been changed.
|[[File:Potatoes Age 0-1 JE7.png|32px]] [[File:Potatoes Age 2-3 JE7.png|32px]] [[File:Potatoes Age 4-6 JE7.png|32px]] [[File:Potatoes Age 7 JE7.png|32px]]{{verify|Correct models?}} The textures of potato crops have been changed.}}
{{History|New 3DS}}
{{History||0.1.0|[[File:Potato JE1 BE1.png|32px]] Added potatoes.
|[[File:Potatoes Age 0-1 JE6 BE1.png|32px]] [[File:Potatoes Age 2-3 JE6 BE1.png|32px]] [[File:Potatoes Age 4-6 JE6 BE1.png|32px]] [[File:Potatoes Age 7 JE6 BE1.png|32px]]{{verify|Correct models?}} Added potato crops.}}
{{History|foot}}
=== Potatoes "item" ===
{{:Technical blocks/Potatoes}}
== Issues ==
{{issue list}}
== Gallery ==
<gallery>
AllSeeds.png|All the seeds that exist in the game (except [[Pitcher Plant|seeds fr]][[Torchflower Seeds|om 1.20,]] [[nether wart]] and [[cocoa beans]]).
VillageGrowingCarrotsAndPotatoes.png|[[Carrot]]s and potatoes found growing naturally in a [[village]].
File:Hot Potato.jpeg|Official render of a potato to celebrate National Potato Day.<ref> https://twitter.com/Minecraft/status/1692969488617029859?s=20| Hot potato! @ a friend to toss it.</ref>
</gallery>
== References ==
{{reflist}}
== External Links ==
*[https://www.minecraft.net/en-us/article/taking-inventory--potato Taking Inventory: Potato] – Minecraft.net on December 16, 2021
{{items}}
{{blocks|vegetation}}
[[Category:Plants]]
[[Category:Food]]
[[Category:Renewable resources]]
[[Category:Non-solid blocks]]
[[Category:Generated structure blocks]]
[[cs:Brambora]]
[[de:Kartoffel]]
[[es:Patata]]
[[fr:Pomme de terre]]
[[hu:Burgonya]]
[[it:Patata]]
[[ja:ジャガイモ]]
[[ko:감자]]
[[nl:Aardappel]]
[[pl:Ziemniak]]
[[pt:Batata]]
<br />
[[ru:Картофель]]
[[th:มันฝรั่ง]]
[[uk:Картопля]]
[[zh:马铃薯]]</li><li>[[Axe|Axe]]<br/>{{For}}
{{Item
| image = <gallery>
Wooden Axe.png | Wooden
Stone Axe.png | Stone
Iron Axe.png | Iron
Golden Axe.png | Golden
Diamond Axe.png | Diamond
Netherite Axe.png | Netherite
</gallery>
| rarity = Common
| renewable =
* '''Netherite''': No
* '''Others''': Yes
| durability =
'''Bedrock Edition'''
* Golden: 33
* Wooden: 60
* Stone: 132
* Iron: 251
* Diamond: 1562
* Netherite: 2032
'''Java Edition'''
* Golden: 32
* Wooden: 59
* Stone: 131
* Iron: 250
* Diamond: 1561
* Netherite: 2031
| stackable = No
}}
An '''axe''' is a [[tool]] used to hasten the [[breaking]] of [[wood]]-based or other tough organic [[block]]s, strip or scrape certain blocks, or as a melee [[weapon]] that can disable [[Shield|shields]] it hits.
==Obtaining==
===Crafting===
{{Crafting
|head=1
|showname=0
|showdescription=1
|name=[[Axe]]
|A1={Any Planks}; Iron Ingot; Gold Ingot; Diamond
|B1={Any Planks}; Iron Ingot; Gold Ingot; Diamond
|A2={Any Planks}; Iron Ingot; Gold Ingot; Diamond
|B2=Stick
|B3=Stick
|Output= Wooden Axe; Iron Axe; Golden Axe; Diamond Axe
|type= Tool
}}
{{Crafting
|name=[[Stone Axe]]
|A1=Any stone-tier block |B1=Any stone-tier block
|A2=Any stone-tier block |B2=Stick
|B3=Stick
|Output=Stone Axe
|type=Tool
|description=Can use cobblestone and its other variants interchangeably.
}}
{{Crafting
|foot=1
|ignoreusage=1
|name=[[Axe]]
|ingredients=Damaged Matching [[Axe]]
|Damaged Wooden Axe; Damaged Stone Axe; Damaged Iron Axe; Damaged Golden Axe; Damaged Diamond Axe; Damaged Netherite Axe
|Damaged Wooden Axe; Damaged Stone Axe; Damaged Iron Axe; Damaged Golden Axe; Damaged Diamond Axe; Damaged Netherite Axe
|Output=Wooden Axe; Stone Axe; Iron Axe; Golden Axe; Diamond Axe; Netherite Axe
|description= The durability of the two axes is added together, plus an extra 5% durability.
|type= Tool
}}
=== Upgrading ===
{{Smithing
|head=1
|Netherite Upgrade
|Diamond Axe
|Netherite Ingot
|Netherite Axe
|tail=1
}}
===Repairing===
====Grinding====
{{Grinding
|showdescription=1
|ingredients= 2× Damaged [[Wooden Axe]] or 2× Damaged [[Stone Axe]] or 2× Damaged [[Iron Axe]] or 2× Damaged [[Golden Axe]] or 2× Damaged [[Diamond Axe]] or 2× Damaged [[Netherite Axe]]
|Damaged Wooden Axe; Damaged Stone Axe; Damaged Iron Axe; Damaged Golden Axe; Damaged Diamond Axe; Damaged Netherite Axe
|Damaged Wooden Axe; Damaged Stone Axe; Damaged Iron Axe; Damaged Golden Axe; Damaged Diamond Axe; Damaged Netherite Axe
|Wooden Axe; Stone Axe; Iron Axe; Golden Axe; Diamond Axe; Netherite Axe
|description=The durability of the two axes is added together, plus an extra 5% of max durability.
}}
====[[Anvil mechanics#Unit repair|Unit repair]]====
An axe can be repaired in an [[anvil]] by adding units of the [[tiers|tier]]'s repair material, with each repair material restoring 25% of the axe's maximum durability, rounded down.
===Mob loot===
==== Equipment ====
{{Main|Drops#Equipped items}}
A [[vindicator]] spawns with an iron axe and has an 8.5% chance (9.5% with Looting I, 10.5% with Looting II, and 11.5% with Looting III) of dropping it upon death by the player. It is usually heavily damaged and is sometimes enchanted.
A [[piglin brute]] spawns with a golden axe and has an 8.5% chance (9.5% with Looting I, 10.5% with Looting II, and 11.5% with Looting III) of dropping it upon death by the player. Also, {{in|java}}, [[Zombified Piglin|zombified piglins]] can drop their golden axe (with the same chance as piglin brute drop) if they have been zombified from a [[Piglin Brute|piglin brute.]]
====Raids====
{{IN|be}}, [[Vindicator]] and [[pillager]]s that spawn in raids have a 4.1% chance (5.12% on hard) to drop a badly-damaged iron axe, which is sometimes enchanted with a random enchantment. A vindicator can drop 2 iron axes, one from natural equipment and one from raid drops.
===Trading===
Novice-level [[Trading#Toolsmith|Toolsmith]] [[villager]]s have a 25% chance to sell a stone axe for one [[emerald]], journeyman-level Toolsmith villagers have a 25% chance to sell an enchanted iron axe for eight emeralds, and expert-level Toolsmith villagers have a 50% chance to sell an enchanted diamond axe for 13 emeralds.{{only|bedrock}}
Novice-level [[Trading#Toolsmith 2|Toolsmith]] villagers have a 40% chance to sell a stone axe for one emerald, journeyman-level Toolsmith villagers have a 40% chance to sell an enchanted iron axe for 7-22 emeralds, and expert-level Toolsmith villagers have a 66.67% chance to sell an enchanted diamond axe for 18-35 emeralds.{{only|java}}
Novice-level [[Trading#Weaponsmith|Weaponsmith]] [[villager]]s sell an iron axe for 3 emeralds as one of their trades, and master-level Weaponsmith villagers sell an enchanted diamond axe for 12 emeralds.{{only|bedrock}}
Novice-level [[Trading#Weaponsmith 2|Weaponsmith]] villagers have a 66.67% chance to sell an iron axe for 3 emeralds. Master-level Weaponsmith villagers always offer to sell an enchanted diamond axe for 18-35 emeralds.{{only|java}}
The enchantments are the same as the ones obtained from an [[enchantment table]] at levels 5–19.
=== Villager gifts ===
[[Trading#Toolsmith 2|Toolsmith]] [[villagers]] occasionally throw stone axes at players with the [[Hero of the Village]] status effect.{{only|java}}
[[Trading#Weaponsmith 2|Weaponsmith]] [[villagers]] occasionally throw either stone, gold, or iron axes at players with the [[Hero of the Village]] status effect.{{only|java}}
===Structure loot===
{{IN|JE}}, a sealed room in [[woodland mansion]]s can appear that has a chest always containing an [[Efficiency]] I iron axe.
{{LootChestItem|wooden-axe,stone-axe,random-enchanted-golden-axe,damaged-random-enchanted-netherite-axe,iron-axe}}
==Usage==
===Chopping===
An axe is used to break [[logs]], blocks derived from wood and some other blocks faster than by using other tools. An axe uses 1 durability to break 1 block. For blocks that break instantly, it uses 0 durability.
====Durability====
Each tier of axe has a different durability:
{| class="wikitable sortable"
! Material
! [[Durability]]
|-
| {{itemLink|Wooden Axe|Wood|link=Axe}}
| 59
|-
| {{itemLink|Stone Axe|Stone|link=Axe}}
| 131
|-
| {{itemLink|Iron Axe|Iron|link=Axe}}
| 250
|-
| {{itemLink|Diamond Axe|Diamond|link=Axe}}
| 1561
|-
| {{itemLink|Golden Axe|Golden|link=Axe}}
| 32
|-
| {{itemLink|Netherite Axe|Netherite|link=Axe}}
| 2031
|}
====Speed====
The following table summarizes the speed at which axes of different qualities perform.
{{breaking row|Wooden Trapdoors|link=Trapdoor|sort=1|simple=1}}
{{breaking row|Wooden Doors|item=1|link=Door|sprite=oak-door}}
{{breaking row|Barrel}}
{{breaking row|Cartography Table}}
{{breaking row|Chest}}
{{breaking row|Trapped Chest}}
{{breaking row|Crafting Table}}
{{breaking row|Fletching Table}}
{{breaking row|Lectern}}
{{breaking row|Loom}}
{{breaking row|Smithing Table}}
{{breaking row|Bamboo Mosaic}}
{{breaking row|Block of Bamboo}}
{{breaking row|Campfire}}
{{breaking row|Fences}}
{{breaking row|Fence Gates}}
{{breaking row|Jukebox}}
{{breaking row|Logs}}
{{breaking row|Planks}}
{{breaking row|Wooden Slabs|link=Slabs|sprite=all-wooden-slabs}}
{{breaking row|Wooden Stairs|link=Stairs|sprite=all-wooden-stairs}}
{{breaking row|Bookshelf}}
{{breaking row|Chiseled Bookshelf}}
{{breaking row|Banners}}
{{breaking row|Jack o'Lantern}}
{{breaking row|Melon}}
{{breaking row|Pumpkin}}
{{breaking row|Sign|sprite=oak-sign}}
{{breaking row|Hanging Sign|sprite=hanging-oak-sign}}
{{breaking row|Note Block}}
{{breaking row|Mangrove Roots}}
{{breaking row|Wooden Pressure Plate|sprite=oak-pressure-plate}}
{{breaking row|Beehive}}
{{breaking row|Ladder}}
{{breaking row|Bee Nest|drop=0}}
{{breaking row|Composter}}
{{breaking row|Bamboo}}
{{breaking row|sprite=red-bed|Bed}}
{{breaking row|Cocoa}}
{{breaking row|Daylight Detector}}
{{breaking row|Mushroom Block|sprite=mushroom-blocks}}
{{breaking row|Vines|drop=0|foot=1}}
=== Stripping ===
{{control|Using}} an axe on a [[log]], [[wood]] block, [[block of bamboo]]\, or [[block of copper]] causes it to become a [[stripped log]], [[stripped wood]] block, [[block of stripped bamboo]], or removes one layer of oxidization or wax, respectively. This consumes one point of durability from the axe.
===Weapon===
An axe loses 2 points of durability when used as a weapon.
==== Bedrock Edition ====
{{IN|bedrock}}, axes always attack instantly and deal {{hp|1}} less damage than a [[sword]] of the same quality but it lowers the durability of armor and shields faster than any other tool in-game.
{| class="wikitable" style="text-align:center" data-description="Bedrock damage"
! Material !! Damage
|-
| {{ItemSprite|Wooden Axe}} Wooden || rowspan="2" |{{hp|4}}
|-
| {{ItemSprite|Golden Axe}} Golden
|-
| {{ItemSprite|Stone Axe}} Stone ||{{hp|5}}
|-
| {{ItemSprite|Iron Axe}} Iron ||{{hp|6}}
|-
| {{ItemSprite|Diamond Axe}} Diamond ||{{hp|7}}
|-
| {{ItemSprite|Netherite Axe}} Netherite ||{{hp|8}}
|}
====Java Edition====
Attacking a [[shield]] user with an axe should have a chance to disable the use of the shield for 5 seconds, but currently this always disables a shield.<ref>{{bug|MC-197537}}</ref> The base chance is 25%, plus 5 percentage points per level of [[Efficiency]] on the axe, plus 75 percentage points if attacking while sprinting. [[Vindicator]]s, [[piglin brute]]s, or other [[mob]]s with commands always disable the player's shield. Damage done when using an axe as a weapon is more than that of a [[sword]] of the same tier, though they take longer than a sword to [[Damage#Attack cooldown|recover]], resulting in lower <abbr title="Damage/Second">DPS</abbr> (with the exception of [[gold]]en axes). The damage dealt and cooldown time depends on the type:
{| class="wikitable" style="text-align:center" data-description="Attack damage"
! Material
! {{ItemSprite|Wooden Axe|text=Wooden}}
! {{ItemSprite|Golden Axe|text=Gold}}
! {{ItemSprite|Stone Axe|text=Stone}}
! {{ItemSprite|Iron Axe|text=Iron}}
! {{ItemSprite|Diamond Axe|text=Diamond}}
! {{ItemSprite|Netherite Axe|text=Netherite}}
|-
! Attack Damage
| {{hp|7}}
| {{hp|7}}
| {{hp|9}}
| {{hp|9}}
| {{hp|9}}
| {{hp|10}}
|-
! Attack Speed
| 0.8
| 1.0
| 0.8
| 0.9
| 1.0
| 1.0
|-
! Recovery time
| {{convert|1.25|sec|tick|sep=}}
| {{convert|1|sec|tick|sep=}}
| {{convert|1.25|sec|tick|sep=}}
| {{convert|1.11|sec|tick|sep=}}
| {{convert|1|sec|tick|sep=}}
| {{convert|1|sec|tick|sep=}}
|-
! <abbr title="Damage/Second">DPS</abbr>
| 5.6
| 7.0
| 7.2
| 8.1
| 9.0
| 10.0
|-
! Lifetime damage inflicted<ref group="note">The formula to find the total lifetime damage is <code>ceil(''durability'' ÷ 2) × ''damage per hit''</code>. The durability is halved then ceiled because axes take double durability when used as a weapon, and the last 1 durability can also deal damage. The formula also ignores enchantments and critical hits, and assumes each attack is performed at maximum charge.</ref>
| {{hp|210}}
| {{hp|112}}
| {{hp|594}}
| {{hp|1125}}
| {{hp|7029}}
| {{hp|10160}}
|}
{{notelist}}
=== Enchantments ===
An axe can receive the following enchantments:
{| class="wikitable col-2-center col-3-right"
|+
!Name
!Max Level
![[Enchanting|Method]]
|-
|[[Fortune]]<ref group=note name=exc>Silk Touch and Fortune are mutually exclusive.</ref>
|III
|{{Inventory slot|Enchanting Table}}{{Inventory slot|Anvil}}
|-
|[[Silk Touch]]<ref group=note name=exc/>
|I
|{{Inventory slot|Enchanting Table}}{{Inventory slot|Anvil}}
|-
|[[Efficiency]]
|V
|{{Inventory slot|Enchanting Table}}{{Inventory slot|Anvil}}
|-
|[[Unbreaking]]
|III
|{{Inventory slot|Enchanting Table}}{{Inventory slot|Anvil}}
|-
|[[Sharpness]]<ref group="note" name="exc2">Sharpness, Smite, Bane of Arthropods, and Cleaving{{upcoming|java Combat Tests}} are mutually exclusive.</ref>
|V
|{{Inventory slot|Anvil}}
|-
|[[Smite]]<ref group="note" name=exc2/>
|V
|{{Inventory slot|Anvil}}
|-
|[[Bane of Arthropods]]<ref group="note" name=exc2/>
|V
|{{Inventory slot|Anvil}}
|-
|[[Fire Aspect]]{{upcoming|java Combat Tests}}<ref group="note" name="sword">Fire Aspect, Looting, Knockback, and Sweeping Edge currently exist, but they can be used only for [[sword]]s.</ref>
|II
|{{Inventory slot|Anvil}}
|-
|[[Looting]]{{upcoming|java Combat Tests}}<ref group="note" name="sword" />
|III
|{{Inventory slot|Anvil}}
|-
|[[Knockback]]{{upcoming|java Combat Tests}}<ref group="note" name="sword" />
|II
|{{Inventory slot|Anvil}}
|-
|[[Cleaving]]{{upcoming|java Combat Tests}}<ref group="note" name="exc2" />
|III
|{{Inventory slot|Enchanting Table}}{{Inventory slot|Anvil}}
|-
|[[Sweeping Edge]]{{upcoming|java Combat Tests}}<ref group="note" name="sword" />
|III
|{{Inventory slot|Enchanting Table}}{{Inventory slot|Anvil}}
|-
|[[Mending]]
|I
|{{Inventory slot|Anvil}}
|-
|[[Curse of Vanishing]]
|I
|{{Inventory slot|Anvil}}
|}
{{notelist}}
=== Fuel===
Wooden axes can be used as a fuel in [[furnace]]s, smelting 1 item per axe.
===Smelting ingredient===
{{Smelting|showname=1|Iron Axe;Golden Axe|Iron Nugget;Gold Nugget|0,1}}
===Piglins===
{{EntityLink|Piglin|Piglins}} are attracted to golden axes and run toward any golden axes on the ground, and inspect it for 6 to 8 seconds before putting it in their inventory.
== Sounds ==
{{el|je}}:
{{Sound table
|sound=Axe strip1.ogg
|sound2=Axe strip2.ogg
|sound3=Axe strip3.ogg
|sound4=Axe strip4.ogg
|subtitle=Axe strips
|source=block
|description=When an axe strips a log or wood block
|id=item.axe.strip
|translationkey=subtitles.item.axe.strip
|volume=0.9
|pitch=1.0/0.85
|distance=16}}
{{Sound table
|sound=wax_off1.ogg
|sound2=wax_off2.ogg
|sound3=wax_off3.ogg
|subtitle=Wax off
|source=block
|description=When an axe unwaxes a [[block of copper]]
|id=item.axe.wax_off
|translationkey=subtitles.item.axe.wax_off
|volume=1.0
|pitch=0.9/1.1/1.0
|distance=16}}
{{Sound table
|sound=scrape1.ogg
|sound2=scrape2.ogg
|sound3=scrape3.ogg
|subtitle=Axe scrapes
|source=block
|description=When an axe deoxidizes a block of copper
|id=item.axe.scrape
|translationkey=subtitles.item.axe.scrape
|volume=1.0
|pitch=1.0/0.9/1.1
|distance=16}}
{{Sound table
|sound=Random break.ogg
|subtitle=Item breaks
|source=player
|description=When an axe's durability is exhausted
|id=entity.item.break
|translationkey=subtitles.entity.item.break
|volume=0.8
|pitch=0.8-1.2
|distance=16
|foot=1}}
{{el|be}}:
{{Sound table
|type=bedrock
|sound=Wood hit1.ogg
|sound2=Wood hit2.ogg
|sound3=Wood hit3.ogg
|sound4=Wood hit4.ogg
|sound5=Wood hit5.ogg
|sound6=Wood hit6.ogg
|source=block
|description=When an axe strips a log or wood block <ref group=sound name=stripsoundbug>{{Bug|MCPE-106552}}</ref>
|id=use.wood
|volume=1.0
|pitch=0.8}}
{{Sound table
|sound=Stem step1.ogg
|sound2=Stem step2.ogg
|sound3=Stem step3.ogg
|sound4=Stem step4.ogg
|sound5=Stem step5.ogg
|sound6=Stem step6.ogg
|source=block
|description=When an axe strips a stem or hyphae block <ref group=sound name=stripsoundbug/>
|id=use.stem
|volume=1.0
|pitch=0.8}}
{{Sound table
|sound=Bamboo wood step1.ogg
|sound2=Bamboo wood step2.ogg
|sound3=Bamboo wood step3.ogg
|sound4=Bamboo wood step4.ogg
|sound5=Bamboo wood step5.ogg
|sound6=Bamboo wood step6.ogg
|source=player
|description=When an axe strips a [[block of bamboo]] <ref group=sound name=stripsoundbug/>
|id=step.bamboo_wood
|volume=1.0
|pitch=0.8}}
{{Sound table
|sound=Cherry wood step1.ogg
|sound2=Cherry wood step2.ogg
|sound3=Cherry wood step3.ogg
|sound4=Cherry wood step4.ogg
|sound5=Cherry wood step5.ogg
|sound6=Cherry wood step6.ogg
|source=player
|description=When an axe strips a cherry log or cherry wood block <ref group=sound name=stripsoundbug/>
|id=step.cherry_wood
|volume=1.0
|pitch=0.8}}
{{Sound table
|sound=wax_off1.ogg
|sound2=wax_off2.ogg
|sound3=wax_off3.ogg
|source=neutral
|description=When an axe unwaxes or deoxidizes a block of copper {{More info|Is use.copper used as well?}}
|id=copper.wax.off
|volume=1.0
|pitch=0.8-1.2}}
{{Sound table
|sound=Random break.ogg
|source=player
|description=When an axe's durability is exhausted
|id=random.break
|volume=1.0
|pitch=0.9
|foot=1}}
==Data values==
===ID===
{{edition|java}}:
{{ID table
|edition=java
|showforms=y
|generatetranslationkeys=y
|displayname=Wooden Axe
|spritetype=item
|nameid=wooden_axe
|form=item}}
{{ID table
|displayname=Stone Axe
|spritetype=item
|nameid=stone_axe
|form=item}}
{{ID table
|displayname=Iron Axe
|spritetype=item
|nameid=iron_axe
|form=item}}
{{ID table
|displayname=Diamond Axe
|spritetype=item
|nameid=diamond_axe
|form=item}}
{{ID table
|displayname=Golden Axe
|spritetype=item
|nameid=golden_axe
|form=item}}
{{ID table
|displayname=Netherite Axe
|spritetype=item
|nameid=netherite_axe
|form=item
|foot=1}}
{{edition|bedrock}}:
{{ID table
|edition=bedrock
|shownumericids=y
|showforms=y
|notshowbeitemforms=y
|generatetranslationkeys=y
|displayname=Wooden Axe
|spritetype=item
|nameid=wooden_axe
|id=311
|form=item}}
{{ID table
|displayname=Stone Axe
|spritetype=item
|nameid=stone_axe
|id=315
|form=item}}
{{ID table
|displayname=Iron Axe
|spritetype=item
|nameid=iron_axe
|id=298
|form=item}}
{{ID table
|displayname=Diamond Axe
|spritetype=item
|nameid=diamond_axe
|id=319
|form=item}}
{{ID table
|displayname=Golden Axe
|spritetype=item
|nameid=golden_axe
|id=325
|form=item}}
{{ID table
|displayname=Netherite Axe
|spritetype=item
|nameid=netherite_axe
|id=607
|form=item
|foot=1}}
==Achievements==
{{load achievements|MOAR Tools ;Oooh, shiny!}}
==Advancements ==
{{load advancements|Oh Shiny;Wax off}}
==History==
{{History|java indev}}
{{History||0.31|snap=20100110|[[File:Iron Axe JE1.png|32px]] Added iron axes.
|An axe is used to gather [[log|wood]] 400% faster than by hand.
|When starting in a new world, the [[player]] is given one of each [[tools|tool]].}}
{{History|||snap=20100122|[[File:Iron Axe JE2.png|32px]] The texture of axes has been changed. Half of the axe head has been removed.}}
{{History|||snap=20100124|[[File:Iron Axe JE3.png|32px]] The texture of axes has been changed again. The other axe head is now used instead.
|A complete toolset is no longer given to the [[player]] on starting a new world. Instead, there are multiple [[chest]]s in the later called "[[Indev House]]" containing a stack of most accessible [[blocks]]/[[items]] including [[tools]].}}
{{History|||snap=20100128|[[File:Wooden Axe JE1 BE1.png|32px]] [[File:Stone Axe JE1 BE1.png|32px]] [[File:Diamond Axe JE1 BE1.png|32px]] [[Tools]] now have tiers. Wooden, stone, and diamond axes have been added.
|[[File:Iron Axe JE4 BE1.png|32px]] The texture of iron axes has been changed.
|An axe held by the player is now rendered to appear more 3D.
|They cannot be crafted yet, but have been added to the item chest in the Indev house.}}
{{History|||snap=20100129|Wooden, stone, iron, and diamond axes can now be [[craft]]ed.}}
{{History|||snap=20100130|[[File:Golden Axe JE1.png|32px]] Axes can now be made out of gold.}}
{{History|||snap=20100201-1|[[Tools]] now take [[damage]] when being used. Better tools now last longer.}}
{{History||20100206|[[File:Golden Axe JE2 BE1.png|32px]] The texture of golden axes has been changed.}}
{{History|java beta}}
{{History||1.2|Gold [[tools]], including axes, now remove [[block]]s faster than diamond tools.}}
{{History|java}}
{{History||1.2.4|snap=release|[[Spruce planks]], [[birch planks]], and [[jungle planks]] can now be used to craft wooden axes.}}
{{History||1.3.1|snap=12w16a|Wooden and stone axes are now found in the new [[bonus chest]]s.}}
{{History|||snap=12w18a|Wooden axes can now be used as [[fuel]] in a [[furnace]].}}
{{History|||snap=12w21a|Blacksmith [[villager]]s now [[trading|sell]] 1 diamond axe for 9–11 [[emerald]]s, and 1 iron axe for 6–7 emeralds.}}
{{History||1.6.1|snap=13w21a|Instead of replacing the barehanded [[damage]] ({{hp|1}}), axes now add their damage onto the barehanded damage, which results in all axes doing {{hp|1}} more damage than before.}}
{{History||1.7.2|snap=1.7.1|[[Acacia planks]] and [[dark oak planks]] can now be used to craft wooden axes.}}
{{History||1.8|snap=14w02a|Weapon smith villagers now sell 1 [[enchanting|enchanted]] diamond axe for 9–12 emeralds, and 1 iron axe for 6–8 emeralds. Unenchanted diamond axes are no longer sold.}}
{{History||1.9|snap=15w34a|Axes now use the attack speed combat mechanic meter. The time it takes for the meter to fill up for an axe is 1.2 seconds.}}
{{History|||snap=15w34b|Axes now have an attack speed of 0.8, taking about 1.25 seconds to fill the attack meter.}}
{{History|||snap=15w34c|Axes do {{hp|4}} more [[damage]] than previously.
|Axes now have an attack speed of 0.85.
|Axes can now temporarily disable [[shield]] use.}}
{{History|||snap=15w35a|The [[damage]] of axes has been reduced by {{hp|1}}.
|The speed of axes has been increased to 0.9.}}
{{History|||snap=15w37a|Stone and diamond axes now both do {{hp|9}} damage, instead of the previous {{hp|8}} and {{hp|10}} respectively.
|Axes now have attack speed based on the tier, with wooden and stone having a speed of 0.8, iron having a speed of 0.9, and diamond and gold having a speed of 1.}}
{{History|||snap=15w43a|Stone axes may now be found in [[igloo]] basement chests.}}
{{History|||snap=15w44a|The average yield of stone and wooden axes from [[bonus chest]]s has been decreased.}}
{{History||1.11.1|snap=16w50a|Golden and iron axes now [[smelting|smelt]] down into one of their respective [[nugget]]s.}}
{{History||1.13|snap=17w47a|Prior to [[1.13/Flattening|''The Flattening'']], these [[item]]s' numeral IDs were 271, 275, 258, 279 and 286.}}
{{History||1.13|snap=18w07a|{{control|Using}} an axe on a block of [[wood]] or [[log]] now turns it into a stripped block of wood or log.}}
{{History|||snap=18w09a|Stone axes now can generate in the [[chest]]s of [[underwater ruins]].}}
{{History|||snap=pre2|{{control|Using}} an axe on a bark now turns it into a stripped bark.}}
{{History||1.14|snap=18w43a|[[File:Wooden Axe JE2 BE2.png|32px]] [[File:Stone Axe JE2 BE2.png|32px]] [[File:Iron Axe JE5 BE2.png|32px]] [[File:Golden Axe JE3 BE2.png|32px]] [[File:Diamond Axe JE2 BE2.png|32px]] The textures of all axes have been changed.}}
{{History|||snap=19w11a|Toolsmith villagers now sell stone axes, as well as enchanted iron and diamond axes.}}
{{History|||snap=19w13a|Toolsmith villagers now give stone axes to players under the [[Hero of the Village]] effect.
|Weaponsmith villagers now give stone, golden and iron axes to players under the [[Hero of the Village]] effect.}}
{{History||1.16|snap=20w06a|[[File:Netherite Axe JE1.png|32px]] Added netherite axes.
|Netherite axes are obtained by combining one diamond axe and one netherite ingot in a crafting table.
|[[Crimson planks]] and [[warped planks]] can now be used to craft wooden axes.}}
{{History|||snap=20w09a|[[File:Diamond Axe JE3 BE3.png|32px]] The texture of diamond axes has been changed.}}
{{History|||snap=20w10a|[[File:Netherite Axe JE2.png|32px]] The texture of netherite axes has been changed.
|Netherite axes can no longer be crafted.
|Netherite axes are now obtained by combining one diamond axe and one netherite ingot in a smithing table.}}
{{History|||snap=20w15a|Stone axes can now be crafted using [[blackstone]].}}
{{History|||snap=20w16a|Golden axes now generate randomly enchanted in [[ruined portal]] chests.}}
{{History||1.16.2|snap=20w30a|Enchanted golden axes can now be found in [[bastion remnant]] chests.}}
{{History||1.17|snap=21w08a|Stone axes can now be crafted using [[cobbled deepslate]].}}
{{History|||snap=21w11a|Axes can now be used to scrape wax and oxidation off [[copper block]]s.}}
{{History||1.19|snap=22w11a|[[Mangrove planks]] can now be used to craft wooden axes.}}
{{History||1.20 (Experimental)|link=1.19.3|snap=22w42a|Added [[block of bamboo]], which when used with an axe gives a block of stripped bamboo.}}
{{History||1.20<br>(Experimental)|link=1.19.4|snap=23w04a|Upgrading diamond axes to netherite axes now requires the netherite upgrade [[smithing template]].}}
{{History||1.20|snap=23w12a|Iron axes can now be found in [[suspicious gravel]] and [[suspicious sand]] in cold and warm [[ocean ruins]].}}
{{History|upcoming java}}
{{History||Combat Tests|snap=1.14.3 - Combat Test|The attack speed for all axes has been increased to 2.
|All axes now deal {{hp|1}} more [[damage]] than their sword counterparts.}}
{{History|||snap=Combat Test 3|The [[Cleaving|Chopping]] enchantment has been added for axes, which adds 1 damage and 0.5 seconds (10 [[game tick]]s) of [[shield]] stunning per level and is mutually exclusive with [[Sharpness]].
|Axes now always disable shields for {{convert|1.6|seconds|ticks}}, instead of having a 25% to disable them for 5 seconds (100 game ticks).
|Axes now take 1 damage when attacking instead of 2.
|The [[Sweeping Edge]] enchantment can now be applied to axes.}}
{{History|||snap=Combat Test 4|[[Knockback]], [[Looting]], and [[Fire Aspect]] enchantments can now be applied to axes.}}
{{History|pocket alpha}}
{{History||v0.2.0|[[File:Stone Axe JE1 BE1.png|32px]] Added stone axes.}}
{{History||v0.3.0|[[File:Wooden Axe JE1 BE1.png|32px]] Added wooden axes.
|Survival players no longer start with an infinite durability stone axe in the inventory.}}
{{History||v0.3.2|[[File:Iron Axe JE4 BE1.png|32px]] [[File:Golden Axe JE2 BE1.png|32px]] [[File:Diamond Axe JE1 BE1.png|32px]] Added iron, golden and diamond axes.}}
{{History||v0.4.0|Removed stone axes from the creative inventory.}}
{{History||v0.11.0|snap=build 11|All axes are now available in the [[creative]] [[inventory]].}}
{{History|||snap=build 12|All axes have been removed from creative.}}
{{History|||snap=build 13|All axes have been re-added to creative mode.}}
{{History||v0.12.1|snap=build 1|Instead of replacing the barehanded [[damage]] ({{hp|1}}), axes now add their damage onto the barehanded damage, which results in all axes doing {{hp|1}} more damage than before.}}
{{History|pocket}}
{{History||1.0.0|snap=alpha 0.17.0.1|Stone axes now can be found inside [[igloo]] basement [[chest]]s.}}
{{History||1.0.4|snap=alpha 1.0.4.0|Weaponsmith [[villager]]s now [[trading|sell]] iron axes for 6-8 [[emerald]]s as part of their first tier [[trading|trades]] and [[enchanting|enchanted]] diamond axes for 9-12 emeralds as part of their third tier trades.}}
{{History||1.1.0|snap=alpha 1.1.0.0|Iron and golden axes are now [[smelting|smeltable]].
|Iron axes with the [[Efficiency]] I enchantment can now be found inside [[chest]]s in [[woodland mansion]]s.
|Added [[vindicator]]s, who rarely [[drops|drop]] iron axes.}}
{{History|bedrock}}
{{History||1.2.0|snap=beta 1.2.0.2|Wooden and stone axes can now be found in [[bonus chest]]s.}}
{{History||1.4.0|snap=beta 1.2.13.8|Using an axe on a [[log]] now turns it into a stripped log.}}
{{History|||snap=beta 1.2.20.1|Stone axes can now be found inside [[underwater ruins]] chests.}}
{{History||1.10.0|snap=beta 1.10.0.3|[[File:Wooden Axe JE2 BE2.png|32px]] [[File:Stone Axe JE2 BE2.png|32px]] [[File:Iron Axe JE5 BE2.png|32px]] [[File:Golden Axe JE3 BE2.png|32px]] [[File:Diamond Axe JE2 BE2.png|32px]] The textures of all axes have been changed.}}
{{History||1.11.0|snap=beta 1.11.0.4|[[Vindicator]]s and [[pillager]]s that spawn in [[raid]]s can now [[drops|drop]] an iron axe.
|[[Trading]] has been changed, weaponsmith [[villager]]s now [[trading|sell]] iron axes for 3 [[emerald]]s and [[enchanting|enchanted]] diamond axes for 12 emeralds as part of their fourth tier [[trading|trades]].
|Stone axes, enchanted iron axes, and diamond axes can now be [[trading|bought]] from toolsmith villagers.}}
{{History||1.16.0|snap=beta 1.16.0.51|[[File:Netherite Axe BE1.png|32px]] Added netherite axes.|Netherite axes are obtained by combining one diamond axe and one netherite ingot in a crafting table.
|[[File:Diamond Axe JE3 BE3.png|32px]] The texture of diamond axes has been changed.}}
{{History|||snap=beta 1.16.0.57|Netherite axes can no longer be crafted.
|Netherite axes are now obtained by combining one diamond axe and one netherite ingot in a smithing table.
|Stone axes can now be crafted using blackstone.
|Golden axes now generate randomly enchanted in [[ruined portal]] chests.
|Netherite axes now generate randomly enchanted in [[bastion remnant]] chests.}}
{{History||1.16.20|snap=beta 1.16.20.50|Added [[piglin brute]]s, who rarely drop golden axes.}}
{{History||1.16.100|snap=beta 1.16.100.54|Piglin brutes no longer spawn with enchanted axes.}}
{{History|||snap=beta 1.16.100.55|Zombified piglins that are converted from piglin brutes now keep their golden axes.}}
{{History||1.16.220|snap=beta 1.16.220.52|Axes can now be used to scrape wax off copper blocks.}}
{{History||1.18.30|snap=beta 1.18.30.26|Axes can now temporarily disable [[shield]] use. This is not mentioned in the official changelog.<ref>{{tweet|kingbdogz|1504505321884196872|We missed a change in recent changelogs for the Bedrock beta that you may like - we have now made a parity fix that makes shields get disabled for 5 seconds when attacked by an Axe-wielding mob or player. We will make sure to list this properly in the next beta :)|March 17, 2022}}</ref>
}}
{{History|console}}
{{History||xbox=TU1|xbone=CU1|ps=1.00|wiiu=Patch 1|switch=1.0.1|[[File:Wooden Axe JE1 BE1.png|32px]] [[File:Stone Axe JE1 BE1.png|32px]] [[File:Iron Axe JE4 BE1.png|32px]] [[File:Golden Axe JE2 BE1.png|32px]] [[File:Diamond Axe JE1 BE1.png|32px]] Added axes (all five types).}}
{{History||xbox=TU53|xbone=CU43|ps=1.49|wiiu=Patch 23|switch=1.0.3|Iron and golden axes are now [[smelting|smeltable]].}}
{{History||xbox=none|xbone=none|ps=1.90|wiiu=none|switch=none|[[File:Wooden Axe JE2 BE2.png|32px]] [[File:Stone Axe JE2 BE2.png|32px]] [[File:Iron Axe JE5 BE2.png|32px]] [[File:Golden Axe JE3 BE2.png|32px]] [[File:Diamond Axe JE2 BE2.png|32px]] The textures of all axes have been changed.}}
{{History|New Nintendo 3DS Edition}}
{{History||0.1.0|[[File:Wooden Axe JE1 BE1.png|32px]] [[File:Stone Axe JE1 BE1.png|32px]] [[File:Iron Axe JE4 BE1.png|32px]] [[File:Golden Axe JE2 BE1.png|32px]] [[File:Diamond Axe JE1 BE1.png|32px]] Added axes.}}
{{History|foot}}
==Issues==
{{issue list}}
==Trivia==
*Before [[Java Edition 1.13]], in the language files, axes were referred to as Hatchets.<ref name="1.8 lang">''1.8/assets/minecraft/lang/en_US.lang'', line 915: '''item.hatchetIron.name= Iron Axe'''</ref>
*Weaponsmith villagers gifting stone, iron and golden axes is a reference to the story ''[[wikipedia:The Honest Woodcutter|The Honest Woodcutter]]'', where a woodcutter dropped his axe into a river, and is successively provided a silver and a golden axe by the river god.{{cn}}
== Gallery ==
<gallery>
Stone Axe SDGP.png|Stone axe in the [[Super Duper Graphics Pack]].
</gallery>
=== Enchanted axes ===
<gallery>
Enchanted Wooden Axe.gif
Enchanted Stone Axe.gif
Enchanted Iron Axe.gif
Enchanted Golden Axe.gif
Enchanted Diamond Axe.gif
Enchanted Netherite Axe.gif
</gallery>
==See also==
*{{ItemLink|Pickaxe}}
==References==
{{Reflist}}
== External Links ==
*[https://www.minecraft.net/en-us/article/taking-inventory--axe Taking Inventory: Axe] – Minecraft.net on February 6, 2020
{{items}}
[[Category:Combat]]
[[cs:Sekera]]
[[de:Axt]]
[[es:Hacha]]
[[fr:Hache]]
[[hu:Balta]]
[[ja:斧]]
[[ko:도끼]]
[[nl:Bijl]]
[[pl:Siekiera]]
[[pt:Machado]]
[[ru:Топор]]
[[th:ขวาน]]
[[uk:Сокира]]
[[zh:斧]]</li></ul> | build 4 | Blocks of iron can now be used to activate beacons. | |||
| Bedrock Edition | |||||
1.10.0{{Extension DPL}}<ul><li>[[Dye|Dye]]<br/>{{Item
| title = Dyes
| image = White Dye.png
| extratext = View [[#Gallery|all renders]]
| renewable = Yes
| stackable = Yes (64)
}}
'''Dyes''' are a set of sixteen items used to change the color of [[wool]], [[carpet]]s, [[terracotta]], [[concrete powder]], [[glass]], [[shulker box]]es, [[bed]]s, [[candle]]s, the patterns on [[banner]]s, [[firework star]]s, certain mobs, and text on [[sign]]s and [[hanging sign]]s. {{IN|bedrock}} they can also be used to dye water in a [[cauldron]] (which is thereafter used to dye leather [[armor]]); {{in|java}} leather armor can be dyed directly. {{IN|education}} dyes can also be used to dye [[balloon]]s and [[glow stick]]s.
{{IN|bedrock|education}}, [[bone meal]], [[ink sac]]s, [[lapis lazuli]], and [[cocoa bean]]s can generally substitute for [[white dye]], [[black dye]], [[blue dye]], and [[brown dye]], respectively, in crafting recipes and for use in dyeing items or mobs. However, they have other important uses that aren't related to color, and are therefore not considered true dyes. They are mentioned in this article only in regard to their use as dyeing agents; see their individual articles for complete information about them.
[[File:Dye Recipes.png|400px|thumb|A guide for creating all the dyes]]
== Obtaining ==
<!--[[File:Dye Chart.png|350px|thumb|A guide to crafting all the dyes.{{until|java 1.14}}]]-->
Dyes can be produced by crafting them from plants (mainly flowers), by crafting dyes of different colors together, by smelting plants, or by trading with a [[wandering trader]].
{{loadPage|Crafting/Dye|Crafting|h3}}
=== Smelting ===
{{smelting|head=1|Sea Pickle|Lime Dye|0,2}}
{{smelting|foot=1|Cactus|Green Dye|1||b=Lapis Lazuli|c=Any fuel|d=1}}
=== Trading ===
[[Wandering trader]]s can sell 3 dyes for an [[emerald]]. {{IN|bedrock}}, they can also sell 3 lapis lazuli, bone meal, cocoa beans, or ink sacs for one emerald.
Apprentice-level cleric [[villager]]s sell one lapis lazuli per emerald.
=== Chest loot ===
{{#invoke:LootChest|base3|blue-dye,green-dye,orange-dye,light-blue-dye,yellow-dye,white-dye}}
=== Other ===
Ink sacs can also be created using 1 iron, 1 sulfur, and 4 oxygen in the [[compound creator]]. {{only|bedrock|education}}
== Usage ==
Similar to their use in crafting, [[bone meal]], [[ink sac]]s, [[lapis lazuli]], and [[cocoa beans]] can be substituted for the corresponding dye in any of the following usages unless otherwise specified.{{only|bedrock}} <!--- sections are ordered by craftable dyeable blocks, dyeable items, version exclusive sections, and non-crafting miscellaneous uses--->
=== Dyeing wool and mobs ===
Players can dye wool by placing [[wool]] and any dye in a crafting grid.
{{Crafting
|nocat=1
|Any Wool
|Matching Dye
|Output=Any Wool
}}
Dyes can be {{control|use|text=used}} on sheep to change the color of the wool. Shearing a colored sheep drops the corresponding color of the wool, and the sheep retains the color when the wool regenerates. [[Breeding]] colored sheep produces a lamb colored as one of the parent sheep, or a color resulting from the combination of both parents' color. The color combining follows the same rules that dyes use – red and yellow sheep produce an orange lamb, but a blue and yellow sheep cannot create a green lamb. The unlimited reproduction of colored sheep makes dyeing and shearing sheep infinitely more efficient than just dyeing wool directly.
Dye can also be used on a tamed [[wolf]] or [[cat]] to change the color of its collar from the default red to the color of the dye.
=== Dyeing carpets ===
Carpets can be dyed.
{{Crafting
|Any Carpet
|Matching Dye
|Output= Matching Carpet
|type= Building block
}}
=== Dyeing terracotta ===
[[Terracotta]] can be dyed by placing 8 blocks around a dye on a crafting table.
{{Crafting
|nocat=1
|A1=Terracotta |B1=Terracotta |C1=Terracotta
|A2=Terracotta |B2=Matching Dye |C2=Terracotta
|A3=Terracotta |B3=Terracotta |C3=Terracotta
|Output=Matching Dyed Terracotta,8
}}
=== Creating concrete powder ===
Dyes can also be used to craft [[concrete powder]], which can then be set into their respective [[concrete]] blocks (they cannot be dyed directly).
{{Crafting
|nocat=1
|Sand |Gravel |Sand
|Gravel |Matching Dye |Gravel
|Sand |Gravel |Sand
|Output=Matching Concrete Powder,8
}}
=== Staining glass ===
[[Stained glass]] can be stained by placing 8 blocks of glass around a dye on a [[crafting table]]. Just like regular glass, stained glass can be crafted into stained glass panes. The recipe for this is the same as with regular glass.
{{Crafting
|nocat=1
|A1=Glass |B1=Glass |C1=Glass
|A2=Glass |B2=Matching Dye |C2=Glass
|A3=Glass |B3=Glass |C3=Glass
|Output=Matching Stained Glass,8
|head=1
}}
{{Crafting
|nocat=1
|A1= Glass Pane
|B1= Glass Pane
|C1= Glass Pane
|A2= Glass Pane
|B2= Matching Dye
|C2= Glass Pane
|A3= Glass Pane
|B3= Glass Pane
|C3= Glass Pane
|Output= Matching Stained Glass Pane,8
|type= Decoration block
|foot=1
}}
=== Dyeing shulker boxes ===
[[Shulker box]]es are generated in a light shade of purple (like the [[purpur block]]), but can be dyed any color. They can also be re-dyed as often as desired.
{{Crafting
|ignoreusage=1
|showname=1
|Any Shulker Box
|Matching Dye
|Output=Matching Shulker Box
}}
=== Dyeing beds ===
Players can dye beds by placing a [[bed]] and any color dye in a crafting grid.
{{Crafting
|nocat=1
|Any Bed
|Matching Dye
|Output=Matching Bed
}}
=== Dyeing candles ===
Players can dye [[candles]] by placing an undyed candle and any color dye in a crafting grid.
{{Crafting
|ignoreusage=1
|Candle
|Matching Dye
|Output=Matching Dyed Candle
}}
=== Banner patterns ===
{{main|Banner#Patterns}}
Dyes are used in most banner patterns to determine the pattern and color displayed.
=== Dyeing armor ===
[[File:DyeGraph2.png|200px|thumb|A graph showing all combinations of two dyes on a [[tunic]].]]
Leather [[armor]] can be dyed by:
* Crafting dyes with a piece of leather armor or leather [[horse armor]].{{Only|java}}
* Dousing the leather armor or leather [[horse armor]] in a [[cauldron]] to which dyes have been added.{{Only|bedrock}}
There are 5,713,438<ref>https://anrar4.github.io/DyeLeatherArmor/</ref> (34.1% of sRGB) colors leather armor can be, as it is possible to put more than one dye on the crafting bench alongside the leather armor. Armor can be dyed multiple times with previous colors affecting the final outcome. Colored armor can be reverted to their original color using a [[cauldron]] with undyed water.
The game has a specific formula for calculating the color of dyed armor: each color, in the RGB color model, has a red value, green value, and blue value. For each dye in the crafting grid, and the armor itself (if it is already dyed), the red, green, and blue values are added to running totals. In addition, a running total of the highest value (be it red, green, or blue) is also kept. After this, each total is divided by the number of colors used. This effectively produces the average red, green, blue, and maximum values. The maximum value of the average RGB values is also calculated. Finally, each average RGB value is multiplied by the average maximum value and divided by the maximum of the average RGB values. The modified average RGB values are then used as the final color. This procedure can be summed up with the following equations:
for each color (all "total" variables start at 0 before counting):
totalRed = totalRed + redValue
totalGreen = totalGreen + greenValue
totalBlue = totalBlue + blueValue
totalMaximum = totalMaximum + max(redValue, greenValue, blueValue)
numberOfColors = numberOfColors + 1
averageRed = totalRed / numberOfColors
averageGreen = totalGreen / numberOfColors
averageBlue = totalBlue / numberOfColors
averageMaximum = totalMaximum / numberOfColors
maximumOfAverage = max(averageRed, averageGreen, averageBlue)
gainFactor = averageMaximum / maximumOfAverage
resultRed = averageRed * gainFactor
resultGreen = averageGreen * gainFactor
resultBlue = averageBlue * gainFactor
Due to the way this formula works, the resulting color can never be darker than the average of the input colors and is often lighter and more saturated. Of course, the resulting color can never be lighter or more saturated than the lightest or most saturated input color. In addition, this formula never creates an RGB value higher than 255 (which would be invalid in the 8-bit RGB color model).
If leather armor is renamed on an [[anvil]], it retains its name when dyed or undyed.
;Mixing Samples
: {{ItemSprite|Yellow Dye}} + {{ItemSprite|Yellow Dye}} = {{Tint|leather-chestplate| #{{CalcDye| yellow=2 }} | code=1}}
: {{ItemSprite|Red Dye}} + {{ItemSprite|Blue Dye}} + {{ItemSprite|White Dye}} = {{Tint|leather-chestplate| #{{CalcDye| red=1 | blue=1 | white=1}} | code=1}}
: {{ItemSprite|Green Dye}} + {{ItemSprite|Red Dye}} + {{ItemSprite|Pink Dye}} = {{Tint|leather-chestplate| #{{CalcDye| green=1 | red=1 | pink=1}} | code=1}}
=== Dyeing firework stars ===
A [[firework star]] can have a single color or a combination of up to eight colors when crafted with dyes. Adding one or more dyes to a crafted firework star adds a "fade to color" effect to it, overwriting any existing fade colors.
{{Crafting
|head=1
|ignoreusage=1
|ingredients=[[Gunpowder]] +<br>Any Dye (1–8) +<br>Extra ingredient (optional)
|Gunpowder
|Matching Dye
|Diamond;Glowstone Dust;Head;Gold Nugget;Feather;Fire Charge;
|Output=Matching Firework Star
}}
{{Crafting
|ignoreusage=1
|Matching Firework Star
|Any Dye
|Output=Matching Firework Star
|foot=1
}}
=== Creating balloons ===
Dye can be used to craft balloons.{{only|education}}
{{Crafting
|nocat=1
|A1= Latex
|B1= Matching Dye
|C1= Latex
|A2= Latex
|B2= Helium
|C2= Latex
|A3= Latex
|B3= Lead
|C3= Latex
|Output= Matching Balloon
}}
=== Creating glow sticks ===
Dye can also be used to craft glow sticks.{{only|education}}
{{Crafting
|nocat=1
|A1= Polyethylene
|B1= Hydrogen Peroxide
|C1= Polyethylene
|A2= Polyethylene
|B2= Matching Dye
|C2= Polyethylene
|A3= Polyethylene
|B3= Luminol
|C3= Polyethylene
|Output= Matching Glow Stick
}}
=== Dyeing water inside cauldrons ===
Water can be dyed in a cauldron by holding any dye in the hand and pressing {{Ctrl|use}} on a cauldron filled with water.{{only|bedrock}}
=== Signs ===
Dye can be {{control|used}} on a [[sign]] or a [[hanging sign]] to change the text color. {{IN|bedrock}}, [[ink sac]]s cannot be used for this purpose; black dye must be used to change the text to black.
=== Trading ===
Apprentice, journeyman and expert-level shepherd [[villager]]s buy any of the 12 dyes for an [[emerald]].
== Color values ==
The "color codes" are used to determine the color imparted on sheep, wolf and cat collars, firework stars, [[beacon]] beams, and dyed leather armor. The hex value is shown in the extended tooltips of dyed leather armor; however, to set the color using an NBT data tag in a [[command]], the decimal value must be used instead. The color values for firework stars are slightly different from the ones listed below, and use [[Item colors#Firework stars|these values]] instead.
{| class="wikitable" style="margin:2px; border: 1px solid silver; text-align: left;" data-description="Data values"
! rowspan=2 | Description
! colspan=2 style="text-align:center" | Color Code
|-
! Dec
! <abbr title="Hexadecimal color code">Hex</abbr>
|-
| style="text-align:center" | White || 16383998 || {{color|#F9FFFE}}
|-
| style="text-align:center" | Light gray || 10329495 || {{color|#9D9D97}}
|-
| style="text-align:center" | Gray || 4673362 || {{color|#474F52}}
|-
| style="text-align:center" | Black || 1908001|| {{color|#1D1D21}}
|-
| style="text-align:center" | Brown || 8606770 || {{color|#835432}}
|-
| style="text-align:center" | Red || 11546150 || {{color|#B02E26}}
|-
| style="text-align:center" | Orange || 16351261 || {{color|#F9801D}}
|-
| style="text-align:center" | Yellow || 16701501 || {{color|#FED83D}}
|-
| style="text-align:center" | Lime || 8439583 || {{color|#80C71F}}
|-
| style="text-align:center" | Green || 6192150 || {{color|#5E7C16}}
|-
| style="text-align:center" | Cyan || 1481884|| {{color|#169C9C}}
|-
| style="text-align:center" | Light blue || 3847130 || {{color|#3AB3DA}}
|-
| style="text-align:center" | Blue || 3949738 || {{color|#3C44AA}}
|-
| style="text-align:center" | Purple || 8991416 || {{color|#8932B8}}
|-
| style="text-align:center" | Magenta || 13061821 || {{color|#C74EBD}}
|-
| style="text-align:center" | Pink || 15961002 || {{color|#F38BAA}}
|}
== Sounds ==
{{edition|java}}:
{{Sound table
|rowspan=2
|sound=Dye.ogg
|subtitle=Dye stains
|source=block
|description=When dye is used on a [[sign]]
|id=item.dye.use
|translationkey=subtitles.item.dye.use
|volume=1.0
|pitch=1.0/0.9/0.95/1.1
|distance=16}}
{{Sound table
|subtitle=Dye stains
|source=player
|description=When dye is used on a [[sheep]]
|id=item.dye.use
|translationkey=subtitles.item.dye.use
|volume=1.0
|pitch=1.0/0.9/0.95/1.1
|distance=16
|foot=1}}
{{edition|bedrock}}:
{{Sound table
|type=bedrock
|sound=Dye.ogg
|source=sound
|description=When dye is used on a sign
|id=sign.dye.use
|volume=1.0
|pitch=1.0}}
{{Sound table
|rowspan=3
|sound=Water Splash Old.ogg
|source=block
|description=When dye is added to a cauldron
|id=cauldron.adddye
|volume=0.1
|pitch=1.0}}
{{Sound table
|source=block
|description=When armor is dyed using a cauldron
|id=cauldron.dyearmor
|volume=0.1
|pitch=1.0}}
{{Sound table
|source=block
|description=When dye is removed from armor using a cauldron
|id=cauldron.cleanarmor
|volume=0.1
|pitch=1.0
|foot=1}}
== Achievements ==
{{load achievements|Rainbow Collection;Tie dye outfit}}
== Video ==
{{Video note|These videos are outdated, as it does not include details of the [[Java Edition 1.7.2|1.7.2]] update's changes to the dyeing system/production chain.}}
<div style="text-align:center">
<span style="display:inline-block">{{yt|8YD7oauNZHE}}</span>
<span style="display:inline-block">{{yt|7tETaRt7STM}}</span>
</div>
== History ==
{{History|java beta}}
{{History||January 3, 2011|link=https://web.archive.org/web/0/http://notch.tumblr.com/post/2582321901/2011-here-we-go|Notch mentions adding a "paint" feature if he can figure out how.}}
{{History||January 10, 2011<ref group="n">Supposed time when fragment was filmed. Based on modified date of client.jar/gui/trap.png in [[Beta 1.2]].</ref>|link=https://www.youtube.com/watch?v=cBF2ugTzXqQ&t=181s|[[File:Red Dye (pre-release).png|32px]] Shown rose red in development as part of [[Minecraft: The Story of Mojang]].}}
{{History||1.2|[[File:Ink Sac JE1 BE1.png|32px]] [[File:Red Dye JE1 BE1.png|32px]] [[File:Green Dye JE1 BE1.png|32px]] [[File:Cocoa Beans JE1 BE1.png|32px]] [[File:Lapis Lazuli JE1 BE1.png|32px]] [[File:Purple Dye JE1 BE1.png|32px]] [[File:Cyan Dye JE1 BE1.png|32px]] [[File:Light Gray Dye JE1 BE1.png|32px]] [[File:Gray Dye JE1 BE1.png|32px]] [[File:Pink Dye JE1 BE1.png|32px]] [[File:Lime Dye JE1 BE1.png|32px]] [[File:Yellow Dye JE1 BE1.png|32px]] [[File:Light Blue Dye JE1 BE1.png|32px]] [[File:Magenta Dye JE1 BE1.png|32px]] [[File:Orange Dye JE1 BE1.png|32px]] [[File:Bone Meal JE1 BE1.png|32px]] Added dyes.
|[[File:Black Dye (Recreated).png|32px]] [[File:Red Dye (pre-release).png|32px]] [[File:Green Dye (Recreated).png|32px]] [[File:Brown Dye (Recreated).png|32px]] [[File:Blue Dye (Recreated).png|32px]] [[File:Purple Dye (Recreated).png|32px]] [[File:Cyan Dye (Recreated).png|32px]] [[File:Light Gray Dye (Recreated).png|32px]] [[File:Gray Dye (Recreated).png|32px]] [[File:Pink Dye (Recreated).png|32px]] [[File:Lime Dye (Recreated).png|32px]] [[File:Yellow Dye (Recreated).png|32px]] [[File:Light Blue Dye (Recreated).png|32px]] [[File:Magenta Dye (Recreated).png|32px]] [[File:Orange Dye (Recreated).png|32px]] [[File:White Dye (Recreated).png|32px]] Leftovers of old textures can be seen in [[items.png]] with 100% opacity. The white dye texture was reused for [[Sugar]].
| The colors were as follows:{{verify|Did the color codes remain the same between Beta 1.2 and Java 1.11.2?}}
{{:Color/Java Edition dye colors before 17w06a}}
}}
{{History|java}}
{{History||1.1|snap=11w49a|[[Sheep]] can now regrow their [[wool]] by eating [[grass block|grass]]. Dyed sheep regrow wool in their new color.}}
{{History||1.3.1|snap=12w19a|[[File:Cocoa Beans JE2.png|32px]] The texture of [[cocoa beans]] has been changed.}}
{{History|||snap=1.3|[[File:bone meal changes.gif|32px]] The textures of [[bone meal]], [[cactus green]], cocoa beans and [[rose red]] have been changed. The textures have been lowered one pixel.}}
{{History||1.4.2|snap=12w34a|Added the ability to dye leather [[armor]] and [[wolf]] collars.}}
{{History||1.4.4|snap=1.4.3|Color codes have been changed. The colors of red, brown, blue, purple, cyan, pink, light blue, magenta and orange were adjusted a little vividly.}}
{{History||1.6.1|snap=13w19a|[[Stained clay]] can now be crafted using dyes.}}
{{history||1.7.2|snap=13w36a|With the addition of new [[flower]]s, many secondary and tertiary dyes are now primary dyes.}}
{{History|||snap=13w41a|[[Stained glass]] can now be crafted using dyes.}}
{{History||1.8|snap=14w02a|As cleric [[villager]]s now sell lapis lazuli, all dyes have become fully renewable.}}
{{History|||snap=14w30a|Added [[banner]]s, which can be dyed.}}
{{History||1.9|snap=15w34a|Added [[shield]]s, which can be dyed indirectly by applying a matching [[banner]].}}
{{History||1.11|snap=16w39b|Dyes are now used to change the color of [[shulker box]]es.}}
{{History||1.12|snap=17w06a|Dyes are now used to craft [[concrete powder]].
|Color codes have been changed. All colors are adjusted more vividly. The changes were as follows:
{{:Color/Java Edition dye color changes in 17w06a}}
|Light blue dye, stained glass, and stained glass panes, did not change colors in this update. This means that they still use old colors.<ref name="unchanged dyes">{{Bug|MC-214643}}<br>{{Bug|MC-214641}}</ref>
}}
{{History|||snap=17w15a|Dyes can now apply color to white [[bed]]s.}}
{{History||1.13|snap=17w47a|The different data values for the <code>dye</code> ID have been split up into their own IDs.}}
{{History||1.14|snap=18w43a|[[Bone meal]], [[ink sac]]s, [[cocoa beans]] and [[lapis lazuli]] are no longer considered dyes.
|[[File:White Dye JE1 BE1.png|32px]] [[File:Black Dye JE1 BE1.png|32px]] [[File:Brown Dye JE1 BE1.png|32px]] [[File:Blue Dye JE1 BE1.png|32px]] Added [[white dye|white]], [[black dye|black]], [[brown dye|brown]] and [[blue dye]]s.
|"Rose Red", "Dandelion Yellow" and "Cactus Green" have been renamed to "Red Dye", "Yellow Dye" and "Green Dye", respectively.
|[[Glass pane]]s and [[carpet]]s can now be dyed.
|[[File:Light Gray Dye JE2 BE2.png|32px]] [[File:Gray Dye JE2 BE2.png|32px]] [[File:Red Dye JE2 BE2.png|32px]] [[File:Orange Dye JE2 BE2.png|32px]] [[File:Yellow Dye JE2 BE2.png|32px]] [[File:Lime Dye JE2 BE2.png|32px]] [[File:Green Dye JE2 BE2.png|32px]] [[File:Cyan Dye.png|32px]] [[File:Light Blue Dye JE2 BE2.png|32px]] [[File:Purple Dye JE2 BE2.png|32px]] [[File:Magenta Dye JE2 BE2.png|32px]] [[File:Pink Dye JE2 BE2.png|32px]] The textures of light gray, gray, red, orange, yellow, lime, green, cyan, light blue, purple, magenta, and pink dyes, have been changed. The color texture for light blue dye was not changed to reflect the updated colors from 1.12.<ref name="unchanged dyes"></ref>}}
{{History|||snap=18w44a|The color of the text on [[sign]]s can now be changed with dye.}}
{{History|||snap=18w49a|Yellow dyes can now be found in [[chest]]s in [[village]] mason houses.}}
{{History|||snap=18w50a|Green dyes can now be found in [[chest]]s in [[desert]] [[village]] houses.}}
{{History|||snap=19w05a|Added the [[wandering trader]], which can sell any type of dye.}}
{{History|||snap=19w11a|All 16 types of dyes can now be [[trading|bought]] by shepherd villagers.}}
{{History||1.16.2|snap=Pre-release 2|Reversed the order of dyes to match other colored items in the [[Creative inventory]].<ref name="reverse dye">{{Bug|MC-136553}}</ref>
|Regrouped dyes in the Creative inventory such that white, blue, brown, and black dyes are within and not [[cocoa beans]], [[ink sacs]], [[lapis lazuli]], and [[bone meal]].<ref name="regroup dye">{{Bug|MC-177684}}</ref>}}
{{History||1.17|snap=20w45a|Added [[candle]]s, which can be dyed.}}
{{History|||snap=21w03a|Added a sound for applying dyes.}}
{{History|||snap=21w19a|Candles can no longer be dyed.}}
{{History|||snap=Pre-release 1|Candles can now once again be dyed.}}
{{History||1.20<br>(Experimental)|link=1.19.3|snap=22w42a|The color of the text on [[hanging sign]]s can now be changed with dye.}}
{{History||1.20<br>(Experimental)|link=1.19.4|snap=23w07a|[[Torchflower]]s can now be crafted into orange dye.|[[Pink petals]] can now be crafted into pink dye.}}
{{History||1.20|snap=23w12a|[[Pitcher plant]]s can now be crafted into cyan dye.|Blue, light blue, orange, white, and yellow dye can now be found in [[suspicious gravel]] and [[suspicious sand]] in [[trail ruins]].}}
{{History|||snap=23w14a|Pitcher plants can now craft two [[cyan dye]] instead of one.}}
{{History|||snap=23w16a|Blue, light blue, orange, white, and yellow dye no longer generates in [[suspicious sand]] in [[trail ruins]].|Due to the split of the archaeological loot tables for the suspicious gravel within the [[trail ruins]]; blue, light blue, orange, white, and yellow dye now are in the common loot.}}
{{History|pocket alpha}}
{{History||v0.3.0|[[File:Bone Meal JE1 BE1.png|32px]] [[File:Light Gray Dye JE1 BE1.png|32px]] [[File:Gray Dye JE1 BE1.png|32px]] [[File:Ink Sac JE1 BE1.png|32px]] [[File:Cocoa Beans JE1 BE1.png|32px]] [[File:Red Dye JE1 BE1.png|32px]] [[File:Orange Dye JE1 BE1.png|32px]] [[File:Yellow Dye JE1 BE1.png|32px]] [[File:Lime Dye JE1 BE1.png|32px]] [[File:Green Dye JE1 BE1.png|32px]] [[File:Cyan Dye JE1 BE1.png|32px]] [[File:Light Blue Dye JE1 BE1.png|32px]] [[File:Lapis Lazuli JE1 BE1.png|32px]] [[File:Purple Dye JE1 BE1.png|32px]] [[File:Magenta Dye JE1 BE1.png|32px]] [[File:Pink Dye JE1 BE1.png|32px]] Added dyes. Only [[dandelion yellow]] and [[lapis lazuli]] are currently obtainable and have functionality.}}
{{History||v0.3.2|[[Cactus green]] is now obtainable by smelting [[cacti]].}}
{{History||v0.3.3|[[Bone meal]] is now obtainable via [[crafting]].}}
{{History||v0.4.0|[[Cyan dye]], [[light blue dye]], [[lime dye]], [[magenta dye]], [[orange dye]], [[pink dye]], and [[purple dye]] are now obtainable via crafting.
|[[Rose red]] is now obtainable by smelting red [[mushroom]]s.
|All available dyes, excluding bone meal, can now be used to craft their respective [[wool]] color.}}
{{History||v0.8.0|snap=build 1|[[File:Cocoa Beans JE3 BE2.png|32px]] The texture of cocoa beans has been changed.}}
{{History|||snap=build 3|[[Ink sac]]s, [[cocoa bean]]s, [[gray dye]], and [[light gray dye]] are now available in the [[creative]] [[inventory]].
|Rose red can now be obtained from [[beetroot]]s.}}
{{History||v0.9.0|snap=build 1|Cocoa beans can now be obtained from [[cocoa pod]]s.
|The [[rose]] has been removed and replaced with a new poppy [[flower]] that can be crafted into rose red.}}
{{History|||snap=build 3|All new [[flower]]s can now be [[crafting|crafted]] into dyes. Because of this, many secondary and tertiary dyes are now primary dyes.
|[[Gray dye]] and [[light gray dye]] can now be obtained in [[survival]].}}
{{History|||snap=build 11|[[Terracotta|Stained clay]] can now be crafted using dyes.}}
{{History||v0.11.0|snap=build 1|[[Ink sac]]s can now be obtained from [[squid]].
|Added the ability to dye [[wolf]] collars.}}
{{History||v0.12.1|snap=build 1|Red [[mushroom]]s can no longer be smelted to obtain [[rose red]].}}
{{History||v0.14.0|snap=build 1|[[Cauldron]]s now used for leather dyeing, by applying a dye to a [[water]]-filled cauldron.}}
{{History||v0.16.0|snap=build 1|[[Cocoa bean]]s can no longer be crafted.}}
{{History|pocket}}
{{History||1.0.0|snap=alpha 0.17.0.1|Added a ''Dye'' button for [[sheep]].
|Added [[shulker]]s, which can be dyed.
|Added [[stained glass]]. Stain glass cannot be [[crafting|crafted]], but purple glass generates in [[end city|end cities]].}}
{{History||1.1.0|snap=alpha 1.1.0.0|Dyes can now apply color to a white [[bed]]s.
|Dyes are now used to craft [[concrete powder]].
|The color palette has been changed.}}
{{History|bedrock}}
{{History||1.2.0|snap=beta 1.2.0.2|Dyes can now be used for [[banner]] crafting.
|Dyes can now be used to craft [[firework star]]s.
|[[Stained glass]] is now [[crafting|craftable]], using dyes.}}
{{History||1.4.0|snap=beta 1.2.20.1|[[Lime dye]] can now be obtained from smelting [[sea pickle]]s.
|Dyes can now used to craft [[glow stick]]s and [[balloon]]s.}}
{{History||1.8.0|snap=beta 1.8.0.8|Dyes can now be used to dye [[cat]] collars.}}
{{History|||snap=beta 1.8.0.10|[[File:White Dye JE1 BE1.png|32px]] [[File:Black Dye JE1 BE1.png|32px]] [[File:Brown Dye JE1 BE1.png|32px]] [[File:Blue Dye JE1 BE1.png|32px]] Added [[white dye|white]], [[brown dye|brown]], [[black dye|black]] and [[blue dye]]s, which can be crafted from [[lapis lazuli]], [[bone meal]], [[cocoa beans]] and [[ink sac]]s. This, however, the later four still use as dyes.<ref>{{Bug|MCPE-42473}}</ref>
|"Rose Red", "Dandelion Yellow" and "Cactus Green" have been renamed to "Red Dye", "Yellow Dye" and "Green Dye", respectively.}}
{{History||1.9.0|snap=beta 1.9.0.0|Blue and white dye can now be obtained from [[cornflower]]s and [[lily of the valley]]s.}}
{{History||1.10.0|snap=beta 1.10.0.3|[[Glass pane]]s and [[carpet]]s can now be dyed.
|Only a single dye is now required to apply a banner pattern in a [[loom]].
|Various dyes except black dye, white dye, brown dye and blue dye are now [[trading|sold]] by [[wandering trader]]s.
|[[File:Bone Meal JE2 BE2.png|32px]] [[File:Light Gray Dye JE2 BE2.png|32px]] [[File:Gray Dye JE2 BE2.png|32px]] [[File:Ink Sac JE2 BE2.png|32px]] [[File:Cocoa Beans JE4 BE3.png|32px]] [[File:Red Dye JE3 BE3.png|32px]] [[File:Orange Dye JE2 BE2.png|32px]] [[File:Yellow Dye JE2 BE2.png|32px]] [[File:Lime Dye JE2 BE2.png|32px]] [[File:Green Dye JE2 BE2.png|32px]] [[File:Cyan Dye.png|32px]] [[File:Light Blue Dye JE2 BE2.png|32px]] [[File:Lapis Lazuli JE2 BE2.png|32px]] [[File:Purple Dye JE2 BE2.png|32px]] [[File:Magenta Dye JE2 BE2.png|32px]] [[File:Pink Dye JE2 BE2.png|32px]] The textures of bone meal, light gray, gray, ink sac, cocoa beans, red, orange, yellow, lime, green, cyan, light blue, lapis lazuli, purple, magenta, and pink dyes have been changed.}}
{{History||1.11.0|snap=beta 1.11.0.4|Dye can now be [[trading|sold]] to shepherd [[villager]]s.}}
{{History||1.16.210|snap=beta 1.16.210.59|The color of the text on [[sign]]s can now be changed with dye.}}
{{History|||snap=beta 1.16.210.60|The ability to dye the color of the text on [[sign]]s was temporarily removed.}}
{{History||1.16.220|snap=beta 1.16.220.50|The color of the text on [[sign]]s can now be changed with dye again.}}
{{History||1.17.10|snap=beta 1.17.10.22|Added [[candles]], which can be dyed.}}
{{History|console}}
{{History||xbox=TU1|xbone=CU1|ps=1.0|wiiu=Patch 1|switch=1.0.1|[[File:Bone Meal JE1 BE1.png|32px]] [[File:Light Gray Dye JE1 BE1.png|32px]] [[File:Gray Dye JE1 BE1.png|32px]] [[File:Ink Sac JE1 BE1.png|32px]] [[File:Cocoa Beans JE1 BE1.png|32px]] [[File:Red Dye JE1 BE1.png|32px]] [[File:Orange Dye JE1 BE1.png|32px]] [[File:Yellow Dye JE1 BE1.png|32px]] [[File:Lime Dye JE1 BE1.png|32px]] [[File:Green Dye JE1 BE1.png|32px]] [[File:Cyan Dye JE1 BE1.png|32px]] [[File:Light Blue Dye JE1 BE1.png|32px]] [[File:Lapis Lazuli JE1 BE1.png|32px]] [[File:Purple Dye JE1 BE1.png|32px]] [[File:Magenta Dye JE1 BE1.png|32px]] [[File:Pink Dye JE1 BE1.png|32px]] Added dyes.}}
{{History||xbox=TU9|[[File:Cocoa Beans JE3 BE2.png|32px]] The texture of cocoa beans has been changed.}}
{{History||xbox=none|xbone=none|ps=1.83|wiiu=none|switch=none|[[File:White Dye JE1 BE1.png|32px]] [[File:Black Dye JE1 BE1.png|32px]] [[File:Brown Dye JE1 BE1.png|32px]] [[File:Blue Dye JE1 BE1.png|32px]] Added [[white dye|white]], [[black dye|black]], [[brown dye|brown]], and [[blue dye|blue]] dyes, which can crafted from [[bone meal]], [[ink sac]], [[cocoa beans]], and [[lapis lazuli]].
|"Rose Red", "Dandelion Yellow" and "Cactus Green" have been renamed to "Red Dye", "Yellow Dye" and "Green Dye", respectively.}}
{{History||ps=1.90|[[File:Bone Meal JE2 BE2.png|32px]] [[File:Light Gray Dye JE2 BE2.png|32px]] [[File:Gray Dye JE2 BE2.png|32px]] [[File:Ink Sac JE2 BE2.png|32px]] [[File:Cocoa Beans JE4 BE3.png|32px]] [[File:Red Dye JE2 BE2.png|32px]] [[File:Orange Dye JE2 BE2.png|32px]] [[File:Yellow Dye JE2 BE2.png|32px]] [[File:Lime Dye JE2 BE2.png|32px]] [[File:Green Dye JE2 BE2.png|32px]] [[File:Cyan Dye.png|32px]] [[File:Light Blue Dye JE2 BE2.png|32px]] [[File:Lapis Lazuli JE2 BE2.png|32px]] [[File:Purple Dye JE2 BE2.png|32px]] [[File:Magenta Dye JE2 BE2.png|32px]] [[File:Pink Dye JE2 BE2.png|32px]] The textures of bone meal, light gray, gray, ink sac, cocoa beans, red, orange, yellow, lime, green, cyan, light blue, lapis lazuli, purple, magenta, and pink dyes have been changed.}}
{{History|3ds}}
{{History||0.1.0|[[File:Bone Meal JE1 BE1.png|32px]] [[File:Light Gray Dye JE1 BE1.png|32px]] [[File:Gray Dye JE1 BE1.png|32px]] [[File:Ink Sac JE1 BE1.png|32px]] [[File:Cocoa Beans JE3 BE2.png|32px]] [[File:Red Dye JE1 BE1.png|32px]] [[File:Orange Dye JE1 BE1.png|32px]] [[File:Yellow Dye JE1 BE1.png|32px]] [[File:Lime Dye JE1 BE1.png|32px]] [[File:Green Dye JE1 BE1.png|32px]] [[File:Cyan Dye JE1 BE1.png|32px]] [[File:Light Blue Dye JE1 BE1.png|32px]] [[File:Lapis Lazuli JE1 BE1.png|32px]] [[File:Purple Dye JE1 BE1.png|32px]] [[File:Magenta Dye JE1 BE1.png|32px]] [[File:Pink Dye JE1 BE1.png|32px]] Added dyes from [[Pocket Edition v0.15.4 alpha]].}}
{{History|foot}}
<gallery>
Pre-release dyes.png|Pre-release dye textures hidden within [[Items.png]].
</gallery>
;Notes
{{reflist|group=n}}
== Gallery ==
<gallery>
White Dye.png|White Dye
Light Gray Dye.png|Light Gray Dye
Gray Dye.png|Gray Dye
Black Dye.png|Black Dye
Brown Dye.png|Brown Dye
Red Dye.png|Red Dye
Orange Dye.png|Orange Dye
Yellow Dye.png|Yellow Dye
Lime Dye.png|Lime Dye
Green Dye.png|Green Dye
Cyan Dye.png|Cyan Dye
Light Blue Dye.png|Light Blue Dye
Blue Dye.png|Blue Dye
Purple Dye.png|Purple Dye
Magenta Dye.png|Magenta Dye
Pink Dye.png|Pink Dye
</gallery>
==Issues==
{{issue list}}
== Trivia ==
* Players can obtain each one of every color with 1 cocoa bean, 2 yellow dye, 2 ink sac, 3 green dye, 4 lapis lazuli, 4 red dye, and 6 bone meal (2 bones).
* The dyed sheep breeding behavior mirrors [[wikipedia:Lamarckism|Lamarck's theory]], in which the organisms evolve inheriting the external changes and adaptations of the previous generation, transmitting them to their offspring.
* In ''Bedrock Edition'', tertiary colors, along with their regular crafting recipes, can be crafted with primary colors. E.g.: Magenta can be crafted with one rose red and two bone meals.
* The colors of the dyes match the chat colors in [[color codes]] except for brown (dye only), light aqua, and gold (color codes only).
* The texture for light blue dye still uses the color from prior to the 1.12 World of Color update.<ref name="unchanged dyes"></ref>
== References ==
{{reflist}}
== External Links ==
* Tools for calculating leather dye combination: [https://minecraft.tools/en/armor.php minecraft.tools] (webapp); [https://github.com/pudquick/pyMCdyes/ pyMCDyes] (open-source Python script, outdated); [https://anrar4.github.io/DyeLeatherArmor/ DyeLeatherArmor]: a tool for calculating an exact crafting recipe for any sRGB color
{{Items}}
[[Category:Dyes]]
[[Category:Renewable resources]]
[[cs:Barvivo]]
[[de:Farbstoff]]
[[es:Tinte]]
[[fr:Teinture]]
[[hu:Színezés]]
[[it:Colorante]]
[[ja:染料]]
[[ko:염료]]
[[nl:Kleurstof]]
[[pl:Barwniki]]
[[pt:Corante]]
[[ru:Красители]]
[[th:สีย้อม]]
[[uk:Барвники]]
[[zh:染料]]</li><li>[[Pumpkin Seeds|Pumpkin Seeds]]<br/>{{Block
| image = <gallery>
Pumpkin Stem Age 0.png | Age 0
Pumpkin Stem Age 1.png | Age 1
Pumpkin Stem Age 2.png | Age 2
Pumpkin Stem Age 3.png | Age 3
Pumpkin Stem Age 4.png | Age 4
Pumpkin Stem Age 5.png | Age 5
Pumpkin Stem Age 6.png | Age 6
Pumpkin Stem Age 7.png | Age 7
</gallery>
|image2 = <gallery>
Attached Pumpkin Stem (N).png | North
Attached Pumpkin Stem (E).png | East
Attached Pumpkin Stem (S).png | South
Attached Pumpkin Stem (W).png | West
</gallery>
| transparent = Yes
| light = No
| tool = none
| renewable = Yes
| stackable = Yes (64)
| flammable = No
| lavasusceptible = No
}}
'''Pumpkin seeds''' are items obtained from pumpkins that can be used to grow pumpkin stems.
'''Pumpkin stems''' are plants grown on [[farmland]] that, over time, grow [[pumpkin]]s on dirt, mud and moss blocks adjacent to them.
== Obtaining ==
=== Breaking ===
When broken, a pumpkin stem drops 0–3 pumpkin seeds. The chance for pumpkin seeds to drop increases with the stem's age.
{| class="wikitable"
! rowspan="3" |[[Resource location]]
! rowspan="3" | Source
! colspan="4" | Default
|-
| colspan="1" rowspan="2" style="text-align:center" | Nothing || colspan="3" style="text-align:center" |{{ItemLink|Pumpkin Seeds|Pumpkin seeds}}
|-
| style="text-align:center" | 1 || style="text-align:center" | 2 || style="text-align:center" | 3
|-
| rowspan="8" |<code>blocks/pumpkin_stem</code>
|{{BlockLink|Pumpkin Stem|Pumpkin stem}} <code>age = 0</code>
| style="text-align:center" |81.3%|| style="text-align:center" |17.42%|| style="text-align:center" |1.24%|| style="text-align:center" |0.03%
|-
|{{BlockLink|Pumpkin Stem|Pumpkin stem}} <code>age = 1</code>
| style="text-align:center" |65.1%|| style="text-align:center" |30.04%|| style="text-align:center" |4.62%|| style="text-align:center" |0.24%
|-
|{{BlockLink|Pumpkin Stem|Pumpkin stem}} <code>age = 2</code>
| style="text-align:center" |51.2%|| style="text-align:center" |38.4%|| style="text-align:center" |9.6%|| style="text-align:center" |0.8%
|-
|{{BlockLink|Pumpkin Stem|Pumpkin stem}} <code>age = 3</code>
| style="text-align:center" |39.44%|| style="text-align:center" |43.02%|| style="text-align:center" |15.64%|| style="text-align:center" |1.9%
|-
|{{BlockLink|Pumpkin Stem|Pumpkin stem}} <code>age = 4</code>
| style="text-align:center" |29.13%|| style="text-align:center" |44.44%|| style="text-align:center" |22.22%|| style="text-align:center" |3.7%
|-
|{{BlockLink|Pumpkin Stem|Pumpkin stem}} <code>age = 5</code>
| style="text-align:center" |21.6%|| style="text-align:center" |43.2%|| style="text-align:center" |28.8%|| style="text-align:center" |6.4%
|-
|{{BlockLink|Pumpkin Stem|Pumpkin stem}} <code>age = 6</code>
| style="text-align:center" |15.17%|| style="text-align:center" |39.82%|| style="text-align:center" |34.84%|| style="text-align:center" |10.16%
|-
|{{BlockLink|Pumpkin Stem|Pumpkin stem}} <code>age = 7</code>
| style="text-align:center" |10.16%|| style="text-align:center" |34.84%|| style="text-align:center" |39.82%|| style="text-align:center" |15.17%
|-
| rowspan="1" |<code>blocks/attached_pumpkin_stem</code>
|{{BlockLink|Attached Pumpkin Stem|Attached Pumpkin stem}}
| style="text-align:center" |10.16%|| style="text-align:center" |34.84%|| style="text-align:center" |39.82%|| style="text-align:center" |15.17%
|}
=== Natural generation ===
Pumpkin stems generate naturally in stem farm rooms in [[woodland mansion]]s.
Pumpkin stems generate in [[taiga]] and [[snowy taiga]]{{only|be|short=1}} [[village]] farms.
=== Chest loot ===
{{LootChestItem|pumpkin-seeds}}
=== Crafting ===
{{Crafting
|Pumpkin
|Output= Pumpkin Seeds,4
|type= Material
}}
=== Trading ===
[[Wandering trader]]s sell pumpkin seeds for 1 [[emerald]].
=== Post-generation ===
Shearing an uncarved pumpkin yields 4 pumpkin seeds.
== Usage ==
=== Farming ===
{{see also|Tutorials/Pumpkin and melon farming}}
Pumpkin seeds can be planted only on [[farmland]], as stems. Over time, a stem grows through several stages{{Needs testing}} and, at its final growth stage, will produce [[pumpkin]]s on any adjacent [[dirt]], [[Coarse Dirt|coarse dirt]], [[Rooted Dirt|rooted dirt]], [[Grass Block|grass block]], [[farmland]], [[podzol]], [[mycelium]], [[Moss Block|moss block]], [[mud]] or [[Muddy Mangrove Roots|muddy mangrove roots]]. If a pumpkin is already occupying a spot adjacent to a stem it does not grow more pumpkins until the pumpkin is removed. A single stem can grow an unlimited number of pumpkins. Pumpkin stems need a minimum light level of 10 in the block above the stem to grow and give pumpkins. Pumpkin seeds are affected by [[bone meal]] only with respect to stem growth; bone meal does not help produce the actual pumpkins.
=== Breeding ===
Like other seeds, pumpkin seeds can be used to [[breed]] [[chicken]]s, lead chickens around, and make baby chickens grow up faster by 10% of the remaining time.
=== Taming ===
Like other seeds, pumpkin seeds can be used to tame [[parrot]]s.
=== Composting ===
Placing pumpkin seeds into a [[composter]] has a 30% chance of raising the compost level by 1.
== Pumpkin stem ==
A '''pumpkin stem''' is the block that is planted on [[farmland]] when pumpkin seeds are used on it. It starts underground, and rises up as the plant grows. The stem is colored green when young, and then yellow once fully grown.
The stem curves once a pumpkin has grown from it. A fully-grown single stem connects to any [[pumpkin]] in an adjacent square, thus there are 5 possible appearances to a stem. If there are multiple pumpkins it can connect to, it favors the east, then west, north, and south. When the pumpkin is removed, the stem returns to its straight shape.
== Sounds ==
{{Sound table/Block/Hard crop}}
== Data values ==
=== ID ===
{{edition|java}}:
{{ID table
|edition=java
|showblocktags=y
|showforms=y
|generatetranslationkeys=y
|displayname=Pumpkin Stem
|spritetype=block
|nameid=pumpkin_stem
|blocktags=bee_growables, crops
|form=block}}
{{ID table
|displayname=Attached Pumpkin Stem
|spritetype=block
|nameid=attached_pumpkin_stem
|form=block}}
{{ID table
|displayname=Pumpkin Seeds
|spritetype=item
|nameid=pumpkin_seeds
|form=item
|foot=1}}
{{edition|bedrock}}:
{{ID table
|edition=bedrock
|shownumericids=y
|showforms=y
|generatetranslationkeys=y
|displayname=Pumpkin Stem
|spritetype=block
|nameid=pumpkin_stem
|id=104
|form=block}}
{{ID table
|displayname=Pumpkin Seeds
|spritetype=item
|nameid=pumpkin_seeds
|id=292
|form=item
|foot=1}}
=== Block states ===
{{see also|Block states}}
{{/BS}}
== Advancements ==
{{load advancements|A Seedy Place}}
== History ==
{{info needed section|check if stems floated above farmland upon initial implementation}}
{{History|java beta}}
{{History||1.8|snap=Pre-release|[[File:Pumpkin Seeds JE1 BE1.png|32px]] Added pumpkin seeds.
|[[File:Pumpkin Stem Age 0 JE1.png|32px]] [[File:Pumpkin Stem Age 1 JE1.png|32px]] [[File:Pumpkin Stem Age 2 JE1.png|32px]] [[File:Pumpkin Stem Age 3 JE1.png|32px]] [[File:Pumpkin Stem Age 4 JE1.png|32px]] [[File:Pumpkin Stem Age 5 JE1.png|32px]] [[File:Pumpkin Stem Age 6 JE1.png|32px]] [[File:Pumpkin Stem Age 7 JE1.png|32px]] Added the pumpkin stem, with seven stages of growth.
|Pumpkin seeds can be found in the new [[mineshaft]] [[chest]]s.
|[[File:Attached Pumpkin Stem (N) JE1.png|32px]] [[File:Attached Pumpkin Stem (E) JE1.png|32px]] [[File:Attached Pumpkin Stem (S) JE1.png|32px]] [[File:Attached Pumpkin Stem (W) JE1.png|32px]] The pumpkin stem has four slightly visually distinct appearances for each facing direction - the bent part of the stem rotates, but the other two planes do not.
|[[File:Pumpkin Stem Age 8 JE1.png|32px]] [[File:Pumpkin Stem Age 9 JE1.png|32px]] [[File:Pumpkin Stem Age 10 JE1.png|32px]] [[File:Pumpkin Stem Age 11 JE1.png|32px]] [[File:Pumpkin Stem Age 12 JE1.png|32px]] [[File:Pumpkin Stem Age 13 JE1.png|32px]] [[File:Pumpkin Stem Age 14 JE1.png|32px]] [[File:Pumpkin Stem Age 15 JE1.png|32px]] Pumpkin stem data values from 8 through 15 now show a glitched formation, with a floating stem with an attached stem cross eventually emerging below.
|[[File:Attached Stem Age 8 JE1.png|32px]] [[File:Attached Stem Age 9 JE1.png|32px]] [[File:Attached Stem Age 10 JE1.png|32px]] [[File:Attached Stem Age 11 JE1.png|32px]] [[File:Attached Stem Age 12 JE1.png|32px]] [[File:Attached Stem Age 13 JE1.png|32px]] [[File:Attached Stem Age 14 JE1.png|32px]] [[File:Attached Stem Age 15 JE1.png|32px]] Pumpkin stem blocks with data values higher than 7 can attach to adjacent fruits, which results in buggy stem textures with [[vines]] in the mix due to vines being below attached stems in [[terrain.png]].}}
{{History|||snap=Pre-release 2 ;)|Pumpkin stems can now be grown faster using [[bone meal]].}}
{{History|java}}
{{History||1.0.0|snap=Beta 1.9 Prerelease 2|Pumpkins can now be [[crafting|crafted]] into [[pumpkin seeds]].}}
{{History||1.3.1|snap=1.3|The texture of pumpkin stems has been moved one pixel to the left in [[terrain.png]].
|[[File:Pumpkin Stem Age 0 JE2.png|32px]] [[File:Pumpkin Stem Age 1 JE2.png|32px]] [[File:Pumpkin Stem Age 2 JE2.png|32px]] [[File:Pumpkin Stem Age 3 JE2.png|32px]] [[File:Pumpkin Stem Age 4 JE2.png|32px]] [[File:Pumpkin Stem Age 5 JE2.png|32px]] [[File:Pumpkin Stem Age 6 JE2.png|32px]] [[File:Pumpkin Stem Age 7 JE2.png|32px]] Stems now appear slightly different.
|[[File:Pumpkin Stem Age 8 JE2.png|32px]] [[File:Pumpkin Stem Age 9 JE2.png|32px]] [[File:Pumpkin Stem Age 10 JE2.png|32px]] [[File:Pumpkin Stem Age 11 JE2.png|32px]] [[File:Pumpkin Stem Age 12 JE2.png|32px]] [[File:Pumpkin Stem Age 13 JE2.png|32px]] [[File:Pumpkin Stem Age 14 JE2.png|32px]] [[File:Pumpkin Stem Age 15 JE2.png|32px]] Overgrown attached pumpkin stems now appear slightly different.
|[[File:Attached Pumpkin Stem (N) JE2.png|32px]] [[File:Attached Pumpkin Stem (E) JE2.png|32px]] [[File:Attached Pumpkin Stem (S) JE2.png|32px]] [[File:Attached Pumpkin Stem (W) JE2.png|32px]] Attached pumpkin stems now appear slightly different.
|[[File:Attached Stem Age 8 JE2.png|32px]] [[File:Attached Stem Age 9 JE2.png|32px]] [[File:Attached Stem Age 10 JE2.png|32px]] [[File:Attached Stem Age 11 JE2.png|32px]] [[File:Attached Stem Age 12 JE2.png|32px]] [[File:Attached Stem Age 13 JE2.png|32px]] [[File:Attached Stem Age 14 JE2.png|32px]] [[File:Attached Stem Age 15 JE2.png|32px]] Overgrown attached pumpkin stems now appear slightly different.}}
{{History||1.4.2|snap=12w36a|[[Chicken]]s now use [[wheat seeds]], [[melon seeds]] and pumpkin seeds, instead of [[wheat]] to [[breeding|breed]].}}
{{History||1.5|snap=13w02a|[[File:Pumpkin Stem Age 0 JE3.png|32px]] [[File:Pumpkin Stem Age 1 JE3.png|32px]] [[File:Pumpkin Stem Age 2 JE3.png|32px]] [[File:Pumpkin Stem Age 3 JE3.png|32px]] [[File:Pumpkin Stem Age 4 JE3.png|32px]] [[File:Pumpkin Stem Age 5 JE3.png|32px]] [[File:Pumpkin Stem Age 6 JE3.png|32px]] Pumpkin stems now use a squished version of their texture for immature stems, depending on age.
|[[File:Pumpkin Stem Age 8 JE3.png|32px]] [[File:Pumpkin Stem Age 9 JE3.png|32px]] [[File:Pumpkin Stem Age 10 JE3.png|32px]] [[File:Pumpkin Stem Age 11 JE3.png|32px]] [[File:Pumpkin Stem Age 12 JE3.png|32px]] [[File:Pumpkin Stem Age 13 JE3.png|32px]] [[File:Pumpkin Stem Age 14 JE3.png|32px]] [[File:Pumpkin Stem Age 15 JE3.png|32px]] This also affects pumpkin stems of ages 8-15, which are likewise stretched to accommodate its predicted size.
|[[File:Attached Stem Age 8 JE3.png|32px]] [[File:Attached Stem Age 9 JE3.png|32px]] [[File:Attached Stem Age 10 JE3.png|32px]] [[File:Attached Stem Age 11 JE3.png|32px]] [[File:Attached Stem Age 12 JE3.png|32px]] [[File:Attached Stem Age 13 JE3.png|32px]] [[File:Attached Stem Age 14 JE3.png|32px]] [[File:Attached Stem Age 15 JE3.png|32px]] Pumpkin stems of extreme ages, which are attached to adjacent fruits, now show a stretched and tinted stem appearance.}}
{{History|||snap=13w03a|[[File:Pumpkin Stem Age 0 JE4.png|32px]] [[File:Pumpkin Stem Age 1 JE4.png|32px]] [[File:Pumpkin Stem Age 2 JE4.png|32px]] [[File:Pumpkin Stem Age 3 JE4.png|32px]] [[File:Pumpkin Stem Age 4 JE4.png|32px]] [[File:Pumpkin Stem Age 5 JE4.png|32px]] [[File:Pumpkin Stem Age 6 JE4.png|32px]] [[File:Pumpkin Stem Age 7 JE4.png|32px]] Pumpkin stems are no longer squished or stretched to account for age.<ref>{{bug|MC-7111}}</ref>
|[[File:Pumpkin Stem Age 8 JE4.png|32px]] [[File:Pumpkin Stem Age 9 JE4.png|32px]] [[File:Pumpkin Stem Age 10 JE4.png|32px]] [[File:Pumpkin Stem Age 11 JE4.png|32px]] [[File:Pumpkin Stem Age 12 JE4.png|32px]] [[File:Pumpkin Stem Age 13 JE4.png|32px]] [[File:Pumpkin Stem Age 14 JE4.png|32px]] [[File:Pumpkin Stem Age 15 JE4.png|32px]] Pumpkin stems with age values 8 through 15 now show a tinted [[trapdoor]] texture.
|From this version up until 14w08a, overgrown pumpkin stems start to draw from the texture below them on the [[texture atlas]], in much the same way they previously did with terrain.png. However, as texture atlases are unstable and textures tend to change positions as new blocks and textures are added, overgrown stems change the texture they draw from every time new textures are added, which includes when textures added by [[mods]].}}
{{History|||snap=13w09a|[[File:Pumpkin Stem Age 8 JE5.png|32px]] [[File:Pumpkin Stem Age 9 JE5.png|32px]] [[File:Pumpkin Stem Age 10 JE5.png|32px]] [[File:Pumpkin Stem Age 11 JE5.png|32px]] [[File:Pumpkin Stem Age 12 JE5.png|32px]] [[File:Pumpkin Stem Age 13 JE5.png|32px]] [[File:Pumpkin Stem Age 14 JE5.png|32px]] [[File:Pumpkin Stem Age 15 JE5.png|32px]] Pumpkin stems with age values 8 through 15 now show a tinted [[birch wood]] texture.}}
{{History||1.6.1|snap=13w24a|Melon and pumpkin stems have now been assigned separate textures.
|[[File:Pumpkin Stem Age 8 JE6.png|32px]] [[File:Pumpkin Stem Age 9 JE6.png|32px]] [[File:Pumpkin Stem Age 10 JE6.png|32px]] [[File:Pumpkin Stem Age 11 JE6.png|32px]] [[File:Pumpkin Stem Age 12 JE6.png|32px]] [[File:Pumpkin Stem Age 13 JE6.png|32px]] [[File:Pumpkin Stem Age 14 JE6.png|32px]] [[File:Pumpkin Stem Age 15 JE6.png|32px]] Pumpkin stems with age values 8 through 15 now show a tinted curving [[rail]] texture.}}
{{History||1.7.2|snap=13w37a|Added the {{cmd|setblock}} command, allowing for invalid pumpkin stem ages to be placed in the world without using external editors. This also allows them to be obtained in earlier versions via backdating.}}
{{History|||snap=13w41a|[[File:Pumpkin Stem Age 8 JE7.png|32px]] [[File:Pumpkin Stem Age 9 JE7.png|32px]] [[File:Pumpkin Stem Age 10 JE7.png|32px]] [[File:Pumpkin Stem Age 11 JE7.png|32px]] [[File:Pumpkin Stem Age 12 JE7.png|32px]] [[File:Pumpkin Stem Age 13 JE7.png|32px]] [[File:Pumpkin Stem Age 14 JE7.png|32px]] [[File:Pumpkin Stem Age 15 JE7.png|32px]] Pumpkin stems with age values 8 through 15 now show a tinted lit [[furnace]] texture.}}
{{History|||snap=13w43a|[[File:Pumpkin Stem Age 8 JE8.png|32px]] [[File:Pumpkin Stem Age 9 JE8.png|32px]] [[File:Pumpkin Stem Age 10 JE8.png|32px]] [[File:Pumpkin Stem Age 11 JE8.png|32px]] [[File:Pumpkin Stem Age 12 JE8.png|32px]] [[File:Pumpkin Stem Age 13 JE8.png|32px]] [[File:Pumpkin Stem Age 14 JE8.png|32px]] [[File:Pumpkin Stem Age 15 JE8.png|32px]] Pumpkin stems with age values 8 through 15 now show a tinted [[pumpkin]] top texture.}}
{{History||1.8|snap=14w10a|[[File:Pumpkin Stem Age 8 JE9.png|32px]] [[File:Pumpkin Stem Age 9 JE9.png|32px]] [[File:Pumpkin Stem Age 10 JE9.png|32px]] [[File:Pumpkin Stem Age 11 JE9.png|32px]] Pumpkin stems with data values 8-11 now display a tinted attached stem, with 8 facing west, 9 facing east, 10 facing north and 11 facing south.
|Invalid pumpkin stems with data values 12-15 now crash the game.}}
{{History|||snap=14w25a|[[File:Pumpkin Stem Age 0 JE5.png|32px]] [[File:Pumpkin Stem Age 1 JE5.png|32px]] [[File:Pumpkin Stem Age 2 JE5.png|32px]] [[File:Pumpkin Stem Age 3 JE5.png|32px]] [[File:Pumpkin Stem Age 4 JE5.png|32px]] [[File:Pumpkin Stem Age 5 JE5.png|32px]] [[File:Pumpkin Stem Age 6 JE5.png|32px]] [[File:Pumpkin Stem Age 7 JE5.png|32px]] Pumpkin stems now render as a single diagonal plane, or, in the case of attached stems, a diagonal and orthogonal plane.
|[[File:Attached Pumpkin Stem (N) JE3.png|32px]] [[File:Attached Pumpkin Stem (E) JE3.png|32px]] [[File:Attached Pumpkin Stem (S) JE3.png|32px]] [[File:Attached Pumpkin Stem (W) JE3.png|32px]] The attached pumpkin stem [[model]] now fully rotates to the direction the stem points. Prior to this update, the base of the pumpkin stem would stay the same while the long attaching section would differ, resulting in four possible attached stem appearances.
|Invalid overgrown pumpkin stems have now effectively been removed from the game, as attempting to place an out of range stem via {{cmd|setblock}} creates a stem of age 0 and loading a world with existing such stems cause a game crash.}}
{{History|||snap=14w26a|[[File:Pumpkin Stem Age 0 JE6.png|32px]] [[File:Pumpkin Stem Age 1 JE6.png|32px]] [[File:Pumpkin Stem Age 2 JE6.png|32px]] [[File:Pumpkin Stem Age 3 JE6.png|32px]] [[File:Pumpkin Stem Age 4 JE6.png|32px]] [[File:Pumpkin Stem Age 5 JE6.png|32px]] [[File:Pumpkin Stem Age 6 JE6.png|32px]] [[File:Pumpkin Stem Age 7 JE6.png|32px]] [[File:Attached Pumpkin Stem (N) JE4.png|32px]] [[File:Attached Pumpkin Stem (E) JE4.png|32px]] [[File:Attached Pumpkin Stem (S) JE4.png|32px]] [[File:Attached Pumpkin Stem (W) JE4.png|32px]] Pumpkin stems now correctly render as crosses again.<ref>{{bug|MC-58136}}</ref>}}
{{History|||snap=14w27a|[[File:Attached Stem Age 0 14w27a.png|32px]] [[File:Attached Stem Age 1 14w27a.png|32px]] [[File:Attached Stem Age 2 14w27a.png|32px]] [[File:Attached Stem Age 3 14w27a.png|32px]] [[File:Attached Stem Age 4 14w27a.png|32px]] [[File:Attached Stem Age 5 14w27a.png|32px]] [[File:Attached Stem Age 6 14w27a.png|32px]] Due to a bug, all pumpkin stems now appear attached regardless of age or any actual attachment.<ref>{{bug|MC-60208}}</ref>}}
{{History|||snap=14w28a|All pumpkin stems appearing attached regardless of the age of any actual attachment has been fixed. However, pumpkin stems still appear attached to adjacent fruits regardless of age due to a similar bug.<ref>{{bug|MC-61716}}</ref>}}
{{History|||snap=14w34d|Pumpkin seeds no longer can be used to breed [[chicken]]s.}}
{{History||1.9|snap=15w31a|Chickens can now use pumpkin seeds to [[breeding|breed]] again.}}
{{History|||snap=15w44a|Pumpkin seeds have been added to [[dungeon]] [[chest]]s.
|The average yield of pumpkin seeds in [[mineshaft]] chests has been decreased.}}
{{History|||snap=15w45a|Pumpkin stems must now be fully grown again to attach.}}
{{History||1.11|snap=16w39a|Pumpkin seeds are now found in the new [[woodland mansion]] chests.
|Pumpkin stems now generate inside [[woodland mansion]]s.}}
{{History||1.13|snap=17w47a|The different [[block]] states for the <code>pumpkin_stem</code> ID have been split up into their own IDs.
|Pumpkin seeds can now be obtained by [[shear]]ing an uncarved pumpkin.
|Prior to [[1.13/Flattening|''The Flattening'']], this [[block]]'s numeral ID was 104, and the [[item]]'s 361.}}
{{History|||snap=17w48a|Attached pumpkin stems no longer [[drops|drop]] seeds.}}
{{History||1.14|snap=18w43a|[[File:Pumpkin Stem Age 0 JE7.png|32px]] [[File:Pumpkin Stem Age 1 JE7.png|32px]] [[File:Pumpkin Stem Age 2 JE7.png|32px]] [[File:Pumpkin Stem Age 3 JE7.png|32px]] [[File:Pumpkin Stem Age 4 JE7.png|32px]] [[File:Pumpkin Stem Age 5 JE7.png|32px]] [[File:Pumpkin Stem Age 6 JE7.png|32px]] [[File:Pumpkin Stem Age 7 JE7.png|32px]] The stem texture has changed.
|[[File:Attached Pumpkin Stem (N) JE5.png|32px]] [[File:Attached Pumpkin Stem (E) JE5.png|32px]] [[File:Attached Pumpkin Stem (S) JE5.png|32px]] [[File:Attached Pumpkin Stem (W) JE5.png|32px]] The pumpkin stem texture change also affects the base cross on pumpkin stems.}}
{{History|||snap=18w50a|Pumpkin stems now generate in the updated [[taiga]] [[village]] farms.
|Pumpkin seeds can now be found in [[chest]]s in taiga village houses.}}
{{History|||snap=19w03a|Placing pumpkin seeds into the new [[composter]] has a 10% chance of raising the compost level by 1.}}
{{History|||snap=19w05a|Pumpkin seeds now have a 30% chance of increasing the compost level in a composter by 1.
|Added [[Wandering Trader|wandering trader]]s, which sell pumpkin seeds.}}
{{History||1.15|snap=19w34a|[[Bee]]s can now pollinate pumpkin stems.}}
{{History|||snap=19w39a|Attached pumpkin stems now [[drops|drop]] seeds again.<ref>{{bug|MC-136360}}</ref>}}
{{History|pocket alpha}}
{{History||v0.8.0|snap=build 1|[[File:Pumpkin Seeds JE1 BE1.png|32px]] Added pumpkin seeds.
|[[File:Pumpkin Stem Age 0 JE1.png|32px]] [[File:Pumpkin Stem Age 1 JE1.png|32px]] [[File:Pumpkin Stem Age 2 JE1.png|32px]] [[File:Pumpkin Stem Age 3 JE1.png|32px]] [[File:Pumpkin Stem Age 4 JE1.png|32px]] [[File:Pumpkin Stem Age 5 JE1.png|32px]] [[File:Pumpkin Stem Age 6 JE1.png|32px]] [[File:Pumpkin Stem Age 7 JE1.png|32px]] [[File:Attached Pumpkin Stem (N) JE1.png|32px]] [[File:Attached Pumpkin Stem (E) JE1.png|32px]] [[File:Attached Pumpkin Stem (S) JE1.png|32px]] [[File:Attached Pumpkin Stem (W) JE1.png|32px]]{{verify|Were these the models used by this edition?}} Added pumpkin stems.
|Pumpkin seeds are obtainable from the [[Nether reactor]].}}
{{History||v0.12.1|snap=build 1|Pumpkin seeds are no longer available from the Nether reactor.}}
{{History||v0.14.0|snap=build 1|Pumpkin seeds can now be found in [[minecart with chest]]s inside [[mineshaft]]s.}}
{{History|pocket}}
{{History||1.1.0|snap=alpha 1.1.0.0|Pumpkin stems now generate inside [[woodland mansion]]s.}}
{{History|bedrock}}
{{History||1.2.0|snap=beta 1.2.0.2|Pumpkin seeds are now used to tame [[parrot]]s.}}
{{History||1.4.0|snap=beta 1.2.13.8|Pumpkin seeds can now be obtained by [[shear]]ing an uncarved [[pumpkin]].}}
{{History||1.10.0|snap=beta 1.10.0.3|[[File:Attached Pumpkin Stem (W) JE5.png|32px]]{{info needed|More accurate image}} The texture of attached pumpkin stems has been changed.
|Pumpkin seeds can now be [[trading|bought]] from [[wandering trader]]s.
|A single pumpkin crop now generates in the new [[taiga]] and [[snowy taiga]] [[village]]s.}}
{{History||1.11.0|snap=beta 1.11.0.1|A single pumpkin seed can now be used to fill the [[composter]].
|Pumpkin seeds can now be found in [[taiga]] and [[snowy taiga]] [[village]] house [[chest]]s.}}
{{History|console}}
{{History||xbox=TU5|xbone=CU1|ps=1.0|wiiu=Patch 1|[[File:Pumpkin Seeds JE1 BE1.png|32px]] Added pumpkin seeds.
|[[File:Pumpkin Stem Age 0 JE1.png|32px]] [[File:Pumpkin Stem Age 1 JE1.png|32px]] [[File:Pumpkin Stem Age 2 JE1.png|32px]] [[File:Pumpkin Stem Age 3 JE1.png|32px]] [[File:Pumpkin Stem Age 4 JE1.png|32px]] [[File:Pumpkin Stem Age 5 JE1.png|32px]] [[File:Pumpkin Stem Age 6 JE1.png|32px]] [[File:Pumpkin Stem Age 7 JE1.png|32px]] [[File:Attached Pumpkin Stem (N) JE1.png|32px]] [[File:Attached Pumpkin Stem (E) JE1.png|32px]] [[File:Attached Pumpkin Stem (S) JE1.png|32px]] [[File:Attached Pumpkin Stem (W) JE1.png|32px]]{{verify|Were these the models used by this edition?}} Added pumpkin stems.}}
{{History||xbox=TU69|ps=1.76|wiiu=Patch 38|Pumpkin seeds can now be obtained by [[shear]]ing an uncarved [[pumpkin]].}}
{{History||xbox=none|xbone=none|ps=1.90|wiiu=none|switch=none|[[File:Attached Pumpkin Stem (W) JE5.png|32px]]{{info needed|More accurate image}} The texture of attached pumpkin stems has been changed.}}
{{History|New 3DS}}
{{History||0.1.0|[[File:Pumpkin Stem Age 0 JE1.png|32px]] [[File:Pumpkin Stem Age 1 JE1.png|32px]] [[File:Pumpkin Stem Age 2 JE1.png|32px]] [[File:Pumpkin Stem Age 3 JE1.png|32px]] [[File:Pumpkin Stem Age 4 JE1.png|32px]] [[File:Pumpkin Stem Age 5 JE1.png|32px]] [[File:Pumpkin Stem Age 6 JE1.png|32px]] [[File:Pumpkin Stem Age 7 JE1.png|32px]] [[File:Attached Pumpkin Stem (N) JE1.png|32px]] [[File:Attached Pumpkin Stem (E) JE1.png|32px]] [[File:Attached Pumpkin Stem (S) JE1.png|32px]] [[File:Attached Pumpkin Stem (W) JE1.png|32px]]{{verify|Were these the models used by this edition?}} Added pumpkin stems.}}
{{History|foot}}
<gallery>
Pumpkin Stem with data value 15.png|The final version of the pumpkin stem with age 15, as seen in-game.
Pumpkinstems.png|Pumpkin stems of ages 1 to 15 on a modded version of [[Java Edition 1.7.2|1.7.2]], hence the nearby melon stems using the melon top texture.
Stems of 13w02a.png|All 16 stem sizes in [[Java Edition 13w02a|13w02a]], with accompanying data values.
</gallery>
=== Pumpkin stem "item" ===
{{:Technical blocks/Pumpkin Stem}}
== Issues ==
{{issue list}}
== Gallery ==
<gallery>
Stem All Ages.png|All stages of growth.
AllSeeds.png|All the [[seeds]] that exist in the game.
</gallery>
== References ==
{{reflist}}
{{Blocks|vegetation}}
{{Items}}
[[Category:Plants]]
[[Category:Food]]
[[Category:Non-solid blocks]]
[[Category:Generated structure blocks]]
[[cs:Dýňová semínka]]
[[de:Kürbiskerne]]
[[es:Semillas de calabaza]]
[[fr:Graines de citrouille]]
[[hu:Tökmagok]]
[[ja:カボチャの種]]
[[ko:호박씨]]
[[nl:Pompoenpitten]]
[[pl:Nasiona dyni]]
[[pt:Sementes de abóbora]]
[[ru:Семена тыквы]]
[[th:เมล็ดฝักทอง]]
[[zh:南瓜种子]]</li></ul> | beta 1.10.0.3 | ||||
1.13.0{{Extension DPL}}<ul><li>[[Nether Brick|Nether Brick]]<br/><!--Please do not change "nether brick" to "Nether brick". According to style guide, item names are not proper nouns and should not be capitalized.-->
{{about|the item|the block|Nether Bricks}}
{{Item
| title = Nether Brick
| image = Nether Brick.png
| renewable = Yes
| stackable = Yes (64)
}}
A '''nether brick''' is an [[item]] made by [[smelting]] [[netherrack]] in a [[furnace]], and is used to craft the [[Nether Bricks|nether bricks]] block and its variants.
== Obtaining ==
=== Smelting ===
Nether brick can be smelted from netherrack.
{{smelting
|Netherrack
|Nether Brick
|0,1
}}
=== Bartering ===
[[Piglin]]s may [[barter]] 2 to 8 nether bricks when given a [[gold ingot]].
== Usage ==
=== Crafting ingredient ===
{{crafting usage|Nether Brick}}
== Data values ==
=== ID ===
{{edition|java}}:
{{ID table
|edition=java
|showforms=y
|generatetranslationkeys=y
|displayname=Nether Brick
|spritetype=item
|nameid=nether_brick
|form=item
|foot=1}}
{{edition|bedrock}}:
{{ID table
|edition=bedrock
|shownumericids=y
|showforms=y
|notshowbeitemforms=y
|generatetranslationkeys=y
|displayname=Nether Brick
|spritetype=item
|nameid=netherbrick
|id=523
|form=item
|foot=1}}
== History ==
{{History|java}}
{{History||1.5|snap=13w01a|[[File:Nether Brick JE1 BE1.png|32px]] Added nether brick items.}}
{{History||1.10|snap=16w20a|Nether brick items can now be used to craft [[red nether bricks]].}}
{{History||1.13|snap=17w47a|The ID of nether bricks has been changed from <code>netherbrick</code> to <code>nether_brick</code>.
|Prior to [[1.13/Flattening|''The Flattening'']], this [[item]]'s numeral ID was 405.}}
{{History||1.14|snap=18w43a|[[File:Nether Brick JE2 BE2.png|32px]] The texture of nether bricks has been changed.}}
{{History||1.16|snap=20w07a|Nether bricks now have a {{frac|10|109}} (~9.17%) chance of being given by the new [[piglin]]s when [[bartering]], in a stack size of 1–4.}}
{{History|||snap=20w09a|Nether bricks now have a {{frac|20|226}} (~8.84%) chance of being given by piglins when bartering, in a stack size of 1–5.}}
{{History|||snap=20w10a|Nether bricks now have a {{frac|40|411}} (~9.73%) chance of being given by piglins when bartering, in a stack size of 4–16.}}
{{History||1.16.2|snap=20w28a|Nether bricks now have a {{frac|40|459}} (~8.71%) chance of being given by piglins when bartering, in a stack size of 2–8.}}
{{History|pocket alpha}}
{{History||v0.6.0|[[File:Nether Brick JE1 BE1.png|32px]] Added nether brick items.}}
{{History||v0.16.0|snap=build 5|Added nether brick items to the [[Creative]] [[inventory]].<ref name="missing brick">{{Bug|MCPE-16556}}</ref>}}
{{History|pocket}}
{{History||1.1.3|snap=alpha 1.1.3.0|Nether brick items are now used to craft [[red nether bricks]].}}
{{History|bedrock}}
{{History||1.9.0|snap=beta 1.9.0.0|Nether brick items are now used to craft nether brick [[fence]]s.}}
{{History||1.10.0|snap=beta 1.10.0.3|[[File:Nether Brick JE2 BE2.png|32px]] The texture of nether bricks has been changed.}}
{{History||1.16.100|snap=beta 1.16.100.50|Nether bricks now can be used as fuel for a [[furnace]].<ref>{{bug|MCPE-114216}}</ref>}}
{{History|||snap=beta 1.16.100.54|Nether bricks now have a {{frac|40|459}} (~8.71%) chance of being given by piglins when bartering, in a stack size of 2–8 to match {{el|Java}}.}}
{{History||1.18.30|snap=beta 1.18.30.26|Nether bricks can no longer be used as fuel in a furnace.}}
{{History|console}}
{{History||xbox=TU9|xbone=CU1|ps=1.0|wiiu=Patch 1|switch=1.0.1|[[File:Nether Brick JE1 BE1.png|32px]] Added nether brick items.}}
{{History||xbox=none|xbone=none|ps=1.90|wiiu=none|switch=none|[[File:Nether Brick JE2 BE2.png|32px]] The texture of nether bricks has been changed.}}
{{History|New 3DS}}
{{History||0.1.0|[[File:Nether Brick JE1 BE1.png|32px]] Added nether brick items.}}
{{History|foot}}
== Issues ==
{{issue list}}
== References ==
{{reflist}}
{{items}}
[[cs:Netheritová cihla]]
[[de:Netherziegel (Gegenstand)]]
[[es:Ladrillo del Nether]]
[[fr:Brique du Nether]]
[[hu:Alvilági tégla]]
[[ja:ネザーレンガ (アイテム)]]
[[ko:네더 벽돌 (아이템)]]
[[lzh:焱界磚]]
[[nl:Netherbaksteen (voorwerp)]]
[[pl:Netherowa cegła]]
[[pt:Tijolo do Nether]]
[[ru:Адский кирпич (предмет)]]
[[uk:Пекельна цегла (предмет)]]
[[zh:下界砖]]
[[Category:Renewable resources]]</li><li>[[Bowl|Bowl]]<br/>{{Item
| image = Bowl.png
| renewable = Yes
| stackable = Yes (64)
}}
'''Bowls''' are containers that can hold certain [[food]]s.
== Obtaining ==
=== Crafting ===
{{Crafting
|A2= Any Planks
|C2= Any Planks
|B3= Any Planks
|Output= Bowl,4
|type= Material
}}
=== Fishing ===
Bowls can be obtained as a "junk" item while [[fishing]].
=== Eating ===
A bowl containing food becomes an empty bowl when the food is eaten.
=== Mob loot ===
When a [[turtle]] is killed by a [[Thunderstorm#Lightning|lightning bolt]], it drops 1 bowl.<ref name=BowlReport>{{Cite bug|MC|125562|Turtles drop bowls when killed by lightning|date=February 16, 2018}}</ref><ref>{{Cite bug|MCPE|57038| Turtles killed by lightning drop Bowls.|date=November 17, 2019}}</ref>
== Usage ==
=== Crafting ingredient ===
{{crafting usage}}
=== Mooshrooms ===
{{control|use|text=Using}} a bowl on a [[mooshroom]] turns the bowl into [[mushroom stew]] or [[suspicious stew]]. The stew can then be consumed immediately and the process repeated, making this an excellent way to quickly restore depleted [[hunger]] and [[saturation]] with almost no cost or effort.
=== Fuel ===
Bowls can be used as a fuel in [[furnace]]s, smelting 0.5 items per bowl {{in|je}}, and 1 item per bowl {{in|be}}.
== Data values ==
=== ID ===
{{edition|java}}:
{{ID table
|edition=java
|showforms=y
|generatetranslationkeys=y
|displayname=Bowl
|spritetype=item
|nameid=bowl
|form=item
|foot=1}}
{{edition|bedrock}}:
{{ID table
|edition=bedrock
|shownumericids=y
|showforms=y
|notshowbeitemforms=y
|generatetranslationkeys=y
|displayname=Bowl
|spritetype=item
|nameid=bowl
|id=321
|form=item
|foot=1}}
== History ==
{{History|java indev}}
{{History||0.31|snap=20100130|[[File:Bowl JE1 BE1.png|32px]] Added bowls.
|Bowls are used to craft [[mushroom soup]].}}
{{History|java}}
{{History||1.0.0|snap=Beta 1.9 Prerelease|Added [[mooshroom]]s, which can be {{control|use|text=milked}} with a bowl.}}
{{History||1.2.4|snap=release|[[Spruce planks]], [[birch planks]], and [[jungle planks]] can now be used to craft bowls.}}
{{History||1.7.2|snap=13w36a|Bowls can now be obtained as one of the "junk" [[item]]s by [[fishing]].}}
{{History|||snap=1.7.1|[[Acacia planks]] and [[dark oak planks]] can now be used to craft bowls.}}
{{History||1.8|snap=14w27a|Bowls are now used to craft [[rabbit stew]].}}
{{History||1.9|snap=15w31a|Bowls are now used to craft [[beetroot soup]].}}
{{History||1.11|snap=16w33a|Bowls can now be used to fuel [[furnace]]s.}}
{{History||1.13|snap=17w47a|Prior to [[1.13/Flattening|''The Flattening'']], this [[item]]'s numeral ID was 281.}}
{{History|||snap=18w07a|[[Turtles]] drop 0 to 1 bowls if killed by [[lightning]].<ref name=BowlReport/>}}
{{History||1.14|snap=18w43a|[[File:Bowl JE2 BE2.png|32px]] The texture of bowls has now been changed.
|Bowls are now used to craft [[suspicious stew]].}}
{{History||1.16|snap=20w06a|[[Crimson planks]] and [[warped planks]] can now be used to craft bowls.}}
{{History||1.19|snap=22w11a|[[Mangrove planks]] can now be used to craft bowls.}}
{{History|pocket alpha}}
{{History||v0.2.0|[[File:Bowl JE1 BE1.png|32px]] Added bowls. They are currently unobtainable and serve no purpose.}}
{{History||v0.3.0|Bowls are now [[craft]]able. They still serve no purpose.}}
{{History||v0.4.0|Bowls are now used to craft [[mushroom stew]].}}
{{History||v0.5.0|Bowls now appear in the [[nether reactor]].}}
{{History||v0.8.0|snap=build 2|Bowls are now used to craft [[beetroot soup]].}}
{{History|||snap=build 7|Bowls can now be used as fuel in a [[furnace]].}}
{{History||v0.9.0|snap=build 1|Added bowls to [[creative]] mode.
|[[Mooshroom]]s can now be "milked" to obtain [[mushroom stew]].}}
{{History||v0.12.1|snap=build 1|Bowls are no longer available from the [[nether reactor]].}}
{{History||v0.13.0|snap=build 1|Bowls are now used to craft [[rabbit stew]].}}
{{History|bedrock}}
{{History||1.10.0|snap=beta 1.10.0.3|[[File:Bowl JE2 BE2.png|32px]] The texture of bowls has now been changed.}}
{{History||1.13.0|snap=beta 1.13.0.9|Bowls can now be used to craft [[suspicious stew]].}}
{{History|console}}
{{History||xbox=TU1|xbone=CU1|ps=1.0|wiiu=Patch 1|switch=1.0.1|[[File:Bowl JE1 BE1.png|32px]] Added bowls.}}
{{History||xbox=TU9|Bowls now stack to 64.}}
{{History||xbox=none|xbone=none|ps=1.90|wiiu=none|switch=none|[[File:Bowl JE2 BE2.png|32px]] The texture of bowls has now been changed.}}
{{History|new 3ds}}
{{History||0.1.0|[[File:Bowl JE1 BE1.png|32px]] Added bowls.}}
{{History|foot}}
== Issues ==
{{issue list}}
== Trivia ==
* {{in|be}}, bowls are actually more fuel efficient than [[stick]]s. If 6 wood planks are crafted into 8 bowls, 8 items can be [[smelt]]ed; but if those are crafted into 12 sticks, only 6 items can be smelted. This can be useful when the player only has access to Nether wood types, which cannot be used as fuel.
== See also ==
* [[Mushrooms]]
== References ==
{{reflist}}
== External Links ==
* {{Mcnet|taking-inventory--bowl|Taking Inventory: Bowl|April 25, 2019}}
{{Items}}
[[Category:Renewable resources]]
[[cs:Miska]]
[[de:Schüssel]]
[[es:Cuenco]]
[[fr:Bol]]
[[hu:Tál]]
[[it:Ciotola]]
[[ja:ボウル]]
[[ko:그릇]]
[[nl:Kom]]
[[pl:Miska]]
[[pt:Tigela]]
[[ru:Миска]]
[[th:ชาม]]
[[uk:Миска]]
[[zh:碗]]</li></ul> | beta 1.13.0.9 | Blocks of iron can now be used to play the xylophone, if they are under note blocks. | |||
| Legacy Console Edition | |||||
| TU1 | CU1 | 1.00 | Patch 1 | 1.0.1 | |
| TU3 | |||||
| TU14 | 1.05 | Blocks of iron are now used to craft anvils. | |||
| TU19 | CU7 | 1.12 | Blocks of iron can now be used to construct beacon pyramids. | ||
| 1.90 | |||||
| New Nintendo 3DS Edition | |||||
0.1.0{{Extension DPL}}<ul><li>[[A Very Fine Item|A Very Fine Item]]<br/>{{Joke feature}}
{{Item
| image = A Very Fine Item.png
| renewable = No
| stackable = Yes (64)
}}
'''A very fine item''' was a joke item from [[Java Edition 20w14∞]], found only in the {{code|isolation}} dimension.
== Appearance ==
The texture of a very fine item resembles the side face of a grass block with the words "Home Sweet Home" written on it. Unlike most items, its texture is 64x64 pixels, rather than the usual 16x16.
== Obtaining ==
=== Dimension ===
A very fine item can only be obtained from an item frame in the {{Code|isolation}} dimension. There is a maximum of 1 fine item that can be found legitimately in any world.
=== Cheats/Creative mode ===
This item can't be found in the creative inventory, but it can be middle-click duplicated in creative mode or given with the {{Code|code=give <target> minecraft:fine_item <amount>}} command.
== Usage ==
This item cannot be placed or used in any way other than a trophy. It can still be inserted and/or rotated inside of an item frame.
== Data values ==
=== ID ===
{{ID table
|showforms=y
|generatetranslationkeys=java
|displayname=A Very Fine Item
|spritetype=item
|nameid=fine_item
|form=item
|foot=1}}
== History ==
{{History|java}}
{{History||20w14∞|[[File:A Very Fine Item.png|32px]] Added a very fine item.}}
{{History|foot}}
== Gallery ==
<gallery>
File:isolation biome.png|The Easter Egg dimension that the item spawns in.
</gallery>
== References ==
{{reflist}}
{{Items}}
{{Jokes}}
[[Category:Non-renewable resources]]
[[Category:Joke items]]
[[es:A Very Fine Item]]
[[pt:Um item muito bom]]</li><li>[[Sugar Cane|Sugar Cane]]<br/>{{Block
|image=Sugar Cane.png
|image2=Sugar Cane (item) JE3.png
|extratext = View all [[#Gallery|renders]]
|transparent=Yes
|light=No
|tool=any
|renewable=Yes
|stackable=Yes (64)
|flammable=No
|lavasusceptible=No
}}
'''Sugar cane''' is a block found as 1–4-block-tall. It plants near water in the [[Overworld]]. As an item, it is an important crafting ingredient.
==Obtaining==
Sugar cane can be mined instantly with anything.
When the spot a sugar cane block is placed in becomes unsuitable, such as when the supporting block is removed, the sugar cane block uproots and drops as an item. {{IN|be}}, sugar cane uproots immediately after all adjacent water is removed. {{IN|je}}, sugar cane uproots on the next block update or [[Tick#Random tick|random tick]].
A sugar cane block drops itself as an item if a piston tries to push it (trying to pull it does nothing) or moves a block into its space.
===Natural generation===
[[File:Sugar Canez.png|thumb|250px|Naturally-occurring sugar cane near a river.]]
Sugar cane can generate naturally near [[water]] and [[ice]], as two ({{frac|11|18}} chance), three ({{frac|5|18}} chance), or four ({{frac|2|18}} chance) blocks tall. Rare taller sugar canes can be found if the world generator places two smaller canes on top of each other. It generates in approximately 0.8 sugar cane per chunk seeing as how they only generate near bodies of water.
Sugar canes attempt to generate 10 times in any Overworld biome, which requires water. An extra 10 attempts are made in [[swamp]] biomes, and 50 in [[desert]] biomes, which makes sugar cane twice as frequent in swamps and six times as frequent in desert biomes, making the banks of [[river]]s that cut through deserts lined with sugar canes. Sugar canes do not grow faster in swamps or deserts they only spawn a increased amount.
Sugar cane cannot generate in caves {{in|je}}.<ref>{{bug|MC-214959||Sugar cane generated in cave|Fixed}}</ref>
===Trading===
[[Wandering trader]]s can sell sugar cane for an [[emerald]].
==Usage==
Due to its water-displacing properties, sugar cane can interestingly be used to create underwater paths, allowing [[player]]s to move at normal speed and breathe if it is two blocks in height.{{only|java}}<ref>{{bug|MC-929||Sugar cane can be placed underwater|WAI}}</ref>
Sugar cane takes on a different shade of green depending on the biome in which it is placed.
===Crafting ingredient===
{{crafting usage}}
===Farming===
{{main|Tutorials/Sugar cane farming}}
[[File:Underground Sugar Farm.png|200px|thumb|An underground sugar cane farm.]]
Sugar cane can generate naturally up to any number of blocks tall, but ''grow'' only to a height of three blocks, adding a block of height when the top sugar cane block has received 16 random [[Tick#Block tick|block tick]]s (i.e. on average every 18 minutes on ''Java Edition''<!-- Average 68.27 seconds/tick * 16 ticks/growth = 18.2 minutes --> or 54 minutes on Bedrock Edition, but the actual rate can vary widely).
Sugar cane must be planted on a [[grass block]], [[dirt]], [[coarse dirt]], [[rooted dirt]], [[podzol]], [[mycelium]], [[sand]], [[red sand]], [[suspicious sand]], [[moss block]], or [[mud]] that is directly adjacent to [[water]], [[waterlogged]] block, or [[frosted ice]] (not merely above or diagonal to water), or on top of another sugar cane block. The adjacent water block can be covered with another block, whether [[opacity|opaque or transparent]], and sugar cane can still be placed and grow next to it. Sugar cane grows regardless of light level, even in complete darkness.
[[File:4blockcane.png|thumb|A natural 4-block-high sugar cane plant.]]
{{IN|bedrock}}, [[bone meal]] can be used to instantly grow sugar cane to three blocks. Only one bone meal is consumed. {{IN|java}}, bone meal cannot be used on sugar cane.<ref>{{bug|MC-73963||Can't use bonemeal on cacti or sugar cane|WAI}}</ref>
On average, it takes [[Tutorials/Sugar_cane_farming#Mechanics|18 minutes]] for a single block of sugar cane to grow 3 blocks tall.
=== Composting ===
Placing sugar cane into a [[composter]] has a 50% chance of raising the compost level by 1.
== List of colors ==
{{Missing information|Bedrock Edition colors (see [[Water#Color]]{{verify|it's there?}})}}
=== ''Java Edition'' ===
These values are generated by the biome dyeing algorithm. See [[Color#Biome colors|Biome colors]] for more information.
<div class="mw-collapsible mw-collapsed" style="float: left">
{| class="wikitable sortable" style="text-align:center" data-description="Java edition biome colors"
!Biome !! Category !! Rainfall !! Sugarcane Color !! Temperature Affects !! Render
|-
| {{BiomeLink|Badlands}} || Mesa || No || #90814d || No || [[File:Badlands Sugar Cane.png|32px]]
|-
| {{BiomeLink|Beach}} || Beach || Rain || #91bd59 || || [[File:Plains Sugar Cane.png|32px]]
|-
| {{BiomeLink|Birch Forest}} || Forest || Rain || #88bb67 || || [[File:Birch Forest Sugar Cane.png|32px]]
|-
| {{BiomeLink|Cold Ocean}} || Ocean || Rain || #8eb971 || || [[File:Ocean Sugar Cane.png|32px]]
|-
| {{BiomeLink|Dark Forest}} || Forest || Rain || #507a32 || || [[File:Dark Forest Sugar Cane.png|32px]]
|-
| {{BiomeLink|Deep Cold Ocean}} || Ocean || Rain || #8eb971 || || [[File:Ocean Sugar Cane.png|32px]]
|-
| {{BiomeLink|Deep Frozen Ocean}} || Ocean || Rain || #8eb971 || || [[File:Ocean Sugar Cane.png|32px]]
|-
| {{BiomeLink|Deep Lukewarm Ocean}} || Ocean || Rain || #8eb971 || || [[File:Ocean Sugar Cane.png|32px]]
|-
| {{BiomeLink|Deep Ocean}} || Ocean || Rain || #8eb971 || || [[File:Ocean Sugar Cane.png|32px]]
|-
| {{BiomeLink|Desert}} || Desert || No || #bfb755 || || [[File:Desert Sugar Cane.png|32px]]
|-
| {{BiomeLink|End Barrens}} || The End || No || #8eb971 || || [[File:Ocean Sugar Cane.png|32px]]
|-
| {{BiomeLink|End Highlands}} || The End || No || #8eb971 || || [[File:Ocean Sugar Cane.png|32px]]
|-
| {{BiomeLink|End Midlands}} || The End || No || #8eb971 || || [[File:Ocean Sugar Cane.png|32px]]
|-
| {{BiomeLink|Eroded Badlands}} || Mesa || No || #90814d || No || [[File:Badlands Sugar Cane.png|32px]]
|-
| {{BiomeLink|Flower Forest}} || Forest || Rain || #79c05a || || [[File:Forest Sugar Cane.png|32px]]
|-
| {{BiomeLink|Forest}} || Forest || Rain || #79c05a || || [[File:Forest Sugar Cane.png|32px]]
|-
| {{BiomeLink|Frozen Ocean}} || Ocean || Snow || #80b497 || || [[File:Snowy Plains Sugar Cane.png|32px]]
|-
| {{BiomeLink|Frozen River}} || River || Snow || #80b497 || || [[File:Snowy Plains Sugar Cane.png|32px]]
|-
| {{BiomeLink|Old Growth Spruce Taiga}} || Taiga || Rain || #86b783 || || [[File:Taiga Sugar Cane.png|32px]]
|-
| {{BiomeLink|Old Growth Pine Taiga}} || Taiga || Rain || #86b87f || || [[File:Old Growth Pine Taiga Sugar Cane.png|32px]]
|-
| {{BiomeLink|Ice Spikes}} || Icy || Snow || #80b497 || || [[File:Snowy Plains Sugar Cane.png|32px]]
|-
| {{BiomeLink|Jungle}} || Jungle || Rain || #59c93c || || [[File:Jungle Sugar Cane.png|32px]]
|-
| {{BiomeLink|Sparse Jungle}} || Jungle || Rain || #64c73f || || [[File:Sparse Jungle Sugar Cane.png|32px]]
|-
| {{BiomeLink|Lukewarm Ocean}} || Ocean || Rain || #8eb971 || || [[File:Ocean Sugar Cane.png|32px]]
|-
| {{BiomeLink|Windswept Hills}} || Extreme Hills || Rain || #8ab689 || || [[File:Windswept Hills Sugar Cane.png|32px]]
|-
| {{BiomeLink|Mushroom Fields}} || Mushroom || Rain || #55c93f || || [[File:Mushroom Fields Sugar Cane.png|32px]]
|-
| {{BiomeLink|Nether}} || Nether || No || #bfb755 || || [[File:Desert Sugar Cane.png|32px]]
|-
| {{BiomeLink|Ocean}} || Ocean || Rain || #8eb971 || || [[File:Ocean Sugar Cane.png|32px]]
|-
| {{BiomeLink|Plains}} || Plains || Rain || #91bd59 || || [[File:Plains Sugar Cane.png|32px]]
|-
| {{BiomeLink|River}} || River || Rain || #8eb971 || || [[File:Ocean Sugar Cane.png|32px]]
|-
| {{BiomeLink|Savanna}} || Savanna || No || #bfb755 || || [[File:Desert Sugar Cane.png|32px]]
|-
| {{BiomeLink|Savanna Plateau}} || Savanna || No || #bfb755 || || [[File:Desert Sugar Cane.png|32px]]
|-
| {{BiomeLink|Windswept Savanna}} || Savanna || No || #bfb755 || || [[File:Desert Sugar Cane.png|32px]]
|-
| {{BiomeLink|Small End Islands}} || The End || No || #8eb971 || || [[File:Ocean Sugar Cane.png|32px]]
|-
| {{BiomeLink|Snowy Beach}} || Beach || Snow || #83b593 || || [[File:Snowy Beach Sugar Cane.png|32px]]
|-
| {{BiomeLink|Snowy Taiga}} || Taiga || Snow || #80b497 || || [[File:Snowy Plains Sugar Cane.png|32px]]
|-
| {{BiomeLink|Snowy Plains}} || Icy || Snow || #80b497 || || [[File:Snowy Plains Sugar Cane.png|32px]]
|-
| {{BiomeLink|Stony Shore}} || None || Rain || #8ab689 || || [[File:Windswept Hills Sugar Cane.png|32px]]
|-
| {{BiomeLink|Sunflower Plains}} || Plains || Rain || #91bd59 || || [[File:Plains Sugar Cane.png|32px]]
|-
| {{BiomeLink|Swamp}} || Swamp || Rain || #6A7039 || If temperature below -0.1, used #4C763C. || [[File:Swamp Sugar Cane.png|32px]] / [[File:Swamp Sugar Cane (Cold).png|32px]]
|-
| {{BiomeLink|Taiga}} || Taiga || Rain || #86b783 || || [[File:Taiga Sugar Cane.png|32px]]
|-
| {{BiomeLink|Old Growth Birch Forest}} || Forest || Rain || #88bb67 || || [[File:Birch Forest Sugar Cane.png|32px]]
|-
| {{BiomeLink|The End}} || The End || No || #8eb971 || || [[File:Ocean Sugar Cane.png|32px]]
|-
| {{BiomeLink|The Void}} || None || No || #8eb971 || || [[File:Ocean Sugar Cane.png|32px]]
|-
| {{BiomeLink|Warm Ocean}} || Ocean || Rain || #8eb971 || || [[File:Ocean Sugar Cane.png|32px]]
|-
| {{BiomeLink|Wooded Badlands}} || Mesa || No || #90814d || No || [[File:Badlands Sugar Cane.png|32px]]
|-
| {{BiomeLink|Windswept Forest}} || Extreme Hills || Rain || #8ab689 || || [[File:Windswept Hills Sugar Cane.png|32px]]
|}
</div>
{{clear}}
=== Bedrock Edition ===
{{empty section}}
== Sounds ==
{{Sound table/Block/Grass}}
== Data values ==
=== ID ===
{{edition|java}}:
{{ID table
|edition=java
|showforms=y
|generatetranslationkeys=y
|displayname=Sugar Cane
|spritetype=block
|nameid=sugar_cane
|foot=1}}
{{edition|bedrock}}:
{{ID table
|edition=bedrock
|firstcolumnname=Sugar Cane
|shownumericids=y
|showforms=y
|showaliasids=y
|generatetranslationkeys=y
|displayname=Block
|spritename=sugar-cane
|spritetype=block
|nameid=reeds
|id=83
|form=block
|itemform=item.reeds}}
{{ID table
|displayname=Item
|spritename=sugar-cane
|spritetype=item
|nameid=sugar_cane
|id=385
|form=item
|aliasid=reeds
|translationkey=item.reeds.name
|foot=1}}
=== Block states ===
{{see also|Block states}}
{{/BS}}
== Video ==
{{Video note|This video was made before sugar cane had a different shade of green depending on the biome.|minor}}
<div style="text-align:center">{{yt|zlOnwn3PH5o}}</div>
== History ==
{{more images|Appearance when affected by {{bug|MC-48831}}}}
{{History|java alpha}}
{{History||v1.0.11|[[File:Sugar Cane JE1 BE1.png|32px]] [[File:Sugar Cane (item) JE1 BE1.png|32px]] Added reeds in the [[Seecret Updates|Seecret Friday Update 6]].
|Reeds are informally referred to as "bamboo" or "papyrus" by many [[player]]s.
|Since reeds can be washed away with [[water]] currents or instantly destroyed by removing the water adjacent to them, automated reed farms can be made.
|Reeds can be used to craft [[paper]].}}
{{History|java beta}}
{{History||1.2|[[Notch]] has [[wikipedia:Retroactive continuity|retconned]] reeds into sugar cane so that it can now be [[crafting|crafted]] into [[sugar]], included in the recipe for the [[cake]]s.}}
{{History||1.6|snap=Test Build 3|[[Arrow]]s no longer stick to sugar cane, and instead, they pass through. However, [[snowball]]s still come into contact with any sugar cane blocks, as if they are solid.}}
{{History||1.8|snap=Pre-release|Sugar cane can now grow and be placed onto [[sand]] as long as they are adjacent to [[water]]. This update allows sugar canes to appear next to [[water]] ponds in [[desert]] biomes.
|Sugar cane is now available in the [[creative]] [[inventory]] in both block and item forms.}}
{{History|java}}
{{History||1.0.0|snap=?|The sugar cane block has been removed from the creative inventory.}}
{{History||1.7.2|snap=13w36a|[[File:Sugar Cane JE2 BE2.png|32px]] Sugar cane is now [[tint]]ed depending on the [[biome]] it's in.
|The item texture remained unchanged, however, and still used the color palette from Alpha to 1.6.4.<ref name="Bug">{{bug|MC-216227}}</ref>}}
{{History||1.9|snap=15w43a|Sugar cane no longer breaks if its adjacent [[water]] is turned to [[frosted ice]].}}
{{History||1.13|snap=17w47a|The ID of sugar cane has now been changed from <code>reeds</code> to <code>sugar_cane</code>.
|"Sugar Canes" have now been renamed to "Sugar Cane".
|Prior to [[1.13/Flattening|''The Flattening'']], this [[block]]'s numeral ID was 83, and the [[item]]'s 338.}}
{{History||1.14|snap=18w43a|[[File:Sugar Cane (item) JE2 BE2.png|32px]] The texture of the sugar cane item has been changed.}}
{{History|||snap=19w03a|Placing sugar cane into a [[composter]] has a 20% chance of raising the compost level by 1.}}
{{History|||snap=19w05a|Sugar cane now has a 50% chance of increasing the compost level in a composter by 1.
|Added [[wandering trader]]s, which sell sugar cane.}}
{{History||1.16|snap=20w13a|Sugar cane has been moved from the Miscellaneous tab to the Decoration Blocks tab in the [[Creative inventory]].<ref name="misc decoration">https://bugs.mojang.com/browse/MC-174434</ref>}}
{{History||1.17|snap=21w11a|[[File:Sugar Cane (item) JE3.png|32px]] The texture of the sugar cane item has been changed, so that it actually matches the color it uses when placed again.<ref name="Bug"/>}}
{{History|||snap=Pre-release 1|Sugar cane now generates in mushroom fields.<ref>{{bug|MC-226683}}</ref>}}
{{History||1.19|snap=22w15a|Sugar cane can now be planted on mud.}}
{{History||1.20|snap=23w14a|Sugar cane can now be planted on [[suspicious sand]].}}
{{History|pocket alpha}}
{{History||Pre-release|[[File:Sugar Cane JE1 BE1.png|32px]] [[File:Sugar Cane (item) JE1 BE1.png|32px]] Added sugar cane.}}
{{History||v0.2.0|Despite being visible in the inventory, sugar cane does not drop anything when mined, making it unobtainable in Survival mode.}}
{{History||v0.2.1|Survival players now start with an infinite stack of sugar cane in the inventory.}}
{{History||v0.3.0|Sugar cane now drops its item form when mined.
|Survival players no longer start with an infinite stack of sugar cane in the inventory.}}
{{History||v0.5.0|Sugar cane can now be grown on [[sand]].
|Sugar cane can now be obtained after activating the [[nether reactor]].}}
{{History||v0.8.0|snap=build 5|[[Bone meal]] can now grow sugar cane to maximum height.}}
{{History||v0.9.0|snap=build 1|[[File:Sugar Cane JE2 BE2.png|32px]] The color of sugar cane now changes depending on the [[biome]] they are in.
|Using bone meal on sugar cane is no longer able to break blocks above it.}}
{{History||v0.12.1|snap=build 1|Sugar cane is no longer available from the [[nether reactor]].}}
{{History|pocket}}
{{History||1.0.0|snap=alpha 0.17.0.1|[[File:Sugar Cane JE1 BE1.png|32px]] Due to a bug, sugar canes no longer change color depending on the [[biome]].}}
{{History|bedrock}}
{{History||1.2.13|snap=beta 1.2.13.5|[[File:Sugar Cane JE2 BE2.png|32px]] The color of sugar canes now changes depending on the [[biome]], once again.}}
{{History||1.10.0|snap=beta 1.10.0.3|[[File:Sugar Cane (item) JE2 BE2.png|32px]] The texture of the sugar cane [[item]] has been changed.
|Sugar cane can now be [[trading|bought]] from [[wandering trader]]s.}}
{{History||1.11.0|snap=beta 1.11.0.1|Sugar canes can now be used to fill up [[composter]]s.}}
{{History||1.17.0|snap=beta 1.17.0.50|[[File:Sugar Cane (item) JE3.png|32px]] The texture of the sugar cane item has been changed, so that it actually matches the color it uses when placed again.}}
{{History|console}}
{{History||xbox=TU1|xbone=CU1|ps=1.0|wiiu=Patch 1|switch=1.0.1|[[File:Sugar Cane JE1 BE1.png|32px]] [[File:Sugar Cane (item) JE1 BE1.png|32px]] Added sugar canes.
|Sugar canes are solid, making it useful for growable walls. Unlike on Java Edition, they were never renamed to Sugar Cane.}}
{{History||xbox=TU2|Sugar canes are no longer solid, and arrows pass through them.}}
{{History||xbox=TU31|xbone=CU19|ps=1.22|wiiu=Patch 3|[[File:Sugar Cane JE2 BE2.png|32px]] The color of sugar cane now changes depending on the [[biome]] they're in.}}
{{History||xbox=TU60|xbone=CU51|ps=1.64|wiiu=Patch 30|switch=1.0.11|Sugar cane can now be grown with [[bonemeal]].}}
{{History||xbox=none|xbone=none|ps=1.90|wiiu=none|switch=none|[[File:Sugar Cane (item) JE2 BE2.png|32px]] The texture of the sugar cane [[item]] has been changed.}}
{{History||xbox=none|xbone=none|ps=1.91|wiiu=none|switch=none|Sugar cane can now be [[trading|bought]] from [[wandering trader]]s.
|Sugar canes can now be used to fill up [[composter]]s.}}
{{History|New Nintendo 3DS Edition}}
{{History||0.1.0|[[File:Sugar Cane JE1 BE1.png|32px]] [[File:Sugar Cane (item) JE1 BE1.png|32px]] Added sugar cane.}}
{{History|foot}}
=== Sugar cane "item" ===
{{:Technical blocks/Sugar Cane}}
== Issues ==
{{Issue list}}
== Trivia ==
*When a sugar cane is broken at the second level, the time resets (for example, if a two-block high sugar cane is broken, but is just about to grow to the third stage, it would reset that time).
*By placing more sugar canes on top of a sugar cane plant, it is possible to create tall sugar canes (up to y=319, the maximum height for building), although they do not naturally grow this high.
*Before sugar cane received an official name, they were sometimes referred to as [[bamboo]], a block added 9 years later. Other names were "reeds" and "papyrus".
== Gallery ==
=== Renders ===
<gallery>
Plains Sugar Cane.png|Plains
Taiga Sugar Cane.png|Taiga
Snowy Plains Sugar Cane.png|Snowy plains
Jungle Sugar Cane.png|Jungle
Desert Sugar Cane.png|Desert
Swamp Sugar Cane (Cold).png|Swamp (cold)
Swamp Sugar Cane.png|Swamp
Badlands Sugar Cane.png|Badlands
</gallery>
=== In-game ===
<gallery>
Huge Sugar Farm.png|A large sugar cane farm using 2×2 [[water]] holes.
Sugar Cane Waterfall.png|Water flowing over sugar cane.
UnderwaterSugarCane.png|Naturally generated sugar cane found underwater.
Sugar and Cactus.png|A [[cactus]] and sugar cane stalk generated next to each other.
SugarCaneRavine.png|Sugar cane found in the [[ravine]].
Reeds in Winter mode.png|Reeds generated in the [[winter mode]].
Sugar Cane Naturally Growing.png|Sugar cane growing between [[biome]]s.
Mesa Sugar Cane.jpg|Sugar cane growing on [[red sand]] in a [[badlands]] biome.
Sugarcanenowaterglitch.png|Sugar cane generated without a water source.
SwampCane.png|Sugar cane generated in a [[swamp]] biome.
Sugar cane savanna.png|Sugar cane growing in a [[savanna]] biome.
ForestSugarcane.png|Sugar cane growing in a [[forest]] biome.
Lava cane.png|Sugar cane growing with lava flowing around it.
Before breaking.png|Sugar canes few seconds before breaking because the water is frozen.
Undergroundreed.png|A sugar cane plant that generated in an underground [[water lake]].
Cave Sugar.png|Another example.
</gallery>
=== Heights ===
<gallery>
Tall Sugar Cane.png|Four-block tall sugar cane.
4RiverCane.png|Four-block tall sugar cane.
4-block tall sugar cane.png|Four-block tall sugar cane in a [[plains]] biome.
</gallery>
== References ==
{{Reflist}}
{{Blocks|vegetation}}
{{Items}}
[[Category:Plants]]
[[Category:Natural blocks]]
[[Category:Non-solid blocks]]
[[cs:Cukrová třtina]]
[[de:Zuckerrohr]]
[[es:Caña de azúcar]]
[[fr:Canne à sucre]]
[[hu:Cukornád]]
[[it:Canna da zucchero]]
[[ja:サトウキビ]]
[[ko:사탕수수]]
[[nl:Suikerriet]]
[[pl:Trzcina cukrowa]]
[[pt:Cana-de-açúcar]]
[[ru:Сахарный тростник]]
[[th:อ้อย]]
[[uk:Цукрова тростина]]
[[zh:甘蔗]]</li></ul> | |||||
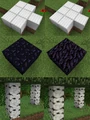
The first image of new textures for iron blocks, obsidian, and birch logs compared to the old ones.
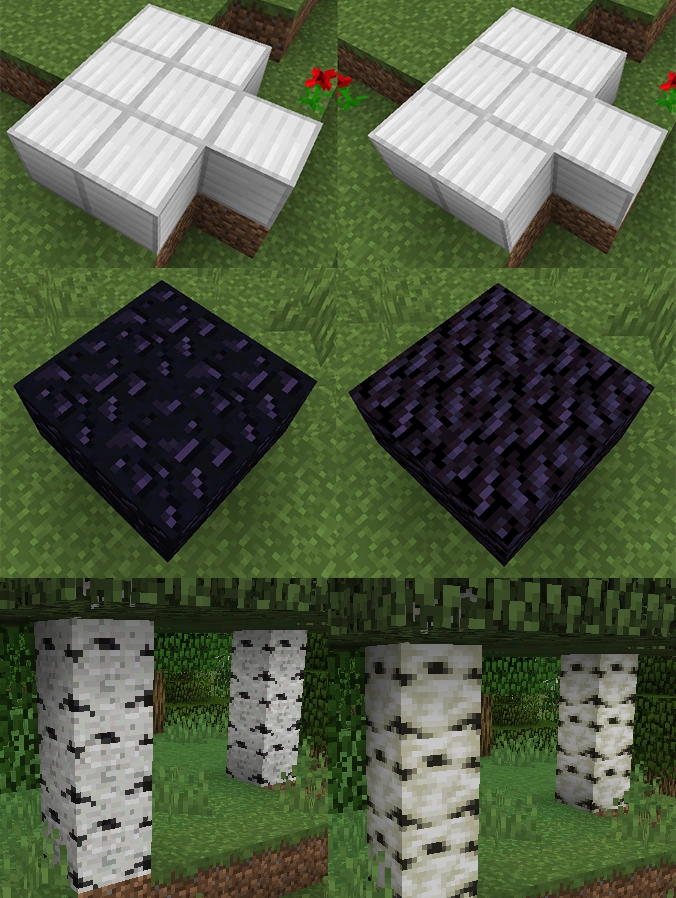
Data history
| Java Edition | |||||
|---|---|---|---|---|---|
1.13{{Extension DPL}}<ul><li>[[End Crystal|End Crystal]]<br/>{{ItemEntity
|image=End Crystal.gif
|imagesize=150px
|invimage=End Crystal
|renewable=Yes
|stackable=Yes (64)
|rarity=Rare
|drops=None
|size=
Height: 2 Blocks<br>Width: 2 Blocks
}}
An '''end crystal''' is an [[entity]] that can be [[Crafting|crafted]] or found on [[the End]]'s main island, where it heals the [[Ender Dragon|ender dragon]]. It can only be placed on [[obsidian]] or [[bedrock]] and [[Explosion|explodes]] instantly when attacked or damaged in most ways.
== Spawning ==
=== Natural generation ===
An end crystal is found atop each [[obsidian pillar]] on the central island of the End, each on top of a piece of [[bedrock]]. There are 10 end crystals in total, of which two are protected in "cages" of [[iron bars]]. All end crystals respawn one after another as the respawning process of the [[ender dragon]] starts.
== Obtaining ==
=== Crafting ===
{{Crafting
|A1=Glass
|B1=Glass
|C1=Glass
|A2=Glass
|B2=Eye of Ender
|C2=Glass
|A3=Glass
|B3=Ghast Tear
|C3=Glass
|Output= End Crystal
|type= Decoration block
}}
== Usage ==
=== Healing the ender dragon ===
Their primary purpose is to recharge the health of the ender dragon, who gains a charge from the nearest crystal within a cuboid extending 32 blocks from the dragon in all directions. The dragon is healed {{hp|1}} each half-second. If multiple ender dragons are spawned, an end crystal can affect multiple dragons at the same time. The healing beam is neither obstructed nor is its power diminished by entities or blocks.
=== Respawning the ender dragon ===
[[File:End Crystals on the Exit portal.png|right|thumb|How to arrange end crystals on the exit portal to respawn the ender dragon.]]
As items, end crystals may be placed on bedrock and [[obsidian]], if the two blocks above the bedrock or obsidian block are air or replaceable blocks and no other entities intersect the area. When an end crystal is placed in [[the End]], a [[fire]] block is created at the end crystal location. If four are placed on the end [[exit portal]], one on each of the flat sides, the crystals respawn the original end crystals on the obsidian pillars, as well as resurrect the dragon itself, before exploding. The top of each pillar also explodes, destroying any player-placed blocks. This happens even if TNT explosions are turned off in settings.
If the exit portal is ever broken for any reason, end crystals can still be placed on obsidian blocks with the same location as the exit portal.
=== Explosions ===
End crystals explode when attacked or damaged in most ways, even by attacks that normally do zero damage. They are not affected by exploding fireworks, and if damaged by an explosion, they disappear instead of exploding.{{Only|Java}}<ref>{{bug|MC-118429||End crystals don't explode when destroyed by nearby explosions}}</ref> The end crystal's [[explosion]] has an [[Explosion#Explosion strength|explosion strength]] of 6, the same as a [[charged creeper]]. The end crystal's fire often remains after the crystal explodes. Any ender dragon charging from the crystal when it is destroyed takes {{hp|10}} damage.
{{IN|java}}, an end crystal's explosion can be [[blocking|blocked]] by a [[shield]].
Although an ender dragon damages most blocks and entities in its path, it cannot destroy end crystals simply by going near them.
Placing [[water]] on the end crystal will neutralize the blast effect, but not the [[damage]] or knockback.
End crystals with obsidian or bedrock below them will not damage blocks below them when they explode.
{{IN|bedrock}}, having the game rule {{cd|mobGriefing}} to {{cd|false}} will prevent the End Crystal from destroying any blocks. While {{in|java}} the same game rule will not prevent the End Crystal from destroying any blocks.
=== Beams ===
The end crystal naturally shoots a beam at the ender dragon and heals it when the dragon is within range. This beam can be manually created using the command {{cmd|data merge entity @e[type{{=}}end_crystal,limit{{=}}1] {BeamTarget:{X:0, Y:0, Z:0<nowiki>}}}}. The beam can be pointed in any direction, allowing it to mark locations or objects.
=== Properties ===
[[File:End Crystal (Slateless).gif|thumb|A base-less end crystal.]]
End crystals are of two kinds: the ones with a base beneath them are created either by game mechanism or by the {{cmd|summon}} command; while the base-less ones are created by players by manually placing the crystal items on top of [[obsidian]] or [[bedrock]].
The base appears to be made of bedrock, with a crystal hovering over it. While in the End, a crystal continually generates fire at its current position, one block above the base (directly on top of the block the base is embedded in), replacing any other block at that location. This fire is capable of spreading.
The end crystal entity is not solid and can be walked through freely. End crystals can be pushed by [[piston]]s, but they explode if moved while on fire. Because fire is checked only when an entity moves, end crystals do not normally take damage from their own fire unless moved.
== Sounds ==
{{edition|java}}:
{{Sound table
|sound=Explosion1.ogg
|sound2=Explosion2.ogg
|sound3=Explosion3.ogg
|sound4=Explosion4.ogg
|subtitle=Explosion
|source=block
|description=When an end crystal explodes
|id=entity.generic.explode
|translationkey=subtitles.entity.generic.explode
|volume=4.0
|pitch=0.56-0.84
|distance=16
|foot=1}}
{{edition|bedrock}}:
{{Sound table
|type=bedrock
|sound=Explosion1.ogg
|sound2=Explosion2.ogg
|sound3=Explosion3.ogg
|sound4=Explosion4.ogg
|source=block
|description=When an end crystal explodes
|id=random.explode
|volume=4.0
|pitch=1.0
|foot=1}}
== Data values ==
=== ID ===
{{edition|java}}:
{{ID table
|edition=java
|firstcolumnname=Item
|showforms=y
|generatetranslationkeys=y
|displayname=End Crystal
|spritetype=item
|nameid=end_crystal
|form=item
|foot=1}}
{{ID table
|edition=java
|firstcolumnname=Entity
|generatetranslationkeys=y
|displayname=End Crystal
|spritetype=entity
|nameid=end_crystal
|foot=1}}
{{edition|bedrock}}:
{{ID table
|edition=bedrock
|firstcolumnname=Item
|shownumericids=y
|showforms=y
|notshowbeitemforms=y
|generatetranslationkeys=y
|displayname=End Crystal
|spritetype=item
|nameid=end_crystal
|id=637
|form=item
|foot=1}}
{{ID table
|edition=bedrock
|firstcolumnname=Entity
|shownumericids=y
|generatetranslationkeys=y
|displayname=End Crystal
|spritetype=entity
|nameid=ender_crystal
|id=71
|foot=1}}
=== Entity data ===
End crystals have entity data that define various properties of the entity.
{{el|java}}:
{{main|Entity format}}
{{/ED}}
{{el|bedrock}}:
: See [[Bedrock Edition level format/Entity format]].
== Achievements ==
{{load achievements|The End... Again...}}
== Advancements ==
{{load advancements|The End... Again...}}
== History ==
[[File:End Crystal 19w38a.gif|thumb|Java Edition 19w38a]]
{{History|java}}
{{History||1.0.0|snap=Beta 1.9 Prerelease 6|[[File:End Crystal JE1 BE1.png|32px]] Added ender crystals.}}
{{History||1.2.1|snap=12w04a|Previously, ender crystals could be spawned using [[spawn egg]]s with ID 200 (in a [[server]], these were created using {{cmd|give 383 1 200}}). The spawned crystal would be positioned where a natural crystal would be if there was a bedrock block at the location. It was still possible until 1.9 to obtain an end crystal spawn egg, but it would not spawn anything.}}
{{History||1.7.2|snap=13w36a|Ender crystals can now be spawned with the {{cmd|summon}} command.}}
{{History||1.8|snap=14w06a|Ender crystals now generate one [[block]] lower. The fire they generate destroys the [[bedrock]] block that is supposed to be underneath (see {{bug|MC-47526}}).}}
{{History||1.9|snap=15w31a|Ender crystals generate at the correct Y-level again.}}
{{History|||snap=15w33c|Respawning the ender dragon now also respawns the ender crystals on the obsidian pillars.
|Ender crystals now have a compound BeamTarget tag that hold the X, Y, Z block location the beam points to.}}
{{History|||snap=15w44a|"Ender crystals" have been renamed to "end crystals".
|[[File:End Crystal (item) JE1 BE1.png|32px]] End crystals can now be obtained as an item.
|End crystals now drop from [[skeleton trap]] horses and can be placed only on [[obsidian]] or bedrock. Placing several of them atop the end exit portal respawns the ender dragon.}}
{{History|||snap=15w44b|End crystals are no longer dropped by [[skeleton horse]]s.
|Added crafting recipe for end crystals, making end crystals [[renewable]].}}
{{History|||snap=15w49a|End crystals now require [[air]]/replaceable [[block]]s and lack of [[entity|entities]] for placement.}}
{{History|||snap=15w51a|End crystals can no longer be placed in [[Adventure mode]].}}
{{History||1.11|snap=16w32a|The entity ID has been changed from <code>EnderCrystal</code> to <code>ender_crystal</code>.}}
{{History||1.13|snap=17w47a|Prior to [[1.13/Flattening|''The Flattening'']], this [[item]]'s numeral ID was 426.}}
{{History|||snap=18w20b|Renamed to "End Crystal".}}
{{History|||snap=pre5|Entity ID has been changed to <code>end_crystal</code>.}}
{{History||1.14|snap=18w43a|[[File:End Crystal JE2.png|32px]][[File:End Crystal (item) JE2 BE2.png|32px]] The textures of end crystals and the end crystal [[item]] have been changed.}}
{{History||1.19.3|snap=22w43a|End crystal explosions can now be [[blocking|blocked]] by [[shield]]s.<ref>{{bug|MC-188247|||Fixed}}</ref>}}
{{History|pocket}}
{{History||1.0.0|snap=alpha 0.17.0.1|[[File:End Crystal JE1 BE1.png|32px]][[File:End Crystal (item) JE1 BE1.png|32px]] Added end crystals.}}
{{History|bedrock}}
{{History||1.6.0|snap=?|[[File:End Crystal BE2.png|32px]] [[File:End Crystal BE2.gif|32px]] The model of the end crystals has been changed. It has now two cubes instead of three.}}
{{History||1.10.0|snap=beta 1.10.0.3|[[File:End Crystal BE3.png|32px]][[File:End Crystal (item) JE2 BE2.png|32px]] The textures of end crystals and the end crystal item have been changed.}}
{{History||1.17.10|snap=beta 1.17.10.20|[[File:End Crystal JE2.png|32px]] The model of the end crystals has been changed to have three cubes again, and to match ''Java Edition''.}}
{{History||1.19.70|snap=beta 1.19.70.20|Increased end crystal collision box size to match ''Java Edition''.|End crystals with obsidian or bedrock below them now will not damage blocks below them when they explode.}}
{{History|console}}
{{History||xbox=TU9|xbone=CU1|ps=1.0|wiiu=Patch 1|[[File:End Crystal JE1 BE1.png|32px]] Added ender crystals.}}
{{History||xbox=TU31|xbone=CU19|ps=1.22|wiiu=Patch 3|Ender crystals now generate one block lower. The fire they generate destroys the [[bedrock]] block that is supposed to be underneath.}}
{{History||xbox=TU46|xbone=CU36|ps=1.38|wiiu=Patch 15|"Ender crystals" have been renamed to "end crystals".
|[[File:End Crystal (item) JE1 BE1.png|32px]] End crystals can now be obtained as an [[item]].
|End crystals now drop from [[skeleton trap]] horses and can be placed only on [[obsidian]] or bedrock. Placing several of them atop the [[end portal|end exit portal]] respawns the ender dragon.
|Added a crafting recipe for end crystals.}}
{{History||xbox=none|xbone=none|ps=1.90|wiiu=none|switch=none|[[File:End Crystal JE2.png|32px]][[File:End Crystal (item) JE2 BE2.png|32px]] The textures of end crystals and the end crystal item have been changed.}}
{{History|new 3ds}}
{{History||1.7.10|[[File:End Crystal JE1 BE1.png|32px]][[File:End Crystal (item) JE1 BE1.png|32px]] Added end crystals.}}
{{History|foot}}
== Issues ==
{{issue list}}
== Trivia ==
* According to [[Jens Bergensten|Jeb]], the reason behind the current crafting recipe using glass as opposed to [[Chorus Fruit|chorus fruit]] or any materials introduced in [[Java Edition 1.9|1.9]] is as a means for players to craft end crystals in older worlds that the dragon has already been killed in.<ref>{{tweet|jeb_|667000226524372992|The problem is that you need to be able to craft the crystals on worlds in which the dragon has been destroyed already|November 18, 2015}}</ref>
* A historical rendition of the [[beacon]] block featured an animated entity within it, which resembled a yellow miniaturized end crystal. The bedrock platform of the end crystal entity would also render below the beacon, though this would normally be hidden within the block below.
* Using a [[piston]] to push an end crystal's fire into an end portal block deletes the end portal block. However, natural portal blocks regenerate if the end crystal is moved.
== Gallery ==
<gallery>
End Crystal Usage.png|Using end crystals to respawn the ender dragon.
Crystal Link.png|An ender dragon being hit with the "healing beam" of an end crystal.
Ender Crystal.png|An end crystal.
EnderCrystalOverworld.png|An end crystal in the Overworld spawned using {{cmd|summon}} {{code|end_crystal}}.
Ender Dragon Revival.png|End crystals respawning the ender dragon.
CagedEnderCrystal.png|A caged end crystal.
Respawn ender dragon.png|A [[player]] trying to respawn the ender dragon.
End Crystal (item).gif|An animation of the item of the end crystal.
</gallery>
== References ==
{{reflist}}
{{Entities}}
{{Items}}
[[de:Enderkristall]]
[[el:Κρύσταλλος του Ender]]
[[es:Cristal del End]]
[[fr:Cristal de l'End]]
[[ja:エンドクリスタル]]
[[ko:엔드 수정]]
[[nl:Endkristal]]
[[pl:Kryształ Endu]]
[[pt:Cristal do End]]
[[ru:Кристалл Края]]
[[th:คริสตัลเอนด์]]
[[uk:Кристал Енду]]
[[zh:末影水晶]]</li><li>[[Pumpkin Seeds|Pumpkin Seeds]]<br/>{{Block
| image = <gallery>
Pumpkin Stem Age 0.png | Age 0
Pumpkin Stem Age 1.png | Age 1
Pumpkin Stem Age 2.png | Age 2
Pumpkin Stem Age 3.png | Age 3
Pumpkin Stem Age 4.png | Age 4
Pumpkin Stem Age 5.png | Age 5
Pumpkin Stem Age 6.png | Age 6
Pumpkin Stem Age 7.png | Age 7
</gallery>
|image2 = <gallery>
Attached Pumpkin Stem (N).png | North
Attached Pumpkin Stem (E).png | East
Attached Pumpkin Stem (S).png | South
Attached Pumpkin Stem (W).png | West
</gallery>
| transparent = Yes
| light = No
| tool = none
| renewable = Yes
| stackable = Yes (64)
| flammable = No
| lavasusceptible = No
}}
'''Pumpkin seeds''' are items obtained from pumpkins that can be used to grow pumpkin stems.
'''Pumpkin stems''' are plants grown on [[farmland]] that, over time, grow [[pumpkin]]s on dirt, mud and moss blocks adjacent to them.
== Obtaining ==
=== Breaking ===
When broken, a pumpkin stem drops 0–3 pumpkin seeds. The chance for pumpkin seeds to drop increases with the stem's age.
{| class="wikitable"
! rowspan="3" |[[Resource location]]
! rowspan="3" | Source
! colspan="4" | Default
|-
| colspan="1" rowspan="2" style="text-align:center" | Nothing || colspan="3" style="text-align:center" |{{ItemLink|Pumpkin Seeds|Pumpkin seeds}}
|-
| style="text-align:center" | 1 || style="text-align:center" | 2 || style="text-align:center" | 3
|-
| rowspan="8" |<code>blocks/pumpkin_stem</code>
|{{BlockLink|Pumpkin Stem|Pumpkin stem}} <code>age = 0</code>
| style="text-align:center" |81.3%|| style="text-align:center" |17.42%|| style="text-align:center" |1.24%|| style="text-align:center" |0.03%
|-
|{{BlockLink|Pumpkin Stem|Pumpkin stem}} <code>age = 1</code>
| style="text-align:center" |65.1%|| style="text-align:center" |30.04%|| style="text-align:center" |4.62%|| style="text-align:center" |0.24%
|-
|{{BlockLink|Pumpkin Stem|Pumpkin stem}} <code>age = 2</code>
| style="text-align:center" |51.2%|| style="text-align:center" |38.4%|| style="text-align:center" |9.6%|| style="text-align:center" |0.8%
|-
|{{BlockLink|Pumpkin Stem|Pumpkin stem}} <code>age = 3</code>
| style="text-align:center" |39.44%|| style="text-align:center" |43.02%|| style="text-align:center" |15.64%|| style="text-align:center" |1.9%
|-
|{{BlockLink|Pumpkin Stem|Pumpkin stem}} <code>age = 4</code>
| style="text-align:center" |29.13%|| style="text-align:center" |44.44%|| style="text-align:center" |22.22%|| style="text-align:center" |3.7%
|-
|{{BlockLink|Pumpkin Stem|Pumpkin stem}} <code>age = 5</code>
| style="text-align:center" |21.6%|| style="text-align:center" |43.2%|| style="text-align:center" |28.8%|| style="text-align:center" |6.4%
|-
|{{BlockLink|Pumpkin Stem|Pumpkin stem}} <code>age = 6</code>
| style="text-align:center" |15.17%|| style="text-align:center" |39.82%|| style="text-align:center" |34.84%|| style="text-align:center" |10.16%
|-
|{{BlockLink|Pumpkin Stem|Pumpkin stem}} <code>age = 7</code>
| style="text-align:center" |10.16%|| style="text-align:center" |34.84%|| style="text-align:center" |39.82%|| style="text-align:center" |15.17%
|-
| rowspan="1" |<code>blocks/attached_pumpkin_stem</code>
|{{BlockLink|Attached Pumpkin Stem|Attached Pumpkin stem}}
| style="text-align:center" |10.16%|| style="text-align:center" |34.84%|| style="text-align:center" |39.82%|| style="text-align:center" |15.17%
|}
=== Natural generation ===
Pumpkin stems generate naturally in stem farm rooms in [[woodland mansion]]s.
Pumpkin stems generate in [[taiga]] and [[snowy taiga]]{{only|be|short=1}} [[village]] farms.
=== Chest loot ===
{{LootChestItem|pumpkin-seeds}}
=== Crafting ===
{{Crafting
|Pumpkin
|Output= Pumpkin Seeds,4
|type= Material
}}
=== Trading ===
[[Wandering trader]]s sell pumpkin seeds for 1 [[emerald]].
=== Post-generation ===
Shearing an uncarved pumpkin yields 4 pumpkin seeds.
== Usage ==
=== Farming ===
{{see also|Tutorials/Pumpkin and melon farming}}
Pumpkin seeds can be planted only on [[farmland]], as stems. Over time, a stem grows through several stages{{Needs testing}} and, at its final growth stage, will produce [[pumpkin]]s on any adjacent [[dirt]], [[Coarse Dirt|coarse dirt]], [[Rooted Dirt|rooted dirt]], [[Grass Block|grass block]], [[farmland]], [[podzol]], [[mycelium]], [[Moss Block|moss block]], [[mud]] or [[Muddy Mangrove Roots|muddy mangrove roots]]. If a pumpkin is already occupying a spot adjacent to a stem it does not grow more pumpkins until the pumpkin is removed. A single stem can grow an unlimited number of pumpkins. Pumpkin stems need a minimum light level of 10 in the block above the stem to grow and give pumpkins. Pumpkin seeds are affected by [[bone meal]] only with respect to stem growth; bone meal does not help produce the actual pumpkins.
=== Breeding ===
Like other seeds, pumpkin seeds can be used to [[breed]] [[chicken]]s, lead chickens around, and make baby chickens grow up faster by 10% of the remaining time.
=== Taming ===
Like other seeds, pumpkin seeds can be used to tame [[parrot]]s.
=== Composting ===
Placing pumpkin seeds into a [[composter]] has a 30% chance of raising the compost level by 1.
== Pumpkin stem ==
A '''pumpkin stem''' is the block that is planted on [[farmland]] when pumpkin seeds are used on it. It starts underground, and rises up as the plant grows. The stem is colored green when young, and then yellow once fully grown.
The stem curves once a pumpkin has grown from it. A fully-grown single stem connects to any [[pumpkin]] in an adjacent square, thus there are 5 possible appearances to a stem. If there are multiple pumpkins it can connect to, it favors the east, then west, north, and south. When the pumpkin is removed, the stem returns to its straight shape.
== Sounds ==
{{Sound table/Block/Hard crop}}
== Data values ==
=== ID ===
{{edition|java}}:
{{ID table
|edition=java
|showblocktags=y
|showforms=y
|generatetranslationkeys=y
|displayname=Pumpkin Stem
|spritetype=block
|nameid=pumpkin_stem
|blocktags=bee_growables, crops
|form=block}}
{{ID table
|displayname=Attached Pumpkin Stem
|spritetype=block
|nameid=attached_pumpkin_stem
|form=block}}
{{ID table
|displayname=Pumpkin Seeds
|spritetype=item
|nameid=pumpkin_seeds
|form=item
|foot=1}}
{{edition|bedrock}}:
{{ID table
|edition=bedrock
|shownumericids=y
|showforms=y
|generatetranslationkeys=y
|displayname=Pumpkin Stem
|spritetype=block
|nameid=pumpkin_stem
|id=104
|form=block}}
{{ID table
|displayname=Pumpkin Seeds
|spritetype=item
|nameid=pumpkin_seeds
|id=292
|form=item
|foot=1}}
=== Block states ===
{{see also|Block states}}
{{/BS}}
== Advancements ==
{{load advancements|A Seedy Place}}
== History ==
{{info needed section|check if stems floated above farmland upon initial implementation}}
{{History|java beta}}
{{History||1.8|snap=Pre-release|[[File:Pumpkin Seeds JE1 BE1.png|32px]] Added pumpkin seeds.
|[[File:Pumpkin Stem Age 0 JE1.png|32px]] [[File:Pumpkin Stem Age 1 JE1.png|32px]] [[File:Pumpkin Stem Age 2 JE1.png|32px]] [[File:Pumpkin Stem Age 3 JE1.png|32px]] [[File:Pumpkin Stem Age 4 JE1.png|32px]] [[File:Pumpkin Stem Age 5 JE1.png|32px]] [[File:Pumpkin Stem Age 6 JE1.png|32px]] [[File:Pumpkin Stem Age 7 JE1.png|32px]] Added the pumpkin stem, with seven stages of growth.
|Pumpkin seeds can be found in the new [[mineshaft]] [[chest]]s.
|[[File:Attached Pumpkin Stem (N) JE1.png|32px]] [[File:Attached Pumpkin Stem (E) JE1.png|32px]] [[File:Attached Pumpkin Stem (S) JE1.png|32px]] [[File:Attached Pumpkin Stem (W) JE1.png|32px]] The pumpkin stem has four slightly visually distinct appearances for each facing direction - the bent part of the stem rotates, but the other two planes do not.
|[[File:Pumpkin Stem Age 8 JE1.png|32px]] [[File:Pumpkin Stem Age 9 JE1.png|32px]] [[File:Pumpkin Stem Age 10 JE1.png|32px]] [[File:Pumpkin Stem Age 11 JE1.png|32px]] [[File:Pumpkin Stem Age 12 JE1.png|32px]] [[File:Pumpkin Stem Age 13 JE1.png|32px]] [[File:Pumpkin Stem Age 14 JE1.png|32px]] [[File:Pumpkin Stem Age 15 JE1.png|32px]] Pumpkin stem data values from 8 through 15 now show a glitched formation, with a floating stem with an attached stem cross eventually emerging below.
|[[File:Attached Stem Age 8 JE1.png|32px]] [[File:Attached Stem Age 9 JE1.png|32px]] [[File:Attached Stem Age 10 JE1.png|32px]] [[File:Attached Stem Age 11 JE1.png|32px]] [[File:Attached Stem Age 12 JE1.png|32px]] [[File:Attached Stem Age 13 JE1.png|32px]] [[File:Attached Stem Age 14 JE1.png|32px]] [[File:Attached Stem Age 15 JE1.png|32px]] Pumpkin stem blocks with data values higher than 7 can attach to adjacent fruits, which results in buggy stem textures with [[vines]] in the mix due to vines being below attached stems in [[terrain.png]].}}
{{History|||snap=Pre-release 2 ;)|Pumpkin stems can now be grown faster using [[bone meal]].}}
{{History|java}}
{{History||1.0.0|snap=Beta 1.9 Prerelease 2|Pumpkins can now be [[crafting|crafted]] into [[pumpkin seeds]].}}
{{History||1.3.1|snap=1.3|The texture of pumpkin stems has been moved one pixel to the left in [[terrain.png]].
|[[File:Pumpkin Stem Age 0 JE2.png|32px]] [[File:Pumpkin Stem Age 1 JE2.png|32px]] [[File:Pumpkin Stem Age 2 JE2.png|32px]] [[File:Pumpkin Stem Age 3 JE2.png|32px]] [[File:Pumpkin Stem Age 4 JE2.png|32px]] [[File:Pumpkin Stem Age 5 JE2.png|32px]] [[File:Pumpkin Stem Age 6 JE2.png|32px]] [[File:Pumpkin Stem Age 7 JE2.png|32px]] Stems now appear slightly different.
|[[File:Pumpkin Stem Age 8 JE2.png|32px]] [[File:Pumpkin Stem Age 9 JE2.png|32px]] [[File:Pumpkin Stem Age 10 JE2.png|32px]] [[File:Pumpkin Stem Age 11 JE2.png|32px]] [[File:Pumpkin Stem Age 12 JE2.png|32px]] [[File:Pumpkin Stem Age 13 JE2.png|32px]] [[File:Pumpkin Stem Age 14 JE2.png|32px]] [[File:Pumpkin Stem Age 15 JE2.png|32px]] Overgrown attached pumpkin stems now appear slightly different.
|[[File:Attached Pumpkin Stem (N) JE2.png|32px]] [[File:Attached Pumpkin Stem (E) JE2.png|32px]] [[File:Attached Pumpkin Stem (S) JE2.png|32px]] [[File:Attached Pumpkin Stem (W) JE2.png|32px]] Attached pumpkin stems now appear slightly different.
|[[File:Attached Stem Age 8 JE2.png|32px]] [[File:Attached Stem Age 9 JE2.png|32px]] [[File:Attached Stem Age 10 JE2.png|32px]] [[File:Attached Stem Age 11 JE2.png|32px]] [[File:Attached Stem Age 12 JE2.png|32px]] [[File:Attached Stem Age 13 JE2.png|32px]] [[File:Attached Stem Age 14 JE2.png|32px]] [[File:Attached Stem Age 15 JE2.png|32px]] Overgrown attached pumpkin stems now appear slightly different.}}
{{History||1.4.2|snap=12w36a|[[Chicken]]s now use [[wheat seeds]], [[melon seeds]] and pumpkin seeds, instead of [[wheat]] to [[breeding|breed]].}}
{{History||1.5|snap=13w02a|[[File:Pumpkin Stem Age 0 JE3.png|32px]] [[File:Pumpkin Stem Age 1 JE3.png|32px]] [[File:Pumpkin Stem Age 2 JE3.png|32px]] [[File:Pumpkin Stem Age 3 JE3.png|32px]] [[File:Pumpkin Stem Age 4 JE3.png|32px]] [[File:Pumpkin Stem Age 5 JE3.png|32px]] [[File:Pumpkin Stem Age 6 JE3.png|32px]] Pumpkin stems now use a squished version of their texture for immature stems, depending on age.
|[[File:Pumpkin Stem Age 8 JE3.png|32px]] [[File:Pumpkin Stem Age 9 JE3.png|32px]] [[File:Pumpkin Stem Age 10 JE3.png|32px]] [[File:Pumpkin Stem Age 11 JE3.png|32px]] [[File:Pumpkin Stem Age 12 JE3.png|32px]] [[File:Pumpkin Stem Age 13 JE3.png|32px]] [[File:Pumpkin Stem Age 14 JE3.png|32px]] [[File:Pumpkin Stem Age 15 JE3.png|32px]] This also affects pumpkin stems of ages 8-15, which are likewise stretched to accommodate its predicted size.
|[[File:Attached Stem Age 8 JE3.png|32px]] [[File:Attached Stem Age 9 JE3.png|32px]] [[File:Attached Stem Age 10 JE3.png|32px]] [[File:Attached Stem Age 11 JE3.png|32px]] [[File:Attached Stem Age 12 JE3.png|32px]] [[File:Attached Stem Age 13 JE3.png|32px]] [[File:Attached Stem Age 14 JE3.png|32px]] [[File:Attached Stem Age 15 JE3.png|32px]] Pumpkin stems of extreme ages, which are attached to adjacent fruits, now show a stretched and tinted stem appearance.}}
{{History|||snap=13w03a|[[File:Pumpkin Stem Age 0 JE4.png|32px]] [[File:Pumpkin Stem Age 1 JE4.png|32px]] [[File:Pumpkin Stem Age 2 JE4.png|32px]] [[File:Pumpkin Stem Age 3 JE4.png|32px]] [[File:Pumpkin Stem Age 4 JE4.png|32px]] [[File:Pumpkin Stem Age 5 JE4.png|32px]] [[File:Pumpkin Stem Age 6 JE4.png|32px]] [[File:Pumpkin Stem Age 7 JE4.png|32px]] Pumpkin stems are no longer squished or stretched to account for age.<ref>{{bug|MC-7111}}</ref>
|[[File:Pumpkin Stem Age 8 JE4.png|32px]] [[File:Pumpkin Stem Age 9 JE4.png|32px]] [[File:Pumpkin Stem Age 10 JE4.png|32px]] [[File:Pumpkin Stem Age 11 JE4.png|32px]] [[File:Pumpkin Stem Age 12 JE4.png|32px]] [[File:Pumpkin Stem Age 13 JE4.png|32px]] [[File:Pumpkin Stem Age 14 JE4.png|32px]] [[File:Pumpkin Stem Age 15 JE4.png|32px]] Pumpkin stems with age values 8 through 15 now show a tinted [[trapdoor]] texture.
|From this version up until 14w08a, overgrown pumpkin stems start to draw from the texture below them on the [[texture atlas]], in much the same way they previously did with terrain.png. However, as texture atlases are unstable and textures tend to change positions as new blocks and textures are added, overgrown stems change the texture they draw from every time new textures are added, which includes when textures added by [[mods]].}}
{{History|||snap=13w09a|[[File:Pumpkin Stem Age 8 JE5.png|32px]] [[File:Pumpkin Stem Age 9 JE5.png|32px]] [[File:Pumpkin Stem Age 10 JE5.png|32px]] [[File:Pumpkin Stem Age 11 JE5.png|32px]] [[File:Pumpkin Stem Age 12 JE5.png|32px]] [[File:Pumpkin Stem Age 13 JE5.png|32px]] [[File:Pumpkin Stem Age 14 JE5.png|32px]] [[File:Pumpkin Stem Age 15 JE5.png|32px]] Pumpkin stems with age values 8 through 15 now show a tinted [[birch wood]] texture.}}
{{History||1.6.1|snap=13w24a|Melon and pumpkin stems have now been assigned separate textures.
|[[File:Pumpkin Stem Age 8 JE6.png|32px]] [[File:Pumpkin Stem Age 9 JE6.png|32px]] [[File:Pumpkin Stem Age 10 JE6.png|32px]] [[File:Pumpkin Stem Age 11 JE6.png|32px]] [[File:Pumpkin Stem Age 12 JE6.png|32px]] [[File:Pumpkin Stem Age 13 JE6.png|32px]] [[File:Pumpkin Stem Age 14 JE6.png|32px]] [[File:Pumpkin Stem Age 15 JE6.png|32px]] Pumpkin stems with age values 8 through 15 now show a tinted curving [[rail]] texture.}}
{{History||1.7.2|snap=13w37a|Added the {{cmd|setblock}} command, allowing for invalid pumpkin stem ages to be placed in the world without using external editors. This also allows them to be obtained in earlier versions via backdating.}}
{{History|||snap=13w41a|[[File:Pumpkin Stem Age 8 JE7.png|32px]] [[File:Pumpkin Stem Age 9 JE7.png|32px]] [[File:Pumpkin Stem Age 10 JE7.png|32px]] [[File:Pumpkin Stem Age 11 JE7.png|32px]] [[File:Pumpkin Stem Age 12 JE7.png|32px]] [[File:Pumpkin Stem Age 13 JE7.png|32px]] [[File:Pumpkin Stem Age 14 JE7.png|32px]] [[File:Pumpkin Stem Age 15 JE7.png|32px]] Pumpkin stems with age values 8 through 15 now show a tinted lit [[furnace]] texture.}}
{{History|||snap=13w43a|[[File:Pumpkin Stem Age 8 JE8.png|32px]] [[File:Pumpkin Stem Age 9 JE8.png|32px]] [[File:Pumpkin Stem Age 10 JE8.png|32px]] [[File:Pumpkin Stem Age 11 JE8.png|32px]] [[File:Pumpkin Stem Age 12 JE8.png|32px]] [[File:Pumpkin Stem Age 13 JE8.png|32px]] [[File:Pumpkin Stem Age 14 JE8.png|32px]] [[File:Pumpkin Stem Age 15 JE8.png|32px]] Pumpkin stems with age values 8 through 15 now show a tinted [[pumpkin]] top texture.}}
{{History||1.8|snap=14w10a|[[File:Pumpkin Stem Age 8 JE9.png|32px]] [[File:Pumpkin Stem Age 9 JE9.png|32px]] [[File:Pumpkin Stem Age 10 JE9.png|32px]] [[File:Pumpkin Stem Age 11 JE9.png|32px]] Pumpkin stems with data values 8-11 now display a tinted attached stem, with 8 facing west, 9 facing east, 10 facing north and 11 facing south.
|Invalid pumpkin stems with data values 12-15 now crash the game.}}
{{History|||snap=14w25a|[[File:Pumpkin Stem Age 0 JE5.png|32px]] [[File:Pumpkin Stem Age 1 JE5.png|32px]] [[File:Pumpkin Stem Age 2 JE5.png|32px]] [[File:Pumpkin Stem Age 3 JE5.png|32px]] [[File:Pumpkin Stem Age 4 JE5.png|32px]] [[File:Pumpkin Stem Age 5 JE5.png|32px]] [[File:Pumpkin Stem Age 6 JE5.png|32px]] [[File:Pumpkin Stem Age 7 JE5.png|32px]] Pumpkin stems now render as a single diagonal plane, or, in the case of attached stems, a diagonal and orthogonal plane.
|[[File:Attached Pumpkin Stem (N) JE3.png|32px]] [[File:Attached Pumpkin Stem (E) JE3.png|32px]] [[File:Attached Pumpkin Stem (S) JE3.png|32px]] [[File:Attached Pumpkin Stem (W) JE3.png|32px]] The attached pumpkin stem [[model]] now fully rotates to the direction the stem points. Prior to this update, the base of the pumpkin stem would stay the same while the long attaching section would differ, resulting in four possible attached stem appearances.
|Invalid overgrown pumpkin stems have now effectively been removed from the game, as attempting to place an out of range stem via {{cmd|setblock}} creates a stem of age 0 and loading a world with existing such stems cause a game crash.}}
{{History|||snap=14w26a|[[File:Pumpkin Stem Age 0 JE6.png|32px]] [[File:Pumpkin Stem Age 1 JE6.png|32px]] [[File:Pumpkin Stem Age 2 JE6.png|32px]] [[File:Pumpkin Stem Age 3 JE6.png|32px]] [[File:Pumpkin Stem Age 4 JE6.png|32px]] [[File:Pumpkin Stem Age 5 JE6.png|32px]] [[File:Pumpkin Stem Age 6 JE6.png|32px]] [[File:Pumpkin Stem Age 7 JE6.png|32px]] [[File:Attached Pumpkin Stem (N) JE4.png|32px]] [[File:Attached Pumpkin Stem (E) JE4.png|32px]] [[File:Attached Pumpkin Stem (S) JE4.png|32px]] [[File:Attached Pumpkin Stem (W) JE4.png|32px]] Pumpkin stems now correctly render as crosses again.<ref>{{bug|MC-58136}}</ref>}}
{{History|||snap=14w27a|[[File:Attached Stem Age 0 14w27a.png|32px]] [[File:Attached Stem Age 1 14w27a.png|32px]] [[File:Attached Stem Age 2 14w27a.png|32px]] [[File:Attached Stem Age 3 14w27a.png|32px]] [[File:Attached Stem Age 4 14w27a.png|32px]] [[File:Attached Stem Age 5 14w27a.png|32px]] [[File:Attached Stem Age 6 14w27a.png|32px]] Due to a bug, all pumpkin stems now appear attached regardless of age or any actual attachment.<ref>{{bug|MC-60208}}</ref>}}
{{History|||snap=14w28a|All pumpkin stems appearing attached regardless of the age of any actual attachment has been fixed. However, pumpkin stems still appear attached to adjacent fruits regardless of age due to a similar bug.<ref>{{bug|MC-61716}}</ref>}}
{{History|||snap=14w34d|Pumpkin seeds no longer can be used to breed [[chicken]]s.}}
{{History||1.9|snap=15w31a|Chickens can now use pumpkin seeds to [[breeding|breed]] again.}}
{{History|||snap=15w44a|Pumpkin seeds have been added to [[dungeon]] [[chest]]s.
|The average yield of pumpkin seeds in [[mineshaft]] chests has been decreased.}}
{{History|||snap=15w45a|Pumpkin stems must now be fully grown again to attach.}}
{{History||1.11|snap=16w39a|Pumpkin seeds are now found in the new [[woodland mansion]] chests.
|Pumpkin stems now generate inside [[woodland mansion]]s.}}
{{History||1.13|snap=17w47a|The different [[block]] states for the <code>pumpkin_stem</code> ID have been split up into their own IDs.
|Pumpkin seeds can now be obtained by [[shear]]ing an uncarved pumpkin.
|Prior to [[1.13/Flattening|''The Flattening'']], this [[block]]'s numeral ID was 104, and the [[item]]'s 361.}}
{{History|||snap=17w48a|Attached pumpkin stems no longer [[drops|drop]] seeds.}}
{{History||1.14|snap=18w43a|[[File:Pumpkin Stem Age 0 JE7.png|32px]] [[File:Pumpkin Stem Age 1 JE7.png|32px]] [[File:Pumpkin Stem Age 2 JE7.png|32px]] [[File:Pumpkin Stem Age 3 JE7.png|32px]] [[File:Pumpkin Stem Age 4 JE7.png|32px]] [[File:Pumpkin Stem Age 5 JE7.png|32px]] [[File:Pumpkin Stem Age 6 JE7.png|32px]] [[File:Pumpkin Stem Age 7 JE7.png|32px]] The stem texture has changed.
|[[File:Attached Pumpkin Stem (N) JE5.png|32px]] [[File:Attached Pumpkin Stem (E) JE5.png|32px]] [[File:Attached Pumpkin Stem (S) JE5.png|32px]] [[File:Attached Pumpkin Stem (W) JE5.png|32px]] The pumpkin stem texture change also affects the base cross on pumpkin stems.}}
{{History|||snap=18w50a|Pumpkin stems now generate in the updated [[taiga]] [[village]] farms.
|Pumpkin seeds can now be found in [[chest]]s in taiga village houses.}}
{{History|||snap=19w03a|Placing pumpkin seeds into the new [[composter]] has a 10% chance of raising the compost level by 1.}}
{{History|||snap=19w05a|Pumpkin seeds now have a 30% chance of increasing the compost level in a composter by 1.
|Added [[Wandering Trader|wandering trader]]s, which sell pumpkin seeds.}}
{{History||1.15|snap=19w34a|[[Bee]]s can now pollinate pumpkin stems.}}
{{History|||snap=19w39a|Attached pumpkin stems now [[drops|drop]] seeds again.<ref>{{bug|MC-136360}}</ref>}}
{{History|pocket alpha}}
{{History||v0.8.0|snap=build 1|[[File:Pumpkin Seeds JE1 BE1.png|32px]] Added pumpkin seeds.
|[[File:Pumpkin Stem Age 0 JE1.png|32px]] [[File:Pumpkin Stem Age 1 JE1.png|32px]] [[File:Pumpkin Stem Age 2 JE1.png|32px]] [[File:Pumpkin Stem Age 3 JE1.png|32px]] [[File:Pumpkin Stem Age 4 JE1.png|32px]] [[File:Pumpkin Stem Age 5 JE1.png|32px]] [[File:Pumpkin Stem Age 6 JE1.png|32px]] [[File:Pumpkin Stem Age 7 JE1.png|32px]] [[File:Attached Pumpkin Stem (N) JE1.png|32px]] [[File:Attached Pumpkin Stem (E) JE1.png|32px]] [[File:Attached Pumpkin Stem (S) JE1.png|32px]] [[File:Attached Pumpkin Stem (W) JE1.png|32px]]{{verify|Were these the models used by this edition?}} Added pumpkin stems.
|Pumpkin seeds are obtainable from the [[Nether reactor]].}}
{{History||v0.12.1|snap=build 1|Pumpkin seeds are no longer available from the Nether reactor.}}
{{History||v0.14.0|snap=build 1|Pumpkin seeds can now be found in [[minecart with chest]]s inside [[mineshaft]]s.}}
{{History|pocket}}
{{History||1.1.0|snap=alpha 1.1.0.0|Pumpkin stems now generate inside [[woodland mansion]]s.}}
{{History|bedrock}}
{{History||1.2.0|snap=beta 1.2.0.2|Pumpkin seeds are now used to tame [[parrot]]s.}}
{{History||1.4.0|snap=beta 1.2.13.8|Pumpkin seeds can now be obtained by [[shear]]ing an uncarved [[pumpkin]].}}
{{History||1.10.0|snap=beta 1.10.0.3|[[File:Attached Pumpkin Stem (W) JE5.png|32px]]{{info needed|More accurate image}} The texture of attached pumpkin stems has been changed.
|Pumpkin seeds can now be [[trading|bought]] from [[wandering trader]]s.
|A single pumpkin crop now generates in the new [[taiga]] and [[snowy taiga]] [[village]]s.}}
{{History||1.11.0|snap=beta 1.11.0.1|A single pumpkin seed can now be used to fill the [[composter]].
|Pumpkin seeds can now be found in [[taiga]] and [[snowy taiga]] [[village]] house [[chest]]s.}}
{{History|console}}
{{History||xbox=TU5|xbone=CU1|ps=1.0|wiiu=Patch 1|[[File:Pumpkin Seeds JE1 BE1.png|32px]] Added pumpkin seeds.
|[[File:Pumpkin Stem Age 0 JE1.png|32px]] [[File:Pumpkin Stem Age 1 JE1.png|32px]] [[File:Pumpkin Stem Age 2 JE1.png|32px]] [[File:Pumpkin Stem Age 3 JE1.png|32px]] [[File:Pumpkin Stem Age 4 JE1.png|32px]] [[File:Pumpkin Stem Age 5 JE1.png|32px]] [[File:Pumpkin Stem Age 6 JE1.png|32px]] [[File:Pumpkin Stem Age 7 JE1.png|32px]] [[File:Attached Pumpkin Stem (N) JE1.png|32px]] [[File:Attached Pumpkin Stem (E) JE1.png|32px]] [[File:Attached Pumpkin Stem (S) JE1.png|32px]] [[File:Attached Pumpkin Stem (W) JE1.png|32px]]{{verify|Were these the models used by this edition?}} Added pumpkin stems.}}
{{History||xbox=TU69|ps=1.76|wiiu=Patch 38|Pumpkin seeds can now be obtained by [[shear]]ing an uncarved [[pumpkin]].}}
{{History||xbox=none|xbone=none|ps=1.90|wiiu=none|switch=none|[[File:Attached Pumpkin Stem (W) JE5.png|32px]]{{info needed|More accurate image}} The texture of attached pumpkin stems has been changed.}}
{{History|New 3DS}}
{{History||0.1.0|[[File:Pumpkin Stem Age 0 JE1.png|32px]] [[File:Pumpkin Stem Age 1 JE1.png|32px]] [[File:Pumpkin Stem Age 2 JE1.png|32px]] [[File:Pumpkin Stem Age 3 JE1.png|32px]] [[File:Pumpkin Stem Age 4 JE1.png|32px]] [[File:Pumpkin Stem Age 5 JE1.png|32px]] [[File:Pumpkin Stem Age 6 JE1.png|32px]] [[File:Pumpkin Stem Age 7 JE1.png|32px]] [[File:Attached Pumpkin Stem (N) JE1.png|32px]] [[File:Attached Pumpkin Stem (E) JE1.png|32px]] [[File:Attached Pumpkin Stem (S) JE1.png|32px]] [[File:Attached Pumpkin Stem (W) JE1.png|32px]]{{verify|Were these the models used by this edition?}} Added pumpkin stems.}}
{{History|foot}}
<gallery>
Pumpkin Stem with data value 15.png|The final version of the pumpkin stem with age 15, as seen in-game.
Pumpkinstems.png|Pumpkin stems of ages 1 to 15 on a modded version of [[Java Edition 1.7.2|1.7.2]], hence the nearby melon stems using the melon top texture.
Stems of 13w02a.png|All 16 stem sizes in [[Java Edition 13w02a|13w02a]], with accompanying data values.
</gallery>
=== Pumpkin stem "item" ===
{{:Technical blocks/Pumpkin Stem}}
== Issues ==
{{issue list}}
== Gallery ==
<gallery>
Stem All Ages.png|All stages of growth.
AllSeeds.png|All the [[seeds]] that exist in the game.
</gallery>
== References ==
{{reflist}}
{{Blocks|vegetation}}
{{Items}}
[[Category:Plants]]
[[Category:Food]]
[[Category:Non-solid blocks]]
[[Category:Generated structure blocks]]
[[cs:Dýňová semínka]]
[[de:Kürbiskerne]]
[[es:Semillas de calabaza]]
[[fr:Graines de citrouille]]
[[hu:Tökmagok]]
[[ja:カボチャの種]]
[[ko:호박씨]]
[[nl:Pompoenpitten]]
[[pl:Nasiona dyni]]
[[pt:Sementes de abóbora]]
[[ru:Семена тыквы]]
[[th:เมล็ดฝักทอง]]
[[zh:南瓜种子]]</li></ul></nowiki> | 17w47a | Prior to The Flattening, this block's numeral ID was 42. | |||
Issues
Issues relating to "Block of Iron" are maintained on the bug tracker. Report issues there.